1
Project:
Document Group:
File Name:
Version:
Cato
05 IT\IT extern\Installation\EN
Installationsplan_EN
37
cato® Installation Instructions
Creation/Last Change
Release
Edited by:
Released by:
Date:
Date:
Signature:
Signature:
Page 1 of 70
Project:
Document Group:
File Name:
Version:
Cato
05 IT\IT extern\Installation\EN
Installationsplan_EN
37
Change History
Version
Date
Author
Release
Date
Remarks
Released
By
1
17.03.00 CH
SQL7 SP2
03.04.00
HH
2
03.01.01 CH
SQL7 SP3, New: Client-Installation
24.01.01
HH
3
11.06.01 CH
SQL 2000 SP1
29.06.01
HH
4
30.11.01 HH
SQL 2000 SP2, KVM-amplifier
03.12.01
CH
5
20.04.02 HH
SQL7 SP4, Settings "SpeechEnabled" 22.04.02
and "DynLicenseType"
CH
6
27.08.03 HH
SQL 2000 SP3, SQL Restore-chapter
19.09.03
CH
7
21.10.03 CH
Balance adjustment to environment 24.11.03
cond.
HH
8
23.03.04 HH
New Nicelabel printer driver
27.03.04
CH
9
06.05.05 MH
SQL 2000 SP4, new Screenshots 06.05.05
MSDE
HH
10
05.06.05 MH
Kern balances, extension amplifier
08.06.05
HH
11
07.12.05 MH
Setting "MultipleInstances"
19.12.05
HH
12
07.02.06 HH
SQL 2000 Authentification settings
07.02.06
MH
13
15.02.06 MH
Printer B-SA4
15.02.06
HH
14
13.03.06 MH
Printer LX 800
13.03.06
HH
15
21.04.06 MH
Form feed tearing edge with printers
21.04.06
HH
16
16.08.06 HH
Data input database in MSDE
16.08.06
CH
17
23.01.07 MH
Additional setting Sartorius
24.01.07
18
11.04.07 HH
KVM USB Mini, old hardware
11.04.07
HH
MH
19
10.08.07 MH
SQL 2005, Citrix, Barcode scanner
16.8.2007
HH
20
27.10.07 HH
Replace H&H by Cato Software
27.10.07
HH
21
07.11.07 JK
SQL2005
modified
authorization 07.11.07
HH
22
07.12.07 CH
UseClientNameEnvVar=1 in Citrix
07.12.07
HH
23
30.04.08 MH
Installer for Cato 2
Cato 2 Screenshots
06.05.08
HH
24
26.06.08 SS
Revision for SQL Server 2005 Express 15.07.08
JK
25
25.11.08 JK
Prerequisite KB935839 for Windows 25.11.08
2000 added
HH
26
20.02.09 JK
Protocol settings for new Sartorius 20.2.08
balances added
HH
27
13.05.09 CM
Avery Dennison AP 5.4
15.05.09
HH
28
01.08.09 CM
Safety warning for Mettler-Toledo
balances (XS series) added
03.08.09
HH
Access
Page 2 of 70
Project:
Document Group:
File Name:
Version:
Cato
05 IT\IT extern\Installation\EN
Installationsplan_EN
37
29
05.08.09 CM
Document restructuring
SQL 2005 Express SP3
Calibratable data storage unit
05.09.09
HH
30
22.10.09 GB
Sartorius Cubis, GPA (Alibi storage), 23.10.09
Mettler-Toledo Bluetooth added
JK
31
27.11.09 GB
Datalogic Matrix200 instructions added 27.11.09
SG
32
09.12.09 SG
Layout adjustments in 4.3
09.12.09
CP
33
22.02.10 CP
Update Avery Dennison AP 44
22.02.10
SG
34
14.06.10 CP
Update Avery Dennison AP 44
14.06.10
GB
35
16.06.10 SG
Various adjustments in the "Trusted 17.06.10
Connection" and "Balances" sections
GB
36
02.05.11 CP
Update Database compatibility mode 9.0
02.05.11
SG
37
04.11.11 CP
Adjustments for Cato 2.26 (Incompatibility 04.11.11
to MSSQL 2000 and Windows 2000, requirement of .NET Framework 4.0)
SG
Page 3 of 70
Project:
Document Group:
File Name:
Version:
Cato
05 IT\IT extern\Installation\EN
Installationsplan_EN
37
Table of Contents
1.
Overview ....................................................................................................................... 7
2
Installing the Server Software ........................................................................................ 8
2.1
2.1.1
Case 1 – Updating an existing cato® database.................................................................8
2.1.2
Case 2 – Creating A New cato® Database ......................................................................11
2.1.3
Important Error Messages ..............................................................................................15
2.1.4
Installing the Service Pack for Microsoft SQL Server 2005 Express ............................15
2.2.
Copying a Pre-Filled Database to the Microsoft SQL Server 2005 Express ..........................16
2.3.
Copying the cato® Database to a Microsoft SQL Server ........................................................16
2.3.1.
Microsoft SQL 2005 Server ...........................................................................................16
2.3.2.
Service Pack for Microsoft SQL Server .........................................................................22
Installing the cato® Client Software ............................................................................. 23
3.
3.1
Providing System Prerequisites ..............................................................................................23
3.2.
Starting the Installation ...........................................................................................................26
3.3
Configuration of the Client-Database Access .........................................................................29
3.4
3.5
3.6
3.7
4
Installing the Microsoft SQL Server 2005 Express ..................................................................8
3.3.1
Standard Configuration ..................................................................................................29
3.3.2
Accessing the cato® Database via another ODBC Entry ...............................................30
3.3.3
Client Settings for "Trusted Connection" .......................................................................30
3.3.4
Citrix and Windows Terminal Server Installations ........................................................30
Other Client Installation Configurations .................................................................................32
3.4.1
Disabling Voice Control .................................................................................................32
3.4.2
Admitting Several Instances ...........................................................................................32
3.4.3
Windows User Rights Required for the Operation of cato® ...........................................32
Installation Configurations After The First Start of cato® ......................................................33
3.5.1
Getting Started ................................................................................................................33
3.5.2
User Login ......................................................................................................................33
3.5.3
User Login with Trusted Connection .............................................................................33
License Administration ...........................................................................................................34
3.6.1
Importing License Keys .................................................................................................34
3.6.2
Dynamic License Administration with Modification of the Cato.ini File ......................34
3.6.3
Dynamic License Administration with Modification of the License Administration ....35
Setting up a Network Path for Auto-Updates .........................................................................36
Hardware Configuration............................................................................................... 37
Page 4 of 70
Project:
Document Group:
File Name:
Version:
4.1
Cato
05 IT\IT extern\Installation\EN
Installationsplan_EN
37
Electronic Balance ..................................................................................................................37
4.1.1
Preparatory Configuration of Mettler-Toledo Balances .................................................37
4.1.1.1
Configuring Mettler-Toledo Balances for Bluetooth .............................................39
4.1.2
Preparatory Configuration of Sartorius Balances ...........................................................40
4.1.3
Preparatory Configuration of Sartorius-Cubis Balances ................................................41
4.1.4
Preparatory Configuration for Calibratable Balance Storage Sartorius GPA Series ......42
4.1.5
Configuring the Balance in cato® ...................................................................................44
4.1.6
Calibratable Data Storage Unit .......................................................................................46
4.2
Barcode Scanner .....................................................................................................................47
4.2.1
Serial Barcode Scanner...................................................................................................47
4.2.2
Scanner with Keyboard Connection ...............................................................................47
4.2.3
Datalogic Matrix200 Barcode-Scanner ..........................................................................47
4.3
Label Printer............................................................................................................................48
4.3.1
Inserting the Label Roll and Print Foil - Avery Dennison 4.4........................................48
4.3.2
Installing the Printer Driver ............................................................................................49
4.3.3
Configuring the Avery Dennison AP 4.4 .......................................................................53
4.3.4
Configuring the Label Printer in cato® ...........................................................................55
4.3.5
Printer for Reports, Prescriptions, and Invoices .............................................................55
5
Special Case "Positioning the PCs outside the Cleanroom with Amplifiers"................. 55
6
Out-of-date Hardware Components ............................................................................. 56
6.1
TEC B-SA4 Label Printer (black & white) .............................................................................56
6.2
TEC B452 Label Printer .........................................................................................................59
6.3. Positioning the Production Computer outside the Cleanroom with the KVM Amplifier
"DUET-UTP" ....................................................................................................................................61
7
6.3.1
The KVM Amplifier "DUET-UTP" Sender/Receiver 250 m.........................................62
6.3.2
Data Extender Kit (Printer Amplifier) ............................................................................63
6.3.3
RS232 Line Extender .....................................................................................................64
Out of date Software Components .............................................................................. 65
7.1
8
9.
Microsoft Data Engine 7.0 ......................................................................................................65
Appendix A .................................................................................................................. 66
8.1
Preliminary Investigations ......................................................................................................66
8.2
Installing the Software Components .......................................................................................66
8.3
Configuring the Calibratable Data Storage Unit .....................................................................66
8.4
Configuring the Calibratable Data Storage Unit in cato® .......................................................67
Appendix B .................................................................................................................. 69
9.1.
Datalogic Matrix200 Barcode Scanner Configuration ............................................................69
Page 5 of 70
Project:
Document Group:
File Name:
Version:
Cato
05 IT\IT extern\Installation\EN
Installationsplan_EN
37
9.1.1.
General Information .......................................................................................................69
9.1.2
Configuration..................................................................................................................69
9.1.2.1
Installation ..............................................................................................................69
9.1.2.2
Importing Configuration .........................................................................................69
9.1.3
Using the Datalogic Matrix200 Barcode Scanner in cato® ............................................70
Page 6 of 70
Project:
Document Group:
File Name:
Version:
Cato
05 IT\IT extern\Installation\EN
Installationsplan_EN
37
1. Overview
This document describes the installation of the software cato®, including database installation and that of special hardware to be used with cato®.
The document has been created on the basis of the ALG/Masterplan
Before performing the installation, please read the information in the document Cato/Integration/System Requirements.
This document applies to all cato® versions 2.26 and higher.
Cato® is a so called Client-Server Database application. This means that several computers
(Clients) can access a central database (Server) at the same time. This requires that both
the cato® client software (in fact on each computer you will be using cato® on) and the cato®
database server be installed on your computer. The database server may be a physically
separate computer; however, client- and server software may as well be installed on one and
the same computer (recommended with "small" installations – see System Requirements).
Page 7 of 70
Project:
Document Group:
File Name:
Version:
Cato
05 IT\IT extern\Installation\EN
Installationsplan_EN
37
2 Installing the Server Software
As for the server software (database), you may either use an MS-SQL-Server or the "Microsoft SQL Server 2005 Express". Both differ in aspects of licensing law and in their performance:
•
Microsoft SQL Server 2005 Express: The Data Engine is a freeware provided by
Cato Software and does not need to be licensed. In fact there is no limitation to the
number of users accessing the server simultaneously. Database size is limited to 4
GB.
•
Microsoft SQL Server: with the relevant server hardware provided, there are no limitations of performance, several hundred users may access the database simultaneously. However, the MS-SQL-Server is commercial shareware software and must
be licensed for the relevant number of users. You may use an existing MS-SQLServer for cato®. The Microsoft SQL Server 2005 as well as 2008 and 2008 R2 are
supported. Starting with cato® version 2.26 only compatibility level 9.0 is supported.
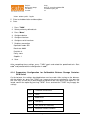
2.1 Installing the Microsoft SQL Server 2005 Express
In this case, go to the directory named Server on your cato® Installation CD and double-click
the Installation program setup.exe.
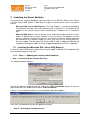
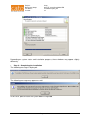
2.1.1 Case 1 – Updating an existing cato® database
• Step 1 – Determining the Program Directory
The following window appears:
Confirm the default installation path by clicking the "Start Installation" button or enter an
alternative path in the "Path" field and click "Start Installation".
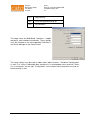
If there is no such program folder yet, the following dialogue box appears:
Click "Yes" to automatically create the program directory.
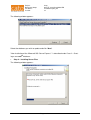
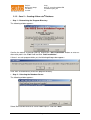
•
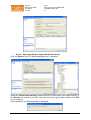
Step 2 – Selecting the Database Server
Page 8 of 70
Project:
Document Group:
File Name:
Version:
Cato
05 IT\IT extern\Installation\EN
Installationsplan_EN
37
The following window appears:
Select the database you wish to update and click "Next".
"New installation of the 'Microsoft SQL Server Express' " is described under Case 2 – Creating a new cato® database.
•
Step 3 – Installing Server Files
The following window appears:
Page 9 of 70
Project:
Document Group:
File Name:
Version:
Cato
05 IT\IT extern\Installation\EN
Installationsplan_EN
37
Depending on system status and installation progress, these windows may appear slightly
differently.
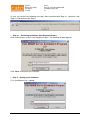
•
Step 4 – Completing the Installation
The following message is displayed:
The following message may appear as well:
In this case, please restart the system before using cato®.
Page 10 of 70
Project:
Document Group:
File Name:
Version:
Cato
05 IT\IT extern\Installation\EN
Installationsplan_EN
37
2.1.2 Case 2 – Creating A New cato® Database
• Step 1 – Determining the Program Directory
The following window appears:
Confirm the default installation path by clicking the "Start Installation" button or enter an
alternative path in the "Path" field and click "Start Installation".
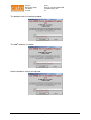
If there is no such program folder yet, the following dialogue box appears:
Click "Yes" to automatically create the program directory.
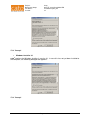
• Step 2 – Selecting the Database Server
The following window appears:
Select 'Reinstall Microsoft SQL Server 2005 Express' and click "Next".
Page 11 of 70
Project:
Document Group:
File Name:
Version:
Cato
05 IT\IT extern\Installation\EN
Installationsplan_EN
37
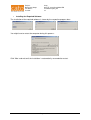
• Step 3 – Installing Server Files
The following window appears:
Depending on system status and installation progress, these windows may appear slightly
differently.
Page 12 of 70
Project:
Document Group:
File Name:
Version:
Cato
05 IT\IT extern\Installation\EN
Installationsplan_EN
37
In case you receive the following message, please proceed with Step 3.1, otherwise skip
Step 3.1 and continue with Step 4.
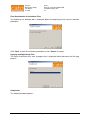
• Step 3.1 – Resuming Installation After Required Restart
After restarting your system, start Setup once again. The following window appears:
Click "Next" to continue the installation.
• Step 4 - Setting up the Database
First, the database file is copied:
Page 13 of 70
Project:
Document Group:
File Name:
Version:
Cato
05 IT\IT extern\Installation\EN
Installationsplan_EN
37
The database tools are now being copied:
The cato® database is created:
Now the database settings are adjusted:
Page 14 of 70
Project:
Document Group:
File Name:
Version:
Cato
05 IT\IT extern\Installation\EN
Installationsplan_EN
37
• Step 5 - Completing the Installation
Finally, the following message appears:
2.1.3 Important Error Messages
"Setup failed to locate an installation to be updated or a Microsoft SQL Server 2005 Express
Installation already exists."
You have already performed the installation and setup could not find any updatable version
of a cato® database.
• Errors with the Installation of the Microsoft SQL Server 2005
The following window appears:
The second line shows the return value as sent by the Microsoft SQL Server Installation.
This value allows to draw conclusions concerning the abort.
2.1.4 Installing the Service Pack for Microsoft SQL Server 2005 Express
The installation comes with the Microsoft SQL Server 2005 Express with Service Pack 2.
Up to now, this is the latest version.
Page 15 of 70
Project:
Document Group:
File Name:
Version:
Cato
05 IT\IT extern\Installation\EN
Installationsplan_EN
37
2.2. Copying a Pre-Filled Database to the Microsoft SQL Server 2005 Express
See 2.3.1 SQL 2005 Server
2.3. Copying the cato® Database to a Microsoft SQL Server
Instead of the Microsoft SQL Server 2005 Express, the cato® database can be copied to an
existing Microsoft SQL Server (Version 2005, or 2008) as well. This requires that you have
an Administrator access to your "SQL Server Management Studio“.
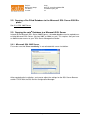
2.3.1. Microsoft SQL 2005 Server
First make sure that "Case sensitivity" is not activated with server installation.
After completing the installation, you have to adjust the settings for the SQL Server Browser
and for TCP/IP with the SQL Server Configuration Manager:
Page 16 of 70
Project:
Document Group:
File Name:
Version:
Cato
05 IT\IT extern\Installation\EN
Installationsplan_EN
37
• SQL Server Browser
Set the Start Mode to "Automatic" and start the SQL Server Browser.
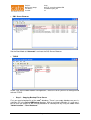
• TCP/IP
Under "SQL Server 2005 Network Configuration", select the server you wish to configure and
activate TCP/IP.
•
Step 1 – Copying Backup File to Server
First you need a backup file of the cato® database. There is an empty database on your installation CD in the Server\DBBackup directory. With an existing installation, it is also possible to save the content of the existing database to a backup file by using the cato® menu
"Administration" / "Save Database".
Page 17 of 70
Project:
Document Group:
File Name:
Version:
Cato
05 IT\IT extern\Installation\EN
Installationsplan_EN
37
It is important that the backup file to be copied is stored on a local drive of the SQL server,
e.g. on the CD in the server's local CD-ROM-drive, or on any of the server's hard drive. Accessing the backup file to be copied via a network drive is not sufficient.
•
Step 2 – Type of Access
Before copying the database to the SQL server, determine how you would like organize
access to the database.
•
Possibility #1: "Trusted Connection"
If you want to enable access authorization via "Trusted Connection“, you must set the cato® ODBC entries with your cato® clients accordingly and, after importing the database, assign the corresponding authorizations on the server.
•
Possibility #2: Microsoft SQL Server Access with Login and Password
If you want to manage access to the server via Login and Password, you should install a Login called "CatoClient“ on your server before importing. If the ODBC driver is not set to
"Trusted Connection“, cato® clients will try to connect via the login "CatoClient“ and the
password "powidl0815“. If you assign this password to the Login "CatoClient“ on the SQL
server, cato® clients will be able to connect. If you choose another password, cato® clients
will have to request the password from the user after an unsuccessful attempt to connect.
If you choose another password, cato® clients will have to request the password from the
user after an unsuccessful attempt to connect and save it encrypted for future connections.
• Copying the Backup File with Management Studio
By means of the SQL Management Studio, the Backup file can be copied to the Microsoft
SQL Server.
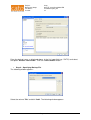
•
Step 1 – Opening the Restore Dialogue
Right-click the "Databases" folder of your server and select "Restore Database".
•
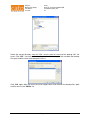
Step 2 – Defining Database Name
The following window appears:
Page 18 of 70
Project:
Document Group:
File Name:
Version:
Cato
05 IT\IT extern\Installation\EN
Installationsplan_EN
37
Enter the desired name, as displayed above, in the first input field (e.g. "CATO") and select
the option "Restore: from media ". Click the "Select media" button.
•
Step 3 – Specifying Backup File
The following window appears:
Select the volume "File" and click "Add“. The following window appears:
Page 19 of 70
Project:
Document Group:
File Name:
Version:
Cato
05 IT\IT extern\Installation\EN
Installationsplan_EN
37
Select the correct directory from the SQL server's point of view and the backup file's file
name. Click "OK". You have arrived at the previous window again, but now both the backup
file's path and file name are displayed in the list:
Click "OK" again. Now you arrive one level higher which also features the backup file's path
and file name in the "Media" list.
Page 20 of 70
Project:
Document Group:
File Name:
Version:
•
Cato
05 IT\IT extern\Installation\EN
Installationsplan_EN
37
Step 4 – Specifying Restore Target and Start Restoring
Click the "Options“ tag. The following dialogue box is displayed:
Select the "Restore with Recovery" option and enter a correct local server path manually in
the "Restore as" column for the files "cato.mdf" and "cato_log.ldf" to be created. Click "OK"
to start restoring.
After completion, the following window is displayed:
Page 21 of 70
Project:
Document Group:
File Name:
Version:
Cato
05 IT\IT extern\Installation\EN
Installationsplan_EN
37
• Authentifications for "CatoClient"
In case you are managing access to the server via Login and Password, you have to do the
following with an SQL-2005 server: search the server in the file directory tree displayed on
the left. Right-click the server and select "Properties" from the context menu. Click "Safety"
and select the "SQL Server and Windows" option with "Authentification". Click "OK".
Now you can add the user "CatoClient" with "CatoClient" as user name in the Enterprise
Manager under "Databases" / "Cato" / "Users". In the "Admit In Database Role" list, select
the entries "public", "db_owner" and "db_CatoClientRole" before saving.
In some cases, the relation between the "CatoClient" login and the database user "CatoClient" might not be established correctly (this shows in SQL Server Management Studio for the
CatoLogin under "User Mapping“ – "Mapping to Cato database could not be established"). In
this case, the following commands should be run:
1.) Right-click the cato® database and select "New Query“
2.) Enter the following line: sp_change_users_login 'update_one', 'CatoClient', 'CatoClient'
3.) Click "Execute“
After this, the User Mapping to the CatoClient user should be established for the CatoLogin
in the cato® database.
2.3.2. Service Pack for Microsoft SQL Server
In order to ensure error-free operation we recommend that the latest MS-SQL Server Service
Packs are installed.
Page 22 of 70
Project:
Document Group:
File Name:
Version:
Cato
05 IT\IT extern\Installation\EN
Installationsplan_EN
37
3. Installing the cato® Client Software
Cato® clients can be installed on any number of computers, however, one cato® license key
is restricted to a particular machine. Thus, the number of concurrent cato® users is limited by
the number of license keys.
To install the cato® Client Software, select the Client folder on your cato® installation CD
and double-click the installation program setup.exe.
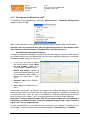
3.1
Providing System Prerequisites
•
MDAC 2.8
cato® requires the Microsoft MDAC components in version 2.8. In case these have not yet
been installed to the computer, the following dialogue box appears:
Click "Accept“.
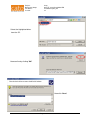
•
Microsoft .NET Framework 2.0 SP 2 and 4.0
®
cato requires the Microsoft .NET Framework 2.0 SP 2 and Microsoft .NET Framework 4.0
and installs the "Cato Update Service" as part of the Cato Client. In case one of the two
components has not yet been installed to the computer, the following dialogue box appears:
Page 23 of 70
Project:
Document Group:
File Name:
Version:
Cato
05 IT\IT extern\Installation\EN
Installationsplan_EN
37
Click "Accept“.
•
Windows Installer 3.1
®
cato requires the Windows Installer in version 3.1. In case this has not yet been installed to
the computer, the following dialogue box appears:
Click "Accept“.
Page 24 of 70
Project:
Document Group:
File Name:
Version:
•
Cato
05 IT\IT extern\Installation\EN
Installationsplan_EN
37
Installing the Required Software
The installation of the required software is shown by the respective progress bars.
You might have to restart the computer during this process:
Click "Yes“ and wait until the installation is automatically resumed after restart.
Page 25 of 70
Project:
Document Group:
File Name:
Version:
3.2.
Cato
05 IT\IT extern\Installation\EN
Installationsplan_EN
37
Starting the Installation
The following window appears:
Finally, the installation program's Welcome Screen appears.
Click "Next“
Specifying Program Folder
The following window appears:
Confirm the default installation path by clicking "Next" or enter an alternative path by clicking
"Browse" and click "Next".
Page 26 of 70
Project:
Document Group:
File Name:
Version:
Cato
05 IT\IT extern\Installation\EN
Installationsplan_EN
37
Final Confirmation of Installation Files
The following, last dialogue box is displayed before the beginning of the actual installation
procedure:
Click "Next" to start the installation procedure or click "Cancel" to cancel.
Copying and Registering Files
The actual installation starts now. A progress bar is displayed which documents the file copy
process:
Completion
The following window appears:
Page 27 of 70
Project:
Document Group:
File Name:
Version:
Cato
05 IT\IT extern\Installation\EN
Installationsplan_EN
37
Click "Close“.
Page 28 of 70
Project:
Document Group:
File Name:
Version:
Cato
05 IT\IT extern\Installation\EN
Installationsplan_EN
37
3.3 Configuration of the Client-Database Access
3.3.1 Standard Configuration
If you have installed cato® client and Microsoft SQL Server or Microsoft SQL Server 2005
Express on one and the same computer, no further adaptation is required on this computer.
However, if you have installed the Microsoft SQL Server or Microsoft SQL Server 2005 Express on a different computer from where the Client is installed, you need to modify the configuration.
●
With Windows XP (32 bit) and Windows Vista (32 bit): Click "Start" / "Control
Panel" and double-click "Administrative Tools".
●
Double-click "ODBC Data sources“.
●
In 64 bit systems, you need to access the 32 bit version of the ODBC data source explicitly. Navigate to the "C:\Windows\SysWOW64" folder and start the "odbcad32.exe" application.
●
In the opening window, click "System DSN".
●
Double-click the entry "CATO" which has been already created by the installation
program, in the list.
●
The input field at the bottom ("Server") contains the data server's name. The cato®
installation program sets "(local)“ by default, meaning that the server program is located on the same computer. Replace this entry by the actual data server's name.
●
Click "Next".
●
If you are connecting to the Microsoft SQL Server 2005 Express as server software, please proceed as follows:
●
Make sure the "With SQL Server authentification using a login ID and password
entered by the user" option is selected.
●
Make sure the "Connect to SQL Server to obtain default settings..." checkbox is
activated.
●
Enter "CatoClient" in the login ID field (without quotation marks).
●
Enter "powidl0815" in the password field (without quotation marks).
●
Please note that the Microsoft SQL Server 2005 Express has been installed under the
specified SQL server instance "CATOSERVER“ so that you have to connect with this
instance. (e.g.: YOURSERVER\CATOSERVER )
●
●
If you are connecting to an Microsoft SQL server, please proceed as follows:
●
Select either SQL-Identification with Login and Password or with "Trusted
Connection“
●
Make sure the "Connect to SQL Server to obtain default settings..." checkbox is activated.
●
With SQL identification with Login and Password, select the Login and Password you have specified with the server configuration.
Click "Next"
Page 29 of 70
Project:
Document Group:
File Name:
Version:
Cato
05 IT\IT extern\Installation\EN
Installationsplan_EN
37
●
If an error message is returned, no connection to the server can be established. First
make sure the server is turned on and properly connected to the network. If this is the
case, click the "Client Configuration“ button. In the opening window you can select
different "Network Libraries“. You should select "TCP / IP" or "Named Pipes“. Click
"OK", and then "Next"
●
Make sure that the checkbox "Change the default database to“ is selected.
●
Make sure that "CATO" (without quotation marks) is written in the input field below.
●
Cick "Next"
●
Make sure "English" is selected in the "Change language of SQL server system
messages to: " input field.
●
Cick "Finish"
●
Click "OK".
●
Click "OK" again to close the ODBC configuration window.
●
Close the "Control Panel" window.
3.3.2 Accessing the cato® Database via another ODBC Entry
As previously described, the cato® database is usually accessed via the ODBC entry "cato“.
However, it is also possible to set another ODBC entry for the access. You must create the
entry
ODBC=Name of the ODBC data source
in the configuration file "cato.ini“ in the "C:\Documents and Settings\All Users\Application
Data\Cato Software Solutions\Cato" program directory. This enables you to parallel two
cato® installations on one computer, each accessing another ODBC entry and, if desired,
another database.
3.3.3 Client Settings for "Trusted Connection"
If you select cato® "Trusted Connection“ with clients in the ODBC entry, cato® will automatically try to match the Windows-user with a user in the cato® user database. It is advantageous as no extra password needs to be entered when starting cato®. However, if you still
wish to have an own user identification with "Trusted Connection“ in cato® (or if you need it
upon the first call), go to the cato® Appdata program directory ("C:\Documents and Settings\All Users\Application Data\Cato Software Solutions") on the client-computer and
double-click the file CatoSoftwareGlobalSettings.xml. Replace the value "InaktivNichtGesetzt" between <SingleSignOn></SingleSignOn> by "Inaktiv". Thus, cato® is forced to perform an own user identification. Replace the value by "Aktiv" to reset cato® into the mode
where it accepts the Windows user as cato® user.
3.3.4 Citrix and Windows Terminal Server Installations
Operating cato® in Citrix- or Windows Terminal Server environments is possible, once the
environment variable "ClientName" is available and its value is not set to an empty string or
to "console". This does not apply to computers for gravimetric preparation which are connected to a balance. These computers cannot be operated in a Citrix or Windows Terminal
Server environment.
Page 30 of 70
Project:
Document Group:
File Name:
Version:
Cato
05 IT\IT extern\Installation\EN
Installationsplan_EN
37
In order for the environment variable "ClientName" to be considered, the following entry must
be added to the cato.ini file in the C:\Documents and Settings\All Users\Application
Data\Cato Software Solutions\Cato program folder in Citrix- or Windows Terminal Server
environments: UseClientNameEnvVar=1. This allows for determination of the Client's name
from the environment variable 'ClientName'.
Page 31 of 70
Project:
Document Group:
File Name:
Version:
Cato
05 IT\IT extern\Installation\EN
Installationsplan_EN
37
3.4 Other Client Installation Configurations
3.4.1 Disabling Voice Control
The Voice Control feature can be permanently disabled by adding the following entry to the
Cato.ini file in the C:\Documents and Settings\All Users\Application Data\Cato Software Solutions\Cato program folder:
SpeechEnabled=0.
This entry can be used if problems of sound mapping occur in Citrix environments. These
problems are manifested in the error message "Runtime Error - Object disconnected from
clients" when starting Cato.
3.4.2 Admitting Several Instances
For general security reasons, only one instance of cato® can be run on one computer at a
time. By adding the entry
MultipleInstances=1
in the cato.ini file in the C:\Documents and Settings\All Users\Application Data\Cato Software Solutions\Cato program directory, this feature can be disabled and several instances of
cato® can be executed simultaneously.
3.4.3 Windows User Rights Required for the Operation of cato®
For the operation of cato®, no specific user rights are required.
Page 32 of 70
Project:
Document Group:
File Name:
Version:
Cato
05 IT\IT extern\Installation\EN
Installationsplan_EN
37
3.5 Installation Configurations After The First Start of cato®
3.5.1 Getting Started
If the ODBC entry is not set to "Trusted Connection", the cato® client is attempting to connect
with the SQL server with the SQL-Login "CatoClient" and the Password "powidl0815" as
default. If this connection attempt fails, the following window is displayed upon the first start:
Here, you can enter the corresponding SQL login and password for connecting with the cato® database. After successful connection with the database, Login and Password (the latter
encrypted) are saved in the cato.ini file.
3.5.2 User Login
Working with cato® requires authentication with a specified cato® username and password.
This follows right after you have started the program.
If you log in for the first time, please enter the preset user "Admin" with "Admin" as password.
3.5.3 User Login with Trusted Connection
In this specific login mode cato® does not request username and password, but obtains both
user and password from Windows™. If the user logs in as e.g. "John" in Windows, he is automatically logged in as user "John" in cato® as well. However, in case there is no user
named "John" in cato®'s user database, starting cato® fails.
The "Trusted Connection" mode in cato® is automatically activated if the ODBC entry "cato"
is set to "Trusted Connection" or, as described in Chapter 3.3.3, the "Trusted Connection"
mode has been triggered by setting the SingleSignOn value to "Active".
Before activating the "Trusted Connection" mode in cato®, you should first create at least
one user with Administrator rights with their Windows login name.
Page 33 of 70
Project:
Document Group:
File Name:
Version:
3.6
Cato
05 IT\IT extern\Installation\EN
Installationsplan_EN
37
License Administration
3.6.1 Importing License Keys
Before you can start working with cato®, you need to import one or more licenses from the
license file provided by Cato Software Solutions into the database. Therefore, the "License
Administration" program section appears upon the first start of cato® (after entering Login
and Password):
In the menu bar selection, click "File" / "Open License File" (or simply use the "Ctrl+O"
shortcut). In the dialog box opening, select the license file. Click "Open" (or simply press "Enter" (" " key). In a dialog box, cato® informs you how many licenses have been imported, and
the imported licenses are shown as license keys. Select one of the imported license keys
and click the menu item "File" / "Apply selected license for this workstation". The selected license is now assigned to this computer.
3.6.2 Dynamic License Administration with Modification of the Cato.ini File
Per default, available licenses are assigned to the individual computers statically. If one
workstation does not have any more licenses, the user is supposed to manually "withdraw"
the license from another workstation. However, it is also possible to add the entry
DynLicenseType=x
to the cato.ini file in the C:\Documents and Settings\All Users\Application Data\Cato Software Solutions\Cato program folder, whereby "x" is to be replaced by the following values:
0 ... Hospital pharmacy full license
1 ... Hospital physician license
2 ... Pharmacist full license, public pharmacy
Page 34 of 70
Project:
Document Group:
File Name:
Version:
Cato
05 IT\IT extern\Installation\EN
Installationsplan_EN
37
3 ... License for practicing physician
9 ... Hospital pharmacy license, volumetric only
10 ... Pharmacy license public pharmacy, volumetric only
12 ... Assistant license
If such an entry is available, cato® will automatically try to retrieve a free license of the specified license type upon program start. When closing cato®, the license is released again.
3.6.3 Dynamic License Administration with Modification of the License Administration
Further, it is also possible to determine whether licenses for the current workstation shall be
administered explicitly statically or dynamically (independent from settings in the cato.ini
configuration file).
With dynamic administration, you can define which license type shall be retrieved for the relevant workstation automatically when starting cato®. In case this is not possible, a secondary license type can be defined. This new system allows now also for Citrix environments to
define mixed static and dynamic license assignments (with different license types) per
workstation.
Page 35 of 70
Project:
Document Group:
File Name:
Version:
3.7
Cato
05 IT\IT extern\Installation\EN
Installationsplan_EN
37
Setting up a Network Path for Auto-Updates
If cato® has been installed on several computers, it is recommended to create a network
share in order that updates function correctly in the future. Register the path in cato® under
"Administration" / "Settings" / "General Settings" / "Network Path for Auto-Updates“ as
a central Auto-Update directory in the form of a UNC path. This path will be saved in the
cato® database.
Please note that the path name must not exceed the maximum number of 50 characters.
With a single installation, a local path can be determined here alternatively.
Once such a directory has been created, and a cato® update is being carried out on one
computer, all new program files will be automatically copied into this directory.
If cato® is run on another computer, where no update has been performed before, cato® is
checking whether there are new program files in this directory and updates itself if necessary. Thus you do not have to import an update on every single computer, which is of course
a significant time saving.
• User Rights for the Cato Auto-Update Directory
Please note: in order to guarantee the correct functioning of the update process, it is necessary to assign at least a "Read" right to the Cato Auto-Update directory, for both the cato®
user and the Windows user group "Domain Computers“!
Page 36 of 70
Project:
Document Group:
File Name:
Version:
Cato
05 IT\IT extern\Installation\EN
Installationsplan_EN
37
4 Hardware Configuration
4.1 Electronic Balance
To support the gravimetric preparation method, an electronic balance can be connected to
cato®.
With gravimetric preparation, the balance is provided inside the safety cabinet. Cato® is
compatible with the following manufacturers
●
Mettler-Toledo,
●
Sartorius, and
●
Kern,
which can be connected to the computer's serial port. It is essential that the balance have a
capacity of at least 2000 g and feature a sensitivity of 0.01 g over the total capacity.
The safety cabinet must be equipped with an aperture for the balance's serial cable. To connect the balance to the PC, a serial interface must be free on the computer. If there is no
serial port available, a USB/Serial Adapter can be used.
The use of such an adapter requires that the corresponding driver be installed, which
is normally provided with the adapter.
4.1.1 Preparatory Configuration of Mettler-Toledo Balances
If you are using Mettler-Toledo balances, make sure the device is set to "Gramm" as unit
and check the appropriate damping as well. The higher the damping, the better the measurements are reproducible and the less sensitive the balance to vibrations. On the other
hand, a high damping causes a slower weighting. With the settings for "Peripheral Devices",
select preferably "Host", and with "Data Transfer Mode" set "Cont" (continuous data transfer). Modern Mettler balances can be connected to the computer's serial interface directly
with a 1:1 serial cable. With older models, an own adapter is required.
In the following, we describe the settings for a XS 4002 (recommended by cato Software
®
Solutions). In order to work with cato , you must change a few settings with your Mettler XS.
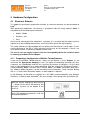
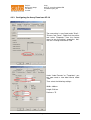
Open the System Settings by pressing the
< > button (on the left on the balance) and
then press "System" (at the bottom of the
menu list).
Select "Set weighing parameters" with the
corresponding buttons:
Page 37 of 70
Project:
Document Group:
File Name:
Version:
Menu Entry
Weighing mode
Environment
Cato
05 IT\IT extern\Installation\EN
Installationsplan_EN
37
Setting
Note
"Control weighing“
The balance only reacts to major weight differences; weighing results are very stable.
"turbulent“
In case you have an especially vibrating safety
cabinet, this might be even "very turbulent"
You can try and select a faster setting, if test
results allow
Result Release
"Reliable“
ATTENTION: a similar value can be set in ca®
to (number of identical weights with balance
settings).
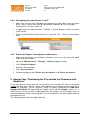
In the "Hardware Configuration" program section make sure that the checkbox "Balance
available" is activated. In the next step (balance type), select either "Mettler old models" or
"Mettler new models". All other parameters can be set manually or press the "Search..."
button.
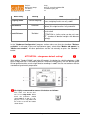
ATTENTION – dangerous default setting!
With "Mettler Toledo XS4002" and other XS models, the button for switching between 1/100
gand 1/10g precision is activated by default! Touched unintentionally, the last decimal place
will be ignored and the results might lead to roundings in cato® that are not conform with the
standards of gravimetric preparation.
We highly recommend to remove this button as follows:
First, make sure that the balance is in 1/100g mode. When
tared, the balanace should
show "0.00 g". If "0.0 g" is displayed, it is in 1/10g mode and
has to be reset with the button
shown above.
Page 38 of 70
Project:
Document Group:
File Name:
Version:
Cato
05 IT\IT extern\Installation\EN
Installationsplan_EN
37
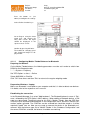
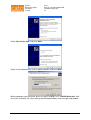
Press the button "3" (see
above) to configure the settings.
Select "Define function keys"
Go to Page 2 using the lower
arrow keys and remove the
entry with "1/10d". No figure
should be displayed in the
square next to "1/10d".
Confirm by pressing OK twice.
The button for changing precision should no longer be displayed now!
4.1.1.1
Configuring Mettler-Toledo Balances for Bluetooth
Preparing the Balance
On the Mettler-Toledo balance, the following parameters must be set in order to switch from
RS232 to the Bluetooth mode:
"...." -> System-> Periphery
Set "BTS Option“ as Host → Define
Select ANSI/WIN as CharSet.
Click "OK" three times and then "Exit“ to return to the regular weighing mode.
Preparation Windows / Laptop
Make sure Bluetooth is activated on your computer and that it is able to detect new devices.
If in doubt, refer to the respective user's manual.
Establishing the connection
In the Bluetooth Manager, first select "Add hardware". The Bluetooth balance's name is "Balance“, followed by the BTS Option's MAC address. When adding a Bluetooth device, a PIN
code must be entered. The default value for this PIN is "Mettler-Toledo“. Now the SPP Data
service must be activated and configured. In the configuration mask, leave the "Secure Connection" option activated. The COM Port can be selected but should be noted as it will be
required in cato® later on. Now you are ready to connect the device in the Bluetooth environment. With the balance type set to "Mettler-Toledo“ in the "Hardware Configuration" and
the correct COM Port selected, the balance should be now working.
Page 39 of 70
Project:
Document Group:
File Name:
Version:
Cato
05 IT\IT extern\Installation\EN
Installationsplan_EN
37
4.1.2 Preparatory Configuration of Sartorius Balances
Also with Sartorius or Kern balances, it is necessary to change certain settings of the balance manually. For more information please contact Cato Software Solutions. Please note
that Sartorius balances may be connected to the computer only with a special cable provided
by Sartorius. In case you are using a different cable the balance can switch into maintenance
mode that can only be reset by a Sartorius technician.
The list below contains the recommended settings. For the key functions of the balance for
setting the respective menu parameters, please refer to your Sartorius manual.
Menu 1 (Weighing Settings)
1 – 1: Environment Conditions:
1 – 1 – 3: turbulent environment or
1 – 1 – 4: very turbulent environment
1 – 6: Protocol Format (Attention: with Sartorius CPA/GCA/GPA models, this
setting is listed under 7-2-1)
1 – 6 – 6 - 1: 16 characters
1 – 7: Weighing Unit
1 – 7 – 2: Gram
Menu 5 (Interface settings)
5 – 1: Baud rate
5 – 1 – 5: 2400 Baud or
5 – 1 – 7: 9600 Baud
5 – 2: Parity
5 – 2 – 3: Odd (also other parities are allowed)
5 – 3: Stopbits
5 – 3 – 1: 1 Stopbit
5 – 4: Handshake
5 – 4 – 2: 2 Hardware-HS
5 – 5: Operation Mode
5 – 5 – 1: SBI (Serial Bus Interface)
5 – 6: Network address
5 – 6 – 1: Address 0
Menu 6 (Data output)
6 – 1: Automatic / Manual
6 – 1 – 4: Automatic without standstill
Only if this selection is not available with your balance, select
Page 40 of 70
Project:
Document Group:
File Name:
Version:
Cato
05 IT\IT extern\Installation\EN
Installationsplan_EN
37
6-1-5 (Automatic with Standstill)
6 – 2: Cancel Automatic Printing
6 – 2 – 2: Canceling not possible
6 – 3: Time-dependent Printing
6 – 3 – 1: 1 Display Cycle
6 – 4: Taring after Printing
6 – 4 – 1: Off
With Sartorius CPA/GCA/GPA models Menu 7
7 – 2: Protocol Format
7 – 2 – 1: 16 characters
4.1.3 Preparatory Configuration of Sartorius-Cubis Balances
The following configuration is required with Sartorius-Cubis balances in order to ensure
proper functioning in cato®. To change the settings, you must be logged on as Administrator
to the balance.
1. Press the TASK key
2. Select "Edit"
3. Create
4. Weigh
Filter adjustment: turbulent environment
Application filter: tare
Standstill: exact
Standstill-delay: short delay
Zero-/Tare function: after standstill
Autom. reset: on
Default unit: Gram
Display precision: all (decimal) places on
Tare/Reset: on
Next
Print output interface: Com A
Protocol: SBI
SBI output: automatic
Autom. print format (16 characters) – when using calibratable data storage units, this
value must be set to 22 characters
Criterion for autom. print: without standstill
Stop autom. print: not possible
Page 41 of 70
Project:
Document Group:
File Name:
Version:
Cato
05 IT\IT extern\Installation\EN
Installationsplan_EN
37
Interv. autom. print: 1 cycle
5. Enter task abbreviation and description
6. Save
1. Press "TASK"
2. Select previously defined task
3. Press "Menu"
4. Configure device
5. Configure interface
6. Configure serial interfaces
7. Periphery connection
Operation mode: SBI
Baud rate: 9600
Data bits: 8
Parity: none
Stopbits: 1
8. Save
After completing these settings, press "TASK" again and reload the predefined task. Start
cato® and proceed with the configuration in cato®.
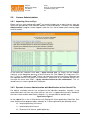
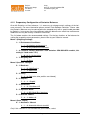
4.1.4 Preparatory Configuration for Calibratable Balance Storage Sartorius
GPA Series
On the balance, the settings described below must be made. After turning on the balance,
with the display on, press the "TARE" key. Increase the current selection by 1 by pressing
the "CAL" key, use the key 2 (data output) to proceed to the next figure. Once figure 3 is selected, confirm the option by pressing "TARE". Press and hold the "TARE" key to apply the
settings.
1-1-1
Turbulent environment
1-7-2
Gram
5-1-7
9600 Baud
5-2-3
Odd parity
5-5-1
SBI (Serial Bus Interface)
6-1-4
Automatic without standstill
Page 42 of 70
Project:
Document Group:
File Name:
Version:
Cato
05 IT\IT extern\Installation\EN
Installationsplan_EN
37
6-2-1
Stop with key
6-4-1
Finish taring after printing: off
7-2-2
22 characters
The target values are 9600 Baud, 7 data bits, 1 stopbit,
odd parity and Hardware-Handshake. These settings
must be selected on the corresponding COM-Port in
the Device Manager in the Control Panel.
The same settings must be made in cato® under "Administration" / "Hardware Configuration"
as well. First, select "Calibratable data storage unit" in the dropdown menu and then "Sartorius 21 characters" on the right. The balance's serial number and manufacturer must be entered correctly as well.
Page 43 of 70
Project:
Document Group:
File Name:
Version:
Cato
05 IT\IT extern\Installation\EN
Installationsplan_EN
37
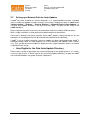
4.1.5 Configuring the Balance in cato®
To configure a connected balance, go to the "Administration" / "Hardware Configuration"
program section in cato®.
Make sure the balance is connected to the computer with the proper cable and turned on.
Attention: turn on the balance only after the operating system has fully booted, otherwise problems with the Windows "Plug-And-Play" function may occur.
•
Setting the Configuration Parameters
In order for the balance to properly communicate with the computer, communication parameters of both devices must be coordinated. You can either configure the balance's parameters
according to cato® settings or vice versa.
•
In any case, you have to specify
the correct balance model: Mettler new models: applies to all
current Mettler-Toledo balances.
•
Mettler old models: applies to
some older Mettler balances (year
of manufacture before 1999), especially for those with a DataPack.
•
Sartorius: applies to all Sartorius
balances
●
Kern: applies to all balances by
Kern..
If parameters have been set correctly, the weight measured by the balance should be displayed in the balance's test field. Once the weight on the balance is modified, the display will
be refreshed on the screen. As soon as the balance is sending a stable weight to the computer, the mass unit in grams ("g") is also displayed with the numeric weight indication.
Important: if current weight changes with not yet stable weights are not displayed in
the balance test field the balance is not yet configured properly and a correct functioning of cato® can not be guaranteed.
In case you would like to use a balance with function keys or a Mettler™ DataPac for controls in cato®, simply activate the corresponding checkbox ("Function Keys“, "DataPac“).
Page 44 of 70
Project:
Document Group:
File Name:
Version:
Cato
05 IT\IT extern\Installation\EN
Installationsplan_EN
37
If you intend to use a balance with "Function Keys" in cato®, make sure the corresponding
checkbox for function keys is activated!
•
Acoustic Signal After Stable Weight
During preparation, cato® separates the individual steps from each other by waiting for a
stable (leveled-off) weight sent by the balance. Thus, it is not necessary to press any key for
confirmation between the individual steps of preparation. An acoustic signal can allow the
user to proceed with the next step. Thereby, the following parameters can be set:
•
•
Signal from balance: only available with some Sartorius balances.
Signal from PC: the user can determine the frequency in Hertz as well as the length
in milliseconds.
Click the "Test" button to play the signal.
•
Adjusting the Balance to Environmental Conditions
In order to guarantee the correctness of stable weights sent to cato®, cato® can be instructed, not to accept the first stable weight immediately. Only after several stable weights
have been sent, cato® will presume that the weight will not change anymore and accept it.
The number of equal stable weights can be adjusted by the user.
The "Adjustment of Balance to Environmental Conditions“ function allows adjusting the
settings for the balance's damping as well as the number of equal weights sent by the balance according to objective criteria. Click the "Perform Test" button to start a test weighing.
You will be requested to place (any) reference weight on the balance.
If the two values are different (e.g. 99.99 g and 100.00 g), it means that the balance has accepted a weight as correct too early and sent it to the computer. In this case, either the "Necessary number of equal weights to be transmitted by the balance" value can be increased, or a higher damping value determined (for Mettler balances, go to "Disturbed environment" in the balance's menu or "high reproducibility of weighing results“ respectively,
to adjust settings).
Note: This setting can considerably influence cato®'s working speed. Therefore, values
should be determined rather lower, which guarantee reliable and reproducible weighing results.
Page 45 of 70
Project:
Document Group:
File Name:
Version:
Cato
05 IT\IT extern\Installation\EN
Installationsplan_EN
37
4.1.6 Calibratable Data Storage Unit
Due to the EU Directive 90/384/EWG, modified by 93/68/EWG, installing a calibratable data
storage unit might be required.
For every balance used, Appendix A must be printed beforehand and Point "8.1 Preliminary Investigations“ filled out.
The activation code must be requested from SMT-MedTech, either via e-mail to
[email protected] or by phone at (+43) 0 2622 73 664.
Page 46 of 70
Project:
Document Group:
File Name:
Version:
Cato
05 IT\IT extern\Installation\EN
Installationsplan_EN
37
4.2 Barcode Scanner
cato® also allows the use of a barcode scanner. Go to "Administration" / "Hardware Configuration" to adjust settings.
4.2.1 Serial Barcode Scanner
In order for the barcode scanner to properly communicate with the computer, communication
parameters of both devices must be coordinated.
4.2.2 Scanner with Keyboard Connection
When using a scanner with keyboard connection, the following parameters must be set:
•
Terminating character: select whether the scanner shall send <ENTER> or <TAB>
as closing sign.
●
If you wish to use the scanner per default to search in search forms please select
"Jump to "Barcode" field on Search Forms".
4.2.3 Datalogic Matrix200 Barcode-Scanner
Cato provides Datalogic's Matrix200 Barcode scanner in a ready-to-operate state.
On every PC that will use the Matrix200 barcode scanner, the following file must be executed. Link: http://www.cato.eu/downloads/matrix200/USB-COM_Driver.exe
The following settings must be made in cato® in order for the scanner to work properly:
COM-Port: as appears in the Device Manager
Baud rate: 115200
Parity: None
Data bits: 8
Stopbits: 1
Should you encounter any problems, please refer to the detailed description of the Matrix200
configuration in Appendix B.
Page 47 of 70
Project:
Document Group:
File Name:
Version:
Cato
05 IT\IT extern\Installation\EN
Installationsplan_EN
37
4.3 Label Printer
cato® can be used with any thermo transfer mode label printer, and with the required Windows driver. With gravimetric production, the label printer is usually placed in the cleanroom
(so that the labels can be stuck on immediately) outside the safety cabinet.
Another possibility is to use cleanroom proof inkjet printers as e.g. provided by the company
"Primera". This is somewhat more expensive but allows color printing.
4.3.1 Inserting the Label Roll and Print Foil - Avery Dennison 4.4
This chapter provides an overview on how to insert the label roll and the thermotransfer foil
into the printer. For a more detailed description, please refer to the printer's manual. (Insert
labels: Page 6 / Insert print foil: Page 11)
First, supply the printer with empty
labels and color foil. Open the cover
on the right side of the printer.
Please note that the labels must face
outwards where inserted and look like
in the picture below.
Now release the green handle (counter-clockwise) and insert the label roll
as shown. Make sure the carrier foil is
adjusted to the left.
The color foil is unspooled counterclockwise, in other words, the front
color foil tape is wound up and the
back foil is unspooled.
The print side of the foil (matt side)
must face outwards (in the labels'
direction).
Now secure the green handle (clockwise).
Close the printer, connect it to the
power cable and turn it on with the
Power button on the backside.
Page 48 of 70
Project:
Document Group:
File Name:
Version:
Cato
05 IT\IT extern\Installation\EN
Installationsplan_EN
37
4.3.2 Installing the Printer Driver
For navigation in the printer's menu, use the keys "Cut•▼" (down), "Feed•▲" (up),
"Prog•Esc" (call menu or return to previous menu level) and "Online•¬" (next menu level or
Enter).
To set the menu language to German, switch into Offline mode first (press the "Online•¬"
key) as the menu (by pressing "Prog•Esc") can only be opened from here. The language
settings are located under the menu "SYSTEM PARAMETER ► LANGUAGE" (towards the
end of the list).
Now select USB as interface. Call the menu again (by pressing "Prog•Esc") and select
"SCHNITTST.PARA". Select "EASYPLUGINTERPR PARAMETER ► Schnittstelle" and select "USB" from the list. Confirm by pressing "Online•¬". In case you are using a tearing
edge, set the following parameters on the printer directly: "Set System Parameters → Peripheral Device → Tearing Edge".
Now switch to the Online mode (press "Prog•Esc" to exit the menu, then "Online•¬") and
connect the printer to the computer by means of a USB cable.
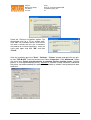
You will be guided through the installation process of the printer driver: after connecting the
printer to the computer, the following window appears:
Select "No, not this time" and click
"Next“.
Since the required drivers are on the cato® CD, select "Install software from a list
or specific location" and click "Next“. Alternatively, you can also use the Avery
Driver by Nicelabel - Download
Page 49 of 70
Project:
Document Group:
File Name:
Version:
Cato
05 IT\IT extern\Installation\EN
Installationsplan_EN
37
Now select "Do not search,
manually select driver to
be installed".
Click "Have Disk".
Click "Browse".
Page 50 of 70
Project:
Document Group:
File Name:
Version:
Cato
05 IT\IT extern\Installation\EN
Installationsplan_EN
37
Select the highlighted driver
from the CD.
Now confirm by clicking "OK"
Now click "Next"
Page 51 of 70
Project:
Document Group:
File Name:
Version:
Cato
05 IT\IT extern\Installation\EN
Installationsplan_EN
37
This information can be ignored, continue the installation with the corresponding button.
The printer driver has been successfully installed. Close the wizard
by clicking "Finish".
Page 52 of 70
Project:
Document Group:
File Name:
Version:
Cato
05 IT\IT extern\Installation\EN
Installationsplan_EN
37
4.3.3 Configuring the Avery Dennison AP 4.4
The new printer is now listed under "Start" /
"Printers and Faxes". Right-click the printer
and select "Properties" from the context
menu to see the printer's properties. Activate the "Printing Preferences" tab.
Under "Label Formats" or "Templates", you
can now create a new label format called
"cato".
Then select the following settings:
Width: 8.00 cm
Height: 5.00 cm
Darkness: 75
Page 53 of 70
Project:
Document Group:
File Name:
Version:
Cato
05 IT\IT extern\Installation\EN
Installationsplan_EN
37
In the "Advanced Settings" tab, activate the option "Thermotransfer“. This will define the printer
type.
For "Offset", define "Gap" with 0.30 cm.
Now activate the "Print directly to printer" option under the "Advanced" tab.
Page 54 of 70
Project:
Document Group:
File Name:
Version:
Cato
05 IT\IT extern\Installation\EN
Installationsplan_EN
37
4.3.4 Configuring the Label Printer in cato®
●
Make sure you can print a Windows test page on the label printer from the printer
driver. (Start / Printers and Faxes ► right-click ► Properties ► "Print test page“)
Continue only if this was successful.
●
In cato®, go to the "Administration" / "Settings" / "Printer" program section and select
"Label Printer"
●
Select the desired label printer from the list and click "File" / "Save" (or the diskette
icon)
4.3.5 Printer for Reports, Prescriptions, and Invoices
•
Make sure that printers are available in Windows to all users who work with cato®
and intend to print reports.
•
Go to the "Administration" / "Settings" / "Printers" program section
•
Click "Printer for Reports"
•
Select the desired printer.
•
Click "Save as default"
●
Proceed analogously with "Printer for Prescriptions" and "Printer for Invoices“
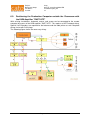
5 Special Case "Positioning the PCs outside the Cleanroom with
Amplifiers"
As an alternative to a clean room PC you can either use a standard PC, which is positioned
outside the clean room. Screen, mouse, and keyboards are connected to the remote PC via
"KVM Line Extenders. For this purpose, Hanke & Hörner recommend the USB MiniExtender SD-VUE/50. For connecting the "Local" station and the "Remote" station, a 1:1KAT5 wiring is necessary, which is not integrated in the network. The VGA splitter shown in
the following picture allows connecting both a screen integrated in the safety cabinet and one
positioned next to it.
The following figure shows the required wiring:
Page 55 of 70
Project:
Document Group:
File Name:
Version:
Cato
05 IT\IT extern\Installation\EN
Installationsplan_EN
37
6 Out-of-date Hardware Components
This chapter describes hardware components, which are no longer distributed by Cato Software Solutions, yet might be used in existing installations.
6.1
TEC B-SA4 Label Printer (black & white)
Cato Software Solutions recommends the TEC B452 label printer. This chapter contains
notes on installation and configuration of the proper printer driver.
Both the driver and the installation instructions can be downloaded from our website
http://www.cato.eu
If you wish to use a different printer, make sure to install the corresponding printer
driver and configure the device accordingly. Drivers for the most common label printers can be found at:
http://www.nicelabel.com/
The TEC B-SA4 label printer requires a free USB port. Insert label roll and ink ribbon. It is
important to know that test-wise feeding with the "FEED"-button only works correctly once
the printer driver has been configured.
To install the printer driver insert the cato® installation CD in your CD drive. Then connect
your printer to the computer via USB and turn it on. The computer will detect the new hardware and display the following window:
Page 56 of 70
Project:
Document Group:
File Name:
Version:
Cato
05 IT\IT extern\Installation\EN
Installationsplan_EN
37
Select "No, not this time" and click "Next“.
Select "Install software from a list or specific location" and click "Next“.
When prompted, enter the printer driver file's path, located in the "TecB452\NiceLabel“ folder on your installation CD. After clicking, the following Windows error message might appear:
Page 57 of 70
Project:
Document Group:
File Name:
Version:
Cato
05 IT\IT extern\Installation\EN
Installationsplan_EN
37
Select the "Continue installation“ option. The
wizard now asks for a CD or another path.
Click "OK“. For unknown reasons, one file has
not been installed with our test installations
and had to be installed separately. Enter the
same path again and click "OK“ and then
"Finish“.
After the installation go to the "Start" / "Settings" / "Printer" window and right-click the printer icon "TEC B-452". From the context menu select "Properties". Click "Advanced“. Select
the menu item "Spool print documents to program finishes printing faster" (printing
process is finishing considerably faster). Attention: if "network sharing" has been selected for
the printer (not recommended) this option is not available as network sharing would not work
otherwise:
Page 58 of 70
Project:
Document Group:
File Name:
Version:
Cato
05 IT\IT extern\Installation\EN
Installationsplan_EN
37
In the "General" section, click "Printing Preferences" and create a new label template
by clicking "New" and then enter "80.0" for
width and "50.0" for height. Set margins to
"0". For the name, enter "cato".
Select the "Label" and "Options" tags, respectively, and enter the following values:
Click "Apply" and then "OK“.
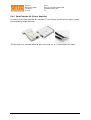
6.2
TEC B452 Label Printer
This chapter contains information regarding the configuration of the TEC B452 Label Printer
driver.
The TEC B452 requires a free parallel interface for connection. If no parallel interface is
available or free, a USB/parallel adapter can be used instead.
The use of such an adapter requires the installation of the proper driver, which usually
comes with the adapter.
Page 59 of 70
Project:
Document Group:
File Name:
Version:
Cato
05 IT\IT extern\Installation\EN
Installationsplan_EN
37
To install the printer driver, insert the cato® Installation CD into the drive and click "Start" /
"Settings" / "Printers“. In the opening window, double-click the "New Printer" icon. The
"Printer Installation Wizard" appears. Follow the installation instructions on the screen. When
prompted, enter the printer driver's path, which is located in the "TecB452\NiceLabel“ directory of the cato® Installation CD. Due to the higher reaction rate, and in order to avoid a mixup of labels, the printer should be installed as a local printer, if possible, and only in exceptional cases as a network printer.
After completion of the installation, a symbol for the "TEC B-452" printer will appear in the
"Start" / "Settings" / "Printers" window. Right-click the symbol and select "Properties" from
the context menu. Now click "Advanced". In this window, select " Spool print documents
to program finishes printing faster" (printing process is finishing considerably faster). Attention: if you have enabled the printer in the network (not recommended), this option cannot
be selected, as network share would not function anymore.
In the "General" section, click "Printer Settings" / "Options" and enter "8,00“ for width
and "5,00“ for height.
Set the "Blackness Value" to "21“ (highest
value).
Now click "Advanced Printer Settings“. If
you are using the printer without a single
sheet feeder, adjust the settings as shown in
the figures. Then click "Apply“ and then
"OK“.
In case you are using the printer with a single
sheet feeder, select "Strip" as the eject
mode. It is also necessary to know that the
"FEED" button only works properly if the
printer driver has been installed correctly and
the printer has been turned off and back on
again.
Page 60 of 70
Project:
Document Group:
File Name:
Version:
6.3.
Cato
05 IT\IT extern\Installation\EN
Installationsplan_EN
37
Positioning the Production Computer outside the Cleanroom with
the KVM Amplifier "DUET-UTP"
With existing installations, keyboard, mouse, and screen can be connected to the remote
computer by means of the KVM amplifier "DUET-UTP". This requires a KAT5 network wiring.
Special Line Extenders are required for the balance and the label printer as well. Required
wiring: 4-wire with RJ12 plugs.
The following figure shows the necessary wiring:
Page 61 of 70
Project:
Document Group:
File Name:
Version:
Cato
05 IT\IT extern\Installation\EN
Installationsplan_EN
37
6.3.1 The KVM Amplifier "DUET-UTP" Sender/Receiver 250 m
The KVM Amplifier set "DUET-UTP" consists of a sender and a receiver and serves the purpose of transmitting signals from and to the mouse, keyboard, and the screen via a KAT5
network cable in great distance.
The Duett KVM amplifier enables the user to position the keyboard, screen, and the mouse
up to 300m far from the computer. For detailed installation instructions, please refer to the
amplifier's Manual.
With the installation, the following should be carefully considered:
Central und Remote Unit are connected with a 1:1 KAT-5 network cable. Connection can be
established via a patchfeld as well.
●
Never use the KVM amplifier's inlets and outlets with a network hub, network
switch, or with another network card, as it may cause serious damage to the
amplifier!
●
Set the computer's graphic card to a frame rate of 75 Hz.
●
Set the DIP switches to the corresponding resolution and cable length, as described
in the Manual, as otherwise the image will be transferred in poor quality only.
●
In case the image is outshining, adjust brightness with the corresponding potentiometer on the backside of the remote unit.
●
"Double images“ (margins on the vertical edges) can be eliminated by setting the corresponding potentiometers on the backside of the remote unit.
●
Make sure you are turning the potentiometers several times for brightness and
sharpness, for the modifications to become visible.
Page 62 of 70
Project:
Document Group:
File Name:
Version:
Cato
05 IT\IT extern\Installation\EN
Installationsplan_EN
37
6.3.2 Data Extender Kit (Printer Amplifier)
By means of the "Data Extender Kit“ (Number 7 in the Figure), parallel printer signals can be
transmitted over larger distances.
The Kit consists of a Sender/Receiver pair. For wiring, use a 1:1 connected RJ12-cable.
Page 63 of 70
Project:
Document Group:
File Name:
Version:
Cato
05 IT\IT extern\Installation\EN
Installationsplan_EN
37
6.3.3 RS232 Line Extender
The RS232 Line Extender Kit (Number 8 in the Figure) consists of a Sender/Receiver pair
and serves the purpose of connecting the balance and the computer over larger distances.
The serial RS232 signal is amplified and can be transmitted up to 800 meters far via a fourwire cabling.
The following settings must be made on the converters (icCL-II):
Computer:
20 - DCE
RX: PSV
TX: ACT
Balance:
20 - DTE
RX: PSV
TX: ACT
The connecting cable must be crossed out as follows:
Balance
Computer
1
3
2
4
3
1
4
2
Page 64 of 70
Project:
Document Group:
File Name:
Version:
Cato
05 IT\IT extern\Installation\EN
Installationsplan_EN
37
7 Out of date Software Components
7.1
Microsoft Data Engine 7.0
The Microsoft Data Engine is no longer supported with the current version.
Page 65 of 70
Project:
Document Group:
File Name:
Version:
Cato
05 IT\IT extern\Installation\EN
Installationsplan_EN
37
8 Appendix A
8.1
Preliminary Investigations
Preparation computer's inventory number
Balance manufacturer
Balance model
Balance's serial number
Activation code
Balance's manual available on spot
8.2
O available
Installing the Software Components
Insert the EDS Installation CD
Run "EDS_Runtime_11e.exe" from the main directory and perform the O Installation OK
installation.
Restart the computer
O done
Run "EDS_SMT_Waagenserver_Cato_1.0.0.11.exe" from the "EDS In- O Installation OK
staller" directory on the CD and complete the installation
Allow
full
access
to
all
users
C:\Documents and Settings\All Users\Application Data\EDS\DATA
to O done
Call "EDS - SMT Balance server" / "Tools" / "Registering Server" in the O done
Start menu.
8.3
Configuring the Calibratable Data Storage Unit
Start the EDS Control Center in the Start menu under "EDS-SMT Bal- O started
ance server / EDS Control Center"
Click "Balance configuration"
then click "Add new
balance"
Enter the balance's details in the form that appears:
-
Manufacturer's name (e.g. "METTLER", "SARTORIUS", "KERN",
etc.)
Page 66 of 70
O Balance
created
Project:
Document Group:
File Name:
Version:
Cato
05 IT\IT extern\Installation\EN
Installationsplan_EN
37
-
Balance's serial number
-
Maximum data sets per day: 9999
-
Working days per week: as required
-
Storage period in months: 3
Activate the balance:
-
O Balance
successfully
Double-click on the balance you have previously added and the
activated
window with the balance details will appear
-
Click "Copy"
-
Enter the License code and click "Activate"
The following balance has been added:
-
Manufacturer's name:
-
Serial number:
-
Activation code:
8.4
O Values
documented
Configuring the Calibratable Data Storage Unit in cato®
Start cato® and make sure that the "Use Cato XPM" option is acti- O XPM activated
vated in the "Administration" / "Cato Extensions" program section.
Open "Administration" / "Configure Hardware" and check whether O Connection OK
connection can be established with the balance.
With Mettler balances: check in the balance's Configuration Menu O Connection OK
that the setting "Menu" / "System" / "Periphery" / "Host" / "Define" /
End of Line" is set to "<CR><LF>". Check the connection again.
In cato®, set the balance type to "Calibratable Data Storage Unit" and O Values entered
enter the exact same values in the "Manufacturer" and "Serial number"
fields as in the configuration program for calibratable data storage
units. In the "Type" field, select the correct balance type.
Test the balance connection.
O Test OK
Perform a gravimetric preparation and select a CDS value in the prep- O CDS value:
aration protocol.
Open the CDS Control Center and click "Data storage unit".
Double-click the selected balance and a "Save" dialogue box will ap- O Value found
pear. Click "Number range" and enter the CDS value in the search
Page 67 of 70
Project:
Document Group:
File Name:
Version:
Cato
05 IT\IT extern\Installation\EN
Installationsplan_EN
37
mask.
Check whether the CDS value and weight are identical in the CDS O Value identical
control center and cato®.
Fill in the sticker and apply it on the PC.
To detect the program version, open the hardware configuration in
O Sticker filled in
and applied
icon will appear in the
cato® and start a balance test – the CDS
system tray. In the icon's context menu, click "About" to read the balance server's version number.
PC Inventory number: …………………………
Program version: ………………………
……………………………
……………………………
……………………………
Name
Signature
Place, Date
Page 68 of 70
Project:
Document Group:
File Name:
Version:
Cato
05 IT\IT extern\Installation\EN
Installationsplan_EN
37
9. Appendix B
9.1.
Datalogic Matrix200 Barcode Scanner Configuration
9.1.1. General Information
This document describes the configuration of the Datalogic Matrix200 Barcode Scanner
(USB-version) so that it can be used correctly in cato®.
The Matrix200 Barcode Scanner can be used from cato® 2.4 and higher as it requires a
Baud rate of 115200.
9.1.2 Configuration
9.1.2.1
Installation
First, install the "USB-COM_Driver.exe“ file. This will make sure that the USB version of the
Matrix200 scanner will be recognized by the PC. This driver must be installed on all computers using the Matrix200 scanner.
Link: http://www.cato.eu/downloads/matrix200/USB-COM_Driver.exe
In the next step, install the VisiSet Software. This tool will guide you through the configuration
of the Matrix200 scanner.
Link: http://www.cato.eu/downloads/matrix200/VisiSet_5_5_0.zip
Download the Matrix200 Configuration File as well. This will be imported into the scanner at
a later point.
Link: http://www.cato.eu/downloads/matrix200/matrix200_finale.ini
9.1.2.2
Importing Configuration
Connect the Matrix200 scanner to a free USB port.
Done
In the Device Manager, under "Connections", search the Matrix200 Done
Scanner's COM port.
Start the VisiSet software and make the following settings under "Op- Done
tions“ – "Communication“:
-
Communication Channel: Serial port
-
Autoconnect ports: Set port from Device Mananger
-
Baud rate: 115200
-
Stopbits: 1
-
Parity: None
Page 69 of 70
Project:
Document Group:
File Name:
Version:
Cato
05 IT\IT extern\Installation\EN
Installationsplan_EN
37
Quit the "Options“ menu and press "Connect“
The VisiSet software will connect to the Matrix200 scanner.
Done
Press "Device“ – "Get Configuration from Temporary Memory“
Done
Under "Parameter Setup“, select "File" – "Load Configuration File"
Done
Open the "Matrix200_finale.ini“ file that you have saved to your comput- Done
er.
Under "Parameter Setup", click "Send“
Done
After transferring the data to the Matrix200 scanner, close the "Parame- Done
ter Setup“ window. The main menu now features:
Checking configuration...OK
Configuration saved in Permanent memory!
On the left-hand side, click "Run Mode"
Done
The scanner is now set to "Run" mode and is permanently ready until it
is removed again.
Close the VisiSet software by clicking "File" – "Exit“ (do not press "ESC. Done
Exit Run Mode" as this would terminate the "Run" mode)
The Matrix200 Barcode Scanner can now be used in cato®.
9.1.3 Using the Datalogic Matrix200 Barcode Scanner in cato®
Use the following settings for the Matrix200 Barcode Scanner in cato®:
COM port: as appears in the Device Manager
Baud rate: 115200
Parity: None
Data bits: 8
Stopbits: 1
Page 70 of 70