1
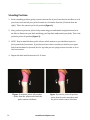
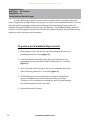
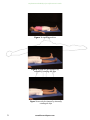
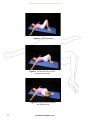
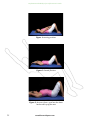
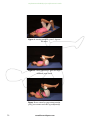
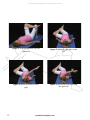
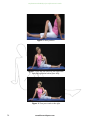
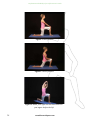
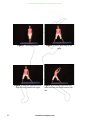
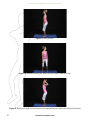
USER’S GUIDE
Performance FlexibilityTM for Golfers Users’s Guide
1
DR. JASON GRAY, BHK, DC
www.KinetesisSports.com
Important – Please Read
Although the flexibility exercises contained in the Performance Flexibility™ for Golfers
program are safe and effective for most people, not all stretches or exercises are
appropriate for everyone. If you experience any pain or discomfort while performing
any of the flexibility exercises, you should consult a licensed health professional for a
complete evaluation before continuing with the Performance Flexibility™ program. If
you have a history of recurrent injury, or are currently recovering from an existing injury,
you should wait until the condition has resolved or seek the opinion of a licensed health
care professional prior to beginning the Performance Flexibility™ for Golfers program.
Building
Better Athletes
Copyright ©2009 Kinetesis Sport Solutions
For more information go to www.kinetesissports.com
Table of Contents
Why Stretch? .................................................................... 5
How to Stretch ............................................................... 7
When to Stretch ............................................................. 9
Ensuring Proper Form ................................................... 11
Pelvic Tilt Program ......................................................... 15
Active Flexibility Tract ...................................................
Open Book Reach ....................................................
Windshield Wiper ....................................................
Acitve Trunk Twist ...................................................
Active Overhead Reach .............................................
Floor Angel Stretch ...................................................
21
22
24
26
28
30
Passive Flexibility Tract ................................................. 33
Figure 4 Stretch ....................................................... 34
Counter-Rotation Stretch ........................................ 36
Trunk Twist Stretch .................................................. 38
Hurdler’s Stretch ..................................................... 40
Kneeling Lunge Stretch ............................................ 42
Integrated Flexibility Tract ............................................
Lateral Sling Stretch ................................................
Anterior Oblique Sling Stretch ..................................
Lateral Oblique Sling Stretch ..................................
Standing Trunk Rotation Stretch .............................
Follow-Thru Stretch .................................................
3
www.KinetesisSports.com
45
46
48
50
52
54
Performance FlexibilityTM for Golfers Users’s Guide
Why Stretch?
Stretching, especially for the golfer, can provide a number of positive effects such as
enhanced performance, increased flexibility and range of motion, decreased aches and stiffness,
and reduced risk of injury. Unfortunately, general stretching programs have proven to be of little
benefit to the golfer. To be effective, a specifically designed stretching program with the goal of
improving your golf swing and reducing injury must include stretches directed at key muscles
and movements. The good news is that this is exactly what we have done for you by developing
the Performance Flexibility™ for Golfers program.
The key objective of Performance Flexibility™ for Golfers is to enable you to swing more
effectively while minimizing wear-and-tear on your body. To promote a more effective swing,
proper golf mechanics is important. This does not mean that all golf swings need to be exactly
the same. It does mean though, to be effective, there are certain key motions that must occur
during each swing. For example: the back leg must be able to remain stable as the trunk and
shoulders rotate back during the backswing; the spine must be able to freely rotate in order to
produce a full shoulder turn and produce adequate power during the swing; and the shoulders
must be able to reach up overhead to get the club all the way back during the backswing and all
the way up and through during the follow through. These are but a few examples of some of the
movements that are critical to an effective golf swing.
In order for these motions to occur consistently with minimal strain to the body, the
muscles and joints must have adequate flexibility. The reality is that most golfers lack the
required flexibility at one or more key areas. This in turn interferes with proper golf swing
mechanics. Poor flexibility forces your body to move in an altered manner to compensate for the
restricted mobility: a situation referred to in golf as a “swing compensation.” Not only will this
lead to a weaker, less effective swing, but “swing compensations” also increase the risk of injury.
Many golfers spend countless hours practicing on the driving range but experience
discouraging progress because their bodies are unable to move properly to produce an effective
golf swing. As a result, much of the power generated never reaches the ball. It is lost due to
inefficient movement patterns and “swing compensations.” Serious negative consequences
of “swing compensations” are too commonly seen by chiropractors, sports therapists, and
4
www.KinetesisSports.com
Performance FlexibilityTM for Golfers Users’s Guide
coaches. This is so unfortunate since we know that “swing compensations” are easily corrected
by promoting proper muscle flexibility and joint movement. The problem is that without
consciously addressing these issues, golfers will continue to perform below their capability.
At Kinetesis Sport Solutions, we simply want to help build better athletes. That is why
we developed Performance Flexibility™ for Golfers. The program is based upon a combination
of the latest scientific research in the field of stretching and athletic performance, along with
our work with golfers helping to rehabilitate their injuries and preparing their bodies for
optimal golf performance. We believe that you can not get maximum benefit from Performance
Flexibility™ for Golfers until you understand “the why” of our specialized stretching program.
So in addition to teaching you the specific stretches, we will also teach you exactly how and
when to stretch, and why each stretch in Performance Flexibility™ for Golfers is critical to
staying healthy and performing at your best.
5
www.KinetesisSports.com
Performance FlexibilityTM for Golfers Users’s Guide
How to stretch
It is important to realize that the flexibility and movement capacity of muscles and
joints is dependent upon several factors. These include active flexibility, passive tissue stiffness,
muscle balance, and the control and regulation of muscle length by the nervous system. Since
different types of stretching affect different components of flexibility, a variety of stretching
techniques are needed to ensure all aspects of flexibility and movement regulation are
addressed. This is why in the Performance Flexibility™ program, we have included 3 different
types of stretches to ensure all the components of flexibility are trained. We have separated
these 3 different types of stretches into distinct flexibility tracts and have arranged the stretches
in a specific order so that each stretch builds on the next.
The Active Flexibility Tract
Performance Flexibility™ for Golfers begins with active stretches which take advantage of
the coordinated contraction and relaxation of opposing muscle groups. These stretches involve
holding each stretch for just 1-2 seconds, but require multiple repetitions of each stretch. This
type of movement helps promote muscle balance at the key joints involved in the golf swing. In
addition, these active motions are a great warm-up as they increase blood flow to the working
muscles. Active motions not only increase flexibility but also help prepare the muscles and
joints for the next stages of the Performance Flexibility™ program.
The Passive Flexibility Tract
The active stretches are followed by the Passive Flexibility Tract which includes stretches
designed to isolate the passive flexibility components of the key muscles and joints which are
central to the golf swing. These stretches resemble the more traditional types of stretches and
require a longer holding time (i.e. 15-30 seconds) than the active flexibility stretches.
6
www.KinetesisSports.com
Performance FlexibilityTM for Golfers Users’s Guide
The Integrated Flexibility Tract
The final flexibility tract includes full-body integrated stretches. Though we often talk
about muscles as if they stretch and contract independently of each other, this is not really how
muscles work. In fact, muscles form intricate connections to each other through a specialized
form of connective tissue known as fascia. This fascia essentially links different muscles
together to form what are referred to as muscle slings. These slings span across several adjacent
joints, providing a functional link between different body segments. In many cases, these
muscle slings can travel all the way from the feet to the shoulders and arms. Not only is the
strength and flexibility of each individual muscle important, but so too is the integrated strength
and flexibility of the muscle slings. This final set of stretches incorporates very specific whole
body movements designed to promote proper flexibility of the key muscle slings involved in golf.
7
www.KinetesisSports.com
Performance FlexibilityTM for Golfers Users’s Guide
When to stretch
The final thing we need to discuss is when to stretch. Many golfers hold to the notion
that stretching needs to be done prior to golf or exercise as a part of a warm-up; however, this is
not necessarily the case. The first thing that needs to be emphasized is that stretching is not a
warm-up. In fact, some studies have even suggested that static stretches prior to exercise may
be detrimental to performance by altering the neurological control of movement and reducing
the force producing capabilities of a muscle. Unfortunately, many golf coaches and instructors
have reasoned this to mean that stretching is not important. This is simply not the case. In fact,
there are many significant and important benefits to be gained from a well designed stretching
program, but to be most effective, the program should not necessarily be done immediately
before a round of golf or hitting balls on the range. Instead, we recommend that the
Performance Flexibility™ for Golfers program be completed seperately from golf. Through our
work with golfers, runners, and other athletes, we have found that performing a sport specific
stretching program separate from exercise training can be a very effective way to develop and
maintain optimal flexibility and movement. To understand why this is, let’s back up and look
at how the body responds to stretching in the first place. This understanding will clear up one
more point of confusion regarding stretching.
Many people believe that stretching will actually lengthen a muscle; however, this is not
really accurate. Stretching, generally, does not lengthen the muscle. Instead, it increases your
muscles tolerance to stretch. This means that although your muscles do not actually get longer,
you can stretch the muscle to a greater degree before you actually feel the stretch. This occurs in
large part because the ability of a muscle to stretch is controlled by the nervous system through
reflexes. A major part of the physiological effect of stretching is training these reflexes. It is
important to realize that to develop and maintain these changes in reflex control and improved
flexibility that these neuromuscular processes must be continually trained and challenged.
In other words, for a stretching routine to be effective in maintaining optimal movement and
therefore optimal movement efficiency, it must be done regularly.
8
www.KinetesisSports.com
Performance FlexibilityTM for Golfers Users’s Guide
Most golfers we have worked with have found that going through the entire Performance
Flexibility™ program each evening (which takes about 10-15 minutes) is one of the best ways
to develop and maintain proper movement and flexibility. Using the Golf StretchMat™ makes
this easy to do even in your living room as you have the entire program in front of you and a
comfortable surface to do your stretches. Of course, the program does not have to be done at
night, but we have found that by doing the stretches in the evening it helps golfers to combat
a lot of the increased muscle tension that develops through the day, and helps you to wake up
looser and more prepared for the next days’ activities.
One of the best times to go through the Performance Flexibility™ for
Golfers program is each evening. This will help to decrease tightness and
speed recovery, ensuring you wake-up ready for the next days’ activities.
In addition, completing the program daily will bring the muscles and
joints through all of the key movements required to ensure optimal
swing technique, helping to promote optimal power, efficiency, and peak
performance.
9
www.KinetesisSports.com
Performance FlexibilityTM for Golfers Users’s Guide
Ensuring Proper Form Is Critical To Success
To derive maximum benefit from Performance Flexibility™ for Golfers, it is important
to keep in mind that the major purpose of stretching is to improve movement efficiency and
prevent the need for “swing compensations.” Just as the way the body moves during the
golf swing determines the effectiveness of the swing, the effectiveness of the stretch will be
determined by how the body moves during the stretching exercises. In fact, if you perform
stretches with the incorrect form, it is unrealistic to expect that the stretching program will
correct your swing mechanics or improve your movement efficiency. This means that proper
form when performing the stretches is important to ensure that the stretch movement is
occurring at the right areas.
Maintaining Proper Trunk Position
The most important factor that ensures proper form with Performance Flexibility™ for
Golfers is to keep the pelvis and low back stable, and in the correct position during the stretch
sequences. Most golfers have a tendency to have excessive motion at the pelvis and spine
when stretching. This will cause problems as excessive motion at the spine not only fails to
promote flexibility in the areas that need it, but can also create excessive strain to the back and
pelvis; thus, instead of correcting faulty movement patterns, using the incorrect form during the
stretches can actually facilitate “swing compensations” and inefficient movement patterns!
To ensure proper form, it is important to actively hold the pelvis and spine in the
correct position while stretching. This will prevent excessive spine and pelvic motion and help
ensure the stretch is occurring at the right areas. To do this, a common practice that can be
incorporated into the stretches are Anterior and Posterior Pelvic Tilts.
With pelvic tilts, you can use the hip and trunk muscles to pre-position the spine and
pelvis in the correct position. Then while performing the stretch, you can simply hold the
position to stabilize the spine and concentrate the stretch at the correct regions. In most cases,
you will feel a dramatic difference in the quality and intensity of the stretch when incorporating
a pelvic tilt into the stretch sequences. It is worth noting that this practice is also supported
10
www.KinetesisSports.com
Performance FlexibilityTM for Golfers Users’s Guide
by existing research which shows adding a pelvic tilt to stretching exercises produces a greater
increase in flexibility and range of motion, particularly with stretches for the legs and hips.
If you are unfamiliar with performing pelvic tilts, pages 11 through 19 explain what these
pelvic tilts are and how to perform both anterior and posterior pelvic tilts.
Anterior Pelvic Tilt
With an anterior pelvic tilt, the top of the pelvis rotates slightly forward while the bottom
of the pelvis rotates backward. Since the pelvis and spine are connected, as the pelvis rotates
anteriorly, the spine will arch to a greater degree accentuating the curve of the lower back.
To perform an anterior pelvic tilt, use the muscles of your lower back to pull the back of the
pelvis upward and gently increase the arch in your lower back. As you do this, you should feel your
pelvis rotate clockwise (if viewed from the right side), but you should not feel your upper body
lean forward. Keep in mind that this is a small and subtle motion so you will not see or feel a great
degree of movement.
Posterior Pelvic Tilt
With a posterior pelvic tilt, the top of the pelvis rotates backward while the bottom of the
To perform a posterior pelvic tilt, use your abdominal muscles to pull the front of your
pelvis rotates forward. A posterior pelvic tilt will also cause the spine to straighten.
lower pelvic bone up, and the muscles on the back of your hips to thrust your hips forward. It
is also helpful to think about flattening the back as you do this. During this motion, your pelvis
should rotate counter-clockwise (if viewed from the right side), but you should not feel your upper
body lean backward or your knees bend. Once again, this is a small and subtle motion so you will
not see or feel a great degree of movement.
11
www.KinetesisSports.com
Performance FlexibilityTM for Golfers Users’s Guide
Figure 1
Figure 2
Figure 3
12
www.KinetesisSports.com
Performance FlexibilityTM for Golfers Users’s Guide
PELVIC TILT PROGRAM
For many golfers, anterior and posterior pelvic tilts will come
naturally and can be easily incorporated into their Performance
Flexibility™ program. For others, holding the spine and pelvis in the
proper position during the stretches will prove more challenging as
they are not familiar with these movements. If you are in the latter
group, it will be helpful to include some simple exercises in the early
stages of the program to teach your body how to better activate
the muscles of the trunk and pelvis, and to maintain the proper
pelvic position. Go through these exercises prior to performing the
Performance Flexibility™ for Golfers program until you can easily
perform the Anterior and Posterior Pelvic Tilts during the stretches.
Once you have this mastered, there is no need to continue with the
isolated pelvic positioning exercises as these motions will be reinforced
during the Performance Flexibility™ program.
To develop better control of the anterior and posterior Pelvic tilts, perform
the following exercise sequence prior to the Performance Flexibility™
program.
13
www.KinetesisSports.com
Performance FlexibilityTM for Golfers Users’s Guide
Quadruped Position
1. Begin on your hands and knees and slowly sag your back towards the mat – this is the anterior pelvic tilt position (figure 1).
2. Next, reverse this position and arch your spine toward the ceiling – this is the posterior pelvic tilt position (figure 2).
3. Slowly move between these two positions 10-15 times.
NOTE: While doing this try to concentrate the movement at the lower back by using your hips
to initiate the movement. For example, as the back sags toward the floor you should feel your
hips stick out behind you – and as your back flexes toward the ceiling, you should feel your hips
tuck under your body. Pay attention to how these movements feel as they are the same movements you will use during the stretches.
Figure 1: anterior pelvic tilt position
- notice how the spine sags toward the
mat
14
Figure 2: posterior pelvic tilt position notice how the spine arches up toward
the ceiling
www.KinetesisSports.com
Performance FlexibilityTM for Golfers Users’s Guide
Supine Position
1. Begin on your back with the knees bent and feet flat on the mat.
2. Slowly arch your back off the mat by contracting the muscles of your lower back. As you do
this, you should feel your hips push into the mat and your lower back lift off of the mat. This
is the anterior pelvic tilt position (figure 1).
3. Next, push your lower back into the mat by contracting your abdominal muscles. This is the
posterior pelvic tilt position (figure 2).
4. Simply repeat this back and forth motion 10-15 times.
Figure 1: anterior pelvic tilt position notice how the spine arches away from
the mat
15
Figure 2: posterior pelvic tilt position
- notice how the spine flattens into the
mat
www.KinetesisSports.com
Performance FlexibilityTM for Golfers Users’s Guide
Standing Position
1. From a standing position, gently contract the muscles of your lower back in an effort to arch
your lower back and tilt your pelvis forward in a clockwise direction (if viewed from the
right). This is the anterior pelvic tilt position (figure 1).
2. Next, perform a posterior pelvic tilt by contracting your abdominal and gluteal muscles in
an effort to flatten out your back and bring your hips back underneath your body. This is the
posterior pelvic tilt position (figure 2).
3. NOTE: Keep in mind that these pelvic tilts are subtle motions so you should not expect to
feel a great deal of movement. If you find your knees have a tendency to bend or your upper
body leans backward or forward, this is a sign that you are trying to move too much or in an
incorrect manner.
4. Repeat this back and forth motion 10-15 times.
Figure 1: anterior pelvic tilt position
- notice how the spine arches and the
pelvis rotates clockwise
16
Figure 2: posterior pelvic tilt position
- notice how the spine straightens and
the pelvis rotates counter-clockwise
www.KinetesisSports.com
Performance FlexibilityTM for Golfers Users’s Guide
ACTIVE FLEXIBILITY TRACT
17
www.KinetesisSports.com
Performance FlexibilityTM for Golfers Users’s Guide
Open Book Reach
Hold Time: 1-2 seconds
Repetitions: 10
Trunk Position: Does Not Apply
Proper rotation at the hips, spine, and shoulders is critical for an effective golf swing.
This first stretch in the Active Flexibility Tract is designed to promote and maintain the needed
flexibility in these key areas. Not only will this stretch target the rotational muscles of the hip,
trunk, and shoulder, but the active movement component will also help to facilitate mobility in
the joints of these regions.
To perform the Open Book Reach:
1. Begin lying on your right side. Both arms should be fully extended
and resting on the floor in front of you at shoulder height. Your right
leg should be straight and your left hip and knee should be bent 90
degrees and resting on the mat (figure 1).
2. From this position reach the left arm back, bringing the back of your
left hand towards the floor behind you (figure 2).
3. As you reach the left arm back, keep the right arm resting on the floor.
Do not allow the left knee to lift off of the mat (figure 3).
4. To promote greater spine motion, turn your head to look at the left
hand as you reach back.
5. Hold this stretch position for 1-2 seconds and return to the starting
position.
6. Repeat the motion 10 times and then repeat on the opposite side.
18
www.KinetesisSports.com
Performance FlexibilityTM for Golfers Users’s Guide
Figure 1: start position
Figure 2: stretch position
Figure 3: Incorrect form - note how the knee lifts
off the mat
19
www.KinetesisSports.com
Performance FlexibilityTM for Golfers Users’s Guide
Windshield Wiper
Hold Time: 1-2 seconds
Repetitions: 10
Trunk Position: Does Not Apply
A proper golf swing requires the lower body to remain stable to provide an adequate
base of support for the upper body to swing from. In order for the trunk and shoulders to rotate
back during the backswing, and then forward during the follow through, there needs to be
adequate rotational flexibility in both the rear and lead hips. The Windshield Wiper stretch is
an active stretch designed to promote hip internal and external flexibility, and will affect the hip
muscles as well as the hip joints themselves.
To perform the Windshield Wiper stretch:
1. Begin lying on your back with the legs fully extended and your toes
pointing towards the ceiling (figure 1).
2. From this position, externally rotate the legs so that the feet are
pointing away from each other. Hold this position for 1-2 seconds
(figure 2).
3. Next, internally rotate the legs so the feet are pointing toward each
other. Hold this position for 1-2 seconds (figure 3)
4. NOTE: Although you are moving the feet in and out, this flexibility
exercise is designed to promote rotational mobility at the hips.
Therefore, try to concentrate on rotating the entire leg, and initiating
this motion using the muscles of the hips.
5. Repeat this motion 10 times.
20
www.KinetesisSports.com
Performance FlexibilityTM for Golfers Users’s Guide
Figure 1: starting position
Figure 2: turn the feet outward by
externally rotating the hips
Figure 3: turn the feet inward by internally
rotating the hips
21
www.KinetesisSports.com
Performance FlexibilityTM for Golfers Users’s Guide
Active Trunk Twist
Hold Time: 1-2 seconds
Repetitions: 10
Trunk Position: Does Not Apply
Not only is adequate muscle and joint flexibility in the spine important to develop force
and power during the golf swing, but excessive tightness in the spine can often lead to low
back pain (a common condition among golfers). This next stretch in the Active Flexibility Tract
targets the muscles and joints of the spine and is designed to develop rotation flexibility in the
muscles and joints of this key region.
To perform the Active Trunk Twist:
1. Begin lying on your back with both knees bent and feet flat on
the mat Your arms should be straight and resting on the floor
beside you with the palms facing down (figure 1).
2. In a slow and controlled manner, let the knees fall sideways
toward the floor (figure 2).
3. As you do this, both shoulders should remain flat on the mat. If
you cannot bring the knees all the way to the floor move only as
far as possible without either shoulder lifting off the mat.
4. Hold this stretch position for 1-2 seconds and then pull the legs
toward the mat on the opposite side (figure 3).
5. Repeat this back and forth motion 10 times.
22
www.KinetesisSports.com
Performance FlexibilityTM for Golfers Users’s Guide
Figure 1: starting position
Figure 2: Let the knees drop to the
side towards the mat
Figure 3: Bring the knees towards
the opposite side
23
www.KinetesisSports.com
Performance FlexibilityTM for Golfers Users’s Guide
Active Overhead Reach
Hold Time: 1-2 seconds
Repetitions: 10
Trunk Position: Posterior Pelvic Tilt
Flexibility of the shoulders is essential to having a full backswing, and to properly
swinging the club up and around the body during the follow through. Tightness in the shoulders
restricts proper shoulder motion during the backswing and follow through. This will not only
result in a loss of power during the swing, but will also force other body regions to compensate
for the shoulder restriction. The Active Overhead Reach stretch targets shoulder flexibility
(particularly the Latissimus Dorsi muscle).
To perform the Active Overhead Reach:
1. Begin lying on your back with your knees bent and feet flat on the
mat. With your elbows straight and hands together, rest your arms
on top of your body (figure 1).
2. Keeping your elbows straight and hands together, raise your arms up
overhead until you feel a stretch in your shoulders and upper back
(figure 2).
3. To maintain proper form, do not allow your lower back to arch up off
the mat as you raise the arms overhead (figure 3). To prevent this
from happening, perform a posterior pelvic tilt and hold this pelvic
position for the entire stretch.
4. Hold this stretch position for 1-2 seconds and then return to the
starting position.
5. Repeat the overhead reaching motion 10 times.
24
www.KinetesisSports.com
Performance FlexibilityTM for Golfers Users’s Guide
Figure 1: starting position
Figure 2: Stretch position
Figure 3: Incorrect form - note how the lower
back arches up off the mat
25
www.KinetesisSports.com
Performance FlexibilityTM for Golfers Users’s Guide
Floor Angel
Hold Time: 1-2 seconds
Repetitions: 10
Trunk Position: Posterior Pelvic Tilt
As previously stated, proper shoulder mobility is critical for an effective golf swing. The
Floor Angel stretch will help promote proper flexibility in the shoulder region. In particular, this
stretch will target the chest, shoulder blades, and rotational muscles of the shoulder such as the
rotator cuff muscle group. Adequate rotation is especially important at the rear shoulder during
the backswing, and in the lead shoulder during the follow through.
To perform the Floor Angel:
1. Begin on your back with your knees bent and feet flat on the mat.
Position your arms on the floor beside you with the elbows bent
and palms facing the ceiling (figure 1).
2. From this position, slide the arms up overhead until you feel a
stretch in the chest, shoulders, or upper back. Hold the stretch for
1-2 seconds (figure 2).
3. NOTE: To ensure proper form throughout this movement, only move
the arms up and down as far as possible without allowing the lower
back to arch (figure 3), or the elbows or hands to lose contact with
the mat. To ensure proper form, it is helpful to push the lower back
into the mat by performing a posterior pelvic tilt, and holding this
position throughout the entire movement.
4. Pull the arms back down and bring the elbows back toward the
side of the rib cage while squeezing the shoulder blades together at
the bottom of this motion (figure 4).
5. Repeat this motion 10 times.
26
www.KinetesisSports.com
Performance FlexibilityTM for Golfers Users’s Guide
Figure 1: starting position
Figure 3: incorrect form - note how the
back is arching up off the mat
27
Figure 2: stretch position - arms
overhead
Figure 4: squeeze the shoulder blades
together as you pull the elbows in towards the body
www.KinetesisSports.com
Performance FlexibilityTM for Golfers Users’s Guide
PASSIVE FLEXIBILITY TRACT
28
www.KinetesisSports.com
Performance FlexibilityTM for Golfers Users’s Guide
Figure 4 Stretch
Hold Time: 15-30 seconds
Repetitions: 1
Trunk Position: Anterior Pelvic Tilt
The first stretch in the Passive Flexibility Tract is the figure 4 stretch which targets the deep
external rotator muscles on the back of the hip. Similar to the Open Book Reach and Windshield
Wiper stretches, the Figure 4 stretch will help to promote proper flexibility in the hips. The major
difference is that the Figure 4 stretch specifically targets the deep rotational muscles of hip such as
the Piriformis muscle. In addition, since the passive stretches involve longer holding times, they
target different components of the muscles than the active stretches.
To perform the Figure 4 stretch:
1. Begin lying on your back with knees bent and feet flat on the mat. Cross
the left leg over the right, resting the left ankle on the right knee (figure 1).
2. Keeping the left leg relaxed, lift the right knee toward your chest until you
feel a light pull in the back of the left hip and upper thigh. This stretch
is easier if you use your arms to help pull the thigh towards your chest
(figure 2).
3. NOTE: If you find it difficult to reach the leg with your hands, use a towel or
yoga strap to assist you until your flexibility improves (figure 3).
4. Hold this stretch position for 15-30 seconds then repeat on the opposite
side.
5. NOTE: If you find that your lower back has a tendency to push into the mat
as you pull the thigh towards your chest, this is an indication that motion
is occurring at the lower back instead of the hip. To prevent this, arch your
lower back away from the mat by performing an anterior pelvic tilt. This will
help concentrate the stretch at the hip and protect the back from excessive
movement.
29
www.KinetesisSports.com
Performance FlexibilityTM for Golfers Users’s Guide
Figure 1: starting position - cross 1 leg over
the other
Figure 2: stretch position - pull the thigh
towards your chest
Figure 3: use a towel or yoga strap to assist
you if you cannot reach the leg comfortably
30
www.KinetesisSports.com
Performance FlexibilityTM for Golfers Users’s Guide
Counter-Rotation Stretch
Hold Time: 15-30 seconds
Repetitions: 1
Trunk Position: Does Not Apply
Proper mobility at the hips and shoulders is important for an effective swing. It is important
to realize that the motions of the upper and lower body occur in opposite directions to one
another. These opposing motions create the rotational movement of the spine that is so
important to the golf swing. Since one of the key goals of Performance Flexibility™ for Golfers
is to promote optimal movement, it is important that we incorporate these movements into
the stretching program. The Counter-Rotation stretch does this by stretching the hips and
shoulders in opposing directions, just as these motions occur during the golf swing.
To perform the Counter-Rotation stretch:
1. Begin lying on your back with the knees bent and feet flat on
the mat. From this position cross the left leg over the right, resting the left ankle on the right knee (figure 1).
2. Keeping the right foot in contact with the mat, let the right knee
drop inward towards the mat. To increase the stretch on the
right hip you can use the left leg to pull the right knee further in
toward the mat (figure 2).
3. While maintaining this stretch reach your left arm across your
chest (figure 3).
4. Keeping the elbow straight let the left arm fall toward the floor
by your right side. This will create a counter-rotation movement between the hips and shoulders.
5. To increase the stretch on the left shoulder, pull down on
your left wrist with your right hand while keeping your elbow
straight (figure 4).
6. Hold this stretch for 15-30 seconds and then repeat on the opposite side.
31
www.KinetesisSports.com
Performance FlexibilityTM for Golfers Users’s Guide
32
Figure 1: cross the left ankle over the
right knee
Figure 2: bring the right knee to the
left
Figure 3: Reach the left arm to the
right
Figure 4: pull the left arm down with
the right arm
www.KinetesisSports.com
Performance FlexibilityTM for Golfers Users’s Guide
Seated Trunk Twist
Hold Time: 15-30 seconds
Repetitions: 1
Trunk Position: Does Not Apply
The next stretch in the Passive Flexibility Tract is the Seated Trunk Twist. As with the
Open Book Reach and Active Trunk Twist stretches, the Seated Trunk Twist stretch is designed
to promote rotational mobility in the spine and surrounding muscles. Although these stretches
target similar areas, keep in mind that there are different components of the muscles and
tendons related to flexibility. To target each different component different types of stretches are
required. The Seated Trunk Twist targets the more passive component of the rotational muscles
of the spine, including the Erector Spinae muscles, Multifidi muscles, as well as many of the
joints and ligaments surrounding the spine.
To perform the Seated Trunk Twist:
1. Begin in a seated position with the left leg fully extended and the right
leg bent with the right foot positioned flat on the mat on the outside of the
left leg (figure 1).
2. From this position, reach your left arm forward so it is resting against the
outside of the right knee and place your right hand on the floor behind
you (figure 2).
3. Next, turn your upper body to the right as if you are trying to look behind. As you do this, you should feel a stretch in the back and right hip
.
4. To increase the stretch, gently push against the right knee with your left
arm to further rotate the trunk (figure 3).
5. Hold this stretch for 15-30 seconds and then repeat on the opposite side.
33
www.KinetesisSports.com
Performance FlexibilityTM for Golfers Users’s Guide
Figure 1: Start position
Figure 2: Place the left elbow on your right knee
and your right arm behind your body
Figure 3: Turn your trunk to the right
34
www.KinetesisSports.com
Performance FlexibilityTM for Golfers Users’s Guide
Hurdler’s Stretch
Hold Time: 15-30 seconds
Repetitions: 1
Trunk Position: Anterior Pelvic Tilt
The Hurdler’s stretch targets the hamstring muscles located on the back of the thigh. The
hamstrings are often forgotten muscles in golf, but this muscle group plays an important role
in the golf swing. For example, the hamstrings are very active in stabilizing the lower body and
supporting the forward lean of the trunk during all phases of the swing. As a result of the high
demand on the hamstrings they have a tendency to become tight which will interfere with a
proper swing. Keeping these muscles loose and flexible should not be overlooked.
To perform the Hurdler’s Stretch:
1. Begin in a seated position with the left leg extended out in front
of you and the sole of your right foot resting against the inside of
your left knee (figure 1).
2. From this position, lean your trunk forward until you feel a
stretch in the back of the thigh (figure 2).
3. NOTE: It is important to keep the trunk tall and upright when
leaning the upper body forward to concentrate the stretch at the
hamstring group. To do this, perform an anterior pelvic tilt and
hold this position throughout the stretch.
4. Hold this stretch for 15-30 seconds, then repeat on the opposite
side.
35
www.KinetesisSports.com
Performance FlexibilityTM for Golfers Users’s Guide
Figure 1: starting position
Figure 2: stretch position - note how the back remains straight
36
www.KinetesisSports.com
Performance FlexibilityTM for Golfers Users’s Guide
Kneeling Lunge
Hold Time: 15-30 seconds
Repetitions: 1
Trunk Position: Posterior Pelvic Tilt
The final stretch in the Passive Flexibility Tract is the Kneeling Lunge stretch. This
stretch targets the hip flexor muscle group, particularly the Iliopsoas muscle located deep on
the front of the thigh. Tightness of this muscle not only restricts proper hip extension, but will
also restrict rotation of the hip because of how the muscle attaches to the upper leg. Since this
muscle originates on the lower spine, to fully stretch this muscle, it is important to not only
to stretch to promote hip extension, but also to include a lateral trunk lean in the stretching
motion. This will ensure the muscle is fully stretched from both ends of its origin and insertion.
To perform the Kneeling Lunge stretch:
1. Begin in a kneeling position with the right knee on the mat and the
left foot positioned in front of you (figure 1).
2. Perform a posterior pelvic tilt to ensure proper form. Hold this
posterior pelvic tilt for the entire stretch.
3. Slide your upper body forward by bending your left knee and
pushing forward with your right hip (figure 2).
4. NOTE: As you do this, you should feel a stretch on the front of the
right hip and thigh. It is important that you do not allow the lower
back to arch or the upper body to lean forward during this movement.
Either of these positions will be less effective in stretching the hip
flexors and promoting optimal motion at the hip during the swing.
5. While maintaining the stretch in the hip, reach the right arm up
overhead and grasp the right wrist with the left hand.
6. From this position, lean the upper body to the left while gently
pulling the right arm with the left hand up and over to increase the
stretch (figure 3).
7. Hold this stretch position for 15-30 seconds and then repeat on the
opposite side.
37
www.KinetesisSports.com
Performance FlexibilityTM for Golfers Users’s Guide
Figure 1: start position
Figure 2: stretch position
Figure 3: Reach your right arm overhead and lean
your upper body to the left
38
www.KinetesisSports.com
Performance FlexibilityTM for Golfers Users’s Guide
INTEGRATED FLEXIBILITY TRACT
39
www.KinetesisSports.com
Performance FlexibilityTM for Golfers Users’s Guide
Lateral Sling Stretch
Hold Time: 15-30 seconds
Repetitions: 1
Trunk Position: Posterior Pelvic Tilt
The Integrated Stretch Tract begins with the Lateral Sling stretch. This sling essentially
runs along the entire lateral aspect of the body. The lower portion of this sling begins with
the Peroneal muscle group located on the outside of the lower leg, and continues up to make a
connection at the outer portion of the knee with the Iliotibial band (IT Band). The IT Band is a
thick, strong, fascial band that runs from the outside of the knee up to the hip. As the IT Band
runs up into the hip, it makes a connection with the muscles on the outside of the hip, including
the Gluteus Maximus and Tensor Fascia Latae (TFL). From here, the sling continues as the
muscles of the hip connect with the muscles on the side of the trunk and eventually the shoulder.
Proper flexibility in this sling is important during the downswing and especially the follow
through.
To perform the Lateral Sling stretch:
1. Begin in a standing position and cross your left foot behind your right leg
(figure 1).
2. NOTE: By keeping the foot on an angle so only the outside of your left foot is
in contact with the mat, it will act to place a stretch on the Peroneal muscle
group as the full stretch is executed (figure 2). If you find this difficult, you
may need to keep your foot flat on the mat until you become more familiar
with the stretch and your balance improves enough to maintain the proper
foot alignment.
3. From this position, raise your left arm up overhead and grasp your left
wrist with your right hand (figure 3).
4. Slide your hips to the left while leaning your upper body to the right (figure 4).
5. To place a deeper stretch on the muscles of the shoulder, particularly the
Latissimus Dorsi group, gently pull the left arm with the right hand until
you feel the stretch increase on the outer aspect of your left shoulder.
6. Hold the stretch for 15-30 seconds and repeat on the opposite side.
40
www.KinetesisSports.com
Performance FlexibilityTM for Golfers Users’s Guide
41
Figure 1: starting position
Figure 2: cross the left foot behind the
right leg
Figure 3: raise your left arm up and
grasp the wrist with your opposite hand
Figure 4: slide your hips to the left and
lean your upper body to the right
www.KinetesisSports.com
Performance FlexibilityTM for Golfers Users’s Guide
Anterior Oblique Sling
Hold Time: 15-30 seconds
Repetitions: 1
Trunk Position: Posterior Pelvic Tilt
The next stretch in the Integrated Flexibility Tract targets the Anterior Oblique Sling. This
sling runs diagonally across the front of the body, providing a connection between the upper body
and lower body. The anterior oblique sling includes the adductor muscle group located on one side
of the body and the abdominal oblique and chest muscles located on the opposite side of the body.
As a result of the diagonal orientation of this muscle sling, it is ideally suited for rotational activities
such as the golf swing. Restriction in this sling will restrict the degree of rotation available from
the entire body, which will have a tremendous impact on both the backswing and follow through
phases of the swing.
To perform the Anterior Oblique Sling stretch:
1. Begin in a standing position with your left foot facing straight ahead and
your right foot turned out 90 degrees.
2. Next, Take a wide step to the right (figure 1).
3. From this position, rotate your hips toward the right leg and perform a
posterior pelvic tilt.
4. NOTE: This rotation and posterior pelvic tilt are subtle movements, but when
done properly you should feel a light stretch in the left hip.
5. Holding this pelvic position, bend your right knee and slide your
trunk forward toward your right foot. As you do this, you should feel the
stretch increase in the left hip and groin (figure 2).
6. NOTE: To ensure this stretch is effective, make sure that your knee is positioned
directly over the foot as you slide your upper body toward your right foot. Do
not allow the knee to roll to the inside of the foot (figure 3), and do not allow
the knee to progress beyond the toes. If you are having difficulty with this
stretch, it is an indication that you need to step out further with your right
foot, or you have not positioned the pelvis properly.
7. From this position, reach your left arm across your body and pull back on
the left wrist with the back of your right hand. This will increase the stretch
in the upper portion of the sling (figure 4).
8. Hold this stretch for 15-30 seconds and then repeat on the opposite side.
42
www.KinetesisSports.com
Performance FlexibilityTM for Golfers Users’s Guide
43
Figure 1. Take a wide step to the right.
Figure 2. Bend your right knee and shift your
trunk to the right to stretch your left hip.
Figure 3: incorrect form - note how the knee
does not line up with the foot
Figure 4: Reach your left arm across your
body and pull your left wrist with your right
hand
www.KinetesisSports.com
Performance FlexibilityTM for Golfers Users’s Guide
Lateral Oblique Sling
Hold Time: 15-30 seconds
Repetitions: 1
Trunk Position: Posterior Pelvic Tilt
The Lateral Oblique Sling includes the adductor muscle group on the inside of the
thigh, and the lateral trunk muscles located on the opposite side of the body. This sling is very
important for controlling side-to-side motions of the body, including the degree of side-bending
flexibility of the spine and the right to left sliding of the hips during the golf swing. Excessive
tightness in this sling will restrict the required movements of the spine and hips and interfere
with an optimal swing.
To perform the Lateral Oblique Sling stretch:
1. Begin in a standing position with both feet pointing forward (figure 1).
2. Step out sideways with your right foot. You will need to take a big step for
the stretch to be effective (figure 2).
3. From this position, perform a posterior pelvic tilt. This will stabilize the
lower back and ensure proper form throughout the stretch.
4. Bend the right knee and let your trunk shift towards the right foot (figure
3).
5. From this position reach the right arm up overhead and grasp the right
wrist with the left hand.
6. Keeping the trunk tall and upright, lean the upper body to the left. As you
do this, you should feel the stretch increase in the left thigh, and feel a
stretch on the outside of the right trunk and shoulder (figure 4).
7. Hold the stretch for 15-30 seconds and repeat on the opposite side.
44
www.KinetesisSports.com
Performance FlexibilityTM for Golfers Users’s Guide
Figure 1: starting position
Figure 3: bend the right knee and
shift the body toward the right
45
Figure 2: take a wide step to the
right
Figure 4: reach the right arm overhead and lean the trunk toward the
left
www.KinetesisSports.com
Performance FlexibilityTM for Golfers Users’s Guide
Standing Trunk Rotation
Hold Time: 15-30 seconds
Repetitions: 1
Trunk Position: Does Not Apply
As previously discussed, proper mobility of the trunk and shoulders is essential for a
proper swing. It is not only critical how far the trunk and shoulders can rotate, but also how far
the trunk and shoulders can rotate relative to the hips. This relative rotation between the shoulders and hips is referred to as the “X” factor which plays a critical role in the force development
during the golf swing. To develop a greater “X” factor , it is important to have adequate mobility
of the spine, and to be able to separate the movement of the spine and lower body. The Standing
Trunk Rotation stretch is designed to build this key movement.
To perform the Standing Trunk Rotation stretch:
1. Begin in a standing position with both knees together and bent approximately 45 degrees (figure 1).
2. From this position, rotate the upper body as far as possible to the right
as if you were trying to look at something behind. As you do this, do
not allow the knees to turn or straighten. It is helpful to squeeze the
knees together and concentrate on turning the upper body with the
trunk muscles to prevent this from happening (figure 2).
3. Keeping the left arm straight, reach the left arm across the body.
4. Place the back of the right hand against the back of the left hand and
use the right arm to pull the left arm and trunk further back into rotation - be sure to keep the left arm straight as you do this (figure 3).
5. Hold this stretch for 15-30 seconds and then repeat on the opposite
side.
46
www.KinetesisSports.com
Performance FlexibilityTM for Golfers Users’s Guide
Figure 1: Start position
Figure 2: Without moving your knees turn your upper body to the left
Figure 3: Reach your right arm across your chest and pull on your right wrist with your left hand
47
www.KinetesisSports.com
Performance FlexibilityTM for Golfers Users’s Guide
Follow-Thru Stretch
Hold Time: 15-30 seconds
Repetitions: 1
Trunk Position: Does Not Apply
Balance is a critical aspect of the golf swing. If the body cannot achieve a proper follow
through position, the entire swing will be compromised as the body will subconsciously alter
its movements to match the final follow through position. This last stretch in the Integrated
Flexibility Tract, the Follow-Thru stretch, is specifically designed to improve the body’s ability to
reach your optimal follow through position.
To perform the Follow Through Stretch:
1. From a standing position with the left foot firmly planted on the mat,
turn your hips as far as possible to the left. Be careful to ensure the
entire pelvis has turned and not just the spine. As you do this, you
should feel a stretch in the left hip (figure 1).
2. From this position, reach the right arm up and across the body as if the
arm was executing the follow through phase of the swing (figure 2).
3. Next, place the back of the left hand against the back of the right wrist.
Use the left arm to further pull the right arm up and across the body. It
is important that you keep the right arm straight during this movement.
4. As you complete this stretch, the position of your chest should be facing
left (in reference to the left foot), and you should feel as if your trunk
has coiled around the left planted leg (figure 3).
5. Hold this stretch position for 15-30 seconds and then repeat on the
opposite side.
48
www.KinetesisSports.com
Performance FlexibilityTM for Golfers Users’s Guide
Figure 1: Keep your left foot flat on the and turn your hips toward to the left
Figure 2: Reach your right arm up and across your chest
Figure 3: Pull on the back of your right wrist with your left hand to increase the stretch
49
www.KinetesisSports.com
Performance FlexibilityTM for Golfers Users’s Guide
Performance FlexibilityTM for Golfers Users’s Guide