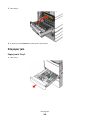
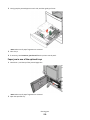
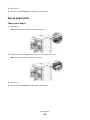
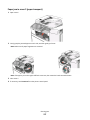
Download User's Guide - 4 Office Technical Support

Transcript
X950 Series
User's Guide
December 2010
Machine type(s):
7558
Model(s):
032, 036, 232, 236, 432, 436
www.lexmark.com
Contents
Safety information.......................................................................................7
Learning about the printer...........................................................................9
Thank you for choosing this printer!.........................................................................................................9
Finding information about the printer......................................................................................................9
Selecting a location for the printer..........................................................................................................10
Printer configurations.............................................................................................................................12
Basic functions of the scanner.................................................................................................................14
Understanding the ADF and scanner glass..............................................................................................15
Understanding the printer control panel................................................................................................16
Understanding the home screen................................................................17
Understanding the home screen.............................................................................................................17
Using the touch-screen buttons..............................................................................................................18
Setting up and using the home screen applications....................................22
Customizing the home screen using the Embedded Web Server...........................................................22
Using the home screen applications.......................................................................................................22
Using Forms and Favorites......................................................................................................................23
Using Scan to Network............................................................................................................................25
Using the Remote Operator Panel..........................................................................................................27
Using My MFP.........................................................................................................................................28
Using WS-Scan.........................................................................................................................................30
Exporting and importing a configuration using the Embedded Web Server...........................................30
Additional printer setup.............................................................................32
Turning on the printer.............................................................................................................................32
Installing internal options........................................................................................................................33
Installing optional trays...........................................................................................................................48
Attaching cables......................................................................................................................................51
Verifying printer setup............................................................................................................................52
Setting up the printer software...............................................................................................................53
Setting up wireless printing.....................................................................................................................54
Installing the printer on a wired network...............................................................................................59
Changing port settings after installing a new network Internal Solutions Port......................................61
Contents
2
Setting up serial printing.........................................................................................................................63
Minimizing your printer's environmental impact........................................65
Saving paper and toner...........................................................................................................................65
Saving energy..........................................................................................................................................66
Recycling..................................................................................................................................................69
Loading paper and specialty media............................................................71
Setting the paper size and type...............................................................................................................71
Configuring Universal paper settings......................................................................................................71
Loading the standard or optional 520-sheet tray....................................................................................72
Loading the optional 850- and 1,150-sheet trays...................................................................................75
Loading the 2000-sheet high-capacity feeder.........................................................................................77
Loading the multipurpose feeder............................................................................................................79
Linking and unlinking trays......................................................................................................................83
Paper and specialty media guidelines.........................................................85
Paper guidelines......................................................................................................................................85
Supported paper sizes, types, and weights.............................................................................................89
Printing......................................................................................................96
Printing a document................................................................................................................................96
Printing from a flash drive.......................................................................................................................98
Printing on specialty media...................................................................................................................100
Printing confidential and other held jobs..............................................................................................102
Printing information pages....................................................................................................................103
Canceling a print job..............................................................................................................................104
Copying....................................................................................................105
Making copies.......................................................................................................................................105
Copying film photos..............................................................................................................................106
Copying on specialty media...................................................................................................................106
Customizing copy settings.....................................................................................................................107
Placing information on copies...............................................................................................................112
Canceling a copy job..............................................................................................................................112
Understanding the copy screens and options.......................................................................................113
Contents
3
E-mailing..................................................................................................116
Getting ready to e-mail.........................................................................................................................116
Creating an e-mail shortcut...................................................................................................................117
E-mailing a document............................................................................................................................118
Customizing e-mail settings...................................................................................................................119
Canceling an e-mail...............................................................................................................................120
Understanding e-mail options...............................................................................................................120
Faxing......................................................................................................123
Getting the printer ready to fax............................................................................................................123
Creating shortcuts.................................................................................................................................129
Sending a fax.........................................................................................................................................130
Customizing fax settings........................................................................................................................132
Canceling an outgoing fax.....................................................................................................................133
Understanding fax options....................................................................................................................134
Holding and forwarding faxes...............................................................................................................136
Scanning to an FTP address......................................................................138
Creating shortcuts.................................................................................................................................138
Scanning to an FTP address...................................................................................................................139
Understanding FTP options...................................................................................................................140
Scanning to a computer or flash drive......................................................143
Scanning to a computer........................................................................................................................143
Scanning to a flash drive........................................................................................................................144
Understanding the Scan Center features..............................................................................................144
Using the ScanBack Utility.....................................................................................................................144
Understanding scan profile options......................................................................................................145
Understanding printer menus...................................................................147
Menus list..............................................................................................................................................147
Supplies menu.......................................................................................................................................148
Paper menu...........................................................................................................................................150
Reports menu........................................................................................................................................161
Network/Ports menu.............................................................................................................................162
Security menu.......................................................................................................................................175
Settings menu........................................................................................................................................180
Contents
4
Help menu.............................................................................................................................................233
Securing the hard disk and other installed memory..................................235
Statement of Volatility..........................................................................................................................235
Erasing volatile memory........................................................................................................................235
Erasing non-volatile memory................................................................................................................236
Erasing printer hard disk memory using the Embedded Web Server...................................................236
Configuring printer hard disk encryption using the Embedded Web Server.........................................237
Maintaining the printer............................................................................238
Cleaning the exterior of the printer......................................................................................................238
Cleaning the scanner glass....................................................................................................................239
Cleaning the printhead lenses...............................................................................................................240
Storing supplies.....................................................................................................................................243
Checking the status of supplies.............................................................................................................244
Ordering supplies..................................................................................................................................244
Replacing Supplies.................................................................................................................................246
Moving the printer................................................................................................................................257
Administrative support............................................................................259
Finding advanced networking and administrator information.............................................................259
Using the Embedded Web Server.........................................................................................................259
Checking the status of the printer.........................................................................................................259
Checking the virtual display...................................................................................................................260
Setting up e-mail alerts.........................................................................................................................260
Viewing reports.....................................................................................................................................260
Restoring factory default settings.........................................................................................................261
Clearing jams............................................................................................262
Avoiding jams........................................................................................................................................262
Understanding jam numbers and locations..........................................................................................263
201–202 paper jams..............................................................................................................................263
203 paper jam.......................................................................................................................................265
230 paper jam.......................................................................................................................................266
231 paper jam.......................................................................................................................................267
24x paper jam........................................................................................................................................269
250 paper jam.......................................................................................................................................271
Contents
5
281 paper jam.......................................................................................................................................272
4yy.xx paper jams..................................................................................................................................274
455 staple jam.......................................................................................................................................278
28y.xx paper jams..................................................................................................................................280
Troubleshooting.......................................................................................281
Understanding printer messages..........................................................................................................281
Solving basic printer problems..............................................................................................................297
Solving printing problems.....................................................................................................................297
Solving copy problems..........................................................................................................................301
Solving scanner problems.....................................................................................................................303
Solving fax problems.............................................................................................................................305
Solving home screen applications problems.........................................................................................309
Solving option problems........................................................................................................................313
Solving paper feed problems.................................................................................................................316
Solving print quality problems..............................................................................................................317
Solving color quality problems..............................................................................................................329
Embedded Web Server does not open.................................................................................................332
Contacting customer support................................................................................................................332
Notices.....................................................................................................333
Product information..............................................................................................................................333
Edition notice........................................................................................................................................333
Power consumption..............................................................................................................................337
Index........................................................................................................351
Contents
6
Safety information
Connect the power cord to a properly grounded electrical outlet that is near the product and easily accessible.
Do not place or use this product near water or wet locations.
This product uses a ground fault circuit interrupter (GFCI). Monthly testing of the GFCI is recommended.
CAUTION—POTENTIAL INJURY: The lithium battery in this product is not intended to be replaced. There is a
danger of explosion if a lithium battery is incorrectly replaced. Do not recharge, disassemble, or incinerate a lithium
battery. Discard used lithium batteries according to the manufacturer's instructions and local regulations.
CAUTION—HOT SURFACE: The inside of the printer might be hot. To reduce the risk of injury from a hot component,
allow the surface to cool before touching.
CAUTION—POTENTIAL INJURY: The printer weight is greater than 18 kg (40 lb) and requires two or more trained
personnel to lift it safely.
CAUTION—POTENTIAL INJURY: Before moving the printer, follow these guidelines to avoid personal injury or
printer damage:
• Turn the printer off using the power switch, and then unplug the power cord from the wall outlet.
• Disconnect all cords and cables from the printer before moving it.
• Lift the printer off the optional drawer, and set it aside instead of trying to lift the drawer and printer at the same
time.
Note: Use the handholds located on both sides of the printer to lift it off the optional drawer.
This product uses a printing process that heats the print media, and the heat may cause the media to release emissions.
You must understand the section in your operating instructions that discusses the guidelines for selecting print media
to avoid the possibility of harmful emissions.
Use only the power cord provided with this product or the manufacturer's authorized replacement.
CAUTION—POTENTIAL INJURY: To reduce risk of fire, use only the telecommunications (RJ-11) cord provided with
this product or a UL Listed 26 AWG or larger replacement when connecting this product to the public switched
telephone network.
CAUTION—SHOCK HAZARD: If you are accessing the system board or installing optional hardware or memory
devices sometime after setting up the printer, then turn the printer off, and unplug the power cord from the wall
outlet before continuing. If you have any other devices attached to the printer, then turn them off as well, and
unplug any cables going into the printer.
CAUTION—SHOCK HAZARD: Make sure that all external connections (such as Ethernet and telephone system
connections) are properly installed in their marked plug-in ports.
This product is designed, tested, and approved to meet strict global safety standards with the use of specific
manufacturer's components. The safety features of some parts may not always be obvious. The manufacturer is not
responsible for the use of other replacement parts.
CAUTION—POTENTIAL INJURY: Do not cut, twist, bind, crush, or place heavy objects on the power cord. Do not
subject the power cord to abrasion or stress. Do not pinch the power cord between objects such as furniture and
walls. If any of these things happen, a risk of fire or electrical shock results. Inspect the power cord regularly for
signs of such problems. Remove the power cord from the electrical outlet before inspecting it.
Refer service or repairs, other than those described in the user documentation, to a professional service person.
Safety information
7
CAUTION—SHOCK HAZARD: To avoid the risk of electric shock when cleaning the exterior of the printer, unplug
the power cord from the wall outlet and disconnect all cables from the printer before proceeding.
CAUTION—SHOCK HAZARD: Do not use the fax feature during a lightning storm. Do not set up this product or
make any electrical or cabling connections, such as the fax feature, power cord, or telephone, during a lightning
storm.
CAUTION—POTENTIAL INJURY: To reduce the risk of equipment instability, load each paper drawer or tray
separately. Keep all other drawers or trays closed until needed.
CAUTION—TIPPING HAZARD: Floor-mounted configurations require additional furniture for stability. You must
use either a printer stand or printer base if you are using a high-capacity input tray, a duplex unit and an input
option, or more than one input option. If you purchased a multifunction printer (MFP) that scans, copies, and faxes,
you may need additional furniture. For more information, contact the place where you purchased the printer.
SAVE THESE INSTRUCTIONS.
Safety information
8
Learning about the printer
Thank you for choosing this printer!
We've worked hard to make sure it will meet your needs.
To start using your new printer right away, use the setup materials that came with the printer, and then skim the User’s
Guide to learn how to perform basic tasks. To get the most out of your printer, read the User’s Guide carefully, and
make sure you check the latest updates on our Web site.
We're committed to delivering performance and value with our printers, and we want to make sure you're satisfied. If
you do encounter any problems along the way, one of our knowledgeable support representatives will be delighted to
help you get back on track fast. And if you find something we could do better, please let us know. After all, you are the
reason we do what we do, and your suggestions help us do it better.
Finding information about the printer
What are you looking for?
Find it here
Initial setup instructions:
Setup documentation—The setup documentation came
with the printer and is also available on the Lexmark Web
site at http://support.lexmark.com.
• Connecting the printer
• Installing the printer software
Additional setup and instructions for using the printer:
•
•
•
•
•
•
User's Guide—The User's Guide is available on the
Software and Documentation CD.
Selecting and storing paper and specialty media
For updates, check our Web site at
http://support.lexmark.com.
Loading paper
Configuring printer settings
Viewing and printing documents and photos
Setting up and using the printer software
Configuring the printer on a network (depending on your
printer model)
• Caring for and maintaining the printer
• Troubleshooting and solving problems
Instructions for:
Networking Guide— Open the Software and
• Installing the printer using Guided or Advanced wireless setup Documentation CD, and then look for Printer and
Software Documentation under the Pubs folder. From
• Connecting the printer to an Ethernet or a wireless network
the list of publications, click the Networking Guide link.
• Troubleshooting printer connection problems
Learning about the printer
9
What are you looking for?
Find it here
Help using the printer software
Windows or Mac Help—Open a printer software program
or application, and then click Help.
Click
to view context-sensitive information.
Notes:
• The Help installs automatically with the printer
software.
• The printer software is located in the printer
Program folder or on the desktop, depending on
your operating system.
Latest supplemental information, updates, and technical support: Lexmark Support Web site—
http://support.lexmark.com
• Documentation
•
•
•
•
Note: Select your country or region, and then select your
product to view the appropriate support site.
Driver downloads
Live chat support
Support telephone numbers and hours of operation for
your country or region can be found on the Support Web
site or on the printed warranty that came with your
printer.
E-mail support
Telephone support
Record the following information (located on the store
receipt and at the back of the printer), and have it ready
when you contact support so they may serve you faster:
•
•
•
•
Warranty information
Machine Type number
Serial number
Date purchased
Store where purchased
Warranty information varies by country or region:
• In the US—See the Statement of Limited Warranty
included with this printer, or at
http://support.lexmark.com.
• In other countries and regions—See the printed
warranty that came with your printer.
Selecting a location for the printer
CAUTION—POTENTIAL INJURY: The printer weight is greater than 18 kg (40 lb) and requires two or more trained
personnel to lift it safely.
When selecting a location for the printer, leave enough room to open trays, covers, and doors. If you plan to install any
options, then leave enough room for them too. It is important to:
• Set up the printer near a properly grounded and easily accessible electrical outlet.
• Make sure airflow in the room meets the latest revision of the ASHRAE 62 standard or the CEN Technical Committee
156 standard.
• Provide a flat, sturdy, and stable surface.
Learning about the printer
10
• Keep the printer:
– Away from the direct airflow of air conditioners, heaters, or ventilators
– Free from direct sunlight, humidity extremes, or temperature fluctuations
– Clean, dry, and free of dust
• Allow the following recommended amount of space around the printer for proper ventilation:
1
100 mm (4 in.)
2
610 mm (24 in.)
3
385 mm (15 in.)
4
100 mm (4 in.)
5
100 mm (4 in.)
Learning about the printer
11
Printer configurations
Basic model
1
Automatic Document Feeder (ADF)
2
ADF input tray
3
ADF exit bin
4
Printer control panel
5
Standard exit bin
6
Standard 520-sheet tray
7
Multipurpose feeder
Learning about the printer
12
Configured models
You can configure your basic printer by adding optional trays. A 2,000-sheet high-capacity feeder and a finisher bin can
also be added.
1
Exit tray 2
Note: Exit tray 2 is applicable to any configurations except when a finisher is installed.
2
Optional 520-sheet tray (Tray 2)
3
Optional 520-sheet tray (Tray 2)
4
Optional 520-sheet tray (Tray 2)
5
Optional 2,000-sheet tandem-tray module
• 850-sheet tray (Tray 3)
• 1,150-sheet tray (Tray 4)
Learning about the printer
13
Fully configured model
1
Finisher bin
The finisher bin can either be one of the following two options:
• Standard finisher (Punch/Stapler)
• Booklet finisher (Punch/Stapler/Booklet)
2
2,000-sheet high-capacity feeder
CAUTION—TIPPING HAZARD: Floor-mounted configurations require additional furniture for stability. You must
use either a printer stand or printer base if you are using a high-capacity input tray, a duplex unit and an input
option, or more than one input option. If you purchased a multifunction printer (MFP) that scans, copies, and faxes,
you may need additional furniture. For more information, see www.lexmark.com/multifunctionprinters.
Basic functions of the scanner
The scanner provides copy, fax, and scan-to-network capability for large workgroups. You can:
•
•
•
•
•
Make quick copies, or change the settings on the printer control panel to perform specific copy jobs.
Send a fax using the printer control panel.
Send a fax to multiple fax destinations at the same time.
Scan documents and send them to your computer, an e-mail address, a flash drive, or an FTP destination.
Scan documents and send them to another printer (PDF by way of FTP).
Learning about the printer
14
Understanding the ADF and scanner glass
Automatic Document Feeder (ADF)
Scanner glass
Use the ADF for multiple-page documents. Use the scanner glass for single pages, small items (such as postcards or photos),
transparencies, photo paper, or thin media (such as magazine clippings).
You can use the ADF or the scanner glass to scan documents.
Using the ADF
The ADF can scan multiple pages including duplex (two-sided) pages. When using the ADF:
Note: Duplex scanning is available only in select printer models.
•
•
•
•
•
Load the document into the ADF faceup, short edge first.
Load up to 100 sheets of plain paper into the ADF.
Scan sizes from 125 x 216 mm (4.9 x 8.5 in.) wide to 127 x 356 mm (5 x 14 in.) long.
Scan media weights from 52 to 120 g/m2 (14 to 32 lb).
Do not load postcards, photos, small items, transparencies, photo paper, or thin media (such as magazine clippings)
into the ADF. Place these items on the scanner glass.
Using the scanner glass
The scanner glass can be used to scan or copy single pages or book pages. When using the scanner glass:
• Place a document facedown on the scanner glass in the corner with the green arrow.
• Scan or copy documents up to 215.9 x 355.6 mm (8.5 x 14 in.).
• Copy books up to 12.7 mm (0.5 in.) thick.
Learning about the printer
15
Understanding the printer control panel
Item
Description
1
Display
2
Indicator light
3
Sleep
Shows the status of the printer, and allows printer setup and operation
•
•
•
•
Off—The printer is off.
Blinking green—The printer is warming up, processing data, or printing.
Solid green—The printer is on, but idle.
Blinking red—The printer requires operator intervention is needed.
Enables Sleep Mode or Hibernate Mode
The following are the statuses of the indicator light and the Sleep button:
• Entering or waking from Sleep Mode—The indicator light is illuminated solid green, Sleep button
is unilluminated.
• Operating in Sleep Mode—The indicator light is illuminated solid green, Sleep button is
illuminated solid amber.
• Entering or waking from Hibernate Mode—The indicator light is illuminated solid green, Sleep
button is illuminated blinking amber.
• Operating in Hibernate Mode—The indicator light is unilluminated, Sleep button is blinking
amber for 1/10 of a second, then go completely unilluminated for 1.9 seconds in pulsing pattern.
The following actions wake the printer from Sleep Mode:
•
•
•
•
Touching the screen or any hard button presses.
Opening an input tray, cover, or door.
Sending a print job from the computer.
Performing a Power On Reset (POR) with the main power switch.
4
Keypad
Lets you enter numbers, letter, or symbols
5
Submit
Lets you submit changes made in the printer settings
6
Stop/Cancel
Stops all printer activity
Note: A list of option is displayed once Stopped appears on the display.
7
Home
Lets you navigate back to the home screen
Learning about the printer
16
Understanding the home screen
When the printer is turned on, the display shows a basic screen, referred to as the home screen. Touch the home screen
buttons and icons to initiate an action such as copying, faxing, or scanning; to open the menu screen; or to respond to
messages.
Note: Your home screen, icons, and buttons may vary depending on your home screen customization settings,
administrative setup, and active embedded solutions.
Touch
To
Copy
Access the Copy menus and make copies.
E-mail
Access the E-mail menus and send e-mails.
Fax
Access the Fax menus and send fax.
Access the printer menus.
Note: These menus are available only when the printer is in the Ready state.
FTP
Access the File Transfer Protocol (FTP) menus and scan documents directly to an FTP server.
Status message bar
• Show the current printer status such as Ready or Busy.
• Show printer conditions such as Toner Low or Cartridge Low.
• Show intervention messages so the printer can continue processing.
Status/Supplies
• Display a warning or error message whenever the printer requires intervention to continue
processing.
• Access the messages screen for more information on the message, and how to clear it.
USB or USB Thumbdrive View, select, print, scan, or e-mail photos and documents from a flash drive.
Note: This button appears only when you return to the home screen while a memory card or flash
drive is connected to the printer.
Bookmarks
Create, organize, and save a set of bookmarks (URL) into a tree view of folders and file links.
Note: The tree view supports only bookmarks created from this function, and not from any other
application.
Held Jobs
Display all current held jobs.
Understanding the home screen
17
Other buttons that may appear on the home screen:
Touch
To
Search held jobs
Search on any of the following items:
•
•
•
•
•
Release Held Fax
User name for held or confidential print jobs
Job names for held jobs, excluding confidential print jobs
Profile names
Bookmark container or print job names
USB container or print job names for supported file types
Access the list of held faxes.
Note: This button appears only when there are held faxes with a
scheduled hold time previously set.
Lock Device
Open a password entry screen. Enter the correct password to lock the
printer control panel.
Note: This button appears only when the printer is unlocked and
password has been set.
Unlock Device
Open a password entry screen. Enter the correct password to unlock
the printer control panel.
Note: This button appears only when the printer is locked. The printer
control panel buttons and shortcuts cannot be used while this appears.
Cancel Jobs
Open the Cancel Jobs screen. The Cancel Jobs screen shows three
headings: Print, Fax, and Network.
The following options are available under the Print, Fax, and Network
headings:
•
•
•
•
•
Print job
Copy job
Fax profile
FTP
E-mail send
Each heading has a list of jobs shown in a column under it which can
show only three jobs per screen. If more than three jobs exist in a
column, then an arrow appears enabling you to scroll through the jobs.
Change Language
Launch the Change Language pop-up window that allows you to change
the primary language of the printer.
Using the touch-screen buttons
Note: Your home screen, icons, and buttons may vary depending on your home screen customization settings and
administrative setup.
Understanding the home screen
18
Sample touch screen
Touch
To
Submit
Submit changes made in the printer settings.
Sample Copy
Print a sample copy.
Right arrow
Scroll to the right.
Left arrow
Scroll to the left.
Home
Return to the home screen.
Right increase Select a higher value.
Left decrease Select a lower value.
Exit
Exit from the current screen.
Understanding the home screen
19
Touch
To
Tips
Open a context-sensitive Help dialog on the touch screen.
Other touch-screen buttons
Touch
To
Accept
Save a setting.
Cancel
• Cancel an action or a selection.
• Exit a screen and lets you return to the previous screen without saving changes.
Reset
Reset values on the screen.
Radio button
Select or clear an item.
Features
Feature
Description
Menu trail line:
Menus > Settings > Copy Settings >
Number of Copies
A menu trail line is located at the top of each menu screen. This feature shows the
path taken to arrive at the current menu.
Touch any of the underlined words to return to that menu.
Number of Copies is not underlined since this is the current screen. If you touch an
underlined word on the Number of Copies screen before the Number of Copies is
set and saved, then the selection is not saved, and it does not become the default
setting.
Attendance message alert
If an attendance message affects a function, then this icon appears and the red
indicator light blinks.
Understanding the home screen
20
Feature
Description
Warning
If an error condition occurs, then this icon appears.
Understanding the home screen
21
Setting up and using the home screen applications
Customizing the home screen using the Embedded Web Server
Accessing the Embedded Web Server
To access the Embedded Web Server, type your printer IP address or host name in the address field of your Web
browser.
Note: If you do not know the IP address or host name of the printer, then you can:
• View the information on the printer control panel home screen, or in the TCP/IP section under the Network/Ports
menu.
• Print a network setup page or menu settings page, and then locate the information in the TCP/IP section.
Customizing the home screen
1 From the Embedded Web Server, click Settings > General Settings > Home screen customization.
2 Select the home screen application to be displayed.
Note: You can also clear the check box to hide the home screen application.
3 Click Submit.
Note: If the application is not listed, then access the application configuration settings by clicking Settings > Device
Solutions > Solutions (eSF) > name of the application.
Using the home screen applications
Note: Your home screen, icons and buttons may vary depending on your home screen customization settings,
administrative setup, and active embedded applications. Some applications are supported only on select printer models.
Touch
Forms and Favorites
To
• Access frequently used forms and bookmarks.
• Create your own index of forms, information sheets, and other materials you
print often.
To print a form, see “Printing forms” on page 25.
Setting up and using the home screen applications
22
Touch
To
Scan to Network
Scan your documents to specified network destinations.
Note: If the application icon does not appear on the printer home screen, then you
need to set up the application.
My MFP
Customize your touch-screen settings, and then store these preferences on a flash
drive. Each time you insert your flash drive into the USB port of a printer that
supports My MFP, your preferred settings are automatically loaded.
Note: The application icon appears only when a flash drive with My MFP settings is
inserted into the USB port of the printer.
WS-Scan
Scan your documents to a specified Windows-based application.
Note: This application is available only for network printers and computers that
support Microsoft Web Services.
Using Forms and Favorites
The Forms and Favorites application provides users with quick and easy access to frequently used forms or other
information that is regularly printed.
The Bookmark function is used to create a link to a form or electronic file at a predetermined URL or network location.
These files are then accessed only from the Forms and Favorites icon, and not from any other application.
When adding bookmarks from the printer Embedded Web Server, more configuration options are available than when
adding bookmarks from the printer control panel.
Setting up and using the home screen applications
23
Changing the display icon and label
You can change the icon and associated text that appear on the printer home screen. If you do not want to use the
default icon for an application, then you can import new icons to be used for both the pressed and unpressed button
states.
Note: For information about compatible image file types and recommended file sizes, see the mouse-over help next
to each field.
1 From the Embedded Web Server, click Settings or Configuration.
2 Click Device Solutions > Solutions (eSF), or click Embedded Solutions.
3 Click the name of the application > Configure.
4 From the Home Screen Button section, you can:
• Specify a new icon text or label to be displayed above the icon on the home screen.
• Click Browse to select a new icon image file to represent the application on the home screen.
• Click Browse to select a new image file to be displayed while the application icon is being pressed.
5 Click Apply to save the settings or Reset to return to the previous settings.
Adding bookmarks using the printer control panel
Note: Bookmarks added from the printer control panel must be edited from the printer Embedded Web Server.
1 From the printer control panel, navigate to:
Forms and Favorites > Create Bookmark
2 Enter a name for the new bookmark, and then touch Enter.
This name will be displayed in the Forms menu when selecting a form to print.
3 Select Network, FTP, HTTP, or HTTPS to specify the network location or the protocol of the bookmark, and then
touch Submit.
4 Choose an authentication option, or enter the URL or network location of the form.
Note: The printer does not verify the validity of the URL or network location. Make sure the location is entered
correctly.
5 Touch
.
Adding bookmarks using the Embedded Web Server
1 From the Embedded Web Server, click Settings or Configuration.
2 Click Device Solutions > Solutions (eSF), or click Embedded Solutions.
3 Click the name of the application, and then click Add under the Bookmarks field.
Note: You can also edit or delete a bookmark.
4 In the Name field, type a new bookmark name.
5 From the Location list, select the protocol or specify if it is located in a network folder. You may choose Network,
FTP, HTTP, or HTTPS.
Setting up and using the home screen applications
24
6 In the PIN field, type a four-digit number. This field is optional and will require users to enter a PIN when printing
the bookmark.
7 Type the network address, the network domain name, the port, or the URL based on the location of the bookmark
specified in Step 4.
8 Under Authentication Options, select whether to require user authentication for this destination. The credentials
are used to access the network destination.
9 In the sections that follow, adjust the settings as necessary:
• Select check boxes to allow users to modify settings.
• Use radio buttons and drop-down menus to specify the default settings.
10 Click Apply to save the new bookmark.
Printing forms
From the home screen, navigate to:
Forms and Favorites > select the form from the list > enter the number of copies > adjust other settings > Submit
Using Scan to Network
Scan to Network lets users of a printer scan their documents to network destinations specified by the network
administrator. After the destinations (shared network folders) have been established on the network, the setup process
for the application involves installing and configuring the application on the appropriate printer(s) using the Embedded
Web Server.
Supported operating systems
For the application to work, the network destination must use any of the following operating systems:
• Using Network Share
– Microsoft Windows Vista Ultimate Edition
– Microsoft Windows 7 Ultimate
– Microsoft Windows 7 Ultimate x64 Edition
– Microsoft Windows Server Professional 2008
– Microsoft Windows Server 2008 x64 Edition
– Microsoft Windows Server 2003 Standard Edition SP1 or R2
– Microsoft Windows XP Professional SP2
– Microsoft Windows 2000 Professional SP4
– Microsoft Windows 2000 SP4
• Using File Transfer Protocol (FTP)
– Microsoft Windows Vista Ultimate Edition
– Microsoft Windows 7 Ultimate
– Microsoft Windows 7 Ultimate x64 Edition
– Microsoft Windows Server Professional 2008
– Microsoft Windows Server 2008 x64 Edition
Setting up and using the home screen applications
25
–
–
–
–
–
–
–
Microsoft Windows Server 2003 Standard Edition SP1 or R2
Microsoft Windows XP Professional SP2
Microsoft Windows 2000 Professional SP4
Microsoft Windows 2000 SP4
Red Hat Linux Enterprise Edition
Sun Solaris 10
Novell OES Linux SUSE 9
• Using Distributed File System (DFS) environment
– Stand-alone DFS
– Domain-based DFS
– Domain based DFS with one child domain used for authentication
Configuring the display icon and label
1 From the Embedded Web Server, click Settings or Configuration.
2 Click Device Solutions > Solutions (eSF), or click Embedded Solutions.
3 Click the name of the application > Configure.
4 From the Home Screen Button section, you can:
• Specify a new icon text or label to be displayed above the icon on the home screen.
• Click Browse to select a new icon image file to represent the application on the home screen.
• Click Browse to select a new image file to be displayed while the application icon is being pressed.
• Select Always show button to make the icon appear on the home screen even when there is no valid destination.
5 Click Apply to save the settings or Reset to return to the previous settings.
Configuring a destination using the Embedded Web Server
1 From the Embedded Web Server, click Settings or Configuration.
2 Click Device Solutions > Solutions (eSF), or click Embedded Solutions.
3 Click the name of the application > Configure > Add.
Note: You can also edit or delete existing destinations.
4 Type a name for the destination.
5 Select Network Folder or FTP Address, and then configure the selected destination.
6 Under Authentication Options, select whether or not to require user authentication for this destination. The
credentials are used to access the network destination.
7 In the sections that follow, adjust the settings as necessary:
• Select check boxes to allow users to modify settings.
• Use radio buttons and drop-down menus to specify the default settings.
8 Click OK.
Setting up and using the home screen applications
26
9 Repeat steps step 3 on page 26 through step 8 on page 26 to add, edit, or delete destinations.
10 Click Apply.
Scanning documents at the printer
1 Load the document into the scanner.
Note: Documents may be loaded into the scanner in multiple ways. For information on the different methods of
loading documents into the scanner, see the User's Guide that came with the printer.
2 Touch the application icon.
3 Select the destination where you want to receive the scanned document.
Note: After steps 2 or 3, you may be required to enter the user name and password used to access the printer
depending on how the printer and the particular destination are configured. Contact your system support person
for login information.
4 Some additional job options may be available depending on how the application has been configured. Follow the
instructions on the screen to update the options. Contact your system support person for more information on
each option.
5 Touch Scan It or Send It. Depending on how the application has been configured, you may have the option to
preview and make adjustments to scanned pages.
6 To scan additional documents, load the next document into the scanner and select one of the following from the
confirmation screen:
• Touch Yes, to same destination to scan the document to the previous destination.
• Touch Yes, to a different destination to scan the document to a different destination.
• Touch No to finish the operation and return to the printer Home screen.
Using the Remote Operator Panel
The Remote Operator Panel application lets you remotely access the printer control panel display using the Embedded
Web Server.
Setting up the Remote Operator Panel
1 From the Embedded Web Server, click Settings or Configuration.
2 Click Device Solutions > Solutions (eSF), or click Embedded Solutions.
3 Select the name of the application, and then select the Enabled check box.
4 From the Authentication Type menu, select an authentication type.
Note: The Remote Management Access Control works only with the Remote Operator Panel Applet.
5 If you selected VNC Password Authentication as the authentication type, then enter a password in the VNC Password
field.
6 If you want to use SSL/TLS for data encryption, then select the Secure Connection check box.
7 Click Apply.
Setting up and using the home screen applications
27
Remotely accessing the printer control panel using the Embedded Web Server
Note: This feature is available only on printers installed with the Remote Operator Panel application.
1 From the Embedded Web Server, click Applications > Remote Operator Panel.
2 Click Launch VNC Applet > Click here to continue.
A dialog appears, remotely showing a dynamic display of the printer control panel in its current state.
3 From the lower left side, refer to the keyboard key equivalent for each of the printer button commands.
Note: The location of the keyboard key equivalent may differ depending on the printer model.
Using My MFP
My MFP lets you customize your printer touch screen interface, and then store those preferences on a flash drive. Each
time the flash drive is inserted into the printer USB port, your preferences will be displayed. My MFP can save job
preferences, home screen preferences, and imported address book files.
Using My MFP Setup Wizard
1 Insert a flash drive into your printer USB port.
The contents of the drive appears on the display.
2 Touch Back to return to the home screen.
Note: Your system support person can configure the My MFP Setup Wizard to launch automatically the first time
you insert your flash drive. If the setup wizard launches automatically, then skip to Step 3.
3 From the home screen, touch Run My MFP Setup Wizard.
4 Select Yes, setup my preferences, and then touch OK.
Note: If you choose No at this step, then you will not be prompted to set up My MFP in the future when you insert
the same flash drive into a printer. If you change your mind and later wish to set up My MFP, then you will need
to manually delete all .mymfp files from the flash drive. For more information, see “Deleting My MFP data from
your USB drive” on page 29.
5 Enter your name, and then touch OK.
6 You can choose to enter your e-mail address, and then touch OK.
If you do not wish to include an e-mail address in your profile, then touch Skip.
7 Enter a password for your profile, and then touch OK.
If you do not wish to use a password with your profile, then touch Skip.
8 If necessary, enter the password again, and then touch OK.
Customizing My MFP settings
1 From the home screen, touch My MFP Configuration.
2 Touch the arrows to select which options to configure.
Setting up and using the home screen applications
28
You can:
•
•
•
•
•
•
•
•
Select home screen icons.
Import an image for home screen wallpaper.
Import one or more address books.
Set preferences for Copy, Fax, E-mail, Scan to USB, and FTP functions.
Edit your name.
Password-protect your data.
Add or edit your e-mail address.
Remove the My MFP profile from your flash drive.
Using My MFP
My MFP lets you use the printer with a personalized profile. Each time you insert your flash drive into the USB port of
a printer that supports My MFP, your preferred settings are automatically loaded.
1 Insert your flash drive into the USB port.
If you have set password-protect for your profile, then enter your password to continue.
2 Select the function you want to use.
If individual functions such as print, copy, or fax are protected by a password or PIN, then you must enter the correct
credentials to use those functions.
3 When you are finished, remove your flash drive from the printer.
Deleting My MFP data from your USB drive
Using the My MFP interface
1 Touch My MFP Configuration.
2 From the Welcome screen use the arrows to scroll through the list of options until you see Remove My MFP data
from the drive.
3 Touch Remove My MFP data from the drive.
4 Select Delete profile, and touch Save Setting to clear your My MFP settings from your USB drive.
Manually deleting the data
1 Insert your USB drive into a computer.
2 Locate all files beginning with .mymfp (they will be grouped together).
3 Delete all files beginning with .mymfp.
Setting up and using the home screen applications
29
Using WS-Scan
The Web Services - Scan application lets you scan documents at the printer, and then send the scanned image to your
computer. This application is available only for network printers and computers that support Microsoft Web Services.
To scan documents at the printer, see “Scanning documents at the printer” on page 27.
Setting up WS-Scan
1 From the computer screen, click
, or click Start and then click Run.
2 In the Start Search or Run box, type control printers.
3 Press Enter, or click OK.
4 Click Add a printer, and then select Add a network, wireless or Bluetooth printer.
Note: The wireless or Bluetooth connection is available only on select printer models.
5 Select the printer that you want to have WS-Scan enabled, and then click Next.
If the printer is not listed, then you can search for the printer using its IP address. If you do not know the IP address
of the printer, then you can:
• View the information on the printer control panel home screen, or in the TCP/IP section under the
Networks/Ports menu.
• Print a network setup page or menu settings page and locate the information in the TCP/IP section.
6 Follow the instructions on the computer screen.
Exporting and importing a configuration using the Embedded
Web Server
You can export configuration settings into a text file that can then be imported and used to apply the settings to one
or more additional printers.
Exporting a configuration
1 From the Embedded Web Server, click Settings or Configuration.
2 Click Device Solutions > Solutions (eSF), or click Embedded Solutions.
3 From Installed Solutions, click the name of the application you want to configure.
4 Click Configure > Export.
5 Follow the instructions on the computer screen to save the configuration file, and then enter a unique file name or
use the default name.
Note: If a JVM Out of Memory error occurs, then repeat the export until the configuration file is saved.
Importing a configuration
1 From the Embedded Web Server, click Settings or Configuration.
2 Click Device Solutions > Solutions (eSF), or click Embedded Solutions.
Setting up and using the home screen applications
30
3 From Installed Solutions, click the name of the application you want to configure.
4 Click Configure > Import.
5 Browse to the saved configuration file, and then load or preview it.
Note: If a timeout occurs and a blank screen appears, then refresh the browser, and then click Apply.
Setting up and using the home screen applications
31
Additional printer setup
Turning on the printer
1 Open the front door.
2 Press the printer power switch.
3 Close the front door.
Additional printer setup
32
Installing internal options
CAUTION—SHOCK HAZARD: If you are accessing the system board or installing optional hardware or memory
devices sometime after setting up the printer, then turn the printer off, and unplug the power cord from the wall
outlet before continuing. If you have any other devices attached to the printer, then turn them off as well, and
unplug any cables going into the printer.
Available internal options
• Memory cards
– Printer memory
– Flash memory
– Fonts
• Firmware cards
– Bar Code
– PrintCryptionTM
• Printer hard disk
Accessing the system board
CAUTION—SHOCK HAZARD: If you are accessing the system board or installing optional hardware or memory
devices sometime after setting up the printer, then turn the printer off, and unplug the power cord from the wall
outlet before continuing. If you have any other devices attached to the printer, then turn them off as well, and
unplug any cables going into the printer.
Note: This task requires a flathead screwdriver.
1 Turn the screws counterclockwise to loosen them.
Additional printer setup
33
2 Pull the system board forward to remove it.
3 Use the following illustration to locate the appropriate connectors.
Warning—Potential Damage: System board electronic components are easily damaged by static electricity. Touch
something metal on the printer before touching any system board electronic components or connectors.
1
ISP connector
2
Firmware and flash memory card connectors
3
Memory card connectors
4 Reattach the system board cover.
Additional printer setup
34
Installing a memory card
CAUTION—SHOCK HAZARD: If you are accessing the system board or installing optional hardware or memory
devices sometime after setting up the printer, then turn the printer off, and unplug the power cord from the wall
outlet before continuing. If you have any other devices attached to the printer, then turn them off as well, and
unplug any cables going into the printer.
Warning—Potential Damage: System board electronic components are easily damaged by static electricity. Touch
something metal on the printer before touching any system board electronic components or connectors.
An optional memory card can be purchased separately and attached to the system board.
1 Access the system board.
For more information, see “Accessing the system board” on page 33.
Note: This task requires a flathead screwdriver.
2 Unpack the memory card.
Note: Avoid touching the connection points along the edge of the card.
3 On the system board, open the memory card connector latches.
Additional printer setup
35
4 Align the notches on the memory card to the ridges on the connector.
1
Notch
2
Ridge
5 Push the memory card straight into the connector until it clicks into place.
6 Reattach the system board cover.
Additional printer setup
36
Installing a flash memory or firmware card
The system board has two connections for an optional flash memory or firmware card. Only one of each may be installed,
but the connectors are interchangeable.
CAUTION—SHOCK HAZARD: If you are accessing the system board or installing optional hardware or memory
devices sometime after setting up the printer, then turn the printer off, and unplug the power cord from the wall
outlet before continuing. If you have any other devices attached to the printer, then turn them off as well, and
unplug any cables going into the printer.
Warning—Potential Damage: System board electronic components are easily damaged by static electricity. Touch
something metal on the printer before touching any system board electronic components or connectors.
1 Access the system board.
For more information, see “Accessing the system board” on page 33.
Notes:
• This task requires a flathead screwdriver.
• Do not unplug the fan cable upon opening the metal panel.
2 Unpack the card.
Note: Avoid touching the connection points along the edge of the card.
3 Holding the card by its sides, align the plastic pins on the card with the holes on the system board.
1
Plastic pins
2
Metal pins
Additional printer setup
37
4 Push the card firmly into place.
Notes:
• The entire length of the connector on the card must touch and be flush against the system board.
• Be careful not to damage the connectors.
5 Reattach the system board cover.
Installing an Internal Solutions Port
The system board supports one optional LexmarkTM Internal Solutions Port (ISP).
Note: This task requires a flathead screwdriver.
CAUTION—SHOCK HAZARD: If you are accessing the system board or installing optional hardware or memory
devices sometime after setting up the printer, then turn the printer off, and unplug the power cord from the wall
outlet before continuing. If you have any other devices attached to the printer, then turn them off as well, and
unplug any cables going into the printer.
Warning—Potential Damage: System board electronic components are easily damaged by static electricity. Touch
something metal on the printer before touching any system board electronic components or connectors.
1 Access the system board.
For more information, see “Accessing the system board” on page 33.
2 Remove the printer hard disk.
For more information, see “Removing a printer hard disk” on page 46
Additional printer setup
38
3 Unpack the ISP kit.
1
ISP solution
2
Screws for the ISP solution
3
Screws for the plastic bracket
4
Plastic bracket
4 Use the provided screws to attach the plastic bracket to the ISP solution.
Additional printer setup
39
5 Use the provided screw to attach the ISP solution to the system board cage.
6 Connect the ISP solution interface cable into the receptacle of the system board.
Additional printer setup
40
7 Firmly connect the ISP solution to the system board cage using two screws.
Installing a printer hard disk
Note: This task requires a flathead screwdriver.
CAUTION—SHOCK HAZARD: If you are accessing the system board or installing optional hardware or memory
devices sometime after setting up the printer, then turn the printer off, and unplug the power cord from the wall
outlet before continuing. If you have any other devices attached to the printer, then turn them off as well, and
unplug any cables going into the printer.
Warning—Potential Damage: System board electronic components are easily damaged by static electricity. Touch
something metal on the printer before touching any system board electronic components or connectors.
1 Access the system board.
For more information, see “Accessing the system board” on page 33.
2 Unpack the printer hard disk.
Additional printer setup
41
3 Locate the appropriate connector on the system board.
Note: If an optional ISP is currently installed, then the printer hard disk must be installed onto the ISP.
To install a printer hard disk onto the ISP:
a Using a flathead screwdriver, loosen the screws.
b Remove the screws attached to the printer hard disk mounting bracket, and then remove the bracket.
Additional printer setup
42
c Align the standoffs of the printer hard disk to the holes in the ISP, and then press down on the printer hard disk
until the standoffs are in place.
d Insert the plug of the printer hard disk interface cable into the receptacle of the ISP.
Note: The plugs and receptacles are color-coded.
Additional printer setup
43
To install a printer hard disk directly on the system board:
a Align the standoffs of the printer hard disk to the holes in the system board, and then press down on the printer
hard disk until the standoffs are in place.
b Use the two provided screws to attach the printer hard disk mounting bracket.
c Insert the plug of the printer hard disk interface cable into the receptacle of the system board.
Note: The plugs and receptacles are color-coded.
Additional printer setup
44
4 Reattach the system board cover.
Additional printer setup
45
Removing a printer hard disk
Note: This task requires a flathead screwdriver.
Warning—Potential Damage: System board electronic components are easily damaged by static electricity. Touch
something metal on the printer before touching any system board electronic components or connectors.
1 Access the system board.
For more information, see “Accessing the system board” on page 33.
2 Unplug the printer hard disk interface cable from the system board, leaving the cable attached to the printer hard
disk. To unplug the cable, squeeze the paddle at the plug of the interface cable to disengage the latch before pulling
the cable out.
Additional printer setup
46
3 Remove the screws while holding the printer hard disk in place, and then remove the printer hard disk.
4 Set the printer hard disk aside.
5 Reattach the system board cover.
Additional printer setup
47
Installing optional trays
Order of installation
CAUTION—TIPPING HAZARD: Floor-mounted configurations require additional furniture for stability. You must
use either a printer stand or printer base if you are using a high-capacity input tray, a duplex unit and an input
option, or more than one input option. If you purchased a multifunction printer (MFP) that scans, copies, and faxes,
you may need additional furniture. For more information, contact the place where you purchased the printer.
CAUTION—SHOCK HAZARD: If you are accessing the system board or installing optional hardware or memory
devices sometime after setting up the printer, then turn the printer off, and unplug the power cord from the wall
outlet before continuing. If you have any other devices attached to the printer, then turn them off as well, and
unplug any cables going into the printer.
CAUTION—POTENTIAL INJURY: The printer weight is greater than 18 kg (40 lb) and requires two or more trained
personnel to lift it safely.
Install the printer and any optional trays or finishers you have purchased in the following order:
Using a 1-tray module
•
•
•
•
Optional 520-sheet tray (Tray 2)
Printer
2,000-sheet high-capacity feeder
Finisher
Using a 3-tray module
•
•
•
•
3-tray module
Printer
2,000-sheet high-capacity feeder
Finisher
Using a tandem-tray module
•
•
•
•
Tandem-tray module
Printer
2,000-sheet high-capacity feeder
Finisher
For information on installing a 1-tray module, 3-tray module, tandem-tray module, high-capacity feeder, or any of the
finishers, see the setup documentation that came with the option.
Installing optional trays
The printer supports the following optional trays:
• 1-tray module
• 3-tray module
Additional printer setup
48
• Tandem-tray module
• High-capacity feeder
CAUTION—POTENTIAL INJURY: The printer weight is greater than 18 kg (40 lb) and requires two or more trained
personnel to lift it safely.
CAUTION—SHOCK HAZARD: If you are accessing the system board or installing optional hardware or memory
devices sometime after setting up the printer, then turn the printer off, and unplug the power cord from the wall
outlet before continuing. If you have any other devices attached to the printer, then turn them off as well, and
unplug any cables going into the printer.
CAUTION—TIPPING HAZARD: Floor-mounted configurations require additional furniture for stability. You must
use either a printer stand or printer base if you are using a high-capacity input tray, a duplex unit and an input
option, or more than one input option. If you purchased a multifunction printer (MFP) that scans, copies, and faxes,
you may need additional furniture. For more information, see www.lexmark.com/multifunctionprinters.
1 Unpack the optional tray, and then remove all packing material.
2 Place the tray near the printer.
3 Turn off the printer.
4 Align the printer with the tray, and then lower the printer into place.
1-tray module
1
1-tray module
2
2,000-sheet high-capacity feeder
Additional printer setup
49
3-tray module
1
3-tray module
2
2,000-sheet high-capacity feeder
Additional printer setup
50
Tandem-tray module
1
Tandem-tray module
2
2,000-sheet high-capacity feeder
5 Turn the printer back on.
6 Set the printer software to recognize the optional tray. For more information, see “Updating available options in
the printer driver” on page 54.
Attaching cables
CAUTION—POTENTIAL INJURY: Do not use the fax feature during a lightning storm. Do not set up this product or
make any electrical or cabling connections, such as the fax feature, power cord, or telephone, during a lightning
storm.
Connect the printer to the computer using a USB cable or Ethernet cable.
Be sure to match the following:
• The USB symbol on the cable with the USB symbol on the printer
• The appropriate Ethernet cable to the Ethernet port
Additional printer setup
51
1
Telephone port
2
Fax port
3
Ethernet port
4
USB printer port
5
USB port
Warning—Potential Damage: Do not touch the USB cable, any network adapter, or the printer in the area shown while
actively printing. A loss of data or a malfunction can occur.
Verifying printer setup
Once all hardware and software options are installed and the printer is turned on, verify that the printer is set up
correctly by printing the following:
• Menu settings page—Use this page to verify that all printer options are installed correctly. A list of installed options
appears toward the bottom of the page. If an option you installed is not listed, then it is not installed correctly.
Remove the option and install it again.
• Network setup page—If your printer is a network model and is attached to a network, print a network setup page
to verify the network connection. This page also provides important information that aids network printing
configuration.
Printing a menu settings page
From the home screen, navigate to:
> Reports > Menu Settings Page
Additional printer setup
52
Printing a network setup page
If the printer is attached to a network, then print a network setup page to verify the network connection. This page
also provides important information that aids network printing configuration.
1 From the home screen, navigate to:
> Reports > Network Setup Page
2 Check the first section of the network setup page, and confirm that the status is Connected.
If the status is Not Connected, then the LAN drop may not be active, or the network cable may be malfunctioning.
Consult a system support person for a solution, and then print another network setup page.
Setting up the printer software
Installing the printer software
Note: If you installed the printer software on this computer before but need to reinstall the software, then uninstall
the current software first.
For Windows users
1 Close all open software programs.
2 Insert the installation software CD.
If the installation dialog screen does not appear after a minute, then launch the CD manually:
a Click , or click Start and then click Run.
b In the Start Search or Run box, type D:\setup.exe, where D is the letter of your CD or DVD drive.
c Press Enter, or click OK.
3 Click Install, and then follow the instructions on the computer screen.
For Macintosh users
1 Close all open applications.
2 Insert the installation software CD.
If the installation dialog does not appear after a minute, then click the CD icon on the desktop.
3 Double-click the software installer package, and then follow the instructions on the computer screen.
Using the Internet
1 Go to the Lexmark Web site at www.lexmark.com.
2 Navigate to:
SUPPORT & DOWNLOADS > select your printer > select your operating system
3 Download the driver and install the printer software.
Note: Updated printer software may be available at http://support.lexmark.com.
Additional printer setup
53
Updating available options in the printer driver
Once the printer software and any options are installed, it may be necessary to manually add the options in the printer
driver to make them available for print jobs.
For Windows users
1 Open the printers folder:
a Click , or click Start and then click Run.
b In the Start Search or Run box, type control printers.
c Press Enter, or click OK.
2 Select the printer.
3 Right-click the printer, and then select Properties.
4 Click the Configuration tab.
5 Click Update Now - Ask Printer or manually add any installed hardware options under Configuration Options.
6 Click Apply.
For Macintosh users
In Mac OS X version 10.5 or later
1 From the Apple menu, navigate to:
System Preferences > Print & Fax > select your printer > Options & Supplies > Driver
2 Add any installed hardware options, and then click OK.
In Mac OS X version 10.4 or earlier
1 From the Finder, navigate to:
Go > Applications > Utilities
2 Double-click Printer Setup Utility or Print Center.
3 Select your printer.
4 From the Printers menu, choose Show Info.
5 Add any installed hardware options, and then click Apply Changes.
Setting up wireless printing
Note: A Service Set Identifier (SSID) is a name assigned to a wireless network. Wireless Encryption Protocol (WEP) and
Wi-Fi Protected Access (WPA) are types of security used on a network.
Information you will need to set up the printer on a wireless network
Note: Do not connect the installation or network cables until prompted to do so by the setup software.
Additional printer setup
54
• SSID—The SSID is also referred to as the network name.
• Wireless Mode (or Network Mode)—The mode will be either infrastructure or ad hoc.
• Channel (for ad hoc networks)—The channel defaults to auto for infrastructure networks.
Some ad hoc networks will also require the auto setting. Check with your system support person if you are not sure
which channel to select.
• Security Method—There are three basic options for Security Method:
– WEP key
If your network uses more than one WEP key, enter up to four in the provided spaces. Select the key currently
in use on the network by selecting the Default WEP Transmit Key.
or
– WPA or WPA2 passphrase
WPA includes encryption as an additional layer of security. The choices are AES or TKIP. Encryption must be set
for the same type on the router and on the printer, or the printer will not be able to communicate on the
network.
– No security
If your wireless network does not use any type of security, then you will not have any security information.
Note: Using an unsecured wireless network is not recommended.
If you are installing the printer on an 802.1X network using the Advanced method, then you may need the following:
•
•
•
•
Authentication type
Inner authentication type
802.1X username and password
Certificates
Note: For more information on configuring 802.1X security, see the Networking Guide on the Software and
Documentation CD.
Installing the printer on a wireless network (Windows)
Before installing the printer on a wireless network, make sure:
• Your wireless network is set up and working properly.
• The computer you are using is connected to the same wireless network where you want to set up the printer.
1 Connect the power cable to the printer and then to a properly grounded electrical outlet, and then turn the printer
on.
Additional printer setup
55
Make sure the printer and computer are fully on and ready.
Do not connect the USB cable until instructed to do so on the computer screen.
2 Insert the Software and Documentation CD.
3 Click Install, and then follow the instructions on the computer screen.
4 Select Wireless connection when asked to choose a connection type.
5 From the Wireless Configuration dialog, select Guided Setup (Recommended).
Note: Choose Advanced Setup only if you want to customize your installation.
6 Temporarily connect a USB cable between the computer on the wireless network and the printer.
Note: After the printer is configured, the software will instruct you to disconnect the temporary USB cable so you
can print wirelessly.
7 Follow the instructions on the computer screen.
Note: For more information on allowing other computers on the network to use the wireless printer, see the Networking
Guide.
Additional printer setup
56
Installing the printer on a wireless network (Macintosh)
Make sure to disconnect the Ethernet cable when installing the printer on a wireless network.
Prepare to configure the printer
1 Connect the power cable to the printer and then to a properly grounded electrical outlet, and then turn the printer
on.
2 Locate the printer MAC address.
a From the home screen, navigate to:
> Reports > Network Setup Page
b In the Standard Network Card section, look for UAA (MAC).
Note: You will need this information later.
Enter the printer information
1 Access the AirPort options:
In Mac OS X version 10.5 or later
From the Apple menu, navigate to:
System Preferences > Network > AirPort
In Mac OS X version 10.4 or earlier
From the Finder, navigate to:
Applications > Internet Connect > AirPort
2 From the Network Name pop-up menu, select print server [yyyyyy], where the y's are the last six digits of the MAC
address located on the MAC address sheet.
3 Open a Web browser.
4 From the Bookmarks menu, select Show or Show All Bookmarks.
5 Under COLLECTIONS, select Bonjour or Rendezvous, and then double-click the printer name.
Note: The application referred to as Rendezvous in Mac OS X version 10.2 is now called Bonjour by Apple Inc.
6 From the Embedded Web Server, navigate to where the wireless settings information are stored.
Additional printer setup
57
Configure the printer for wireless access
1 Type the network name (SSID) in the appropriate field.
2 Select Infrastructure as your Network Mode setting if you are using an access point (wireless router).
3 Select the type of security you want to use to protect your wireless network.
4 Enter the security information necessary for the printer to connect to the wireless network.
5 Click Submit.
6 Open the AirPort application on your computer:
In Mac OS X version 10.5 or later
From the Apple menu, navigate to:
System Preferences > Network > AirPort
In Mac OS X version 10.4 or earlier
From the Finder, navigate to:
Applications > Internet Connect > AirPort
7 From the Network pop-up menu, select the name of your wireless network.
Configure your computer to use the printer wirelessly
To print on a network printer, each Macintosh user must install a custom printer driver file and create a print queue in
the Printer Setup Utility or Print Center.
1 Install a printer driver file on the computer:
a Insert the Software and Documentation CD, and then double-click the installer package for the printer.
b Follow the instructions on the computer screen.
c Select a destination, and then click Continue.
d From the Easy Install screen, click Install.
e Type the user password, and then click OK.
All necessary applications are installed in the computer.
f Click Close when installation is complete.
2 Add the printer:
a For IP printing:
In Mac OS X version 10.5 or later
1 From the Apple menu, navigate to:
System Preferences > Print & Fax
2 Click +, and then click the IP tab.
3 Type the IP address of the printer in the address field, and then click Add.
In Mac OS X version 10.4 or earlier
1 From the Finder, navigate to:
Applications > Utilities
2 Double-click Printer Setup Utility or Print Center.
Additional printer setup
58
3 From the Printer List, choose Add, and then click IP Printer.
4 Type the IP address of the printer in the address field, and then click Add.
b For AppleTalk printing:
Note: Make sure AppleTalk is activated on your printer.
In Mac OS X version 10.5
1 From the Apple menu, navigate to:
System Preferences > Print & Fax
2 Click +, and then navigate to:
AppleTalk > select the printer from the list > Add
In Mac OS X version 10.4 or earlier
1 From the Finder, navigate to:
2
3
4
5
6
7
Applications > Utilities
Double-click Printer Setup Utility or Print Center.
From the Printer List, click Add.
Click Default Browser tab > More Printers.
From the first pop-up menu, select AppleTalk.
From the second pop-up menu, select Local AppleTalk Zone.
Select the printer from the list, and then click Add.
Installing the printer on a wired network
These instructions apply to Ethernet and fiber optic network connections.
Note: Make sure you have completed the initial setup of the printer.
For Windows users
1 Insert the Software and Documentation CD.
If the installation screen does not appear after a minute, then launch the CD manually:
a Click , or click Start and then click Run.
b In the Start Search or Run box, type D:\setup.exe, where D is the letter of the CD or DVD drive.
c Press Enter, or click OK.
2 Click Install, and then follow the instructions on the computer screen.
Note: To configure the printer using a static IP address, IPv6, or scripts, select Advanced Options > Administrator
Tools.
3 Select Ethernet connection, and then click Continue.
4 Attach the appropriate cable to the computer and to the printer when instructed to do so.
5 Select the printer from the list, and then click Continue.
Note: If the configured printer does not appear on the list, then click Modify Search.
6 Follow the instructions on the computer screen.
Additional printer setup
59
For Macintosh users
1 Allow the network DHCP server to assign an IP address to the printer.
2 Obtain the printer IP address. You can:
a View the information on the printer control panel home screen, or in the TCP/IP section under the
Networks/Ports menu.
b Print a network setup page or menu settings page and locate the information in the TCP/IP section.
Note: You will need the IP address if you are configuring access for computers on a different subnet than the
printer.
3 Install the printer drivers, and then add the printer.
a Install a printer driver file on the computer:
1 Insert the Software and Documentation CD, and then double-click the installer package for the printer.
2 Follow the instructions on the computer screen.
3 Select a destination, and then click Continue.
4 From the Easy Install screen, click Install.
5 Type the user password, and then click OK.
All the necessary applications are installed in the computer.
6 Click Close when installation is complete.
b Add the printer:
• For IP printing:
In Mac OS X version 10.5 or later
1 From the Apple menu, navigate to:
System Preferences > Print & Fax
2 Click +, and then click the IP tab.
3 Type the printer IP address in the address field, and then click Add.
In Mac OS X version 10.4 or earlier
1 From the Finder, navigate to:
Applications > Utilities
2 Double-click Printer Setup Utility or Print Center.
3 From the Printer List, click Add, and then click IP Printer.
4 Type in the printer IP address in the address field, and then click Add.
• For AppleTalk printing:
Note: Make sure AppleTalk is activated on your printer.
In Mac OS X version 10.5
1 From the Apple menu, navigate to:
System Preferences > Print & Fax
2 Click +, and then navigate to:
AppleTalk > select the printer from the list > Add
Additional printer setup
60
In Mac OS X version 10.4 or earlier
1 From the Finder, navigate to:
2
3
4
5
6
7
Applications > Utilities
Double-click Printer Setup Utility or Print Center.
From the Printer List, click Add.
Click Default Browser tab > More Printers.
From the first pop-up menu, select AppleTalk.
From the second pop-up menu, select Local AppleTalk Zone.
Select the printer from the list, and then click Add.
Note: If the printer does not show up in the list, then you may need to add it using the IP address. For more
information, contact your system support person.
Changing port settings after installing a new network Internal
Solutions Port
When a new Lexmark Internal Solutions Port (ISP) is installed in the printer, the printer configurations on computers
that access the printer must be updated since the printer will be assigned a new IP address. All computers that access
the printer must be updated with this new IP address.
Notes:
• If the printer has a static IP address, then you do not need to make any changes to the computer configurations.
• If the computers are configured to use network name that will stay the same, instead of by IP address, then you
do not need to make any changes to your computer configurations.
• If you are adding a wireless ISP to a printer previously configured for a wired connection, then make sure the wired
network is disconnected when you configure the printer to operate wirelessly. If the wired connection remains
connected, then the wireless configuration will complete, but the wireless ISP will not be active. In the event that
the printer was configured for a wireless ISP while still attached to a wired connection, disconnect the wired
connection, turn the printer off, and then turn the printer back on again. This will enable the wireless ISP.
• Only one network connection at a time is active. If you want to switch the connection type between wired and
wireless, you must first turn the printer off, connect the cable (to switch to a wired connection) or disconnect the
cable (to switch to a wireless connection), and then turn the printer on.
For Windows users
1 Type the printer IP address into the address field of your Web browser.
If you do not know the IP address of the printer, you can:
• View the IP address on the printer control panel in the TCP/IP section under the Networks/Ports menu.
• Print a network setup page or the menu settings pages and locate the IP address in the TCP/IP section.
2 Click
, or click Start and then click Run.
3 In the Start Search or Run box, type control printers.
4 Press Enter, or click OK.
The printer folder opens.
Additional printer setup
61
5 Locate the printer that has changed.
Note: If there is more than one copy of the printer, then update all of them with the new IP address.
6 Right-click the printer.
7 Click Properties > Ports tab.
8 Select the port from the list, and then click Configure Port.
9 Type the new IP address in the “Printer Name or IP Address” field.
10 Click OK > Close.
For Macintosh users
1 Type the printer IP address into the address field of your Web browser.
If you do not know the IP address of the printer, you can:
• View the IP address on the printer control panel in the TCP/IP section under the Networks/Ports menu.
• Print a network setup page or the menu settings pages and locate the IP address in the TCP/IP section.
Note: You will need the IP address if you are configuring access for computers on a different subnet than the
printer.
2 Add the printer:
• For IP printing:
In Mac OS X version 10.5 or later
a From the Apple menu, navigate to:
System Preferences > Print & Fax
b Click +, and then click the IP tab.
c Type the IP address of your printer in the Address field, and then click Add.
In Mac OS X version 10.4 or earlier
a From the Finder, navigate to:
Applications > Utilities
b Double-click Printer Setup Utility or Print Center.
c From the Printer List, click Add, and then click IP Printer.
d Type the IP address of your printer in the Address field, and then click Add.
• For AppleTalk printing:
Note: Make sure AppleTalk is activated on your printer.
In Mac OS X version 10.5
a From the Apple menu, navigate to:
System Preferences > Print & Fax
b Click +, and then navigate to:
AppleTalk > select the printer from the list > Add
Additional printer setup
62
In Mac OS X version 10.4 or earlier
a From the Finder, navigate to:
b
c
d
e
f
g
Applications > Utilities
Double-click Printer Setup Utility or Print Center.
From the Printer List, click Add.
Click the Default Browser tab > More Printers.
From the first pop-up menu, select AppleTalk.
From the second pop-up menu, select Local AppleTalk Zone.
Select the printer from the list, and then click Add.
Setting up serial printing
In serial printing, data is transferred one bit at a time. Although serial printing is usually slower than parallel printing,
it is the preferred option when there is a great deal of distance between the printer and computer or when an interface
with a better transfer rate is not available.
After installing the serial or communication (COM) port, configure the printer and the computer so they can
communicate. Make sure you have connected the serial cable to the COM port on your printer.
1 Set the parameters in the printer:
a From the printer control panel, navigate to the menu with port settings.
b Locate the menu with serial port settings.
c Make any necessary changes to the serial settings.
d Save the new settings, and then print a menu settings page.
2 Install the printer driver:
a Insert the Software and Documentation CD.
If the installation screen does not appear after a minute, then launch the CD manually::
1 Click , or click Start and then click Run.
2 In the Start Search or Run box, type D:\setup.exe, where D is the letter of the CD or DVD drive.
3 Press Enter, or click OK.
b Click Advanced Options > Custom Install.
c Follow the instructions on the computer screen
d From the Configure Printer Connection dialog, select Connect through a port discovered on your computer,
and then select a port.
e If the port is not in the list, then click Refresh.
or
Navigate to:
Add port > select a port type > enter necessary information > OK
f Click Continue.
1 If you want to add another printer, then click Add Another.
2 If you want to make changes, then select a printer, and then click Edit.
3 Follow the instructions on the computer screen.
g Click Finish.
3 Set the COM port parameters:
Additional printer setup
63
After installing the printer driver, set the serial parameters in the COM port assigned to the printer driver.
Note: Make sure the serial parameters in the COM port match the serial parameters you set in the printer.
a Open the Device Manager.
1 Click , or click Start and then click Run.
2 In the Start Search or Run box, type devmgmt.msc.
3 Press Enter, or click OK.
b Look for Ports, and then click + to expand the list of available ports.
c Right-click the COM port where you attached the serial cable to your computer (example: COM1).
d Click Properties.
e On the Port Settings tab, set the serial parameters to the same serial parameters in the printer.
Check the serial heading of the menu settings page for the printer settings.
f Click OK, and then close all the windows.
g Print a test page to verify printer installation.
Additional printer setup
64
Minimizing your printer's environmental impact
Lexmark is committed to environmental sustainability and is continually improving its printers to reduce their impact
on the environment. We design with the environment in mind, engineer our packaging to reduce materials, and provide
collection and recycling programs. For more information, see:
• The Notices chapter
• The Environmental Sustainability section of the Lexmark Web site at www.lexmark.com/environment
• The Lexmark recycling program at www.lexmark.com/recycle
By selecting certain printer settings or tasks, you may be able to reduce your printer's impact even further. This chapter
outlines the settings and tasks that may yield a greater environmental benefit.
Saving paper and toner
Studies show that as much as 80% of the carbon footprint of a printer is related to paper usage. You can significantly
reduce your carbon footprint by using recycled paper and the following printing suggestions, such as printing on both
sides of the paper and printing multiple pages on one side of a single sheet of paper.
To quickly save paper and energy using one printer setting, use Eco-Mode.
Using recycled paper
As an environmentally conscious company, Lexmark supports the use of recycled office paper produced specifically for
use in laser/LED printers. For more information on recycled papers that work well with your printer, see “Using recycled
paper and other office papers” on page 87.
Conserving supplies
Use both sides of the paper
If your printer model supports duplex printing, you can control whether print appears on one or two sides of the paper
by selecting 2-sided printing from the Print dialog or from the Lexmark Toolbar.
Place multiple pages on one sheet of paper
You can print up to 16 consecutive pages of a multiple-page document onto one side of a single sheet of paper by
selecting a setting from the Multipage printing (N-Up) section of the Print dialog screen.
Check your first draft for accuracy
Before printing or making multiple copies of a document:
• Use the preview feature, which you can select from the Print dialog or from the Lexmark Toolbar to see how the
document will look like before you print it.
• Print one copy of the document to check its content and format for accuracy.
Avoid paper jams
Correctly set the paper type and size to avoid paper jams. For more information, see “Avoiding jams” on page 262.
Minimizing your printer's environmental impact
65
Print in black and white
To print all text and graphics using only the black toner cartridge, set the printer to Black Only. For more information,
see “Printing in black and white” on page 96.
Use Max Speed or Max Yield settings
The Max Speed and Max Yield settings let you choose between a faster print speed or a higher toner yield. Max Speed
is the factory default setting. For more information, see “Using Max Speed and Max Yield” on page 97.
Saving energy
Using Eco-Mode
1 Type the printer IP address into the address field of your Web browser.
If you do not know the IP address of the printer, you can:
• View the IP address on the printer control panel in the TCP/IP section under the Networks/Ports menu.
• Print a network setup page or the menu settings pages and locate the IP address in the TCP/IP section.
2 Click Settings > General Settings > Eco-Mode > select a setting > Submit.
Choose
To
Off
Use factory default settings for all settings associated with Eco-Mode. This setting supports the performance
specifications of your printer.
Energy
Reduce energy use, especially when the printer is idle.
• Printer engine motors do not start until it is ready to print. You may notice a short delay before the first
page is printed.
• The printer enters Sleep mode after one minute of inactivity.
• When the printer enters Sleep mode, the printer control panel display and the standard exit bin lights
are turned off.
• If scanning is supported, the scanner lamps are activated only when a scan job is started.
Energy/Paper Use all the settings associated with Energy mode and Paper mode.
Paper
• Enable the automatic duplex feature.
• Turn off print log features.
Minimizing your printer's environmental impact
66
Reducing printer noise
To select a Quiet Mode setting using the Embedded Web Server:
1 Type the printer IP address into the address field of your Web browser.
If you do not know the IP address of the printer, you can:
• View the IP address on the printer control panel in the TCP/IP section under the Networks/Ports menu.
• Print a network setup page or the menu settings pages and locate the IP address in the TCP/IP section.
2 Click Settings > General Settings > Quiet Mode > select a setting > Submit.
Choose
To
Off
Use factory default settings. This setting supports the
performance specifications of your printer.
Note: Selecting Photo from the driver may disable Quiet
Mode and provide better print quality and full speed printing.
On
Reduce printer noise.
• Print jobs will process at a reduced speed.
• Printer engine motors do not start until a document is
ready to print. There will be a short delay before the first
page is printed.
• If your printer has faxing capability, fax sounds are
reduced or disabled, including those made by the fax
speaker and ringer. The fax is placed in standby mode.
• The alarm control and cartridge alarm sounds are turned
off.
• The printer will ignore the Advance Start command.
Adjusting Sleep Mode
To save energy, you can decrease the number of minutes before the printer enters Sleep Mode.
Available settings range from 2–240 minutes. The factory default setting is 30 minutes.
Using the Embedded Web Server
1 Type the printer IP address or host name in the address field of your Web browser.
If you do not know the IP address or host name of the printer, then you can:
• View the information on the printer control panel home screen, or in the TCP/IP section under the
Networks/Ports menu.
• Print a network setup page or menu settings page and locate the information in the TCP/IP section.
2 Click Settings > General Settings > Timeouts.
3 In the Sleep Mode field, enter the number of minutes you want the printer to wait before it enters Sleep Mode.
4 Click Submit.
Minimizing your printer's environmental impact
67
Using the printer control panel
1 From the home screen, navigate to:
> Settings > General Settings > Timeouts
2 Touch the arrows next to Sleep Mode to select the number of minutes you want the printer to wait before it
enters Sleep Mode.
3 Touch Submit.
Using Hibernate Mode
Hibernate is an ultra-low power operating mode. When operating in Hibernate mode, the printer is essentially off, and
all other systems and devices are powered down safely.
Note: The Hibernate and Sleep modes can be scheduled.
Using the Embedded Web Server
1 Type the printer IP address in the address field of your Web browser.
If you do not know the IP address of the printer, then you can:
• View the IP address on the printer control panel in the TCP/IP section under the Networks/Ports menu.
• Print a network setup page or the menu settings pages and locate the IP address in the TCP/IP section.
2 Click Settings > General Settings > Sleep Button Settings.
3 From the Press Sleep Button or Press and Hold Sleep Button drop-down, select Hibernate.
4 Click Submit.
Using the printer control panel
1 From the home screen, navigate to:
> Settings > General Settings > Press Sleep Button or Press and Hold Sleep Button > Hibernate
2 Touch Submit.
Adjusting the brightness of the display
To save energy, or if you have trouble reading your display, then adjust the brightness of the display.
Available settings range from 20–100. The factory default setting is 100.
Using the Embedded Web Server
1 Type the printer IP address into the address field of your Web browser.
If you do not know the IP address of the printer, you can:
• View the IP address on the printer control panel in the TCP/IP section under the Networks/Ports menu.
• Print a network setup page or the menu settings pages and locate the IP address in the TCP/IP section.
2 Click Settings > General Settings.
Minimizing your printer's environmental impact
68
3 In the Screen Brightness field, enter the brightness percentage you want for the display.
4 Click Submit.
Using the printer control panel
1 From the home screen, navigate to:
> Settings > General Settings
2 Touch the arrows until Screen Brightness appears, and then select a setting.
3 Touch Submit.
Recycling
Lexmark provides collection programs and environmentally progressive approaches to recycling. For more information,
see:
• The Notices chapter
• The Environmental Sustainability section of the Lexmark Web site at www.lexmark.com/environment
• The Lexmark recycling program at www.lexmark.com/recycle
Recycling Lexmark products
To return Lexmark products for recycling:
1 Visit our Web site at www.lexmark.com/recycle.
2 Find the product type you want to recycle, and then select your country or region from the list.
3 Follow the instructions on the computer screen.
Note: Printer supplies and hardware not listed in a Lexmark collection program may be recycled through your local
recycling center. Contact your local recycling center to determine the items they accept.
Recycling Lexmark packaging
Lexmark continually strives to minimize packaging. Less packaging helps to ensure that Lexmark printers are transported
in the most efficient and environmentally sensitive manner and that there is less packaging to dispose of. These
efficiencies result in fewer greenhouse emissions, energy savings, and natural resource savings.
Lexmark cartons are 100% recyclable where corrugated recycling facilities exist. Facilities may not exist in your area.
The foam used in Lexmark packaging is recyclable where foam recycling facilities exist. Facilities may not exist in your
area.
When you return a cartridge to Lexmark, you can reuse the box that the cartridge came in. Lexmark will recycle the
box.
Minimizing your printer's environmental impact
69
Returning Lexmark cartridges for reuse or recycling
The Lexmark Cartridge Collection Program diverts millions of Lexmark cartridges from landfills annually by making it
both easy and free for Lexmark customers to return used cartridges to Lexmark for reuse or recycling. One hundred
percent of the empty cartridges returned to Lexmark are either reused or demanufactured for recycling. Boxes used
to return the cartridges are also recycled.
To return Lexmark cartridges for reuse or recycling, follow the instructions that came with your printer or cartridge and
use the prepaid shipping label. You can also do the following:
1 Visit our Web site at www.lexmark.com/recycle.
2 From the Toner Cartridges section, select your country or region from the list.
3 Follow the instructions on the computer screen.
Minimizing your printer's environmental impact
70
Loading paper and specialty media
Setting the paper size and type
The Paper Size setting is automatically sensed according to the position of the paper guides in each tray except the
multipurpose feeder. The Paper Size setting for the multipurpose feeder must be set manually from the Paper Size
menu. The Paper Type setting must be set manually for all trays that do not contain plain paper.
From the home screen navigate to:
> Paper Menu > Paper Size/Type > select a tray > select the paper size or type > Submit
Configuring Universal paper settings
The Universal Paper Size is a user-defined setting that lets you print on paper sizes that are not preset in the printer
menus. Set paper size to Universal for the specified tray when the size you want is not available from the Paper Size
menu. Then, specify all of the following Universal size settings for your paper:
• Units of Measure
• Portrait Width
• Portrait Height
Notes:
• The largest supported Universal size is 296.9 x 431.8 mm (11.69 x 17 in.).
• The smallest supported Universal size is 76 x 127 mm (3 x 5 in.) and is loaded only in the multipurpose feeder.
1 From the home screen, navigate to:
> Paper Menu > Universal Setup > Units of Measure > select a unit of measure
2 Touch Portrait Width or Portrait Height.
3 Select the width or height, and then touch Submit.
Loading paper and specialty media
71
Loading the standard or optional 520-sheet tray
The printer has one standard 520-sheet tray (Tray 1), and may have one or more optional 520-sheet trays. All 520-sheet
trays support the same paper sizes and types.
CAUTION—POTENTIAL INJURY: To reduce the risk of equipment instability, load each paper drawer or tray
separately. Keep all other drawers or trays closed until needed.
1 Pull the tray out.
Notice the size indicators at the bottom of the tray. Use these indicators to help position the length and width
guides.
Loading paper and specialty media
72
2 Squeeze and then slide the width guide to the correct position for the paper size loaded.
3 Squeeze and then slide the length guide to the correct position for the paper size loaded.
Note: The length guide has a locking device. To unlock, slide the button on top of the length guide down. To lock,
slide the button up when a length has been selected.
4 Flex the sheets back and forth to loosen them. Do not fold or crease the paper. Straighten the edges on a level
surface.
Loading paper and specialty media
73
5 Load the paper stack with the recommended print side faceup.
Notes:
•
•
•
•
Place print side facedown for duplex printing.
Place pre-punched paper with the holes toward the front of the tray.
Place letterheads with the header on the left side of the tray.
Make sure the paper is below the maximum fill line located on the edge of the paper tray.
Warning—Potential Damage: Overloading the tray can cause paper jams and possible printer damage.
6 Insert the tray.
7 From the printer control panel, verify the Paper Size and Paper Type setting for the tray based on the paper you
loaded.
Loading paper and specialty media
74
Loading the optional 850- and 1,150-sheet trays
The 850- and 1,150-sheet trays support the same paper sizes and types, and require the same process for loading paper.
CAUTION—POTENTIAL INJURY: To reduce the risk of equipment instability, load each paper drawer or tray
separately. Keep all other drawers or trays closed until needed.
1 Pull the tray out.
2 Squeeze and then slide the length guide to the correct position for the paper size you are loading.
Loading paper and specialty media
75
3 Flex the sheets back and forth to loosen them. Do not fold or crease the paper. Straighten the edges on a level
surface.
4 Load the paper stack with the recommended print side faceup.
Notes:
•
•
•
•
•
Place print side facedown for duplex printing.
Place pre-punched paper with the holes toward the front of the tray.
Place letterheads faceup with the header on the left side of the tray.
Place letterheads facedown with the header on the right side of the tray for duplex printing.
Make sure the paper is below the maximum fill line located on the edge of the paper tray.
Warning—Potential Damage: Overloading the tray can cause paper jams and possible printer damage.
5 Insert the tray.
6 From the printer control panel, verify the Paper Size and Paper Type setting for the tray based on the paper you
loaded.
Loading paper and specialty media
76
Loading the 2000-sheet high-capacity feeder
The high-capacity feeder can hold up to 2,000 sheets of letter-, A4-, and legal-size paper (80 g/m2 or 20 lb).
1 Pull the tray out.
2 Adjust the width guide as necessary.
Loading paper and specialty media
77
3 Flex the sheets back and forth to loosen them. Do not fold or crease the paper. Straighten the edges on a level
surface.
4 Load paper into the tray with the print side faceup.
Note: Make sure the paper is below the maximum fill line located on the edge of the paper tray. Overloading the
tray can cause paper jams and possible printer damage.
Loading paper and specialty media
78
Notes:
• Place pre-punched paper with the holes toward the front of the tray.
• Place letterheads faceup with the header on the left side of the tray.
• Place letterheads facedown with the header on the right side of the tray for duplex printing.
5 Insert the tray.
Loading the multipurpose feeder
The multipurpose feeder can hold several sizes and types of print media, such as transparencies, labels, card stock, and
envelopes. It can be used for single-page or manual printing, or as an additional tray.
The multipurpose feeder can hold approximately:
• 100 sheets of 75-g/m2 (20-lb) paper
• 10 envelopes
• 75 transparencies
The multipurpose feeder accepts paper or specialty media within the following dimensions:
• Width—89 mm (3.5 in.) to 229 mm (9.02 in.)
• Length—127 mm (5 in.) to 1270 mm (50 in.)
Note: Maximum width and length can be applied only to short-edge feeding.
Note: Do not add or remove paper or specialty media when the printer is printing from the multipurpose feeder or
when the printer control panel indicator light is blinking. Doing so may cause a jam.
1 Pull down the multipurpose feeder door.
Loading paper and specialty media
79
2 For paper or specialty media that is longer than letter-size paper, gently pull the extension until it is fully extended.
3 Flex the sheets of paper or specialty media back and forth to loosen them. Do not fold or crease them. Straighten
the edges on a level surface.
Paper
Envelopes
Loading paper and specialty media
80
Transparencies
Note: Avoid scratching or touching the print side.
4 Push the paper pick tab, and then load the paper or specialty media. Slide the stack gently into the multipurpose
feeder until it comes to a stop, and then release the paper pick tab.
Warning—Potential Damage: Pulling the paper out, without pushing the paper pick tab first, may cause jams or
the paper pick tab to break.
• Load paper and transparencies with the recommended print side facedown and the short edge entering the
printer first.
• For duplex letterhead printing, place the letterhead faceup and the header entering the printer last.
Loading paper and specialty media
81
• Load envelopes with the flap side up and to the right.
Warning—Potential Damage: Never use envelopes with stamps, clasps, snaps, windows, coated linings, or
self-stick adhesives. These envelopes may severely damage the printer.
Notes:
• Do not exceed the maximum stack height by forcing paper or transparencies under the stack height limiter.
• Load only one size and type of paper at a time.
5 Adjust the width guide to lightly touch the edge of the stack. Make sure the paper or specialty media fits loosely in
the multipurpose feeder, lies flat, and is not bent or wrinkled.
6 From the printer control panel, set the Paper Size and Paper Type for the multipurpose feeder (MP Feeder Size and
MP Feeder Type) based on the paper or specialty media loaded.
Loading paper and specialty media
82
Linking and unlinking trays
Linking trays
Tray linking is useful for large print jobs or for printing multiple copies. When one linked tray is empty, paper feeds
from the next linked tray. When the Paper Size and Paper Type settings are the same for any trays, the trays are
automatically linked. The Paper Size setting is automatically sensed according to the position of the paper guides in
each tray except Tray 1 and the multipurpose feeder. The Paper Size setting for the multipurpose feeder must be set
manually from the Paper Size menu. The Paper Type setting must be set for all trays from the Paper Type menu. The
Paper Type menu and the Paper Size menu are both available from the Paper Size/Type menu.
Unlinking trays
Note: Trays that do not have the same settings as any other tray are not linked.
Change one of the following tray settings:
• Paper Type
Paper Type names describe the paper characteristics. If the name that best describes your paper is used by linked
trays, assign a different Paper Type name to the tray, such as Custom Type [x], or define your own custom name.
• Paper Size
Load a different paper size to automatically change the Paper Size setting for a tray. Paper Size settings for the
multipurpose feeder are not automatic; they must be set manually from the Paper Size menu.
Warning—Potential Damage: Do not assign a Paper Type name that does not accurately describe the type of paper
loaded in a tray. The temperature of the fuser varies according to the specified Paper Type. Prints may not be properly
processed if an inaccurate Paper Type is selected.
Creating a custom name for a paper type
If the printer is on a network, you can use the Embedded Web Server to define a name other than Custom Type [x] for
each of the custom paper types loaded into the printer.
1 Type the printer IP address into the address field of your Web browser.
Note: If you do not know the IP address of the printer, then you can:
• View the IP address on the printer control panel in the TCP/IP section under the Networks/Ports menu.
• Print a network setup page or the menu settings pages and locate the IP address in the TCP/IP section.
2 Click Settings > Paper Menu > Custom Name > type a name > Submit.
Note: This custom name will replace the Custom Type [x] name under the Custom Types and Paper Size and Type
menus.
3 Click Custom Types > select a paper type > Submit.
Assigning a custom paper type name
Assign a custom paper type name to a tray when linking or unlinking trays.
From the home screen, navigate to:
Loading paper and specialty media
83
> Paper Menu > Paper Size/Type > select a custom paper type name > select a tray > Submit
Configuring a custom name
If the printer is on a network, then you can use the Embedded Web Server to define a name other than Custom Type [x]
for each of the custom paper types loaded into the printer.
1 Type the printer IP address in the address field of your Web browser.
Note: If you do not know the IP address of the printer, then you can:
• View the IP address on the printer control panel in the TCP/IP section under the Networks/Ports menu.
• Print a network setup page or the menu settings pages and locate the IP address in the TCP/IP section.
2 Click Settings > Paper Menu > Custom Types > select the custom name you want to configure > select a paper or
specialty media type > Submit.
Loading paper and specialty media
84
Paper and specialty media guidelines
Paper guidelines
Paper characteristics
The following paper characteristics affect print quality and reliability. Consider these characteristics when evaluating
new paper stock.
Weight
The printer can automatically feed paper weights from 60 to 220 g/m2 (16 to 58 lb bond) grain long. Paper lighter than
60 g/m2 (16 lb) might not be stiff enough to feed properly, causing jams. For best performance, use 75 g/m2 (20 lb
bond) grain long paper. For paper smaller than 182 x 257 mm (7.2 x 10.1 in.), we recommend 90 g/m2 (24 lb) or heavier
paper.
Note: Duplex is supported only for 63 g/m2–170 g/m2 (17 lb–45 lb bond) paper.
Curl
Curl is the tendency for paper to curl at its edges. Excessive curl can cause paper feeding problems. Curl can occur after
the paper passes through the printer, where it is exposed to high temperatures. Storing paper unwrapped in hot, humid,
cold, or dry conditions, even in the trays, can contribute to paper curling prior to printing and can cause feeding
problems.
Smoothness
Paper smoothness directly affects print quality. If paper is too rough, toner cannot fuse to it properly. If paper is too
smooth, it can cause paper feeding or print quality issues. Always use paper between 100 and 300 Sheffield points;
however, smoothness between 150 and 200 Sheffield points produces the best print quality.
Moisture content
The amount of moisture in paper affects both print quality and the ability of the printer to feed the paper correctly.
Leave paper in its original wrapper until it is time to use it. This limits the exposure of paper to moisture changes that
can degrade its performance.
Condition paper before printing by storing it in its original wrapper in the same environment as the printer for 24 to
48 hours before printing. Extend the time several days if the storage or transportation environment is very different
from the printer environment. Thick paper may also require a longer conditioning period.
Grain direction
Grain refers to the alignment of the paper fibers in a sheet of paper. Grain is either grain long, running the length of
the paper, or grain short, running the width of the paper.
For 60 to 135 g/m2 (16 to 36 lb bond) paper, grain long paper is recommended. For papers heavier than 135 g/m 2, grain
short is recommended.
Paper and specialty media guidelines
85
Fiber content
Most high-quality xerographic paper is made from 100% chemically treated pulped wood. This content provides the
paper with a high degree of stability resulting in fewer paper feeding problems and better print quality. Paper containing
fibers such as cotton can negatively affect paper handling.
Unacceptable paper
The following paper types are not recommended for use with the printer:
• Chemically treated papers used to make copies without carbon paper, also known as carbonless papers, carbonless
copy paper (CCP), or no carbon required (NCR) paper
• Preprinted papers with chemicals that may contaminate the printer
• Preprinted papers that can be affected by the temperature in the printer fuser
• Preprinted papers that require a registration (the precise print location on the page) greater than ±2.3 mm (±0.9 in.),
such as optical character recognition (OCR) forms
In some cases, registration can be adjusted with a software application to successfully print on these forms.
•
•
•
•
•
Coated papers (erasable bond), synthetic papers, thermal papers
Rough-edged, rough or heavily textured surface papers, or curled papers
Recycled papers that fail EN12281:2002 (European)
Paper weighing less than 60 g/m2 (16 lb)
Multiple-part forms or documents
Selecting paper
Using appropriate paper prevents jams and helps ensure trouble-free printing.
To help avoid jams and poor print quality:
• Always use new, undamaged paper.
• Before loading paper, know the recommended print side of the paper. This information is usually indicated on the
paper package.
• Do not use paper that has been cut or trimmed by hand.
• Do not mix paper sizes, types, or weights in the same source; mixing results in jams.
• Do not use coated papers unless they are specifically designed for electrophotographic printing.
Selecting preprinted forms and letterhead
Use these guidelines when selecting preprinted forms and letterhead:
• Use grain long for 60 to 90 g/m2 (16 to 24 lb) weight paper.
• Use only forms and letterhead printed using an offset lithographic or engraved printing process.
• Avoid papers with rough or heavily textured surfaces.
Use papers printed with heat-resistant inks designed for use in xerographic copiers. The ink must be able to withstand
temperatures up to 190°C (374°F) without melting or releasing hazardous emissions. Use inks that are not affected by
the resin in toner. Inks that are oxidation-set or oil-based generally meet these requirements; latex inks might not.
When in doubt, contact the paper supplier.
Paper and specialty media guidelines
86
Preprinted papers such as letterhead must be able to withstand temperatures up to 190°C (374°F) without melting or
releasing hazardous emissions.
Using recycled paper and other office papers
As an environmentally conscientious company, Lexmark supports the use of recycled paper produced specifically for
use in laser (electrophotographic) printers.
While no blanket statement can be made that all recycled paper will feed well, Lexmark consistently tests papers that
represent recycled cut size copier papers available on the global market. This scientific testing is conducted with rigor
and discipline. Many factors are taken into consideration both separately and as a whole, including the following:
•
•
•
•
•
•
•
•
Amount of post-consumer waste (Lexmark tests up to 100% post-consumer waste content.)
Temperature and humidity conditions (Testing chambers simulate climates from all over the world.)
Moisture content (Business papers should have low moisture: 4–5%.)
Bending resistance and proper stiffness means optimum feeding through the printer.
Thickness (impacts how much can be loaded into a tray)
Surface roughness (measured in Sheffield units, impacts print clarity and how well toner fuses to the paper)
Surface friction (determines how easily sheets can be separated)
Grain and formation (impacts curling, which also influences the mechanics of how the paper behaves as it moves
through the printer)
• Brightness and texture (look and feel)
Recycled papers are better than ever; however, the amount of recycled content in a paper affects the degree of control
over foreign matter. And while recycled papers are one good path to printing in an environmentally responsible manner,
they are not perfect. The energy required to de-ink and deal with additives such as colorants and “glue” often generates
more carbon emissions than does normal paper production. However, using recycled papers enables better resource
management overall.
Lexmark concerns itself with the responsible use of paper in general based on life cycle assessments of its products. To
gain a better understanding of the impact of printers on the environment, the company commissioned a number of
life cycle assessments and found that paper was identified as the primary contributor (up to 80%) of carbon emissions
caused throughout the entire life of a device (from design to end-of-life). This is due to the energy-intensive
manufacturing processes required to make paper.
Thus, Lexmark seeks to educate customers and partners on minimizing the impact of paper. Using recycled paper is
one way. Eliminating excessive and unnecessary paper consumption is another. Lexmark is well-equipped to help
customers minimize printing and copying waste. In addition, the company encourages purchasing paper from suppliers
who demonstrate their commitment to sustainable forestry practices.
Lexmark does not endorse specific suppliers, although a converter’s product list for special applications is maintained.
However, the following paper choice guidelines will help alleviate the environmental impact of printing:
1 Minimize paper consumption.
2 Be selective about the origin of wood fiber. Buy from suppliers who carry certifications such as the Forestry
Stewardship Council (FSC) or The Program for the Endorsement of Forest Certification (PEFC). These certifications
guarantee that the paper manufacturer uses wood pulp from forestry operators that employ environmentally and
socially responsible forest management and restoration practices.
3 Choose the most appropriate paper for printing needs: normal 75 or 80 g/m2 certified paper, lower weight paper,
or recycled paper.
Paper and specialty media guidelines
87
Unacceptable paper examples
Test results indicate that the following paper types are at risk for use with laser printers:
•
•
•
•
Chemically treated papers used to make copies without carbon paper, also known as carbonless papers
•
•
•
•
•
Coated papers (erasable bond), synthetic papers, thermal papers
Preprinted papers with chemicals that may contaminate the paper
Preprinted papers that can be affected by the temperature in the printer fuser
Preprinted papers that require a registration (the precise location on the page) greater than ± 2.3 mm (± 0.9 in.),
such as optical character recognition (OCR) forms. In some cases, registration can be adjusted with a software
application to successfully print on these forms.)
Rough-edged, rough or heavily textured surface papers or curled papers
Recycled papers that fail EN12281:2002 (European testing)
Paper weighing less than 60 g/m2 (16 lb)
Multiple part forms or documents
For more information about Lexmark, visit www.lexmark.com. General sustainability-related information can be found
at the Environmental Sustainability link.
Storing paper
Use these paper storage guidelines to help avoid jams and uneven print quality:
• For best results, store paper where the temperature is 21°C (70°F) and the relative humidity is 40%. Most label
manufacturers recommend printing in a temperature range of 18 to 24°C (65 to 75°F) with relative humidity between
40 and 60%.
• Store paper in cartons when possible, on a pallet or shelf, rather than on the floor.
• Store individual packages on a flat surface.
• Do not store anything on top of individual paper packages.
Paper and specialty media guidelines
88
Supported paper sizes, types, and weights
The following tables provide information on standard and optional paper input sources and the types of paper they
support.
Note: To use a paper size that is unlisted, configure a Universal Paper Size.
Supported paper sizes
520sheet
tray
2,000sheet
drawer
A4
210 x 297 mm
(8.27 x 11.7 in.)
1
1, 6
A5
1, 5
Paper size and
dimension
MP feeder
Manual
paper
2, 6
2, 6
Manual
envelope
Duplex
X
Scanner
glass
2, 5, 6
(1, 4, 6) & (2, 4,
5)
X
2, 5
2, 5
X
2, 5
(1, 4, 6)
& ( 1, 3, 5)
148 x 210 mm
(5.83 x 8.27 in.)
A6
ADF
X
X
2
2
X
2, 6
2, 6
X
X
(2, 4, 6) & (1, 3,
5, 6)
X
1, 3
105 x 148 mm
(4.13 x 5.83 in.)
JIS B5
1, 6
1, 6
2, 6
(1, 4, 6)
& ( 1, 3, 5)
182 x 257 mm
(7.17 x 10.1 in.)
Letter
216 x 279 mm
(8.5 x 11 in.)
1
Legal
1
1, 6
X
2, 6
2, 6
X
2, 5, 6
2
2
X
(1, 4) & (2, 3)
1, 3, 4, 5, 6
1, 3, 4
1, 6
1, 6
2, 6
2, 6
X
184 x 267 mm
(7.25 x 10.5 in.)
JIS B4
(1, 4, 6) & (2, 3,
5)
216 x 356 mm
(8.5 x 14 in.)
Executive
(2, 4, 6) & (1, 3,
5, 6)
1
X
2
2
X
257 x 364 mm
(10.12 x 14.33 in.)
1
Source supports size with size sensing.
2
Source supports size without size sensing.
3
Paper size is supported if set to metric.
4
Paper size is supported if set to US.
5
Paper size is supported if loaded in short edge orientation.
6
Paper size is supported if loaded in long edge orientation.
7
Custom-size envelope printing is not supported.
Paper and specialty media guidelines
89
(1, 4, 6) & (1,
1, 3, 4,
3, 5)
5, 6
2
1
(1, 4, 6) & (2, 3,
5)
(2, 4) & (1, 3)
Paper size and
dimension
520sheet
tray
A3
2,000sheet
drawer
MP feeder
Manual
paper
Manual
envelope
Duplex
ADF
Scanner
glass
1
X
2
2
X
2
1
1, 3, 4
1
X
2
2
X
2
1
1, 3, 4
2
X
2
2
X
2
2
2
Folio
216 x 330 mm
(8.5 x 13 in.)
1
X
2
2
X
2
1, 2, 3, 4
(2, 4) & (1, 3)
Statement
1, 5
X
2, 5
2, 5
X
2, 5
1, 4, 5, 6
1, 4, 5, 6
2
X
2
2
X
2
2
2
X
X
2
X
X
X
X
2
X
X
X
2
X
297 x 420 mm
(11.69 x 16.54 in.)
11x17
279 x 432 mm
(11 x 17 in.)
Oficio (México)
216 x 340 mm
(8.5 x 13.4 in.)
140 x 216 mm
(5.5 x 8.5 in.)
Universal
64–297 mm x 148–
432 mm (2.52–
11.69 x 5.83–
17.01 in.)
7 3/4 Envelope
(Monarch)
X
X
X
X
X
X
X
2
X
X
X
2
X
X
X
2
98 x 191 mm
(3.875 x 7.5 in.)
9 Envelope
X
X
X
98 x 226 mm
(3.875 x 8.9 in.)
Com 10 Envelope
105 x 241 mm
(4.12 x 9.5 in.)
DL Envelope
110 x 220 mm
(4.33 x 8.66 in.)
1
Source supports size with size sensing.
2
Source supports size without size sensing.
3
Paper size is supported if set to metric.
4
Paper size is supported if set to US.
5
Paper size is supported if loaded in short edge orientation.
6
Paper size is supported if loaded in long edge orientation.
7
Custom-size envelope printing is not supported.
Paper and specialty media guidelines
90
Paper size and
dimension
520sheet
tray
2,000sheet
drawer
C5 Envelope
X
X
X
X
X
X
X
X
X
X
MP feeder
2
Manual
paper
Manual
envelope
Duplex
ADF
Scanner
glass
X
X
X
X
X
X
X
X
X
X
X
X
2
162 x 229 mm
(6.38 x 9.01 in.)
B5 Envelope
176 x 250 mm
(6.93 x 9.84 in.)
Other Envelope7
76.22 x 76.22 mm
(3 x 3 in.) up to
296.93 x 427.48 mm
(11.69 x 16.83 in.)
1
Source supports size with size sensing.
2
Source supports size without size sensing.
3
Paper size is supported if set to metric.
4
Paper size is supported if set to US.
5
Paper size is supported if loaded in short edge orientation.
6
Paper size is supported if loaded in long edge orientation.
7
Custom-size envelope printing is not supported.
Supported paper types and weights
Printer
The printer supports 60–120-g/m2 (16–74-lb) paper weights. The duplex unit supports 64–128-g/m2 (17–34-lb) paper
weights.
Note: Labels, transparencies, envelopes, and card stock always print at reduced speed.
Paper and specialty media guidelines
91
Paper type
520sheet
tray
2,000sheet
drawer
MP feeder Manual
paper
Paper
•
•
•
•
•
•
•
•
•
•
•
•
Manual
envelope
Duplex
ADF
Scanner
glass
X
Plain
Bond
Glossy
Heavy Glossy
Colored
Custom Type [x]
Letterhead
Light
Heavy
Preprinted
Rough/Cotton
Recycled
Card stock
X
X
X
Transparencies
X
X
X
Labels
X
X
X
X
X
• Paper
• Vinyl
Envelopes
X
X
X
Finisher
Use this table to determine the possible exit destinations of print jobs which use supported paper types and weights.
The paper capacity of each exit bin is listed in parentheses. Paper capacity estimations are calculated based on
75-g/m2 (20-lb) paper.
The finisher standard bin and Bin 1 support 60–220-g/m2 (16–60-lb) paper weights. Bin 3 (booklet-maker) supports 60–
90-g/m2 (16–24-lb) paper weights plus one additional cover weighted up to 220 g/m2 (60 lb).
Paper type
Standard
500-sheet bin
Second exit bin
Bin 1
Bin 2
Bin 3
Plain paper
Card stock
X
Transparency
X
X
X
Recycled
X
X
X
Glossy
X
Heavy glossy
X
Labels
Vinyl labels
X
X
X
X
X
X
X
X
Paper and specialty media guidelines
92
Paper type
Standard
500-sheet bin
Second exit bin
Bin 1
Bin 2
Bond
Bin 3
X
Envelope
X
X
X
Rough envelope
X
X
X
Letterhead
X
Preprinted
X
Colored paper
Light paper
Heavy paper
Rough/Cotton
X
Custom Type [x]
X
X
Supported finishing features
1
Finisher standard bin
2
Finisher bin 1
3
Finisher bin 2 (booklet-maker)
4
Paper transport
Notes:
• The finisher shown is the booklet finisher. Bin 2 is available only when the booklet finisher is installed.
• All paper tray capacities are based on 75-g/m2 (20-lb) paper.
Paper and specialty media guidelines
93
Paper transport
•
•
•
•
The paper capacity is 50 sheets.
Finishing options are not supported in this bin.
Envelopes are routed here.
Universal paper is routed here when it is longer than 483 mm (19 in.) or shorter than 148 mm (6 in.).
Finisher standard bin
• The paper capacity is 500 sheets.
• Envelopes and executive-size paper are not supported in this bin.
• Finishing options are not supported in this bin.
Bin 1
• The paper capacity is 3,000 sheets when the standard finisher is installed.
• The paper capacity is 1,500 sheets when the booklet finisher is installed.
Bin 1 finishing features
Size
Punch*
Offset
Single/Double staple
Double dual staple
X
X
X
X
A3
A4
A5
Executive
Folio
X
X
X
JIS B4
X
JIS B5
X
Legal
X
X
Letter
Statement
X
X
X
Tabloid
X
Universal
Envelopes (any size)
X
* For the Universal paper size, the
X
X
X
finishing edge must be at least 9 in. (229 mm) for a 3-hole punch and 10 in. (254 mm) for
a 4-hole punch.
Punch—Select from two-, three-, or four-hole punch
Single staple—Use only one staple
Double staple—Use two staples
Double dual staple—Use two sets of two staples. This setting is supported only for widths between 8 in. (203 mm) and
12 in. (297 mm) with lengths between 7 in. (182 mm) and 17 in. (432 mm).
Paper and specialty media guidelines
94
Bin 2 (booklet-maker)
Bin 2 is available only when the booklet finisher is installed. The paper capacity of Bin 2 (booklet-maker) is 300 sheets
or 20 sets of 15-sheet booklets.
Bin 2 finishing features
Size
Bi fold
Booklet fold
Saddle staple
A5
X
X
X
Executive
X
X
X
X
X
X
X
X
X
Universal
X
X
X
Envelopes (any size)
X
X
X
A3
A4 (only SEF)
Folio
JIS B4
JIS B5
Legal
Letter (only SEF)
Statement
Tabloid
SEF—The paper is loaded in the short edge orientation. The short edge of the paper enters the printer first.
Bi fold—Each page is individually folded and stacked separately.
Booklet fold—A multiple-page job is folded along the center into a single booklet.
Saddle staple—A booklet-fold print job is stapled along the center fold.
Paper and specialty media guidelines
95
Printing
The selection and handling of paper and specialty media can affect how reliably documents print. For more information,
see “Avoiding jams” on page 262 and “Storing paper” on page 88.
Printing a document
Printing a document
1 From the printer control panel Paper menu, set the Paper Type and Paper Size to match the loaded paper.
2 Send the print job:
For Windows users
a
b
c
d
With a document open, click File > Print.
Click Properties, Preferences, Options, or Setup.
Adjust settings as necessary.
Click OK > Print.
For Macintosh users
a Customize the settings as needed in the Page Setup dialog:
1 With a document open, choose File > Page Setup.
2 Choose a paper size or create a custom size to match the loaded paper.
3 Click OK.
b Customize the settings as needed in the Print dialog:
1 With a document open, choose File > Print.
If necessary, click the disclosure triangle to see more options.
2 From the Print dialog and pop-up menus, adjust the settings as needed.
Note: To print on a specific paper type, adjust the paper type setting to match the loaded paper, or select
the appropriate tray or feeder.
3 Click Print.
Printing in black and white
From the home screen, navigate to:
> Settings > Print Settings > Quality Menu > Print Mode > Black Only > Submit
Adjusting toner darkness
1 Type the printer IP address into the address field of your Web browser.
Printing
96
If you do not know the IP address of the printer, you can:
• View the IP address on the printer control panel in the TCP/IP section under the Networks/Ports menu.
• Print a network setup page or the menu settings pages and locate the IP address in the TCP/IP section.
2 Click Settings > Print Settings > Quality Menu > Toner Darkness.
3 Adjust the toner darkness setting.
4 Click Submit.
Using Max Speed and Max Yield
The Max Speed and Max Yield settings let you choose between a faster print speed or a higher toner yield. Max Yield
is the factory default setting.
• Max Speed—Prints in color unless Black Only is selected in the driver. Prints in black only if the Black Only driver
setting is selected.
• Max Yield—Switches from black to color based on the color content found on each page. Frequent color mode
switching can result in slower printing if the content of pages is mixed.
Using the Embedded Web Server
1 Type the printer IP address into the address field of your Web browser.
If you do not know the IP address of the printer, you can:
• View the IP address on the printer control panel in the TCP/IP section under the Networks/Ports menu.
• Print a network setup page or the menu settings pages and locate the IP address in the TCP/IP section.
2 Click Configuration > Print Settings > Setup Menu.
3 From the Printer Usage list, select Max Speed or Max Yield.
4 Click Submit.
Using the printer control panel
1 Navigate to:
> Settings > Print Settings > Setup Menu
2 From the Printer Usage list, select Max Speed or Max Yield.
3 Touch Submit.
Printing
97
Printing from a flash drive
Notes:
• Before printing an encrypted PDF file, enter the file password from the printer control panel.
• You cannot print files for which you do not have printing permissions.
1 Insert a flash drive into the USB port.
Notes:
• If you insert the flash drive when the printer requires attention, such as when a jam has occurred, then the
printer ignores the flash drive.
• If you insert the flash drive while the printer is processing other print jobs, then Busy appears. After these
print jobs are processed, you may need to view the held jobs list to print documents from the flash drive.
Warning—Potential Damage: Do not touch the USB cable, any network adapter, any connector, the memory
device, or the printer in the areas shown while actively printing, reading, or writing from the memory device. A
loss of data can occur.
Printing
98
2 From the printer control panel, touch the document you want to print.
3 Touch the arrows to increase the number of copies to print, and then touch Print.
Notes:
• Do not remove the flash drive from the USB port until the document has finished printing.
• If you leave the flash drive in the printer after leaving the initial USB menu screen, then you can still print files
from the flash drive as held jobs.
Supported flash drives and file types
Flash drive
File type
Documents:
• Lexar JumpDrive 2.0 Pro (256MB, 512MB, or 1GB sizes)
• SanDisk Cruzer Mini (256MB, 512MB, or 1GB sizes)
• .pdf
• .xps
Notes:
• Hi-Speed USB flash drives must support the Full-Speed standard. Devices supporting only USB low-speed
capabilities are not supported.
• USB flash drives must support the FAT (File Allocation Tables) system. Devices formatted with NTFS
(New Technology File System) or any other file system are not supported.
Printing
99
Images:
•
•
•
•
•
•
•
•
•
.dcx
.gif
.JPEG
.jpg
.bmp
.pcx
.TIFF
.tif
.png
Printing on specialty media
Tips on using letterhead
•
•
•
•
Use letterhead designed specifically for laser/LED printers.
Print samples on the letterhead being considered for use before buying large quantities.
Before loading letterhead, flex the sheets to prevent them from sticking together.
Page orientation is important when printing on letterhead.
Source
Print side
Paper orientation
Standard and optional trays (simplex printing)
Preprinted letterhead
design is placed faceup.
When feeding short edge, the top
edge of the sheet with the logo is
placed at the right side of the tray.
When feeding long-edge, the
letter head should go to the rear
of the printer.
Standard and optional trays (duplex printing)
Preprinted letterhead
design is placed facedown.
The top edge of the sheet with the
logo is placed at the right side of
the tray.
Multipurpose feeder (simplex printing)
Preprinted letterhead
design is placed facedown.
The top edge of the sheet with the
logo should enter the
multipurpose feeder first.
Multipurpose feeder (duplex printing)
Preprinted letterhead
design is placed faceup.
The top edge of the sheet with the
logo should enter the
multipurpose feeder last.
Note: Check with the manufacturer or vendor to determine whether the chosen preprinted letterhead is acceptable
for laser/LED printers.
Tips on using transparencies
•
•
•
•
Print samples on the transparencies being considered for use before buying large quantities.
Feed transparencies from the standard tray or from the multipurpose feeder.
From the Paper menu, set the Paper Type to Transparency.
Use transparencies designed specifically for laser/LED printers. Transparencies must be able to withstand
temperatures of 230°C (446°F) without melting, discoloring, offsetting, or releasing hazardous emissions.
• To prevent print quality problems, avoid getting fingerprints on the transparencies.
• Before loading transparencies, flex the stack to prevent sheets from sticking together.
• We recommend Lexmark transparencies. For ordering information, see the Lexmark Web site at
www.lexmark.com.
Printing
100
Tips on using envelopes
Print samples on the envelopes being considered for use before buying large quantities.
• Use envelopes designed specifically for laser/LED printers. Check with the manufacturer or vendor to ensure that
the envelopes can withstand temperatures up to 220°C (446°F) without sealing, wrinkling, curling excessively, or
releasing hazardous emissions.
• For best performance, use envelopes made from 90 g/m2 (24 lb bond) paper or 25% cotton. All-cotton envelopes
must not exceed 70 g/m2 (20 lb bond) weight.
• Use only new envelopes from undamaged packages.
• To optimize performance and minimize jams, do not use envelopes that:
– Have excessive curl or twist
– Are stuck together or damaged in any way
– Have windows, holes, perforations, cutouts, or embossing
– Have metal clasps, string ties, or folding bars
– Have an interlocking design
– Have postage stamps attached
– Have any exposed adhesive when the flap is in the sealed or closed position
– Have bent corners
– Have rough, cockle, or laid finishes
• Adjust the width guides to fit the width of the envelopes.
Note: A combination of high humidity (over 60%) and the high printing temperature may wrinkle or seal envelopes.
Tips on using labels
Notes:
• Single-sided paper labels designed for laser/LED printers are supported for occasional use.
• It is recommended to print no more than 20 pages of paper labels a month.
• Vinyl, pharmacy, and dual-sided labels are not supported.
For detailed information on label printing, characteristics, and design, see the Card Stock & Label Guide available on
the Lexmark Web site at http://support.lexmark.com.
When printing on labels:
• Use labels designed specifically for laser/LED printers. Check with the manufacturer or vendor to verify that:
– The labels can withstand temperatures up to 210°C (410°F) without sealing, excessive curling, wrinkling, or
releasing hazardous emissions.
Note: Labels can be printed at a higher fusing temperature up to 220°C (428°F) if Label Weight is set to Heavy.
Select this setting using the Embedded Web Server, or from the printer control panel Paper menu.
– Label adhesives, face sheet (printable stock), and topcoats can withstand up to 25 psi (172 kPa) pressure without
delaminating, oozing around the edges, or releasing hazardous fumes.
• Do not use labels with slick backing material.
• Use full label sheets. Partial sheets may cause labels to peel off during printing, resulting in a jam. Partial sheets
also contaminate the printer and the cartridge with adhesive, and could void the printer and cartridge warranties.
• Do not use labels with exposed adhesive.
Printing
101
• Do not print within 1 mm (0.04 in.) of the edge of the label, of the perforations, or between die-cuts of the label.
• Be sure adhesive backing does not reach to the sheet edge. Zone coating of the adhesive at least 1 mm (0.04 in.)
away from edges is recommended. Adhesive material contaminates the printer and could void the warranty.
• If zone coating of the adhesive is not possible, then remove a 1.6 mm (0.06 in.) strip on the leading and driver edge,
and use a non-oozing adhesive.
• Portrait orientation works best, especially when printing bar codes.
Tips on using card stock
Card stock is heavy, single-ply specialty media. Many of its variable characteristics, such as moisture content, thickness,
and texture, can significantly impact print quality. Print samples on the card stock being considered for use before
buying large quantities.
• From the Paper menu, set the Paper Type to Card Stock.
• Select the appropriate Paper Texture setting.
• Be aware that preprinting, perforation, and creasing may significantly affect the print quality and cause jams or
other paper handling problems.
• Check with the manufacturer or vendor to ensure the card stock can withstand temperatures up to 220°C (446°F)
without releasing hazardous emissions.
• Do not use preprinted card stock manufactured with chemicals that may contaminate the printer. Preprinting
introduces semi-liquid and volatile components into the printer.
• Use grain short card stock when possible.
Printing confidential and other held jobs
Storing print jobs in the printer
You can set the printer to store print jobs in the printer memory until you start the print job from the printer control
panel.
All print jobs that can be initiated by the user at the printer are called held jobs.
Note: Confidential, Verify, Reserve, and Repeat print jobs may be deleted if the printer requires extra memory to process
additional held jobs.
Print job type
Description
Confidential
Confidential lets you hold print jobs in the computer until you enter the PIN from
the control panel.
Note: The PIN is set from the computer. It must be four digits, using the numbers
0–9.
Verify
Verify lets you print one copy of a print job while the printer holds the remaining
copies. It allows you to examine if the first copy is satisfactory. The print job is
automatically deleted from the printer memory once all copies are printed.
Reserve
Reserve allows the printer to store print jobs for printing at a later time. The print
jobs are held until deleted from the Help Jobs menu.
Repeat
Repeat prints and stores print jobs in the printer memory for reprinting.
Printing
102
Printing confidential and other held jobs
Note: Confidential and Verify print jobs are automatically deleted from memory after printing. Repeat and Reserve
jobs are held in the printer until you choose to delete them.
For Windows users
1 With a document open, click File > Print.
2 Click Properties, Preferences, Options, or Setup.
3 Click Print and Hold.
4 Select the print job type (Confidential, Repeat, Reserve, or Verify), and then assign a user name. For a confidential
print job, also enter a four-digit PIN.
5 Click OK or Print.
6 From the printer home screen, release the print job.
• For confidential print jobs, navigate to:
Held jobs > your user name > Confidential Jobs > enter PIN > select print job > specify number of copies >
Print
• For other print jobs, navigate to:
Held jobs > your user name > select print job > specify number of copies > Print
For Macintosh users
1 With a document open, choose File > Print.
If necessary, click the disclosure triangle to see more options.
2 From the print options or Copies & Pages pop-up menu, choose Job Routing.
3 Select the print job type (Confidential, Repeat, Reserve, or Verify), and then assign a user name. For a confidential
print job, also enter a four-digit PIN.
4 Click OK or Print.
5 From the printer home screen, release the print job.
• For confidential print jobs, navigate to:
Held jobs > your user name > Confidential Jobs > enter PIN > select print job > specify number of copies >
Print
• For other print jobs, navigate to:
Held jobs > your user name > select print job > specify number of copies > Print
Printing information pages
Printing a font sample list
1 From the home screen, navigate to:
> Reports > Print Fonts
2 Touch PCL Fonts or PostScript Fonts.
Printing
103
Printing a directory list
A directory list shows the resources stored in a flash memory or on the printer hard disk.
From the home screen, navigate to:
> Reports > Print Directory
Canceling a print job
Canceling a print job from the printer control panel
1 Touch Cancel Jobs on the touch screen, or press
on the keypad.
2 Touch the job you want to cancel, and then touch Delete Selected Jobs.
Canceling a print job from the computer
For Windows users
1 Open the printers folder:
a Click , or click Start and then click Run.
b In the Start Search or Run box, type control printers.
c Press Enter, or click OK.
2 Double-click the printer icon.
3 Select the print job you want to cancel.
4 From the keyboard, press Delete.
For Macintosh users
In Mac OS X version 10.5 or later:
1 From the Apple menu, choose System Preferences > Print & Fax > Open Print Queue.
2 From the printer window, select the print job you want to cancel.
3 From the icon bar at the top of the window, click the Delete icon.
In Mac OS X version 10.4 or earlier:
1 From the Finder, navigate to:
Go > Applications
2 Double-click Utilities > Print Center or Printer Setup Utility.
3 Double-click the printer icon.
4 From the printer window, select the print job you want to cancel.
5 From the icon bar at the top of the window, click the Delete icon.
Printing
104
Copying
ADF
Scanner glass
Use the ADF for multiple-page documents. Use the scanner glass for single pages, small items (such as postcards or photos),
transparencies, photo paper, or thin media (such as magazine clippings).
Making copies
Making a quick copy
1 Load an original document faceup, short edge first into the ADF or facedown on the scanner glass.
Note: Do not load postcards, photos, small items, transparencies, photo paper, or thin media (such as magazine
clippings) into the ADF. Place these items on the scanner glass.
2 Adjust the paper guides when loading a document into the ADF.
Note: Make sure the size of the original document and the copy paper size are the same. Failure to set the proper
size may result to a cropped image.
3 From the printer control panel, press
to start copying.
Copying using the ADF
1 Load an original document faceup, short edge first into the ADF.
Note: Do not load postcards, photos, small items, transparencies, photo paper, or thin media (such as magazine
clippings) into the ADF. Place these items on the scanner glass.
2 Adjust the paper guides.
3 From the home screen, navigate to:
Copy > change the copy settings > Copy It
Copying
105
Copying using the scanner glass
1 Place an original document facedown on the scanner glass in the upper left corner.
2 From the home screen, navigate to:
Copy > change the copy settings > Copy It
3 If you have more pages to scan, then place the next document on the scanner glass, and then touch Scan the Next
Page.
4 Touch Finish the Job to return to the home screen.
Copying film photos
1 Place a photo facedown on the upper left corner of the scanner glass.
2 From the home screen, navigate to:
Copy > Content > Photo >
> Photo/Film >
> Copy It > Scan the Next Page or Finish the Job
Copying on specialty media
Copying on transparencies
1 Load an original document faceup, short edge first into the ADF or facedown on the scanner glass.
Note: Do not load postcards, photos, small items, transparencies, photo paper, or thin media (such as magazine
clippings) into the ADF. Place these items on the scanner glass.
2 If you are loading a document into the ADF, then adjust the paper guides.
3 From the home screen, navigate to:
Copy > Copy from > size of the original document >
4 Touch Copy to, and then select the tray that contains transparencies, or touch Manual Feeder Size.
5 Load transparencies in the multipurpose feeder.
6 From the home screen, navigate to:
> select the desired size of the transparencies > Manual Feeder Type >
> Copy It
Copying on letterhead
1 Load an original document faceup, short edge first into the ADF or facedown on the scanner glass.
Note: Do not load postcards, photos, small items, transparencies, photo paper, or thin media (such as magazine
clippings) into the ADF. Place these items on the scanner glass.
2 If you are loading a document into the ADF, then adjust the paper guides.
3 From the home screen, navigate to:
Copy > Copy from > size of the original document > Copy to > Manual Feeder
4 Place the letterhead faceup, top edge first in the multipurpose feeder.
Copying
106
5 Select the size of the letterhead.
6 Navigate to:
Continue > Letterhead > Continue > Copy It
Customizing copy settings
Copying to a different size
1 Load an original document faceup, short edge first into the ADF or facedown on the scanner glass.
Note: Do not load postcards, photos, small items, transparencies, photo paper, or thin media (such as magazine
clippings) into the ADF. Place these items on the scanner glass.
2 If you are loading a document into the ADF, then adjust the paper guides.
3 On the home screen, touch Copy.
4 Touch Copy from > select the size of the original document >
5 Touch Copy to > select the size of the copy >
.
.
Note: The printer will scale the size automatically.
6 Touch Copy It.
Making copies using paper from a selected tray
1 Load an original document faceup, short edge first into the ADF or facedown on the scanner glass.
Note: Do not load postcards, photos, small items, transparencies, photo paper, or thin media (such as magazine
clippings) into the ADF. Place these items on the scanner glass.
2 If you are loading a document into the ADF, then adjust the paper guides.
3 From the home screen, navigate to:
Copy > Copy from > size of the original document > Copy to
4 Touch Manual Feeder or select the tray that contains the paper type you want to use.
Note: If you choose Manual Feeder, then you will also need to select the paper size and type.
5 Touch Copy It.
Copying
107
Copying different paper sizes
Use the ADF to copy original documents with different paper sizes. Depending on the paper sizes loaded and the “Copy
to” and “Copy from” settings, each copy is either printed on mixed paper sizes (Example 1) or scaled to fit a single paper
size (Example 2).
Example 1: Copying on mixed paper sizes
1 Load an original document faceup, short edge first into the ADF or facedown on the scanner glass.
Note: Do not load postcards, photos, small items, transparencies, photo paper, or thin media (such as magazine
clippings) into the ADF. Place these items on the scanner glass.
2 If you are loading a document into the ADF, then adjust the paper guides.
3 From the home screen, navigate to:
Copy > Copy from > Mixed Sizes >
> Copy to > Auto Size Match >
> Copy It
The scanner identifies the different paper sizes as they are scanned. Copies are printed on mixed paper sizes
corresponding to the paper sizes of the original document.
Example 2: Copying on a single paper size
1 Load an original document faceup, short edge first into the ADF or facedown on the scanner glass.
Note: Do not load postcards, photos, small items, transparencies, photo paper, or thin media (such as magazine
clippings) into the ADF. Place these items on the scanner glass.
2 If you are loading a document into the ADF, then adjust the paper guides.
3 From the home screen, navigate to:
Copy > Copy from > Mixed Sizes >
> Copy to > Letter >
> Copy It
The scanner identifies the different paper sizes as they are scanned, and then scales the mixed paper sizes to fit on
the paper size selected.
Copying on both sides of the paper (duplexing)
1 Load an original document faceup, short edge first into the ADF or facedown on the scanner glass.
Note: Do not load postcards, photos, small items, transparencies, photo paper, or thin media (such as magazine
clippings) into the ADF. Place these items on the scanner glass.
2 If you are loading a document into the ADF, then adjust the paper guides.
3 On the home screen, touch Copy.
4 From the Sides (Duplex) area, touch the button for your preferred duplexing method.
The first number represents sides of the original documents; the second number represents sides of the copy. For
example, select 1-sided to 2-sided if you have 1-sided original documents and you want 2-sided copies.
5 Touch
, and then Copy It.
Copying
108
Reducing or enlarging copies
Copies can be reduced to 25% of the original document size or enlarged to 400% of the original document size. The
factory default setting for Scale is Auto. If you leave Scale set to Auto, the content of your original document will be
scaled to fit the size of the paper onto which you are copying.
To reduce or enlarge a copy:
1 Load an original document faceup, short edge first into the ADF or facedown on the scanner glass.
Note: Do not load postcards, photos, small items, transparencies, photo paper, or thin media (such as magazine
clippings) into the ADF. Place these items on the scanner glass.
2 If you are loading a document into the ADF, then adjust the paper guides.
3 On the home screen, touch Copy.
4 From the Scale area, touch the arrows to enlarge or reduce your copies.
Touching “Copy to” or “Copy from” after setting Scale manually changes the scale value back to Auto.
5 Touch Copy It.
Adjusting copy quality
1 Load an original document faceup, short edge first into the ADF or facedown on the scanner glass.
Note: Do not load postcards, photos, small items, transparencies, photo paper, or thin media (such as magazine
clippings) into the ADF. Place these items on the scanner glass.
2 If you are loading a document into the ADF, then adjust the paper guides.
3 From the home screen, navigate to:
Copy > Content
4 Touch the button that best represents the content type of the document you are copying:
• Text—Use when the content of the original document is mostly text or line art.
• Graphics—Use when the original document is mostly business-type graphics such as pie charts, bar charts, and
animations.
• Text/Photo—Use when the original document is a mixture of text, graphics, and photos.
• Photo—Use when the original document is mostly a photo or an image.
5 Touch
.
6 Touch the button that best represents the content source of the document you are copying:
• Color Laser—Use when the original document was printed using a color laser printer.
• Black/White Laser—Use when the original document was printed using a mono laser printer.
• Inkjet—Use when the original document was printed using an inkjet printer.
• Photo/Film—Use when the original document is a photo from film.
• Magazine—Use when the original document is from a magazine.
• Newspaper—Use when the original document is from a newspaper.
• Press—Use when the original document was printed using a printing press.
• Other—Use when the original document was printed using an alternate or unknown printer.
7 Touch
> Copy It.
Copying
109
Collating copies
If you print multiple copies of a document, then you can choose to print each copy as a set (collated) or to print the
copies as groups of pages (not collated).
Collated
Not collated
By default, Collate is set to On. If you do not want to collate your copies, then change the setting to Off:
1 Load an original document faceup, short edge first into the ADF or facedown on the scanner glass.
Note: Do not load postcards, photos, small items, transparencies, photo paper, or thin media (such as magazine
clippings) into the ADF. Place these items on the scanner glass.
2 If you are loading a document into the ADF, then adjust the paper guides.
3 From the home screen, navigate to:
Copy > enter the number of copies > Collate > Off >
> Copy It
Placing separator sheets between copies
1 Load an original document faceup, short edge first into the ADF or facedown on the scanner glass.
Note: Do not load postcards, photos, small items, transparencies, photo paper, or thin media (such as magazine
clippings) into the ADF. Place these items on the scanner glass.
2 If you are loading a document into the ADF, then adjust the paper guides.
3 From the home screen, navigate to:
Copy > Advanced Options > Separator Sheets
Note: Collate must be set to On for the separator sheets to be placed between copies. If Collate is set to Off, then
the separator sheets are added to the end of the print job.
4 Select one of the following:
• Between Copies
• Between Jobs
• Between Pages
• Off
5 Touch
, and then Copy It.
Copying multiple pages onto a single sheet
In order to save paper, you can copy either two or four consecutive pages of a multiple-page document onto a single
sheet of paper.
Copying
110
Notes:
• The Paper Size must be set to Letter, Legal, A4, or JIS B5.
• The Copy Size must be set to 100%.
1 Load an original document faceup, short edge first into the ADF or facedown on the scanner glass.
Note: Do not load postcards, photos, small items, transparencies, photo paper, or thin media (such as magazine
clippings) into the ADF. Place these items on the scanner glass.
2 If you are loading a document into the ADF, then adjust the paper guides.
3 From the home screen, navigate to:
Copy > Advanced Options > Paper Saver > select desired output >
> Copy It
Creating a custom copy job (job build)
The custom copy job or job build is used to combine one or more sets of original documents into a single copy job. Each
set may be scanned using different job parameters. When a copy job is submitted and Custom Job is enabled, the
scanner scans the first set of original documents using the supplied parameters, and then it scans the next set with the
same or different parameters.
The definition of a set depends on the scan source:
• If you scan a document on the scanner glass, then a set consists of one page.
• If you scan multiple pages using the ADF, then a set consists of all scanned pages until the ADF becomes empty.
• If you scan one page using the ADF, then a set consists of one page.
For example:
1 Load an original document faceup, short edge first into the ADF or facedown on the scanner glass.
Note: Do not load postcards, photos, small items, transparencies, photo paper, or thin media (such as magazine
clippings) into the ADF. Place these items on the scanner glass.
2 If you are loading a document into the ADF, then adjust the paper guides.
3 From the home screen, navigate to:
Copy > Options > Custom Job > On > Done > Copy It
When the end of a set is reached, the scan screen appears.
4 Load the next document faceup, short edge first into the ADF or facedown on the scanner glass, and then touch
Scan the Automatic Document Feeder or Scan the flatbed.
Note: If required, change the job settings.
5 If you have another document to scan, then repeat the previous step. Otherwise, touch Finish the job.
Copying
111
Placing information on copies
Placing the date and time at the top of each page
1 Load an original document faceup, short edge first into the ADF or facedown on the scanner glass.
Note: Do not load postcards, photos, small items, transparencies, photo paper, or thin media (such as magazine
clippings) into the ADF. Place these items on the scanner glass.
2 If you are loading a document into the ADF, then adjust the paper guides.
3 From the home screen, navigate to:
Copy > Advanced Options > Header/Footer
4 Pick an area of the page where you want to place the date and time.
5 Touch Yes or No >
> Copy It.
Placing an overlay message on each page
An overlay message can be placed on each page. The message choices are Urgent, Confidential, Copy, Custom or Draft.
To place a message on the copies:
1 Load an original document faceup, short edge first into the ADF or facedown on the scanner glass.
Note: Do not load postcards, photos, small items, transparencies, photo paper, or thin media (such as magazine
clippings) into the ADF. Place these items on the scanner glass.
2 If you are loading a document into the ADF, then adjust the paper guides.
3 From the home screen, navigate to:
Copy > Advanced Options > Overlay > select overlay message >
.
4 Touch Copy It.
Canceling a copy job
Canceling a copy job while the document is in the ADF
When the ADF begins processing a document, the scanning screen appears. To cancel the copy job, touch Cancel Job
on the touch screen.
A “Canceling scan job” screen appears. The ADF clears all pages in the ADF and cancels the job.
Canceling a copy job while copying pages using the scanner glass
Touch Cancel Job on the touch screen.
A “Canceling scan job” screen appears. Once the job is canceled, the copy screen appears.
Copying
112
Canceling a copy job while pages are being printed
1 From the home screen, touch Cancel Job, or press
on the keypad.
2 Touch the job you want to cancel.
3 Touch Delete Selected Jobs.
Understanding the copy screens and options
Copy from
This option opens a screen where you can enter the paper size of the original document.
• Touch a paper size that matches the original document.
• Touch Mixed Sizes to copy an original document that contains mixed paper sizes with the same width.
• Touch Auto Size Sense to allow the scanner to automatically determine the size of the original document.
Copy to
This option opens a screen where you can enter the paper size and type on which your copies will be printed.
• Touch the paper size and type that matches the paper loaded.
• If the settings for “Copy from” and “Copy to” are different, then the printer automatically adjusts the Scale setting
to accommodate the difference.
• If the paper type or size that you want to copy onto is not loaded in one of the trays, then touch Manual Feeder,
and manually load the paper in the multipurpose feeder.
• When “Copy to” is set to Auto Size Match, each copy matches the paper size of the original document. If a matching
paper size is not in one of the trays, then Paper size not found appears and prompts to load a paper in a
tray or multipurpose feeder.
Copies
This option allows you to set the number of copies to be printed.
Scale
This option creates an image from your copy that is proportionally scaled anywhere between 25% and 400%. Scale can
also be set for you automatically.
• When you want to copy from one size of paper to another, such as from legal-size to letter-size paper, setting the
“Copy from” and “Copy to” paper sizes automatically changes the scale to keep all the original document information
on your copy.
• Touch the left arrow to decrease the value by 1%; touch the right arrow to increase the value by 1%.
• Hold your finger on an arrow to make a continuous increment change.
• Hold your finger on an arrow for two seconds to cause the pace of the change to accelerate.
Copying
113
Darkness
This option adjusts how light or dark your copies will turn out in relation to the original document.
Sides (Duplex)
Use this option to select duplex settings. You can print copies on one or two sides, make two-sided copies (duplex) of
two-sided original documents, make two-sided copies from one-sided original documents, or make one-sided copies
(simplex) from two-sided original documents.
Collate
This option keeps the pages of a print job stacked in sequence when printing multiple copies of the document. The
factory default setting for Collate is on; the output pages of your copies will be ordered (1,2,3) (1,2,3) (1,2,3). If you
want all the copies of each page to remain together, turn Collate off, and your copies will be ordered (1,1,1) (2,2,2)
(3,3,3).
Content
This option lets you set the original document type and source.
Choose content type from Text, Text/Photo, Photo, or Graphics.
• Text—Use when the content of the original document is mostly text or line art.
• Graphics—Use when the original document is mostly business-type graphics such as pie charts, bar charts, and
animations.
• Text/Photo—Use when the original document is a mixture of text, graphics, and photos.
• Photo—Use when the original document is mostly a photo or an image.
Choose content source from Color Laser, Black/White Laser, Inkjet, Photo/Film, Magazine, Newspaper, Press, or Other.
•
•
•
•
•
•
•
•
Color Laser—Use when the original document was printed using a color laser printer.
Black/White Laser—Use when the original document was printed using a mono laser printer.
Inkjet—Use when the original document was printed using an inkjet printer.
Photo/Film—Use when the original document is a photo from film.
Magazine—Use when the original document is from a magazine.
Newspaper—Use when the original document is from a newspaper.
Press—Use when the original document was printed using a printing press.
Other—Use when the original document was printed using an alternate or unknown printer.
Color
This option enables or disables color for the scanned image.
Copying
114
Advanced Options
Touching the Advanced Options button opens a screen where you can change the following settings:
• Advanced Duplex—Use to specify the document orientation, whether documents are one-sided or two-sided, and
how documents are bound.
Note: Some Advanced Duplex options are available only on select printers.
• Advanced Imaging—Use to change or adjust Auto Center, Background Removal, Color Balance, Color Dropout,
Contrast, Mirror Image, Negative Image, Scan Edge to Edge, Shadow Detail, Sharpness, and Temperature settings
before you copy the document.
• Create Booklet—Use to create a booklet. You can choose between 1-sided and 2-sided.
Note: This option appears only when a print duplexer and printer hard disk are installed.
• Cover Page Setup—Use to set copy cover page and booklet cover page.
• Custom Job—Use to combine multiple scanning jobs into a single job.
• Edge Erase—Use to eliminate smudges or information around the edges of a document. You can choose to eliminate
an equal area around all four sides of the paper, or pick a particular edge. Edge Erase will erase whatever is within
the area selected, leaving nothing on that portion of the scan.
• Header/Footer—Use to turn on Date/Time, Page number, Bates number, or Custom text, and prints them in the
specified header or footer location.
• Margin Shift—Use to increase the size of the margin of a specified distance by shifting the scanned image. This can
be useful in providing space to bind or hole-punch copies. Use the increase or decrease arrows to set how much of
a margin you want. If the additional margin is too large, then the copy will be cropped.
• Overlay—Use to create a watermark (or message) that overlays the content of your copy. You can choose from
Urgent, Confidential, Copy, and Draft, or you can enter a custom message in the ”Enter custom text” field. The word
you pick will appear, faintly, in large print across each page.
Note: A custom overlay can also be created by your system support person. When a custom overlay is created, a
button with an icon of that overlay will be available.
• Paper Saver—Use to print two or more sheets of an original document together on the same page. Paper Saver is
also called N-up printing. The N stands for Number. For example, 2-up would print two pages of your document on
a single page, and 4-up would print four pages of your document on a single page. Touching Print Page Borders
adds or removes the outline border surrounding the original document pages on the output page.
• Separator Sheets—Use to place a blank piece of paper between copies, pages, or print jobs. The separator sheets
can be drawn from a tray that contains a type or color of paper that is different from the paper your copies are
printed on.
Save As Shortcut
This option allows the current settings to be saved as a shortcut by assigning a number.
Copying
115
E-mailing
ADF
Scanner glass
Use the ADF for multiple-page documents. Use the scanner glass for single pages, small items (such as postcards or photos),
transparencies, photo paper, or thin media (such as magazine clippings).
You can use the printer to e-mail scanned documents to one or more recipients. There are three ways to send an e-mail
from the printer. You can type the e-mail address, use a shortcut number, or use the address book.
Getting ready to e-mail
Setting up the e-mail function
1 Type the printer IP address into the address field of your Web browser.
If you do not know the IP address of the printer, you can:
• View the IP address on the printer control panel in the TCP/IP section under the Networks/Ports menu.
• Print a network setup page or the menu settings pages and locate the IP address in the TCP/IP section.
2 Click Settings.
3 Under Default Settings, click E-mail/FTP Settings.
4 Click E-mail Settings > Setup E-mail Server.
5 Fill in the fields with the appropriate information.
6 Click Submit.
Configuring e-mail settings
1 Type the printer IP address into the address field of your Web browser.
If you do not know the IP address of the printer, you can:
• View the IP address on the printer control panel in the TCP/IP section under the Networks/Ports menu.
• Print a network setup page or the menu settings pages and locate the IP address in the TCP/IP section.
E-mailing
116
2 Click Settings > E-mail/FTP Settings > E-mail Settings.
3 Fill in the fields with the appropriate information.
4 Click Submit.
Creating an e-mail shortcut
Creating an e-mail shortcut using the Embedded Web Server
1 Type the printer IP address into the address field of your Web browser.
If you do not know the IP address of the printer, you can:
• View the IP address on the printer control panel in the TCP/IP section under the Networks/Ports menu.
• Print a network setup page or the menu settings pages and locate the IP address in the TCP/IP section.
2 Click Settings.
3 Under Other Settings, click Manage Shortcuts > E-mail Shortcut Setup.
4 Type a unique name for the recipient, and then enter the e-mail address.
Note: If you are entering multiple addresses, then separate each address with a comma (,).
5 Select the scan settings (Format, Content, Color, and Resolution).
6 Enter a shortcut number, and then click Add.
If you enter a number that is already in use, then you are prompted to select another number.
Creating an e-mail shortcut using the touch screen
1 From the home screen, navigate to:
E-mail > Recipient > type an e-mail address
To create a group of recipients, touch Next address, and then type the next recipient’s e-mail address.
2 Touch
.
3 Type a unique name for the shortcut, and then touch Done.
4 Verify that the shortcut name and number are correct, and then touch OK.
If the name or number is incorrect, then touch Cancel, and then reenter the information.
E-mailing
117
E-mailing a document
Sending an e-mail using the touch screen
1 Load an original document faceup, short edge first into the ADF or facedown on the scanner glass.
Note: Do not load postcards, photos, small items, transparencies, photo paper, or thin media (such as magazine
clippings) into the ADF. Place these items on the scanner glass.
2 If you are loading a document into the ADF, then adjust the paper guides.
Note: Make sure the size of the original document and the copy paper size are the same. Failure to set the proper
size may result to a cropped image.
3 From the home screen, navigate to:
E-mail > Recipient
4 Enter the e-mail address, or press
and then enter the shortcut number.
To enter additional recipients, touch Next Address, and then enter the address or shortcut number you want to
add.
Note: You can also enter an e-mail address using the address book.
5 Touch Done > Send It.
Sending an e-mail using a shortcut number
1 Load an original document faceup, short edge first into the ADF or facedown on the scanner glass.
Note: Do not load postcards, photos, small items, transparencies, photo paper, or thin media (such as magazine
clippings) into the ADF. Place these items on the scanner glass.
2 If you are loading a document into the ADF, then adjust the paper guides.
3 Press
, enter the shortcut number using the keypad, and then touch
.
To enter additional recipients, touch Next address, and then enter the address or shortcut number you want to
add.
4 Touch Send It.
Sending an e-mail using the address book
1 Load an original document faceup, short edge first into the ADF or facedown on the scanner glass.
Note: Do not load postcards, photos, small items, transparencies, photo paper, or thin media (such as magazine
clippings) into the ADF. Place these items on the scanner glass.
2 If you are loading a document into the ADF, then adjust the paper guides.
3 From the home screen, navigate to:
E-mail >Recipient(s) >
> enter the name of recipient > Browse shortcuts
E-mailing
118
4 Touch the name of the recipients.
To enter additional recipients, touch Next address, and then enter the address or shortcut number you want to
add, or search the address book.
5 Touch Done.
Customizing e-mail settings
Adding e-mail subject and message information
1 Load an original document faceup, short edge first into the ADF or facedown on the scanner glass.
Note: Do not load postcards, photos, small items, transparencies, photo paper, or thin media (such as magazine
clippings) into the ADF. Place these items on the scanner glass.
2 If you are loading a document into the ADF, then adjust the paper guides.
3 From the home screen, touch E-mail.
4 Type an e-mail address.
5 Touch Options > Subject.
6 Type the e-mail subject.
7 Touch Done > Message.
8 Type an e-mail message.
9 Touch Done > E-mail It.
Changing the output file type
1 Load an original document faceup, short edge first into the ADF or facedown on the scanner glass.
Note: Do not load postcards, photos, small items, transparencies, photo paper, or thin media (such as magazine
clippings) into the ADF. Place these items on the scanner glass.
2 If you are loading a document into the ADF, then adjust the paper guides.
3 From the home screen, navigate to:
E-mail > Recipient > type an e-mail address > Send as
4 Touch the button that represents the file type you want to send.
• PDF—Use this to create a single file with multiple pages, viewable with Adobe Reader. Adobe Reader is provided
free by Adobe at www.adobe.com.
• Secure PDF—Use this to create an encrypted PDF file that protects the file contents from unauthorized access.
• TIFF—Use this to create multiple files or a single file. If Multi-page TIFF is turned off in the Settings menu of the
Embedded Web Server, then TIFF saves one page in each file. The file size is usually larger than an equivalent
JPEG.
E-mailing
119
• JPEG—Use this to create and attach a separate file for each page of your original document, viewable by most
Web browsers and graphics programs.
• XPS—Use this to create a single XML Paper Specification (XPS) file with multiple pages, viewable using an Internet
Explorer-hosted viewer and the .NET Framework, or by downloading a third-party standalone viewer.
5 Touch E-mail It.
Note: If you selected Secure PDF, you will be prompted to enter your password twice.
Canceling an e-mail
• When using the ADF, touch Cancel Job while Scanning appears.
• When using the scanner glass, touch Cancel Job while Scanning appears, or while Scan the Next Page /
Finish the Job appears.
Understanding e-mail options
Recipients
This option lets you enter the destination of your e-mail. You may enter multiple e-mail addresses.
Subject
This option lets you enter a subject line for your e-mail.
Message
This option lets you enter a message that will be sent with your scanned attachment.
File Name
This option lets you customize the attachment file name.
Original Size
This option opens a screen where you can choose the size of the documents you are going to e-mail.
• Touch a paper size button to select that size as the Original Size setting. The e-mail screen appears with the new
setting displayed.
• When “Original Size” is set to Mixed Sizes, you can scan an original document that contains mixed paper sizes.
• When “Original Size” is set to Auto Size Sense, the scanner automatically determines the size of the original
document.
E-mailing
120
Resolution
Adjusts the output quality of your e-mail. Increasing the image resolution increases the e-mail file size and the time
needed to scan your original document. Image resolution can be decreased to reduce the e-mail file size.
Color
This option sets the output color for the scanned image. Touch to enable or disable color.
Content
This option lets you specify the content type and source of the original document.
Choose content type from Text, Text/Photo, Photo, or Graphics.
• Text—Use when the content of the original document is mostly text or line art.
• Graphics—Use when the original document is mostly business-type graphics such as pie charts, bar charts, and
animations.
• Text/Photo—Use when the original document is a mixture of text, graphics, and photos.
• Photo—Use when the original document is mostly a photo or an image.
Choose content source from Color Laser, Black/White Laser, Inkjet, Photo/Film, Magazine, Newspaper, Press, or Other.
•
•
•
•
•
•
•
•
Color Laser—Use when the original document was printed using a color laser printer.
Black/White Laser—Use when the original document was printed using a mono laser printer.
Inkjet—Use when the original document was printed using an inkjet printer.
Photo/Film—Use when the original document is a photo from film.
Magazine—Use when the original document is from a magazine.
Newspaper—Use when the original document is from a newspaper.
Press—Use when the original document was printed using a printing press.
Other—Use when the original document was printed using an alternate or unknown printer.
Darkness
This option adjusts how light or dark your scanned documents will turn out in relation to the original document.
Send As
This option sets the output (PDF, TIFF, JPEG or XPS) for the scanned image.
• PDF—Creates a single file with multiple pages, viewable with Adobe Reader. Adobe Reader is provided free by
Adobe at www.adobe.com.
• Secure PDF—Creates an encrypted PDF file that protects the file contents from unauthorized access
• TIFF—Creates multiple files or a single file. If Multi-page TIFF is turned off in the Settings menu of the Embedded
Web Server, then TIFF saves one page in each file. The file size is usually larger than an equivalent JPEG.
• JPEG—Creates and attaches a separate file for each page of your original document, viewable by most Web browsers
and graphics programs
• XPS—Creates a single XPS file with multiple pages, viewable using an Internet Explorer-hosted viewer and the .NET
Framework, or by downloading a third party standalone viewer
E-mailing
121
Page Setup
This option lets you change the Sides (Duplex), Orientation, and Binding.
• Sides (Duplex)— Specifies if the original document is simplex (printed on one page) or duplex (printed on both
sides). This also identifies what needs to be scanned for inclusion in the e-mail.
• Orientation— Specifies the orientation of the original document, and then changes Sides and Binding to match the
orientation.
• Binding— Specifies if the original document is bound on the long-edge or short-edge side.
Scan Preview
This option displays the first page of the image before it is included in the e-mail. When the first page is scanned, the
scanning is paused and a preview image appears.
Advanced Options
Touching this button opens a screen where you can change the following settings:
• Advanced Imaging—Use to adjust the Background Removal, Color Balance, Color Dropout, Contrast, JPEG Quality,
Mirror Image, Negative Image, Scan Edge to Edge, Shadow Detail, Sharpness, and Temperature settings before you
e-mail the document.
• Custom Job—Use to combine multiple scanning jobs into a single job.
• Edge Erase—Use to eliminate smudges or information around the edges of a document. You can choose to eliminate
an equal area around all four sides of the paper, or pick a particular edge. Edge Erase will erase whatever is within
the area selected, leaving nothing on that portion of the scan.
• Transmission Log—Use to print the transmission log or transmission error log.
E-mailing
122
Faxing
Note: Fax capabilities may not be available on all printer models.
ADF
Scanner glass
Use the ADF for multiple-page documents. Use the scanner glass for single pages, small items (such as postcards or photos),
transparencies, photo paper, or thin media (such as magazine clippings).
Getting the printer ready to fax
The following connection methods may not be applicable in all countries or regions.
Note: During the initial printer setup, deselect Fax and any other function you plan to set up later, and then touch
Continue. The indicator light may blink red if the fax function is enabled and not fully set up.
CAUTION—SHOCK HAZARD: Do not use the fax feature during a lightning storm. Do not set up this product or
make any electrical or cabling connections, such as the fax feature, power cord, or telephone, during a lightning
storm.
Warning—Potential Damage: Do not touch cables or the printer in the area shown while actively sending or receiving
a fax.
Faxing
123
Initial fax setup
Many countries and regions require outgoing faxes to contain the following information in a margin at the top or bottom
of each transmitted page, or on the first page of the transmission: station name (identification of the business, other
entity, or individual sending the message) and station number (telephone number of the sending fax machine, business,
other entity, or individual).
To enter your fax setup information, use the printer control panel, or use your browser to access the Embedded Web
Server and then enter the Settings menu.
Note: If you do not have a TCP/IP environment, then you must use the printer control panel to enter your fax setup
information.
Using the printer control panel for fax setup
When the printer is turned on for the first time or if the printer has been off for an extended time, a series of start-up
screens appear. If the printer has fax capabilities, then the following screens appear:
Fax Name or Station Name
Fax Number or Station Number
1 When Fax Name or Station Name appears, enter the name to be printed on all outgoing faxes.
2 After entering the Fax Name or Station Name, touch Submit.
3 When Fax Number or Station Number appears, enter the printer fax number.
4 After entering the Fax Number or Station Number, touch Submit.
Using the Embedded Web Server for fax setup
1 Type the printer IP address into the address field of your Web browser.
If you do not know the IP address of the printer, you can:
• View the IP address on the printer control panel in the TCP/IP section under the Networks/Ports menu.
• Print a network setup page or the menu settings pages and locate the IP address in the TCP/IP section.
Faxing
124
2 Click Settings > Fax Settings > Analog Fax Setup.
3 In the Fax Name or Station Name field, enter the name to be printed on all outgoing faxes.
4 In the Fax Number or Station Number field, enter the printer fax number.
5 Click Submit.
Choosing a fax connection
Notes:
• The printer is an analog device that works best when directly connected to the telephone wall outlet. Other devices
(such as a telephone or answering machine) can be successfully attached to pass through the printer, as described
in the setup steps.
• If you want a digital connection such as ISDN, DSL, or ADSL, then a third-party device (such as a DSL filter) is required.
Contact your DSL provider for a DSL filter. The DSL filter removes the digital signal on the telephone line that can
interfere with the ability of the printer to fax properly.
• You do not need to attach the printer to a computer, but you do need to connect it to an analog telephone line to
send and receive faxes.
Equipment and service options
Fax connection setup
Connect directly to the telephone line.
See “Connecting to an analog telephone line” on page 125.
Connect to a Digital Subscriber Line (DSL or ADSL) service.
See “Connecting to a DSL service” on page 126.
Connect to a Private Branch eXchange (PBX) or Integrated
Services Digital Network (ISDN) system.
See “Connecting to a PBX or ISDN system” on page 126.
Use a Distinctive Ring service.
See “Connecting to a distinctive ring service” on page 127.
Connect through an adapter used in your area.
See “Connecting to an adapter for your country or region” on
page 127.
Connecting to an analog telephone line
If your telecommunications equipment uses a US-style (RJ11) telephone line, then follow these steps to connect the
equipment:
1 Connect one end of the telephone cable that came with the printer to the printer LINE port .
2 Connect the other end of the telephone cable to an active analog telephone wall jack.
Faxing
125
Connecting to a DSL service
If you subscribe to a DSL service, then contact the DSL provider to obtain a DSL filter and telephone cord, and then
follow these steps to connect the equipment:
1 Connect one end of the telephone cable that came with the printer to the printer LINE port .
2 Connect the other end of the telephone cable to the DSL filter.
Note: Your DSL filter may look different than the one in the illustration.
3 Connect the DSL filter cable to an active telephone wall jack.
Connecting to a PBX or ISDN system
If you use a PBX or ISDN converter or terminal adapter, then follow these steps to connect the equipment:
1 Connect one end of the telephone cable that came with the printer to the printer LINE port .
2 Connect the other end of the telephone cable to the port designated for fax and telephone use.
Notes:
•
•
•
•
•
Make sure the terminal adapter is set to the correct switch type for your region.
Depending on the ISDN port assignment, you may have to connect to a specific port.
When using a PBX system, make sure the call waiting tone is off.
When using a PBX system, dial the outside line prefix before dialing the fax number.
For more information on using the fax with a PBX system, see the documentation that came with your PBX
system.
Faxing
126
Connecting to a distinctive ring service
A distinctive ring service may be available from your telephone service provider. This service allows you to have multiple
telephone numbers on one telephone line, with each telephone number having a different ring pattern. This may be
useful for distinguishing between fax and voice calls. If you subscribe to a distinctive ring service, then follow these
steps to connect the equipment:
1 Connect one end of the telephone cable that came with the printer to the printer LINE port .
2 Connect the other end of the telephone cable to an active analog telephone wall jack.
3 Change the Distinctive Rings setting to match the setting you want for the printer to answer:
Note: The factory default setting for distinctive rings is On. This allows the printer to answer single, double, and
triple ring patterns.
a From the home screen, navigate to:
> Settings > Fax Settings > Analog Fax Settings > Distinctive Rings
b Select the pattern setting you want to change, and then touch Submit.
Connecting to an adapter for your country or region
The following countries or regions may require a special adapter to connect the telephone cable to the active telephone
wall jack:
Country/Region
•
•
•
•
•
•
•
•
Austria
Cyprus
Denmark
Finland
France
Germany
Ireland
•
•
•
•
•
•
•
New Zealand
Netherlands
Norway
Portugal
Sweden
Switzerland
United Kingdom
Italy
For some countries or regions, a telephone line adapter is included in the box. Use this adapter to connect an answering
machine, telephone, or other telecommunications equipment to the printer.
1 Connect one end of the telephone cable that came with the printer to the printer LINE port
2 Connect the other end of the telephone cable to the adapter, and then connect the adapter to the active telephone
wall jack.
Note: Your telephone adapter may look different than the one shown. It will fit the wall jack used in your location.
Faxing
127
Setting the outgoing fax or station name and number
1 Type the printer IP address into the address field of your Web browser.
If you do not know the IP address of the printer, you can:
• View the IP address on the printer control panel in the TCP/IP section under the Networks/Ports menu.
• Print a network setup page or the menu settings pages and locate the IP address in the TCP/IP section.
2 Click Settings > Fax Settings > Analog Fax Setup.
3 In the Fax Name or Station Name field, enter the name to be printed on all outgoing faxes.
4 In the Fax Number or Station Number field, enter the printer fax number.
5 Click Submit.
Setting the date and time
You can set the date and time so that they are printed on every fax you send. If there is a power failure, then you may
have to reset the date and time.
1 Type the printer IP address in the address field of your Web browser.
If you do not know the IP address of the printer, then you can:
• View the IP address on the printer control panel in the TCP/IP section under the Networks/Ports menu.
• Print a network setup page or the menu settings pages and locate the IP address in the TCP/IP section.
2 Click Security > Set Date and Time.
3 In the Set Date & Time field, enter the current date and time.
4 Click Submit.
Note: It is recommended to use the network time.
Configuring the printer to observe daylight saving time
The printer can be set to automatically adjust for daylight saving time:
1 Type the printer IP address in the address field of your Web browser.
Faxing
128
If you do not know the IP address of the printer, then you can:
• View the IP address on the printer control panel in the TCP/IP section under the Networks/Ports menu.
• Print a network setup page or the menu settings pages and locate the IP address in the TCP/IP section.
2 Click Security > Set Date and Time.
3 Select the Automatically Observe DST checkbox, and then enter the DST start and end dates in the Custom Time
Zone Setup section.
4 Click Submit.
Creating shortcuts
Creating a fax destination shortcut using the Embedded Web Server
Instead of entering the entire phone number of a fax recipient on the printer control panel each time you want to send
a fax, you can create a permanent fax destination and assign a shortcut number. A shortcut can be created to a single
fax number or a group of fax numbers.
1 Type the printer IP address into the address field of your Web browser.
If you do not know the IP address of the printer, you can:
• View the IP address on the printer control panel in the TCP/IP section under the Networks/Ports menu.
• Print a network setup page or the menu settings pages and locate the IP address in the TCP/IP section.
2 Click Settings > Manage Shortcuts > Fax Shortcut Setup.
Note: A password may be required. If you do not have an ID and password, get one from your system support
person.
3 Type a unique name for the shortcut, and then enter the fax number.
To create a multiple-number shortcut, enter the fax numbers for the group.
Note: Separate each fax number in the group with a semicolon (;).
4 Assign a shortcut number.
If you enter a number that is already in use, then you are prompted to select another number.
5 Click Add.
Creating a fax destination shortcut using the touch screen
1 Load an original document faceup, short edge first into the ADF or facedown on the scanner glass.
Note: Do not load postcards, photos, small items, transparencies, photo paper, or thin media (such as magazine
clippings) into the ADF. Place these items on the scanner glass.
2 If you are loading a document into the ADF, then adjust the paper guides.
Faxing
129
3 From the home screen, navigate to:
Fax > enter the fax number
To create a group of fax numbers, touch Next number, and then enter the next fax number.
4 Navigate to:
> enter a name for the shortcut > Done > OK > Fax It
Sending a fax
Sending a fax using the touch screen
1 Load an original document faceup, short edge first into the ADF or facedown on the scanner glass.
Note: Do not load postcards, photos, small items, transparencies, photo paper, or thin media (such as magazine
clippings) into the ADF. Place these items on the scanner glass.
2 If you are loading a document into the ADF, then adjust the paper guides.
3 From the home screen, touch Fax.
4 Enter the fax number or a shortcut using the touch screen or keypad.
To add recipients, touch Next Number and then enter the recipient's telephone number or shortcut number, or
search the address book.
Note: To place a dial pause within a fax number, press . The dial pause appears as a comma in the “Fax to” box.
Use this feature if you need to dial an outside line first.
5 Touch Fax It.
Sending a fax using the computer
The printer driver fax option allows you to “print to fax,” where the printer will send a queued document as a fax rather
than print it. The fax option functions as a normal fax machine, but is controlled through the printer driver instead of
the printer control panel.
1 With a document open, click File > Print.
2 Select the printer, and then navigate to:
Properties > Fax tab > Enable fax
3 Enter the recipient fax number(s) in the “Fax number(s)” field.
Fax numbers can be entered manually or by using the Phone Book feature.
4 If necessary, enter a prefix in the Dialing prefix field.
5 Select the appropriate paper size and page orientation.
6 If you want to include a cover page with the fax, then select Include cover page with fax, and enter the appropriate
information.
7 Click OK.
Faxing
130
Notes:
• The Fax option is available for use only with the PostScript driver or the Universal Fax Driver. For information on
installing these drivers, see the Software and Documentation CD.
• The Fax option must be configured and enabled in the PostScript driver under Configuration tab before it can be
used.
• If the Always display settings prior to faxing check box is selected, then you will be prompted to verify the recipient
information before the fax is sent. If this check box is not selected, then the queued document will be sent
automatically as a fax when you click OK on the Fax tab.
Sending a fax using shortcuts
Fax shortcuts are just like the speed dial numbers on a telephone or fax machine. A shortcut number (1–99999) can
contain a single recipient or multiple recipients.
1 Load an original document faceup, short edge first into the ADF or facedown on the scanner glass.
Note: Do not place postcards, photos, small items, transparencies, photo paper, or thin media (such as magazine
clippings) into the ADF. Place these items on the scanner glass.
2 If you are loading a document into the ADF, then adjust the paper guides.
3 Press
, and then enter the shortcut number using the keypad.
4 Touch Fax It.
Sending a fax using the address book
The address book enables you to search for bookmarks and network directory servers.
Note: If the address book feature is not enabled, then contact your system support person.
1 Load an original document faceup, short edge first into the ADF or facedown on the scanner glass.
Note: Do not load postcards, photos, small items, transparencies, photo paper, or thin media (such as magazine
clippings) into the ADF. Place these items on the scanner glass.
2 If you are loading a document into the ADF, then adjust the paper guides.
3 From the home screen, navigate to:
Fax >
> Browse shortcuts
4 Using the virtual keyboard, type the name or part of the name of the person whose fax number you want to find.
Note: Do not attempt to search for multiple names at the same time.
5 Touch Done > Fax It.
Faxing
131
Customizing fax settings
Changing the fax resolution
Settings range from Standard (fastest speed) to Ultra Fine (slowest speed, best quality).
1 Load an original document faceup, short edge first into the ADF or facedown on the scanner glass.
Note: Do not load postcards, photos, small items, transparencies, photo paper, or thin media (such as magazine
clippings) into the ADF. Place these items on the scanner glass.
2 If you are loading a document into the ADF, then adjust the paper guides.
3 From the home screen, navigate to:
Fax > enter the fax number > Options
4 From the Resolution area, touch the arrows to change to the resolution you want.
5 Touch Fax It.
Making a fax lighter or darker
1 Load an original document faceup, short edge first into the ADF or facedown on the scanner glass.
Note: Do not load postcards, photos, small items, transparencies, photo paper, or thin media (such as magazine
clippings) into the ADF. Place these items on the scanner glass.
2 If you are loading a document into the ADF, then adjust the paper guides.
3 From the home screen, navigate to:
Fax > enter the fax number > Options
4 From the Darkness area, touch the arrows to adjust the darkness of the fax.
5 Touch Fax It.
Sending a fax at a scheduled time
1 Load an original document faceup, short edge first into the ADF or facedown on the scanner glass.
Note: Do not load postcards, photos, small items, transparencies, photo paper, or thin media (such as magazine
clippings) into the ADF. Place these items on the scanner glass.
2 If you are loading a document into the ADF, then adjust the paper guides.
3 From the home screen, navigate to:
Fax > enter the fax number > Options > Advanced Options > Delayed Send
Note: If Fax Mode is set to Fax Server, the Delayed Send button will not appear. Faxes waiting for transmission are
listed in the Fax Queue.
Faxing
132
4 Touch the arrows to adjust the time the fax will be transmitted.
The time is increased or decreased in increments of 30 minutes. If the current time is shown, the left arrow is
unavailable.
5 Touch Fax It.
Note: The document is scanned and then faxed at the scheduled time.
Viewing a fax log
1 Type the printer IP address into the address field of your Web browser.
If you do not know the IP address of the printer, you can:
• View the IP address on the printer control panel in the TCP/IP section under the Networks/Ports menu.
• Print a network setup page or the menu settings pages and locate the IP address in the TCP/IP section.
2 Click Settings > Reports > Fax Job Log or Fax Call Log.
Blocking junk faxes
1 Type the printer IP address into the address field of your Web browser.
If you do not know the IP address of the printer, you can:
• View the IP address on the printer control panel in the TCP/IP section under the Networks/Ports menu.
• Print a network setup page or the menu settings pages and locate the IP address in the TCP/IP section.
2 Click Settings > Fax Settings > Analog Fax Setup > Block No Name Fax.
Notes:
• This option blocks all incoming faxes that have a private caller ID or no fax station name.
• In the Banned Fax List field, enter the phone numbers or fax station names of specific fax callers you want to
block.
Canceling an outgoing fax
Canceling a fax while the original documents are still scanning
• When using the ADF, touch Cancel Job while Scanning… appears.
• When using the scanner glass, touch Cancel Job while Scanning… appears or while Scan the Next Page /
Finish the Job appears.
Faxing
133
Canceling a fax after the original documents have been scanned to memory
1 On the home screen, touch Cancel Jobs.
The Cancel Jobs screen appears.
2 Touch the job or jobs you want to cancel.
Only three jobs appear on the screen; touch the down arrow until the job you want appears, and then touch the
job you want to cancel.
3 Touch Delete Selected Jobs.
The Deleting Selected Jobs screen appears, the selected jobs are deleted, and then the home screen appears.
Understanding fax options
Content
This option lets you specify the content type and source of the original document.
Choose content type from Text, Text/Photo, Photo, or Graphics.
• Text—Use when the content of the original document is mostly text or line art.
• Graphics—Use when the original document is mostly business-type graphics such as pie charts, bar charts, and
animations.
• Text/Photo—Use when the original document is a mixture of text, graphics, and photos.
• Photo—Use when the original document is mostly a photo or an image.
Choose content source from Color Laser, Black/White Laser, Inkjet, Photo/Film, Magazine, Newspaper, Press, or Other.
•
•
•
•
•
•
•
•
Color Laser—Use when the original document was printed using a color laser printer.
Black/White Laser—Use when the original document was printed using a mono laser printer.
Inkjet—Use when the original document was printed using an inkjet printer.
Photo/Film—Use when the original document is a photo from film.
Magazine—Use when the original document is from a magazine.
Newspaper—Use when the original document is from a newspaper.
Press—Use when the original document was printed using a printing press.
Other—Use when the original document was printed using an alternate or unknown printer.
Resolution
This options increases how closely the scanner examines the document you want to fax. If you are faxing a photo, a
drawing with fine lines, or a document with very small text, then increase the Resolution setting. This will increase the
amount of time required for the scan and will increase the quality of the fax output.
•
•
•
•
Standard—Suitable for most documents
Fine 200 dpi—Recommended for documents with small print
Super fine 300 dpi—Recommended for original documents with fine detail
Ultra fine 600 dpi—Recommended for documents with pictures or photos
Note: Fine 200 dpi and Super fine 300 dpi is displayed when color printing is selected.
Faxing
134
Darkness
This option adjusts how light or dark your faxes will turn out in relation to the original document.
Color
This option enables or disables color in faxing.
Page Setup
This option lets you change the Sides (Duplex), Orientation, and Binding settings.
• Sides (Duplex)—Use to specify if the original document is simplex (printed on one page) or duplex (printed on both
sides). This also identifies what needs to be scanned for inclusion in the fax.
• Orientation—Use to specify the orientation of the original document, and then changes Sides and Binding to match
the orientation.
• Binding—Use to specify if the original document is bound on the long-edge or short-edge side.
Scan Preview
This option displays the first page of the image before it is included in the fax. When the first page is scanned, the
scanning is paused and a preview image appears.
Delayed Send
This lets you send a fax at a later time or date.
1 Set up your fax.
2 From the home screen, navigate to:
Delayed Send > enter the date and time you want to send your fax > Done
Note: If the printer is turned off when the delayed fax is scheduled to be sent, then the fax is sent the next time the
printer is turned on.
This setting can be especially useful in sending information to fax lines that are not readily available during certain
hours, or when transmission times are cheaper.
Advanced Options
Touching the Advanced Options button opens a screen where you can change the following settings:
• Advanced Imaging—Use to adjust the Background Removal, Contrast, Color Balance, Negative Image, Mirror Image,
Scan Edge to Edge, Shadow Detail, Sharpness, and Temperature settings before you fax the document.
• Custom Job—Use to combine multiple scanning jobs into a single job.
• Edge Erase—Use to eliminate smudges or information around the edges of a document. You can choose to eliminate
an equal area around all four sides of the paper, or pick a particular edge. Edge Erase will erase whatever is within
the area selected, leaving nothing on that portion of the scan.
• Transmission Log—Use to print the transmission log or transmission error log.
Faxing
135
Holding and forwarding faxes
Holding faxes
This option lets you hold received faxes from printing until they are released. Held faxes can be released manually or
at a scheduled day or time.
1 Type the printer IP address into the address field of your Web browser.
If you do not know the IP address of the printer, you can:
• View the IP address on the printer control panel in the TCP/IP section under the Networks/Ports menu.
• Print a network setup page or the menu settings pages and locate the IP address in the TCP/IP section.
2 Click Settings > Fax Settings > Analog Fax Setup > Holding Faxes.
3 In the Print Faxes Password field, enter a password.
4 From the Held Fax Mode menu, select one of the following:
• Off
• Always On
• Manual
• Scheduled
5 If you selected Scheduled, then continue with the following steps:
a Click Fax Holding Schedule.
b From the Action menu, select Hold faxes.
c From the Time menu, select the time you want the held faxes released.
d From the Day(s) menu, select the day you want the held faxes released.
6 Click Add.
Forwarding a fax
This option lets you print and forward received faxes to a fax number, e-mail address, FTP site, or LDSS.
1 Type the printer IP address into the address field of your Web browser.
If you do not know the IP address of the printer, you can:
• View the IP address on the printer control panel in the TCP/IP section under the Networks/Ports menu.
• Print a network setup page or the menu settings pages and locate the IP address in the TCP/IP section.
2 Click Settings > Fax Settings.
3 From the Fax Forwarding menu, select one of the following:
• Print
• Print and Forward
• Forward
4 From the “Forward to” menu, select one of the following:
• Fax
• E-mail
Faxing
136
• FTP
• LDSS
• eSF
5 In the Forward to Shortcut field, enter the shortcut number where you want the fax forwarded.
Note: The shortcut number must be valid for the setting selected in the “Forward to” menu.
6 Click Submit.
Faxing
137
Scanning to an FTP address
ADF
Scanner glass
Use the ADF for multiple-page documents. Use the scanner glass for single pages, small items (such as postcards or photos),
transparencies, photo paper, or thin media (such as magazine clippings).
The scanner lets you scan documents directly to a File Transfer Protocol (FTP) server. Only one FTP address may be sent
to the server at a time.
Once an FTP destination has been configured by your system support person, the name of the destination becomes
available as a shortcut number, or it is listed as a profile under the Held Jobs icon. An FTP destination could also be
another PostScript printer; for example, a color document can be scanned and then sent to a color printer.
Creating shortcuts
Instead of entering the entire FTP site address on the printer control panel each time you want to send a document to
an FTP server, you can create a permanent FTP destination and assign a shortcut number. There are two methods for
creating shortcut numbers: using the Embedded Web Server or using the printer touch screen.
Creating an FTP shortcut using the Embedded Web Server
1 Type the printer IP address into the address field of your Web browser.
If you do not know the IP address of the printer, you can:
• View the IP address on the printer control panel in the TCP/IP section under the Networks/Ports menu.
• Print a network setup page or the menu settings pages and locate the IP address in the TCP/IP section.
2 Click Settings.
3 Under Other Settings, click Manage Shortcuts.
Note: A password may be required. If you do not have an ID and password, get one from your system support
person.
4 Click FTP Shortcut Setup.
5 Enter the appropriate information.
Scanning to an FTP address
138
6 Enter a shortcut number.
If you enter a number that is already in use, then you are prompted to select another number.
7 Click Add.
Creating an FTP shortcut using the touch screen
1 From the home screen, navigate to:
FTP > type the FTP address >
> enter a name for the shortcut > Done
2 Verify that the shortcut name and number are correct, and then touch OK. If the name or number is incorrect, then
touch Cancel, and then reenter the information.
If you enter a number that is already in use, then you are prompted to select another number.
3 Touch Submit.
Scanning to an FTP address
Scanning to an FTP address using the touch screen
1 Load an original document faceup, short edge first into the ADF or facedown on the scanner glass.
Note: Do not load postcards, photos, small items, transparencies, photo paper, or thin media (such as magazine
clippings) into the ADF. Place these items on the scanner glass.
2 If you are loading a document into the ADF, then adjust the paper guides.
3 From the home screen, navigate to:
FTP > FTP > type the FTP address > Send It
Scanning to an FTP address using a shortcut number
1 Load an original document faceup, short edge first into the ADF or facedown on the scanner glass.
Note: Do not load postcards, photos, small items, transparencies, photo paper, or thin media (such as magazine
clippings) into the ADF. Place these items on the scanner glass.
2 If you are loading a document into the ADF, then adjust the paper guides.
3 Press
, and then enter the FTP shortcut number.
4 Touch Send It.
Scanning to an FTP address using the address book
1 Load an original document faceup, short edge first into the ADF or facedown on the scanner glass.
Note: Do not load postcards, photos, small items, transparencies, photo paper, or thin media (such as magazine
clippings) into the ADF. Place these items on the scanner glass.
2 If you are loading a document into the ADF, adjust the paper guides.
Scanning to an FTP address
139
3 From the home screen, navigate to:
FTP > FTP >
> enter the name of recipient > Browse shortcuts > name of recipient > Search
Understanding FTP options
FTP
This option lets you enter the IP address for the FTP destination.
Note: Addresses should be in dot notation form (for example: yyy.yyy.yyy.yyy).
File Name
This option lets you enter the file name of the scanned document.
Original Size
This option opens a screen where you can choose the size of the documents for FTP sending.
• Touch a paper size button to select that size as the Original Size setting. The FTP screen appears with the new setting
displayed.
• When “Original Size” is set to Mixed Sizes, you can scan an original document that contains mixed paper sizes.
• When “Original Size” is set to Auto Size Sense, the scanner automatically determines the size of the original
document.
Send As
This option sets the output (PDF, TIFF, JPEG or XPS) for the scanned image.
• PDF—Creates a single file with multiple pages, viewable with Adobe Reader. Adobe Reader is provided free by
Adobe at www.adobe.com.
• Secure PDF—Creates an encrypted PDF file that protects the file contents from unauthorized access
• TIFF—Creates multiple files or a single file. If Multi-page TIFF is turned off in the Settings menu of the Embedded
Web Server, then TIFF saves one page in each file. The file size is usually larger than an equivalent JPEG.
• JPEG—Creates and attaches a separate file for each page of your original document, viewable by most Web browsers
and graphics programs
• XPS—Creates a single XPS file with multiple pages, viewable using an Internet Explorer-hosted viewer and the .NET
Framework, or by downloading a third party standalone viewer
Color
This option enables or disables color for the scanned image.
Resolution
This option adjusts the output quality of your file. Increasing the image resolution increases the file size and the time
needed to scan your original document. Image resolution can be decreased to reduce the file size.
Scanning to an FTP address
140
Darkness
This option adjusts how light or dark your files will turn out in relation to the original document.
Page Setup
This option lets you change the Sides (Duplex), Orientation, and Binding.
• Sides (Duplex)— Specifies if the original document is simplex (printed on one page) or duplex (printed on both
sides). This also identifies what needs to be scanned.
• Orientation— Specifies the orientation of the original document, and then changes the Sides and Binding settings
to match the orientation.
• Binding— Specifies if the original document is bound on the long-edge or short-edge side.
Content
This option lets you specify the content type and source of the original document.
Choose content type from Text, Text/Photo, Photo, or Graphics.
• Text—Use when the content of the original document is mostly text or line art.
• Graphics—Use when the original document is mostly business-type graphics such as pie charts, bar charts, and
animations.
• Text/Photo—Use when the original document is a mixture of text, graphics, and photos.
• Photo—Use when the original document is mostly a photo or an image.
Choose content source from Color Laser, Black/White Laser, Inkjet, Photo/Film, Magazine, Newspaper, Press, or Other.
•
•
•
•
•
•
•
•
Color Laser—Use when the original document was printed using a color laser printer.
Black/White Laser—Use when the original document was printed using a mono laser printer.
Inkjet—Use when the original document was printed using an inkjet printer.
Photo/Film—Use when the original document is a photo from film.
Magazine—Use when the original document is from a magazine.
Newspaper—Use when the original document is from a newspaper.
Press—Use when the original document was printed using a printing press.
Other—Use when the original document was printed using an alternate or unknown printer.
Scan Preview
This option displays the first page of the original document before it is scanned completely. When the first page is
scanned, the scanning is paused and a preview image appears.
Scanning to an FTP address
141
Advanced Options
Touching the Advanced Options button opens a screen where you can change the following settings:
• Advanced Imaging—Use to adjust the Background Removal, Color Balance, Color Dropout, Contrast, JPEG Quality,
Negative Image, Mirror Image, Scan edge to edge, Shadow Detail, Sharpness, and Temperature image output
settings before sending the image.
• Edge Erase—Use to eliminate smudges or information around the edges of a document. You can choose to eliminate
an equal area around all four sides of the paper, or pick a particular edge. Edge Erase will erase whatever is within
the area selected, leaving nothing on that portion of the scan.
• Transmission Log—Use to print the transmission log or transmission error log.
• Custom Job—Use to combine multiple scanning jobs into a single job.
Scanning to an FTP address
142
Scanning to a computer or flash drive
ADF
Scanner glass
Use the ADF for multiple-page documents. Use the scanner glass for single pages, small items (such as postcards or photos),
transparencies, photo paper, or thin media (such as magazine clippings).
The scanner lets you scan documents directly to a computer or a flash drive. The computer does not have to be directly
connected to the printer for you to receive Scan to PC images. You can scan the document back to the computer over
the network by creating a scan profile on the computer and then downloading the profile to the printer.
Scanning to a computer
1 Type the printer IP address into the address field of your Web browser.
If you do not know the IP address of the printer, you can:
• View the IP address on the printer control panel in the TCP/IP section under the Networks/Ports menu.
• Print a network setup page or the menu settings pages and locate the IP address in the TCP/IP section.
2 Click Scan Profile > Create.
3 Select your scan settings, and then click Next.
4 Select a location on your computer where you want to save the scanned output file.
5 Enter a scan name.
The scan name is the name that appears in the Scan Profile list on the display.
6 Click Submit.
7 Review the instructions on the Scan Profile screen.
A shortcut number was automatically assigned when you clicked Submit. You can use this shortcut number when
you are ready to scan your documents.
a Load an original document faceup, short edge first into the ADF or facedown on the scanner glass.
Note: Do not load postcards, photos, small items, transparencies, photo paper, or thin media (such as magazine
clippings) into the ADF. Place these items on the scanner glass.
b If you are loading a document into the ADF, then adjust the paper guides.
Scanning to a computer or flash drive
143
c Press
, and then enter the shortcut number using the keypad, or touch Held Jobs on the home screen, and
then touch Profiles.
d After entering the shortcut number, the scanner scans and sends the document to the directory or program
you specified. If you touched Profiles on the home screen, then locate your shortcut on the list.
8 Return to the computer to view the file.
The output file is saved in the location or launched in the program you specified.
Scanning to a flash drive
1 Load an original document faceup, short edge first into the ADF or facedown on the scanner glass.
Note: Do not load postcards, photos, small items, transparencies, photo paper, or thin media (such as magazine
clippings) into the ADF. Place these items on the scanner glass.
2 If you are loading a document into the ADF, then adjust the paper guides.
3 Insert the flash drive into the USB port on the front of the printer.
The USB Drive home screen appears.
4 Select the destination folder, and then touch Scan to USB drive.
5 Adjust the scan settings.
6 Touch Scan It.
Understanding the Scan Center features
The Scan Center software lets you modify scan settings and select where to send the scanned output. Scan settings
modified with the Scan Center software can be saved and used for other scan jobs.
The following features are available:
•
•
•
•
•
Scan and send images to your computer
Convert scanned images to text
Preview the scanned image and adjust the brightness and contrast
Make larger scans without losing detail
Scan two-sided documents
Using the ScanBack Utility
You can use the Lexmark ScanBackTM Utility instead of the Embedded Web Server to create scan-to-PC profiles. The
ScanBack Utility can be downloaded from the Lexmark Web site home page on http:\\support.lexmark.com.
1 Set up your scan-to-PC profile:
a Launch the ScanBack Utility.
b Select the printer.
If no printers are listed, then contact your system support person, or click Setup to manually search for an IP
address or host name.
Scanning to a computer or flash drive
144
c Follow the instructions on your computer screen to define the type of document being scanned and what kind
of output you want to create.
d Select any of the following:
• Show MFP Instructions—View or print the instructions.
• Create Shortcut—Save this group of settings to use again.
e Click Finish.
A dialog box appears with your scan profile information and the status of the received images.
2 Scan your original documents:
a Load all pages in the ADF or on the scanner glass.
b From the printer control panel, navigate to:
Scan/Email > Profiles > select your scan profile > Submit
Note: Your output file is saved in a directory or launched in the application you specified.
Understanding scan profile options
Original Size
This option sets the size of the documents you are going to scan. When Original Size is set to Mixed Sizes, you can scan
an original document that contains mixed paper sizes (letter- and legal-size pages).
Resolution
This option adjusts the output quality of your file. Increasing the image resolution increases the file size and the time
needed to scan your original document. Image resolution can be decreased to reduce the file size.
Color
This option enables or disables color for the scanned image.
Content
This option lets you specify the content type and source of the original document.
Choose content type from Text, Text/Photo, Photo, or Graphics.
• Text—Use when the content of the original document is mostly text or line art.
• Graphics—Use when the original document is mostly business-type graphics such as pie charts, bar charts, and
animations.
• Text/Photo—Use when the original document is a mixture of text, graphics, and photos.
• Photo—Use when the original document is mostly a photo or an image.
Choose content source from Color Laser, Black/White Laser, Inkjet, Photo/Film, Magazine, Newspaper, Press, or Other.
• Color Laser—Use when the original document was printed using a color laser printer.
• Black/White Laser—Use when the original document was printed using a mono laser printer.
• Inkjet—Use when the original document was printed using an inkjet printer.
Scanning to a computer or flash drive
145
•
•
•
•
•
Photo/Film—Use when the original document is a photo from film.
Magazine—Use when the original document is from a magazine.
Newspaper—Use when the original document is from a newspaper.
Press—Use when the original document was printed using a printing press.
Other—Use when the original document was printed using an alternate or unknown printer.
Darkness
This option adjusts how light or dark your scanned documents will turn out in relation to the original document.
Page Setup
This option lets you change the Sides (Duplex), Orientation, and Binding.
• Sides (Duplex)— Use this to specify if the original document is simplex (printed on one page) or duplex (printed on
both sides). This also identifies what needs to be scanned for inclusion in the e-mail.
• Orientation— Use this to specify the orientation of the original document, and then change Sides and Binding to
match the orientation.
• Binding— Use this to specify if the original document is bound on the long-edge or short-edge of the page.
Scan Preview
This option displays the first page of the image before it is included in the e-mail. When the first page is scanned, the
scanning is paused and a preview image appears.
Advanced Options
Touching the Advanced Options button opens a screen where you can change the following settings:
• Advanced Imaging—Use to change or adjust Background Removal, Color Balance, Color Dropout, Contrast, JPEG
Quality, Mirror Image, Negative Image, Scan Edge to Edge, Shadow Detail, Sharpness, and Temperature settings
before scanning a document.
• Custom Job—Use to combine multiple scan jobs into a single scan job.
• Edge Erase—Use to remove smudges or information around the edges of a document. You can choose to eliminate
an equal area around all four sides of the paper, or pick a particular edge. Edge Erase will erase whatever is within
the area selected, leaving nothing on that portion of the scanned image.
• Transmission Log—Use to print the transmission log or transmission error log.
Scanning to a computer or flash drive
146
Understanding printer menus
Menus list
Supplies
Paper Menu
Reports
Settings
Replace Supply
Default Source
Menu Settings Page
General Settings
Cyan Cartridge
Paper Size/Type
Device Statistics
Copy Settings
Magenta Cartridge
Yellow Cartridge
Configure MP
Substitute Size
Network Setup Page
Network [x] Setup Page
Fax Settings
E-mail Settings
Black Cartridge
Paper Texture
Shortcut List
FTP Settings
Cyan Photoconductor Unit
Paper Weight
Fax Job Log
Flash Drive Menu
Magenta Photoconductor Unit
Paper Loading
Fax Call Log
Print Settings
Yellow Photoconductor Unit
Custom Types
Copy Shortcuts
Black Photoconductor Unit
Custom Names
E-mail Shortcuts
Separator Pick Assembly and Roller
Custom Scan Sizes
Fax Shortcuts
Waste Toner Bottle
Custom Bin Names
FTP Shortcuts
Fuser
Universal Setup
Profiles List
Transfer Module
Bin Setup
Print Fonts
Staple Cartridge
Print Directory
Hole Punch Box
Asset Report
Security
Network/Ports
Help
Manage Shortcuts
Edit Security Setups
Miscellaneous Security Settings
Active NIC
Network1
Print All Guides
Copy Guide
Fax Shortcuts
E-mail Shortcuts
Confidential Print
Standard USB
E-mail Guide
FTP Shortcuts
Disk Wiping
Parallel [x]
Fax Guide
Copy Shortcuts
Security Audit Log
Serial [x]
FTP Guide
Profile Shortcuts
Set Date and Time
SMTP Setup
Print Defects Guide
Information Guide
Supplies Guide
Option Card Menu
A list of installed DLEs (Download Emulators) appears.2
1
Depending on the printer setup, this menu appears as Standard Network or Network [x].
2
This menu appears only when one or more DLEs are installed.
Understanding printer menus
147
Supplies menu
Menu item
Description
Replace Supply
Separator Pick Assembly and Roller
Yes
No
Provides the option to reset the supply counter for the
separator pad
Cyan Cartridge
Cartridge Nearly Low
Cartridge Low
Cartridge Very Low
Cartridge Critically Low
Invalid
Replace
Missing or Defective
OK
Unsupported
Shows the status of the cyan toner cartridge
Magenta Cartridge
Cartridge Nearly Low
Cartridge Low
Cartridge Very Low
Cartridge Critically Low
Invalid
Replace
Missing or Defective
OK
Unsupported
Shows the status of the magenta toner cartridge
Yellow Cartridge
Cartridge Nearly Low
Cartridge Low
Cartridge Very Low
Cartridge Critically Low
Invalid
Replace
Missing or Defective
OK
Unsupported
Shows the status of the yellow toner cartridge
• Select Yes to reset the supply counter.
• Select No to exit.
Understanding printer menus
148
Menu item
Description
Black Cartridge
Cartridge Nearly Low
Cartridge Low
Cartridge Very Low
Cartridge Critically Low
Invalid
Replace
Missing or Defective
OK
Unsupported
Shows the status of the black toner cartridge
Cyan Photoconductor Unit
Early Warning
Low
Replace
Missing
OK
Shows the status of the cyan photoconductor unit
Magenta Photoconductor Unit
Early Warning
Low
Replace
Missing
OK
Shows the status of the magenta photoconductor unit
Yellow Photoconductor Unit
Early Warning
Low
Replace
Missing
OK
Shows the status of the yellow photoconductor unit
Separator Pick Assembly and Roller
OK
Replace
Shows the status of the separator pick assembly and roller
Waste Toner Bottle
Near Full
Replace
Missing
OK
Shows the status of the waste toner bottle
Fuser
Early Warning
Low
Replace
Missing
OK
Shows the status of the fuser
Understanding printer menus
149
Menu item
Description
Transfer Module
Early Warning
Low
Replace
Missing
OK
Shows the status of the transfer module
Staple Cartridge
Early Warning
Low
Replace
Missing
OK
Shows the status of the staple cartridge
Hole Punch Box
Near Full
Replace
Missing
OK
Shows the status of the hole punch box
Paper menu
Default Source menu
Menu item
Description
Default Source
Tray [x]
MP Feeder
Manual Paper
Manual Envelope
Sets a default paper source for all print jobs
Notes:
• Tray 1 (standard tray) is the factory default setting.
• From the Paper menu, Configure MP feeder must be set to Cassette for MP
feeder to appear as a menu setting.
• If the same size and type of paper are in two trays and the Paper Size and
Paper Type settings match, then the trays are automatically linked. When
one tray is empty, the print job continues using the linked tray.
Understanding printer menus
150
Paper Size/Type menu
Menu item
Description
Tray [x] Size
Letter
Legal
Executive
JIS-B4
A3
11 x 17
Oficio (México)
Folio
Statement
Universal
A4
A5
A6
JIS B5
Specifies the paper size loaded in each tray
Tray [x] Type
Plain Paper
Card Stock
Transparency
Recycled
Glossy
Heavy Glossy
Labels
Bond
Envelope
Rough Envelope
Letterhead
Preprinted
Colored Paper
Light Paper
Heavy Paper
Rough/Cotton Paper
Custom Type [x]
Specifies the paper type loaded in each tray
Notes:
• Letter is the US factory default setting. A4 is the international factory
default setting.
• For trays with automatic size sensing, only the size detected by the
hardware appears.
• If the same size and type of paper are in two trays and the Paper Size and
Paper Type settings match, then the trays are automatically linked. When
one tray is empty, the print job uses the linked tray.
Notes:
• Plain Paper is the factory default setting for Tray 1. Custom Type [x] is the
factory default setting for all other trays.
• If available, then a user-defined name will appear instead of Custom
Type [x].
• Use this menu to configure automatic tray linking.
Note: Only installed trays are listed in this menu.
Understanding printer menus
151
Menu item
Description
MP Feeder Size
Letter
Legal
Executive
JIS-B4
A3
11 x 17
Oficio (México)
Folio
Statement
Universal
7 3/4 Envelope
10 Envelope
DL Envelope
C5 Envelope
Other Envelope
A4
A5
A6
JIS B5
Specifies the paper size loaded in the multipurpose feeder
MP Feeder Type
Custom Type [x]
Plain Paper
Card Stock
Transparency
Recycled
Glossy
Heavy Glossy
Labels
Bond
Envelope
Rough Envelope
Letterhead
Preprinted
Colored Paper
Light Paper
Heavy Paper
Rough/Cotton Paper
Specifies the paper type loaded in the multipurpose feeder
Notes:
• Letter is the US factory default setting. A4 is the international factory
default setting.
• From the Paper menu, Configure MP Feeder must be set to Cassette for
MP Feeder to appear as a menu.
• Other Envelope printing is not supported.
Notes:
• Custom Type [x] is the factory default setting.
• From the Paper menu, Configure MP Feeder must be set to Cassette for
MP Feeder Type to appear as a menu setting.
Note: Only installed trays are listed in this menu.
Understanding printer menus
152
Menu item
Description
Manual Paper Size
Letter
Legal
Executive
JIS-B4
A3
11 x 17
Oficio (México)
Folio
Statement
Universal
A4
A5
A6
JIS B5
Specifies the paper size being manually loaded
Manual Paper Type
Plain Paper
Card Stock
Transparency
Recycled
Glossy
Heavy Glossy
Labels
Bond
Letterhead
Preprinted
Colored Paper
Light Paper
Heavy Paper
Rough/Cotton Paper
Custom Type [x]
Specifies the paper type being manually loaded
Manual Envelope Size
10 Envelope
DL Envelope
C5 Envelope
Other Envelope
7 3/4 Envelope
Specifies the envelope size being manually loaded
Manual Envelope Type
Envelope
Rough Envelope
Custom Type [x]
Specifies the envelope type being manually loaded
Note: Letter is the US factory default setting. A4 is the international factory
default setting.
Note: Plain Paper is the factory default setting.
Notes:
• 10 Envelope is the US factory default setting. DL Envelope is the
international factory default setting.Printing a custom size envelope is not
supported.
• Other Envelope printing is not supported.
Note: Envelope is the factory default setting.
Note: Only installed trays are listed in this menu.
Understanding printer menus
153
Configure MP menu
Menu item
Description
Configure MP
Cassette
Manual
First
Determines when the printer selects paper from the multipurpose feeder
Notes:
• Cassette is the factory default setting. Cassette configures the multipurpose
feeder as the automatic paper source.
• Manual sets the multipurpose feeder only for manual feed print jobs.
• First configures the multipurpose feeder as the primary paper source.
Substitute Size menu
Menu item
Description
Substitute Size
All Listed
Off
Statement/A5
Letter/A4
11 x 17/A3
Substitutes a specified paper size if the requested paper size is not available
Notes:
• All Listed is the factory default setting. All available substitutions are
allowed.
• Off indicates that no size substitutions are allowed.
• Setting a size substitution lets the print job continue without a Change
Paper message appearing.
Paper Texture menu
Menu item
Description
Plain Texture
Normal
Rough
Smooth
Specifies the relative texture of the paper loaded
Card Stock Texture
Normal
Rough
Smooth
Specifies the relative texture of the card stock loaded
Transparency Texture
Normal
Rough
Smooth
Specifies the relative texture of the transparencies loaded
Recycled Texture
Normal
Rough
Smooth
Specifies the relative texture of the recycled paper loaded
Note: Settings appear only if card stock is supported.
Note: Normal is the factory default setting for all paper types except bond, rough envelope and rough/cotton paper.
Understanding printer menus
154
Menu item
Description
Glossy Texture
Normal
Rough
Smooth
Specifies the relative texture of the glossy paper loaded
Heavy Glossy Texture
Normal
Rough
Smooth
Specifies the relative texture of the glossy paper loaded
Labels Texture
Normal
Rough
Smooth
Specifies the relative texture of the labels loaded
Bond Texture
Rough
Smooth
Normal
Specifies the relative texture of the bond paper loaded
Envelope Texture
Normal
Rough
Smooth
Specifies the relative texture of the envelopes loaded
Rough Envelope Texture
Rough
Specifies the relative texture of the envelopes loaded
Letterhead Texture
Normal
Rough
Smooth
Specifies the relative texture of the letterhead loaded
Preprinted Texture
Normal
Rough
Smooth
Specifies the relative texture of the preprinted paper loaded
Colored Texture
Normal
Rough
Smooth
Specifies the relative texture of the colored paper loaded
Light Texture
Normal
Rough
Smooth
Specifies the relative texture of the paper loaded
Note: Normal is the factory default setting for all paper types except bond, rough envelope and rough/cotton paper.
Understanding printer menus
155
Menu item
Description
Heavy Texture
Normal
Rough
Smooth
Specifies the relative texture of the paper loaded
Rough/Cotton Texture
Rough
Specifies the relative texture of the cotton paper loaded
Custom [x] Texture
Normal
Rough
Smooth
Specifies the relative texture of the custom paper loaded
Note: Settings appear only if the custom type is supported.
Note: Normal is the factory default setting for all paper types except bond, rough envelope and rough/cotton paper.
Paper Loading menu
Menu item
Description
Card Stock Loading
Off
Duplex
Determines whether 2-sided printing occurs for all print jobs that
specify Card Stock as the paper type
Recycled Loading
Off
Duplex
Determines whether 2-sided printing occurs for all print jobs that
specify Recycled as the paper type
Glossy Loading
Off
Duplex
Determines whether 2-sided printing occurs for all print jobs that
specify Glossy as the paper type
Heavy Glossy Loading
Off
Duplex
Determines whether 2-sided printing occurs for all print jobs that
specify Heavy Glossy as the paper type
Labels Loading
Off
Duplex
Determines whether 2-sided printing occurs for all print jobs that
specify Labels as the paper type
Vinyl Labels Loading
Off
Duplex
Determines whether 2-sided printing occurs for all print jobs that
specify Vinyl Labels as the paper type
Bond Loading
Off
Duplex
Determines whether 2-sided printing occurs for all print jobs that
specify Bond as the paper type
Note: Off is the factory default setting.
Notes:
• Duplex sets the printer default to 2-sided printing for every print job unless 1-sided printing is selected from Print
Properties.
• If Duplex is selected, then all print jobs are sent through the duplex unit, including 1-sided print jobs.
Understanding printer menus
156
Menu item
Description
Letterhead Loading
Off
Duplex
Determines whether 2-sided printing occurs for all print jobs that
specify Letterhead as the paper type
Preprinted Loading
Off
Duplex
Determines whether 2-sided printing occurs for all print jobs that
specify Preprinted as the paper type
Colored Loading
Off
Duplex
Determines whether 2-sided printing occurs for all print jobs that
specify Colored as the paper type
Light Loading
Off
Duplex
Determines whether 2-sided printing occurs for all print jobs that
specify Light as the paper type
Heavy Loading
Off
Duplex
Determines whether 2-sided printing occurs for all print jobs that
specify Heavy as the paper type
Rough/Cotton Loading
Off
Duplex
Determines whether 2-sided printing occurs for all print jobs that
specify Rough or Cotton as the paper type
Custom [x] Loading
Off
Duplex
Determines whether 2-sided printing occurs for all print jobs that
specify Custom [x] as the paper type
Note: Off is the factory default setting.
Notes:
• Off is the factory default setting.
• Custom [x] Loading is available only if the custom paper type is
supported.
Notes:
• Duplex sets the printer default to 2-sided printing for every print job unless 1-sided printing is selected from Print
Properties.
• If Duplex is selected, then all print jobs are sent through the duplex unit, including 1-sided print jobs.
Understanding printer menus
157
Custom Types menu
Menu item
Description
Custom Type [x]
Paper
Card Stock
Letterhead
Transparency
Glossy
Rough/Cotton
Labels
Bond
Envelope
Associates a paper or specialty media type with a factory default Custom
Type [x] name or a user-defined custom name created from the Embedded
Web Server or from MarkVisionTM Professional
Recycled
Paper
Card Stock
Letterhead
Transparency
Glossy
Rough/Cotton
Labels
Bond
Envelope
Specifies a paper type when the Recycled setting is selected in other menus
Notes:
• Paper is the factory default setting.
• The custom paper type must be supported by the selected tray or
multipurpose feeder in order to print from that source.
Notes:
• Paper is the factory default setting.
• The custom paper type must be supported by the selected tray or
multipurpose feeder in order to print from that source.
Custom Names menu
Menu item
Definition
Custom Name [x]
[none]
Specify a custom name for a paper type. This name replaces the Custom
Type [x] name in the printer menus.
Understanding printer menus
158
Custom Scan Sizes menu
Menu item
Description
Custom Scan Size [x]
Scan Size Name
Width
1–11.69 inches (25–297 mm)
Height
1–17 inches (25–432 mm)
Orientation
Portrait
Landscape
2 scans per side
Off
On
Specifies a custom scan size name, scan sizes, and options. The custom scan
size name replaces Custom Scan Size [x] in the printer menus.
Notes:
• 11.69 inches is the US factory default setting for Width. 297 millimeters is
the international factory default setting for Width.
• 17 inches is the US factory default setting for Height. 432 millimeters is the
international factory default setting for Height.
• Portrait is the factory default setting for Orientation.
• Off is the factory default setting for 2 scans per side.
Universal Setup menu
Menu item
Description
Units of Measure
Inches
Millimeters
Identifies the unit of measure
Portrait Width
3–48 inches
76–1219 mm
Sets the portrait width
Note: Inches is the US factory default setting. Millimeters is the
international factory default setting.
Notes:
• 11.69 inches is the US factory default setting. Inches can be increased
in 0.01-inch increments.
• 296.9 mm is the international factory default setting. Millimeters can
be increased in 1-mm increments.
• If the width exceeds the maximum, then the printer uses the maximum
width allowed.
Portrait Height
3–48 inches
76–1219 mm
Sets the portrait height
Notes:
• 48 inches is the US factory default setting. Inches can be increased in
0.01-inch increments.
• 1219 mm is the international factory default setting. Millimeters can
be increased in 1-mm increments.
• If the height exceeds the maximum, then the printer uses the
maximum height allowed.
Feed Direction
Short Edge
Long Edge
Specifies the feed direction
Notes:
• Short Edge is the factory default setting.
• Long Edge appears only if the longest edge is shorter than the
maximum width supported by the tray.
Understanding printer menus
159
Bin Setup menu
Menu item
Description
Output Bin
Standard Bin
Bin [x]
Specifies the default exit bin
Configure Bins
Mailbox
Link
Link Optional
Type Assignment
Specifies configuration options for exit bins
Note: Standard Bin is the factory default setting.
Notes:
• Mailbox is the factory default setting. This setting
treats each bin as a separate mailbox.
• Link configures all available bins as one large exit bin.
• Link Optional links together all available exit bins
except the standard bin and only appears when at least
two optional bins are installed.
• Type Assignment assigns each paper type to an output
bin or linked bin set.
• Bins assigned the same name are automatically linked
unless Link Optional is selected.
Overflow Bin
Standard Bin
Bin [x]
Specifies an alternate exit bin when a designated bin is full
Assign Type/Bin
Plain Paper Bin
Card Stock Bin
Transparency Bin
Recycled Bin
Glossy Bin
Heavy Glossy Bin
Labels Bin
Bond Bin
Envelope Bin
Rough Envelope Bin
Letterhead Bin
Preprinted Bin
Colored Bin
Light Paper Bin
Heavy Paper Bin
Rough/Cotton Bin
Custom [x] Bin
Selects an exit bin for each supported paper type
Note: Standard Bin is the factory default setting.
Available selections for each type are:
Disabled
Standard Bin
Bin [x]
Note: Disabled is the factory default setting.
Understanding printer menus
160
Reports menu
Reports menu
Menu item
Description
Menu Settings Page
Prints a report containing information about the paper loaded into trays, installed
memory, total page count, alarms, timeouts, printer control panel language,
TCP/IP address, status of supplies, status of the network connection, and other
information
Device Statistics
Prints a report containing printer statistics such as supply information and details
about printed pages
Network Setup Page
Prints a report containing information about the network printer settings, such
as the TCP/IP address information
Note: This menu item appears only in network printers or printers connected to
print servers.
Network [x] Setup Page
Prints a report containing information about the network printer settings, such
as the TCP/IP address information
Notes:
• This menu item is available when there is more than one network option
installed.
• This menu item appears only in network printers or printers connected to
print servers.
Shortcut List
Prints a report containing information about configured shortcuts
Fax Job Log
Prints a report containing information about the last 200 completed faxes
Note: This menu item is available only when Enable Job Log is set to On in the
Fax Settings menu.
Fax Call Log
Prints a report containing information about the last 100 attempted, received,
and blocked calls
Note: This menu item is available only when Enable Job Log is set to On in the
Fax Settings menu.
Copy Shortcuts
Prints a report containing information about copy shortcuts
E-mail Shortcuts
Prints a report containing information about e-mail shortcuts
Fax Shortcuts
Prints a report containing information about fax shortcuts
FTP Shortcuts
Prints a report containing information about FTP shortcuts
Profiles List
Prints a list of profiles stored in the printer
Print Fonts
Prints a report of all the fonts available for the printer language currently set in
the printer
Understanding printer menus
161
Menu item
Description
Print Directory
Prints a list of all the resources stored on an optional flash memory card or printer
hard disk
Notes:
• Job Buffer Size must be set to 100%.
• Make sure the optional flash memory or printer hard disk is installed correctly
and working.
Asset Report
Prints a report containing asset information including the printer serial number
and model name. The report contains text and UPC barcodes that can be scanned
into an asset database.
Network/Ports menu
Active NIC menu
Menu item
Description
Active NIC
Auto
[list of available network cards]
Notes:
• Auto is the factory default setting.
• This menu item appears only if an optional network card is installed.
Standard Network or Network [x] menus
Note: Only active ports appear in this menu; all inactive ports are omitted.
Menu item
Description
PCL SmartSwitch
On
Off
Sets the printer to automatically switch to PCL emulation when a print job requires
it, regardless of the default printer language
Notes:
• On is the factory default setting.
• When Off is used, the printer does not examine incoming data. The printer uses
PostScript emulation if PS SmartSwitch is set to On. It uses the default printer
language specified in the Setup menu if PS SmartSwitch is set to Off.
PS SmartSwitch
On
Off
Sets the printer to automatically switch to PS emulation when a print job requires
it, regardless of the default printer language
Notes:
• On is the factory default setting.
• When Off is used, the printer does not examine incoming data. The printer uses
PCL emulation if PCL SmartSwitch is set to On. It uses the default printer
language specified in the Setup menu if PCL SmartSwitch is set to Off.
Understanding printer menus
162
Menu item
Description
NPA Mode
Auto
Off
Sets the printer to perform the special processing required for bidirectional
communication following the conventions defined by the NPA protocol
Notes:
• Auto is the factory default setting.
• Changing this setting from the printer control panel and then exiting the menus
causes the printer to restart. The menu selection is then updated.
Network Buffer
Auto
3KB to [maximum size allowed]
Sets the size of the network input buffer
Notes:
• Auto is the factory default setting.
• The value can be changed in 1-KB increments.
• The maximum size allowed depends on the amount of memory in the printer,
the size of the other link buffers, and whether Resource Save is set to On or Off.
• To increase the maximum size range for the Network Buffer, disable or reduce
the size of the parallel, serial, and USB buffers.
• Changing this setting from the printer control panel and then exiting the menus
causes the printer to restart. The menu selection is then updated.
Job Buffering
Off
On
Auto
Temporarily stores print jobs on the printer hard disk before printing. This menu
only appears if a formatted disk is installed.
Notes:
• Off is the factory default setting.
• On buffers print jobs on the printer hard disk.
• Auto buffers print jobs only if the printer is busy processing data from another
input port.
• Changing this setting from the printer control panel and then exiting the menus
causes the printer to restart. The menu selection is then updated.
Mac Binary PS
Auto
On
Off
Sets the printer to process Macintosh binary PostScript print jobs
Notes:
• Auto is the factory default setting.
• Off filters print jobs using the standard protocol.
• On processes raw binary PostScript print jobs.
Understanding printer menus
163
Menu item
Description
Standard Network Setup
Reports
Network Card
TCP/IP
IPv6
Wireless
AppleTalk
Displays and sets the printer network settings.
Note: The Wireless menu appears only when the printer is connected to a wireless
network.
Network [x] Setup
Reports
Network Card
TCP/IP
IPv6
Wireless
AppleTalk
Network Reports menu
This menu is available from the Network/Ports menu:
Network/Ports > Standard Network or Network [x] > Standard Network Setup or Network Setup > Reports or Network
Reports
Menu item
Description
Print Setup Page Prints a report containing information about the network printer settings, such as the TCP/IP address
Network Card menu
This menu is available from the Network/Ports menu:
Network/Ports > Standard Network or Network [x] > Standard Network Setup or Network [x] Setup > Network Card
Menu item
Description
View Card Status
Connected
Disconnected
Lets you view the connection status of the Network Card
View Card Speed
Lets you view the speed of a currently active network card
Network Address
UAA
LAA
Lets you view the network addresses
Job Timeout
Sets the amount of time in seconds before a network print job is canceled
0
Note: 90 seconds is the factory default setting.
10–225
Understanding printer menus
164
Menu item
Description
Banner Page
Allows the printer to print a banner page
Off
Note: Off is the factory default setting.
On
TCP/IP menu
This menu is available from the Network/Ports menu:
Network/Ports > Standard Network or Network [x] > Standard Network Setup or Network [x] Setup > TCP/IP
Note: This menu is available only in network models or printers attached to print servers.
Menu item
Description
Activate
On
Off
Activates TCP/IP
Set Hostname
Lets you set the current TCP/IP hostname
Note: On is the factory default setting.
Note: This can be changed only from the Embedded Web Server.
IP Address
Lets you view or change the current TCP/IP address
Note: Manually setting the IP address sets the Enable DHCP and Enable Auto IP settings
to Off. It also sets Enable BOOTP and Enable RARP to Off on systems that support
BOOTP and RARP.
Netmask
Lets you view or change the current TCP/IP netmask
Gateway
Lets you view or change the current TCP/IP gateway
Enable DHCP
On
Off
Specifies the DHCP address and parameter assignment setting
Enable RARP
On
Off
Specifies the RARP address assignment setting
Enable BOOTP
On
Off
Specifies the BOOTP address assignment setting
Enable AutoIP
Yes
No
Specifies the Zero Configuration Networking setting
Enable FTP/TFTP
Yes
No
Enables the built-in FTP server, which allows you to send files to the printer using File
Transfer Protocol.
Enable HTTP Server
Yes
No
Enables the built-in web server (Embedded Web Server). When enabled, the printer
can be monitored and managed remotely using a web browser.
Note: On is the factory default setting.
Note: Yes is the factory default setting.
Understanding printer menus
165
Menu item
Description
WINS Server Address
Lets you view or change the current WINS server address
Enable DDNS
Yes
No
Lets you view or change the current DDNS setting
Enable mDNS
Yes
No
Lets you view or change the current mDNS setting
DNS Server Address
Lets you view or change the current DNS server address
Enable HTTPS
Yes
No
Lets you view or change the current HTTPS setting
Note: Yes is the factory default setting.
IPv6 menu
This menu is available from the Network/Ports menu:
Network/Ports > Standard Network or Network [x] > Standard Network Setup or Network [x] Setup > IPv6
Note: This menu is available only for network models or printers attached to print servers.
Menu item
Description
Enable IPv6
On
Off
Enables IPv6 in the printer
Auto Configuration
On
Off
Specifies whether the network adapter accepts the automatic IPv6
address configuration entries provided by a router
Set Hostname
Lets you set the hostname
View Address
Note: These settings can be changed only from the Embedded Web
Server.
View Router Address
Enable DHCPv6
On
Off
Note: On is the factory default setting.
Enables DHCPv6 in the printer
Note: On is the factory default setting.
Wireless menu
Use the following menu items to view or configure the wireless internal print server settings.
Note: This menu is available only for models connected to a wireless network.
The Wireless menu is available from the Network/Ports menu:
Understanding printer menus
166
Network/Ports > Standard Network or Network [x] > Standard Network Setup or Network [x] Setup > Wireless
Menu item
Description
WPS PBC Mode
Lets you connect the printer to a wireless network by pressing buttons on
both the printer and the access point (wireless router) within a given
period of time
WPS PIN Mode
Lets you connect the printer to a wireless network by using a PIN on the
printer and entering it into the wireless settings of the access point
WPS Auto Detect
Disable
Enable
Automatically detects the connection method that an access point with
WPS uses— WPS Push Button Configuration (PBC) or WPS Personal
Identification Number (PIN)
Note: Disable is the factory default setting.
Network Mode
Ad hoc
Infrastructure
Specifies the network mode
Notes:
• Ad hoc is the factory default setting. This configures wireless
connection directly between the printer and a computer.
• Infrastructure lets the printer access a network using an access point.
Compatibility
802.11b/g/n
802.11n
802.11b/g
Specifies the wireless standard for the wireless network
Choose Network
[list of available networks]
Lets you select an available network for the printer to use
View Signal Quality
Lets you view the quality of the wireless connection
View Security Mode
Lets you view the encryption method that a wireless network uses
Note: The 802.11b/g/n is the factory default setting.
Note: Wi-Fi Protected Setup (WPS) is a simple and secure configuration that allows you to establish a wireless network
and enable network security without requiring prior knowledge of Wi-Fi technology. It is no longer necessary to
configure the network name (SSID) and WEP key or WPA passphrase for network devices.
AppleTalk menu
This menu is available from the Network/Ports menu:
Network/Ports > Standard Network or Network [x] > Standard Network Setup or Network [x] Setup > AppleTalk
Menu item
Description
Activate
Yes
No
Activates AppleTalk support
View Name
Shows the assigned AppleTalk name
Note: Yes is the factory default setting.
Note: The name can be changed only from the Embedded Web Server.
View Address
Shows the assigned AppleTalk address
Note: The address can be changed only from the Embedded Web Server.
Understanding printer menus
167
Menu item
Description
Set Zone
Provides a list of AppleTalk zones available on the network
[default]
Note: When “default” is selected, the printer uses the AppleTalk zone that the
[list of zones available on the network] router identifies as the default zone for the network. If no default zone exists,
then the zone marked with an * is the default setting.
Standard USB menu
Menu item
Description
PCL SmartSwitch
On
Off
Sets the printer to automatically switch to PCL emulation when a print job received
through a USB port requires it, regardless of the default printer language
Notes:
• On is the factory default setting.
• When set to Off, the printer does not examine incoming data. The printer uses
PostScript emulation if the PS SmartSwitch is set to On. It uses the default printer
language specified in the Setup menu if the PS SmartSwitch is set to Off.
PS SmartSwitch
On
Off
Sets the printer to automatically switch to PS emulation when a print job received
through a USB port requires it, regardless of the default printer language
Notes:
• On is the factory default setting.
• When set to Off, the printer does not examine incoming data. The printer uses
PCL emulation if the PCL SmartSwitch is set to On. It uses the default printer
language specified in the Setup menu if the PCL SmartSwitch is set to Off.
NPA Mode
Auto
On
Off
Sets the printer to perform the special processing required for bidirectional
communication following the conventions defined by the NPA protocol
Notes:
• Auto is the factory default setting. Auto sets the printer to examine data,
determine the format, and then process it appropriately.
• Changing this setting from the printer control panel and then exiting the menus
causes the printer to restart. The menu selection is then updated.
USB Buffer
Auto
3KB to [maximum size allowed]
Disabled
Sets the size of the USB input buffer
Notes:
• Auto is the factory default setting.
• Disabled turns off job buffering. Any jobs already buffered on the printer hard
disk are printed before normal processing resumes.
• The USB buffer size value can be changed in 1-KB increments.
• The maximum size allowed depends on the amount of memory in the printer,
the size of the other link buffers, and whether Resource Save is set to On or Off.
• To increase the maximum size range for the USB Buffer, disable or reduce the
size of the parallel, serial, and network buffers.
• Changing this setting from the printer control panel and then exiting the menus
causes the printer to restart. The menu selection is then updated.
Understanding printer menus
168
Menu item
Description
Job Buffering
Off
On
Auto
Temporarily stores print jobs on the printer hard disk before printing
Notes:
• Off is the factory default setting.
• On buffers jobs on the printer hard disk.
• Auto buffers print jobs only if the printer is busy processing data from another
input port.
• Changing this setting from the printer control panel and then exiting the menus
causes the printer to restart. The menu selection is then updated.
Mac Binary PS
Auto
On
Off
Sets the printer to process Macintosh binary PostScript print jobs
ENA Address
yyy.yyy.yyy.yyy
Sets the network address information for an external print server
ENA Netmask
yyy.yyy.yyy.yyy
Sets the netmask information for an external print server
ENA Gateway
yyy.yyy.yyy.yyy
Sets the gateway information for an external print server
Notes:
• Auto is the factory default setting.
• On processes raw binary PostScript print jobs.
• Off filters print jobs using the standard protocol.
Note: This menu item is available only if the printer is attached to an external print
server through the USB port.
Note: This menu item is available only if the printer is attached to an external print
server through the USB port.
Note: This menu item is available only if the printer is attached to an external print
server through the USB port.
Parallel [x] menu
Menu item
Description
PCL SmartSwitch
On
Off
Sets the printer to automatically switch to PCL emulation when a print job received
through a serial port requires it, regardless of the default printer language
Notes:
• On is the factory default setting.
• When set to Off, the printer does not examine incoming data. The printer uses
PostScript emulation if PS SmartSwitch is set to On. It uses the default printer
language specified in the Setup menu if PS SmartSwitch is set to Off.
PS SmartSwitch
On
Off
Sets the printer to automatically switch to PS emulation when a print job received
through a serial port requires it, regardless of the default printer language
Notes:
• On is the factory default setting.
• When set to Off, the printer does not examine incoming data. The printer uses
PCL emulation if PCL SmartSwitch is set to On. It uses the default printer language
specified in the Setup menu if PCL SmartSwitch is set to Off.
Understanding printer menus
169
Menu item
Description
NPA Mode
Auto
On
Off
Sets the printer to perform the special processing required for bidirectional
communication following the conventions defined by the NPA protocol
Notes:
• Auto is the factory default setting.
• Changing this setting from the printer control panel and then exiting the menus
causes the printer to restart. The menu selection is then updated.
Parallel Buffer
Auto
3KB to [maximum size allowed]
Disabled
Sets the size of the parallel input buffer
Notes:
• Auto is the factory default setting.
• Disabled turns off job buffering. Any print jobs already buffered on the printer
hard disk are printed before normal processing resumes.
• The parallel buffer size setting can be changed in 1-KB increments.
• The maximum size allowed depends on the amount of memory in the printer,
the size of the other link buffers, and whether Resource Save is set to On or Off.
• To increase the maximum size range for the Parallel Buffer, disable or reduce the
size of the USB, serial, and network buffers.
• Changing this setting from the printer control panel and then exiting the menus
causes the printer to restart. The menu selection is then updated.
Job Buffering
Off
On
Auto
Temporarily stores print jobs on the printer hard disk before printing
Notes:
• Off is the factory default setting.
• On buffers print jobs on the printer hard disk.
• Auto buffers print jobs only if the printer is busy processing data from another
input port.
• Changing this setting from the printer control panel and then exiting the menus
causes the printer to restart. The menu selection is then updated.
Advanced Status
On
Off
Enables bidirectional communication through the parallel port
Protocol
Fastbytes
Standard
Specifies the parallel port protocol
Notes:
• On is the factory default setting.
• Off disables parallel port negotiation.
Notes:
• Fastbytes is the factory default setting. It provides compatibility with most
existing parallel ports and is the recommended setting.
• Standard tries to resolve parallel port communication problems.
Understanding printer menus
170
Menu item
Description
Honor Init
Off
On
Determines if the printer honors printer hardware initialization requests from the
computer
Notes:
• Off is the factory default setting.
• The computer requests initialization by activating the Init signal from the parallel
port. Many personal computers activate the Init signal each time the computer
is turned on.
Parallel Mode 2
On
Off
Determines if the parallel port data is sampled on the leading or trailing edge of a
strobe
Mac Binary PS
Auto
On
Off
Sets the printer to process Macintosh binary PostScript print jobs
ENA Address
yyy.yyy.yyy.yyy
Sets the network address information for an external print server
ENA Netmask
yyy.yyy.yyy.yyy
Sets the netmask information for an external print server
ENA gateway
yyy.yyy.yyy.yyy
Sets the gateway information for an external print server
Note: On is the factory default setting.
Notes:
• Auto is the factory default setting.
• Off filters print jobs using the standard protocol.
• On processes raw binary PostScript print jobs.
Note: This menu item is available only if the printer is attached to an external print
server through the USB port.
Note: This menu item is available only if the printer is attached to an external print
server through the USB port.
Note: This menu item is available only if the printer is attached to an external print
server through the USB port.
Serial [x] menu
Menu item
Description
PCL SmartSwitch
On
Off
Sets the printer to automatically switch to PCL emulation when a print job received
through a serial port requires it, regardless of the default printer language
Notes:
• On is the factory default setting.
• When set to Off, the printer does not examine incoming data. The printer uses
PostScript emulation if PS SmartSwitch is set to On. It uses the default printer
language specified in the Setup menu if PS SmartSwitch is set to Off.
Understanding printer menus
171
Menu item
Description
PS SmartSwitch
On
Off
Sets the printer to automatically switch to PS emulation when a print job received
through a serial port requires it, regardless of the default printer language
Notes:
• On is the factory default setting.
• When set to Off, the printer does not examine incoming data. The printer uses
PCL emulation if PCL SmartSwitch is set to On. It uses the default printer language
specified in the Setup menu if PCL SmartSwitch is set to Off.
NPA Mode
Auto
On
Off
Sets the printer to perform the special processing required for bidirectional
communication following the conventions defined by the NPA protocol
Notes:
• Auto is the factory default setting. Auto sets the printer to examine data,
determine the format, and then processes it appropriately.
• When set to On, the printer performs NPA processing. If the data is not in NPA
format, it is rejected as bad data.
• When set to Off, the printer does not perform NPA processing.
• Changing this setting from the printer control panel and then exiting the menus
causes the printer to restart. The menu selection is then updated.
Serial Buffer
Auto
3KB to [maximum size allowed]
Disabled
Sets the size of the serial input buffer
Notes:
• Auto is the factory default setting.
• Disabled turns off job buffering. Any jobs already buffered on the disk are printed
before normal processing is resumed.
• The serial buffer size setting can be changed in 1-KB increments.
• The maximum size allowed depends on the amount of memory in the printer,
the size of the other link buffers, and whether Resource Save is set to On or Off.
• To increase the maximum size range for the Serial Buffer, disable or reduce the
size of the parallel, serial, and network buffers.
• Changing this setting from the printer control panel and then exiting the menus
causes the printer to restart. The menu selection is then updated.
Job Buffering
Off
On
Auto
Temporarily stores print jobs on the printer hard disk before printing
Notes:
• Off is the factory default setting. The printer does not buffer print jobs on the
printer hard disk.
• On buffers print jobs on the printer hard disk.
• Auto buffers print jobs only if the printer is busy processing data from another
input port.
• Changing this setting from the printer control panel and then exiting the menus
causes the printer to restart. The menu selection is then updated.
Understanding printer menus
172
Menu item
Description
Protocol
DTR
DTR/DSR
XON/XOFF
XON/XOFF/DTR
XONXOFF/DTRDSR
Selects the hardware and software handshaking settings for the serial port
Notes:
•
•
•
•
DTR is the factory default setting.
DTR/DSR is a hardware handshaking setting.
XON/XOFF is a software handshaking setting.
XON/XOFF/DTR and XON/XOFF/DTR/DSR are combined hardware and software
handshaking settings.
Robust XON
Off
On
Determines whether the printer communicates availability to the computer
Baud
9600
19200
38400
57600
115200
138200
172800
230400
345600
1200
2400
4800
Specifies the rate at which data can be received through the serial port
Data Bits
8
7
Specifies the number of data bits sent in each transmission frame
Parity
None
Ignore
Even
Odd
Sets the parity for serial input and output data frames
Honor DSR
Off
On
Determines whether the printer uses the DSR Signal
Notes:
• Off is the factory default setting.
• This menu item applies only to the serial port if Serial Protocol is set to XON/XOFF.
Notes:
• 9600 is the factory default setting.
• 138200, 172800, 230400, and 345600 baud rates are only displayed in the
Standard Serial menu. These settings do not appear in the Serial Option 1, Serial
Option 2, or Serial Option 3 menus.
Note: 8 is the factory default setting.
Note: None is the factory default setting.
Notes:
• Off is the factory default setting.
• DSR is a handshaking signal used by most serial cables. The serial port uses DSR
to distinguish data sent by the computer from data created by electrical noise in
the serial cable. The electrical noise can cause stray characters to print. Set this
to On to prevent stray characters from printing.
Understanding printer menus
173
SMTP Setup menu
Menu item
Description
Primary SMTP Gateway
Specifies SMTP server gateway and port information
Primary SMTP Gateway Port
Note: 25 is the default SMTP gateway port.
Secondary SMTP Gateway
Secondary SMTP Gateway Port
SMTP Timeout
5–30
Specifies the amount of time in seconds before the server stops trying to
send an e-mail
Note: 30 seconds is the factory default setting.
Reply Address
Specifies a reply address of up to 128 characters in the e-mail sent by the
printer
Use SSL
Disabled
Negotiate
Required
Sets the printer to use SSL for increased security when connecting to the
SMTP server
Notes:
• Disabled is the factory default setting.
• When the Negotiate setting is used, the SMTP server determines if
SSL will be used.
SMTP Server Authentication
No authentication required
Login/Plain
CRAM-MD5
Digest-MD5
NTLM
Kerberos 5
Specifies the type of user authentication required for scan to e-mail
privileges
Device-Initiated E-mail
None
Use Device SMTP Credentials
Specifies what credentials will be used when communicating to the SMTP
server. Some SMTP servers require credentials to send an e-mail.
User-Initiated E-mail
None
Use Device SMTP Credentials
Use Session User ID & Password
Use Session E-mail address & Password
Prompt User
Note: “No authentication required” is the factory default setting.
Notes:
• None is the factory default setting for Device and User-Initiated
E-mail.
• Device Userid and Device Password are used to log in to the SMTP
server when Use Device SMTP Credentials is selected.
Device Userid
Device Password
Kerberos 5 Realm
NTLM Domain
Understanding printer menus
174
Security menu
Editing Security Setups menu
Menu item
Description
Edit Backup Password
Creates a backup password
Note: This menu item will only appear if a backup password exists.
Edit Building Blocks
Edits the Internal Accounts, NTLM, various Setups, Password, and PIN
Edit Security Templates
Adds or edits a Security Template
Edit Access Controls
Controls access to printer menus, firmware updates, held jobs, and other access
points
Miscellaneous Security Settings menu
Menu item
Description
Login Restrictions
Login failures
Failure time frame
Lockout time
Panel Login Timeout
Remote Login Timeout
Limits the number and time frames of failed login attempts from the printer control
panel before all users are locked out
Notes:
• “Login failures” specifies the number of failed login attempts before users are
locked out. Settings range from 1–10 attempts is the factory default setting.
• “Failure time frame” specifies the time frame during which failed login attempts
can be made before users are locked out. Settings range from 1–60 minutes. 5
minutes is the factory default setting.
• “Lockout time” specifies how long users are locked out after exceeding the login
failures limit. Settings range from 1–60 minutes. 5 minutes is the factory default
setting. 1indicates the printer does not impose a lockout time.
• “Panel Login Timeout” specifies how long the printer remains idle on the Home
screen before automatically logging the user off. Settings range from 1–900
seconds. 30 seconds is the factory default setting.
• “Remote Login Timeout” specifies how long a remote interface remains idle
before automatically logging the user off. Settings range from 1–120 seconds.
10 minutes is the factory default setting.
Security Reset Jumper
Access controls=”No Security”
No Effect
Reset factory security defaults
Changes the value of the security settings
Notes:
• Access controls=”No Security” retains all the security information that the user
has defined. “No Security" is the factory default setting.
• “No Effect” means the reset has no effect on the device’s security configuration.
• “Reset factory security defaults” deletes all security information that the user
has defined, and assigns the factory default value to each setting in the
Miscellaneous Security Settings section of both the panel and the Web page.
Understanding printer menus
175
Menu item
Description
LDAP Certificate Verification
Demand
Try
Allow
Never
Allows the user to request a server certificate
Notes:
• “Demand” means a server certificate is requested. If a bad certificate is provided
or if no certificate is provided, the session is terminated immediately. “Demand”
is the factory default setting.
• “Try ” means a server certificate is requested. If no certificate is provided, the
session proceeds normally. If a bad certificate is provided, the session is
terminated immediately.
• “Allow” means a server certificate is requested. If no certificate is provided, the
session proceeds normally. If a bad certificate is provided, it will be ignored and
the session proceeds normally.
• “Never” means no server certificate is requested.
Minimum PIN Length
1–16
Limits the digit length of the PIN.
Note: 4 is the is the factory default setting.
Confidential Print menu
Menu item
Description
Max Invalid PIN
Off
2–10
Limits the number of times an invalid PIN can be entered
Notes:
• This menu appears only if a formatted, non-defective printer hard disk is installed.
• Once the limit is reached, the print job for that user name and that PIN are deleted.
Confidential Job Expiration Limits the amount of time a confidential print job stays in the printer before it is deleted
Off
Notes:
1 hour
• If the Job Expiration setting is changed while confidential print jobs reside on the printer
4 hours
RAM or printer hard disk, then the expiration time for those print jobs does not change
24 hours
to the new default value.
1 week
• If the printer is turned off, then all confidential jobs held in printer RAM are deleted.
Repeat Job Expiration
Off
1 hour
4 hours
24 hours
1 week
Sets a time limit on how long the printer stores print jobs
Verify Job Expiration
Off
1 hour
4 hours
24 hours
1 week
Sets a time limit on how long the printer stores print jobs needing verification
Note: Off is the factory default setting.
Understanding printer menus
176
Menu item
Description
Reserve Job Expiration
Off
1 hour
4 hours
24 hours
1 week
Sets a time limit on how long the printer stores print jobs for printing at a later time
Note: Off is the factory default setting.
Disk Wiping menu
Disk Wiping erases only print job data on the printer hard disk that are not currently in use by the file system. All
permanent data on the printer hard disk are preserved, such as downloaded fonts, macros, and held jobs.
Note: This menu appears only when a formatted, non-defective printer hard disk is installed.
Menu item
Description
Wiping Mode
Auto
Manual
Off
Specifies the mode for disk wiping
Scheduled Wiping
Time
Day
Sets the schedule for disk wiping
Note: Auto is the factory default setting. The printer determines when to initiate a
disk wipe.
Notes:
• Time is used to set the time for scheduled wiping.
• Day is used to set the specific day or period for scheduled wiping. Values are
Sunday to Friday, Everyday, Weekdays, and Weekends.
• Scheduled wipes are initiated without displaying a user warning or confirmation
message.
• Both manual and scheduled wiping allow the file system to reuse marked disk
space without first having to wipe it.
Manual Wiping
Do not start now
Start now
Overwrites all disk space that has been used to hold data from a print job that has
been processed (printed). This type of wipe does not erase any information related
to an unprocessed print job.
Notes:
• “Do not start now “is the factory default setting.
• If the Disk Wiping access control is activated, then a user must successfully
authenticate and have the required authorization in order to initiate the disk
wipe.
Understanding printer menus
177
Menu item
Description
Automatic Method
Single pass
Multiple pass
Marks all disk space used by a previous print job and does not permit the file system
to reuse this space until it has been cleared
Notes:
• “Single pass” is the factory default setting.
• Only automatic wiping enables users to activate disk wiping without having to
turn the printer off for an extended amount of time.
• Highly confidential information should be wiped using only the Multiple pass
method.
Manual Method
Single pass
Multiple pass
Allows the file system to reuse marked disk space without having to wipe it first
Notes:
• “Single pass” is the factory default setting.
• Highly confidential information should be wiped using the Multiple pass method
only.
Scheduled Method
Single pass
Multiple pass
Allows the file system to reuse marked disk space without having to wipe it first
Note: “Single pass” is the factory default setting.
Security Audit Log menu
Menu item
Description
Export Log
Enables an authorized user to export the security log
Notes:
• To export the log from the printer control panel, a flash drive must be attached
to the printer.
• From the Embedded Web Server, the log can be downloaded to a computer.
Delete Log
Yes
No
Specifies whether audit logs are deleted
Note: Yes is the factory default setting.
Understanding printer menus
178
Menu item
Description
Configure Log
Specifies whether and how the audit logs are created
Enable Audit
Note: Factory default settings enable the security audit log.
Enable Remote Syslog
Remote Syslog Server
Remote Syslog Port
Remote Syslog Method
Remote Syslog Facility
Log full behavior
Admin’s e-mail address
Digitally sign exports
Severity of events to log
Remote Syslog non-logged
events
E-mail log cleared alert
E-mail log wrapped alert
E-mail % full alert
% full alert level
E-mail log exported alert
E-mail log settings changed alert
Log line endings
Set Date and Time menu
Menu item
Description
Current Date and Time
Lets you view the current date and time settings for the printer
Manually Set Date and Time
Note: Date/Time is set in YYYY-MM-DD HH:MM:SS format.
Time Zone
Note: GMT is the factory default setting.
Automatically Observe DST
On
Off
Note: On is the factory default setting and uses the applicable Daylight Saving Time
associated with the Time Zone setting.
Custom Time Zone Setup
DST Start Week
DST Start DayOff
DST Start Month
DST Start Time
DST End Week
DST End Day
DST End Month
DST End Time
DST Offset
Enables the user to set up the time zone
Enable NTP
On
Off
Enables Network Time Protocol, which synchronizes the clocks of devices on a
network
Note: On is the factory default setting.
Understanding printer menus
179
Menu item
Description
NTP Server
Lets you view the NTP Server Address
Enable Authentication
Off
On
Lets you change the authentication setting to on or off
Note: Off is the factory default setting.
Settings menu
General Settings menu
Menu item
Description
Display Language
English
Francais
Deutsch
Italiano
Espanol
Greek
Dansk
Norsk
Nederlands
Svenska
Portuguese
Suomi
Russian
Polski
Magyar
Turkce
Cesky
Simplified Chinese
Traditional Chinese
Korean
Japanese
Sets the language of the text appearing on the display
Note: All languages may not be available for all printers.
Understanding printer menus
180
Menu item
Description
Eco-Mode
Off
Energy
Energy/Paper
Paper
Minimizes the use of energy, paper, or specialty media
Notes:
• Off is the factory default setting. Off resets the printer to its
factory default settings.
• The Energy setting minimizes the power used by the printer.
Performance may be affected, but print quality is not.
• Energy/Paper minimizes the use of power and of paper and
specialty media.
• Paper minimizes the amount of paper and specialty media
needed for a print job. Performance may be affected, but print
quality is not.
ADF Loaded Beep
Enabled
Disabled
Specifies whether or not the ADF sounds a beep when paper is
loaded
Quiet Mode
Off
On
Reduces the amount of noise produced by the printer
Note: Disabled is the factory default setting.
Notes:
• Off is the factory default setting. This setting supports the
performance specifications for your printer.
• “On” configures the printer to produce as little noise as
possible. This setting is best suited for printing text and line
art.
• For optimal printing of color-rich documents, set Quiet Mode
to Off.
• Selecting Photo from the printer driver may disable Quiet
Mode and provide better print quality and full speed printing.
Run Initial setup
Yes
No
Instructs the printer to run the setup wizard
Notes:
• Yes is the factory default setting.
• After completing the setup wizard by selecting Done at the
Country select screen, the default becomes No.
Understanding printer menus
181
Menu item
Description
Keyboard
Keyboard Type
English
Francais
Francais Canadien
Deutsch
Italiano
Espanol
Greek
Dansk
Norsk
Nederlands
Svenska
Suomi
Portuguese
Russian
Polski
Swiss German
Swiss French
Turkce
Korean
Custom Key [x]
Accents/Symbols Tab
On
Off
Russian/Polish Tab
On
Off
Korean Tab
On
Off
Specifies a language and custom key information for the printer
control panel keyboard. The additional tabs enable access to accent
marks and symbols from the printer control panel keyboard.
Paper Sizes
US
Metric
Specifies the default paper measurement
Notes:
• Initial setting is determined by your country or region selection
in the initial setup wizard.
• Changing this setting also changes the default for each input
source in the Paper Size/Paper Type menu.
Scan to PC Port Range
[port range]
Specifies a valid port range for printers behind a port blocking
firewall. The valid ports are specified by two sets of numbers
separated by a semicolon.
Note: 9751:12000 is the factory default setting.
Understanding printer menus
182
Menu item
Description
Displayed Information
Left side
Right side
Custom Text [x]
[text entry]
[x] Cartridge
[x] Photoconductor
Fuser
Transfer Module
Specifies what is displayed on the upper left and right corners of
the home screen
For the Left side and Right side menus, choose from the following
options:
None
IP Address
Hostname
Contact Name
Location
Date/Time
mDNS/DDNS Service Name
Zero Configuration Name
Cartridge Level
Custom Text [x]
For [x] Cartridge, [x] Photoconductor, Fuser, and Transfer Module,
choose from the following options:
When to display
Do not display
Display
Message to Display
Default
Alternate
Default
[text entry]
Alternate
[text entry]
Notes:
• IP Address is the factory default setting for Left side.
• Date/Time is the factory default setting for Right side.
• Off is the factory default setting for Display When Supply
Registers.
• Default is the factory default setting for Type of Message to
Display.
Understanding printer menus
183
Menu item
Description
Displayed Information (continued)
Waste Toner Bottle
Paper Jam
Load Paper
Service Errors
Specifies what is displayed for Paper Jam, Load Paper, and Service
Errors. Available options for each button are:
Activate
Yes
No
Type of Message to Display
Default
Alternate
Default Message
[text entry]
Alternate Message
[text entry]
Notes:
• No is the factory default setting for Activate.
• Default is the factory default setting for Type of Message to
Display.
Home screen customization
Change Language
Copy
Copy Shortcuts
Fax
Fax Shortcuts
E-mail
E-mail Shortcuts
FTP
FTP Shortcuts
Search Held Jobs
Held Jobs
USB Drive
Profiles and Solutions
Bookmarks
Jobs by user
Forms and Favorites
Lets you add or remove icons and buttons that appear on the home
screen
Date Format
MM-DD-YYYY
DD-MM-YYYY
YYYY-MM-DD
Formats the printer date
Time Format
12 hour A.M./P.M.
24 hour clock
Formats the printer time
Screen Brightness
20–100
Specifies the brightness of the printer control panel screen
Available selections for each button are:
Display
Do Not Display
Understanding printer menus
184
Menu item
Description
One Page Copy
On
Off
Sets copies from the scanner glass to only one page at a time
Output Lighting
Standard Bin LED
Normal/Standby Mode
Bright
Dim
Off
Sets the amount of light from the standard bin or an optional exit
bin
Note: Off is the factory default setting.
Notes:
• In Normal/Standby Mode, the factory default setting is Bright.
• In Power Saver Mode, the factory default is Dim.
Power Saver
Bright
Dim
Off
Output Option Bin LEDs
Normal/Standby Mode
Bright
Dim
Off
Power Saver
Bright
Dim
Off
Audio Feedback
Button Feedback
On
Off
Volume
1–10
Sets the audio volume for the buttons
Notes:
• On is the factory default setting for Button Feedback.
• 5 is the factory default setting for Volume.
Tactile Touchscreen Feedback
On
Off
Provides touch screen sensation feedback
Show Bookmarks
On
Off
Specifies whether bookmarks are displayed from the Held Jobs area
Allow Background Removal
On
Off
Specifies whether image background removal is allowed in copy,
fax, e-mail, FTP, or scan-to-USB jobs
Allow Custom Job Scans
On
Off
Lets you scan multiple jobs to one file
Note: On is the factory default setting.
Note: On is the factory default setting. When On is selected,
bookmarks appear in the Held Jobs area.
Note: On is the factory default setting. The background of the image
will be removed.
Note: On is the factory default setting. If On is selected, the Allow
Custom Job Scans setting can be enabled for specific jobs.
Understanding printer menus
185
Menu item
Description
Scanner Jam Recovery
Job level
Page level
Specifies how a scanned job should be reloaded if a paper jam
occurs in the ADF
Notes:
• Job level is the factory default setting.
• If Job level is selected, then the entire job must be rescanned
if any pages jam.
• If Page level is selected, then rescan from the jammed page
forward.
Web Page Refresh Rate
30–300
Specifies the number of seconds between Embedded Web Server
refreshes
Note: 120 seconds is the factory default setting.
Contact Name
Specifies a contact name for the printer
Note: The contact name will be stored on the Embedded Web
Server.
Location
Specifies the location of the printer
Note: The location will be stored on the Embedded Web Server.
Alarms
Alarm Control
Cartridge Alarm
Staple Alarm
Hole Punch Alarm
Sets an alarm to sound when the printer requires operator
intervention
Available selections for each alarm type are:
Off
Single
Continuous
Notes:
• Single is the factory default setting for Alarm Control. Single
sounds three quick beeps.
• Off is the factory default setting for Cartridge Alarm. Off means
no alarm will sound.
• Continuous repeats three beeps every 10 seconds.
Timeouts
Standby Mode
Disabled
1–240
Specifies the number of minutes of inactivity before the printer
enters a lower power state
Note: 15 minutes is the factory default setting.
Understanding printer menus
186
Menu item
Description
Timeouts
Sleep Mode
2–240
Sets the amount of time the printer waits after a job is printed
before it goes into a reduced power state
Notes:
• 30 minutes is the factory default setting.
• Lower settings conserve more energy, but may require longer
warm-up times.
• Select the lowest setting if the printer shares an electrical
circuit with room lighting or you notice lights flickering in the
room.
• Select a high setting if the printer is in constant use. Under most
circumstances, this keeps the printer ready to print with
minimum warm-up time.
Timeouts
Screen Timeout
15–300
Sets the amount of time in seconds the printer waits before
returning the printer display to a Ready state
Timeouts
Print Timeout
Disabled
1–255
Sets the amount of time in seconds the printer waits to receive an
end-of-job message before canceling the remainder of the print job
Note: 30 seconds is the factory default setting.
Notes:
• 90 seconds is the factory default setting.
• When the timer expires, any partially printed page still in the
printer is printed, and then the printer checks to see if any new
print jobs are waiting.
• Print Timeout is available only when using PCL emulation. This
setting has no effect on PostScript emulation print jobs.
Timeouts
Wait Timeout
Disabled
15–65535
Sets the amount of time in seconds the printer waits for additional
data before canceling a print job
Notes:
• 40 seconds is the factory default setting.
• Wait Timeout is available only when the printer is using
PostScript emulation. This setting has no effect on PCL
emulation print jobs.
Timeouts
Job Hold Timeout
5–255
Sets the amount of time the printer waits for user intervention
before it holds jobs that require unavailable resources and
continues to print other jobs in the print queue
Notes:
• 30 seconds is the factory default setting.
• This menu appears only when a printer hard disk is installed.
Print Recovery
Disabled
Auto Continue
5–255
Lets the printer automatically continue printing from certain offline
situations when not resolved within the specified time period
Note: Disabled is the factory default setting.
Understanding printer menus
187
Menu item
Description
Print Recovery
Jam Recovery
Auto
On
Off
Specifies whether the printer reprints jammed pages
Notes:
• Auto is the factory default setting. The printer reprints jammed
pages unless the memory required to hold the pages is needed
for other printer tasks.
• On sets the printer to always reprint jammed pages.
• Off sets the printer to never reprint jammed pages.
Print Recovery
Page Protect
Off
On
Lets the printer successfully print a page that may not have printed
otherwise
Notes:
• Off is the factory default setting. Off prints a partial page when
there is not enough memory to print the whole page.
• On sets the printer to process the whole page so that the entire
page prints.
Press Sleep Button
Sleep
Hibernate
Do Nothing
Determines how the printer responds when pressing the Sleep
button when the printer is idle
Notes:
• Sleep is the factory default setting.
• Sleep or Hibernate sets the printer to operate at a lower power
configuration.
• If the printer is in Sleep Mode, then the touch screen appears
off and the Sleep button turns amber in color.
• Touch anywhere on the touch screen or press a button on the
printer control panel to exit Sleep Mode.
• If the printer is in Hibernate mode, then the touch screen is
completely off and the Sleep button turns amber in color and
is blinking.
Press and Hold Sleep Button
Do Nothing
Sleep
Hibernate
Determines how the printer responds when pressing the Sleep
button when the printer is idle
Notes:
• Do Nothing is the factory default setting.
• Sleep or Hibernate sets the printer to operate at a lower power
configuration.
• If the printer is in Sleep Mode, then the touch screen appears
off and the Sleep button turns amber in color.
• Press and hold the Sleep button for 3 seconds or longer to enter
Hibernate mode.
• Touch anywhere on the touch screen or press a button on the
printer control panel to exit Sleep Mode.
Understanding printer menus
188
Menu item
Description
Factory Defaults
Do Not Restore
Restore Now
Returns the printer settings to the factory default settings
Notes:
• Do Not Restore is the factory default setting. Do Not Restore
keeps the user-defined settings.
• Restore Now returns all printer settings to the factory default
settings except Network/Ports menu settings. All downloads
stored in RAM are deleted. Downloads stored in flash memory
or on a printer hard disk are not affected.
Copy Settings menu
Menu item
Description
Content Type
Text/Photo
Text
Graphics
Photo
Specifies the content of the original document
Content Source
Color Laser
Inkjet
Magazine
Press
Black/White Laser
Photo/Film
Newspaper
Other
Specifies how the original document was produced
Color
On
Off
Specifies whether or not copies are printed in color
Allow color copies
On
Off
Lets you enable or disable color in copying
Note: Text/Photo is the factory default setting.
Note: Color Laser is the factory default setting.
Note: On is the factory default setting.
Notes:
• On is the factory default setting.
• Setting this to Off will hide all color-specific menus.
• This setting overrides the Color setting.
Understanding printer menus
189
Menu item
Description
Sides (Duplex)
1 sided to 1 sided
1 sided to 2 sided
2 sided to 1 sided
2 sided to 2 sided
Specifies whether an original document is duplex (two-sided) or simplex (one-sided),
and then specifies whether the copy should be duplex or simplex
Notes:
• 1 sided to 1 sided—The original document has print on one side and the copy will
also have print on one side.
• 1 sided to 2 sided—The original document has print on one side, while the copy
will have print on both sides.
• 2 sided to 1 sided—The original document has print on both sides, while the copy
will have print on just one side.
• 2 sided to 2 sided—The original document has print on both sides, and the copy
will also have print on both sides.
Paper Saver
Off
2 on 1 Portrait
2 on 1 Landscape
4 on 1 Portrait
4 on 1 Landscape
Allows copying two or four sheets of a document on one page
Print Page Borders
Off
On
Specifies whether or not a border is printed
Collate
On [1,2,1,2,1,2]
Off [1,1,1,2,2,2]
Keeps the pages of a print job stacked in sequence when printing multiple copies
Punch
Off
2 holes
3 holes
4 holes
Specifies the type of hole punch finishing to be used in a print or copy job
Staple
Off
Auto
Back
Dual
Dual Double
Front
Lets you enable or disable the staple finisher
Note: Off is the factory default setting.
Note: On is the factory default setting.
Note: Off is the factory default setting.
Notes:
• Off is the factory default setting.
• This menu only appears when a staple finisher is installed.
Understanding printer menus
190
Menu item
Description
Original Size
Letter
Legal
Executive
Tabloid
Folio
Statement
Universal
4 x 6 in.
3 x 5 in.
Business Card
ID Card
Custom Scan Size [x]
A3
A4
A5
Oficio (Mexico)
A6
JIS B4
JIS B5
Book Original
Auto Size Sense
Mixed Sizes
Specifies the paper size of the original document
Copy To Source
Tray [x]
Auto Size Match
Manual Feeder
Specifies the paper source for copy jobs
Transparency Separators
On
Off
Places a sheet of paper between transparencies
Separator Sheets
Off
Between Copies
Between Jobs
Between Pages
Places a sheet of paper between pages, copies, or jobs
Separator Sheet Source
Tray [x]
Manual Feeder
Specifies the separator sheet source
Darkness
1–9
Specifies the level of darkness for the copy job
Notes:
• Letter is the US factory default setting.
• A4 is the international factory default setting.
Note: Tray 1 is the factory default setting.
Note: On is the factory default setting.
Note: Off is the factory default setting.
Note: Tray 1 is the factory default setting.
Note: 5 is the factory default setting.
Understanding printer menus
191
Menu item
Description
Output Bin
Standard Bin
Bin [x]
Specifies the exit bin to be used for the copy job
Number of Copies
1–999
Specifies the number of copies for the copy job
Header/Footer
[Location]
Off
Date/Time
Page number
Custom text
Print on
All pages
First page only
All but first page
Custom text
Specifies header/footer information and its location on the page
Overlay
Off
Confidential
Copy
Draft
Urgent
Custom
Specifies the overlay text printed on each page of the copy job
Custom Overlay
Specifies the custom overlay text
Notes:
• Standard Bin is the factory default setting.
• Bin [x] only appears when at least one optional exit bin is installed.
Note: 1 is the factory default setting.
For the location, choose from the following options:
•
•
•
•
•
•
Top left
Top middle
Top right
Bottom left
Bottom middle
Bottom right
Notes:
• Off is the factory default setting for the location.
• “All pages” is the factory default setting for “Print on.”
Note: Off is the factory default setting.
Note: A maximum of 64 characters is allowed.
Allow priority copies
On
Off
Allows interruption of a print job to copy a page or document
Custom Job scanning
Off
On
Lets you copy, in a single copy job, a document that contains mixed paper sizes
Allow Save as Shortcut
On
Off
Lets you save custom copy settings as shortcuts
Background Removal
-4 to 4
Adjusts the amount of background visible on a copy
Note: On is the factory default setting.
Notes:
• Off is the factory default setting.
• This menu appears only when a valid printer hard drive is installed.
Note: On is the factory default setting.
Note: 0 is the factory default setting.
Understanding printer menus
192
Menu item
Description
Auto Center
Off
On
Lets you automatically center the content on the page
Color Balance
Cyan - Red
Magenta - Green
Yellow - Blue
Enables an equal balance of colors in the output
Color Dropout
Color Dropout
None
Red
Green
Blue
Default Red Threshold
0–255
Default Green Threshold
0–255
Default Blue Threshold
0–255
Specifies which color to drop during copies, and how much to increase or decrease
the dropout
Contrast
Best for content
0–5
Specifies the contrast used for the copy job
Mirror Image
Off
On
Creates a mirror image of the original document
Negative Image
Off
On
Creates a negative image of the original document
Shadow Detail
-4 to 4
Adjusts the amount of shadow detail visible on a copy
Scan edge to edge
Off
On
Specifies if the original document is scanned edge-to-edge
Sharpness
1–5
Adjusts the amount of sharpness of a copy
Temperature
-4 to 4
Enables the user to specify “warm” or “cool” outputs. "Cool” values generate a bluer
output than the default, while “warm” values generate a redder output than the
default.
Sample Copy
Off
On
Creates a sample copy of the original document
Note: Off is the factory default setting.
Notes:
• None is the factory default setting for Color Dropout.
• 128 is the factory default setting for each color threshold.
Note: “Best for content” is the factory default setting.
Note: Off is the factory default setting.
Note: 0 is the factory default setting.
Note: Off is the factory default setting.
Note: 3 is the factory default setting.
Note: Off is the factory default setting.
Understanding printer menus
193
Fax Settings menu
Fax Mode (Analog Fax Setup) menu
Analog Fax Setup mode sends the fax job by way of a telephone line.
General Fax Settings
Menu item
Description
Fax Name or Station Name
Specifies the name of the fax in the printer
Fax Number or Station Number
Specifies the number assigned to the fax
Station ID
Specifies how the fax is identified
Fax Name or Station Name
Fax Number or Station Number
Enable Manual Fax
Off
On
Sets the printer to fax manually only, which requires a line splitter and a telephone
handset
Notes:
• Use a regular telephone to answer an incoming fax job and to dial a fax number.
• Touch # 0 on the numeric keypad to go directly to the Manual Fax function.
Memory Use
Equal
Mostly sent
All send
All receive
Mostly receive
Defines the allocation of non-volatile memory between sending and receiving fax jobs
Notes:
• Equal is the factory default setting. Equal splits the memory for sending and
receiving fax jobs into equal amounts.
•
•
•
•
Mostly sent specifies that most of the memory is set to send fax jobs.
All send specifies that all the memory is set to send fax jobs.
All receive specifies that all the memory is set to receive fax jobs.
Mostly receive specifies that most of the memory is set to receive fax jobs.
Cancel Faxes
Allow
Don't Allow
Specifies whether or not the printer cancels fax jobs
Caller ID
On
Off
Alternate
Specifies the type of caller ID being used
Fax number masking
Off
From left
From right
Specifies the direction from where digits are masked in an outgoing fax number
Digits to mask
0–58
Specifies the number of digits to mask in an outgoing fax number
Note: The number of characters masked is determined by the “Digits to mask” setting.
Understanding printer menus
194
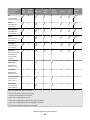
Menu item
Description
Fax Cover Page
Fax Cover Page
Off by default
On by default
Never use
Always use
Include to field
On
Off
Include from field
Off
On
From
Include Message field
Off
On
Message
Include Logo
Off
On
Include Footer [x]
Footer [x]
Configures the fax cover page
Note: “Off by default” is the factory default setting for all Fax Cover Page options.
Fax Send Settings
Menu item
Description
Resolution
Standard
Fine 200 dpi
Super Fine 300 dpi
Ultra Fine 600 dpi
Specifies quality in dots per inch (dpi). A higher resolution gives greater print quality,
but increases the fax transmission time for outgoing faxes.
Note: Standard is the factory default setting.
Understanding printer menus
195
Menu item
Description
Original Size
Mixed Sizes
Letter
Legal
Executive
Tabloid
Folio
Statement
Universal
4 x 6 in.
3 x 5 in.
Business Card
Custom Scan Size [x]
A3
A4
A5
Oficio (Mexico)
A6
JIS B4
JIS B5
Book Original
Auto Size Sense
Specifies the paper size of the original document
Sides (Duplex)
Off
Long edge
Short edge
Specifies how text and graphics are oriented on a page
Note: Mixed Sizes is the US factory default setting. A4 is the international factory
default setting.
Notes:
• Off is the factory default setting.
• Long edge assumes binding along the long edge of the page (left edge for portrait
and top edge for landscape).
• Short edge assumes binding along the short edge of the page (top edge for portrait
and left edge for landscape).
Content Type
Text
Graphics
Text/Photo
Photo
Specifies the content of the original document
Content Source
Color Laser
Inkjet
Photo/Film
Magazine
Newspaper
Press
Other
Black and White Laser
Specifies how the original document was produced
Note: Text is the factory default setting.
Note: Color Laser is the factory default setting.
Understanding printer menus
196
Menu item
Description
Darkness
1–9
Lightens or darkens the output
Dial Prefix
Lets you enter a dialing prefix, such as 99. A numeric entry field is provided.
Dialing Prefix Rules
Prefix Rule [x]
Establishes a dialing prefix rule
Automatic Redial
0–9
Specifies the number of times the printer tries to send the fax to a specified number
Redial Frequency
1–200
Specifies the number of minutes between redials
Behind a PABX
No
Yes
Enables or disables switchboard blind dialing without a dial tone
Enable ECM
Yes
No
Enables or disables Error Correction Mode for fax jobs
Enable Fax Scans
On
Off
Lets you fax files that are scanned at the printer
Driver to fax
Yes
No
Allows the printer driver to send fax jobs
Allow Save as Shortcut
On
Off
Lets you save fax numbers as shortcuts in the printer
Dial Mode
Tone
Pulse
Specifies the dialing sound, either as a tone or a pulse
Max Speed
2400
4800
9600
14400
33600
Specifies the maximum speed in baud at which faxes are sent
Custom Job scanning
Off
On
Lets you scan a document that contains mixed paper sizes into a single file
Scan Preview
Off
On
Specifies whether a preview will appear on the display for scan jobs
Note: 5 is the factory default setting.
Understanding printer menus
197
Menu item
Description
Background Removal
-4 to 4
Adjusts the amount of background visible on a scanned image
Color Balance
Cyan - Red
Magenta - Green
Yellow - Blue
Enables an equal balance of colors in the scanned image
Color Dropout
Color Dropout
None
Red
Green
Blue
Default Red Threshold
0–255
Default Green Threshold
0–255
Default Blue Threshold
0–255
Specifies which color to drop, and how much to increase or decrease the dropout
Contrast
Best for content
0–5
Specifies the contrast in the scanned image
Mirror Image
Off
On
Creates a mirror image of the original document
Negative Image
Off
On
Creates a negative image of the original document
Shadow Detail
-4 to 4
Adjusts the amount of shadow detail visible
Scan edge to edge
Off
On
Specifies if the original document is scanned edge-to-edge prior to faxing
Sharpness
0–5
Adjusts the sharpness of a fax
Temperature
-4 to 4
Enables the user to specify “warm” or “cool” outputs. "Cool” values generate a bluer
output than the default while “warm” values generate a redder output than the
default.
Enable Color Fax Scans
Off by default
On by default
Never use
Always use
Enables color faxing
Note: 0 is the factory default setting.
Notes:
• None is the factory default setting for Color Dropout.
• 128 is the factory default setting for each color threshold.
Note: “Best for content” is the factory default setting.
Note: Off is the factory default setting.
Note: 0 is the factory default setting.
Note: Off is the factory default setting.
Note: 3 is the factory default setting.
Note: “Off by default” is the factory default setting.
Understanding printer menus
198
Menu item
Description
Auto Convert Color Faxes to Mono Converts all outgoing faxes to black and white
Faxes
Note: On is the factory default setting.
On
Off
Fax Receive Settings
Menu item
Description
Enable Fax Receive
On
Off
Allows fax jobs to be received by the printer
Fax Job Waiting
None
Toner
Toner and Supplies
Removes fax jobs that request specific unavailable resources from the print queue
Rings to Answer
1–25
Specifies the number of rings before answering an incoming fax job
Auto Reduction
On
Off
Scales an incoming fax job so that it fits the size of the paper loaded in the designated
fax source
Paper Source
Auto
Tray [x]
Multi-Purpose Feeder
Specifies the paper source selected to supply paper for the printer to print an incoming
fax
Sides (Duplex)
Off
On
Enables duplex printing (two-sided printing) for incoming fax jobs
Separator Sheets
Off
Before Job
After Job
Enables the printer to include separator sheets for incoming fax jobs
Separator Sheet Source
Tray [x]
Manual Feeder
Specifies where the printer will pick the separator sheet
Output Bin
Standard Bin
Bin [x]
Specifies an exit bin for received faxes
Fax Footer
Off
On
Prints the transmission information at the bottom of each page from a received fax
Note: On is the factory default setting.
Note: None is the factory default setting.
Note: 3 is the factory default setting.
Note: On is the factory default setting.
Note: Bin 1 is available only when the finisher is installed.
Note: Off is the factory default setting.
Understanding printer menus
199
Menu item
Description
Max Speed
2400
4800
9600
14400
33600
Specifies the maximum speed in baud at which faxes are received
Fax Forwarding
Print
Print and Forward
Forward
Enables forwarding of received faxes to another recipient
Forward to
Fax
E-mail
FTP
LDSS
eSF
Specifies the type of recipient to which faxes will be forwarded
Forward to Shortcut
Lets you enter the shortcut number which matches the recipient type (Fax, E-mail,
FTP, LDSS, or eSF)
Block No Name Fax
Off
On
Enables blocking of incoming faxes sent from devices with no station ID specified
Banned Fax List
Enables the list of banned fax numbers stored in the printer
Holding Faxes
Held Fax Mode
Off
Always On
Manual
Scheduled
Fax Holding Schedule
Enables fax holding all of the time or according to set schedule
Punch
Off
On
Specifies whether prints are punched
Staple
Off
1 staple
2 staples
4 staples
Specifies whether prints are stapled
Enable Color Fax Receive
On
Off
Enables the device to receive fax in color
Note: This menu is available only from the printer Embedded Web Server.
Note: Off is the factory default setting.
Understanding printer menus
200
Fax Log Settings
Menu item
Description
Transmission Log
Print log
Do not print log
Print only for error
Enables printing of a transmission log after each fax job
Receive Error Log
Print Never
Print on Error
Enables printing of a receive error log following a receive error
Auto Print Logs
On
Off
Enables automatic printing of fax logs
Log Paper Source
Tray [x]
Manual Feeder
Specifies the source of the paper used for printing logs
Logs Display
Remote Fax Name or Remote
Station Name
Dialed Number
Specifies whether printed logs display the dialed number or the station name returned
Enable Job Log
On
Off
Enables access to the Fax Job log
Enable Call Log
On
Off
Enables access to the Fax Call log
Log Output Bin
Standard Bin
Bin [x]
Specifies the exit bin where fax logs are printed
Note: Logs print after every 200 fax jobs.
Speaker Settings
Menu item
Description
Speaker Mode
On until Connected
Always On
Always Off
Specifies the mode of the speaker.
Notes:
• “On until Connected” is the factory default setting. A sound is issued until the fax
connection is made.
• Always On turns the speaker on.
• Always Off turns the speaker off.
Speaker Volume
High
Low
Controls the volume setting
Note: High is the factory default setting.
Understanding printer menus
201
Menu item
Description
Ringer Volume
On
Off
Controls the fax speaker ringer volume
Note: On is the factory default setting.
Answer On
Menu item
All Rings
Single Ring Only
Double Ring Only
Triple Ring Only
Single or Double Rings Only
Single or Triple Rings Only
Double or Triple Rings Only
Description
Specifies ring patterns when device is answering calls
Note: All Rings is the factory default setting.
Fax Mode (Fax Server Setup) menu
Fax Server mode sends the fax job to a fax server for transmission.
Fax Server Setup
Menu item
Description
To Format
Lets you enter the information using the virtual keyboard on the printer touch screen
Reply Address
Subject
Message
SMTP Setup
Specifies SMTP setup information
Primary SMTP Gateway
Specifies SMTP server port information
Secondary SMTP Gateway
Image Format
PDF (.pdf)
XPS (.xps)
TIFF (.tif)
Specifies the image type for scan to fax
Content Type
Text
Text/Photo
Graphics
Photo
Specifies the content of the original document
Note: Text is the factory default setting.
Understanding printer menus
202
Menu item
Description
Content Source
Color Laser
Inkjet
Photo/Film
Magazine
Newspaper
Press
Other
Specifies how the original document was produced
Fax Resolution
Standard
Fine 200 dpi
Super Fine 300 dpi
Ultra Fine 600 dpi
Specifies the resolution level for scan to fax
Darkness
1–9
Lightens or darkens the output
Orientation
Portrait
Landscape
Specifies the orientation of the scanned image
Original Size
Letter
Legal
Executive
Tabloid
Folio
Statement
Universal
4 x 6 in.
3 x 5 in.
Business Card
Custom Scan Size [x]
A3
A4
A5
Oficio (Mexico)
JIS B4
JIS B5
Book Original
Auto Size Sense
Specifies the paper size of the document that is being scanned
Note: Color Laser is the factory default setting.
Note: 5 factory default setting.
Note: Letter is the US factory default setting. A4 is the international factory default
setting.
Mixed Sizes
Understanding printer menus
203
Menu item
Description
Use Multi-Page TIFF
On
Off
Provides a choice between single-page TIFF files and multiple-page TIFF files. For a
multiple-page scan to fax job, either one TIFF file is created containing all the pages,
or multiple TIFF files are created with one file for each page of the job.
Notes:
• On is the factory default setting.
• This menu item applies to all scan functions.
Enable Analog Receive
Off
On
Enables analog fax receive
Note: Off is the factory default setting.
E-mail Settings menu
Menu item
Description
E-mail Server Setup
Subject
Message
Base file name
Specifies e-mail server information
E-mail Server Setup
Send me a copy
Never appears
On by default
Off by default
Always On
Sends a copy of the e-mail back to the sender
E-mail Server Setup
Max E-mail size
0–65535 KB
Specifies the maximum e-mail size in kilobytes
E-mail Server Setup
Size error message
Sends a message when an e-mail is greater than the configured size limit
E-mail Server Setup
Limit destinations
Specifies a domain name, such as a company domain name, and then limits e-mail
destinations to that domain name only
Notes:
• The subject box has a limitation of 255 characters.
• The message box has a limitation of 512 characters.
Note: “Never appears” is the factory default setting.
Note: E-mails above the specified size are not sent.
Notes:
• E-mail can be sent only to the specified domain.
• The limit is one domain.
Understanding printer menus
204
Menu item
Description
E-mail Server Setup
Web Link Setup
Server
Login
Password
Path
Base file name
Web Link
Defines the e-mail server path name; for example: /directory/path
Format
PDF (.pdf)
Secure PDF
TIFF (.tif)
JPEG (.jpg)
XPS (.xps)
Specifies the format of the scanned file
PDF Version
1.2–1.6
A–1a
Sets the version of the PDF file that will be scanned for e-mailing
Content Type
Text/Photo
Photo
Text
Graphics
Specifies the content of the original document
Content Source
Color Laser
Inkjet
Photo/Film
Magazine
Newspaper
Press
Other
Black and White Laser
Specifies how the original document was produced
Color
On
Off
Specifies whether or not copies are printed in color
Resolution
150 dpi
200 dpi
300 dpi
400 dpi
600 dpi
75 dpi
Specifies the resolution of the scan in dots per inch
Darkness
1–9
Lightens or darkens the output
Note: The characters * : ? < > | are invalid entries for a path name.
Note: PDF (.pdf) is the factory default setting.
Note: 1.5 is the factory default setting.
Note: Text/Photo is the factory default setting.
Note: Color Laser is the factory default setting.
Note: On is the factory default setting.
Note: 150 dpi is the factory default setting.
Note: 5 is the factory default setting.
Understanding printer menus
205
Menu item
Description
Orientation
Portrait
Landscape
Specifies the orientation of the scanned image
Original Size
Letter
Legal
Executive
Tabloid
Folio
Statement
Universal
4 x 6 in.
3 x 5 in.
Business Card
Custom Scan Size [x]
A3
A4
A5
Oficio (Mexico)
A6
JIS B4
JIS B5
Book Original
Auto Size Sense
Mixed Sizes
Specifies the paper size of the document being scanned
Sides (Duplex)
Off
Long edge
Short edge
Specifies how the text and graphics are oriented on the page
Note: Portrait is the factory default setting.
Notes:
• A4 is the international factory default setting.
• Letter is the US factory default setting.
Notes:
• Off is the factory default setting.
• Long edge assumes binding along the long edge of the page (left edge for portrait
and top edge for landscape ).
• Short edge assumes binding along the short edge of the page (top edge for
portrait and left edge for landscape ).
JPEG Quality
Best for content
5–90
Text Default
5–90
Sets the quality of a JPEG photo image in relation to file size and quality of the image
Notes:
•
•
•
•
“Best for content” is the factory default setting.
5 reduces the file size and quality of the image.
90 provides the best image quality, but the file size is very large.
This menu applies to all scan functions.
Sets the quality of a text image in relation to file size and quality of the image
Note: 75 is the factory default setting.
Understanding printer menus
206
Menu item
Description
Text/Photo Default
5–90
Sets the quality of a text or photo image in relation to file size and the quality of the
image
Note: 75 is the factory default setting.
Photo Default
5–90
Sets the quality of a photo image in relation to file size and the quality of the image
E-mail images sent as
Attachment
Web Link
Specifies how the images will be sent
Use Multi-Page TIFF
On
Off
Provides a choice between single-page TIFF files and multiple-page TIFF files. For a
multiple-page scan-to-e-mail job, either one TIFF file is created containing all the
pages, or multiple TIFF files are created with one file for each page of the job.
Note: 50 is the factory default setting.
Note: Attachment is the factory default setting.
Notes:
• On is the factory default setting.
• This menu applies to all scan functions.
Transmission Log
Print log
Do not print log
Print only for error
Specifies whether or not the transmission log prints
Log Paper Source
Tray [x]
Manual Feeder
Specifies the paper source for printing e-mail logs
E-mail Bit Depth
8 bit
1 bit
Enables the Text/Photo mode to produce smaller file sizes by using 1-bit images when
Color is set to Off
Custom Job scanning
Off
On
Lets you copy, in a single copy job, a document that contains mixed paper sizes
Scan Preview
Off
On
Specifies whether or not a preview will appear on the display for scan jobs
Allow Save as Shortcut
On
Off
Lets you save e-mail addresses as shortcuts
Note: Print log is the factory default setting.
Note: Tray 1 is the factory default setting.
Note: 8 bit is the factory default setting.
Note: Off is the factory default setting.
Notes:
• On is the factory default setting.
• When set to Off, the Save as Shortcut button does not appear on the e-mail
Destination screen.
Background Removal
-4 to 4
Adjusts the amount of background visible on a scanned image
Note: 0 is the factory default setting.
Understanding printer menus
207
Menu item
Description
Color Balance
Cyan - Red
Magenta - Green
Yellow - Blue
Enables an equal balance of colors in the output
Color Dropout
Color Dropout
None
Red
Green
Blue
Default Red Threshold
0–255
Default Green Threshold
0–255
Default Blue Threshold
0–255
Specifies which color to drop during scanning, and how much to increase or decrease
the dropout
Contrast
Best for content
0–5
Specifies the contrast of the output
Mirror Image
Off
On
Creates a mirror image of the original document
Negative Image
Off
On
Creates a negative image of the original document
Shadow Detail
-4 to 4
Adjusts the amount of shadow detail visible on a scanned image
Scan edge to edge
Off
On
Specifies whether the original document is scanned edge-to-edge
Sharpness
1–5
Adjusts the amount of sharpness on a scanned image
Temperature
-4 to 4
Enables the user to specify “warm” or “cool” outputs. "Cool” values generate a bluer
output than the default while “warm” values generate a redder output than the
default.
Use cc:/bcc:
Off
On
Enables the use of the cc: and bcc: fields
Notes:
• None is the factory default setting for Color Dropout.
• 128 is the factory default setting for each color threshold.
Note: “Best for content” is the factory default setting.
Note: Off is the factory default setting.
Note: 0 is the factory default setting.
Note: Off is the factory default setting.
Note: 3 is the factory default setting.
Note: Off is the factory default setting.
Understanding printer menus
208
FTP Settings menu
Menu item
Description
Format
PDF (.pdf)
Secure PDF (.pdf)
TIFF (.tif)
JPEG (.jpg)
XPS (.xps)
Specifies the format of the FTP file
PDF Version
1.2–1.6
A–1a
Sets the version level of the PDF file for FTP sending
Content Type
Text/Photo
Photo
Text
Graphics
Specifies the content of the original document
Content Source
Color Laser
Inkjet
Photo/Film
Magazine
Newspaper
Press
Other
Black and White Laser
Specifies how the original document was produced
Color
On
Off
Specifies whether or not copies are printed in color
Resolution
150 dpi
200 dpi
300 dpi
400 dpi
600 dpi
75 dpi
Specifies the quality of the scan in dots per inch
Darkness
1–9
Lightens or darkens the output
Orientation
Portrait
Landscape
Specifies the orientation of the scanned image
Note: PDF (.pdf) is the factory default setting.
Note: 1.5 is the factory default setting.
Note: Text/Photo is the factory default setting.
Note: Color Laser is the factory default setting.
Note: On is the factory default setting.
Note: 150 dpi is the factory default setting.
Note: 5 is the factory default setting.
Note: Portrait is the factory default setting.
Understanding printer menus
209
Menu item
Description
Original Size
Letter
Legal
Executive
Tabloid
Folio
Statement
Universal
4 x 6 in.
3 x 5 in.
Business Card
Custom Scan Size [x]
A3
A4
A5
Oficio (Mexico)
A6
JIS B4
JIS B5
Book Original
Auto Size Sense
Mixed Sizes
Specifies the paper size of the original document
Sides (Duplex)
Off
Long edge
Short edge
Specifies how the text and graphics are oriented on the page
Notes:
• Letter is the US factory default setting.
• A4 is the international factory default setting.
Notes:
• Off is the factory default setting.
• Long edge assumes binding along the long edge of the page (left edge for portrait
and top edge for landscape ).
• Short edge assumes binding along the short edge of the page (top edge for
portrait and left edge for landscape ).
JPEG Quality
Best for content
5–90
Sets the quality of a JPEG photo image in relation to file size and the quality of the
image
Notes:
•
•
•
•
“Best for content” is the factory default setting.
5 reduces the file size, but the quality of the image is lessened.
90 provides the best image quality, but the file size is very large.
This menu applies to all scan functions.
Text Default
5–90
Sets the quality of the text in relation to file size and the quality of the image
Text/Photo Default
5–90
Sets the quality of a text/photo image in relation to file size and the quality of the
image
Note: 75 is the factory default setting.
Understanding printer menus
210
Menu item
Description
Photo Default
5–90
Sets the quality of a photo image in relation to file size and the quality of the image
Use Multi-Page TIFF
On
Off
Provides a choice between single-page TIFF files and multiple-page TIFF files. For a
multiple-page scan-to-FTP job, either one TIFF file is created containing all the pages,
or multiple TIFF files are created with one file for each page of the job.
Note: 50 is the factory default setting.
Notes:
• On is the factory default setting.
• This menu applies to all scan functions.
Transmission Log
Print log
Do not print log
Print only for error
Specifies whether the transmission log prints
Log Paper Source
Tray [x]
Manual Feeder
Specifies a paper source when printing FTP logs
Log Output Bin
Standard Bin
Bin [x]
Specifies an exit bin for FTP logs
FTP bit Depth
8 bit
1 bit
Enables the Text/Photo mode to have smaller file sizes by using 1-bit images when
Color is set to Off
Base File Name
Lets you enter a base file name
Note: “Print log” is the factory default setting.
Note: Tray 1 is the factory default setting.
Notes:
• Standard Bin is the factory default setting.
• Bin [x] only appears when at least one optional exit bin is installed.
Note: 8 bit is the factory default setting.
Note: The limitation is 53 characters.
Custom Job Scanning
Off
On
Lets you copy a document that contains mixed paper sizes into a single scan job
Scan Preview
Off
On
Specifies whether a preview will appear on the display for scan jobs
Allow Save as Shortcut
On
Off
Enables shortcut creation for FTP addresses
Background Removal
-4 to 4
Adjusts the amount of background visible on a copy
Color Balance
Cyan - Red
Magenta - Green
Yellow - Blue
Enables an equal balance of colors in the output
Note: Off is the factory default setting.
Note: On is the factory default setting.
Note: 0 is the factory default setting.
Understanding printer menus
211
Menu item
Description
Color Dropout
Color Dropout
None
Red
Green
Blue
Default Red Threshold
0–255
Default Green Threshold
0–255
Default Blue Threshold
0–255
Specifies which color to drop during scanning, and how much to increase or decrease
the dropout
Contrast
0–5
Best for content
Specifies the contrast of the output
Mirror Image
Off
On
Creates a mirror image of the original document
Negative Image
Off
On
Creates a negative image of the original document
Shadow Detail
-4 to 4
Adjusts the amount of shadow detail visible on a scanned image
Scan edge to edge
Off
On
Specifies whether the original document is scanned edge-to-edge
Sharpness
1–5
Adjusts the amount of sharpness of a scanned image
Temperature
-4 to 4
Enables the user to specify “warm” or “cool” outputs. "Cool” values generate a bluer
output than the default while “warm” values generate a redder output than the
default.
Notes:
• None is the factory default setting for Color Dropout.
• 128 is the factory default setting for each color threshold.
Note: “Best for content” is the factory default setting.
Note: Off is the factory default setting.
Note: 0 is the factory default setting.
Note: Off is the factory default setting.
Note: 3 is the factory default setting.
Understanding printer menus
212
Flash Drive menu
Scan Settings
Menu item
Description
Format
PDF (.pdf)
Secure PDF
TIFF (.tif)
JPEG (.jpg)
XPS (.xps)
Specifies the format of the file to be sent through FTP
PDF Version
1.2–1.6
A-1a
Sets the version of the PDF file to be sent through FTP
Content Type
Text/Photo
Photo
Text
Graphics
Specifies the content of the original document
Content Source
Color Laser
Inkjet
Photo/Film
Magazine
Newspaper
Press
Other
Black and White Laser
Specifies how the original document is produced
Color
On
Off
Specifies whether prints are in black-and-white or color
Resolution
150 dpi
200 dpi
300 dpi
400 dpi
600 dpi
75 dpi
Specifies the resolution of the scan in dots per inch (dpi)
Darkness
1–9
Lightens or darkens the output
Orientation
Portrait
Landscape
Specifies the orientation of the scanned image
Note: PDF (.pdf) is the factory default setting.
Note: 1.5 is the factory default setting.
Note: Text/Photo is the factory default setting.
Note: Color Laser is the factory default setting.
Note: Off is the factory default setting.
Note: 150 dpi is the factory default setting.
Note: 5 is the factory default setting.
Note: Portrait is the factory default setting.
Understanding printer menus
213
Menu item
Description
Original Size
Letter
Legal
Executive
Tabloid
Folio
Statement
Universal
4 x 6 in.
3 x 5 in.
Business Card
Custom Scan Size [x]
A3
A4
A5
Oficio (Mexico)
A6
JIS B4
JIS B5
Book Original
Auto Size Sense
Mixed Sizes
Specifies the paper size of the original document
Sides (Duplex)
Off
Long edge
Short edge
Specifies how the text and graphics are oriented on a page
Note: Letter is the US factory default setting. A4 is the international factory default
setting.
Notes:
• Off is the factory default setting.
• Long edge assumes binding along the long edge of the page (left edge for portrait
and top edge for landscape).
• Short edge assumes binding along the short edge of the page (top edge for
portrait and left edge for landscape).
JPEG Quality
Best for content
5–90
Sets the quality of a JPEG photo image in relation to file size and quality
Notes:
•
•
•
•
“Best for content” is the factory default setting.
5 reduces the file size, but the quality of the image is lessened.
90 provides the best image quality, but the file size is very large.
This menu applies to all scan functions.
Text Default
5–90
Sets the quality of the text in relation to file size and the quality of the image
Text/Photo Default
5–90
Sets the quality of a text/photo image in relation to file size and quality
Photo Default
5–90
Sets the quality of a photo image in relation to file size and quality
Note: 75 is the factory default setting.
Note: 50 is the factory default setting.
Understanding printer menus
214
Menu item
Description
Use Multi-Page TIFF
On
Off
Provides a choice between single-page TIFF files and multiple-page TIFF files. For a
multiple-page scan to FTP job, either one TIFF file is created containing all the pages,
or multiple TIFF files are created with one file for each page.
Notes:
• On is the factory default setting.
• This menu applies to all scan functions.
Scan Bit Depth
8 bit
1 bit
Enables the Text/Photo mode to have smaller file sizes by using 1-bit images when
Color is set to Off
File Name
Lets you enter a base file name
Note: 8 bit is the factory default setting.
Note: A maximum of 53 characters is allowed.
Custom Job Scanning
Off
On
Lets you copy a document containing mixed paper sizes in a single copy job
Scan Preview
Off
On
Specifies whether a preview appears on the display for scan jobs
Background Removal
-4 to 4
Adjusts the amount of background visible on a copy
Color Balance
Cyan - Red
Magenta - Green
Yellow - Blue
Enables an equal balance of colors in the scanned image
Color Dropout
Color Dropout
None
Red
Green
Blue
Default Red Threshold
0–255
Default Green Threshold
0–255
Default Blue Threshold
0–255
Specifies which color to drop during scanning, and how much to increase or decrease
in the dropout
Contrast
Best for content
0–5
Specifies the contrast of the scanned image
Mirror Image
Off
On
Creates a mirror image of the original document
Note: Off is the factory default setting.
Note: 0 is the factory default setting.
Notes:
• None is the factory default setting for Color Dropout.
• 128 is the factory default setting for each color threshold.
Note: “Best for content” is the factory default setting.
Note: Off is the factory default setting.
Understanding printer menus
215
Menu item
Description
Negative Image
Off
On
Creates a negative image of the original document
Shadow Detail
-4 to 4
Adjusts the amount of shadow detail visible on a scanned image
Scan edge to edge
Off
On
Specifies whether the original document is scanned edge-to-edge
Sharpness
1–5
Adjusts the amount of sharpness on a scanned image
Temperature
-4 to 4
Enables the user to specify “warm” or “cool” outputs. "Cool” values generate a bluer
output than the default while “warm” values generate a redder output than the
default.
Note: Off is the factory default setting.
Note: 0 is the factory default setting.
Note: Off is the factory default setting.
Note: 3 is the factory default setting.
Print Settings
Copies
1–999
Specifies a default number of copies for each print job
Paper Source
Tray [x]
MP Feeder
Manual Paper
Manual Envelope
Sets a default paper source for all print jobs
Color
Color
Black Only
Specifies whether copies are printed in color or black-and-white
Collate
On (1,2,1,2,1,2)
Off (1,1,1,2,2,2)
Stacks the pages of a print job in sequence when printing multiple copies
Sides (Duplex)
1 sided
2 sided
Specifies whether prints are on one side or on both sides of the page
Staple
Off
Auto
Back
Dual
Dual Double
Front
Specifies whether prints are stapled
Note: 1 is the factory default setting.
Note: Tray 1 is the factory default setting.
Note: Color is the factory default setting.
Note: On is the factory default setting.
Note: 1 sided is the factory default setting.
Notes:
• Off is the factory default setting.
• This menu appears only when a stapler is installed.
Understanding printer menus
216
Hole Punch
Off
On
Specifies whether prints have punched holes
Hole Punch Mode
2 holes
3 holes
4 holes
Determines the type of punch finishing performed on prints
Duplex Binding
Long Edge
Short Edge
Defines the way duplexed pages are bound and how the printing on the back of the page is
oriented in relation to the printing on the front of the page
Notes:
• Off is the factory default setting.
• This menu appears only when a puncher is installed.
Notes:
• “3 holes” is the factory default setting if 3-hole puncher is installed.
• “4 holes” is the factory default setting if 2-hole and 4-hole puncher is installed.
• This menu appears only when a puncher is installed.
Notes:
• Long edge assumes binding along the long edge of the page (left edge for portrait and top
edge for landscape).
• Short edge assumes binding along the short edge of the page (top edge for portrait and left
edge for landscape).
Paper Saver Orientation Specifies the orientation of a multiple-page document
Auto
Note: Auto is the factory default setting. The printer chooses between portrait and landscape.
Landscape
Portrait
Paper Saver
Off
2-Up
3-Up
4-Up
6-Up
9-Up
12-Up
16-Up
Specifies that multiple-page images be printed on one side of a paper
Paper Saver Border
None
Solid
Prints a border on each page image
Paper Saver Ordering
Horizontal
Reverse Horizontal
Reverse Vertical
Vertical
Specifies the positioning of multiple-page images
Notes:
• Off is the factory default setting.
• The number selected is the number of page images that will print per side.
Note: None is the factory default setting.
Notes:
• Horizontal is the factory default setting.
• Positioning depends on the number of page images and whether they are in portrait or
landscape orientation.
Understanding printer menus
217
Separator Sheets
Off
Between Copies
Between Jobs
Between Pages
Specifies whether blank separator sheets are inserted
Notes:
• Off is the factory default setting.
• Between Copies inserts a blank sheet between each copy of a print job if Collate is set to On.
If Collate is set to Off, then a blank page is inserted between each set of printed pages, such
as after all page 1's and after all page 2's.
• Between Jobs inserts a blank sheet between print jobs.
• Between Pages inserts a blank sheet between each page of the print job. This setting is useful
when printing transparencies or when inserting blank pages in a document .
Separator Sheet Source Specifies the paper source for separator sheets
Tray [x]
Note: Tray 1 is the factory default setting.
Manual Feeder
Blank Pages
Do Not Print
Print
Specifies whether blank pages are inserted in a print job
Note: Do Not Print is the factory default setting.
Print Settings
Setup menu
Menu item
Description
Printer Language
PS Emulation
PCL Emulation
Sets the default printer language
Notes:
• PS Emulation is the factory default printer language.
• Setting a printer language as the default does not prevent a
software program from sending print jobs that use another
printer language.
Job Waiting
Off
On
Specifies that print jobs be removed from the print queue if they
require unavailable printer options or custom settings. They are
stored in a separate print queue, so other jobs print normally. When
the missing information and/or options are obtained, the stored
jobs print.
Notes:
• Off is the factory default setting.
• This menu appears only when a non-read-only printer hard disk
is installed. This requirement ensures that stored jobs are not
deleted if the printer loses power.
Understanding printer menus
218
Menu item
Description
Print Area
Normal
Whole Page
Sets the logical and physical printable area
Notes:
• Normal is the factory default setting. When attempting to print
data in the non-printable area defined by the Normal setting,
the printer clips the image at the boundary.
• Whole Page allows the image to be moved into the
non-printable area defined by the Normal setting, but the
printer will clip the image at the Normal setting boundary.
Whole Page only affects pages printed using a PCL 5e
interpreter. This setting has no effect on pages printed using
the PCL XL or PostScript interpreter.
Printer Usage
Max Speed
Max Yield
Sets color toner use in printing
Black Only Mode
Off
On
Sets the printer to print text and graphics using only the black print
cartridge
Download Target
RAM
Flash
Disk
Sets the storage location for downloads
Notes:
• Max Speed is the default printer setting.
• The printer driver is capable of overriding this setting
Note: Off is the factory default setting.
Notes:
• RAM is the factory default setting. Storing downloads in RAM
is temporary.
• Storing downloads in flash memory or on a printer hard disk
places them in permanent storage. Downloads remain in flash
memory or on the printer hard disk even when the printer is
turned off.
• This menu appears only when a flash and/or disk option is
installed.
Resource Save
Off
On
Specifies how the printer handles temporary downloads, such as
fonts and macros stored in RAM, when the printer receives a job
that requires more memory than is available
Notes:
• Off is the factory default setting. Off sets the printer to retain
the downloads only until memory is needed. Downloads are
deleted in order to process print jobs.
• On retains the downloads during language changes and printer
resets. If the printer runs out of memory, then 38 Memory
Full appears, and downloads are not deleted.
Print All Order
Alphabetical
Oldest First
Newest First
Specifies the order in which held and confidential jobs are printed
when Print All is selected
Note: Alphabetical is the factory default setting. Print jobs always
appear in alphabetical order on the printer control panel.
Understanding printer menus
219
Job Accounting menu
Note: This menu item appears only if a formatted, non-defective printer hard disk is installed. The printer hard disk
cannot be read/write- or write-protected.
Menu item
Description
Job Accounting Log
Off
On
Determines if the printer creates a log of the print jobs it receives
Job Accounting Utilities
Lets you print and delete log files or export them to a flash drive
Accounting Log Frequency
Monthly
Weekly
Determines how often a log file is created
Log Action at End of Frequency
None
E-mail Current Log
E-mail & Delete Current Log
Post Current Log
Post & Delete Current Log
Determines how the printer responds when the frequency threshold expires
Disk Near Full Level
1–99
Off
Specifies the maximum size of the log file before the printer executes the Disk Near
Full Action
Disk Near Full Action
None
E-mail Current Log
E-mail & Delete Current Log
E-mail & Delete Oldest Log
Post Current Log
Post & Delete Current Log
Post & Delete Oldest Log
Delete Current Log
Delete Oldest Log
Delete All Logs
Delete All But Current
Determines how the printer responds when the printer hard disk is nearly full
Disk Full Action
None
E-mail & Delete Current Log
E-mail & Delete Oldest Log
Post & Delete Current Log
Post & Delete Oldest Log
Delete Current Log
Delete Oldest Log
Delete All Logs
Delete All But Current
Determines how the printer responds when disk usage reaches the maximum limit
(100MB)
URL to Post Logs
Determines where the printer posts job accounting logs
Note: Off is the factory default setting.
Note: Monthly is the factory default setting.
Note: None is the factory default setting.
Note: 5MB is the factory default setting.
Notes:
• None is the factory default setting.
• The value defined in Disk Near Full Level determines when this action is triggered.
Note: None is the factory default setting.
Understanding printer menus
220
Menu item
Description
E-mail Address to Send Logs
Specifies the e-mail address to which the device sends job accounting logs
Log File Prefix
Note: The current host name defined in the TCP/IP menu is used as the default log
file prefix.
Finishing menu
Menu item
Description
Sides (Duplex)
1 sided
2 sided
Specifies whether duplex (2-sided) printing is set as the default setting for all print
jobs
Notes:
• 1 sided is the factory default setting.
• You can set 2-sided printing from the software program. For Windows users, click
File > Print, and then click Properties, Preferences, Options, or Setup. For
Macintosh users, choose File > Print, and then adjust the settings from the print
dialog and pop-up menus.
Duplex Binding
Long Edge
Short Edge
Defines the way duplexed pages are bound and how the printing on the back of the
page is oriented in relation to the printing on the front of the page
Notes:
• Long Edge is the factory default setting. Long edge assumes binding along the
long edge of the page (left edge for portrait and top edge for landscape).
• Short edge assumes binding along the short edge of the page (top edge for
portrait and left edge for landscape).
Copies
1–999
Specifies the default number of copies for each print job
Blank Pages
Do Not Print
Print
Specifies whether blank pages are inserted in a print job
Collate
On (1,2,1,2,1,2)
Off (1,1,1,2,2,2)
Stacks the pages of a print job in sequence when printing multiple copies
Separator Sheets
Off
Between Copies
Between Jobs
Between Pages
Specifies whether blank separator sheets are inserted
Note: 1 is the factory default setting.
Note: Do Not Print is the factory default setting.
Notes:
• On is the factory default setting.
• On stacks the print job in sequence.
Notes:
• Off is the factory default setting.
• Between Copies inserts a blank sheet between each copy of a print job if Collate
is set to On. If Collate is set to Off, then a blank page is inserted between each
set of printed pages, such as after all page 1's and after all page 2's.
• Between Jobs inserts a blank sheet between print jobs.
• Between Pages inserts a blank sheet between each page of a print job. This
setting is useful when printing transparencies or when inserting blank pages in
a document.
Understanding printer menus
221
Menu item
Description
Separator Source
Tray [x]
Manual Feeder
Specifies the paper source for separator sheets
Notes:
• Tray 1 (standard tray) is the factory default setting.
• From the Paper menu, Configure MP must be set to Cassette for Manual Feeder
to appear as a menu setting.
Paper Saver
Off
2-Up
3-Up
4-Up
6-Up
9-Up
12-Up
16-Up
Specifies that multiple-page images be printed on one side of a paper
Paper Saver Ordering
Horizontal
Reverse Horizontal
Reverse Vertical
Vertical
Specifies the positioning of multiple-page images when using Paper Saver
Paper Saver Orientation
Auto
Landscape
Portrait
Specifies the orientation of a multiple-page document
Paper Saver Border
None
Solid
Prints a border on each page image
Staple Job
Off
Auto
Back
Dual
Dual Double
Front
Specifies whether the prints are stapled
Hole Punch
Off
On
Specifies whether the prints have punched holes
Notes:
• Off is the factory default setting.
• The number selected is the number of page images that will print per side.
Notes:
• Horizontal is the factory default setting.
• Positioning depends on the number of page images and whether they are in
portrait or landscape orientation.
Note: Auto is the factory default setting. The printer chooses between portrait and
landscape.
Note: None is the factory default setting.
Notes:
• Off is the factory default setting.
• This menu appears only when a stapler is installed.
Note: This menu appears only when a puncher is installed.
Understanding printer menus
222
Menu item
Description
Hole Punch Mode
2 holes
3 holes
4 holes
Determines the type of punch finishing performed on a printed output
Notes:
• “2 holes” is the factory default setting regardless of hardware.
• “3 holes” and “4 holes” appear only when their respective hole punch hardware
is installed.
•
Offset Pages
None
Between Copies
Between Jobs
Offsets pages at certain instances
Notes:
• None is the factory default setting.
• Between Copies offsets each copy of a print job if Collate is set to On. If Collate
is set to Off, each set of printed pages are offset, such as all page 1's and all page
2's.
• Between Jobs sets the same offset position for the entire print job regardless of
the number of copies printed.
• This menu appears only when a stapler is installed.
Quality menu
Menu item
Description
Print Mode
Color
Black Only
Specifies whether images are printed in color or in black and white
Color Correction
Auto
Off
Manual
Adjusts the color output on the printed page
Notes:
• Color is the factory default setting.
• The printer driver is capable of overriding this setting.
Notes:
• Auto is the factory default setting. Auto applies different color conversion tables to
each object on the printed page.
• Manual allows customization of color tables using the settings available from the
Manual Color menu.
• Due to the differences in additive and subtractive colors, certain colors that appear
on computer screens are impossible to duplicate on a printed page.
Print Resolution
2400 Image Q
1200 dpi
Specifies the printed output resolution
Notes:
• 2400 Image Q is the factory default setting.
• 1200 dpi provides the highest resolution output, and increases gloss.
Understanding printer menus
223
Menu item
Description
Toner Darkness
1–5
Lightens or darkens the printed output
Notes:
• 4 is the factory default setting.
• Selecting a smaller number can help conserve toner.
• If Print Mode is set to Black Only, then a setting of 5 increases toner density and
darkness for all print jobs.
• If Print Mode is set to Color, then a setting of 5 is the same as a setting of 4.
Enhance Fine Lines
Off
On
Enables a print mode preferable for files such as architectural drawings, maps, electrical
circuit diagrams, and flow charts
Notes:
• Off is the factory default setting.
• You can set this option from the software program. For Windows users, click File >
Print, and then click Properties, Preferences, Options, or Setup. For Macintosh
users, choose File > Print, and then adjust the settings from the print dialog and
pop-up menus.
• To set this option using the Embedded Web Server, type the network printer IP
address or host name in a browser window.
Color Saver
Off
On
Reduces the amount of toner used for graphics and images. The amount of toner used
for text is not reduced.
Notes:
• Off is the factory default setting.
• On overrides Toner Darkness settings.
RGB Brightness
-6 to 6
Adjusts brightness in color outputs
Notes:
• 0 is the factory default setting.
• This does not affect files where CMYK color specifications are used.
RGB Contrast
0–5
Adjusts contrast in color outputs
Notes:
• 0 is the factory default setting.
• This does not affect files where CMYK color specifications are used.
RGB Saturation
0–5
Adjusts saturation in color outputs
Notes:
• 0 is the factory default setting.
• This does not affect files where CMYK color specifications are used.
Understanding printer menus
224
Menu item
Description
Color Balance
Cyan
-5 to 5
Magenta
-5 to 5
Yellow
-5 to 5
Black
-5 to 5
Reset Defaults
Adjusts color in printed output by increasing or decreasing the amount of toner used
for each color
Color Samples
sRGB Display
sRGB Vivid
Display—True Black
Vivid
Off—RGB
US CMYK
Euro CMYK
Vivid CMYK
Off—CMYK
Prints sample pages for each of the RGB and CMYK color conversion tables used in the
printer
Manual Color
RGB Image
Vivid
sRGB Display
Display—True Black
sRGB Vivid
Off
RGB Text
Vivid
sRGB Display
Display—True Black
sRGB Vivid
Off
RGB Graphics
Vivid
sRGB Display
Display—True Black
sRGB Vivid
Off
Customizes the RGB color conversions
Note: 0 is the factory default setting.
Notes:
• Selecting any setting prints the sample.
• Color samples consist of a series of colored boxes along with the RGB or CMYK
combination that creates the color observed. These pages can be used to help
decide which combinations to use to get the desired printed output.
• From a browser window, type the IP address of the printer to access a complete list
of color sample pages from the Embedded Web Server.
Notes:
• sRGB Display is the factory default setting for RGB Image. This applies a color
conversion table to an output that matches the colors displayed on a computer
monitor.
• sRGB Vivid is the factory default setting for RGB Text and RGB Graphics. sRGB Vivid
applies a color table that increases saturation. This is preferred for business graphics
and text.
• Vivid applies a color conversion table that produces brighter, more saturated colors.
• Display—True Black applies a color conversion table that uses only black toner for
neutral gray colors.
Understanding printer menus
225
Menu item
Description
Manual Color
CMYK Image
US CMYK
Euro CMYK
Vivid CMYK
Off
CMYK Text
US CMYK
Euro CMYK
Vivid CMYK
Off
CMYK Graphics
US CMYK
Euro CMYK
Vivid CMYK
Off
Customizes the CMYK color conversions
Spot Color Replacement
Allows users to create and save custom spot colors with corresponding CMYK values
Notes:
• US CMYK is the US factory default setting. US CMYK applies a color conversion table
that tries to produce output that matches SWOP color output.
• Euro CMYK is the international factory default setting. Euro CMYK applies a color
conversion table that tries to produce output that matches EuroScale color output.
• Vivid CMYK increases color saturation for the US CMYK color conversion table.
Utilities menu
Menu item
Description
Remove Held Jobs
Confidential
Held
Not Restored
All
Removes confidential and held jobs from the printer hard disk
Notes:
• Selecting a setting affects only print jobs that are resident in the printer.
Bookmarks, print jobs on flash drives, and other types of held jobs are not
affected.
• Not Restored removes all Print and Hold jobs that are not restored from the
printer hard disk or memory.
Format Flash
Yes
No
Formats the flash memory
Warning—Potential Damage: Do not turn off the printer while the flash memory is
being formatted.
Notes:
• Yes deletes all data stored in flash memory.
• No cancels the format request.
• Flash memory refers to the memory added by installing a flash memory option
card in the printer.
• A flash memory option card must be installed in the printer and operating
properly for this menu item to be available.
• The flash memory option card must not be read/write- or write-protected.
Understanding printer menus
226
Menu item
Description
Delete Downloads on Disk
Delete Now
Do Not Delete
Removes downloads from the printer hard disk, including all held jobs, buffered jobs,
and parked jobs
Notes:
• Delete Now configures the printer control panel to return to the originating
screen after the deletion process is completed.
• Do Not Delete sets the printer control panel to return to the main Utilities menu.
Activate Hex Trace
Assists in isolating the source of a print job problem
Notes:
• When activated, all data sent to the printer is printed in hexadecimal and
character representation, and control codes are not executed.
• To exit or deactivate Hex Trace, turn the printer off or reset the printer.
Coverage Estimator
Off
On
Provides an estimate of the percentage coverage of toner on a page. The estimate is
printed on a separate page at the end of each print job.
Note: Off is the factory default setting.
XPS menu
Menu item
Description
Print Error Pages
Off
On
Prints a page containing information on errors, including XML markup errors
Note: Off is the factory default setting.
PDF menu
Menu item
Description
Scale to Fit
No
Yes
Scales page content to fit the selected paper size
Annotations
Do Not Print
Print
Prints annotations in a PDF
Note: No is the factory default setting.
Note: Do Not Print is the factory default setting.
PostScript menu
Menu item
Description
Print PS Error
Off
On
Prints a page containing the PostScript error
Note: Off is the factory default setting.
Understanding printer menus
227
Menu item
Description
Lock PS Startup Mode
Off
On
Enables users to disable the SysStart file
Font Priority
Resident
Flash/Disk
Establishes the font search order
Note: Off is the factory default setting.
Notes:
• Resident is the factory default setting.
• This menu item is available only if a formatted flash memory option card or
printer hard disk is installed and operating properly.
• Make sure the flash memory option or printer hard disk is not read/write-,
write-, or password-protected.
• Job Buffer Size must not be set to 100%.
Image Smoothing
Off
On
Enhances the contrast and sharpness of low-resolution images and smooths
their color transitions
Notes:
• Off is the factory default setting.
• Image Smoothing has no effect on images that are 300 dpi or higher in
resolution.
PCL Emul menu
Menu item
Description
Font Source
Resident
Disk
Download
Flash
All
Specifies the set of fonts used by the Font Name menu item
Notes:
• Resident is the factory default setting. It shows the factory default set of
fonts downloaded in RAM.
• Flash and Disk settings show all fonts resident in that option. Make sure the
flash option is properly formatted and is not read/write-, or
password-protected.
• Download shows all the fonts downloaded in RAM.
• All shows all fonts available to any option.
Font Name
RO Courier
Identifies a specific font and where it is stored
Note: RO Courier is the factory default setting. The RO Courier format shows the
font name, font ID, and storage location in the printer. The font source
abbreviation is R for Resident, F for Flash, K for Disk, and D for Download.
Understanding printer menus
228
Menu item
Description
Symbol Set
10U PC-8
12U PC-850
Specifies the symbol set for each font name
Notes:
• 10U PC-8 is the US factory default setting. 12U PC-850 is the international
factory default setting.
• A symbol set is a set of alphabetical and numeric characters, punctuation,
and special symbols. Symbol sets support the different languages or specific
programs such as math symbols for scientific text. Only the supported
symbol sets are shown.
PCL Emulation Settings
Point Size
1.00–1008.00
Changes the point size for scalable typographic fonts
Notes:
• 12 is the factory default setting.
• Point Size refers to the height of the characters in the font. One point equals
approximately 1/72 of an inch.
• Point sizes can be increased or decreased in 0.25-point increments.
PCL Emulation Settings
Pitch
0.08–100
Specifies the font pitch for scalable monospaced fonts
Notes:
•
•
•
•
10 is the factory default setting.
Pitch refers to the number of fixed-space characters per inch (cpi).
Pitch can be increased or decreased in 0.01-cpi increments.
For non-scalable monospaced fonts, the pitch appears on the display but
cannot be changed.
PCL Emulation Settings
Orientation
Portrait
Landscape
Specifies the orientation of text and graphics on a page
PCL Emulation Settings
Lines per Page
1–255
Specifies the number of lines that print on each page
Notes:
• Portrait is the factory default setting.
• Portrait prints text and graphics parallel to the short edge of the page.
• Landscape prints text and graphics parallel to the long edge of the page.
Notes:
• 60 is the US factory default setting. 64 is the international default setting.
• The printer sets the amount of space between each line based on the Lines
per Page, Paper Size, and Orientation settings. Select the desired Paper Size
and Orientation before setting Lines per Page.
PCL Emulation Settings
A4 Width
198 mm
203 mm
Sets the printer to print on A4-size paper
Notes:
• 198 mm is the factory default setting.
• The 203-mm setting sets the width of the page to allow the printing of eighty
10-pitch characters.
Understanding printer menus
229
Menu item
Description
PCL Emulation Settings
Auto CR after LF
Off
On
Specifies whether the printer automatically performs a carriage return (CR) after
a line feed (LF) control command
PCL Emulation Settings
Auto LF after CR
Off
On
Specifies whether the printer automatically performs a line feed (LF) after a
carriage return (CR) control command
Tray Renumber
Assign MP Feeder
Off
None
0–199
Assign Tray [x]
Off
None
0–199
Assign Manual Paper
Off
None
0–199
Assign Manual Env
Off
None
0–199
Configures the printer to work with printer software or programs that use
different source assignments for trays, drawers, and feeders
Tray Renumber
View Factory Defaults
MPF Default = 8
T1 Default = 1
T2 Default = 4
T3 Default = 5
T4 Default = 20
T5 Default = 21
Env Default = 6
MPaper Default = 2
MEnv Default = 3
Displays the factory default setting assigned to each tray, drawer, or feeder
Tray Renumber
Restore Defaults
Yes
No
Returns all tray, drawer, and feeder assignments to the factory default settings
Note: Off is the factory default setting.
Notes:
• Off is the factory default setting.
• None ignores the Select Paper Feed command. This selection is displayed
only when it is selected by the PCL 5e interpreter.
• 0–199 allows a custom setting to be assigned.
Understanding printer menus
230
HTML menu
Menu Item
Font Name
Albertus MT
Antique Olive
Apple Chancery
Arial MT
Avant Garde
Bodoni
Bookman
Chicago
Clarendon
Cooper Black
Copperplate
Coronet
Courier
Eurostile
Garamond
Geneva
Gill Sans
Goudy
Helvetica
Hoefler Text
Intl CG Times
Intl Courier
Intl Univers
Description
Joanna MT
Letter Gothic
Lubalin Graph
Marigold
MonaLisa Recut
Monaco
New CenturySbk
New York
Optima
Oxford
Palatino
StempelGaramond
Taffy
Times
TimesNewRoman
Univers
Zapf Chancery
NewSansMTCS
NewSansMTCT
New SansMTJA
NewSansMTKO
Sets the default font for HTML documents
Note: The Times font is used in HTML documents that do not
specify a font.
Menu item
Description
Font Size
1–255 pt
Sets the default font size for HTML documents
Notes:
• 12 pt is the factory default setting.
• Font size can be increased in 1-point increments.
Scale
1–400%
Scales the default font for HTML documents
Notes:
• 100% is the factory default setting.
• Scaling can be increased in 1% increments.
Orientation
Portrait
Landscape
Sets the page orientation for HTML documents
Note: Portrait is the factory default setting.
Understanding printer menus
231
Menu item
Description
Margin Size
8–255 mm
Sets the page margin for HTML documents
Notes:
• 19 mm is the factory default setting.
• Margin size can be increased in 1-mm increments.
Backgrounds
Print
Do Not Print
Specifies whether to print backgrounds on HTML documents
Note: Print is the factory default setting.
Image menu
Menu item
Description
Auto Fit
On
Off
Selects the optimal paper size, scaling, and orientation
Invert
Off
On
Inverts bi-tonal monochrome images
Scaling
Best Fit
Anchor Center
Fit Height/Width
Fit Height
Fit Width
Anchor Top Left
Scales the image to fit the selected paper size
Orientation
Portrait
Landscape
Rev Portrait
Rev Landscape
Sets the image orientation
Note: On is the factory default setting. It overrides scaling and orientation settings
for some images.
Notes:
• Off is the factory default setting.
• This setting does not apply to GIF or JPEG images.
Notes:
• Best Fit is the factory default setting.
• When Auto Fit is set to On, Scaling is automatically set to Best Fit.
Note: Portrait is the factory default setting.
Booklet Adjustments menu
The Booklet Adjustments menu is available only when a booklet finisher is installed. You can select various adjustments
from this menu when printing booklets.
To access the Booklet Adjustments menu:
1 Turn the printer off.
2 Hold down
and
while turning the printer on.
3 Release the buttons when the screen with the progress bar appears.
The printer performs a power-on sequence, and then the Configuration Menu appears.
Understanding printer menus
232
4 Touch the arrows until Booklet Adjustments appears.
5 Touch Booklet Adjustments.
Menu item
Description
Size of paper
JIS B4
Letter
A4
Legal
11 x 17
A3
Oficio
Folio
Specifies the paper size
Total number of sheets
1–2 sheets
3 sheets
4 sheets
5–7 sheets
8–15 sheets
Specifies the total number of sheets in a booklet
Adjust for folding overlap
Top overlap
Bottom overlap
Select top or bottom overlap based on prints
Adjust for skew during booklet making
Clockwise skew
Counter-clockwise skew
Select skew direction based on prints
Note: This setting defaults to the Tray 1 paper size value.
Note: The factory default setting is 1–2 sheets.
Help menu
The Help menu consists of a series of Help pages that are stored in the multifunction printer (MFP) as PDF files. They
contain information about using the printer and performing various tasks, including copying, scanning, and faxing.
English, French, German, and Spanish translations are stored in the printer.
Other translations are available on the Lexmark Web site at www.lexmark.com.
Menu item
Description
Print All Guides
Prints all the guides
Copy Guide
Provides information about making copies and changing settings
Fax Guide
Provides information about sending faxes using fax numbers, shortcut numbers,
or the address book, and about changing settings
E-mail Guide
Provides information about sending e-mails using addresses, shortcut numbers, or
the address book, and about changing settings
FTP Guide
Provides information about scanning documents directly to an FTP server using an
FTP address, shortcut numbers, or the address book, and about changing settings
Understanding printer menus
233
Menu item
Description
Print Defects Guide
Provides help in resolving repeating defects in copies or prints
Information Guide
Provides help in locating additional information
Supplies Guide
Provides part numbers for ordering supplies
Understanding printer menus
234
Securing the hard disk and other installed memory
Statement of Volatility
Your printer contains various types of memory that are capable of storing device and network settings, information
from embedded solutions, and user data. The types of memory—along with the types of data stored by each—are
described below.
• Volatile memory—Your device utilizes standard Random Access Memory (RAM) to temporarily buffer user data
during simple print and copy jobs.
• Non-volatile memory—Your device may utilize two forms of non-volatile memory: EEPROM and NAND (flash
memory). Both types are used to store the operating system, device settings, network information, scanner and
bookmark settings, and embedded solutions.
• Hard disk memory—Some devices have a hard disk drive installed. The printer hard disk is designed for
device-specific functionality and cannot be used for long term storage for data that is not print-related. The hard
disk does not provide the capability for users to extract information, create folders, create disk or network file
shares, or FTP information directly from a client device. The hard disk can retain buffered user data from complex
scan, print, copy, and fax jobs, as well as form data, and font data.
There are several circumstances under which you might wish to erase the contents of the memory devices installed in
your printer. A partial list includes:
•
•
•
•
•
The printer is being decommissioned
The printer hard drive is being replaced
The printer is being moved to a different department or location
The printer is being serviced by someone from outside your organization
The printer is being removed from your premises for service
Disposing of a hard drive
Note: Not all printers have a hard disk installed.
In high-security environments, it may be necessary to take additional steps to ensure that confidential data stored on
the printer hard disk cannot be accessed once the printer—or its hard disk—is removed from your premises. While
most data can be erased electronically, you may want to consider one or more of the following actions before disposing
of a printer or hard disk:
• Degaussing—Flushes the hard drive with a magnetic field that erases stored data
• Crushing—Physically compresses the hard disk to break component parts and render them unreadable
• Milling—Physically shreds the hard disk into small metal bits
Note: While most data can be erased electronically, the only way to guarantee that all data is completely erased is to
physically destroy each memory device on which data could have been stored.
Erasing volatile memory
The volatile memory (RAM) installed on your printer requires a power source to retain information. To erase the
buffered data, simply power down the device.
Securing the hard disk and other installed memory
235
Erasing non-volatile memory
There are several methods available for erasing data stored in non-volatile memory, depending on the type of memory
device installed, and the type of data stored by that device. For information about how to erase each type of information,
see the Embedded Web Server Administrator Guide.
• Individual settings—You can erase individual printer settings using the printer control panel, or the printer
Embedded Web Server.
• Device and network settings—You can erase device and network settings and restore factory defaults by resetting
the NVRAM using the printer Config menu.
• Security settings—You can restore factory defaults or erase security settings by selecting a behavior for the Security
Reset Jumper in the Embedded Web Server, and then moving a hardware jumper located on the motherboard.
• Fax data—If your printer does not contain a hard disk, or you have chosen NAND for fax storage, you can erase fax
settings and data by resetting the NVRAM using the printer Config menu.
Note: If your printer has a hard disk that has been partitioned for fax storage, you must reformat that partition to
erase fax data and settings.
• Embedded solutions—You can erase information and settings associated with embedded solutions by uninstalling
the solutions, or by restoring factory defaults using the printer Config menu.
Erasing printer hard disk memory using the Embedded Web
Server
Note: Not all printers have a hard disk installed.
Configuring Disk Wiping in the printer menus enables you to remove residual confidential material left by scan, print,
copy, and fax jobs, by securely overwriting files that have been marked for deletion.
1 From the Embedded Web Server, click Settings > Security > Disk Wiping.
Note: Printers without a hard disk will not display Disk Wiping in the Security menu.
2 For Wiping Mode, select one of the following:
• Auto—Use this to automatically wipe data following each use (can increase the time between jobs).
• Manual—Use this to set up a schedule for disk wiping.
3 Click Submit.
4 From the Security menu, click Disk Wiping.
5 If you have enabled Manual mode and wish to set up a schedule for disk wiping, click Scheduled Disk Wiping.
Notes:
• Scheduled Disk Wiping will not be displayed until after Manual mode has been selected and submitted.
• If you do not wish to schedule disk wiping, then you can skip steps 5 and 6.
6 Use the Time and Day(s) options to designate when disk wiping should occur, and then click Add. Repeat as needed
to schedule additional times for disk wiping. When finished, use the browser Back button to return to the Disk
Wiping setup screen.
Note: Disk wiping can take from several minutes to more than an hour, during which time the printer will be
unavailable for other user tasks.
Securing the hard disk and other installed memory
236
7 From the Disk Wiping settings screen, select one of the following for each method of disk wiping (Automatic, Manual,
and Scheduled):
• Single Pass—This lets you overwrite the printer hard disk in a single pass with a repeating bit pattern.
• Multi-pass—This lets you overwrite the printer hard disk with random bit patterns several times, followed by
a verification pass. A secure overwrite is compliant with the DoD 5220.22-M standard for securely erasing data
from a hard disk. Highly confidential information should be wiped using this method.
8 Click Submit.
Configuring printer hard disk encryption using the Embedded
Web Server
Note: Not all printers have a hard disk installed.
Enabling hard disk encryption helps prevent the loss of sensitive data in the event your printer or its hard disk is stolen.
1 From the Embedded Web Server, click Settings > Security > Disk Encryption.
Note: Printers without a hard disk will not display Disk Encryption in the Security menu.
2 From the Disk Encryption menu, select Enable.
Warning—Potential Damage: Enabling disk encryption will erase the contents of the printer hard disk.
Note: Disk encryption can take from several minutes to more than an hour, during which the printer will be
unavailable for other user tasks.
3 Click Submit.
Securing the hard disk and other installed memory
237
Maintaining the printer
Periodically, certain tasks are required to maintain optimum print quality.
Cleaning the exterior of the printer
1 Make sure that the printer is turned off and unplugged from the wall outlet.
CAUTION—SHOCK HAZARD: To avoid the risk of electric shock when cleaning the exterior of the printer,
unplug the power cord from the wall outlet and disconnect all cables to the printer before proceeding.
2 Remove paper from the standard exit bin.
3 Dampen a clean, lint-free cloth with water.
Warning—Potential Damage: Do not use household cleaners or detergents, as they may damage the finish of the
printer.
4 Wipe only the outside of the printer, making sure to include the standard exit bin.
Warning—Potential Damage: Using a damp cloth to clean the interior may cause damage to your printer.
5 Make sure the paper support and standard exit bin are dry before beginning a new print job.
Maintaining the printer
238
Cleaning the scanner glass
Clean the scanner glass if you encounter print quality problems, such as streaks on copied or scanned images.
1 Slightly dampen a soft, lint-free cloth or paper towel with water.
2 Open the scanner cover.
1
White underside of the ADF cover
2
White underside of the scanner cover
3
Scanner glass
4
ADF glass
3 Wipe the areas shown and let them dry.
4 Close the scanner cover.
Maintaining the printer
239
Cleaning the printhead lenses
Clean the printhead lenses when you encounter print quality problems.
1 Open the front door.
2 Slide the release lever to the left to unlock the cover.
3 Open the cover.
Warning—Potential Damage: To avoid overexposing the photoconductor unit, do not leave the cover open for
more than 10 minutes.
Maintaining the printer
240
4 Locate the printhead wipers.
Maintaining the printer
241
5 Gently pull the printhead wipers out until it stops, and then slowly slide them back into place.
6 Close the cover.
Maintaining the printer
242
7 Slide the release lever to the right to lock the cover.
8 Close the front door.
Storing supplies
Choose a cool, clean storage area for the printer supplies. Store supplies right side up in their original packing until you
are ready to use them.
Do not expose supplies to:
•
•
•
•
•
•
Direct sunlight
Temperatures above 35°C (95°F)
High humidity above 80%
Salty air
Corrosive gases
Heavy dust
Maintaining the printer
243
Checking the status of supplies
A message appears on the display when a replacement supply item is needed or when maintenance is required.
Checking the status of supplies from the printer control panel
From the home screen, touch Status/Supplies > View Supplies.
Checking the status of supplies from a network computer
Note: The computer must be connected to the same network as the printer.
1 Type the printer IP address into the address field of your Web browser.
If you do not know the IP address of the printer, you can:
• View the IP address on the printer control panel in the TCP/IP section under the Networks/Ports menu.
• Print a network setup page or the menu settings pages and locate the IP address in the TCP/IP section.
2 Click Device Status.
The Device Status page appears, displaying a summary of supply levels.
Ordering supplies
To order supplies in the U.S., contact Lexmark at 1-800-539-6275 for information about Lexmark authorized supplies
dealers in your area. In other countries or regions, visit the Lexmark Web site at www.lexmark.com or contact the
place where you purchased the printer.
Notes:
• The toner gauge is an estimate of how much toner is left in your cartridge.
• All life estimates for printer supplies assume printing on letter- or A4-size plain paper.
Ordering toner cartridges
When 88.xx [color] cartridge low or 88.xx [color] cartridge nearly low appears, order a
new cartridge.
When 88 Replace [color] cartridge appears, replace the specified cartridge.
Estimated cartridge yield is based on the ISO/IEC 19798 standard (with about 5% coverage per color). Extremely low
print coverage (less than 1.25% for a color) for extended periods of time may negatively affect actual yield for that color
and may cause cartridge parts to fail prior to exhaustion of toner.
Recommended toner cartridges and part numbers
Part name
Part number
Black high-yield toner cartridge
X950X2KG
Yellow high-yield toner cartridge
X950X2YG
Magenta high-yield toner cartridge
X950X2MG
Maintaining the printer
244
Part name
Part number
Cyan high-yield toner cartridge
X950X2CG
Ordering a photoconductor unit
When 84.xx [Color] photoconductor low or 84.xx [Color] photoconductor nearly low
appears, order a replacement photoconductor unit.
When 84.xx Replace [color] photoconductor appears, replace the specified photoconductor.
Recommended photoconductor units and part numbers
Part name
Part number
Photoconductor unit
C950X71G
•
•
•
•
Black
Cyan
Magenta
Yellow
CMY (Cyan, Magenta, Yellow) Photoconductor Kit
C950X73G
Note: CMY photoconductor units may reach end of life all at the
same time.
Ordering a waste toner bottle
When 82.xx Waste toner bottle nearly full appears, order a replacement waste toner bottle.
When 82.xx Replace waste toner bottle appears, replace the waste toner bottle.
Note: Waste toner bottle reuse is not recommended.
Part name
Part number
Waste toner bottle
C950X76G
Ordering staple cartridges
When Staples Low or Staples Empty appears, order the specified staple cartridge.
For more information, see the illustrations inside the stapler door.
Part name
Part number
Staple Cartridges--3 pack (Staples G5)
25A0013
Advanced Booklet Staples (Staples G11 and Staples G12)
21Z0357
Maintaining the printer
245
Replacing Supplies
Replacing a photoconductor unit
1 Open the front door.
2 Rotate the release lever counterclockwise to open the cover.
Maintaining the printer
246
3 Lower the cover.
Warning—Potential Damage: To avoid overexposing the photoconductor unit, do not leave the door open for
more than 10 minutes.
4 Grasp the handle of the photoconductor unit and pull it out of the machine.
5 Unpack the replacement photoconductor unit.
Maintaining the printer
247
6 Align and insert the end of photoconductor unit.
7 Remove the tape from the top of the photoconductor unit.
Maintaining the printer
248
8 Push the tab forward to insert the photoconductor unit.
9 Push the photoconductor unit until it clicks into place
Maintaining the printer
249
10 Close the cover.
11 Rotate the release lever clockwise to lock the cover.
Maintaining the printer
250
12 Close the front door.
Replacing a toner cartridge
1 Open the front door.
2 Put your hand under the dent of the toner cartridge, and then slightly lift up the cartridge.
Maintaining the printer
251
3 Pull the toner cartridge out.
4 Unpack the replacement toner cartridge, and then shake it to redistribute the toner.
5 Insert the new cartridge into the printer.
Maintaining the printer
252
6 Close the front door.
Replacing the waste toner bottle
1 Turn the printer off.
2 Open the front door.
3 Remove the used waste toner bottle.
Maintaining the printer
253
4 Unpack the new waste toner bottle.
5 Insert the new waste toner bottle into the printer until it clicks into place.
6 Rotate the release lever counterclockwise to open the cover.
Maintaining the printer
254
7 Lower the cover.
8 Slide out the printhead wipers.
Maintaining the printer
255
9 Slide the printhead wipers back into place.
10 Close the cover.
Maintaining the printer
256
11 Rotate the release lever clockwise to lock the cover.
12 Close the front door.
13 Turn the printer back on.
Moving the printer
Before moving the printer
CAUTION—POTENTIAL INJURY: The printer weight is greater than 18 kg (40 lb) and requires two or more trained
personnel to lift it safely.
CAUTION—POTENTIAL INJURY: Before moving the printer, follow these guidelines to avoid personal injury or
printer damage:
• Turn the printer off using the power switch, and then unplug the power cord from the wall outlet.
• Disconnect all cords and cables from the printer before moving it.
Maintaining the printer
257
• Lift the printer off of the optional drawer and set it aside instead of trying to lift the drawer and printer at the same
time.
Note: Use the handholds located on both sides of the printer to lift it off the optional drawer.
Warning—Potential Damage: Damage to the printer caused by improper moving is not covered by the printer warranty.
Moving the printer to another location
The printer and options can be safely moved to another location by following these precautions:
• Any cart used to move the printer must have a surface able to support the full footprint of the printer. Any cart
used to move the options must have a surface able to support the dimensions of the options.
• Keep the printer in an upright position.
• Avoid severe jarring movements.
Shipping the printer
When shipping the printer, use the original packaging or call the place of purchase for a relocation kit.
Maintaining the printer
258
Administrative support
Finding advanced networking and administrator information
This chapter covers basic administrative support tasks using the Embedded Web Server. For more advanced system
support tasks, see the Networking Guide on the Software and Documentation CD and the Embedded Web Server
Administrator's Guide on the Lexmark Web site at http://support.lexmark.com.
Using the Embedded Web Server
If the printer is installed on a network, then the Embedded Web Server is available for a range of functions including:
•
•
•
•
•
Viewing a virtual display of the printer control panel
Checking the status of the printer supplies
Configuring printer settings
Configuring network settings
Viewing reports
To access the Embedded Web Server for your printer:
1 Type the printer IP address into the address field of your Web browser.
Notes:
• If you do not know the IP address of the printer, then print a network setup page, and then locate the IP address
in the TCP/IP section.
• If you are using a proxy server, then temporarily disable it to load the Embedded Web Server correctly.
2 Press Enter.
Checking the status of the printer
1 Type the printer IP address into the address field of your Web browser.
If you do not know the IP address of the printer, you can:
• View the IP address on the printer control panel in the TCP/IP section under the Networks/Ports menu.
• Print a network setup page or the menu settings pages and locate the IP address in the TCP/IP section.
2 Click Device Status.
The device status shows the following:
•
•
•
•
Paper tray settings
Level of toner in the print cartridge
Percentage of life remaining in the maintenance kit
Capacity measurements of certain printer parts
Administrative support
259
Checking the virtual display
1 Open an Embedded Web Server associated with your printer.
Type the printer IP address into the address field of your Web browser.
If you do not know the IP address of the printer, you can:
• View the IP address on the printer control panel in the TCP/IP section under the Networks/Ports menu.
• Print a network setup page or the menu settings pages and locate the IP address in the TCP/IP section.
2 Check the virtual display that appears in the top left corner of the screen.
The virtual display works as an actual display would work on a printer control panel, showing printer messages.
Setting up e-mail alerts
Configure the printer to send you e-mail alerts when the supplies are getting low or when the paper needs to be changed
or added, or when there is a paper jam.
1 Type the printer IP address into the address field of your Web browser.
If you do not know the IP address of the printer, you can:
• View the IP address on the printer control panel in the TCP/IP section under the Networks/Ports menu.
• Print a network setup page or the menu settings pages and locate the IP address in the TCP/IP section.
2 Click Settings.
3 Under Other Settings, click E-mail Alert Setup.
4 Select the items for notification, and type the e-mail addresses.
5 Click Submit.
Note: For information on setting up the e-mail server, contact your system support person.
Viewing reports
You can view some reports from the Embedded Web Server. These reports are useful for assessing the status of the
printer, the network, and supplies.
To view reports from a network printer:
1 Type the printer IP address into the address field of your Web browser.
If you do not know the IP address of the printer you can:
• View the IP address on the printer control panel in the TCP/IP section under the Networks/Ports menu.
• Print a network setup page or the menu settings pages and locate the IP address in the TCP/IP section.
2 Click Reports, and then click the type of report you want to view.
Administrative support
260
Restoring factory default settings
If you want to retain a list of the current menu settings for reference, then print a menu settings page before restoring
the factory default settings.
Warning—Potential Damage: Restoring factory defaults returns most printer settings to the original factory default
settings. Exceptions include the display language, custom sizes and messages, and network/port menu settings. All
downloads stored in RAM are deleted. Downloads stored in flash memory or on a printer hard disk are not affected.
From the home screen, navigate to:
> Settings > General Settings > Factory Defaults > Restore Now > Submit
Administrative support
261
Clearing jams
By carefully selecting papers and specialty media and loading it properly, you should be able to avoid most jams. For
more information, see “Avoiding jams” on page 262. If jams do occur, follow the steps outlined in this chapter.
To resolve the jam messages, you must clear the entire paper path, and press to clear the message and resume
printing. The printer prints a new copy of the page that jammed if Jam Recovery is set to On or Auto; however, the
Auto setting does not guarantee the page will print.
Note: Jam recovery is set to Auto by default. The printer reprints jammed pages unless the memory required to hold
the pages is needed for other printer tasks.
Avoiding jams
Paper tray recommendations
•
•
•
•
•
Make sure the paper lies flat in the tray.
Do not remove a tray while the printer is printing.
Do not load a tray while the printer is printing. Load it prior to printing, or wait for a prompt to load it.
Do not load too much paper. Make sure the stack height does not exceed the indicated maximum height.
Make sure the guides in the tray or the multipurpose feeder are properly positioned and are not pressing too tightly
against the paper or envelopes.
• Push the tray in firmly after loading paper.
Paper recommendations
• Use only recommended paper or specialty media.
• Do not load wrinkled, creased, damp, bent, or curled paper.
• Flex and straighten paper before loading it.
•
•
•
•
Do not use paper that has been cut or trimmed by hand.
Do not mix paper sizes, weights, or types in the same stack.
Make sure all sizes and types are set correctly in the printer control panel menus.
Store paper per manufacturer recommendations.
Clearing jams
262
Understanding jam numbers and locations
When a jam occurs, a message indicating the jam location appears on the display. Open doors and covers and remove
trays to access jam locations. To resolve any paper jam message, you must clear all jammed paper from the paper path.
Area
Area name
Jam numbers What to do
1
Cover F (paper transport)
4yy.xx
2
Door G
455
3
Door H
4
Standard exit bin
Open cover F, and then removed jammed paper.
Open door G and H, and then remove the jammed paper.
Open staple door, remove the staple cartridge, and then
remove the jammed staple.
201-202
203
Remove all paper from the standard exit bin, and then remove
the jammed paper.
5
Automatic Document Feeder (ADF)
28y.xx
6
Door C
Tray [x]
24x
Open door C, and then remove the jammed paper
Open each tray, and then remove the jammed paper.
7
Multipurpose feeder
250
Remove all paper from the multipurpose feeder, and then
remove the jammed paper.
8
Door B
230
Open door B, and then remove jammed paper.
9
Door A
201-202
231
281
10
Door D
203
Remove all paper from the ADF, and then remove the jammed
paper.
Open door A, and then remove the jammed paper.
Remove all paper from the fuser, and then remove the jammed
paper.
Open door A, and then door D, and then remove the jammed
paper.
201–202 paper jams
If the jammed paper is visible in the standard exit bin, then firmly grasp the paper on each side, and then gently pull it
out.
Note: Make sure all paper fragments are removed.
Clearing jams
263
Paper jam in the fuser
1 Open door A by lifting the release latch and lowering the door.
CAUTION—HOT SURFACE: The inside of the printer might be hot. To reduce the risk of injury from a hot
component, allow the surface to cool before touching.
2 Pull the green lever down.
3 Firmly grasp the jammed paper on each side, and then gently pull it out.
Warning—Potential Damage: Do not touch the center of the fuser unit. Doing so will damage the fuser.
Note: Make sure all paper fragments are removed.
Clearing jams
264
4 Push the green lever back into place.
5 Close door A.
6 If necessary, touch Continue from the printer control panel.
Paper jam under the fuser
1 Open door A.
CAUTION—HOT SURFACE: The inside of the printer might be hot. To reduce the risk of injury from a hot
component, allow the surface to cool before touching.
2 If the jammed paper is visible under the fuser, then firmly grasp the paper on each side, and then gently pull it out.
Note: Make sure all paper fragments are removed.
3 Close door A.
4 If necessary, touch Continue from the printer control panel.
203 paper jam
If the jammed paper is visible in the standard exit bin, then firmly grasp the paper on each side, and then gently pull it
out.
Note: Make sure all paper fragments are removed.
Clearing jams
265
1 Open door A, and then door D by lifting the release latch of each door and lowering the doors.
CAUTION—HOT SURFACE: The inside of the printer might be hot. To reduce the risk of injury from a hot
component, allow the surface to cool before touching.
2 Firmly grasp the jammed paper on each side, and then gently pull it out.
Note: Make sure all paper fragments are removed.
3 Close door D, and then close door A.
4 If necessary, touch Continue from the printer control panel.
230 paper jam
1 Lower the multipurpose feeder, and then open door B.
Clearing jams
266
2 Firmly grasp the jammed paper on each side, and then gently pull it out.
Note: Make sure all paper fragments are removed.
3 Close door B.
4 If necessary, touch Continue from the printer control panel.
231 paper jam
1 Open door A by lifting the release latch, and then lowering the door.
CAUTION—HOT SURFACE: The inside of the printer might be hot. To reduce the risk of injury from a hot
component, allow the surface to cool before touching it.
Clearing jams
267
2 Pull the green lever down.
Note: Make sure all paper fragments are removed.
3 Firmly grasp the jammed paper on each side, and then gently pull it out.
4 Push the green lever back into place.
Clearing jams
268
5 Close door A.
6 If necessary, touch Continue from the printer control panel.
24x paper jam
Paper jam in Tray 1
1 Open Tray 1.
Clearing jams
269
2 Firmly grasp the jammed paper on each side, and then gently pull it out.
Note: Make sure all paper fragments are removed.
3 Close Tray 1.
4 If necessary, touch Continue, jam cleared from the printer control panel.
Paper jam in one of the optional trays
1 Check door C, and then pull the jammed pages out.
Note: Make sure all paper fragments are removed.
2 Open the specified tray.
Clearing jams
270
3 Firmly grasp the jammed paper on each side, and then gently pull it out.
Note: Make sure all paper fragments are removed.
4 Close the tray.
5 If necessary, touch Continue, jam cleared from the printer control panel.
250 paper jam
1 Remove any jammed pages from the multipurpose feeder.
2 Load paper into the multipurpose feeder.
3 If necessary, touch Continue, jam cleared from the printer control panel.
Clearing jams
271
281 paper jam
Paper jam in door A
1 Open door A.
CAUTION—HOT SURFACE: The inside of the printer might be hot. To reduce the risk of injury from a hot
component, allow the surface to cool before touching.
2 Determine where the jam is located, and then remove it:
a If the paper is visible under the fuser, then firmly grasp it on each side and pull it out.
Note: Make sure all paper fragments are removed.
b If the paper is not visible, then you will need to remove the fuser unit.
Warning—Potential Damage: Do not touch the center of the fuser unit. Doing so will damage the fuser.
1 Remove the thumbscrew from each side of the fuser unit by rotating them counterclockwise.
2 Lift the handles on each side of the fuser, and then pull to remove the fuser unit.
3 Firmly grasp the jammed paper on each side, and then gently pull it down and out.
Notes:
• Make sure all paper fragments are removed.
• If the paper is in the fuser, then lower the fuser nip release lever and switch it to envelope mode.
• After removing the jammed paper, return the lever to the proper position.
Clearing jams
272
4 Align the fuser unit using the handles on each side, and then place it back into the printer.
3 Close door A.
4 If necessary, touch Continue from the printer control panel.
Paper jam in cover F (paper transport)
1 Open cover F.
2 Firmly grasp the jammed paper on each side, and then gently pull it out.
Note: Make sure all paper fragments are removed.
Note: If the paper jam on the right is difficult to remove, then rotate the knob counterclockwise.
Clearing jams
273
3 Close cover F.
4 If necessary, touch Continue from the printer control panel.
4yy.xx paper jams
Paper jam in door H
1 Open door H.
Note: Door H is located between the finisher exit bins.
2 Firmly grasp the jammed paper on each side, and then gently pull it out.
Note: Make sure all paper fragments are removed.
3 Close door H.
4 If necessary, touch Continue from the printer control panel.
Clearing jams
274
Paper jam in door G
1 Open door G.
Area
Cover, knob, or handle name
1
Cover G1
2
Cover G2
3
Knob G3
4
Cover G4
5
Cover G7
6
Knob G8
7
Handle G9
2 Lift cover G1 lever .
Clearing jams
275
3 Firmly grasp any jammed paper, and then gently pull it out.
Note: Make sure to remove all paper fragments after gently pulling out any jammed paper inside door G.
4 Move cover G2 to the right, and then remove any jammed paper.
Note: If the paper is jammed in the rollers, then rotate knob G3 counterclockwise.
5 Move cover G4 down, and then remove any jammed paper.
6 Move cover G7 to the left, and then remove any jammed paper.
7 Pull handle G9 until the tray is completely open.
8 Lift the inside cover. If the paper is jammed in the rollers, then rotate knob G8 counterclockwise, and then remove
the jammed paper.
9 Close door G.
10 If necessary, touch Continue from the printer control panel.
Clearing jams
276
Paper jam in cover F (paper transport)
1 Open cover F.
2 Firmly grasp the jammed paper on each side, and then gently pull it out.
Note: Make sure all paper fragments are removed.
Note: If the paper jam on the right is difficult to remove, then rotate the knob counterclockwise.
3 Close cover F.
4 If necessary, touch Continue from the printer control panel.
Clearing jams
277
455 staple jam
1 Open door G.
2 Press the latch to open the stapler door.
Note: The stapler door is located behind the finisher.
3 Lower the latch of the staple cartridge holder, and then pull the staple cartridge holder out of the printer.
Clearing jams
278
4 Use the metal tab to lift the staple guard, and then remove any jammed or loose staples.
5 Close the staple guard.
6 Press down on the staple guard until it clicks into place.
7 Push the staple cartridge holder firmly back into the stapler unit until the staple cartridge holder clicks into place.
8 Close the stapler door.
Clearing jams
279
9 Close door G.
10 If necessary, touch Continue, jam cleared from the printer control panel.
28y.xx paper jams
The scanner failed to feed one or more pages through the ADF.
1 Remove all original documents from the ADF.
Note: The message clears when the pages are removed from the ADF.
2 Open the ADF cover.
3 Firmly grasp the jammed paper on each side, and then gently pull it out.
Note: Make sure all paper fragments are removed.
4 Close the ADF cover.
5 Reload original documents into the ADF, straighten the stack, and then adjust the paper guide.
Clearing jams
280
Troubleshooting
Understanding printer messages
Adjusting color
Wait for the process to complete.
Change [paper source] to [custom type name]
Try one or more of the following:
• Touch Use current [paper source] to ignore the message and print from the selected tray.
• Load the correct paper size and type in the tray, verify the paper size and type settings are specified in the printer
control panel Paper menu, and then touch Paper changed, continue.
• Touch Cancel job to cancel the print job.
Change [paper source] to [custom type name] load [orientation]
Try one or more of the following
• Touch Use current [paper source] to ignore the message and print from the selected tray.
• Load the correct paper size and type in the tray, verify the paper size and type settings are specified in the printer
control panel Paper menu, and then touch Paper changed, continue.
• Touch Cancel job to cancel the print job.
Change [paper source] to [custom string]
Try one or more of the following:
• Touch Use current [paper source] to ignore the message and print from the selected tray.
• Load the correct paper size and type in the tray, verify the paper size and type settings are specified in the printer
control panel Paper menu, and then touch Paper changed, continue.
• Touch Cancel job to cancel the print job.
Change [paper source] to [custom string] load [orientation]
Try one or more of the following:
• Touch Use current [paper source] to ignore the message and print from the selected tray.
• Load the correct paper size and type in the tray, verify the paper size and type settings are specified in the printer
control panel Paper menu, and then touch Paper changed, continue.
• Touch Cancel job to cancel the print job.
Troubleshooting
281
Change [paper source] to [paper size]
Try one or more of the following:
• Touch Use current [paper source] to ignore the message and print from the selected tray.
• Load the correct paper size and type in the tray, verify the paper size and type settings are specified in the printer
control panel Paper menu, and then touch Paper changed, continue.
• Touch Cancel job to cancel the print job.
Change [paper source] to [paper size] load [orientation]
Try one or more of the following:
• Touch Use current [paper source] to ignore the message and print from the selected tray.
• Load the correct paper size and type in the tray, verify the paper size and type settings are specified in the printer
control panel Paper menu, and then touch Paper changed, continue.
• Touch Cancel job to cancel the print job.
Change [paper source] to [paper size] [paper type]
Try one or more of the following:
• Touch Use current [paper source] to ignore the message and print from the selected tray.
• Load the correct paper size and type in the tray, verify the paper size and type settings are specified in the printer
control panel Paper menu, and then touch Paper changed, continue.
• Touch Cancel job to cancel the print job.
Change [paper source] to [paper size] [paper type] load [orientation]
Try one or more of the following:
• Touch Use current [paper source] to ignore the message and print from the selected tray.
• Load the correct paper size and type in the tray, verify the paper size and type settings are specified in the printer
control panel Paper menu, and then touch Paper changed, continue.
• Touch Cancel job to cancel the print job.
Check [src] orientation or guides
Try one or more of the following:
• Move the paper guides in the tray to the correct positions for the paper size loaded.
• Make sure the paper size setting matches the paper loaded in the tray:
1 From the printer control panel Paper menu, check the Paper Size setting.
2 Before sending the print job, specify the correct size setting:
– For Windows users, specify the paper size from Print Properties.
– For Macintosh users, specify the paper size from the Page Setup dialog.
Troubleshooting
282
Close cover [x]
Close the specified cover to clear the message.
Close door [x]
Close the specified door.
Disk corrupted
The printer attempted a hard disk recovery on a corrupted hard disk, and the hard disk cannot be repaired. The hard
disk must be reformatted.
Touch Format disk to reformat the printer hard disk and clear the message.
Note: Formatting deletes all the files stored on the printer hard disk.
Empty the hole punch box
1 Empty the hole punch box.
For instructions on emptying the hole punch box, from the printer control panel touch More Information.
2 Reinsert the hole punch box into the finisher, and then touch Continue to clear the message.
Error reading USB drive. Remove USB.
An unsupported USB device has been inserted. Remove the USB device, and then install a supported one.
Error reading USB hub. Remove hub.
An unsupported USB hub has been inserted. Remove the USB hub, and then install a supported one.
Fax memory full
There is not enough memory to send the fax job.
Touch Continue to clear the message.
Fax partition inoperative. Contact system administrator.
The fax partition appears to be corrupted. Try one or more of the following:
• Touch Continue to clear the message.
• Turn the printer off and then back on to reset the printer. If the message appears again, then contact your system
support person.
Fax server 'To Format' not set up. Contact system administrator.
The printer is in Fax Server mode, but the Fax Server setup has not been completed.
Troubleshooting
283
Try one or more of the following:
• Touch Continue to clear the message.
• Complete the Fax Server setup. If the message appears again, contact your system support person.
Fax Station Name not set up
The Fax Station Name has not been entered. Sending and receiving faxes is disabled until fax is configured properly.
Try one or more of the following:
• Touch Continue to clear the message.
• Complete the Analog Fax Setup. If the message appears again, contact your system support person.
Fax Station Number not set up
The Fax Station Number has not been entered. Sending and receiving faxes is disabled until fax is configured properly.
Try one or more of the following:
• Touch Continue to clear the message.
• Complete the Analog Fax Setup. If the message appears again, contact your system support person.
Insert Tray [x]
Insert the specified tray into the printer.
Insert the hole punch box
Insert the hole punch box into the finisher, and then touch Continue to clear the message.
Install Tray [x]
Try one or more of the following:
• Install the specified tray:
1 Turn the printer off.
2 Unplug the power cord from the wall outlet.
3 Install the specified tray.
4 Connect the power cord to a properly grounded electrical outlet.
5 Turn the printer back on.
• Cancel the print job.
Troubleshooting
284
Load [src] with [custom type name]
Try one or more of the following:
• Load the specified paper in the tray or feeder.
• Touch Paper loaded, continue to clear the message and continue printing.
If the printer finds a tray that has the correct paper type and size, it feeds from that tray. If the printer cannot find
a tray with the correct paper type and size, it prints from the default paper source.
• Cancel the print job.
Load [src] with [custom string]
Try one or more of the following:
• Load the specified paper in the tray or feeder.
• Touch Paper loaded, continue to clear the message and continue printing.
If the printer finds a tray that has the correct paper type and size, it feeds from that tray. If the printer cannot find
a tray with the correct paper type and size, it prints from the default paper source.
• Cancel the print job.
Load [src] with [size]
Try one or more of the following:
• Load the specified paper in the tray or feeder.
• Touch Paper loaded, continue to clear the message and continue printing.
If the printer finds a tray that has the correct paper type and size, it feeds from that tray. If the printer cannot find
a tray with the correct paper type and size, it feeds from the default paper source.
• Cancel the print job.
Load [src] with [type] [size]
Try one or more of the following:
• Load the specified paper in the tray or feeder.
• Touch Paper loaded, continue to clear the message and continue printing.
If the printer finds a tray that has the correct paper type and size, it feeds from that tray. If the printer cannot find
a tray with the correct paper type and size, it feeds from the default paper source.
• Cancel the print job.
Load Manual Feeder with [custom type name]
Try one or more of the following:
•
•
•
•
Load the specified paper in the manual feeder.
Touch Prompt each page, paper loaded or Do not prompt, paper loaded to clear the message and continue printing.
Touch Automatically select paper to use the paper loaded in the tray.
Cancel the print job.
Troubleshooting
285
Load Manual Feeder with [custom string]
Try one or more of the following:
•
•
•
•
Load the specified paper in the manual feeder.
Touch Prompt each page, paper loaded or Do not prompt, paper loaded to clear the message and continue printing.
Touch Automatically select paper to use the paper loaded in the tray.
Cancel the print job.
Load Manual Feeder with [paper size]
Try one or more of the following:
•
•
•
•
Load the specified paper in the manual feeder.
Touch Prompt each page, paper loaded or Do not prompt, paper loaded to clear the message and continue printing.
Touch Automatically select paper to use the paper loaded in the tray.
Cancel the print job.
Load Manual Feeder with [paper type] [paper size]
Try one or more of the following:
•
•
•
•
Load the specified paper in the manual feeder.
Touch Prompt each page, paper loaded or Do not prompt, paper loaded to clear the message and continue printing.
Touch Automatically select paper to use the paper loaded in the tray.
Cancel the print job.
Load staples
Try one or more of the following:
• Replace the specified staple cartridge in the finisher.
• Touch Continue to clear the message and continue printing.
Note: The print job will be stapled if the staple cartridge is replaced or inserted.
• Touch Cancel job to cancel the print job.
Manual feeder expects [paper size]. Check [paper source] guides
Try one or more of the following:
• Load the specified paper size in the manual feeder.
• Physically adjust [paper source] guides to a recognized paper size.
• Touch Continue to clear the message and continue printing.
If the printer finds a tray that has the correct paper type and size, then it feeds from that tray. If the printer cannot
find a tray with the correct paper type and size, then it prints from the default source.
Troubleshooting
286
Memory full, cannot print faxes
There is not enough memory to print the fax job.
Touch Continue to clear the message without printing. Held faxes will attempt to print after the printer has been
restarted.
Power off, wait 2 seconds, power on
Turn the printer off and wait for 2 seconds before turning the printer back on.
Remove paper from standard output bin
Remove the stack of paper from the standard exit bin.
Remove paper from bin [x]
Remove the paper from the specified bin. The printer automatically senses paper removal and resumes printing.
If removing the paper does not clear the message, then touch Continue.
Remove paper from [linked bin set name]
Remove the paper from the specified bin. The printer automatically senses paper removal and resumes printing.
If removing the paper does not clear the message, then touch Continue.
Remove paper from all bins
Remove the paper from all of the bins. The printer automatically senses paper removal and resumes printing.
If removing the paper does not clear the message, then touch Continue.
Restore Held Jobs?
Try one or more of the following:
• Touch Continue to restore all held jobs stored on the printer hard disk.
• Touch Do not restore if you do not want any print jobs to be restored.
Scanner ADF Cover Open
The ADF cover is open. The message clears when the cover is closed.
Scan Document Too Long
The scan job exceeds the maximum number of pages. Touch Cancel Job to clear the message.
Troubleshooting
287
SMTP server not set up. Contact system administrator.
An error occurred on the SMTP server, or the SMTP server is not configured properly. Touch Continue to clear the
message. If the message appears again, contact your system support person.
Some held jobs were not restored
Touch Continue to delete the specified job.
Note: Held jobs that are not restored stay on the hard disk and are inaccessible.
Unsupported disk
An unsupported printer hard disk has been installed. Remove the unsupported device, and then install a supported
one.
31.xx Missing or defective [color] cartridge
Try one or more of the following:
1 Remove and reinstall the specified print cartridge.
For instructions on removing a print cartridge, touch More Information.
2 Touch Continue to clear the message.
Note: If the message is not cleared, then replace the defective print cartridge.
32.xx [color] cartridge part number unsupported by device
Remove the unsupported toner cartridge, and then install a supported one.
34 Incorrect paper size, check [paper source]
Try one or more of the following:
• Load the appropriate paper or specialty media in the proper tray.
• Confirm that the wheel on Tray 1 is set to the paper size loaded in the tray. Make sure the paper size matches the
document you are trying to print.
•
•
•
•
Touch Continue to clear the message and print using a different tray.
Check the tray length and width guides and make sure the paper is loaded properly in the tray.
Make sure the correct paper size and type are specified on the Print Properties or Print dialog settings.
Check that the paper size is correctly set. For example, if the MP Feeder Size is set to Universal, make sure the paper
is large enough for the data being printed.
• Cancel the print job.
Troubleshooting
288
34 Incorrect paper type, check [paper source]
Try one or more of the following:
• Load the appropriate paper or specialty media in the proper tray.
• Confirm that the wheel on Tray 1 is set to the paper type loaded in the tray. Make sure the paper type matches the
document you are trying to print.
•
•
•
•
Touch Continue to clear the message and print using a different tray.
Check the tray length and width guides and make sure the paper is loaded properly in the tray.
Make sure the correct paper size and type are specified on the Print Properties or Print dialog settings.
Check that the paper type is correctly set. For example, if the MP Feeder Type is set to Universal, then make sure
the paper is large enough for the data being printed.
• Cancel the print job.
35 Insufficient memory to support Resource Save feature
Try one or more of the following:
• Touch Continue to disable Resource Save and continue printing.
• To enable Resource Save after receiving this message, make sure the link buffers are set to Auto, and then exit the
menus to activate the link buffer changes. When Ready appears, enable Resource Save.
• Install additional memory.
36 Printer service required
Touch Continue to clear the message or contact customer support.
37 Insufficient memory to collate job
Try one or more of the following:
• Touch Continue to print the portion of the job already stored and begin collating the rest of the print job.
• Cancel the current print job.
37 Insufficient memory for Flash Memory Defragment operation
Try one or more of the following:
• Touch Continue to stop the defragment operation and continue printing.
• Delete fonts, macros, and other data in printer memory.
• Install additional printer memory.
37 Insufficient memory, some Held Jobs were deleted
The printer deleted some held jobs in order to process current jobs.
Touch Continue to clear the message.
Troubleshooting
289
38 Memory full
Try one or more of the following:
• Touch Cancel job to clear the message.
• Install additional printer memory.
39 Complex page, some data may not have printed
Try one or more of the following:
• Touch Continue to clear the message and continue printing.
• Cancel the current print job.
• Install additional printer memory.
40 [color] invalid refill, change cartridge
Replace the specified cartridge to continue printing.
51 Defective flash detected
Try one or more of the following:
• Touch Continue to clear the message and continue printing.
• Cancel the current print job.
52 Not enough free space in flash memory for resources
Try one or more of the following:
• Touch Continue to clear the message and continue printing.
Downloaded fonts and macros not previously stored in flash memory are deleted.
• Delete fonts, macros, and other data stored in flash memory.
• Upgrade to a larger capacity flash memory card.
53 Unformatted flash detected
Try one or more of the following:
• Touch Continue to stop the defragment operation and continue printing.
• Format the flash memory. If the error message remains, the flash memory may be defective and require replacing.
54 Network [x] software error
Try one or more of the following:
• Touch Continue to continue printing.
• Turn the printer off, wait for about 10 seconds, and then turn the printer back on.
• Upgrade (flash) the network firmware in the printer.
Troubleshooting
290
54 Serial option [x] error
Try one or more of the following:
• Check that the serial cable is properly connected and is the correct one for the serial port.
• Check that the serial interface parameters (protocol, baud, parity, and data bits) are set correctly on the printer
and host computer.
• Touch Continue to continue printing.
• Turn the printer power off and then back on to reset the printer.
54 Standard network software error
Try one or more of the following:
• Touch Continue to continue printing.
• Turn the printer off and then back on to reset the printer.
• Upgrade (flash) the network firmware in the printer or print server.
55 Unsupported option in slot [x]
1 Turn the printer off.
2 Unplug the power cord from the wall outlet.
3 Remove the unsupported option card from the printer system board, and then replace it with a supported card.
4 Connect the power cord to a properly grounded electrical outlet.
5 Turn the printer back on.
56 Parallel port [x] disabled
Try one or more of the following:
• Touch Continue to clear the message.
The printer discards any data received through the parallel port.
• Make sure the Parallel Buffer menu item is not set to Disabled.
56 Serial port [x] disabled
Try one or more of the following:
• Touch Continue to clear the message.
The printer discards any data received through the serial port.
• Make sure the Serial Buffer menu is not set to Disabled.
Troubleshooting
291
56 Standard USB port disabled
Try one or more of the following:
• Touch Continue to clear the message.
The printer discards any data received through the USB port.
• Make sure the USB Buffer menu item is not set to Disabled.
56 Standard parallel port disabled
Try one or more of the following:
• Touch Continue to clear the message.
The printer discards any data received through the parallel port.
• Make sure the Parallel Buffer menu item is not set to Disabled.
56 USB port [x] disabled
Try one or more of the following:
• Touch Continue to clear the message.
The printer discards any data received through the USB port.
• Make sure the USB Buffer menu is not set to Disabled.
58 Too many disks installed
1 Turn the printer off.
2 Unplug the power cord from the wall outlet.
3 Remove the excess disks.
4 Connect the power cord to a properly grounded electrical outlet.
5 Turn the printer back on.
58 Too many flash options installed
1 Turn the printer off.
2 Unplug the power cord from the wall outlet.
3 Remove the excess flash memory.
4 Connect the power cord to a properly grounded outlet.
5 Turn the printer back on.
58 Too many trays attached
1 Turn the printer off.
2 Unplug the power cord from the wall outlet.
Troubleshooting
292
3 Remove the additional trays.
4 Connect the power cord to a properly grounded outlet.
5 Turn the printer back on.
59 Incompatible tray [x]
Try one or more of the following:
• Remove the specified tray.
• Touch Continue to clear the message and continue printing without using the specified tray.
61 Remove defective disk
Try one or more of the following:
• Touch Continue to clear the message and continue printing.
• Install a different printer hard disk before performing any operations that require a printer hard disk.
62 Disk full
Try one or more of the following:
• Touch Continue to clear the message and continue processing.
• Delete fonts, macros, and other data stored on the printer hard disk.
• Install a printer hard disk with larger capacity.
63 Unformatted disk
Try one or more of the following:
• Touch Continue to clear the message and continue printing.
• Format the printer hard disk.
If the error message remains, the hard disk may be defective and require replacing.
80.xx Fuser life warning
• Order a replacement fuser immediately. When print quality is reduced, install the new fuser, following the
instruction sheet that came with the replacement part.
• Touch Continue to clear the message and continue printing.
80 Replace fuser
1 Replace the fuser using the instruction sheet that came with the replacement part.
2 Touch Continue to clear the message and continue printing.
Troubleshooting
293
80 Scanner maintenance required, use ADF kit
Contact customer support, and report the message. The printer is scheduled for maintenance.
80 Scheduled maintenance [x]
Contact customer support, and report the message. The printer is scheduled for maintenance.
80 Replace paper pick rollers in [paper source], use parts and instructions in tray 1
compartment
Try one or more of the following:
• Touch Continue and replace later to ignore the message and continue printing.
Note: Worn or defective paper pick rollers may cause paper jams.
• Replace the worn or defective paper pick rollers, and then touch Rollers replaced to clear the message and continue
printing.
82.xx Replace waste toner bottle
1 Replace the waste toner bottle.
For instructions on replacing the waste toner bottle, from the printer control panel touch More Information.
2 Touch Continue to clear the message and continue printing.
82.xx Waste toner bottle missing
Reinsert the waste toner bottle into the printer.
82.xx Waste toner bottle nearly full
Order a replacement waste toner bottle immediately.
1 Replace the waste toner bottle.
For instructions on installing the waste toner bottle, from the printer control panel touch More Information.
2 Touch Continue to clear the message and continue printing.
84 unsupported [color] photoconductor
Remove the specified photoconductor, and then install a supported one.
84.xx [color] photoconductor missing
Install the specified color photoconductor, following the instruction sheet that came with the replacement part.
Troubleshooting
294
84.xx [color] photoconductor nearly low
1 Order a replacement photoconductor.
2 When print quality is reduced, install the new photoconductor, following the instruction sheet that came with the
replacement part.
3 Touch Continue to clear the message and continue printing.
84.xx [color] photoconductor low
1 Order a replacement photoconductor immediately.
2 When print quality is reduced, install the new photoconductor, following the instruction sheet that came with the
replacement part.
3 Touch Continue to clear the message and continue printing.
83.xx Transfer module missing
Insert the transfer module into the printer.
84.xx Replace [color] photoconductor
1 Replace the photoconductor, following the instruction sheet that came with the replacement part.
2 From the printer control panel, touch Continue to clear the message and continue printing.
88 Replace [color] cartridge
The specified print or toner cartridge is empty.
1 Replace the specified cartridge.
For instructions on replacing cartridge, from the printer control panel, touch More Information.
2 Touch Continue to clear the message and continue printing.
88.xx [color] cartridge low
1 Order a replacement toner cartridge immediately.
2 Remove the specified cartridge.
3 Firmly shake the cartridge side-to-side and front-to-back several times to redistribute the toner.
4 Reinsert the cartridge, and then touch Continue to clear the message and continue printing.
Note: Repeat this procedure multiple times until the print remains faded, and then replace the cartridge.
Troubleshooting
295
88.xx [Color] cartridge very low
The specified print cartridge is very low.
1 For instructions on replacing a print cartridge, from the printer control panel touch More Information.
2 Touch Continue to clear the message and continue printing.
2yy.xx Close flatbed cover and load originals if restarting job
Try one or more of the following:
• Touch Cancel job to cancel the job and clear the message.
• Touch Scan from automatic feeder to resume the scan job from the ADF immediately following the last successfully
scanned page.
• Touch Scan from flatbed to resume the scan job from the scanner glass immediately following the last successfully
scanned page.
• Touch Finish job without further scanning to end the scan job at the last successfully scanned page.
Note: This does not cancel the scan job. All successfully scanned pages will be processed further for copying, faxing,
and e-mailing.
280.06 Paper missing
Try one or more of the following:
• Touch Continue to clear the message.
• Touch Cancel job to cancel the job and clear the message.
• Touch Scan from automatic feeder to resume the scan job from the ADF immediately following the last successfully
scanned page.
• Touch Scan from flatbed to resume the scan job from the scanner glass immediately following the last successfully
scanned page.
• Touch Finish job without further scanning to end the scan job at the last successfully scanned page.
Note: This does not cancel the scan job. All successfully scanned pages will be processed further for copying, faxing,
or e-mailing.
• Touch Restart job to clear the message and start a new scan job with the same settings as the previous job.
840.01 Scanner disabled by admin
Print without the scanner or contact your system support person.
840.02 Scanner disabled. Contact system administrator if problem persists.
Try one or more of the following:
• Touch Continue with scanner disabled to return to the home screen, and then contact your system support person.
• Touch Reboot and automatically enable scanner to cancel the job.
Note: This attempts to bring the scanner back online.
Troubleshooting
296
1565 Emulation error, load emulation option
The printer automatically clears the message in 30 seconds, and then disables the download emulator on the firmware
card.
Solving basic printer problems
If there are basic printer problems, or the printer is unresponsive, make sure:
•
•
•
•
•
•
The power cord is plugged into the printer and a properly grounded electrical outlet.
The electrical outlet is not turned off by any switch or breaker.
The printer is not plugged into any surge protectors, uninterrupted power supplies, or extension cords.
Other electronic equipment plugged into the outlet is working.
The printer is turned on. Check the printer power switch.
The printer cable is securely attached to the printer and the host computer, print server, option, or other network
device.
• All options are properly installed.
• The printer driver settings are correct.
Once you have checked each of these possibilities, turn the printer off, wait for about 10 seconds, and then turn the
printer back on. This often fixes the problem.
Solving printing problems
Multiple-language PDF files do not print
The PDF files may contain unavailable fonts.
1 Open the document you want to print in Adobe Acrobat.
2 Click the printer icon > Advanced > Print as image > OK > OK.
Printer control panel display is blank or displays only diamonds
The printer self test failed. Turn the printer off, wait about 10 seconds, and then turn the printer on.
If Ready does not appear, then turn the printer off and contact Customer Support.
Error message about reading USB drive appears
Make sure the flash drive is supported.
Troubleshooting
297
Print jobs do not print
Try one or more of the following:
MAKE SURE THERE IS NO PROBLEM WITH YOUR PRINTER
From the printer control panel, check the status. If necessary, follow the recovery instructions.
MAKE SURE THE PRINTER IS READY TO PRINT
Make sure Ready appears on the display before sending a print job.
CHECK IF A SUPPLY IS MISSING OR NEEDS REPLACEMENT
Remove and then reinstall or replace the supply.
CHECK IF THE STANDARD EXIT BIN IS FULL
Remove the paper stack from the standard exit bin.
CHECK IF THE PAPER TRAY IS EMPTY
Load paper in the tray.
MAKE SURE THE CORRECT PRINTER SOFTWARE IS INSTALLED
• Verify that you are using the correct printer software.
• If the printer is connected to your computer through a USB port, then make sure you are running a supported
operating system and using a compatible printer software.
MAKE SURE THE INTERNAL PRINT SERVER IS WORKING PROPERLY
• Make sure the internal print server is properly installed and that the printer is connected to the network.
• Print a network setup page and check that the status shows Connected. If the status is Not Connected,
then check the network cables, and then try printing the network setup page again. Contact your system support
person to make sure the network is functioning correctly.
The printer software is available on the Lexmark Web site at http://support.lexmark.com.
MAKE SURE YOU ARE USING A RECOMMENDED USB, SERIAL, OR ETHERNET CABLE
For more information, visit the Lexmark Web site at http://support.lexmark.com.
MAKE SURE PRINTER CABLES ARE SECURELY CONNECTED
Check the cable connections to the printer and print server to make sure they are secure.
For more information, see the setup documentation that came with the printer.
Troubleshooting
298
Confidential and other held jobs do not print
These are possible solutions. Try one or more of the following:
PARTIAL JOB, NO JOB, OR BLANK PAGE PRINTS
The print job may contain a formatting error or invalid data.
• Delete the print job, and then print it again.
• For PDF documents, recreate the PDF and then print it again.
If you are printing from the Internet, then the printer may be reading multiple job titles as duplicates and deleting
all jobs except the first one.
• For Windows users, open Print Properties. From the Print and Hold dialog, select the "Keep duplicate documents"
check box under the User name text box before entering a PIN number.
• For Macintosh users, save each print job, naming each job differently, and then send the individual jobs to the
printer.
MAKE SURE THE PRINTER HAS SUFFICIENT MEMORY
Free up additional printer memory by scrolling through the list of held jobs and deleting some of them.
Print job takes longer than expected
Try one or more of the following:
REDUCE THE COMPLEXITY OF THE PRINT JOB
Eliminate the number and size of fonts, the number and complexity of images, and the number of pages in the print
job.
TURN OFF THE PAGE PROTECT SETTING
From the home screen, navigate to:
> Settings > General Settings > Print Recovery > Page Protect > Off >
CHANGE THE ENVIRONMENTAL SETTINGS
When using Eco-Mode or Quiet Mode settings, you may notice a reduction in performance.
Troubleshooting
299
Job prints from the wrong tray or on the wrong paper
CHECK THE PAPER TYPE AND PAPER SIZE SETTINGS
Make sure the paper type setting matches the paper loaded in the tray:
1 From the printer control panel Paper menu, check the paper type and paper size settings.
2 Before sending the job to print, specify the correct type setting:
• For Windows users, specify the paper type from Print Properties.
• For Macintosh users, specify the paper type from the Print dialog.
Incorrect characters print
• Make sure the printer is not in Hex Trace mode. If Ready Hex appears on the display, you must exit Hex Trace
mode before you can print your job. Turn the printer off and back on to exit Hex Trace mode.
• Make sure the SmartSwitch settings are set to On in the Network and USB menus.
Tray linking does not work
These are possible solutions. Try one or more of the following:
LOAD THE SAME SIZE AND TYPE OF PAPER
• Load the same size and type of paper in each tray to be linked.
• Move the paper guides to the correct positions for the paper size loaded in each tray.
USE THE SAME PAPER SIZE AND PAPER TYPE SETTINGS
• Print a menu settings page and compare the settings for each tray.
• If necessary, adjust the settings from the Paper Size/Type menu.
Note: The standard 550-sheet tray and the multipurpose feeder do not automatically sense the paper size. You must
set the size from the Paper Size/Type menu.
Large jobs do not collate
These are possible solutions. Try one or more of the following:
MAKE SURE COLLATE IS SET TO ON
From the Finishing menu or Print Properties, set Collate to On.
Note: Setting Collate to Off in the software overrides the setting in the Finishing menu.
REDUCE THE COMPLEXITY OF THE PRINT JOB
Reduce the complexity of the print job by eliminating the number and size of fonts, the number and complexity of
images, and the number of pages in the job.
Troubleshooting
300
MAKE SURE THE PRINTER HAS ENOUGH MEMORY
Add printer memory or an optional hard disk.
Unexpected page breaks occur
INCREASE THE PRINT TIMEOUT VALUE
1 From the home screen, navigate to:
> Settings > General Settings > Timeouts
2 Touch the left or right arrow next to Print Timeout until the desired value appears.
3 Touch Submit.
Solving copy problems
Copier does not respond
These are possible solutions. Try one or more of the following:
CHECK THE DISPLAY FOR ERROR MESSAGES
Clear any error messages.
CHECK THE POWER
Make sure the printer is plugged in, the power is on, and Ready appears.
Scanner unit does not close
Make sure there are no obstructions:
1 Lift the scanner unit.
2 Remove any obstruction keeping the scanner unit open.
3 Lower the scanner unit.
Poor copy quality
These are some examples of poor copy quality:
•
•
•
•
•
•
Blank pages
Checkerboard pattern
Distorted graphics or pictures
Missing characters
Faded print
Dark print
Troubleshooting
301
•
•
•
•
•
Skewed lines
Smudges
Streaks
Unexpected characters
White lines in print
Try one or more of the following:
CLEAR ANY ERROR MESSAGES
Check the display and clear any error messages.
REPLACE THE TONER OR PRINT CARTRIDGE
When the print remains faded, replace the toner or print cartridge.
CLEAN THE SCANNER GLASS
The scanner glass may be dirty. Clean the scanner glass with a clean, lint-free cloth dampened with water.
For more information, see “Cleaning the scanner glass” on page 239.
ADJUST THE TONER DARKNESS OF THE COPY
Adjust the toner darkness from the Copy menus.
MAKE SURE THE QUALITY OF THE ORIGINAL DOCUMENT IS SATISFACTORY
Check the quality of the original document.
PLACE THE ORIGINAL DOCUMENT PROPERLY
Make sure the document or photo is loaded facedown on the scanner glass in the upper left corner.
MAKE SURE TO USE THE APPROPRIATE COPY SETTINGS
When patterns (moiré) appear in the output:
• On the Copy screen make sure the Content Type and Source settings are appropriate for the document being
scanned.
• From the Copy screen, navigate to:
Advanced Options > Advanced Imaging > Sharpness > lower the Sharpness setting
• On the Copy screen, make sure no scaling is being selected.
When the text is light or disappearing:
• From the Copy screen, navigate to:
Content > Text >
> select the appropriate source for the original document being copied >
• From the Copy screen, navigate to:
Advanced Options > Advanced Imaging > Sharpness > increase the current setting
Troubleshooting
302
• From the Copy screen, navigate to:
Advanced Options > Advanced Imaging > Background removal, and then reduce the current setting
• From the Copy screen, navigate to:
Advanced Options > Advanced Imaging > Contrast > increase the current setting
• From the Copy screen, navigate to:
Advanced Options > Advanced Imaging > Shadow detail > reduce the current setting
When the output appears washed out or overexposed:
• On the Copy screen make sure the Content Type and Source settings are appropriate for the document being
scanned.
• From the Copy screen, adjust the Darkness setting.
• From the Copy screen, navigate to:
Advanced Options > Advanced Imaging > Shadow detail > reduce the current setting
• From the Copy screen, navigate to:
Advanced Options > Advanced Imaging > Background removal > reduce the current setting
Partial document or photo copies
These are possible solutions. Try one or more of the following:
CHECK THE DOCUMENT PLACEMENT
Make sure the document or photo is loaded facedown on the scanner glass in the upper left corner.
CHECK THE PAPER SIZE SETTING
Make sure the paper size setting matches the paper loaded in the tray:
1 From the printer control panel, check the Paper Size setting from the Paper menu.
2 Before sending the job to print, specify the correct size setting:
• For Windows users, specify the size from Print Properties.
• For Macintosh users, specify the size from the Page Setup dialog.
Solving scanner problems
Checking an unresponsive scanner
If your scanner is not responding, then make sure:
• The printer is turned on.
• The printer cable is securely attached to the printer and the host computer, print server, option, or other network
device.
• The power cord is plugged into the printer and a properly grounded electrical outlet.
• The electrical outlet is not turned off by any switch or breaker.
Troubleshooting
303
• The printer is not plugged into any surge protectors, uninterrupted power supplies, or extension cords.
• Other electrical equipment plugged into the outlet is working.
Once you have checked each of these possibilities, turn the printer off and then back on. This often fixes the problem
with the scanner.
Scan was not successful
These are possible solutions. Try one or more of the following:
CHECK THE CABLE CONNECTIONS
Make sure the network or USB cable is securely connected to the computer and the printer.
AN ERROR MAY HAVE OCCURRED IN THE PROGRAM
Turn off and then restart the computer.
Scanning takes too long or freezes the computer
These are possible solutions. Try one or more of the following:
OTHER SOFTWARE PROGRAMS MAY BE INTERFERING WITH SCANNING
Close all programs not being used.
THE SCAN RESOLUTION MAY BE SET TOO HIGH
Select a lower scan resolution.
Poor scanned image quality
These are possible solutions. Try one or more of the following:
CHECK THE DISPLAY FOR ERROR MESSAGES
Clear any error messages.
THE SCANNER GLASS MAY BE DIRTY
Clean the scanner glass with a clean, lint-free cloth dampened with water. For more information, see “Cleaning the
scanner glass” on page 239.
ADJUST THE SCAN RESOLUTION
Increase the resolution of the scan for a higher quality output.
CHECK THE QUALITY OF THE ORIGINAL DOCUMENT
Make sure the quality of the original document is satisfactory.
Troubleshooting
304
CHECK THE DOCUMENT PLACEMENT
Make sure the document or photo is loaded facedown on the scanner glass in the upper left corner.
Partial document or photo scans
These are possible solutions. Try one or more of the following:
CHECK THE DOCUMENT PLACEMENT
Make sure the document or photo is loaded facedown on the scanner glass in the upper left corner.
CHECK THE PAPER SIZE SETTING
Make sure the paper size setting matches the paper loaded in the tray:
1 From the printer control panel, check the Paper Size setting from the Paper menu.
2 Before sending the job to print, specify the correct size setting:
• For Windows users, specify the size from Print Properties.
• For Macintosh users, specify the size from the Page Setup dialog.
Cannot scan from a computer
These are possible solutions. Try one or more of the following:
CHECK THE DISPLAY FOR ERROR MESSAGES
Clear any error messages.
CHECK THE POWER
Make sure the printer is plugged in, the power is on, and Ready appears.
CHECK THE CABLE CONNECTIONS
Make sure the network or USB cable is securely connected to the computer and the printer.
Solving fax problems
Fax and e-mail functions are not set up
The indicator light blinks red until you set up fax and e-mail. To set up fax and e-mail, follow these steps:
Note: Before completing these instructions for a printer on a network, make sure the fax cables are connected.
1 From the home screen, navigate to:
> General Settings > Run initial setup > Yes > Submit
2 Turn the printer off, and then turn it back on.
Troubleshooting
305
3 From the printer control panel, touch your language.
4 Touch your country or region, and then touch Continue.
5 Select your time zone, and then touch Continue.
6 Touch Fax and E-mail to clear the icons, and then touch Continue.
Note: You can use these same steps to disable fax and e-mail.
Caller ID is not shown
Contact your telecommunications company to verify that your telephone line is subscribed to the caller ID service.
If your region supports multiple caller ID patterns, you may have to change the default setting. There are two settings
available: FSK (pattern 1) and DTMF (pattern 2). The availability of these settings by way of the Fax menu depends on
whether your country or region supports multiple caller ID patterns. Contact your telecommunications company to
determine which pattern or switch setting to use.
Cannot send or receive a fax
These are possible solutions. Try one or more of the following:
CHECK THE DISPLAY FOR ERROR MESSAGES
Clear any error messages.
CHECK THE POWER
Make sure the printer is plugged in, the power is on, and Ready appears.
CHECK THE PRINTER CONNECTIONS
Make sure the cable connections for the following hardware are secure, if applicable:
• Telephone
• Handset
• Answering machine
CHECK THE TELEPHONE WALL JACK
1 Plug a telephone into the wall jack.
2 Listen for a dial tone.
3 If you do not hear a dial tone, then plug a different telephone into the wall jack.
4 If you still do not hear a dial tone, then plug a telephone into a different wall jack.
5 If you hear a dial tone, then connect the printer to that wall jack.
Troubleshooting
306
REVIEW THIS DIGITAL PHONE SERVICE CHECKLIST
The fax modem is an analog device. Certain devices can be connected to the printer so that digital telephone services
can be used.
• If you are using an ISDN telephone service, then connect the printer to an analog telephone port (an R-interface
port) on an ISDN terminal adapter. For more information and to request an R-interface port, contact your ISDN
provider.
• If you are using DSL, then connect to a DSL filter or router that will support analog use. For more information,
contact your DSL provider.
• If you are using a PBX telephone service, then make sure you are connecting to an analog connection on the PBX.
If none exists, consider installing an analog telephone line for the fax machine.
CHECK FOR A DIAL TONE
• Place a test call to the telephone number to which you want to send a fax to make sure that it is working correctly.
• If the telephone line is being used by another device, then wait until the other device is finished before sending
a fax.
• If you are using the On Hook Dial feature, then turn up the volume to verify a dial tone.
TEMPORARILY DISCONNECT OTHER EQUIPMENT
To ensure the printer is working correctly, connect it directly to the telephone line. Disconnect any answering
machines, computers with modems, or telephone line splitters.
CHECK FOR JAMS
Clear any jams, and then make sure that Ready appears.
TEMPORARILY DISABLE CALL WAITING
Call Waiting can disrupt fax transmissions. Disable this feature before sending or receiving a fax. Call your telephone
company to obtain the keypad sequence for temporarily disabling Call Waiting.
VOICE MAIL SERVICE MAY BE INTERFERING WITH THE FAX TRANSMISSION
Voice Mail offered through your local telephone company may disrupt fax transmissions. To enable both Voice Mail
and the printer to answer calls, you may want to consider adding a second telephone line for the printer.
THE PRINTER MEMORY MAY BE FULL
1 Dial the fax number.
2 Scan the original document one page at a time.
Troubleshooting
307
Can send but not receive faxes
Try one or more of the following:
LOAD PAPER
If the tray is empty, then load paper in the tray or feeder.
CHECK THE RING COUNT DELAY SETTINGS
The ring count delay sets the number of times the phone rings before the printer answers. If you have extension
phones on the same line as the printer, or subscribe to the telephone company's Distinctive Ring service, then keep
the Ring Delay setting at 4.
1 Type the printer IP address in the address field of your Web browser.
If you do not know the IP address of the printer, then you can:
• View the IP address on the printer control panel in the TCP/IP section under the Networks/Ports menu.
• Print a network setup page or the menu settings pages and locate the IP address in the TCP/IP section.
2 Click Settings > Fax Settings > Analog Fax Setup.
3 In the Rings to Answer field, enter the number of times you want the phone to ring before the printer answers.
4 Click Submit.
REPLACE THE TONER OR PRINT CARTRIDGE
Replace the toner or print cartridge.
Can receive but not send faxes
These are possible solutions. Try one or more of the following:
THE PRINTER IS NOT IN FAX MODE
On the home screen, touch Fax to put the printer in Fax mode.
THE DOCUMENT IS NOT LOADED PROPERLY
Load the original document faceup, short edge first into the ADF or facedown on the scanner glass in the upper left
corner.
Note: Do not load postcards, photos, small items, transparencies, photo paper, or thin media (such as magazine
clippings) into the ADF. Place these items on the scanner glass.
MAKE SURE THE SHORTCUT NUMBER IS SET UP PROPERLY
• Check to make sure the shortcut number has been programmed for the number that you want to dial.
• As an alternative, dial the telephone number manually.
Troubleshooting
308
Received fax has poor print quality
Try one or more of the following:
RESEND THE DOCUMENT
Ask the person who sent you the fax to:
• Check that the quality of the original document is satisfactory.
• Resend the fax. There may have been a problem with the quality of the telephone line connection.
• Increase the fax scan resolution, if possible.
REPLACE THE CARTRIDGE
When 88 Cartridge low appears or when the prints appear faded, replace the cartridge.
MAKE SURE THE FAX TRANSMISSION SPEED IS NOT SET TOO HIGH
Decrease the incoming fax transmission speed:
1 Type the printer IP address in the address field of your Web browser.
Note: If you do not know the IP address of the printer, then print a network setup page and locate the IP address
in the TCP/IP section.
2 Click Settings > Fax Settings > Analog Fax Setup.
3 In the Max Speed box, click one of the following:
2400
4800
9600
14400
33600
4 Click Submit.
Solving home screen applications problems
An application error has occurred
CHECK THE SYSTEM LOG FOR RELEVANT DETAILS
1 Type the printer IP address or host name in the address field of your Web browser.
If you do not know the IP address or host name of the printer, then you can:
• View the information on the printer control panel home screen, or in the TCP/IP section under the
Networks/Ports menu.
• Print a network setup page or menu settings page, and then locate the information in the TCP/IP section.
2 Click Settings or Configuration.
3 Click Device Solutions > Solutions (eSF), or click Embedded Solutions.
Troubleshooting
309
4 Click System tab > Log
5 From the Filter menu, select an application status.
6 From the Application menu, select an application, and then click Submit.
MAKE SURE THE FILE NAME YOU WANT TO SCAN TO IS NOT ALREADY IN USE
Verify that the file to which you want to scan is not open by another application or user.
To help prevent errors, make sure either Append time stamp or Overwrite existing file is selected in the destination
configuration settings.
ADJUST THE SCAN SETTINGS
In the destination configuration settings, lower the scan settings. For example, to lower the scan resolution, disable
Color, or change the “Content type” setting to Text.
CONTACT CUSTOMER SUPPORT
If you still cannot isolate the problem, then contact customer support.
Forms and Favorites troubleshooting
Forms are not available or are not working
MAKE SURE THE BOOKMARK POINTING TO THE FORM IS IN THE BOOKMARKS ROOT FOLDER
If the bookmark pointing to the form was created in a subfolder of the Bookmarks folder, then it will not be available
under the Forms solution. Delete the bookmark and recreate it under the Bookmarks root folder.
MAKE SURE THE BOOKMARK IS POINTING TO THE CORRECT LOCATION
The printer does not validate bookmarks. If the URL or network location that was specified when the bookmark was
created is incorrect, then the printer will not be able to access the document.
MAKE SURE THE BOOKMARK IS CREATED WITH FORMS AND FAVORITES
If the bookmark is created using another application, then it cannot be accessed in Forms and Favorites.
A network destination stopped working or is invalid
MAKE SURE THE PRINTER AUTHENTICATION IS CONFIGURED
If the application is configured to use MFP authentication credentials, then the printer authentication settings must
be configured from the Embedded Web Server.
For more information on configuring the printer authentication settings, see the Embedded Web Server
Administrator's Guide available on www.lexmark.com.
MAKE SURE DESTINATION IS SHARED AND HAS A VALID NETWORK ADDRESS
Check that the folder or source file is set to be shared across the network.
Troubleshooting
310
If the destination has been moved, then the network address may have changed. The destination network address
can be accessed from the Embedded Web Server.
MAKE SURE THE PRINTER IS CONNECTED TO THE NETWORK
Make sure that all appropriate network cables are securely connected and that the network settings of the printer
are correctly configured. For information on networking the printer, see the Networking Guide on the Software and
Documentation CD that came with the printer.
IF THE SOURCE FILE AND PRINTER RESIDE IN DIFFERENT DOMAINS, THEN MAKE SURE THE DOMAIN INFORMATION IS SPECIFIED
If the source file exists within a different domain than the printer, then you can edit the destination from the
application configuration page and enter the appropriate domain information in the Network Address and Network
Domain fields. If you do not know the network address of the computer where your source file resides, then consult
your system support person.
You can also add the domain name to the Domain Search Order list under the printer network setup.
CHECK THE SYSTEM LOG FOR RELEVANT DETAILS
1 Type the printer IP address or host name in the address field of your Web browser.
If you do not know the IP address or host name of the printer, then you can:
• View the information on the printer control panel home screen, or in the TCP/IP section under the
Networks/Ports menu.
• Print a network setup page or menu settings page and locate the information in the TCP/IP section.
2 Click Settings or Configuration.
3 Click Device Solutions > Solutions (eSF), or click Embedded Solutions.
4 Click System tab > Log.
5 From the Filter menu, select an application status.
6 From the Application menu, select an application, and then click Submit.
Scan to Network troubleshooting
The application icon is missing from the home screen
MAKE SURE TO ENABLE AT LEAST ONE VALID DESTINATION
DISPLAY THE APPLICATION ICON WHEN NO DESTINATIONS ARE AVAILABLE
1 From the Embedded Web Server, click Settings or Configuration.
2 Click Device Solutions > Solutions (eSF), or click Embedded Solutions.
3 Click the name of the application > Configure.
4 From the Home Screen Button section, select Always show button under Display Option, and then click Apply.
Troubleshooting
311
Printer cannot scan to the selected destination
MAKE SURE THE DESTINATION IS VALID
Verify that the destination is valid in the application configuration settings.
If the destination has been moved, then the network address may have changed. The destination network address
can be accessed from the Embedded Web Server.
IF THE PRINTER AND DESTINATION RESIDE IN DIFFERENT DOMAINS, THEN MAKE SURE THE DOMAIN INFORMATION IS SPECIFIED
If the destination exists within a different Windows domain than the printer, then you can edit the destination from
the application configuration page and enter the appropriate Windows domain information in the domain field as
part of the Network Folder Address. You can also add the domain name to the Domain Search Order list under the
printer network setup.
MAKE SURE THE FIREWALL SOFTWARE IS ALLOWING COMMUNICATION
If the destination resides on a computer that uses a newer version of the Windows operating system (Windows XP
or later), and the Windows Firewall is enabled, then the printer may have difficulty sending information to the
destination if the destination and the printer reside on different subnets. The Windows Firewall must either be
configured to allow communication with the subnet the printer resides on, or the destination should be set up on
the same subnet as the printer. For more information, contact your system support person.
MAKE SURE A FILE WITH THE DEFAULT FILE NAME DOES NOT ALREADY EXIST IN THE DESTINATION
If the three configuration settings for the File Name section of the application configuration page are not selected
(allow user to enter file name; append time stamp; overwrite existing file), and a file using the default file name
already exists within the destination, then there will be no method in place to distinguish the newly scanned file from
the file present in the destination. The printer will not be able to overwrite the old file, the new file will not receive
a time stamp to differentiate it from the old file, and the user will not be able to give the new file a different name.
In this case, the old file must either be removed from the destination, or one of the previously mentioned settings
must be turned on.
MAKE SURE THE NETWORK IS FUNCTIONING AND THE PRINTER CAN COMMUNICATE
Verify all network connections and that the network settings of the printer are configured appropriately. For
information on networking the printer, see the Networking Guide on the Software and Documentation CD that came
with the printer.
FOR NETWORKS USING LDAP AUTHENTICATION, MAKE SURE LDAP SETTINGS HAVE BEEN CONFIGURED CORRECTLY
Verify that LDAP settings are configured appropriately in your printer setup, and in the setup dialog. For more
information on LDAP settings, contact your system support person.
MAKE SURE YOU HAVE PERMISSION TO SAVE SCANS TO THIS DESTINATION
On the application Edit Destination screen, clear the contents of the Path Suffix field; or on the destination server,
change the user home folder to match the contents of the Path Suffix field.
Troubleshooting
312
My MFP troubleshooting
Error reading USB drive
Some flash drives may not be compatible with the printer. At a minimum, the flash drive should:
•
•
•
•
Be USB 2.0-compatible
Support the Full Speed standard (low-speed devices will not work)
Have a USB type “A” connector
Support the FAT file system (NTFS file system not supported)
For a list of tested and approved flash drives, visit the Lexmark Web site at www.lexmark.com.
Nothing happens when USB drive is inserted
If nothing happens within a few seconds after you insert your USB drive into the MFP, then use of USB drives may be
disabled on the device. Contact your system support person for more information.
I forgot the password to My MFP
If you forget the password for your My MFP profile, then you must delete the profile from your USB drive, insert the
drive into an MFP, and then run the setup wizard again. To manually delete the My MFP profile from your USB drive:
1 Insert your USB drive into a computer.
2 Locate the .mymfp.preferences file, as well as any other files beginning with .mymfp (they will be grouped together).
3 Delete all files beginning with .mymfp.
Solving option problems
Option does not operate correctly or quits after it is installed
Try one or more of the following:
RESET THE PRINTER
Turn the printer off, wait for about 10 seconds, and then turn the printer on.
CHECK TO SEE IF THE OPTION IS CONNECTED TO THE PRINTER
1 Turn the printer off using the power switch.
2 Unplug the power cord from the wall outlet, and then from the printer.
3 Check the connection between the option and the printer.
Troubleshooting
313
MAKE SURE THE OPTION IS INSTALLED CORRECTLY
Print a menu settings page and check to see if the option is listed in the Installed Options list. If the option is not
listed, then reinstall it. For more information, see the hardware setup documentation that came with the option, or
go to www.lexmark.com to view the option instruction sheet.
MAKE SURE THE OPTION IS SELECTED
From the computer you are printing from, select the option.
For more information, see “Updating available options in the printer driver” on page 54.
Paper tray problems
Try one or more of the following:
MAKE SURE THE PAPER IS LOADED CORRECTLY
1 Open the paper tray.
2 Check for paper jams or misfeeds.
3 Make sure the paper guides are aligned against the edges of the paper.
4 Make sure the paper tray closes properly.
RESET THE PRINTER
Turn the printer off, wait about 10 seconds, and then turn the printer on.
MAKE SURE THE PAPER TRAY IS INSTALLED CORRECTLY
If the paper tray is listed on the menu settings page, but paper jams when it enters or exits the tray, then it may not
be properly installed. Reinstall the paper tray. For more information, see the hardware setup documentation that
came with the paper tray, or go to http://support.lexmark.com to view the paper tray instruction sheet.
2,000-sheet drawer problems
CHECK THE DRAWER CONNECTION
Make sure the 2,000-sheet drawer is properly connected to the printer.
LOAD PAPER
If the tray is empty, then load paper in the tray or feeder
CLEAR ANY JAMS
Open the side door of the tray or feeder, and then remove any jammed paper.
Troubleshooting
314
AVOID PAPER JAMS
•
•
•
•
•
•
Flex the paper.
Make sure the drawer is properly installed.
Make sure paper is loaded correctly.
Make sure the paper stack you load does not exceed the maximum stack height indicated in the tray.
Make sure the paper or specialty media meets specifications and is not damaged.
Make sure the guides are positioned correctly for the paper size loaded.
Memory card
Make sure the memory card is securely connected to the printer system board.
Cannot detect flash memory card
Make sure the flash memory card is securely connected to the printer system board.
Cannot detect printer hard disk
Make sure the printer hard disk is securely connected to the printer system board.
Internal Solutions Port does not operate correctly
Try one or more of the following:
CHECK THE INTERNAL SOLUTIONS PORT (ISP) CONNECTIONS
Make sure the ISP is securely connected to the printer system board.
CHECK THE CABLE
Make sure you are using the correct cable and that it is securely connected to the Internal Solutions (ISP) port.
MAKE SURE THE NETWORK SOFTWARE IS CONFIGURED CORRECTLY
For information on installing the network printing software, see the Networking Guide on the Software and
Documentation CD.
Internal print server does not operate correctly
Try one or more of the following:
CHECK THE PRINT SERVER CONNECTIONS
• Make sure the internal print server is attached securely to the printer system board.
• Make sure you are using the correct cable and that it is securely connected.
Troubleshooting
315
MAKE SURE THE NETWORK SOFTWARE IS CONFIGURED CORRECTLY
For more information on installing the network printing software, do the following:
1 Open the Software and Documentation CD.
2 Click Additional.
3 Under Publications on this CD, select Networking Guide.
USB/parallel interface card does not operate correctly
CHECK THE USB/PARALLEL INTERFACE CARD CONNECTION
Make sure the USB/parallel interface card is securely connected to the printer system board.
CHECK THE CABLE
Make sure you are using the correct cable and that it is securely connected.
Solving paper feed problems
Paper frequently jams
These are possible solutions. Try one or more of the following:
CHECK THE PAPER
Use recommended paper and specialty media. For more information, see the chapter about paper and specialty
media guidelines.
MAKE SURE THERE IS NOT TOO MUCH PAPER IN THE PAPER TRAY
Make sure the stack of paper you load does not exceed the maximum stack height indicated in the tray or on the
multipurpose feeder.
CHECK THE PAPER GUIDES
Move the guides in the tray to the correct positions for the paper size loaded.
THE PAPER MAY HAVE ABSORBED MOISTURE DUE TO HIGH HUMIDITY
• Load paper from a fresh package.
• Store paper in its original wrapper until you use it.
Troubleshooting
316
Paper jam message remains after jam is cleared
CHECK THE PAPER PATH
The paper path is not clear. Clear jammed paper from the entire paper path, and then touch Continue.
Jammed pages are not reprinted
TURN ON JAM RECOVERY
1 From the home screen, navigate to:
> Settings > General Settings > Print Recovery
2 Touch the arrows next to Jam Recovery until On or Auto appears.
3 Touch Submit.
Solving print quality problems
If these suggestions do not correct the problem, then contact customer support. You may have a printer part that
requires adjustment or replacement.
Characters have jagged or uneven edges
If you are using downloaded fonts, verify that the fonts are supported by the printer, the host computer, and the
software program.
Clipped images
Try one or more of the following:
CHECK THE GUIDES
Move the width and length guides in the tray to the correct positions for the paper size loaded.
Troubleshooting
317
CHECK THE PAPER SIZE SETTING
Make sure the paper size setting matches the paper loaded in the tray:
1 From the printer control panel Paper menu, check the Paper Size setting.
2 Before sending the job to print, specify the correct size setting:
• For Windows users, specify the size from Print Properties.
• For Macintosh users, specify the size from the Page Setup dialog.
Fine horizontal lines appear on color pages
You may notice fine, horizontal lines in photographs or pages with a high concentration of color. This can occur when
the printer is in Quiet Mode. To fix this, set Quiet Mode to Off (Image/Photo).
Shadow images appear on prints
Try one or more of the following:
CHECK THE PAPER TYPE AND WEIGHT SETTINGS
Make sure the paper type and weight settings match the paper loaded in the tray or feeder:
1 From the printer control panel Paper menu, check the Paper Type and Paper Weight settings.
2 Before sending the print job, specify the correct paper type setting:
• For Windows users, specify the paper type from Print Properties.
• For Macintosh users, specify the paper type from the Print dialog.
MAKE SURE THE PRINT CARTRIDGE IS NOT LOW ON TONER
When 88.xx [color] cartridge low appears, make sure that toner is distributed evenly among all four
print cartridges or whichever color has the shadow images.
1 Remove the print cartridge.
Warning—Potential Damage: Be careful not to touch the photoconductor drum. Doing so may affect the print
quality of future print jobs.
2 Firmly shake the cartridge side-to-side and front-to-back several times to redistribute the toner.
3 Reinsert the print cartridge.
Note: If print quality does not improve, replace the print cartridge of the color that is giving a shadow.
If the problem continues, the printer may need to be serviced. For more information, contact customer support.
Troubleshooting
318
Gray background
CHECK THE TONER DARKNESS SETTING
Select a lighter Toner Darkness setting:
• From the printer control panel Quality menu, change the setting.
• For Windows users, change the setting from Print Properties.
• For Macintosh users, change the setting from the Print dialog.
THE TONER CARTRIDGE MAY BE WORN OR DEFECTIVE
Replace the toner cartridge.
Incorrect margins
These are possible solutions. Try one or more of the following:
CHECK THE PAPER GUIDES
Move the guides in the tray to the correct positions for the paper size loaded.
CHECK THE PAPER SIZE SETTING
Make sure the paper size setting matches the paper loaded in the tray:
1 From the printer control panel Paper menu, check the Paper Size setting.
2 Before sending the job to print, specify the correct size setting:
• For Windows users, specify the size from Print Properties.
• For Macintosh users, specify the size from the Page Setup dialog.
Troubleshooting
319
Light colored line, white line, or incorrectly colored line appears on prints
Try one or more of the following:
MAKE SURE THERE IS NO DEFECTIVE TONER CARTRIDGE
Replace the defective toner cartridge.
MAKE SURE THE PHOTOCONDUCTOR UNIT IS NOT DEFECTIVE
Replace the defective photoconductor unit.
MAKE SURE THE TRANSFER MODULE IS NOT DEFECTIVE
Replace the defective transfer module.
CLEAN THE PRINTHEAD LENSES
1 Open the front door, and then the internal cover.
2 Locate the printhead wipers.
3 Gently pull the printhead wiper out until it stops, and then slowly slide it back into place.
4 Clean the remaining three printhead lenses.
Paper curl
Try one or more of the following:
CHECK THE PAPER TYPE AND WEIGHT SETTINGS
Make sure the paper type and weight settings match the paper loaded in the tray or feeder:
1 From the printer control panel Paper menu, check the Paper Type and Paper Weight settings.
2 Before sending the print job, specify the correct paper type setting:
• For Windows users, specify the paper type from Print Properties.
• For Macintosh users, specify the paper type from the Print dialog.
LOAD PAPER FROM A FRESH PACKAGE
Paper absorbs moisture due to high humidity. Store paper in its original wrapper until you use it.
Troubleshooting
320
Print irregularities
Try one or more of the following:
LOAD PAPER FROM A FRESH PACKAGE
The paper may have absorbed moisture due to high humidity. Store paper in its original wrapper until you use it.
CHECK THE PAPER TYPE AND WEIGHT SETTINGS
Make sure the paper type and weight settings match the paper loaded in the tray or feeder:
1 From the printer control panel Paper menu, check the Paper Type and Paper Weight settings.
2 Before sending the print job, specify the correct paper type setting:
• For Windows users, specify the paper type from Print Properties.
• For Macintosh users, specify the paper type from the Print dialog.
AVOID TEXTURED PAPER WITH ROUGH FINISHES
MAKE SURE THERE IS NO DEFECTIVE TONER CARTRIDGE
Replace the worn or defective toner cartridge.
MAKE SURE THE TRANSFER MODULE IS NOT DEFECTIVE
Replace the defective transfer module. For more information, see the instruction sheet that came with the
replacement part.
MAKE SURE THE FUSER IS NOT DEFECTIVE
Replace the defective fuser. For more information, see the instruction sheet that came with the replacement part.
Print is too dark
Troubleshooting
321
Try one or more of the following:
CHECK THE DARKNESS, BRIGHTNESS, AND CONTRAST SETTINGS
The Toner Darkness setting may be too dark, the Brightness setting may be too dark, or the Contrast setting may be
too high.
• Change these settings from the printer control panel Quality menu.
• For Windows users, change these settings from Print Properties.
• For Macintosh users:
1 Choose File > Print.
2 From the “Orientation pictures” menu, choose Printer Features.
3 Choose a lower value for the Toner Darkness, Brightness, and Contrast settings.
LOAD PAPER FROM A FRESH PACKAGE
The paper may have absorbed moisture due to high humidity. Store paper in its original wrapper until you use it.
AVOID TEXTURED PAPER WITH ROUGH FINISHES
CHECK THE PAPER TYPE SETTING
Make sure the paper type setting matches the paper loaded in the tray or feeder:
• From the printer control panel Paper menu, check the Paper Type setting.
• For Windows users, check this setting from Print Properties.
• For Macintosh users, check this setting from the Print dialog.
Print is too light
Try one or more of the following:
CHECK THE DARKNESS, BRIGHTNESS, AND CONTRAST SETTINGS
The Toner Darkness setting may be too light, the Brightness setting may be too light, or the Contrast setting may be
too low.
• Change these settings from the printer control panel Quality menu.
• For Windows users, change these settings from Print Properties
Troubleshooting
322
• For Macintosh users:
1 Choose File > Print.
2 From the Orientation pictures drop-down menu, choose Printer Features.
3 Choose a higher value for the Toner Darkness, Brightness, and Contrast settings.
LOAD PAPER FROM A FRESH PACKAGE
The paper may have absorbed moisture from high humidity. Store paper in its original wrapper until you use it.
AVOID TEXTURED PAPER WITH ROUGH FINISHES
CHECK THE PAPER TYPE SETTING
Make sure the Paper Type setting matches the paper loaded in the tray or feeder:
• From the printer control panel Paper menu, check the Paper Type setting.
• For Windows users, check this setting from Print Properties.
• For Macintosh users, check this setting from the Print dialog.
Printer is printing blank pages
Try one or more of the following:
MAKE SURE THERE IS NO PACKING MATERIAL LEFT ON THE TONER OR PRINT CARTRIDGE
Remove the cartridge and make sure the packing material is properly removed. Reinstall the cartridge.
MAKE SURE THE TONER OR PRINT CARTRIDGE IS NOT LOW ON TONER
When 88.xx [color] cartridge low appears, make sure that toner is distributed evenly among all four
cartridges:
1 Remove the cartridge.
Warning—Potential Damage: Be careful not to touch the photoconductor drum. Doing so may affect the print
quality of future print jobs.
2 Firmly shake the cartridge side-to-side and front-to-back several times to redistribute the toner.
3 Reinsert the cartridge.
Note: If print quality does not improve, then replace the cartridge of the color that is not printing.
Troubleshooting
323
If the problem continues, then the printer may need to be serviced. For more information, contact customer support.
Repeating defects appear on a page
Try one or more of the following:
MAKE SURE THE PHOTOCONDUCTOR UNIT IS NOT DEFECTIVE
The photoconductor unit may be defective if marks occur repeatedly in only one color and multiple times on a page.
• Replace the photoconductor unit if the defects occur every 94.2 mm (3.71 in.) or 37.68 mm (1.48 in.).
MAKE SURE THE FUSER IS NOT DEFECTIVE
The fuser may be defective if the marks occur down repeatedly in all colors.
• Replace the fuser if the defects occur every 141 mm (5.55 in.).
Skewed print
Try one or more of the following:
CHECK THE PAPER GUIDES
Adjust the length and width guides in the tray to the correct positions for the paper size loaded.
• Make sure the guides are not too far from the paper stack.
• Make sure the guides are not pressing too lightly against the paper stack.
CHECK THE PAPER
Make sure you are using paper that meets the printer specifications.
MAKE SURE THE PRINTER IS CLEAN OR IS NOT CONTAMINATED WITH PAPER DUST
Clean the exterior of the printer
1 Make sure that the printer is turned off and unplugged from the wall outlet.
Warning—Potential Damage: To avoid the risk of electric shock when cleaning the exterior of the printer, unplug
the power cord from the wall outlet and disconnect all cables to the printer before proceeding.
2 Remove paper from the standard exit bin.
3 Dampen a clean, lint-free cloth with water.
Warning—Potential Damage: Do not use household cleaners or detergents, as they may damage the finish of the
printer.
4 Wipe only the exterior of the printer, making sure to include the standard exit bin.
Warning—Potential Damage: Using a damp cloth to clean the interior may cause damage to your printer.
5 Make sure the paper support and standard exit bin are dry before beginning a new print job.
Troubleshooting
324
MAKE SURE THE PAPER FEED ROLLERS ARE CLEAN AND ARE NOT CONTAMINATED WITH DUST
1 Turn the printer off using the power switch, and then unplug the power cord from the wall outlet.
2 Remove the paper feed rollers.
Note: For instructions on how to remove and reinstall the paper feed rollers, see the setup sheet that came with
the rollers inside the compartment box of Tray 1.
3 Dampen a clean, lint-free cloth with water.
4 Clean the paper feed rollers.
Warning—Potential Damage: Do not touch the rubber. Doing so will damage the rollers.
5 Reinstall the paper feed rollers.
Note: Make sure to replace the worn or defective paper feed rollers.
Solid color pages
MAKE SURE THE PHOTOCONDUCTOR IS NOT DEFECTIVE AND IS INSTALLED CORRECTLY
Remove and then reinstall the photoconductor. If the problem continues, then the photoconductor may need to be
replaced.
Black or white streaks appear on transparencies or paper
Try one or more of the following:
ENSURE THAT THE FILL PATTERN IS CORRECT
If the fill pattern is incorrect, choose a different fill pattern from your software program.
Troubleshooting
325
CHECK THE PAPER TYPE
• Use only the recommended transparencies.
• Ensure that the Paper Type setting matches what is loaded in the tray or feeder.
• Ensure that the Paper Texture setting is correct for the type of paper or specialty media loaded in the tray or
feeder.
MAKE SURE THE PRINT CARTRIDGE IS NOT LOW ON TONER
When 88.xx [color] cartridge low appears, make sure the toner is distributed evenly within the print
cartridge:
1 Remove the print cartridge.
Warning—Potential Damage: Be careful not to touch the photoconductor drum. Doing so may affect the print
quality of future print jobs.
2 Firmly shake the cartridge side-to-side and front-to-back several times to redistribute the toner.
3 Reinsert the print cartridge.
If the problem continues, the printer may need to be serviced. For more information, contact Customer Support.
Streaked horizontal lines appear on prints
Try one or more of the following:
SELECT ANOTHER TRAY OR FEEDER
• From the printer control panel Paper Menu, select Default Source.
• For Windows users, select the paper source from Print Properties.
• For Macintosh users, select the paper source from the Print dialog and pop-up menus.
MAKE SURE THERE IS NO WORN, DEFECTIVE, OR EMPTY TONER CARTRIDGE
Replace the worn, defective, or empty toner cartridge.
CLEAR THE PAPER PATH AROUND THE TONER CARTRIDGE
CAUTION—HOT SURFACE: The inside of the printer might be hot. To reduce the risk of injury from a hot
component, allow the surface to cool before touching.
Clear any paper you see or clean any visible toner from the paper path. If the problem persists, then contact Customer
Support.
Troubleshooting
326
Streaked vertical lines appear on prints
Try one or more of the following:
SELECT ANOTHER TRAY OR FEEDER
• From the printer control panel Paper menu, select Default Source
• For Windows users, select the paper source from Print Properties.
• For Macintosh users, select the paper source from the Print dialog and pop-up menus.
MAKE SURE THERE IS NO WORN, DEFECTIVE, OR EMPTY TONER CARTRIDGE
Replace the worn, defective, or empty toner cartridge.
CLEAR THE PAPER PATH AROUND THE TONER CARTRIDGE
Check the paper path around the toner cartridge.
CAUTION—HOT SURFACE: The inside of the printer might be hot. To reduce the risk of injury from a hot
component, allow the surface to cool before touching.
Clear any paper you see.
MAKE SURE THERE IS NO TONER IN THE PAPER PATH
Toner fog or background shading appears on the page
Try one or more of the following:
MAKE SURE THE TONER CARTRIDGE IS INSTALLED CORRECTLY OR IS NOT DEFECTIVE
Reinstall or replace the defective toner cartridge.
MAKE SURE THE TRANSFER MODULE IS NOT WORN OR DEFECTIVE
Replace the worn or defective transfer module.
MAKE SURE THE PHOTOCONDUCTOR UNIT IS NOT WORN OR DEFECTIVE
Replace the word or defective photoconductor unit.
Troubleshooting
327
MAKE SURE THE FUSER IS NOT WORN OR DEFECTIVE
Replace the worn or defective fuser.
MAKE SURE THE PRINTER HAS RECALIBRATED RECENTLY
Perform color adjust from the Quality menu.
MAKE SURE THE APPLICATION HAS NOT SPECIFIED AN OFF-WHITE BACKGROUND
Check the application settings.
MAKE SURE NO TONER IS IN THE PAPER PATH
Contact customer support.
Toner rubs off
Try one or more of the following:
CHECK THE PAPER TYPE AND WEIGHT SETTINGS
Make sure the paper type and weight settings match the paper loaded in the tray or feeder:
1 From the printer control panel Paper menu, check the Paper Type and Paper Weight settings. Change the Paper
Weight setting from Normal to Heavy.
2 Before sending the print job, specify the correct paper type setting:
• For Windows users, specify the paper type from Print Properties.
• For Macintosh users, specify the paper type from the Print dialog.
CHECK THE PAPER TEXTURE SETTING
From the printer control panel Paper menu, make sure the Paper Texture setting matches the paper loaded in the
tray or feeder. If necessary, change the Paper Texture setting from Normal to Rough.
MAKE SURE THE FUSER IS NOT WORN OR DEFECTIVE
Replace the worn or defective fuser. For more information, see the instruction sheet that came with the replacement
part.
Troubleshooting
328
Toner specks
Try one or more of the following:
MAKE SURE THERE IS NO DEFECTIVE TONER CARTRIDGE
Replace the defective or worn cartridges.
MAKE SURE THE PHOTOCONDUCTOR UNIT IS NOT DEFECTIVE
Replace the defective photoconductor unit.
CALL CUSTOMER SUPPORT
Transparency print quality is poor
Try one or more of the following:
CHECK THE TRANSPARENCIES
Use only transparencies that meet the printer specifications.
CHECK THE PAPER TYPE SETTING
Make sure the paper type setting is set to Transparency:
1 From the printer control panel Paper menu, check the Paper Type setting.
2 Before sending the job to print, specify the correct type setting:
• For Windows users, specify the type from Print Properties.
• For Macintosh users, specify the type from the Print dialog.
Solving color quality problems
FAQ about color printing
What is RGB color?
Red, green, and blue light can be added together in various amounts to produce a large range of colors observed in
nature. For example, red and green can be combined to create yellow. Televisions and computer monitors create
colors in this manner. RGB color is a method of describing colors by indicating the amount of red, green, or blue
needed to produce a certain color.
What is CMYK color?
Cyan, magenta, yellow, and black inks or toners can be printed in various amounts to produce a large range of colors
observed in nature. For example, cyan and yellow can be combined to create green. Printing presses, inkjet printers,
and color laser printers create colors in this manner. CMYK color is a method of describing colors by indicating the
amount of cyan, magenta, yellow, and black needed to reproduce a particular color.
Troubleshooting
329
How is color specified in a document to be printed?
Software programs typically specify document color using RGB or CMYK color combinations. Additionally, they allow
users to modify the color of each object in a document. For more information, see the software program Help topics.
How does the printer know what color to print?
When a user prints a document, information describing the type and color of each object is sent to the printer. The
color information is passed through color conversion tables that translate the color into the appropriate amounts of
cyan, magenta, yellow, and black toner needed to produce the desired color. The object information determines the
application of color conversion tables. For example, it is possible to apply one type of color conversion table to text
while applying a different color conversion table to photographic images.
Why doesn't the printed color match the color I see on the computer screen?
The color conversion tables used in Auto Color Correction mode generally approximate the colors of a standard
computer monitor. However, because of technology differences that exist between printers and monitors, there are
many colors that can also be affected by monitor variations and lighting conditions. For recommendations on how
the printer color sample pages may be useful in solving certain color-matching problems, see the question, “How
can I match a particular color (such as a corporate logo)?”
The printed page appears tinted. Can I adjust the color?
Sometimes a printed page may appear tinted (for example, everything printed seems to be too red). This can be
caused by environmental conditions, paper type, lighting conditions, or user preference. In these instances, adjust
the Color Balance setting to create a more preferable color. Color Balance provides the user with the ability to make
subtle adjustments to the amount of toner being used in each color plane. Selecting positive or negative values for
cyan, magenta, yellow, and black (from the Color Balance menu) will slightly increase or decrease the amount of
toner used for the chosen color. For example, if a printed page has a red tint, then decreasing both magenta and
yellow could potentially improve the color balance.
My color transparencies seem dark when they are projected. Is there anything I can do to improve the color?
This problem most commonly occurs when projecting transparencies with reflective overhead projectors. To obtain
the highest projected color quality, transmissive overhead projectors are recommended. If a reflective projector
must be used, then adjusting the Toner Darkness setting to 1, 2, or 3 will lighten the transparency. Make sure to print
on the recommended type of color transparencies.
What is manual color correction?
When manual color correction is enabled, the printer employs user-selected color conversion tables to process
objects. However, Color Correction must be set to Manual, or no user-defined color conversion will be implemented.
Manual color correction settings are specific to the type of object being printed (text, graphics, or images), and how
the color of the object is specified in the software program (RGB or CMYK combinations).
Notes:
• Manual color correction is not useful if the software program does not specify colors with RGB or CMYK
combinations. It is also not effective in situations in which the software program or the computer operating
system controls the adjustment of colors.
• The color conversion tables—applied to each object when Color Correction is set to Auto—generate preferred
colors for the majority of documents.
To manually apply a different color conversion table:
1 From the Quality menu, select Color Correction, and then select Manual.
2 From the Quality menu, select Manual Color, and then select the appropriate color conversion table for the
affected object type.
Troubleshooting
330
Manual Color menu
Object type
RGB Image
RGB Text
RGB Graphics
Color conversion tables
• Vivid—Produces brighter, more saturated colors and may be applied
to all incoming color formats.
• sRGB Display—Produces an output that approximates the colors
displayed on a computer monitor. Black toner usage is optimized for
printing photographs.
• Display—True Black—Produces an output that approximates the
colors displayed on a computer monitor. Uses only black toner to create
all levels of neutral gray.
• sRGB Vivid—Provides an increased color saturation for the sRGB
Display color correction. Black usage is optimized for printing business
graphics.
• Off—No color correction is implemented.
CMYK Image
CMYK Text
CMYK Graphics
• US CMYK—Applies color correction to approximate the SWOP
(Specifications for Web Offset Publishing) color output.
• Euro CMYK—Applies color correction to approximated EuroScale color
output.
• Vivid CMYK—Increases the color saturation of the US CMYK color
correction setting.
• Off—No color correction is implemented.
How can I match a particular color (such as a corporate logo)?
From the printer Quality menu, nine types of Color Samples sets are available. These are also available from the Color
Samples page of the Embedded Web Server. Selecting any sample set generates a multiple-page printout consisting
of hundreds of colored boxes. Either a CMYK or RGB combination is located on each box, depending on the table
selected. The observed color of each box is obtained by passing the CMYK or RGB combination labeled on the box
through the selected color conversion table.
By examining Color Samples sets, a user can identify the box whose color is the closest to the desired color. The color
combination labeled on the box can then be used for modifying the color of the object in a software program. For
more information, see the software program Help topics. Manual color correction may be necessary to utilize the
selected color conversion table for the particular object.
Selecting which Color Samples set to use for a particular color-matching problem depends on the Color Correction
setting being used (Auto, Off, or Manual), the type of object being printed (text, graphics, or images), and how the
color of the object is specified in the software program (RGB or CMYK combinations). When the printer Color
Correction setting is set to Off, the color is based on the print job information; and no color conversion is implemented.
Note: The Color Samples pages are not useful if the software program does not specify colors with RGB or CMYK
combinations. Additionally, certain situations exist in which the software program or the computer operating system
adjusts the RGB or CMYK combinations specified in the program through color management. The resulting printed
color may not be an exact match of the Color Samples pages.
What are detailed Color Samples and how do I access them?
Detailed Color Samples sets are available only through the Embedded Web Server of a network printer. A detailed
Color Samples set contains a range of shades (displayed as colored boxes) that are similar to a user-defined RGB or
CMYK value. The likeness of the colors in the set are dependent on the value entered in the RGB or CMYK Increment
box.
Troubleshooting
331
To access a detailed Color Samples set from the Embedded Web Server:
1 Type the printer IP address or host name in the address field of your Web browser.
Note: If you do not know the IP address or host name of the printer, then you can:
• View the information on the printer control panel home screen, or in the TCP/IP section under the
Networks/Ports menu.
• Print a network setup page or menu settings page and locate the information in the TCP/IP section.
2 Click Configuration > Color Samples > Detailed Options.
3 Select a color conversion table.
4 Enter the RGB or CMYK color number.
5 Enter an increment value from 1–255.
Note: The closer the value is to 1, the narrower the color sample range will appear.
6 Click Print.
Embedded Web Server does not open
Try one or more of the following:
CHECK THE NETWORK CONNECTION
Make sure the printer and computer are turned on and connected to the same network.
CHECK ADDRESS ENTERED INTO THE WEB BROWSER
• Depending on the network settings, you may need to type https:// instead of http:// before the printer
IP address to access the Embedded Web Server. For more information, contact your system support person.
• Make sure you have the correct printer IP address.
TEMPORARILY DISABLE WEB PROXY SERVERS
Proxy servers may block or restrict you from accessing certain Web sites including the Embedded Web Server. For
more information, contact your system support person.
Contacting customer support
When you call customer support, describe the problem you are experiencing, the message on the display, and the
troubleshooting steps you have already taken to find a solution.
You need to know your printer model type and serial number. For more information, see the label on the inside top
front cover of the printer. The serial number is also listed on the menu settings page.
In the U.S. or Canada, call 1-800-539-6275. For other countries or regions, visit the Lexmark Web site at
http://support.lexmark.com.
Troubleshooting
332
Notices
Product information
Product name:
Lexmark X950de 4, x952dte 4, x954dhe 4
Machine type:
7558
Model(s):
032, 036, 232, 236, 432, 436
Edition notice
December 2010
The following paragraph does not apply to any country where such provisions are inconsistent with local law:
LEXMARK INTERNATIONAL, INC., PROVIDES THIS PUBLICATION “AS IS” WITHOUT WARRANTY OF ANY KIND, EITHER
EXPRESS OR IMPLIED, INCLUDING, BUT NOT LIMITED TO, THE IMPLIED WARRANTIES OF MERCHANTABILITY OR FITNESS
FOR A PARTICULAR PURPOSE. Some states do not allow disclaimer of express or implied warranties in certain
transactions; therefore, this statement may not apply to you.
This publication could include technical inaccuracies or typographical errors. Changes are periodically made to the
information herein; these changes will be incorporated in later editions. Improvements or changes in the products or
the programs described may be made at any time.
References in this publication to products, programs, or services do not imply that the manufacturer intends to make
these available in all countries in which it operates. Any reference to a product, program, or service is not intended to
state or imply that only that product, program, or service may be used. Any functionally equivalent product, program,
or service that does not infringe any existing intellectual property right may be used instead. Evaluation and verification
of operation in conjunction with other products, programs, or services, except those expressly designated by the
manufacturer, are the user’s responsibility.
For Lexmark technical support, visit support.lexmark.com.
For information on supplies and downloads, visit www.lexmark.com.
If you don't have access to the Internet, you can contact Lexmark by mail:
Lexmark International, Inc.
Bldg 004-2/CSC
740 New Circle Road NW
Lexington, KY 40550
USA
© 2010 Lexmark International, Inc.
All rights reserved.
Notices
333
UNITED STATES GOVERNMENT RIGHTS
This software and any accompanying documentation provided under this agreement are commercial computer
software and documentation developed exclusively at private expense.
Trademarks
Lexmark, Lexmark with diamond design, and MarkVision are trademarks of Lexmark International, Inc., registered in
the United States and/or other countries.
ScanBack is a trademark of Lexmark International, Inc.
Mac and the Mac logo are trademarks of Apple Inc., registered in the U.S. and other countries.
PCL® is a registered trademark of the Hewlett-Packard Company. PCL is Hewlett-Packard Company’s designation of a
set of printer commands (language) and functions included in its printer products. This printer is intended to be
compatible with the PCL language. This means the printer recognizes PCL commands used in various application
programs, and that the printer emulates the functions corresponding to the commands.
The following terms are trademarks or registered trademarks of these companies:
Albertus
The Monotype Corporation plc
Antique Olive
Monsieur Marcel OLIVE
Apple-Chancery
Apple Computer, Inc.
Arial
The Monotype Corporation plc
CG Times
Based on Times New Roman under license from The Monotype Corporation plc, is a product of
Agfa Corporation
Chicago
Apple Computer, Inc.
Clarendon
Linotype-Hell AG and/or its subsidiaries
Eurostile
Nebiolo
Geneva
Apple Computer, Inc.
GillSans
The Monotype Corporation plc
Helvetica
Linotype-Hell AG and/or its subsidiaries
Hoefler
Jonathan Hoefler Type Foundry
ITC Avant Garde Gothic International Typeface Corporation
ITC Bookman
International Typeface Corporation
ITC Mona Lisa
International Typeface Corporation
ITC Zapf Chancery
International Typeface Corporation
Joanna
The Monotype Corporation plc
Marigold
Arthur Baker
Monaco
Apple Computer, Inc.
New York
Apple Computer, Inc.
Oxford
Arthur Baker
Notices
334
Palatino
Linotype-Hell AG and/or its subsidiaries
Stempel Garamond
Linotype-Hell AG and/or its subsidiaries
Taffy
Agfa Corporation
Times New Roman
The Monotype Corporation plc
Univers
Linotype-Hell AG and/or its subsidiaries
All other trademarks are the property of their respective owners.
Federal Communications Commission (FCC) compliance information statement
This product has been tested and found to comply with the limits for a Class A digital device, pursuant to Part 15 of the
FCC Rules. Operation is subject to the following two conditions: (1) this device may not cause harmful interference,
and (2) this device must accept any interference received, including interference that may cause undesired operation.
The FCC Class A limits are designed to provide reasonable protection against harmful interference when the equipment
is operated in a commercial environment. This equipment generates, uses, and can radiate radio frequency energy
and, if not installed and used in accordance with the instruction manual, may cause harmful interference to radio
communications. Operation of this equipment in a residential area is likely to cause harmful interference, in which case
the user will be required to correct the interference at his own expense.
The manufacturer is not responsible for any radio or television interference caused by using other than recommended
cables or by unauthorized changes or modifications to this equipment. Unauthorized changes or modifications could
void the user's authority to operate this equipment.
Note: To assure compliance with FCC regulations on electromagnetic interference for a Class A computing device, use
a properly shielded and grounded cable such as Lexmark part number 1021231 for parallel attach or 1021294 for USB
attach. Use of a substitute cable not properly shielded and grounded may result in a violation of FCC regulations.
Modular component notice
This product may contain the following modular component(s):
Lexmark regulatory type/model LEX-M01-003; FCC ID:IYLM01003; IC:2376A-M01003
Lexmark regulatory type/model LEX-M05-001; FCC ID:IYLLEXM05001; IC:2376A-M05001
Lexmark regulatory type/model LEX-M05-002; FCC ID:IYLLEXM05002; IC:2376A-M05002
Licensing notices
All licensing notices associated with this product can be viewed from the CD:\LEGAL directory of the installation software
CD.
Noise emission levels
The following measurements were made in accordance with ISO 7779 and reported in conformance with ISO 9296.
Note: Some modes may not apply to your product.
Notices
335
1-meter average sound pressure, dBA
Printing
53 dBA
Ready
35 dBA
Values are subject to change. See www.lexmark.com for current values.
Waste from Electrical and Electronic Equipment (WEEE) directive
The WEEE logo signifies specific recycling programs and procedures for electronic products in countries of the European
Union. We encourage the recycling of our products. If you have further questions about recycling options, visit the
Lexmark Web site at www.lexmark.com for your local sales office phone number.
Static sensitivity notice
This symbol identifies static-sensitive parts. Do not touch in the areas near these symbols without first touching the
metal frame of the printer.
ENERGY STAR
Any Lexmark product bearing the ENERGY STAR emblem on the product or on a start-up screen is certified to comply
with Environmental Protection Agency (EPA) ENERGY STAR requirements as configured when shipped by Lexmark.
Notices
336
Temperature information
Ambient temperature
15.6 to 32.2°C (60 to 90°F)
Shipping and storage temperature
-40 to 40°C (104° Fahrenheit) and 0°C to 35°C (95° Fahrenheit)
Power consumption
Product power consumption
The following table documents the power consumption characteristics of the product.
Note: Some modes may not apply to your product.
Mode
Description
Power consumption (Watts)
Printing
The product is generating hard-copy output from electronic inputs.
850 W
Copy
The product is generating hard-copy output from hard-copy original
documents.
820 W
Scan
The product is scanning hard-copy documents.
150 W
Ready
The product is waiting for a print job.
105 W
Sleep Mode The product is in a high-level energy-saving mode.
17 W
Hibernate
The product is in a low-level energy-saving mode.
0.4 W
Off
The product is plugged into a wall outlet, but the power switch is turned off.
0W
The power consumption levels listed in the previous table represent time-averaged measurements. Instantaneous
power draws may be substantially higher than the average.
Values are subject to change. See www.lexmark.com for current values.
Power Saver
This product is designed with an energy-saving mode called Power Saver. The Power Saver Mode is equivalent to the
Sleep Mode. The Power Saver Mode saves energy by lowering power consumption during extended periods of inactivity.
The Power Saver Mode is automatically engaged after this product is not used for a specified period of time, called the
Power Saver Timeout.
Factory default Power Saver Timeout for this product (in minutes):
30
By using the configuration menus, the Power Saver Timeout can be modified between 2 minutes and 240 minutes.
Setting the Power Saver Timeout to a low value reduces energy consumption, but may increase the response time of
the product. Setting the Power Saver Timeout to a high value maintains a fast response, but uses more energy.
Off mode
If this product has an off mode which still consumes a small amount of power, then to completely stop product power
consumption, disconnect the power supply cord from the wall outlet.
Notices
337
Total energy usage
It is sometimes helpful to calculate the total product energy usage. Since power consumption claims are provided in
power units of Watts, the power consumption should be multiplied by the time the product spends in each mode in
order to calculate energy usage. The total product energy usage is the sum of each mode's energy usage.
Industry Canada compliance statement
This Class A digital apparatus meets all requirements of the Canadian Interference-Causing Equipment Standard
ICES-003.
Avis de conformité aux normes de l’industrie du Canada
Cet appareil numérique de classe A est conforme aux exigences de la norme canadienne relative aux équipements
pouvant causer des interférences NMB-003.
European Community (EC) directives conformity
This product is in conformity with the protection requirements of EC Council directives 2004/108/EC and 2006/95/EC
on the approximation and harmonization of the laws of the Member States relating to electromagnetic compatibility
and safety of electrical equipment designed for use within certain voltage limits.
The manufacturer of this product is: Lexmark International, Inc., 740 West New Circle Road, Lexington, KY, 40550 USA.
The authorized representative is: Lexmark International Technology Hungária Kft., 8 Lechner Ödön fasor, Millennium
Tower III, 1095 Budapest HUNGARY, A declaration of conformity to the requirements of the Directives is available upon
request from the Authorized Representative.
This product satisfies the Class A limits of EN 55022 and safety requirements of EN 60950.
Radio interference notice
Warning
This is a product that complies with the emission requirements of EN55022 Class A limits and immunity requirements
of EN55024. This product is not intended to be used in residential/domestic environments.
This is a Class A product. In a domestic environment, this product may cause radio interference, in which case the user
may be required to take adequate measures.
Notice to users of the US telephone network: FCC requirements
This equipment complies with Part 68 of the FCC rules and the requirements adopted by the Administrative Council
for Terminal Attachments (ACTA). On the back of this equipment is a label that contains, among other information, a
product identifier in the format US:AAAEQ##TXXXX. If requested, this number must be provided to your telephone
company.
This equipment uses the RJ-11C Universal Service Order Code (USOC) jack.
A plug and jack used to connect this equipment to the premises’ wiring and telephone network must comply with the
applicable FCC Part 68 rules and requirements adopted by the ACTA. A compliant telephone cord and modular plug is
Notices
338
provided with this product. It is designed to be connected to a compatible modular jack that is also compliant. See your
setup documentation for more information.
The Ringer Equivalence Number (REN) is used to determine the number of devices that may be connected to a telephone
line. Excessive RENs on a telephone line may result in the devices not ringing in response to an incoming call. In most
but not all areas, the sum of RENs should not exceed five (5.0). To be certain of the number of devices that may be
connected to a line, as determined by the total RENs, contact your local telephone company. For products approved
after July 23, 2001, the REN for this product is part of the product identifier that has the format US:AAAEQ##TXXXX.
The digits represented by ## are the REN without a decimal point (for example, 03 is a REN of 0.3). For earlier products,
the REN is shown separately on the label.
If this equipment causes harm to the telephone network, the telephone company will notify you in advance that
temporary discontinuance of service may be required. If advance notice is not practical, the telephone company will
notify the customer as soon as possible. You will also be advised of your right to file a complaint with the FCC.
The telephone company may make changes in its facilities, equipment, operations or procedures that could affect the
operation of this equipment. If this happens, the telephone company will provide advance notice in order for you to
make necessary modifications to maintain uninterrupted service.
If you experience trouble with this equipment, for repair or warranty information, contact Lexmark International, Inc.
at www.lexmark.com or your Lexmark representative. If the equipment is causing harm to the telephone network, the
telephone company may request that you disconnect the equipment until the problem is resolved.
This equipment contains no user serviceable parts. For repair and warranty information, contact Lexmark International,
Inc. See the previous paragraph for contact information.
Connection to party line service is subject to state tariffs. Contact the state public utility commission, public service
commission, or corporation commission for information.
If your home has specially wired alarm equipment connected to the telephone line, ensure the installation of this
equipment does not disable your alarm equipment. If you have questions about what will disable alarm equipment,
consult your telephone company or a qualified installer.
Telephone companies report that electrical surges, typically lightning transients, are very destructive to customer
terminal equipment connected to AC power sources. This has been identified as a major nationwide problem. It is
recommended that the customer install an appropriate AC surge arrestor in the AC outlet to which this device is
connected. An appropriate AC surge arrestor is defined as one that is suitably rated, and certified by UL (Underwriter's
Laboratories), another NRTL (Nationally Recognized Testing Laboratory), or a recognized safety certification body in
the country/region of use. This is to avoid damage to the equipment caused by local lightning strikes and other electrical
surges.
The Telephone Consumer Protection Act of 1991 makes it unlawful for any person to use a computer or other electronic
device, including fax machines, to send any message unless said message clearly contains in a margin at the top or
bottom of each transmitted page or on the first page of the transmission, the date and time it is sent and an identification
of the business or other entity, or other individual sending the message, and the telephone number of the sending
machine or such business, other entity, or individual. (The telephone number provided may not be a 900 number or
any other number for which charges exceed local or long-distance transmission charges.)
See your user documentation in order to program this information into your fax machine.
Notice to users of the Canadian telephone network
This product meets the applicable Industry Canada technical specifications. The Ringer Equivalence Number (REN) is
an indication of the maximum number of terminals allowed to be connected to a telephone interface. The terminus of
an interface may consist of any combination of devices, subject only to the requirement that the sum of the RENs of
all the devices does not exceed five. The modem REN is located on the rear of the equipment on the product labeling.
Notices
339
Telephone companies report that electrical surges, typically lightning transients, are very destructive to customer
terminal equipment connected to AC power sources. This has been identified as a major nationwide problem. It is
recommended that the customer install an appropriate AC surge arrestor in the AC outlet to which this device is
connected. An appropriate AC surge arrestor is defined as one that is suitably rated, and certified by UL (Underwriter’s
Laboratories), another NRTL (Nationally Recognized Testing Laboratory), or a recognized safety certification body in
the country/region of use. This is to avoid damage to the equipment caused by local lightning strikes and other electrical
surges.
This equipment uses CA11A telephone jacks.
Avis réservé aux utilisateurs du réseau téléphonique du Canada
Ce produit est conforme aux spécifications techniques d’Industrie Canada. Le numéro REN (ringer equivalence number :
numéro d’équivalence de sonnerie) fournit une indication du nombre maximum de terminaux pouvant être connectés
à l’interface téléphonique. En bout de ligne, le nombre d’appareils qui peuvent être connectés n’est pas directement
limité, mais la somme des REN de ces appareils ne doit pas dépasser cinq. Le numéro REN du modem est indiqué sur
l’étiquette produit située à l’arrière de l’équipement.
Les compagnies de téléphone constatent que les surtensions électriques, en particulier celles dues à la foudre,
entraînent d'importants dégâts sur les terminaux privés connectés à des sources d’alimentation CA. Il s’agit-là d’un
problème majeur d’échelle nationale. En conséquence, il vous est recommandé de brancher un parasurtenseur dans
la prise de courant à laquelle l’équipement est connecté. Utilisez un parasurtenseur répondant à des caractéristiques
nominales satisfaisantes et certifié par le laboratoire d’assureurs UL (Underwriter’s Laboratories), un autre laboratoire
agréé de type NRTL (Nationally Recognized Testing Laboratory) ou un organisme de certification agréé dans votre région
ou pays. Ceci prévient tout endommagement de l’équipement causé par les orages et autres surtensions électriques.
Cet équipement utilise des prises de téléphone CA11A.
Notice to users of the New Zealand telephone network
The following are special conditions for the Facsimile User Instructions. The grant of a telepermit for any item of terminal
equipment indicates only that Telecom has accepted that the item complies with minimum conditions for connection
to its network. It indicates no endorsement of the product by Telecom, nor does it provide any sort of warranty. Above
all, it provides no assurance that any item will work correctly in all respects with another item of telepermitted
equipment of a different make or model, nor does it imply that any product is compatible with all of Telecom's network
services.
This equipment shall not be set up to make automatic calls to the Telecom's 111 Emergency Service.
This equipment may not provide for the effective hand-over of a call to another device connected to the same line.
This equipment should not be used under any circumstances that may constitute a nuisance to other Telecom
customers.
Some parameters required for compliance with Telecom's telepermit requirements are dependent on the equipment
associated with this device. The associated equipment shall be set to operate within the following limits for compliance
to Telecom's specifications:
• There shall be no more than 10 call attempts to the same number within any 30 minute period for any single manual
call initiation, and
• The equipment shall go on-hook for a period of not less than 30 seconds between the end of one attempt and the
beginning of the next call attempt.
• The equipment shall be set to ensure that automatic calls to different numbers are spaced such that there is not
less than 5 seconds between the end of one call attempt and the beginning of another.
Notices
340
Using this product in Switzerland
This product requires a Swiss billing tone filter (Lexmark part number 14B5109 or 80D1877) to be installed on any line
which receives metering pulses in Switzerland. The Lexmark filter must be used, as metering pulses are present on all
analog telephone lines in Switzerland.
Utilisation de ce produit en Suisse
Cet appareil nécessite l’utilisation d’un filtre de tonalité de facturation suisse (nº de référence Lexmark : 14B5109 ou
80D1877) devant être installé sur toute ligne recevant des impulsions de comptage en Suisse. Ce filtre doit être utilisé
pour toute installation car ces impulsions existent sur toutes les lignes téléphoniques suisses.
Verwendung dieses Produkts in der Schweiz
Für dieses Produkt muss ein schweizerischer Billing Tone Filter zur Zählzeichenübertragung (Lexmark Teilenummer
14B5109 oder 80D1877) für jede Leitung installiert werden, über die in der Schweiz Zeitsteuertakte übertragen werden.
Die Verwendung des Lexmark Filters ist obligatorisch, da in allen analogen Telefonleitungen in der Schweiz
Zeitsteuertakte vorhanden sind.
Uso del prodotto in Svizzera
Questo prodotto richiede un filtro toni Billing svizzero, (codice Lexmark 14B5109 o 80D1877) da installare su tutte le
linee che ricevono impulsi remoti in Svizzera. È necessario utilizzare il filtro Lexmark poiché gli impulsi remoti sono
presenti su tutte le linee analogiche in Svizzera.
Notice to Users in the European Union
Products bearing the CE mark are in conformity with the protection requirements of EC Council directives 2004/108/EC,
2006/95/EC, and 1999/5/EC on the approximation and harmonization of the laws of the Member States relating to
electromagnetic compatibility, safety of electrical equipment designed for use within certain voltage limits and on radio
equipment and telecommunications terminal equipment.
Compliance is indicated by the CE marking.
The manufacturer of this product is: Lexmark International, Inc., 740 West New Circle Road, Lexington, KY, 40550 USA.
The authorized representative is: Lexmark International Technology Hungária Kft., 8 Lechner Ödön fasor, Millennium
Tower III, 1095 Budapest HUNGARY, A declaration of conformity to the requirements of the Directives is available upon
request from the Authorized Representative.
Refer to the table at the end of the Notices section for further compliance information.
Notices
341
Regulatory notices for wireless products
This section contains the following regulatory information pertaining to wireless products that contain transmitters,
for example, but not limited to, wireless network cards or proximity card readers.
Exposure to radio frequency radiation
The radiated output power of this device is far below the radio frequency exposure limits of the FCC and other regulatory
agencies. A minimum separation of 20 cm (8 inches) must be maintained between the antenna and any persons for
this device to satisfy the RF exposure requirements of the FCC and other regulatory agencies.
Industry Canada (Canada)
This device complies with Industry Canada specification RSS-210. Operation is subject to the following two conditions:
(1) this device may not cause interference, and (2) this device must accept any interference, including interference that
may cause undesired operation of the device.
This device has been designed to operate only with the antenna provided. Use of any other antenna is strictly prohibited
per regulations of Industry Canada.
To prevent radio interference to the licensed service, this device is intended to be operated indoors and away from
windows to provide maximum shielding. Equipment (or its transmit antenna) that is installed outdoors is subject to
licensing.
The installer of this radio equipment must ensure that the antenna is located or pointed such that it does not emit RF
fields in excess of Health Canada limits for the general population; consult Safety Code 6, obtainable from Health
Canada's Web site www.hc-sc.gc.ca/rpb.
The term "IC:" before the certification/registration number only signifies that the Industry Canada technical
specifications were met.
Industry Canada (Canada)
Cet appareil est conforme à la norme RSS-210 d'Industry Canada. Son fonctionnement est soumis aux deux conditions
suivantes :
(1) cet appareil ne doit pas provoquer d'interférences et (2) il doit accepter toute interférence reçue, y compris celles
risquant d'altérer son fonctionnement.
Cet appareil a été conçu pour fonctionner uniquement avec l'antenne fournie. L'utilisation de toute autre antenne est
strictement interdite par la réglementation d'Industry Canada.
En application des réglementations d'Industry Canada, l'utilisation d'une antenne de gain supérieur est strictement
interdite.
Pour empêcher toute interférence radio au service faisant l'objet d'une licence, cet appareil doit être utilisé à l'intérieur
et loin des fenêtres afin de garantir une protection optimale.
Si le matériel (ou son antenne d'émission) est installé à l'extérieur, il doit faire l'objet d'une licence.
L'installateur de cet équipement radio doit veiller à ce que l'antenne soit implantée et dirigée de manière à n'émettre
aucun champ HF dépassant les limites fixées pour l'ensemble de la population par Santé Canada. Reportez-vous au
Code de sécurité 6 que vous pouvez consulter sur le site Web de Santé Canada www.hc-sc.gc.ca/rpb.
Notices
342
Le terme « IC » précédant le numéro de d'accréditation/inscription signifie simplement que le produit est conforme
aux spécifications techniques d'Industry Canada.
Notice to users in the European Union
Products bearing the CE mark are in conformity with the protection requirements of EC Council directives 2004/108/EC,
2006/95/EC, and 1999/5/EC on the approximation and harmonization of the laws of the Member States relating to
electromagnetic compatibility, safety of electrical equipment designed for use within certain voltage limits and on radio
equipment and telecommunications terminal equipment.
Compliance is indicated by the CE marking.
The manufacturer of this product is: Lexmark International, Inc., 740 West New Circle Road, Lexington, KY, 40550 USA.
The authorized representative is: Lexmark International Technology Hungária Kft., 8 Lechner Ödön fasor, Millennium
Tower III, 1095 Budapest HUNGARY, A declaration of conformity to the requirements of the Directives is available upon
request from the Authorized Representative.
This product satisfies the Class A limits of EN 55022 and safety requirements of EN 60950.
Products equipped with 2.4GHz Wireless LAN option are in conformity with the protection requirements of EC Council
directives 2004/108/EC, 2006/95/EC, and 1999/5/EC on the approximation and harmonization of the laws of the
Member States relating to electromagnetic compatibility, safety of electrical equipment designed for use within certain
voltage limits and on radio equipment and telecommunications terminal equipment.
Compliance is indicated by the CE marking.
Operation is allowed in all EU and EFTA countries, but is restricted to indoor use only.
The manufacturer of this product is: Lexmark International, Inc., 740 West New Circle Road, Lexington, KY, 40550 USA.
The authorized representative is: Lexmark International Technology Hungária Kft., 8 Lechner Ödön fasor, Millennium
Tower III, 1095 Budapest HUNGARY, A declaration of conformity to the requirements of the Directives is available upon
request from the Authorized Representative.
This product may be used in the countries indicated in the table below.
AT
BE
BG
CH
CY
CZ
DE
DK
EE
EL
ES
FI
FR
HR
HU
IE
IS
IT
LI
LT
LU
LV
MT
NL
NO
PL
PT
RO
SE
SI
SK
TR
UK
Česky
Společnost Lexmark International, Inc. tímto prohlašuje, že výrobek tento výrobek je ve shodě se základními
požadavky a dalšími příslušnými ustanoveními směrnice 1999/5/ES.
Dansk
Lexmark International, Inc. erklærer herved, at dette produkt overholder de væsentlige krav og øvrige relevante
krav i direktiv 1999/5/EF.
Notices
343
Deutsch
Hiermit erklärt Lexmark International, Inc., dass sich das Gerät dieses Gerät in Übereinstimmung mit den
grundlegenden Anforderungen und den übrigen einschlägigen Bestimmungen der Richtlinie 1999/5/EG
befindet.
Ελληνική
ΜΕ ΤΗΝ ΠΑΡΟΥΣΑ Η LEXMARK INTERNATIONAL, INC. ΔΗΛΩΝΕΙ ΟΤΙ ΑΥΤΟ ΤΟ ΠΡΟΪΟΝ
ΣΥΜΜΟΡΦΩΝΕΤΑΙ ΠΡΟΣ ΤΙΣ ΟΥΣΙΩΔΕΙΣ ΑΠΑΙΤΗΣΕΙΣ ΚΑΙ ΤΙΣ ΛΟΙΠΕΣ ΣΧΕΤΙΚΕΣ ΔΙΑΤΑΞΕΙΣ
ΤΗΣ ΟΔΗΓΙΑΣ 1999/5/ΕΚ.
English
Hereby, Lexmark International, Inc., declares that this type of equipment is in compliance with the
essential requirements and other relevant provisions of Directive 1999/5/EC.
Español
Por medio de la presente, Lexmark International, Inc. declara que este producto cumple con los requisitos
esenciales y cualesquiera otras disposiciones aplicables o exigibles de la Directiva 1999/5/CE.
Eesti
Käesolevaga kinnitab Lexmark International, Inc., et seade see toode vastab direktiivi 1999/5/EÜ
põhinõuetele ja nimetatud direktiivist tulenevatele muudele asjakohastele sätetele.
Suomi
Lexmark International, Inc. vakuuttaa täten, että tämä tuote on direktiivin 1999/5/EY oleellisten vaatimusten
ja muiden sitä koskevien direktiivin ehtojen mukainen.
Français
Par la présente, Lexmark International, Inc. déclare que l'appareil ce produit est conforme aux exigences
fondamentales et autres dispositions pertinentes de la directive 1999/5/CE.
Magyar
Alulírott, Lexmark International, Inc. nyilatkozom, hogy a termék megfelel a vonatkozó alapvetõ
követelményeknek és az 1999/5/EC irányelv egyéb elõírásainak.
Íslenska
Hér með lýsir Lexmark International, Inc. yfir því að þessi vara er í samræmi við grunnkröfur og aðrar
kröfur, sem gerðar eru í tilskipun 1999/5/EC.
Italiano
Con la presente Lexmark International, Inc. dichiara che questo questo prodotto è conforme ai requisiti
essenziali ed alle altre disposizioni pertinenti stabilite dalla direttiva 1999/5/CE.
Latviski
Ar šo Lexmark International, Inc. deklarē, ka šis izstrādājums atbilst Direktīvas 1999/5/EK būtiskajām
prasībām un citiem ar to saistītajiem noteikumiem.
Lietuvių
Šiuo Lexmark International, Inc. deklaruoja, kad šis produktas atitinka esminius reikalavimus ir kitas
1999/5/EB direktyvos nuostatas.
Malti
Bil-preżenti, Lexmark International, Inc., jiddikjara li dan il-prodott huwa konformi mal-ħtiġijiet
essenzjali u ma dispożizzjonijiet oħrajn relevanti li jinsabu fid-Direttiva 1999/5/KE.
Nederlands Hierbij verklaart Lexmark International, Inc. dat het toestel dit product in overeenstemming is met de essentiële
eisen en de andere relevante bepalingen van richtlijn 1999/5/EG.
Norsk
Lexmark International, Inc. erklærer herved at dette produktet er i samsvar med de grunnleggende krav og
øvrige relevante krav i direktiv 1999/5/EF.
Polski
Niniejszym Lexmark International, Inc. oświadcza, że niniejszy produkt jest zgodny z zasadniczymi
wymogami oraz pozostałymi stosownymi postanowieniami Dyrektywy 1999/5/EC.
Português
A Lexmark International Inc. declara que este este produto está conforme com os requisitos essenciais e outras
disposições da Diretiva 1999/5/CE.
Slovensky Lexmark International, Inc. týmto vyhlasuje, že tento produkt spĺňa základné požiadavky a všetky
príslušné ustanovenia smernice 1999/5/ES.
Slovensko Lexmark International, Inc. izjavlja, da je ta izdelek v skladu z bistvenimi zahtevami in ostalimi
relevantnimi določili direktive 1999/5/ES.
Svenska
Härmed intygar Lexmark International, Inc. att denna produkt står i överensstämmelse med de väsentliga
egenskapskrav och övriga relevanta bestämmelser som framgår av direktiv 1999/5/EG.
Notices
344
Statement of Limited Warranty
Lexmark X950de 4, x952dte 4, x954dhe 4
Lexmark International, Inc., Lexington, KY
This limited warranty applies to the United States and Canada. For customers outside the U.S., refer to the countryspecific warranty information that came with your product.
This limited warranty applies to this product only if it was originally purchased for your use, and not for resale, from
Lexmark or a Lexmark Remarketer, referred to in this statement as “Remarketer.”
Limited warranty
Lexmark warrants that this product:
—Is manufactured from new parts, or new and serviceable used parts, which perform like new parts
—Is, during normal use, free from defects in material and workmanship
If this product does not function as warranted during the warranty period, contact a Remarketer or Lexmark for repair
or replacement (at Lexmark's option).
If this product is a feature or option, this statement applies only when that feature or option is used with the product
for which it was intended. To obtain warranty service, you may be required to present the feature or option with the
product.
If you transfer this product to another user, warranty service under the terms of this statement is available to that user
for the remainder of the warranty period. You should transfer proof of original purchase and this statement to that
user.
Limited warranty service
The warranty period starts on the date of original purchase as shown on the purchase receipt and ends 12 months later
provided that the warranty period for any supplies and for any maintenance items included with the printer shall end
earlier if it, or its original contents, are substantially used up, depleted, or consumed.
To obtain warranty service you may be required to present proof of original purchase. You may be required to deliver
your product to the Remarketer or Lexmark, or ship it prepaid and suitably packaged to a Lexmark designated location.
You are responsible for loss of, or damage to, a product in transit to the Remarketer or the Lexmark designated location.
When warranty service involves the exchange of a product or part, the item replaced becomes the property of the
Remarketer or Lexmark. The replacement may be a new or repaired item.
The replacement item assumes the remaining warranty period of the original product.
Replacement is not available to you if the product you present for exchange is defaced, altered, in need of a repair not
included in warranty service, damaged beyond repair, or if the product is not free of all legal obligations, restrictions,
liens, and encumbrances.
Before you present this product for warranty service, remove all print cartridges, programs, data, and removable storage
media (unless directed otherwise by Lexmark).
For further explanation of your warranty alternatives and the nearest Lexmark authorized servicer in your area contact
Lexmark on the World Wide Web at http://support.lexmark.com.
Remote technical support is provided for this product throughout its warranty period. For products no longer covered
by a Lexmark warranty, technical support may not be available or only be available for a fee.
Notices
345
Extent of limited warranty
Lexmark does not warrant uninterrupted or error-free operation of any product or the durability or longevity of prints
produced by any product.
Warranty service does not include repair of failures caused by:
—Modification or unauthorized attachments
—Accidents, misuse, abuse or use inconsistent with Lexmark user’s guides, manuals, instructions or guidance
—Unsuitable physical or operating environment
—Maintenance by anyone other than Lexmark or a Lexmark authorized servicer
—Operation of a product beyond the limit of its duty cycle
—Use of printing media outside of Lexmark specifications
—Refurbishment, repair, refilling or remanufacture by a third party of products, supplies or parts
—Products, supplies, parts, materials (such as toners and inks), software, or interfaces not furnished by Lexmark
TO THE EXTENT PERMITTED BY APPLICABLE LAW, NEITHER LEXMARK NOR ITS THIRD PARTY SUPPLIERS OR
REMARKETERS MAKE ANY OTHER WARRANTY OR CONDITION OF ANY KIND, WHETHER EXPRESS OR IMPLIED, WITH
RESPECT TO THIS PRODUCT, AND SPECIFICALLY DISCLAIM THE IMPLIED WARRANTIES OR CONDITIONS OF
MERCHANTABILITY, FITNESS FOR A PARTICULAR PURPOSE, AND SATISFACTORY QUALITY. ANY WARRANTIES THAT
MAY NOT BE DISCLAIMED UNDER APPLICABLE LAW ARE LIMITED IN DURATION TO THE WARRANTY PERIOD. NO
WARRANTIES, EXPRESS OR IMPLIED, WILL APPLY AFTER THIS PERIOD. ALL INFORMATION, SPECIFICATIONS, PRICES,
AND SERVICES ARE SUBJECT TO CHANGE AT ANY TIME WITHOUT NOTICE.
Limitation of liability
Your sole remedy under this limited warranty is set forth in this document. For any claim concerning performance or
nonperformance of Lexmark or a Remarketer for this product under this limited warranty, you may recover actual
damages up to the limit set forth in the following paragraph.
Lexmark's liability for actual damages from any cause whatsoever will be limited to the amount you paid for the product
that caused the damages. This limitation of liability will not apply to claims by you for bodily injury or damage to real
property or tangible personal property for which Lexmark is legally liable. IN NO EVENT WILL LEXMARK BE LIABLE FOR
ANY LOST PROFITS, LOST SAVINGS, INCIDENTAL DAMAGE, OR OTHER ECONOMIC OR CONSEQUENTIAL DAMAGES.
This is true even if you advise Lexmark or a Remarketer of the possibility of such damages. Lexmark is not liable for any
claim by you based on a third party claim.
This limitation of remedies also applies to claims against any Suppliers and Remarketers of Lexmark. Lexmark's and its
Suppliers' and Remarketers' limitations of remedies are not cumulative. Such Suppliers and Remarketers are intended
beneficiaries of this limitation.
Additional rights
Some states do not allow limitations on how long an implied warranty lasts, or do not allow the exclusion or limitation
of incidental or consequential damages, so the limitations or exclusions contained above may not apply to you.
This limited warranty gives you specific legal rights. You may also have other rights that vary from state to state.
Notices
346
LEXMARK SOFTWARE LIMITED WARRANTY AND LICENSE AGREEMENT
PLEASE READ CAREFULLY BEFORE USING THIS PRODUCT: BY USING THIS PRODUCT, YOU AGREE TO BE BOUND BY ALL
THE TERMS AND CONDITIONS OF THIS SOFTWARE LIMITED WARRANTY AND LICENSE AGREEMENT. IF YOU DO NOT
AGREE WITH THE TERMS OF THIS SOFTWARE LIMITED WARRANTY AND LICENSE AGREEMENT, PROMPTLY RETURN THE
PRODUCT UNUSED AND REQUEST A REFUND OF THE AMOUNT YOU PAID. IF YOU ARE INSTALLING THIS PRODUCT FOR
USE BY OTHER PARTIES, YOU AGREE TO INFORM THE USERS THAT USE OF THE PRODUCT INDICATES ACCEPTANCE OF
THESE TERMS.
LEXMARK SOFTWARE LICENSE AGREEMENT
This License Agreement (“Software License Agreement”) is a legal agreement between you (either an individual or a
single entity) and Lexmark International, Inc. (“Lexmark”) that, to the extent your Lexmark product or Software Program
is not otherwise subject to a written software license agreement between you and Lexmark or its suppliers, governs
your use of any Software Program installed on or provided by Lexmark for use in connection with your Lexmark product.
The term “Software Program” includes machine-readable instructions, audio/visual content (such as images and
recordings), and associated media, printed materials and electronic documentation, whether incorporated into,
distributed with or for use with your Lexmark product.
1 STATEMENT OF SOFTWARE LIMITED WARRANTY. Lexmark warrants that the media (e.g., diskette or compact disk)
on which the Software Program (if any) is furnished is free from defects in materials and workmanship under normal
use during the warranty period. The warranty period is ninety (90) days and commences on the date the Software
Program is delivered to the original end-user. This limited warranty applies only to Software Program media
purchased new from Lexmark or an Authorized Lexmark Reseller or Distributor. Lexmark will replace the Software
Program should it be determined that the media does not conform to this limited warranty.
2 DISCLAIMER AND LIMITATION OF WARRANTIES. EXCEPT AS PROVIDED IN THIS SOFTWARE LICENSE AGREEMENT
AND TO THE MAXIMUM EXTENT PERMITTED BY APPLICABLE LAW, LEXMARK AND ITS SUPPLIERS PROVIDE THE
SOFTWARE PROGRAM "AS IS" AND HEREBY DISCLAIM ALL OTHER WARRANTIES AND CONDITIONS, EITHER EXPRESS
OR IMPLIED, INCLUDING, BUT NOT LIMITED TO, TITLE, NON-INFRINGEMENT, MERCHANTABILITY AND FITNESS FOR
A PARTICULAR PURPOSE, AND ABSENCE OF VIRUSES, ALL WITH REGARD TO THE SOFTWARE PROGRAM. TO THE
EXTENT LEXMARK CANNOT BY LAW DISCLAIM ANY COMPONENT OF THE IMPLIED WARRANTIES OF
MERCHANTABILITY OR FITNESS FOR A PARTICULAR PURPOSE, LEXMARK LIMITS THE DURATION OF SUCH
WARRANTIES TO THE 90-DAY TERM OF THE EXPRESS SOFTWARE LIMITED WARRANTY.
This Agreement is to be read in conjunction with certain statutory provisions, as that may be in force from time to
time, that imply warranties or conditions or impose obligations on Lexmark that cannot be excluded or modified.
If any such provisions apply, then to the extent Lexmark is able, Lexmark hereby limits its liability for breach of those
provisions to one of the following: providing you a replacement copy of the Software Program or reimbursement
of the price paid for the Software Program.
The Software Program may include internet links to other software applications and/or internet web pages hosted
and operated by third parties unaffiliated with Lexmark. You acknowledge and agree that Lexmark is not responsible
in any way for the hosting, performance, operation, maintenance, or content of, such software applications and/or
internet web pages.
3 LIMITATION OF REMEDY. TO THE MAXIMUM EXTENT PERMITTED BY APPLICABLE LAW, ANY AND ALL LIABILITY OF
LEXMARK UNDER THIS SOFTWARE LICENSE AGREEMENT IS EXPRESSLY LIMITED TO THE GREATER OF THE PRICE PAID
FOR THE SOFTWARE PROGRAM AND FIVE U.S. DOLLARS (OR THE EQUIVALENT IN LOCAL CURRENCY). YOUR SOLE
REMEDY AGAINST LEXMARK IN ANY DISPUTE UNDER THIS SOFTWARE LICENSE AGREEMENT SHALL BE TO SEEK TO
RECOVER ONE OF THESE AMOUNTS, UPON PAYMENT OF WHICH LEXMARK SHALL BE RELEASED AND DISCHARGED
OF ALL FURTHER OBLIGATIONS AND LIABILITY TO YOU.
IN NO EVENT WILL LEXMARK, ITS SUPPLIERS, SUBSIDIARIES, OR RESELLERS BE LIABLE FOR ANY SPECIAL, INCIDENTAL,
INDIRECT, EXEMPLARY, PUNITIVE, OR CONSEQUENTIAL DAMAGES (INCLUDING BUT NOT LIMITED TO LOST PROFITS
OR REVENUES, LOST SAVINGS, INTERRUPTION OF USE OR ANY LOSS OF, INACCURACY IN, OR DAMAGE TO, DATA
Notices
347
4
5
6
7
8
OR RECORDS, FOR CLAIMS OF THIRD PARTIES, OR DAMAGE TO REAL OR TANGIBLE PROPERTY, FOR LOSS OF PRIVACY
ARISING OUT OR IN ANY WAY RELATED TO THE USE OF OR INABILITY TO USE THE SOFTWARE PROGRAM, OR
OTHERWISE IN CONNECTION WITH ANY PROVISION OF THIS SOFTWARE LICENSE AGREEMENT), REGARDLESS OF
THE NATURE OF THE CLAIM, INCLUDING BUT NOT LIMITED TO BREACH OF WARRANTY OR CONTRACT, TORT
(INCLUDING NEGLIGENCE OR STRICT LIABILITY), AND EVEN IF LEXMARK, OR ITS SUPPLIERS, AFFILIATES, OR
REMARKETERS HAVE BEEN ADVISED OF THE POSSIBILITY OF SUCH DAMAGES, OR FOR ANY CLAIM BY YOU BASED
ON A THIRD-PARTY CLAIM, EXCEPT TO THE EXTENT THIS EXCLUSION OF DAMAGES IS DETERMINED LEGALLY INVALID.
THE FOREGOING LIMITATIONS APPLY EVEN IF THE ABOVE-STATED REMEDIES FAIL OF THEIR ESSENTIAL PURPOSE.
U.S.A. STATE LAWS. This Software Limited Warranty gives you specific legal rights. You may also have other rights
that vary from state to state. Some states do not allow limitations on how long an implied warranty lasts or the
exclusion of limitation of incidental or consequential damages, so the above limitations may not apply to you.
LICENSE GRANT. Lexmark grants you the following rights provided you comply with all terms and conditions of this
License Agreement:
a Use. You may Use one (1) copy of the Software Program. The term “Use” means storing, loading, installing,
executing, or displaying the Software Program. If Lexmark has licensed the Software Program to you for
concurrent use, you must limit the number of authorized users to the number specified in your agreement with
Lexmark. You may not separate the components of the Software Program for use on more than one computer.
You agree that you will not Use the Software Program, in whole or in part, in any manner that has the effect of
overriding, modifying, eliminating, obscuring, altering or de-emphasizing the visual appearance of any
trademark, trade name, trade dress or intellectual property notice that appears on any computer display screens
normally generated by, or as a result of, the Software Program.
b Copying. You may make one (1) copy of the Software Program solely for purposes of backup, archiving, or
installation, provided the copy contains all of the original Software Program’s proprietary notices. You may not
copy the Software Program to any public or distributed network.
c Reservation of Rights. The Software Program, including all fonts, is copyrighted and owned by Lexmark
International, Inc. and/or its suppliers. Lexmark reserves all rights not expressly granted to you in this License
Agreement.
d Freeware. Notwithstanding the terms and conditions of this License Agreement, all or any portion of the
Software Program that constitutes software provided under public license by third parties (“Freeware”) is
licensed to you subject to the terms and conditions of the software license agreement accompanying such
Freeware, whether in the form of a discrete agreement, shrink-wrap license, or electronic license terms at the
time of download. Use of the Freeware by you shall be governed entirely by the terms and conditions of such
license.
TRANSFER. You may transfer the Software Program to another end-user. Any transfer must include all software
components, media, printed materials, and this License Agreement and you may not retain copies of the Software
Program or components thereof. The transfer may not be an indirect transfer, such as a consignment. Prior to the
transfer, the end-user receiving the transferred Software Program must agree to all these License Agreement terms.
Upon transfer of the Software Program, your license is automatically terminated. You may not rent, sublicense, or
assign the Software Program except to the extent provided in this License Agreement, and any attempt to do so
shall be void.
UPGRADES. To Use a Software Program identified as an upgrade, you must first be licensed to the original Software
Program identified by Lexmark as eligible for the upgrade. After upgrading, you may no longer use the original
Software Program that formed the basis for your upgrade eligibility.
LIMITATION ON REVERSE ENGINEERING. You may not alter, decrypt, reverse engineer, reverse assemble, reverse
compile or otherwise translate the Software Program, except as and to the extent expressly permitted to do so by
applicable law for the purposes of inter-operability, error correction, and security testing. If you have such statutory
rights, you will notify Lexmark in writing of any intended reverse engineering, reverse assembly, or reverse
compilation. You may not decrypt the Software Program unless necessary for the legitimate Use of the Software
Program.
Notices
348
9 ADDITIONAL SOFTWARE. This License Agreement applies to updates or supplements to the original Software
10
11
12
13
14
15
16
17
18
19
Program provided by Lexmark unless Lexmark provides other terms along with the update or supplement.
TERM. This License Agreement is effective unless terminated or rejected. You may reject or terminate this license
at any time by destroying all copies of the Software Program, together with all modifications, documentation, and
merged portions in any form, or as otherwise described herein. Lexmark may terminate your license upon notice
if you fail to comply with any of the terms of this License Agreement. Upon such termination, you agree to destroy
all copies of the Software Program together with all modifications, documentation, and merged portions in any
form.
TAXES. You agree that you are responsible for payment of any taxes including, without limitation, any goods and
services and personal property taxes, resulting from this Agreement or your Use of the Software Program.
LIMITATION ON ACTIONS. No action, regardless of form, arising out of this Agreement may be brought by either
party more than two years after the cause of action has arisen, except as provided under applicable law.
APPLICABLE LAW. This Agreement is governed by the laws of the Commonwealth of Kentucky, United States of
America. No choice of law rules in any jurisdiction shall apply. The UN Convention on Contracts for the International
Sale of Goods shall not apply.
UNITED STATES GOVERNMENT RESTRICTED RIGHTS. The Software Program has been developed entirely at private
expense. Rights of the United States Government to use the Software Program is as set forth in this Agreement and
as restricted in DFARS 252.227-7014 and in similar FAR provisions (or any equivalent agency regulation or contract
clause).
CONSENT TO USE OF DATA. You agree that Lexmark, its affiliates, and agents may collect and use information you
provide in relation to support services performed with respect to the Software Program and requested by you.
Lexmark agrees not to use this information in a form that personally identifies you except to the extent necessary
to provide such services.
EXPORT RESTRICTIONS. You may not (a) acquire, ship, transfer, or reexport, directly or indirectly, the Software
Program or any direct product therefrom, in violation of any applicable export laws or (b) permit the Software
Program to be used for any purpose prohibited by such export laws, including, without limitation, nuclear, chemical,
or biological weapons proliferation.
AGREEMENT TO CONTRACT ELECTRONICALLY. You and Lexmark agree to form this License Agreement
electronically. This means that when you click the “Agree” or “Yes” button on this page or use this product, you
acknowledge your agreement to these License Agreement terms and conditions and that you are doing so with the
intent to “sign” a contract with Lexmark.
CAPACITY AND AUTHORITY TO CONTRACT. You represent that you are of the legal age of majority in the place you
sign this License Agreement and, if applicable, you are duly authorized by your employer or principal to enter into
this contract.
ENTIRE AGREEMENT. This License Agreement (including any addendum or amendment to this License Agreement
that is included with the Software Program) is the entire agreement between you and Lexmark relating to the
Software Program. Except as otherwise provided for herein, these terms and conditions supersede all prior or
contemporaneous oral or written communications, proposals, and representations with respect to the Software
Program or any other subject matter covered by this License Agreement (except to the extent such extraneous
terms do not conflict with the terms of this License Agreement, any other written agreement signed by you and
Lexmark relating to your Use of the Software Program). To the extent any Lexmark policies or programs for support
services conflict with the terms of this License Agreement, the terms of this License Agreement shall control.
MICROSOFT CORPORATION NOTICES
1 This product may incorporate intellectual property owned by Microsoft Corporation. The terms and conditions
upon which Microsoft is licensing such intellectual property may be found at
http://go.microsoft.com/fwlink/?LinkId=52369.
Notices
349
2 This product is based on Microsoft Print Schema technology. You may find the terms and conditions upon which
Microsoft is licensing such intellectual property at http://go.microsoft.com/fwlink/?LinkId=83288.
ADOBE SYSTEMS INCORPORATED NOTICE
Contains Flash®, Flash® Lite™ and/or Reader® technology by Adobe Systems Incorporated
This Product contains Adobe® Flash® player software under license from Adobe Systems Incorporated, Copyright ©
1995-2007 Adobe Macromedia Software LLC. All rights reserved. Adobe, Reader and Flash are trademarks of Adobe
Systems Incorporated.
Notices
350
Index
Numerics
1565 Emulation error, load
emulation option 297
1-tray module
installing 48
2,000-sheet high-capacity feeder
installing 48
2000-sheet high-capacity feeder
loading 77
201–202 paper jams 263
203 paper jam 265
230 paper jam 266
231 paper jam 267
24x paper jam 269
250 paper jam 271
280.06 Paper missing 296
281 paper jam 272
28y.xx paper jams 280
2yy.xx Close flatbed cover and load
originals if restarting job 296
31.xx Missing or Defective [color]
cartridge 288
32.xx [color] cartridge part number
unsupported by device 288
34 Incorrect paper size, check [paper
source] 288
34 Incorrect paper type, check
[paper source] 289
35 Insufficient memory to support
Resource Save feature 289
36 Printer service required 289
37 Insufficient memory for Flash
Memory Defragment
operation 289
37 Insufficient memory to collate
job 289
37 Insufficient memory, some Held
Jobs were deleted 289
38 Memory full 290
39 Complex page, some data may not
have printed 290
3-tray module
installing 48
40 [color] invalid refill, change
cartridge 290
455 staple jam 278
4yy.xx paper jams 274
51 Defective flash detected 290
52 Not enough free space in flash
memory for resources 290
520-sheet tray (standard or
optional)
loading 72
53 Unformatted flash detected 290
54 Network [x] software error 290
54 Serial option [x] error 291
54 Standard network software
error 291
55 Unsupported option in slot
[x] 291
56 Parallel port [x] disabled 291
56 Serial port [x] disabled 291
56 Standard parallel port
disabled 292
56 Standard USB port disabled 292
56 USB port [x] disabled 292
58 Too many disks installed 292
58 Too many flash options
installed 292
58 Too many trays attached 292
59 Incompatible tray [x] 293
61 Remove defective disk 293
62 Disk full 293
63 Unformatted disk 293
80 Replace fuser 293
80 Replace paper pick rollers in
[paper source] 294
80 Scanner maintenance
required 294
80 Scheduled maintenance [x] 294
80.xx Fuser life warning 293
82.xx Replace waste toner
bottle 294
82.xx Waste toner bottle
missing 294
82.xx Waste toner bottle nearly
full 294
83.xx Transfer module missing 295
84 unsupported [color]
photoconductor 294
84.xx [color] photoconductor
low 295
84.xx [color] photoconductor
missing 294
84.xx [color] photoconductor nearly
low 295
Index
351
84.xx Replace [color]
photoconductor 295
840.01 Scanner disabled by
admin 296
840.02 Scanner disabled. Contact
system administrator if problem
persists. 296
88 Replace [color] cartridge 295
88.xx [color] cartridge low 295, 296
A
accessing the Embedded Web
Server 22
accessing the system board 33
Active NIC menu 162
adding a date and time stamp 112
adding bookmarks
using the Embedded Web
Server 24
using the printer control panel 24
adding bookmarks from the printer
control panel 24
adding bookmarks using the
Embedded Web Server 24
ADF
copying using 105
Adjusting color 281
adjusting copy quality 109
adjusting Sleep Mode 67
adjusting toner darkness 96
advanced options, touch-screen
copy 115
e-mail 122
fax 135
FTP 142
scanning to computer 146
AppleTalk menu 167
application icon is missing 311
applications list
home screen 22
assigning a custom paper type
name 83
attaching cables 51
available internal options 33
avoiding paper jams 262
B
Bin Setup menu 160
black-and-white printing 96
blank pages 323
blocking junk faxes 133
Booklet Adjustments menu 232
buttons, printer control panel 16
buttons, touch screen
using 18
C
cables
Ethernet 51
USB 51
calling customer support 332
canceling
print job, from computer 104
canceling a print job
from a computer 104
from the printer control
panel 104
canceling an e-mail 120
cannot open Embedded Web
Server 332
card stock
loading in multipurpose feeder 79
tips 102
Change [paper source] to [custom
string] 281
Change [paper source] to [custom
string] load [orientation] 281
Change [paper source] to [custom
type name] 281
Change [paper source] to [custom
type name] load [orientation] 281
Change [paper source] to [paper
size] 282
Change [paper source] to [paper
size] [paper type] 282
Change [paper source] to [paper
size] [paper type] load
[orientation] 282
Change [paper source] to [paper
size] load [orientation] 282
Check [src] orientation or
guides 282
checking an unresponsive
printer 297
checking an unresponsive
scanner 303
checking printer status
on Embedded Web Server 259
checking printer status using the
Embedded Web Server 259
checking status of supplies 244
checking the status of supplies 244
checking the virtual display
using the Embedded Web
Server 260
checking virtual display
using the Embedded Web
Server 260
choosing a fax connection 125
cleaning
exterior of the printer 238
scanner glass 239
cleaning the printhead lenses 240
Close cover [x] 283
Close door [x] 283
collating copies 110
confidential print jobs 102
printing from a Macintosh
computer 103
printing from Windows 103
Confidential Print menu 176
configuration information
wireless network 54
Configure MP menu 154
configuring a destination
using the Embedded Web
Server 26
configuring e-mail settings 116
configuring port settings 61
connecting printer to distinctive ring
service 127
connecting the printer to
regional adapters 127
conservation settings
brightness, adjusting 68
Eco-Mode 66
Quiet Mode 67
Sleep Mode 67, 68
conserving supplies 65
contacting customer support 332
control panel, printer 16
copy quality
adjusting 109
copy screen
advanced options 115
options 113, 114, 115, 140
Copy Settings menu 189
copy troubleshooting
copier does not respond 301
partial document or photo
copies 303
poor copy quality 301
Index
352
poor scanned image quality 304
scanner unit does not close 301
copying
adding a date and time stamp 112
adding an overlay message 112
adjusting quality 109
canceling a copy job 112, 113
collating copies 110
custom job (job build) 111
different paper sizes 108
enlarging 109
multiple pages on one sheet 110
on both sides of the paper
(duplexing) 108
on letterhead 106
on transparencies 106
photos 106
placing separator sheets between
copies 110
quick copy 105
reducing 109
selecting a tray 107
to a different size 107
using the ADF 105
using the scanner glass
(flatbed) 106
copying different paper sizes 108
copying multiple pages on one
sheet 110
copying on both sides of the paper
(duplexing) 108
copying on letterhead 106
copying on transparencies 106
copying photos 106
corrupted printer hard disk 283
creating a fax destination shortcut
using the Embedded Web
Server 129
creating an FTP shortcut
using the Embedded Web
Server 138
creating profiles
using the ScanBack Utility 144
custom name
configuring 84
Custom Names menu 158
custom paper type name
creating 83
Custom Scan Sizes menu 159
Custom Type [x]
changing name 83
changing paper type 84
Custom Types menu 158
customizing My MFP settings 28
customizing the home screen using
the Embedded Web Server 22
D
date and time, fax
setting 128
daylight savings time, faxing 128
Default Source menu 150
delete profile, My MFP 29
destination
adding 26
deleting 26
editing 26
different paper sizes, copying 108
directory list
printing 104
disk wiping 236
Disk Wiping menu 177
display icons, home screen
applications
changing 24
display troubleshooting
display is blank 297
display shows only diamonds 297
display, printer control panel 16
adjusting brightness 68
disposing of printer hard disk 235
distinctive ring service, fax
connecting to 127
documents, printing
from Macintosh 96
from Windows 96
duplexing 108
E
Eco-Mode setting 66
Edit Security Setups menu 175
Embedded Web Server
accessing 22, 259
administrator settings 259
checking printer status 259
checking supplies 244
creating a fax destination
shortcut 129
creating an FTP shortcut 138
creating e-mail shortcuts 117
functions 259
initial fax setup 124
networking settings 259
problem accessing 332
setting up e-mail alerts 260
using 259
Embedded Web Server
Administrator's Guide
where to find 259
Embedded Web Server, using
remotely accessing the printer
control panel 28
emission notices 335, 338, 342, 343
Empty the hole punch box 283
encrypting the printer hard
disk 237
enlarging a copy 109
envelopes
loading in multipurpose feeder 79
tips 101
environmental settings
brightness, adjusting 68
conserving supplies 65
Eco-Mode 66
Hibernate Mode 68
Quiet Mode 67
Sleep Mode 67
erasing non-volatile memory 236
erasing printer hard disk
memory 236
erasing volatile memory 235
Error reading USB hub. Remove
hub. 283
Ethernet networking
Macintosh 59
Windows 59
Ethernet port 51
exporting a configuration
using the Embedded Web
Server 30
exporting a configuration using the
Embedded Web Server 30
exterior of the printer
cleaning 238
e-mail
canceling 120
e-mail alerts
low supply levels 260
paper jam 260
setting up 260
e-mail function
setting up 116
e-mail screen
advanced options 122
options 120, 121, 122
Index
353
E-mail Settings menu 204
e-mail shortcuts, creating
using the Embedded Web
Server 117
e-mail, sending
using a shortcut number 118
using the address book 118
using the touch screen 118
e-mailing
adding message line 119
adding subject line 119
changing output file type 119
configuring e-mail settings 116
creating shortcuts using the
Embedded Web Server 117
creating shortcuts using the touch
screen 117
setting up e-mail function 116
using a shortcut number 118
using the address book 118
using the touch screen 118
F
factory defaults
restoring 261
FAQ about color printing 329
fax and e-mail functions
setting up 305
fax and e-mail functions are not set
up 305
fax connection
connecting the printer to the wall
jack 125
connecting to a DSL line 126
connecting to a PBX or ISDN 126
fax connections
regional adapters 127
fax log
viewing 133
Fax memory full 283
Fax Mode (Analog Fax Setup)
menu 194
Fax Mode (Fax Server Setup)
menu 202
Fax partition inoperative. Contact
system administrator. 283
Fax port 51
fax screen
advanced options 135
options 134, 135
Fax server 'To Format' not set up.
Contact system administrator. 283
Fax Station Name not set up 284
Fax Station Number not set up 284
fax troubleshooting
caller ID is not shown 306
can receive but not send
faxes 308
can send but not receive
faxes 308
cannot send or receive a fax 306
received fax has poor print
quality 309
faxing
blocking junk faxes 133
canceling a fax job 133, 134
changing resolution 132
choosing a fax connection 125
configuring the printer to observe
daylight saving time 128
creating shortcuts using the
Embedded Web Server 129
creating shortcuts using the touch
screen 129
distinctive ring service 127
fax setup 124
forwarding faxes 136
holding faxes 136
making a fax lighter or darker 132
sending a fax 130
sending a fax at a scheduled
time 132
sending using the touch
screen 130
setting the date and time 128
setting the fax number or station
number 128
setting the outgoing fax name or
station name 128
viewing a fax log 133
FCC notices 335, 338, 342
features
Scan Center 144
fiber optic
network setup 59
finding more information about the
printer 9
finisher
finishing features 93
supported paper sizes 93
Finishing menu 221
firmware card
installing 37
flash drive
printing from 98
Flash Drive menu 213
flash drives
supported file types 99
flash memory card
installing 37
troubleshooting 315
font sample list
printing 103
Forms and Favorites
overview 23
forwarding faxes 136
FTP
scanning using address book 139
FTP address
creating shortcuts using the touch
screen 139
FTP screen
advanced options 142
options 140, 141
FTP Settings menu 209
G
General Settings menu 180
Green settings
Eco-Mode 66
Quiet Mode 67
green settings
Hibernate Mode 68
H
held jobs 102
printing from a Macintosh
computer 103
printing from Windows 103
Help menu 233
Hibernate Mode
using 68
holding faxes 136
home screen
applications 22
home screen application icons
configuring 26
home screen applications
changing display icons and
labels 24
configuring display icons and
labels 26
using 22
Index
354
home screen buttons and icons
description 17
home screen, customizing
using the Embedded Web
Server 22
how to use My MFP 29
HTML menu 231
I
icons, home screen applications
changing 24
configuring 26
Image menu 232
importing a configuration
using the Embedded Web
Server 30
importing a configuration using the
Embedded Web Server 30
initial fax setup 124
using the Embedded Web
Server 124
Insert hole punch box 284
Install Tray [x] 284
installing a memory card 35
installing an Internal Solutions
Port 38
installing on a wireless network
using Windows 55
installing options
order of installation 48
installing printer
on wireless network 55
installing printer hard disk 41
installing printer on a network
wired networking 59
installing printer on a wireless
network
using Macintosh 57
installing printer software 53
adding options 54
installing the 1-tray module 48
installing the 2,000-sheet
high-capacity feeder 48
installing the 3-tray module 48
installing the tandem-tray
module 48
internal print server
troubleshooting 315
Internal Solutions Port
changing port settings 61
installing 38
troubleshooting 315
IPv6 menu 166
J
jams
avoiding 262
locating jam areas 263
locations 263
numbers 263
jams, clearing
201–202 paper jams 263
203 paper jam 265
230 paper jam 266
231 paper jam 267
24x paper jam 269
250 paper jam 271
281 paper jam 272
28y.xx paper jams 280
455 staple jam 278
4yy.xx paper jams 274
Job Accounting menu 220
L
labels, paper
tips 101
letterhead
copying on 106
loading, 2000-sheet high-capacity
feeder 77
loading, multipurpose feeder 100
loading, trays 100
light colored line, white line, or
incorrectly colored line appears on
prints 320
light, indicator 16
linking trays 83
Load Manual Feeder with [custom
string] 286
Load Manual Feeder with [custom
type name] 285
Load Manual Feeder with [paper
size] 286
Load Manual Feeder with [paper
type] [paper size] 286
Load staples 286
loading
2000-sheet high-capacity
feeder 77
520-sheet tray (standard or
optional) 72
letterhead in 2000-sheet
high-capacity feeder 77
multipurpose feeder 79
optional 1,150-sheet tray 75
optional 850-sheet tray 75
loading card stock
in multipurpose feeder 79
loading envelopes
in multipurpose feeder 79
loading letterhead
paper orientation 100
loading the multipurpose feeder 79
loading the standard tray 72
loading transparencies
in multipurpose feeder 79
M
making copies using paper from
selected tray 107
Manual feeder expects [paper size].
Check [paper source] guides 286
max speed
using 97
max yield
using 97
memory
types installed on printer 235
memory card
installing 35
troubleshooting 315
Memory full, cannot print
faxes 287
menu settings page
printing 52
menus
Active NIC 162
AppleTalk 167
Bin Setup 160
Booklet Adjustments 232
Confidential Print 176
Configure MP 154
Copy Settings 189
Custom Names 158
Custom Scan Sizes 159
Custom Types 158
Default Source 150
diagram of 147
Disk Wiping 177
Edit Security Setups 175
E-mail Settings 204
Fax Mode (Analog Fax Setup) 194
Fax Mode (Fax Server Setup) 202
Finishing 221
Flash Drive 213
Index
355
FTP Settings 209
General Settings 180
Help 233
HTML 231
Image 232
IPv6 166
Job Accounting 220
Miscellaneous 175
Network [x] 162
Network Card 164
Network Reports 164
Paper Loading 156
Paper Size/Type 151
Paper Texture 154
Parallel [x] 169
PCL Emul 228
PDF 227
PostScript 227
Quality 223
Reports 161
Security Audit Log 178
Serial [x] 171
Set Date/Time 179
Settings 218
SMTP Setup menu 174
Standard Network 162
Standard USB 168
Substitute Size 154
Supplies 148
TCP/IP 165
Universal Setup 159
Utilities 226
Wireless 166
XPS 227
menus diagram 147
Miscellaneous menu 175
moving the printer 257, 258
moving your printer 10
multipurpose feeder
loading 79
My MFP
deleting your profile 29
setting up 28
troubleshooting, forgot
password 313
using 29
My MFP settings
customizing 28
My MFP Setup Wizard
using 28
N
P
Network [x] menu 162
Network Card menu 164
Network Reports menu 164
network setup page
printing 53
Networking Guide
where to find 259
noise emission levels 335
non-volatile memory 235
erasing 236
notices 334, 335, 336, 337, 338,
339, 340, 341, 342, 343
paper
characteristics 85
different sizes, copying 108
finishing features 93
letterhead 86
preprinted forms 86
recycled 87
saving 110
selecting 86
storing 88
unacceptable 86, 87
Universal size setting 71
using recycled 65
paper feed troubleshooting
message remains after jam is
cleared 317
paper jams
avoiding 262
paper jams, clearing
201–202 paper jams 263
203 paper jam 265
230 paper jam 266
231 paper jam 267
24x paper jam 269
250 paper jam 271
281 paper jam 272
28y.xx paper jams 280
4yy.xx paper jams 274
Paper Loading menu 156
paper size
setting 71
Paper Size/Type menu 151
paper sizes
supported 89
Paper Texture menu 154
paper type
setting 71
paper types
duplex support 91
supported by printer 91
supported by the finisher 91
where to load 91
Parallel [x] menu 169
PCL Emul menu 228
PDF menu 227
photoconductor unit
replacing 246
photoconductor units
ordering 245
O
optional 1,150-sheet tray
loading 75
optional 850-sheet tray
loading 75
options
1-tray module, installing 48
2,000-sheet high-capacity feeder,
installing 48
3-tray module, installing 48
firmware card 37
firmware cards 33
flash memory card 37
Internal Solutions Port,
installing 38
list 33
memory card, installing 35
memory cards 33
order of installation 48
printer hard disk, installing 41
printer hard disk, removing 46
tandem-tray module, installing 48
updating in printer driver 54
options, touch-screen
copy 113, 114, 115, 140
e-mail 120, 121, 122
fax 134, 135
FTP 140, 141
scan 145
scan to computer 145, 146
ordering
staple cartridges 245
toner cartridges 244
waste toner bottle 245
ordering photoconductor units 245
output file type
changing 119
Index
356
photos
copying 106
placing separator sheets between
copies 110
port
Ethernet 51
Fax 51
Telephone 51
USB 51
port settings
configuring 61
PostScript menu 227
Power off, wait 2 seconds, power
on 287
preferences, My MFP
deleting your profile 29
print job
canceling, from computer 104
print quality
cleaning the scanner glass 239
replacing a photoconductor
unit 246
print quality troubleshooting
black streaks on a page 325
blank pages 323
characters have jagged edges 317
clipped images 317
fine horizontal lines 318
gray background 319
light colored line, white line, or
incorrectly colored line appears
on prints 320
poor transparency quality 329
print irregularities 321
print is too dark 321
print is too light 322
repeating defects appear on a
page 324
shadow images appear on
prints 318
skewed print 324
solid color pages 325
streaked horizontal lines appear on
prints 326
streaked vertical lines on
prints 327
toner fog or background shading on
the page 327
toner rubs off 328
toner specks 329
white streaks on a page 325
print quality, troubleshooting
cleaning the printhead lenses 240
print troubleshooting
error reading flash drive 297
held jobs do not print 299
incorrect characters print 300
incorrect margins 319
jammed pages are not
reprinted 317
job prints from wrong tray 300
job prints on wrong paper 300
jobs do not print 298
Large jobs do not collate 300
multiple-language PDF files do not
print 297
paper curl 320
paper frequently jams 316
print job takes longer than
expected 299
tray linking does not work 300
unexpected page breaks
occur 301
printer
basic model 12
fully configured 12
minimum clearances 10
moving 10, 257, 258
selecting a location 10
shipping 258
turning on 32
printer configurations 12
printer control panel 16
adjusting brightness 68
factory defaults, restoring 261
remotely accessing using the
Embedded Web Server 28
printer hard disk
disposing of 235
encrypting 237
installing 41
removing 46
troubleshooting 315
wiping 236
printer hard disk encryption 237
printer hard disk memory
erasing 236
printer information
where to find 9
printer messages
1565 Emulation error, load
emulation option 297
280.06 Paper missing 296
2yy.xx Close flatbed cover and load
originals if restarting job 296
31.xx Missing or Defective [color]
cartridge 288
32.xx [color] cartridge part number
unsupported by device 288
34 Incorrect paper size, check
[paper source] 288
34 Incorrect paper type, check
[paper source] 289
35 Insufficient memory to support
Resource Save feature 289
36 Printer service required 289
37 Insufficient memory for Flash
Memory Defragment
operation 289
37 Insufficient memory to collate
job 289
37 Insufficient memory, some Held
Jobs were deleted 289
38 Memory full 290
39 Complex page, some data may
not have printed 290
40 [color] invalid refill, change
cartridge 290
51 Defective flash detected 290
52 Not enough free space in flash
memory for resources 290
53 Unformatted flash
detected 290
54 Network [x] software error 290
54 Serial option [x] error 291
54 Standard network software
error 291
55 Unsupported option in slot
[x] 291
56 Parallel port [x] disabled 291
56 Serial port [x] disabled 291
56 Standard parallel port
disabled 292
56 Standard USB port
disabled 292
56 USB port [x] disabled 292
58 Too many disks installed 292
58 Too many flash options
installed 292
58 Too many trays attached 292
59 Incompatible tray [x] 293
61 Remove defective disk 293
62 Disk full 293
63 Unformatted disk 293
80 Replace fuser 293
Index
357
80 Replace paper pick rollers in
[paper source] 294
80 Scanner maintenance required,
use ADF kit 294
80 Scheduled maintenance
[x] 294
80.xx Fuser life warning 293
82.xx Replace waste toner
bottle 294
82.xx Waste toner bottle
missing 294
82.xx Waste toner bottle nearly
full 294
83.xx Transfer module
missing 295
84 Replace black pc unit 246
84 Replace color pc units 246
84 unsupported [color]
photoconductor 294
84.xx [color] photoconductor
low 295
84.xx [color] photoconductor
missing 294
84.xx [color] photoconductor
nearly low 295
84.xx Replace [color]
photoconductor 295
840.01 Scanner disabled by
admin 296
840.02 Scanner disabled. Contact
system administrator if problem
persists. 296
88 Replace [color] cartridge 295
88.xx [color] cartridge
low 295, 296
Adjusting color 281
Change [paper source] to [custom
string] 281
Change [paper source] to [custom
string] load [orientation] 281
Change [paper source] to [custom
type name] 281
Change [paper source] to [custom
type name] load
[orientation] 281
Change [paper source] to [paper
size] 282
Change [paper source] to [paper
size] [paper type] 282
Change [paper source] to [paper
size] [paper type] load
[orientation] 282
Change [paper source] to [paper
size] load [orientation] 282
Check [src] orientation or
guides 282
Close cover [x] 283
Close door [x] 283
Disk corrupted 283
Empty the hole punch box 283
Error reading USB hub. Remove
hub. 283
Fax memory full 283
Fax partition inoperative. Contact
system administrator. 283
Fax server 'To Format' not set up.
Contact system
administrator. 283
Fax Station Name not set up 284
Fax Station Number not set
up 284
Insert hole punch box 284
Insert Tray [x] 284
Install Tray [x] 284
Load [src] with [custom
string] 285
Load [src] with [custom type
name] 285
Load [src] with [size] 285
Load [src] with [type] [size] 285
Load Manual Feeder with [custom
string] 286
Load Manual Feeder with [custom
type name] 285
Load Manual Feeder with [paper
size] 286
Load Manual Feeder with [paper
type] [paper size] 286
Load staples 286
Manual feeder expects [paper size].
Check [paper source] guides 286
Memory full, cannot print
faxes 287
Power off, wait 2 seconds, power
on 287
Remove paper from [linked bin set
name] 287
Remove paper from all bins 287
Remove paper from bin [x] 287
Remove paper from standard
output bin 287
Restore Held Jobs? 287
Scan Document Too Long 287
Scanner ADF Cover Open 287
SMTP server not set up. Contact
system administrator. 288
Some held jobs were not
restored 288
Unsupported disk 288
Unsupported USB device, please
remove 283
Unsupported USB hub, please
remove 283
printer options troubleshooting
2,000-sheet drawer problems 314
cannot detect flash memory
card 315
cannot detect printer hard
disk 315
internal print server 315
Internal Solutions Port 315
memory card 315
option does not work 313
paper tray problems 314
USB/parallel interface card 316
printer problems, solving basic 297
printer software
installing 53
printhead lenses
cleaning 240
printing
black-and-white 96
canceling, from printer control
panel 104
directory list 104
font sample list 103
forms 25
from flash drive 98
from Macintosh 96
from Windows 96
max speed and max yield 97
menu settings page 52
network setup page 53
printing a directory list 104
printing a document 96
printing a font sample list 103
printing a menu settings page 52
printing a network setup page 53
printing confidential and other held
jobs
from a Macintosh computer 103
from Windows 103
printing forms 25
printing from a flash drive 98
printing in black and white 96
Index
358
publications
where to find 9
Q
Quality menu 223
Quiet Mode
print quality troubleshooting 318
R
recycled paper
using 65, 87
recycling
Lexmark packaging 69
Lexmark products 69
toner cartridges 70
WEEE statement 336
reducing a copy 109
reducing printer noise 67
Remote Operator Panel
setting up 27
Remove paper from [linked bin set
name] 287
Remove paper from all bins 287
Remove paper from bin [x] 287
Remove paper from standard output
bin 287
removing printer hard disk 46
repeat print jobs 102
printing from a Macintosh
computer 103
printing from Windows 103
replacing a toner cartridge 251
replacing supplies
toner cartridge 251
waste toner bottle 253
replacing the waste toner
bottle 253
reports
viewing 260
Reports menu 161
reserve print jobs 102
printing from a Macintosh
computer 103
printing from Windows 103
resolution, fax
changing 132
Restore Held Jobs? 287
restoring factory default
settings 261
S
safety information 7, 8
saving paper 110
Scan Center features 144
Scan Document Too Long 287
scan screen
advanced options 146
options 145
scan to computer
options 145, 146
original size 145
paper orientation, setting 146
Scan to Network
supported operating systems 25
scan troubleshooting
cannot scan from a computer 305
partial document or photo
scans 305
scan was not successful 304
scanner unit does not close 301
scanning takes too long or freezes
the computer 304
ScanBack Utility
using 144
scanner
Automatic Document Feeder
(ADF) 15
functions 14
scanner glass 15
Scanner ADF Cover Open 287
scanner glass
cleaning 239
scanner glass (flatbed)
copying using 106
scanning
from a flash drive 144
quick copy 105
to a computer 143
to an FTP address 139
to an FTP, using address book 139
scanning documents at the
printer 27
scanning to a computer 143
scanning to a flash drive 144
scanning to an FTP address
creating shortcuts using the
computer 138
using shortcut numbers 139
using the address book 139
using the touch screen 139
Security Audit Log menu 178
selecting a location for the
printer 10
sending a fax 130
sending a fax using shortcuts 131
sending a fax using the touch
screen 130
sending fax
using shortcuts 131
using the address book 131
sending fax at a scheduled
time 132
sending fax using the address
book 131
Serial [x] menu 171
serial printing
setting up 63
Set Date/Time menu 179
setting
TCP/IP address 165
setting the fax number or station
number 128
setting the outgoing fax name or
station name 128
setting the paper size 71
setting the paper type 71
setting the Universal paper size 71
setting up e-mail alerts using the
Embedded Web Server 260
setting up fax and e-mail
functions 305
setting up My MFP 28
setting up serial printing 63
setting up the printer
on a wired network
(Macintosh) 59
on a wired network (Windows) 59
setting up the Remote Operator
Panel 27
setting up WS-Scan 30
Settings menu 218
settings, My MFP
deleting your profile 29
shadow images appear on
prints 318
shipping the printer 258
shortcuts, creating
e-mail 117
fax destination 129
FTP address 139
FTP destination 138
Sleep Mode
adjusting 67
Index
359
SMTP server not set up. Contact
system administrator. 288
SMTP Setup menu 174
Some held jobs were not
restored 288
Standard Network menu 162
standard tray
loading 72
Standard USB menu 168
staple cartridges
ordering 245
staple jam, clearing
455 staple jam 278
statement of volatility 235
status of supplies
checking 244
storing
paper 88
supplies 243
storing print jobs 102
streaked horizontal lines appear on
prints 326
streaks appear on a page 325
subject and message information
adding to e-mail 119
Substitute Size menu 154
supplies
checking status 244
checking, from printer control
panel 244
checking, using the Embedded Web
Server 244
conserving 65
storing 243
using recycled paper 65
Supplies menu 148
supplies, ordering
photoconductor units 245
staple cartridges 245
toner cartridges 244
waste toner bottle 245
supported flash drives 99
supported paper sizes 89
supported paper types and
weights 91
system board
accessing 33
system board cover
reattaching 33
T
tandem-tray module
installing 48
TCP/IP menu 165
telecommunication
notices 338, 339, 340, 341
Telephone port 51
tips
card stock 102
envelopes 101
labels, paper 101
on using letterhead 100
on using transparencies 100
tips on using letterhead 100
toner cartridge
replacing 251
toner cartridges
ordering 244
recycling 70
toner darkness
adjusting 96
toner fog or background shading
appears on the page 327
toner rubs off 328
toner specks 329
touch screen
buttons 18
transparencies
copying on 106
loading 100
loading in multipurpose feeder 79
tips on using 100
using 100
tray linking
assigning a custom paper type
name 83
tray unlinking
assigning a custom paper type
name 83
trays
linking 83
unlinking 83
troubleshooting
A network destination stopped
working or is invalid 310
an application error has
occurred 309
application icon is missing 311
cannot open Embedded Web
Server 332
checking an unresponsive
printer 297
checking an unresponsive
scanner 303
contacting customer support 332
error reading USB drive 313
FAQ about color printing 329
fax and e-mail functions are not set
up 305
forgot My MFP password 313
Forms are not available or are not
working 310
nothing happens when USB drive is
inserted 313
printer cannot scan to selected
destination 312
Scan to Network 310
solving basic printer
problems 297
troubleshooting, copy
copier does not respond 301
partial document or photo
copies 303
poor copy quality 301
poor scanned image quality 304
scanner unit does not close 301
troubleshooting, display
display is blank 297
display shows only diamonds 297
troubleshooting, fax
caller ID is not shown 306
can receive but not send
faxes 308
can send but not receive
faxes 308
cannot send or receive a fax 306
received fax has poor print
quality 309
troubleshooting, paper feed
message remains after jam is
cleared 317
troubleshooting, print
error reading flash drive 297
held jobs do not print 299
incorrect characters print 300
incorrect margins 319
jammed pages are not
reprinted 317
job prints from wrong tray 300
job prints on wrong paper 300
jobs do not print 298
Large jobs do not collate 300
Index
360
multiple-language PDF files do not
print 297
paper curl 320
paper frequently jams 316
print job takes longer than
expected 299
tray linking does not work 300
unexpected page breaks
occur 301
troubleshooting, print quality
black streaks on a page 325
blank pages 323
characters have jagged edges 317
clipped images 317
fine horizontal lines 318
gray background 319
light colored line, white line, or
incorrectly colored line appears
on prints 320
poor transparency quality 329
print irregularities 321
print is too dark 321
print is too light 322
repeating defects appear on a
page 324
shadow images appear on
prints 318
skewed print 324
solid color pages 325
streaked horizontal lines appear on
prints 326
streaked vertical lines on
prints 327
toner fog or background shading on
the page 327
toner rubs off 328
toner specks 329
white streaks on a page 325
troubleshooting, printer options
2,000-sheet drawer problems 314
cannot detect flash memory
card 315
cannot detect printer hard
disk 315
internal print server 315
Internal Solutions Port 315
memory card 315
option does not work 313
paper tray problems 314
USB/parallel interface card 316
troubleshooting, scan
cannot scan from a computer 305
partial document or photo
scans 305
scan was not successful 304
scanner unit does not close 301
scanning takes too long or freezes
the computer 304
turning on the printer 32
U
understanding the home screen
buttons and icons 17
Universal Paper Size
setting 71
Universal Setup menu 159
unlinking trays 83
Unsupported disk 288
Unsupported USB device, please
remove 283
Unsupported USB hub, please
remove 283
updating options in printer
driver 54
usb drive
error reading 313
nothing happens when
inserted 313
USB port 51
USB/parallel interface card
troubleshooting 316
using Eco-Mode 66
using Forms and Favorites 25
using Hibernate Mode 68
using max speed and max yield 97
using My MFP 29
using Quiet Mode 67
using recycled paper 65
using shortcuts
sending fax 131
using the address book 118
sending fax 131
using the Embedded Web
Server 259
using the ScanBack Utility 144
using the touch-screen buttons 18
Utilities menu 226
viewing
reports 260
viewing a fax log 133
virtual display
checking, using Embedded Web
Server 260
volatile memory 235
erasing 235
volatility
statement of 235
W
waste toner bottle
ordering 245
replacing 253
wiping the printer hard disk 236
wired network setup
using Macintosh 59
using Windows 59
Wireless menu 166
wireless network
configuration information 54
installation, using Macintosh 57
installation, using Windows 55
wireless network setup
in Windows 55
wireless printer setup
in Macintosh 57
WS-Scan
setting up 30
X
XPS menu 227
V
verify print jobs 102
printing from a Macintosh
computer 103
printing from Windows 103
Index
361