1
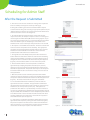
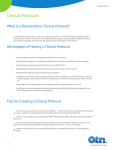
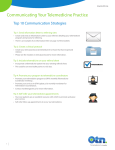
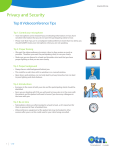
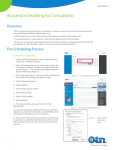
www.otn.ca
Scheduling for Admin Staff
Overview
Once the Consultant’s Admin has been trained in Ncompass (OTN’s scheduling software), they will
have full capability to schedule telemedicine appointments on their own. This allows for greater
autonomy and convenience in managing patient appointments and establishing the telemedicine
practice for the consultant.
The Scheduling Process
Follow these simple steps:
1. Ensure that the Consultant’s Admin or delegate has been
provisioned for NCompass training. If you have not been provisioned
and are interested in using Ncompass please contact your regional
manager to be enrolled in the Ncompass Training Course. If you
are not sure who your regional manager is please contact OTN at:
[email protected].
Once the Consultant’s Admin completes the training course they
will receive Ncompass privileges and their Ncompass username
and password via email. They will now be able to schedule clinical,
educational or administrative telemedicine events.
2. To schedule a clinical appointment, the Consultant’s Admin logs
into NCompass and selects the appropriate type of event. Therer are
2 available options for scheduling clinical telemedicine appointments:
(i) For single events select “Create Point-to-Point” in the Clinical
Events tab on the left of the page (Figure 1).
(ii) To schedule multiple events select “Create Ncompass Clinic” in
the Clinical Events tab (Figure 1).
Figure 1:
Create a Point-to-Point Event
3. The Consultant’s Admin completes the appointment details.
Required fields are marked with an asterisk and include:
a. Requestor and Consultant names
b. Event and Appointment type
c. Clinic Type (Ncompass Clinics only)
d. Purpose of appointment and priority
e. The date, start and end times of the event
Figure 2:
Consultant Coordinator Contacts Patient
f. Patient first/last name, gender and age group (Point-to-Point only)
g. Consultant system
h. Select the box indicating that the consultant coordinator will
contact the patient (Figure 2).
i. Make sure to save the request as “Draft” if you are continuing to
work on arranging the appointment
1

Te lemedicine’s Leader
www.otn.ca
Scheduling for Admin Staff
After the Request is Submitted
4. The event is now saved as a draft and a message “This request has
been successfully saved” appears at the top of the page.
If during the scheduling process the Consultant’s Admin requires
assistance with locating and contacting an appropriate patient site, the
“Request Assistance” button can be selected in the Event Toolbar after
the event has been saved as a draft (Figure 3).
5. An email window will appear (Figure 4). Please indicate your
request in the email, for example: “I require assistance in locating and
contacting the site in Geraldton, ON that has nursing support.” If you
are arranging an Ncompass Clinic, it is especially important to indicate
what area in Ontario you are attempting to connect with as this
information will not be in Ncompass if the patient site is not selected.
Figure 3:
Request Assistance Button
Figure 4:
Request Assistance Email
6. The request is sent to OTN’s Contact Centre. The Contact Centre will
locate and contact the patient site for availability. The appropriate
site will be selected and populated in the Ncompass event. Contact
information for the Telemedicine Coordinator at the site will be
provided under “Contact Name” and “Contact Info.”
7. Through the use of the “Notify Participants” button the Contact
Centre notifies the Consultant’s Admin via email that the scheduling
request has been fulfilled. In Ncompass, the “Event Approval” tab on
the right will show a checkmark next to the Patient System Approval
(Figure 5). The Consultant’s Admin can now contact the patient.
8. The Consultant’s Admin contacts the patient to confirm the
appointment by notifying the patient of the date, time, location,
direction to site and any other pertinent information relating to the
telemedicine appointment. The patient letter may be sent out by the
Consultant’s Admin if there are more than 5 days prior to the start of
the appointment.
9. Once the patient has been confirmed, the Consultant’s Admin
confirms the event in Ncompass by clicking the “Confirm” button under
the question “Patient Has Been Contacted?” in the Event Approval box
(Figure 5). The status of the event will change to “Scheduled.”
Figure 5:
Confirm the Patient was Contacted
Figure 6:
Click the Cancel Button in Event Tool Bar
10. The Consultant Admin then notifies the patient site that the
appointment has been scheduled. The appointment confirmation
may be faxed to the patient site and may include any other necessary
information (ex: clinical protocols, forms, etc). If the patient site
provided an email address as a preferred way of contact and there is
no necessary supporting documentation for the appointment, the site
may be notified of the confirmation via the “Notify Participants” button
in the Event Tool Bar. Please note that the Contact Centre will not be
sending confirmations to patient sites as the event will not yet be in
the scheduled state upon site approval.
11. If the event is cancelled the Consultant’s Admin must cancel the
appointment in Ncompass by clicking the “Cancel” button (Figure 6).
The patient and patient site must also be contacted to inform them
of the cancellation. To recoordinate the event the Consulant’s Admin
contacts the site directly to request a new date and time.
2

Te lemedicine’s Leader