1
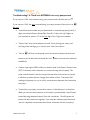
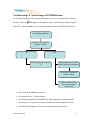
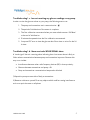
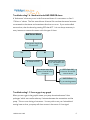
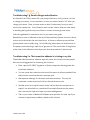
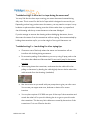
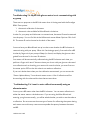
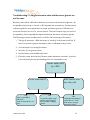
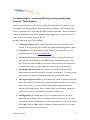
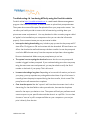
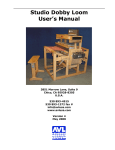
Troubleshooting Guide for the Paradigm REAL Time system.
This troubleshooting guide was created to assist Paradigm REAL Time users with some
of the common issues they may encounter during the initial set up and use of the
sensor portion of the system.
How to use this Guide:
1.
Identify the main problem
2.
Go to the troubleshooting page and follow the suggestions
3.
Refer to your user guide and 1-800 technical support line if you continue to
experience issues related to your pump system.
Who can you call?
•
Your certified pump or sensor trainer
•
A Medtronic Diabetes Nurse Specialist from your region
•
Canadian Customer service 1-800-284-4416 (EST business hours, for nontechnical issues)
•
1-800-Technical support line (24/7) located on the back of your pump.
Before using this troubleshooting guide, please refer to the materials included in the
package with your pump:
•
Pump User Guide
•
Sensor User Guide
•
Patient Reference Guide
J.Milliken RN CDE
1
Table of Contents:
1.
2.
3.
Daily sensor use
a) There is no ANTENNA icon on my pump screen
p.3
b) I am receiving a LOST SENSOR alarm
p. 4
c) I am not receiving any glucose readings on my pump.
P.5
d) I have received a WEAK SIGNAL alarm
p.5
e) I have received a BAD SENSOR alarm
p.6
f) I have a gap in my graph
p.6
g) Sensor changes and calibrations
p.7
Skin and Taping:
a) The transmitter adhesive is irritating to my skin
p.7
b) How can I re-tape during the sensor use?
P.8
c) I am looking for other taping tips.
P.8
Calibration:
a) My BD Link glucose meter is not communicating with my pump
p.9
b) I want to enter calibrations manually using an alternate meter
p.9
c) My glucose meter value and the sensor glucose are not the same p.10
4..
Software:
a) I am having difficulty accessing the data using Solutions P&M
p.11
b) I am having difficulty using the CareLink™ website
p.12
J.Milliken RN CDE
2
Troubleshooting 1. a: There is no ANTENNA icon on my pump screen
If your sensor is “ON” and communicating, your pump screen will show this icon
If your sensor is “ON” but not communicating, your pump screen will show this icon
No icon:
•
Transmitter serial number may not be entered (or entered improperly) Verify 7
digits are entered: Sensor>Setup>Edit>Trans ID. If there are only 6 digits on
your transmitter, place a “0” as the first digit of the 7 digit serial number.
•
“Sensor start” may not have been activated. After placing your sensor and
verifying all the settings, go to “sensor start” then “new sensor”
•
This icon
will show on the pump screen for several minutes with each new
sensor start and then the icon should turn into
when communication has been
established.
•
A sensor input signal (ISIG) will show a number value in the Sensor Status screen
(ESC) if the sensor and transmitter are communicating with the pump. This
value is also blocked for the first several minutes after a new sensor is started.
It will show up when the icon changes from white to black. The sensor ISIG
reading on the pump is a way to verify communication between the transmitter
and pump.
•
Transmitter not properly connected to sensor or failed battery in transmitter.
When you connect the transmitter to the sensor you should hear a small “beep”
sound indicating adequate battery life in the transmitter. Carefully press the
sensor and the transmitter together, if you now hear a beep sound, the sensor
was not completely connected and would not communicate with your pump.
J.Milliken RN CDE
3
Troubleshooting 1. b. I am receiving a LOST SENSOR alarm
A lost sensor means that the pump and transmitter are not in communication with one
another. This icon
will appear on the pump screen. Clear the alarm by pressing ESC
then ACT. Follow the below chart to determine the nature of the LOST Sensor alarm.
Lost Sensor Alarm
Have you received any
glucose values?
No
Yes
Verify Settings as in section
1.a.
Reposition pump on same
side of body as transmitter
Verify ISIG is present in
“sensor status”
Observe sensor site: is
sensor still in place?
Connected?
•
Clear alarm & troubleshoot as above.
•
Go to sensor start – “find lost sensor”
•
You may be prompted to “Enter BG Now” when the system resumes normal
functioning. It is important to enter the calibration when requested to do so.
•
Call the technical support line for any unresolved lost sensor alarms.
J.Milliken RN CDE
4
Troubleshooting 1. c. I am not receiving any glucose readings on my pump.
In order to view the glucose values on your pump, the following must occur:
1. The pump and transmitter are in communication (
)
2. The period of initialization of the sensor is complete
3. The first calibration was entered when you were asked to enter a “BG Now”
at the end of initialization.
4. 10 minutes has passed since the first calibration was entered.
5. You press ESC once to view the glucose data 3 hour view or twice for the 24
hr view.
Troubleshooting 1. d. I have received a WEAK SIGNAL alarm
A “weak signal” alarm is a warning alarm indicating that a lost sensor alarm is likely to
follow unless communication between pump and transmitter improves. Reasons this
may occur include:
•
Interference between other radio frequency devices (RF) in close proximity.
•
Distance between transmitter and pump > 6ft
•
Pump and transmitter communication hampered or blocked
1) Reposition pump on same side of body as transmitter.
2) Remove or distance yourself from any objects which could be causing interference
such as an optical mouse or cell phone.
J.Milliken RN CDE
5
Troubleshooting 1. e. I have received a BAD SENSOR alarm
A “bad sensor” alarm may occur in the first several hours of a new sensor or after 2
“CAL error” alarms. The first several hours of sensor life are when the sensor becomes
accustomed to the tissues and sometimes this alarm can occur. If you receive a Bad
sensor alarm, clear the alarm by pressing ESC then ACT. It is not always necessary in
every instance to remove the sensor with this type of alarm.
Bad Sensor Alarm
Is the sensor less than
12 hours old?
Yes
No
Is there an ISIG?
Did the pump alarm “Cal
Error” twice before this
alarm?
Go to sensor start> New
Sensor, Enter BG when
prompted
YES?: Check ISIG
2 cal errors & Low ISIG –
remove sensor
No? Cal Error
Try re-starting sensor
Troubleshooting 1. f. I have a gap in my graph
When you see a gap in the graph it means your pump has missed several “data
packages” which are transferred every 5 minutes between the transmitter and the
pump. This can occur during a lost sensor. You may wish to set your “missed data”
setting lower so that your pump will alarm sooner in the event of a lost signal.
J.Milliken RN CDE
6
Troubleshooting 1. g. Sensor changes and calibration.
At the end of the 72 hour sensor life, your pump will alarm to notify you that it is time
to change your sensor. It is not necessary to turn your sensor feature “off” after you
change your sensor. Place your new sensor at least 2 inches away from your used
sensor site or pump site. You will need to wait another 2 hours while your new sensor
is initializing during which time you will have no access to sensor glucose values.
Follow the guidelines for new sensor start in your sensor user guide.
Remember to enter a calibration at the end of the initialization phase, the next in about
an hour and a third within the next three hours. It is best to calibrate pre-meal when
glucose levels are not rapidly rising. Avoid calibrating when there are raised arrows on
the pump screen indicating a rapid rate of glucose rise. The actual value of the glucose
at the time of the calibration is less important than the presence of raised arrows.
Troubleshooting 2.a. The transmitter adhesive is irritating to my skin
The double-sided transmitter adhesive tape may cause skin irritation in some people.
Here are some suggestions for minimizing skin irritation:
•
Place a piece of IV 3000, Tegaderm or Opsite transparent dressing under the
transmitter adhesive.
•
You can rotate the transmitter site around the sensor as often as needed if the
skin becomes irritated under the transmitter pad.
•
Use separate dressings for the sensor and the transmitter. This way the
transmitter can be moved and it will not disturb the sensor site.
•
Another option is to tape the sensor down well and leave the transmitter untaped. It can be tucked into a waistband for example. Ensure that the sensor
site is secure with 2 pieces of tape to prevent dislodgement.
•
Talk to your trainer or Medtronic Diabetes nurse specialist for other tips if you
continue to experience problems related to skin irritation.
J.Milliken RN CDE
7
Troubleshooting 2. b. How can I re-tape during the sensor use?
You may find that the clear tape covering your sensor becomes loosened during
daily wear. This is normal for this kind of tape which is designed to move with you.
Depending on how long you have worn the sensor, you may need to re-tape. It may
be better to place another dressing over the old site rather than try to peel back
the old dressing which may cause the sensor to become dislodged.
If you do manage to remove the dressing without dislodging the sensor, do not
disconnect the sensor from the transmitter while re-taping. Have someone help by
holding the transmitter up for you as the weight of it may pull the sensor out.
Troubleshooting 2. c. I am looking for other taping tips.
•
Choose an area of the body where the sensor and transmitter will not
interfere with clothing during movement.
•
For excessive peeling of the adhesive, you can try using IV prep pads on the
skin where the adhesive will be attached. Do not use IV prep for the sensor
insertion.
•
When taping down the transmitter, make sure that the cable will not be
pulling on the sensor by bending the cable slightly above or below where the
cable extends from the dressing. (see below)
•
Use site rotation as you would with your pump sites to give your skin a rest.
You can use your upper outer arm, abdomen or buttock for sensor
insertion.
•
You can place a piece of IV 3000 over part of the top of the transmitter and
attach the other half to your skin allowing the air to get to your skin under
the transmitter. This also may limit cable wear caused by the motion of the
transmitter if it is not affixed to the skin.
J.Milliken RN CDE
8
Troubleshooting 3. a. My BD Link glucose meter is not communicating with
my pump
There are two purposes to the BD Link meter when it is being used with the Paradigm
REAL-Time system:
1. Automatic calibration of the sensor
2. Automatic value available for Bolus Wizard calculations.
In order for your pump and Link meter to communicate, the meter ID must be entered
into the pump. You can find this in the Utilities main menu> Meter Options> ON > Add
ID. The meter ID can be located on the back of the meter.
You must have your Bolus Wizard set up in order to see whether the BD link meter is
communicating with your pump. When it is functioning properly, 5 seconds after a BG
is taken by finger-stick your pump will beep (or vibrate) and display the glucose value
gained from the test for the next 12 minutes.
Your sensor will be automatically calibrated using the BD link meter each time you
perform a finger-stick test. If there are times you do not wish your glucose value used
as a calibration such as checking your meter with control solution, you must first turn
the meter option OFF so that this value is not used as a calibration.
If you are in doubt about when your last calibration was entered, you can access the
“Sensor Update History” from the main sensor menu. A list of calibrations will be
shown along with the value and the time the test was taken.
Troubleshooting 3. b. I want to enter calibrations manually using an
alternate meter
You may use a BG meter other than the BD Link meter. You can enter calibrations in
either the sensor menu or the bolus menu. If you are using the Bolus Wizard and
entering your glucose manually, you will be asked whether you wish to use the value as
a calibration. Do not use more than one type of meter for calibrating the system during
each sensor use as this may cause an unacceptable discrepancy between the sensor
and BG.
J.Milliken RN CDE
9
Troubleshooting 3. c. My glucose meter value and the sensor glucose are
not the same
Normally, there will be a difference between your sensor and meter blood glucose. An
acceptable variance is up to 2 mmol or 20% between the two devices. See the patient
reference guide for more explanation on meter and sensor glucose. Differences of
more than 2 mmol can occur for various reasons. There are several ways you can limit
the possibility of unacceptable discrepancies between the sensor and meter glucose.
The following are some variables which can affect the functioning of the sensor.
1. The age of the sensor. While the sensor is “settling” in the tissue in the first 12
hours it may have a greater discrepancy than on subsequent days of use.
2. Your technique for inserting the sensor.
3. Accuracy of your glucose meter
4. How the sensor was handled and stored
5. If blood or water enter the tiny filament where the sensor is housed. (note this
is not necessarily the surface bleeding which can sometimes occur)
Sensor value is off
by > 20%
Is this a new sensor?
Yes:
-enter variant BG as
calibration
-Enter another BG in 2 or 3
hours
J.Milliken RN CDE
No
-Is your BG rapidly rising?
-Sensor may be lagging
behind rapidly changing
glucose.
Is this a sensor more
than 24 hrs old?
Yes
-check BG value entered.
-check ISIG- 10 – 200?
-Was sensor recently
exposed to water?
10
Troubleshooting 4.a. I am having difficulty accessing the data using
Solutions™ Pumps & Meters
There are several versions of Solutions™ pumps & meters software. Version 7.0 only
will download the Paradigm REAL Time pump. What you need for downloading: your
pump, a computer a Com Link cable OR a BD Link meter and cable. The most common
issues are listed below with some troubleshooting suggestions. For more information,
refer to the software User Guide on the CD.
Having trouble with any of the following?
•
Loading the software: Using a Mac? The software is not formatted for your
system. You may wish to use CareLink online web based management system.
•
User guide: you may not have the Adobe reader to open a pdf file. You can
download this software at www.adobe.com
•
Download: make sure there are no boluses in effect, and that the battery on
your pump is normal. Make sure the BD link meter has a battery and it is not
low. Orient the pump and BD Link still and in close proximity. Don’t wave the
pump around or pass any objects between the devices during download.
•
Viewing blood glucose values: Only values from the BD Link meter will be
displayed in the meter data screen if you used it to download. To download any
other meter, you require the meter manufacturers connection cable.
•
Viewing sensor glucose values: you can see sensor values on three screens: the
sensor daily details, the sensor daily overlay and the sensor data screen. In the
sensor daily overlay, you need to fill in the date fields using the drop down
calendar and hitting refresh. Up to a week of data can be viewed. Make sure
you have checked off access boxes in the set up preferences.
•
Emailing the file: You can email the file in it’s original format only. It can be
opened by the recipient if they too have the solutions software ver. 7.0. Open
and address the email message, click on the attachment icon. Go to C: program
files > MM Solutions, (MM Pumps and meters) Patient data> click on the name
and date of the file you wish to attach.
J.Milliken RN CDE
11
Troubleshooting 4.b. I am having difficulty using the CareLink website
CareLink online http://carelink.minimed.com is a web-based diabetes management
program. Like Solutions software, It allows the user to upload their pump and meter.
The system also stores all the past files uploaded from your pump and or meter. You
can allow your health provider access to this information by providing them your
private user name and password. You may be asked to allow a reader program called
an “applet” to be installed on your computer so that you can view the information
properly. Some common issues you may encounter include:
•
Interruption during downloading: may include a pop up note that the pump and PC
time differ. Click ignore or OK and continue with the download. RF interference can
affect the download as well and interrupt the data transfer. Locate the pump and
com link or BD link meter away from the computer and put them close together.
Re-start the download. Make sure your pump battery is not low.
•
The system is not accepting the download: ensure that the correct pump serial
number is logged in when prompted. If you are downloading more than one pump
using the same user name and password, you may be asked to verify the Serial
number on the back of your pump. This is all normal.
•
It seems to be taking a long time: Depending on how much information you have in
your pump, you may experience a prolonged download time of up to 8 minutes. It
normally places the pump in suspend during the data transfer, this is normal. The
pump function will resume when complete.
•
Cant view the reports: Use the “reports” tab from the main screen view. Look at
the setting for the date fields to make your selection, then use the drop down
menu for the report you desire to view. The system will load your preference and
create a report to your specifications and then show it as a .pdf file. You can then
choose to “save as” a pdf in a separate folder on your computer or you can just
print it directly from the site.
J.Milliken RN CDE
12