1
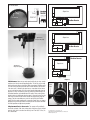
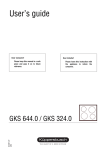
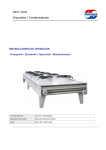
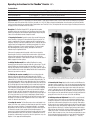
Operating Instructions for the PhosBan® Reactor 550 ™
Technical Data
Capacity
Aquarium size
Recommended flow rate
Connection for hoses
Use with up to a maximum of 750 grams (1.25L) of PhosBan, or a media height of ca. 8 inches (20 cm).
One reactor for up to 600 gallons (2270 Liters). Multiple reactors may be used for larger aquariums.
ca. 20 - 40 gal/hr (75 - 150 L/hr). Too much flow can grind PhosBan.
1/2 inch (12.7 mm) i.d. The inlet and outlet flexible 90° fittings rotate to suit your installation.
Important Notes: Do not use a media bag in the PhosBan Reactor. Simply place PhosBan or other GFH/GFO media inside it according to the instructions.
Don’t over or under fill the column. Max 8 in (20 cm) of media, min 2 in (5 cm). When using only activated carbon, the entire column can be filled. PhosBan
may be mixed with phosphate-free activated carbon (HydroCarbon2 from Two Little Fishies). Do not place ball valve on the exit pipe. Restricting the flow on the
exit pipe pressurizes the reactor and can cause leaks.
Description The PhosBan Reactor 550™ is designed with the upflow
principle to achieve the most efficient use of PhosBan or other chemical filter
media. By pushing water from the bottom upward through a dispersion plate,
it forces an even distribution of water through the media.
A.
B.
C.
1. Preparing the Reactor Unpack the reactor. Open reactor lid by turning
counter clockwise. Check parts list to confirm that all parts are present. The
reactor is supplied with all the parts needed to operate it except for the hose
and pump. The pump used can be a powerhead, such as a Maxijet 500, or the
supply of water can be tapped off of a circulating pump already in use on the
aquarium (see diagrams 1-3 on instructions page two). The pump should
have 100-200 gph (380-760 l/hr) capacity, although the flow must be
reduced using the supplied ball valve.
I.
H.
Slide one of the sponges onto the long tube so that it rests on top of the
dispersion plate. Insert this assembly into the reactor column. Keep the lower
sponge resting on top of the dispersion plate when you insert it into the
reactor column. Add about 1 cup of water to the reactor. Push out the large air
bubbles trapped in the lower sponge.
1a. Adding PhosBan media Before adding PhosBan to the reactor,
temporarily cover the top of the long center tube with a piece of tape. This will
prevent PhosBan from entering the tube when you add it to the column. To
minimize dust evolution, wet the PhosBan first. Use a large spoon or scoop to
put the PhosBan into the reactor. After adding PhosBan to the reactor column,
remove the tape from the center tube.
1b. Finishing the reactor assembly Attach the remaining dispersion
plate with short center tube onto the top of long center tube. Slide the
remaining sponge on top of the center tube above the dispersion plate. Press
it down to be sure it is sitting flat all the way around the dispersion plate. The
input and output locations for the reactor depend on where the user positions
the short pipe adaptor (G). Choose a position and connect part G with the soft
90 (C) onto the top of the center tube and insert the narrow end of part G into
the hole position inside the reactor body (A) for the water input (see diagram
4 on instructions page two). Note that the ball valve must always be attached
to the water input. A short length of 1/2” hose may be used with a supplied
connector (I) and a soft 90 (C) to extend the connection over the rim of the
aquarium. Inside the top of the lid there is a flat plastic washer and on top of it
an O-ring. Check to be sure the O-ring is seated properly. Rotate lid on the
threads until it becomes stiff (hand-tight) to seal and close the reactor. Do not
overtighten! The flat washer allows slippage and makes it easier to open the
reactor. It is otherwise not necessary.
2. Locating the reactor The PhosBan reactor can be seated upright in the
cabinet, in the filter sump, upright on the floor below the aquarium or hanging
on the side or rear of an aquarium. For hanging installations, use threaded
bolt provided in the base plate to level it against the aquarium wall. Wherever
it is located, the reactor must be upright and level to operate properly. To
prevent any risk of back-siphoning, the outlet of the water return hose should
not be located below the water line if the reactor is located below the level of
the aquarium or below where the return line enters the aquarium or sump. See
diagrams 1-3 for suggested installation options.
D.
G.
E.
F.
A. Reactor body; B. Lid (Qty: 1); C. soft 90 fitting (Qty: 3); D. Sponges (Qty: 2); E. Dispersion Plate (Qty: 2);
F. Ball valve (Qty: 1); G. short pipe adaptor (Qty: 1); H. Ratchet Clip (Qty: 1); I. Connectors (Qty: 2).
3. Connecting the Pump Attach the ball valve to the soft 90 fitting on the
input pipe. Connect a length of 1/2 inch i.d. hose from the pump output to the
ball valve. Connect another length of hose to the barbed fitting that slides into
the soft 90 fitting on the water output pipe to return water to the aquarium or
sump. It is not necessary to use hose clamps to secure the hose connections
on the supplied fittings because they are barbed. It may be necessary to use a
hose clamp to secure the connection to the pump. Do not let the weight of the
pump pull the hose since this can cause a leak at the soft 90 fitting.
4. Initial Operation and Adjustment Once the lid is securely fastened,
the reactor is level, all of the hoses are securely attached, and the pump is
located in the aquarium or sump, direct the return hose into a bucket, open
the ball valve, and connect the pump to the mains electricity. Allow water to
fill the reactor for a few seconds and then close the ball valve to stop the flow.
Partially open the valve slowly to about 20 gph to purge air from the outflow
pipe and allow the initial dusty 1/2 gallon of water to empty into the bucket.
Adjust the flow with the ball valve so that the PhosBan granules are tumbling
slightly at the surface. A section of clear water will be located above the
granules. When the water runs clear, close the valve and reposition the return
hose to feed water back to the aquarium or sump. Open the valve slowly to
achieve the normal operating flow rate: 20 - 40 gal/hr (75 - 150 L/hr).
Lid: inside detail
Aquarium
O-Ring
Flat washer
PhosBan Reactor
Sump
Pump
Pump
Diagram 1
Aquarium
sponge over
dispersion plate
PhosBan Reactor
Sump
Pump
Diagram 2
PhosBan Reactor
Aquarium
sponge over
dispersion plate
Sump
Pump Pump
Diagram 3
5. Maintenance About once per week open the ball valve for a few seconds
and then return it to the normal operating position. This will stir up the media
briefly and prevent caking or channeling. When changing the PhosBan media,
first shut off the pump that sends water to the reactor and close the ball valve.
If the return hose is located in the aquarium or a sump above the level where
you are servicing the reactor, lift it out so that it cannot siphon water from the
aquarium or sump. Disconnect the hoses by pulling the soft 90 fittings off of
the barbed connectors or barbed fittings of the reactor. Place reactor inside a
bucket to catch any spilled water when you open it. Unscrew the top. Pour the
water from the reactor into the bucket. Remove the top dispersion plate and
sponge. Take the reactor body over a trash bin and spill out the PhosBan
media. Rinse the reactor sponges with a strong jet of water. Never use soap or
detergents of any kind. Reassemble the reactor per the instructions and follow
the initial operation and adjustment procedure.
water
input
water
input
Diagram 4
6. Replacement Parts & Accessories The sponges will periodically
need to be replaced. Order them and any other replacement parts through
your pet shop, which can order them directly from Two Little Fishies, Inc.
or its distributors.
Copyright 2009. Two Little Fishies, Inc.
1007 Park Centre Blvd. Miami Gardens, FL 33169 USA
www.twolittlefishies.com