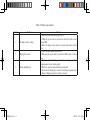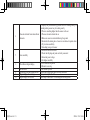
1
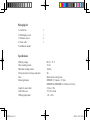
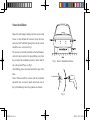
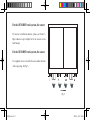
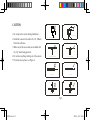
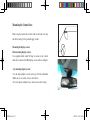
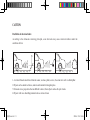
Model: OEM400
OEM400T
OEM400H
(for passenger car, SUV or VAN)
(for truck or commercial VAN)
(for Hummer or the SUV with spare mount at back)
Installation Manual
说明书new.indd 1
2008.6.2 10:47:42 AM
Packaging list:
1. Control box
2. LED display screen
3. Ultrasonic sensor
4. Power cable
5. Installation manual
1
1
4
1
Specifications:
Working voltage:
Static working current:
Maximum working current:
Power protection of wrong connection:
Fuse:
Detecting distance:
Length of sensor cable:
Control box size:
Working temperature:
说明书new.indd 2
DC 10 ~ 15 V
27 mA
180 mA
Yes
Inside self-recovering fuses
OEM400: 0.3-2 meters (1-7 feet).
OEM400T & OEM400H: 0.6-2.5meters (2-8 feet)
2.5 m or 3.5m
73 x 54 x 22mm
- 40 ~ +80 c
2008.6.2 10:47:43 AM
Manual
Introduction
OEM400 series parking sensor systems are the new generation design with dual CPU & 4 individual channels to
detect obstacles behind the vehicle.
OEM400 series parking sensor is supplementary safety equipment specially designed for car reversing. There is
hidden peril when reversing because of the blind zone behind the car. After installing the parking sensor system,
when reversing, the display screen will show the distance from obstacles to the rear bumper.
Special Specifications
●
●
●
●
●
●
●
●
No-ground detecting technology. The system will not detect obstacles lower than 1cm.
Unique ultrasonic resistance function can filter environmental ultrasonic waves effectively.
System with sensitive adjustment guaranteed on false alarm.
Display with high brilliance under bright environment with the fine LED screen showing the obstacle direction.
Unique designed feature can be the display unit for dash mount, up mount or ceiling mount.
Unique designed feature can be either in Meters or Feet for distance indication.
All sensor cable plugs are sealed & detachable, easy for installation or warranty repair and replacement.
Universal mount OEM style control box can be quickly installed into any vehicle.
说明书new.indd 3
2008.6.2 10:47:43 AM
Using method:
When reversing, the parking sensor will switch on automatically.
If there are no obstacles within two meters behind the car, it will display “--”. As the car nears the obstacle, it will
display the distance between the rear bumper of the vehicle and the obstacle, sending out four-converter buzz. The
display will show “P” when the distance is less than 0.3m or 1 foot. Please see Table 1.
The caution degree indicates degree of danger, and reminds the driver to be careful.
Taking inertia into consideration, it will show the distance with an extra 10cm (4inch).
Table 1: Safety distance and buzz with display
Distance: Meters (Feet)
>1.5( 5 )
1.5-1.0 ( 5~3.5 )
1.0-0.7( 3.5~3 )
0.7-0.4( 3~1.25 )
0.7-.06 ( 3~1.5 ) OEM400T,H
<0.3 (1)OEM400
<0.6 (2) OEM400T,H
说明书new.indd 4
Buzz
No buzz
Slow buzz
Middle speed buzz
Quick buzz
Urgent solid buzz showing “P”
2008.6.2 10:47:43 AM
Display screen:
Unique designed display screen unit can be switching it from dash mount to up mount. The Buzz comes with
volume control.
Corresponding color scope to sensor L, LC & RC, R
Color scope on left/right & large LED numeric to indicate the obstacle’s distance & direction.
Buzz volume contrl
1.8
Dash mount
说明书new.indd 5
1.8
Up mount
2008.6.2 10:47:43 AM
Sensor installation:
Inspect the rear bumper, making sure there are no metal
braces or struts behind the locations where the holes
and sensor will be drilled. Spacing between the sensors
should be even, as shown in Fig 1.
The sensors are normally installed on the back bumper,
vertical to the ground or a bit upward tilting away from
the ground, if the installation position is lower than 50
cm to the ground. Please see Fig 2.
After drilling, please clean and smooth the edge of the
holes.
Notice: Please install the sensors with the arrowhead
upward if there is an arrow mark on the back end, or
they will mistakenly detect the ground as an obstacle.
L
CL
CR
R
Fig 1. Sensor’s installation distance
Arrowheadupward
90-95
。
Fig 2.
说明书new.indd 6
2008.6.2 10:47:44 AM
For the OEM400T truck system, the sensor:
For sensors’ installation distance, please see Picture 6.
Paper adhesive tape is helpful to fix the sensors on the
back bumper.
For the OEM400T truck system, the sensor:
Use supplied screws to install all sensors under the back
of the cargo edge. See Fig 3.
Fig 3.
说明书new.indd 7
2008.6.2 10:47:44 AM
CAUTION:
1. Do not press the sensors during installation.
2. Install the sensors in the order of L, CL, CR and
R and the cable also.
3. Make sure all the sensor units are installed with
the “up” mark facing upwards.
4. Do not have anything sticking out of the sensors.
5. For other notices please see Figure 4.
To uch the ed ge on ly
N e ver press th e co re of se nso r
B ad jo in t w ith on e circle w ire
M o re tha n 5 circle 's w ire
T ig ht ca ble w ire
S oft ca ble w ire
P lu g d ra w ed ligh tly
P lu g d ra w ed too ha rd
Fig 4.
说明书new.indd 8
2008.6.2 10:47:44 AM
Mounting the Control box:
Find a dry place inside the vehicle trunk at sidewall, clear any
dust before using Velcro pad and apply sticker.
Mounting the display screen:
Dash mounting display screen:
Use supplied double sided 3M tape to mount on the vehicle
dash. Do not mount the LED display screen in direct sunlight.
- Up mounting display screen:
Use the angle adapter to stick on the top of front windshield.
(Make sure to cut yellow wire at control box)
Or use the plastic adapter base to mount at rear side ceiling.
说明书new.indd 9
2008.6.2 10:47:44 AM
Connection & set up of the Control box
Please see Fig 5.
-Insert the sensors cable into the four sockets of control box L, CL and CR, R from left to right.
-Insert the power cable into PWR socket of control box.
Connect the Red wire of the power cable into the reversing light, and the Black wire to the ground.
-Insert plug of the display screen cable into DISP socket.
Select system display in Feet (Factory set in Meters):
-Cut Blue wire at left side of control box. The system will show Feet in the display.
Select display as up mount (Factory set in Dash mount):
-Cut Yellow wire at left side of the control box. The display unit works in up mount mold.
说明书new.indd 10
2008.6.2 10:47:44 AM
Control Box
Red
Blk
R
DISP
Display
Reverse Light
CR
Right
B
CL
Left center
Power
Meter or Feet display option
L
Left
PWR
Right center
Sensors
Dach or Up mount display option
Y
1.8
Ground
Sensors
Fig 5. Connect Control Box Plug
说明书new.indd 11
2008.6.2 10:47:44 AM
Testing process:
1. Park the vehicle outside on flat, even grounds in an open area.
2. Using a piece of cardboard as an obstacle, set at 2 m or 6 feet away from the rear bumper.
3. Start power of the vehicle and set gear into reverse; the parking sensor system should automatically turn on.
4. Slowly reverse the vehicle towards the obstacle. The display screen will show the distance & the Buzz tone will sound.
5. Place obstacle at left side behind vehicle. As the distance from the obstacle decreases, the left side of the LED
will first show green bars, then yellow and then red. By the time the obstacle is less than 0.3m or 1 Foot away
the entire left side of the LED will be on and the letter “P” will appear. At this time the vehicle must stop.
6. Repeat the same process for the right side.
7. Use the Buzz tone switch located at top of the display screen to adjust the Buzz tone volume.
Notice:
1. Do not press or pound the sensor.
2. Please clear any ice, snow, salt or other dust from the surface of the sensors in time.
3. As the system does not connect to car braking machinery, please brake immediately once the urgent buzz is heard.
说明书new.indd 12
2008.6.2 10:47:44 AM
CAUTION:
Possibilities of detection failure
According to the ultrasonic detecting principle, some obstacles may cause detection failure under the
conditions below:
1. A vertical obstacle much lower than the sensor, such as a pillar, a curve, the corner of a wall or a tilted pillar.
2. Objects such as metal net fences, narrow and rounded or triangular poles.
3. Ultrasonic wave projections that are difficult to detect, from objects such as bicycle wheels.
4. Objects with wave-absorbing material such as cotton or foam.
说明书new.indd 13
2008.6.2 10:47:44 AM
Table 2 Problems and solutions
Number
Problem
1
No display when reversing
2
Display but no buzz
3
Wrong digital display
说明书new.indd 14
Solution
1. Make sure power and revering light are on.
2. Make sure power cable is connected to control box with correct
pole at DISP
3. Make sure display screen cables are correctly connected to control
box
1. Check the Buzz volume control switch
2. Make sure the screen cable is connected to DISP socket of control
box
1. Display may be disturbed by pressure from car washing, or another
parking sensor may be working nearby
2. Make sure sensor is not installed facing the ground
3. Ensure that the turning face of sensor is not inclined or upside down
4. Check if all plugs and joints are firmly connected
2008.6.2 10:47:44 AM
4
Ceaseless ticktack from radar without
obstacles
5
Low sensibility
6
Two different digital display
7
8
9
10
Re-start often
Sometimes good and sometimes bad
Digital display when raining
Digital display on the snow
说明书new.indd 15
1. Display may be disturbed by pressure from car washing nearby, or
another parking sensor may be working nearby
2. There is something higher than the sensor on the car
3. There are obstacles beside the car
4. Make sure sensor is not installed facing the ground
5. Ensure that the turning face of sensor is not inclined or upside down
6. Try to reduce sensibility
7. Something wrong with sensor
1. Excessive dust on the sensor
2. Check that all plugs and joints are firmly connected
3. Abnormal power voltage
4. Set higher sensibility
A Two obstacles are present
B Obstacle is moving
Poor contact of power
Check that all plugs and joints are firmly connected
Heavy rain may be detected
Snow may be detected if it is much higher than the ground
2008.6.2 10:47:44 AM
CAUTION:
The Parking sensor system is strictly a driver assistant device. It should not be
considered as a safety device for any purpose. Manufacturers and distributors of the
product do not guarantee or assume liability for collisions or damages that take place
during vehicle reversal.
说明书new.indd 16
2008.6.2 10:47:44 AM