1
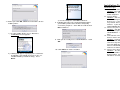
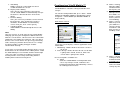
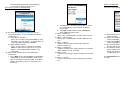
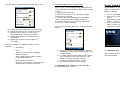
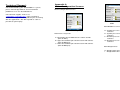
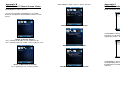
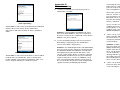
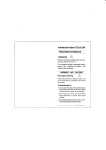
Minimum Requirements
Hardware
1. A Microsoft Windows Mobile 6 Standard or
Professional Phone with Mobile Provider service
2. A Bluetooth headset
3. A computer from which to install VitalX Mobile™
Mobile NewMedia
VitalX Mobile™
Computer
1. A computer with Microsoft Windows
2000/XP/Vista installed.
2. Microsoft .NET Framework 2.0 Runtime installed
3. Microsoft ActiveSync 4.5 (Microsoft Windows
XP/2000) or Windows Mobile Device Center
(Microsoft Windows Vista) installed
4. Internet access for the desktop during installation
Installing the VitalX Mobile™
Software Package
Installation Manual
5. At this point in the installation, you have 2 options:
1) If you want to try VitalX Mobile™ for 7 days,
just click Next.
2) If you received an email with the license key,
please cut and paste the key into the space
provided (look for “----cut here---“ in the email
and ). Click Next to continue.
Note: The installation program will require access to
the Internet to verify your license key.
1. Plug in your Microsoft Windows Mobile 6 phone to
the computer with your USB cable.
2. Double-click on VitalXMobile.msi file.
3. Read the text on the screen and click Next
6. VitalX Mobile™ installer will start setting up the
application to install onto your Microsoft Windows
Mobile 6 phone.
General inquiries: [email protected]
Support: [email protected]
For information on our other products,
please visit us at: http://www.vitalx.ca
© 2009 Mobile NewMedia Ltd. All rights reserved.
Rights of modification reserved
4. Select I agree and click Next.
Installation Troubleshooting
7. Before you click OK, follow the instructions on the
mobile phone.
3) On the computer, click OK to continue.
8. A dialog will request to send information about
your mobile phone to our website for quality
assurance purposes. Click Yes to send or click
No to continue.
1) On your mobile phone, press Yes if the
CONFIRM screen appears.
9. Now you are ready to use VitalX Mobile™. Click
OK.
10. Click Close to exit the installer.
2) A dialog will appear signifying if the certificate
installation succeeded (If unsuccessful, see
Troubleshooting section for help). Press
Done.
Error Messages
1. “Phone is not connected”
Solution: The mobile phone is not connected to
the computer. Please connect the mobile phone
to the computer.
2. “System Error”
Solution: You must have an Internet connection
enabled during installation for verification of the
license key. If it is connected, then our website
may not be accessible. Please try again in a few
minutes. If you still cannot install our application,
contact Mobile NewMedia for further assistance.
3. “License key has expired”
Solution: You will need to contact Mobile
NewMedia to purchase a new license key for
VitalX Mobile™. Trial licenses are only valid for 7
days.
4. “Cert.cab was unsuccessfully installed on your
device” occurs on your phone
Solution: Cancel the installation and try to
reinstall VitalX Mobile™ again. If you still get this
error message on your mobile phone, your phone
may not allow you to install our application.
Please contact Mobile NewMedia via email for
further assistance.
5. “License Key already in Use”
Solution: The license key you entered is already
in use on another phone. Keys are only usable
by one phone. Please contact Mobile NewMedia
for further assistance.
Introduction
Mobile NewMedia
VitalX Mobile™
VitalX Mobile™ is a revolutionary new application
designed to alert the user when their vital statistics
are outside the norm. The alarms are useradjustable to fit whatever situation necessary;
whether they are going for a jog, taking a nap, or just
watching television. Alarms that are generated can
be sent in whatever form you wish from just an audio
alarm to you to calling others and alerting them of
your state.
Before Using VitalX Mobile™
VitalX Mobile™ monitors two different types of
sensors: (a) sensors that wait for the mobile phone to
connect with them, and (b) sensors that actively
attempt to connect to the mobile phone on their own.
User Manual
General inquiries: contact @m-newmedia.com
Support: [email protected]
For information on our other products,
please visit us at: http://www.vitalx.ca
© 2009 Mobile NewMedia Ltd. All rights reserved.
Rights of modification reserved
Before using VitalX Mobile™ with the first type of
sensor (eg. a Nonin pulse oxymeter), you will need to
do three things.
1. PAIR the Bluetooth medical device with the
Windows Mobile Phone.
a. Go to Start >Settings > Connections >
Bluetooth (for Windows Mobile 6 Standard) or
Start > Settings > Connections tab >
Bluetooth (for Windows Mobile 6
Professional)
b. Power up the Pulse Oxymeter (or other
medical device to pair with phone). Select
Add New Device. ThePulse Oxymeter should
appear as one of the devices to add.
c. Select the device and press Next.
d. Enter the passcode (located on the side of the
Nonin Pulse Oxymeter) or elsewhere on other
medical devices.
e. Press Next to name the device and complete
the pairing.
2. TEST the VitalX Mobile™ to ensure that the
phone is properly paired with the medical device
and that you are receiving data from the device.
3. CONFIGURE the alarms to suit your vital stats
and fit your health profile.
Before using VitalX Mobile™ with the second type of
sensor (eg. an A&D blood pressure monitor or an
A&D weight scale), you will need to ensure that the
mobile phone is visible to the sensor.
1. TURN ON Bluetooth visibility on the Windows
Mobile Phone.
a. Go to Start >Settings > Connections >
Bluetooth (for Windows Mobile 6 Standard) or
Start > Settings > Connections tab >
Bluetooth (for Windows Mobile 6
Professional)
b. Select Menu > Turn On Visibility
c. Select Done.
2. TAKE a measurement with the blood pressure
monitor or the weight scale
3. ALLOW automatic configuration to occur. VitalX
Mobile™ will automatically answer the following
dialog prompts that occur when the sensor is
trying to connect with the mobile phone:
a. Add Device – Confirm dialog
Notifies you of the device attempting to
connect to your Smartphone using Bluetooth.
VitalX Mobile™ selects [Yes] for you, adding it
to your device list.
b. Passcode dialog
Asks you to enter a passcode to establish a
secure connection with the sensor device.
VitalX Mobile™ automatically fills in the
Passcode box and selects [Next].
See Note
c. Info dialog
Notifies you that a connection has been
established with the sensor.
d. Display Name dialog
Asks you to select a display name for the
sensor. VitalX Mobile™ automatically accepts
the device’s advertised name and selects
[Next].
e. Services dialog
Asks you select any available service offered
by the device. If the Serial Port service is
available, VitalX Mobile™ automatically
selects it for you, then selects [Next].
f. Complete dialog
VitalX Mobile™ automatically dismisses this
dialog.
Configuring VitalX Mobile™
VitalX Mobile™ should be configured before first
using it.
To start the configuration tool, press Start > VitalX
Mobile (for Windows Mobile 6 Standard) or Start >
Programs > VitalX Mobile (for Windows Mobile 6
Professional)
Main Status Screen
i
Note
You may receive an error after the Passcode dialog,
notifying you that your Smartphone did not connect
with the sensor device, either because the connection
failed or the passcode was incorrect. This may occur
because the sensor device has given up prematurely
and is now trying another device that it sees. Simply
try taking another reading to trigger another
reconnection attempt.
It may take several connection attempts by the sensor
before data can be viewed on the mobile phone. Both
the A&D blood pressure monitor and the A&D weight
scale can retain a number of readings in internal
memory before successfully connecting with the
mobile phone and transferring them.
B. Menu > Emergency Contacts
Manage SMS or voice phone contacts that are
contacted when an alarm is activated. (see
Emergency Contacts section for details)
C. Menu > Alarms
Manage the actions to perform when an alarm
threshold is reached (see Alarm section for
details), or when a “significant” sensor event
occurs (connection, disconnection,
unavailability).
D. Menu > Personal Info
Edit the personal info that would be sent with
your SMS messages. All you need is to enter
your first and last name. The personal medical
record ID is only required when the sensor
data is being stored with a third-party health
minding service.
ii
The main screen displays various application status
information:
i. Monitoring: Shows whether the alarm service is
on or not
ii. Data storage: Shows whether or not sensor data
is going to be stored, and if so, where the
sensor data is going to be stored
The menu options available are:
A. Apply
Quits the VitalX Mobile™ configuration tool,
saves any changes made, and forces the
background alarming and monitoring services
to reconfigure themselves.
E. Menu > Health Recording Service
Configure VitalX Mobile™ to store/send
monitored medical data. (see Health
Recording Service for details)
F. Menu > Exit
Quits the VitalX Mobile™ configuration tool,
saving any changes made, but without forcing
the background alarming and monitoring
services to reconfigure themselves.
Emergency Contacts Configuration
Alarm Configuration
The main alarm configuration screen:
A
B
C
A) This displays the phone number list you are
currently viewing. There are 2 different phone
number lists:
1) Voice phone numbers These are numbers that VitalX Mobile™ will
call when a sensor alarms. It will call them in
sequential order from top to bottom.
2) SMS mobile numbers These are the phone numbers that VitalX
Mobile™ will text message when a sensor
alarms. Only mobile phone numbers are
supported.
B) Adds a new number to the selected phone
number list.
i. Press New on the VitalX Mobile™ application.
It will bring up another window asking you to
type in the phone number to add. Only digits
will be accepted as input (ie. no dashes or
brackets).
ii. To add pauses or waits to the phone number
just select Menu > Insert Pause or Menu >
Insert Wait.
iii. Cick OK to add number to list or Cancel to
abort adding number to list.
C) Menu > Move Up
Moves the selected phone number up on the list.
D) Menu > Move Down
Moves the selected phone number down on the
list.
E) Menu > Delete
Deletes the currently selected item from the
phone number list.
F) Menu > Switch List
Switches between the Voice Number List and the
SMS Number List to view/edit
G) Menu > OK
Confirms the changes to the Emergency Contact
list
H) Menu > Cancel
Cancels the changes to the Emergency Contact
list
E
D
Nonin Pulse Oxymeter
A. SpO2 lower threshold before the alarm sounds
(from 0-100%)
B. Upper threshold of pulse before alarm will activate
(from 0-200 bpm)
C. Lower threshold of pulse before alarm will activate
(from 0-200 bpm)
D. The amount of time that the readings have to go
beyond the threshold before the alarm activates.
E. The amount of time, once the alarm is activated,
that readings need to be outside the threshold
before the alarm is deactivated
(scrolled out of view)
See Appendix A for additional alarm configuration
screens.
Pressing Menu > Additional Settings gets you to here:
A
B
C
D
Health Recording Service Configuration
The user has several options when dealing with the
sensor data that VitalX Mobile™ detects from nearby
sensors:
1. Simply discard the data,
2. Send the data to the user’s desktop or laptop
computer when docked,
3. Send the data to a third-party health minding
service that expects HL7 medical records, or
4. Send the data to a server running VitalX Data
Converter™ (sold separately)
E
For example, to send readings to a third party health
minder:
A. Action to perform when the sensor connects.
B. Action to perform if the sensor disconnects.
C. Maximum time that the sensor can be
unavailable before triggering an alarm
D. Action to perform if the sensor becomes
unavailable
E. Action to perform if the thresholds are
exceeded.
For each condition, the following actions can be
selected:
• Do nothing
•
Beep
Generate a local alarm sound only
•
Notify contact list
Start calling phone numbers and/or
texting mobile phones
•
Beep & Notify contact list
Generate a local alarm sound and start
calling/texting emergency contacts
Using VitalX Mobile™
VitalX Mobile™ is very simple to use and requires
almost no interaction by the user. To get the VitalX
Mobile™ running,
1. Turn on the Windows Mobile 6 phone.
2. Turn on the medical device that is paired with the
phone.
3. Wait until the medical device connects to the
phone. You are now ready to use the device.
4. To see if you medical device is connected, there
will be a display panel on the Home Screen, that
summarizes VitalX Mobile™ information:
A
B
C
D
Home Screen
A. Where to send the monitored data. Options
include none, a third party health minder, and
remote storage.
B. If remote storage or third party health minder
was selected in A, then you enter the URL
where the remote storage is located
C. Username to log into remote storage
D. Password to log into remote storage
See Appendix C for additional Health Recording
Service configuration screens.
Nonin Pulse Oxymeter
Connected
See Appendix B for more home screen views.
Alarms will be generated as necessary according to
your configuration.
Technical Support
For troubleshooting your VitalX Mobile™ system,
please consult Appendix D. Several common
problems/issues are described there.
Appendix A
Alarm Configuration Screens
Alarm Configuration Screens:
For technical support, email us at
[email protected]. Please provide a
detailed message about the problem you are having
with the application. We will respond as soon as
possible to your inquiry.
A
D
H
E
I
F
G
B
C
A&D Blood Pressure
Cuff
A&D Weight Scale
A&D Blood Pressure Cuff
Nonin Pulse Oxymeter
Nonin Pulse Oxymeter
A. SpO2 lower threshold before the alarm sounds
(from 0-100%)
B. Upper threshold of pulse before alarm will activate
(from 0-200 bpm)
C. Lower threshold of pulse before alarm will activate
(from 0-200 bpm)
D. Systolic pressure upper threshold before alarm
activates
E. Systolic pressure lower threshold before alarm
activates
F. Diastolic pressure upper threshold before alarm
activates
G. Diastolic pressure lower threshold before alarm
activates
A&D Weight Scale
H. Weight upper threshold before alarm activates
I. Weight lower threshold before alarm activates
Appendix B
VitalX Mobile™ Home Screen Views
VitalX Mobile™ Home Screen, Active Sensors:
VitalX Mobile™ Home Screen:
Appendix C
Health Recording Service Setup
Health Recording Service Alternatives:
Use the left and right navigation keys to switch
between the different VitalX Mobile™ home screen
panels.
Nonin Pulse Oxymeter connected
No one
VitalX Mobile™ will generate alarms based upon the
incoming sensor data, if the user has configured
appropriate alarms. However, the data is not stored.
Home Screen:
Status of Sensor Service
Press [Action] to disable service and turn it off.
Press [Action] again to enable service and turn in on.
A&D Weight Scale connected
My Computer
Home Screen:
Status of Bluetooth Scanning
Press [Action] to turn scanning on/off.
A&D Blood Pressure Cuff connected
VitalX Mobile™ will store sensor data on the user’s
destkop/laptop when the Smartphone is docked,
including data recorded when the phone was
roaming.
Appendix D
Troubleshooting
1. “I receive a warning message that my license
information is invalid.”
Also, make sure that the phone is actually visible
to these sensors. Go to the Bluetooth settings by
pressing Start > Settings > Connections >
Bluetooth. Then select Menu > Turn On Visibility
to make the Smartphone visible to other Bluetooth
devices around it.
VitalX Data Converter™
(sold separately)
VitalX Mobile™ will send sensor data to the indicated
IP/port, where an instance of the VitalX Data
Converter™ will store the data in Access database
tables.
Solution: Contact Mobile NewMedia Ltd. Your
license to VitalX Mobile™ may have expired, or
the license to one of the supported sensor device
AddOns may have expired.
2. “I have tried taking weight scale measurements,
but nothing is appearing on the VitalX home
screen view. What’s happening?”
Third Party Health Minder
VitalX Mobile™ will send sensor data as HL7 medical
records to the specified URL. Please contact your
health minding service for the appropriate URL, user
name, and password to use for their system.
Try turning off scanning via the VitalX Mobile™
Home Screen (switch to the Scanning status
panel, then press the [Action] button in the centre
of the navigation keys to turn scanning on or off).
Solution: The A&D Weight Scale and A&D Blood
Pressure Cuff sensors actively try to connect with
the Windows Mobile Smartphone, instead of the
Smartphone trying to connect with them. If the
sensor service on the phone is actively scanning
its Bluetooth environment, it may miss incoming
requests from these sensors. In addition, it may
take several connection attempts on the part of
the sensor before the phone is fully configured to
support receiving and displaying the data.
These sensors are capable of storing a number of
readings themselves while waiting to transfer them
to your phone. If, however, you are unable to view
readings after several attempts, please contact
Mobile NewMedia Ltd. for further assistance.
3. “I have set up several phone numbers in both the
call list and the SMS text message lists, but when
the alarm occurs, no calls are made to my
emergency contacts and no text messages are
received either.”
Solution: In order for the numbers to be called or
text messaged, you need to select either the
[Notify contact list] or [Beep & Notify contact list]
action. From the main screen, Menu > Alarms
takes you to the threshold settings for a particular
sensor. From this screen, Menu > Additional
Settings will take you to the screen to configure
the actions to perform when sensors
connect/disconnect/become unavailable, and
when sensors alarm.
4. “I have set up VitalX Mobile™ to beep when when
heart rate goes above 150 bpm. But nothing
seems to happen, even though I can see on the
home screen that my heart rate’s been around
155 bpm for several minutes. Is something wrong
with the system?”
Solution: Users have the option of changing the
VitalX Mobile™ settings without having them take
effect immediately. When you select Menu > Exit
from the main screen, changes you have made
are saved, but the monitoring service is not
updated. If you want the changes to apply
immediately, choose Apply instead. Otherwise,
your changes will not take effect until the phone
has been turned off and back on again.
5. “I’m not able to connect with my Nonin pulse
oxymeter anymore. I haven’t made any changes
to my alarm settings or my emergency contacts.
What could be wrong?”
Second, check to see that the sensor and alarm
services are running. You can monitor the status
of these two services from the VitalX Mobile™
home screen. If the services are disabled,
pressing the [Action] key should restart them.
Finally, check to see whether or not your license
for this particular sensor AddOn has expired.
Press Start > File Explorer to open up the File
Explorer. Navigate to <Program Files>, <Mobile
NewMedia>, <VitalX Mobile>. You should see the
LicenseManager application. Selecting it will bring
up a summary of the various Mobile NewMedia
licensed components on your phone, indicating
when their licenses expire.
Solution: Several things could be wrong in this
case: the Nonin pulse oxymeter may have been
deleted accidentally from the Smartphone’s list of
Bluetooth devices, the sensor and alarm services
may be disabled or off, or the Nonin Pulse
Oxymeter AddOn’s license may have expired.
First, check to see that the Nonin pulse oxymeter
is still in the Smartphone’s Bluetooth Device list.
Press Start > Settings > Connections > Bluetooth
to open up the list of currently known devices. You
should see a name like
Nonin_Medical_Inc._123456 appear in the list. If
not, you may have to select “Add new device…”
and turn on the pulse oxymeter, then select the
device again to recreate the pairing between your
phone and the pulse oxymeter. Once you’ve
successfully done this, you’ll need to restart the
service.
Mobile NewMedia Suite License Manager
© 2009 Mobile NewMedia Ltd. All rights reserved.
Rights of modification reserved