1
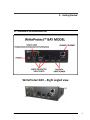
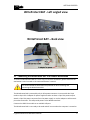
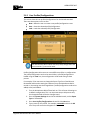
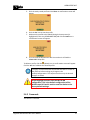
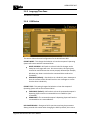
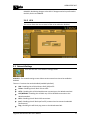
WriteProtect™ BAY User’s Manual
Logicube, Inc.
Chatsworth, CA 91311
USA
Phone: 818 700 8488
Fax: 818 700 8466
Version: 1.02
Date: 07/17/15
MAN-WP-BAY
Logicube WriteProtect™ BAY User’s Manual
I
Limitation of Liability and Warranty Information
Logicube Disclaimer
LOGICUBE IS NOT LIABLE FOR ANY INCIDENTAL OR CONSEQUENTIAL DAMAGES, INCLUDING, BUT NOT
LIMITED TO PROPERTY DAMAGE, LOSS OF TIME OR DATA FROM USE OF A LOGICUBE PRODUCT, OR ANY
OTHER DAMAGES RESULTING FROM PRODUCT MALFUNCTION OR FAILURE OF (INCLUDING WITHOUT
LIMITATION, THOSE RESULTING FROM: (1) RELIANCE ON THE MATERIALS PRESENTED, (2) COSTS OF
REPLACEMENT GOODS, (3) LOSS OF USE, DATA OR PROFITS, (4) DELAYS OR BUSINESS INTERRUPTIONS, (5)
AND ANY THEORY OF LIABILITY, ARISING OUT OF OR IN CONNECTION WITH THE USE OR PERFORMANCE
(OR FROM DELAYS IN SERVICING OR INABILITY TO RENDER SERVICE ON ANY) LOGICUBE PRODUCT.
LOGICUBE MAKES EVERY EFFORT TO ENSURE PROPER OPERATION OF ALL PRODUCTS. HOWEVER, THE
CUSTOMER IS RESPONSIBLE TO VERIFY THAT THE OUTPUT OF LOGICUBE PRODUCT MEETS THE
CUSTOMER’S QUALITY REQUIREMENT. THE CUSTOMER FURTHER ACKNOWLEDGES THAT IMPROPER
OPERATION OF LOGICUBE PRODUCT AND/OR SOFTWARE, OR HARDWARE PROBLEMS, CAN CAUSE LOSS
OF DATA, DEFECTIVE FORMATTING, OR DATA LOADING. LOGICUBE WILL MAKE EFFORTS TO SOLVE OR
REPAIR ANY PROBLEMS IDENTIFIED BY CUSTOMER, EITHER UNDER WARRANTY OR ON A TIME AND
MATERIALS BASIS.
Warranty
DISCLAIMER
IMPORTANT - PLEASE READ THE TERMS OF THIS AGREEMENT CAREFULLY. BY INSTALLING OR USING
LOGICUBE PRODUCTS, YOU AGREE TO BE BOUND BY THIS AGREEMENT.
IN NO EVENT WILL LOGICUBE BE LIABLE (WHETHER UNDER THIS AGREEMENT, RESULTING FROM THE
PERFORMANCE OR USE OF LOGICUBE PRODUCTS, OR OTHERWISE) FOR ANY AMOUNTS REPRESENTING
LOSS OF PROFITS, LOSS OR INACCURACY OF DATA, LOSS OR DELAYS OF BUSINESS, LOSS OF TIME, COSTS
OF PROCUREMENT OF SUBSTITUTE GOODS, SERVICES, OR TECHNOLOGY, PROPERTY DAMAGE, OR
INDIRECT, CONSEQUENTIAL, OR PUNITIVE DAMAGES OF A PURCHASER OR USER OF LOGICUBE PRODUCTS
OR ANY THIRD PARTY. LOGICUBE’S AGGREGATE LIABILITY IN CONTRACT, TORT, OR OTHERWISE
(WHETHER UNDER THIS AGREEMENT, RESULTING FROM THE PERFORMANCE OR USE OF LOGICUBE
PRODUCTS, OR OTHERWISE) TO A PURCHASER OR USER OF LOGICUBE PRODUCTS SHALL BE LIMITED TO
THE AMOUNT PAID BY THE PURCHASER FOR THE LOGICUBE PRODUCT. THIS LIMITATION OF LIABILITY
WILL BE EFFECTIVE EVEN IF LOGICUBE HAS BEEN ADVISED OF THE POSSIBILITY OF ANY SUCH DAMAGES.
LOGICUBE MAKES EVERY EFFORT TO ENSURE PROPER OPERATION OF ITS PRODUCTS. HOWEVER, THE
PURCHASER IS RESPONSIBLE FOR VERIFYING THAT THE OUTPUT OF A LOGICUBE PRODUCT MEETS THE
Logicube WriteProtect™ BAY User’s Manual
I
PURCHASER’S REQUIREMENTS. THE PURCHASER FURTHER ACKNOWLEDGES THAT IMPROPER OPERATION
OF LOGICUBE PRODUCTS CAN CAUSE LOSS OF DATA, DEFECTIVE FORMATTING, OR DEFECTIVE DATA
LOADING. LOGICUBE WILL MAKE EFFORTS TO SOLVE OR REPAIR ANY PROBLEMS IDENTIFIED BY
PURCHASER, EITHER UNDER THE WARRANTY SET FORTH BELOW OR ON A TIME AND MATERIALS BASIS.
LIMITED WARRANTY
FOR ONE YEAR FROM THE DATE OF SALE (THE “WARRANTY PERIOD”) LOGICUBE WARRANTS THAT THE
PRODUCT (EXCLUDING CABLES, ADAPTERS, AND OTHER “CONSUMABLE” ITEMS) IS FREE FROM
MANUFACTURING DEFECTS IN MATERIAL AND WORKMANSHIP. THIS LIMITED WARRANTY COVERS
DEFECTS ENCOUNTERED IN THE NORMAL USE OF THE PRODUCT DURING THE WARRANTY PERIOD AND
DOES NOT APPLY TO: PRODUCTS DAMAGED DUE TO PHYSICAL ABUSE, MISHANDLING, ACCIDENT,
NEGLIGENCE, OR FAILURE TO FOLLOW ALL OPERATING INSTRUCTIONS CONTAINED IN THE OPERATING
MANUAL; PRODUCTS WHICH ARE MODIFIED; PRODUCTS WHICH ARE USED IN ANY MANNER OTHER THAN
THE MANNER FOR WHICH THEY WERE INTENDED, AS SET FORTH IN THE OPERATING MANUAL; PRODUCTS
WHICH ARE DAMAGED OR DEFECTS CAUSED BY THE USE OF UNAUTHORIZED PARTS OR BY
UNAUTHORIZED SERVICE; PRODUCTS DAMAGED DUE TO UNSUITABLE OPERATING OR PHYSICAL
CONDITIONS DIFFERING FROM THOSE RECOMMENDED IN THE OPERATING MANUAL OR PRODUCT
SPECIFICATIONS PROVIDED BY LOGICUBE; ANY PRODUCT WHICH HAS HAD ANY OF ITS SERIAL NUMBERS
ALTERED OR REMOVED; OR ANY PRODUCT DAMAGED DUE TO IMPROPER PACKAGING OF THE WARRANTY
RETURN TO LOGICUBE. AT LOGICUBE’S OPTION, ANY PRODUCT PROVEN TO BE DEFECTIVE WITHIN THE
WARRANTY PERIOD WILL EITHER BE REPAIRED OR REPLACED USING NEW OR REFURBISHED
COMPONENTS AT NO COST. THIS WARRANTY IS THE SOLE AND EXCLUSIVE REMEDY FOR DEFECTIVE
PRODUCTS. IF A PRODUCT IS HAS BECOME OBSOLETE OR IS NO LONGER SUPPORTED BY LOGICUBE THE
PRODUCT MAY BE REPLACED WITH AN EQUIVALENT OR SUCCESSOR PRODUCT AT LOGICUBE’S
DISCRETION. THIS WARRANTY EXTENDS ONLY TO THE END PURCHASER OF LOGICUBE PRODUCTS. THIS
WARRANTY DOES NOT APPLY TO, AND IS NOT FOR THE BENEFIT OF, RESELLERS OR DISTRIBUTORS OF
LOGICUBE PRODUCTS. UNLESS OTHERWISE AGREED IN WRITING BY LOGICUBE, NO WARRANTY IS
PROVIDED TO RESELLERS OR DISTRIBUTORS OF LOGICUBE PRODUCTS.
IN ORDER TO RECEIVE WARRANTY SERVICES CONTACT LOGICUBE’S TECHNICAL SUPPORT DEPARTMENT
VIA PHONE OR E-MAIL. PRODUCTS RETURNED TO LOGICUBE FOR REPAIR UNDER WARRANTY MUST
REFERENCE A LOGICUBE RETURN MATERIAL AUTHORIZATION NUMBER (“RMA”). ANY PRODUCT RECEIVED
BY LOGICUBE WITHOUT AN RMA# WILL BE REFUSED AND RETURNED TO PURCHASER. THE PURCHASER
MUST CONTACT LOGICUBE’S TECHNICAL SUPPORT DEPARTMENT VIA E-MAIL
([email protected]) OR VIA PHONE AT +1-818-700-8488 OPT. 3 TO OBTAIN A VALID RMA#. THE
PURCHASER MAY BE REQUIRED TO PERFORM CERTAIN DIAGNOSTIC TESTS ON A PRODUCT PRIOR TO
LOGICUBE ISSUING AN RMA#. THE PURCHASER MUST PROVIDE THE PRODUCT MODEL, SERIAL NUMBER,
PURCHASER NAME AND ADDRESS, EMAIL ADDRESS AND A DESCRIPTION OF THE PROBLEM WITH AS
MUCH DETAIL AS POSSIBLE. AT LOGICUBE’S SOLE AND ABSOLUTE DISCRETION, REASONABLE TELEPHONE
AND EMAIL SUPPORT MAY ALSO BE AVAILABLE FOR THE LIFE OF THE PRODUCT AS DEFINED BY LOGICUBE.
EXCEPT AS OTHERWISE SPECIFICALLY PROVIDED IN THIS AGREEMENT, LOGICUBE PRODUCTS ARE
PROVIDED AS-IS AND AS-AVAILABLE, AND LOGICUBE DISCLAIMS ANY AND ALL OTHER WARRANTIES
(WHETHER EXPRESS, IMPLIED, OR STATUTORY) INCLUDING, WITHOUT LIMITATION, ANY WARRANTIES OF
MERCHANTABILITY, FITNESS FOR A PARTICULAR PURPOSE, OR NONINFRINGEMENT OF THIRD PARTY
RIGHTS.
SOME JURISDICTIONS DO NOT ALLOW THE EXCLUSION OR LIMITATION OF INCIDENTAL OR
CONSEQUENTIAL DAMAGES, OR LIMITATIONS ON HOW LONG AN IMPLIED WARRANTY LASTS, SO THE
ABOVE LIMITATIONS OR EXCLUSIONS MAY NOT APPLY TO YOU. THIS WARRANTY GIVES YOU SPECIFIC
LEGAL RIGHTS, AND YOU MAY HAVE OTHER RIGHTS WHICH VARY FROM JURISDICTION TO JURISDICTION.
Logicube WriteProtect™ BAY User’s Manual
II
RoHS Certificate of Compliance
LOGICUBE PRODUCTS COMPLY WITH THE EUROPEAN UNION RESTRICTION OF THE USE OF CERTAIN
HAZARDOUS SUBSTANCES IN ELECTRONIC EQUIPMENT, ROHS DIRECTIVE (2002/95/EC).
THE ROHS DIRECTIVE PROHIBITS THE SALE OF CERTAIN ELECTRONIC EQUIPMENT CONTAINING SOME
HAZARDOUS SUBSTANCES SUCH AS MERCURY, LEAD, CADMIUM, HEXAVALENT CHROMIUM AND CERTAIN
FLAME-RETARDANTS IN THE EUROPEAN UNION. THIS DIRECTIVE APPLIES TO ELECTRONIC PRODUCTS
PLACED ON THE EU MARKET AFTER JULY 1, 2006.
Logicube Technical Support Contact Information
1.
2.
3.
By website: www.logicube.com
By email: [email protected]
By telephone: 1 - (818) 700 8488 ext. 3 between the hours of 7am – 5pm PST, Monday through
Friday, excluding U.S. legal holidays.
Logicube WriteProtect™ BAY User’s Manual
III
Table of Contents
WRITEPROTECT™ BAY USER’S MANUAL ........................................................................ I
LIMITATION OF LIABILITY AND WARRANTY INFORMATION ........................................... I
LOGICUBE DISCLAIMER ........................................................................................................................ I
WARRANTY ....................................................................................................................................... I
ROHS CERTIFICATE OF COMPLIANCE .................................................................................................... III
LOGICUBE TECHNICAL SUPPORT CONTACT INFORMATION........................................................................ III
TABLE OF CONTENTS ..................................................................................................... I
1: INTRODUCTION ...................................................................................................... 1
1.0
1.1
1.2
1.3
1.4
INTRODUCTION TO THE WRITEPROTECT BAY .................................................................................. 1
FEATURES ................................................................................................................................. 1
SPECIFICATIONS.......................................................................................................................... 2
IN THE BOX ............................................................................................................................... 2
ADDITIONAL OPTIONS ................................................................................................................. 3
2: GETTING STARTED .................................................................................................. 4
2.0
2.1
2.2
2.3
2.4
OVERVIEW OF THE WRITEPROTECT BAY ........................................................................................ 4
CONNECTING THE WRITEPROTECT BAY TO A FORENSIC WORKSTATION ............................................... 5
CONNECTING VARIOUS DRIVE TYPES............................................................................................... 6
USING USB/FIREWIRE/ESATA ENCLOSURES OR EXTERNAL DRIVES.................................................... 7
LEDS ........................................................................................................................................ 7
3: QUICK START .......................................................................................................... 8
3.0 QUICK START GUIDE ................................................................................................................... 8
3.1 REGISTRY OPTIMIZATION ............................................................................................................. 8
3.2 CONNECTED DRIVES.................................................................................................................... 9
4: REMOTE CONNECTIVITY ....................................................................................... 11
4.0 INTRODUCTION ........................................................................................................................ 11
4.1 CONNECTING TO THE WEB INTERFACE ......................................................................................... 11
4.2 USAGE .................................................................................................................................... 11
5: USING THE WEB INTERFACE .................................................................................. 12
5.0
5.1
5.2
5.3
5.4
INTRODUCTION ........................................................................................................................ 12
USB DEVICE ............................................................................................................................ 12
FILE BROWSER ......................................................................................................................... 13
WRITE PROTECT STATISTICS ....................................................................................................... 13
SYSTEM SETTINGS..................................................................................................................... 13
Logicube WriteProtect™ BAY User’s Manual
I
5.4.1 User Profiles/Configurations ........................................................................................ 14
5.4.2 Passwords .................................................................................................................... 15
5.4.3 Language/Time Zone ................................................................................................... 16
5.4.4 USB Device ................................................................................................................... 16
5.4.5 HPA............................................................................................................................... 17
5.5 NETWORK SETTINGS ................................................................................................................. 17
5.6 SOFTWARE UPDATES................................................................................................................. 18
5.7 POWER OFF ............................................................................................................................ 18
6: UPDATING THE WRITEPROTECT BAY SOFTWARE ................................................... 19
6.0 LOADING NEW SOFTWARE ......................................................................................................... 19
6.1 SOFTWARE LOADING INSTRUCTIONS ............................................................................................ 19
6.1.1 From Network – Via the web ....................................................................................... 20
6.1.2 From USB Drive – Via software download ................................................................... 20
6.2 FIRMWARE LOADING INSTRUCTIONS ............................................................................................ 21
TECHNICAL SUPPORT INFORMATION ................................................................................................... 22
Logicube WriteProtect™ BAY User’s Manual
II
1: Introduction
1.0 Introduction to the WriteProtect BAY
The WriteProtect™ BAY write-blocker provides secure, read-only, write-blocked access to SAS, SATA,
USB 3.0, FireWire™, and PATA/IDE (PATA/IDE supported with an adapter) suspect hard drives. Extremely
fast performance is powered by a SuperSpeed USB 3.0 host connection to easily manage large capacity
hard drives. The WriteProtect BAY is the only portable write-blocker on the market that provides
support for 5 different storage technologies in a 5.25” half height design that fits into the drive bay of
your forensic workstation. Logicube, a pioneer in the digital forensic industry, delivers an easy to use,
reliable and professional forensic write-blocking solution.
1.1 Features
The standalone WriteProtect-BAY mounts into a standard 5.25” half-height forensic workstation
drive bay for efficient imaging and preview tasks in the lab
Superspeed USB 3.0 host connection for extremely fast operation
Built-in, read-only, write-blocked support for SAS/SATA/USB 3.0/2.0/1.1/FW400/800 storage
technologies, an adapter is included to support 2.5”/3.5” IDE drives
Logicube WriteProtect BAY User’s Manual
1
INTRODUCTION
Multiple source drives can be connected to the WriteProtect and imaged, using your forensic
imaging software, simultaneously to shorten processing time
Features 2 SAS/SATA drive ports, 1 USB 3.0 port, 1 FireWire port, 1 Gigabit Ethernet port
Support for IDE, 1.8” IDE, 1.8” ZIF, mSATA, microSATA, eSATA and flash media is available using
optional adapters
Use the browser-based user interface to manage all WriteProtect operations including software
updates. Connect to your network using the WriteProtect’s Gigabit Ethernet port
Preview drives connected to WriteProtect using the browser-based user interface
HPA/DCO detection and capture supported via the browser-based user interface
5 LEDs for power, host, device, activity, HPA/DCO detection allow you to easily monitor all
processes
Compatible with forensic acquisition and analysis software
1.2 Specifications
Power
Requirements
Power Supply
Voltage (DC IN)
Output Voltage
(DC OUT)
Net
Weight
Dimensions
Agency
Approvals
72 watts
(including 2
hard drives
plus 1 hard
drive using a
USB 3 to SATA
adapter)
+12V DC +/- 5%
from PC required
+5V DC @ 2.5A,
+12V DC @ 2.5A
1.75lbs
0.79kg
7.62” X 5.75” X 1.62”
(L)
(W)
(H)
RoHS
compliant
19.3cm X 14.6 cm X
4.1cm
1.3 In the Box
The following items are included with WriteProtect BAY:
2 SAS/SATA power & data cables
1 FireWire cable
1 USB 3.0 Type A Male to Micro-B Male
1 Cat 6 network cable
1 2.5”/3.5” IDE to SATA adapter
1 Dual 4-pin molex to 6-pin PCIe Y adapter
Logicube WriteProtect™ BAY User’s Manual
2
INTRODUCTION
1.4 Additional Options
The following options are available for the WriteProtect BAY:
eSATA cable
mSATA adapter
Flash media reader for compact flash, SD cards and other flash media
1.8” IDE to SATA adapter
1.8” IDE ZIF to SATA adapter
1.8” microSATA adapter
WARNINGS:
Avoid dropping the Logicube WriteProtect BAY or subjecting it to
sharp jolts. When in use, place it on a flat surface.
Keep the unit dry. If the WriteProtect BAY needs to be cleaned,
use a lightly damp, lint free cloth. Avoid using soap or other
cleaning agents particularly those containing bleach, ammonia,
alcohol or other harsh chemicals.
Do not attempt to service or open the WriteProtect BAY. Doing
so may void the warranty. If the unit requires service, please
contact Logicube Technical Support for assistance.
Special Icons – Throughout this manual, there are two icons that can be seen. Please
pay close attention when any of these two icons are found. These icons highlight additional information
or important warnings on specific topics.
Logicube WriteProtect™ BAY User’s Manual
3
2: Getting Started
2.0 Overview of the WriteProtect BAY
WriteProtect BAY – Right angled view
Logicube WriteProtect BAY User’s Manual
4
GETTING STARTED
WriteProtect BAY - Left angled view
WriteProtect BAY – Back view
2.1 Connecting the WriteProtect BAY to a forensic workstation
To mount the WriteProtect BAY to a 5.25” bay on a forensic workstation, please reference the
workstation’s user’s manual or the case manufacturer’s manual.
It is recommended the workstation be powered off when mounting and
connecting the WriteProtect BAY.
The WriteProtect BAY is powered by a 6-pin PCIe power connector. It comes with dual 4-pin
molex to 6-pin PCIe Y adapter for power supplies that do not have a 6-pin PCIe power output.
Attach a 6-pin PCIe power connector from the power supply or use the adapter to utilize two 4pin molex connectors. This will provide power to the WriteProtect BAY.
Connect the USB 3.0 host cable to an available USB port.
The WriteProtect BAY is now ready to be used and will turn on when the computer is turned on.
Logicube WriteProtect BAY User’s Manual
5
GETTING STARTED
The PWR LED will blink for up to 30 seconds when turned on. The WriteProtect
BAY will be ready to use when the PWR LED turns solid green.
There are three ways of turning the WriteProtect BAY off:
1. Shut down the forensic analysis computer. The WriteProtect BAY will turn off with the
computer.
2. Press and immediately release the power button on the WriteProtect BAY. The Power
LED will start blinking as the WriteProtect BAY begins to shut down. The Power LED and
the fans will turn off within 30 seconds. When the Power LED turns off, the WriteProtect
BAY has fully shut down.
3. Using the Graphical User Interface (GUI) via a browser through a remote connection,
navigate to the Power Off screen and click the Power Off icon. The Power LED will start
blinking as the WriteProtect BAY begins to shut down. The Power LED and the fans will
turn off within 30 seconds. When the Power LED turns off, the WriteProtect BAY has
fully shut down.
2.2 Connecting various drive types
Cables and adapters are available for the following drive types:
SAS
SATA
USB
FireWire
2.5” and 3.5” PATA/IDE
eSATA cable (optional)
mSATA adapter (optional)
Flash media reader for compact flash, SD cards and other flash media (optional)
1.8” IDE to SATA adapter (optional)
1.8” IDE ZIF to SATA adapter (optional)
1.8” microSATA adapter (optional)
Logicube WriteProtect BAY User’s Manual
6
GETTING STARTED
The SAS/SATA cable must be matched with the SAS and Power (PWR) ports. For example, SAS 1
goes with PWR 1 and SAS 2 goes with PWR 2.
Drives do not have to be connected in any order. For example, a single SATA drive
does not have to be connected to the SAS/SATA S1 port. It can be connected to
the SAS/SATA S2 port without having anything connected to the S1 port.
Any combination of drives can be connected at the same time, up to 4 drives
connecting to all available ports.
2.3 Using USB/FireWire/eSATA Enclosures or External Drives
When using drives that came from a USB, FireWire, or eSATA enclosure, or external drives, it is
highly recommended to leave the drive inside the enclosure. USB enclosures typically have an
on-board controller that may be necessary to read the drive properly. Taking the drive out of
the enclosure could cause any device (including computers) not to read the drive contents
properly.
2.4 LEDs
The WriteProtect BAY has five (5) LEDs:
PWR – Power LED
On – The WriteProtect is powered on
Blinking – This LED will blink while the WriteProtect is being turned ON or OFF
Off - The WriteProtect is turned off
HOST – Detects a link connection between the WriteProtect and the host computer
On – Detects an active link between the WriteProtect and host computer
Off – There is no active link between the WriteProtect and host computer
DEV – Device LED
On – This LED is ON when a drive is connected (SATA, SAS, USB, FireWire, etc.)
Off – This LED is OFF when there are no drives connected
ACT – Activity LED
Blinking – Detects activity on the connected drive
Off – No activity on the connected drive
HPA/DCO – HPA and/or DCO detection
On – Detects the presence of an HPA and/or DCO on the connected drive
Off – Does not detect the presence of an HPA and/or DCO on the connected drive
Logicube WriteProtect BAY User’s Manual
7
3: Quick Start
3.0 Quick Start Guide
This chapter gives a basic overview and steps on how to set up the WriteProtect BAY.
Two steps must be performed to use the WriteProtect BAY:
Turn the WriteProtect BAY on
Connect at least one drive to the WriteProtect BAY
Optional: Connect the WriteProtect BAY to a network using a Cat5e or Cat6 network cable
for remote connectivity to be able to use the built-in file browsing capabilities, configure, or
update the software of the WriteProtect BAY.
3.1 Registry Optimization
Logicube recommends a registry entry to optimize the USB 3.0 transfer speeds for windows 7
and Windows 8/8.1.
The registry entries can be downloaded from:
http://updates.logicube.com/WriteProtectOptimization/WriteProtect_Optimization.zip
Extract the contents of the ZIP file to a folder on your computer. You should see two files:
Logicube_WriteProtect_Optimization_Win7.reg
Logicube_WriteProtect_Optimization_Win8.reg
Microsoft recommends backing up the registry andany important/valued
data before making any changes to the registry.
To import the optimization registry entry:
1. Make sure you are logged in to a Windows 7 or 8/8.1 computer on an account with
administrator rights
2. Double-click the appropriate registry file
(Logicube_WriteProtect_Optimization_Win7.reg for Windows 7 computers and
Logicube_WriteProtect_Optimization_Win8.reg 8.reg for Windows 8/8.1 computers).
3. Windows should prompt you asking if you are sure you want to allow the program (the
registry file) to make changes to yoru computer. Select Yes. You may also be prompted
Logicube WriteProtect BAY User’s Manual
8
QUICK START
with a warning about adding infromation to the registry may cause components to stop
working correctly. Please select Yes to continue adding the registry entry.
4. When the registry entry has been imported, you should see a confirmation window
stating it has been successfully added to the registry. Once successfully added, we
recommend restarting the computer.
3.2 Connected Drives
Depending on the Operating System on the computer, drives connected to the WriteProtect BAY
may or may not be automatically mounted. Windows should automatically assign a drive letter
to partitions that it can recognize.
Disk Management will show the drives as “Read Only”:
If at least one drive is already connected and a second, third, or fourth drive is
added, Windows may not automatically detect the added drives. It is
recommended to go to Disk Management, click Action, then click Refresh.
When drives are disconnected, refreshing Disk Management may also be
required to refresh the list of connected drives.
Logicube WriteProtect BAY User’s Manual
9
QUICK START
FireWire drives may not be seen by the computer when the FireWire drive is
already connected to the WriteProtect BAY before the WriteProtect BAY is turned
on.
If FireWire drives are not detected, disconnect the FireWire drive from the
WriteProtect BAY, wait a few seconds, then re-connect the FireWire drive.
HPA/DCO can be managed and configured through the web browser interface
(additional information TBD). Third party tools can always be used to manage
HPA/DCO.
Logicube WriteProtect BAY User’s Manual
10
4: Remote Connectivity
4.0 Introduction
The WriteProtect BAY comes with a gigabit network connection in the back of the unit.
Connecting the WriteProtect BAY to a network allows remote access from any computer within
the same network using a supported Internet browser (Chrome or Firefox).
The WriteProtect BAY is configured for DHCP.
4.1 Connecting to the Web Interface
Using a supported web browser, go to the WriteProtect BAY’s hostname. The hostname will be:
http://wp-XXXXXX where XXXXXX is the 6 digit serial number of the WriteProtect BAY. The IP
address can be found on a sticker underneath the WriteProtect BAY. The WriteProtect BAY’s
web interface will appear on the browser screen.
Google Chrome or Mozilla Firefox are the recommended browsers. Other browsers may not
display the Graphical User Interface correctly.
On some browsers or Operating Systems, the WriteProtect BAY will need to be
accessed by browsing to http://wp-XXXXXX.local/.
4.2 Usage
The web interface can be used for built-in file browsing capabilities, configuration, or software
updates for the WriteProtect BAY. The built-in file browser can recognize many different file
systems and can be a useful tool when the computer being used does not have the ability to see
the connect drive’s file system or contents. See Section 5: Using the Web Interface for details
on the web interface.
Logicube WriteProtect BAY User’s Manual
11
5: Using the Web Interface
5.0 Introduction
The Web Interface allows the user to update the software (and firmware) of the WriteProtect
BAY. It can also be used to configure advanced settings for the device. The following sections
give a brief explanation of each screen on the web interface.
5.1 USB Device
This screen has three tabs: Drives, HPA/DCO, and Exports.
DRIVES – This screen allows the user to see basic information about drives connected to the
device. The
More Info icon shows additional information about the drive.
HPA/DCO – This screen displays the HPA and DCO sizes for each connected drive.
Logicube WriteProtect BAY User’s Manual
12
WEB INTERFACE
EXPORTS – This screen has a
RE-ENGAGE USB button which resets the USB
connection without having to physically disconnect and re-connect the USB cable between the
WriteProtect BAY and the computer.
5.2 File Browser
The contents of all connected drives can be previewed using the WriteProtect
BAY’s file browser. The file browser will show the partitions and the contents
of each partition. Note that only some files can be opened by the file browser.
Files opened by the file browser will not alter the drive in any way. The file
browser can be useful for file systems that cannot be recognized by the computer’s Operating
System (for example, EXT4 file systems can be viewed using the file browser if it cannot be
viewed by Windows.
If a file cannot be previewed, the following message will appear:
5.3 Write Protect Statistics
This will display two tabs: About WriteProtect and Adv. Drive Statistics.
The About screen will show information about the WriteProtect BAY including the current
software installed.
The Adv. Drive Statistics tab displays S.M.A.R.T. information taken directly from what the drive
is reporting.
5.4 System Settings
The System Settings screen allows users to configure five different settings for
the WriteProtect BAY:
User Profiles/Configurations
Passwords
Language/Time Zone
USB Device
HPA
Logicube WriteProtect BAY User’s Manual
13
WEB INTERFACE
5.4.1 User Profiles/Configurations
This screen shows all user profiles/configurations for the WriteProtect BAY.
There are three options in this screen:
New – Allows the user to create a new profile/configuration name.
Save – Saves the selected profile/configuration.
Load – Loads the selected profile/configuration.
The WriteProtect BAY will boot with the profile/configuration that
has an asterisk (*) next to the name.
Profiles/configurations allow users to create different profiles or configurations.
The profile/configuration can then be saved. When a profile/configuration is
loaded using the Load icon, that configuration will be used during its boot
process.
For example, if the user wants to change the Export Type from Fixed Drive to
Removable and have that setting be used every time the WriteProtect BAY is
turned on, the setting must be changed then a profile/configuration needs to be
added, saved, and loaded:
1. Turn the WriteProtect BAY off then back on. This will reset all settings to
its default configuration. This is an important step to help ensure only
the changes desired will be the changes saved.
2. Go to the System Settings tab and in the USB Device tab, set the Export
Type to ‘Removable’.
3. Go to User Profiles/Configurations tab and click the New icon.
4. Type a name for this profile. For example, removable and click the OK
icon. The profile name should appear on the screen.
Logicube WriteProtect BAY User’s Manual
14
WEB INTERFACE
5. Click the newly saved profile and click Save. A confirmation screen will
appear:
6. Click the Yes icon to save the profile.
7. Make sure the profile to be loaded (during the boot process) is
highlighted (in this case, REMOVABLE.DB) and click the Load icon. A
confirmation screen will appear:
8. The next time the WriteProtect BAY is turned on it will load the
REMOVABLE.DB profile.
To delete a profile, click the (delete) icon. A confirmation screen will appear.
Click the Yes icon to delete the selected profile.
It is highly recommended that the WriteProtect BAY is turned off
then back on before making any changes to the
profiles/configurations. This helps ensure that only the desired
changes are saved.
Do not highlight and save over the INITIAL.DB
configuration. This is the default configuration of the
WriteProtect BAY and is used to reset the device to the
factory default settings.
5.4.2 Passwords
This section is reserved.
Logicube WriteProtect BAY User’s Manual
15
WEB INTERFACE
5.4.3 Language/Time Zone
This section is reserved.
5.4.4 USB Device
This section allows advanced configuration for the WriteProtect BAY.
EXPORT MODE – This changes the behavior on how the computer’s Operating
System will interact with the connected drive.
WRITE SUPPRESS – Will make it so that it looks like changes can be
made, but no changes will occur. On rare occasions, this setting may
need to be used for drives that are not properly detected (for example,
Windows may show a notice that the connected drive needs to be
formatted).
READ ONLY (Default) – Sets the drive in a Read-Only state. Attempts to
alter the contents of the drive will result in error messages or notices
that the drive is Read-Only.
EXPORT TYPE – This setting changes the behavior on how the computer’s
Operating System will see the connected drive.
FIXED DRIVE (Default) – Will make it so that the connected computer’s
Operating System sees the connected drive as a fixed drive (nonremovable).
REMOVABLE – The connected computer’s Operating System will see the
connected drive as a removable disk.
DCO PASSTHROUGH – Changes to DCO is persistent and may be permanent.
Always proceed with caution when changing the DCO. By default, this is set to
Logicube WriteProtect BAY User’s Manual
16
WEB INTERFACE
DISABLED, disallowing changes to the DCO. If changes need to be performed to
the DCO, set this to ENABLED.
5.4.5 HPA
This screen allows the auto-removal of HPA to be enabled or disabled.
5.5 Network Settings
There are two tabs in the Network settings screen:
SERVICES – The network settings screen allows certain network services to be enabled or
disabled.
There are 7 services that can be disabled (enabled by default):
SSH – Disabling this will block Secure Shell (SSH) traffic.
Telnet – Disabling this will block Telnet traffic.
HTTP – Disabling this will block web browser connections to the WriteProtect BAY.
CIFS/NETBIOS – Disabling this will block any CIFS or NETBIOS connection to the
WriteProtect BAY.
iSCSI – Disabling this will block iSCSI connections.
Iperf – Disabling this will block Iperf traffic (a network tool to measure bandwidth
performance).
Ping – Disabling this will block ping access to the WriteProtect BAY.
Logicube WriteProtect BAY User’s Manual
17
WEB INTERFACE
Disabling any of the services above will disallow the types of communication
controlled by those services. For example, if HTTP is disabled, users will not be
able to see the WriteProtect BAY through a web browser over the network.
Please contact your Network or Systems Administrator before changing any of
these services.
HTTP PROXY – In order for the WriteProtect BAY to be able to update software from a network
(over the internet), proxy settings may need to be set if the network utilizes a proxy server.
Networks that have a proxy server for internet access will require proxy settings for devices like
the WriteProtect BAY to connect to the Internet. This typically includes a server (or IP address), a
host port, a username and password.
5.6 Software Updates
New and improved software will be released from time to time. There are two
ways to update the software on the WriteProtect BAY: From the web via a
network connection or from a USB drive.
See Section 6: Updating the WriteProtect DESTKOP Software for step-by-step information on
how to update the software and firmware.
5.7 Power Off
This screen allows the user to remotely turn off the WriteProtect BAY or
refresh the Graphical User Interface (GUI).
Logicube WriteProtect BAY User’s Manual
18
6: Updating the WriteProtect BAY Software
6.0 Loading New Software
New and improved software will be released from time to time and will always be available on
the WriteProtect support page at http://www.logicube.com/knowledge/WriteProtect.
6.1 Software Loading Instructions
There are two methods of how to update the WriteProtect software:
A. FROM NETWORK – Via the Internet through a network connection
B. FROM USB DRIVE – Via software file download onto a USB drive flash.
The actual software installation will take about 5 minutes. If FROM NETWORK was
chosen, the total time can take up to 10 to 20 minutes (or longer) depending on
Internet speeds and Internet traffic.
Logicube WriteProtect BAY User’s Manual
19
SOFTWARE UPDATES
The most up-to-date instructions on updating the software can be found on the
WriteProtect support page at:
http://www.logicube.com/knowledge/WriteProtect.
6.1.1 From Network – Via the web
1. Connect the WriteProtect to a network with Internet access. Set the
proxy settings (IP settings) if necessary.
The WriteProtect is DHCP enabled by default.
2. Using the Remote Connectivity feature (see Section 4.0 for details on
Remote Connectivity), connect to the WriteProtect.
3. From the main menu on the WriteProtect, click the down arrow once
then click the Software Updates icon. A screen will appear showing the
current version of software installed towards the top of the screen.
4. Select From Network. The WriteProtect will check for a newer version
on the web. If one is found, it will display the version on the screen and
the Update icon will be selectable.
5. Click the Update icon to begin the update. A confirmation screen will
appear. ClickYes to continue the update.
6. Do not interrupt the update process. It may take several minutes. Once
completed, a ‘Successful’ screen will appear.
7. Reboot the WriteProtect by turning the unit off then back on using the
Power button.
8. Remotely connect to the WriteProtect again, then verify the software
version at the top of the ‘Software Updates’ screen.
6.1.2 From USB Drive – Via software download
The latest software can also be downloaded from Logicube’s website and be
placed onto a USB flash drive.
It is recommended to use an empty USB flash drive.
Download the latest software from the WriteProtect’s product support page at
http://www.logicube.com/knowledge/WriteProtect
1. Download the zip file from the download page.
2. Extract the contents of the downloaded zip file to the root of the USB
flash drive (the file must not be in any folder). Do not connect the USB
Logicube WriteProtect BAY User’s Manual
20
SOFTWARE UPDATES
3.
4.
5.
6.
7.
8.
flash drive yet. The WriteProtect will display a message when to connect
the USB drive.
From the main screen, click the Software Updates icon.
Select From USB Drive. The WriteProtect will prompt for the USB drive
to be connected to USB_S1.
Connect the USB drive to the front USB port. The WriteProtect will then
check for the version of the software on the USB drive and will display
that version on the box next to the selected location.
Click the Update icon to begin the update. A confirmation screen will
appear. Click Yes to continue the update. Do not interrupt the update
process. It may take several minutes. Once completed, a ‘Successful’
screen will appear.
Reboot the WriteProtect by turning the unit off then back on using the
Power button.
Remotely connect to the WriteProtect again, then verify the software
version at the top of the ‘Software Updates’ screen.
6.2 Firmware Loading Instructions
Some software releases may contain a firmware upgrade. The steps below outline how to check
if the WriteProtect requires a firmware upgrade:
After the software is updated on the WriteProtect, from the main menu, click the down
arrow once then click the Software Updates icon.
2. Click the “Firmware Update” tab. One of two screens will appear:
a. FIRMWARE UPGRADE AVAILABE – Click the Update icon. A message will
appear: “FIRMWARE UPDATE COULD TAKE UP TO A FEW MINUTES TO
COMPLETE; PLEASE DO NOT INTERRUPT POWER DURING THIS TIME. ON
COMPLETION THE UNIT WILL AUTO-RESTART AND CONFIRM THE UPDATE.” Click
the OK icon to start the firmware update process.
1.
When the OK icon is clicked, the screen may appear to do
nothing. Do not keep clicking the OK icon. The firmware
update will take no more than 60 seconds. When the
firmware update finishes, the WriteProtect will reboot
automatically.
b. FIRMWARE UPGRADE NOT AVAILABLE – This message will appear if the device
does not require a firmware update. No further action is necessary if this
message appears.
Logicube WriteProtect BAY User’s Manual
21
SOFTWARE UPDATES
Technical Support Information
For further assistance please contact
Logicube Technical Support at: (001) 818 700 8488 7am-5pm PST, M-F (excluding US
legal holidays)
or by email to [email protected]
Logicube WriteProtect BAY User’s Manual
22