1
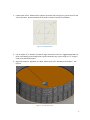
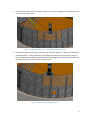
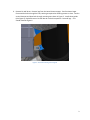
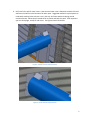
D & R MANUFACTURING
Center Cleanout
Installation Manual
27’ – 30’ Bins
Dave Bissett
7/10/2013
1. Locate center of bin. Measure from 4 points on the bin wall (see Figure 1), ensure that 1,3 and
2,4 are the same. Accurate location of this hole is critical to success of installation.
Figure 1 - Finding Bin Center
2. Cut out a hole 31 ½” diameter for vertical auger centered on this hole. Suggested method is to
drive a self-tapping screw through floor at point located in step 1, then using a 15 ¾” string to
scribe a line around that point.
3. Dig out for cleanout. Dig about 15” down, taper hole to 16 ½” diameter at the bottom. See
Figure 2.
Figure 2 - Vertical Cleanout Pit
1
4. Place vertical cleanout in hole as shown in Figure 3. Point spout roughly in direction desired. Do
not screw down at this point.
Figure 3 - Installed Vertical Auger (note – panel made transparent for clarity)
5. Locate which side you want auger to exit bin. Cut a hole 14” wide by 12” high centered between
indicated stiffeners. Use bin wall brace to set height and position of hole as shown in Figure 4.
Center brace between stiffeners as bolt clearances will be tight later. Drill the 4 holes to bolt the
brace to the wall at this point, but do not attach brace.
Figure 4 - Location of hole for horizontal cleanout
2
6. Remove bin wall brace. Remove legs from horizontal cleanout auger. Feed horizontal auger
from outside the bin through the hole, twisting as required to allow leg mounts to clear. Feed to
vertical cleanout and place bolt through mounting ears shown in Figure 5. Install chute guides
(also Figure 5) Replace brace on bin wall but do not bolt into position. Reinstall legs. Unit
should resemble Figure 6.
Figure 5 - Cleanout mounting ears and guide
3
Figure 6 - Horizontal cleanout installed
7. Carefully lower aeration and rotate vertical auger as required for leg clearance.
27’ bins will require the colliding leg to be cut away and a new leg to be bent backwards and
installed over aeration as shown in Figure 7. Note that aeration skin is not shown for clarity, but
leg is installed over skin.
Figure 7 - 27' aeration leg modification
8. Lift aeration away. Without rotating, lift edge of vertical auger and caulk. Screw down with ¼”
hex head self-tapping screws.
4
9. Drill holes in bin wall for outer covers. Note that the lower cover is bolted to the back of the bin
wall brace and will force the location of all other parts. Suggested method is to place panels on
inside while marking holes so brace is not in the way. Put foam weather stripping around
outside of panels. Mount panels outside of bin as shown and bolt into place. Caulk anywhere
you can see daylight, except for rod covers. See Figures 8 and 9 for details.
Figure 8 - Outside view bin wall penetration
Figure 9 - Inside view bin wall penetration
5