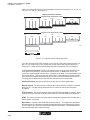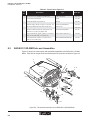
1
RAD-802.11-XD and RAD-802.11-XD-WM
User Manual
INSPIRING INNOVATIONS
Wireless Ethernet Radios
802.11 Transceiver Series
User Manual
RAD-80211-XD and RAD-80211-XD-WM
2186A016
i
RAD-802.11-XD and RAD-802.11-XD-WM
User Manual
ii
INSPIRING INNOVATIONS
Wireless Ethernet Radios
802.11 Transceiver Series
User Manual
RAD-80211-XD (IP20 DIN-rail Version – PN: 28 85 72 8)
RAD-80211-XD-WM (IP67 Wall Mount Version – PN: 28 85 71 5)
Headquarters,U.S.
PHOENIX CONTACT
P.O. Box 4100
Harrisburg, PA 17111-0100
Phone: 800-888-7388
717-944-1300
Fax: 717-944-1625
Email: [email protected]
Website: www.phoenixcon.com
Technical Service
Phone: 800-322-3225
1. Ethernet™ is a tradename of Xerox Corporation
2. Windows® and Windows® CE are tradenames of Microsoft Corporation
3. Modbus is a trademark of Modicon, Inc.
Rev A • Issued: June 2006
Headquarters, Canada
PHOENIX CONTACT Ltd.
235 Watline Avenue
Mississauga, Ontario L4Z 1P3
Phone: 905-890-2820
Fax: 905-890-0180
Technical Service
Phone: 800-890-2828
2186A
iii
RAD-802.11-XD and RAD-802.11-XD-WM
User Manual
This Manual Contains Information on the
Wireless Ethernet Radios, 802.11 Transceiver Series
RAD-80211-XD and RAD-80211-XD-WM
Information given herein is based on data believed to be reliable, but Phoenix Contact
makes no warranties expressed or implied as to its accuracy and assumes no liability
arising out of its use by others. This publication is not intended to be taken as a license
to operate under, or recommendation to infringe upon, any patents.
iv
RAD-802.11-XD and RAD-802.11-XD-WM
User Manual – Table of Contents
Table of Contents
Preface
I.
II.
III.
Warranty ...................................................................................................................... xi
A.
Important Notice (RF Exposure) ..................................................................... xi
B.
FCC Part 15 Compliance ................................................................................ xii
About this Manual ....................................................................................................... xii
A.
Requirements of the User Group .................................................................... xii
B.
Purpose of this Manual ................................................................................... xii
Using This Manual ....................................................................................................... xii
A.
Finding Information ........................................................................................ xiii
B.
Additional or Related Documentation ............................................................. xiii
C.
Current Documentation on the Internet .......................................................... xiii
D.
Statement of Legal Authority .......................................................................... xiii
E.
Validity of Documentation ............................................................................... xiii
SECTION 1
802.11 Series Overview
1.1
1.2
1.3
1.4
1.5
1.6
1.7
Basic Features of the IEEE 802.11 Wi-Fi Standard .................................................... 1-1
Radio Descriptions ..................................................................................................... 1-2
1.2.1 RAD-80211-XD ............................................................................................. 1-2
1.2.2 RAD-80211-XD-WM ...................................................................................... 1-2
Wireless Standard IEEE 802.11 Basics ..................................................................... 1-3
1.3.1 802.11b ......................................................................................................... 1-3
1.3.2 802.11a ......................................................................................................... 1-3
1.3.3 802.11g ......................................................................................................... 1-3
1.3.4 802.11b/g Mixed ............................................................................................ 1-3
Access Point/Client Configurations ............................................................................ 1-4
1.4.1 Example of Access Point/Client Topologies ................................................... 1-4
Bridge Configurations ................................................................................................ 1-4
1.5.1 Point-to-Point Bridging .................................................................................. 1-5
1.5.2 Point-to-Multipoint Bridging ........................................................................... 1-5
1.5.3 Repeater mode ............................................................................................. 1-6
Data Encryption and Security .................................................................................... 1-6
SSID (Service Set ID) ................................................................................................ 1-6
v
RAD-802.11-XD and RAD-802.11-XD-WM
User Manual – Table of Contents
Table of Contents
1.8
1.9
1.10
1.11
Access Point and Client Encryption ........................................................................... 1-7
1.8.1 WEP Encryption ............................................................................................ 1-7
1.8.2 WPA with TKIP/AES-CCMP Encryption ........................................................ 1-7
1.8.3 MAC Address Filtering .................................................................................. 1-7
Bridge Encryption ...................................................................................................... 1-8
1.9.1 AES .............................................................................................................. 1-8
DHCP Server ............................................................................................................. 1-8
Operator Authentication and Management ................................................................. 1-8
SECTION 2
System Planning
2.1
2.2
2.3
2.4
2.5
2.6
Accessing the Site ..................................................................................................... 2-1
Path Quality Analysis ................................................................................................. 2-2
Signal Strength .......................................................................................................... 2-2
Antennas and Cabling ................................................................................................ 2-2
2.4.1 Coaxial Cable Considerations ....................................................................... 2-3
Antenna Mounting Considerations ............................................................................. 2-4
Maintaining System Performance .............................................................................. 2-4
2.6.1 Antennas and Coaxial cable ......................................................................... 2-4
2.6.2 Cable Connections ........................................................................................ 2-4
2.6.3 Power Supply ................................................................................................ 2-4
SECTION 3
Mounting the Radios
3.1
3.2
Mounting the RAD-80211-XD ..................................................................................... 3-1
Mounting the RAD-80211-XD-WM ............................................................................. 3-4
SECTION 4
Making Connections and Powering Up
4.1
4.2
4.3
4.4
vi
Power Connections .................................................................................................... 4-1
4.1.1 RAD-80211-XD ............................................................................................. 4-1
4.1.2 RAD-80211-XD-WM ...................................................................................... 4-2
Ethernet Connections ................................................................................................ 4-3
Serial Port Connections ............................................................................................. 4-3
4.3.1 RS232 Connections ...................................................................................... 4-3
4.3.2 RS422/485 Connections ............................................................................... 4-4
Antenna Connections ................................................................................................. 4-5
RAD-802.11-XD and RAD-802.11-XD-WM
User Manual – Table of Contents
Table of Contents
SECTION 5
Programming the Radio
5.1
5.2
5.3
5.4
5.5
5.6
5.7
5.8
5.9
5.10
5.11
5.12
5.13
5.14
5.15
5.16
5.17
5.18
5.19
Configuring your PC to Communicate with the Radio ................................................ 5-2
Logging Into the Radio ............................................................................................... 5-2
Viewing Device Information ........................................................................................ 5-3
General Device Information ....................................................................................... 5-4
Local Diagnostics ....................................................................................................... 5-5
Device Diagram ......................................................................................................... 5-5
General Configuration ................................................................................................ 5-6
5.7.1 Operational Mode ......................................................................................... 5-7
LAN Configuration ..................................................................................................... 5-7
SNMP Configuration .................................................................................................. 5-8
DHCP Server ........................................................................................................... 5-10
Configuring the RAD-80211-XD/-WM as an Access Point ....................................... 5-10
5.11.1 General ....................................................................................................... 5-10
5.11.2 Access Point Security ................................................................................. 5-13
A. Static WEP ............................................................................................. 5-13
B. IEEE 802.11i and WPA Security ............................................................. 5-14
5.11.3 MAC Address Filtering ................................................................................ 5-15
5.11.4 Rogue AP Detection .................................................................................... 5-16
5.11.5 Advanced Settings ...................................................................................... 5-16
Client Configuration ................................................................................................. 5-17
5.12.1 General ....................................................................................................... 5-17
5.12.2 Security ....................................................................................................... 5-18
A. Open or Shared Authentication (WEP Security) ..................................... 5-18
B. WPA-PSK and WPA2-PSK Encryption ................................................... 5-19
Bridge Configuration ................................................................................................ 5-19
5.13.1 General ....................................................................................................... 5-19
5.13.2 Bridge Radio Settings ................................................................................. 5-20
5.13.3 Bridge Security ........................................................................................... 5-21
A. Static AES Security ................................................................................. 5-21
Serial I/O Port Configuration .................................................................................... 5-22
Passwords ............................................................................................................... 5-23
Store and Retrieve Settings ..................................................................................... 5-23
Performance ............................................................................................................ 5-24
Maintenance ............................................................................................................ 5-24
Monitoring / Reports ................................................................................................. 5-24
vii
RAD-802.11-XD and RAD-802.11-XD-WM
User Manual – Table of Contents
Table of Contents
SECTION 6
Radio Troubleshooting
6.1
6.2
6.3
6.4
LED Indicators ........................................................................................................... 6-1
6.1.1 RAD-80211-XD ............................................................................................. 6-1
6.1.2 RAD-80211-XD-WM ...................................................................................... 6-2
RSSI (Received Signal Strength Indicator) ................................................................ 6-2
6.2.1 RAD-80211-XD ............................................................................................. 6-2
6.2.2 RAD-80211-XD-WM ...................................................................................... 6-3
General Troubleshooting ............................................................................................ 6-4
Resetting the IP Address ........................................................................................... 6-5
6.4.1 DOS Command ............................................................................................ 6-5
6.4.2 Hardware Reset ............................................................................................ 6-5
SECTION 7
Technical Data
7.1
7.2
Dimensions ................................................................................................................ 7-1
Specifications ............................................................................................................. 7-2
SECTION 8
Ordering Information
8.1
8.2
8.3
viii
RAD-80211-XD Parts and Assemblies ...................................................................... 8-1
RAD-80211-XD-WM Parts and Assemblies ............................................................... 8-2
Additional Parts and Accessories ............................................................................... 8-4
RAD-802.11-XD and RAD-802.11-XD-WM
User Manual – Table of Contents
Appendixes
APPENDIX A
Structure of IP Addresses
A.1
A.2
Valid IP Parameters ..................................................................................................
A.1.1 Valid IP addresses are: ................................................................................
A.1.2 Valid subnet masks are: ...............................................................................
A.1.3 Default gateway/router: ................................................................................
Assigning IP Addresses ............................................................................................
A.2.1 Special IP Addresses for Special Applications .............................................
A.2.2 Value 255 in the Byte ...................................................................................
A.2.3 Subnet Masks ..............................................................................................
A.2.4 Examples for Subnet masks and Computer Bits
(See Figure A-4) ..........................................................................................
A-1
A-1
A-1
A-1
A-1
A-3
A-3
A-3
A-5
APPENDIX B
Glossary
APPENDIX C
Mounting Template for RAD-80211-XD-WM
ix
RAD-802.11-XD and RAD-802.11-XD-WM
User Manual – Table of Contents
x
RAD-802.11-XD and RAD-802.11-XD-WM
User Manual – Preface
Preface
Wireless Ethernet Radios
802.11 Transceiver Series
RAD-80211-XD and RAD-80211-XD-WM
Preface Contents
I. Warranty ........................................................................................................................... xi
A. Important Notice (RF Exposure) ........................................................................... xi
B. FCC Part 15 Compliance .................................................................................... xii
II. About this Manual ........................................................................................................... xii
A. Requirements of the User Group ........................................................................ xii
B. Purpose of this Manual ....................................................................................... xii
III.Using This Manual ........................................................................................................... xii
A. Finding Information ............................................................................................ xiii
B. Additional or Related Documentation ................................................................. xiii
C. Current Documentation on the Internet .............................................................. xiii
D. Statement of Legal Authority .............................................................................. xiii
E. Validity of Documentation ................................................................................... xiii
I. Warranty
Phoenix Contact Inc. warrants its wireless products against defects in materials and workmanship under normal use and service for a period of 12 months from the date of purchase.
During the warranty period, products determined by Phoenix Contact to be defective, shall at
the option of Phoenix Contact, either be repaired at a location authorized by Phoenix Contact
(and returned free of charges for parts, labor, or shipping), or replaced with an equivalent
product. Defective parts replaced by Phoenix Contact shall become the property of Phoenix
Contact. This Limited Warranty does not cover on-site repair of products. Defective products must be returned to Phoenix Contact to be repaired or replaced. Phoenix Contact is not
responsible for the operation, damage, availability, or loss of use, of the customer supplied
equipment being used with a wireless product.
This warranty is void under the following circumstances:
1. Abnormal use of the product or use in violation of the instructions provide in this
manual
2. Improper and/or unauthorized installation or repair of system components
A.
Important Notice (RF Exposure)
This product is intended for fixed installation applications. In order to comply with FCC/ISC
adopted RF exposure requirements, installation of this transmitter system’s antennas must
be performed in a manner that will provide at least a 6 foot (2m) clearance from the front
radiating aperture to any user or member of the public.
xi
RAD-802.11-XD and RAD-802.11-XD-WM
User Manual – Preface
B.
FCC Part 15 Compliance
This device complies with Part 15 of the FCC Rules. Operation is subject to the following two
conditions: (1) This device may not cause harmful interference, and (2) this device must
accept any interference received, including interference that may cause undesired operation.
Changes or modifications not expressly approved by Phoenix Contact will void the user’s
authority to operate the equipment.
FCC Part 15.247
ISC RSS 2101
II. About this Manual
In order to guarantee the safe use of your device, we recommend that you read this manual
carefully. The following notes give you information on how to use this manual.
A.
Requirements of the User Group
The products described in this manual should be installed/operated/maintained only by
qualified application programmers and software engineers, electricians or persons instructed
by them. Phoenix Contact assumes no liability for damage to any products resulting from
disregard of information contained in this manual.
B.
Purpose of this Manual
This manual contains the information necessary to understand and to configure a Phoenix
Contact wireless serial data modem.
III. Using This Manual
This manual contains the information necessary to understand, install, operate, and order
parts for Phoenix Contact wireless serial data modem and associated components. The
table of contents at the front of this manual provides a paragraph-by-paragraph breakdown
of the subject matter covered in each section.
Specifications within the text of this manual are given in the International System of Units
(SI), with English equivalents in parentheses. Fully capitalized words within the text indicate
markings found on the equipment. Warnings, Cautions and Notes are used to emphasize
critical instructions:
WARNING
An operating procedure, practice, etc., which, if not carefully followed, could result in personal injury.
CAUTION
An operating procedure, practice, etc., which, if not strictly
observed, could result in damage to the equipment.
NOTE
Highlights important information about an operating procedure
or the equipment.
xii
RAD-802.11-XD and RAD-802.11-XD-WM
User Manual – Preface
A.
Finding Information
For ease of finding specific information in this manual, we have provide the following help:
• A main table of contents covering all subject matter is provided at the front of this
manual.
• A table of contents covering information within a section or an appendix is provided at
the front of each individual section or appendix.
B.
Additional or Related Documentation
For specific information on the individual expansion I/O modules, see the corresponding
module-specific data sheets.
C.
Current Documentation on the Internet
Make sure you are always working with the latest documentation published. The latest
changes or additional information can be found on the Internet at:
http://www.phoenixcon.com (Info Service)
D.
Statement of Legal Authority
This manual, including all illustrations contained herein, is copyright protected. Use of this
manual by any third party in departure from the copyright provision is forbidden. Reproduction, translation, and electronic or photographic archiving or alteration requires the express
written consent of Phoenix Contact. Violators are liable for damages.
Phoenix Contact reserves the right to make any technical changes that serve the purpose of
technical progress.
Phoenix Contact reserves all rights in the case of patent award or listing of a registered
design. External products are always named without reference to patent rights. The existence of such rights shall not be excluded.
E.
Validity of Documentation
This manual mainly contains a description of RAD-80211-XD (WM) Ethernet radios that were
available when this manual was published.
Phoenix Contact reserves the right to make any technical extensions and changes to the
system that would serve the purpose of technical progress. Up to the time that a new manual
revision is published, any updates or changes will be documented on the Internet at:
http://www.phoenixcon.com (Info Service)
xiii
RAD-802.11-XD and RAD-802.11-XD-WM
User Manual – Preface
xiv
RAD-802.11-XD and RAD-802.11-XD-WM
User Manual – Section 1
1
SECTION
802.11 Series Overview
Section 1 Contents
1.1
1.2
1.3
1.4
1.5
1.6
1.7
1.8
1.9
1.10
1.11
1.1
Basic Features of the IEEE 802.11 Wi-Fi Standard ................................................. 1-1
Radio Descriptions .................................................................................................. 1-2
1.2.1 RAD-80211-XD ........................................................................................... 1-2
1.2.2 RAD-80211-XD-WM ................................................................................... 1-2
Wireless Standard IEEE 802.11 Basics ................................................................... 1-3
1.3.1 802.11b ....................................................................................................... 1-3
1.3.2 802.11a ....................................................................................................... 1-3
1.3.3 802.11g ....................................................................................................... 1-3
1.3.4 802.11b/g Mixed ......................................................................................... 1-3
Access Point/Client Configurations .......................................................................... 1-4
1.4.1 Example of Access Point/Client Topologies ................................................ 1-4
Bridge Configurations .............................................................................................. 1-4
1.5.1 Point-to-Point Bridging ................................................................................ 1-5
1.5.2 Point-to-Multipoint Bridging ......................................................................... 1-5
1.5.3 Repeater mode ........................................................................................... 1-6
Data Encryption and Security .................................................................................. 1-6
SSID (Service Set ID) .............................................................................................. 1-6
Access Point and Client Encryption ......................................................................... 1-7
1.8.1 WEP Encryption ......................................................................................... 1-7
1.8.2 WPA with TKIP/AES-CCMP Encryption ...................................................... 1-7
1.8.3 MAC Address Filtering ................................................................................ 1-7
Bridge Encryption .................................................................................................... 1-8
1.9.1 AES ............................................................................................................ 1-8
DHCP Server ........................................................................................................... 1-8
Operator Authentication and Management .............................................................. 1-8
Basic Features of the IEEE 802.11 Wi-Fi Standard
The Phoenix Contact 802.11 Series of radio transceivers are capable of transmitting Ethernet data using transmission methods conforming to IEEE 802.11a/b/g standards. This
manual describes both the RAD-80211-XD and the RAD-80211-XD-WM. Each radio can be
programmed to function as an Access Point, Client or a Bridge. Some of the features of this
series include:
• 802.11i Security: This algorithm provides an exceptionally high level of security that is
currently deemed un-hackable.
• Local and Remote Diagnostics: An RF link dry contact provides local assurance of
link between radios. The RSSI test point provides an easy way to check the strength of
the RF signal. Advanced diagnostics are available via the web based management.
1-1
RAD-802.11-XD and RAD-802.11-XD-WM
User Manual – Section 1
• RS232/485/422 Serial Ports: Two built-in serial ports allow the transmission of serial
data using the 802.11 wireless protocol. Ethernet and serial data can be sent simultaneously.
• Adjustable Transmit Power: Ability to raise or lower the power level to reduce the RF
range to facility boundaries or boost it to overcome obstructions in the path.
• Logging and Reporting Capabilities: Logs can be kept of any configuration
changes, attempts to gain access to the network or which Clients are connected.
1.2
Radio Descriptions
1.2.1
RAD-80211-XD
The RAD-80211-XD is a DIN rail mount radio with a protection rating of IP20. See
Figure 1-1. This radio features an RJ45 connector for connection of Ethernet devices as well
as an RS232 and RS485/422 port, which gives it the capability of sending serial data to
another transceiver over the 802.11 radio link. The RAD-80211-XD features an RF link dry
contact for indicating a radio link and an RSSI (Received Signal Strength Indicator) voltage
test point to aid installation and troubleshooting. There are two (2) antenna connectors for
antenna diversity.
DIN-rail Universal
End Bracket
(Not Supplied)
Pluggable
Connectors
Omnidirectional
Antenna Assembly
(Not Supplied)
8
7
DIN-rail
(Not Supplied)
5
6
Power/Status
LED
RS-422/485
Status LEDs
4
DIN-rail
Grounding
Block (Not
Supplied)
3
2
1
Typ USLKG 5
B(B
A
ND
R1
V G -01
+24 -2938
B(-
)
)
A(+
S
TU
STA
X
5R
-48
RS
X
5T
-48
RS
BL
FL
T1
AN
T2
AN
Main Antenna
Connection
(MCX Receptacle)
A(+
)
RF
)
RF Link
Status LEDs
WLAN
Status LEDs
K
LIN
TA
DA
RF
X
2R
-23
RS
X
2T
-23
RS
ED
PE
NS
WA
INK
NL
WA
5
9
4
8
3
7
2
6
1
D
-X
11
Diversity Antenna
Connection
(MCX Receptacle)
02
RA
D-8
RJ-45 Ethernet
Port
SI
RS
RS-232
Status LEDs
RS-232
Port
RJ-45 Ethernet
Cable Assembly
(Not Supplied)
RSSI Test
Port
2186A054-2
9-position D-Sub Cable
Assembly (Not Supplied)
Figure 1-1. Features of the RAD-80211-XD Wireless Radio
1.2.2
RAD-80211-XD-WM
The RAD-80211-XD-WM is a wall mount radio rated IP67. See Figure 1-2. This radio
features waterproof connectors for the connection of Ethernet and RS-232 and RS-422/485
devices. It can be powered via a standard power supply or Power-over-Ethernet (PoE). The
RAD-80211-XD-WM features an RF link dry contact for indicating a radio link and an RSSI
(Received Signal Strength Indicator) voltage test point to aid installation and troubleshooting.
The RAD-80211-XD-WM radio comes with two (2) sealed antenna connectors for antenna
diversity.
1-2
RAD-802.11-XD and RAD-802.11-XD-WM
User Manual – Section 1
RS-232 Port
Status LEDs
(Bank of 2)
Power Supply
and RF Link
M12 Male
Connector
RS-422 / 485
M12 Female
Connector
Earth Ground
Connection Terminal
802.11a/b/g Radio
Transceiver
RJ-45 Ethernet
Port
RSSI
Test Point
5/
EN
RF
RX
TX
SI
RS
Ethernet Port
Protective Cover
2
42
-48
RS
FLBL
-2937
-01R2
T
P
O
C W
U
C R ER
O R :
E NT EN
M A T
P C :
E T
R R
A
T AT
U IN
R
R
28 AD E: G:
85 -8
12
0
15 -3
0
0.5 0m V
71 21
D
0 A A C
5 1-X 32°F°C TO @ 3 @ 2
D TO 65°C0VA 4VD
-W 14 C / C
D
9
M °F C
Omnidirectional
Antenna
(RP=SMA)
ST
RS-422 / 485
Port Protective Cover
K
R/
RF
LIN
WE
PO
RS-232
Port
2
-23
RS
FL
BL
3-01
-294
R7
Mounting Hole
(Typical 4 Places)
Connector Assembly
(Not Supplied*)
*
Ethernet Cable
Assembly
(Not Supplied*)
WLAN Status
LEDs (Bank of 3)
Power Supply M12
Port Protective Cover
RS-232
Port Cover
Sensor/actuator
Cable with Straight
M12 Male Connector
(Not Supplied*)
54
32
19
87
6
Refer to parts List at back of this
manual for additional information on
cable assemblies
Sensor/actuator
Cable with Straight
M12 Female Connector
(Not Supplied*)
Serial Cable
(Not Supplied*)
2186A053
Figure 1-2. Features of the RAD-80211-XD-WM Wireless Radio
1.3
Wireless Standard IEEE 802.11 Basics
1.3.1
802.11b
The IEEE 802.11b standard, developed by the Wireless Ethernet Compatibility Alliance
(WECA) and ratified by IEEE, establishes a stable standard for compatibility. A user with an
802.11b product can use any brand of access point with any other brand of client hardware
(or bridge to bridge) that is built to the 802.11b standard for basic interconnection.
802.11b devices provide up to 11 Mbps transmission speed, and can fall back to 5.5, 2 and 1
Mbps depending on signal strength or user selection. The 802.11b uses DSSS (Direct
Sequence Spread Spectrum) and operates in the 2.4 GHz band.
1.3.2
802.11a
The IEEE 802.11a standard is an extension to 802.11 that applies to wireless LANs and
provides up to 54 Mbps in the 5 GHz band. 802.11a uses OFDM (Orthogonal Frequency
Division Multiplexing).
1.3.3
802.11g
802.11g operates at data rates up to 54 Mbps within the 2.4GHz band using OFDM. 802.11g
is backwards compatible with 802.11b.
1.3.4
802.11b/g Mixed
802.11b/g Mixed mode only applies to Access Points (described in the following paragraphs), and allows both 802.11b and 802.11g clients to connect using optimum settings.
1-3
RAD-802.11-XD and RAD-802.11-XD-WM
User Manual – Section 1
1.4
Access Point/Client Configurations
A transceiver configured as an Access Point can only communicate with devices configured
as Clients. A transceiver operating in Bridge mode can only communicate with other Bridge
mode devices.
All wireless devices connected to the Access Point are configured on the same subnetwork
as the wired network interface and can be accessed by devices on the wired network.
1.4.1
Example of Access Point/Client Topologies
An access point can be used as a stand-alone Access Point without any connection to a
wired network. In this configuration, it simply provides a stand-alone wireless network for a
group of wireless devices. See Figure 1-4.
Network
Access
Point
Client
POWER:
CURRENT:
CONTACT RATING:
TEMPERATURE:
Ethernet
12-30VDC
150mA @ 24VDC
0.5A @ 30VAC / DC
0°C TO 65°C
32°F TO 149°F
RAD-80211-XD-WM
28 85 71 5
L-2
FLB
937
-01
R2
US1 GND US2 GND R1
LNK/ACT
Ethernet
100
LNK/ACT
100
LNK/ACT
100
ABC
NC
US2
100
LNK/ACT
100
LNK/ACT
100
LNK/ACT
100
FL SWITCH SF 8TX
Odr. No. 2832771
Fn
Client
R2
LNK/ACT
US1
100
LNK/ACT
Switch
2186A024-1
Figure 1-4. Example of Access Point/Client
The RAD-80211-XD/-WM can be used as one of a number of Access Points connected to an
existing Ethernet network to bridge between the wired and wireless environments. Each
Access Point can operate independently of the other Access Points on the same LAN.
Multiple Access Points can coexist as separate individual networks at the same site by using
different SSIDs and operating on different channels. It is recommended that non-overlapping
channels be used to minimize interference.
The most common configuration is multiple Access Points connected to a wired network in
various locations to provide a wider coverage area. This enables wireless client devices to
roam freely about a site switching from Access Point to Access Point. The Access Points all
have the same SSID but operate on different channels.
1.5
Bridge Configurations
The wireless bridging function of the RAD-80211-XD family supports several different
configurations. The most popular ones are described below.
1-4
RAD-802.11-XD and RAD-802.11-XD-WM
User Manual – Section 1
1.5.1
Point-to-Point Bridging
Figure 1-5 shows Point-to-Point bridging of two Ethernet links.
Network
Network
Ethernet
POWER:
CURRENT:
CONTACT RATING:
TEMPERATURE:
Bridge
Mode
12-30VDC
150mA @ 24VDC
0.5A @ 30VAC / DC
0°C TO 65°C
32°F TO 149°F
POWER:
CURRENT:
CONTACT RATING:
TEMPERATURE:
RAD-80211-XD-WM
28 85 71 5
937
L-2
FLB
-01
RAD-80211-XD-WM
28 85 71 5
R2
-01
937
L-2
FLB
R2
Ethernet
Ethernet
US1 GND US2 GND R1
R2
NC
US1 GND US2 GND R1
LNK/ACT
LNK/ACT
US2
US1
LNK/ACT
LNK/ACT
100
100
100
LNK/ACT
LNK/ACT
LNK/ACT
100
100
100
100
LNK/ACT
100
LNK/ACT
LNK/ACT
LNK/ACT
100
100
LNK/ACT
NC
US2
100
100
LNK/ACT
R2
LNK/ACT
LNK/ACT
US1
100
100
LNK/ACT
12-30VDC
150mA @ 24VDC
0.5A @ 30VAC / DC
0°C TO 65°C
32°F TO 149°F
Ethernet
Bridge
Mode
100
100
FL SWITCH SF 8TX
Odr. No. 2832771
FL SWITCH SF 8TX
Odr. No. 2832771
Switch
Switch
2186A025-1
Figure 1-5. Example of Point-to-Point Bridging
Point-to-Multipoint Bridging
Figure 1-6 shows Point-to-Multipoint bridging of multiple Ethernet networks.
Bridge
Mode
Ethernet
Network
US1 GND US2 GND R1
R2
NC
LNK/ACT
LNK/ACT
US1
US2
100
100
LNK/ACT
LNK/ACT
100
100
LNK/ACT
LNK/ACT
POWER:
CURRENT:
CONTACT RATING:
TEMPERATURE:
100
Ethernet
100
100
100
12-30VDC
150mA @ 24VDC
0.5A @ 30VAC / DC
0°C TO 65°C
32°F TO 149°F
RAD-80211-XD-WM
28 85 71 5
LNK/ACT
LNK/ACT
L-2
FLB
FL SWITCH SF 8TX
Odr. No. 2832771
937
-01
R2
Bridge
Mode
Bridge
Mode
Network
Network
12-30VDC
150mA @ 24VDC
0.5A @ 30VAC / DC
0°C TO 65°C
32°F TO 149°F
POWER:
CURRENT:
CONTACT RATING:
TEMPERATURE:
RAD-80211-XD-WM
28 85 71 5
937
L-2
FLB
-01
R2
937
L-2
FLB
Ethernet
100
LNK/ACT
100
LNK/ACT
100
R2
R2
NC
US1 GND US2 GND R1
LNK/ACT
LNK/ACT
US1
100
LNK/ACT
-01
Ethernet
US1 GND US2 GND R1
LNK/ACT
12-30VDC
150mA @ 24VDC
0.5A @ 30VAC / DC
0°C TO 65°C
32°F TO 149°F
RAD-80211-XD-WM
28 85 71 5
US1
100
LNK/ACT
LNK/ACT
100
100
LNK/ACT
LNK/ACT
100
100
LNK/ACT
LNK/ACT
100
100
NC
US2
100
LNK/ACT
100
LNK/ACT
100
LNK/ACT
100
FL SWITCH SF 8TX
Odr. No. 2832771
Switch
R2
LNK/ACT
US2
100
Ethernet
POWER:
CURRENT:
CONTACT RATING:
TEMPERATURE:
Ethernet
1.5.2
FL SWITCH SF 8TX
Odr. No. 2832771
Switch
2186A041-1
Figure 1-6. Example of Point-to-Multipoint Bridging
1-5
RAD-802.11-XD and RAD-802.11-XD-WM
User Manual – Section 1
1.5.3
Repeater mode
Figure 1-7 shows three radios all configured as bridges, two are connected to LAN networks
and the third simply acts as a repeater to extend the range.
Bridge/Repeater
Mode
POWER:
CURRENT:
CONTACT RATING:
TEMPERATURE:
12-30VDC
150mA @ 24VDC
0.5A @ 30VAC / DC
0°C TO 65°C
32°F TO 149°F
RAD-80211-XD-WM
28 85 71 5
L-2
FLB
937
-01
R2
Bridge
Mode
Bridge
Mode
Network
Network
12-30VDC
150mA @ 24VDC
0.5A @ 30VAC / DC
0°C TO 65°C
32°F TO 149°F
POWER:
CURRENT:
CONTACT RATING:
TEMPERATURE:
RAD-80211-XD-WM
28 85 71 5
Ethernet
L-2
FLB
937
-01
R2
L-2
FLB
Ethernet
100
LNK/ACT
100
LNK/ACT
100
R2
-01
R2
NC
LNK/ACT
US1 GND US2 GND R1
LNK/ACT
US1
100
LNK/ACT
937
Ethernet
US1 GND US2 GND R1
LNK/ACT
12-30VDC
150mA @ 24VDC
0.5A @ 30VAC / DC
0°C TO 65°C
32°F TO 149°F
RAD-80211-XD-WM
28 85 71 5
US1
100
LNK/ACT
LNK/ACT
100
100
LNK/ACT
LNK/ACT
100
100
LNK/ACT
LNK/ACT
100
100
NC
US2
100
LNK/ACT
100
LNK/ACT
100
LNK/ACT
100
FL SWITCH SF 8TX
Odr. No. 2832771
Switch
R2
LNK/ACT
US2
100
Ethernet
POWER:
CURRENT:
CONTACT RATING:
TEMPERATURE:
FL SWITCH SF 8TX
Odr. No. 2832771
Switch
2186A042-1
Figure 1-7. Example of Bridge/Repeater Mode
1.6
Data Encryption and Security
The RAD-80211-XD family of radios feature several advanced security technologies. Access Points and Clients can be operated using no security (not recommended), WEP, WPA
or WPA2 (802.11i). In Bridge mode, no security or AES encryption can be used. Some
level of security is recommended.
1.7
SSID (Service Set ID)
The Service Set ID is a string used to identify a network among multiple wireless access
points. The SSID can act as a basic password without which the client cannot connect to the
network. Choosing to broadcast the SSID allows any client to discover the Access Point.
Disabling SSID broadcasting is the most basic form of wireless network protection.
1-6
RAD-802.11-XD and RAD-802.11-XD-WM
User Manual – Section 1
1.8
Access Point and Client Encryption
1.8.1
WEP Encryption
WEP (Wired Equivalent Privacy) encryption is a security protocol for wireless local area
networks (WLANs) defined in the 802.11b standard. WEP relies on the use of identical static
keys deployed on client stations and access points.
There is also shared or open authentication that applies to WEP. When shared authentication is configured, the Access Point performs an additional step when a new client is first
detected. The AP sends out an authentication request to the client. The client then encrypts
the request using the WEP key it has, and sends it to the AP. The AP then confirms (or
denies access) that the new client has the correct WEP key. When open authentication is
configured, this step is skipped. Data being sent back and forth is still encrypted using the
WEP key.
Note
Utilities exist for monitoring wireless traffic encrypted using
WEP. After a certain amount of traffic has been monitored,
these utilities can recognize encryption patterns. Additional
security should be used such as hiding the SSID and MAC
address filtering. This will create a network with a minimal level
of security however it is not suitable for sensitive data.
1.8.2
WPA with TKIP/AES-CCMP Encryption
Wi-Fi Protected Access or WPA was designed to enable use of wireless legacy systems
employing WEP while improving security. WPA uses improved data encryption through the
temporal key integrity protocol (TKIP) which mixes keys using a hashing algorithm and adds
an integrity-checking feature to ensure that the keys haven’t been tampered with. TKIP also
incorporates re-keying, so the key is periodically changed to prevent old keys from being
captured and used for unauthorized network access.
In addition, user authentication is enabled using the extensible authentication protocol (EAP).
Finally, a message integrity check (MIC) is used to prevent an attacker from capturing and
altering or forging data packets. It can also employ a form of AES (Advanced Encryption
Standard) called AES-CCMP.
AES-Counter Mode CBC-MAC Protocol (AES-CCMP) is an encryption algorithm used in the
802.11i security protocol. It uses the AES block cipher, but restricts the key length to 128
bits. AES-CCMP incorporates two sophisticated cryptographic techniques (counter mode
and CBC-MAC) and adapts them to Ethernet frames to provide a robust security protocol
between the mobile client and the access point.
AES itself is a very strong cipher, but counter mode makes it difficult for an eavesdropper to
spot patterns, and the CBC-MAC message integrity method ensures that messages have
not been tampered with.
1.8.3
MAC Address Filtering
The MAC (Media Access Control) address is a hardware address that uniquely identifies
each node of a network. In IEEE 802 networks, the Data Link Control layer of the OSI
Reference Model is divided into two sub-layers: the Logical Link Control (LLC) layer and the
MAC layer. The MAC layer interfaces directly with the network media. Consequently, each
network device requires a unique MAC address.
Authentication is the process of proving a client’s identity. The RAD-80211-XD/-WM can
utilize MAC address filtering to detect an attempt to connect by an unauthorized client. The
1-7
RAD-802.11-XD and RAD-802.11-XD-WM
User Manual – Section 1
transceiver will compare the client’s MAC address to those on a user predefined MAC
address filter list. Only client addresses found on the list are allowed to associate. MAC
addresses are preassigned by the manufacturer for each wireless card.
1.9
Bridge Encryption
1.9.1
AES
The Advanced Encryption Standard (AES) was selected by National Institute of Standards
and Technology (NIST) in October 2000 as an upgrade from the previous DES standard.
AES is currently approved for military use, and utilizes a 128-bit block cipher algorithm and
encryption technique for protecting computerized information.
1.10
DHCP Server
The RAD-80211-XD (-WM) is compatible with networks that use a Dynamic Host Control
Protocol (DHCP) server for allocating IP Addresses. In addition, an AP can be configured to
function as the DHCP Server for a network.
1.11
Operator Authentication and Management
Authentication mechanisms are used to authenticate an operator accessing the device and
to verify that the operator is authorized to assume the requested role and perform services
within that role.
Access to the management screens for the RAD-80211-XD family of radios requires that you
enter an ID and Password. The factory defaults are:
Note
The Username and Password are case sensitive.
A.
Access to Configuration options
For access to configuration options, use the following log in:
• Username = Admin
• Password = admin
B.
Access to Monitoring Screens
For access to monitoring screens only, use the following log in:
• Username = Monitor
• Password = monitor
1-8
RAD-802.11-XD and RAD-802.11-XD-WM
User Manual – Section 2
2
SECTION
System Planning
Section 2 Contents
2.1
2.2
2.3
2.4
2.5
2.6
2.1
Accessing the Site ................................................................................................... 2-1
Path Quality Analysis ............................................................................................... 2-2
Signal Strength ........................................................................................................ 2-2
Antennas and Cabling ............................................................................................. 2-2
2.4.1 Coaxial Cable Considerations ..................................................................... 2-3
Antenna Mounting Considerations ........................................................................... 2-4
Maintaining System Performance ............................................................................ 2-4
2.6.1 Antennas and Co-axial cable ...................................................................... 2-4
2.6.2 Cable Connections ..................................................................................... 2-4
2.6.3 Power Supply ............................................................................................. 2-4
Accessing the Site
To achieve the best radio performance possible, the installation sites have to be given
careful consideration. The primary requirements for a reliable installation include:
·
·
·
·
Antenna placement that allows for line-of-sight or adequate signal strength
Primary power source that provides required current
Protection of radio equipment from exposure to weather or temperature extremes
Suitable entrances for antenna, lightning arrestor, interface or other required cables - if
using remote antennas.
These requirements can be quickly assessed in most applications. A possible exception is
the first item, verifying that a clear line-of-sight exists. A non-obstructed path is ideal,
however, minor obstructions in the signal path will not always block communication. In
general, the need for a clear path becomes greater as the transmission distance increases.
2-1
RAD-802.11-XD and RAD-802.11-XD-WM
User Manual – Section 2
2.2
Path Quality Analysis
With the exception of short range applications, a path loss study is generally recommended
for new installations. The exceptions include distances of less than 300 feet where no test is
required in 90% of applications, and where a test is done with a functional Phoenix Contact
radio set to the desired wireless mode (802.11a, b or g), transmit data rate and transmit
power setting. However, where towers would need to be built just to do the test, a path loss
study is more practical. A path loss study predicts the signal strength reliability and estimates the fade margin of a proposed radio link. While terrain, elevation and distance are
the major factors in this process, a path loss study also considers antenna gain, coaxial
cable loss, transmitter power, and receiver sensitivity to arrive at a final prediction.
Path loss studies are normally performed by a communications consultant, wireless hardware vendor, or a system integrator who uses topographic maps or a software path analysis
to evaluate a proposed path.
Although path studies provide valuable assistance in system planning, they are not perfect in
their predictions. It is difficult, for example, to consider the effects of man made obstructions
or foliage growth without performing an actual on-air-test. Such tests can be done using
temporarily installed equipment.
2.3
Signal Strength
The strength of radio signals in a well designed radio network must exceed the minimum
level needed to establish basic communication. The excess signal is known as the fade
margin, and it compensates for variations in signal level which may occur from time to time
due to foliage growth, minor antenna misalignment, or changing atmospheric losses.
While the required amount of fade margin differs from one system to another, experience
has shown that a level of 20 dB above the receiver sensitivity threshold is sufficient in most
systems. RAD-80211 modules provide a means for direct measurement of received signal
strength using a DC voltmeter. Consult section 5.1 for more information.
2.4
Antennas and Cabling
The single most important item affecting radio performance is the antenna system.
Careful attention must be given to this part of an installation, or the performance of the entire
system will be compromised. Quality high gain antennas should be used at all stations. The
antennas should be specifically designed for use at the intended frequency of operation and
with matching impedance (50 ohms).
Antennas are made by several manufacturers and fall into two categories—omnidirectional,
and yagi-directional. See Figure 2-1. An omnidirectional antenna provides equal radiation
and response in all directions and is therefore appropriate for use at master stations which
must communicate with an array of remote stations scattered in various directions. Omni
antennas should also be used where clients will be mobile.
At remote fixed stations, a directional antenna, such as a yagi is typically used. Directional
antennas confine the transmission and reception of signals to a relatively narrow beam
width, allowing greater communication range, and reducing the chances of interference from
other users outside the pattern. It is necessary to aim these antennas in the desired direction of communication (i.e., at the master station).
The end of the antenna (furthest from support mast) should face the associated station.
Final alignment of the antenna heading can be accomplished by orienting it for maximum
received signal strength.
2-2
RAD-802.11-XD and RAD-802.11-XD-WM
User Manual – Section 2
OMNI
Round Reflector Antenna
Vertical
Aperture Angle
YAGI
Vertical
Transmit and
Receive Range
Directional Antenna
Horizontal
Aperture Angle
1845A076-1
Figure 2-1. OMNI-directional, and YAGI-directional Antennas
Performance Characteristics.
2.4.1
Coaxial Cable Considerations
The importance of using a low-loss antenna coaxial cable is often neglected during radio
installation. Using the wrong cable can cause huge reductions in efficiency and these losses
cannot be recovered with any amount of antenna gain or transmitter power.
For every 3 dB of coaxial cable loss, half the transmitter power will be lost before reaching
the antenna. The choice of coaxial cable to use depends on: 1) the length of cable required
to reach the antenna, 2) the amount of signal loss that can be tolerated, and 3) cost considerations. For long range transmission paths, where signal is likely to be weaker, a low-loss
cable type is recommended, especially if the length of the cable must exceed 50 feet. The
higher operational frequency of 802.11a (5 GHz) will be more prone to coaxial cable losses
and therefore more consideration should be give to low loss cable.
For a short range system, or one that requires only a short antenna coaxial cable, a less
efficient cable may be acceptable, and will cost far less than large diameter cable. See
Table 2-1 to judge the effectiveness of various cables at 2.4GHz (802.11b and g) and 5GHz
(802.11a).
Table 2-1. Cable Types and Signal Loss (dB)
Cable
Type
2.4 GHz Loss
(dB/100 ft)
5.2 GHz Loss
(dB/100 ft)
5.8 GHz Loss
(dB/100 ft)
RG-58
25.01
38.96
41.02
RG-213
12.51
20.56
21.79
LMR-400
6.68
10.27
10.79
LMR-600
4.37
6.87
7.24
2186A089
2-3
RAD-802.11-XD and RAD-802.11-XD-WM
User Manual – Section 2
2.5
Antenna Mounting Considerations
The antenna manufacturer’s installation instructions must be strictly followed for proper
operation of a directional or omnidirectional antenna. Using proper mounting hardware and
bracket ensures a secure mounting arrangement with no pattern distortion or de-tuning of
the antenna. The following recommendations apply to all antenna installations:
A. Mount the antenna in the clear, as far away as possible from obstructions such as
buildings, metal objects, dense foliage, etc. Choose a location that provides a clear
path in the direction of the opposite antenna. If the antenna is co-located with another
antenna (other than 2nd antenna connector on the same radio), try to get at least six
(6) feet vertical or ten (10) feet horizontal separation between the two.
B. Polarization of the antenna is important. Most systems use a vertically polarized
omnidirectional antenna at the master station. Therefore, the remote antennas must
also be vertically polarized (elements perpendicular to the horizon). Cross-polarization
between stations can cause a signal loss of 20 decibels (dB) or more.
2.6
Maintaining System Performance
Over time, any communications system requires a degree of preventative maintenance to
ensure peak operating efficiency. Periodic checks of master and remote sites should be
made to identify and correct potential problems before they become threats to system
operation. The following areas should be given special attention:
2.6.1
Antennas and Coaxial cable
Visually inspect the antenna and coaxial cable for physical damage, and make sure that the
coaxial connections are tight and properly sealed against the weather. When using directional antennas, be sure that the antenna heading has not shifted since installation.
The SWR (Standing Wave Ratio) of the antenna system can be checked from time to time
using a through-line wattmeter. Defects in the antenna system will frequently show up as
reflected power on the meter. It is good practice to accept only a maximum reflected power
of about 5%; this corresponds to an SWR of approximately 1.5:1. For any condition exceeding this value, search for and correct the cause—damaged antenna, defective or improperly
installed connectors, water in the coaxial feedline, etc.
2.6.2
Cable Connections
All power, data, and ground connections should be secure and free of corrosion.
2.6.3
Power Supply
The voltage of the station power supply should be measured to verify that it is within the
operating specifications for the radio. If possible, the radio should be keyed during this test,
to ensure maximum current draw from the supply. Batteries, if used, should be checked for
charge level and signs of leakage or corrosion.
2-4
RAD-802.11-XD and RAD-802.11-XD-WM
User Manual – Section 3
3
SECTION
Mounting the Radios
Section 3 Contents
3.1
3.2
Mounting the RAD-80211-XD
Figure 3-1 shows a typical RAD-80211-XD radio installation using a Phoenix Contact power
supply, end clamps and a DIN-rail grounding block.
DIN-rail Universal
End Bracket
E/NS 35 N
RAD-802.11-XD
Wireless Transceiver
USLKG
Grounding
Block
8
7
6
5
4
3
2
1
–
–
+
DC
OK
+24 V
Typ USLKG 5
GND
–
A
D
1
1R
8-0
93
L-2
B
FL
+2
+
+
–
4V
B
)
B((+)
) A
B(-
GN
US
AT
ST
DC
OK
+
A
1.3
4V +
C2 +
-
T2
AN
K
LIN
TA
DA
RF
RF
D
UT
O
-
-
9
8
3
7
2
6
1
DC
OK
0V
24 )
0 - N(10 C
AC C N
)
L(+
ED
PE
NS
WA
K
LIN
N
WA
4
IN
.522
.5
28 C
VD
X
2R
-23
RS
X
2T
-23
RS
5
Standard
NS 35/15
DIN-rail
To
Protective
Earth Ground
)
A(+
X
5R
-48
RS
X
5T
-48
RS
T1
AN
MINI POWER
3.1
Mounting the RAD-80211-XD .................................................................................. 3-1
Mounting the RAD-80211-XD-WM ........................................................................... 3-4
1-X
D
21
RA
N
0
D-8
SI
RS
Power Supply
2186A047-2
L(+)
N(-)
120 V ac to
230 V ac
Power Source
Figure 3-1. RAD-80211-XD Installation Using a DIN-rail Power Supply,
End Clamps and Gropund Terminal Block
3-1
RAD-802.11-XD and RAD-802.11-XD-WM
User Manual – Section 3
When mounting the radio onto a standard 35 mm (1.378 in.) DIN rail, end clamps should be
mounted on both sides of the module(s) to stop the modules from slipping on the DIN rail.
Refer to Figure 3-1.
Modules are installed from left to right on the mounting rail. Install modules to mounting rail
as described in the following steps.
WARNING
Never install or remove a module while power is being
applied to any component on the rail. Before installing or
removing a module, disconnect power to the entire station. Make sure work on the entire station is complete
before switching power back on.
WARNING
Do not connect or disconnect any connector while power
is ON. This can cause arcing that could damage electronics or cause personal injury.
1. Attach the RAD-80211-XD module to the mounting rail by positioning the keyway at the
top of the module onto the mounting rail. See Figure 3-2. Then rotate the module
inward until the DIN-rail latch locks the module in place on the DIN rail. Next, check
that the module is fixed securely to the DIN rail by lightly pull outward on the module.
2. Continue attaching any other module(s) to the mounting rail as described in Step 1.
Note
We recommend the use of end clamps to prevent modules
from slipping back and forth on the mounting rail.
3. When all modules are installed, place an end clamp tight up against the left side of the
leftmost module on the mounting rail. Then place a second end clamp tight up against
the right side of the rigtmost module on the mounting rail.
Note
Grounding clips built into the RAD-80211-XD module make
contact with the upper rail of the DIN rail during installation.
This provides a ground path from the DIN rail to the module. To
ensure proper shielding of the module(s) through the DIN rail,
we recommend connecting the DIN rail directly to a low
impedance earth ground.
4. Connect the DIN rail to protective earth ground using a grounding terminal block. Refer
to Figure 3-1.
3-2
RAD-802.11-XD and RAD-802.11-XD-WM
User Manual – Section 3
Installation
1
Position On
DIN-rail
2
Push
In
DIN-rail Latch
Removal
3
Lift Off
DIN-rail
2
1
Rotate
Out
Open
Latch
Blade Type
Screwdriver
2186A035
Figure 3-2. Installing and Removing RAD-80211-XD Modules from the DIN rail
3-3
RAD-802.11-XD and RAD-802.11-XD-WM
User Manual – Section 3
3.2
Mounting the RAD-80211-XD-WM
Install the RAD-80211-XD-WM as described in the following steps.
1. Mount the radio to a flat surface such as a wall or cabinet side using four (4), 8-32 panhead screws at least 3/4-in. long. Figure 3-3 shows a typical RAD-80211-XD-WM radio
installation. A template for locating the mounting holes is provided in Appendix C at the
back of this manual.
m
9c
.31 n.)
12 50 i
8
(4.
11.43 Cm
(4.50 in.)
8-32 x 3/4 in.
Pan Head Screw
(4 Places)
n.)
4i
19
.
0
(
m le
7 m r Ho
2
4.9 metes)
Dia lace
P
(4
cm
.33 .)
16 5 in
4
(6.
2186A030
G:
R:
WE NT: ATIN
PO RRE T R RE:
C
CU NTA ATU
R
CO PE
M
TE
1-X
21
80
D- 1 5
RA 85 7
28
F
L
B
L
-2
9
3
7
-0
1
R
C
DC 24VD/ DC
-30V @ C
12 A VA
0m 30
15 @ °C F
65
0.5ATO 149°
0°C TO
°F
32
D-
WM
2
Figure 3-3. Typical Installation of the RAD-80211-XD-WM Radio
2. Connect the radio to protective earth ground using the ground lug located on the right
side of the module. See Figure 3-4.
1/4 in. Lock
Washer
1/4 in Acorn Nut
(7/16-in. across
flats)
2
2.5 mm (14 AWG)
Ground Wire with
1/4 in. Ring Terminal
To Protective
Earth Ground
1/4-20 x 3/4 in.
Stud Bolt
ST
RF
EN
1/4-20 Hex-Head
Nut
1/4 in.
Flat Washer
2186A055
Figure 3-4. RAD-80211-XD-WM Radio Ground Connection
3-4
RAD-802.11-XD and RAD-802.11-XD-WM
User Manual – Section 4
4
SECTION
Making Connections and
Powering Up
Section 4 Contents
4.1
4.2
4.3
4.4
Power Connections
4.1.1
RAD-80211-XD
Connect a regulated DC power source to the transceiver. The supply voltage can range
from 12 to 30 VDC with a nominal voltage of either 12 VDC or 24 VDC recommended. The
power supply must be able to supply 300 mA of current at 24 VDC. Figure 4-1 shows an
installation using a Phoenix Contact MINI power supply. Figure 4-2 provides wiring information for the RAD-80211-XD.
DIN-rail Universal
End Bracket
E/NS 35 N
RAD-802.11-XD
Wireless Transceiver
USLKG
Grounding
Block
8
7
6
5
4
3
2
1
–
–
+
DC
OK
+24 V
Typ USLKG 5
GND
–
–
A
B(-
FL
(+
) A
U
AT
ST
BL
-4
RS
AN
() B
RS
T1
A(+
)
S
85
-48
)
RX
5T
X
DC
OK
+
A
1.3
4V +
C2 +
-
OU
TD
AN
T2
RF
-
-
RS
.522
.5
28 C
VD
RS
2
-23
-23
K
LIN
TA
DA
ED
PE
NS
WA
INK
NL
WA
X
8
3
7
2
6
1
S
RS
Power Supply
-XD
11
02
D-8
RA
N
L(+
9
)
2T
4
DC
OK
0V
24 )
0 - N(10 C
AC C N
IN
RF
RX
5
Standard
NS 35/15
DIN-rail
To
Protective
Earth Ground
B
D
GN 1R1
-0
4V
+2 -2938
+
+
MINI POWER
4.1
Power Connections ................................................................................................. 4-1
4.1.1 RAD-80211-XD ........................................................................................... 4-1
4.1.2 RAD-80211-XD-WM ................................................................................... 4-2
Ethernet Connections .............................................................................................. 4-3
Serial Port Connections ........................................................................................... 4-3
4.3.1 RS232 Connections .................................................................................... 4-3
4.3.2 RS422/485 Connections ............................................................................. 4-4
Antenna Connections .............................................................................................. 4-5
I
2186A047-2
L(+)
N(-)
120 V ac to
230 V ac
Power Source
Figure 4-1. RAD-80211-XD Power Connections
4-1
RAD-802.11-XD and RAD-802.11-XD-WM
User Manual – Section 4
Strip Length
1
7 mm
(0.275 in.)
Wire Size
(Solid or Stranded)
0.2 – 2.5 mm2
(14 – 24 AWG)
8
7
6
5
4
3
2
2
1
)
A(+
)
B(B
A(+
)
S
U
AT
ST
A
D
R1
GN
V
-01
+24 -2938
L
X
5R
B
FL
8
S-4
R
X
5T
-48
RS
T1
AN
Tightern Screws to
0.5 – 0.6 Nm
(4.42 – 5.31 lbf/in.)
2186A058
B(-
)
T2
AN
RF
32
-2
RS
RF
RX
K
LIN
TA
DA
ED
PE
NS
WA
INK
NL
WA
X
2T
-23
RS
5
9
4
8
3
7
2
6
1
RA
D-8
02
11
-XD
SI
RS
Figure 4-2. RAD-80211-XD Transceiver Wiring Requirements
4.1.2
RAD-80211-XD-WM
This model has two power options. The device may be powered from a DC power supply
ranging from 12 to 30 VDC or by Power-over-Ethernet (PoE) using an 802.3af compliant
power injector. See Figure 4-3 and Figure 4-4. If redundancy is needed, the radio can be
powered from both the DC source and using PoE. In this case the DC source would be a
backup power source in the event that primary power is lost. The DC source must be
connected to the radio with an M12 connector. For example; the Phoenix Contact 1.5 meter
cable (PN 1668108) has an M12 connector on one end and flying leads on the other. Other
cable lengths are available. Visit our web site at www.phoenixcon.com.
P
O
C W
U
C R ER
O
T N RE :
E TA N
M
P C T:
E T
R R
A
T AT
U IN
R
R
28 AD E: G:
85 -8
12
0
15 -3
0
0.5 0m V
71 21
D
0 A A C
5 1-X 32°F°C TO @ 3 @ 2
D TO 65°C0VA 4VDC
-W 14 C /
D
9
M °F C
RAD-80211-XD-WM
Transceiver
2
-485
RS
FLB
L-2937
-01R2
M12
Ports (2)
/ 42
EN
RF
RX
SI
RS
ST
Power-overEthernet
(PoE)
TX
R
WE
PO
K
IN
FL
/R
-232
RS
FL
BL
-29
43
-01
PC
RJ-45 Ethernet
Port
R7
RS-232
RS-422/
RS-485
LAN-IN
Port
PWR
LAN-OUT
Port
S
ta
B nd
y
P
M ow
o er
d
e
12 to 30 VDC
Power Source
2186A046-1
Ethernet Power
Injector
Figure 4-3. RAD-80211-XD-WM Power Connections
4-2
110-240 V ac
Receptacle
RAD-802.11-XD and RAD-802.11-XD-WM
User Manual – Section 4
M12 Male
Connector
(Mating Side)
M12 Female
Connector
(Mating Side)
3
3
4
1
2
2
1
12
15 -3
0V
0. 0m
D
0° 5A A C
32 C TO @ @
30 24
°F
TO 65 VA VD
°C C C
14
/D
9°
C
F
4
M
/ 42
2
EN
L-29
FLB
RF
RX
RS
SI
RS
R/
RF
LIN
Black
White
See
Note
White
ST
TX
WE
PO
2186A045
Blue
Brown
Brown
-W
-485
37-0
1R2
T
P
O
C W
U
C R ER
O R :
E NTA EN
M
P C T:
E T
R R
A
T AT
U IN
R
R
2 8 A D E: G :
85 -8
0
71 21
5 1-X
D
RS
Sensor Actuator
Cable Assembly
(Type: SAC-4P...FS...)
4-Position, M12 Female
Connector
–
–
+
–
–
+
+
–
–
+
DC
OK
DC
OK
OUT DC 24V 1A
-
-
+
MINI POWER
PIN Function Wire Color
1
+24 Vdc
Brown
2
Ground
White
3 RF Link (-)
Blue
4 RF Link (+)
Black
+
22.528.5
VDC
DC
OK
K
-232
NOTE: Blue and black wires
are used for RF LINK connection
on the RAD-80211-XD-WM
Transceiver.
R7
-01
43
-29
BL
FL
RAD-80211-XD-WM
Transceiver
IN AC 110 - 240V
L(+)
NC
NC
N(-)
L(+) NC NC N(-)
MINI DIN-rail Power Supply
(Type: MINI-PS-100-240 AC/24DC/1
100–240 V ac IN, 24 V dc OUT
Figure 4-4. RAD-80211-XD-WM M12 Cable Connections
4.2
Ethernet Connections
Connect an RJ-45 Ethernet cable between the port on the transceiver and the network
adapter card on your computer. Use either a crossover (C/O) or 1:1 cable as the radio has
autocross functionality.
4.3
Serial Port Connections
Note
These ports are used for transferring data. Device configuration is done through the Ethernet port.
4.3.1
RS232 Connections
When the correct RS232 cable is used to connect the radio to the computer or PLC/industrial
instrument, the TX LED on the radio will light. (This TX LED will also flash when data is
passed).
There are 2 types of serial port cables that both have DB9 (9-pin D-sub) connectors. See
Figure 4-5. One is called a straight through 9-pin serial port cable and the other is called a
null modem cable. On a straight through cable, it is wired as just that – straight through, in
other words, pin 1 is connected to pin 1, pin 2 to 2, etc.
A null modem cable crosses over pins 2 and 3 (transmit and receive data) and also crosses
over pins 7 and 8 (clear-to-send (CTS) and ready-to-send (RTS). A null modem cable is
designed to allow two devices to be connected together when they both function as data
terminal equipment (DTE) or when they both function as data communications equipment
(DCE). By swapping the pins, it connects inputs to outputs and vice versa for proper operation.
4-3
RAD-802.11-XD and RAD-802.11-XD-WM
User Manual – Section 4
Figure 4-5. RS-232 Wiring Diagrams and Pinouts
Equipment with serial ports can be designed as either DTE or DCE. This determines the
functions of pins 2 & 3, and 7 & 8. For example, if pin 7 is an output on one end, then it will
have to be an input on the other end. Computers are typically DTE devices while modems
and radio modems are DCE. Programmable Logic Controllers (PLCs) flow computers and
other industrial instruments could be either DCE or DTE.
To connect a DCE device to a DTE device, a straight through cable is used. To connect two
DCE devices together or to connect two DTE devices together, a null modem cable is
required.
4.3.2
RS422/485 Connections
The radio can also be connected to external devices using RS485 or RS422. Both 2-wire
and 4-wire configurations are supported. See Figure 4-6. Although the 4-wire configuration
supports full duplex communications, the radio is only half duplex over the air.
RS485 2-Wire
+
TXD (A+)
TXD (B-)
RAD-80211-XD
-
RS485/RS422 4-Wire
+
-
TXD
TXD (A+)
TXD (B-)
RXD (A+)
RXD (B-)
RXD (A+)
RXD (B-)
TXD (A+)
TXD (B-)
RAD-ISM-900
RXD (A+)
RXD (B-)
RXD
2186A093
Figure 4-6. RS422/485 2-Wire and 4-Wire Connections
4-4
RAD-802.11-XD and RAD-802.11-XD-WM
User Manual – Section 4
4.4
Antenna Connections
There are two antenna connectors on the transceiver. See Figure 4-7. The two antenna
connections provide antenna diversity. You can use a single antenna. However, in some
environments you may experience multipath problems. Multipathing is likely to be a greater
problem when there is no line-of-sight and there are lots of metal structures in the path.
Conductive metals reflect RF energy fairly efficiently and increase the possibility of a
multipath condition. If there is clear line-of-sight, multipath is less likely to occur but can still
be a problem. If using a single antenna, connect it to ANT 1.
To realize the benefits of antenna diversity, the antennas should be located at least 1.25
wavelengths apart. At 2.4 GHz, this distance is 15 cm (5.9 inches). At 5 GHz, this distance
is 7 cm (2.8 in.). Antennas can be mounted further apart, but most of the benefit is realized
at 1.25 wavelengths.
Note
Transceiver can use either the 2.4 GHz or 5 GHz ISM band.
The antenna you use must be specific to the frequency. There
are dual band antennas available if you are using both frequency ranges. 802.11a uses the 5 GHz band whereas
802.11b and g use the 2.4 GHz band.
Omnidirectional Antenna
(PN 28 67 46 1)with
Adapter Cable and
MCX Plug
8
7
6
5
4
3
2
1
A
Antenna No. 1 Connection
FL
B
Antenna No. 2 Connection
(for Antenna Diversity)
(+
) A
AN
RS
RS
T2
RF
-23
-23
2R
2
-48
-4
RS
T1
RF
X
TX
() B
U
AT
ST
RS
AN
2186A023
B
D
GN 1R1
-0
4V
+2 -2938
L
B(-
)
A(+
)
S
5R
85
X
Lockwasher
TX
K
LIN
TA
DA
N
WA
N
WA
S
E
PE
LIN
9 mm
Hex-head
Nut
D
K
5
MCX Plug
9
4
8
3
7
2
6
1
-XD
11
02
D-8
RA
RS
SI
Figure 4-7. RAD-80211-XD Redundant Antenna Connections
4-5
RAD-802.11-XD and RAD-802.11-XD-WM
User Manual – Section 4
CAUTION
The maximum antenna (system) gain is restricted by the
FCC (Federal Communications Commission) and ISC
(Industry Science Canada).
In the 2.4 GHz band, the maximum EIRP (Effective
Isotropically-Radiated Power) is limited to 4 W (36 dBm).
The EIRP is calculated by adding the transmit power of the
radio to the system gain of the antennas and coaxial
cables measured in dBm.
Example:
• 1 W transmit power (30 dBm) +6 dBi system
gain = 36 dBm
• 100 mW transmit power (20 dBm) +16 dBi system
gain = 36 dBm
The 5 GHz band is divided into 2 porttions of the spectrum
with slightly different rules. In the UnII lower band: [5.25–
5.35 GHz (channels 52, 56, 60, 64)], the maximum EIRP is
800 mW (29 dBm).
Example:
• 200 mW transmit power (23 dBm) +6 dBi system
gain = 29 dBm
• 100 mW transmit power (20 dBm) +9 dBi system
gain = 29 dBm
In the UNII upper band: {5.745–5.805 GHz (channels 149,
153, 157,161)], the maximum EIRP is 4 W (36 dBm).
• 800 mW transmit power (29 dBm) +7 dBi system
gain = 36 dBm
• 100 mW transmit power (20 dBm) +16 dBi system
gain = 36 dBm
4-6
RAD-802.11-XD and RAD-802.11-XD-WM
User Manual – Section 5
5
SECTION
Programming the Radio
Section 5 Contents
5.1
5.2
5.3
5.4
5.5
5.6
5.7
5.8
5.9
5.10
5.11
5.12
5.13
5.14
5.15
5.16
5.17
5.18
5.19
Configuring your PC to Communicate with the Radio .............................................. 5-2
Logging Into the Radio ............................................................................................. 5-2
Viewing Device Information ..................................................................................... 5-3
General Device Information ..................................................................................... 5-4
Local Diagnostics .................................................................................................... 5-5
Device Diagram ....................................................................................................... 5-5
General Configuration .............................................................................................. 5-6
5.7.1 Operational Mode ....................................................................................... 5-7
LAN Configuration ................................................................................................... 5-7
SNMP Configuration ................................................................................................ 5-8
DHCP Server ......................................................................................................... 5-10
Configuring the RAD-80211-XD/-WM as an Access Point ..................................... 5-10
5.11.1 General ..................................................................................................... 5-10
5.11.2 Access Point Security ............................................................................... 5-13
A. Static WEP ............................................................................................. 5-13
B. IEEE 802.11i and WPA Security ............................................................. 5-14
5.11.3 MAC Address Filtering .............................................................................. 5-15
5.11.4 Rogue AP Detection ................................................................................. 5-16
5.11.5 Advanced Settings .................................................................................... 5-16
Client Configuration ............................................................................................... 5-17
5.12.1 General ..................................................................................................... 5-17
5.12.2 Security .................................................................................................... 5-18
A. Open or Shared Authentication (WEP Security) ..................................... 5-18
B. WPA-PSK and WPA2-PSK Encryption ................................................... 5-18
Bridge Configuration .............................................................................................. 5-19
5.13.1 General ..................................................................................................... 5-19
5.13.2 Bridge Radio Settings ............................................................................... 5-20
5.13.3 Bridge Security ......................................................................................... 5-21
A. Static AES Security ................................................................................ 5-21
Serial I/O Port Configuration .................................................................................. 5-22
Passwords ............................................................................................................. 5-23
Store and Retrieve Settings ................................................................................... 5-23
Performance .......................................................................................................... 5-24
Maintenance .......................................................................................................... 5-24
Monitoring / Reports .............................................................................................. 5-24
5-1
RAD-802.11-XD and RAD-802.11-XD-WM
User Manual – Section 5
5.1
Configuring your PC to Communicate with the Radio
Note
The instructions below are for Windows 2000. Other versions
of Windows will be similar but not identical. You may need to
be logged in as an administrator to make these settings.
1. Select Start > Settings > Network and Dial up Connections > Local Area Connections. Then right-click and select Properties. See Figure 5-1.
2. Highlight Internet Protocol (TCP/IP) and click Properties.
3. Select Use the following IP address and enter the following IP address:
192.168.254.xxx (xxx can be 2-253)
4. Set the Subnet mask to 255.255.255.0 and click OK.
2186A065
Figure 5-1. Setting Internet Protocol Properties
5.2
Logging Into the Radio
1. Apply power to the transceiver and run a browser program (such as Internet Explorer)
on your computer. Wait approximately 10 seconds for the radio to boot up.
2. Enter the following IP address into the Address field of your browser:
https://192.168.254.254
3. Enter the default case-sensitive credentials:
Username: Admin
Password: admin
4 Agree to the terms and conditions and click Sign In. See Figure 5-2
5-2
RAD-802.11-XD and RAD-802.11-XD-WM
User Manual – Section 5
2186A066
Figure 5-2. RAD-80211-XD Sign In Menu
Note
Powering multiple radios with factory default IP addresses will
cause a network conflict, and incorrect parameters may be set
in the radios. When programming radios for the first time, it is
important to power on only one radio at a time, and change the
IP address of each radio such that they are all unique (and
different from your PC). Once each radio has a different IP
address they can be powered on together. The IP Address of
the radio can be changed under Configuration, LAN, IP
Configuration, and is described under Paragraph 5-8. The
new IP address must be known in order to gain access to the
radio in the future.
5.3
Viewing Device Information
After signing in, the home page shows the following basic information. See Figure 5-3.
Name/Location: This is a user adjustable field. Information on where this radio was
installed or the site name is shown here. The factory default is a blank field.
Network SSID: The System Security ID is shown here. The factory default is “Phoenix”.
Device Mode: This shows if the device has been programmed as an Access Point, Client or
a Bridge.
Contact: The name of the individual responsible for the operation of this radio is shown
here.
Time/Date: The time and date of the radio’s internal clock.
Uptime: Uptime shows how long the radio has been in operation.
Status: This tells you if the radio is operating normally or if it has encountered any internal
or configuration errors.
5-3
RAD-802.11-XD and RAD-802.11-XD-WM
User Manual – Section 5
1
2186A067
Figure 5-3. RAD-80211-XD Configuration Data
5.4
General Device Information
By clicking on Device Information, and then on General from the left column, the current
network configuration and device version of the transceiver can be viewed. See Figure 5-4.
1
2
2186A068
Figure 5-4. RAD-80211-XD General Device Information
LAN IP Address: An IP address is the logical address of a network adapter. The IP address
uniquely identifies this radio on the network.
5-4
RAD-802.11-XD and RAD-802.11-XD-WM
User Manual – Section 5
LAN Subnet Mask: A subnet mask is a bit mask used to tell how much of an IP Address
identifies the subnetwork the host is on and how much identifies the host.
LAN Default Gateway: A default gateway is a node on the network that serves as an
access point to a different network (possibly the Internet).
LAN MAC Address: Media Access Control address (MAC address) is a unique identifier
attached to most forms of networking equipment. It is the physical address of the hardwired
Ethernet port that is permanently assigned by the manufacturer.
Wireless MAC Address: There are separate MAC Addresses for the wireless card and the
physical Ethernet port. This is the address for the wireless card.
Serial Number: This is the manufacturer’s serial number of the radio
Firmware Version: Identifies the version of software loaded into the radio. This is important
in the event upgrades become available.
Hardware Version: Identifies the version and revision level of the circuit boards.
5.5
Local Diagnostics
Click on Local Diagnostics from the left column to reveal the screen shown in Figure 5-5.
This menu shows the current status and function of each LED on the radio and is useful for
diagnostic purposes. For more information on the status LEDs, see Section 6.
1
2
2186A069
Figure 5-5. RAD-80211-XD Local Diagnostics Status
5.6
Device Diagram
The Device Diagram shows the location and purpose of LED’s and electrical connections.
5-5
RAD-802.11-XD and RAD-802.11-XD-WM
User Manual – Section 5
5.7
General Configuration
To begin configuring the radio for a specific application, click on Configuration and then
General. See Figure 5-6.
1
2
2186A070
Figure 5-6. RAD-80211-XD General Configuration
Device/Host Name/Location: In this field you may enter text data to name this radio or
location. This is only used to help the network administrator identify this radio from others.
Domain Name: If applicable, you may wish to enter the domain name of this radio. This
information is text only, and has no impact on network operation.
Contact: You may enter the name of the network administrator or individual responsible for
this equipment.
System Time and Date: There are 3 methods of the radio determining time and date. You
may either manually set the time and date, sync the radio’s clock from the PC’s internal
clock, or use an NTP Server. The radio uses a super capacitor to allow it to retain the date
and time in the event of a power outage.
If you decide to use an NTP server, there must either be one connected to the LAN/WAN
you must be connected to the Internet. Enter the server address. One example is the
University of Houston’s NTP server, which requires the address be entered as follows:
tick.uh.edu
Click Submit to write the configuration to the radio.
Note
If no functions are performed for 10 minutes, the program will
exit and you will need to re-configure all parameters. It is
generally good practice to select the Submit button after all
parameters have been adjusted on each screen.
5-6
RAD-802.11-XD and RAD-802.11-XD-WM
User Manual – Section 5
5.7.1
Operational Mode
This is where you can configure the radio to function as an Access Point, Client or Bridge.
See Figure 5-7.
1
2
2186A095
Figure 5-7. RAD-80211-XD Selecting Access Point, Client or Bridge Mode
5.8
LAN Configuration
Note
This configuration step can be skipped if the radio is functioning as a repeater.
Click on LAN then on IP Configuration to show the following parameters. See Figure 5-8.
LAN Link Speed and Duplex: This determines the speed the radio communicates with
your wired LAN (if applicable). Leave the setting at AUTO to have the radio determine the
speed. The radio and the device it is hardwired to must be set the same.
LAN IP Address: Select the method your network uses to obtain IP addresses. If you are
using static IP addresses, enter the IP Address you wish to assign to the radio. Each device
on the network must have a different IP address.
If you have a DHCP server on your network, and wish to use that to assign IP addresses to
the RAD-80211 modules, select Use DHCP To Get IP Address.
Note
If the IP Address is changed from the factory default, you will
need to know this in order to log back into the radio for future
configuration changes. If DHCP addressing is used, additional
software may be necessary to determine the IP address based
on the MAC address of the radio.
5-7
RAD-802.11-XD and RAD-802.11-XD-WM
User Manual – Section 5
1
2
3
2186A071
Figure 5-8. RAD-80211-XD LAN Configuration
Enter a Subnet Mask and Default Gateway if desired. If neither are required, enter 0.0.0.0
in both fields.
If you wish to access the Internet though this device enter the IP address of the domain
name server(s) under DNS 1 and DNS 2.
5.9
SNMP Configuration
The Simple Network Management Protocol (SNMP) forms part of the Internet protocol that is
used for monitoring the health and welfare of network equipment like routers and computers.
To configure SNMP, click on Configuration, LAN, SNMP Configuration. See Figure 5-9.
The RAD-80211-XD(-WM) generate SNMP Traps when one of the following events occurs:
- Cold start – when the device powers up
- Warm start – generated when the users invokes the Reboot option in the web interface
- Link up – generated whenever the client configuration is changed after the wireless
client interface is restarted.
- Link down – generated whenever the client configuration is changed before the wireless client interface is restarted.
- Authentication failure – generated when the user fails to authenticate via the web
interface.
SNMP Agent: To enable, SNMP, click Enable and enter parameters in the Community
Settings and/or Secure User Configuration Settings.
Community Setting: The community setting is a string of up to 30 characters. The community name acts as a password and is used to authenticate messages sent between an SNMP
client and a device containing an SNMP server. The community name is sent in every
packet between the client and the server.
5-8
RAD-802.11-XD and RAD-802.11-XD-WM
User Manual – Section 5
1
2
3
2186A072
Figure 5-9. RAD-80211-XD SNMP Configuration
Source: (IP Access List) The IP access list identifies those IP addresses of SNMP Managers permitted to use a given SNMP community. An example of the network address format
is 192.168.42.182/24. The subnet mask of the network is typically annotated in written form
as a “slash prefix” that trails the network number.
Access Control: You can determine if the Community has read/write access.
Secure User Configuration Settings: This is the configuration for SNMP version 3.
User Name: A string of up to 30 characters.
Authentication Type Key: Indicates the algorithm used for authentication; it can be either
MD5 or SHA the latter one being the better algorithm.
Authentication key: is a string of characters used for authentication. Maximum length is 42
characters
Encryption type: defines the encryption algorithm used by the SNMP protocol and it can be
either DES or AES. AES is the strongest encryption algorithm.
Encryption key: a string of up to 32 characters.
System Information:
Location: The device’s physical location, a string of up to 64 characters.
Contact: The person who manages the device, a string of up to 64 characters .
Engine ID: Each SNMPv3 agent has an engine ID that uniquely identifies the agent
in the device. The engine ID may be set by the network administrator and is unique to
that internal network. It is a string of up to 48 characters.
5-9
RAD-802.11-XD and RAD-802.11-XD-WM
User Manual – Section 5
5.10
DHCP Server
A DHCP (Dynamic Host Configuration Protocol) server provides configuration parameters to
the devices on the network. This information includes IP addresses and a network mask.
There can only be one DHCP server on the network. Only an AP can be configured as a
DHCP server. The IP addresses are the unique identifier that each piece of equipment on
the network must have.
To configure the radio to function as a DHCP server, select Configuration, LAN, and then
DHCP Server. See Figure 5-10.
1
2
3
2186A073
Figure 5-10. RAD-80211-XD DHCP Configuration
Status: Select Enable to turn on the DHCP Server
DHCP Netmask: Enter the network mask here.
Dynamic Address Range: Enter the beginning and ending available IP addresses that
devices on your network can use. Any value within this range may be assigned to nodes on
your network.
DNS Server: Enter the IP address of the Domain Name Server.
WINS Server: Enter the IP Address of the Windows Internet Naming Service.
5.11
Configuring the RAD-80211-XD/-WM as an Access Point
5.11.1 General
To configure your Access point, (after selecting Access Point under Configuration, General) select Configuration, Access Point, General. See Figure 5-11.
SSID: Enter a SSID for your wireless network. The factory default is Phoenix. In order for
a client to connect to the Access Point, it must have the same SSID.
5-10
RAD-802.11-XD and RAD-802.11-XD-WM
User Manual – Section 5
1
2
3
2186A074
Figure 5-11. RAD-80211-XD Access Point Configuration
Wireless Mode: Choose a desired wireless mode. Select 802.11a if you will only be using
802.11a clients in the 5GHz band. This will provide a stronger wireless network if there are
existing 802.11b/g networks in the area, or there are other nearby sources of interference in
the 2.4GHz band. 802.11a and g have higher throughput than 802.11b (54 Mbps compared
to 11 Mbps).
Channel Number: There are 11 channels available to use in the 2.4 GHz band (802.11b/g).
See Figure 5-12. All of the channels overlap each other with the exception of 1, 6 and 11.
Separate wireless networks should use different channels, preferably non-overlapping. All
radios in a wireless network must use the same channel.
802.11b/g RF Channel Scheme
Channel Number
1
2
3
4
5
6
7
8
9
5
10
11
9
3
2
13 European Only
12 European Only
7
6
2.422
2.417
2.432
2.427
14
14 European Only
8
1
13
10
4
2.412
12
11
2.442
2.437
2.452
2.447
2.462
2.457
2.472
2.467
2.484
Channel-Center Frequencies in GHz
22 MHz
2186A044
Channel Bandwidth
Figure 5-12. 802.11b/g RF Channels
5-11
RAD-802.11-XD and RAD-802.11-XD-WM
User Manual – Section 5
If 802.11a is selected, there are 8 non-overlapping channels to choose from: 52, 56, 60, 64,
149, 153, 157, and 161. See Figure 13.
802.11a RF Channel Scheme
Channel-Center Frequencies in GHz
5.735
5.755
5.745
5.775
5.765
5.795
5.785
5.815
5.805
161
157
153
149
Channel-Center Frequencies in GHz
5.25
5.27
5.26
5.29
5.28
5.31
5.30
5.33
5.32
64
60
56
52
2186A043
20 MHz
Channel Bandwidth
Figure 5-13. Channel-Center Frequencies (GHz)
If you are uncertain about which channel to use, click the “Select the Optimal Channel” (in
802.11b or g modes only) to let the radio scan for the channel with the least amount of
interference. Clients will automatically determine which channel the AP is operating on.
Tx (Transmit) Power Mode: Either fix the transmit power or let the radio determine how
much power is necessary to communicate with the clients. In Auto mode, the AP will
monitor the signal strength from the client. If it begins to get weak, it will automatically boost
the transmit power. This works well with mobile clients. Note that the client must have the
same amount of transmit power/antenna gain in order to send information back to the AP.
The range will be dictated by the radio with the least amount of transmit power.
Advanced Settings (use factory defaults if you are unsure of these parameters)
Beacon Interval: The time interval in milliseconds in which the 802.11 beacon is transmitted by the AP. A higher setting decreases time for a client to connect but decreases
throughput.
RTS Threshold: The number of bytes used for the RTS/CTS handshake boundary. When
a packet size is greater than the RTS threshold, the RTS/CTS handshaking is performed.
DTIM: The number of beacon intervals that broadcast and multicast traffic is buffered for a
client in power save mode.
Basic Rates: The basic rates used and reported by the AP. The highest rate specified is
the rate that the AP uses when transmitting broadcast/multicast and management frames.
The RF range of the units will increase as the data rate decreases. It may be desirable to
select a lower data rate to maximize range.
5-12
RAD-802.11-XD and RAD-802.11-XD-WM
User Manual – Section 5
Preamble: The Preamble synchronizes bits and sets up bit timing on receiving radios.
Older 802.11b systems require long preambles. Newer 802.11a/b/g systems can use both
short or long. Short preamble is more efficient for data throughput. All radios must be set
the same.
Broadcast SSID: When disabled, the AP hides the SSID in outgoing beacon frames and
other radios cannot obtain the SSID through passive scanning. Also, when disabled, the AP
doesn’t send probe responses to probe requests from clients with unspecified SSIDs.
5.11.2 Access Point Security
To enable security, select Configuration, Access Point and then Security. See
Figure 5-14.
4
1
5
6
2
3
7
8
2186A075
Figure 5-14. Static WEP Security Screen
A.
Static WEP
Authentication Type: Select either open, shared, or if clients may employ either, select
open/shared. Shared provides slightly higher security, however all clients must also have
shared enabled as well. See "Access Point and Client Encryption" in Section 1 for more
information.
WEP Encryption Method: There are 3 sizes of keys that can be used by WEP. Larger
keys will provide a higher level of security. Select the size of key and enter a key using only
hexadecimal characters and no spaces (0-9 and A-F). Make a note of this key as it must be
entered in all of the client radios. Select Key Generator to have the program automatically
generate a key. Copy the key into other radios this unit must communicate with.
WEP Keys 1-4 (64 bit encryption): There are 4 possible keys that can be used with 64 bit
encryption. This serves the purpose of allowing periodic rotation of the WEP key by the
operator. Simply select which key is desired. The same key must be chosen in the Access
Point and all Clients for successful operation. Only one key will be used at a time. Copy the
key into other radios this unit must communicate with.
5-13
RAD-802.11-XD and RAD-802.11-XD-WM
User Manual – Section 5
B.
IEEE 802.11i and WPA Security
WPA and 80211i (WPA2): Select your method of security from either WPA or 802.11i
(WPA2) or you have the option of selecting both. See Figure 5-15. WPA2 is more advanced and secure than WPA. WPA implements only a subset of the encryption algorithms
used in WPA2. By implementing both WPA and WPA2, wireless clients using either type of
encryption will be allowed to connect and communicate. This is useful when older devices
incapable of WPA2 encryption are used in conjunction with WPA2 enabled client devices.
1
2
3
2186A076
Figure 5-15. 802.11i and WPA Security Screen
Pre-Shared Key or 802.1x: Select Pre-Shared Key if you do not have an authentication
server in your network. This is recommended for personal and small offices networks that
do not have an authentication (RADIUS) server. Each user must enter a pass phrase with a
minimum of eight (8) characters to access the network. Copy the Passphrase into other
radios this unit must communicate with.
Note
The weak pass phrases users typically employ create a major
vulnerability to password cracking attacks. A longer pass
phrase is much stronger than a short one. A good method of
creating a secure pass phrase is to utilize an easy to remember
sentence rather than just a word. Create the pass phrase
using the first letter of each word in the sentence. An example
sentence would be:
• The Quick Brown Fox Jumped Over The Lazy Dog.
• The pass phrase would be: TQBFJOTLD
Pass phrases should be changed whenever an individual with
access is no longer authorized to use the network or when a
device configured to use the network is lost or compromised.
For maximum security, 802.11i requires the use of an authentication (RADIUS) server.
5-14
RAD-802.11-XD and RAD-802.11-XD-WM
User Manual – Section 5
Pairwise Key: TKIP (Temporal Key Integrity Protocol) and AES-CCMP are available. For
additional information, refer to Section 1, Paragraph 1.8.2 "WPA with TKIP/AES-CCMP
Encryption". If all clients will use WPA-TKIP, select TKIP as encryption type. If all clients
can use WPA-AES, select AES-CCMP. You may enable both if you have a mix of clients
with TKIP and AES-CCMP.
Radius Server: For business applications who have installed RADIUS servers, select
802.1x and input the Radius Server IP Address and a Shared Secret. Use of a RADIUS
server for key management and authentication requires that you have installed a separate
certification system and each client must have been issued an authentication certificate.
Encryption Suite and Re-keying: Those parameters are defined in IEEE 802.11i. In the
WPA process, the access point distributes a group key to the authenticated client device.
You can use these optional settings to configure the access point to change and distribute
the group key based on client association and disassociation. Broadcast key rotation (also
known as group key update) allows the access point to generate the best possible random
group key and update all key-management capable clients periodically.
The “Group Encryption Key lifetime” is for this purpose. This is the handshaking protocol
between AP and client in WPA and is transparent to the user.
5.11.3 MAC Address Filtering
To enable MAC Address Filtering, select Configuration, Access Point and then MAC
Address Filtering. See Figure 5-16.
To use the feature, select Enable. You may then select whether to exclude certain MAC
addresses or include only certain MAC addresses. Enter MAC addresses accordingly;
optionally include some text describing the device, and select Add. You may delete MAC
addresses by selecting Delete.
1
2
3
2186A077
Figure 5-16. MAC Address Filtering Screen
5-15
RAD-802.11-XD and RAD-802.11-XD-WM
User Manual – Section 5
5.11.4 Rogue AP Detection
This feature enables you to be informed if a rogue access point has been setup and is
attempting to log into your network. To enable, select Configuration, Access Point and
then Rogue AP Detection. See Figure 5-17.
E-mail Notification: If you wish to have an e-mail message sent to you upon detection of a
rogue Access Point, select Enable and enter your e-mail server and your address. You may
then select to be alerted if the rogue Access Point has just a different SSID, is operating on a
different channel or both
Adding Known or Trusted AP MAC Addresses: There may be a number of known
Access Points that are part of your network. Enter the MAC addresses of these known
Access Points to prevent you from being falsely alerted. You may also enter some text in
the notes field describing each MAC address.
1
2
3
2186A078
Figure 5-17. Rogue AP Detection Screen
5.11.5 Advanced Settings
Advanced options such as load balancing and restricting inter-client communications can be
configured here. To access this menu, select Configuration, Access Point and then
Advanced. See Figure 5-18.
Load Balancing: If there are multiple clients within range of more than one Access Point,
90% of them could connect to one AP while only 10% connect to the second AP (for example). This would create a throughput bottle neck on the AP serving the larger number of
clients. Enabling Load Balancing will force the AP’s to share the clients evenly.
Publicly Secure Packet Forwarding: Public Secure Packet Forwarding (PSPF) prevents
client devices associated to an access point from inadvertently sharing files or communicating with other client devices associated to the access point. To prevent inter-client communications, select Enable.
5-16
RAD-802.11-XD and RAD-802.11-XD-WM
User Manual – Section 5
1
2
3
2186A079
Figure 5-18. Advanced Settings Screen
5.12
Client Configuration
5.12.1 General
To configure the client, select Configuration, Client Radio and then General. See
Figure 5-19
1
2
3
2186A080
Figure 5-19. Client Radio Settings Screen
5-17
RAD-802.11-XD and RAD-802.11-XD-WM
User Manual – Section 5
SSID: Enter the SSID of the Access Point you wish to associate with.
Wireless Mode: Select the wireless mode the Access Point is using.
After clicking ‘Connect,’ the client will attempt to connect to the Access Point. Select Refresh to update the Link Status.
By clicking on Scan, the radio will do a site survey of the selected Wireless Mode to see
what AP’s are present and display some basic information on each network.
5.12.2 Security
To adjust security parameters, select Configuration, Client Radio and then Security.
A.
Open or Shared Authentication (WEP Security)
Select option (Open or Shared) to match the Access Point. See Figure 5-20. Note that
Access Points may be set to allow both.
Enter the number of bits of security the Access Point uses and the pass phrase. Alternately,
you could select Key Generator to have the device automatically generate a key; however,
this key must match the Access Point.
There are 4 possible keys that can be used with 64 bit encryption. This serves the purpose
of allowing periodic rotation of the WEP key by the operator. Simply select which key is
desired. The same key must be chosen in the Access Point and all Clients for successful
operation. Only one key will be used at a time.
4
1
2
3
2186A081
Figure 5-20. WEP Configuration Screen
5-18
RAD-802.11-XD and RAD-802.11-XD-WM
User Manual – Section 5
B.
WPA-PSK and WPA2-PSK Encryption
Enter the Pass phrase and Encryption Method to match the Access Point. See Figure
5-21. For more detail information about these encryption methods, refer to the Access Point
Configuration paragraphs in Section 1.
1
2
3
2186A082
Figure 5-21. Pass Phrase and Encryption Method Screen
5.13
Bridge Configuration
5.13.1 General
To configure the bridge, select Configuration, Bridge Radio and then General. See Figure
5-22.
1
2
3
2186A083
Figure 5-22. Bridge Configuration Screen
5-19
RAD-802.11-XD and RAD-802.11-XD-WM
User Manual – Section 5
Spanning Tree Protocol: Enable this if bridge radios are configured in a ring topology.
This will prevent data from going in an endless cycle around the ring.
By selecting Active Radio’s Monitoring the radio will scan the spectrum and display what
networks are operating within range along with some basic information.
5.13.2 Bridge Radio Settings
To configure the bridge radio settings, select Configuration, Bridge Radio and then Radio
Settings. See Figure 5-23.
Set the Wireless Mode, Tx Rate, and Channel Number to match the other bridge this radio
will be communicating with. Adjust the Transmit Power Level or leave it on Auto to have
the radio calculate how much power is needed to communicate with the remote radio(s).
Wireless Mode: Choose a desired wireless mode. Select 802.11a if you will only be using
802.11a clients in the 5GHz band. This will provide a stronger wireless network if there are
existing 802.11b/g networks in the area, or there are other nearby sources of interference in
the 2.4GHz band. 802.11a and g have higher throughput than 802.11b (54 Mbps compared
to 11 Mbps).
1
2
3
2186A084
Figure 5-23. Bridge Radio Settings Screen
Channel Number: There are 11 channels available to use in the 2.4GHz band (802.11b/g).
Refer to Figure 5-12 in this section. All of the channels overlap each other with the exception
of 1, 6 and 11. Separate wireless networks should use different channels, preferably nonoverlapping. All radios in a wireless network must use the same channel.
If 802.11a is selected, there are 8 non-overlapping channels to choose from: 52, 56, 60, 64,
149, 153, 157, and 161. Refer to Figure 5-13 in this section.
If you are uncertain about which channel to use, click the “Select the Optimal Channel” (in
802.11b or g modes only) to let the radio scan for the channel with the least amount of
interference. Clients will automatically determine which channel the AP is operating on.
5-20
RAD-802.11-XD and RAD-802.11-XD-WM
User Manual – Section 5
Tx (Transmit) Power Mode: Either fix the transmit power or let the radio determine how
much power is necessary to communicate with the clients. In Auto mode, the AP will
monitor the signal strength from the client. If it begins to get weak, it will automatically boost
the transmit power. This works well with mobile clients. Note that the client must have the
same amount of transmit power/antenna gain in order to send information back to the AP.
The range will be dictated by the radio with the least amount of transmit power.
Propagation Distance: Set this according to how far apart the radios will be located. This
setting adjusts the amount of time a radio will wait to receive a transmission due to propagation delay as it increases with distance.
RTS Threshold: The number of bytes used for the RTS/CTS handshake boundary. When a
packet size is greater than the RTS threshold, the RTS/CTS handshaking is performed.
5.13.3 Bridge Security
To configure the bridge radio settings, select Configuration, Bridge Radio and then Security. See Figure 5-24.
A.
Static AES Security
Enter a 32 digit hexadecimal key or select Key Generator and have the program generate a
key automatically. Copy the key into all other bridge mode radios, they must have the same
key in order to communicate.
1
2
3
2186A085
Figure 5-24. Bridge Radio Security
5-21
RAD-802.11-XD and RAD-802.11-XD-WM
User Manual – Section 5
5.14
Serial I/O Port Configuration
There are 2 independent serial channels available that allow use of the 2 physical serial
ports on each radio (RS232 and a RS485/422 port). See Figure 5-25. The serial port
function varies depending on the radio mode of operation. Serial data transmitted from a
client will only be available at the serial port of the Access Point. Serial data transmitted from
an Access Point will appear at the serial port of each client (broadcast mode). Data sent
into a bridge will be transmitted to the other bridge. If the radios are configured as multipoint
bridges, all serial data received by any one bridge shall be broadcast to all the other bridges.
1
2
3
2186A096
Figure 5-25. Serial Port Conmfiguration Screen
To configure the RS-232/485/422 ports, select Configuration, I/O Port and then Serial
Ports. First, select which port you wish to use (RS-232 or RS-422/485). The port settings
Baud Rate, Data Bits, Stop Bits, Parity, and Flow Control must match those of the serial
device that will be connected.
Baud Rate refers to the speed data will flow in/out the serial port. Data Bits refer to how
many bits make up each character. Stop Bits refer to how many bits will signify the end of a
character. Parity is an error checking method. Flow Control is used to prevent buffer
overflow when data streaming into the radio arrives faster than it can be sent out the serial
port. The radios have a 600 byte buffer. Buffer overflow occurs when transmitting a message larger than 600 bytes because the over-the-air data rate is much higher than the serial
port data rate. Enable flow control to resolve this.
Connect to Stream: There are 2 independent serial channels available that allow use of the
2 physical serial ports on each radio (RS232 and a RS485/422 port). Select one of the 2
available streams to use. The radio can also be configured as a Modbus/TCP client. It will
accept Modbus/TCP requests and convert them to Modbus RTU. The Modbus RTU requests will then be sent out of the serial port. If a serial port is not enabled on the client
radio, the Modbus requests will be ignored.
5-22
RAD-802.11-XD and RAD-802.11-XD-WM
User Manual – Section 5
5.15
Passwords
There are Administrator Passwords and Monitor Passwords. The Administrator can make
changes to the configuration whereas a Monitor can only view information.
To change or set passwords, click on Configuration, Passwords. See Figure 5-26.
1
2
2186A086
Figure 5-26. Password Set or Change Screen
5.16
Store and Retrieve Settings
This menu allows you to load the factory default parameters, save your configuration parameters to your PCs hard drive and send the configuration to the radio. To access these
functions, select Configuration, Store Retrieve Settings. See Figure 5-27.
1
2
2186A087
Figure 5-27. Store and SP. Settings Screen
5-23
RAD-802.11-XD and RAD-802.11-XD-WM
User Manual – Section 5
A pass phrase is required to protect/validate the file before it can be saved or retrieved from
your PC. It prevents unauthorized users from applying the system configuration file to an
unauthorized Access Point to gain access to the network.
5.17
Performance
Several aspects of the device’s performance can be monitored. LAN Performance provides
information on how the Ethernet network is operating. The Radio Performance section
offers data on how well the information is being transmitted over the air. The Serial Port
section presents statistics on the RS-232/422/485 data. To access this information select
Configuration, Performance. Each section contains a dialog box to set the refresh interval
(in seconds) of the page.
5.18
Maintenance
You can Register for Updates and have an e-mail message sent to you if there are any
firmware upgrades available. Under the Software Updates submenu you can view the
current version of firmware and install new ones.
The Utilities submenu contains a dialog Ping an IP address or host name to find out if it is
online and functional.
Traceroute will show the path a packet of information takes to get to its destination.
5.19
Monitoring / Reports
This menu allows viewing of the Web Access Log, and Bridging Status, Site Map, System Log, and if you are operating in AP mode, you can also access AP Client List, Adjacent AP List and DHCP Server Status.
The Web Access Log displays system facility messages with date and time stamp for any
actions involving web access. For example, this log records when the encryption mode was
set, if the operating mode was changed, etc., using the web browser. The log also documents the user who made the changes. The Web Access Log will continue to accumulate
listings. To clear the listings, use the Clear button.
The Bridging Status and Bridge Site Map provide statistics on a bridge connection.
System Log records all processes within the radio. It is used primarily for debugging.
The AP Client List shows all Clients that are connected to this Access Point.
The Adjacent AP List shows all Access Points that are within range of this Access Point.
Selecting an Access Point and clicking the Trust button adds that Access Point to the list of
trusted Access Points. This prevents an Access Point from being reported as a Rogue
Access Point.
5-24
RAD-802.11-XD and RAD-802.11-XD-WM
User Manual – Section 6
6
SECTION
Radio Troubleshooting
Section 6 Contents
6.1
6.2
6.3
6.4
6.1
LED Indicators ......................................................................................................... 6-1
6.1.1 RAD-80211-XD ........................................................................................... 6-1
6.1.2 RAD-80211-XD-WM ................................................................................... 6-2
RSSI (Received Signal Strength Indicator) .............................................................. 6-2
6.2.1 RAD-80211-XD ........................................................................................... 6-2
6.2.2 RAD-80211-XD-WM ................................................................................... 6-3
General Troubleshooting ......................................................................................... 6-4
Resetting the IP Address ......................................................................................... 6-5
6.4.1 DOS Command .......................................................................................... 6-5
6.4.2 Hardware Reset .......................................................................................... 6-5
LED Indicators
6.1.1
RAD-80211-XD
Figure 6-1 defines the LED indicator meanings for the RAD-80211-XD and Figure 6-2
defines the LED indicator meanings of the RAD-80211-XD-WM.
1
1
2
3
2
3
4
+24V GND A
5
B
6
7
B(-) A(+) B(-) A(+)
FLBL-2938-01R1
STATUS
ANT 1
RS-485 RX
RS-485 TX
ANT 2
4
5
8
RS-232 RX
RF LINK
RS-232 TX
RF DATA
6
7
WAN SPEED
5
9
4
WAN LINK
8
3
7
2
6
8
9
1
RSSI
RAD-80211-XD
No.
LED
Name
LED
Color
LED
Status
Meaning
1
STATUS
Green
ON Solid
WLAN is operating normally.
Flashing
Internal error
2
RS-485RX
Green
Flashing
RS-422/485 data is being transmitted
3
RS-485TX
Green
Flashing
RS-422/485 data is being received
4
RS-232RX
Green
Flashing
RS-232 data is being transmitted
5
RS-232TX
Green
Fashing
RS-232 data is being received
6
RF LINK
Green
ON Solid
RF Link is established
7
RF DATA
Green
Flashing
RF Data is being sent/received
8
WAN SPEED
Green
ON Solid
100BaseT connection exists
9
WAN LINK
Green
Flashing
Data is detected on Ethernet port
2186A040
Figure 6-1. RAD-80211-XD LED Descriptions
6-1
RAD-802.11-XD and RAD-802.11-XD-WM
User Manual – Section 6
6.1.2
RAD-80211-XD-WM
Figure 6-2 defines the LED indicator meanings of the RAD-80211-XD-WM. These LEDs can
assist you in troubleshooting the radio.
1
2
RS-485 / 422
RSSI
5
1
9
6
RX
EN
TX
RF
ST
RS-232
FLBL-2943-01R7
POWER / RF LINK
3
5
4
2
No.
LED
Name
LED
Color
LED
Status
1
TX
Green
Flashing
RS-232 data is being transmitted
2
RX
Green
Flashing
RS-232 data is being received
3
EN
Green
ON Solid
Wired network connected
4
RF
Green
OFF
5
ST
Green
ON Solid
Device is operating normally
Flashing
Internal error has oppccurred
Meaning
WiFi transceiver has valid RF link with another
WiFi transceiver.
2186A039
Figure 6-1. RAD-80211-XD-WM LED Descriptions
6.2
RSSI (Received Signal Strength Indicator)
The RSSI test point will provide a measure of how strong the received radio signal is at each
client or bridge. See Figure 6-3. RSSI will not function on an Access Point because there is
no method of determining which client is connected. The RSSI is a voltage output, ranging
from 0-3.5 VDC, and can be measured using a standard voltmeter.
6.2.1
RAD-80211-XD
On the model RAD-80211-XD, the positive connection for your multimeter is made on the
RSSI test point of the radio and the negative connection to the power supply ground. An
adapter is available that will connect to the RSSI connector to allow permanent monitoring of
the RSSI voltage (part numbers 0201744 for test connector and 0201663 for insulating
sleeve).
RAD-802.11-XD
Wireless Transceiver
8
7
6
5
4
3
2
1
–
–
+
DC
OK
A
Typ USLKG 5
–
FL
RS
AN
(-)
) B
RS
T1
A(+
S
-485
-485
)
Common Probe (-)
to Terminal No. 2 (GND)
0 to 3.5 Vdc
RX
TX
DC
OK
D
UT
O
C
3A
V 1. +
24
AN
T2
RF
+
-
-
MINI POWER
RS
RS
-232
-232
RF
RX
TX
K
LIN
A
DAT
N
WA
N
WA
SP
EE
LIN
D
K
5
8
7
2
6
1
0V
24 -)
0 - N(
10 NC
3
AC
9
DC
OK
4
IN
.522
.5
28
V DC
RA
NC
L(+)
L(+)
120 V ac to 230 V ac
Power Source
A(+
TU
STA
B
+
-
2186A048-1
B(-)
+24 2938
L-
+
+
–
B
D
GN 1R1
V
-0
RS
D-8
02
11
-X
D
SI
N(-)
Positive Probe (+)
to RSSI Connector
Figure 6-3. RAD-80211-XD RSSI Voltage Strength Check
6-2
RAD-802.11-XD and RAD-802.11-XD-WM
User Manual – Section 6
RAD-80211-XD-WM
On the model RAD-80211-XD-WM, the positive connection is made on the RSSI test point
and the negative lead is connected to the bolt under the antenna on the right side of the unit.
The voltage measured directly correlates to the received signal expressed as -dBm. Refer
to the chart below to determine the dB from the voltage measured. Note that this voltage will
fluctuate constantly due to multipathing.
The minimum recommended signal is 2.5 VDC. This will allow for approximately a 20 dB
fade margin to ensure communications in the event of deteriorating RF conditions.
12
15 -3
0
0.5 0m V
D
0° A A C
32 C T @ @
°F O 30 24
T 65 VA VD
O ° C C
14 C /
D
9°
C
F
Common Probe (-)
to Ground Terminal
M
-W
P
O
C W
U
C R ER
O R :
E NT EN
M A T
P C :
E T
R R
A
RS
-48
5/
4
22
EN
RF
FLBL
-2937
-01R2
T
0 to 3.5 Vdc
Earth Ground
Connection
T AT
U IN
R
R
28 AD E: G:
85 -8
0
71 21
5 1-X
D
6.2.2
RS
RX
TX
SI
2186A032
WE
PO
-2
RS
R
/R
FL
IN
ST
K
32
7
-01R
43
29
BLFL
Positive Probe (+)
to RSSI Test Point
RSSI (Received Signal
Strength Indication)
Test Point
Figure 6-3. RAD-80211-XD-WM RSSI Voltage Strength Check
6-3
RAD-802.11-XD and RAD-802.11-XD-WM
User Manual – Section 6
6.3
General Troubleshooting
When troubleshooting a network, the first step is to ensure there is a good radio signal.
Once that has been established, check the wiring between the radio and external devices.
After the wiring has been verified, then you can adjust configuration parameters.
The most practical method of troubleshooting a system is to lay all of the components out on
a table, such that all radios are within 10 feet of each other. This way there will be a strong
radio signal and programming each radio will not involve traveling to a remote site.
Refer to Table 6-1 to help identify various problems and possible solutions.
Table 6-1. RAD-80211-XD and RAD-80211-XD-WM Troubleshooting Procedures
Problem
Unable to open Web Based
Management
Solution
1. Ensure power is applied to radio.
2. Ensure cable is connected between PC and radio (WAN LINK LED will be
on if cable is connected).
3. Verify network settings of PC match network settings of radio.
4. The LAN Link and Duplex selection in the radio should match the settings
of the connected wired network. Select Auto if in doubt.
5. Confirm IP address of radio. If IP address is unknown, it can be set using a
DOS command. See Resetting the IP Address in this section.
No radio link (radios within 10
feet of each other) [Access
Point/Client Modes]
1. Ensure one radio is programmed as an Access Point and the others as
clients.
2. Verify selected wireless modes are compatible (802.11a or 802.11b/g).
3. Confirm security settings match in each radio.
No radio link (radios within 10
feet of each other) [Bridge
Mode]
1. Ensure BSSID of remote radio is entered in local radio and vice versa.
2. Verify selected wireless modes are compatible (802.11a or 802.11b/g) and
wireless channels match in each radio.
3. Confirm security settings match in each radio.
No radio link (field installed)
1. Check to ensure antennas are connected and aimed properly
2. Inspect antenna connections, they should be tight and corrosion free.
3. Increase the mounting height of the antenna to gain line of sight.
4. Install larger gain antenna (and/or decrease coaxial cable loss)
5. Use a WiFi scanner to check for nearby networks that may cause
interference.
6. Check the power supply to ensure sufficient current capacity.
7. Make sure the center pin of the antenna coaxial cable is not shorted to
ground.
Able to send data, but no
response from remote device
1. Verify network settings in remote device match those of the radios and
LAN.
a. Each device should have a unique IP Address in the same
network (e.g. 192.168.254.xxx).
b. The Subnet Mask should be the same in each device.
c. The LAN Link and Duplex selection in the radio should match the
settings of the connected wired network. Select Auto if in doubt.
2186A088
6-4
RAD-802.11-XD and RAD-802.11-XD-WM
User Manual – Section 6
6.4
Resetting the IP Address
If the IP address is unknown, access to the radio can be restored by changing the IP address using either a DOS command or a hardware reset.
6.4.1
DOS Command
Open a DOS prompt in Windows by clicking Start, Run, and typing “cmd” without
quotes. A C:/ prompt will open. At the prompt, do the following steps.
1. Enter arp -s (desired IP address) (MAC address of Radio).
For example: arp -s 192.168.254.200 00-aa-00-62-c6-09
2. Hit Enter. Then type: ping -l 1040 (IP address)
For example: ping -l 192.168.254.200
Note
The character in “ping-l” is a lower case “L”. If the IP Address
assignment was successful, a reply message will appear. To
abort the ping, press Ctrl+C.
6.4.2
Hardware Reset
The hardware reset will restore the default IP Address 192.168.254.254 as well as the
default user passwords “admin” for the Admin user and “monitor” for the Monitor user. To
initiate a hardware reset, disconnect power from the radio and insert a jumper across pins 2
and 3 on the DB9 RS232 port. Reconnect power. Once startup is complete, remove the
jumper.
For Technical Support, contact Phoenix Contact Technical Service.
800-322-3225
Please have the model number of your radio available.
6-5
RAD-802.11-XD and RAD-802.11-XD-WM
User Manual – Section 6
6-6
RAD-802.11-XD and RAD-802.11-XD-WM
User Manual – Section 7
7
SECTION
Technical Data
Section 7 Contents
7.1
7.2
Dimensions
Figure 7-1 and Figure 7-2 provide the basic dimension of the RAD-80211-XD and RAD80211-XD-WM transceivers.
6.3
(2. 5 mm
50
in.
)
na
ten s
An ition °
s 0
Po To 9
Up
G:
R:
WE NT: ATIN
PO RRE T R RE:
C
CU NTA ATU
R
CO PE
M
TE
25.4 cm
(10.0 in.)
7.1
Dimensions .............................................................................................................. 7-1
Specifications .......................................................................................................... 7-2
WM
D-
1-X
21
80
D- 1 5
RA85 7
28
L
F
9
-2
L
B
7
3
1
-0
R
2
C
DC 24VD/ DC
-30V @ C
12 A VA
0m 30
15 @ °C F
65
0.5ATO 149°
0°C TO
°F
32
2186A021
VARIOSUB
9-Pin, D-sub
Connector
m
c
.17
23
n.)
5i
(
47
2
9.1
cm
)
.5
(18
in.
Figure 7-1. RAD-80211-XD-WM Transceiver Dimensions
7-1
RAD-802.11-XD and RAD-802.11-XD-WM
User Manual – Section 7
11
3.
(4. 25 m
46 m
in.
)
8
7
6
5
4
3
2
1
B(-)
B
A
GND 1R1
-0
+24V 2938
L-
B(-)
A(+)
RX
B
FL
-485
RS
TX
-485
RS
T1
AN
2186A094-1
A(+)
S
TU
STA
T2
AN
K
LIN
A
DAT
RF
RF
RX
-232
RS
TX
-232
RS
D
EE
SP
N
WA
K
LIN
N
WA
99
.
(3. 0 mm
89
in.
)
5
9
4
8
3
7
2
6
1
RA
D-8
02
11
-X
D
SI
RS
mm
.0 .)
46 1 in
8
(1.
Figure 7-2. RAD-80211-XD Transceiver Dimensions
7.2
Specifications
Tables 7-1 provide general wireless specifications applicable to both the RAD-80211-XD and
RAD-80211-XD-WM transceivers. Tables 7-2 and 7-3 provide specifications applicable to a
specific transceiver.
Table 7-1. General Wireless Specifications
Frequency
802.11a ..................................................................................................................................... 5.25-5.815 GHz
802.11b/g................................................................................................................................... 2.4-2.4835 GHz
Transmit power ........................................................................................100 mW maximum (adjustable to 1 mW)
Channel selection
802.11a ........................................................................................................ 52, 56, 60, 64, 149, 153, 157, 161
802.11b/g ..................................................................................................................................................... 1-11
FCC ID (USA) ..........................................................................................................................................NKRCM9
2186A038
7-2
RAD-802.11-XD and RAD-802.11-XD-WM
User Manual – Section 7
Table 7-2. RAD-80211-XD Wireless Specifications
Status .....................................................................................................................................................12-30 V dc
Wiring connections
Power ............................................................................................................ screw-type terminals; 12–24 AWG
RS-232 port ..................................................................................................................................... DB9 female
RS-422/485 port ......................................................................................... screw-type terminals; 12– 24 AWG
Ethernet port .............................................................................................................................................. RJ45
Mounting configuration ............................................................................................................................... DIN-rail
Dimensions (L x W)........................................................ 3.90 in. x 0.88 in. x 4.5 in. (99 mm x 45 mm x 114.5 mm)
Case material................................................................................................................................................ plastic
Temperature range ................................................................................................. -0°C to +55°C (32°F to 131°F)
Environmental rating ...................................................................................................................................... IP-20
Approvals .......................................................................Class I, Div. 2 Groups A, B, C, D; UL and CSA (pending)
LED indicators
STATUS ............................................................................................... glows solid when 12–30 V dc is applied
RS 485TX ......................................................................... flashes when RS-422/485 data is being transmitted
RX 485RX ............................................................................. flashes when RS-422/485 data is being received
RS-232TX ............................................................. RS-232TX: flashes when RS-232 data is being transmitted
RS-232RX ............................................................................. flashes when RS-422/485 data is being received
RF DATA ............................................................................ RF DATA: flashes when data is being sent/received
RF LINK ................................................................................ RF LINK: glows solid when RF link is established
WAN LINK ............................................................. WAN LINK: flashes when data is detected on Ethernet port
WAN SPEED ...................................................... WAN SPEED: glows solid when 100BaseT connection exists
Antenna
Type ..................................................................................................................2 dBi gain omnidirectional, IP-20
Connector ...............................................................................................................................2 X MCX (female)
2186A037
Table 7-3. RAD-80211-XD-WM Wireless Specifications
Power .....................................................................................................Power-over-Ethernet (PoE) or 12-30 V dc
Wiring connections
Power ........................................................................................................................................................... M12
RF link contact ............................................................................................................................................ M12
RS-422/485 port ...........................................................................................................................................M12
RS-232 port ............................................................................................................................ IP67 DB9 female
Ethernet port .................................................................................................................. IP67 RJ45 VARIOSUB
Mounting configuration .......................................................................................................................... wall mount
Dimensions (L x W)..................................................................................... 7.00 in. x 6.49 in. (178 mm x 165 mm)
Case material ......................................................................................................................... Xenoy 5220U plastic
Temperature range ................................................................................................. -0°C to +55°C (32°F to 131°F)
Environmental rating ...................................................................................................................................... IP-67
Approvals .......................................................................Class I, Div. 2 Groups A, B, C, D; UL and CSA (pending)
LED indicators
TX ..............................................................................................flashes when RS-232 data is being transmitted
RX .................................................................................................flashes when RS-232 data is being received
ST ........................................ON when the device is operating normally flashes when there is an internal error
RF ...........................................ON when the WiFi transceiver has a valid RF link with another WiFi transceiver
EN ...............................................................................................................................wired network connected
Antenna
Type .....................................................................................................2 dBi gain omnidirectional, built-in IP-67
Connector ..........................................................................................................................2 X RPSMA (female)
2186A036
7-3
RAD-802.11-XD and RAD-802.11-XD-WM
User Manual – Section 7
7-4
RAD-802.11-XD and RAD-802.11-XD-WM
User Manual – Section 8
8
SECTION
Ordering Information
Section 8 Contents
8.1
8.2
8.3
RAD-80211-XD Parts and Assemblies
Figure 8-1 shows the various parts and assemblies applicable to the RAD-80211-XD Radio.
Table 8-1 list the part number and description for each item identified in Figure 8-1.
5
3
6
4
2
3
8
7
5
6
4
3
2
1
1
–
–
+
DC
OK
)
(+
) A
A
Typ USLKG 5
–
FL
BL
U
AT
ST
RS
-48
-4
RS
T1
AN
A(+
)
S
5R
85
X
TX
DC
OK
+
.3
V1
-
OU
TD
4
C2 +
A
AN
+
T2
RS
.522
.5
28 C
VD
RS
2
-23
ED
PE
NS
WA
INK
NL
WA
X
2T
-23
9
4
8
3
7
2
6
1
DC
OK
0V
24 )
0 - N(10 C
AC C N
)
L(+
RX
7
5
IN
K
LIN
TA
DA
RF
RF
-
-
2186A050
B
() B
B(-
D
GN 1R1
-0
4V
+2 -2938
+
+
–
MINI POWER
8.1
RAD-80211-XD Parts and Assemblies.................................................................... 8-1
RAD-80211-XD-WM Parts and Assemblies ............................................................. 8-2
Additional Parts and Accessories ............................................................................ 8-3
RA
N
RS
D-8
02
11
-X
D
SI
8
Figure 8-1. Parts and Accessories for the RAD-80211-XD Radio
8-1
RAD-802.11-XD and RAD-802.11-XD-WM
User Manual – Section 8
Table 8-1. Parts List for Figure 8-1.
Item
No.
Type
Description
Order No.
1
DIN-rail, 35 x 7.5 mm, perforated, 2 m (6.56 ft) long
NS 35/7,5 GELOCHT
08 01 73 3
2
Universal Ground terminal Block
USLKG5
04 41 50 4
3
Universal End Bracket for NS 15 DIN-rail
E/NS 35 N
08 00 88 6
4
MINI Power supply, 100-240 V ac input, 24 V dc output, 1.3A
MINI-PS-100-240AC/24DC/1.3
28 66 44 6
5
802.11a/b/g Industrial radio transceiver, DIN-rail mount
RAD-80211-XD
28 85 72 8
6
2 dBi gain omnidirectional antenna, IP65 protection, with
bracket and 1.5 m (4.92 ft) long adapter cable
RAD-ISM-2400-ANT-OMNI-2-1
28 67 46 1
7
Ethernet cable assembly (purple), 8-position, one end RJ45
(1P67), one end RJ45 (IP20), 5 m (16.40 ft) long
VS-08-LI-VSIP67-VSIP20-CF-5,0
16 89 59 8
8
D-Sub cable assembly, 9-position, one male end & one
female end, 3.0 m (9.85 ft) long*
CABLE-D 9SUB/B/S/300KONFEK/S
23 02 02 3
2186A049
8.2
RAD-80211-XD-WM Parts and Assemblies
Figure 8-2 shows the various parts and assemblies applicable to the RAD-80211-XD-WM
Radio. Table 8-2 list the part number and description for each item identified in Figure 8-2.
1
2
D
R
28 AD
85 -8
0
71 21
5 1-X
5/
-48
RS
2
42
EN
RF
FLBL
-293
7-01
R2
T
P
O
C W
U
C R ER
O R :
E NT EN
M A T
P C :
E T
R R
A A
T T
U IN
R G
E
: :
-W
M
12
15 -3
0
0.5 0m V
D
0° A A C
32 C T @ @
°F O 30 24
T 65 VA VD
O ° C C
14 C /
D
9°
C
F
3, 4
RX
TX
SI
RS
2186A052
R
WE
PO
ST
5
K
IN
FL
/R
6
2
-23
RS
R7
-01
43
-29
BL
FL
7
9
8
14
54
32
19
87
6
10
13
12
11
Figure 8-2. Parts and Accessories for the RAD-80211-XD-WM Radio
8-2
RAD-802.11-XD and RAD-802.11-XD-WM
User Manual – Section 8
Table 8-2. Parts List for Figure 8-2.
Item
No.
Description
Type
Order No.
1
802.11a/b/g Industrial radio transceiver, wall mount
RAD-80211-XD-WM
28 85 71 5
2
Protective cover, RJ45 port
VS-08-SD-F
16 52 60 6
3
Connector, RJ45 (IP67), includes hood and connector
VS-08-T-RJ45/IP67-SET
16 89 47 5
41
Ethernet patch cable, purple, CAT5, 4-pair, shielded,
connection not crossed (line), one end RJ45 (1P67), one
end RJ45 (IP20), 5 m (16.40 ft) long
VS-08-4X2X26C6/7-VS67-RJ45/5,0
16 53 20 7
5
Protective cap, M12 port, for unused position
PROT-M12
16 80 53 9
61
Sensor/actuator cable assembly, one end has 4-position,
male M12 straight plug, other end has free wires,
1.5 m (4.92 ft) long
SAC-4P-M12MS/1,5-PUR
16 68 04 3
7
Protective cap, M12 port, for unused position
PROT-M12-M
27 36 194
81
Sensor/actuator cable assembly, one end has 4-position
female M12 straight socket, other end has free wires,
1.5 m (4.92 ft) long
SAC-4P-1,5-PUR/M12FS
16 68 10 8
9
Protective cover, RS-232 port
VS-09-SD
18 87 08 6
10
RS-232 D-sub hood (IP67)
VS-09-T-2M16
16 88 35 3
112
Cable, 3 twisted pairs, shielde, highly flexible, sold by the
meter
IBS RBC METER-T
28 06 28 6
Cable gland for D-sub hood, accepts cable diameters from
3 to 6 mm
VS-M16 (3-6)
16 88 45 0
13
Cable gland sealing cap, for unused sealing positions
Q-PROT 9/11
16 70 23 5
143
VARIOSUB D-sub Insert, male, 9-position, 0.5 mm screwclamp connection
VS-09-ST-DSUB/9-MPT-0,5
16 88 37 9
12
2186A051
Other lengths are available upon request.
For 8- or 10-conductors cables, see to your local distributor.
3 VARIOSUB D-sub inserts are available for different field buses or applications. They are also available
in both screw-clamp and spring-clamp termination methods. Visit the PLUSCON family of products at
our website: www.phoenixcon.com.
1
2
8-3
RAD-802.11-XD and RAD-802.11-XD-WM
User Manual – Section 8
8.3
Additional Parts and Accessories
Table 8-3 lists parts and accessories that are available for use with the RAD-80211-XD and
RAD-80211-XD-WM radios. You can find more products, accessories, guides, system
configurators, etc for wireless solutions by visiting our web site at:
www.phoenixcon.com
INTERFACE / Wireless
Table 8-3. List of Additional Parts and Accessories
Item
No.
1
Description
Type
Order No.
8 dBi gain directional antenna, IP65 protection, connection
type SMA (female), for 802.11b/g
RAD-ISM-2400-ANT-PAN-8-0
28 67 61 0
9 dBi gain omnidirectional antenna, IP65 protection,
connection type N (female), for 802.11b/g
RAD-ISM-2400-ANT-OMNI-9-0
28 67 62 3
24 dBi gain directional parabolic dish antenna and mounting
bracket, connection type N (female), for 802.11a
RAD-ISM-5000-ANT-PARI-22-N
56 06 17 4
4
RG213 cable, 7.62 m (25 ft) long, connection type N (male)
RAD-CAB-RG213-25
28 67 59 7
5
Surge protection for 2.4 GHz to 5.8 GHz antennas,
connection type N (female) to N (female)
RAD-TRAB-N-BB/6GHZ
56 06 53 2
Adapter, MCX(male) to N (male), for connection to radio and
surge protector, 1.2 m (4 ft) longf
RAD-CON-MCX90-N-SS
28 85 20 7
2
3
6
2186A091
8-4
RAD-80211-XD & RAD-80211-XD-WM
User Manual, Appendix A
A
APPENDIX
Structure of IP Addresses
Appendix A Contents
A.1
A.2
A.1
Valid IP Parameters ................................................................................................. A-1
A.1.1 Valid IP addresses are: ............................................................................... A-1
A.1.2 Valid subnet masks are: .............................................................................. A-1
A.1.3 Default gateway/router: ............................................................................... A-1
Assigning IP Addresses ........................................................................................... A-1
A.2.1 Special IP Addresses for Special Applications ............................................ A-3
A.2.2 Value 255 in the Byte .................................................................................. A-4
A.2.3 Subnet Masks ............................................................................................. A-4
A.2.4 Examples for Subnet masks and Computer Bits
(See Figure A-4) ......................................................................................... A-6
Valid IP Parameters
IP parameters comprise the following three elements: “IP address”, “subnet mask”, and
“default gateway/router”.
A.1.1
Valid IP addresses are:
000.000.000.001 to 126.255.255.255 and
128.000.000.000 to 223.255.255.255
A.1.2
Valid subnet masks are:
255.000.000.000 to 255.255.255.252
A.1.3
Default gateway/router:
The IP address of the gateway/router must be in the same subnetwork as the address of the
switch.
Assigning IP Addresses
Bit 32
The IP address is a 32-bit address. See Figure A-1. The IP address consists of a network
part and a user part. The network part consists of the network class and the network
address. There are currently five defined network classes. See Table A-1. Classes A, B,
and C are used in modern applications, while classes D and E are hardly ever used. It is
therefore usually sufficient if a network device only “recognizes” classes A, B, and C.
Bit 1
A.2
2186A059
Figure A-1. Location of Bits within the IP Address
A-1
RAD-80211-XD & RAD-80211-XD-WM
User Manual, Appendix A
With binary representation of the IP address the network class is represented by the first
bits. The key factor is the number of “ones” before the first “zero”. The assignment of
classes is shown in Table A-1. The empty cells in the table are not relevant to the network
class and are already used for the network address.
Table A-1. Class Asignments
Bit 1
Bit 3
Bit 2
Bit 4
Class A
0
Class B
1
0
Class C
1
1
0
Class D
1
1
1
0
Class E
1
1
1
1
Bit 5
0
2186A060
The bits for the network class are followed by those for the network address and user
address. Depending on the network class, a different number of bits are available, both for
the network address (network ID) and the user address (host ID). See Table A-2.
Table A-2. Network and User Class Bit Assignments
Network ID
Class A
7 Bits
Class B
14 Bits
Class C
21 Bits
Host ID
Class D
28-Bit Multicast Identifier
Class E
27 Bits (Reserved)
2186A061
IP addresses can be represented in decimal or hexadecimal form. In decimal form, bytes are
separated by dots (dotted decimal notation) to show the logical grouping of the individual
bytes. See Figure A-2.
NOTE
The decimal points do not divide the address into a network
and user address. Only the value of the first bits (before the
first “zero”) specifies the network class and the number of
remaining bits in the address.
A-2
RAD-80211-XD & RAD-80211-XD-WM
User Manual, Appendix A
Possible Address Combinations
Class A
0.0.0.0 - 127.255.255.255
Class B
128.0.0.0 - 191.255.255.255
Class C
192.0.0.0 - 233.255.255.255
0
7 Bits
24 Bits
Network ID
Host ID
1 0
1 1 0
14 Bits
16 Bits
Network ID
Host ID
21 Bits
8 Bits
Network ID
Host ID
28 Bits
Class D
224.0.0.0 - 239.255.255.255
1 1 1 0
Identifier for Multicast Group
27 Bits
Class E
240.0.0.0 - 247.255.255.255
1 1 1 1 0
Reserved for Future Applications
2186A062
Figure A-2. Structure of IP Addresses
A.2.1
Special IP Addresses for Special Applications
Certain IP addresses are reserved for special functions. The following addresses should not
be used as standard IP addresses.
127.x.x.x Addresses
The class A network address “127” is reserved for a loopback function on all PCs, regardless
of the network class. This loopback function may only be used on networked PCs for
internal test purposes.
If a telegram is addressed to a PC with the value 127 in the first byte, the receiver immediately sends the telegram back to the transmitter. In this way, it is possible to check, for
example, whether the TCP/IP software is correctly installed and configured.
As the first and second layers of the ISO/OSI reference model are not included in the test
they should be tested separately using the ping function.
A-3
RAD-80211-XD & RAD-80211-XD-WM
User Manual, Appendix A
A.2.2
Value 255 in the Byte
Value 255 is defined as a broadcast address. The telegram is sent to all the PCs that are in
the same part of the network. Examples: 004.255.255.255, 198.2.7.255 or 255.255.255.255
(all the PCs in all the networks). If the network is divided into subnetworks, the subnet
masks must be observed during calculation, otherwise some devices may be omitted.
0.x.x.x Addresses
Value 0 is the ID of the specific network. If the IP address starts with a zero, the receiver is
in the same network. Example: 0.2.1.1, refers to device 2.1.1 in this network.
The zero previously signified the broadcast address. If older devices are used, unauthorized
broadcast and complete overload of the network (broadcast system) may occur when using
the IP address 0.x.x.x.
A.2.3
Subnet Masks
Routers and gateways divide large networks into several subnetworks. The subnet mask is
used to assign the IP addresses of individual devices to specific subnetworks. The network
part of an IP address is not modified by the subnet mask. An extended IP address is
generated from the user address and subnet mask. Because the masked subnetwork is only
recognized by the local PC, this extended IP address appears as a standard IP address to
all the other devices.
Structure of the Subnet Mask
The subnet mask always contains the same number of bits as an IP address. The subnet
mask has the same number of bits (in the same position) set to “one”, which is reflected in
the IP address for the network class.
Example: A Class A IP address contains a
1-byte network address and a 3-byte PC address. Therefore, the first byte of the subnet
mask may only contain 1s (ones). The remaining bits (three bytes) then contain the address
of the subnetwork and the PC. The extended IP address is created when the bits of the IP
address and the bits of the subnet mask are ANDed. Because the subnetwork is only
recognized by local devices, the corresponding IP address appears as a “normal” IP address
to all the other devices.
A-4
RAD-80211-XD & RAD-80211-XD-WM
User Manual, Appendix A
Application
If ANDing the address bits give the local network address and the local subnetwork address,
the device is located in the local network. If ANDing gives a different result, the data telegram is sent to the subnetwork router. Figure A-3 shows an example of a Class B subnet
Decimal Notation: 255.255.192.0
Binary Notation: 1111 1111.1111 1111.1100 0000.0000 0000
Class B
Subnet Mask Bits
Using this subnet mask, the TCP/IP protocol software distinguished
between devices that are connected to the local subnetwork and devices
that are located in other subnetworks.
Example:
Device no. 1 wants to establish a connection with device no. 2 using the
above subnet mask. Device no. 2 has IP address 59.EA.55.32. The IP
address for device no. 2 is displayed as follows:
Hexadecimal Notation: 59.EA.55.3
Binary Notation: 0101 1001.1110 1010.0101 0101.0011 00102
The individual subnet mask and the IP address for device no. 2 are then
ANDed bit-by-bit by the software to determine whether device no. 2 is
located in the local subnetwork.
ANDing the subnet mast and IP Address for Device No. 2 is as follows:
Subnet Mask:
IP Address:
1111 1111.1111 1111.1100 0000.0000 0000
AND
0101 1001.1110 1010.0101 0101.0011 0010
Result after ANDing:
0101 1001.1110 1010.0100 0000.0000 0000
Subnetwork
After ANDing, the software determines that the relevant subnetwork (01)
does not correspond to the local subnetwork (11) and forwards the data
telegram to a subnetwork router.
2186A063
Figure A-3. Example for a class B subnet mask
A-5
RAD-80211-XD & RAD-80211-XD-WM
User Manual, Appendix A
A.2.4
Examples for Subnet masks and Computer Bits
(See Figure A-4)
Subnet Mask
Computer/Host ID
255.255.255.252
255.255.255.248
255.255.255.240
2 Bits
3 Bits
4 Bits
255.255.255.224
255.255.255.192
255.255.255.128
5 Bits
6 Bits
7 Bits
255.255.2545.0
255.255.254.0
255.255.252.0
8 Bits
9 Bits
10 Bits
255.255.248.0
...
...
11 Bits
...
...
255.128.0.0
255.0.0.0
23 Bits
24 Bits
2186A064
A-4. Examples of Subnet Masks and Number of Computer Bits
A-6
RAD-802.11-XD and RAD-802.11-XD-WM
User Manual – Appendix B
B
APPENDIX
Glossary
802.11a - An IEEE wireless networking standard that specifies a maximum data rate of 54
Mbps, OFDM modulation and an operating frequency of 5GHz.
802.11b - An IEEE wireless networking standard that specifies a maximum data transfer rate
of 11 Mbps, DSSS modulation and an operating frequency of 2.4GHz.
802.11g- An IEEE wireless networking standard that specifies a maximum data transfer rate
of 54 Mbps, OFDM modulation and an operating frequency of 2.4GHz.
A
Access Point- A device that allows wireless-equipped computers and other devices to
communicate with a wired network.
Ad-hoc- A group of wireless devices communicating directly with each other (peer-to-peer)
without the use of an access point.
AES (Advanced Encryption Standard) - Short for Advanced Encryption Standard, a symmetric 128-bit block data encryption technique developed by Belgian cryptographers Joan
Daemen and Vincent Rijmen. The U.S government adopted the algorithm as its encryption
technique in October 2000, replacing the DES encryption it used. AES works at multiple
network layers simultaneously.
AES-CCMP- AES-Counter Mode CBC-MAC Protocol (AES-CCMP) is the encryption
algorithm used in the 802.11i security protocol. It uses the AES block cipher, but restricts the
key length to 128 bits. Incorporates two sophisticated cryptographic techniques (counter
mode and CBC-MAC) and adapts them to Ethernet frames to provide a robust security
protocol between the mobile client and the access point.
B
Bandwidth - The transmission capacity of a given device or network.
Beacon Interval - The time interval in milliseconds in which the 802.11 beacon is transmitted by the AP.
Bit - A binary digit.
Bridge- A device that connects two local-area networks (LANs), or two segments of the
same LAN that use the same protocol, such as Ethernet or Token-Ring.
Browser - An application program that provides a way to look at and interact with all the
information on the World Wide Web.
B-1
RAD-802.11-XD and RAD-802.11-XD-WM
User Manual – Appendix B
C
CSMA/CA (Carrier Sense Multiple Access/Collision Avoidance) - A method of data transfer
that is used to prevent data collisions.
CTS (Clear To Send) - A signal sent by a wireless device, signifying that it is ready to receive
data.
D
DNS- Short for Domain Name System (or Service or Server), an Internet service that
translates domain names into IP addresses. Because domain names are alphabetic, they’re
easier to remember. The Internet however, is really based on IP addresses. Every time you
use a domain name, therefore, a DNS service must translate the name into the corresponding IP address. For example, the domain name www.example.com might translate to
198.105.232.4. The DNS system is, in fact, its own network. If one DNS server doesn’t know
how to translate a particular domain name, it asks another one, and so on, until the correct
IP address is returned.
Default Gateway - A device that forwards Internet traffic from your local area network.
DHCP (Dynamic Host Configuration Protocol) - A networking protocol that allows administrators to assign temporary IP addresses to network computers by “leasing” an IP address to a
user for a limited amount of time, instead of assigning permanent IP addresses.
DNS (Domain Name Server) - The IP address of your ISP’s server, which translates the
names of websites into IP addresses.
Domain - A specific name for a network of computers.
DSSS (Direct-Sequence Spread-Spectrum) - Frequency transmission with a redundant bit
pattern resulting in a lower probability of information being lost in transit.
DTIM (Delivery Traffic Indication Message) - A message included in data packets that can
increase wireless efficiency.
DTIM Interval- The number of beacon intervals that broadcast and multicast traffic is
buffered for a client in power save mode.
Dynamic IP Address - A temporary IP address assigned by a DHCP server.
E
Encryption - Encoding data transmitted in a network.
Ethernet - IEEE standard network protocol that specifies how data is placed on and retrieved from a common transmission medium.
F
Firewall - A set of related programs located at a network gateway server that protects the
resources of a network from users from other networks.
Firmware - The programming code that runs a networking device.
Fragmentation -Breaking a packet into smaller units when transmitting over a network
medium that cannot support the original size of the packet.
FTP (File Transfer Protocol) - A protocol used to transfer files over a TCP/IP network.
B-2
RAD-802.11-XD and RAD-802.11-XD-WM
User Manual – Appendix B
G
Gateway - A device that interconnects networks with different, incompatible communications
protocols.
H
Half Duplex - Data transmission that can occur in two directions over a single line, but only
one direction at a time.
Hardware - The physical aspect of computers, telecommunications, and other information
technology devices.
HTTP (HyperText Transport Protocol) - The communications protocol used to connect to
servers on the World Wide Web.
I
IEEE (The Institute of Electrical and Electronics Engineers) - An independent institute that
develops networking standards.
Infrastructure - A wireless network that is bridged to a wired network via an access point.
IP (Internet Protocol) - A protocol used to send data over a network.
IP Address - The address used to identify a computer or device on a network.
IPSec (Internet Protocol Security) - A VPN protocol used to implement secure exchange of
packets at the IP layer.
ISM band - Industrial Scientific Medical band. A license free portion of the spectrum open to
all users.
L
LAN - The computers and networking products that make up your local network.
Load Balancing- In an infrastructure wireless LAN, the access point (AP) is responsible for
connecting mobile stations (STA) and wired stations. Each access point is assigned on one
channel. Traditionally, one station selects AP to connect is based on the received signal
strength indicator (RSSI). This approach may cause all active mobile stations to connect to
few APs and lots of contentions/collisions will occur by the Carrier Sense Multiple Access/
Collision Avoidance (CSMA/CA) protocol. Consequently, the total network throughput will be
degraded. Contrarily, if all STAs can be equally distributed to all APs and the signal strength
of any pair of STA and connected AP is still kept in an acceptable range, the spare bandwidth in wireless LAN (WLAN) will be utilized in a more efficient way.
M
MAC (Media Access Control) Address - The unique address that a manufacturer assigns to
each networking device.
Mbps (MegaBits Per Second) - One million bits per second; a unit of measurement for data
transmission.
B-3
RAD-802.11-XD and RAD-802.11-XD-WM
User Manual – Appendix B
N
Network - A series of computers or devices connected for the purpose of data sharing,
storage, and/or transmission between users.
Node - A network junction or connection point, typically a computer or work station.
P
Packet - A unit of data sent over a network.
Passphrase - Used much like a password, a passphrase simplifies the WEP encryption
process by automatically generating the WEP encryption keys for Linksys products.
Ping (Packet INternet Groper) - An Internet utility used to determine whether a particular IP
address is online.
Port - The connection point on a computer or networking device used for plugging in cables
or adapters.
PPPoE (Point-to-Point Protocol over Ethernet) - A type of broadband connection that
provides authentication (username and password) in addition to data transport.
PPTP (Point-to-Point Tunneling Protocol) - A VPN protocol that allows the Point to Point
Protocol (PPP) to be tunneled through an IP network. This protocol is also used as a type of
broadband connection in Europe.
R
RADIUS (Remote Authentication Dial-In User Service) - An AAA (authentication, authorization and accounting) protocol for applications such as network access or IP mobility. It is
intended to work in both local and roaming situations. It is a client/server protocol and
software that enables remote access servers to communicate with a central server to
authenticate dial-in users and authorize their access to the requested system or service.
RADIUS allows a company to maintain user profiles in a central database that all remote
servers can share. It provides better security, allowing a company to set up a policy that can
be applied at a single administered network point. Having a central service also means that
it’s easier to track usage for billing and for keeping network statistics. RADIUS is a de facto
industry standard used by a number of network product companies and is a proposed IETF
standard. RADIUS was originally developed by Livingston Enterprises for their PortMaster
series of Network Access Servers, but later (1997) published as RFC 2058 and RFC 2059
(current versions are RFC 2865 and RFC 2866). The DIAMETER protocol is the planned
replacement for RADIUS, but is still backwards compatible.
RTS threshold- The number of bytes used for the RTS/CTS handshake boundary. When a
packet size is greater than the RTS threshold, the RTS/CTS handshaking is performed.
Roaming - The ability to take a wireless device from one access point’s range to another
without losing the connection.
Router - A networking device that connects multiple networks together.
RTS (Request To Send) - A networking method of coordinating large packets through the
RTS Threshold setting.
B-4
RAD-802.11-XD and RAD-802.11-XD-WM
User Manual – Appendix B
S
Server - Any computer whose function in a network is to provide user access to files,
printing, communications, and other services.
SPI (Stateful Packet Inspection) Firewall - A technology that inspects every incoming packet
of information before allowing it to enter the network.
Spread Spectrum - Wideband radio frequency technique used for more reliable and secure
data transmission.
SSID (Service Set IDentifier) - Service Set ID is a network ID unique to a network. Only
clients and access points that share the same SSID are able to communicate with each
other.
Static IP Address - A fixed address assigned to a computer or device that is connected to a
network.
Static Routing - Forwarding data in a network via a fixed path.
Subnet Mask - An address code that determines the size of the network.
Ethernet Switch - A data switch that connects computing devices to host computers,
allowing a large number of devices to share a limited number of ports.
T
TCP (Transmission Control Protocol) - A network protocol for transmitting data that requires
acknowledgement from the recipient of data sent.
TCP/IP (Transmission Control Protocol/Internet Protocol) - A set of instructions PCs use to
communicate over a network.
TKIP (Temporal Key Integrity Protocol) - TKIP is a protocol used in WPA. It scrambles the
keys using a hashing algorithm and, by adding an integrity-checking feature, ensures that
the keys haven’t been tampered with.
U
UDP (User Datagram Protocol) - A network protocol for transmitting data that does not
require acknowledgement from the recipient of the data that is sent.
V
VPN (Virtual Private Network) - A security measure to protect data as it leaves one network
and goes to another over the Internet.
B-5
RAD-802.11-XD and RAD-802.11-XD-WM
User Manual – Appendix B
W
WAN - Wide Area Network
WEP (Wired Equivalent Privacy) - A method of encrypting network data transmitted on a
wireless network for greater security.
WINS- Short for Windows Internet Naming Service, a system that determines the IP
address associated with a particular network computer. This is called name resolution. WINS
supports network client and server computers running Windows and can provide name
resolution for other computers with special arrangements. Determining the IP address for a
computer is a complex process when DHCP servers assign IP addresses dynamically. For
example, it is possible for DHCP to assign a different IP address to a client each time the
machine logs on to the network. INS uses a distributed database that is automatically
updated with the names of computers currently available and the IP address assigned to
each one. DNS is an alternative system for name resolution suitable for network computers
with fixed IP addresses.
WLAN (Wireless Local Area Network) - A group of computers and associated devices that
communicate with each other wirelessly.
WPA (Wi-Fi Protected Access) - a wireless security protocol using TKIP (Temporal Key
Integrity Protocol) encryption, which can be used in conjunction with a RADIUS server.
B-6
114.30 mm
(4.50 in.)
163.30 mm
(6.450 in.)
4.927 mm (0.194 in.) Diameter Hole
(4 Places) For N0. 8-32x3/4-in.
Phillips/Pan-head Screws
Scale 1 : 1
123.19 mm
(4.850 in.)
2186A092
RAD-802.11-XD and RAD-802.11-XD-WM
User Manual – Appendix C
APPENDIX
Mounting Template for
RAD-80211-XD-WM
C
C-1
RAD-802.11-XD and RAD-802.11-XD-WM
User Manual – Appendix C
C-2
RAD-802.11-XD and RAD-802.11-XD-WM
User Manual
The information given herein is based on data believed to be reliable, but Phoenix
Contact makes no warranties expressed or implied as to its accuracy and
assumes no liability arising out of its use by others. This publication is not to be
taken as a license to operate under, or recommendation to infringe, any patent.
Headquarters, U.S.
PHOENIX CONTACT
P.O. Box 4100
Harrisburg, PA 17111-0100
Phone : 800-888-7388
717 -944-1300
Fax: 717-944-1625
Email: [email protected]
Web site: www.phoenixcon.com
Technical Service
Phone: 800-322-3225
Headquarters, Canada
PHOENIX CONTACT Ltd.
235 Watline Avenue
Mississauga, Ontario L4Z 1P3
Phone: 905-890-2820
Fax: 905-890-0180
Technical Service
Phone: 800-890-2828