1
DVR SYSTEM (Plus Model)
User’s Manual
Manual Revision
: Above version. 7.0
Release Date
:
June. 2006
HanaNet Digital
Security
1
Contents
Contents ………………………………………………………………………………………………………………….. 2
Installing hardware and software ……………………………………………………………………………………… 4
System requirements ……………………………………………………………………………………………….. 4
Installing the video card in the PC ……………………………………………………………………………….. 4
Installing the software ………………………………………………………………………………………………. 4
Main Screen ………………………………………………………………………………………………………………. 5
Overview of the live screen ………………………………………………………………………………………..
5
System Information(SYS-INFO) …………………………………………………………………………………..
6
Update History ……………………………………………………………………………………………………….
7
Sending an automatic e-mail ……………………………………………………………………………………… 7
Message function ……………………………………………………………………………………………………. 7
Controlling PTZ cameras …………………………………………………………………………………………… 8
Power down mode …………………………………………………………………………………………………..
9
Saving Configuration File …………………………………………………………………………………………..
9
Programming the DVR system [SETUP] ……………………………………………………………………………
10
Standard settings ……………………………………………………………………………………………………. 10
Recording …………………………………………………………………………………………………………….. 16
Schedule …………………………………………………………………………………………………………….. 19
Motion ………………………………………………………………………………………………………………… 20
Color Control ………………………………………………………………………………………………………… 20
PAN/TILT setup …………………………………………………………………………………………………….. 21
Control User Access ……………………………………………………………………………………………….
22
Back Up ………………………………………………………………………………………………………………
24
WEBVA (IP Camera) ………………………………………………………………………………………………..
27
Search Screen ………………………………………………………………………………………………………….
29
Overview of the playback screen ………………………………………………………………………………..
29
Search bar …………………………………………………………………………………………………………..
30
Playback bar ………………………………………………………………………………………………………..
30
Event filters ………………………………………………………………………………………………………….
30
Date/time search …………………………………………………………………………………………………..
31
Zoom function …………………………………………………………………………………………………….. . 31
Views …………………………………………………………………………………………………………………
31
Live view …………………………………………………………………………………………………………….
31
HanaNet Digital
Security
2
Back Up …………………………………………………………………………………………………………….
31
Smart Search ………………………………………………………………………………………………………
33
Bookmark …………………………………………………………………………………………………………..
33
Network Connection [CLIENT] ……………………………………………………………………………………..
34
Client software …………………………………………………………………………………………………….
34
Direct recording(Save) ………………………………………………………………………………………..
35
Multi-server connections …………………………………………………………………………………….
35
Web Client …………………………………………………………………………………………………………….
36
Searcher ……………………………………………………………………………………………………………….
36
Installing the alarm I/O card ………………………………………………………………………………………..
37
POS function ………………………………………………………………………………………………………….. 38
Connecting the POS box ……………………………………………………………………………………….
38
Setting up the POS box …………………………………………………………………………………………
39
Setup in the DVR software ……………………………………………………………………………………..
40
Analyzing transaction data ……………………………………………………………………………………..
41
HanaNet Digital
Security
3
Installing hardware and software
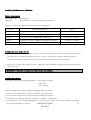
System requirements
Operating system :
Windows XP
Hard disk :
Min. 200 GB for accident prevention certification
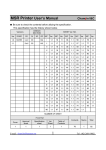
Number of drivers required and special hardware requirements :
Card Type
Hardware requirements
Driver
900P ~ 1000P
Celeron, 1.0GHz, 256MB RAM, 40GB HDD
1 x video / 1 x audio
1500P
Celeron, 1.7GHz, 256MB RAM, 120GB HDD
2 x video / 2 x audio
2400P
Celeron, 1.7GHz, 256MB RAM, 120GB HDD
4 x video / 4 x audio
4900P
Pentium 4, 2.4GHz, 256MB DDR-RAM, 200GB HDD
1 x video / 1 x audio
9100P ~ 9400P
Pentium 4, 2.4GHz, 512MB DDR-RAM, 200GB HDD
1 x video / 1 x audio
Installing the video card in the PC
1. Switch the PC off and pull the main plug out. Open the PC and insert the DVR card in a free PCI socket.
You may have to remove the blank on the rear of the PC. Fix the card using the screws provided.
Connect the watchdog cable correctly to the recorder card and the PC(PC reset switch).
2. Close the PC cabinet and switch on the PC. Windows starts hardware recognition and detects the newly
fitted DVR card.
IMPORTANT : Install the hardware and drivers before the software.
Installing the software
The S/W contains the following applications : DVR Server software
DVR Client
DVR Searcher
Before installing the software, make the following setting on the PC :
1. Set the screen resolution to 1024 X 768 pixels, True Color 32 bit.
2. If the graphic card uses an overlay function, disable the function.
3. Disable the screensaver under [Control Panel / Display / Screensaver].
4. In this windows, click [Energy Management]. Set [Turn off monitor], [Turn off hard disks], [Standby]
and [System standby] to “Never”.
HanaNet Digital
Security
4
Main Screen
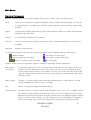
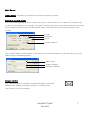
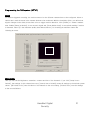
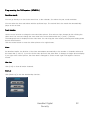
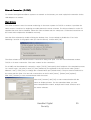
Overview of the live screen
After the software starts, an information window opens on the screen. Close it by clicking [OK].
Setup:
Here you can configure the digital surveillance system. Besides general settings, you can set
the following here : recording type, schedule, motion detection, pan/tilt function, network and
backups.
Search:
To play back recording video data you have a wide range of options for finding, analysing and
saving relevant video data.
Pan/Tilt:
For controlling connected P/T/Z cameras.
Function:
Useful functions such as preview, system info, history, network messages or auto-email are
available.
Date/time:
Display of date and time
On-screen information: In the live view, various information can be displayed with the video picture
Channel number
Recording of motion event
Normal (continuous) recording
Recording of sensor alarm event
Pre(Pr) or Post(Af)-event recording
Voice recording
Channel selector: Here you can select a specific channel or automatic channel sequencing.
Main Screen:
(live video)
To view video pictures live, you can select either a single picture (full-screen) or up to 16
pictures at a time (depending on your video card). You can move the channels around in
the live-video area according to your needs. To do this, left-click a live video picture and
keep the mouse button pressed. Now drag the video picture to the desired live video area
and drop it there.
Alarm outputs:
Outputs 1-4 can be switched here manually (optional alarm I/O card required ; see the
section “Installing the alarm I/O card” for fitting).
Exit:
Button for exiting the digital surveillance system.
Screen Division:
The video section of the live screen can be divided into 4,6,7,9,10,13 or 16 smaller screens.
The channels can be swapped around on the screen. To move a channel, left-click it and
keep the left mouse button pressed. Drag the video picture to the desired position and drop
it there. If you left-click a channel, you can change it to full-screen display. Click again to
return to the original view. A right-click enlarges the video area a fill the whole screen.
HanaNet Digital
Security
5
Main Screen
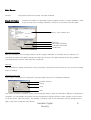
Preview:
The preview shows all currently recorded channels.
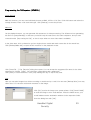
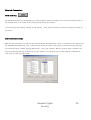
System Information:
(SYS-INFO)
Provides information on operating system, program version or system hardware. Other
useful tools are the recording calculator, drive info or the frame-rate calculator.
Hard – and software info
Disk Info
Recording calculator
Calculate Frame rate
Update Info
Recording calculator
With this calculator, the recording duration can be roughly calculated for a known memory capacity. All
recording, resolution and quality settings are taken into account. The upper window shows the probable
recording duration after the hard-disk size is selected.
Disk Info
Click the button to display information on the total space, used space and free space of the current recording
disk in a window.
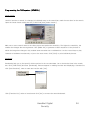
Calculate Frame rate
This program calculates the compression rate and single-frame size of individual channels.
Channel selector
Result
Stop
Start
First select a camera or channel. Client [Start Compress data] to start the calculation. When the calculation is
Complete, you can display the picture size and compression with the different Codec variants on the screen.
To do this, press [See the screen]. The number of pictures used for the calculation can be changed on the
right of the [Start Compress data] button.
HanaNet Digital
Security
6
Main Screen
Update History : The history log contains the functions used by the system.
Sending an automatic e-mail
This function automatically sends an e-mail in the event of motion detection or an alarm. The content of the
e-mail is an AVI sequence of any length. The length is defined by the entry under [Post-detection] in seconds,
and the frequency by the entry in the field behind. Enter a start and end time to restrict the period of this
function.
Length
Frequency
Period
Camera selection
Click [Setup E-Mail] to make settings for the send process. Enter the address of your mail server, your own
address and the destination address.
SMTP server
Sender’s address
Recipient’s address
Message function
This function permits the sending of network messages to connected
Network users. Enable a message and select a connected user.
Click [Send] to send the message.
HanaNet Digital
Security
7
Main Screen
Controlling PTZ cameras
To open the PTZ control tab, click [PAN/TILT] in the live screen. With the digital surveillance system, you
can control a large number of PTZ cameras. You first have to configure a connected PTZ camera on the
[Setup / PAN/TILT] tab.
Speed
The pan and tilt speeds can be adjusted according to requirements.
Zoom/Focus
You can zoom and focus the camera manually with the [+] and [-] buttons.
Control
This contains the direction control buttons. At the center an autofocus button is displayed (not active for all
cameras).
Setup Preset
Under [Preset], you can save and retrieve
camera positions. Up to 64 preset positions
can be saved for each camera channel.
Select a number from the Preset list and name
this position under [ID]. Now move the camera
to the desired position and then click [Save ID].
remove a preset with [Delete Preset].
Auto Group
This figure shows the Auto Group window.
Here you can form a group of preset positions. The
positions of this group are then automatically set by
this camera at specific successive time intervals.
Enter a group number and ID and click [Group Add].
In the lower half, select a preset and click [Preset
Add]. Add all desired positions to the group. Then
click [Group Run] to start automatic positioning.
At the bottom, you can set the movement speed and
the dwell time for each position.
Camera no.
Camera no.
Preset list
Group Run/Stop
Group Del/Rename
Go to preset
Group # / ID / Add
Name ID
Preset Delete
Preset Insert / Add
Save ID
Goto Preset
Movement speed /
Dwell time
Set Preset
Delete Preset
Setup menu
Here you can control various functions of the PTZ camera. These functions cannot be accessed for all camera
models.
Close
Click this blue button to close camera control.HanaNet
Digital
Security
8
Main Screen
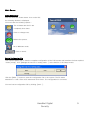
Power down mode
After you click the “Power down” icon on the GUI,
the following window is displayed.
You now have the following options :
The software and the PC are
completely shut down.
Press to change user.
Reboot the system.
Go to Windows mode.
Click to cancel.
Saving Configuration File
This function allows you to save the complete configuration of the DVR system and reactivate it when required.
Under [Setup], click [Manage the text file of setting value…] at the bottom of the setup screen.
Click the [Write…] button to save the configuration file of the system. The file name
extension is “*.sat”. Enter a file name and click “Save”. The configuration is not saved.
You can load a configuration file by clicking [read…].
HanaNet Digital
Security
9
Programming the DVR system [SETUP]
Via [Setup] in the live screen, you open the configuration menu of the digital surveillance system. You can save
your settings by clicking [Save]. Click [Apply] to save your settings and exit Setup. In Setup, you can set the
following functions:
Standard settings
Voice
One channel is provided for recording audio data. The built-in sound card of the PC is used as input.
Click here to activate audio input (voice recording). Select between microphone(MIC) or line-in(LINE).
Monitor out
The video card of the digital surveillance system has a socket for connecting an external monitor (Chinch
connector next to the camera inputs). You can select channels for display on the external monitor by clicking
[Monitor out Select] (not High End Model). The display mode in the surveillance system (single-picture,
multi-channel display) is used for the external connection. In the case of single-picture display, the channels
can be shown in sequence. You can define the display time (dwell time) of each channel by entering the time
in seconds.
HanaNet Digital
Security
10
Programming the DVR system [SETUP]
Add Printer
Click to install a printer. You can connect a local or network printer to the surveillance system. You install the
printer via the Windows standard routine.
Time Setup
For setting the current system time.
IMPORTANT : If you reset the clock, older video data may be overwritten.
Auto System reset
Reboot the recording system automatically. If necessary, you can merely switch off the system
(without rebooting).
Disk Manager
The disk manager includes functions for defining, checking and formatting a disk drive. From the menu, you
can select a drive letter for saving data(e.g., drive D). When all space is used up on this drive, the system
automatically goes to the next available drive letter.
[Scan Disk] checks the drive for errors. Click [Format] to delete all data from the drive via the Windows
formatting function.
IMPORTANT : If only one partition is available for saving data (e.g., C:\), the data is written to this drive.
In this case, the [Format] function must be carried out only once.
Click [Refresh Data Base] to check the structure of recorded data of the individual channels and reorganize it
Automatically if necessary.
Enable [Recording while delete data] for continuous saving of recorded data. When the drive is full, the oldest
data is automatically overwritten. If this function is not enabled and no further memory is available, an alarm
tone sounds and a message appears, telling you to change the storage location.
Compression
Here you can set the compression type, the recording resolution and the recording quality.
Three compression methods are available for recorded video data : MJPEG, MPEG4 or MPEG4+
Three resolution are provided for video pictures : 320 X 240, 720 X 240 or 720 X 480 pixels
HanaNet Digital
Security
11
Programming the DVR system [SETUP]
Click [Picture Quality] to select the compression rate. The higher the compression rate, the lower the memory
Requirement, but the poorer the image quality.
For MPEG4+ compression, the sensitivity of the motion sensor must be set and the noise filter must be set.
Windows logon
Enter a user name and password for a Windows logon. You need these for an automatic system start.
The data is automatically accepted by the operating system.
Power Down mode
When you switch off the digital surveillance system, the PC either returns to Windows or shuts down.
Camera name
Enable this option to display the name, number and status of each camera in the video picture.
On-screen keyboard
For entering camera names, passwords, etc., an on-screen keyboard is provided. You operate the keyboard
with the mouse. No external keyboard is required, which increases access protection.
Password
The 3 areas (for primary password, user setup [Setup/Standard] and network user setting
[Setup/Network]) are now combined in a single password manager under [Setup/Standard
/Set Password]. The password manager now looks like this :
HanaNet Digital
Security
12
Programming the DVR system [SETUP]
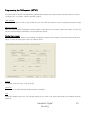
To install a user :
1. First click [Add] on the left or right-click the left of the screen.
2. Select a user group type : Super User, Power User, User, Guest.
The user groups have different user permissions.
You can change these permissions at any time later.
3. Enter a user name, a password and the password confirmation. Click [Apply].
4. The following table shows the different user permissions.
Set the check-mark to use a permission.
Permission
Meaning
Standard
Permission for [Setup / Standard] menu item
Recording Type
Permission for [Setup / Record ] menu item
Color Control
Permission for [Setup / Color control] menu item
Motion
Permission for [Setup / Motion] menu item
Network Setup/Network
Permission for [Setup / Network] menu item
Pan/Tilt
Permission for [Setup / Pan/Tilt] menu item
Schedule
Permission for [Setup / Schedule] menu item
Search/Search
Permission for access to search screen
Power down
Permission for switching off system
Backup
Permission for [Setup / Backup] menu item
History
Permission for [Setup / History] menu item
Web Camera
/ Web Camera
Permission for [Setup / Web Camera] menu item
Set Camera
Enabled cameras are visible to the user.
Select the permissions required for the user and then click [Save] and [Close].
For every system access, whether direct at the PC or using client software / web client ,
a valid user name and password now have to be entered.
Set Channel
The administrator can configure the video card used (4,8 or 16) to the software of the digital surveillance
system. If channels are not used, they have to be deactivated under [Setup / Recording Type].
HanaNet Digital
Security
13
Programming the DVR system [SETUP]
Day-light savings
Here you can set the day-light savings. The DVR then is switching automatically the summer and winter time.
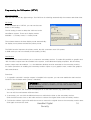
DX-Setup
In the Standard tap of SETUP, you can see the new
button of DX Setting.
The DX setting is used to adapt the VGA card to the
surveillance system. There are 2 display modes
Available : 1. Primary mode, 2. Overlay mode.
The software detects the best display mode automatically.
On display errors please activate the primary mode.
The RGB-function improves the primary mode, but this consumes more CPU power.
In RGB mode you can set a better picture quality (32 Bit).
Dual Monitor
The dual-monitor function allows you to connect a secondary monitor. To make this possible, a graphic card
with 2 monitor outputs must be installed in the system. In the Windows display properties, the secondary
monitor output must be enabled – i.e., the Windows desktop must be extended to the secondary monitor.
For further questions on enabling the secondary monitor output on your graphics card, contact the graphics
card manufacturer.
Functions:
1. If a graphic card with 2 monitor outputs is installed in the system, you can now enable the dual-monitor
function in the Software under [Setup / Standard]
IMPORTANT : If no graphic card with 2 monitor outputs in installed but
the Dual-Monitor function is enabled, you may have problems with
display and stability.
2. Following activation, the channels are displayed as on the main monitor (e.g.,quad view).
You can still choose between different views.
3. If necessary, you can click the Minimize button to minimize the view on the secondary monitor.
Click the dual-monitor icon on the main monitor to restore the original view on the secondary monitor.
4. To hide the toolbars, right-click while the mouse to restore the original view on the secondary monitor area.
Click again to restore the view.
HanaNet Digital
Security
14
Programming the DVR system [SETUP]
5. The dual-monitor function now offers you a further feature
in the event of anything happening. If an event occurs
(motion, alarm,…), the corresponding channel can be
shown full-screen on the secondary monitor.
Under [Setup / Record / Event setup],
select “Print by Second monitor”.
The corresponding channel is now shown full-screen
on the secondary monitor but not
full-screen on the main monitor.
6. Click the [Change Primary Secondary] button in the [Setup / Standard] button in the
[Setup / Standard] menu to switch between the main monitor and the secondary monitor
if required.
HanaNet Digital
Security
15
Programming the DVR system [SETUP]
Recording
Video signal
You can show or hide a connected camera on the live screen. Although an installed but hidden camera is not
shown in the live view, it is recorded with the corresponding setting. Left-click a channel field to switch
between options.
Name
You can give each camera input a name. This camera name is shown in the video picture and saved with it.
You can enter the name via a normal keyboard or the on-screen keyboard.
Recording type
The following recording types are available:
-Record:
[continuous recording] The video data is recorded continuously.
-Motion:
[motion-triggered recording] Recording is triggered by motion sensors of the respective
channel. You can configure the sensors under [Setup/Motion]. They react to changes in the
video picture (or parts thereof).
HanaNet Digital
Security
16
Programming the DVR system [SETUP]
-Sensor:
[recording triggered by alarm sensor] Recording is controlled via max. 16 alarm inputs.
The input connections are on a separate sensor card, which has to be built in to the system.
If you click the record type button again, another button appears on the right.
Click this button to open a submenu. You can now choose the alarm inputs to which the
selected channel is to react. Do this by enabling the required alarm inputs(1-16).
-Schedule:
[scheduled recording] Recording takes place according to a channel-specific schedule. You
can select a different recording type for every hour. You define the schedule under
[Setup/Schedule]
-Rec/Mot:
[continuous recording/motion sensor] The video picture of the channel is recorded
continuously and for motion sensor events in this channel.
-Rec/Sen:
[continuous recording/alarm sensor] The video picture of the channel is recorded
continuously and on the triggering of the respective alarm input.
-Mot/sen:
[motion/alarm sensor] The video picture of the channel is recorded if either the motion sensor
or the alarm sensor is triggered for this channel.
-R/M/S:
[record/motion/sensor] The video picture is recorded continuously and if either the motion
sensor or the alarm sensor is triggered for this channel.
-No Record:
No video data is recorded this camera input.
Frame
Here you define the frame rate (number of pictures recorded per second) for the channels. In the NTSC
standard, this is max. 30 frames per second. The frame rate can be variably defined, but the maximum
recording frame rate must not be exceeded.
Furthermore, for the motion sensor and alarm sensor recording types, the frame rates can be set separately for
pre- and post-event recording.
HanaNet Digital
Security
17
Programming the DVR system [SETUP]
Pre- and post- event recording [Pre/Post]
We have a so-called pre- and post-event recording feature. If recording is triggered by a motion or alarm
sensor, the system stores the video data of up to 20 minutes before and after the event. The pre-event
recording data is buffered for the time specified and retrieved if required (if an event occurs). The pre- and
post-event recording times can be set at anything between 1 second and 20 minutes.
IMPORTANT : The pre-recording first functions following the expiry of the desired time after setting, since
otherwise the data is not written completely to the buffer.
Sensor type
Defines the switch type of the alarm inputs. It is either NO (normal open) or NC (normal close). If you select
Two or more alarm inputs for triggering recording under [Set ALARM Event], this switch setting applies to all
Alarm inputs.
Alarm Control
The recording system can switch up to 8 alarm outputs for different events. The connections are on an optional
alarm card, which has to be built in to the system. Here you can define the alarm output to be switched for an
event. Possible events are motion detection, triggered of an alarm input, loss of video signal and active
Recording status. The duration of the activation of the alarm output can be set between 0 and 90 seconds.
If this is set to [on], a short impulse is activated at the output.
Auto Camera Search
Click to search automatically for connected video sources. Sources found are activated for live display and set
to continuous recording.
Event setup
Here you can activate a function that points to any event that occurs. Two functions are available. The first
function switches to full-screen display for a specific time if an event occurs.
The second function can control a dome camera if an event occur.
Set ALARM Event
Here you can forward a video signal loss and the recording state to an alarm output.
HanaNet Digital
Security
18
Programming the DVR system [SETUP]
Record Motion/Sensor Event
If you enable this function, the event is registered on the playback screen under Function/Event filter/Event
memory/log.
Setup Audio
Here you can use 16Ch. Audio with DVR model 9100 ~ 9400(Real Time Board).
This button is only shown when you choose the option for audio while installing S/W.
You can select each audio source number by each camera number one by one.
With [Set internal sound card] function, you can choose audio input type from main-board and can control
audio volume for recording and displaying.
With [Volume] button, you can control the volume from the PC system.
If you don’t want the system be muted, please use the feature “System Speaker On”.
HanaNet Digital
Security
19
Programming the DVR system [SETUP]
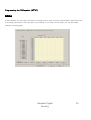
Schedule
In the schedule, you can select a different recording type for each hour and camera. Mark a period and click
a recording type button in the lower part of the window. If you right-click the mark, you can also switch
between recording types.
HanaNet Digital
Security
20
Programming the DVR system [SETUP]
Motion
For motion-triggered recording, the motion sensors for the different cameras have to be configured. Select a
camera and mark the areas in the camera window to be monitored. With the Sensitivity slider, you define how
big the changes in the video picture have to be to trigger motion detection. Click [Delete] to delete a marked
area. Enable [Beep for Motion] for an acoustic signal and [Show Motion Area] for an optical marking if motion
is detected. Select [To the maximum quality after Motion/Sensor] for recording at maximum frame rate
following an event.
Color Control
Here you can set the brightness, saturation, contrast and hue of the channels. If you click [Setup User’s
Default], the settings for this channel are used. [Cancel User’s Default] resets all settings to the default system
values. [All Default Color] sets the values of all channels to the user setting. [Default Color] sets the settings
to the user definitions.
HanaNet Digital
Security
21
Programming the DVR system [SETUP]
PAN/TILT (dome camera) setup
With the digital surveillance system, you can control pan/tilt cameras. First select the camera channel to which
a dome camera is connected. Then select the connected model(protocol) with the device number.
HanaNet Digital
Security
22
Programming the DVR system [SETUP]
You also have to set the communication parameters between the system and the dome camera correctly
(COM port no. on system, speed, data bits, parity).
User settings
If your dome camera is not on the model list, you can enter the specific control commands here(hex code).
Master Controller
Here you can integrate a separate camera master controlled into the system. Select the model from the list,
set the communication parameters, and activate the device.
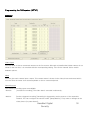
Control User Access
You can have remote access to the digital surveillance system via a network. The system then works as a
server. A user accessing this server is called a client.
TCP/IP
To enable remote access, click [TCP/IP].
Check IP
The server IP is defined either automatically or manually.
Port
Define the network port here. The default setting is Port 2000. The server and client port numbers must be
identical.
HanaNet Digital
Security
23
Programming the DVR system [SETUP]
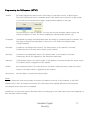
Transmission speed and image quality
Select a quality or speed according to the connected network.
User
Here you can add or delete network users. To add a user, define the user ID and password, confirm the
password and click [Add]. You can remove a user with [Delete].
Connected Client List
Click to view all active connections.
Web Server
The digital surveillance system has a built-in web server that allows access to the system via the Internet
Explorer. The user can access the system by entering the IP address in the address bar of the Internet
Explorer.
Under [Settings], you enter the setup of the web server. This is active following system installation.
If necessary, the port of the web server can be changed under [Server Port].
Voice communication
Voice communication is possible between server and client. Enable communication and select a connected
user. The microphone is connected to the line-in port of the PC. The voice recording function and [Setup/
Standard/Voice] must not be enabled.
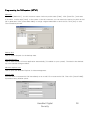
Setup TCP/IP
Here you can make settings for the TCP/IP protocol. You can define this data automatically or manually,
depending on the network connection. For manual definition, enter the IP address, the subnet mask, the
gateway, and the DNS of the network adapter in the respective fields. If you use a router, enter a local IP and
user the router IP as gateway and DNS.
HanaNet Digital
Security
24
Programming the DVR system [SETUP]
Emergency Call
With this function, an emergency call can be made to a telephone number if an event such as an alarm occurs.
For this you need a voice model integrated in the system. For an own emergency call please overwrite the file
with an own file.
IP server
Via the IP server function, the IP can also be linked to any site name.
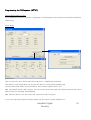
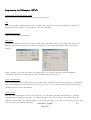
Back Up
Here you can define the making of backups. The data can either be backed up in database format or an an AVI
file. In database format, the data can only be edited on this system or with the special software(Searcher)
supplied. As an AVI file, the video data can be displayed with programs such as the Windows Media Player.
First select the channel whose data you want to back up. In the window below, select a period. Click [Backup]
to save the data in database format. Click [Make AVI..] for AVI conversion.
HanaNet Digital
Security
25
Programming the DVR system [SETUP]
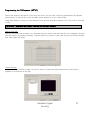
Make AVI
If you click [Make AVI..], the AVI converter opens. Select a period under [Data]. Click [Save File..] and enter
a file name. Confirm with [Save]. In the center of the AVI converter, you can restrict the period for which an AVI
file is generated. Click [Insert Water Mark] to assign a digital watermark to each AVI file. Click [Go!] to start
The conversion process.
Backup disk
Click to select the path for the backup data.
Run NeroBurning…
Click to start the Nero CD burn application automatically (if installed on your system). The data is then backed
up to an external storage medium.
Windows explorer.exe
Click to open the Windows Explorer for data management.
Send E-Mail
You can send a converted AVI file immediately as an e-mail. First create an AVI file. Then click [Send E-Mail].
A password entry window opens.
HanaNet Digital
Security
26
Programming the DVR system [SETUP]
Enter a title and brief description of the short film scene. The file name of the last generated AVI file appears
automatically. On the next line, enter the SMTP server address of your e-mail provider.
Under [Mail Address], enter your own address (From) and the destination address (To). Click [OK] to send the
e-mail.
IMPORTANT : Make sure the recipient’s mailbox has sufficient capacity.
Backup Schedule
Here you can define that a backup for a particular period is made at the specified time. First highlight a channel
And then select it by clicking [Channel]. Define the period you want to save under [Save time] and the backup
time under [Back Up Time].
Confirm Backup
Here you can view backed-up data. On the left, select a channel and the backup section, and click the
playback or stop button on the right.
HanaNet Digital
Security
27
Programming the DVR system [SETUP]
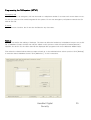
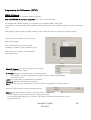
WEBVA (IP Camera)
This tap enables you to integrate network cameras.
Now only VIVOTEK IP camera is supported. (No Come control function)
An enabled web camera channel is connected to the respective BNC video input.
The number of channels (BNC+web cameras) cannot exceed the max. channel capacity of the PCI recording
card.
The following figure shows the [Web Camera] menu. Open this menu by clicking the [setup] button.
You can select a channel for the incoming
web camera signal.
Enter camera access data on the right
(enabling, IP address, login, password, port).
At the bottom are options for transmission
And storage type.
Using VA Camera : Set the check mark to use a web
camera on this channel.
IP Address : Address or domain name of the web camera.
This address must be configured in the web camera or defined automatically
by a DHCP server.
Login : The login name for administrator is required.
Password : Enter the administrator password.
Port : Enter the http port number used. This port must be configured in the web camera.
There are further options under the preview picture.
Capture : The web camera is shown on the live screen.
The recording is made in http mode at 1 frame per second.
You can delay data display on the screen. The camera is shown in the same way on the
secondary monitor.
HanaNet Digital
Security
28
Programming the DVR system [SETUP]
Streaming : The web camera is shown on the live screen, with camera information at the top
and bottom. No recording is made. The camera is not shown on the secondary monitor.
The max. possible resolution is 320X240(352X288,PAL) pixels.
Capture + Streaming : The camera is shown on the live screen and on the secondary monitor.
The camera signal is prepared for recording. Select the recording type under [Setup /
Record] (e.g., motion-triggered recording). The same recording types as for analogue
cameras are available. The max. possible resolution is 320X240(352X288,PAL) pixels.
Protocol : Select between UDP (no backup data), TCP (with backup data) and HTTP (single -frame mode,
1frame/sec)
HanaNet Digital
Security
29
Search Screen
Overview of the playback screen
Search bar:
This function gives you direct access to recorded video data. The data is displayed as a
colored bar for each channel and according to recording type.
Channel selector:
Buttons for activating/deactivating channels for display in the video area. The channels are
arranged automatically in the video area. For more than for video channels, you can access
the other video channels via the vertical scroll bar to the right of the channel selector.
Playback bar:
Various functions are provided for playing back recorded data. In addition to continuous
playback, you can select picture-by-picture display for analysing the video data.
Date/time:
Here you can go directly to pictures recorded on a specific date or at a specific time.
Video zoom:
For zooming parts of the video picture.
Functions:
Other playback screen functions such as backups or event search.
Exit:
Button for exiting the playback screen.
IMPORTANT : To switch to the Windows user interface, the switch-off mode must be set to “Window”
under [Setup / Standard / Power Down mode].
HanaNet Digital
Security
30
Programming the DVR system [SEARCH]
Search bar
The search bar displays clearly all recorded video data as colored bars for each channel. Switches are provided
on the left for displaying the desired channel in the video area. Four channels are shown at a time in the search
bar. With the vertical scroll bar on the left, you can select other channels. If you check [Multi], the division of
pictures is adapted automatically. If you click [All], all available channels are displayed with a corresponding
picture division in the video area.
To select video data, left-click a time in the search bar. The currently selected time is marked by a vertical line.
There are 3 different time divisions available in the search bar: 24 hours, half-hour and minute. You can switch
between the time divisions by clicking the time bar label. With the horizontal slider at the bottom of the screen,
you can also adjust the search time.
Playback bar
Three functions simplify playback of recorded video data. You can play back data continuously or frame by
frame. You can also playback the video pictures forwards or backwards at different speeds.
Click the loudspeaker button to switch off any recorded audio data.
Event filters
These functions enable you to search recorded video data for different event types. First click [Function] and
then [Event].
The event memory (History) logs all events (date, time, camera number, event type). Click a line in the event
memory(History). If you click [Search Area], the vertical line in the search bar jumps to this event and displays
the respective video image. Click [Release all] to clear the event memory, or click [OK] to close it.
The event filter enables you to search for the following :
- Motion events (pink) via [MOTION]
- Alarm events (blue) via [SENSOR]
- Voice recordings via {AUDIO]
- All events via [ALL]
- Normal display (yellow) via [NORMAL]
The different events are displayed in corresponding colors in the search bar.
Click the blue button at the top of the event filter to close it.
HanaNet Digital
Security
31
Programming the DVR system [SEARCH]
Date/time search
You can go directly to a time in the search bar. In the calendar, first select the year, month and date.
You can select the hour and minute with the up/down keys. The vertical line in the search bar automatically
jumps to the set time.
Zoom function
Use the zoom function to enlarge the recorded video picture. First select a video channel by left-clicking the
video area. You can now change the zoom area in the zoom window with the [+] and [-] buttons.
The enlarged picture is displayed in the video area. You can drag the zoom area by pressing and holding down
the left mouse button.
Click the center button to return the video picture to its original state.
Views
As described earlier, the division of the video area adapts automatically to the number of channels selected in
the search bar (1,4,9,16). If you left-click a video picture in the video area, it changes to single-picture display.
If you right-click a video picture, the video area is enlarged to fill the screen; right-click again to return to
normal.
Live view
Click [Live] to show all active channels.
Back Up
Click [Back Up] to use the data backup function.
HanaNet Digital
Security
32
Programming the DVR system [SEARCH]
Image Backup
With this function, you can save individual pictures as BMP, JPEG or YUV files. Click this button and select the
storage location. Enter a file name and type. Click [Backup] to save the picture.
Make AVI
On the playback screen, you can generate AVI sequences for data processing. The difference from generating
AVI files via [Setup/Backup] is that here you define only the start time in the video sequence, and you end
conversion with [Stop saving AVI file], or else it stops when no more video data is available.
In the video area, click a channel to go into single-picture mode and mark a start time in the search bar.
Click [Backup/Make AVI] to open the AVI converter of the playback screen.
Click [Save File…]. The [Save As] dialog box opens. You can accept the suggested file name for the video
sequence by clicking [Save]. You can insert a description and a watermark.
Click [Start] to start conversion. Click [Stop making AVI file] to stop at any time.
Print
Here you can print images from video recording or send them by e-mail. You can start [Backup/Print] from any
video view. You can enter a title and comment for the image.
Click [OK] to print the image on a system printer. Click [Send E-Mail]
to send the image to an e-mail address. Enter the SMTP server, your
e-mail address and a destination address in the respective fields.
close the dialog box with [OK].
HanaNet Digital
Security
33
Programming the DVR system [SEARCH]
Smart Search
Use this function to search for changes in individual area. In the search bar, mark the start time for the search.
Open the Smart Search dialog box via [FUNCTION] and [Smart Search].
Mark one or more search areas in the video picture and define the sensitivity. The higher the sensitivity, the
smaller the changes that are registered. Click [Make AVI] to generate a video sequence of the pictures in
which the image has changed. Only marked areas are taken into consideration. Use the control keys to play
forwards or backward continuously or just to the next scene. Click [Print] to print individual pictures.
Bookmark
Bookmarks help you to find specific video sections in the recorded data. Go to the desired time in the search
bar. Click [FUNCTION] and then [Bookmark]. Buttons appear for adding favorites and displaying a favorites list.
click [Add Favorites], enter a name and confirm with [OK].
Click [Favorites list], select a favorite and click [Go] to access the saved bookmark.
HanaNet Digital
Security
34
Network Connection [CLIENT]
To connect the digital surveillance system to a network or the Internet, you need a physical connection via the
LAN adapter or a modem.
Client Software
The Client software is used for remote monitoring of the server system via TCP/IP or modem. It provides the
same scope of functions for analyzing recorded data as the server software. The client software is on the CD
supplied and must first be installed. Select the Client software and run “setup.exe”. Follow the instructions on
the screen and complete the installation correctly.
Start the client software by double-clicking the desktop icon. You are asked to disable the “True Color
Rendering” function of the graphic card (no check mark set). Confirm with [OK].
The client software user interface and the connection dialog now open. You can choose between modem,
TCP/IP or IP server connection. First enter a name for the connection.
For a LAN(Local Area Network) connection, select [TCP/IP] and specify the IP address of the destination server.
for a server logon, you have to enter [ID] and [Password] as registered in the DVR server under [setup /
Network / User]. Click [Port] to change the communication port (default:2000). The port must be identical for
the server and the client. You can edit a connection on the list with [Insert], [Delete] and [replace].
Now click [Connect] to start communication with the server.
Now click [Connect] and [OK] to start communication with the
server or display pictures. For the transmitted data, you now
have comprehensive search, analysis and control functions as in
the server software.
HanaNet Digital
Security
35
Network Connection
Direct recording
An additional function for saving data on a client system is direct recording. You can save the data locally on
the storage drive of the client PC by clicking [FUNCTION] and [Save].
You can access this data by clicking [Local Search]. Click [Remote Search] to access the data recorded on
the server.
Multi-server connections
With the Client software, you can access several servers simultaneously. Up to 16 cameras at 16 locations can
be displayed simultaneously. First, connect to the different servers. The [Select connected Server] tabs lists
all connected server. Enable [Assign Multiserver]. Click [Set Camera]. With the mouse, drag a camera from
the list on the right (server) to the list on the left (client). You can also save or load channel combinations.
Click [OK] to open the video view.
HanaNet Digital
Security
36
Web Client
The DVR system integrates a so-called web-server. This provides data to the connected network via the HTTP
Protocol. This enables you to access the DVR server via the Internet Explorer via the connected network. The
Web-server is automatically loaded when the server starts.
Open the Internet Explorer of a PC connected to the network or the Internet. Enter the IP address or the
Address registered via DynDNS in the address line and confirm your input. The web-server of the destination
Server opens and you are asked to confirm the loading of a plug-in.
IMPORTANT : Your Windows setup may have various functions that prevent loading a plug-in (Firewall,
Popup-blocker, Download Active X control elements not permitted.)
Enter the data of a user installed in the server program under [Setup / Network] to receive access to the web
interface. The web interface opens.
IMPORTANT : If the selected user has access to all functions of the server program, he/she can make all
server settings via this web interface. You should therefore protect the setup level from
unauthorized access by using passwords.
Searcher
The Searcher is on the software CD. With this program, you can analyze recorded and saved surveillance data
on any PC.
Run “setup.exe” for Searcher and follow the instructions on the screen and complete the installation correctly.
You are asked to specify a path containing the saved data. Confirm with [OK].
The Searcher user interface contains all functions of the playback screen. You can search for data, print
pictures, make AVI files or save pictures, etc.
HanaNet Digital
Security
37
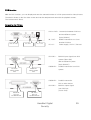
Installing the alarm I/O card
The I/O card (optional) enables you to connect up to 16 sensors to the surveillance
system. The I/O card also has 8 relay outputs for connection external equipment.
The I/O card needs 2 PCI sockets in your PC.
2
3
1
Alarm card
Sensor card
Switch the PC off and pull the main plug out. Open the PC cabinet. Connect the sensor card with the
alarm card via connectors 2 and 3. Use the short flat cable provided.
Connect the recorder card to the sensor card (connector 1) using the second flat cable.
Now plug the sensor card into a free PCI socket and the alarm card into any free socket.
Please use the provided power connector to connect the sensor card with the power supply of the PC.
Close the PC cabinet and switch the PC on.
The pin connections of the alarm and sensor card is shown on the alarm card.
Alarm card
Sensor card
NO8
GND
COM8
GND
NO7
GND
COM7
GND
NO6
16
COM6
15
NO5
14
COM5
13
NO4
12
COM4
11
NC4
10
NO3
09
COM3
08
NC3
07
NO2
06
COM2
05
NC2
04
NO1
03
COM1
02
NC1
01
Alarm card :
Up to 8 outputs (24V DC,1A) can be connected ;
1-4 can be switched to NO(Normal Open) and
NC(Normal Close) and 5-8 only to NO.
Sensor card :
You can connect 16 sensor inputs to the system.
The pin contacts can be set to NO or NC in the
server software setup.
HanaNet Digital
Security
38
POS function
With the POS function, you can display and save the transaction data of a POS system and its video pictures.
The data is shown on the live video screen and can be analysed and saved via the playback screen.
The format used is Excel.
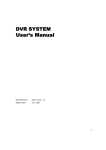
Connecting the POS box
POS to DVR : Connection between POS box
and surveillance system
(9 pin RS232C)
IN / OUT :
RS485 connection to or from
another POS box
POS to DVR
IN / OUT
DC + 12V
DC+12 :
RS-232C :
Power supply 12V DC / 500 mA
RS232C input signal from POS
system (direct link)
and surveillance system
(9 pin RS232C)
PARALLEL : Parallel connection from POS
RS-232C
INPUT FROM
POS
PARALLEL
INPUT FROM
POS
system
PARALLEL : Parallel connection
POS to other device
RS-232C :
RS232C output signal
from POS box
(Cross-Link)
PARALLEL
POS TO
OTHER DEVICE
RE-232C
POS TO
OTHER DEVICE
HanaNet Digital
Security
39
POS function
Setting up the POS box
The following switch positions are shown on the base of the POS box :
No
0
1
2
3
4
5
6
7
8
9
SW1
1
2
Other POS Box
3
M ULTI POS
4
INPUT
5
OUTPUT
ON
Terminal ON
Terminal ON
PARALLEL
M ULTIPOS
OFF
Terminal OFF
Terminal OFF
RS-232C
POS
SW2
POS ID
0
1
2
3
4
5
6
7
8
X
SW3
POS SPEED
1200
2400
4800
9600
14400
19200
38400
57600
115200
128000
SW4
DVR SPEED
9600
14400
19200
38400
57600
115200
128000
X
X
X
HanaNet Digital
Security
40
POS function
Setup in the DVR software
The POS screen opens.
Click [Setup].
Set the correct communication parameters of the COM port. [Delay Time] sets the delay time for displaying the
data of each article after entry in the POS system. [Wait Time] defines the delay time for the transmission from
the POS system to the surveillance system for the accounting of all articles.
Select a camera that you want to associate with a specific POS ID. Enter the connection data and the type of
POS system. Then close the window.
HanaNet Digital
Security
41
POS function
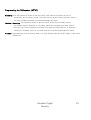
Analyzing transaction data
The POS data is automatically displayed in the video picture of the respective camera. To analyze the data,
Change to the POS screen under [Search / POS].
The transaction data is shown on the left with date and time.
Click a data row : the video screen shows the associated video picture. Play back the video data using the
Buttons in the playback bar. If necessary, you can save the video data in the playback screen as described
Above.
You can search for specific data via the search mask.
Define a channel and period for the search. Under [Search string/Data], enter the text to be searched for
(e.g., article name, assistant). Click [Search]. All found data is shown in the list on the left.
You can export the data in Excel format. Excel must first be installed in the surveillance system.
(not part of the scope of delivery)
HanaNet Digital
Security
42