1
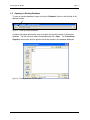
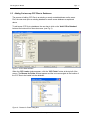
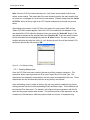
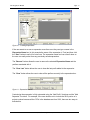
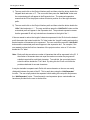
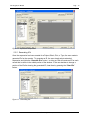
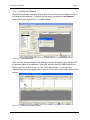
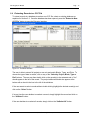
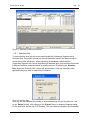
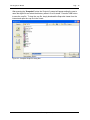
CruiseComp
Organizer Module
User Manual
February 26, 2010
Industrial Forestry Service Ltd.
TABLE OF CONTENTS
LIST OF FIGURES ....................................................................................................................... 1
1 CRUISECOMP ORGANIZER ............................................................................................... 1
1.1
Introduction to the Organizer...................................................................................... 1
1.2
CruiseComp Organizer Main Screen .......................................................................... 1
2 CRUISECOMP ORGANIZER FUNCTIONS ......................................................................... 4
2.1
Creating a New Database ............................................................................................ 4
2.2
Opening an Existing Database ................................................................................... 5
2.3
Adding Cruisecomp CCP Files to Databases ............................................................ 6
2.3.1 Creating Expressions ................................................................................................ 7
2.3.2 Generating ID’s ....................................................................................................... 10
2.3.3 Loading the Database ............................................................................................. 11
2.4
Extracting Records to a CCP File ............................................................................. 12
2.4.1 Selection Rule ......................................................................................................... 13
2.5
Deleting Records from a Database........................................................................... 14
2.6
Printing Reports from the Organizer ........................................................................ 16
LIST OF FIGURES
Figure 1 - CruiseComp Organizer Main Screen ................................................................................. 1
Figure 2 - Selecting and Displaying Records ..................................................................................... 2
Figure 3 - Creating a New Database ................................................................................................ 4
Figure 4 - New Database File Dialog Box ......................................................................................... 4
Figure 5 - Opening Existing Databases ............................................................................................ 5
Figure 6 - Existing Database File Dialog Box .................................................................................... 5
Figure 7 - CCP Loader Interface ....................................................................................................... 6
Figure 8 - Browse for Folder Dialog Box ........................................................................................... 6
Figure 9 - CCP Selector Dialog ........................................................................................................ 7
Figure 10 - Creating Expressions ..................................................................................................... 8
Figure 11 - Expression Buttons......................................................................................................... 8
Figure 12 - Expression Manipulation ............................................................................................... 10
Figure 13 - Generating IDs ............................................................................................................ 10
Figure 14 - Loading Databases ...................................................................................................... 11
Figure 15 - Viewing New Database Entries ..................................................................................... 11
Figure 16 - Extractor Interface ....................................................................................................... 12
Figure 17 - Selecting records to be extracted ................................................................................... 13
Figure 18 Selection Rule ............................................................................................................... 13
Figure 19 - Deleting Records from a Database ................................................................................ 14
Figure 20 - Delete from Database Confirmation Prompt ................................................................... 15
Figure 21 - Items Deleted Prompt .................................................................................................. 15
Figure 22 - Printing Records .......................................................................................................... 16
Figure 23 - Print Options ............................................................................................................... 17
Figure 24 - Example of Printed Report ........................................................................................... 17
Figure 25 - Snapshot Output to Dialog Box ..................................................................................... 18
Plot Organizer Module
1
Page - 1
CRUISECOMP ORGANIZER
1.1
Introduction to the Organizer
The CruiseComp Organizer has been developed to complement the Industrial Forestry
Service CruiseComp Core program. It is an MS Access based database that organizes and
compactly stores CruiseComp files ready for quick retrieval. It is a cost effective data
manager.
1.2
CruiseComp Organizer Main Screen
The CruiseComp Organizer has a main viewer that displays all records by Project ID, Block ID,
Plot ID, and Type ID. The naming conventions for the IDs are user defined.
Figure 1 - CruiseComp Organizer Main Screen
The address bar at the top of the window allows the user to browse and select an existing
database or create a new database.
Immediately below the the address bar are a series of record viewing windows The user can
scroll through the records of the active database and select which ones to view. By clicking
on a Project, Block, Plot, or Type, the user is able to view the attributes associated with
that ID. For example, if the user knows the block, but not the project or filename, they can go
Industrial Forestry Service Ltd.
Plot Organizer Module
Page - 2
into the block viewing window, select the block and view the project ID. Only the Project
ID’s, Plots, and Types associated with this block will be displayed when the block is chosen.
The lower portion of the window provides details on all attributes entered in CruiseComp for
a particular record. The lower portion of the window is automatically updated when the user
selects a record in the upper portion. There are a variety of tabs that can be selected and
each will display information that is relevant to that subject. For example, if the user wants to
know the attributes associated with a certain block, select the block in the upper portion of
the window and then select the block tab in the bottom portion of the window. The user can
then access such information as Block number, Block maturity, Block area and any
associated Non-merch areas.
Figure 2 - Selecting and Displaying Records
The “Add CCP to Database” button
active database.
allows the user to add CruiseComp CCP files to the
allows the user to select a certain Project(s),
The “Extract to New CCP file” button
Block(s), Stand(s), or Plot(s) and extract them to a CCP file, which can then be used in
CruiseComp.
Industrial Forestry Service Ltd.
Plot Organizer Module
Page - 3
The “Print” button
allows the user to select a Project, Block, Stand, or Plot and print a
customized report based on the related information.
The “Delete” button
allows the user to delete selected records from the active database.
The “Exit” button
terminates the Plot Organizer program.
Industrial Forestry Service Ltd.
Plot Organizer Module
2
Page - 4
CRUISECOMP ORGANIZER FUNCTIONS
2.1
Creating a New Database
To create a new database using the CruiseComp Organizer, click on “New” on the right
side of the database address window.
Figure 3 - Creating a New Database
A window will appear allowing the user to select the database name and the location to save
it. After clicking the “Save” button, a blank CruiseComp Organizer main screen will appear,
which is ready to have CCP files added.
Figure 4 - New Database File Dialog Box
Industrial Forestry Service Ltd.
Plot Organizer Module
2.2
Page - 5
Opening an Existing Database
To open an existing database, simply click on the “Database” button on the left side of the
address window.
Figure 5 - Opening Existing Databases
A window will appear allowing the user to navigate and find the location of the desired
database. The user can then select the database and click “Open”. The CruiseComp
Organizer main screen will then appear with all the records in the database displayed.
Figure 6 - Existing Database File Dialog Box
Industrial Forestry Service Ltd.
Plot Organizer Module
2.3
Page - 6
Adding Cruisecomp CCP Files to Databases
The process of adding CCP files to an existing or newly created database are the same.
First, the user must open an existing database or create a new database as explained
above.
To add a new CCP file to a database, the user has to click on the “Add CCP to Database”
button at the bottom left of the main screen. (see Fig. 2)
Figure 7 - CCP Loader Interface
When the CCP Loader window appears, click the “CCP Folder” button at the top left of the
screen. The Browse for Folder window appears and the user can navigate to the location of
the CCP files to be loaded into the database.
Figure 8 - Browse for Folder Dialog Box
Industrial Forestry Service Ltd.
Plot Organizer Module
Page - 7
Note: Once the CCP file location has been set, it will remain as the default until the user
selects a new location. This means that if the user frequently goes to the same location they
do not have to re-navigate to it at the start of each session. Instead, simply press the “Select
CCP Files” button at the top right of the CCP Loader window and go through the process
below.
After selecting the location of the CCP files to be loaded, the user presses “OK” and the
“Select CCP files” window appears. Select the CCP to be loaded into the database. If the
user loads all the CCPs within the directory he/she can press the “Select All” button. If the
user wants to unselect all the selected files press “Unselect All”. If the User wants to select
all files other than the ones highlighted press the “N select” button. The user may make
multiple selections by using the <shift> or <crtl> buttons as well. Once all the desired CCPs
have been selected the user presses “OK”.
Figure 9 - CCP Selector Dialog
2.3.1 Creating Expressions
Once the CCP files have been selected, the user must then create an expression. This
expression will be used to generate an ID for each Project, Block, Plot, and Type. The
expressions are completely customizable to suit the needs and standards of the user. These
expressions can also be saved and used for as long as they are relevant.
Once the flashing cursor is visible in the box, the user may select the attributes (by double
clicking) desired from the list with the headings Prefix and Max Length. These attributes will
become the ID for that record. For example, in the figure below an expression with the file
name and the project number were chosen. The file name portion of the expression can be
a maximum of 50 characters, while the project number can only be 15 characters long.
Industrial Forestry Service Ltd.
Plot Organizer Module
Page - 8
Figure 10 - Creating Expressions
If the user wants to re-use an expression more than once they can type a name in the
Expression Name box (in this example the name of the expression is Test) and then click
the “Save” button to save it for future use. The expression name box has a scroll down so
the user can easily select from any previously saved expressions.
The “Remove” button allows the user to remove the selected Expression Name and the
prefixes associated with it.
The “Clear Last” button allows the user to clear the last prefix added to the expression.
The “Clear” button allows the user to clear all the prefixes currently in the expression box.
Figure 11 - Expression Buttons
Customizing the expression is fully automated using the “Add Prefix” functions and the ”Add
Separator” functions. For example, if the user decides not to include the 2010 portion of a
project number because all the CCPs in the database are from 2010, there are two ways to
exclude this.
Industrial Forestry Service Ltd.
Plot Organizer Module
Page - 9
1) The user could click on the Project Number prefix and then select the button beside the
“At pos” label and enter a “6”. The user would then press the “Add Prefix” button and
the customized prefix will appear in the Expression box. The produced expression
means that the ID for the project number will start at position six of the eight character
prefix.
2) The user could click on the Project Number prefix and then select the button beside the
“After” label and enter a “-“. The user would then press the “Add Prefix” button and the
customized prefix will appear in the Expression box. The produced expression means
that the generated ID will only include those characters to the right of the “-“.
If the user wants to reduce the length of characters expressed in the ID click on the desired
prefix then select the button beside the “Fix” label under the “Length” heading and enter the
desired number of characters to be expressed. The user would then press the “Add Prefix”
button and the customized prefix would appear in the expression box. For example, if the
user wanted to show the first four characters of the project number, enter a “4” in the box
beside the “Fix” label.
Note: Each prefix has a maximum number of characters that will be expressed in the ID. If
the number of characters does not equal the maximum number the program will
substitute a period for each blank character. To avoid this, the user simply has to
select the button beside the “Trim” label. By doing this the ID will not include the
periods substituted for unused characters.
It may be desirable to separate each Prefix with some character so the user can easily
distinguish between the parts of the ID. This is easily done using the “Add Separator”
function. The user simply selects the separator before adding the next prefix and presses
the “Add Separator” button. Three frequently used separators plus a customizable one
have been provided for the user to choose from.
Industrial Forestry Service Ltd.
Plot Organizer Module
Page - 10
Figure 12 - Expression Manipulation
2.3.2 Generating ID’s
Once the expression has been created for a Project, Block, Plot, or Type, the user needs to
generate ID’s for the records. To generate an ID, the user simply selects a desired
expression and clicks the “Generate ID’s” button. In doing so, this will create an ID for each
record that is visible in the middle portion of the window. If the user decides to change a
portion of the ID after viewing the generated ID, clear them by pressing the “Clear ID’s”
button.
Figure 13 - Generating IDs
Industrial Forestry Service Ltd.
Plot Organizer Module
Page - 11
2.3.3 Loading the Database
After all ID’s have been created for Project, Block, Plot, and Type, the records are ready to
be loaded into the database. To do this, the user simply presses the “Load Database”
button at the bottom right of the CCP Loader window.
Figure 14 - Loading Databases
When the file(s) has been added to the database a prompt will appear saying that the CCP
file has been added to the database. Press “OK” and then press the “Exit” button at the
bottom right of the window to exit out of the CCP Loader window. The Cruisecomp
Organizer main screen will appear and the new file will be visible in the Project portion of the
window.
Figure 15 - Viewing New Database Entries
Industrial Forestry Service Ltd.
Plot Organizer Module
2.4
Page - 12
Extracting Records to a CCP File
To extract records in a database to make a new CCP file, select an existing database as
explained in Section 2.2. Once the database has been opened, press the “Extract to New
CCP File” button to open the Extractor Interface.
Figure 16 - Extractor Interface
The user is able to extract full projects or can mix and match Blocks, Types, and Plots. To
choose the type of data to extract, click on any of the “Select by Project, Block, Type or
Plot” buttons. The user can then double click on the record(s) to be extracted and a “Yes”
should appear to the left of the record. The project attributes should also appear at the
bottom with a check in the box to the left of the attributes.
If the user wants to select records without double-clicking highlight the desired record(s) and
click on the “Select” button.
If at any time the user decides to unselect a record, simply highlight the record and click on
the “UnSelect” button.
If the user decides to unselect all records, simply click on the “UnSelect All” button.
Industrial Forestry Service Ltd.
Plot Organizer Module
Page - 13
Figure 17 - Selecting records to be extracted
2.4.1 Selection Rule
To ensure that the user gets the correct data needed the Cruisecomp Organizer has a
Selection Rule. This means the user can choose the earliest records, the latest records or
choose the records individually. When populating the databases created with the
Cruisecomp Organizer the user will sometimes get duplicate plots, plots that have been used
in different scenarios, and plots shared by multiple projects. By pressing the “Selection
Rule” button the “Selection Rule” prompt will appear and the user can choose the most
appropriate way they want to extract their information.
Figure 18 Selection Rule
Once the user has selected the record(s) to be extracted along with the selection rule, click
on the “Extract” button. After clicking on the “Extract” button, a window will appear asking
for the destination and the new CCP filename. The user needs to navigate to the destination
Industrial Forestry Service Ltd.
Plot Organizer Module
Page - 14
and enter a file name, then click on the “Save” button. Once the information has been
extracted, a prompt will appear saying that the information has been successfully extracted.
2.5
Deleting Records from a Database
To delete a record from an existing database click on the “Delete” button on the main viewer
and the Delete from Database window will appear.
Figure 19 - Deleting Records from a Database
Choose the type of information that is to be deleted (i.e. Project, Block, Stand, or Plot) and
double click on the specific record(s). This will cause a “Yes” to appear to the left of the
record. If the user wants to unselect the record(s), use the “UnSelect” or “Unselect All”
buttons under the respective record viewer area.
By selecting a record(s), all attributes that are associated with it will appear in the bottom
portion of the window. Once all the records to be deleted have been selected and the
selection rule has been set (Section 2.4.1), press the “Delete” button at the bottom left of the
screen.
Industrial Forestry Service Ltd.
Plot Organizer Module
Page - 15
Figure 20 - Delete from Database Confirmation Prompt
After pressing the “Delete” button a prompt will appear asking if records to be deleted are
correct. The user can press “OK” when he/she is sure these records are the correct ones.
This will produce another prompt saying the selected records have been successfully
deleted. Press “OK” to continue. The “Delete from Database” screen will reappear, then
press the “Exit” button to return to the Cruisecomp Organizer main screen.
Figure 21 - Items Deleted Prompt
Industrial Forestry Service Ltd.
Plot Organizer Module
2.6
Page - 16
Printing Reports from the Organizer
To print a customizable report of selected information in the Cruisecomp Organizer, press
the “Print” button at the bottom of the organizer main screen. The “Select items to print”
window will appear. Select the information to be printed by selecting records the same way
used to select records to be extracted (Section 2.4) or deleted (Section 2.5). Choose the
selection rule and then press the “Print” button.
Figure 22 - Printing Records
By pressing the “Print” button the “Print Options” window will appear. The options available
allow the user to create a report title, include or exclude certain information, and sort the
information by type or block.
Industrial Forestry Service Ltd.
Plot Organizer Module
Page - 17
Figure 23 - Print Options
When the user has chosen the desired options for the reports, preview the report by pressing
the “Preview” button. This preview shows the user how the report will look when printed.
Figure 24 - Example of Printed Report
If the user decides to make a digital copy of the reports rather than a paper copy press the
“Snapshot” button to produce a digital file that can be viewed using the Snapshot viewer.
Industrial Forestry Service Ltd.
Plot Organizer Module
Page - 18
After pressing the “Snapshot” button the “Output to” prompt will appear asking the user to
name the digital file and select the directory where it is to be stored. Press the “OK” button
to save the .snp file. To view the .snp file, simply download the Snap shot viewer from the
internet and open the .snp file in the viewer.
Figure 25 - Snapshot Output to Dialog Box
Industrial Forestry Service Ltd.