1
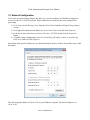
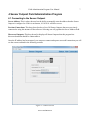
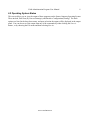
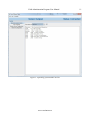
Sensor Outpost Field Administration Program
User Manual
http://www.versiontwo.ca
June 05, 2014
Field Administration Program User Manual
© 2014 by Version 2.0 Inc
Version 2.0 Inc.
P.O. Box 504
1476 Stittsville Main Street
Ottawa, Ontario K2S 1A6
Canada
Tel: (613) 663-3004
Fax: (613) 836-5153
Email: [email protected]
www.versiontwo.ca
Change Log
Author
Date
Changes
Derek Markell
2014-03-13
Original Document.
Derek Markell
2014-05-29
Camera and Component Section
Alex Van Leyen
2014-06-05
Minor Edits
www.versiontwo.ca
2
Field Administration Program User Manual
3
Table of Contents
1 Summary.................................................................................................................................................5
2 Installation...............................................................................................................................................5
2.1 Java..................................................................................................................................................5
2.2 Jar File.............................................................................................................................................5
3 Network Configuration ..........................................................................................................................5
3.1 Network Configuration ...................................................................................................................6
4 Sensor Outpost Field Administration Program ......................................................................................7
4.1 Connecting to the Sensor Outpost...................................................................................................7
4.2 Operating System Status.................................................................................................................8
4.3 Adaptive Sensor Language (ASL) Programs................................................................................12
4.4 Remote Server Configuration .......................................................................................................15
4.5 Sensor Outpost Network Configuration .......................................................................................16
4.6 Camera Configuration...................................................................................................................17
4.7 Components...................................................................................................................................18
www.versiontwo.ca
Field Administration Program User Manual
4
Illustration Index
Figure 1: Static IP Address ........................................................................................................................6
Figure 2: Connect Screen...........................................................................................................................7
Figure 3: Operating System Status Screen...............................................................................................11
Figure 4: ASL Programs Screen...............................................................................................................14
Figure 5: Remote Server Configuration Screen.......................................................................................15
Figure 6: Network Configuration Screen.................................................................................................16
Figure 7: Camera Configuration Screen..................................................................................................17
Figure 8: Components Screen..................................................................................................................18
www.versiontwo.ca
Field Administration Program User Manual
5
1 Summary
The Sensor Outpost Field Administration Program's primary use is to allow easy configuration of the
Sensor Outpost. It has the capability to view and modify Adaptive Sensor Language(ASL) programs
currently installed on the Sensor Outpost. ASL programs can also be uninstalled and new programs can
be installed. The program is also used to configure what remote server the Sensor Outpost will connect
to. The Sensor Outpost's network settings can also be configured and tested through the program.
Once installed, the program uses Ethernet to make a connection with the Sensor Outpost. The
instructions in this user manual will be based on the Windows 7 Operating system.
2 Installation
2.1 Java
This program requires Java be installed on the computer for the program to run. Java version 7 is the
required version. The most up-to-date version of Java can be found at
http://www.java.com/en/download/manual.jsp.
2.2 Jar File
Copy the SensorOutpost.jar file to your desktop. A copy can be obtained from the installation CD or
our website, www.versiontwo.ca.
3 Network Configuration
Under most circumstances connecting to the Sensor Outpost is straightforward. If the Sensor Outpost
was configured to use a static IP address, the address should already be known. In cases where the
Sensor Outpost was configured with DHCP, the IP address might not be known. If the Sensor Outpost
is connected to a local network using wifi, this is not a problem. On start up, the Field Administration
Program scans for Sensor Outposts on the local network and will present a list of them on the
connection screen.
The Sensor Outpost, regardless of network configuration (DHCP or static), will always have the IP
address 10.10.10.10. This is used as a last-resort address in cases where the DHCP allocated address
isn't known.
www.versiontwo.ca
Field Administration Program User Manual
6
3.1 Network Configuration
If you can't access the Sensor Outpost any other way, you can configure your Windows computer to
access it on the 10.10.10.XXX network. Please make sure to record your previous settings before
proceeding.
1) Go to Network and Sharing Center from the Control Panel and then clicking Change adapter
settings.
2) Now right click on the desired adapter (ex. Local Area Connection) and click Properties.
3) In the list of items select Internet Protocol Version 4 (TCP/IPv4) and click the Properties
button.
4) To enable a static configuration, select Use the following IP address: and Use the following
DNS server addresses:(See Figure 1).
Knowledge about specific addresses to use should already by known, as this is beyond the scope of this
document.
Figure 1: Static IP Address
This will assign the address of 10.10.10.20 to your Windows computer. The Sensor Outpost is at
10.10.10.10.
www.versiontwo.ca
Field Administration Program User Manual
7
4 Sensor Outpost Field Administration Program
4.1 Connecting to the Sensor Outpost
Server Address: This is where the user has the ability to manually enter the address that the Sensor
Outpost is configured to. If this is not known, 10.10.10.10 will allow access.
Previous Connections: This drop down box has a list of all Sensor Outposts that were previously
connected to using this instance of the software. Selecting one will populate the Server Address field.
Discovered Outposts: This drop down list displays all Sensor Outposts that this program has
discovered and that should be connectable to.
Once the IP address has been entered, you can press connect and upon a successful connection you will
see the screens outlined in the following sections.
Figure 2: Connect Screen
www.versiontwo.ca
Field Administration Program User Manual
8
4.2 Operating System Status
This screen allows you to view the output of three programs on the Sensor Outposts Operating System.
These include, Disk Free(df), Process Status(ps), and Interface Configuration(ifconfig). The three
options are listed in the drop down menu, and upon selection the output will be displayed in the output
panel. You can also to save the output from any of the commands by either clicking the Save As
button , or by choosing the File menu and then selecting Save As.
www.versiontwo.ca
Field Administration Program User Manual
www.versiontwo.ca
9
Field Administration Program User Manual
www.versiontwo.ca
10
Field Administration Program User Manual
Figure 3: Operating System Status Screen
www.versiontwo.ca
11
Field Administration Program User Manual
12
4.3 Adaptive Sensor Language (ASL) Programs
In this screen you can manage all ASL programs running on the Sensor Outpost, as well as any ASL
programs on the local computer. To start off, the user should select a workspace. This is simply any
directory on the local computer where ASL programs are stored. To do this, click on the Browse button
. Once a
directory has been chosen, click on the Change button . Doing so should
populate the Workspace table with all ASL programs located in the workspace directory
The Installed Programs table should already be populated with all of the ASL programs installed on the
Sensor Outpost.
Local ASL Programs can be edited directly by selecting the desired program and then toggling the Edit
button to enable Edit Mode. To exit Edit Mode, toggle the Edit button again. Multiple actions can be
performed on a local program, the following describes those actions:
Save: Clicking the Save button
system. Must be in Edit Mode
, all changes made to the selected program will be written to the file
Save As: Opening the File menu and clicking Save As, the user can save the selected program with a
different name.
Undo: Clicking the Undo button
be in Edit Mode.
, any change made will be reverted, character by character. Must
Redo: Clicking the Redo button , any change made by Undo will be brought back, character by
character. Must be in Edit Mode.
Revert: Clicking the Revert button
be in Edit Mode.
, the program will be brought back to its last saved state. Must
Install: Clicking the Install button , the selected program will be installed to the Sensor Outpost. If
a program with the same name already exists, the user will be given the option to overwrite the version
of that program already installed on the Sensor Outpost. If successfully installed, the program will
appear in the Installed Programs table.
Run: Clicking the Run button , will run the currently selected local program on the Sensor Outpost
and will display any output in the form of a popup window, once the program has finished running.
Delete: Opening the Edit menu and clicking on Delete, the selected program will be permanently
deleted from the file system. A prompt asking the user to confirm this action will be shown.
New: Opening the File menu and clicking the New button will create a new, empty program. A
prompt asking the user for the name of this program will appear. The newly created, empty program
will now appear in the Workspace table.
www.versiontwo.ca
Field Administration Program User Manual
13
Rename: Opening the File menu and clicking the Rename button will allow the user to rename the
selected program.
Using any of the previous actions on a local ASL program will have no effect to any programs currently
installed on the Sensor Outpost, regardless if they have the same name or not. As with being able to
perform actions on local programs, actions can also be performed on installed programs. The
following will describe those actions:
Wipe: Right-clicking an installed program and clicking the Wipe button or opening the Program menu
and clicking the Wipe button will clear the program's persistent variable memory.
Uninstall: Right-clicking an installed program and clicking the Uninstall button or opening the
Program menu and clicking the Uninstall button will permanently uninstall and remove the program
from the Sensor Outpost.
Import: Opening the File menu and clicking the Import button will import the selected installed
program to the local machine. The imported program will now be visible in the Workspace table.
Wipe All: This action is similar to the Wipe action, except it will wipe all programs' persistent variable
memory. This can be achieved by opening the Program menu and clicking the Wipe All button.
Refresh Programs: Opening the Program menu and clicking the Refresh Programs button will
retrieve all the installed programs from the Sensor Outpost and repopulate the Installed Programs table.
This action may take a few seconds to complete.
www.versiontwo.ca
Field Administration Program User Manual
Figure 4: ASL Programs Screen
www.versiontwo.ca
14
Field Administration Program User Manual
15
4.4 Remote Server Configuration
In this screen you can set the location of the Sensor Outpost's remote server and to also log into that
server. To change the location of the remote server, the user must click the Configure button. This will
enable the user to modify the IP and port fields. To save these settings, the user must click the Save
button. To test that the Sensor Outpost can make a connection to the remote server, the user can click
the Test Connection button.
You can also has the ability to log into the remote server. To do so, while in a logged out state, enter
the username and password and click the Login button. To test whether these credentials are valid, the
user can click the Test Authentication button.
Figure 5: Remote Server Configuration Screen
www.versiontwo.ca
Field Administration Program User Manual
16
4.5 Sensor Outpost Network Configuration
In this screen you can configure the Sensor Outpost's network settings and perform some tests to make
sure the settings are as desired.
DHCP Configuration: To have the network configured using DHCP, the Use DHCP network
configuration radio button must be selected and for it to take effect the user must click the Apply
button. Within a few seconds the changes should have taken place.
Static Configuration: To configure the network statically, the Use static network configuration radio
button must first be selected. The next step is to click the Configure button which will enable the fields
for editing. Once all fields are filled in, click Apply and within a few seconds the changes should have
taken place.
In order to test the network there are two programs that can be run from the Sensor Outpost. The first
is Ping and the second is Traceroute. Both programs require a hostname or IP address to be entered.
Clicking on either of the two buttons (Ping or Traceroute) will have the Sensor Outpost execute those
commands and the output will be displayed in the output panel. It should be noted that depending on
the IP address or hostname, either of these actions could take up to 30 seconds to finish.
Figure 6: Network Configuration Screen
www.versiontwo.ca
Field Administration Program User Manual
17
4.6 Camera Configuration
The camera configuration tab can be used to take individual images with the camera or have the camera
continuously loop, taking images. Among these options the user can save the most recent image to the
local file system.
Capture Image: Clicking the Capture button , will result in the Sensor Outpost captuing an image
with the camera. The image will then be displayed in the viewing area above the controls.
Loop: Clicking the Loop button , will have the Sensor Outpost continuously capture images and
display them in the viewing area. This will go on until the Stop button , is clicked. All other controls
are disabled while this is happening
Save: Clicking the Save button
that is currently displayed.
, will bring up a file browser, allowing the user to save the image
Figure 7: Camera Configuration Screen
www.versiontwo.ca
Field Administration Program User Manual
4.7 Components
The components tabbed pane can be used to view the hardware configuration of the Sensor Outpost.
The Select a board drop down allows the user to view components associated with the board they're
connected to. The Select a component drop down allows the user to select and view a top-level
component and any subcomponents which are apart of the selected board.
Figure 8: Components Screen
www.versiontwo.ca
18