1
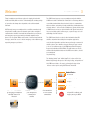
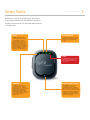
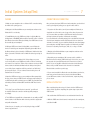
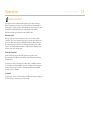
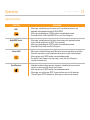
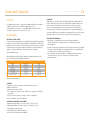
USER MANUAL
SPOT Connect USER MANUAL 2
Table of Contents
Welcome ............................................................3
Getting Started ..................................................4
Initial System Setup ..........................................7
Using SPOT Connect ..........................................9
Operation ..........................................................10
Care and Support ..............................................14
Warranty and FCC/IC Notice ..............................15
Welcome 3
SPO T C O N N EC T U SER MANUAL
Today’s smartphones provide more options for staying in touch with
friends and family than ever before. Unfortunately, this amazing variety
of connections has always been dependent on the cellular network.
Until now.
SPOT Connect turns your smartphone into a satellite communicator by
using the GPS satellite system to determine your location and global
communication satellites to transmit that information to your contacts
and emergency response personnel from virtually anywhere on the
planet. You can update Twitter and Facebook, send short email and text
messages, and in the case of a critical emergency, send an SOS message
requesting emergency assistance.
The SPOT Connect app runs on your smartphone and pairs with the
SPOT Connect device via Bluetooth. Bluetooth is a short range wireless
connectivity standard that allows electronic devices to communicate
with one another, and pairing is simply establishing a link between two
electronic devices. You can use the smartphone to operate all the modes
of SPOT Connect and access optional features like Type & Send, which
lets you send short emails, text messages, or post messages to social
networking sites like Facebook.
The SPOT Connect device receives location information from GPS
satellites and, when instructed by the smartphone application,
sends location information and short messages through a commercial
satellite system. These satellites relay your message to your contacts
or in case of an SOS message, to the GEOS International Emergency
Response Coordination Center (IERCC). The SOS feature can also be
activated directly with the button on the SPOT Connect device, should
your smartphone
stop functioning.
The “Getting Started” and “Initial Setup/Test” sections of this User
Manual step through all aspects of the setup, testing, and operation of
the SPOT Connect device. Be sure to go through all setup actions
in these sections prior to using SPOT Connect in the field.
Update Twitter
Update
Twitter
and
Facebook
and Facebook
Send short
email
Send
short
email
messages
messages
Send text
messages
Send
text
messages
Download
the SPOT
Connect
Download
the SPOT
app app
and pair
andyour
pairsmartphone
your
with SPOT Connect
via
Smartphone
with SPOT
Bluetooth
Connect via Bluetooth
SPOTConnect
Connect links
SPOT
links
your
smartphone toto
your
Smartphone
communication
communication
satellites
satellites
YourSmartphone
smartphone
Your
is
now
is now aa satellite
satellite
communicator
communicator
Send your GPS coordinates
Send your GPS coordinates and
and
emergency
emergency
messagemessage
to GEOS
to GEOS
Getting Started
FOLLOW THESE IMPORTANT GUIDELINES TO GET
MAXIMUM RELIABILITY FROM SPOT CONNECT:
Give SPOT Connect an unobstructed view of the sky to obtain
a GPS signal and provide the most accurate location information.
It is not reliable indoors, in a cave, or in very dense woods.
Orient the SPOT Connect logo toward the sky to improve performance.
Keep the SPOT Connect device within 30 feet of your mobile
device to maintain a consistent Bluetooth connection.
SPOT CONNECT DEVICE
WHAT YOU NEED
1. SPOT Connect Device.
2. 2 AA Energizer® Ultimate Lithium 8x Batteries (L91) (included).
INSTALL THE INCLUDED BATTERIES
1. Loosen the screw holding the battery cover in place.
2. Write down the ESN and Authentication Code for use during
service activation.
3. Install 2 AA Energizer® Ultimate Lithium 8x Batteries (L91).
4. Replace cover, then tighten screw with a screwdriver or coin.
It is important that you tighten the battery cover to keep
SPOT Connect waterproof.
5. To turn SPOT Connect on simply press and hold the ON/OFF button until
the Power LED blinks green. SPOT Connect performs a self-diagnostic
test every time it is powered on. To turn SPOT Connect off, press and hold
the ON/OFF button until the Power LED starts blinking rapidly.
6. If SPOT Connect’s self-test fails, the Power, GPS, and Message Sending
LEDs simultaneously blink red.
SPO T C O N N EC T U SER MANUAL
4
Getting Started
SPO T C O N N EC T U SER MANUAL
SPOT Connect uses LEDs to tell you what it’s doing. Take a moment
to become familiar with these LEDs. Your SPOT Connect app will also
display the current mode of the device and provide further detail about
its operating status.
GPS LED
MESSAGE SENDING LED
This LED is Green when SPOT
Connect is providing the GPS fix
to the smartphone and has 3 or
more GPS satellites in view. It is
red when SPOT Connect has less
than 3 satellites in view (no GPS
fix). Blinks for 15 seconds (green or
red depending on GPS acquisition)
when the smartphone provides the
GPS fix and switching from GPS
acquisition to message sending.
This LED blinks green when a message
is being sent. This LED blinks red when
a casual message sending attempt
has failed.
SOS LED
This LED blinks green every 3 seconds
when in SOS mode, and blinks red
every 3 seconds when SOS mode has
been cancelled.
POWER LED
WIRELESS CONNECTION LED
This LED blinks green every 3
seconds when the SPOT Connect
device is powered on, and blinks
rapidly during the power off sequence.
If SPOT Connect’s self-test fails,
the Power, GPS, and Message
Sending LEDs simultaneously blink red.
Contact SPOT Customer service for
troubleshooting help if this
should occur.
This LED blinks every 3 seconds
when a wireless connection is
established between the smartphone
and the SPOT Connect device. The blue
LED goes off if the SPOT Connect has not
heard from the smartphone in 1 minute.
The Wireless Connection LED blinks
rapidly while the smartphone and SPOT
Connect are being paired.
5
Getting Started
SPO T C O N N EC T U SER MANUAL
6
SPOT ACCOUNT
SPOT CONNECT APP
WHAT YOU NEED
1. Internet access.
1. Go to the appropriate application marketplace for your smartphone/
mobile device and search for “SPOT Connect”.
2. Personal and Emergency contact information
(names and phone numbers).
2. Alternatively, findmeSPOT.com/app provides direct links to the
appropriate apps for the different mobile platforms supported by
SPOT Connect.
3. SMS (Text) and e-mail contacts for messaging.
Phone numbers for US/Canada customers require the
carrier information (e.g., AT&T, Verizon, etc.).
3. Once the app is downloaded and installed, sign in with your SPOT
account information (Note: You must first have activated your device at
findmeSPOT.com with the SPOT Basic Service Plan).
4. Credit card information.
5. SPOT electronic serial number (ESN) and Authentication Code
(located inside the battery compartment).
ACCOUNT SETUP AND DEVICE ACTIVATION
1. Log onto findmeSPOT.com, choose your country or language,
and select the Activate Your SPOT tab.
4. The app will pull the appropriate information about your account
and device from the server and display a “Connecting to Device”
notification while it searches for your SPOT Connect device.
Once the app is installed you will see the SPOT
Connect app icon in your smartphone home screen.
2. Login to your account if you are an existing customer,
or create a new account if you are new to SPOT.
3. Follow the online instructions to choose the SPOT Basic
Service Plan to activate your SPOT Connect device.
4. Select additional services, such as Track Progress
or Type & Send bundle.
5. You will be required to enter contact information for a primary and
secondary SOS emergency contact. These can be updated at any time.
These contacts cannot match your personal contact information in your
SPOT Account.
6. Create at least one contact group and add a contact to it.
It is recommended to add your own name and email or phone number to
a contact group for use during the initial system test.
7. Create at least one Predefined message for use during the system test.
8. Social Destinations – SPOT Connect can post messages to Facebook
and Twitter, after you connect to them from your SPOT Account.
More details on establishing these connections are available in
the Initial System Setup/Test section.
After completing all three of the setup steps – powering on the device,
activating the device, and installing the app – you are ready to pair your
smartphone with your SPOT Connect device and complete the initial
system test.
Inital System Setup/Test 7
SPO T C O N N EC T U SER MANUAL
PAIRING
CONNECTING/DISCONNECTING
1. Make sure your smartphone has a cellular or Wi-Fi connection during
the initial device pairing process.
Once you have paired your SPOT Connect and smartphone, you should not
need to go through the pairing process again for these devices.
2. Navigate to the Bluetooth Menu on your smartphone and turn on the
Bluetooth if it is not already.
1. If you turn off either device, turn off your smartphone’s Bluetooth, or
simply take one of the devices out of range of the other, all you need to
do is reconnect. Once you initiate a SPOT Connect function, the device
will stay in that mode regardless of Bluetooth connectivity.
If you lose Bluetooth connectivity and wish to re-establish the link, make
sure both your smartphone and the SPOT Connect device are turned on
and next to each other. You can establish a Bluetooth connection between
your smartphone and SPOT Connect regardless of what mode your SPOT
Connect is in (Standby, Track Progress, SOS, etc.) as long as it is On.
3. From Off Mode, place the SPOT Connect device in Pairing Mode by
holding down on the ON/OFF button until the Power LED comes on and the
blue Wireless Connection LED begins blinking. Your SPOT Connect is now
discoverable by your smartphone.
4. With your SPOT Connect now in Pairing Mode, scan for Bluetooth
devices if needed by your smartphone’s Operating System (OS). One of
the Bluetooth devices listed should be ‘SPOTConnect’ with the last three
digits of your unit’s ESN at the end. Pair with this device by pressing its
name.
5. Depending on your smartphone’s OS, if the pairing process was
successful you will see your SPOT Connect device listed as ‘Paired but
not connected’ or ‘Connected’. Either of these statuses next to your SPOT
Connect device in the Bluetooth Menu indicates that you have paired
successfully. If your smartphone still lists your device as ‘Not Paired’,
please repeat Steps 3 -5. If you continue to have trouble, please call
Customer Care for assistance.
6. Open the SPOT Connect app on your smartphone. When prompted by
the app, please enter your SPOT Account’s username and password you
created during the device activation process (NOTE: You must first have
activated your device at findmeSPOT.com with the SPOT Basic Service
Plan).
7. If in Step 5 you saw ‘Paired but not connected’, you still need
to establish a Bluetooth connection and the app will prompt you
accordingly.
2. Navigate to the Bluetooth Menu on your smartphone and turn on the
Bluetooth if it is not already.
3. Depending on your smartphone’s OS, you may need to establish a
Bluetooth connection via the SPOT Connect app. If this is the case, open
the app and select your SPOT Connect device from the list of Paired
Devices. If you can establish a Bluetooth connection via the Bluetooth
Menu, select your SPOT Connect device from the list of available
Bluetooth devices and then open the app.
4. If you cannot reestablish a Bluetooth connection between your devices,
make sure you have the two devices paired. In the Bluetooth Menu,
if your SPOT Connect device is listed as ‘Not Paired’, repeat the pairing
process above.
INITIAL SYSTEM TEST
After completing the previous steps it’s time to test the SPOT Connect
device and the app before completing the system setup at your online
SPOT Account.
1. Go outside where SPOT Connect has an unobstructed view of the sky.
8. The SPOT Connect app will take a few moments to sync with your SPOT
Connect device for the first time while it checks your device registration
and profile information.
9. Once the sync is complete, you’re ready to begin using your SPOT
Connect app and device.
2. With the SPOT Connect device turned on and paired to the smartphone,
select Check-in/OK.
Continued on next page
Inital System Setup/Test 8
SPO T C O N N EC T U SER MANUAL
INITIAL SYSTEM TEST (continued)
PREDEFINED MESSAGES
3. Select the contact group which includes your own email or phone
number, and select a Predefined message or create a custom
Type & Send message. Note that if you choose to send a Type & Send
message, this uses one of the 5 Free Trial messages included with the
SPOT Basic Service.
4. If you entered a Social Destination site during the account setup you
can choose to have your message sent to Facebook or Twitter.
Social destinations can also be linked via the Settings menu of the
smartphone app.
The fastest and most reliable way to send messages from the field is with
Predefined messages. You can send an unlimited number of Predefined
messages with the SPOT Basic Service. When you select a Predefined
message, the SPOT Connect device does not actually communicate the
details of the message over the satellite network, it merely sends a short
instruction to the servers to send out the message. You can have up to
14 Predefined messages in your account. Predefined messages can be
appended to Check-in/OK, Help, or SOS messages. You can modify these
messages from your smartphone, but only when you are on the cellular
network or have internet access through a Wi-Fi connection.
5. Send the Check-in/OK message from the smartphone app.
CONTACT GROUPS
6. Leave SPOT Connect in clear view of the sky during the test,
which can take up to 20 minutes to complete.
7. Verify that the message was received in the email account or SMS
text number you entered during the device activation step.
OPTIONAL SERVICES
Several optional services can be enabled for use with your SPOT Connect
device. These services require an additional service fee. Pricing details
are available online.
TRACK PROGRESS
SPOT Connect sends your location automatically to allow contacts to
track your progress in near real-time using Google Maps™ or SPOT
Adventures, giving them a virtual breadcrumb trail of your adventure.
TYPE & SEND
Type a custom message on the smartphone for delivery over the satellite
network to emergency personnel, your personal contacts, or selected
social networks.
SPOT ASSIST
For non-emergency situations, SPOT Assist gives you access to
professional roadside and maritime assistance providers to get you back
on track fast when you need help. SPOT has partnered with Nation Safe
Drivers and BoatUS Towing Services to provide assistance that you can
summon from off the grid, unlike other roadside assistance programs
which require cellular service. (See findmeSPOT.com for terms and
coverage area).
Establish up to 10 contact groups for easy selection when sending
Check-in/OK messages. Each group can contain 50 contacts,
and you can specify any combination of text/SMS messages or
email for the contacts.
At any one time, specific groups can be selected to receive messages
from the field. This allows you to select different groups depending on
where you are traveling and who you want to keep informed during a
given adventure.
NOTE: SMS messaging services are subject to international
pricing terms. See findmeSPOT.com for details.
ADDING CONTACTS FROM YOUR SMARTPHONE
You can add contacts directly from your smartphone contact list to your
SPOT Account only when your smartphone is on the cellular network or
has internet access through a Wi-Fi connection.
SOCIAL DESTINATIONS
Because SPOT Connect can send messages out over the satellite network,
popular social networking sites (Facebook and Twitter) can be updated
from the field with SPOT Connect. The connection between the SPOT
service and your accounts on the social destination sites is made in
the SPOT Account online under the Share tab. You will need your login
and password for these sites to establish the connection. You can post
Predefined messages to these services or use the Type & Send function to
post customized messages.
Using SPOT Connect 9
SPO T C O N N EC T U SER MANUAL
STARTING YOUR ADVENTURE
MESSAGE PRIORITY LEVEL
SPOT recommends that you send and verify a Check-in/OK message
before each trip. This also allows you to evaluate your entire messaging
system, from the operational condition of the SPOT Connect device to the
readiness of those in your contact groups.
Each type of message you can send is assigned a priority level which
governs which messages get sent or ignored in the event of multiple
functions being activated at the same time.
GPS ACQUISITION
Under normal operation SPOT Connect obtains the GPS fix and provides
this information to the smartphone. Turning off the GPS/location
services feature in your smartphone will help minimize battery drain on
your smartphone.
REFERENCE POINTS
A Reference Point is any point on the map other than your current
location. By default, SPOT Connect uses your current location for all
messages and actions, but you can use the SPOT Connect app to send
messages and information associated with Reference Points.
To establish a Reference Point, go to the Map View while in Track
Progress mode and lift the corner of the map. You can select
“Drop Pin” and move the pin to the desired location on the map.
Tap the pin and you will have the option to either send the Reference
Point location along with a Check-in/OK message, Delete Reference Point
or Cancel to return back to the tracking screen.
CRITICAL
An SOS message is the highest priority message and is sent to the GEOS
IERCC. It supersedes Urgent and Casual messages. Once in SOS mode all
other message requests are ignored.
URGENT
Help/SPOT Assist messages are the second highest priority. SPOT Assist
messages are sent to one or more professional service providers for
non-emergency response.
CASUAL
Casual messages (Check-in/OK, Track Progress) go to a contact or social
destination that you have set up in your SPOT account and are the lowest
priority. They are terminated if higher priority messages are sent after a
Casual message is initiated, and ignored if SPOT is already in Help
or SOS mode.
Operation 10
SPO T C O N N EC T U SER MANUAL
For life threatening or other critical emergency situations, use SOS
to alert the GEOS IERCC. GEOS notifies the appropriate emergency
responders based on your location– which may include Search & Rescue,
U.S. Coast Guard, Civil Air Patrol, local police, highway patrol, your
country’s embassy or consulate or other emergency response centers.
MESSAGE CYCLE
SPOT sends your emergency profile information and current GPS location
to GEOS every 5 minutes until cancelled or until the batteries run out. If
SPOT cannot get a GPS signal, it will still attempt to send your message
without a GPS location. There is no test mode for this function. If you
activate the SOS function, the GEOS IERCC will treat it as a
real emergency.
USING THE SOS FUNCTION
The SOS function can be accessed from the SPOT Connect app or from
the device itself.
• From the app
Slide the SOS bar on the SPOT Connect app home screen.
You will have the option to select a Predefined message or send a
Type & Send custom message, providing additional details with the SOS.
• From the Connect device
If your smartphone or mobile device is inoperable, the SOS button on the
SPOT Connect device can be used to send the basic SOS message with
your GPS location. Press and hold the SOS button on the device until the
SOS LED blinks green. If you return to the app on your smartphone you
will see the status updated with the current function mode.
Once your GPS location is obtained, SPOT sends your message and GPS
location. The GPS LED and Message Sending LED will both blink green
for approximately 15 seconds. The Message Sending LED continues to
blink green until the next scheduled message to notify you that your most
recent message was transmitted.
If no GPS signal is found, the GPS LED will blink red. You should move to
a location with a clearer view of the sky. For all subsequent messages,
SPOT will keep looking for your GPS location for up to 4 minutes. If no GPS
signal is found within 4 minutes, SPOT sends your message without GPS
location, indicated by the GPS LED blinking red and the Message Sending
LED blinking green for approximately 15 seconds.
TO CANCEL
• From the app
You can cancel SOS from the app by sliding the SOS bar.
• From the device
Press and hold the SOS button until it blinks red.
Let SPOT work until the SOS LED stops blinking red. The Message Sending
LED will blink green, indicating it has sent the Cancel message. If an
SOS message has already been transmitted, SPOT Connect will send 3
Cancel SOS messages over a 15-20 minute period. If no SOS message
was transmitted it will simply return to Standby mode after 15 seconds.
When you select SOS, you disable Help, Check-in/OK, and Track Progress
function modes and discontinue any casual or urgent messages in
progress.
Operation 11
SPO T C O N N EC T U SER MANUAL
HELP/SPOT ASSIST
A Help message notifies your contacts that you need assistance in a
non-emergency situation. A SPOT Assist message notifies
SPOT Assist dispatch centers of your location and that you need
assistance. Professional service providers will be notified that you need
help (SPOT Assist service subscription required).
MESSAGE CYCLE
SPOT sends your Help message every 5 minutes for one hour. If a GPS
signal cannot be obtained SPOT will attempt to send the message with
no location information.
USING THE FUNCTION
Help and SPOT Assist can only be activated from the SPOT Connect
smartphone app. Select the appropriate button from the home screen
and follow the on screen instructions for selecting a Predefined message
or creating a unique Type & Send custom message.
TO CANCEL
Help messages can be cancelled from the SPOT Connect app,
simply go to the Help message status page and select the Cancel option.
CHECK-IN/OK
The most common type of message sent from SPOT Connect, the
Check-in/OK message is used to send Predefined or Type & Send custom
messages to specific contact groups as well as to Facebook and Twitter.
These destinations can be selected from the app for each individual
message cycle is complete. The Check-in/OK message will not be sent if
the GPS fix cannot be acquired.
MESSAGE CYCLE
These messages are sent 3 times within a 20 minute window of
activating the function for redundancy. However, only one message
will be delivered to your designated contacts.
USING THE FUNCTION
Select Check-in/OK from the SPOT Connect app home screen and follow
subsequent directions for choosing a Predefined message or using a
Type & Send message. You will also select which contact group to send
your message to.
Check-in/OK cannot be sent concurrently with Help, SPOT Assist or SOS
messages. Check-in/OK messages can be sent while Track Progress is
enabled, but will interrupt the Track Progress messages until the
Check-in/OK message cycle is complete.
TO CANCEL
Check-in/OK messages can be cancelled from the SPOT Connect app,
simply go to the Check-in/OK message status page and select the
Cancel option. There is a 3 minute delay before another casual message
can be sent.
Operation
SPO T C O N N EC T U SER MANUAL
TRACK PROGRESS
This optional service automatically updates your location on Google
Maps™ allowing your contacts to track a virtual breadcrumb trail of
your progress in near real-time. Alternatively you can share your location
information at SPOT Adventures (spotadventures.com) or with a
SPOT Shared Page you create from your SPOT Account.
MESSAGE CYCLE
Messages are sent every 10 minutes for 24 hours at a time or until
cancelled. You can re-engage Track Progress any time to restart the 24
hour clock. With each message SPOT will include your GPS location for
the 2 previous track locations for a reliable breadcrumb trail. If a GPS
signal is not obtained within 4 minutes, SPOT Connect will wait for the
next message cycle and try again.
USING THE FUNCTION
Select Track Progress from the SPOT Connect app home screen.
Any unsent Check-in/OK messages will be cancelled when you initiate
Track Progress.
Track Progress mode is disabled once SOS, Help, or SPOT Assist modes
are activated. If a Check-in/OK message is sent while in Track Progress
mode, the Track Progress mode is interrupted until the Check-In/OK
message cycle is complete.
TO CANCEL
Track Progress can be cancelled from the SPOT Connect app, simply go to
the Track Progress status page and select Stop.
12
Operation 13
SPO T C O N N EC T U SER MANUAL
FUNCTION OVERVIEW
FUNCTION
SOS
Help/SPOT Assist
Check-In/OK
Track Progress
OPERATION
- Messages scheduled every 5 minutes until cancelled (or batteries are
depleted) with updated location to GEOS IERCC.
- Message scheduled even if GPS location cannot be determined.
- Overrides Check-in/OK, Help/SPOT Assist, and Track Progress.
- Messages scheduled every 5 minutes for one hour with updated location
to your friends and family, or SPOT Assist provider.
- Message scheduled even if GPS location cannot be determined.
- Overrides Check-In/OK and Track Progress.
- Messages scheduled 3 times over 20 minutes for message delivery reliabilty.
Only one message is actually delivered to contacts in your contact groups.
- Message not sent if GPS location cannot be determined.
- Suspends Track Progress until message is sent, then Track Progress
resumes automatically.
- Updated location and two previous locations scheduled for transmission
to your account every 10 minutes for 24 hours.
- Message not sent if GPS location cannot be determined.
- Messages are sent to your SPOT Account where you can link them to a
Shared Page or SPOT Adventures. Messages are not sent to contacts.
Care and Support 14
SPO T C O N N EC T U SER MANUAL
SUPPORT
For additional questions or support, visit findmeSPOT.com for answers
to FAQ’s, training videos, and other information, or call
• North American customers – 1.866.OK1.SPOT (1.866.651.7768)
• European customers: Tel: +353 12 909 505
MAINTENANCE
BATTERY LIFE AND USAGE
To obtain reliable performance use only AA Energizer Ultimate Lithium 8x
batteries (L91). The Power LED on SPOT Connect will blink red when the
batteries have less than 100 transmissions remaining. Colder conditions
and extreme heat can impact battery life. Always carry extra batteries
with you. Test your SPOT device before each trip by sending a
Check-in/OK message.
When utilizing new AA Energizer Ultimate Lithium 8x batteries (L91)
you can anticipate the following battery life:
MODE
CONNECTED/NOT CONNECTED
BATTERY LIFE
Standby
Standby
SOS
SOS
Track Progress
Track Progress
Not Connected
11 Days
Connected
Not Connected
Connected
Not Connected
Connected
5 Days
5 Days
4 Days
6 Days
4.5 Days
Check-in/OK
Type & Send (Max Length)
Connected
Connected
260 Messages
180 Messages
Predefined Messages
Connected
260 Messages
All battery life estimates are based on the assumptions that Connect has a 100% clear view of the
sky and is at room temperature.
CLEANING
Follow these general rules when cleaning the outside of your
SPOT Connect device:
• Make sure the power is OFF.
• Use a damp, soft, lint-free cloth. Avoid excess moisture near buttons
or openings.
• Do not use aerosol sprays, solvents, alcohol or abrasives.
• Do not attempt to open the SPOT case.
OPERATING CONDITIONS AND CLIMATE
• Operating temperatures: -13°F to +140°F (-25°C to 60°C)
• Operating altitude: -328 ft to 21,320 ft (-100m to 6,500 m)
• Humidity and Salt Fog rated
• IPX7 Waterproof to 1M for 30 minutes
• GPS Lat. Long. Datum format: WGS-84
COVERAGE
SPOT works around the world, including virtually all of North America,
Europe, Australia, and portions of South America, Northern Africa and
Asia, as well as hundreds or thousands of miles off-shore of these
areas. It is important that you check coverage for your destination
before traveling. In Russia, GPS performance is limited (degraded) in
accordance with Russian regulations regarding GPS accuracy for devices
utilized in Russia. You can find coverage maps at findmespot.com
CAUTIONS AND WARNINGS
• Any changes or modifications not expressly approved by the
grantee of this device could void the user’s authority to operate
the equipment.
• Danger of explosion if battery is incorrectly replaced. Replace only with the same or equivalent type recommended. Dispose of used batteries
according to the manufacturer’s instructions.
• Do not damage the Lithium battery. A damaged battery can cause
an explosion or fire, and can result in personal injury and/or
property damage.
Warranty and FCC/IC Notice SPO T C O N N EC T U SER MANUAL
15
WARRANTY INFORMATION
FCC RF RADIATION EXPOSURE STATEMENT
Your SPOT has a Limited Warranty for 12 months (24 months for
European Customers) from the date of purchase against defects in
materials and workmanship only. For full details regarding the Limited
Warranty and warranty claim procedures, visit www.spotwarranty.com
or www.findmeSPOT.com.
This equipment complies with FCC RF radiation exposure limits set forth
for an uncontrolled environment. This equipment should be installed and
operated with a minimum distance of 20 cm between the radiator and
your body.
EXCEPT AS PROVIDED ABOVE, THE PRODUCT IS SOLD “AS IS” WITHOUT ANY EXPRESS OR
IMPLIED WARRANTIES FOR THE PRODUCT WHATSOEVER, INCLUDING, WITHOUT LIMITATION,
ANY IMPLIED WARRANTIES REGARDING THE CONDITION, DESIGN, SPECIFICATIONS,
WORKMANSHIP, MERCHANTABILITY OR FITNESS FOR A PARTICULAR PURPOSE OF THE
PRODUCT, OR ANY WARRANTIES THAT THE PRODUCT IS FREE FROM LATENT DEFECTS OR
DEFICIENCIES, OR THAT THE PRODUCT IS FREE FROM INFRINGEMENT OF ANY PATENT,
TRADEMARK, COPYRIGHT OR PROPRIETARY RIGHT OF ANY THIRD PARTY AND SUCH
WARRANTIES ARE HEREBY EXPRESSLY DISCLAIMED.
THIS LIMITED WARRANTY PROVIDES THE SOLE AND EXCLUSIVE REMEDY FOR ANY DEFECTS
IN THE PRODUCT. IN NO EVENT SHALL WE BE LIABLE FOR ANY INDIRECT, CONSEQUENTIAL,
SPECIAL, INCIDENTAL OR PUNITIVE DAMAGES, WHETHER IN CONTRACT, TORT, NEGLIGENCE,
STRICT LIABILITY OR OTHERWISE. OUR LIABILITY IS LIMITED TO THE AMOUNT YOU PAID
FOR THE PRODUCT THAT IS THE SUBJECT OF A CLAIM. THE APPLICABILITY OF THE ABOVE
LIMITATIONS AND EXCLUSIONS MAY VARY FROM STATE TO STATE, OR COUNTRY TO COUNTRY.
FCC CERTIFICATIONS
FCC/IC NOTICE
This equipment has been tested and found to comply with the limits for
a Class B digital device, pursuant to Part 15 of the FCC rules. Operation
is subject to the following two conditions: (1) This device may not cause
harmful interference, and (2) this device must accept any interference
received, including interference that may cause undesired operation. This
device complies with the requirements for radio astronomy site avoidance
as specified by the Globalstar National Science Foundation agreement of
2001. It is compliant with CFR 25.213.
This device automatically adjusts to transmission frequency according to
its location and is compliant with international regulatory requirements.
This Class B digital apparatus complies with Canadian ICES-003.
MODEL: SMTPH
This equipment has been tested and found to comply with the limits
for a class B digital device, pursuant to Part 15 of the FCC rules. These
limits are designed to provide reasonable protection against harmful
interference in a residential installation. This equipment generates, uses,
and can radiate radio frequency energy and, if not installed and used
in accordance with the instructions, may cause harmful interference to
radio communications. However, there is no guarantee that interference
will not occur in a particular installation.
If this equipment does cause harmful interference to radio or television
reception, which can be determined by turning the equipment off and on,
the user is encouraged to try to correct the interference by one or more of
the following measures:
• Reorient or relocate the receiving antenna.
• Increase the separation between the equipment and the receiver.
• Connect the equipment into an outlet on a circuit different from that to
which the receiver is connected.
• Consult the dealer or an experienced radio/TV technician for help.
CERTIFICATIONS
ROHS and WEEE compliant
Certified to FCC and CE emissions, immunity, and safety regulations.
Meets FCC Part 25 regulations, Canada type approval, CISPR Publication
22 (1985 1st edition), RTTE Directive (1999/EC), and IEC 60950
safety standard.
© 2011 Spot LLC. All rights reserved. Visit us online at findmeSPOT.com. All SPOT products described herein are the products of Spot LLC,
which is not affiliated in any manner with Spot Image of Toulouse, France or Spot Image Corporation of Chantilly, Virginia. Made in China.
Revision 1.0, January, 2011