1
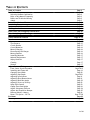
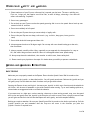
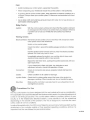
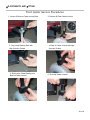
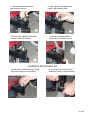
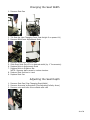
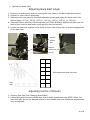
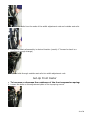
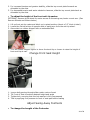
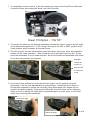
POWER CHAIR USER MANUAL – EXPRESS
Future Mobility Healthcare
3223 Orlando Drive, Mississauga, ON L4V 1C5
Phone: 1-888-737-4011, Fax 1-866-670-3377
www.future-mobility.com . Prices and specs are subject to change without notice.
Dealer: This manual must be given to the user of the wheelchair.
User: Before using, read this manual, and save for future reference.
1 of 30
ABLE OF
ONTENTS
Table of Contents
Read Before Use
Selecting the Best Combination
Refer to this Manual Frequently
Dealer and Technician Warning
Labels
Power Wheelchair and Parts
Basic Safety Precautions
Equipment Guidelines and Precautions
Warnings for the User
Power Chair Electro Magnetic Interference
Wheelchair Safety and Handling
Driving and Handling Instructions
Power Wheelchair Controls
Transfers
Maintenance
Tire Pressure
Circuit Breaker
Care of Batteries
Battery Charging
Disconnecting the Charger
Battery Pointers
Installing Batteries
Maintain Performance
Safety Checklist
Cleaning
Storage
Adjustments and Fitting
Front Caster Service Procedure
Installing Anti Flutter Kit
Changing Seat Width
Adjusting Seat Depth
Adjusting Infinity Arms
Adjusting Rear Mounted Arms
Adjusting Back Rest Angle
Adjusting Centre of Gravity
Setup Front Casters
Change Front Seat Height
Adjust Swingaway Footrest
Adjust the Suspension Damper
Remove Wheels + Motors
Power Tilt Option – CG Tilt
Disclaimer
Warranty
Page 2
Page 3
Page 3
Page 3
Page 3
Page 3
Page 4
Page 5
Page 5
Page 6
Page 6-7
Page 8
Page 8-10
Page 10-14
Page 14
Page 15
Page 15
Page 15
Page 16
Page 16
Page 16
Page 16
Page 17
Page 17
Page 17
Page 17
Page 17
Page 18
Page 18-19
Page 19
Page 20
Page 20-21
Page 21
Page 21
Page 22
Page 22
Page 23
Page 24
Page 24
Page 25
Page 26
Page 27-28
Page 29
Page 30
2 of 30
EAD
EFORE
SE
SELECTING THE BEST COMBINATION
The Express offers the user many different combinations of styles, accessories, and options to best fit each
individual; the final selection should be made by you and your health care advisor in conjunction with
the dealer and based on factors such as:
-The level of your coordination, balance, and physical strength
- The conditions and challenges you will encounter in your environment (your home, workplace, frequent
destinations etc.)
-The best combination for your comfort and safety while using the equipment
REFER TO THIS MANUAL FREQUENTLY
Before you begin using this wheelchair, you – along with each person who will assist you – should carefully
read this manual, making sure to follow all instructions, and become familiar with the contents to ensure
proper use and easy reference for the future.
DEALER AND TECHNICIAN WARNING
Do not operate or service this wheelchair without consulting this manual. If you do not understand the
instructions or terms in the manual contact customer service for assistance.
In addition, many power wheelchairs have printed circuit boards which must be handled carefully in
accordance with the instruction provided.
LABELS
CAUTION LABEL FOR BATTERIES
WARNING LABEL FOR ELECTRO MAGNETIC
INTERFERENCE (PLACED NEAR CONTROLLER)
LABEL FOR MOTOR RELEASE LEVER
LABEL SHOWING BATTERY DIAGRAM
3 of 30
OWER
1.
2.
3.
4.
5.
6.
7.
8.
9.
10.
HEELCHAIR AND
ARTS
Back Cane – Push Handle
Flip-Up Armrest
Rear Seat Pivot
Free-Wheel Lever (Behind Tire)
Drive Wheel
700 Watt Motor
Backrest
Armrest (Full-Length Pictured)
Swing-Away Joystick
Cushion
11.
12.
13.
14.
15.
16.
Rehab Seat Frame
70° Swing away Footrest Hangers
Caster Fork
Foot Plate (Pictured: Composite FlipUp)
Rear Anti Tip Assembly
Fuse (Under Shroud, Above Left Motor)
7
1
8
10
9
2
12
3
16
15
4
11
5
14
6
13
4 of 30
ASIC AFETY
RECAUTIONS
Make sure to study and comply with all the instructions contained here; failure to comply with these
warnings may result in serious injury and/or damage to the equipment.
1. Prior to use, you should receive training from an authorized dealer and/or a health care advisor on
safety and efficiency.
2. Take time to practice bending, reaching, and transferring while being supervised to familiarize
yourself with the parameters of your new chair – remember to always turn off the power before any
such activity
3. Never try a new maneuver on your own until you have confidence you can complete it safely.
4. Survey and evaluate the areas where you will be using your wheelchair to ensure you know how to
navigate them safely, and noting any hazards that need to be avoided.
5. It is recommended to always use slower speeds during normal use. Always check to make sure the
chair is fully charged prior to use.
6. Always ensure that the wheels roll smoothly and that all parts are working properly prior to use.
Noise, vibrations or changes in ease of driving may indicate loose fasteners or damage to the chair –
contact an authorized dealer for service and repairs.
7. Never use a chair if the joystick does not return to neutral on it’s own or if the joystick or boot is
damaged in any way.
EQUIPENT UIDELINES AND
RECAUTIONS
1. Do not exceed the published weight limit of 400 lbs. Please note the weight limit applies to the user
and all items carried or loaded onto the chair, activities such as lifting weights or towing may damage
the chair and void the warranty.
2. Unauthorized modification of the wheelchair or the use of non-Future Mobility Healthcare
parts may change the performance of the wheelchair and could represent a safety hazard as well as
voiding the warranty.
3. Never travel in a vehicle or transport the chair while sitting in the chair unless properly outfitted with
an EZ Lock or equivalent system. Any seatbelt on the chair is not crash tested and may fail to prevent
movement while in transit. Serious injury or death may result from failing to use authorized lock-down
components.
4. Never transport this chair if unsecured in a cargo space.
5. Do not attach straps or tie downs to the wheels, as the chair may tip over resulting in serious injury
and damage to the wheelchair.
6. Do not stand on the footplates during transfers.
7. Never lift the wheelchair by the armrests or any other detachable component.
8. If the chair is equipped with pneumatic tires, the air pressure in the tires should be checked
frequently and air added when necessary in accordance with the specifications noted on the tires.
Failure to do so will result in loss of performance and pose a safety hazard.
5 of 30
ARNINGS FOR THE
SER
1.YOU ARE CONSIDERED A PEDESTRIAN. Do not attempt to operate the chair on streets or highways.
When crossing the street make sure to make eye contact with motorists and always wait until you are
confident it is safe to proceed.
2.If you are required to use the chair at night or when lighting is poor, use reflective tape on the chair
or reflective clothing to ensure safe visibility.
3.Do not attempt to use the chair to traverse rough terrain; do not use the chair on sandy, wet, oily, or
icy surfaces.
4.DO NOT ATTEMPT any grade steeper than 12° without assistance.
5.Always use curb cut outs or ramps. Attempting to ride over curbs and large obstacles may result in
damage to the chair and risk of injury.
6.Never use the chair on an escalator.
7.Never attempt to stop the progress of the chair by reaching out limbs, or hands; keep your hands and
feet away from the wheels at all times.
8.Always ensure the motors are engaged and chair turned off while transferring, reaching, or bending. Do
9.not attempt to reach out by moving forward in the seat or leaning over the back of the chair.
10. Do not attempt to pick up anything by reaching between your legs, instead carefully lean over the side
while using the armrest for support.
POWER CHAIR ELECTRO MAGNETIC INTERFERENCE
OR wheelchairs may be susceptible to electromagnetic interference (EMI), which is interfering
Power
electromagnetic (EM) energy emitted from sources such as radio stations, TV stations, amateur radio (HAM)
transmitters, two-way radios, and cellular telephones. The interference (from radio wave sources) can
cause a powered wheelchair to release its brakes, move by itself, or move in unintended directions. It can
also permanently damage a powered wheelchair’s control system. The intensity of the interfering EM energy
can be measured in volts per meter (V/m). Each powered wheelchair can resist EMI up to a certain
intensity. This is called its ‘immunity level’. The higher the immunity level, the greater the protection. At
this time, current technology is capable of achieving at least a 20 V/m immunity level, which would provide
useful protection from the more common sources of radiated EMI. This powered wheelchair model as
shipped, with a VR2 PG Drives Technology controller, has an immunity level of 20 V/m.
There are a number of sources of relatively intense electromagnetic fields in the everyday environment.
Some of these sources are obvious and easy to avoid. Others are not apparent and exposure is unavoidable.
However, we believe that by taking into account the warnings that follow, your risk to EMI exposure will be
minimized. The sources of radiated EMI can be broadly classified into three types:
Hand held portable transceivers (transmitters-receivers) with the antenna mounted directly on the
transmitting unit. Examples include: citizens’ band (CB) radios, “walkie-talkies”, security, fire, and police
transceivers, cellular telephones, and other personal communication devices.
6 of 30
NOTE: Some cellular telephones and similar devices transmit signals while they are on, even when not
being used.
Medium-range mobile transceivers, such as those used in police cars, fire trucks, ambulances, and taxis.
These usually have the antenna mounted on the outside of the vehicle.
Long-range transmitters and transceivers, such as commercial broadcast transmitters (radio and TV
broadcast antenna towers) and amateur (HAM) radios.
NOTE: Other types of hand-held devices, such as cordless phones, laptop computers, AM/FM radios, TV
sets, CD players, cassette players, and small appliances, such as electric shavers and hair dryers, so
far as we know are not likely to cause EMI problems to your wheelchair.
Since EM energy rapidly becomes more intense as one moves closer to the transmitting antenna (source),
the EM fields from hand-held radio wave sources (transceivers) are of special concern. It is possible to
unintentionally bring high levels of EM energy very close to a powered wheelchair’s control system while
using these devices. This can affect powered wheelchair movement and braking. Therefore, the warnings
that follow are recommended to prevent possible interference with the control system of the powered
wheelchair.
EMI Warnings
Electromagnetic interference (EMI) from sources such as radio and TV stations, amateur radio (HAM)
transmitters, two-way radios, and cellular telephones can affect powered wheelchairs. Following the
warnings listed below should reduce the chance of unintended brake release or powered wheelchair
movement that could result in serious injury.
1. Do not operate hand-held transceivers (transmitters-receivers), such as citizens’ band (CB) radios, or
turn on personal communication devices, such as cellular telephones, while the powered wheelchair is
turned on.
2. Be aware of nearby transmitters, such as radio or TV stations, and try to avoid coming close to
them.
3. If unintended movement or brake release occurs, turn the powered wheelchair off as soon as it
is safe to do so.
4. Be aware that adding accessories or components, or modifying the powered wheelchair, may make it
more susceptible to EMI (NOTE: There is no easy way to evaluate their effect on the overall
immunity of the powered wheelchair.)
5. Report all incidents of unintended movement or brake release to Future Mobility Healthcare Inc., and
note whether there is a source of EMI nearby.
7 of 30
WHEELCHAIR
AFETY AND
ANDLING
1. Please make use of your Express often and let it expand your horizons. The more mobility your
E x p r e s s brings you, the happier we will be! But, as with all things, observing a few rules will
ensure safe motoring. So please...
2. Do not carry passengers.
3. Do not back up your Express unless the speed governing dial is set to low speed. Never back up onto
uneven inclines or surfaces.
4. Do not turn suddenly at full speed.
5. Do not ride your Express where you cannot safely or legally walk.
6. Do not ride your Express over deep, soft terrain. (e.g. soft dirt, deep grass, loose gravel or
sand)
7. Do not drink alcoholic beverages and then ride.
8. Always approach curbs at a 90 degree angle. Do not stop with rear wheels butting up to the curb,
then accelerate.
9. Always proceed carefully while riding, especially as you approach the downgrade of a ramp or
hill, and while riding on uneven surfaces. When on a downgrade select lower speed setting.
10. Always strap down the wheelchair, then transfer to vehicle seat, fasten safety belt.
11. Please consult your physician or therapist if in doubt about your ability to operate a wheelchair.
RIVING AND
ANDLING NSTRUCTIONS
BASIC DRIVING
Make sure you are properly seated on the Express. Ensure that the Speed Control Dial is turned to slow.
Pull or push on the joystick, as described earlier. You will gently accelerate. Release the joystick and you
will gently stop. Practice these two basic functions until you get used to them.
Steering the Express is easy and logical. Just move your joystick in which ever direction and the wheelchair
will follow. Just be sure to remember to give wide clearance when turning. Try to avoid making rapid turns,
instead make an exaggerated wide arc around the obstacle.
If you must steer in a tight spot, such as entering a doorway or when turning around, stop, turn the speed
dial to slow and gently move the joystick in the direction you wish to travel. After trying this several times
you will gain confidence in the fact that the Express will move gently, and with complete stability.
Backing up requires attention. Be sure your Speed Control Dial is turned to slow before you back up. Pull the
joystick towards you and remember that the E x p r e s s will move in the direction you point the
joystick. Practice is required here.
8 of 30
Going up and down ramps and hills is now simple. To stop, simply release your joystick. Because of the
power of the Express you are able to keep your speed control turned down low so that you have total
control going up or down an incline, ramp or curb.
DISMOUNTING
Stop the Express in a nice flat location with enough room around for you to comfortably dismount. Turn
the power off by depressing the on/off button. The light inside the button should go out. Now you are
ready to dismount.
In Control through the Tight Spots
Chances are good that when you start really using your E x p r e s s you will meet some obstacles that
will require some practice to drive through smoothly.
Here are some common problems, with tips that will help you master them quickly. You will soon be in
control through heavy doors, into and out of elevators, up and down ramps, up and over curbs, through
grass, gravel, and upgrades with surprising ease by following these tips.
In Control In Elevators
To begin with, be aware that elevator doors have a safety mechanism. The door has a rubber protrusion.
When you press the rubber, it moves into the door, and the door stops and then reopens. It will remain open
for a few seconds, or for as long as you keep pressing.
So, if the door does hit the wheelchair, it is soft rubber that makes the contact, and then the door reopens.
Unfortunately, some elevators are rather jerky and unpredictable. The strategy is the same for all of them.
Keep the door from closing by keeping pressure on the rubber for as long as you need. This is easier than it
sounds.
Approach the elevator button and press it. You can use a special button pushing wand to do this without
getting up. Then line yourself up so that you can go through the door quickly and easily when it opens. If
there is a choice of doors, and no indication which will open, position yourself so that you can go through
either one. Going straight in, without turning, works best. If, however, it is a very short elevator, you
may need to turn just a little as you go in. Be sure the back wheel is clear of the door's path. If it is
not, the doors will not close.
When the door opens, gently back out. Back out slowly, avoiding the feet of those who may want to go into
the elevator. Practice makes perfect. In a short time, elevators won't present a problem.
In Control On Ramps
More and more buildings have ramps or wheelchair access. Some have a switchback in the middle, and good
cornering is required.
Always approach hills so that gravity is pulling you either forward or backward. Never let gravity pull you
sideways, as this can be a stability problem. In other words, go straight up, or straight down, but do not
turn on the hill, and do not steer toward one side or the other.
Going down the ramp, keep the dial set to "slow". This will keep you in a safely controlled descent. If you
wish to stop completely, release the joystick. With a little practice, you'll always be in control.
9 of 30
In Control Over Curbs
Chances are good that when you start really using your E x p r e s s you will meet some obstacles that
will require some practice to drive through smoothly.
Most curbs have wheelchair access ramps at intersections. If there are none, and you can't find a driveway
ramp either, you may be able to go over the curb, if it is small enough.
BUT BE CAREFUL. Going up or down a curb must be done ONLY AT A DIRECT 90 DEGREE ANGLE. Always
approach the curb so that both back wheels go over at the same time, in the same way. Never go up or down
hills on an angle. It can cause stability problems.
Going down a curb is simple, but must be done slowly to avoid a jarring thump. Slowly drive the front wheel
over the curb. Use as little power as possible. Next, drive ahead so the back wheels are at the edge
together. Going up a curb, turn your speed adjustment dial up to top speed. Start 2 or 3 feet back from the
curb. Apply power gently, increasing as needed. Steer straight and go straight up. Be prepared to feel a
bump as each tire reaches and climbs the curb.
In Control Over Grass, Gravel, and Grades
Express performs admirably in grass, gravel and on hills. BUT YOU MUST NOT EXCEED THE PARAMETERS SET
DOWN IN THIS MANUAL. Please refer to the rules on page 1. Safety must come first. If you are unsure about
a situation, avoid it.
Feel free to use your Express on lawns or in park areas. Avoid long, unkempt grass. Otherwise, just follow
the rules.
Packed gravel, such as on driveways or roads, will present no problem. Loose, deep gravel should be
avoided, as well as loosely packed sand.
Because of the power of your Express wheelchair, you are able to climb steep hills. But the maximum grade
limit is 22%, or an incline of 22 inches to every 100 inches (shown below). The reason for this is to ensure
proper stability. Remember, read and follow the RULES at the front of this manual.
10 of 30
OWER
HEELCHAIR
ONTROLS
VR2 System (P & G)
Your wheelchair is equipped with a VR2 System from PG Drives.
70 Amp Controller
Ergonomic Joystick Module
Standard LED Display
Dual Push Button Speed Control
Dual Push Button Speed Control
Programmable Drive Modes
Your controls are located on the joystick module, the black box found on the front end of your armrests.
They are as follows:
1. Speed Adjustment Buttons: This allows you to pre-select your desired top speed. They can be set
anywhere between 0 and 6 mph. Push the right hand button to go faster and the left hand button to
slow down. This device will ultimately govern your speed and related settings.
2. On / Off Button: Press it to turn your chair on and off. The button will light up when the power is on.
3. Joystick Control: Use this joystick to control your chair. Simply push forward and your chair will
gently move ahead. Turn in left or right and the E x p r e s s will respond by moving in the
selected direction. If you wish to back up just pull on the joystick and you will begin to move in the
reverse direction.
Optional controls for a leg raising and chair reclining functions. If your chair is equipped with these
functions simply move the toggle switch towards you to raise your feet and/or recline your chair. Hold
it until a comfortable position is achieved and release. Move the toggle switch away from you to
return to the original position.
11 of 30
12 of 30
13 of 30
TRANSFERS
It is potentially dangerous to attempt unaided transfers; exceptional balance and agility is required. To
ensure safety during transfers complete the following steps first:
1. ALWAYS TURN OFF THE CHAIR USING THE POWER BUTTON ON THE JOYSTICK!
2. Work with your health care advisor to learn how to position your body for maximum support, and
always have assistance until you can confidently complete the transfer process repeatedly.
3. Always engage the wheel locks by turning the chair off prior to transfer.
4. Ensure the tire pressure is appropriate and that the wheel locks engage the tires fully.
5. Move the chair as close to the surface you are transferring to (or from) as possible – employ a transfer
board to bridge the distance if you can.
6. Rotate the front casters forward completely.
7. Make sure not to catch your legs or feet on the front frame or leg rest assembly.
14 of 30
8. Remove the armrests if they might interfere with the direction of the transfer.
9. Try to position yourself as far back into the chair as possible when transferring into the chair.
AINTENANCE
TIRE PRESSURE
The rear tire pressure should be kept at 27 psi and the front tire pressure at 25 psi. We recommend a
maintenance check up every 12 - 18 months.
If you have a back problem and the ride seems too bumpy, there are two things that you can do easily to
smooth the ride:
1. Consult the tire pressure guide above and subtract three pounds (psi) from each indicated pressure.
2. A 2" foam cushion can work wonders. You can do this yourself or see us about a specially made
upholstered orthopedic foam seat.
CIRUIT BREAKER
If your wheelchair stops for no apparent reason, it is probably due to the circuit breakers on the batteries.
# 16 on the Diagram
On rare occasion, it happens that there is a temporary overload on the electric circuit. If this happens, the
circuit breakers will pop out. It is merely a matter of pressing them back in, and you're going again. They are
white buttons marked 30. Turn the power off, press the buttons, and turn the power on again. The circuit
breakers can be found underneath the seat of your chair.
CARE OF BATTERIES
Express wheelchairs have two long lasting 12 volt batteries. They are sealed and are maintenance free. The
charger is fully automatic. There is no danger of spillage. They will work or transport in any position.
BATTERY CHARGING
PLEASE, always follow the procedure in this sequence:
1. Turn the on/off button to the off position.
2. Plug the charger into the wall and leave the charger switch turned OFF.
3. The front of the black control box that houses the joystick, speed dial and on/off button has two
outlets in it. Locate the plug that matches the plug on the line from your charger.
4. Take the matching plug (coming from the charger) in one hand. Push the plug in. It is now ready to
charge.
5. Turn the charger switch to the ON position.
6. Be sure the on/off button is turned OFF when you are charging.
15 of 30
7. Leave the batteries charging for 10 to 14 hours. The CHARGING METER will be pointing to zero when
the batteries are fully charged or a green light will glow.
8. If you use your wheelchair at all during the day, put it back on charge when you stop using it. It is fully
automatic, so will not overcharge, and your Express will be ready to give you full service the next
time you use it.
DISCONNECTING THE CHARGER
PLEASE, always follow this order of sequence:
1. Turn the power switch on the charger to the OFF position.
2. Unplug the charger from the wheelchair.
Points To Remember
1. NEVER connect or disconnect the battery charger while the switch is in the on position.
2. ALWAYS turn the on/off button to the OFF position to charge.
INSTALLING BATTERIES
1. Connect Cable for Controller:
- Positive (White) to Battery A Positive
- Negative (Black) to Battery B Negative
2. Connect Cable for Breaker:
- Positive (White) to Battery B Positive
- Negative (Black) to Battery A Negative
16 of 30
REMOVING BATTERIES
When removing the batteries, be sure to disconnect the Breaker Line first, then disconnect the Controller
Line next.
MAINTAIN PERFORMANCE
To keep the chair functioning as efficiently as possible pay attention to the following procedures and
conditions for your routine:
SAFETY CHECKLIST
The following items should be checked routinely to ensure optimal and safe performance of your wheelchair.
If any of these things are not as outlined contact your dealer for service.
1. Wheelchair roles straight – does not pull right or left.
2. Inspect frame for loose or missing hardware, as well as bent or damaged portions of the frame or
cross braces.
3. Inspect the seat and back upholstery for rips or stretched mounting points.
4. Rear wheels should spin easily and with low vibrations and wobbles .
5. Front casters should spin freely and with no wobble.
6. Tires should be inflated to the pressure specified on the tire.
7. Free Wheel Levers should release the wheels entirely and when the chair is off and hold the wheels
securely when the chair is turned off while in gear.
CLEANING
1. Clean the frame with mild soap every season, or after any exposure to muddy or oily surfaces.
2. Clean the areas around the axles and moving parts with a slightly damp cloth.
3. Hand wash removable seating elements and hang to dray. Wipe the seat upholstery with a damp cloth
and a mild disinfectant cleaner.
STORAGE
1. Store the wheelchair in a clean, dry area preferably indoors.
2. Inspect the wheelchair fully if stored for longer than two weeks and have the wheelchair fully
serviced by your authorized dealer if stored for longer than three months.
17 of 30
DJUSTMENTS AND
ITTING
Front Caster Service Procedures
1. Loosen & Remove Caster Journal Nuts
3. Coat Lower Bearing Seat with
High Viscosity Grease
5. Slide Lower Caster Bearing onto
Base of Caster Journal
2. Remove & Clean Caster Journal
4. Base of Caster Journal with High
Viscosity Grease
6. Re-Install Caster Journal
18 of 30
7. Coat Upper Bearing Seat with
High Viscosity Grease
9. Ensure Upper Bearing is Properly
Seated & Coat with Grease
8. Slide Upper Caster Bearing into
Upper Caster Bearing Seat
10. Replace Remaining Parts &
Tighten Nuts to Suitable Tension
Installing Anti Flutter Kit
1. With Caster Journal Removed, Place
Anti-Flutter Spring in Journal Shaft
2. Re-Install Caster Journal & ReAssemble Caster as Outlined Above
19 of 30
Changing the Seat Width
1. Remove Seat Pan
2. Tilt Seat Up (see Changing Front Seat Height if no power tilt)
3. Remove Bolts from Adjustment Rods
4.
5.
6.
7.
Remove Bolts from Rigidizer Bar
Slide Seat Rails Out or In to desired width (by 1” Increments).
Replace Bolts in Adjustment Rods
Replace Bolts in Rigidizer Bar
NOTE: Squeeze back-canes to restore tension.
8. Restore Seat Position to Level
9. Replace Seat Pan
Adjusting the Seat Depth
1. Remove Seat Pan (See Changing Seat Width)
2. Remove Armrests as Required (See Adjusting Infinity Arms)
3. Remove nuts and bolts from outside seat rails
20 of 30
4. Place Back Assembly to Desired Depth
5. Replace Bolts in Seat Rails and Replace Nuts.
Adjusting Infinity Arms
•
To adjust starting depth, remove bolts from under seat rails and mount in desired
position
• To Adjust Height an/or Position of Armpads
1. Loosen nuts on rod receivers until rods can slide with moderate force
2. Position Armrest as desired
3. Tighten Nuts on Rod Receivers until Rods are firmly held in place – DO NOT OVER
TIGHTEN!
Adjusting Rear-Mounted Arms
•
•
To adjust armrest depth, remove bolts from under seat rails and mount in
desired position (see Adjusting Infinity Arms)
To Adjust Height an/or Position of Armpads
1. Loosen hex head bolts on Adjustment Plate of base.
2. Slide Upper Arm to desired height
21 of 30
3. Tighten hex head bolts.
Adjusting Back Rest Angle
1. Remove the bottom bolt and nut holding the Push Cane to the Back Adjustment plate.
2. Repeat for other side of wheelchair.
3. Reference the hole chart for the back adjustment plate and rotate the back rest to the
desired angle ( 87°(a) ,95°(b) ,102°(c) ,110°(d) ,118°(e) ,125°(f) ,or 132°(g) )
4. Place the bottom bolt and nut through the Push Cane and Back Adjustment plate into the
desired hole location and fasten using an allen key and wrench.
5. Ensure the new hole location is the same on both sides of the chair to avoid misalignment
of the back rest.
Remove
bottom
bolt
Remove
bottom nut
and cap
Back
Side
A
87°
B
95°
C
102°
D
110°
E
118°
F
125°
G
132°
Back adjustment plate hole chart
Adjusting Centre of Gravity
1. Remove Seat Pan (See Changing Seat Width)
2. Locate Bolts which secure outside seat rails to width adjustment rods NOTE: Often, the
rear bolts also secure the backrest plates to the outside seat rails; additional adjustments
may be required.
22 of 30
3. Remove the bolts from the ends of the width adjustment rods and outside seat rails.
4. Place outer seat rail assembly in desired location (usually 1” forward or back is a
significant enough change)
5. Replace bolts through outside seat rails into width adjustment rods
Set-Up Front Caster
•
To increase or decrease the resistance of the front suspension spring:
1. Loosen the bolts on the adjustment plate of the top spring mount
23 of 30
2. For increased tension and greater stability, slide the top mount plate forwards as
allowable by the slots.
3. For decreased tension and easier obstacle clearance, slide the top mount plate back as
allowable by the slots.
•
To adjust the height of the front anti-tip caster:
OPTIONAL: Remove drive wheel for easier access to the swing arm/motor mount arm. (See
Remove Wheels and Motors below)
1. Lift up front ant-tip caster and block up in raised position (about a 3.5” block is ideal).
2. Locate the flat tab at top of opposite side of swing arm from the anti-tip wheel.
3. Above tab is a rubber stopper with an embedded bolt
4. Turn the rubber stopper tighter to lower front anti-tip or loosen to raise the height of
front-anti tip at rest.
Change Front Seat Height
1.
2.
3.
4.
Loosen bolt passing through slider under centre of seat
Tilt Front of Seat to achieve desired height and angle
Tighten bolt, ensuring that the lock washer is fully compressed
Test by applying firm pressure to front of seat pan before loading
Adjust Swing-Away Footrests
•
To change the Length of the Footrests:
24 of 30
1. Remove the two or three bolts at the rear of the Leg Rest Hanger
2. Locate desired foot location
3. Replace bolts into Leg Rest Hanger and Threaded Insert
•
To adjust the Swing Away Legrests position (depth)
1. Press Legrest Release Lever downwards to swing away the Legrest and Lift off Receiver
to remove legrest.
2. Remove bolts underneath Receiver which attach the Receiver to the Outside Seat Rails of
the Rehab Seat.
3. Position the Receivers forwards or backwards to achieve desired footrest position
4. Make sure to hand tighten the bolts then replace the Legrest onto the receiver to check
that the Casters can turn freely without hitting the footplates.
5. Once checked for Caster clearance, tighten the bolts in the Receiver
Adjust the Suspension Dampener
1. OPTIONAL: Remove drive wheel for easier access to the swing arm/motor mount arm.
(See Remove Wheels and Motors below)
2. Lift up front ant-tip caster and block up in raised position (about a 3.5” block is ideal).
3. Push down on motor mount arm to allow suspension cone to decompress
4. Rotate suspension cone by hand to adjust firmness and travel (down = less travel)
25 of 30
Remove Wheels and Motors
1. Lift up the side of the base you want to remove the wheel and/or motor from.
2. Place block underneath frame so wheel can spin freely without touching the ground
3. Remove Plastic Cover from Centre of Drive Wheel
4. With motors in gear and chair turned off, loosen and remove the lock nut in the centre of
the Drive Wheel holding the Drive Wheel and hub onto the motor shaft.
5. Carefully slide the Drive Wheel and Hub off the Motor Shaft being careful not to lose the
key.
6. Then, if the motors must be removed as well, remove the Allan Key bolts which hold the
motor gearbox case onto the Swing Arm/Motor Mount
26 of 30
7. To completely remove motors, it will be necessary to remove the Front Cover Plate and
Controller Mount and unplug the Motor from the Controller.
Power Tilt Option – “CG Tilt”
1. The power tilt option on the Express wheelchairs allows the client to control the tilt angle
of the wheelchair seat from 0° to 45° though the use of the VR2 or RNET joystick and a
Linak Actuator which connects to the seat frame.
2. The VR2 joystick has two extra buttons near the bottom which can either be pressed to
initiate the tilt mode operation. One should see two small lights come on red. At this
point the wheelchair is in tilt mode and can’t be driven forward or backwards until either
of the two extra buttons are pressed.
Red lights
indicate tilt
mode is on
Buttons used
to Initiate tilt
mode
3. Once the tilt has initiated the client places their fingers on the joystick and push
backwards to tilt the seat backwards to a desired angle. Incase the client wants to
tilt the seat forwards(or reduce the tilt angle) they would place their fingers on the
joystick and push forwards. Ensure when tilting the chair that there not no obstacles
either in front or behind the client which maybe damaged or cause injury to the client
which they are tilting the wheelchair.
Increase tilt angle
Reduce tilt angle
27 of 30
Wheelchair at 0° tilt
Wheelchair at 25° tilt
Wheelchair at 45° tilt
4. Prior to driving the wheelchair ensure that the wheelchair is brought down to 0° tilt
so that the wheelchair can be driven in a proper and safe manner.
28 of 30
ISCLAIMER
Future Mobility Healthcare Inc. and Ranger Wheelchairs Ltd. are not responsible for any damage or injury
incurred due to improper or unsafe use of the Express Power Wheelchair. Mechanical or electrical defects
will be dealt with on a contingent liability basis. The part or parts will be replaced, but no responsibility
for any damage or injury can be implied to Future Mobility Healthcare Inc. or Ranger Wheelchairs Ltd. .
Future Mobility Healthcare Inc.
3223 Orlando Drive
Mississauga, Ontario L4V 1C5
Phone: 1-888-737-4011, Fax 1-866-670-3377
www.future-mobility.com
Ranger Wheelchairs Ltd.
#16 - 14722 64th Ave
Surrey, BC V3S 1X7
Phone: 1-888-745-7888, Fax 1-866-497-4337
www.rangerwheelchairs.com
29 of 30
IMITED
ARRANTY
The Express Power Chair is built with safety and comfort in mind. This warranty is to make it easy to enjoy new
freedom and independence on your Express.
Ranger Wheelchairs Ltd. warrants the Express Power Chair against defects in parts and workmanship for a
period of two full years from the date of delivery. This includes all components which were installed at our
factory. The Power Chair frame is warranted against structural fault for five years. This manufacturer's
warranty covers replacement parts. Any alteration to the wheelchair voids the warranty.
Ranger Wheelchairs Ltd. further guarantees that your authorized dealer is prepared to provide SPEEDY SERVICE
and repairs within and beyond the scope of this warranty. Pick-up and delivery to ANY AUTHORIZED DEALER is
your responsibility, but your dealer will be happy to do this at a minimal cost. This warranty is not transferable
because your Express is assessed as being appropriate for your needs.
Enjoy the superior quality of your Express Power Chair. Dependability and service are the hallmarks of the
Express Power Chair and the company that stands behind it.
30 of 30