Transcript
LIGHTING SYSTEMS
HEADLIGHT ADJUSTMENT
A5U091851030W01
1.
2.
3.
4.
5.
6.
Adjust the tire air pressure to the specification.
Position the unloaded vehicle on a flat, level surface.
Seat one person in the driver's seat.
Position the vehicle straight ahead and perpendicularly to a wall.
Set the headlights 3 m {10 ft} from the wall.
While adjusting one headlight, disconnect the
connector of the other.
7. Start the engine to charge the battery.
Z5U918WA1
8. Adjust the headlights by turning the adjusting
screws as shown in the figure. Loosen the screws
first, then tighten them.
Note
• If the adjusting screws are tightened first,
then loosened, they will continue to loosen
when the vehicle is in motion and may cause
the headlights to become misaligned.
End Of Sie
Z5U918WA2
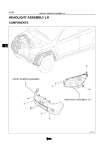
FRONT COMBINATION LIGHT REMOVAL/INSTALLATION
A5U091851060W01
1. Disconnect the negative battery cable.
2. Remove the front bumper. (See 09–10–5 FRONT BUMPER REMOVAL/INSTALLATION.)
3. Remove in the order indicated in the table.
1
2
3
Connector
Bolt
Front combination light
4. Install in the reverse order of removal.
5. Adjust the headlight aiming. (See 09–18–2
HEADLIGHT ADJUSTMENT.)
End Of Sie
Z5U918WA6
HEADLIGHT BULB REMOVAL/INSTALLATION
A5U091851030W02
1. Disconnect the negative battery cable.
2. Remove in the order indicated in the table.
1
2
3
Connector
Headlight bulb (Low)
Headlight bulb (High)
Caution
• A halogen bulb generates extremely high
heat when it is used. If the surface of the
bulb is soiled, excessive heat will build
up and the light's life will be shortened.
When replacing the bulb, hold the metal
flange, not the glass.
3. Install in the reverse order of removal.
End Of Sie
09–18–2
Z5U918WAB