1
•
JOB SHEET 62
Diagnosing Lighting System Problems
Name: ----------------------------
Station: ______________
Date: _____
NATEF Correlation
This Job Sheet addresses the following NATEF task{s):
6.E.l
Diagnose the cause of brighter than normal, intermittent, dim, or no light operation;
determine necessary action. (P-1)
6.E.3
Inspect and diagnose incorrect turn signal or hazard light operation; perform necessary
action. (P-2)
Performance Objective(s)
Upon completion of this Job Sheet, you will be able to understand how to properly test the headlight and
turn signal circuits for improper circuit operation.
.DMM
Tools and Materials
Service manual
Technician's tool set
Vehicle
Charging system tester
Battery tester
Protective Clothing/Equipment
Goggles or safety glasses with side shields
Describe the vehicle being worked on:
Year
Make
Model
VIN
Engine type and size
PROCEDURE
1. Test the operation of the headlights and turn signals. Do they appear brighter or dimmer than usual?
•
2. Sometimes the headlights will be brighter than normal due to an overcharged battery. Dimmer than
normal headlights can be caused by several circuit defects including a low battery charge or a charging system malfunction. Refer to Job Sheets #46 and #55 to test the battery and charging system for
malfunctions and overcharging.
Task Completed _ _ __
228
© 2012, Cengage Learning, Inc. Licensed for one-time use by the purchaser only; no additional copying or retransmission is permitted .
Job Sheet 62
•
229
3. Are the battery and charging system operating properly?
4. If the battery is charged properly, check the voltage drop on the ground side of the headlight for
dimmer than usual headlights. What was your voltage reading?
5. Check the voltage at the positive (insulated) side of the headlight. What is the voltage reading?
6. Remove the test meter and reconnect the connector. With the headlights on, wiggle the connector
and wiring harness. Did the lights have intermittent operation?
7. Based on your test results, describe the condition of the headlight circuit.
8. With the key on, turn on the turn signals and note the blinking speed and light operation. A difference in blink rate can indicate that a bulb is inoperative. Explain what you found .
•
9. The hazard lights should operate with the key off. Activate the hazard switch and check all external
hazard lights.
Note: Keep your foot off the brake pedal.
Task Completed _ _ __
10. What could cause the turn signals to work but not the hazards?
Problems Encountered
INSTRUCTOR EVALUATION
0
D
•
D
0
D
•
4
3
2
1
0
Mastered Task
Able to Perform Task Independently; Some Additional Training Suggested
Able to Perform Task with Close Supervision; Requires Additional Training
Unable to Perform Task
Not Attempted
© 2012, Cengage Learning, Inc. Licensed for one-time use by the purchaser only; no additional copying or retransmission is permitted.
230
Job Sheet 62
.Comments
Instructor Name:
Date: ________
Instructor Signature: - - - - - - - - - - - - - - - - - - - - - - - - - - - - - - - - -
•
•
© 2012, Cengage Learning, Inc. Licensed for one-time use by the purchaser only; no additional copying or retransmission is permitted.
•
JOB SHEET 63
Headlight Aiming
Name: --------------------------- Station: ---------------------
Date: _______
NATEF Correlation
This Job Sheet addresses the following NATEF task(s):
6.E.2
Inspect, replace, and aim headlights and bulbs. (P-2)
Performance Objective(s)
Upon completion of this Job Sheet, you will be able to understand how to properly aim headlights.
Tools and Materials
•
Service manual
Technician's tool set
Headlight aiming kit
Protective Clothing/Equipment
Goggles or safety glasses with side shields
Describe the vehicle being worked on:
Year
Make
Model
VIN
Engine type and size
PROCEDURE
1. Place the vehicle on a level working surface. Install the aiming unit on the headlight lens. Calibrate
the aiming unit according to the manufacturer's instructions.
Task Completed _ _ __
2. Check the tire pressures.
~~---R_F__+-__L_F__~___RR__-+___L_R__~
3. Adjust the tire pressure to the correct pressure.
•
Task Completed _ _ __
4. Check the cargo/trunk area. Unload if necessary.
Task Completed _____
231
© 2012, Cengage Learning, Inc. Licensed for one-time use by the purchaser only; no additional copying or retransmission is permitted.
232
Job Sheet 63
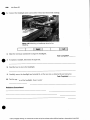
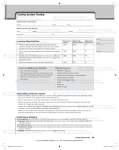
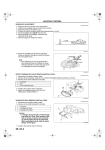
Figure 33.32 Attaching a head lamp aimer to the
headlamp.
Right
Left
6. Make the necessary adjustments to align the headlights.
Task Completed _ _ __
•
7. To replace a headlight, determine the type first.
8. Describe how to remove the headlight.
9. Carefully remove the headlight and reinstall it, or the new one, as directed by your instructor.
Task Completed _ _ __
10. Test the operation of the headlight. Does it work?
Problems Encountered
•
© 2012, Cengage Learning, Inc. Licensed for one-time use by the purchaser only; no additional copying or retransmission is permitted .
Job Sheet 63
•
233
INSTRUCTOR EVALUATION
0
0
0
0
0
4
3
2
1
0
Mastered Task
Able to Perform Task Independently; Some Additional Training Suggested
Able to Perform Task with Close Supervision; Requires Additional Training
Unable to Perform Task
Not Attempted
Comments
InstructorName: ------------------------------------------------ Date: ______________
InstructorSignature: -----------------------------------------------------------------
•
•
© 2012, Cengage Learning, Inc. Licensed for one-time use by the purchaser only; no additional copying or retransmission is permitted .
•
JOB SHEET 64
Inspecting High-Intensity Discharge Headlights
Name: --------------------------- Station: ---------------------
Date: ________
NATEF Correlation
This Job Sheet addresses the following NATEF task(s):
Identify system voltage and safety precautions associated with high-intensity discharge
headlights. (P-2)
6.E.4
Performance Objective(s)
Upon completion of this Job Sheet, you will be able to understand how to properly inspect a vehicle that
has high-intensity discharge (HID) headlights and how to work safely around them.
Tools and Materials
•
Service manual
Technician's tool set
Vehicle with HID headlights
Protective Clothing/Equipment
Goggles or safety glasses with side shields
Describe the vehicle being worked on:
Year
Make
Model
VIN
Engine type and size
PROCEDURE
1. Use the service manual to find out if this vehicle has a fail-safe mode. If so, describe how it works.
2. Describe the construction and operation of the HID light bulb system in this vehicle .
•
234
© 2012, Cengage Learning, Inc. Licensed for one-time use by the purchaser only; no additional copying or retransmission is permitted .
Job Sheet 64
•
235
3. List five safe work practices when working with HID lighting systems.
4. How many volts may be present at the high-voltage socket when the lights are on?
5. List any other precautions that the manufacturer gives for HID lights.
Problems Encountered
•
INSTRUCTOR EVALUATION
0
0
0
0
0
4
3
2
1
0
Mastered Task
Able to Perform Task Independently; Some Additional Training Suggested
Able to Perform Task with Close Supervision; Requires Additional Training
Unable to Perform Task
Not Attempted
Comments
InstructorName: ------------------------------------------------
•
Date: ______________
Instructor Signature: ------------------------------------------------------------------
© 2012, Cengage Learning, Inc. Licensed for one-time use by the purchaser only; no additional copying or retransmission is permitted.