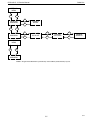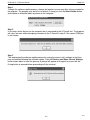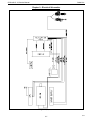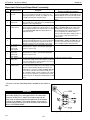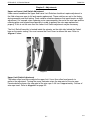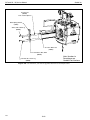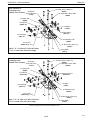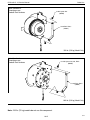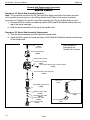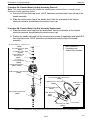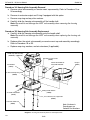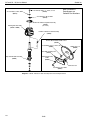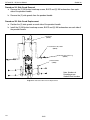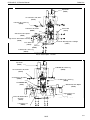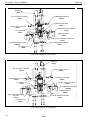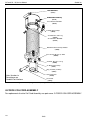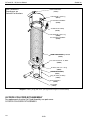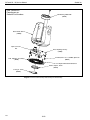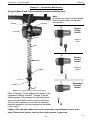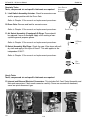
1
®
Service
Manual
G-Force®
Q and iQ Series
All Capacities
Gorbel® Dealer __________________________________________
Gorbel® Customer Order No. __________________________
Serial No. __________________________________
Date _______________________________
Month
Year
G-Force® Q - iQ Service Manual
Gorbel Inc.
Index
Page
Chapter 1 - Safe Hoist Operating Guidelines . . . . . . . . . . . . . . . . . . . . . . . . . .1-1
Chapter 2 - Technical Specifications . . . . . . . . . . . . . . . . . . . . . . . . . . . . . . . . .2-1
Chapter 3 - Installation Procedure
• Step 1 - Unpacking the G-Force . . . . . . . . . . . . . . . . . . . . . . . . . . . . . . .3-1
• Step 2 - Pre-Assembly / Tools Required . . . . . . . . . . . . . . . . . . . . . . . . .3-1
• Step 3 - Actuator Assembly Installation . . . . . . . . . . . . . . . . . . . . . . . . .3-1
• Step 4 - Coil Cord Installation . . . . . . . . . . . . . . . . . . . . . . . . . . . . . . . . .3-2
• Step 5 - Handle Installation . . . . . . . . . . . . . . . . . . . . . . . . . . . . . . . . . . .3-3
• Step 6 - Electrical Power Connection . . . . . . . . . . . . . . . . . . . . . . . . . . .3-9
• Step 7 - Initial Power-Up . . . . . . . . . . . . . . . . . . . . . . . . . . . . . . . . . . . . .3-9
• Step 8 - Float Mode and Final Steps . . . . . . . . . . . . . . . . . . . . . . . . . .3-10
• Step 9 - Expansion I/O Block Mounting Instructions (Option) . . . . . . .3-12
Chapter 4 - Removal Procedure . . . . . . . . . . . . . . . . . . . . . . . . . . . . . . . . . . . .4-1
Chapter 5 - Control and Programming
• Controls Interface Features . . . . . . . . . . . . . . . . . . . . . . . . . . . . . . . . . .5-1
• Program Mode Overview . . . . . . . . . . . . . . . . . . . . . . . . . . . . . . . . . . . .5-2
• iQ Actuator Input/Output Module Functionality . . . . . . . . . . . . . . . . . . .5-14
• Expansion 8-Point Input/Output Block Functionality . . . . . . . . . . . . . . .5-15
Chapter 6 - Software Update . . . . . . . . . . . . . . . . . . . . . . . . . . . . . . . . . . . . . . .6-1
Chapter 7 - Troubleshooting
• Troubleshooting Procedure . . . . . . . . . . . . . . . . . . . . . . . . . . . . . . . . . . .7-1
• Troubleshooting Section I: Functional Failure Table . . . . . . . . . . . . . . . .7-2
• Troubleshooting Section II: System Fault Diagnostics Chart . . . . . . . . .7-4
• Q-iQ Unit: System, Motion and Feature Command Fault List . . . . . . . .7-8
Chapter 8 - Electrical Schematics . . . . . . . . . . . . . . . . . . . . . . . . . . . . . . . . . . .8-1
Chapter 9 - Adjustments
• Limit Switch Adjustment . . . . . . . . . . . . . . . . . . . . . . . . . . . . . . . . . . . . .9-1
• Wire Rope Replacement Adjustment . . . . . . . . . . . . . . . . . . . . . . . . . . .9-3
• Linear Transducer Adjustment . . . . . . . . . . . . . . . . . . . . . . . . . . . . . . . .9-4
• Slack Spring Adjustment . . . . . . . . . . . . . . . . . . . . . . . . . . . . . . . . . . . . .9-5
Chapter 10 - Parts and Assembly
• Actuator . . . . . . . . . . . . . . . . . . . . . . . . . . . . . . . . . . . . . . . . . . . . . . . . .10-2
• Sliding Handle . . . . . . . . . . . . . . . . . . . . . . . . . . . . . . . . . . . . . . . . . . .10-40
• Pendant Handle . . . . . . . . . . . . . . . . . . . . . . . . . . . . . . . . . . . . . . . . .10-53
• Coil Cords . . . . . . . . . . . . . . . . . . . . . . . . . . . . . . . . . . . . . . . . . . . . . .10-67
• G360™ . . . . . . . . . . . . . . . . . . . . . . . . . . . . . . . . . . . . . . . . . . . . . . . .10-74
• PLC Battery . . . . . . . . . . . . . . . . . . . . . . . . . . . . . . . . . . . . . . . . . . . . .10-80
Chapter 11 - Preventative Maintenance . . . . . . . . . . . . . . . . . . . . . . . . . . . . .11-1
Chapter 12 - Recommended Tools & Parts . . . . . . . . . . . . . . . . . . . . . . . . . . .12-1
7/11
G-Force® Q - iQ Service Manual
Gorbel Inc.
Chapter 1 - Safe Hoist Operating Guidelines
General
There is no one single factor that is more important for
minimizing the possibility of personal injury to the operator
and those working in the area, or damage to property,
equipment, or material than being familiar with the equipment
and using Safe Operating Practices.
7. Avoid sharp contact between two hoists or between hoist
and end stop.
8. Do not tamper with or adjust any parts of the hoist unless
specifically authorized to do so.
9. Never use the load cable as a sling.
10. Do not divert attention from load while operating hoist.
11. Never leave a suspended load unattended.
12. Do not use limit switch(es) for normal operating stop(s).
These are safety devices only and should be checked on
a regular basis for proper operation.
13. Never operate a hoist that has an inherent or suspected
mechanical or electrical defect.
14. Do not use load cable as a ground for welding. Never
touch a live welding electrode to the load cable.
15. Do not jog controls unnecessarily. Hoist motors are
generally high torque, high slip types. Each start causes
an inrush of current greater than the running current and
leads to overheating and current failure, or burnout, if
continued to excess.
16. Do not operate hoist if load is not centered under hoist.
17. Do not operate hoist if cable is twisted, kinked, or
damaged.
18. Do not remove or obscure label.
19. Do not permanently activate operator present sensor.
Hoists/trolleys are designed for lifting and transporting of
material only. Under no circumstances, either during initial
installation or in any other use, should the hoist be used for
lifting or transporting
personnel.
No operator should be permitted to use the equipment that is
not familiar with its operation, is not physically or mentally fit,
or has not been schooled in safe operating practices. The
misuse of hoists can lead to certain hazards which cannot be
protected against by mechanical means; hazards which can
only be avoided by the exercise of intelligence, care, and
common sense.
Safe Operating Practices also involve a program of periodic
inspection and preventative maintenance (covered in a
separate section). Part of the operator’s training should be an
awareness of potential malfunctions/hazards requiring
adjustments or repairs, and bringing these to the attention of
supervision for corrective action.
DO’S - HOISTS
1. Read and follow manufacturer’s instruction, installation,
and maintenance manuals. When repairing or maintaining
a hoist, use only manufacturer’s recommended parts and
materials.
2. Read and follow all instruction and warning information on
or attached to a hoist.
3. Remove the hoist from service and thoroughly inspect and
repair, as necessary, if unusual performance or visual
defects (such as peculiar noise, jerky operations, travel in
improper direction, or obviously damaged parts) are
noticed.
4. Establish a regular schedule of inspection and maintain
records for all hoists with special attention given to hooks,
load cables, brakes, and limit switches.
5. Check operation of brakes for excessive drift.
6. Never lift loads over people, etc.
7. Check for damaged hooks and load cable.
8. Keep load cable clean and well maintained.
9. Check the load cable for improper seating, twisting,
kinking, wear, or other defects before operating the hoist.
10. Make sure a load clears neighboring stockpiles,
machinery, or other obstructions when raising, lowering, or
traveling the load.
11. Center hoist over the load before operating.
12. Avoid swinging of load or load hook when traveling the
hoist.
13. Be sure the load attachment is properly seated in the
saddle of the hook. Balance load properly before handling.
Avoid hook tip loading.
14. Pull in a straight line, so that neither hoist body nor load
cable are angled around an object.
15. Take up slack slowly.
16. Know the hand signals for hoisting, cross travel, and crane
travel if working with cab-operated hoists or cranes.
Operators should accept signals of only those persons
authorized to give them.
Supervision and management also have an important role to
play in any safety program by ensuring that a maintenance
schedule is adhered to, and that the equipment provided for
the operators is suitable for the job intended without violation
of one or more of the rules covering safe operating practices
and good common sense.
The Safe Operating Practices shown are taken in part from
the following publications:
• American National Standard Institute (ANSI)
• Safety Standards for Cranes, Derricks, Hoists
• ANSI B30.2 - Overhead and Gantry Cranes
• ANSI B30.16 - Overhead Hoists
Do’s and Don’ts (Safe Operation of Hoists)
The following are Do’s and Don’ts for safe operation of
overhead hoists. A few minutes spent reading these rules can
make an operator aware of dangerous practices to avoid and
precautions to take for his own safety and the safety of
others. Frequent examinations and periodic inspections of the
equipment as well as a conscientious observance of safety
rules may save lives as well as time and money.
DON’TS - HOISTS
1. Never lift or transport a load until all personnel are clear
and do not transport the load over personnel.
2. Do not allow any unqualified personnel to operate hoist.
3. Never pick up a load beyond the capacity rating appearing
on the hoist. Overloading can be caused by jerking as well
as by static overload.
4. Never carry personnel on the hook or the load.
5. Do not operate hoist if you are not physically fit.
6. Do not operate hoist to extreme limits of travel of cable
without first checking for proper limit switch action.
1-1
7/11
G-Force® Q - iQ Service Manual
Gorbel Inc.
G-Force® Operational Guidelines
All operators should read the G-Force® Installation and Operation Manual before
operating the unit. Please follow the instructions contained in this manual for your
safety and for optimum trouble-free operation of your G-Force®.
1
2
3
4
rce®
G-Fo ation &
ll
ta
s
In
ation
Oper l
ua
n
a
M
5
6
Check the coil cord for
improper seating, twisting,
kinking, wear or defects
before operating.
9
Center G-Force® over
the load before lifting
a load. Do not end
or side load.
Check Wire Rope for
improper seating, twisting,
kinking, wear or defects
before operating.
Read & follow all
instruction & warning
information on or attached
to the G-Force®.
7
The operator’s hand should
not leave the handle grip at
any time the G-Force® is in
use (excluding Float Mode).
10
8
Float Mode - Press the G-Force®
The wire rope should never be
logo button with only the load weight
more than 15° out of vertical
hanging from unit. Applying
while the G-Force® is in use. The
additional force will cause unit to drift. G360™ must be level at all times.
11
What is
Trolley
Saddle?
The distance
from bottom
of wheels to
floor.
Avoid swinging of load
or load hook when
traveling with the
G-Force®.
12
11’
?
Maximum
Trolley
Saddle is
14'.
Do not impact the G-Force®
into end stops repeatedly or at
a speed faster than a normal
walking pace.
7/11
Maximum Trolley Saddle for the
G-Force® with standard in-line slide
handle is 14'. See above drawing
for Trolley Saddle definition.
1-2
The maximum available wire
rope travel for the G-Force® is
11’. For H5 duty cycle the
maximum working stroke is 8’.
Questions about G-Force®?
Call your local Gorbel®
distributor or Gorbel® Customer
Service at (800) 821-0086.
G-Force® Q - iQ Service Manual
Gorbel Inc.
Chapter 2 - Technical Specifications
Series
Maximum Capacity (Load
& Tool)
Maximum Lifting Speed
Unloaded
Maximum Lifting Speed
Fully Loaded
Maximum Float Mode
(Option) Lifting Speed
Maximum Lift Range
Maximum Lift Stroke
Q Series
iQ Series
Q Series
iQ Series
Q Series
iQ Series
Q Series
iQ Series
1320 lb
1320 lb
660 lb
660 lb
330 lb
330 lb
165 lb
165 lb
600 kg
600 kg
300 kg
300 kg
150 kg
150 kg
75 kg
75 kg
50 ft/min
50 ft/min
100 ft/min
100 ft/min
200 ft/min
200 ft/min
30 m/min
30 m/min
61 m/min
61 m/min
75 ft/min
75 ft/min
125 ft/min
125 ft/min
23 m/min
23 m/min
38 m/min
38 m/min
65 ft/min
65 ft/min
103 ft/min
103 ft/min
20 m/min
20 m/min
31 m/min
31 m/min
25 ft/min
25 ft/min
7.47 m/min
7.47 m/min
21 ft/min
21 ft/min
6.40 m/min
6.40 m/min
19 ft/min
19 ft/min
5.79
5.79 m/min
14.94 m/min 14.94 m/min
42 ft/min
42 ft/min
12.80 m/min 12.80 m/min
38 ft/min
38 ft/min
11.58 m/min 11.58 m/min
5.5 ft
5.5 ft
11 ft
11 ft
11 ft
11 ft
11 ft
11 ft
1.68 m
1.68 m
3.35 m
3.35 m
3.35 m
3.35 m
3.35 m
3.35 m
5.5 ft
5.5 ft
8 ft
8 ft
8 ft
8 ft
8 ft
8 ft
1.68 m
1.68 m
2.44 m
2.44 m
2.44 m
2.44 m
2.44 m
2.44 m
Primary Lift Voltage (VAC) 220 +/- 10% 220 +/- 10% 220 +/- 10% 220 +/- 10% 220 +/- 10% 220 +/- 10% 220 +/- 10% 220 +/- 10%
Maximum Current (Amps)
10
10
10
10
10
10
10
10
Duty Cycle
H5
H5
H5
H5
H5
H5
H5
H5
Not Available
24VDC @
0.5A
Not Available
24VDC @
0.5A
Not Available
24VDC @
0.5A
Not Available
24VDC @
0.5A
Power Available for
Tooling
1/4” dia. 19x7 1/4” dia. 19x7 1/4” dia. 19x7 1/4” dia. 19x7 3/16” dia. 19x7 3/16” dia. 19x7 3/16” dia. 19x7 3/16” dia. 19x7
Preformed
Preformed
Preformed
Preformed
Preformed
Preformed
Preformed
Preformed
Stainless Steel Stainless Steel Stainless Steel Stainless Steel Stainless Steel Stainless Steel Stainless Steel Stainless Steel
Wire Rope
Wire Rope
Wire Rope
Wire Rope
Wire Rope
Wire Rope
Wire Rope
Wire Rope
Lifting Media
6.35mm dia.
6.35mm dia.
6.35mm dia.
6.35mm dia.
4.76mm dia.
4.76mm dia.
4.76mm dia.
4.76mm dia.
19x7 Preformed 19x7 Preformed 19x7 Preformed 19x7 Preformed 19x7 Preformed 19x7 Preformed 19x7 Preformed 19x7 Preformed
Stainless Steel Stainless Steel Stainless Steel Stainless Steel Stainless Steel Stainless Steel Stainless Steel Stainless Steel
Wire Rope
Wire Rope
Wire Rope
Wire Rope
Wire Rope
Wire Rope
Wire Rope
Wire Rope
41 - 122° F
41 - 122° F
41 - 122° F
41 - 122° F
41 - 122° F
41 - 122° F
41 - 122° F
41 - 122° F
5 - 50° C
5 - 50° C
5 - 50° C
5 - 50° C
5 - 50° C
5 - 50° C
5 - 50° C
5 - 50° C
Operating Humidity
Range (Non-Condensing)
35 - 90%
35 - 90%
35 - 90%
35 - 90%
35 - 90%
35 - 90%
35 - 90%
35 - 90%
Virtual Limits (Upper
Limit, Power Limit, Speed
Reduction)
Optional
Standard
Optional
Standard
Optional
Standard
Optional
Standard
Operating Temperature
Range
Weight Display Accuracy +/- 1% Rated +/- 1% Rated +/- 1% Rated +/- 1% Rated +/- 1% Rated +/- 1% Rated +/- 1% Rated +/- 1% Rated
(option with Float Mode)
Capacity*
Capacity*
Capacity
Capacity
Capacity
Capacity
Capacity
Capacity
I/O Actuator
Number of Inputs, Type
N/A
8, Sinking
N/A
8, Sinking
N/A
8, Sinking
N/A
8, Sinking
Input Current @ 24 VDC
N/A
6ma
N/A
6ma
N/A
6ma
N/A
6ma
Number of Outputs, Type
N/A
8, FET
N/A
8, FET
N/A
8, FET
N/A
8, FET
Continuous
Current/Channel (Amps)
N/A
0.5
N/A
0.5
N/A
0.5
N/A
0.5
Module Maximum Current
(Amps)
N/A
0.5
N/A
0.5
N/A
0.5
N/A
0.5
Number of Inputs, Type
N/A
8, Sinking
N/A
8, Sinking
N/A
8, Sinking
N/A
8, Sinking
Input Current @ 24 VDC
N/A
4ma
N/A
4ma
N/A
4ma
N/A
4ma
Number of Outputs, Type
N/A
8, FET
N/A
8, FET
N/A
8, FET
N/A
8, FET
Continuous
Current/Channel (Amps)
N/A
0.5
N/A
0.5
N/A
0.5
N/A
0.5
Module Maximum Current
(Amps)
N/A
0.5
N/A
0.5
N/A
0.5
N/A
0.5
Handle with I/O Module
2-1
7/11
G-Force® Q - iQ Service Manual
Gorbel Inc.
Chapter 3 - Installation Procedure
Step 1 - Unpacking the G-Force®
TIP: Packing list can be found in plastic pocket attached to shipping box.
1.1
Carefully remove all items from the box. Important: Save shipping box and all packing
materials.
1.2
Verify that all components listed on the packing slip are included.
1.3
If any items are missing or were damaged during shipping, please contact Gorbel® Inside
Sales immediately at (800) 821-0086 or (585) 924-6262.
Step 2 - Pre-Assembly / Tools Required
2.1
Read entire Operator’s Manual before beginning installation of the G-Force®.
2.2
Tools
•
•
•
•
•
and materials typically needed to install/assemble a G-Force® are as follows:
5mm Allen wrench
• 19mm hex socket
8mm Allen wrench
• Plastic cable tie straps
2.5mm Allen wrench
• Ladders/man lifts
6mm Allen wrench (1320 lb only) • 14mm wrench or hex socket (1320 lb. only)
3mm Allen wrench (1320 lb only) • Snap ring pliers (1320 lb. only)
Step 3 - Actuator Assembly Installation
WARNING
DO NOT lift the actuator by grabbing the blue plastic end covers. To lift the actuator, grab the
handle slots in the trolley.
3.1
The standard G-Force® will come with the wheels
pre-assembled to the actuator trolley (diagram 3A).
When a Gorbel® G-Force® is to be used on a
non-Gorbel® bridge system, a universal adapter
trolley is required (diagram 3B). Note: The customer
must provide two (2) hoist trolleys when the unit will
run in a non-Gorbel® bridge system.
3.2
Ensure the power cord from the actuator is facing the
festooning side of the bridge/monorail. Remove the
end stop from the bridge and install the G-Force®
actuator into the track. Immediately reinstall the end
stop. Verify that the G-Force® trolley wheels are
correct for the style and capacity track that the unit is
being installed on by rolling the actuator assembly
along the full length of the bridge to ensure that the
travel is smooth throughout.
Diagram 3A. Standard Actuator Assembly.
Diagram 3B. Standard Actuator Assembly
with Universal Adapter Trolley.
3-1
7/11
G-Force® Q - iQ Service Manual
Gorbel Inc.
Step 4 - Coil Cord Installation (Standard In-Line Slide Handle, Remote Mounted Slide
Handle and Remote Mounted Pendant Handle)
TIP:
This step is best completed once the actuator has been installed into the bridge system.
CAUTION
Do not rest the actuator on a hard flat surface with the wear ring and/or coil cord
attached. You will damage the coil cord and bend the wear ring bracket which
will cause poor performance.
Note: G-Force® units, standard in-line or remote mounted, that are ordered from
the factory will be shipped with the coil cord assembled to the actuator wear ring
and the coil cord footer, creating the coil cord assembly (diagrams 4A and 4B). In
addition, units ordered with air power will have a 1/4” ID nycoil air hose coil cord
assembled onto the coil cord assembly (not shown).
4.1
Verify the coil cord assembly is correct. There are two coil cord
assemblies: standard and double length. The standard coil cord
assembly is used on systems with a trolley saddle up to 14’
(4.27m) and will measure approximately 8.3” (211.46mm). The
double length coil cord assembly is used on systems with a trolley
saddle greater than 14’ (4.27m) and will measure approximately
16.4” (415.93mm).
4.2
Feed the wire rope from the actuator assembly through the center
of the coil cord assembly.
CAUTION
The connectors on the coil cord are keyed. The connector must be
aligned correctly before it threads into place.
4.3
Use the actuator assembly hardware to fasten the coil cord
assembly to the actuator (diagram 4C). Adjust the coil cord in the
clamps so that the coil cord connector is conveniently located on
the proper side of the actuator assembly.
Note: The orientation of the coil cord
must be correct so that the connector is
located properly (diagram 4D).
4.4
Thread the coil cord connector into
the actuator connector (diagram 4D).
4.5
Ensure that the coils of the coil cord
are centered around the wire rope
when properly installed.
4.6
Use the 16mm shoulder bolt and M12
jam-nut to retain the coil cord footer
to the thimble in the wire rope.
Note:: The shoulder bolt and
jam-nut will be used to retain the
handle or collector in the next step.
Diagram 4A. Standard Coil
Cord Assembly.
Diagram 4B. Double
Length Coil Cord
Assembly.
Diagram 4C. Coil Cord Assembly Diagram 4D. Coil Cord Assembly
Installation at the Actuator.
Installation (Bottom).
(black center not shown)
4.7
If applicable, connect air hose coil cord to supply line from the actuator assembly. The air hose coil
cord is provided with two (2) 1/4” NPT male swivel fittings located at both ends of the air hose.
4.8
For
For
For
For
For
For
7/11
standard in-line slide handle installation, go to Step 5A, page 3-3.
remote mounted slide handle installation, go to Step 5B, page 3-3.
suspended pendant handle installation, go to Step 5C, page 3-5.
remote mounted pendant handle installation, go to Step 5D, page 3-5.
1320 lb. in-line slide or remote mounted handle installation, go to Step 5E, page 3-7.
1320 lb. suspended pendant handle installation, go to Step 5F, page 3-8.
3-2
G-Force® Q - iQ Service Manual
Gorbel Inc.
Step 5A - Standard In-Line Slide Handle Installation
5A.1 Ensure the wire rope is still fed
through the center of the coil
cord. Hold the slide handle just
16 mm Shoulder Bolt
below the coil cord.
5A.2 Center the coil cord footer
between the ears of the slide
handle swivel. Note: Make sure
the fin of the coil cord footer is
on the opposite side of the slide
handle connector.
Wire Rope
Coil Cord Footer
M12 Jam Nut
Slide Handle Connector
5A.3 Remove the 16mm shoulder
bolt from the coil cord footer
and wire rope and allow the coil
cord footer and wire rope to
slide down into the slide handle
swivel.
**COIL CORD
HAS BEEN
REMOVED FOR
CLARITY
Diagram 5A. Slide Handle, Shoulder Bolt and Coil Cord
5A.4 Once the wire rope, coil cord footer and slide handle swivel are aligned, replace the 16mm
shoulder bolt, thereby capturing the wire rope, coil cord footer and slide handle (diagram
5A).
5A.5 Thread the coil cord connector into the slide handle connector (diagram 5A).
5A.6 Thread the M12 jam nut onto the 16mm shoulder bolt.
5A.7 Check that the coils of the coil cord are centered around the wire rope when properly
installed.
5A.8 Continue to Step 6 on page 3-9.
Step 5B - Remote Mounted Slide Handle Installation
5B.1 Ensure the wire rope is still fed
through the center of the coil cord.
Hold the G360™ swivel just below the
16 mm Shoulder Bolt
coil cord assembly.
5B.2 Center the coil cord footer between
the ears of the G360™ swivel. Note:
Make sure the fin of the coil cord
footer is on the opposite side of the
G360™ connector.
Wire Rope
Coil Cord Footer
M12
Jam Nut
M8 Jam
Nut
**COIL CORD HAS BEEN
REMOVED FOR CLARITY
5B.3 Remove the 16mm shoulder bolt from
the coil cord footer and wire rope and
allow the coil cord footer and wire
rope to slide down into the G360™
swivel.
G360 Swivel
STRAIN-RELIEF CLAMP - MUST BE USED
TO PREVENT DAMAGE TO G360.
Diagram 5B. G360™, Shoulder Bolt and Coil Cord.
3-3
7/11
G-Force® Q - iQ Service Manual
Gorbel Inc.
Step 5B - Remote Mounted Slide Handle Installation (Continued)
5B.4 Once the wire rope, coil cord footer
and G360™ swivel are aligned,
replace the 16mm shoulder bolt
thereby capturing the wire rope,
coil cord footer and G360™ swivel
(diagram 5B, page 3-3).
5B.5 Thread the coil cord connector into
the G360™ connector (diagram
5B, page 3-3).
5B.6 Thread M12 jam nut onto the
16mm shoulder bolt.
Diagram 5C. Tooling Installation.
5B.7 Check that the coils of the coil cord are centered around the wire
rope when properly installed.
5B
A pilot hole is provided for the locking pin. Attach tooling to
G360™ utilizing M16 thread. The tool bolt/rod thread should
be beyond pilot hole of shaft when fully engaged. Using a
#21 drill bit, drill through the tool bolt/rod thread and out
the other side of G360™ shaft. Hammer pin into place
thereby locking tooling to G360™ (diagram 5C).
2X M16 Hex
x 30mm Lg.
Head Cap Screw
2X M16
Lockwasher
2X M16
Flatwasher
2x M16 Hex Head Cap Screw
2x M16 Lockwasher
2x M16 Flatwasher
Slide Handle,
Remote Mounted
Configuration
5B.9 Assemble the remote mounted slide handle inside the remote
mount bracket using the hardware provided (diagram 5D).
Note: This step is best completed on a workbench prior to
mounting handle to tooling.
WARNING
Remote mounted G-Force® handles must be mounted at both
the top and bottom of the handle assembly. Failure to mount the
remote mounted handle at top and bottom can result in poor
performance and/or premature component failure.
Remote
Mount Slide
Handle
Bracket
Diagram 5D. Remote
Mounted Slide Handle,
Exploded View.
5B.10 Attach the remote mounted handle with bracket to the tooling. Assure that the mounting
arrangement does not affect the operating function of the slide handle.
5B.11 Connect the extension cable from the G360™ to the remote mounted slide handle.
Securely clamp the remote mount coil cord extension cable to the tooling as needed.
CAUTION
All cables used in a remote mounted handle configuration must be properly clamped
and/or strain-relieved to prevent premature failure of the G-Force® or customer tooling.
CAUTION
Take care to avoid looping excess cable at locations where the loop could catch on foreign
objects.
5B.12 Continue to Step 6 on page 3-9.
7/11
3-4
G-Force® Q - iQ Service Manual
Gorbel Inc.
Step 5C - Suspended Pendant Handle Installation
5C.1 Assure that the coils of the pendant handle coil
cord are centered around the pendant handle wire
rope.
5C.2 Remove the eyebolt from suspended pendant
cable assembly using the threaded connector.
Eyebolt With Hexnut
5C.3 Thread the eyebolt into the bottom of the actuator
assembly as shown (diagram 5E).
Actuator Connector
Cable Assembly
Connector
Suspended Pendant
Cable Assembly
5C.4 Reattach the suspended pendant cable assembly
to the eyebolt via the threaded connector.
5C.5 Adjust the suspended pendant cable assembly so
that there is a service loop in the wiring cable and
there is no tension in the wire cable.
5C.6 Thread the cable assembly connector into the
actuator connector (diagram 5E).
Diagram 5E. Assembly of Suspended Pendant
Cable Assembly to Bottom of Actuator Assembly.
Wire Rope
Cotter Pin
5C.7 Remove the cotter pin and clevis from the wire rope
swivel assembly.
5C.8
Threaded Connector
Clevis Sleeve
Clevis
Reinsert the clevis and cotter pin capturing the wire rope
thimble in the swivel assembly (diagram 5F).
Wire Rope Swivel
Assembly
5C.9 Continue to Step 6 on page 3-9.
Step 5D - Remote Mounted Pendant Handle Installation
5D.1 Ensure the wire rope is still fed through the center
of the coil cord. Hold the G360™ swivel just below
the coil cord.
Diagram 5F. Cotter Pin, Clevis, Wire Rope
Swivel Assembly and Wire Rope Thimble.
5D.2 Center the coil cord footer between the ears of the
G360™ swivel. Note: Make sure the fin of the coil cord footer is on the opposite side of
the G360™ connector.
5D.3 Remove the 16mm shoulder bolt from the coil cord footer and wire rope and allow the coil
cord footer and wire rope to slide down into the G360™ swivel.
5D.4 Once the wire rope, coil cord footer and G360™ swivel are aligned, replace the 16mm
shoulder bolt thereby capturing the wire rope, coil cord footer and G360™ swivel (diagram
5G, page 3-6).
3-5
7/11
G-Force® Q - iQ Service Manual
Gorbel Inc.
Step 5D - Remote Mounted Pendant Handle Installation (Continued)
5D.5 Thread the coil cord connector into the
G360™ connector (diagram 5G).
Wire Rope
Coil Cord Footer
5D.6 Thread the M12 jam nut onto the
16mm shoulder bolt.
16 mm Shoulder Bolt
5D.7 Check that the coils of the coil cord
are centered around the wire rope
when properly installed.
M12
Jam Nut
M8 Jam
Nut
5D.8 A pilot hole is provided for the locking
pin. Attach tooling to G360™ utilizing
M16 thread. The tool bolt/rod thread
should be beyond pilot hole of shaft
when fully engaged. Using a #21 drill
bit, drill through the tool bolt/rod thread
and out the other side of G360™
shaft. Hammer pin into place thereby
locking tooling to G360™ (diagram
5H).
G360 Swivel
**COIL CORD HAS BEEN
REMOVED FOR CLARITY
STRAIN-RELIEF CLAMP - MUST BE USED
TO PREVENT DAMAGE TO G360.
Diagram 5G. G360™, Shoulder Bolt and Coil Cord.
5D.9 Attach the pendant handle bracket
directly to the tooling. Assure that the
mounting arrangement does not affect
the operating function of the pendant
handle. Note: If necessary, a collar
clamp mounting bracket option can be
used to attach the pendant handle to
the tooling (diagram 5I).
5D.10 Connect the extension cable from the
G360™ to the remote mounted pendant
handle. Securely clamp the remote mount
coil cord extension cable to the tooling as
needed.
Diagram 5H. Tooling Installation.
REMOTE MOUNTED PENDANT HANDLE
CLAMP COLLAR
CAUTION
All cables used in a remote mounted
handle configuration must be properly
clamped and/or strain-relieved to prevent
premature failure of the G-Force® or
customer tooling.
CAUTION
Take care to avoid looping excess cable
at locations where the loop could catch
on foreign objects.
5D.11 Continue to Step 6 on page 3-9.
7/11
3-6
Diagram 5I. Remote Mounted Pendant Handle with Collar
Clamp Mounting Bracket (Option).
G-Force® Q - iQ Service Manual
Gorbel Inc.
Step 5E - 1320 lb. Inline Slide & Remote Mounted Handle Installation
5E.1 With the actuator hanging from rail or other support
structure, thread the free end of the wire rope
through the wear ring bracket and use the supplied
hardware to attach the bracket to the actuator.
5E.2 Thread the free end of the wire rope through the coil
cord assembly so it hangs below the coil cord
mounting plate and attach the wear ring bracket
using the supplied hardware (diagram 5J).
W EAR RIN G
(76764)
2X 03370
2X 65112
2X 65028
2X 03370
2X 79150
C O IL C O RD
5E.3 Insert Turck connector on coil cord into mating
connector on the underside of the actuator.
2X 79150
2X 65032
5E.4 Grab the free end of the wire rope and loop it up
towards the underside of the actuator, ensuring there
are no twists or kinks in the rope. Feed the U-bolt
through the wire rope thimble and insert the U-bolt
into the appropriate holes in the reinforcement plate.
Using supplied hexnuts, securely tighten U-bolt to
the plate (diagram 5K).
5E.5 Attach the plate to the underside of the actuator
using the supplied cap screws, lockwashers, and
spacers as shown and ensure hardware is now
completely tightened. (If an air hose is being
installed, leave hardware loose for now.)
83253
79150
65032
W IRE RO PE ASSEM BLY
Diagram 5J. Assembly of Wire Rope to 1320
lb. Actuator Assembly.
4X 83260
83252
4X 00195
5E.6 While holding the handle or G360™, loop the
pulley through the wire rope and slip the pulley and
side spacers down between the plates (diagram
5L, page 3-8).
5E.7 Align the holes in the plates with the spacers and
the bearings, insert the pulley pin, and install the
snap ring on the pulley pin.
4X 83236
2X 01355
4X 02158
83265
N O TE:C O IL C O RD AN D ASSO C IATED C O M PO N EN TS
N O T SH O W N FO R C LARITY
Diagram 5K. Attaching U-bolt and
Reinforcement Plate to Actuator Assembly.
5E.8 Using the supplied cap screws and lockwashers, attach the coil cord mounting plate to the
top of the handle or G360™.
5E.9 Attach the coil cord Turck connector to the mating connector in the top of the handle or
G360™ and use the supplied cap screw to attach the strain relief clamp to the side plate
so there is a small service loop at the connector.
5E.10 Continue to Step 6 on page 3-9.
3-7
7/11
G-Force® Q - iQ Service Manual
Gorbel Inc.
Step 5F - 1320 lb. Suspended Pendant Handle Installation
5F.1 With the actuator hanging from rail or other
support structure, thread the free end of the wire
rope through the wear ring bracket and use the
supplied hardware to attach the bracket to the
actuator (diagram 5J, page 3-7).
5F.2
Thread the free end of the wire rope through the
wear ring and attach the wear ring to the wear
ring bracket using the supplied hardware.
5F.3
Grab the free end of the wire rope and loop it up
towards the underside of the actuator, ensuring
there are no twists or kinks in the rope. Feed the
U-bolt through the wire rope thimble and insert
the U-bolt into the appropriate holes in the
reinforcement plate. Using supplied hexnuts,
securely tighten the U-bolt to the plate (diagram
5K, page 3-7).
4X 65018
4X 65052
83255 (PU LLEY)
83261 (BEARIN G )
65086 (SN AP RIN G )
2X 83259
2X 2001.12
83258
Diagram 5L. Attaching Wire Rope to Pulley.
5F.4
Attach the plate to the underside of the actuator using the supplied cap screws,
lockwashers and spacers as shown and ensure hardware is completely tightened. (If an air
hose is being installed, leave hardware loose for now).
5F.5
Insert eyebolt at the end of the pendant cable into the threaded hole on the reinforcement
plate and tighten. Insert Turck connector into mating connector or the underside of the
actuator.
5F.6
While holding the G360™, loop the pulley through the wire rope and slip the pulley and
side spacers down between the plates (diagram 5L).
5F.7
Align the holes in the plates with the spacers and the bearing, insert the pulley pin, and
install the snap ring on the pulley pin.
5F.8
Using the supplied cap screws and lockwashers, attach the coil cord mounting plate to the
top of the G360™.
5F.9
Continue to Step 6 on page 3-9.
Step 5G - 1320 lb. Air Hose Assembly Installation (Optional)
5G.1 The air hose assembly comes attached to the wear ring and coil cord mounting plate.
Once the handle installation is complete, the air hose should be installed.
5G.2 Remove two of the screws and lockwashers holding the reinforcement plate to the
underside of the actuator (leaving the spacers in place) and insert them through the air
hose bracket and reattach to the underside of the actuator. Tighten all hardware.
5G.3 At the handle or G360™, insert the male swivel fitting at the end of the air hose into the
female end of the elbow in the footer and tighten.
5G.4 Connect the bulkhead fitting on the underside of the actuator to shop air and check for leaks.
7/11
3-8
G-Force® Q - iQ Service Manual
Gorbel Inc.
Step 6 - Electrical Power Connection
TIP: Do not connect main power until all assembly is complete.
Standard
6.1
Prior to final wiring, inspect the entire system to ensure that all connections are seated
properly and are without kinks or bends. Verify the following connections:
a) Coil cord to handle or G360™ collector
b) Coil cord to actuator assembly
c) Extension cables (if included)
6.2
Connect a 220 VAC single-phase power source through a disconnect switch (by others) to
the festooned power cabling (not provided with G-Force®).
WARNING
The power mains connection to the G-Force® unit is to measure 1 x 220 VAC +/- 10%.
Voltages outside this range may result in unexpected motion and/or premature controls failure.
6.3
Wire the female receptacle (provided) to the end of the festooned power cable.
6.4
After verifying the disconnect switch is turned OFF, connect the newly installed receptacle
to the male plug at the G-Force®.
Step 7 - Initial Power-Up
7.1
Turn on the disconnect switch (by others) to apply power to the G-Force®. When power is
detected, “POWER ON” is displayed on the LCD.
7.2
Disengage the emergency stop (E-stop) button located on the front face of the handle.
7.3
During the system power up the LCD at the handle will display “UNIT POWER-UP”.
7.4
Once the system is on-line and ready, “LIFT READY” will be displayed on the LCD.
7.5
•
Standard Operation - Slide Handle Configuration: Grasp the handle grip to run the
unit up and down. Do this several times to get a feel for the unit. The LCD displays
RUN MODE HANDLE.
• Standard Operation - Pendant Handle Configuration: Depress the up and down
levers to run the unit up and down. Do this several times to get a feel for the unit. The
LCD displays RUN MODE PENDANT.
Note: The LCD backlight will shut off after 10 minutes of inactivity.
TIP: The operator should always keep their hand under the operator present sensor
on the slide handle while operating the unit in standard mode. If the hand is
frequently moved away from the operator present sensor it will result in jerky
movement from the unit.
7.6
Finally, test the operation of any special tooling that may have been integrated to the
G-Force®.
TIP: Gorbel, Inc., does not provide integrated tooling for the G-Force®. All tooling
related questions should be directed to the tooling manufacturer or supplier.
3-9
7/11
G-Force® Q - iQ Service Manual
Gorbel Inc.
Step 8 - Float Mode and Final Steps
TIP: Gorbel® Inside Sales is available from 7am to 7pm Eastern Time Monday - Thursday
and 7am to 5pm Eastern Time Friday.
8.1
Float Mode may be activated by simply pressing
the G-Force® logo button on the left hand side of
the handle (diagram 8A). Below is a simple
exercise to practice if you are not familiar with the
Float feature. (This exercise assumes an in-line
slide handle is being used).
A) Grasp the handle grip and lift an object
weighing at least 20 lbs. (9 kg) to a
comfortable height in front of you.
FLOAT INDICATOR LED (BLUE)
G-FORCE LOGO BUTTON
(FLOAT MODE) (OPTION)
Diagram 8A. Float Mode Button - Slide Handle.
B) Let go the of the handle grip.
C) Press the G-Force® logo button on the handle. Note: Do not hold onto the load.
Applying an upward or downward force on the handle or load while initiating Float
Mode will give the unit a false reading and cause excessive drift.
D) After Float Mode is initialized, the “blue” LED light will turn on and the handle with
payload should not be moving. The LCD will display RUN MODE FLOAT.
E) Now grasp the load.
F) To move the load down, put vertical pressure on the load downward, towards the
floor. To move the load up, lift up on the load, towards the ceiling. Note: The
direction and speed of travel is now being controlled by the amount of force that the
operator exerts directly onto the load. The higher the force exerted on the load, the
faster the unit moves. Note: An over-speed detection routine checks if Float Mode
reaches 90% of the maximum fully loaded lifting speed and shuts the unit down. It
safely limits the maximum speed of travel in Float Mode.
G) Run the unit up and down several times (at least 20 times in each direction) to
assure proper operation. Float Mode should provide a smooth feel.
CAUTION
Actuating the operator present switch while in Float Mode will cause the unit to exit
Float.
H) Repeat this exercise until you become comfortable with Float Mode.
7/11
3-10
G-Force® Q - iQ Service Manual
Gorbel Inc.
Step 8 - Float Mode and Final Steps (Continued)
WARNING
NEVER remove the load from the G-Force® while still in Float Mode. The control system will
interpret the removal of the load as operator intent to lift the load. Therefore, the unit will begin to
drift up. The speed of the unit drift directly correlates to the weight that was removed from the
unit. The heavier the weight, the faster the unit will travel.
WARNING
In Float Mode, the live load weight CANNOT be increased or decreased because this will cause
unwanted motion. Float Mode must be reinitiated each time the weight of the live load is changed.
CAUTION
If external forces are applied to the load while Float Mode is being initiated, the G-Force® will
calculate a baseline weight that is higher or lower than the actual weight being lifted. When the
external force is removed, the load will begin to drift in the opposite direction of the load that was
applied.
8.2
The speed, acceleration, and other features of the G-Force® can be adjusted using the
Program Menu available at the handle. See the Program Mode section on page 5-2 for
complete details on modifying and programming features.
3-11
7/11
G-Force® Q - iQ Service Manual
Gorbel Inc.
Step 9 - Expansion I/O Block Mounting Instructions (Option)
TIP: Expansion I/O block mounting instructions only apply to iQ units with an I/O block.
Dimensions
Diagram 9A. Expansion I/O block dimensions (millimeters).
Diagram 9B. Screw fastener drilling template.
7/11
3-12
G-Force® Q - iQ Service Manual
Gorbel Inc.
Step 9 - Expansion I/O Block Mounting Instructions (Option) (Continued)
Installation
9.1
The I/O block can be installed into different locations (e.g. to an aluminum frame, to DIN
rail, to a mounting plate, or directly on the machine). The minimum base plate thickness is
1.5 mm and the screw length should thus be selected accordingly. The recommended
torque on the M4 screw is of 0.6 Nm.
Diagram 9C. Base plate and screw length selection.
Installation examples:
Diagram 9D. Installation on an aluminum frame, DIN rail or mounting plate.
3-13
7/11
G-Force® Q - iQ Service Manual
Gorbel Inc.
Chapter 4 - Removal Procedure
If it has been determined that the G-Force® Q or iQ system must be returned to Gorbel or
another authorized service location, or if the system is being relocated for some other reason,
please follow the guidelines listed below:
1. Locate the original shipping box and materials or use a suitable alternative if necessary.
Gorbel can provide a new shipping box upon receipt of a purchase order. Do not ship the unit
anywhere strapped to a pallet or inside an empty box without any protection or packing
material.
2. Disconnect any tooling or non-Gorbel® accessories including air hose fittings, external
electrical switches, harnesses, etc. Do not send any of these items back unless
specifically requested by Gorbel® Inside Sales.
3. If possible, before powering off the system and disconnecting the control handle, raise the
wire rope assembly to the upper limit.
4. Disconnect the coil cord assembly from both the actuator and the handle or swivel assembly.
Pack these components carefully to avoid shipping damage (diagram 1).
Diagram 1.
5. If you are returning the system to Gorbel for service, upgrading, etc., mark the box clearly with
the RMA (Return Material Authorization) number supplied by Gorbel® Inside Sales
(800-821-0086) and include a copy of the RMA in the box whenever possible. Do not send
any components back to Gorbel without an RMA.
4-1
7/11
G-Force® Q - iQ Service Manual
Gorbel Inc.
Chapter 5 - Control and Programming
Controls Interface Features
The jog switch push buttons and
communications connector are protected
by a cover (Diagram 1). To access the jog
switch push buttons and
communications connector, loosen the M4
screw and slide the shield back towards
the wire rope. Note: Do not fully unthread
the M4 screw. When finished, slide the
shield back into place and re-tighten the
M4 screw.
Jog Switch Push Buttons: The jog switch
buttons allow qualified personnel to
replace the wire rope on the unit. To
effectively operate the jog switch buttons,
all electrical cables must be connected
and power on. Depressing the “Up” jog
switch button will enable the motor and
cause the system to reel the wire rope into
the actuator and onto the drum pulley.
Depressing the “Down” jog switch button
will enable the motor and cause the
system to pay out the wire rope from the
actuator and off of the main pulley. Jog
switch push buttons override all motion
control from a handle or tooling.
JOG DOWN PUSH BUTTON
COMMUNICATION CONNECTOR
JOG UP PUSH BUTTON
M4 SHCS
Diagram 1. Actuator - Controls Interface Display (as viewed from
bottom of actuator).
WARNING
The jog switch buttons are for system maintenance and load testing use only and should not be
manipulated during normal operation of the G-Force®. Operation of the jog switch buttons during
normal operation increases the risk of personal injury to the operator.
Service Mode: This operation mode is similar to the “safe mode” of a PC. In this state all handle
motion control and Q & iQ custom features are disabled, all digital outputs are turned off, and
only basic jog up, jog down, LCD display and safety program mode are available. It allows a
minimum safe operation on a unit with a damaged handle, broken I/O electronics or other
damaged peripheral control components that would make it dangerous to run the unit if the
component is used. The unit is still inoperative if actuator components such as the drive, motor,
or jog switches are damaged. To activate service mode, with the handle E-stop pushbutton
released and the LCD screen displaying LIFT READY, press and hold both jog pushbuttons on
the actuator for ten seconds. Both the blue and red LEDs flash once per second and the LCD
displays SERVICE MODE when the operation mode is ready.
Communications Connector: This connector is the communications port for the G-Force®. With
the program kit (option), provided by Gorbel, users may connect to the G-Force® to upload
software programs or use the G-Force® Visual Basic program.
5-1
7/11
G-Force® Q - iQ Service Manual
Gorbel Inc.
Program Mode Overview (Software Version R1.07.0)
Program Mode is used to control and adjust all of the features on the Q and iQ series G-Force®.
Before entering Program Mode review the Program Mode Menu outline, Chart 4, pages 5-7
through 5-11.
LCD DISPLAY
EMERGENCY STOP BUTTON
FLOAT INDICATOR LED (BLUE)
G-FORCE LOGO BUTTON
(FLOAT MODE) (OPTION)
FAULT INDICATOR LED (RED)
LCD DISPLAY
G-FORCE LOGO BUTTON
(FLOAT MODE) (OPTION)
MENU BUTTON
MENU BUTTON
(PROGRAM MODE)
FLOAT INDICATOR LED (BLUE)
Diagram 2. Slide Handle - G-Force® Logo (Float Mode), MENU
and Emergency-Stop Buttons and LEDs.
FAULT INDICATOR LED (RED)
EMERGENCY STOP BUTTON
DOWN LEVER (LOWER)
UP LEVER (RAISE)
Diagram 3. Pendant Handle - G-Force® Logo (Float Mode),
MENU and Emergency-Stop Buttons and LEDs.
Entering Program Mode (chart 1, page 5-4):
1. Press and Hold the MENU button (right-hand side of handle) for two seconds to activate
Program Mode.
2. After two seconds, release the MENU button. The red and blue LEDs will illuminate and
“PROGRAM MODE” will be displayed for one second. Then the first menu will be
displayed.
• Q unit: SPEED MENU (default). Note: If the Virtual Limits Package has been
ordered, the Virtual Limits Menu (V-LIMITS) will appear first.
• iQ unit: V-LIMITS MENU
3. Press the MENU button to toggle between menus. The LCD will display the corresponding
programmable menus:
• V-LIMITS MENU - Virtual Limits menu (option)
• SPEED MENU - Lift Speed adjustment
• RESPONSE MENU - Lift Response (acceleration) adjustment
• SETTINGS MENU - Programmable Features on both the Q and iQ units
• SETTINGS MENU 2 - Programmable Features on iQ units only (iQ only)
• LED MENU - Program the LED lights (iQ only)
• SERVICE MENU - Customize and manage maintenance and service features
• CONFIGUR MENU - Special unit features and hardware configurations
4. Once you have reached the menu you would like to enter, press the G-Force® logo button.
5. The first programmable feature in that menu will be displayed. Chart 4, pages 5-7 thru 5-11,
displays a full list of all the menus and programmable features under each menu.
6. To move to the second programmable feature press the G-Force® logo button again.
7. Note: If the MENU button is pressed after Step 4, the selection is cleared and the LCD
displays the next program menu.
8. Once the desired feature is selected wait three seconds.
9. After displaying the feature text for three seconds, the request is executed. The LCD will
flash the feature text several times to indicate the command is being executed.
10. After the command is executed, the system returns to standard operation, and the LCD
displays “LIFT READY”.
7/11
5-2
G-Force® Q - iQ Service Manual
Gorbel Inc.
Handle Operation
Make sure to keep fingers clear of the photo sensor
area when in program mode. Breaking the photo
sensor will drop the unit out of program mode and
you will need to start over again.
When making changes in program mode, do not
break the beam of the photo sensor until the new
setting has been completed. The display must be
allowed to flash three times before the handle is
gripped. Breaking the sensor beam before the display flashes three times will cancel the change and
drop the unit out of program mode and you will
have to start over.
Press and hold this button for approximately
three seconds until the
unit enters program
mode. Once in program
mode, this button is used
to select the desired
menu. Press and release
this button to advance to
the next menu. If you
happen to accidentally
pass by a menu, it will
come around again if you
continue to press and
release this button.
When the unit is not in
program mode, press
and release this button to
initiate float mode.
When the unit is in float
mode, use this button to
select the desired item
within the menu by
pressing and releasing to
advance to the next
selection
If you stay on a menu item selection for approximately three seconds, the display will blink
three times and the change will be made. Keep advancing through the menu items quickly
until you are certain of the change you want to make. Otherwise, you may accidentally make
an undesired change.
5-3
7/11
G-Force® Q - iQ Service Manual
Gorbel Inc.
Press & Hold
M
MENU Button
Click
G
G-Force® Logo Button
M
2 sec to activate
Q
PROGRAM
MODE
iQ Only
iQ or Q with software option
V-LIMITS
MENU N
G
Set Various Virtual Limits
G
Select Maximum Hoist
Speed
G
Select Handle Control
Response
G
Program Common Q & iQ
Custom Features
G
Program iQ Features
G
Configure Blue LED
Indicator
G
[Optional] Configure
Dual Actuator System
M
Q without software option
SPEED
MENU
M
RESPONSE
MENU
M
SETTINGS
MENU
M
SETTINGS
MENU 2 ~ N
M
M
LED
MENU
M
DUAL ACT
MENU
M
SERVICE
MENU
G
Select Maintenance and
Service Features
G
User Accessible
Hardware Configurations
Activate Through CFG MENU ENABLE
CONFIGUR
MENU
Chart 1. Program Mode Process.
7/11
5-4
G-Force® Q - iQ Service Manual
Gorbel Inc.
SETTINGS
MENU
M
G
FM SETUP
SUB-MENU
M
G
M
FM ANTIRECOIL
G
PRESET
SUB-MENU
G
M
CHANGE
OVLD LMT
G
M
CHANGE
OP FORCE
G
M
CHANGE
SENSITIV
CONFIGUR
MENU
M
G
PRESET
SUB-MENU
Chart 2. Program Mode Main Menu (Solid Border) and Sub-Menu (Dotted Border) Layouts.
5-5
7/11
G-Force® Q - iQ Service Manual
Gorbel Inc.
Lockout Feature (chart 3)
To prevent tampering in Program Mode, a Lockout Feature is available.
To
1.
2.
3.
Lockout Program Mode:
Press both the G-Force® logo button and the MENU button simultaneously for five seconds.
The LCD will display “LOCKOUT CHECK” while both buttons are being depressed.
After five seconds, “PROGRAM LOCKED” will be displayed to confirm the Lockout was
successful.
If Program Mode is requested after the Lockout has been enabled, the LEDs will flash twice to indicate Program
Mode is not accessible and “PROGRAM LOCKED” will be displayed again.
To
1.
2.
3.
Unlock Program Mode:
Press both the G-Force® logo button and the MENU button simultaneously for five seconds.
The LCD will display “UNLOCK CHECK” while both buttons are being depressed.
After five seconds, “PROGRAM UNLOCKED” will be displayed to confirm the Lockout was
successful.
M
Both buttons for
5 sec to activate
G
Locked?
No
LOCKOUT
CHECK
5 sec
PROGRAM
LOCKED
Yes
UNLOCK
CHECK
5 sec
PROGRAM
UNLOCKED
Chart 3. Lockout Feature Process.
Safety Program Mode
If the G-Force® has detected a fault or is running in SERVICE MODE, only a limited set of menus are accessible.
For example, if the G-Force® records a fault, when Program Mode is activated the LCD will
display “LIMITED PRG MODE” rather than “PROGRAM MODE”. Safety Program Mode can be navigated just as
Program Mode would be, however the only menus available are:
• V-LIMITS MENU - Virtual Limits menu (option)
• SPEED MENU - Lift Speed adjustment
• RESPONSE MENU - Lift Responsiveness (Acceleration) adjustment
• SERVICE MENU - Customize and manage maintenance and service features
7/11
5-6
G-Force® Q - iQ Service Manual
Program Mode
Menu
Gorbel Inc.
LCD Text
UPPER
LIMIT
LOWER
Virtual Limits
LIMIT
(VL) Menu*,**,***
LOWER
V-LIMITS
SLOW DN
(also available
UPPER
MENU1,2
for Q unit with
SLOW DN
Software
UPPER
Package)
RESUME
VL MENU
-RESET!SPD MENU
Lift Speed
SPEED
SPD 10% ~
Setting
MENU
SPD 100%
RESPONSE
Lift
LOW
Responsiveness RESPONSE RESPONSE
(Acceleration)
MENU
MEDIUM
RESPONSE
Setting
HIGH
ZERO
WT DISP
WEIGHT
READ ON_
READ OFF
DISPLAY
Q & iQ Custom SETTINGS
METRIC
Features
MENU
ENGLISH
FM SETUP
SUB-MENU
USR OVLD
SUB-MENU
SETTINGS
-RESET!FM
SETTINGS
ENABLE
DISABLE
FLOAT MO
[SUB-MENU]
FM ANTIFM SETUP
RECOIL
Float Mode
SUB-MENU
Configuration
Setup
UNLOAD
STOP ON
STOP OFF
Feature Description
Program the upper virtual limit (load must be at desired position for upper limit).
Program the lower virtual limit (load must be at desired position for lower limit).
Program the lower slow down reduction point (load must be at position where
slow-down begins when descending).
Program the upper slow down reduction point (load must be at position where
slow-down begins when raising load).
Program the upper speed resume point (load must be at position where system
will resume normal speed when raising load).
Reset all programmed virtual limits in this menu.
Maximum hoist speed selection, [1 ~ 10] correspond to lowest and highest speed.
Set the lowest handle control response corresponding to about 75% of the highest
responsiveness setting.
Set the medium handle control response corresponding to about 85% of the
highest responsiveness setting.
Set the highest handle control responsiveness setting.
Record and tare out the handle weight for weight readout calculation.
Toggle between enabling and displaying the load weight. Once enabled, weight is
displayed two seconds into standard operation (unit idling).
Toggle the unit of the weight readout display between pounds (English) and kilograms (Metric).
Access Float Mode Configuration Setup Sub-Menu.
User Programmable Overload Setup Sub-Menu.
Reset above Custom Features, i.e. reset tarred handle weight, weight readout off,
and readout display back to English unit.
Startup prompt screen when this sub-menu is accessed.
Enable or Disable running Float Mode related features, such as Standard Float
Mode, Remote-Mount Float Mode Trigger, Dual Float Mode Weights, etc.
Float Mode Anti-Recoil Configuration Sub-Menu.
Optional feature utilizing Anti-Recoil detection. When user sets a weight onto a
surface in Float Mode, it is terminated if Anti-Recoil detects an unloading. This can
be useful for applications needing a quick Float Mode exit to an idle state to allow
user to work on the part. Note: As a result of the extra detection, Float Mode is
likely to terminate when the upper limit switch is hit while unit is running at a fast
speed. This false detection can be avoided or reduced by running the unit at a low
speed.
Chart 4. (continued on pages 5-8 thru 5-11) Program Mode Menu and Selection Settings.
5-7
7/11
G-Force® Q - iQ Service Manual
Program Mode
Menu
Gorbel Inc.
LCD Text
Feature Description
OVER
FORCE
SPEED
Startup screen when this sub-menu is accessed. The correct configured
Anti-Recoil detection method is displayed (see next item for details on the
detection methods).
Toggle Anti-Recoil detection method between standard over-speed and over-force
detections. Anti-Recoil protects against a dropped weight while running Float Mode
causing the unit to speed upward until hitting an object or a push force equivalent
to the dropped weight.
Over-Speed Detection: Unit terminates Float Mode if speed exceeds maximum
Float Mode speed at 90% of unit loaded speed.
[SUB-MENU]
Float Mode AntiRecoil
Configuration
Setup
FM ANTIRECOIL
[SUB-MENU]
USR OVLD
User
SUB-MENU
Programmable
Overload Setup
Program an
Overload Limit
CHANGE
OVLD LMT
OVER
FORCE
SPEED
Over-Force Detection: Unit terminates if user’s operating force exceeds the
maximum force limit or a dropped weight is detected by evaluating the force
profile. Different from Over-Speed Detection, unit can run at the maximum Float
Mode speed.
a. Maximum force limit defaults at 35 lbs.
b. A dropped weight profile assumes the operator has both hands off the weight
(tooling) as the unit speeds upward. Detection ability may reducer if user
attempts to stop the unit or if the tooling swings heavily.
c. If the total lifted weight (e.g. tool and part) is less than the maximum force limit,
Over-Speed Detection is applied.
MX FORCE
Set Anti-Recoil Over-Force Detection maximum force limit between 15 and 45 lbs.
15 ~ 45 LBS
Unit reset to the default setup according to the configured detection method. For
DEFAULT example, unit configured with Over-Force Detection defaults to 35 lbs. maximum
SETTINGS force limit, dropped weight profile checkup and conditional Over-Speed Detection.
UNLOAD STOP option is turned off for both methods.
Startup prompt screen when this sub-menu is accessed. Please activate weight
USR OVLD readout while setting an overload limit, to ensure that the load cell is properly caliSETUP
brated and the desired overload limit is within the acceptable range. Please see
WEIGHT READ ON_ under SETTINGS MENU for additional details.
CHANGE
Program an overload limit.
OLVD LMT
CHANGE
Configure operating force limit for moving a load in air.
OP FORCE
CHANGE
Configure overload detection sensitivity.
SENSITIV
Apply factory default settings. Overload limit is set as the maximum limit which is
DEFAULT
101% of the rated capacity plus 12 lbs to account for a handle weight. The operatSETTINGS
ing force limit is set at 15 lbs and detection sensitivity is set to 5 (High).
Startup prompt screen displaying the programmed overload limit. User Overload
feature adjusts the detection and over limit parameters proportional to programmed
Overload Limit. The over limit when overload is triggered is at M% above the
CHANGE
Overload Limit plus the Operating Force Limit (see CHANGE OP FORCE section
OVLD LMT
for info). An over limit is roughly set at:
G-Force®: 120% x Overload Limit + OP FORCE
East Arm®: 105% x Overload Limit + OP FORCE
Tare the total weight as Overload Limit. When selected, unit tares the lifted weight
supported by the wire rope as the Overload Limit. This value can be monitored
through the Weight Readout feature without zeroing the reading (see SETTINGS
TARE
MENU). For G-Force® and Easy Arm® 165 lb. units, the maximum limit is 175 lbs.
OVLD LMT For all other capacities, the maximum limit is 101% of the rated capacity plus 12 lbs
for a handle weight. The minumum limit is 25% of the rated capacity. A warning is
triggered if the tare weight is outside this range. Overload Limit is capped at one of
these bounds.
Set Overload Limit to the selected NNNN lbs limit. TARE OVLD LMT section lists a
range of the maximum and minimum limits for Overload Limit. Clicking the G-Force®
SET LIMIT Logo pushbutton decrements the limit from the maximum down to the minimum, one
LBS NNNN lb at a time. The button can be pressed and held to decrease the count at a faster
rate. Once the minimum value is reached, click the pushbutton to restart from the
setup screen; otherwise, the minum limit is applied after the pushbutton is released.
Chart 4. (continued from page 5-7 & continued on pages 5-9 thru 5-11) Program Mode Menu and Selection Settings.
7/11
5-8
G-Force® Q - iQ Service Manual
Program Mode
Configure
Operating Force
Limit for Moving
a Load in Air
Configure
Overload
Detection
Sensitivity
iQ Features*,**
LED Config
Menu*,**:
Programs the
blue LED as an
indicator)
Dual Actuator
Configuration
Menu*,***
(Dual Actuator
option required)
Service Menu:
Maintenance and
Service Features
Menu
Gorbel Inc.
LCD Text
Feature Description
Startup prompt screen displaying the programmed Operating Force Limit.
Operator’s push and pull force is an extra loading to the system, especially when
AT FORCE handle is mounted on the tooling. This sub-menu allows one to set a Force Limit to
CHANGE LBS NNNN account for different user’s operating force thus reducing chance of false overload
OP FORCE
detection. The limit should not be set larger than necessary as it reduces detection
capability. By default, the limit is set at 15 lbs.
TO FORCE
Set Operating Force Limit to between 5 and 25 lbs in 1 lb increments.
LBS NN
Startup prompt screen displaying the programmed Detection Sensitivity. This feature may falsely detect varying weight as overloaded, for example, on a system
with unbalanced or elongated tooling that sways easily during usage, or a less
AT LEVEL rigid supporting structure that induce much vibration. The sensitivity parameter can
5 (HIGH) ~ be reduced to prevent false detection when operating a load at no greater than the
CHANGE
1 (LOW) Overload Limit. However, do not reduce the sensitivity unless it is necessary due
SENSITIV
to actual usage. A reduced sensitivity increases the time to detect a legitimate
overload condition that may result in damages or failure to the unit. By default,
Detection Sensitivity is set at 5 (HIGH).
TO LEVEL
Set Detection Sensitivity to between 5 (HIGH) and 1 (LOW) one level decrements
5 (HIGH) ~
at a time.
1 (LOW)
DUAL FM (Float Mode feature enabled) Record tooling weight for the Dual Float Mode
TOOL WT weights feature.
DUAL FM (Float Mode feature enabled) Record tooling and load weights for the Dual Float
LOAD WT Mode weights feature.
Tare tooling weight for anti-drop feature. The minimum difference between
SETTINGS ANTIDROP
unloaded and loaded tool weight is 20 lbs. for G-Force®, 25 lbs. for Easy Arm®
MENU 2
TOOL WT
and 25 lbs. for G-Jib™.
MENU 2 Program the auto home tracking position (load must be at desired position for the
SET HOME limit).
MENU 2 Reset above custom features including the dual Float Mode, anti-drop, and auto
-RESET!- home features.
RESET
Disable any custom feature (e.g. anti-drop) from utilizing the blue LED as an
LEDS
indicator.
Enables the blue LED on the control handle to act as an indicator for the anti-drop
ANTI
function. When this function is enabled and the anti-drop output is off (off is
LED
DROP
typically the grip/clamp state of the tooling), the blue LED will flash until the
MENU
anti-drop output turns on (on is typically the release state of the tooling).
Set Slack Anti-Drop to use the blue LED for indication identical to ANTI-DROP
SLACK
above. This selection is not available by default because this is a disabled built-in
ANTIDROP
feature.
MOTION
Item is only selectable if the dual-actuator system is set to manual configuration,
INDEPEND
SETUP MANUAL.
SYNC
A dual-actuator system defaults to AUTO configuration, i.e. the system
automatically configures the various run mode controls to INDEPEND or SYNC
linking. If MANUAL option is selected, user can choose to overwrite some of the
controls to a specific mode as programmed through MOTION INDEPEND\SYNC.
DUAL ACT
SETUP
The breakdowns are as such:
MENU
MANUAL RUN MODE
AUTO
MANUAL
AUTO
Jog Switch
INDEPEND
SELECTABLE
Slide Handle
SYNC
SELECTABLE
Pendant Handle
SYNC
SELECTABLE
Float Mode
INDEPEND
INDEPEND
Custom Motion
SYNC
SELECTABLE
SETUP
Default dual-actuator feature settings to SYNC linking mode and AUTO
-RESET!- configuration setup.
SRV MENU
Program upper limit for the cycle count.
SERVICE UP CYCLE
SRV MENU
MENU
Program lower limit for the cycle count.
LO CYCLE
Chart 4. (continued from pages 5-7 & 5-8, and continued on page 5-10 & 5-11) Program Mode Menu and Selection Settings.
5-9
7/11
G-Force® Q - iQ Service Manual
Program Mode
Menu
Gorbel Inc.
LCD Text
DISPLAY
SYS INFO
Feature Description
Enable/disable displaying of usage data. When enabled, text display cycles
between system time, run time, cycle counts, and the software version number
once per second.
CLEAR
Reset cycle count to zero.
COUNT
CLEAR
Reset run time to zero.
RUN TIME
Reset the warning or the time limit of the Maintenance Service Indicator* feature.
SRV WARN
Does not reset the current run time. Note: The warning can also be reset by
OFF
selecting CLEAR RUN TIME.
SRV WARN Configure the time limit of the Maintenance Service Indicator* feature on I/O point
500 HRS 7 (see diagram F) to 500 hours.
SRV WARN Configure the time limit of the Maintenance Service Indicator* feature on I/O point
1000 HRS 7 (see diagram F) to 1000 hours.
SRV WARN Configure the time limit of the Maintenance Service Indicator* feature on I/O point
1500 HRS 7 (see diagram F) to 1500 hours.
When the LCD screen asks to enter a key code, click the Menu button three times
CFG MENU
followed by another three clicks on the G-Force® Logo button to access the
ENABLE
Configuration Menu.
Standard Diagnostic Mode displays all handle pushbuttons, sliding gripper or
STANDARD
pendant lever position, load cell weight reading, and limit switches status on the
DIAGNOSE
LCD screen.
Service Menu:
iQ Actuator Input/Output Module Diagnostic Mode displays the status of the eight
SERVICE
Maintenance and
configurable inputs and outputs on the LCD screen. The inputs statuses are
MENU
LIFT I/O
Service Features
displayed in the first screen followed by those for the outputs. The I/O Point
DIAGNOSE
number of the input that measures incoming 24VDC or output that is turned on to
(Continued)
(Continued)
provide 24VDC is displayed in each screen as numerical numbers, 1 ~ 8.
[iQ Only] First (Primary) Expansion Input/Output Block Diagnostic Mode displays
the status of the eight configurable inputs and outputs on the LCD screen. The
I/O BLK1 inputs statuses are displayed in the first screen followed by those for the outputs.
DIAGNOSE The I/O Point number of the input that measures incoming 24VDC or output that
is turned on to provide 24VDC is displayed in each screen as numerical numbers,
1 ~ 8.
[iQ Unit with Custom or Reconfigured Program] Second Expansion Input/Output
Block Diagnostic Mode displays the status of the eight configurable inputs and
I/O BLK2 outputs on the LCD screen. The inputs statuses are displayed in the first screen
DIAGNOSE followed by those for the outputs. The I/O Point number of the input that measures incoming 24VDC or output that is turned on to provide 24VDC is displayed in
each screen as numerical numbers, 1 ~ 8.
[iQ Unit with Custom or Reconfigured Program] Third Expansion Input/Output
Block Diagnostic Mode displays the status of the eight configurable inputs and
I/O BLK3 outputs on the LCD screen. The inputs statuses are displayed in the first screen
DIAGNOSE followed by those for the outputs. The I\O Point number of the input that measures incoming 24VDC or output that is turned on to provide 24VDC is displayed in
each screen as numerical numbers, 1 ~ 8.
Reset all programmed features in this menu such as the upper and lower cycle
SRV MENU
limits and the service indicator time limit if the feature is available. Does not clear
-RESET!the run time and cycle counts.
Record the current unit system configuration settings such as unit type and
RECORD capacity setting, factory overload settings, loadcell calibration parameters, virtual
CONFIG limit software package enabling flag for Q unit, burn-in status and all the custom
feature setup parameters.
ZERO
Set loadcell bias signal with no weight attached to define a “zero” value (requires
Special Unit
Features and
CONFIGUR LOD BIAS Float Mode option).
Set loadcell signal slope coefficient with a lifted weight equal to the rated capacity
Hardware
MENU
CALIBRAT of the unit below the wire rope. Any different lifting weight will result in false
Configurations
LOD COEF calibration and inaccuracy such as weight readout feature (requires Float Mode
option). This step must be performed after zero load bias.
PRESET Access predefined sets of Q/iQ feature configurations including factory default
SUB-MENU setup.
Chart 4. (continued from pages 5-7 thru 5-9 & continued on page 5-11) Program Mode Menu and Selection Settings.
7/11
5-10
G-Force® Q - iQ Service Manual
Program Mode
Menu
LCD Text
PRESET
1*
PRESET
2*
[SUB-MENU]
Preset Feature
Configuration
List
Gorbel Inc.
PRESET
SUB-MENU
PRESET
3*
Feature Description
I/O
Expansion I/O Block (Assignment for one I/O Anti-Drop)
1
Input - Dual Float Mode
2
Input - Anti-Drop
3
Output - Anti-Drop
4
Input - Auto Home
5
Input - External device control (combine with Actuator I/O Module point 5)
6
Input - External device control (combine with Actuator I/O Module point 6)
7
Output - mimic OPS
8
Output - mimic stack
I/O
Expansion I/O Block (Assignment for two I/O Anti-Drop)
1
Input - Dual Float Mode
2
Input - Anti-Drop (Clamp)
3
Input - Anti-Drop (Unclamp)
4
Input - Auto Home
5
Input - External device control (combine with Actuator I/O Module point 5)
6
Input - External device control (combine with Actuator I/O Module point 6)
7
Output - Anti-Drop (Clamp)
8
Output - Anti-Drop (Unclamp)
I/O
Expansion I/O Block (Two I/O Anti-Drop & System Switches Output)
1
Input - Dual Float Mode
2
Input - Anti-Drop (Clamp)
3
Input - Anti-Drop (Unclamp)
4
Input - Auto Home
5
Output - Handle Operator Present Sensor Status
6
Output - Slack or Down Travel Limit Switch Status
7
Output - Anti-Drop (Clamp)
8
Output - Anti-Drop (Unclamp)
The external device control feature previously on I/O5 and 6 is disabled; therefore
its corresponding outputs on Actuator I/O Module I/O points 5 and 6 are disabled
as well.
FACTORY
Reset feature assignments back to factory default equivalent to PRESET 2.
DEFAULT
* Indicates this feature is only available on iQ units.
** Additional details are available in the Input/Output Functionality section.
*** This menu is hidden unless the optional feature is purchased and installed.
1
Two (2) virtual limit sets are available with a standard iQ unit. More virtual limit sets are possible with custom programming.
2
The minimum distance between any two Virtual Limits is 1”, 1/2”, 1/4” and 1/8” for any 75Kg, 150Kg, 300Kg, and 600Kg actuators correspondingly,
with the exception that the gap between the Upper and Lower Virtual Limits must be greater than 1”. The motion control position accuracy to any
Virtual Limit is as follows:
+/- 1/4” for G-Force®, Easy Arm®, G-Jib™ 150Kg; +/- 1/16” for G-Jib™ 300Kg, +/- 1/8” for G-Force® 300Kg, +/- 1/16” for G-Force® 600Kg
Note that the actual total accuracy is motion control accuracy plus any mechanical component accuracy constraints. For example, if
mechanical component accuracy is +/- 1/4”, the total cumulated accuracy is +/- 1/2” for G-Force® 75Kg unit.
Chart 4. (continued from pages 5-7 thru 5-10) Program Mode Menu and Selection
5-11
7/11
G-Force® Q - iQ Service Manual
Gorbel Inc.
Active Diagnostic Mode Messages
Button, Switch or Sensor
G-Force® Logo Button (Float Mode)
Menu Button
Operator Present Switch
Handle Controller Auxiliary Input
Upper Limit Switch
Lower Limit or Slack Switch
Both Limit Switches
Jog Up Button
Jog Down Button
Both Jog Buttons
LCD Display Message
Alternately displays:
1. FLOAT BUTTON
2. WEIGHT NNN LBS
(Weight Readout Value)
3. SIGNAL # NNNNN
(Actual Load Cell Signal)
MENU BUTTON
Alternately displays:
1. HANDLE SWITCH
2. STROKE NNN MAX%
(Handle Position % to Maximum Stroke)
3. SIGNAL # NNNNN
(Actual Handle Position Signal)
HANDLE N AUX INPUT
(N is the handle number in a multi-handle-controller application, e.g.
1 or 2)
UP TRAVL LIMIT
DN TRAVL LIMIT
2 TRAVL LIMITS
JOG UP SWITCH
JOG DOWN SWITCH
BOTH JOG SWITCHES
Chart 5. Standard Diagnostic Mode Messages.
Button, Switch or Sensor
G-Force® Logo Button (Float Mode)
Menu Button
Operator Present Switch
Handle Controller Auxiliary Input
Upper Limit Switch
Actuator 1 (Leader)
Actuator 2 (Follower)
Lower Limit or Slack Switch
Actuator 1 (Leader)
Actuator 2 (Follower)
Both Limit Switches
Actuator 1 (Leader)
Actuator 2 (Follower)
Jog Up Button
Actuator 1 (Leader)
Actuator 2 (Follower)
Jog Down Button
Actuator 1 (Leader)
Actuator 2 (Follower)
Both Jog Buttons
Actuator 1 (Leader)
Actuator 2 (Follower)
LCD Display Message
Alternately displays:
1. FLOAT BUTTON
2. WEIGHT NNN LBS
(Weight Readout Value)
3. SIGNAL # NNNNN
(Actual Load Cell Signal)
MENU BUTTON
Alternately displays:
1. HANDLE SWITCH
2. STROKE NNN MAX%
(Handle Position % to Maximum Stroke)
3. SIGNAL # NNNNN
(Actual Handle Position Signal)
HANDLE N AUX INPUT
(N is the handle number in a multi-handle-controller application, e.g.
1 or 2)
UP1
UP2
UP1
UP2
TRAV LMT
TRAV LMT
DN1
DN2
TRAV LMT
TRAV LMT
DN1
DN2
TRAV LMT
TRAV LMT
UP1
UP2
UP1
UP2
JOG SWTH
JOG SWTH
DN1
DN2
JOG SWTH
JOG SWTH
DN1
DN2
JOG SWTH
JOG SWTH
Chart 6. Custom Diagnostic Mode for Systems Equipped with Dual-Actuator Feature.
7/11
5-12
G-Force® Q - iQ Service Manual
Gorbel Inc.
Active Diagnostic Mode Messages (Continued)
I/O Status
Any of the eight I/O Points configured as
Digital Inputs
Any of the eight I/O Points configured as
Digital Outputs
LCD Display Message
INPUTS -------- , or
INPUTS 12345678
(Only the Input(s) sensing incoming 24VDC displays its I/O Point
number)
OUTPUTS --------, or
OUTPUTS 12345678
(Only the Output(s) turned on to send 24VDC displays its I/O Point
number)
Chart 7. Diagnostic Mode Messages for iQ Actuator Input/Output Module or the
Expansion 8-Point Input / Output Block.
Virtual Limits Warnings
WARNINGS
If the upward speed reduction point is being used to reduce the impact of engaging the load “on the fly” (i.e. catching
the load with a hook while the G-Force® is already in motion in the upward direction), care must be taken to ensure
the speed reduction takes place before the load is engaged. Please program the Upper Slow Down Reduction point
at least half an inch to an inch below the exact point of pick-up.
Note: Setting the upper and lower virtual limits to the same position will cause the unit to not travel in either direction.
5-13
7/11
G-Force® Q - iQ Service Manual
Gorbel Inc.
iQ Actuator Input/Output Module Functionality
I/O
Point
1
2
3
4
5
6
7
8
Settings (see chart 1 for
instructions on navigating
and setting menu functions)
Input - Dual virtual
When this input is turned on, the G-Force® switches Second set of virtual limits is
limit sets
to a second independent set of virtual limits. See
done the same as the standard
chart 3 for instructions on setting each of these limit set but with this input on.
sets.
Future expansion - no Functionality may be assigned via custom
default functionality
programming to meet application requirements.
assigned
Contact your Gorbel® dealer for more details.
Future expansion - no Functionality may be assigned via custom
default functionality
programming to meet application requirements.
assigned
Contact your Gorbel® dealer for more details.
Future expansion - no Functionality may be assigned via custom
default functionality
programming to meet application requirements.
assigned
Contact your Gorbel® dealer for more details.
Output - External
This output is controlled by input number 5 on the
device control (requires optional expansion 8-point input/output block. When
optional expansion 8- that input is on, output 5 on the iQ actuator
point input/output block) input/output module is on and vise versa.
Output - External
This output is controlled by input number 6 on the
device control (requires optional expansion 8-point input/output block. When
optional expansion 8- that input is on, output 6 on the iQ actuator
point input/output block) input/output module is on and vise versa.
Output - Service
This output turns on when service is required
The reset function for this
indicator
(based on hours of use and set at the factory) and output is in the SERVICE
may be used to turn on an external service indicator MENU, items CLEAR RUN
(supplied by others).
TIME or SRV WARN OFF.
Output - Fault indicator This output turns on when a command fault or drive
fault occurs. It does not turn on due to a command
warning.
Assigned Function
Description
Chart 8. iQ Actuator Input/Output Module Standard Functionality.
Diagram 4. Actuator CPU Input/Output Block.
7/11
5-14
G-Force® Q - iQ Service Manual
Gorbel Inc.
Expansion 8-Point Input/Output Block Functionality
I/O
Point
1
2
3
4
5
6
7
8
Settings (see chart 1 for instructions on
navigating and setting menu functions)
Input - Dual load weight When the G-Force® is in float mode, this input allows switching The two Float Mode load weights programmed are
Float Mode*
from one pre-programmed load weight to another. These two
located in SETTINGS MENU 2 - DUAL TOOL WT and
weights must remain fixed; otherwise, some drifting can occur if DUAL FM LOAD WT. The desired load weight must be
the weight is different than the programmed value.
suspended from the G-Force® when performing each
setting.
Input - Anti-drop feature This input is typically wired to a clamp request pushbutton. When the See I/O Point 3 Settings description.
(Clamp request)
input is on, Output #7 (see I/O Point 7) turns on and Output #8 turns
off regardless of the tooling loading state.
Input - Anti-drop feature This input is typically wired to an unclamp request pushbutton.
Programming to tare weight is located at SETTINGS
(Unclamp request)
When the input is on, Output #8 (see I/O Point 8) turns on only if MENU 2 - ANTIDROP TOOL WT. The empty tooling
Anti-Drop algorithm determines the suspended load is at or below (including handle controller and other accessories)
the set weight (ANTIDROP TOOL WT). If Output #8 turns on,
without a pickup part must be suspended solely by the
Output #7 is turned off.
wire rope when tarring. The minimum difference
between unloaded and loaded tool weight is 20 lbs. for
G-Force®, 25 lbs. for Easy Arm®, and 25 lbs. for
G-Jib™ products.
Input - Auto Home
When this input is toggled (momentarily turned on then off again), The Auto Home position programming is located at
the G-Force® automatically travels to the set home position in the SETTINGS MENU 2 - MENU 2 SET HOME. Move the
vertical travel. Tracking stops when obstruction is detected, i.e. G-Force® to the desired position in the vertical travel
Q/iQ G-Force® stops at 10-25 lbs. depending on unit capacity.
before selecting the position setting in this menu.
Input - External device This input controls input 5 on the actuator input/output module.
control (used in
When this input is on, output 5 on the iQ actuator input/output
conjunction with
module is on and vise versa.
actuator output 5)
Input - External device This input controls input 6 on the actuator input/output module.
control (used in
When this input is on, output 6 on the iQ actuator input/output
conjunction with
module is on and vise versa.
actuator output 6)
Output - Anti-drop feature This output is typically wired to actuate the clamping mechanism See I/O Point 3 Settings description.
(Clamp Control)
of an end effector tooling. It turns on when Input #2 (see I/O Point
2) is on and remains latched on when the input is released. It can
be turned off by Input #3 (see I/O Point 3).
Output - Anti-drop feature This output is typically wired to actuate the unclamping mecha- See I/O Point 3 Settings description.
(Unclamp Control)
nism of an end effector tooling. It turns on when Input #3 (see I/O
Point 3) is on and the Anti-Drop algorithm determines the suspended load is at or below the set weight (ANTIDROP TOOL WT).
If it is not turned on, the input can be held momentarily (do not
hold on indefinitely) until the tooling is unloaded then the output is
turned on. Once the output turns on, it remains latched on when
the input is released. It is always turned off with Input #2 (see I/O
Point 2).
Assigned Function
Description
* G-Force® must have Float Mode feature enabled for this feature to work.
Chart 9. Expansion 8-Point Input/Output Block.
WARNING
Please be aware that software versions prior to R1.07.0 use I/O
block model X67BC7321, while those with R1.07.0 and newer
require the X67BC7321-1 model. The model number can be
found at the left side of the block when placed in the orientation
as shown in the diagram. The running software version can be
checked through DISPLAY SYS INFO selection under SERVICE
MENU in PROGRAM MODE.
Diagram 5. Handle Input/Output Block.
5-15
7/11
G-Force® Q - iQ Service Manual
Gorbel Inc.
Chapter 6 - Software Update
Gorbel® G-Force® Q/iQ units are shipped out of the factory with the latest released software.
The software will be continuously improved by adding new Q or iQ features, expanded feature
capabilities, bug fixes, or even a new product line. When a software update or a standard release
version is ready, it can be deployed into an existing unit with the Gorbel® Q/iQ Update Utility
program. The program can connect to the unit, retrieve and store its current settings, upload the
new software version and restore the original settings. This program MUST BE used to update
the software for the users and followed through properly. Any alternative method may corrupt the
unit configuration and result in an inoperable unit.
Gorbel® G-Force Software Update Instructions
The following instructions pertain to running the Gorbel® Q/iQ Update Utility for Gorbel®
G-Force® units.
Installation
Upon insertion of the CD, the installation program should start automatically. If it does not,
navigate to the CD in Windows Explorer and run the program called GorbelUpdate.msi.
At this point, if you do not have the .NET 2.0 Framework installed on your computer (this is
included with most XP and Vista computers) you will be prompted to download and install this
before proceeding.
With the .NET 2.0 Framework installed you will be prompted to install the Gorbel® Q/iQ Update
Utility on your computer.
6-1
7/11
G-Force® Q - iQ Service Manual
Gorbel Inc.
Click the Next buttons until the software installation is complete and then click Close at the
following screen.
Starting the Program
Now that the program is installed, you may run the program from the icon on your desktop.
You may also run the program using the Start Menu from the Gorbel Inc group.
Using the Program
On program start-up, you will see a prompt reminding you that at times during the update you
may see a pop-up box like the one shown below. This is expected and merely needs to be closed
to continue with the update.
7/11
6-2
G-Force® Q - iQ Service Manual
Gorbel Inc.
Step 1
To begin the software update process, choose the location to save temp files that are created by
the program. The program may be left at its default (C:\temp) or click the Select Folder button
and choose an alternate folder anywhere on the computer.
Step 2
In this step, select the port on the computer that is connected to the G-Force® unit. The program
will return an error when attempting to connect to the G-Force® in step 2 if the correct COM port
is not chosen.
Step 3
This step begins the software update process by saving the current unit’s settings so that they
may be restored following the software update. Click the Retrieve and Store Current Settings
button shown below to start the process. A prompt will appear at this point to ensure that the
E-stop button is pressed before proceeding with the retrieval.
6-3
7/11
G-Force® Q - iQ Service Manual
Gorbel Inc.
After this pop-up window closes, the status of the retrieval may be followed in the gauge below
the button and in the Status and Messages window at the bottom of the screen.
When the retrieval process is complete, this will be indicated by a green success label next to the
progress gauge.
7/11
6-4
G-Force® Q - iQ Service Manual
Gorbel Inc.
Step 4
This step involves choosing the location of the update file that you need to run for the G-Force®
unit. The location of this file may be on the CD that contained the Gorbel® Q/iQ Update Utility,
sent separately on a CD or delivered via the internet. In any case, contact Gorbel to ensure that
the correct update package is being utilized. After confirmation, select the PIL file and click the
Open button in the file dialog window.
The selected file name will then be displayed in the program window.
6-5
7/11
G-Force® Q - iQ Service Manual
Gorbel Inc.
Step 5
With the update program selected, it is now time to run the software update. Upon clicking the
Run Q/iQ Software Update button, the PVI Transfer program will open in a separate window.
This update can take up to 10-15 minutes, but the program will show the current progress so that
status of the update can be monitored. At this time do not make any adjustments to the G-Force®
unit or press any buttons in the PVI Transfer or Gorbel® Q/iQ Update Utility windows.
When the software update is complete, a pop-up box will appear as a reminder to cycle the
power of the G-Force® unit before proceeding.
7/11
6-6
G-Force® Q - iQ Service Manual
Gorbel Inc.
Step 6
For the final step of the update process, the previous settings need to be restored to the unit.
Click the Restore Settings button and the progress of the restore process will be shown in a
gauge beneath the button, as well as in the Status and Messages box at the bottom of the
program window. You will be prompted to depress the E-stop button before beginning the
retrieval process.
After the retrieval process is complete, a green label next to the Restore Settings button will
indicate success.
At this point, the G-Force® unit should be ready to function using the updated software.
Other Functions
There are three additional buttons at the bottom of the program window that perform additional
functions. During the normal update process there should be no reason to use these buttons and
are only present for debugging when working in conjunction with Gorbel to address problems that
may occur during the update process.
Connection Status
This button informs the user of the connection status of the Task, CPU and Service between the
G-Force® unit and the computer.
6-7
7/11
G-Force® Q - iQ Service Manual
Gorbel Inc.
Disconnect PLC
This button manually disconnects the PLC from the computer that is performing the update.
PVI Manager Status
This button informs the user of the PVI manager status. The PVI manager allows the G-Force®
to share information with the computer.
7/11
6-8
G-Force® Q - iQ Service Manual
Gorbel Inc.
Chapter 7 - Troubleshooting
Troubleshooting Procedure
If your system does not appear to be functioning properly, the following statements will help you
identify which section of this chapter to refer to.
A. If you are unfamiliar with how the system is supposed to operate, read the G-Force®
Operational Guidelines, Lift Functionality and Program Mode sections of the G-Force® Q and
iQ Series Installation and Operation Manual.
B. If the system has a functional failure such as the system does not move in one direction, Float
Mode does not work or you have a blank LCD screen on the control handle, refer to
Troubleshooting Section I: Functional Failure Table in this chapter of the Service Manual.
C. If you have a message or fault displayed on the LCD screen on the control handle, refer to
Troubleshooting Section II: System Fault Diagnostic Chart in this chapter of the Service
Manual.
D. If there is something visually wrong such as a damaged wire rope, damaged coil cord or
something obviously broken or out of position, refer to Chapter 10 - Parts and Assembly or
Chapter 11 - Preventative Maintenance in this Service Manual to identify the correct
orientation or replacement criteria for any component.
If none of the above statements described your problem, contact your Gorbel® distributor first, or
Gorbel® Inside Sales at 800-821-0086, for assistance. Please have your system serial number
available when you call. It can be found on a label on the bottom of the actuator or on the bottom
of the control handle. Refer to the pictures below for the location of the serial number label.
Actuator Label
Handle Label
7-1
7/11
G-Force® Q - iQ Service Manual
Gorbel Inc.
Troubleshooting Section I: Functional Failure Table
#
1
Functional
Failure
Blank handle
display
Note: The LCD
screen will go into
screen saver mode
after 17 minutes of
inactivity.
Possible
Cause(s)
Handle mother
board
No DC power to
handle
Communication
Failure
Suspect Component(s)
Damaged / defective mother board
Blown fuse F7 on main PCB
Handle failure
Broken or damaged coil cord or
connector
Loose connector (any applicable cable
connection)
Incorrect cable
Drive fault
PLC (CPU) failure
2 Handle display
System
Handle mother board
reads:
network
########
communication Any CAN bus cable or connection inside
########
to the handle actuator or handle
Coil cord or pendant cable
is lost.
3
4
No Actuator
LEDs
Unit will not
move up or
down with
handle
8-3 thru 8-5
Repair or tighten connector
8-3 thru 8-5
7-5
10-15
Replace cable with correct part
Refer to Drive Fault tables
Replace PLC (CPU)
10-41, 10-57
Replace slide or pendant handle
mother board
Repair or replace cable
8-3 thru 8-5
10-65, 10-69
PLC (CPU) failure
10-15
AC power cable Damaged or defective power cable
8-4
Drive power Damaged or defective drive cable
cable
Handle mother Damaged or defective mother board
board
DC power
Damaged or defective 24 VDC power
supply or wiring
Drive LED
Damaged or defective LEDs on the
ACOPOS drive
Cable or
Loose or disconnected cable (78608)
connection
8-3
Limit switches A limit switch is actuated
A limit switch is broken
Switch wiring to mother board is
disconnected or broken
Fault present Unknown
Handle failure Blown fuse (F7)
Handle mother board failure
Handle operator present sensor failure
Broken linear transducer core
Any loose connector
CAN bus
E-stop switch
Mechanical handle failure
Coil cord or Broken cable
pendant cable Loose connector
Incorrect cable
Operator error Virtual limits set incorrectly
Cable
Loose or disconnected cable (78613)
connection
ACOPOS Drive See drive fault # to identify cause, e.g.:
Fault
• input drive fluctuation
• drive overcurrent
• drive or motor over-temperature
• broken or loose motor cable
• broken or loose encoder cable
PLC (CPU) PLC (CPU locked up in error state
failure
7/11
Location
Corrective Action
(page reference)
10-41, 10-57 Replace slide or pendant handle
mother board
10-10
Replace F7 fuse on actuator
main PCB
N/A
Repair or replace handle
10-65 thru 10-69 Repair or replace coil cord
7-2
10-41, 10-57
10-15, 8-4
10-13, 8-3
8-3
10-35
10-35
8-4
Repair or replace coil cord or
pendant cable
Replace PLC (CPU)
Repair or replace AC power
cable
Replace drive cable
Replace slide or pendant handle
mother board
Repair wiring, replace DC power
supply
Replace the ACOPOS drive
Repair or replace cable
assembly
Jog the unit off the switch
Replace the limit switch
Repair the wiring or connection
7-4, 7-8 thru 7-24 Refer to Section II
8-4, 10-10
Replace F7 fuse
10-41, 10-57 Replace slide or pendant handle
mother board
10-40
Repair or replace operator
present sensor
10-44
Repair or replace linear
transducer core
8-4, 8-5
Repair or tighten connections
8-3 thru 8-5
Repair or replace CAN bus
cables
10-41, 10-60 Repair or replace E-stop switch
N/A
Repair or replace handle
8-5
Replace cable
8-5
Retighten connection
8-5
Replace with correct cable
5-5
Check / reset virtual limits
8-4
Reconnect / retighten cable
connection
7-8 thru 7-24 Follow the recommended
remedy for each fault
10-15
Replace the PLC (CPU)
G-Force® Q - iQ Service Manual
#
5
6
Functional
Failure
Unit will not
move up or
down in Float
Mode
Unit only
moves in the
up direction
Possible
Cause(s)
Option not
installed
Gorbel Inc.
Suspect Component(s)
Loadcell not installed inside actuator
Software not configured
Loadcell cable Loadcell cable to main PCB
disconnected or damaged
Loadcell
Loadcell is damaged or defective
Loadcell pin Loadcell pin is damaged / defective
Handle
Pushbutton or switch is broken
pushbutton
Cable
Loose or disconnected cable (78613)
connection
Handle failure Handle mother board failure
Linear transducer failure
Coil cord or Broken conductor
pendant cable
Actuator wiring Broken conductor
Down limit switch Limit switch failure
Unit only
moves in the
down direction
Linear transducer failure
Broken conductor
10-41, 10-57
5-5
Broken conductor
Limit switch failure
Falsely programmed upper virtual limit,
under dual VL setup
Falsely activating a custom feature that
stops all upward movement
Float Mode: loadcell maximum capacity
reached
Linear transducer failure
Linear transducer adjustment
Damaged / defective handle mother
board
Damaged operator present sensor:
falsely keep unit running
Damaged / defective motor brake
Custom feature: input to Auto Move
falsely turned on
9
Jog switches
not functioning
Actuator PCB
Drive module
Module cable
Cable
connection
10
Unit moves
noticeably
faster in one
direction than
the other
Handle linear
transducer
Replace loadcell
Repair / replace loadcell pin
Replace pushbutton or handle
mother board
Repair or replace the cable
Replace slide or pendant handle
mother board
Repair linear transducer
Repair or replace coil cord or
pendant cable
Repair or replace cable
Replace down limit switch
Check / reset virtual limits
None
Avoid this condition
None
Decrease load
10-41, 10-57
10-41
8-5
8 Load continues Handle linear
to drop after
transducer
Handle mother
handle is
PCB
released
Handle operator
present sensor
Motor brake
Operation
11 Float Mode is
no smooth
and/or weight
readout is
inaccurate
8-4
8-3, 8-4
10-35
Handle failure Handle mother board failure
Coil cord or
pendant cable
Actuator wiring
Up limit switch
Operator error
10-22, 10-23
10-22, 10-23
10-42, 10-60
10-41
8-5
Operator error Falsely programmed lower virtual limit,
under dual VL setup
Falsely activating a custom feature that
stops all downward movement
Float Mode: loadcell maximum capacity
reached
7
Location
Corrective Action
(page reference)
10-22, 10-23 Contact your Gorbel® distributor
for option
6-1
Reload software
8-4
Reconnect or replace loadcell
8-3, 8-4
10-35
5-5
Replace slide or pendant handle
mother board
Replace linear transducer
Repair or replace coil cord or
pendant cable
Repair or replace cable
Replace up limit switch
Check / reset virtual limits
None
Avoid this condition
None
Decrease load
10-17, 10-18
None
Replace linear transducer
Adjust linear transducer
Replace slide or pendant handle
mother board
Replace operator present
sensor
Replace motor
Avoid this condition
Damaged / defective actuator PCB
Damaged / defective drive module
Damaged / defective drive cable
Loose or disconnected cable (78608)
10-10
10-13
8-3
8-4
Replace actuator main PCB
Replace ACOPOS drive module
Replace the cable
Replace motor drive cable
Linear transducer failure
10-41
Replace linear transducer
Coil cord wear Coil cord bracket is bent or out of
ring is binding position
inside actuator
opening
7-3
10-41
9-4
10-41, 10-57
10-40
10-65 thru 10-68 Replace or reform coil cord
bracket
7/11
G-Force® Q - iQ Service Manual
#
12
13
Functional
Failure
Constant
“E-Stop
Engaged”
Message
“Excessive
Pause”
Message
Gorbel Inc.
Possible
Suspect Component(s)
Location
Corrective Action
Cause(s)
(page reference)
Communication Any communication interruption between
8-3
Check all applicable
failure
the E-stop switch and the servo drive
connections: handle, coil cord,
G360™
E-stop switch E-stop switch
10-41, 10-60 Replace the E-stop switch
failure
Operator present Sliding Handle: Operator present sensor
sensor is
blocked for more
than 60 seconds Pendant Handle: Either lever
14 Air Leaking at O-rings are worn O-rings
Swivel
or undersized
Assembly
15 Weight readout
is not accurate
(within 1%)
and/or Float
Mode is
“jumpy”
Load plate
movement is
restricted
10-40
Clean the sensor and remove
any blockage
10-53
Look for interference with the
levers
10-38, 10-73
Replace the o-rings and
lubricate with general purpose
non-synthetic grease
Coil cord bracket and/or nylon wear ring 10-65 thru 10-68 Check for bent coil cord bracket
is out of position
or nylon wear ring is not
positioned correctly
16 4005 & 7219 Servo DC Bus AC supply voltage is out of spec: should
Drive Faults voltage is out of be between 208 & 242 VAC
spec
2-1, 3-7
Find a suitable AC voltage
source
17 501 & 11001 Slack and upper Slack and upper limit switch. Usually
Drive Faults limit switch are only occurs with Suspended Pendant
actuated at the applications
same time
10-35
Add weight to the swivel hook,
power off the system and power
the system back on. Use the
down jog button to move the
load down away from the upper
limit switch.
18 32011, 32189, Communication Swivel assembly slip rings
6015
failure
Communication
Faults
10-76
Clean and lubricants slip rings
(Deoxit) or replace if worn
excessively
7/11
7-4
G-Force® Q - iQ Service Manual
Gorbel Inc.
Troubleshooting Section II: System Fault Diagnostics Chart
Under certain conditions, a system fault or warning message may appear on the LCD screen or
the G-Force® handle along with either the red or blue LED flashing. The system fault or warning
message can be one of the following:
1. Command faults - describes faults detected by the PLC while executing a command that
results in a system shutdown with a message displayed on the LCD screen.
2. Command warnings - describes a condition that will allow the system to continue to
operate with a message being displayed on the LCD screen until that message is cleared
using Program Mode. Note: The warning is cleared through Program Mode or cycling the
power or E-stop if the warning is not repetitive.
3. ACOPOS Drive fault - describes faults detected in the drive that result in a shutdown and a
drive fault message displayed on the LCD screen.
The recovery from these may require the cycling off/on of the E-stop switch or AC power source.
Note: The latter must be done by disconnecting the AC power cord, using an electrical
disconnect device or a circuit breaker.
It is also possible that the fault clearance may require a more specific corrective action such as
reloading system software (see Chapter 6), replacing the wire rope, checking certain external
input/output modules or some other service-related task. If necessary, check with your Gorbel®
distributor or contact Gorbel® Inside Sales at 800-821-0086 for assistance.
Q-iQ Unit Fault/Error/Warning Categories
Command Faults
These are faults detected by the PLC while executing a command and will result in unit shutdown
with the command fault message on the LCD.
Sub-Category
1. Unit Configuration Setting
2. Supplemental tools
3. Hardware ID
4. Control Parameter Database
5. Process and Display Mode
6. Other Status
7. Non-Motion Watchdog Timer
8. Motion Control
9. Custom Motion Control
10. Motion Command Watchdog Timer
Fault Examples
Mismatched configuration settings
Problem saving configuration settings
Drive not ready to run
Digital input or output location outside range
A processing or I/O control feature resulted in shutdown
Both travel limits are trigged during power up
A checkup or process causes system to hang up
Drive not ready to run
Multiple Virtual Limit targets detected
A Run Mode process causes system to hang up
Command Warnings
Allows unit to continue to operate with warning message on the LCD the whole time until the
warning is cleared through processed steps such as clearing the cycle counts through Program
Mode.
Sub-Category
1. Process and Display Mode
2. Other Status
3. Non-Motion Watchdog Timer
4. Motion Control
5.
6.
7.
8.
Custom Motion Control
Motion Command Watchdog Timer
Service Mode
Fault Warning
Warning Examples
Multiple processes controlling LCD displays
PLC battery low power
A checkup or process causes system to hang up
Programming Upper and Lower Virtual limit at the same
position
Multiple features controlling motion commands
A non-critical Run Mode process causes system to hang up
Wire rope replacement
Handle electronics generated fault
7-5
7/11
G-Force® Q - iQ Service Manual
Gorbel Inc.
ACOPOS Drive Fault
When the ACOPOS drive detects a fault, unit is shutdown with drive fault message displayed on
the LCD.
List of Drive Fault Types:
Sub-Category
1. SPT Drive Command
Description and Examples
PLC command to the drive, e.g. E#1 invalid parameter
Communication and information exchange between the PLC
2. PLC Drive Communication
and the drive, e.g. E#1004 communication network timeout
CAN communication condition, e.g. E#6015 received data in
3. CAN Communication
the CAN network is corrupted
4. CPU Processing
CPU running, e.g. E#1016, CPU doing too much work
5. Drive Error State
Drive in error state (E#4005) and other fault messages
Motor position sensor problem, e.g. E#7045 corrupted
6. Position Encoder
sensor data
7. E-Stop Enable Input
E-stop signal integrity, e.g. E#6021 signal is turned off
8. Input Power
Drive line voltage condition, e.g. E#7211 line power low
9. System Setup
Software processing, e.g. E#32131 missing data
10. Motor, Regen, and Junction Temperature Motor temperature status, e.g. E#9010 motor overheat
11. Motor Drive Over Current
Drive current status, e.g. E#9300 over current
12. Not Handled
All other less common drive faults
Known Drive Fault Error Numbers Corresponding to Each Category:
Error # History
1, 1003, 1017, 1018, 1021
1004, 32011, 32061, 32189
6015, 6016
1016
4005
5034, 7045, 7046
6021, 6023, 6048
7211, 7215, 7217, 7219
32131
9002, 9010, 9030, 9031, 9040, 9070, 9071, 41011, 41031,
10. Motor, Regen, and Junction Temperature
41041, 41070
11. Motor Drive Over Current
9050, 9051, 9060, 9061, 9300, 41051, 41061
12. Not Handled
All others
1.
2.
3.
4.
5.
6.
7.
8.
9.
Sub-Category
SPT Drive Command
PLC Drive Communication
CAN Communication
CPU Processing
Drive Error State
Position Encoder
E-Stop Enable Input
Input Power
System Setup
Multiple drive faults can occur at one time and are displayed serially on the LCD screen. The first
displayed drive fault number is often the initial cause that lead to subsequent triggered faults and
is thus a good indicator to the true cause. However, this is not always the case as E#4005 (Drive
Error State category) always precedes other error numbers that are the cause(s) of the shutdown.
User should identify the fault category corresponding to the drive fault number(s) as a quick
reference to the potential type of problem encountered. User may attempt basic troubleshooting
checkup or repair. For example, if the fault category is “CAN Communication”, check all the cable
wiring and connectors for loose connections. If the fault category is “Motor, Regen, and Junction
Temperature”, user can let the unit cool down before reusing the unit.
Another approach may be referencing Troubleshooting Section I: Functional Failure Table for
similar failure condition and perform the suggested corrective action(s).
Users should contact their dealer or Gorbel® Inside Sales for additional support and any
questions about the encountered problem, corrective action, or replacement parts.
7/11
7-6
G-Force® Q - iQ Service Manual
Gorbel Inc.
Corrective Action Summary
Use the following table to identify the appropriate corrective action for the specific faulted
condition
Fault Category
Command Faults
LCD Error # Displayed
LCD Error Message
Corrective Action
1 - 9, 100 - 105,
110 - 122, 300 - 310
DOWNLOAD PROGRAM
Cycle Power
200, 201, 203, 204
CHK PLC HARDWARE
Cycle Power
202, 205, 206
CHK DRIV STATUS
Cycle Power
1600
EXTD S# NNNN
Cycle E-stop
0 ~ 9998
Command Warnings
Cycle Power
10400, 10401, 10402,
10403, 11001
CONTACT GORBEL
Cycle Power
10500
REPLACE BATTERY
Cycle Power
11000
RELEASE SWITCHES
Service is Required
11002
RE-PROGM OVERLOAD
Follow Overload
Program Instructions
11003
CHK HNDL HARDWARE
Cycle Power
11700, 11701
REPLACE WIREROPE
Clear Cycle Count after
wire rope replacement
11800, 11801, 11802
CHK HNDL ELECTRIC
Cycle E-stop
11803, 11804, 11805
CHK LCD ELECTRIC
Cycle Power
11806, 11807, 11808
CHK I/O MODULE
Cycle Power
11000 ~ 65534
Drive Faults
5034, 7045, 7046
All Other Drive Faults
1 ~ 64506
Cycle E-stop
ENCODER ERROR
Cycle E-stop
Reprogram Position
Cycle E-stop or Power
7-7
7/11
G-Force® Q - iQ Service Manual
Gorbel Inc.
LED Chart: The chart below shows the status of LED lights in different states.
ID
Program State
1
Blue
Red
Engaged
E-stop
Off
Off
2
Programming
Mode
On
On
3
Fault Mode or
Drive Fault
Off
On
4
Warning
Off
Fast Flash
5
Service
Warning
Fast Flash
Off
6
Service Mode
Slow Flash
Slow Flash
7
Startup
Process
Before Ready
Mode
On
On
10.a
Overload
Previous
Slow Flash
10.b
Still Motion
Previous
Slow Flash
Over-Speed
Previous
Slow Flash
Handle Mode
Previous
Previous
Float Mode
On
Off
On
On
Slow Flash
Off
Off
On
Off
Slow Flash
Off
Off
On
On
Slow Flash
Off
Off
On
Off
Slow Flash
10.c
Run Mode
Sub-State
10.d
11.a
11.b
11.c
11.d
Custom
Feature #N
20
Ready Mode
20.a
20.b
20.c
20.d
Custom
Feature #N
7/11
Display
Display
Display
Display
Display
Display
Display
Display
1
2
3
4
1
2
3
4
7-8
LCD Text Display
Displays “E-STOP ENGAGED”. This state can also be
used for troubleshooting if the E-stop is turned off
intentionally.
Overwrites fault, warning or service warning messages to
allow correction of the cause of the messages. Displays
“PROGRAM MODE”, various menu screens and selection
items. Please see “Program Mode” section for more
details.
LCD displays if unit is in command or drive fault, followed
by a fault number and a corrective message. Unit is shut
down until a corrective action is taken or cycling the
E-stop or main AC power.
LCD displays unit is in warning fault, followed by a fault
number and a corrective message. Unit is still allowed to
run but warning messages overwrite other normal
running messages defined in the latter cases.
Displays warnings for parts replacement
recommendations and those that require immediate
attention, e.g. wire rope replacement or PLC low battery
Because SERVICE MODE is meant to run for special
diagnostic purposes, it is shown before Service Warnings
such as cycle count warnings. Multiple diagnostic
messages are likely to be displayed here such as output
a live handle connection, pushbutton states (only a
special Jog Mode is running), etc.
Displays “UNIT POWER UP”. Unit is starting up (power up)
and executing necessary settings and self diagnostics.
Indicates unit is overloaded (factory or user defined) while
lifting.
Indicates unit maintains still for an extensive time while
running in a Run Mode application such as handle mode,
Float Mode, etc.
Indicates Float Mode control exceeded the over speed
limit and the unit is shutting down.
Displays run mode specific message such as RUN
MODE JOG, HANDLE, PENDANT or CUSTOM
Displays run mode specific messages such as
“--RECORD-- --DATA--” and RUN MODE FLOAT. The first
message indicates when the unit is collecting loadcell
data to perform Float Mode.
Displays custom feature messages for a custom motion
feature (Run Mode) that also requires using LEDs for
indication. More information may be found in the Custom
Feature description section.
Displays LIFT READY to indicate unit is idling and waiting
for response.
Displays custom feature messages for a custom feature
that also requires using LEDs for indication while the unit
is idling (in Ready Mode). More information may be found
in the Custom Feature description section.
G-Force® Q - iQ Service Manual
Gorbel Inc.
Q-iQ Unit: System, Motion and Feature Command Fault List (Software Version R1.07.0)
Command Faults - Unit Configuration Setting
Error #1 - ERROR_SERIAL_NUM_OBJ_SIZE_MISMATCH
Description: At startup, the stored PLC serial number in memory does not match the version the lift program uses or
it may be corrupted.
Reaction: Lift program terminates processing to prevent running with an unconfigured or potentially faulty PLC unit.
Cause / Remedy: Please contact Gorbel® Inside Sales at 800-821-0086 or 585-924-6262.
Error #2 - ERROR_SERIAL_NUM_OBJ_LOCATE
Description: At startup, the query command to locate the stored PLC serial number is returned with an error.
Reaction: Lift program terminates processing to prevent running with an unconfigured or potentially faulty PLC unit.
Cause / Remedy: Please contact Gorbel® Inside Sales at 800-821-0086 or 585-924-6262.
Error #3 - ERROR_SERIAL_NUM_OBJ_READ
Description: At startup, the query command to retrieve the stored PLC serial number is returned with an error.
Reaction: Lift program terminates processing to prevent running with an unconfigured or potentially faulty PLC unit.
Cause / Remedy: Please contact Gorbel® Inside Sales at 800-821-0086 or 585-924-6262.
Error #4 - ERROR_UNIT_OBJ_SIZE_MISMATCH
Description: At startup, the stored unit-specific configuration variable in memory does not match the version lift
program used.
Reaction: Lift program terminates processing to prevent running with an incorrect configuration setup.
Cause / Remedy: Run the Gorbel® supplied installation CD (i.e. Gorbel® G-Force® Q/iQ Software Downloader) and
select the “Download Q/iQ Software and Reset to Factory Default Configurations” option to reset any faulty settings.
All configuration settings (e.g. if unit is configured for Float Mode) and Q/iQ feature settings (e.g. virtual limit
positions) are cleared and reset to default.
Error #5 - ERROR_UNIT_OBJ_LOCATE
Description: At startup, the query command to locate the stored unit-specific configuration variable is returned with
an error.
Reaction: Lift program terminates processing to prevent running with an incorrect configuration setup.
Cause / Remedy: Run the Gorbel® supplied installation CD (i.e. Gorbel® G-Force® Q/iQ Software Downloader) and
select the “Download Q/iQ Software and Reset to Factory Default Configurations” option to reset any faulty settings.
All configuration settings (e.g. if unit is configured for Float Mode) and Q/iQ feature settings (e.g. virtual limit
positions) are cleared and reset to default.
Error #6 - ERROR_FACTORY_OBJ_SIZE_MISMATCH
Description: At startup, stored default factory configuration does not match the version lift program used.
Reaction: Lift program terminates processing to prevent running with an incorrect configuration setup.
Cause / Remedy: Run the Gorbel® supplied installation CD (i.e. Gorbel® G-Force® Q/iQ Software Downloader) and
select the “Download Q/iQ Software and Reset to Factory Default Configurations” option to reset any faulty settings.
All configuration settings (e.g. if unit is configured for Float Mode) and Q/iQ feature settings (e.g. virtual limit
positions) are cleared and reset to default.
Error #7 - ERROR_FACTORY_OBJ_LOCATE
Description: At startup, the query command to locate the default factory configuration is returned with an error.
Reaction: Lift program terminates processing to prevent running with an incorrect configuration setup.
Cause / Remedy: Run the Gorbel® supplied installation CD (i.e. Gorbel® G-Force® Q/iQ Software Downloader) and
select the “Download Q/iQ Software and Reset to Factory Default Configurations” option to reset any faulty settings.
All configuration settings (e.g. if unit is configured for Float Mode) and Q/iQ feature settings (e.g. virtual limit
positions) are cleared and reset to default.
7-9
7/11
G-Force® Q - iQ Service Manual
Gorbel Inc.
Error #8 - ERROR_NO_FACTORY_SETTINGS
Description: At startup, the default factory configuration setting does not exist in memory. This check only takes
place when unit-specific configuration cannot be found or a deleted factory setting command is performed.
Reaction: Lift program terminates processing to prevent running with an incorrect configuration setup.
Cause / Remedy: Run the Gorbel® supplied installation CD (i.e. Gorbel® G-Force® Q/iQ Software Downloader) and
select the “Download Q/iQ Software and Reset to Factory Default Configurations” option to reset any faulty settings.
All configuration settings (e.g. if unit is configured for Float Mode) and Q/iQ feature settings (e.g. virtual limit
positions) are cleared and reset to default.
Error #9 - ERROR_UNIT_OBJ_READ
Description: At startup, the retrieval of the stored unit-specific or default factory configuration setting in memory is
returned with an error.
Reaction: Lift program terminates processing to prevent running with an incorrect configuration setup.
Cause / Remedy: Run the Gorbel® supplied installation CD (i.e. Gorbel® G-Force® Q/iQ Software Downloader) and
select the “Download Q/iQ Software and Reset to Factory Default Configurations” option to reset any faulty settings.
All configuration settings (e.g. if unit is configured for Float Mode) and Q/iQ feature settings (e.g. virtual limit
positions) are cleared and reset to default.
Command Faults - Supplemental Tools
Error #100 - ERROR_DUMMY_SERIAL_NUM_OBJ_CHECK
Description: An error has occurred when checking if a temporary PLC serial number variable exists. This fault can
only be triggered during the factory setup process or by authorized personnel attempting to record the PLC serial
number.
Reaction: Lift program terminates processing to prevent running with an incorrect configuration setup.
Cause / Remedy: Please contact Gorbel® Inside Sales at 800-821-0086 or 585-924-6262.
Error #101 - ERROR_DUMMY_SERIAL_NUM_OBJ_DELETE
Description: An error has occurred while deleting the stored temporary PLC serial number during the factory setup
process.
Reaction: Lift program terminates processing to prevent running with an incorrect configuration setup.
Cause / Remedy: Please contact Gorbel® Inside Sales at 800-821-0086 or 585-924-6262.
Error #102 - ERROR_SERIAL_NUM_OBJ_CHECK
Description: An error has occurred while checking if a stored PLC serial number exists.
Reaction: Lift program terminates processing to prevent running with an incorrect configuration setup.
Cause / Remedy: Please contact Gorbel® Inside Sales at 800-821-0086 or 585-924-6262.
Error #103 - ERROR_SERIAL_NUM_OBJ_DELETE
Description: Prior to saving the PLC serial number, the last stored version is deleted and an error is returned while
the command is executed.
Reaction: Lift program terminates processing to prevent running with an incorrect configuration setup.
Cause / Remedy: Please contact Gorbel® Inside Sales at 800-821-0086 or 585-924-6262.
Error #104 - ERROR_SERIAL_NUM_OBJ_CREATE_DUMMY
Description: A temporary PLC serial number variable is created prior to saving but an error has occurred while the
command is executed.
Reaction: Lift program terminates processing to prevent running with an incorrect configuration setup.
Cause / Remedy: Please contact Gorbel® Inside Sales at 800-821-0086 or 585-924-6262.
Error #105 - ERROR_SERIAL_NUM_OBJ_COPY
Description: While copying the temporary PLC serial number into memory, an error has occurred while the
command is executed.
Reaction: Lift program terminates processing to prevent running with an incorrect configuration setup.
Cause / Remedy: Please contact Gorbel® Inside Sales at 800-821-0086 or 585-924-6262.
7/11
7-10
G-Force® Q - iQ Service Manual
Gorbel Inc.
Error #110 - ERROR_SAVE_UNIT_OBJ_SIZE_MISMATCH
Description: Prior to saving the current unit-specific configuration setting into memory, when checking the last stored
version with this version, they are not compatible.
Reaction: Lift program terminates processing to prevent running with an incorrect configuration setup.
Cause / Remedy: Run the Gorbel® supplied installation CD (i.e. Gorbel® G-Force® Q/iQ Software Downloader) and
select the “Download Q/iQ Software and Retain Existing Configurations” option to clear the faulty memory and retain
the latest configuration settings (e.g. if unit is configured for Float Mode) and Q/iQ feature settings (e.g. virtual limit
positions). For custom iQ units, all custom feature settings such as position or weight settings are not retained and
are reset to default settings as specified for the unit.
Error #111 - ERROR_SAVE_UNIT_OBJ_CHECK
Description: Prior to saving the current unit-specific configuration setting into memory, an error has occurred when
checking if a stored version exists.
Reaction: Lift program terminates processing to prevent running with an incorrect configuration setup.
Cause / Remedy: Run the Gorbel® supplied installation CD (i.e. Gorbel® G-Force® Q/iQ Software Downloader) and
select the “Download Q/iQ Software and Retain Existing Configurations” option to clear the faulty memory and retain
the latest configuration settings (e.g. if unit is configured for Float Mode) and Q/iQ feature settings (e.g. virtual limit
positions). For custom iQ units, all custom feature settings such as position or weight settings are not retained and
are reset to default settings as specified for the unit.
Error #112 - ERROR_SAVE_UNIT_OBJ_DELETE
Description: Prior to saving the current unit-specific configuration setting into memory, the last stored version is first
deleted. An error has occurred during the delete command.
Reaction: Lift program terminates processing to prevent running with an incorrect configuration setup.
Cause / Remedy: Run the Gorbel® supplied installation CD (i.e. Gorbel® G-Force® Q/iQ Software Downloader) and
select the “Download Q/iQ Software and Retain Existing Configurations” option to clear the faulty memory and retain
the latest configuration settings (e.g. if unit configured for Float Mode) and Q/iQ feature settings (e.g. virtual limit
positions). For custom iQ units, all custom feature settings such as position or weight settings are not retained and
are reset to default settings as specified for the unit.
Error #113 ERROR_SAVE_UNIT_OBJ_FREE
Description: Prior to saving the current unit-specific configuration setting into memory, an error has occurred while
determining the available free memory space to store into PLC.
Reaction: Lift program terminates processing to prevent running with an incorrect configuration setup.
Cause / Remedy: Run the Gorbel® supplied installation CD (i.e. Gorbel® G-Force® Q/iQ Software Downloader) and
select the “Download Q/iQ Software and Retain Existing Configurations” option to clear the faulty memory and retain
the latest configuration settings (e.g. if unit is configured for Float Mode) and Q/iQ feature settings (e.g. virtual limit
positions). For custom iQ units, all custom feature settings such as position or weight settings are not retained and
are reset to default settings as specified for the unit.
Error #114 - ERROR_SAVE_UNIT_OBJ_CLEAR
Description: Prior to saving the current unit-specific configuration setting into memory, the program found limited
memory space available for storage. A clear memory command is executed but an error is returned.
Reaction: Lift program terminates processing to prevent running with an incorrect configuration setup.
Cause / Remedy: Run the Gorbel® supplied installation CD (i.e. Gorbel® G-Force® Q/iQ Software Downloader) and
select the “Download Q/iQ Software and Retain Existing Configurations” option to clear the faulty memory and retain
the latest configuration settings (e.g. if unit is configured for Float Mode) and Q/iQ feature settings (e.g. virtual limit
positions). For custom iQ units, all custom feature settings such as position or weight settings are not retained and
are reset to default settings as specified for the unit.
Error #115 - ERROR_SAVE_UNIT_OBJ_STORE
Description: When saving the current unit-specific configuration setting into memory, an error is returned.
Reaction: Lift program terminates processing to prevent running with an incorrect configuration setup.
Cause / Remedy: Run the Gorbel® supplied installation CD (i.e. Gorbel® G-Force® Q/iQ Software Downloader) and
select the “Download Q/iQ Software and Retain Existing Configurations” option to clear the faulty memory and retain
the latest configuration settings (e.g. if unit is configured for Float Mode) and Q/iQ feature settings (e.g. virtual limit
positions). For custom iQ units, all custom feature settings such as position or weight settings are not retained and
are reset to default settings as specified for the unit.
7-11
7/11
G-Force® Q - iQ Service Manual
Gorbel Inc.
Error #120 - ERROR_FACTORY_OBJ_CREATE
Description: An error has occurred when creating a dummy factory configuration variable.
Reaction: Lift program terminates processing to prevent running with an incorrect configuration setup.
Cause / Remedy: Run the Gorbel® supplied installation CD (i.e. Gorbel® G-Force® Q/iQ Software Downloader) and
select the “Download Q/iQ Software and Reset to Factory Default Configurations” option to reset any faulty settings.
All configuration settings (e.g. if unit is configured for Float Mode) and Q/iQ feature settings (e.g. virtual limit
positions) are cleared and reset to default.
Error #121 - ERROR_FACTORY_OBJ_COPY
Description: An error has occurred while copying the dummy factory configuration to be the default factory
configuration.
Reaction: Lift program terminates processing to prevent running with an incorrect configuration setup.
Cause / Remedy: Run the Gorbel® supplied installation CD (i.e. Gorbel® G-Force® Q/iQ Software Downloader) and
select the “Download Q/iQ Software and Reset to Factory Default Configurations” option to reset any faulty settings.
All configuration settings (e.g. if unit is configured for Float Mode) and Q/iQ feature settings (e.g. virtual limit
positions) are cleared and reset to default.
Error #122 - ERROR_FACTORY_OBJ_DELETE
Description: An error has occurred while deleting the factory configuration from PLC.
Reaction: N/A
Cause / Remedy: Run the Gorbel® supplied installation CD (i.e. Gorbel® G-Force® Q/iQ Software Downloader) and
select the “Download Q/iQ Software and Reset to Factory Default Configurations” option to reset any faulty settings.
All configuration settings (e.g. if unit is configured for Float Mode) and Q/iQ feature settings (e.g. virtual limit
positions) are cleared and reset to default.
Command Faults - Hardware ID
Error #200 - ERROR_HW_ID_PLC_QUERY
Description: An error has occurred while identifying the PLC type and connected add-on modules, if any.
Reaction: N/A
Cause / Remedy:
(a) Check if a PLC model CP470 or CP474 is properly installed. If CP474 is used, check if the other expansion
cards such as DO435 are correctly attached.
(b) Run the Gorbel® supplied installation CD (i.e. Gorbel® G-Force® Q/iQ Software Downloader) and select the
“Download Q/iQ Software and Reset to Factory Default Configurations” option to reset any faulty settings. All
configuration settings (e.g. if unit is configured for Float Mode) and Q/iQ feature settings (e.g. virtual limit
positions) are cleared and reset to default.
Error #201 - ERROR_HW_ID_EXCESS_PLC_MODULE
Description: The PLC has identified more add-on modules than the maximum limit of 5.
Reaction: N/A
Cause / Remedy:
(a) Check if PLC model CP470 has any add-on modules.
(b) Check if PLC model CP474 has a DO435 add-on module.
(c) Reboot the unit.
(d) Run the Gorbel® supplied installation CD (i.e. Gorbel® G-Force® Q/iQ Software Downloader) and select the
“Download Q/iQ Software and Reset to Factory Default Configurations” option to reset any faulty settings. All
configuration settings (e.g. if unit is configured for Float Mode) and Q/iQ feature settings (e.g. virtual limit
positions) are cleared and reset to default.
(e) If problem persists, replace the component.
Error #202 - ERROR_HW_ID_DRIVE_NOT_READY
Description: At startup, 10 seconds after power cycling the system, the ACOPOS drive is still not ready for
operation.
Reaction: Lift program terminates processing to prevent running with incorrect configuration setup.
Cause / Remedy: PLC is not communicating with the ACOPOS drive due to:
i. Loose or disconnected communication CAN cable(s) in the system.
ii. PLC CAN communication component is not working.
iii. ACOPOS AC110 CAN communication card is not working.
iv. Interface circuit board has bad CAN cabling connection.
7/11
7-12
G-Force® Q - iQ Service Manual
Gorbel Inc.
Error #203 - ERROR_HW_MISMATCH_PLC
Description: At startup, found the identified PLC model type does not match any of the known models for this
system.
Reaction: Lift program terminates processing to prevent running with an incorrect configuration setup.
Cause / Remedy: Check if the installed PLC controller is of model CP470 or CP474, as labeled on its front cover.
i. Replace the module if an installation error has indeed occurred.
ii. Run the Gorbel® supplied installation CD (i.e. Gorbel® G-Force® Q/iQ Software Downloader) and select the
“Download Q/iQ Software and Reset to Factory Default Configurations” option to reset any faulty settings. All
configuration settings (e.g. if unit is configured for Float Mode) and Q/iQ feature settings (e.g. virtual limit positions)
are cleared and reset to default.
Error #204 - ERROR_HW_MISMATCH_PLC_MODULE
Description: At startup, found the identified modules for CP474 PLC model do not match the known modules for this
controller.
Reaction: Lift program terminates processing to prevent running with an incorrect configuration setup.
Cause / Remedy:
(a) Confirm the adapter module AF101 and the digital IO module DO435 are installed with the CP474 controller.
(b) If AF101 and DO435 modules are present, either one of them can be at fault. Replace as necessary.
Error #205 - ERROR_HW_MISMATCH_DRIVE (OBSOLETE)
Description: At startup, found an unknown ACOPOS drive.
Reaction: N/A
Cause / Remedy: Please contact Gorbel® Inside Sales at 800-821-0086 or 585-924-6262.
Error #206 - ERROR_HW_MISMATCH_DRIVE_MODULE
Description: At startup, found the identified ACOPOS plug-in modules do not match the known models for this
system.
Reaction: Lift program terminates processing to prevent running with an incorrect configuration setup.
Cause / Remedy: The designed plug-in modules are AC110, AC122, and AC131. If this error occurs:
(a) At least one unknown module is installed and should be removed.
(b) If correct modules are installed, at least one of them cannot be identified, possibly due to a faulty component.
Replace as necessary.
Error #207 - ERROR_HW_MOTOR_PAR_SETUP_FAULT
Description: At startup, the configuration of the motor settings of the unit is returned with an error.
Reaction: Lift program terminates processing to prevent running with an incorrect configuration setup.
Cause / Remedy: Run the Gorbel® supplied installation CD (i.e. Gorbel® G-Force® Q/iQ Software Downloader) and
select the “Download Q/iQ Software and Reset to Factory Default Configurations” option to reset any faulty settings.
All configuration settings (e.g. if unit is configured for Float Mode) and Q/iQ feature settings (e.g. virtual limit
positions) are cleared and reset to default.
Error #208 - ERROR_HW_MISMATCH_PLC_VS_SOFTWARE
Description: At startup, found the identified PLC model does not match the installed software version. A Q or iQ
software version must be installed into the corresponding PLC type.
Reaction: Lift program terminates processing to prevent running with an incorrect software program.
Cause / Remedy: Check if the installed PLC controller is of model CP470 or CP474, as labeled on its front cover.
i. Replace the module if an installation error has indeed occurred.
ii. Run the Gorbel® supplied installation CD (i.e. Gorbel® G-Force® Q/iQ Software Downloader) and re-install the
correct software version (Q or iQ) into the PLC. Note: Due to incorrect software installation earlier. the stored
feature configurations may be faulty. Therefore, it is also recommended to choose the “Reset Factory Default
Configurations” option when installing the updated software. All configuration settings (e.g. if unit is configured for
Float Mode) and Q/iQ feature settings (e.g. virtual limit positions) are cleared and reset to default.
7-13
7/11
G-Force® Q - iQ Service Manual
Gorbel Inc.
Command Faults - Control Parameter Database
Error #300 - ERROR_MACHINE_STYLE_INVALID
Description: At startup, found the stored configuration setting has an invalid machine style (i.e. G-Force®, Easy
Arm®, etc.) value.
Reaction: Lift program terminates processing to prevent running with an incorrect configuration setup.
Cause / Remedy: A critical configuration setting of the unit is corrupted and falsely set. Please contact Gorbel®
Customer Service at 800-821-0086 or 585-924-6262 for further instruction.
Error #301 - ERROR_MACHINE_EA_VERSION_INVALID
Description: At startup, found the stored configuration setting has an invalid Easy Arm® span and height version
value.
Reaction: Lift program terminates processing to prevent running with an incorrect configuration setup.
Cause / Remedy: A critical configuration setting of the unit is corrupted and falsely set. Please contact Gorbel®
Customer Service at 800-821-0086 or 585-924-6262 for further instruction.
Error #302 - ERROR_MACHINE_CAPACITY_INVALID
Description: At startup, found the stored configuration setting has an invalid capacity selection value.
Reaction: Lift program terminates processing to prevent running with an incorrect configuration setup.
Cause / Remedy: A critical configuration setting of the unit is corrupted or falsely set. Please contact Gorbel®
Customer Service at 800-821-0086 or 585-924-6262 for further instruction.
Error #310 - ERROR_CONTROL_DATABASE_NOT_FOUND
Description: At startup, found the stored configuration setting has an invalid index value to the control setting
database.
Reaction: Lift program terminates processing to prevent running with an incorrect configuration setup.
Cause / Remedy: Please contact Gorbel® Customer Service at 800-821-0086 or 585-924-6262.
Error #320 - ERROR_MULTI_FEATURES_PER_UNIT_CONFIGURATION
Description: At startup, found multiple Q/iQ feature configuration settings are set to use the same digital input
channel.
Reaction: Lift program terminates processing to prevent running with an incorrect configuration setup.
Cause / Remedy:
(a) Use the extended error index number to identify which Q/iQ feature contains the faulty setting. Use the VB
Configurator program (not yet available as of July 2010) to correct the false setting.
(b) Run the Gorbel® supplied installation CD (i.e. Gorbel® G-Force® Q/iQ Software Downloader) and select the
“Download Q/iQ Software and Reset to Factory Default Configurations” option to reset any faulty settings. All
configuration settings (e.g. if unit is configured for Float Mode) and Q/iQ feature settings (e.g. virtual limit
positions) are cleared and reset to default.
Error #321 - ERROR_MULTI_FEATURES_PER_OUTPUT_CONFIGURATION
Description: At startup, found multiple Q/iQ feature configuration settings are set to use the same digital output
channel.
Reaction: Lift program terminates processing to prevent running with an incorrect configuration setup.
Cause / Remedy:
(a) Use the extended error index number to identify which Q/iQ feature contains the faulty setting. Use the VB
Configurator program (not yet available as of July 2010) to correct the false setting.
(b) Run the Gorbel® supplied installation CD (i.e. Gorbel® G-Force® Q/iQ Software Downloader) and select the
“Download Q/iQ Software and Reset to Factory Default Configurations” option to reset any faulty settings. All
configuration settings (e.g. if unit is configured for Float Mode) and Q/iQ feature settings (e.g. virtual limit
positions) are cleared and reset to default.
7/11
7-14
G-Force® Q - iQ Service Manual
Gorbel Inc.
Error #322 - ERROR_INPUT_CONFIGURATION_OUT_OF_BOUND
Description: At startup, found a Q/iQ feature input channel configuration setting is outside the allowable range.
Reaction: Lift program terminates processing to prevent running with an incorrect configuration setup.
Cause / Remedy:
(a) Use the extended error index number to identify which Q/iQ feature contains the faulty setting. Use the VB
Configurator program (not yet available as of July 2010) to correct the false setting.
(b) Run the Gorbel® supplied installation CD (i.e. Gorbel® G-Force® Q/iQ Software Downloader) and select the
“Download Q/iQ Software and Reset to Factory Default Configurations” option to reset any faulty settings. All
configuration settings (e.g. if unit is configured for Float Mode) and Q/iQ feature settings (e.g. virtual limit
positions) are cleared and reset to default.
Error #323 - ERROR_OUTPUT_CONFIGURATION_OUT_OF_BOUND
Description: At startup, found a Q/iQ feature input channel configuration setting is outside the allowable range.
Reaction: Lift program terminates processing to prevent running with an incorrect configuration setup.
Cause / Remedy:
(a) Use the extended error index number to identify which Q/iQ feature contains the faulty setting. Use the VB
Configurator program (not yet available as of July 2010) to correct the false setting.
(b) Run the Gorbel® supplied installation CD (i.e. Gorbel® G-Force® Q/iQ Software Downloader) and select the
“Download Q/iQ Software and Reset to Factory Default Configurations” option to reset any faulty settings. All
configuration settings (e.g. if unit is configured for Float Mode) and Q/iQ feature settings (e.g. virtual limit
positions) are cleared and reset to default.
Error #324 - ERROR_FALSE_SETTING_CUS_MULTIPLE_VL_SETS
Description: At startup, found found configuration setting(s) for the multiple virtual limit (VL) sets standard iQ
feature. These conditions include:
1. Option A specifies the number of inputs directly linked to a VL set. For example, default standard set (all inputs
off), custom set 1 (input 1), custom set 2 (input 2), etc. The value cannot be greater than 4 for more than 5 VL
sets. Option B specifies the number of inputs to create a binary indexing format to link to VL set. For example, a
value 3 represents 3-digit binary where the first input is the least significant bit and they can index up to a total of
8 VL sets. Option B cannot be greater than 4 for more than 16 VL sets.
2. Option A and B cannot both be zero.
3. Either Option A or B must be non-zero.
4. The starting input channel number must be set.
Reaction: Lift program terminates processing to prevent running with an incorrect configuration setup.
Cause / Remedy:
(a) Use the extended error index number to identify which Q/iQ feature contains the faulty setting. Use the VB
Configurator program (not yet available as of July 2010) to correct the false setting.
(b) Run the Gorbel® supplied installation CD (i.e. Gorbel® G-Force® Q/iQ Software Downloader) and select the
“Download Q/iQ Software and Reset to Factory Default Configurations” option to reset any faulty settings. All
configuration settings (e.g. if unit is configured for Float Mode) and Q/iQ feature settings (e.g. virtual limit
positions) are cleared and reset to default.
Error #325 - ERROR_DUAL_ACTUATOR_SETTING_ON_Q_UNIT
Description: At startup, found Dual Actuator feature is falsely configured on the Q system. This is an iQ only feature
and is not currently available for iQ Easy Arm™ system.
Reaction: Lift program terminates processing to prevent running with an incorrect configuration setup.
Cause / Remedy:
(a) Contact Gorbel Inc. regarding the purchased unit to determine if a mismatched order, CPU model, or software
version has been installed. It may be necessary to send the unit back to Gorbel Inc. for proper reconfiguration.
(b) Run the Gorbel® supplied installation CD (i.e. Gorbel® G-Force® Q/iQ Software Downloader) and select the
“Download Q/iQ Software and Reset to Factory Default Configurations” option to reset any faulty settings. All
configuration settings (e.g. if unit is configured for Float Mode) and Q/iQ feature settings (e.g. virtual limit
positions) are cleared and reset to default.
Note: Please do not perform this action if the fault is caused by (a).
7-15
7/11
G-Force® Q - iQ Service Manual
Gorbel Inc.
Error #326 - ERROR_MISSING_INPUT_CHANNEL
Description: At startup, found an iQ feature is misconfigured, specifically a required digital input channel location is
missing.
Reaction: Lift program terminates processing to prevent running with an incorrect configuration setup. Handle
displays this command fault followed by an extended error index number referencing the iQ feature with the faulty
setting.
Cause / Remedy:
(a) Use the extended error index number to identify which Q/iQ feature contains the faulty setting. Use the VB
Configurator program (not yet available as of July 2010) to correct the false setting.
(b) Run the Gorbel® supplied installation CD (i.e. Gorbel® G-Force® Q/iQ Software Downloader) and select the
“Download Q/iQ Software and Reset to Factory Default Configurations” option to reset any faulty settings. All
configuration settings (e.g. if unit is configure for Float Mode) and Q/iQ feature settings (e.g. virtual limit
positions) are cleared and reset to default.
Error #327 - ERROR_MISSING_OUTPUT_CHANNEL
Description: At startup, found an iQ feature is misconfigured, specifically a required digital output channel location is
missing.
Reaction: Lift program terminates processing to prevent running with an incorrect configuration setup. Handle displays this command fault followed by and extended error index number referencing the iQ feature with the faulty
setting.
Cause / Remedy:
(a) Use the extended error index number to identify which Q/iQ feature contains the faulty setting. Use the VB
Configurator program (not yet available as of July 2010) to correct the false setting.
(b) Run the Gorbel® supplied installation CD (i.e. Gorbel® G-Force® Q/iQ Software Downloader) and select the
“Download Q/iQ Software and Reset to Factory Default Configurations” option to reset any faulty settings. All
configuration settings (e.g. if unit is configured for Float Mode) and Q/iQ feature settings (e.g. virtual limit
positions) are cleared and reset to default.
Error #331 - ERROR_X67_1_IO_MASK_SETUP
Description: At startup, unit detects an error while configuring the first X67 spare IO module based on the
configuration setting.
Reaction: Lift program terminates processing to prevent running with an incorrect configuration setup.
Cause / Remedy:
(a) Use the extended error index number to identify which Q/iQ feature contains the faulty setting. Use the VB
Configurator program (not yet available as of July 2010) to correct the false setting.
(b) Run the Gorbel® supplied installation CD (i.e. Gorbel® G-Force® Q/iQ Software Downloader) and select the
“Download Q/iQ Software and Reset to Factory Default Configurations” option to reset any faulty settings. All
configuration settings (e.g. if unit is configured for Float Mode) and Q/iQ feature settings (e.g. virtual limit
positions) are cleared and reset to default.
Error #332 - ERROR_X67_2_IO_MASK_SETUP
Description: At startup, unit detects an error while configuring the second X67 spare IO module based on the
configuration setting.
Reaction: Lift program terminates processing to prevent running with an incorrect configuration setup.
Cause / Remedy:
(a) Use the extended error index number to identify which Q/iQ feature contains the faulty setting. Use the VB
Configurator program (not yet available as of July 2010) to correct the false setting.
(b) Run the Gorbel® supplied installation CD (i.e. Gorbel® G-Force® Q/iQ Software Downloader) and select the
“Download Q/iQ Software and Reset to Factory Default Configurations” option to reset any faulty settings. All
configuration settings (e.g. if unit is configured for Float Mode) and Q/iQ feature settings (e.g. virtual limit
positions) are cleared and reset to default.
7/11
7-16
G-Force® Q - iQ Service Manual
Gorbel Inc.
Error #333 - ERROR_X67_3_IO_MASK_SETUP
Description: At startup, unit detects an error while configuring the third X67 spare IO module based on the
configuration setting.
Reaction: Lift program terminates processing to prevent running with an incorrect configuration setup.
Cause / Remedy:
(a) Use the extended error index number to identify which Q/iQ feature contains the faulty setting. Use the VB
Configurator program (not yet available as of July 2010) to correct the false setting.
(b) Run the Gorbel® supplied installation CD (i.e. Gorbel® G-Force® Q/iQ Software Downloader) and select the
“Download Q/iQ Software and Reset to Factory Default Configurations” option to reset any faulty settings. All
configuration settings (e.g. if unit is configured for Float Mode) and Q/iQ feature settings (e.g. virtual limit
positions) are cleared and reset to default.
Error #334 - ERROR_X67_4_IO_MASK_SETUP
Description: Not Used
Reaction: Not Used
Cause / Remedy: Not Used
Error #335 - ERROR_X67_5_IO_MASK_SETUP
Description: Not Used
Reaction: Not Used
Cause / Remedy: Not Used
Error #336 - ERROR_X67_6_IO_MASK_SETUP
Description: Not Used
Reaction: Not Used
Cause / Remedy: Not Used
Error #337 - ERROR_X67_7_IO_MASK_SETUP
Description: Not Used
Reaction: Not Used
Cause / Remedy: Not Used
Command Faults - Process and Display Mode
Error #400 - ERROR_PROC_DISP
Description: General: Process and Display Mode faults
Reaction: Not Used
Cause / Remedy: Not Used
Command Faults - Other Status
Error #500 - ERROR_STATUS
Description: Starting index to other faults
Reaction: Not Used
Cause / Remedy: Not Used
Error #501 - ERROR_BOTH_TRAVEL_LIMITS_AT_HOMING
Description: At startup, both the upper and lower limit switches, or the upper limit and slack switches, are triggered.
This can inhibit the ACOPOS drive from properly setting its position.
Reaction: Lift program terminates processing because the drive cannot properly configure its position.
Cause / Remedy:
(a) if both the upper and slack switches are engaged, pull down on the wire rope to remove slack and recycle power
on the unit.
(b) Check for any mechanical binding that could engage both the upper and lower limit switches or upper limit and
slack switches.
(c) Check and correct if the limit switch cable is connected to the interface board.
(d) Check for bad electrical connection or shorted wires from the switches.
7-17
7/11
G-Force® Q - iQ Service Manual
Gorbel Inc.
Command Faults - Non-Motion Watchdog Timer
Error #600 - ERROR_WATCHDOG_NON_MOTION
Description: At startup, the stored configuration variable in memory does not match the version lift program used.
Reaction: Not Used
Cause / Remedy: Not Used
Command Faults - Motion Control
Error #1000 - ERROR_STARTUP_DRIVE_NOT_READY (OBSOLETE)
Description: Not Used
Reaction: Not Used
Cause / Remedy: Not Used
Error #1001 - ERROR_READY_MODE_CONTROLLER_NOT_READY (OBSOLETE)
Description: Not Used
Reaction: Not Used
Cause / Remedy: Not Used
Command Faults - Custom Motion Control
Error #1100 - ERROR_MULTP_MOTION_REQUEST
Description: Not Used
Reaction: Not Used
Cause / Remedy: Not Used
Error #1101 - ERROR_MORE_THAN_ONE_VL_TARGETS_DETECTED
Description: If multiple virtual limit (VL) set iQ feature is enabled with Option A (see error #324 for more
information), only one digital input can turn on at a time to select a VL set. This error is triggered when the unit
detects that multiple inputs are turned on at the same time.
Reaction: Lift is shut down to prevent unit from falsely responding to a wrong set.
Cause / Remedy:
(a) Check for any electrical problem on the switches or devices connected to the input channels to falsely turn on at
the same time.
(b) Check for the electrical connection to the input channels of the lift (DO435 IO block in the actuator or X67
expansion IO module).
(c) Check for any mechanical setup such that the detection targets to multiple proximity sensors can overlap in any
portion of the layout.
(d) Faulty input channels in the DO435 IO block or X67 expansion IO module.
Command Faults - Motion Command Watchdog Timer
Error #1600 - ERROR_WATCHDOG_RUN_MODE
Description: While running through Jog, Handle, Float or other custom motion, a processing command has taken
too long to execute.
Reaction: Lift is shut down if the excessive delay is caused by any problem in the lift.
Cause / Remedy:
(a) Use the extended error index number to obtain the processing state when excessive delay has occurred.
(b) Please contact Gorbel® Customer Service at 800-821-0086 or 585-924-6262 regarding this problem and the
processing state information.
ACOPOS Drive Faults
Error #9999 - ERROR_ACOPOS_FAULT
Description: ACOPOS drive faults or warnings.
Reaction: Lift is shut down for all drive faults or warnings.
Cause / Remedy: ACOPOS drive fault. Please check the fault number displayed on the LCD screen for additional
detail.
7/11
7-18
G-Force® Q - iQ Service Manual
Gorbel Inc.
Command Warnings
Error #10000 - WARNING_LIFT
Description: Starting index to non-critical warnings.
Reaction: Not Used
Cause / Remedy: Not Used
Command Warnings - Process and Display Mode
Error #10400 - WARN_MULTP_PROCESS_REQUEST (OBSOLETE)
Description: More than two features are attempting to display messages in the LCD at the same time. This is
caught when the current running feature is a PROCESS specific feature.
Reaction: Handle LCD displays the warning while unit is allowed to continue to run.
Cause / Remedy: Please contact Gorbel® Customer Service at 800-821-0086 or 585-924-6262.
Error #10401 - WARN_MULTP_DISP_REQUEST (OBSOLETE)
Description: More than two features are attempting to display messages in the LCD at the same time. This is
caught when the current running feature is a DISPLAY specific feature.
Reaction: Handle LCD displays the warning while unit is allowed to continue to run.
Cause / Remedy: Please contact Gorbel® Customer Service at 800-821-0086 or 585-924-6262.
Error #10402 - WARN_SET_MESSAGES_MISMATCH_LENGTHS
Description: The first and second line of the LCD text display are not the same length when unit attempts to
process the message information.
Reaction: Handle LCD displays the warning while unit is allowed to continue to run.
Cause / Remedy: Please contact Gorbel® Customer Service at 800-821-0086 or 585-924-6262.
Error #10403 - WARN_ADD_MESSAGES_EXCEED_LENGTH
Description: The maximum allowable number of consecutive text messages is exceeded when unit attempts to
process the message information.
Reaction: Handle LCD displays the warning while unit is allowed to continue to run.
Cause / Remedy: Please contact Gorbel® Customer Service at 800-821-0086 or 585-924-6262.
Error #10404 - WARN_PROG_ERROR_LOADCELL_COEF
Description: This warning is generated when system attempts to program the load cell coefficient, as commanded
through PROGRAM MODE \ CONFIGUR MENU \ CALIBRAT LOD COEF and resulted in an invalid setting number.
Reaction: Handle LCD displays the warning while unit is allowed to continue to run. The invalid coefficient is cleared
and all previously programmed weights for Q and iQ features are reset.
Cause / Remedy: Load cell calibration procedure composed of three steps: (1) zero the empty handle and any
clevis or hook), (2) pick up a maximum capacity with and set the load cell coefficient, and (3) set unit in stack and set
a true zero weight. This error is generated when performing (2). The possible causes can be:
(a) Step (1) is not correctly performed with an empty handle.
(b) The pickup weight does not match the rated capacity.
(c) The programming sequences are not followed correctly.
(d) Problem with the load cell electronics. This may include a damaged load cell, loose load cell cable connection to
the actuator main interface board or to the servo drive.
7-19
7/11
G-Force® Q - iQ Service Manual
Gorbel Inc.
Error #10405 - WARN_PROG_OVER_RANGE_LOADCELL_BIAS
Description: The sampled minimum load cell signal (bias) is greater than the acceptable range from the normal bias
value for this unit. The acceptable range of this parameter is empirically determined and selected for different models
and capacities.
Reaction: Handle LCD displays the warning while unit is allowed to continue to run. The over-range warning
indicates the potential error in programming the parameter without altering the value. The sample value is still
retained.
Cause / Remedy: The load cell minimum signal (bias) is sampled during procedure steps (1) and (3) (see Warning
#10404). However, the normal bias value selected is based on step (3), when the unit is in slack. Therefore, if a
handle, tooling, or additional parts are tare in step (1), this warning will be triggered. Ignore this warning if it is
triggered in step (1). If this warning is triggered while the unit should be in slack, the possible causes can be:
(a) The unit may appear to be in slack while a loading plate is still exerting pressure to the load cell. This may be
due to some binding or drag in the rotary geartrain mechanism. Ensure the unit is in slack such that the rotary
geartrain mechanism is pushed back (i.e. push up onto the white plastic wear ring at the bottom of the unit) and
the unit cannot move down with a handle controller.
(b) The metal mounting bracket of the white plastic wear ring onto the geartrain mechanism may be bent such that
the wear ring cannot move back far enough and is touching the cast body housing opening prematurely. When
the unit is loaded, the wear ring should be situated near the center of the circular opening without contact. The
bracket may be bent if it is offset near a particular side significantly. Readjust the bracket or replace it.
(c) Problem with the load cell electronics. This may include a damaged load cell or loose load cell cable connection
to the actuator main interface board or to the servo drive.
(d) The actuator PCB board which processes the load cell signal may be damaged or out of spec. Replace the PCB
board.
Error #10406 - WARN_PROG_OVER_RANGE_LOADCELL_COEF
Description: The sampled maximum load cell signal (coefficient) is greater than the acceptable range from the
normal coefficient value) for this unit. The acceptable range of this parameter is empirically determined and selected
for different models and capacities.
Reaction: Handle LCD displays the warning while unit is allowed to continue to run. The over-range warning
indicates the potential error in programming the parameter without altering the value. The sample value is still
retained.
Cause / Remedy: The load cell maximum signal (coefficient) is sampled during procedure step (2) (see Warning
#10404). When this parameter is calibrated, the unit is expected to be loaded with a weight corresponding to the
capacity of the unit. The possible causes can be:
(a) Step (1) of the calibration procedure (see Warning #10404) is not correctly performed.
(b) The pickup weight does not match the rated capacity.
(c) The metal mounting bracket of the white plastic wear ring onto the geartrain mechanism may be bent such that
the wear ring is pressing against the cast body housing opening. When the unit is loaded, the wear ring should
be situated near the center of the circular opening without any contact. Readjust the bracket or replace it.
(d) Problem with the load cell electronics. This may include a damaged load cell or loose load cell cable connection
to the actuator main interface board or to the servo drive.
(e) The actuator PCB board which processes the load cell signal may be damaged or out of spec. Replace the PCB
board.
Error #10407 - WARN_PROG_OVER_RANGE_OVLD_LIMIT (OBSOLETE)
Description: One of the calibrated factory overload settings returned from the overload programming sequence is
greater than the acceptable range from the normal limit value for this unit. The acceptable range of this parameter is
empirically determined and selected for different models and capacities.
Reaction: Handle LCD displays the warning while the unit is allowed to continue to run. The over-range warning
indicates the potential error in programming the parameter without altering the value. The sample value is still
retained.
Cause / Remedy: The actuator characteristics are profiled such that while no actuators are expected to be identical,
the characteristics are expected to be similar within a tolerance range. The possible causes of this warning are:
(a) The pickup weight does not match the rated capacity.
(b) The geartrain mechanism may be exerting excessive drag or binding such that the resultant actuator
characteristic is significantly different from the tolerance range. Inspect for any mechanical problem and
correct it.
7/11
7-20
G-Force® Q - iQ Service Manual
Gorbel Inc.
Error #10408 - WARN_PROG_OVER_RANGE_OVLD_SHUTDOWN (OBSOLETE)
Description: One of the calibrated factory overload settings returned from the overload programming sequence is
greater than the acceptable range from the normal shutdown value for this unit. The acceptable range of this
parameter is empirically determined and selected for different models and capacities.
Reaction: Handle LCD displays the warning while unit is allowed to continue to run. The over-range warning
indicates the potential error in programming the parameter without altering the value. The sample value is still
retained.
Cause / Remedy: The actuator characteristics are profiled such that while no actuators are expected to be identical,
the characteristics are expected to be similar within a tolerance range. The possible causes of this warning are:
(a) The pickup weight does not match the rated capacity.
(b) The geartrain mechanism may be exerting excessive drag or binding such that the resultant actuator
characteristic is significantly different from the tolerance range. Inspect for any mechanical problem and
correct it.
Command Warnings - Other Status
Error #10500 - WARN_STATUS_PLC_BATTERY_ERROR
Description: The PLC memory retention battery power level is low or faulty.
Reaction: Handle LCD displays the warning while unit is allowed to continue to run.
Cause / Remedy:
1. Please contact Gorbel® Customer Service at 800-821-0086 or 585-924-6262 for replacement battery. When the
battery is replaced, any unsaved configuration or Q/iQ feature settings are lost and revert back to the last saved
or factory configured settings. Be sure to follow the instructions prior to taking out the battery.
2. Replace the battery as soon as possible. When the battery power has depleted, any unsaved settings are lost
when the power to the unit is recycled and unit uploads the last saved or factory configured settings upon power
up.
Error #10501 - WARN_MAX_NUM_RECORDING_REACHED (OBSOLETE)
Description: Not Used
Reaction: Not Used
Cause / Remedy: Not Used
Command Warnings - Non-Motion Watchdog Timer
Error #10600 - WARN_WATCHDOG_NON_MOTION
Description: Not Used
Reaction: Not Used
Cause / Remedy: Not Used
Command Warnings - Motion Control
Error #11000 - WARN_BOTH_TRAVEL_LIMITS_ENGAGED
Description: Both the upper and lower travel limit switches are engaged at motion startup (i.e. handle, pendant, float
mode, etc.). This warning can only trigger after the unit has powered up and is different from error #501.
Reaction: Motion not started and handle display warning on the LCD.
Cause / Remedy:
(a) If both the upper and slack switches are engaged, pull down on the wire rope to remove slack and recycle power
on the unit.
(b) Check for any mechanical binding that could engage both the upper and lower limit switches or upper limit and
slack switches.
(c) Check and correct if the limit switch cable is connected to the interface board.
(d) Check for bad electrical connection or shorted wires from the switches.
7-21
7/11
G-Force® Q - iQ Service Manual
Gorbel Inc.
Error #11001 - WARN_UNCONTROLLED_MODE_SWITCH
Description: The current running control mode (RUN MODE) is switched to another unexpectedly rather than
handled properly such as Float Mode switching to Handle Mode because of grabbing a slide handle. Furthermore, a
slide handle or pendant handle sends a unique signal to the PLC to differentiate the handle type. This is further used
to check that if a handle is identified as a slide or pendant type but the identifier signal is switched to another type
such that a miss-matched handle type is detected.
Reaction: Handle LCD displays the warning while unit is allowed to continue to run.
Cause / Remedy: When a control mode is started, the handle LCD displays the type of RUN MODE the unit is
running at, e.g. HANDLE, PENDANT, or FLOAT MODE.
(a) When the handle controller is used, if the LCD displays correctly its type, i.e. HANDLE or PENDANT, but this
error is triggered while the unit is running; or the LCD displays the incorrect type at any time that does not match
the actual handle type, the handle motherboard may be damaged and should be replaced.
(b) For all other cases, please contact Gorbel Inc. to describe the symptoms and if the problem is reoccurring.
Error #11002 - WARN_OVLD_PROGM_NOT_SUCCESSFUL (OBSOLETE)
Description: The automatic overload programming routine is interrupted and is not completed.
Reaction: If programming routine is interrupted in an odd state, the recorded overload setting may be inaccurate and
may falsely trigger overload while lifting.
Cause / Remedy: Please re-run the overload programming routine.
Error #11003 - WARN_SLIDE_PENDANT_TYPE_IO_BOTH_OFF
Description: Slide or pendant handle sends a unique signal to the PLC to differentiate the handle type. This error is
caught if none of them is received.
Reaction: Unit is stopped with a warning display.
Cause / Remedy: Replace the slide or pendant handle motherboard.
Error #11004 - WARN_UP_DOWN_V_LIMITS_AT_SAME_POSITION
Description: This warning is triggered when both the Upper and Lower Virtual Limits are falsely attempted to be
programmed to the same position, which would essentially stop all motion. This is done by checking if the distance
gap between these two limits is less than 1”. In other words, the Upper and Lower Virtual Limits must be at least 1”
apart.
Reaction: Handle LCD displays the warning message and the virtual limit is not programmed.
Cause / Remedy: While this warning attempts to catch and prevent false setup, if it is intentional, move the two
virtual limit positions slightly apart and re-program the virtual limit(s).
Error #11005 - WARN_LOADCELL_DROP_BELOW_MINIMUM
Description: This warning is triggered when Float Mode detects load cell signal drops below a minimum level
indicating an electronics problem.
Reaction: Handle LCD displays the warning message and Float Mode is terminated.
Cause / Remedy: This fault is typically triggered when the load cell cable or signal wire(s) is disconnected or
damaged. Check for:
(a) loose or damaged load cell cable to the main circuit board in the actuator
(b) loose or damaged intermedium cable, P/N 78613, to the main circuit board or the load cell analog signal wire(s)
on this cable to the drive
(c) damaged main circuit board for processing the load cell sensor
(d) damaged load cell sensor
7/11
7-22
G-Force® Q - iQ Service Manual
Gorbel Inc.
Error #11006 WARN_UO_EXCEED_MAX_CAPACITY
Description: This warning is triggered when User Programmable Overload attempts to tare a weight larger than the
maximum limit. The maximum limit is set at 101% of the rated capacity plus 12 lbs to account for the handle weight.
Reaction: The overloaded tare weight is rejected and the maximum limit is used to set up the overload detection
parameters.
Cause / Remedy: When TARE OVLD LMT selection from USR OVLD SUB-MENU \ CHANGE OVLD LMT in
PROGRAM MODE is selected, unit tares the current lifted weight and applies overload settings proportional to this
weight. This warning is triggered when the lifted weight exceeds the maximum limit. To prevent overload limit being
set above maximum limit, when this error occurs, the maximum limit is applied instead of the tare value, to generate
the corresponding overload detection parameters.
Please activate weight readout, WEIGHT READ ON_ under SETTINGS MENU in PROGRAM MODE, and ensure
that the lifted weight does not exceed the maximum limit before selecting TARE OVLD LMT. This warning does not
negatively affect system performance because overload parameters are set to the maximum allowable settings. User
can cycle the E-stop switch on the handle to clear the warning.
Error #11007 WARN_UO_BELOW_MIN_LIMIT
Description: This warning is triggered when User Programmable Overload attempts to tare a weight less than 25%
of the rated capacity.
Reaction: The tare weight is rejected and 25% of the rated capacity is used to set up the overload detection
parameters.
Cause / Remedy: When TARE OVLD LMT selection from USR OVLD SUB-MENU \ CHANGE OVLD LMT in
PROGRAM MODE is selected, unit tares the current lifted weight and applies overload settings proportional to this
weight. This warning is triggered when the lifted weight is below the minimum 25% rated capacity limit. To prevent
overload limit being set below the minimum, when this error occurs, the 25% rated capacity value is applied instead
of the tare value, to generate the corresponding overload detection parameters.
Please activate weight readout, WEIGHT READ ON_ under SETTINGS MENU in PROGRAM MODE, and ensure
that the lifted weight is not below the minimum limit before selecting TARE OVLD LMT. This warning does not
negatively affect system performance because overload parameters are set to the minimum allowable settings. User
can cycle the E-stop switch on the handle to clear the warning.
Error #11008 WARN_SLIDE_PENDANT_TYPE_OI_MISMATCH
Description: Slide or pendant handle sends a unique signal to the PLC to differentiate the handle type. This error is
generated if handle type signal changes from slide to pendant or vice versa while the unit is running.
Reaction: Unit is stopped with a warning display.
Cause / Remedy: Replace the slide or pendant handle mother board.
Command Warnings - Custom Motion Control
Error #11100 - WARN_MULTP_MOTION_REQUEST
Description: Not Used
Reaction: Not Used
Cause / Remedy: Not Used
Command Warnings - Motion Command Watchdog Timer
Error #11600 - WARN_WATCHDOG_MOTION
Description: Not Used
Reaction: Not Used
Cause / Remedy: Not Used
7-23
7/11
G-Force® Q - iQ Service Manual
Gorbel Inc.
Command Warnings - Maintenance Services
Error #11700 - WARN_REPLACE_WIREROPE_RECOMMEND
Description: When cycle count and lower limits are set, cycle count can increment. This warning is triggered if the
cycle exceeds 15000 counts.
Reaction: N/A
Cause / Remedy: This is a warning indicator to check wire rope condition under the most severe operating
conditions for signs of wear and tear and it can vary based on the actual usage. Please examine the wire rope and
replace if necessary. After replacement, activate Program Mode with a handle, browse to SRV MENU, and click to
CLEAR COUNT selection to reset the cycle count to 0.
Error #11701 - WARN_REPLACE_WIREROPE_REQUIRED
Description: When cycle count and lower limits are set, cycle count can increment. This warning is triggered if the
cycle exceeds 20000 counts.
Reaction: N/A
Cause / Remedy: This is a warning indicator to check wire rope condition under the most severe operating
conditions when replacement may be necessary and it can vary based on the actual usage. Please examine the wire
rope and replace if necessary. After replacement, activate Program Mode with a handle, browse to SRV MENU, and
click to CLEAR COUNT selection to reset the cycle count to 0.
Command Warnings - Fault Warning
Error #11800 - WARN_HANDLE_FAULT_NOT_ACTIVE
Description: Handle digital IO CAN bus controller has triggered a fault and becomes inactive.
Reaction: The digital inputs such as the OPS sensor, Menu and Float pushbuttons are disabled.
Cause / Remedy: A fault, specifically an inactive node, can occur if the handle CAN bus controller does not
communicate with the PLC correctly and exceeds the allowable wait period of the master node. Reboot the unit with
the E-stop to clear the fault if it is not repetitive. Inaccurate communication can result from faulty handle board, noise
or data corruption in the CAN communication wires, or any cut wires. Replace the handle, coil cord, actuator
interface board, and CAN communication wires in the actuator until the fault is corrected.
Error #11801 - WARN_HANDLE_FAULT_CAN_IO_ALARM
Description: Handle digital IO CAN bus controller has triggered an alarm status. Additional error information may be
available following the warning.
Reaction: The digital inputs such as the OPS sensor, Menu and Float pushbuttons are disabled.
Cause / Remedy: A fault, specifically a CAN bus alarm, can occur if the CAN controller board does not communicate
with the PLC correctly, is in a fault state, falsely removed, configuration memory error, etc. Additional error
information may be available after the warning message. Reboot the unit with the E-stop to clear the fault if it is not
repetitive. Problem can result from faulty handle board, noise or data corruption in the CAN communication wires, or
any cut wires. Replace the handle, coil cord, actuator interface board, and CAN communication wires in the actuator
until the fault is corrected.
Error #11802 - WARN_HANDLE_FAULT_BUS_OFF
Description: Handle digital IO CAN bus controller has been turned off unintentionally. If a WARN_HANDLE_FAULT_
NOT_ACTIVE warning does not occur together with this, then the bus line is turned off only briefly.
Reaction: The digital inputs such as the OPS sensor, Menu and Float pushbuttons are disabled.
Cause / Remedy: A fault, specifically bus off exception, can occur if the handle CAN controller does not
communicate with the PLC correctly or at all. Reboot the unit with the E-stop to clear the fault if it is not repetitive.
Inaccurate communication can result from faulty handle board, noise or data corruption in the CAN communication
wires, or any cut wires. Replace the handle, coil cord, actuator interface board, and CAN communication wires in the
actuator until the fault is corrected.
7/11
7-24
G-Force® Q - iQ Service Manual
Gorbel Inc.
Error #11803 - WARN_LCD_FAULT_NOT_ACTIVE
Description: Handle LCD board CAN bus controller has triggered a fault and becomes inactive.
Reaction: Warning message on this fault may be on screen or by flashing LED. If the board has become
inoperative, a factory default warning message may be displayed on the LCD screen.
Cause / Remedy: A fault, specifically an inactive node, can occur if the handle LCD board CAN bus controller does
not communicate with the PLC correctly and exceeds the allowable wait period of the master node. Reboot the unit
with the E-stop to clear the fault if it is not repetitive. Inaccurate communication can result from faulty handle board,
noise or data corruption in the CAN communication wires, or any cut wires. Replace the handle, coil cord, actuator
interface board, and CAN communication wires in the actuator until the fault is corrected.
Error #11804 - WARN_LCD_FAULT_CAN_IO_ALARM
Description: Handle LCD board CAN bus controller has triggered an alarm status. Additional error information may
be available following the warning.
Reaction: Warning message on this fault may be on screen or by flashing LED. If the board has become
inoperative, a factory default warning message may be displayed on the LCD screen.
Cause / Remedy: A fault, specifically a CAN bus alarm, can occur if the CAN controller board does not communicate
with the PLC correctly, is in a fault state, falsely removed, configuration memory error, etc. Additional error
information may be available after the warning message. Reboot the unit with the E-stop to clear the fault if it is not
repetitive. Problem can result from faulty handle board, noise or data corruption in the CAN communication wires, or
any cut wires. Replace the handle, coil cord, actuator interface board, and CAN communication wires in the actuator
until the fault is corrected.
Error #11805 - WARN_LCD_FAULT_BUS_OFF
Description: Handle LCD board CAN bus controller has been turned off unintentionally. If a WARN_LCD_FAULT_
NOT_ACTIVE warning does not occur together with this, then the bus line is turned off only briefly.
Reaction: Warning message on this fault may be on screen or by flashing LED. If the board has become
inoperative, a factory default warning message may be displayed on the LCD screen.
Cause / Remedy: A fault, specifically bus off exception, can occur if the handle CAN controller does not
communicate with the PLC correctly or at all. Reboot the unit with the E-stop to clear the fault if it is not repetitive.
Inaccurate communication can result from faulty handle board, noise or data corruption in the CAN communication
wires, or any cut wires. Replace the handle, coil cord, actuator interface board, and CAN communication wires in the
actuator until the fault is corrected.
Error #11806 - WARN_SPAREIO_FAULT_NOT_ACTIVE
Description: An X67 spare IO block CAN bus controller connected to the handle has triggered a fault and become
inactive.
Reaction: Standard iQ features operating through this spare IO block are either disabled or outputs turned off.
Cause / Remedy: A fault, specifically an inactive node, can occur if an X67 spare IO block CAN bus controller does
not communicate with the PLC correctly and exceeds the allowable wait period of the master node. Reboot the unit
with the E-stop to clear the fault if it is not repetitive. Inaccurate communication can result from faulty handle board,
noise or data corruption in the CAN communication wires, or any cut wires. Replace the handle, coil cord, actuator
interface board, and CAN communication wires in the actuator until the fault is corrected.
Error #11807 - WARN_SPAREIO_FAULT_CAN_IO_ALARM
Description: An X67 spare IO block CAN bus controller connected to the handle has triggered an alarm status.
Additional error information may be available following the warning message.
Reaction: Standard iQ features operating through this spare IO block are either disabled or outputs turned off.
Cause / Remedy: A fault, specifically a CAN bus alarm, can occur if the CAN controller board does not communicate
with the PLC correctly, is in a fault state, falsely removed, configuration memory error, etc. Additional error
information may be available after the warning message. Reboot the unit with the E-stop to clear the fault if it is not
repetitive. Problem can result from faulty handle board, noise or data corruption in the CAN communication wires, or
any cut wires. It can also be triggered if a channel in the X67 spare IO module is configured as an output but 24Vdc
is sent to this channel, for example, due to miss-wiring. Check and correct any wiring into a false channel or false
custom feature configuration. Replace the handle, coil cord, actuator interface board, and CAN communication wires
in the actuator until the fault is corrected.
7-25
7/11
G-Force® Q - iQ Service Manual
Gorbel Inc.
Error #11808 - WARN_SPAREIO_FAULT_BUS_OFF
Description: An X67 spare IO block CAN bus controller connected to the handle has been turned off unintentionally.
If a WARN_SPAREIO_FAULT_NOT_ACTIVE warning does not occur together with this, then the bus line is turned
off only briefly.
Reaction: Standard iQ features operating through this spare IO block are either disabled or outputs turned off.
Cause / Remedy: A fault, specifically bus off exception, can occur if the X67 spare IO block CAN controller does not
communicate with the PLC correctly or at all. Reboot the unit with the E-stop to clear the fault if it is not repetitive.
Inaccurate communication can result from faulty handle board, noise or data corruption in the CAN communication
wires, or any cut wires. Replace the handle, coil cord, actuator interface board, and CAN communication wires in the
actuator until the fault is corrected.
Error #11809 - WARN_CANIO_FAULT
Description: The CAN bus controller fault checking routine has experienced an error or the detected failed CAN bus
board has a node number outside the designed range of the system.
Reaction: N/A
Cause / Remedy: In the system application there is an exception fault checking routine on all CAN bus controller
boards if the system is running constantly. This warning occurs if the routine itself experiences a fault such as
unconfigured bus, node or even application. User should reboot the unit with the E-stop to clear the fault if it is not
repetitive. Similar to other CAN bus controller warnings, replace the handle, coil cord, actuator interface board, and
CAN communication wires in the actuator until the fault is corrected. If the problem cannot be resolved, contact
Gorbel® Customer Service at 800-821-0086 or 585-924-6262 for further diagnostic and troubleshooting information.
7/11
7-26
G-Force® Q - iQ Service Manual
Gorbel Inc.
Q-iQ Unit: Command Fault - Extended Error List (Software Version R1.06.3)
Command
Fault (E#)
Extended Error
(S#)
320
Ext
321
Ext
322
Ext
323
Ext
1600
Ext
--
331
65535
8955
8956
8976
8978
8979
8985
--
100
101
102
103
104
105
120
121
122
20600
20601
20602
20603
20604
20605
20606
20607
20608
20609
20610
20611
20612
20613
20614
Description: Command Fault and Extended Fault Supplement Information
Multiple iQ features are configured to use the same digital input channels. Ext is
the latter feature that triggers the fault.
Multiple iQ features are configured to use the same digital output channel. Ext is
the latter feature that triggers the fault.
An iQ feature input channel is set outside the allowable range. Ext is the feature
that triggers the fault.
An iQ feature output channel is set outside the allowable range. Ext is the feature
that triggers the fault.
While executing a Jog, Handle, Float, or other custom motion, a processing
command is taking too long to execute. Ext is the state of execution when this error
is generated. Please contact Gorbel Inc. with this error number.
A fault has been triggered while configuring the spare I/O block. Please follow the
recommended remedy for this fault such as resetting configurations to factory
default.
System has configured the module and is waiting for confirmation.
The module is not properly configured, specifically the CAN bus number.
The module is not properly configured, specifically the CAN node number.
Missing software module to process the module.
Missing software module to process the module.
The module status has become inactive.
Control timeout while waiting for response back from the module.
A fault has been triggered while executing a command to process the stored
system configuration or unit serial number in the CPU memory. Please contact
Gorbel Inc. with these error numbers.
Wrong parameter given (NULL pointer)
Object already present
Wrong target memory specified
No memory available for module to be created
Error installing data object
Object not found
Wrong object type (not data object)
Wrong offset specified
Wrong length specified
Data object not found
Wrong date in SetDate (DatObjChangeDate)
Incorrect state of the data object
Error while enabling asynchronous handler (only SG4)
Module name too long (max. 100 characters)
Error while saving the data object in “Flash” memory
7-27
7/11
G-Force® Q - iQ Service Manual
Command
Fault (E#)
Extended
Error (S#)
--
4352 ~ 4368
4352 ~ 4368
4864 ~ 4880
8448 ~ 8467
16384 ~ 16400
16640 ~ 16656
16896 ~ 16927
11807
20480
20736
20992
21248
21504
11809
798720 ~ 798739
11801
11804
798976 ~ 798995
799232 ~ 799251
799488 ~ 799507
799744 ~ 799763
800000 ~ 800019
800256 ~ 800275
800512 ~ 800531
800768 ~ 800787
7/11
Gorbel Inc.
Description: Command Fault and Extended Fault Supplement Information
An alarm fault has been triggered while processing one of the electrical
components connected in the communication line, including the handle board, LCD
display, spare I/O block, and the overall CAN communication. Please check the
specific extended fault description for possible corrective actions.
Note: Standard iQ system uses adapter module 1 without any screw-in module
whereas adapter module 2 or screw-in module(s) may be used on a custom system
setup. The error numbers are listed for completeness whereas certain errors do not
apply to some components, e.g. S#16904 cannot occur with E#11804, LCD display.
Idle time has passed for designed digital output module
4352 (Adapter module 1); 4368 (Adapter module 2)
Output set, even though no output is defined
4608 (Adapter module 1); 4624 (Adapter module 2)
Output level incorrect - short circuit on a digital output module
4864 (Adapter module 1); 4880 (Adapter module 2)
Idle time has passed for designed analog output module
8448 ~ 8451: Screw-in module 1 ~ 4 on Adapter module 1
8464 ~ 8467: Screw-in module 1 ~ 4 on Adapter module 2
Voltage monitoring has found an error
16384 (Adapter module 1); 16400 (Adapter module 2)
Error flag for digital input module set (often triggered on spare I/O module)
16640 (Adapter module 1); 16656 (Adapter module 2)
Error flag for digital output module set (often triggered on spare I/O module)
16896 (Adapter module 1); 16904 ~ 16911: I/O Channel 1 ~ 8
16912 (Adapter module 2); 16920 ~ 16927: I/O Channel 1 ~ 8
Programming configuration memory ended without error
Faulty or incorrect parameter in command request
No configuration memory available
Error when writing to configuration memory
Configuration memory is being written to
Invalid channel or value
798720 ~ 798723: Screw-in module 1 ~ 4 on Adapter module 1
798736 ~ 798739: Screw-in module 1 ~ 4 on Adapter module 2
Measurement range exceeded (positive direction)
798976 ~ 798979: Screw-in module 1 ~ 4 on Adapter module 1
798992 ~ 798995: Screw-in module 1 ~ 4 on Adapter module 2
Measurement range exceeded (negative direction)
799232 ~ 799235: Screw-in module 1 ~ 4 on Adapter module 1
799248 ~ 799251: Screw-in module 1 ~ 4 on Adapter module 2
Open connector or sensor open
799488 ~ 799491: Screw-in module 1 ~ 4 on Adapter module 1
799504 ~ 799507: Screw-in module 1 ~ 4 on Adapter module 2
Converter error
799744 ~ 799747: Screw-in module 1 ~ 4 on Adapter module 1
799760 ~ 799763: Screw-in module 1 ~ 4 on Adapter module 2
Screw-in module removed
800000 ~ 800003: Screw-in module 1 ~ 4 on Adapter module 1
800016 ~ 800019: Screw-in module 1 ~ 4 on Adapter module 2
Screw-in module inactive
800256 ~ 800259: Screw-in module 1 ~ 4 on Adapter module 1
800272 ~ 800275: Screw in module 1 ~ 4 on Adapter module 2
Screw-in module communication error
800512 ~ 800515: Screw-in module 1 ~ 4 on Adapter module 1
800528 ~ 800531: Screw-in module 1 ~ 4 on Adapter module 2
Screw-in module type changed
800768 ~ 800771: Screw-in module 1 ~ 4 on Adapter module 1
800784 ~ 800787: Screw-in module 1 ~ 4 on Adapter module 2
7-28
G-Force® Q - iQ Service Manual
Gorbel Inc.
Chapter 8 - Electrical Schematics
Diagram 1. Q-iQ Block.
8-1
7/11
G-Force® Q - iQ Service Manual
Gorbel Inc.
Diagram 2. Q-iQ System Schematic.
7/11
8-2
8-3
CABLE ASSEMBLY
(78612)
CABLE ASSEMBLY
(78611)
CABLE ASSEMBLY
(78610)
CABLE ASSEMBLY
(78609)
Note: Numbers in
Parentheses are
Gorbel® Part Numbers
CABLE ASSEMBLY
(78608)
CABLE ASSEMBLY
(78607)
CABLE ASSEMBLY
(78540)
CABLE ASSEMBLY
(78613)
CABLE ASSEMBLY
(78541)
CABLE ASSEMBLY
(78605)
G-Force® Q - iQ Service Manual
Gorbel Inc.
Diagram 3. Cable Interconnect, 474 CPU and Drive.
7/11
7/11
8-4
Diagram 4. Cable Interconnect, Q-iQ Actuator PCB.
CABLE ASSEMBLY
(78606)
CABLE ASSEMBLY
(78608)
CABLE ASSEMBLY
(78610)
CABLE ASSEMBLY
(78612)
CABLE ASSEMBLY
(78609)
CABLE ASSEMBLY
(78611)
CABLE ASSEMBLY
(78602)
CABLE ASSEMBLY
(78601)
CABLE ASSEMBLY
(78600)
CABLE ASSEMBLY
(78613)
78827
78828
78826
78825
PART NUMBER
Note: Numbers in
Parentheses are
Gorbel® Part Numbers
3A 350V
F7
3A 250V FA
F4 + F5
5A 125V FA
10A 125V SB
F1 + F2
F6
RATING
FUSE #
CABLE ASSEMBLY
(78607)
CABLE ASSEMBLY
(78604)
CABLE ASSEMBLY
(78603)
G-Force® Q - iQ Service Manual
Gorbel Inc.
G-Force® Q - iQ Service Manual
Gorbel Inc.
iQ Actuator Input/Output Module Functionality
I/O
Point
1
2
3
4
5
6
7
8
Settings (see chart 1, page
5-3) for instructions on
Assigned Function
Description
navigating and setting
menu functions)
Input - Dual virtual
When this input is turned on, the G-Force® switches Second set of virtual limits is
limit sets
to a second independent set of virtual limits. See
done the same as the standard
chart C for instructions on setting each of these limit set but with this input on.
sets.
Future expansion - no Functionality may be assigned via custom
default functionality
programming to meet application requirements.
assigned
Contact your Gorbel® dealer for more details.
Future expansion - no Functionality may be assigned via custom
default functionality
programming to meet application requirements.
assigned
Contact your Gorbel® dealer for more details.
Future expansion - no Functionality may be assigned via custom
default functionality
programming to meet application requirements.
assigned
Contact your Gorbel® dealer for more details.
Output - External
This output is controlled by input number 5 on the
device control (requires optional expansion 8-point input/output block. When
optional expansion 8- that input is on, output 5 on the iQ actuator
point input/output block) input/output module is on and vise versa.
Output - External
This output is controlled by input number 6 on the
device control (requires optional expansion 8-point input/output block. When
optional expansion 8- that input is on, output 6 on the iQ actuator
point input/output block) input/output module is on and vise versa.
Output - Service
This output turns on when service is required
The reset function for this
indicator
(based on hours of use and set at the factory) and output is in the SERVICE
may be used to turn on an external service indicator MENU, items CLEAR RUN
(supplied by others).
TIME or SRV WARN OFF.
Output - Fault indicator This output turns on when a command fault or drive
fault occurs. It does not turn on due to a command
warning.
Chart 1. iQ Actuator Input/Output Module
Standard Functionality.
Diagram 5. Actuator CPU Input/Output Block.
8-5
7/11
G-Force® Q - iQ Service Manual
Gorbel Inc.
Expansion 8-Point Input/Output Block Functionality
I/O
Point
1
2
3
4
5
6
7
8
Settings (see chart 1, page 5-3, for instructions on
navigating and setting menu functions)
Input - Dual load weight When the G-Force® is in float mode, this input allows switching The two Float Mode load weights programmed are
Float Mode*
from one pre-programmed load weight to another. These two
located in SETTINGS MENU 2 - DUAL TOOL WT and
weights must remain fixed; otherwise, some drifting can occur if DUAL FM LOAD WT. The desired load weight must be
the weight is different than the programmed value.
suspended from the G-Force® when performing each
setting.
Input - Anti-drop feature This input is typically wired to a clamp request pushbutton. When the See I/O Point 3 Settings description.
(Clamp request)
input is on, Output #7 (see I/O Point 7) turns on and Output #8 turns
off regardless of the tooling loading state.
Output - Anti-drop feature This input is typically wired to an unclamp request pushbutton.
Programming to tare weight is located at SETTINGS
(Unclamp request)
When the input is on, Output #8 (see I/O Point 8) turns on only if MENU 2 - ANTIDROP TOOL WT. The empty tooling
Anti-Drop algorithm determines the suspended load is at or below (including handle controller and other accessories)
the set weight (ANTIDROP TOOL WT). If Output #8 turns on,
without a pickup part must be suspended solely by the
Output #7 is turned off.
wire rope when tarring. The minimum difference
between unloaded and loaded tool weight is 20 lbs. for
G-Force®, 25 lbs. for Easy Arm®, and 25 lbs. for
G-Jib™ products.
Input - Auto Home
When this input is toggled (momentarily turned on then off again), The Auto Home position programming is located at
the G-Force® automatically travels to the set home position in the SETTINGS MENU 2 - MENU 2 SET HOME. Move the
vertical travel. Tracking stops when obstruction is detected, i.e. G-Force® to the desired position in the vertical travel
Q/iQ G-Force® stops at 10-25 lbs. depending on unit capacity.
before selecting the position setting in this menu.
Input - External device This input controls input 5 on the actuator input/output module.
control (used in
When this input is on, output 5 on the iQ actuator input/output
conjunction with
module is on and vise versa.
actuator output 5)
Input - External device This input controls input 6 on the actuator input/output module.
control (used in
When this input is on, output 6 on the iQ actuator input/output
conjunction with
module is on and vise versa.
actuator output 6)
Output - Anti-drop feature This output is typically wired to actuate the clamping mechanism See I/O Point 3 Settings description.
(Clamp Control)
of an end effector tooling. It turns on when Input #2 (see I/O Point
2) is on and remains latched on when the input is released. It can
be turned off by Input #3 (see I/O Point 3).
Output - Anti-drop feature This output is typically wired to actuate the unclamping mecha- See I/O Point 3 Settings description.
(Unclamp Control)
nism of an end effector tooling. It turns on when Input #3 (see I/O
Point 3) is on and the Anti-Drop algorithm determines the suspended load is at or below the set weight (ANTIDROP TOOL WT).
If it is not turned on, the input can be held momentarily (do not
hold on indefinitely) until the tooling is unloaded then the output is
turned on. Once the output turns on, it remains latched on when
the input is released. It is always turned off with Input #2 (see I/O
Point 2).
Assigned Function
Description
Chart 2. Expansion 8-Point Input/Output Block.
* G-Force® must have Float Mode feature enabled for this feature to
work.
WARNING
Please be aware that software versions prior to R1.07.0 use I/O
block model X67BC7321, while those with R1.07.0 and newer
require the X67BC7321-1 model. The model number can be
found at the left side of the block when placed in the orientation
as shown in the diagram. The running software version can be
checked through DISPLAY SYS INFO selection under SERVICE
MENU in PROGRAM MODE.
Diagram 6. Handle Input/Output Block.
7/11
8-6
Gorbel Inc.
Note: Numbers in
Parentheses are
Gorbel® Part Numbers
G-Force® Q - iQ Service Manual
Diagram 7. Q-iQ Handle Configurations.
8-7
7/11
G-Force® Q - iQ Service Manual
Gorbel Inc.
Diagram 8. Actuator IO, 474 CPU.
7/11
8-8
8-9
CABLE ASSY, (78681) OR SIMILAR
CABLE ASSY, (78681) OR SIMILAR
CABLE ASSY
(78671) OR SIMILAR
CABLE ASSY
(78666) OR SIMILAR
Note: Numbers in
Parentheses are
Gorbel® Part Numbers
G-Force® Q - iQ Service Manual
Gorbel Inc.
Diagram 9. Handle IO Detail, Slide Model.
7/11
7/11
Diagram 10. Handle IO Detail, Pendant Model.
8-10
CABLE ASSY, (78681) OR SIMILAR
CABLE ASSY, (78681) OR SIMILAR
CABLE ASSY
(78671) OR SIMILAR
CABLE ASSY
(78666) OR SIMILAR
Note: Numbers in
Parentheses are
Gorbel® Part Numbers
G-Force® Q - iQ Service Manual
Gorbel Inc.
G-Force® Q - iQ Service Manual
Gorbel Inc.
Chapter 9 - Adjustments
Upper and Lower Limit Switch Adjustment
Under normal conditions the Upper and Lower Limit Switches should not require adjustment in
the field unless one were to fail and require replacement. These switches are set in the factory
during assembly and final testing. There could be situations however that would require a slight
adjustment. For example, when replacing a wire rope assembly, the end of the wire rope and the
retaining plate must be positioned precisely in order to perform the wire rope replacement
properly. If this is not the case then the Lower Limit Switch adjustment may be necessary.
The Limit Switch Assembly is located inside the actuator, on the right side, behind the Gorbel
logo on the center casting. You must remove the Front Cover to access this area. Refer to
diagram 1 below.
Diagram 1.
Upper Limit Switch Adjustment
The bottom allen head screw adjusts the upper limit. Use a 5mm allen head wrench to
perform the adjustment. Turning the screw clockwise raises the stop point of the wire rope.
Counterclockwise lowers the stop point of the wire rope. A full turn is approximately 3 inches of
wire rope travel. Refer to diagram 2 on page 9-2.
9-1
7/11
G-Force® Q - iQ Service Manual
Gorbel Inc.
Upper
Limit
Switch
M6
Adjusting
Screw
Diagram 2.
Lower Limit Switch Adjustment
The lower limit is a default of the wire rope replacement position. When this switch is actuated
there should be approximately two full turns of wire rope left on the drum. There is no adjustment
for this position. The switch provides protection for the hardware inside the actuator. Refer to
diagram 3 below.
Lower
Limit
Switch
Diagram 3.
7/11
9-2
G-Force® Q - iQ Service Manual
Gorbel Inc.
Wire Rope Replacement Adjustment for the Lower Limit Switch
In order to determine whether this adjustment needs to be performed you must push the upper
allen head screw in until it bottoms out against the body of the Limit Switch Actuator as
illustrated in diagram 4 below and press the Jog Down Button until the drum stops and the Wire
Rope Retaining Plate is approximately at the 2-3 o’clock position as shown in diagram 5 below. If
the drum does not reach this position when it stops, turn the upper allen head screw 1/2 turn
counterclockwise with a 5 mm allen head wrench. Jog the wire rope up one full turn and repeat
the process all over again.
Caution: If the wire rope retaining plate rotates past the 4 o’clock position, release the Jog Down
Button immediately or internal damage may occur. Press the Jog Up Button until the drum makes
one full rotation and adjust the Lower Limit Switch by turning the upper allen head screw one full
turn clockwise.
Diagram 4.
Retaining
Plate at
3 o’clock
position
Wire Rope
Assembly
Diagram 5.
9-3
7/11
G-Force® Q - iQ Service Manual
Gorbel Inc.
Linear Transducer Adjustment
If there is motion (drift) in the system when the Operator Present Sensor is activated and the
handle grip is not moved in either direction, the Linear Transducer will need to be adjusted. The
adjustment can be monitored by using DIAGNOSTIC MODE in the PROGRAM MENU.
1. Press and hold the MENU button
(right side of handle) for two seconds
to activate Program Mode.
2. Release MENU button. Both the red
and blue LED will illuminate and
PROGRAM MODE will be displayed
for one second. Note: If system is
equipped with the Virtual Limits
Package the VIRTUAL LIMITS menu
will appear first.
3. Press the MENU button to scroll until
you reach the SERVICE MENU.
Press the G-Force® logo button (left
side of the handle) several times
until the readout displays SERV
MENU ACT DIAG. Wait
approximately 2 seconds.
4. DIAG MODE will appear on the
display. Block the Operator Present
Sensor beam with your hand but do
not move the slide portion of the
handle at all.
2mm Allen
Wrench
Diagram 6.
5. HANDLE SWITCH STROKE MAX %
will appear on the display with a
number. It should be between -3% and 3%.
6. To decrease the number on the display, turn the LT Adjustment Screw counter clockwise. To
increase the number on the display, turn the LT Adjustment Screw clockwise. Use a 2mm
Allen head wrench for the adjustment. Try increments of one revolution at a time.
7. Recheck the number on the display by blocking and unblocking the OPS at least five times.
7/11
9-4
G-Force® Q - iQ Service Manual
Gorbel Inc.
Slack Spring Adjustment
Slack spring adjustment is necessary if one or more of the following conditions apply:
• When wire rope continues to “pay out” from actuator when end effector (handle, tooling) is
being supported and down travel is commanded.
• When slack wire rope deflection exceeds 3 inches when end effector is supported.
• When tooling is added to a G360™ assembly.
• When an air-line coil hose assembly is added between the end effector and actuator.
• When changing from a pendant handle to a slide handle or vice-versa occurs.
• When chatter or erratic travel down operation occurs when using an unloaded G3601
or a weighted hook traveling downward from top of travel up limit (spring is too
tight).
1
Unloaded G360™ equipped hoist may encounter this type of operation until tooling is added.
Slack Spring Adjustment Procedure:
1. Use an M3 hex wrench to remove all screws securing the blue rear cover to actuator. Place
screws in cover and set aside.
2. Locate slack spring over the motor, next to casting (diagram 7). Spring is held in place by a
motor bracket on one end and an eyebolt on the other end.
3. Using a 10mm open-end wrench, loosen the nut closest to the “eye” inside on bolt
(diagram 8).
Diagram 8.
Diagram 7.
4. If chatter or erratic operation of hoist while traveling down is encountered, the end
effector or tooling on wire rope is not heavy enough to overcome the spring tension. Loosen
the outside nut one half turn and test the hoist operation (full stroke up and down) between
each half turn adjustment of eyebolt but until chattering is eliminated.
9-5
7/11
G-Force® Q - iQ Service Manual
Gorbel Inc.
5. All other conditions will require the outside nut to be adjusted by turning clockwise, tightening
to increase tension to the slack spring. Before tightening of this nut, be sure there is enough
free travel of the eyebolt (inside nut loose).
6. Using the applications’ end effector (handle, unloaded end tool), travel downward resting end
effector on floor. If rope continues to “pay out” from actuator beyond two seconds after
reaching floor, remove hand from handle or release down button (pendant). Turn the outside
nut clockwise one half turn tightening it. Test again by traveling up removing handle or tooling
from floor and travel down again resting on floor. Continue adjusting and testing this until rope
travel stops within two seconds of effector resting (supported) on floor and deflection of rope
is 3-4 inches. Tighten inside nut clockwise until “jammed” against sheet metal while keeping
eyebolt stationary.
7. Correct slack adjustment occurs when a deflection of the wire rope is 3-4 inches when in
slack mode and rope travel stops (diagram 9).
3-4"
3-4"
Diagram 9.
7/11
9-6
G-Force® Q - iQ Service Manual
Gorbel Inc.
Chapter 10 - Parts & Assembly
This chapter provides the Gorbel® part numbers for all capacity G-Force® Q and iQ models as
well as the removal and replacement instructions for most of the components inside the actuators
and control handles.
In most cases the Gorbel® part numbers for all three capacity G-Forces are the same. Where
there are differences, separate pages are used to illustrate the differences. All Gorbel® part
numbers are shown in parentheses and bold print.
Index
Actuator . . . . . . . . . . . . . . . . . . . . . . . . . . . . . . . . . . . . . . . . . . . . . . . . . . . . . .10-2
Slide Handle . . . . . . . . . . . . . . . . . . . . . . . . . . . . . . . . . . . . . . . . . . . . . . . . .10-40
Pendant Handle . . . . . . . . . . . . . . . . . . . . . . . . . . . . . . . . . . . . . . . . . . . . . . .10-53
Coil Cords . . . . . . . . . . . . . . . . . . . . . . . . . . . . . . . . . . . . . . . . . . . . . . . . . . .10-67
G360™ . . . . . . . . . . . . . . . . . . . . . . . . . . . . . . . . . . . . . . . . . . . . . . . . . . . . .10-74
CPU Battery . . . . . . . . . . . . . . . . . . . . . . . . . . . . . . . . . . . . . . . . . . . . . . . . . .10-80
CAUTION!
Many of the removal/replacement procedures in this section require AC power to be removed
from the actuator. You must disconnect the AC power plug from the AC source in order to do this
or use a disconnect, if equipped with one. Using the e-stop button will not accomplish this
because it does not interrupt AC power to the actuator.
10-1
7/11
G-Force® Q - iQ Service Manual
Gorbel Inc.
Removal and Replacement Procedures
ACTUATOR
Plug
(79274)
2x Gorbel® Label
(76550)
3x G-Force® Label
(83178)
Capacity Label
See Table Below for P/N
Note: Numbers in
Parentheses are
Gorbel® Part Numbers
G-Force® Actuator Labels.
7/11
Capacity
P/N
Capacity
P/N
Q 300 kg
76555
iQ 300 kg
76552
Q 660 lb.
76561
iQ 660 lb.
76558
Q 150 kg
76556
iQ 150 kg
76553
Q 330 lb.
76562
iQ 330 lb.
76559
Q 75 kg
76557
iQ 75 kg
76554
Q 165 lb.
76563
iQ 165 lb.
76560
Q 600 kg
Q 1320 lb.
83268
iQ 600 kg
iQ 1320 lb.
83268
10-2
G-Force® Q - iQ Service Manual
Gorbel Inc.
Procedure 1A - Front Cover Removal
a. Turn power off by disconnecting AC power to the system.
b. Remove (4) M5 button head cap screws, BHCS and (4) M5 lockwashers.
c. Carefully slide front cover away from actuator casting.
Procedure 1B - Front Cover Replacement
a. Carefully slide front cover over ACOPOS assembly and align four holes with brackets
attached to the actuator casting.
b. Install (4) M5 button head cap screws, BHCS and (4) M5 lockwashers.
c. Restore AC power to the system.
Note: Numbers in
Parentheses are
Gorbel® Part Numbers
4x Lockwasher, M5
(65062)
4x BHCS, M5 x 20mm Lg
Flanged
(65008)
Front Cover
(76530)
Nylock Nut, M4, ZNPL
(65096)
Jog Button Cover
(76532)
Flatwasher, M4, ZNPL
(65081)
BHCS, M4 x 16mm Lg
(65068)
Diagram 1. Front Cover Removal and Replacement.
10-3
7/11
G-Force® Q - iQ Service Manual
Gorbel Inc.
Procedure 2A - Rear Cover Removal
a. Turn power off by disconnecting AC power to the system.
b. Remove (4) M5 button head cap screws, BHCS and (4) M5 lockwashers.
c. Carefully slide rear cover away from actuator casting.
Procedure 2B - Rear Cover Replacement
a. Carefully slide rear cover over motor, CPU and power supply and align holes with the
actuator casting.
b. Install (4) M5 button head cap screws, BHCS and (4) M5 lockwashers.
c. Restore AC power to the system.
4x Lockwasher, M5,
High-Collar
(65062)
4x BHCS, M5 x 20mm Lg
Flanged
(65008)
Back Cover Assembly
(76531)
Note: Numbers in
Parentheses are
Gorbel® Part Numbers
Diagram 2. Rear Cover Removal and Replacement.
7/11
10-4
G-Force® Q - iQ Service Manual
Gorbel Inc.
SHSS, M12 x 12mm Lg
Bolt Hole Plug
(65088)
Note: Numbers in
Parentheses are
Gorbel® Part Numbers
Note: iQ Model Shown
4x Panduit Push
Wing Mounts, 6.4 mm
(76518)
Starwasher, M4
External Tooth
(65056)
2x Hex Nut,
M4, ZNPL
(65057)
Strain Relief
Clamp
(65105)
Flat Washer, M4, ZNPL
(65081)
Nylock Nut, M4, ZNPL
(65096)
3x Panduit Latching
Wire Clip, 6.4mm
(76516)
8x Panduit Latching
Wire Clip, 9.6mm
(76517)
10-5
Note: Numbers in
Parentheses are
Gorbel® Part Numbers
7/11
G-Force® Q - iQ Service Manual
Gorbel Inc.
Procedure 3A - Wire Rope Assembly Removal
Warning: Wire rope replacement is to be performed by qualified maintenance personnel only.
a. Make sure the replacement rope is same length and diameter (3/16 or 1/4) as rope
currently on actuator unit.
i. Ensure there is no load on handle, weighted load hook (pendant) or end effector.
ii. If using slow down setting, clear (reset) on handle or pendant handle menu screen. If
using virtual limits, clear (reset) on handle or the pendant handle’s menu screen.
iii. Remove end tool.
• Slide handle: Using a 19mm socket and ratchet, remove the nut from the handle’s
socket head shoulder screw, then use an M8 hex wrench and remove (unthread)
socket head shoulder screw from handle. This will detach it from wire rope thimble.
Set handle down on bench or table to support it and not stretch coil cord.
• Pendant handle: Remove the weighted hook or end effector from rope removing the
clip and pin and set aside.
b. Using a 3mm hex wrench, remove the (4) button head
screws on front cover (two on each side of unit).
c. Remove front cover from actuator and set aside upward to
use as a bowl to hold future parts. Note: Be careful not to
contact circuit board.
d. Going in the down direction, unspool rope from drum using
jog down button while keeping tension on wire rope with
other hand wearing a glove. Continue until lower limit is
engaged.
e. Insert a medium sized screwdriver between the white
colored wear ring and the actuator black casting where the
wire rope exits the actuator (right side). This will keep the
slack switch disengaged while jogging down the remainder
of the rope (diagram 3A).
Diagram 3A.
Insert screwdriver between the
white wear ring and the actuator
casting where the rope exits the
actuator.
f. Face the unit with circuit board on your left and wire rope
on the right.
Note: The next two steps must be done at the same time.
g. Using a long screwdriver or hex wrench, reach through
front of actuator and locate upper socket head cap screw
head facing you underneath the lower limit switch. Fully
push the screw in until it cannot move anymore (it is spring
loaded). Keep pressure on it (diagram 3B).
h. Using your right hand, press the jog down button while
watching the drum rotate two full turns in the clockwise
direction. The drum should stop automatically with the wire
rope retainer visible in the 3 o’clock position on the drum.
7/11
10-6
Push
Diagram 3B.
Locate socket head cap screw
head and fully push it in until it can
not move anymore.
G-Force® Q - iQ Service Manual
i.
j.
Gorbel Inc.
From the limit switches is a gray colored lead that plugs into
the circuit board. Its connected location is approximately (2)
inches down the right side of the circuit board labeled
“limits”. Gently pull out the plug lead to disconnect the plug
from board (diagram 3C).
Using a 3mm hex wrench, remove (4) M5 button head cap
screws that fasten the swiveling circuit board bracket to the
front support plate. (2) screws are located on the top and (2)
are on the bottom of bracket. Set screws in plastic front
cover. Swing bracket out towards you and to the left
(diagrams 3D).
k. Using 13mm open-end wrench, loosen, but do not remove,
the (2) flange nuts and remove reinforcement bracket
(diagram 3E) (330 lb. (150 kg) and 660 lb. (300 kg) units
only).
l.
Using an M5 hex wrench, remove (2) M6 socket head cap
screws from the drum gates. Slide the unthreaded gate out
towards you. Place gate and hardware in front cover
(diagram 3F).
m. Using an M6 hex wrench, remove the (2) M8 socket head
cap screws from the rope retainer and slide retainer off of
rope end toward you. Set retainer and screws in front cover
(diagram 3G). Note: 165 and 330 lb. units use two 5mm
button head cap screws (BHCS).
n. Grasp wire rope with right hand where it exits actuator.
Keep rope from bending while pushing rope upward to
unseat the stop sleeve from the anchor channel. If this
does not work, use a medium screwdriver (flat) sliding it
upward between rope and drum to progressively pry rope
out of anchor channel while still pushing up on rope.
Remove rope from actuator through opening at bottom
once unseated (diagram 3H).
Detach
Release
Diagram 3C.
Gently pull out the grey limit switch
wiring lead to disconnect plug from
board.
Top
Bottom
Diagrams 3D.
Remove four M5 socket head cap
screws (two on top, two on bottom)
that fasten the swiveling
circuit board bracket to the front
support plate.
Flange
Nuts
Diagram 3E.
Loosen flange nuts to remove
reinforcement bracket.
660 lb.
(300 kg) only
Remove
Rope
Retainer
Drum Gate
Cap Screws
Diagram 3F.
Remove two M6 socket head cap
screws from the drum gates.
Diagram 3G.
Remove M8 socket head cap
screws and slide retainer off rope
end towards you.
10-7
Diagram 3H.
Remove rope from actuator
through opening at bottom.
7/11
G-Force® Q - iQ Service Manual
Gorbel Inc.
Procedure 3B - Wire Rope Assembly Replacement
a. Insert end of wire rope assembly upward through coil cord
bracket with right hand. With left hand, grab free end, and
bend rope to form loop, tightly enough to insert loop portion
into groove of drum (diagram 3I). At this point, free end will
project from face of drum by several inches (diagram 3J).
b. By pulling downward with right hand and holding rope in
groove with left hand, rope end can then be pulled into
recess in drum face (diagram 3K).
c. Make sure retainer plug on end of wire rope is fully seated in
recess before replacing rope retainer plate (diagram 3L).
Diagram 3I.
Form loop in wire rope and insert
loop portion into groove of drum.
d. Install the rope retainer plate over the rope end and install
the (2) M8 socket head cap screws and lockwashers. Torque
hardware to fully compress lockwashers.
e. Ensure that rope is seated in radius channel and install rope
gate back in the unit making sure the rope guide (cutout) side
is inserted first and the ends are sliding on guide rails freely.
Fasten the rope gate assembly together using the previously
removed hardware. Torque hardware to compress
lockwashers.
f. Install (slide) the reinforcement bracket studs into channel
and tighten the (2) 13mm flange nuts. Next, swing circuit
board bracket closed towards plate and fasten to plate using
the (4) previously removed socket head cap screws and
lockwashers. Torque hardware to compress lockwashers.
Diagram 3J.
Free end of wire rope projects from
face of drum by several inches.
g. Plug limit switch lead into circuit board “limits” receptacle
making sure retention tab on plug is facing you.
h. Using a clean cotton cloth wrapped around rope loosely near
actuator entrance, pull down on rope and press jog up button
allowing rope to pass through cloth cleaning it as it is being
wrapped onto the drum. Continue loading rope onto drum
using jog button until (3) drum revolutions are completed.
i.
Remove screwdriver from between actuator and wear ring.
j.
Install front cover onto actuator making sure all (4) screws
are aligned with tabs before threading.
Diagram 3K.
Pull wire rope end into recess of
drum face.
k. If using coil cord, make sure rope is inserted down through
the middle of the coils.
l.
Attach wire rope to handle, weighted hook, or end effector in
reverse order of disassembly.
m. Reset virtual limits and/or slow down settings.
7/11
10-8
Diagram 3L.
Retainer plug on end of wire rope
should be fully seated in recess.
G-Force® Q - iQ Service Manual
Gorbel Inc.
Procedure 4A - Electrical Shield Removal
a. Turn power off by disconnecting AC power to the system.
b. Remove front cover. Refer to Procedure 1A.
c. Remove (3) M3 socket head cap screws, SHCS and M3 lockwashers.
d. Remove (3) shield standoffs.
e. Remove electrical shield.
Procedure 4B - Electrical Shield Replacement
a. Position the electrical shield and align (1) shield standoff with the corresponding hole in the
actuator main PCB.
b. Install (1) M3 socket head cap screw, SHCS and M3 lockwasher. Do not tighten hardware
completely.
c. Install the other (2) shield standoffs, M3 socket head cap screws, SHCS and M3
lockwashers.
d. Tighten all hardware carefully to avoid damaging the electrical shield.
e. Install the front cover. Refer to Procedure 1B.
f. Restore AC power to the system.
Note: Numbers in
Parentheses are
Gorbel® Part Numbers
3x M3 Shield Standoff
8mm OD x 3.1mm x 16mm Lg
(76575)
Electrical Shield
(76521)
3x Lockwasher
M3, ZNPL
(65051)
3x SHCS, M3 x 25mm Lg
(65013)
Diagram 4. Electrical Shield Removal and Replacement.
10-9
7/11
G-Force® Q - iQ Service Manual
Gorbel Inc.
Procedure 5A - Main PCB Removal
a. Turn off power by disconnecting AC power to the system.
b. Remove front cover. Refer to Procedure 1A.
c. Remove electrical shield. Refer to Procedure 4A.
d. Unplug cable assemblies from J1 through J14 on main PCB. Note the color coding for
cable assemblies that connect to J6, J7 and J8.
e. Remove (2) M3 socket head cap screws, SHCS and M3 lockwashers.
Note: Use caution when handling the main PCB to avoid any damage.
Procedure 5B - Main PCB Replacement
a. Install (2) M3 socket head cap screws, SHCS and M3 lockwashers.
b. Connect cable assemblies to J1 through J14 on the main PCB. Check the color coding for
J6, J7 and J8.
c. Install the electrical shield. Refer to Procedure 4B.
d. Install the front cover. Refer to Procedure 1B.
e. Restore AC power to the system.
Note: Numbers in
Parentheses are
Gorbel® Part Numbers
Actuator Main PCB
(78801)
2x Lockwasher, M3, ZNPL
(65051)
Metal Loop Strap, 1/2” ID
(76525)
2x SHCS, M3 x 12mm Lg
(65012)
Nylock Nut, M5, ZNPL
(65070)
Hex Standoff
(01007)
Diagram 5. Main PCB Removal and Replacement.
7/11
10-10
G-Force® Q - iQ Service Manual
Gorbel Inc.
Procedure 6A - Cooling Fan Removal
a. Turn power off by disconnecting AC power to the system.
b. Remove rear cover. Refer to Procedure 2A.
c. Unplug connector from cable assembly.
d. Remove (4) M4 button head cap screws, BHCS and M4 lockwashers and remove cooling
fan.
Procedure 6B - Cooling Fan Replacement
a. Position cooling fan on underside of CPU / power supply mounting bracket.
b. Install (4) M4 button head cap screws, BHCS and M4 lockwashers.
c. Connect cable assembly.
d. Install rear cover. Refer to Procedure 2B.
e. Restore AC power to the system.
Note: Numbers in
Parentheses are
Gorbel® Part Numbers
Cooling Fan
(78815)
4x Lockwasher, M4, ZNPL
(65052)
4x BHCS, M4 x 25mm Lg
(65015)
All 660 lb. (300 kg) models and certain
150 lb. (75 kg) and 330 lb. (150 kg) models.
Diagram 6. Cooling Fan Removal and Replacement.
10-11
7/11
G-Force® Q - iQ Service Manual
Gorbel Inc.
Procedure 7A - ACOPOS Support Bracket & ACOPOS Servo Drive Removal
Note: If only the ACOPOS servo drive needs to be removed, it will not be necessary to perform
all the following steps. Perform steps a, b, e, f, g and j only.
a. Turn power off by disconnecting AC power to the system.
b. Remove front cover. Refer to Procedure 1A.
c. Remove electrical shield. Refer to Procedure 4A.
d. Remove main PCB. Refer to Procedure 5A.
e. Remove (2) M5 button head cap screws, BHCS and M5 lockwashers from top portion of
PCB / ACOPOS support bracket.
f. Remove (2) M5 button head cap screws, BHCS and M5 lockwashers from lower portion of
support bracket.
g. Disconnect all external cable assemblies from the ACOPOS drive.
h. Remove (2) M6 nylock nuts from hinge pins.
i.
Lift PCB / ACOPOS support bracket with ACOPOS drive still attached off hinge bracket.
j.
Separate the ACOPOS servo drive from the PCB / ACOPOS support bracket assembly
by removing the (2) M6 nylock nuts from the underside of the upper portion of the PCB /
ACOPOS support bracket assembly.
Procedure 7B - ACOPOS Support Bracket & ACOPOS Servo Drive Replacement
a. Attach ACOPOS servo drive to PCB / ACOPOS support bracket with the (2) M6 nylock
nuts.
b. Position PCB / ACOPOS support bracket with ACOPOS servo drive attached onto hinge
bracket and install (2) M6 nylock nuts.
c. Swing ACOPOS assembly into its normal operating position and install all the cable
assemblies to the ACOPOS servo drive.
d. Install (2) M5 button head cap screws, BHCS and M5 lockwashers into top portion of
PCB / ACOPOS support bracket.
e. Install (2) M5 button head cap screws, BHCS and M5 lockwashers into lower portion of
PCB / ACOPOS support bracket.
f. Install main PCB. Refer to Procedure 5B.
g. Install electrical shield. Refer to Procedure 4B.
h. Install front cover. Refer to Procedure 1B.
i.
7/11
Restore AC power to the system.
10-12
G-Force® Q - iQ Service Manual
Note: Numbers in
Parentheses are
Gorbel® Part Numbers
Gorbel Inc.
ACOPOS Servo Drive, 110-230 VAC, 1 Phase
(78550 includes 78551, 78552, 78553)
Ground Warning Label
(77072)
AC110 Card (78551)
AC122 Card (78552)
AC131 Card (78553)
PCB/ACOPOS Support Bracket Assy
(79218)
3x Nylock Nut, M6, ZNPL
(65090)
6x Lockwasher, M5,
High-Collar
(65062)
6x SHCS, M5 x 12mm Lg
(65002)
ACOPOS Pivot Bracket
(79215)
Diagram 7. ACOPOS and Support Bracket Removal and Replacement.
10-13
7/11
G-Force® Q - iQ Service Manual
Gorbel Inc.
Procedure 8A - CPU Assembly Removal
a. Turn power off by disconnecting AC power to the system.
b. Remove rear cover. Refer to Procedure 2A.
c. Disconnect (3) cable assemblies from the CPU.
d. If this is an iQ model it may be necessary to disconnect any I/O wiring from the I/O
module.
e. Remove (2) Phillips head screws and lift CPU off mounting bracket.
Procedure 8B - CPU Assembly Replacement
a. Position CPU on mounting bracket.
b. Install (2) Phillips head screws.
c. Connect (3) cable assemblies to CPU and any I/O wiring, if necessary.
d. Reinstall rear cover. Refer to Procedure 2B.
e. Restore AC power to the system.
Slack Spring
(79237)
Note: Numbers in
Parentheses are
Gorbel® Part Numbers
Slack Spring Eye Bolt
(79210)
Nylock Nut, M6, ZNPL
(65090)
Hexnut, M6, ZNPL
(01764)
Power Supply, 150W
(78811)
5x Flat Washer, M4, ZNPL
(65081)
5x Lockwasher, M4, ZNPL
(65052)
Q: CPU 2003 470 (78562)
iQ: CPU, 2004 474 (78563)
2x SHCS, M4 x 16mm Lg
(65018)
3x SHCS, M4 x 10mm Lg
(76304)
Diagram 8. CPU Assembly Removal and Replacement.
7/11
10-14
G-Force® Q - iQ Service Manual
Gorbel Inc.
Procedure 9A - Power Supply Removal
a. Turn power off by disconnecting AC power to the system.
b. Remove rear cover. Refer to Procedure 2A.
c. Disconnect input and output wiring from the power supply.
d. Remove (3) M4 socket head cap screws, SHCS and (3) M4 lockwashers from bottom of
power supply.
e. Slide power supply out of CPU / power supply mounting bracket.
Procedure 9B - Power Supply Replacement
a. Position power supply inside the CPU / power supply mounting bracket.
b. Install (3) M4 socket head cap screws, SHCS and (3) M4 lockwashers into bottom of
power supply.
c. Connect input and output wiring. Refer to System Schematic if necessary.
d. Reinstall rear cover. Refer to Procedure 2B.
e. Restore AC power to the system.
Slack Spring
(79237)
Note: Numbers in
Parentheses are
Gorbel® Part Numbers
Slack Spring Eye Bolt
(79210)
Nylock Nut, M6, ZNPL
(65090)
Hexnut, M6, ZNPL
(01764)
Power Supply, 150W
(78811)
5x Flat Washer, M4, ZNPL
(65081)
5x Lockwasher, M4, ZNPL
(65052)
Q: CPU 2003 470 (78562)
iQ: CPU, 2004 474 (78563)
2x SHCS, M4 x 16mm Lg
(65018)
3x SHCS, M4 x 10mm Lg
(76304)
Diagram 9. Power Supply Removal and Replacement.
10-15
7/11
G-Force® Q - iQ Service Manual
Gorbel Inc.
Procedure 10A - CPU / Power Supply Mounting Bracket Removal
a. Turn power off by disconnecting AC power to the system.
b. Remove rear cover. Refer to Procedure 2A.
c. Remove CPU assembly. Refer to Procedure 8A.
d. Remove power supply. Refer to Procedure 9A.
e. Disconnect slack spring.
f. Free any wiring harnesses required.
g. Remove (6) M5 socket head cap screws, SHCS and (6) M5 lockwashers.
Procedure 10B - CPU / Power Supply Mounting Bracket Replacement
a. Position CPU / power supply mounting bracket against actuator casting.
b. Install (6) M5 socket head cap screws, SHCS and (6) M5 lockwashers.
c. Reconnect slack spring.
d. Reinstall power supply. Refer to Procedure 9B.
e. Reinstall CPU assembly. Refer to Procedure 8B.
f. Reposition any wiring harnesses as required.
g. Reinstall rear cover. Refer to Procedure 2B.
h. Restore AC power to the system.
Note: Numbers in
Parentheses are
Gorbel® Part Numbers
CPU/Power Supply
Mounting Bracket
(76526)
6x SHCS, M5 x 12mm Lg
(65002)
6x Lockwasher, M5,
High-Collar
(65062)
Rubber Grommet, 3/8”
(79255)
Diagram 10. CPU/Power Supply Mounting Bracket Removal and Replacement.
7/11
10-16
G-Force® Q - iQ Service Manual
Gorbel Inc.
Procedure 11A - Motor Set Removal
a. Turn power off by disconnecting AC power to the system.
b. Remove rear cover. Refer to Procedure 2A.
c. Remove resolver and motor power cables from motor set.
d. Disconnect slack spring from slack spring bracket.
e. Remove (4) M6 socket head cap screws, SHCS and (4) M6 lockwashers from motor set.
f. Carefully pry motor set away from gearbox assembly.
Procedure 11B. Motor Set Replacement
a. Align key on motor set shaft with gearbox assembly and push motor set into gearbox
assembly with mounting holes properly aligned.
b. Position slack spring bracket on left side of motor set and secure motor set with (4) M6
socket head cap screws, SHCS and (4) M6 lockwashers. Note: Do not tighten hardware
completely until all (4) screws have been installed and are hand tight.
c. Connect slack spring to slack spring bracket.
d. Connect resolver and motor power cables to motor set.
e. Reinstall rear cover. Refer to Procedure 2B.
f. Restore AC power to the system.
Note: Numbers in
Parentheses are
Gorbel® Part Numbers
4x SHCS, M6 x 25mm Lg
(65028)
4x Lockwasher, M6, ZNPL
(00370)
Slack Spring Bracket
(79211)
36 Frame Motor Set
(78560)
Diagram 11A. 165 lb. (75 kg) Motor Set Removal and Replacement.
10-17
7/11
G-Force® Q - iQ Service Manual
Gorbel Inc.
Hex Nut, M8
(65101)
To be used as Spacer
Slack Spring Bracket
(79211)
SHCS, M6 x 40mm Lg
(65033)
37 Frame Motor Set
(78561)
4x Lockwasher, M6, ZNPL
(00370)
Note: Numbers in
Parentheses are
Gorbel® Part Numbers
3x SHCS, M6 x 25mm Lg
(65028)
Diagram 11B. 330 and 660 lb. (150 and 300 kg) Motor Set Removal and Replacement.
7/11
10-18
G-Force® Q - iQ Service Manual
Gorbel Inc.
Procedure 12A - End Support Frame Removal
a. Turn power off by disconnecting AC power to the system.
b. Remove front cover. Refer to Procedure 1A.
c. Remove ACOPOS support bracket with electrical shield, main PCB and ACOPOS servo
drive still attached. Disconnect all cable assemblies from the main PCB and ACOPOS
drive as required. Refer to Procedure 7A.
d. Remove (7) M5 socket head cap screws, SHCS and (7) M5 lockwashers from end support
frame.
Procedure 12B - End Support Frame Replacement
a. Align the end support frame with the holes in the actuator casting and install (7) M5 socket
head cap screws, SHCS and (7) M5 lockwashers.
b. Install the ACOPOS support bracket with electrical shield, main PCB and ACOPOS servo
drive. Connect all cable assemblies to the main PCB and ACOPOS drive. Refer to
Procedure 7B.
c. Install the front cover. Refer to Procedure 1B.
d. Restore AC power to the system.
End Support Frame
(76758)
7x Lockwasher, M5
High-Collar
(65062)
7x SHCS, M5 x 20mm Lg
(65001)
4x Front Cover
Mounting Bracket
(76759)
4x SHCS, M5 x 12mm Lg
(65002)
Note: Apply
Blue Loctite to
Threads
2x FHCS, M5 x 10mm Lg
(65004)
Note: Numbers in
Parentheses are
Gorbel® Part Numbers
Bearing Retainer Ring
(76512)
Diagram 12A. 165 and 330 lb. (75 and 150 kg) End Support Frame Removal and Replacement.
10-19
7/11
G-Force® Q - iQ Service Manual
Gorbel Inc.
End Support Frame
(76502)
11x Lockwasher, M5
High-Collar
(65062)
7x SHCS, M5 x 20mm Lg
(65001)
4x SHCS, M5 x 12mm Lg
(65002)
2x FHCS, M5 x 10mm Lg
(65004)
4x Front Cover Mounting Bracket
(79219)
Note: Numbers in
Parentheses are
Gorbel® Part Numbers
Bearing Retainer Ring
(76512)
Diagram 12B. 660 lb. (300 kg) End Support Frame Removal and Replacement.
7/11
10-20
G-Force® Q - iQ Service Manual
Gorbel Inc.
Procedure 13A - Load Cell Removal
a. Turn power off by disconnecting AC power to the system.
b. Remove front cover. Refer to Procedure 1A.
c. Remove rear cover. Refer to Procedure 2A.
d. Disconnect load cell cable from J4 on the main PCB and open cable clamp to free cable
and connector for removal.
e. Remove the M12 hex head cap screw, HHCS and M12 lockwasher that secures the load
cell to the main middle section through the opening towards the rear of the main middle
section. Note: Be careful not to damage any wiring as you pull the load cell cable through
the main middle section since there is other wiring present.
f. Remove the load cell pin from the load cell as required.
Procedure 13B - Load Cell Replacement
a. Install the load cell actuation pin and into the bottom of the load cell.
b. Position the load cell with the pin attached in place from the rear of the main middle
section.
c. Install the M12 hex head cap screw, HHCS and M12 lockwasher that secure the load cell
to the main middle section.
d. Connect the load cell cable connector J4 on the main PCB and secure the cable with the
corresponding clamp.
e. Install the front cover. Refer to Procedure 1B.
f. Install the rear cover. Refer to Procedure 2B.
g. Restore AC power to the system
Note: If you are replacing the load cell, you will have to perform specific load cell diagnostic
procedures described in the Configuration Menu. Contact Gorbel® Customer Service Support for
assistance.
10-21
7/11
G-Force® Q - iQ Service Manual
Gorbel Inc.
HHCS,
M12
x 25mm
HHCS M12
X 25
MM LGLg
(65022)
(65022)
Lockwasher,
M12,
ZNPL
Lockwasher M 12
ZNPL
(00206)
(00206)
Cord
Connector
Cord Connector
(76505)
(76505)
Threaded
Plug
Threaded
Plug
(77860)
(77860)
Cell
Load Cell 165 lbLoad
(75 KG)
165#, (75kg) Capacity
(78806)
75 KG IQ-CERTIFIED
(78806)
Load
Pin
Load Cell
Cell Pin
(76763)
(76763)
75 KG Q
Hex
SocketPlug
Plug
Hex Socket
1/2 NPT (65089)
1/2 NPT
(65089)
Note: Numbers in
Parentheses are
Gorbel® Part Numbers
75 KG IQ
Cord
Cord Connector
Connector
(77861)
(77861)
75 KG Q-CERTIFIED
Diagram 13A. 165 lb. (75 kg) Q and iQ Load Cell Removal and Replacement.
7/11
10-22
G-Force® Q - iQ Service Manual
Gorbel Inc.
HHCS,
M12
x 25mm
HHCS
M12
X 25
MM LG Lg
(65022)
(65022)
Cord Connector
Connector
Cord
(76505)
(76505)
Lockwasher
M12
ZNPL
Lockwasher,
M12,
ZNPL
(00206)
(00206)
Threaded
Plug
Threaded Plug
(77860)
(77860)
Load
CellPin
Pin
Load Cell
(76763)
(76763
)
150-300 KG IQ CERT.
150-300 KG Q
Cord
CordConnector
Connector
(77861)
(77861)
Load
Cell660
660#
(300KG)
kg)
Load Cell
lb (300
(74014)
(74014)
Load Cell
lb (150
Load
Cell330
330#
(150KG)
kg)
(78807)
(78807)
Hex
Plug
Hex Socket
Socket Plug
1/2 NPT 1/2
(65089)
NPT
(65089)
150-300 KG IQ
Note: Numbers in Parentheses
are Gorbel® Part Numbers
150-300 KG Q-CERT.
Diagram 13B. 330 lb. (150 kg) and 660 lb. (300 kg) Q and iQ Load Cell Removal and Replacement.
10-23
7/11
G-Force® Q - iQ Service Manual
Note: Numbers in
Parentheses are
Gorbel® Part Numbers
Gorbel Inc.
4x HHCS, M12 x 30mm Lg
(65020)
2x Bumper
G-Force® Trolley
(77320)
4x Lockwasher, M12, ZNPL
(00206)
4x Nylock, M6
(65090)
2x End Axle
(A1001.24)
4x End Wheel
(S2001.14)
C.H.2
4x End Spacer
(75336)
6x Snap Ring
(2001.12)
C.H.1
4x Flatwasher, M6
(65060)
Note: C.H.1 is either of
2 holes off center.
C.H.2 is center hole
with slot to edge.
4x SHCS, M6 x 16mm Lg
(00190)
Trolley Body
(76573)
Trolley Components for 2000 Series Steel or Aluminum Track.
Note: Numbers in
Parentheses are
Gorbel® Part Numbers
4x HHCS, M12 x 30mm Lg
(65020)
2x Bumper
G-Force® Trolley
(77320)
4x Lockwasher, M12, ZNPL
(00206)
4x Nylock, M6
(65090)
2x Center Wheel
(A2001.16)
2x End Axle
(76588)
C.H.2
4x Center Spacer
(75336)
4x End Wheel
(A0501.16)
3x Snap Ring
(2001.12)
4x End Spacer
(75765)
C.H.1
4x Flatwasher, M6
(65060)
Center Axle
(A1001.24) [C.H.2]
4x SHCS, M6 x 16mm Lg
(00190)
Note: C.H.1 is either of 2 holes off center.
C.H.2 is center hole with slot to edge.
Trolley Body
(76573)
Trolley Components for 1000 Series Steel or Aluminum Track.
7/11
10-24
G-Force® Q - iQ Service Manual
Note: Numbers in
Parentheses are
Gorbel® Part Numbers
Gorbel Inc.
4x HHCS, M12 x 30mm Lg
(65020)
2x Bumper
G-Force® Trolley
(77320)
4x Lockwasher, M12, ZNPL
(00206)
4x Nylock, M6
(65090)
2x End Axle
(A0501.24)
C.H.2
2x Spacer
(75336)
6x Steel Wheel
(0501.16)
6x Snap Ring
(2001.12)
C.H.1
4x Flatwasher, M6
(65060)
Center Axle
(A0501.24) [C.H.1]
4x SHCS, M6 x 16mm Lg
(00190)
Note: C.H.1 is either of 2 holes off center.
C.H.2 is center hole with slot to edge.
Trolley Body
(76573)
Trolley Components for 500 Series Steel Track.
Note: Numbers in
Parentheses are
Gorbel® Part Numbers
4x HHCS, M12 x 30mm Lg
(65020)
4x Lockwasher, M12, ZNPL
(00206)
2x Bumper
G-Force® Trolley
(77320)
4x Nylock, M6
(65090)
2x End Axle
(A1001.24)
6x Aluminum Wheel
(A0501.16)
C.H.2
6x Spacer
(77865)
6x Snap Ring
(2001.12)
C.H.1
4x Flatwasher, M6
(65060)
Center Axle
(A0501.24) [C.H.1]
4x SHCS, M6 x 16mm Lg
(00190)
Trolley Body
(76573)
Note: C.H.1 is either of 2 holes off center.
C.H.2 is center hole with slot to edge.
Trolley Components for 500 Series Aluminum Track.
10-25
7/11
G-Force® Q - iQ Service Manual
Note: Numbers in
Parentheses are
Gorbel® Part Numbers
Gorbel Inc.
4x HHCS, M12 x 30mm Lg
(65020)
4x Lockwasher, M12, ZNPL
(00206)
2x Bumper
G-Force® Trolley
(77320)
2x Steel Wheel
(0501.16)
4x Nylock, M6
(65090)
2x End Axle
(A1001.24)
4x Aluminum Wheel
(A0501.16)
C.H.2
6x Spacer
(75336)
6x Snap Ring
(2001.12)
C.H.1
4x Flatwasher, M6
(65060)
Center Axle
(A0501.24) [C.H.1]
4x SHCS, M6 x 16mm Lg
(00190)
Trolley Body
(76573)
Note: C.H.1 is either of 2 holes off center.
C.H.2 is center hole with slot to edge.
Trolley Components for 250 Series Aluminum Track.
Note: Numbers in
Parentheses are
Gorbel® Part Numbers
Universal Adapter Trolley (77879)
Universal Trolley Adapter.
7/11
10-26
G-Force® Q - iQ Service Manual
Gorbel Inc.
Note: Numbers in
Parentheses are
Gorbel® Part Numbers
2x M8 Nylock Nut
(65103)
Load Plate Brace
(76761)
330 lb. (150 kg) Model Only
Load Plate Brace.
Note: Numbers in
Parentheses are
Gorbel® Part Numbers
2x M8 Nylock Nut, M8, ZNPL
(65103)
Load Plate Brace
(76522)
660 lb. (330 kg) Model Only
Load Plate Brace.
Note: 165 lb. (75 kg) models do not use this component.
10-27
7/11
G-Force® Q - iQ Service Manual
Gorbel Inc.
Procedure 14A - Drum Gate Removal
a. Turn power off by disconnecting AC power to the system.
b. Remove the front cover. Refer to Procedure 1A.
c. Remove the (4) M5 button head cap screws, BHCS and (4) M5 lockwashers that secure
the PCB / ACOPOS support bracket assembly to the end support frame.
d. Disconnect limit switch cable assembly from main PCB in order to swing the ACOPOS
drive assembly into the open position for access to the drum gate area.
e. Loosen the (2) M8 nylock nuts and remove the load plate brace if your unit is a 330 or
660 lb. (150 or 300 kg) model.
f. Remove the (2) M6 socket head cap screws, SHCS and (2) M6 lockwashers from the
drum gate and slide the drum gate off the load plate.
Procedure 14B - Drum Gate Replacement
a. Slide the drum gate into position on the load plate and install the (2) M6 socket head cap
screws, SHCS and (2) M6 lockwashers.
b. Position the load plate brace if equipped with one and tighten the (2) M8 nylock nuts.
c. Swing the ACOPOS drive assembly into the closed position and connect the limit switch
cable assembly to the main PCB.
d. Install the (4) M5 button head cap screws, BHCS and (4) M5 lockwashers that secure the
PCB / ACOPOS support bracket assembly to the end support frame.
e. Install the front cover. Refer to Procedure 1B.
f. Restore AC power to the system.
7/11
10-28
G-Force® Q - iQ Service Manual
Gorbel Inc.
2x Lockwasher, M6, ZNPL
(03370)
2x SHCS, M6 x 80mm Lg
(65031)
Note: Numbers in
Parentheses are
Gorbel® Part Numbers
Drum Gate Clearance
(76537)
Diagram 14A. 165 lb. (75 kg) and 330 lb. (150 kg) Clearance Drum Gate Removal and Replacement.
2x BHCS, M5 x 12mm Lg
(65000)
Apply Blue Loctite
Retainer, 3/16” Rope
(75337)
Wire Rope Assembly
(79258)
Note: Numbers in
Parentheses are
Gorbel® Part Numbers
Diagram 14B. 165 lb. (75 kg) and 330 lb. (150 kg) Clearance Drum Gate Removal and Replacement.
10-29
7/11
G-Force® Q - iQ Service Manual
Gorbel Inc.
Wire Rope Termination Plate
(76545)
2x Lockwasher, M8, ZNPL
(00195)
2x SHCS, M8 x 25mm Lg
(00194)
Wire Rope Assembly
(79245)
Drum Gate, Clearance
(76510)
2x SHCS, M6 x 80 mm Lg
(65031)
2x Lockwasher, M6
High Collar
(65053)
Note: Numbers in
Parentheses are
Gorbel® Part Numbers
Diagram 14C. 660 lb. (300 kg) Clearance Drum Gate Removal and Replacement.
7/11
10-30
G-Force® Q - iQ Service Manual
Gorbel Inc.
Procedure 15A - Drum Cover and Drum Cover Band Removal
a. Turn power off by disconnecting AC power to the system.
b. Remove front cover. Refer to Procedure 1A.
c. Remove ACOPOS support bracket with electrical shield, main PCB and ACOPOS servo
drive still attached. Disconnect only cable assemblies from the main PCB as necessary.
Refer to Procedure 7A.
d. Remove end support frame. Refer to Procedure 12A.
e. Remove the drum gate. Refer to Procedure 14A.
Note: Use caution during the next step. The drum cover band will be in tension.
f. Remove the (2) M6 socket head cap screws, SHCS and (2) M6 lockwashers that secure
the drum cover band to the load plate.
g. Slide both the drum cover band and drum cover off the drum pulley.
Procedure 15B - Drum Cover and Drum Cover Band Replacement
a. Position the drum cover band inside the drum cover and slide the assembly over the drum
pulley.
b. Install the (2) M6 socket head cap screws, SHCS and (2) M6 lockwashers for the drum
cover band into the load plate.
c. Install the drum gate. Refer to Procedure 14B.
d. Install the end support frame. Refer to Procedure 12B.
e. Install the ACOPOS support bracket with electrical shield, main PCB and ACOPOS servo
drive still attached. Connect all cable assemblies to the main PCB. Refer to Procedure 7B.
f. Install the front cover. Refer to Procedure 1B.
g. Restore power to the system.
10-31
7/11
G-Force® Q - iQ Service Manual
Gorbel Inc.
Drum Cover Band
(76703)
Drum Cover
(76702)
Note: Numbers in
Parentheses are
Gorbel® Part Numbers
2x SHCS, M6 x 110mm Lg
(65037)
Note: Apply Blue
Loctite to Threads
Diagram 15A. 165 lb. (75 kg) and 330 lb. (150 kg) Drum Cover and Band Removal and Replacement.
Drum Cover
(76513)
Drum Cover Band
(76509)
Note: Numbers in
Parentheses are
Gorbel® Part Numbers
2x SHCS, M6 x 90mm Lg
(65030)
Note: Apply Blue
Loctite to Threads
Diagram 15B. 660 lb. (300 kg) Drum Cover and Band Removal and Replacement.
7/11
10-32
G-Force® Q - iQ Service Manual
Gorbel Inc.
Procedure 16A - Limit Switch Assembly Removal
a. Turn power off by disconnecting AC power to the system.
b. Remove front cover. Refer to Procedure 1A.
c. Disconnect the limit switch cable assembly from the main PCB (J11).
d. Remove the access plug from the main middle section.
e. Remove the M6 button head cap screw, BHCS and M6 lockwasher from the outside end of
the limit SWITCH assembly.
f. Remove the limit SWITCH assembly from the load plate inside the main middle section.
Procedure 16B - Limit Switch Assembly Replacement
a. Position the limit switch assembly on the load plate by locating it on the inside M6 button
head cap screw, BHCS. The lower projection of the slide must be engaged in recess in
threaded gate.
b. Install the M6 button head cap screw, BHCS and M6 lockwasher on the outside end of the
limit switch assembly.
c. Connect the limit switch cable assembly to the main PCB (J11).
d. Install the access plug into the main middle section.
e. Install the front cover. Refer to Procedure 1B.
f. Restore AC power to the system.
10-33
7/11
G-Force® Q - iQ Service Manual
Gorbel Inc.
Note: Numbers in
Parentheses are
Gorbel® Part Numbers
Limit Switch Assembly
(79259)
Note: Slide limit switch
assembly into place on
load plate. The M6
BHCS will retain one
end and the M6 SHCS,
shown below, will retain
the other.
BHCS, M6 x 16mm Lg
(65075)
Lockwasher, M6, ZNPL
(03370)
Diagram 16A. 165 lb. (75 kg) and 330 lb. (150 kg) Limit Switch Assembly Removal and Replacement.
Limit Switch Assembly
(79274)
Load Plate
(76503)
Note: Slide limit
switch into place on
load plate. The M6
SHCS will retain one
end and the M6
BHCS, shown below,
will retain the other.
BHCS, M6 x 16mm Lg
(65075)
Note: Numbers in
Parentheses are
Gorbel® Part Numbers
Lockwasher, M6, ZNPL
(03370)
Diagram 16B. 660 lb. (300 kg) Limit Switch Assembly Removal and Replacement.
7/11
10-34
G-Force® Q - iQ Service Manual
Gorbel Inc.
Planetary Gearbox
EPL84, 35:1, With Key
(76713)
BHCS, M6 x 20mm Lg
(65075)
Nylock Nut, M6
(65090)
Note: BHCS (65075) should provide
slide fit for limit switch assembly; do
not fully thread into load plate.
Load Plate
(79223)
Drum Gate, Threaded
(76705)
Ball Bearing, 6908
Double Seal
Drum Pulley
(65075)
(76751)
2x Bearing Spacer
(79209)
Note: Numbers in
Parentheses are
Gorbel® Part Numbers
2x Ball Bearing 6824-RS
(74011)
Note: Thread drum gate (76705) onto
drum so the wire rope slot matches
up to the wire rope anchor point on
the drum pulley (76751)
165 lb. (75 kg)
Nylock Nut, M6
(65090)
BHCS, M6 x 16mm Lg
(65075)
Ball Bearing, 6908, Double Seal
(74019)
Note: Numbers in
Parentheses are
Gorbel® Part Numbers
330 lb. (150 kg)
10-35
7/11
G-Force® Q - iQ Service Manual
Note: Numbers in
Parentheses are
Gorbel® Part Numbers
Gorbel Inc.
Planetary Gearbox, EPL118, 70:1
(76714)
Load Plate
(76701)
Drum Pulley
(76753)
Drum Gate, Threaded
(76705)
2x Bearing Spacer
(79209)
2x Ball Bearing 6824-RS
(74011)
Note: Thread drum gate (76705) onto drum so
the wire rope slot matches up to the wire rope
anchor point on the drum pulley (79155).
330 lb. (150 kg)
8x SHCS, M5
x 30mm Lg
(65003)
8x Lockwasher, M5
High-Collar
(65062)
4x Lockwasher, M8, ZNPL
(00195)
4x SHCS, M8 x
25mm Lg
(00194)
Note: Numbers in
Parentheses are
Gorbel® Part Numbers
Gearbox, Planetary, 4:1
(74037)
660 lb. (300 kg)
7/11
10-36
Ball Bearing 6908,
Double Seal
(74019)
G-Force® Q - iQ Service Manual
Gorbel Inc.
Gearbox, Planetary, 40:1, With Key
(74035)
Hex Nut, M6
(01764)
5x SHCS, M6 x
20mm Lg
(00186)
Note: Numbers in
Parentheses are
Gorbel® Part Numbers
4x Lockwasher, M6, ZNPL
(03370)
660 lb. (300 kg)
Load Plate
(76503)
Sleeve
(76514)
Drum Gate, Threaded
(76565)
Drum Pulley
(76501)
2x Bearing Spacer
(79209)
2x Ball Bearing, 6824-2RS
(74011)
Note: Numbers in
Parentheses are
Gorbel® Part Numbers
Note: Thread drum gate (76504) onto drum
so the wire slot matches up to the wire rope
anchor point on the drum pulley (76501).
660 lb. (300 kg)
10-37
7/11
G-Force® Q - iQ Service Manual
Gorbel Inc.
4x Spacer
(83260)
Reinforcement Plate
(83252)
4x M8 Lockwasher
(00195)
4x M8 SHCS
(83236)
2x 3/8” Lockwasher
(01355)
4x 3/8” Hexnut
(02158)
U-Bolt
(83265)
Note: Numbers in
Parentheses are
Gorbel® Part Numbers
Note: Coil cord and associated components
not shown for clarity.
1320 lb. (600 kg) Reeved G-Force® Reinforcement Plate Assembly.
2x M6 Lockwasher (03370)
2x M6 SHCS (65032)
Wear Ring
2x Lockwasher (03370)
2x SHCS
(65028)
Wear Ring Bracket
(76708)
Coil Cord
Note: Numbers in
Parentheses are
Gorbel® Part Numbers
Coil Cord Mounting Plate
(83253)
Wire Rope Assembly
1320 lb. (600 kg) Reeved G-Force® Coil Cord Assembly.
7/11
10-38
G-Force® Q - iQ Service Manual
Gorbel Inc.
4x M4 SHCS
(65018)
4x M4 Lockwasher
(65052)
Pulley (83255)
Bearing (83261)
Snap Ring (65086)
M6 SHCS
2x Pulley Spacer
(83259)
2x 17mm Snap Ring
(2001.12)
Pulley Pin
(83258)
Note: Numbers in
Parentheses are
Gorbel® Part Numbers
1320 lb. (600 kg) Reeved G-Force Pulley Assembly.
2x Pulley Side Plate
(83254)
2x Pulley Side Plate Spacer
(83257)
2x Shaft Collar
(83267)
6x M4 Lockwasher
(65052)
6x M4 SHCS
(83264)
4x PHMS #4-40 x 1/4”
(83266)
2x M8 Shoulder Bolt
(83263)
Note: Numbers in
Parentheses are
Gorbel® Part Numbers
2x Pulley Side Guard
(83256)
Coil Cord Footer
(83250)
Swivel Sub-Assembly
2x M6 Hexnut
(01764)
2x M6 Lockwasher
(03370)
1320 lb. (600 kg) Reeved G-Force® Swivel Assembly.
10-39
7/11
G-Force® Q - iQ Service Manual
Gorbel Inc.
Removal and Replacement Procedures
SLIDING HANDLE
Procedure 1A. Swivel Sub Assembly Removal:
Note: This procedure assumes the Coil Cord and Wire Rope assemblies have been removed
prior to performing any repairs on the Sliding Handle itself. Refer to the system installation
procedures in Chapter 3 for specific instructions regarding Coil Cord and Wire Rope removal.
a. Remove the M16 custom hex head cap screw, HHCS and M16 Belleville washer from the
top of the swivel assembly.
b. Slide the swivel assembly off the top of the handle shaft.
Procedure 1B. Swivel Sub Assembly Replacement:
a. Slide the swivel assembly onto the top of the handle shaft.
b. Install the M16 custom hex head cap screw, HHCS and M16 Belleville washer onto the top
of the handle shaft.
Hardware Kit
(74251)
(see inset)
Note: Numbers in
Parentheses are
Gorbel® Part Numbers
Swivel Sub-Assembly
(74249)
Housing Sub-Assembly
Air Extension O-Ring
(74242)
Air Extension Output, DN8 (1/4 NPT) (option)
(74240)
Linear Transducer Sub-Assembly
(74246)
HHCS, M16 x 2mm Pitch
with Channel
(74281)
2x Collector O-Ring
(74269)
Grip & Shaft Sub-Assembly
(74245)
Flatwasher, M16, ZNPL
(01310)
Lockwasher, M16, ZNPL
(00212)
Hexnut, M16, ZNPL
(65063)
Hook Latch Assembly
(74199)
Belleville Washer, M16
(65098)
External Snap Ring, 25.4mm
(65069)
Diagram 1. In-Line Slide Handle Swivel Sub Assembly Removal and Replacement.
7/11
10-40
G-Force® Q - iQ Service Manual
Gorbel Inc.
Procedure 2A. Remote Mount Cap Sub Assembly Removal
Note: This procedure assumes the handle has already been removed from a remote mount
bracket or similar mounting device.
a. Remove M16 hex head cap screw, HHCS, flatwasher and lockwasher from the top of the
handle assembly.
b. Slide the remote mount cap off the handle shaft. Note the orientation of the internal
electrical connector located below the remote mount cap.
Procedure 2B. Remote Mount Cap Sub Assembly Replacement
a. Slide the remote mount cap onto the handle shaft. Note the orientation of the internal
electrical connector located below the remote mount cap.
b. Position the handle assembly into the remote mount bracket (if applicable) and install M16
hex head cap screw, HHCS, flatwasher and lockwasher onto the top of the handle
assembly.
2x HHCS, M16 x 2 - 33mm, CL 8.8
(74230)
2x Lockwasher, M16, ZNPL
(00212)
2x Flatwasher, M16, ZNPL
(01310)
Remote Mount Cap
Sub-Assembly
(74252)
(see inset)
External Snap Ring
(65069)
Housing Sub-Assembly
(74247 / 74248)
Note: Numbers in
Parentheses are
Gorbel® Part Numbers
Handle Transducer Sub-Assembly
(74246)
Remote Mount Slide Handle Cover
(74224)
Hex Standoff, 6mm x 12mm, M4
(65083)
SHSS, M6 x 1-8
(65099)
PCB Slide Auxiliary Out
(74233)
Grip & Shaft Sub-Assembly
(74245)
PHMS, M3x0.5-20,
ZNPL
(65082)
Lockwasher, M3, ZNPL
(65051)
Connector Nut
Diagram 2. Remote Mounted Sliding Handle Remote Mount Cap Sub Assembly Removal and Replacement.
10-41
7/11
G-Force® Q - iQ Service Manual
Gorbel Inc.
Procedure 3A. Housing Sub Assembly Removal
a. Remove swivel sub assembly or remote mount cap assembly. Refer to Procedure 1A or
2A accordingly.
b. Remove air extension output and O-ring if equipped with this option.
c. Remove snap ring and any shim washers.
d. Carefully slide the housing sub assembly off the handle shaft.
Note: Be careful to not damage the LVDT sub assembly when removing the housing
assembly.
Procedure 3B. Housing Sub Assembly Replacement
a. Carefully slide the housing sub assembly onto the handle shaft.
Note: Be careful to not damage the LVDT sub assembly when replacing the housing sub
assembly.
b. Replace either the swivel sub assembly or remote mount cap sub assembly accordingly.
Refer to Procedure 1B or 2B.
c. Replace snap ring, washers, and air extensions (if applicable).
Handle Top Sub-Assembly
(74248-10) / (74247-10)
Operator Present Sensor
(78615)
NOTE LOCATION OF
NUT AND WASHER
LCD Window
(74223)
Bumper
(74207)
2x External Snap Ring, 6mm
(65065)
2x Handle Pushbutton
(74215)
Sliding Handle Bottom
(74209)
4x Lockwasher, M5, High-Collar
(65062)
4x SHCS, M5x0.8-55
(65067)
Note: Numbers in
Parentheses are
Gorbel® Part Numbers
Diagram 3. Housing Sub-Assembly Removal and Replacement.
7/11
10-42
G-Force® Q - iQ Service Manual
Gorbel Inc.
Procedure 4A. Housing Sub Assembly Disassembly
Note: This procedure is applicable to both Q and iQ handle assemblies.
a. Remove the swivel sub assembly or remote mount cap sub assembly. Refer to Procedure
1A or 2A accordingly.
b. Remove the housing sub assembly. Refer to Procedure 3A.
c. Remove (4) M5 socket head cap screws, SHCS and (4) M5 flatwashers.
d. Separate the handle top sub assembly from the handle bottom. Use caution, the ribbon
cable and ground wire will still be connected.
e. All the sub assembly internal components can be removed or replaced using the exploded
view drawings as a reference.
Procedure 4B. Housing Sub Assembly Reassembly
a. All the sub assembly internal components can be removed or replaced using the exploded
view drawings as a reference.
b. Once all the internal components have been positioned properly, slide the handle bumper
in place on the handle bottom and join the handle top sub assembly with the handle
bottom. Make sure the ribbon cable and ground wire are connected properly.
c. Install the (4) M5 socket head cap screws, SHCS and (4) M5 flatwashers.
d. Install the housing sub assembly and swivel or remote cap sub assemblies as required.
Refer to Procedures 3B and 1B or 2B.
E-Stop Pushbutton Assembly
(78804)
E-Stop Body with Nut
Top Handle, Cast
(74208)
Emergency Stop Label
(74225)
2x Light Pipe
(74216)
Handle Plug, M20 Thread
(74217)
3x PHMS, M2x0.4-6, SEMS Split Lock
(65073)
ESD Ground Wire
Not Shown
E-Stop Pushbutton Assembly
(78804)
O-Ring, 10mm ID, 1mm Thick
(65109)
Slide Mother Board PCB
(78802)
Note: Numbers in
Parentheses are
Gorbel® Part Numbers
E-Stop Leads with
Connector Not Shown
Slide Daughter Board PCB, Remote (78808)
Slide Daughter Board PCB, CAN (78803)
Diagram 4A. Housing Sub-Assembly Assembly and Disassembly.
10-43
7/11
G-Force® Q - iQ Service Manual
Gorbel Inc.
Housing Sub-Assembly
(74247-10) / (74248-10)
Operator Present Sensor
(78615)
2x External Snap Ring, 6mm
(65065)
LCD Window
(74223)
Bumper
(74207)
NOTE LOCATION OF
NUT AND WASHER
S-Handle Bottom
(74209)
2x Handle Pushbutton
(74215)
4x Lockwasher, M5, High-Collar
(65062)
Note: Numbers in
Parentheses are
Gorbel® Part Numbers
4x SHCS, M5x8-55
(65067)
Diagram 4B. Housing Sub-Assembly Assembly and Disassembly.
7/11
10-44
G-Force® Q - iQ Service Manual
Gorbel Inc.
Procedure 5A. LVDT Sub Assembly Removal
a. Remove the swivel or remote mount cap sub assembly. Refer to Procedure 1A or 2A.
b. Remove the housing sub assembly. Refer to Procedure 3A.
c. Access the LVDT adjustment screw from the opening below the upper portion of the
handle grip assembly. Turn the screw clockwise until the LVDT is clear of the grip
assembly.
Note: Keep track of the approximate number of turns required to remove the assembly. It will
help approximate the starting position for the replacement process.
Procedure 5B. LVDT Sub Assembly Replacement
a. Insert the LVDT sub assembly into the top opening in the upper portion of the handle grip
assembly. Turn the screw counterclockwise from the bottom until the LVDT sub assembly
is positioned close to its original position.
Note: The fine adjustment can be done using a diagnostic procedure after the handle is
completely reassembled and power is applied to the system. Refer to Chapter 5 (SERVICE
MENU - SRV MENU ACT DIAG) for this diagnostic.
b. Replace the housing sub assembly. Refer to Procedure 3B.
c. Replace the swivel or remote mount cap sub assembly. Refer to Procedure 1B or 2B.
10-45
7/11
G-Force® Q - iQ Service Manual
2x Lockwasher, M16, ZNPL
(00212)
Gorbel Inc.
2x HHCS, M16 x 2 - 33mm, CL 8.8
(74230)
Note: Numbers in
Parentheses are
Gorbel® Part Numbers
2x Flatwasher, M16, ZNPL
(01310)
Remote Mount Cap Sub-Assembly
(74252)
(see inset)
Housing Sub-Assembly
(74247 / 74248)
Handle Transducer Sub-Assembly
(74246)
Remote Mount Slide Handle Cover
(74224)
Hex Standoff, 6mm x 12mm, M4
(65083)
SHSS, M6 x 1-8
(65099)
PCB Slide Auxiliary Out
(74233)
Grip & Shaft Sub-Assembly
(74245)
PHMS, M3x0.5-20,
ZNPL
(65082)
Lockwasher, M3, ZNPL
(65051)
Diagram 5. Handle Transducer Sub Assembly Removal and Replacement.
7/11
10-46
Connector Nut
G-Force® Q - iQ Service Manual
Gorbel Inc.
Procedure 6A. Handle Grip and Shaft Assembly Disassembly
a. Remove the spring pin from the hex jam nut and handle shaft.
b. Remove the hex ham nut from the handle shaft.
c. Slide the spring sleeve up over the top portion of the handle shaft.
d. Slide the first bearing sleeve up over the top portion of the handle shaft.
e. Slide the compression spring up over the top portion of the handle shaft.
f. Slide the second bearing sleeve up over the top portion of the handle shaft.
g. Slide the grip assembly off the top portion of the handle shaft.
Note: There are a total of (12) ball bearings seated in (3) separate grooves in the handle
shaft. These are normally coated with grease and should remain in place however they can
fall out if the amount of grease has decreased over time.
Procedure 6B. Handle Grip and Shaft Assembly Reassembly
a. Install the grip assembly over the top portion of the handle shaft and position the grip
assembly so that the ball bearings can be installed into the grooves of the handle shaft
from the top of the grip assembly.
b. Slide the second bearing sleeve down over the top portion of the handle shaft.
c. Slide the compression spring down over the top portion of the handle shaft.
d. Slide the first bearing sleeve down over the top portion of the handle shaft.
e. Slide the spring sleeve down over the top portion of the handle shaft to the hex jam nut.
f. Install the hex ham nut from the handle shaft.
g. Install the spring pin into the hex jam nut and handle shaft.
10-47
7/11
G-Force® Q - iQ Service Manual
Gorbel Inc.
Note: Numbers in
Parentheses are
Gorbel® Part Numbers
Handle Transducer Feature
Grip Assembly
(74234)
Shaft
(74201)
Hex Standoff, 6mm Hex
(74228)
1/4” NPT Thread
2x Spring Bearing
(74212)
12x Hardened Precision Ball, 6mm
(74227)
Coiled Spring Pin, M4x9.5mm
(65087)
Compression Spring
(73019)
Spring Sleeve
(74213)
Hex Jam Nut, M24x3.0
(74226)
Pin Hole
Diagram 6. Handle Grip and Shaft Assembly and Disassembly.
7/11
10-48
G-Force® Q - iQ Service Manual
Gorbel Inc.
Note: Numbers in
Parentheses are
Gorbel® Part Numbers
BHCS, M6 x 16mm Lg
(65075)
Lockwasher, M6, ZNPL
(03370)
Remote Mounted Slide Handle
(G-FORCE.RM.SLIDE.HANDLE)
Bracket, Remote Mount
(74270)
Flatwasher, M16, ZNPL
(01310)
Lockwasher, M16, ZNPL
(00212)
HHCS, M16x2.0 - 35, Gr 8.8, ZNPL
(65066)
Remote Mounted Slide Handle Bracket.
10-49
7/11
G-Force® Q - iQ Service Manual
Gorbel Inc.
Note: Numbers in
Parentheses are
Gorbel® Part Numbers
In-Line Slide Handle
(G-FORCE.SLIDE.HANDLE)
Bracket, In-Line Slide Handle
(74273)
Latch Hook Assembly*
(74199)
* Option - Latch Hook:
If the latch hook assembly is
ordered with the in-line slide
handle bracket, 74273, the
latch hook hardware will
replace the bracket hardware
(flatwasher, lockwasher and
HHCS).
Flatwasher, M16, ZNPL
(01310)
Lockwasher, M16, ZNPL
(00212)
HHCS, M16x2.0 - 35, Gr 8.8, ZNPL
(65066)
In-Line Slide Handle Control Bracket.
7/11
10-50
G-Force® Q - iQ Service Manual
Item
1
2
3
4
5
6
7
8
9
10
11
12
13
Gorbel Inc.
P/N
Description
74271
Bracket, Auxiliary Controls
74272
Bracket, Block Mount
88881M One Signal Pilot Valve, Metric
88604 Left Angled Lever (not shown)
88605
Right Angled Lever
88901
Lever Shaft 38mm Long
88501
Lever Guard 40mm Wide
65075
BHCS, M6 x 16mm Lg
65076
BHCS, M6 x 10mm Lg
65100
HHCS, M6x1.0 - 20, ZNPL
65060
Flatwasher, M6, ZNPL
03370
Lockwasher, M6, ZNPL
01764
Hexnut, M6, ZNPL
9
12
12
3
13
7
6
5
11
2
10
12
1
8
Single Auxiliary Control Pilot Valve Kit for Slide Handle.
8
6
10
2
5
11
Item
1
2
3
4
5
6
7
8
9
10
11
P/N
Description
74272
Bracket, Block Mount
88881M One Signal Pilot Valve, Metric
88604 Left Angled Lever (not shown)
88605
Right Angled Lever
88901
Lever Shaft 38mm Long
88501
Lever Guard 40mm Wide
65075
BHCS, M6 x 16mm Lg
65076
BHCS, M6 x 10mm Lg
65060
Flatwasher, M6, ZNPL
03370
Lockwasher, M6, ZNPL
01764
Hexnut, M6, ZNPL
9
4
1
10
7
Auxiliary Control Pilot Valve Kit.
10-51
7/11
G-Force® Q - iQ Service Manual
Gorbel Inc.
Item
P/N
Description
1
74271
Bracket, Auxiliary Controls
2
74272
Bracket, Block Mount
3
74330 Electric Switch Block, Single
4 Ref BOM Switch Body w/Roller Plunger
5
65027
SHCS, M4 x 20mm Lg
6
65052
Lockwasher, M4, ZNPL
7
88604 Left Angled Lever (not shown)
8
88605
Right Angled Lever
9
88901
Lever Shaft 38mm Long
10
88501
Lever Guard 40mm Wide
11
65075
BHCS, M6 x 16mm Lg
12
65076
BHCS, M6 x 10mm Lg
13
65100
HHCS, M6x1.0 - 20, ZNPL
14
65060
Flatwasher, M6, ZNPL
15
03370
Lockwasher, M6, ZNPL
16
01764
Hexnut, M6, ZNPL
12
4
6
15
10
5
9
16
15
8
14
3
2
15
11
2
13
1
Auxiliary Electric Switch with Bracket.
11
2
3
9
8
5
4
14
Item
P/N
Description
1
74272
Bracket, Block Mount
2
74330 Electric Switch Block, Single
3 Ref BOM Switch Body w/Roller Plunger
4
65027
SHCS, M4 x 20mm Lg
5
65052
Lockwasher, M4, ZNPL
6
88604 Left Angled Lever (not shown)
7
88605
Right Angled Lever
8
88901
Lever Shaft 38mm Long
9
88501
Lever Guard 40mm Wide
10
65075
BHCS, M6 x 16mm Lg
11
65076
BHCS, M6 x 10mm Lg
12
65060
Flatwasher, M6, ZNPL
13
03370
Lockwasher, M6, ZNPL
14
01764
Hexnut, M6, ZNPL
13
12
7
1
10
Single Electric Switch Assembly for Slide Handle.
7/11
10-52
G-Force® Q - iQ Service Manual
Gorbel Inc.
Removal & Replacement Procedures
PENDANT HANDLE
Note: The following procedures assume any electrical or support cables have
been disconnected prior to performing any repairs on the Pendant Handle itself.
Procedure 1A. Top Guard Removal
a. Remove the (4) M6 button head cap screws, BHCS and (4) M6 lockwashers.
b. Slide the top guard off the top portion of the pendant handle.
Procedure 1B. Top Guard Replacement
a. Position the top guard on the top portion of the pendant handle.
b. Install the (4) M6 button head cap screws, BHCS and (4) M6 lockwashers.
Top Guard
(74335)
8x Lockwasher, M6, ZNPL
(03370)
8x BHCS, M6 x 10mm Lg
(65076)
2x Side Guards
(74313)
Note: Numbers in
Parentheses are
Gorbel® Part Numbers
Diagram 1. Top Guard Removal and Replacement.
10-53
7/11
G-Force® Q - iQ Service Manual
Gorbel Inc.
Procedure 2A. Side Guard Removal
a. Remove the (2) M6 button head cap screws, BHCS and (2) M6 lockwashers from each
side of the pendant handle.
b. Remove the (2) side guards from the pendant handle.
Procedure 2B. Side Guard Replacement
a. Position the (2) side guards on each side of the pendant handle.
b. Install the (2) M6 button head cap screws, BHCS and (2) M6 lockwashers on each side of
the pendant handle.
Top Guard
(74335)
8x Lockwasher, M6, ZNPL
(03370)
8x BHCS, M6 x 10mm Lg
(65076)
2x Side Guards
(74313)
Note: Numbers in
Parentheses are
Gorbel® Part Numbers
Diagram 2. Side Guard Removal and Replacement.
7/11
10-54
G-Force® Q - iQ Service Manual
Gorbel Inc.
Procedure 3A. Lever Shaft Removal
a. Remove either side guard. Refer to Procedure 2A.
b. Slide the lever shaft through each lever.
Procedure 3B. Lever Shaft Replacement
a. Position both levers and slide the lever shaft through both levers.
b. Install the side guard using the (2) M6 button head cap screws, BHCS and (2) M6
lockwashers.
Note: Numbers in
Parentheses are
Gorbel® Part Numbers
Lever Shaft, 67
(74314)
Green Lever
(88601)
Red Lever
(88602)
Diagram 3. Lever Shaft Removal and Replacement.
10-55
7/11
G-Force® Q - iQ Service Manual
Gorbel Inc.
Procedure 4A. Lever Removal
a. Remove either side guard. Refer to Procedure 2A.
b. Remove the lever shaft. Refer to Procedure 3A.
c. Remove both levers from the pendant handle.
Procedure 4B. Lever Replacement
a. Position both levers on the pendant handle.
b. Install the lever shaft. Refer to Procedure 3B.
c. Install the side guard. Refer to Procedure 2B.
Note: Numbers in
Parentheses are
Gorbel® Part Numbers
Lever Shaft, 67
(74314)
Green Lever
(88601)
Red Lever
(88602)
Diagram 4. Lever Removal and Replacement.
7/11
10-56
G-Force® Q - iQ Service Manual
Gorbel Inc.
Procedure 5A. Handle Base Bracket Removal
a. Disconnect handle base bracket from clamp collar or tooling if necessary.
b. Remove (2) M6 button head cap screws, BHCS and (2) M6 lockwashers.
Procedure 5B. Handle Base Bracket Replacement
a. Install (2) M6 button head cap screws, BHCS and (2) M6 lockwashers.
b. Reattach the handle base bracket to clamp collar or tooling if necessary.
Note: Numbers in
Parentheses are
Gorbel® Part Numbers
Handle Base Bracket
(88401)
Rubber Grip
(88402)
2x Lockwasher, M6, ZNPL
(03370)
2x BHCS, M6 x 16mm Lg
(65075)
Diagram 5. Handle Base Bracket Removal and Replacement.
10-57
7/11
G-Force® Q - iQ Service Manual
Gorbel Inc.
Procedure 6A. Rear Cover Removal
a. Remove handle base bracket. Refer to Procedure 5A.
b. Remove the (6) M3 button head cap screws, BHCS and (6) M3 lockwashers that secure
the rear cover.
c. Remove rear cover and rear cover gasket.
Procedure 6B. Rear Cover Replacement
a. Position rear cover gasket and rear cover on pendant handle assembly.
b. Install the (6) M3 button head cap screws, BHCS and (6) M3 lockwashers that secure the
rear cover.
c. Install handle base bracket. Refer to Procedure 5B.
Rear Cover Gasket
(74311)
Rear Cover
(74310)
6x Lockwasher, M3, ZNPL
(65051)
6x BHCS, M3 x 8mm Lg
(65080)
Note: Numbers in
Parentheses are
Gorbel® Part Numbers
Diagram 6. Rear Cover Removal and Replacement.
7/11
10-58
G-Force® Q - iQ Service Manual
Gorbel Inc.
Procedure 7A. Pendant Mother and Pendant Daughter Board Removal
a. Remove handle base bracket. Refer to Procedure 5A.
b. Remove the rear cover. Refer to Procedure 6A.
c. Remove the external nuts from the pendant daughter board.
d. Remove the (2) M3 button head cap screws, BHCS and (2) M3 starwashers from the
pendant mother board.
e. Slide the pendant mother and daughter boards out from the pendant handle body.
Procedure 7B. Pendant Mother and Pendant Daughter Board Replacement
a. Slide the pendant mother and daughter boards into the pendant handle body.
b. Install the (2) M3 button head cap screws, BHCS and (2) M3 starwashers to secure the
pendant mother board inside the pendant handle body.
c. Install the external nuts on the pendant daughter board.
d. Install the rear cover and rear cover gasket. Refer to Procedure 6B.
e. Install the handle base bracket. Refer to Procedure 5B.
PCB, Pendant Daughter Board
(74319 - Remote)
(74304 - CAN)
PCB, Pendant Mother Board
(74303)
2x Starwasher, External, M3
(65084)
2x BHCS, M3 x 20mm Lg
(65009)
Note: Numbers in
Parentheses are
Gorbel® Part Numbers
Diagram 7. Pendant Mother and Daughter Board Removal and Replacement.
10-59
7/11
G-Force® Q - iQ Service Manual
Gorbel Inc.
Procedure 8A. Plunger Assembly Removal
a. Remove either side guard. Refer to Procedure 2A.
b. Remove the lever shaft. Refer to Procedure 3A.
c. Remove both levers. Refer to Procedure 4A.
d. Remove the M4 button head cap screw, BHCS and M4 large OD washer.
e. Slide both plunger assemblies out of pendant handle housing.
f. Remove the plunger springs from plunger assemblies.
g. Remove the plunger tips from plunger assemblies.
Procedure 8B. Plunger Assembly Replacement
a. Install the plunger tips into the plunger assemblies.
b. Install the plunger springs into the pendant handle housing.
c. Install both plunger assemblies into the pendant handle housing.
d. Install the M4 button head cap screw, BHCS and M4 large OD washer to secure the
plunger assemblies in the pendant handle housing.
e. Install both levers. Refer to Procedure 4B.
f. Install the lever shaft. Refer to Procedure 3B.
g. Install the side guard. Refer to Procedure 2B.
Note: Numbers in
Parentheses are
Gorbel® Part Numbers
2x Plunger Assembly
(74323)
Washer, M4, Large OD
(65081)
2x Plunger Spring
(89015)
2x Plunger Tip
(74321)
BHCS, M4 x 8mm Lg
(65077)
Apply Blue Loctite 242
Diagram 8. Plunger Assembly Removal and Replacement.
7/11
10-60
G-Force® Q - iQ Service Manual
Gorbel Inc.
Procedure 9A. Faceplate and Face Seal Removal
a. Remove the (10) M2 Phillips screws, PHMS and (10) M2 lockwashers from the faceplate.
b. Remove the faceplate and face seal from the pendant handle housing.
Procedure 9B. Faceplate and Face Seal Replacement
a. Install the faceplate and face seal into the pendant handle housing.
b. Install the (10) M2 Phillips screws, PHMS and (10) M2 lockwashers for the faceplate.
Face Seal
(74306)
Faceplate
(74305)
10x Lockwasher, M2, ZNPL
(65055)
10x PHMS, M2 x 6mm Lg
SEMS Split Lock
(65073)
Note: Numbers in
Parentheses are
Gorbel® Part Numbers
Diagram 9. Faceplate and Face Seal Removal and Replacement.
10-61
7/11
G-Force® Q - iQ Service Manual
Gorbel Inc.
Procedure 10A. E-Stop Assembly and Pushbutton Removal
a. Remove the faceplate and face seal. Refer to Procedure 9A.
b. Remove the (2) pushbutton shafts from the pendant handle housing.
Note: The E-stop button assembly is removed and installed from the inside of the housing.
There are two parts that make up the E-stop assembly. The switch part is disconnected from
the inside first. The pushbutton is then held in place by a nut that needs to be removed from
the inside.
Procedure 10B. E-Stop Assembly and Pushbutton Replacement
a. Install the (2) pushbutton shafts into the pendant handle housing.
b. Install the faceplate and face seal. Refer to Procedure 9B.
Note: Numbers in
Parentheses are
Gorbel® Part Numbers
Housing
(74302)
2x LED Light Tube
(74320)
2x Pushbutton Shaft
(74309)
Pushbutton, E-Stop Assembly
(78804)
Diagram 10. E-Stop Assembly, Pushbutton and Light Tube Removal and Replacement.
7/11
10-62
G-Force® Q - iQ Service Manual
Gorbel Inc.
Top Guard
(74335)
9x Lockwasher, M6, ZNPL
(03370)
Flatwasher, M6, ZNPL
(65060)
7x BHCS, M6 x 10mm Lg
(65076)
One Signal Pilot Valve Block
(88881M)
Side Guard, Valve Option
(74329)
Side Guard
(74313)
Right Angled Lever
(88605)
Pneumatic Mounting Plate Left/Right
(74317)
Lever Shaft, 105
(74315)
2x BHCS, M6 x 16mm Lg
(65075)
Single Valve Option - Right Side.
Top Guard
(74335)
7x BHCS, M6 x 10mm Lg
(65076)
9x Lockwasher, M6, ZNPL
(03370)
Flatwasher, M6, ZNPL
(65060)
Side Guard
(74313)
Lever Shaft, 105
(74315)
Side Guard, Valve Option
(74329)
Pneumatic Mounting Plate Left/Right
(74317)
One Signal Pilot Valve Block
(88881M)
Left Angled Lever
(88604)
2x BHCS, M6 x 16mm Lg
(65075)
Single Valve Option - Left Side.
10-63
7/11
G-Force® Q - iQ Service Manual
Gorbel Inc.
Top Guard
(74335)
4x BHCS, M6 x 10mm Lg
(65076)
10x Lockwasher, M6, ZNPL
(03370)
2x Flatwasher, M6, ZNPL
(65060)
2x Side Guard, Valve Option
(74329)
6x BHCS, M6 x 16mm Lg
(65075)
Lever Shaft, 105
(74316)
Right Angled Lever
(88605)
2x One Signal Pilot Valve Block
(88881M)
Pneumatic Mounting Plate Left/Right
(74318)
Left Angled Lever
(88604)
Single Valve Option - Right and Left Sides.
Top Guard
(74335)
9x Lockwasher, M6, ZNPL
(03370)
7x BHCS, M6 x 10mm Lg
(65076)
Flatwasher, M6, ZNPL
(65060)
Lever Shaft, 105
(74315)
Side Guard, Valve Option
(74329)
Side Guard
(74313)
Pneumatic Mounting Plate Left/Right
(74317)
Single Electric Switch Block Assembly
(74332)
2x BHCS, M6 x 16mm Lg
(65075)
Right Angled Lever
(88605)
Electric Switch Options - Right Side.
7/11
10-64
G-Force® Q - iQ Service Manual
Gorbel Inc.
Top Guard
(74335)
9x Lockwasher, M6, ZNPL
(03370)
7x BHCS, M6 x 10mm Lg
(65076)
Side Guard
(74313)
Flatwasher, M6, ZNPL
(65060)
Side Guard, Valve Option
(74329)
Single Electric Switch Block Assembly
(74332)
Pneumatic Mounting Plate Left/Right
(74317)
Lever Shaft, 105
(74315)
Left Angled Lever
(88604)
2x BHCS, M6 x 16mm Lg
(65075)
Electric Switch Option - Left Side.
Top Guard
(74335)
4x BHCS, M6 x 10mm Lg
(65076)
10x Lockwasher, M6, ZNPL
(03370)
2x Flatwasher, M6, ZNPL
(65060)
6x BHCS, M6 x 16mm Lg
(65075)
Lever Shaft, 105
(74315)
Side Guard, Valve Option
(74329)
Right Angled Lever
(88605)
2x Electric Switch Block
Assembly
(74332)
Left Angled Lever
(88604)
Electric Switch Option - Both Sides.
10-65
7/11
G-Force® Q - iQ Service Manual
Gorbel Inc.
Top Guard
(74335)
10x Lockwasher, M6, ZNPL
(03370)
4x BHCS, M6 x 10mm Lg
(65076)
2x Flatwasher, M6, ZNPL
(65060)
6x BHCS, M6 x 16mm Lg
(65075)
2x Side Guard, Valve Option
(74329)
Lever Shaft, 105
(74316)
Right Angled Lever
(88605)
Single Electric Switch Block Assembly
(74332)
One Signal Pilot Valve Block
(88881M)
Left Angled Lever
(88604)
Pneumatic Mounting Plate Both
(74318)
Electric Switch Right Side, Valve Left Side.
Top Guard
(74335)
10x Lockwasher, M6, ZNPL
(03370)
4x BHCS, M6 x 10mm Lg
(65076)
2x Flatwasher, M6, ZNPL
(65060)
6x BHCS, M6 x 16mm Lg
(65075)
Lever Shaft, 105
(74316)
2x Side Guard, Valve Option
(74329)
One Signal Pilot Valve Block
(88881M)
Right Angled Lever
(88605)
Single Electric Switch Block
Assembly
(74332)
Pneumatic Mounting Plate Both
(74318)
Left Angled Lever
(88604)
Electric Switch Left Side, Valve Right Side.
7/11
10-66
G-Force® Q - iQ Service Manual
Gorbel Inc.
Removal & Replacement Procedures
COIL CORDS
Procedure 1. Standard Coil Cord Assembly (G-FORCE.COILCORD.ASSEMBLY)
CoilCord
Cord
Bracket
Coil
Bracket
(76708)
(76708)
2x
M6Xx 12
12mm
Lg
2X BHCS
BHCS M6
MM LG
(65112)(65112)
2x Lockwasher
LockwasherM6
M6ZNPL
ZNPL
2X
(03370) (03370)
2x
Clamp
2XStrain-Relief
Strain Relief Clamp
(79150)
(79150)
2X2xSHCS
M6M6
X 25
MM LGLg
SHCS
x 25mm
(65028) (65028)
2X
M6M6
ZNPL
2xLockwasher
Lockwasher
ZNPL
(03370) (03370)
StandardCable
CableAssembly
Assembly, Molded
Standard
(78614)
(78614)
Hex Jam
Jam Nut
Nut,M12
M12x1.75,
ZNPL
X 1.75 ZNPL
(65064) (65064)
2x
M4Xx0.7
0.7Xx1616LG
Lg
2X BHCS,
BHCS M4
(65068) (65068)
2x Strain
Strain-Relief
Clamp
2X
Relief Clamp
(74232)
(74232)
Plug,
Air,DN8
DN8(1/4
(1/4NPT)
NPT)
Plug, Air
(74241)(74241)
Coil Cord
CordFooter
Footer
(74205)
(74205)
Note: Numbers in
Parentheses are
Gorbel® Part Numbers
Clevis Bolt
Bolt
Clevis
(74222)
(74222)
Diagram 1. 660 lb. (300 kg) Standard Length Coil Cord Assembly.
G-FORCE.COILCORD.ASSEMBLY
For replacement of entire Coil Cord Assembly use part name: G-FORCE.COILCORD.ASSEMBLY.
10-67
7/11
G-Force® Q - iQ Service Manual
Gorbel Inc.
Coil
Bracket
CoilCord
Cord
Bracket
(76757)
(76757)
2x BHCS
M6 Xx 12
12mm
Lg
2X
BHCS M6
MM LG
(65112)(65112)
2x Lockwasher M6 ZNPL
2X Lockwasher M6 ZNPL
(03370) (03370)
2x
2XStrain-Relief
Strain Relief Clamp
Clamp
(79150)
(79150)
2xSHCS
SHCSM6
M6
x 25mm
2X
X 25
MM LGLg
(65028) (65028)
2xLockwasher
Lockwasher
ZNPL
2X
M6M6
ZNPL
(03370) (03370)
Standard
CableAssembly
Assembly, Molded
Standard Cable
(78614)
(78614)
Hex
Jam Nut
Nut,M12
M12x1.75,
ZNPL
Hex Jam
X 1.75 ZNPL
(65064) (65064)
2x
M4Xx 0.7
0.7Xx16
16LG
Lg
2X BHCS,
BHCS M4
(65068)
(65068)
2x
Clamp
2X Strain-Relief
Strain Relief Clamp
(74232)
(74232)
Plug,
Air,DN8
DN8(1/4
(1/4NPT)
NPT)
Plug, Air
(74241)(74241)
Coil
Footer
Coil Cord
Cord Footer
(74205)
(74205)
Note: Numbers in
Parentheses are
Gorbel® Part Numbers
Clevis
Bolt
Clevis Bolt
(74222)
(74222)
Diagram 2. 165 lb. (75 kg) and 330 lb. (150 kg) Standard Length Coil Cord Assembly.
G-FORCE.COILCORD.ASSEMBLY
For replacement of entire Coil Cord Assembly use part name: G-FORCE.COILCORD.ASSEMBLY.
7/11
10-68
G-Force® Q - iQ Service Manual
Gorbel Inc.
Procedure 2. Double Length Coil Cord Assembly (G-FORCE.COILCORD.EXT.ASSEMBLY)
Coil
Bracket
Coil Cord
Cord Bracket
(76708)
(76708)
Note: Numbers in
Parentheses are
Gorbel® Part Numbers
2x
M6Xx 12
12mm
Lg
2X BHCS
BHCS M6
MM LG
(65112)(65112)
2x
M6ZNPL
ZNPL
2X Lockwasher
Lockwasher M6
(03370) (03370)
2x Strain
StrainRelief
ReliefClamp
Clamp
2X
(79150)(79150)
2x SHCS
M6Xx25
25mm
Lg
2X
SHCS M6
MM LG
(65028)(65028)
2X Lockwasher
Lockwasher M6
2x
M6ZNPL
ZNPL
(03370)(03370)
DoubleCable
CableAssembly
Assembly, Molded
Double
(78622)
(78622)
Hex
Nut,M12
M12x1.75,
ZNPL
Hex Jam
Jam Nut
X 1.75 ZNPL
(65064) (65064)
2x BHCS, M4 x 0.7 x 16 Lg
(65068)
2x
Clamp
2XStrain-Relief
Strain Relief Clamp
(74232)
(74232)
Plug,
Air,DN8
DN8(1/4
(1/4NPT)
NPT)
Plug, Air
(74241)(74241)
Coil
CordFooter
Footer
Coil Cord
(74205)
(74205)
ClevisBolt
Bolt
Clevis
(74222)
(74222)
Diagram 3. 660 lb. (300 kg) Double Length Coil Cord Assembly.
G-FORCE.COILCORD.EXT.ASSEMBLY
For replacement of entire Coil Cord Assembly use part name:
G-FORCE.COILCORD.EXT.ASSEMBLY.
10-69
7/11
G-Force® Q - iQ Service Manual
Gorbel Inc.
CoilCord
CordBracket
Bracket
Coil
(76757)
(76757)
Note: Numbers in
Parentheses are
Gorbel® Part Numbers
2x
BHCSM6
M6Xx1212mm
2X BHCS
MM LGLg
(65112) (65112)
2x
LockwasherM6
M6
ZNPL
2X Lockwasher
ZNPL
(03370) (03370)
2x Strain
StrainRelief
Relief
Clamp
2X
Clamp
(79150)(79150)
2x SHCS
SHCSM6
M6X x2525mm
2X
MM LGLg
(65028) (65028)
2X Lockwasher
ZNPL
2x
LockwasherM6
M6
ZNPL
(03370) (03370)
DoubleCable
Cable
Assembly, Molded
Double
Assembly
(78622)
(78622)
Hex
Nut,M12
M12x1.75,
ZNPL
HexJam
Jam Nut
X 1.75 ZNPL
(65064) (65064)
2xBHCS
BHCS,
x 0.7
16 Lg
2X
M4M4
X 0.7
X 16x LG
(65068) (65068)
2x
Strain-Relief
Clamp
2X Strain
Relief Clamp
(74232)
(74232)
Plug,Air
Air,
DN8
(1/4
NPT)
Plug,
DN8
(1/4
NPT)
(74241)(74241)
CoilCord
CordFooter
Footer
Coil
(74205)
(74205)
Clevis Bolt
Clevis Bolt
(74222)
(74222)
Diagram 4. 165 lb. (75 kg) and 330 lb. (150 kg) Double Length Coil Cord Assembly.
G-FORCE.COILCORD.EXT.ASSEMBLY
For replacement of entire Coil Cord Assembly use part name:
G-FORCE.COILCORD.EXT.ASSEMBLY.
7/11
10-70
G-Force® Q - iQ Service Manual
Gorbel Inc.
Drawing Not To Scale
48”
12”
Compressed
Coil
12”
Female
Male
Pendant Cable
(74324)
This cord is intended to stretch from 48” to 114”
Pendant Cable (Electrical Portion Only).
G-FORCE.PENDANT.CABLE
For replacement of entire Cable Assembly use part name:
G-FORCE.PENDANT.CABLE.
10-71
7/11
G-Force® Q - iQ Service Manual
Gorbel Inc.
Procedure 3. Standard Air Hose Assembly (G-FORCE.AIRHOSE.ASSEMBLY)
Note: Numbers in
Parentheses are
Gorbel® Part Numbers
2x Strain-Relief Clamp
(65105)
2x Adapter, DN8 (1/4 NPT)
(74238)
32x Nylon Air Hose, Coiled
(74237)
Hose Swivel, 90, DN8 (1/4 NPT)
(74243)
Diagram 5. Standard Air Hose Assembly.
G-FORCE.AIRHOSE.ASSEMBLY
For replacement of entire Airhose Assembly use part name: G-FORCE.AIRHOSE.ASSEMBLY.
7/11
10-72
G-Force® Q - iQ Service Manual
Gorbel Inc.
Procedure 4. Extended Length Air Hose Assembly (G-FORCE.AIRHOSE.EXT.ASSEMBLY)
2x Strain-Relief Clamp
(65105)
2x Adapter, DN8 (1/4 NPT)
(74238)
64x Nylon Air Hose, Coiled
(74237)
Hose Swivel, 90, DN8 (1/4 NPT)
(74243)
Note: Numbers in
Parentheses are
Gorbel® Part Numbers
Diagram 6. Extended Length Air Hose Assembly.
G-FORCE.AIRHOSE.EXT.ASSEMBLY
For replacement of entire Airhose Assembly use part name: G-FORCE.AIRHOSE.EXT.ASSEMBLY.
10-73
7/11
G-Force® Q - iQ Service Manual
Gorbel Inc.
Removal & Replacement Procedures
G360™
Procedure 1A. G360™ Disassembly Procedure
a. Remove M16 x 2 MM hex head cap screw, HHCS and M16 Belleville washer from G360™
assembly. Note the orientation of the Belleville washer; concave side down.
b. Slide the swivel sub-assembly off the collector shaft.
Note: Set aside the swivel sub assembly with the PCBs facing upward to avoid damaging
them.
c. Remove output connector nut from the slip ring PCB.
d. Remove the (2) M2 Phillips head machine screws, PHMS that secure the slip ring PCB to
the collector shaft.
e. Remove the air extension and nylon washer from collector shaft.
f. Remove (3) M3 socket head cap screws, SHCS and (3) M3 lockwashers from the collector
shaft and slide the collector shaft out of the cover.
Procedure 1B. G360™ Reassembly Procedure
a. Slide the collector shaft into the cover and secure it using the (3) M3 socket head cap
screws and (3) M3 lockwashers. Note the alignment of the output connector to the cover
opening.
b. Install the air extension and nylon washer into the collector shaft.
c. Assemble the slip ring PCB to the collector shaft with (2) M2 Phillips head machine
screws, PHMS.
d. Install the output connector nut on the slip ring PCB.
e. Slide the swivel sub-assembly onto the collector shaft. Carefully align connectors using the
alignment grooves in the cover.
f. Install the M16 x 2 MM hex head cap screw, HHCS and M16 Belleville washer onto the
G360™ assembly. Note the orientation of the Belleville washer; concave side down.
7/11
10-74
G-Force® Q - iQ Service Manual
Gorbel Inc.
2x Collector O-Ring
(74269)
HHCS, M16 x 2mm Pitch w/Channel
(74281)
Belleville Washer, M16, DIN 2093 - Grp.2
(65098)
Note: Numbers in
Parentheses are
Gorbel® Part Numbers
Sliding Handle Swivel Sub-Assembly
(74249)
2x PHMS, M2x0.4 - 6, SEMS Split Lock
(65073)
PCB, Slip Ring, Aux Out
(74282)
Output
Connector Nut
Collector Shaft
(74280)
Spring Pin, M4 x 24
(65102)
G360™ Collector Label
(74284)
Standalone Swivel Cover
(74283)
3x Lockwasher, M3
(65051)
Nylon Washer, .563 ID .031 Thk
(65104)
1/4 NPT Air Extension Output, DN8
(74240)
3x SHCS, M3 x 0.5 - 12
(65012)
Diagram 1A. G360™ with Air Assembly and Disassembly.
10-75
7/11
G-Force® Q - iQ Service Manual
Gorbel Inc.
HHCS, M16 x 35mm Lg, ZNPL
(65066)
Belleville Washer, M16, DIN 2093 - Grp.2
(65098)
Note: Numbers in
Parentheses are
Gorbel® Part Numbers
Sliding Handle Swivel Sub-Assembly
(74249)
2x PHMS, M2x0.4 - 6, SEMS Split Lock
(65073)
PCB, Slip Ring, Aux Out
(74282)
Output
Connector Nut
Collector Shaft
(74280)
Spring Pin, M4 x 24
(65102)
Standalone Swivel Cover
(74283)
G360™ Collector Label
(74284)
Push-In Plug, 5/8” ID, Black
(70071)
Strain-Relief Clamp, Coil Cord
(79150)
Nylock Nut, M6, ZNPL
(65090)
3x Lockwasher, M3
(65051)
3x SHCS, M3 x 0.5 - 12
(65012)
Diagram 1B. Standard G360™ Assembly and Disassembly.
7/11
10-76
G-Force® Q - iQ Service Manual
Gorbel Inc.
Procedure 2A. Swivel Sub Assembly Disassembly Procedure
a. Remove the swivel sub assembly from the G360™ assembly. Refer to Procedure 1A.
b. Remove the C-ring from the swivel sub assembly.
c. Remove the Delrin spacer washer from the swivel sub assembly.
d. Remove the secondary slip ring PCB from the swivel casting. Be very careful to not
deform the contacts on the PCB.
e. Remove the primary slip ring PCB from the swivel by removing the input connector nut,
(3) M2 Phillips head machine screws, PHMS, (4) nylon Phillips head machine screws,
PHMS, and (12) flatwashers from the swivel casting.
f. Remove the bearing from the swivel casting if necessary. Note: This bearing is pressed
into the swivel casting.
Procedure 2B. Swivel Sub Assembly Reassembly Procedure
a. Press the bearing into the swivel casting.
b. Install the primary slip ring PCB into the swivel casting by installing the input connector
nut, (3) M2 Phillips head machine screws, PHMS, (4) nylon Phillips head machine screws,
PHMS, and (12) flatwashers.
c. Install the secondary slip ring PCB into the swivel casting. Be very careful to not deform
the contacts on the PCB.
d. Install the Delrin spacer washer onto the swivel sub assembly.
e. Install the C-ring onto the swivel sub assembly. Check to see that the assembly moves
freely.
f. Install the swivel sub assembly into the G360™ assembly. Refer to Procedure 1B.
10-77
7/11
G-Force® Q - iQ Service Manual
Gorbel Inc.
Note: Numbers in
Parentheses are
Gorbel® Part Numbers
Ball Bearing, 6005-NSE
(74221)
Slide Handle Swivel
(74206)
Input Connector
Nut
PCB, Slip Ring, Primary
(74235)
3x PHMS, M2 x 0.4 - 6, SEMS, Split Lock
(65073)
PCB, Slip Ring, Secondary
(74236)
4x Nylon PHMS and Flatwashers
Washer, Spacer, Delrin
(74218)
C-Ring 31.75mm
(65074)
Diagram 2. Swivel Sub Assembly Disassembly and Reassembly.
7/11
10-78
G-Force® Q - iQ Service Manual
Gorbel Inc.
Note: Numbers in
Parentheses are
Gorbel® Part Numbers
Suspended Pendant Swivel Assembly Shaft
(74290)
Sleeve, Clevis, Suspended Pendant
Swivel Assembly
(74292)
Clevis Pin, 1/2” Dia, 1-1/2” Lg, ZNPL
(74293)
Cotter Pin
Snap Ring, Internal, 47mm, Basic
(65086)
Ball Bearing, 6005-NSE
(74221)
Snap Ring, External, 25mm, HD
(65085)
Suspended Pendant Swivel Assembly
Housing
(74291)
Flatwasher, M16, ZNPL
(01310)
Lockwasher, M16, ZNPL
(00212)
Hexnut, M16x2.0, ZNPL
(65063)
Latch Hook Assembly, Metric, Option
(74199)
Suspended Pendant Swivel Assembly.
10-79
7/11
G-Force® Q - iQ Service Manual
Gorbel Inc.
Removal & Replacement Procedures
CPU BATTERY
Procedure 1. (Optional) Retain Q-iQ Custom Feature Settings
Q-iQ custom feature settings like the programmed weight of the handle (tooling) for zeroing the
weight readout on the handle LCD display, programmed positions like the virtual limits, etc. are
temporarily stored in the PLC memory powered by the PLC battery. As a result, these memories
are cleared and reset to default when the battery is replaced. Users can reprogram these
features to use them again.
If available, an alternative to reprogramming the features is to use the Gorbel® Q-iQ Update
Utility. Use this utility to save the settings onto a PC, then follow Procedure 2 to replace the battery. Use the utility again to upload the settings from the PC back into the PLC. After a power
reboot, the unit will be back online as before.
Choose the “Replace PLC Battery” option in the utility program as shown below. More information
can be found in Chapter 6 - Software Update in this manual.
7/11
10-80
G-Force® Q - iQ Service Manual
Gorbel Inc.
Procedure 2. CPU Battery Replacement
These procedures should be followed if the unit experiences a Command Warning #10500, if the
PLC memory retention battery power level is low or faulty, or if instructed to by a Gorbel®
Customer Service Representative.
a. Typically, battery replacement resets all configuration and features settings back to default
unless memory retention procedures are performed prior to the replacement. Please check
the Software Update chapter for information on using the “Replace PLC Battery” option to
record the settings. Skip this step if not available.
b. If the previous step cannot be performed, please reference the Program Mode Overview
section for accessing the configuration menu (LCD display: CONFIGUR MENU) if
available (accessibility may not be available on order units). Choose RECORD CONFIG
selection to save the latest configuration settings into nonvolatile memory. Feature settings
will not be recorded. Skip this step if not available.
c. Turn power off using the external circuit breaker device.
d. Follow Actuator Procedure 2A on page 10-4 to remove the rear cover.
e. Locate the battery cover of the CPU.
f. Touch the mounting rail or ground connection (not the power supply!) in order to discharge
any electrostatic charge from your body.
10-81
7/11
G-Force® Q - iQ Service Manual
Gorbel Inc.
g. Remove the cover from the lithium battery holder using a screwdriver.
h. Remove the battery from the holder by pulling the removal strip (don’t use insulated tools
because of the risk of short circuiting). The battery should not be held by its edges.
Insulated tweezers may also be used for removing the battery.
i.
Insert the new battery with correct polarity. The removal strip should be pulled to the right
of the battery holder and the “+” side of the battery should be facing left. In order to be
able to remove the battery again in the future, the removal strip must be on the right side
of the battery.
j.
Now wrap the end of the removal strip over the top of the battery and insert it underneath
the battery so that it does not protrude from the battery holder.
k. Replace cover. Insert the lower edge of the cover in the battery holder opening. Press the
upper end of the cover home firmly.
Note: Lithium batteries are considered hazardous waste. Used batteries should be disposed of
accordingly.
7/11
10-82
G-Force® Q - iQ Service Manual
Gorbel Inc.
Chapter 11 - Preventative Maintenance
G-Force® Model Q and iQ Recommended Preventative Maintenance
5, 9 & 10
18 & 19
Note:
iQ model show with in-line slide handle.
See illustrations below for alternate
configurations.
Remote
Sliding
Handle
13 & 14
15
* tooling by
others
1&6
Remote
Pendant
Handle
2&3
* tooling by
others
11 & 12
8
Suspended
Pendant
Handle
7, 16 & 17
4
Diagram 1. G-Force® with Suspended Pendant Handle.
Refer to Diagram 1 for the approximate location of the
components listed by numbers 1 through 19 on the
following pages. The procedures are divided into four
specific intervals; daily, monthly, quarterly and yearly.
You may find it necessary to increase the frequency
based on equipment use and environmental conditions
in your facility.
Federal, state and local codes may require inspection and maintenance checks more
often. Please check federal, state and local code manuals in your area.
11-1
7/11
G-Force® Q - iQ Service Manual
Gorbel Inc.
Daily Checks
These are quick visual checks that do not require any tools.
1. Wire Rope: Look for any obvious external defects, damage or excessive wear. Check the
lower end where it attaches to the Handle, Swivel Assembly or tooling (by others) for signs of
damage or excessive wear.
2. Coil Cord: Look for any obvious external defects or damaged caused by the Wire Rope or
other external causes. Make sure all the Coil Cord Clamps are in place.
3. Air Hose (if equipped): Look for any obvious external damage or wear caused by the Wire
Rope or other external causes. Make sure the Air Hose is secured properly with the correct
clamps.
4. Load Hook and/or tooling (by others): Check that the Load Hook is secured properly to the
handle or swivel. Make sure lock washers are compressed completely and any other
associated hardware is secure.
Monthly Tasks
Tools may be required, as well as a clean dry cloth and compressed air.
5. Slack Switch Adjustment: Using the Handle, lower the Wire
Rope until it goes slack. There should be no additional
movement downward once it is slack. If the Wire Rope
continues to pay out, stop immediately and refer to Chapter 9
of this manual to perform the Slack Switch Adjustment.
Check the Coil Cord and Air Hose Clamps on the Wear Ring
to insure the Wear Ring is moving freely inside the Actuator
opening.
SLACK
ADJUSTMENT
HARDWARE
WEAR RING
7/11
11-2
G-Force® Q - iQ Service Manual
Gorbel Inc.
6. Wire Rope: Expose any much of the Wire Rope as possible and wipe it off with a clean dry
cloth. Use the Jog Buttons to pay out as much of the Wire Rope as possible.
7. Operator Present Sensor (sliding handle only): Use a gentle puff of compressed air or a
soft cloth to clean the sensor. Do not apply any
pressure to the lens or do anything that may scratch it.
OPERATOR PRESENT SENSOR
NOTE: PHOTO
ENHANCED TO
SHOW LOCATION OF SENSOR.
RED
BEAM WILL NOT BE VISIBLE
DURING NORMAL OPERATION.
8. Handle I/O Connections (both handles): Check connections at handle (if equipped). Wipe
off any oil or other contamination from either Handle at this time. Clean the LCD screen as
well.
I/O
CONNECTION
PORTS
LCD
SCREENS
11-3
7/11
G-Force® Q - iQ Service Manual
Gorbel Inc.
Quarterly Tasks
Tools, compressed air and specific lubricants are required.
LIMIT SWITCH
ASSEMBLY
ACTUATOR
9. Limit Switch Assembly Actuator: Check for excessive wear
and for proper position with the Drum Gate.
Refer to Chapter 10 for removal and replacement procedures.
10. Drum Gate: Remove and look for excessive wear.
Refer to Chapter 10 for removal and replacement procedures.
DRUM GATE
11. Air Swivel Assembly (if equipped) O-Rings: These should
be replaced if worn or damaged. Apply a thin coating of nonsynthetic general purpose grease.
Refer to Chapter 10 for removal and replacement procedures.
O-RINGS
(2)
12. Swivel Assembly Slip Rings: Check for wear. Wipe clean with soft
dry cloth and apply a thin layer of DeoxIT. This also applies to the
independent G360™.
Refer to Chapter 10 for removal and replacement procedures.
SLIP
RINGS
Yearly Tasks
Tools, compressed air and specific lubricants are required.
13. Internal and External Electrical Connectors: This includes Coil Cord, Swivel Assembly and
Main pwb connectors. Check each connector carefully. Some are secured with hardware,
some are quick disconnect type.
7/11
11-4
G-Force® Q - iQ Service Manual
Gorbel Inc.
14. Servo Drive Heat Sink: Clean this area
only if the operating environment is
especially dusty. Use compressed air and
safety glasses.
17. Linear Transducer Position: Check the
Linear Transducer by using the Diagnostic
Menu as described in Chapter 9. Adjust
only if necessary.
HEAT SINK
INSIDE
15. Cooling Fan (if equipped): Clean this area
if it appears to be dirty. Use compressed air
and safety glasses.
18. Trolley Wheels: Check for excessive wear
and/or contamination.
16. Sliding Handle: The ball bearings on the
slide mechanism should be lubricated with
white lithium grease. Use
the grease sparingly and
wipe any excess off
immediately.
19. Crane or supporting structure: Check for
wear or excessive contamination inside the
bridge. Check lock washers and other
hardware for proper tightness.
BALL
BEARINGS (12)
11-5
7/11
G-Force® Q - iQ Service Manual
Gorbel Inc.
Wire Rope Inspection
1. Frequent Inspection
The operator or other designated person should visually inspect all ropes at the start of each
shift. These visual observations should be concerned with discovering gross damage, such as
listed below, which may be an immediate hazard:
•
•
•
•
distortion or the rope such as kinking, crushing, unstranding, birdcaging, main strand
displacement, or core protrusion;
general corrosion;
broken or cut strands;
number, distribution, and type of visible broken wires (see next section on rope
replacement).
When such damage is discovered, the rope shall either be removed from service or given an
inspection as detailed in the next section.
2. Periodic Inspection
The inspection frequency shall be determined by a qualified person and shall be based on
such factors as expected rope life as determined by experience on the particular installation or
similar installations; severity of environment; percentage to capacity lifts; frequency rates of
operation; and exposure to shock loads. Inspections need not be at equal calendar intervals
and should be more frequent as the rope approaches the end of its useful life.
A designated person shall perform periodic inspections. This inspection shall cover the entire
length of rope. The individual outer wires in the strands of the rope shall be visible to this
person during the inspection. Any deterioration resulting in appreciable loss of original
strength, such as described below, shall be noted, and determination shall be made as to
whether further use of the rope would constitute a hazard.
•
•
•
•
points listed in previous section on frequent inspection;
reduction of rope diameter below nominal diameter due to loss of core support, internal
or external corrosion, or wear of outside wires;
severely corroded or broken wires at end connections;
severely corroded, cracked, bent, worn, or improperly applied end connections.
Special care should be taken when inspecting sections of rapid deterioration, such as the
following:
•
•
•
•
7/11
sections in contact with saddles, equalizer sheaves, or other sheaves where rope travel
is limited;
sections of rope at or near terminal ends where corroded or broken wires may
protrude;
sections subject to reverse bends;
sections of rope that are normally hidden during visual inspection, such as parts
passing over sheaves.
11-6
G-Force® Q - iQ Service Manual
Gorbel Inc.
Wire Rope Maintenance
1. Rope should be stored to prevent damage, contamination, and deterioration.
2. Rope shall be unreeled or uncoiled in a manner to avoid kinking of or inducing a twist in the rope.
3. Before cutting rope, means shall be used to prevent unlaying of the strands.
4. During installation, care should be observed to avoid dragging of the rope in dirt or around
objects that will scrape, nick, crush, or induce sharp bends.
CAUTION
Rope should be maintained in a well-lubricated condition. Gorbel recommends using chain and
cable penetrating oil for lubrication. Lubricant applied as part of a maintenance program shall be
compatible with the original lubricant (PreLube 6). Lubricant applied shall be of the type that does
not hinder visual inspection. Immediately after inspection, lubricant shall be applied before rope
is returned to service. Those sections of rope that are located over sheaves or otherwise hidden
during inspection and maintenance procedures require special attention when lubricating ropes.
The object of rope lubrication is to reduce internal friction and to prevent corrosion.
Wire Rope Replacement Criteria
1. No precise rules can be given for determination of the exact time for rope replacement since
many factors are involved. Once a rope reaches any one of the specified removal criteria, it
may be allowed to operate to the end of the work shift, based on the judgment of a qualified
person. The rope shall be replaced after that work shift, at the end of the day, or at the latest
time prior to the equipment being used by the next work shift.
2. Removal criteria for the rope replacement shall be as follows:
• in running ropes, any visible broken wires (diagram 3);
• wear of one-third the original diameter of outside individual wires;
• kinking, crushing, birdcaging, or any other damage resulting in distortion of the rope
structure;
• evidence of heat damage from any cause;
• reductions from nominal diameter greater than 1/64” (.4 mm) for 1/4” (6.35 mm) diameter
rope.
STRAND
3. Broken wire removal criteria applies to
wire rope operating on steel sheaves
and drums. However, results of internal
testing have shown that rope
replacement follows the same criteria
regardless of sheave or drum material.
4. Attention shall be given to end
WIRE
connections. Upon development of any (7 WIRES PER STRAND)
CORE STRAND
broken wires adjacent to an end
Diagram 3. 19x7 Preformed Wire Rope Composition.
connection, the rope should be
reterminated or replaced. Reterminating shall not be attempted if the resulting rope length will
be insufficient for proper operation.
5. Replacement rope and connections shall have strength rating at least as great as the original
rope and connection furnished by the hoist manufacturer. A rope manufacturer, or a qualified
person shall specify any deviation from the original size, grade, or construction.
11-7
7/11
G-Force® Q - iQ Service Manual
Gorbel Inc.
Chapter 12 - Recommended Tools and Parts
Tool Name
Metric Allen Wrenches
(T-Type, 230mm long are preferred)
Metric Sockets
(Drive sizes are typically 1/4 and 3/8 inch
depending on socket size)
Sizes
2mm, 2.5mm, 3mm, 4mm, 5mm, 6mm,
8mm, 10mm
Ratchet Handles and Extensions
User preference
5.5mm, 7mm, 8mm, 10mm, 19mm
Metric Combination Wrenches
(10mm should be ratcheting type)
Lock Ring Pliers
Screwdrivers (flat and Phillips)
Long Nose Pliers
10mm, 17mm, 19mm, 24mm
small and medium sizes
smaller precision type
8 inch is typical
Spare Parts Kits
Gorbel® Part Number
Contact Inside Sales for specific part
numbers and applications
Contact Inside Sales for specific part
numbers and applications
Contact Inside Sales for specific part
numbers and applications
Basic Kit
Hardware Kit
Swivel Kit
12-1
7/11