1
MetaMap Manager User Guide
Release 8.1.3
November 2013
IKAN Solutions N.V.
Schaliënhoevedreef 20A
B-2800 Mechelen
BELGIUM
Copyright © 2013, IKAN Solutions N.V.
No part of this document may be reproduced or transmitted in any form or by any
means, electronically or mechanically, for any purpose, without the express written
permission of IKAN Solutions N.V.
MetaSuite is a trademark of IKAN Solutions N.V.
Table of Contents
Chapter 1 - About This Manual........................................................................... 1
1.1.
Related Publications ...............................................................................................................................................1
Chapter 2 - Purpose of MetaMap ....................................................................... 3
Chapter 3 - Key Notions ..................................................................................... 4
Chapter 4 - Prerequisites for Using MetaMap .................................................... 5
Chapter 5 - MetaMap Manager User Interface ................................................... 6
5.1.
Logging On to MetaMap Manager ........................................................................................................................6
5.2.
Menu Bar ................................................................................................................................................................9
5.3.
Main Toolbar ........................................................................................................................................................11
5.4.
Developer Toolbar................................................................................................................................................12
5.5.
Wizard Toolbar .....................................................................................................................................................13
5.6.
Tree View Window................................................................................................................................................13
Object Types depending from a Source File .......................................................................................................15
Object Types depending from an External Array ................................................................................................16
Object Types depending from a Parameter File..................................................................................................16
Object Types depending from a Target Field or Target Report..........................................................................16
Object Types depending from a Work Field........................................................................................................18
5.7.
Context Menus .....................................................................................................................................................18
Tree View - Title Bar .............................................................................................................................................18
Model Name Context Menu.................................................................................................................................19
Source File Context Menu ....................................................................................................................................21
Path Context Menu ..............................................................................................................................................22
Path Record Context Menu ..................................................................................................................................23
Source Record Context Menu ..............................................................................................................................24
Source Field Context Menu..................................................................................................................................25
Record Procedure Context Menu ........................................................................................................................26
External Array Context Menu ...............................................................................................................................27
External Array Source Record Context Menu ......................................................................................................28
Array Procedure Context Menu ...........................................................................................................................29
Parameter File Context Menu ..............................................................................................................................30
Parameter File Record Context Menu..................................................................................................................31
Parameter File Field Context Menu .....................................................................................................................32
Target Context Menu ...........................................................................................................................................33
IKAN Solutions
METASUITE METAMAP MANAGER - RELEASE 8.1.3
TABLE OF CONTENTS | ii
Target Record Context Menu...............................................................................................................................34
Target Field Context Menu ..................................................................................................................................36
Target Title, Heading and End Page Context Menu............................................................................................37
Target Procedure Context Menu .........................................................................................................................38
Program Procedure Context Menu ......................................................................................................................39
Public Procedure Context Menu ..........................................................................................................................40
Work Field Context Menu ....................................................................................................................................41
Sub Work Field Context Menu .............................................................................................................................42
5.8.
Workspace ............................................................................................................................................................43
5.9.
Output ..................................................................................................................................................................43
5.10. Package/Compile/Generate Window...................................................................................................................43
5.11. Statusbar...............................................................................................................................................................44
5.12. Docking a Window ...............................................................................................................................................44
Chapter 6 - MetaMap Models - Overview ........................................................ 46
Chapter 7 - MetaMap Models........................................................................... 47
Chapter 8 - Data Sources.................................................................................. 49
8.1.
Source Files...........................................................................................................................................................50
Procedure .............................................................................................................................................................50
Technical Tab........................................................................................................................................................51
Business Tab .........................................................................................................................................................56
8.2.
Source Records.....................................................................................................................................................56
Procedure .............................................................................................................................................................56
Fields.....................................................................................................................................................................57
8.3.
Source Fields ........................................................................................................................................................58
Procedure .............................................................................................................................................................58
Fields.....................................................................................................................................................................59
8.4.
Sub Source Fields ................................................................................................................................................59
Procedure .............................................................................................................................................................59
Fields.....................................................................................................................................................................60
8.5.
Record Procedures ...............................................................................................................................................61
Procedure .............................................................................................................................................................61
Technical Tab........................................................................................................................................................62
Business Tab .........................................................................................................................................................63
8.6.
File Procedures .....................................................................................................................................................63
Procedure .............................................................................................................................................................64
Technical Tab........................................................................................................................................................65
Business Tab .........................................................................................................................................................66
8.7.
Path.......................................................................................................................................................................67
Procedure .............................................................................................................................................................67
Fields.....................................................................................................................................................................68
8.8.
Source Path Records.............................................................................................................................................69
Procedure .............................................................................................................................................................69
IKAN Solutions
METASUITE METAMAP MANAGER - RELEASE 8.1.3
TABLE OF CONTENTS | iii
Fields.....................................................................................................................................................................70
8.9.
External Arrays......................................................................................................................................................71
Procedure .............................................................................................................................................................71
Technical Tab........................................................................................................................................................72
Business Tab .........................................................................................................................................................74
8.10. Source Records for an External Array...................................................................................................................75
Procedure .............................................................................................................................................................75
Fields.....................................................................................................................................................................76
8.11. Source Fields for an External Array ......................................................................................................................76
Procedure .............................................................................................................................................................76
Fields.....................................................................................................................................................................77
8.12. Sub Source Fields for an External Array ...............................................................................................................77
Procedure .............................................................................................................................................................77
Fields.....................................................................................................................................................................78
8.13. Array Procedures ..................................................................................................................................................79
Procedure .............................................................................................................................................................79
Technical Tab........................................................................................................................................................80
Business Tab .........................................................................................................................................................81
8.14. Path for an External Array ....................................................................................................................................81
Procedure .............................................................................................................................................................81
Fields.....................................................................................................................................................................82
8.15. Parameter Files .....................................................................................................................................................83
Procedure .............................................................................................................................................................83
Technical Tab........................................................................................................................................................84
Business Tab .........................................................................................................................................................85
8.16. Source Records for a Parameter File ....................................................................................................................85
Procedure .............................................................................................................................................................85
Fields.....................................................................................................................................................................86
8.17. Source Fields for a Parameter File........................................................................................................................87
Procedure .............................................................................................................................................................87
Fields.....................................................................................................................................................................88
8.18. Sub Source Fields for a Parameter File ................................................................................................................88
Procedure .............................................................................................................................................................88
Fields.....................................................................................................................................................................89
8.19. Source Wizard.......................................................................................................................................................90
Adding a Source File ............................................................................................................................................90
Adding an External Array .....................................................................................................................................94
Adding a Parameter File.......................................................................................................................................97
8.20. Matching Wizard...................................................................................................................................................99
Chapter 9 - Data Targets ................................................................................ 104
9.1.
Target Files or Reports .......................................................................................................................................104
Procedure ...........................................................................................................................................................105
Technical Tab......................................................................................................................................................105
Business Tab .......................................................................................................................................................111
IKAN Solutions
METASUITE METAMAP MANAGER - RELEASE 8.1.3
TABLE OF CONTENTS | iv
9.2.
Target Records ...................................................................................................................................................111
Procedure ...........................................................................................................................................................112
Fields...................................................................................................................................................................112
9.3.
Target Fields .......................................................................................................................................................114
Procedure ...........................................................................................................................................................115
Fields...................................................................................................................................................................116
9.4.
Target Titles........................................................................................................................................................119
9.5.
Target Headings .................................................................................................................................................119
9.6.
Target End Pages ...............................................................................................................................................120
9.7.
Target Procedures ..............................................................................................................................................121
Procedure ...........................................................................................................................................................122
Technical Tab......................................................................................................................................................123
Business Tab .......................................................................................................................................................124
9.8.
Target Wizard .....................................................................................................................................................125
9.9.
Mapping Wizard .................................................................................................................................................130
Chapter 10 - Work Fields ............................................................................... 135
10.1. Work Fields .........................................................................................................................................................135
Procedure ...........................................................................................................................................................135
Technical Tab......................................................................................................................................................136
Business Tab .......................................................................................................................................................142
10.2. Subfields .............................................................................................................................................................142
Procedure ...........................................................................................................................................................143
Chapter 11 - Program Procedures .................................................................. 144
11.1. Procedure ...........................................................................................................................................................145
11.2. Technical Tab......................................................................................................................................................146
Name ..................................................................................................................................................................146
Execution Time ...................................................................................................................................................146
Commands Workspace.......................................................................................................................................146
11.3. Business Tab .......................................................................................................................................................147
Business Rule ......................................................................................................................................................147
Note....................................................................................................................................................................147
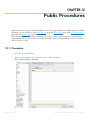
Chapter 12 - Public Procedures ...................................................................... 148
12.1. Procedure ...........................................................................................................................................................148
12.2. Technical tab.......................................................................................................................................................149
Name ..................................................................................................................................................................149
Commands Workspace.......................................................................................................................................149
12.3. Business Tab .......................................................................................................................................................150
Business Rule ......................................................................................................................................................150
Note....................................................................................................................................................................150
IKAN Solutions
METASUITE METAMAP MANAGER - RELEASE 8.1.3
TABLE OF CONTENTS | v
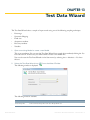
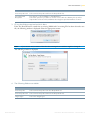
Chapter 13 - Test Data Wizard ....................................................................... 151
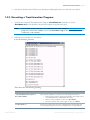
Chapter 14 - Transformation Programs .......................................................... 163
14.1. Generating a Transformation Program ..............................................................................................................163
14.2. Finding Error Messages ......................................................................................................................................165
14.3. Executing a Transformation Program.................................................................................................................166
14.4. Programming Runtime Messages.......................................................................................................................168
Runtime Parameter Messages ............................................................................................................................168
Runtime Error Messages.....................................................................................................................................168
Source File End-of-Job Messages ......................................................................................................................170
Target File or Report End-of-Job Messages ......................................................................................................170
Program Exit Codes............................................................................................................................................170
File Status Codes ................................................................................................................................................171
Chapter 15 - Exporting a Model to CDIF format ............................................ 175
Chapter 16 - Packaging a Model .................................................................... 176
Chapter 17 - Display Options ......................................................................... 178
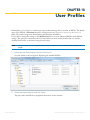
Chapter 18 - User Profiles .............................................................................. 180
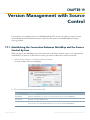
Chapter 19 - Version Management with Source Control ................................ 181
19.1. Establishing the Connection Between MetaMap and the Source Control System............................................181
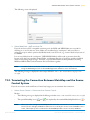
19.2. Terminating the Connection Between MetaMap and the Source Control System ...........................................182
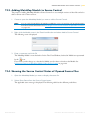
19.3. Adding MetaMap Models to Source Control.....................................................................................................183
19.4. Showing the Source Control Status of Opened Source Files.............................................................................183
19.5. Performing Changes to MetaMap Models Under Source Control ....................................................................184
19.6. Undoing the Check-out of a MetaMap Model...................................................................................................185
Chapter 20 - Structured Editor ....................................................................... 186
20.1. Using the Structured Editor................................................................................................................................186
Components Overview .......................................................................................................................................187
20.2. META Syntax ......................................................................................................................................................187
20.3. Notation Conventions ........................................................................................................................................188
20.4. Commands..........................................................................................................................................................188
Basic Assignments (=).........................................................................................................................................189
Arithmetic Expressions .......................................................................................................................................191
Concatenation ....................................................................................................................................................193
COMPUTE ..........................................................................................................................................................194
CASE...................................................................................................................................................................196
DEBUG................................................................................................................................................................199
DO ... ..................................................................................................................................................................200
IKAN Solutions
METASUITE METAMAP MANAGER - RELEASE 8.1.3
TABLE OF CONTENTS | vi
DO … FOR..........................................................................................................................................................201
DO … WHILE......................................................................................................................................................203
EXEC-IDMS / END-EXEC....................................................................................................................................205
EXEC SQL / END-EXEC ......................................................................................................................................205
EXCLUDE ............................................................................................................................................................207
EXIT.....................................................................................................................................................................214
FOR … END-FOR ...............................................................................................................................................214
FUNCTION .........................................................................................................................................................215
GET .....................................................................................................................................................................217
HALT ALL ............................................................................................................................................................220
HALT SOURCEFILE.............................................................................................................................................221
HALT TARGETFILE .............................................................................................................................................221
IF .........................................................................................................................................................................222
INVOKE...............................................................................................................................................................227
PUT Source .........................................................................................................................................................228
PUT Target..........................................................................................................................................................230
REM (REMARKS).................................................................................................................................................232
SAMPLE ..............................................................................................................................................................233
SET......................................................................................................................................................................242
START .................................................................................................................................................................242
20.5. Miscellaneous Functions.....................................................................................................................................245
AGE.....................................................................................................................................................................245
INSTRING ...........................................................................................................................................................246
LENGTH..............................................................................................................................................................247
MANUAL-INPUT .................................................................................................................................................247
REPLACE.............................................................................................................................................................248
REPLACE-ALL .....................................................................................................................................................250
SUBSTRING ........................................................................................................................................................251
SYSTEM-FUNCTION...........................................................................................................................................252
USER-FUNCTION ...............................................................................................................................................254
20.6. Variables .............................................................................................................................................................255
SYS-CURRENT-KEY ............................................................................................................................................256
SYS-GROUP ........................................................................................................................................................257
SYS-GROUP-COUNT ..........................................................................................................................................257
SYS-GROUP-LEVEL.............................................................................................................................................257
SYS-LINE-NUMBER.............................................................................................................................................258
SYS-PAGE-NUMBER...........................................................................................................................................258
SYS-RANDOM-KEY ............................................................................................................................................259
SYS-RECORD ......................................................................................................................................................259
SYS-RECORD-LENGTH.......................................................................................................................................260
SYS-RESTART .....................................................................................................................................................261
SYS-RETURN-CODE ...........................................................................................................................................262
SYS-SQL-AREA ...................................................................................................................................................262
SYS-SQLSTATE ...................................................................................................................................................262
SYS-RUNTIME-STATUS ......................................................................................................................................263
SYS-TIME ............................................................................................................................................................263
SYS-TIMESTAMP ................................................................................................................................................264
IKAN Solutions
METASUITE METAMAP MANAGER - RELEASE 8.1.3
TABLE OF CONTENTS | vii
20.7. Constants ............................................................................................................................................................264
SYS-DUPLICATE .................................................................................................................................................265
SYS-EOF..............................................................................................................................................................265
SYS-ERROR .........................................................................................................................................................266
SYS-HIGH-VALUE ...............................................................................................................................................266
SYS-INVALID-DATE ............................................................................................................................................267
SYS-INVOKE-RETURN ........................................................................................................................................267
SYS-LOW-VALUE ................................................................................................................................................268
SYS-NOT-NUMERIC ...........................................................................................................................................268
SYS-NOT-RELATED ............................................................................................................................................269
SYS-NULL-VALUE ...............................................................................................................................................269
SYS-NUMVALIDATE ...........................................................................................................................................270
SYS-OK ...............................................................................................................................................................271
SYS-OUT-OF-LIMIT.............................................................................................................................................271
SYS-OUT-OF-RANGE .........................................................................................................................................272
SYS-PROGRAM...................................................................................................................................................273
SYS-WHEN-COMPILED ......................................................................................................................................273
20.8. Attributes............................................................................................................................................................274
SYS-DBNAME .....................................................................................................................................................274
SYS-DIRECT-KEY ................................................................................................................................................275
SYS-INPUT-COUNT ............................................................................................................................................276
SYS-INTERNAL-STATUS .....................................................................................................................................277
SYS-IO-STATUS ..................................................................................................................................................277
SYS-MATCH-COUNT..........................................................................................................................................278
SYS-PATH-COUNT .............................................................................................................................................279
SYS-READ-COUNT .............................................................................................................................................280
SYS-SQL-LENGTH ..............................................................................................................................................281
SYS-STATUS .......................................................................................................................................................281
20.9. System Functions (MetaSuite Export Language)................................................................................................283
SYS-ABSOLUTE-VALUE ......................................................................................................................................284
SYS-ASCII............................................................................................................................................................284
SYS-ASCII-UNICODE ..........................................................................................................................................285
SYS-BINARY........................................................................................................................................................285
SYS-DATE-OF-INTEGER.....................................................................................................................................286
SYS-DAY-OF-INTEGER .......................................................................................................................................286
SYS-EBCDIC........................................................................................................................................................287
SYS-EBCDIC-UNICODE......................................................................................................................................288
SYS-EDIT .............................................................................................................................................................288
SYS-HEXADECIMAL ...........................................................................................................................................289
SYS-INTEGER......................................................................................................................................................289
SYS-INTEGER-OF-DATE.....................................................................................................................................290
SYS-INTEGER-OF-DAY .......................................................................................................................................291
SYS-INTEGER-PART ...........................................................................................................................................291
SYS-LENGTH ......................................................................................................................................................292
SYS-LENGTH-R ...................................................................................................................................................292
SYS-LOG .............................................................................................................................................................293
SYS-LOG10 .........................................................................................................................................................293
IKAN Solutions
METASUITE METAMAP MANAGER - RELEASE 8.1.3
TABLE OF CONTENTS | viii
SYS-NUMVAL......................................................................................................................................................294
SYS-NUMVALC ...................................................................................................................................................294
SYS-RANDOM ....................................................................................................................................................295
SYS-RAW ............................................................................................................................................................296
SYS-REVERSE......................................................................................................................................................296
SYS-SQRT ...........................................................................................................................................................297
SYS-TRIM ............................................................................................................................................................297
SYS-UNICODE-ASCII ..........................................................................................................................................298
SYS-UNICODE-EBCDIC......................................................................................................................................298
SYS-LOWERCASE ...............................................................................................................................................299
SYS-UPPERCASE ................................................................................................................................................299
20.10.Conditional Keywords ........................................................................................................................................300
Format ................................................................................................................................................................300
Elements Description..........................................................................................................................................300
Coding Conditional Keywords............................................................................................................................301
TESTING FOR A VALUE EQUAL TO ONE OF THE VALUES IN A LIST .............................................................301
TESTING FOR A VALUE NOT EQUAL TO ANY OF THE VALUES IN A LIST.....................................................301
TESTING FOR A RANGE OF VALUES................................................................................................................302
TESTING THE ABSENCE OF A RANGE OF VALUES.........................................................................................302
Nested IF ............................................................................................................................................................302
Compound Conditional Expressions - Combining Conditional Keywords ........................................................302
Examples.............................................................................................................................................................303
Chapter 21 - Runtime Parameters .................................................................. 307
21.1. Parameter Files vs Parameter Fields...................................................................................................................307
Parameter Files ...................................................................................................................................................307
Parameter Fields.................................................................................................................................................308
21.2. SYS-AGE-DATE...................................................................................................................................................308
Example ..............................................................................................................................................................308
Runtime Parameter Usage..................................................................................................................................309
21.3. SYS-APPLICATION .............................................................................................................................................309
21.4. SYS-APPLICATION-GROUP ...............................................................................................................................309
PPTLID ................................................................................................................................................................309
PPTIPT.................................................................................................................................................................309
21.5. SYS-AUTO-SQLCODE ........................................................................................................................................310
Usage ..................................................................................................................................................................310
21.6. SYS-DATE ...........................................................................................................................................................311
Runtime Parameter Usage..................................................................................................................................311
21.7. SYS-DATE-CHECK ..............................................................................................................................................311
21.8. SYS-DB-CONNECT.............................................................................................................................................312
21.9. SYS-DB-DATABASE............................................................................................................................................312
21.10.SYS-DB-PASSWORD...........................................................................................................................................312
21.11.SYS-DB-USER......................................................................................................................................................312
21.12.SYS-ERROR-LIMIT...............................................................................................................................................312
21.13.SYS-INPUT-LIMIT ................................................................................................................................................313
IKAN Solutions
METASUITE METAMAP MANAGER - RELEASE 8.1.3
TABLE OF CONTENTS | ix
21.14.SYS-LIMITS-CHECK ............................................................................................................................................313
21.15.SYS-NUMERIC-CHECK .......................................................................................................................................313
21.16.SYS-READ-LIMIT .................................................................................................................................................314
21.17.SYS-RECORD-SNAP ...........................................................................................................................................314
21.18.SYS-USER-DATE .................................................................................................................................................315
21.19.SYS-USER-MIX ....................................................................................................................................................315
21.20.SYS-USER-NUM ..................................................................................................................................................315
Chapter 22 - Calling the MetaMap Manager in Batch .................................... 316
22.1. Using MSBMAP to Export MetaMap Models to the MXL Files .........................................................................316
22.2. MSBMAP Return Codes .....................................................................................................................................317
22.3. Calling MetaMap Manager Via the Commandline.............................................................................................317
IKAN Solutions
METASUITE METAMAP MANAGER - RELEASE 8.1.3
CHAPTER 1
About This Manual
This manual is the MetaMap Manager User Guide for MetaSuite 8.1.3.
It is part of the MetaSuite documentation set intended for MetaSuite Users.
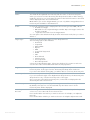
1.1. Related Publications
The following table gives an overview of the complete MetaSuite documentation set.
Release Information
Release Notes 8.1.3
Installation Guides
•
•
•
•
•
•
•
•
•
•
BS2000/OSD Runtime Component
DOS/VSE Runtime Component
Fujitsu Windows Runtime Component
MicroFocus Windows Runtime Component
MicroFocus UNIX Runtime Component
OS/390 and Z/OS Runtime Component
OS/400 Runtime Component
VisualAge Windows Runtime Component
VisualAge UNIX Runtime Component
VMS Runtime Component
User Guides
•
•
•
•
•
•
INI Manager User Guide
Installation and Setup Guide
Introduction Guide
MetaStore Manager User Guide
MetaMap Manager User Guide
Generator Manager User Guide
Technical Guides
•
•
•
•
•
•
•
ADABAS File Access Guide
IDMS File Access Guide
IMS DLI File Access Guide
RDBMS File Access Guide
XML File Access Guide
Runtime Modules
User-defined Functions User Guide
If you are unfamiliar with MetaSuite, the following technical description provides you with a brief overview.
The MetaSuite System
IKAN Solutions
MetaSuite is designed for data retrieval, extraction, conversion and
reporting. It includes a workstation-based graphical user interface and
a mainframe runtime component.
METASUITE METAMAP MANAGER - RELEASE 8.1.3
ABOUT THIS MANUAL | 2
MetaSuite Database Interfaces
MetaSuite can access data from a number of database management
systems, using the same commands, program structure and retrieval
techniques used for non-database files. Each database interface is
available as an optional enhancement to the base product.
MetaMap Manager
MetaMap Manager is the MetaSuite tool used to define models. Such
models are intuitively built by describing overall program
specifications, input file definitions (data and process) and target file
definitions (data and process).
MetaStore Manager
MetaStore Manager is a tool that provides metadata maintenance and
documentation services.
Generator Manager
The Generator Manager is the system administration tool. All kinds of
basic functionalities and customization possibilities are supported by
this tool.
IKAN Solutions
METASUITE METAMAP MANAGER - RELEASE 8.1.3
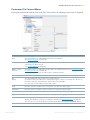
CHAPTER 2
Purpose of MetaMap
MetaSuite is a data integration application that enables you to rapidly move large volumes of data from any
Source to any Target Business Intelligence environment of your choice.
MetaMap Manager allows you to:
Activity
Sub-Activity/Meaning
Create MetaMap Models
• Select Data Sources and Data Targets available in the MetaSuite
MetaStore.
• Create Data Targets manually
• Define mapping rules between Data Sources and Data Targets
Generate MetaSuite Programs
Generate the Model with a Generator for the platform where you
will execute it.
Execute MetaSuite Transformation
Programs
Execute the generated run script on the source platform. If the
proper compile and file transfer procedures are provided, this can be
done automatically.
IKAN Solutions
METASUITE METAMAP MANAGER - RELEASE 8.1.3
CHAPTER 3
Key Notions
This section contains an explanation for the following key notions used by MetaMap Manager:
Notion
Description
Data Source
Your input data.
Data Target
Your output data.
Mapping Rule
A definition of a mapping from a source field to a target field. Mapping a field
means copying its content.
Wizard
A built-in step-by-step function to perform a task.
Public Procedure
A Public Procedure can be called at any time in the programming sequence.
The DO operator calls it to be executed once or in a loop.
It is advised to use a Public Procedure if you have large blocks of logic or logic
that has to be executed more than once.
Program Procedure
A Program Procedure can be called at two positions in your program:
• At Program start: use it to initialize your work fields
• At Program end: use it to process job-level totals or statistics.
Path
Paths can be defined for Source Files that are:
• SQL files: the Path indicates to the Model which Record Information the File
contains.
• Multi-Record SQL files: the Path contains up to 50 Path Records in which you
define inner joins between the File Records.
• Multi-Record non-SQL files: you can combine up to 50 Records of the same
File into a Path. The purpose is to define the subordinate Records and the
Relationships between the Records.
Command Language
MetaSuite specific language allowing the definition of procedures and
mapping rules.
IKAN Solutions
METASUITE METAMAP MANAGER - RELEASE 8.1.3
CHAPTER 4
Prerequisites for Using MetaMap
The following prerequisites must have been met before you can use MetaMap Manager. All procedures you
need to follow to obtain this situation are described in the Installation and Setup Guide and the MetaStore
Manager User Guide:
•
MetaSuite program installed
•
Repository created
•
ODBC access to the Repository created
•
Setup after installation, including Generator Manager, completed
•
Required Data Sources and Data Targets defined in MetaStore
• Source Control database created and connected (optional)
If you want to maintain several versions of your Models, the Source Control database must be created and the
connection between the MetaStore and the Source Control database must be established. See Version
Management with Source Control on page 181.
IKAN Solutions
METASUITE METAMAP MANAGER - RELEASE 8.1.3
CHAPTER 5
MetaMap Manager User Interface
This section provides an overview of the different elements of the MetaMap Manager User Interface.
•
Logging On to MetaMap Manager (page 6)
•
Menu Bar (page 9)
•
Main Toolbar (page 11)
•
Wizard Toolbar (page 13)
•
Developer Toolbar (page 12)
•
Tree View Window (page 13)
•
Context Menus (page 18)
•
Workspace (page 43)
•
Output (page 43)
•
Statusbar (page 44)
•
Docking a Window (page 44)
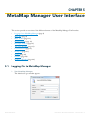
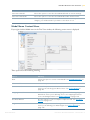
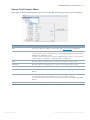
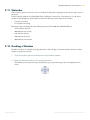
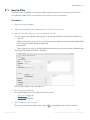
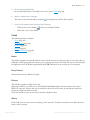
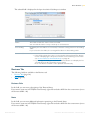
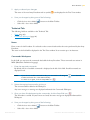
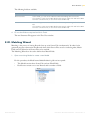
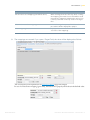
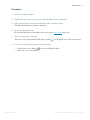
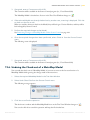
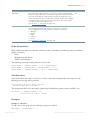
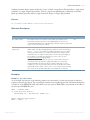
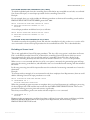
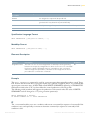
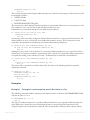
5.1. Logging On to MetaMap Manager
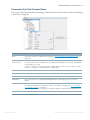
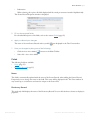
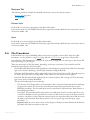
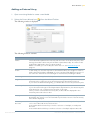
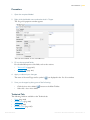
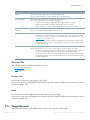
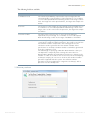
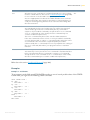
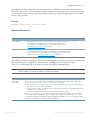
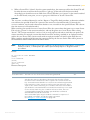
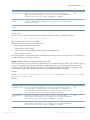
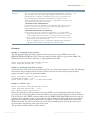
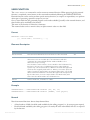
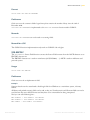
1.
Start MetaMap Manager.
The MetaSuite Logon window appears:
IKAN Solutions
METASUITE METAMAP MANAGER - RELEASE 8.1.3
METAMAP MANAGER USER INTERFACE | 7
2.
Fill out the fields as required:
Fields
Description
User ID
Enter the User ID you want to use to connect to the MetaSuite Repository
through ODBC.
Password
Enter the password associated with the selected User ID.
Data Source Name
Select the required ODBC data source from the drop-down list. This dropdown list contains all DSNs defined on your machine.
Database
Enter the name of the database where the MetaSuite Repository is
implemented.
Owner
Enter the name of the owner of the Repository Tables, if this Owner ID is
different from the User ID.
Note:
3.
The default values that may be present in the fields match the ones defined during the
installation of the program. For more information, refer to the Installation and Setup Guide.
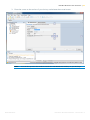
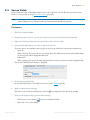
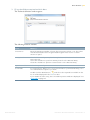
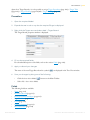
Click OK.
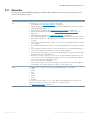
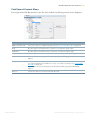
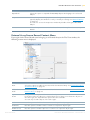
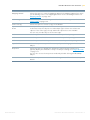
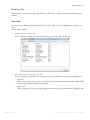
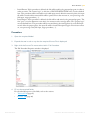
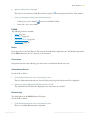
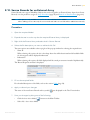
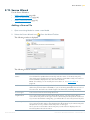
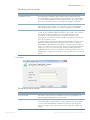
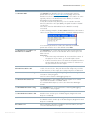
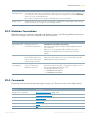
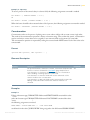
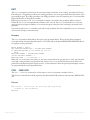
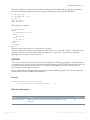
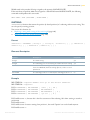
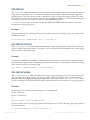
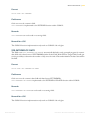
The MetaMap Manager opening screen appears:
This screen contains the following elements:
IKAN Solutions
METASUITE METAMAP MANAGER - RELEASE 8.1.3
METAMAP MANAGER USER INTERFACE | 8
Element
Description
Menu Bar (page 9)
The Menu Bar gives access to the different MetaMap menus.
Main Toolbar (page 11)
The Main Toolbar gives access to some frequently used options.
These options can also be accessed from the Menu Bar.
Wizard Toolbar (page 13)
The Wizard Toolbar gives access to the Wizards that can also be
accessed from the Tools menu.
Developer Toolbar (page 12)
The Developer Toolbar gives access to the frequently used options
when working with the MetaSuite Definition Language. It is only
visible when a Properties window allowing the introduction of these
commands is displayed.
Tree View Window (page 13)
The Tree View Window displays all opened MetaMap Models with
their dependent Objects, such as Data Sources, Data Targets,
Procedures, etc.
If you just started working the Tree View Window is empty.
Workspace (page 43)
In the Workspace, the Properties windows for the MetaMap Objects
will be displayed. These windows can be used for verifying or
updating the Properties.
If you just started working the Workspace is empty.
Output (page 43)
The Output window contains all messages generated during the
current session of MetaMap.
Package/Compile/Generate
Window (page 43)
Statusbar (page 44)
Note:
IKAN Solutions
• Generate window:
When generating, this window will display the MXL and the
generator errors.
• Package window:
When creating a package, the output of the package will be
displayed in this window.
• Compile window:
When executing a compile script, the listing will be displayed
in this window.
If a Properties window for a specific MetaMap Object is active in the
Workspace, the Statusbar displays when this MetaMap Object was
created and updated for the last time.
If the Opening screen does not appear, this means that the MetaSuite.ini file is not available in
the MetaSuite home folder. You will need to browse to a valid .ini file and click OK. For more
information about default settings, refer to the MetaSuite INI Manager Guide.
METASUITE METAMAP MANAGER - RELEASE 8.1.3
METAMAP MANAGER USER INTERFACE | 9
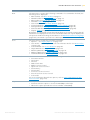
5.2. Menu Bar
Once you have started MetaMap Manager, the Menu Bar is displayed at the top of the opening screen. It
contains the following menus:
Menu
Description
File
The File menu contains the following commands:
• New Model: See MetaMap Models on page 47.
• Open Model: Use this option to open an existing Model from the list of available MetaMap Models.
• Generate Active Model: See Transformation Programs on page 163.
• Export Active Model to CDIF: See Exporting a Model to CDIF format on
page 175.
• Package Active Model: See Packaging a Model on page 176.
• Save Active Model: Use this option to save the active Model in its current state.
• Save Active Model As...: Use this option to save the active Model under another name.
• Close Active Model: Use this option to close the active Model without saving
the changes.
• Close All Models: Use this option to close all Models without saving the changes.
• Save Properties: Use this option to save the Properties of the MetaMap Object,
of which the Properties window is active in the Workspace.
• Print Tree: Use this option to print the opened Models as they are currently displayed in the Tree View Window.
• Reconnect: Use this option to connect to another MetaStore Repository. The
connection to the current MetaStore Repository is terminated and the MetaSuite Logon window is displayed again.
• List of recently opened Models.
• Exit: Use this option to leave the program. If there are any unsaved changes to
the Models, you will be asked if you want to save them now.
Edit
The Edit menu contains the following standard Windows commands:
• Undo
• Redo
• Cut
• Copy
• Paste
• Find
• Replace
You can use these options to cut, copy, paste, find and replace text entries in
Properties windows. You can also undo one of these actions.
See Developer Toolbar on page 12.
IKAN Solutions
METASUITE METAMAP MANAGER - RELEASE 8.1.3
METAMAP MANAGER USER INTERFACE | 10
Menu
Description
View
The View menu contains the following commands. If a command is checked, the
matching item is displayed:
• Main Toolbar: See Main Toolbar on page 11.
• Wizard Toolbar: See Wizard Toolbar on page 13.
• Edit Toolbar: See Developer Toolbar on page 12.
• Statusbar: Statusbar (page 44)
• Tree View Window: Tree View Window (page 13)
• Compile Window: Package/Compile/Generate Window (page 43)
• Package Window: Package/Compile/Generate Window (page 43)
• Generate Window: Package/Compile/Generate Window (page 43)
• Output: Output (page 43)
By default, all commands (except the Edit Toolbar) are checked, meaning that all
listed items are displayed on the screen. The Edit Toolbar can only be displayed if
a Properties window allowing the introduction of MetaSuite Definition Language
(page 186) commands is opened in the Workspace.
Tools
The Tools menu contains the following commands:
• Options...: See Display Options on page 178.
• User Profile...: Use this option to select another User Profile. See User Profiles
on page 180.
• Source Wizard: See Source Wizard on page 90.
• Target Wizard: See Target Wizard on page 125.
• Matching Wizard: See Matching Wizard on page 99.
• Mapping Wizard: See Mapping Wizard on page 130.
• Test Data Wizard: See Test Data Wizard on page 151.
Source Control
The Source Control menu contains the following commands:
• Get Latest Version
• Check Out
• Check In
• Undo Check Out
• Add to Source Control
• Open from Source Control
• Show History
• Show Status
• Connect to Source Control
• Disconnect from Source Control
• SourceSafe
For more information about these options, refer to Version Management with
Source Control (page 181).
Help
The Help menu contains the following commands:
• Contents: Use this option to access the MetaMap online help.
• About: this option provides the release number of MetaMap.
IKAN Solutions
METASUITE METAMAP MANAGER - RELEASE 8.1.3
METAMAP MANAGER USER INTERFACE | 11
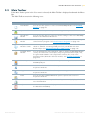
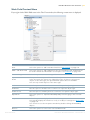
5.3. Main Toolbar
If the Main Toolbar option in the View menu is selected, the Main Toolbar is displayed underneath the Menu
Bar.
The Main Toolbar contains the following icons:
Icon
IKAN Solutions
Meaning
Description
New Model
You can use this option to create a new MetaMap Model. See MetaMap
Models on page 47.
Open Model
You can use this option to open an existing MetaMap Model.
Save Active
Model
You can use this option to save the current settings of the active MetaMap
Model in the MetaSuite MetaStore.
Generate Active
Model
You need to generate the active Model in order to obtain the MetaMap
transformation program. See Transformation Programs on page 163.
Export Active
Model to CDIF
You can export the active MetaMap Model to a CDIF format in order to
obtain a .CDF file containing all Objects from your Model with their
Relationships. See Exporting a Model to CDIF format on page 175.
Package Active
Model
You can package the active Model in order to obtain the MetaMap Model
(.msm), its text-format counterpart (.mxl), the generated run-script (.mrl),
the generated COBOL code (.mgl) and a summary file (.mul) in the
Package Folder (defined in the User Profile). See Packaging a Model on
page 176.
Save Properties
Use this option to save the current Properties settings of the active
MetaMap Object.
Cut
You can use this standard Windows option to cut text sections in
Properties windows.
Copy
You can use this standard Windows option to copy text sections in
Properties windows.
Paste
You can use this standard Windows option to paste text sections in
Properties windows.
Print Tree
Print the opened MetaMap Models as they are currently displayed in the
Tree View Window.
Help
You can use this option to display a window with the version information of
the MetaSuite MetaMap.
METASUITE METAMAP MANAGER - RELEASE 8.1.3
METAMAP MANAGER USER INTERFACE | 12
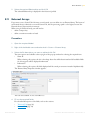
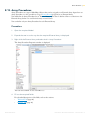
5.4. Developer Toolbar
The Developer Toolbar is displayed underneath the Menu Bar, if the active Properties window contains a text
box allowing the definition of mapping rules (structured editor):
•
When you are defining a Target Field (page 114), this is the Value text box.
•
When you are defining a Procedure (Record (page 56), File (page 63), Array (page 71), Target (page 121),
Program (page 144) or Public (page 148) Procedure), this is the Commands text box.
The Edit Toolbar contains the following icons:
Button
IKAN Solutions
Meaning
Description
Start/Stop
Editing
Use this option to start or stop editing commands.
You can also activate the Structured Editor by clicking the Properties
window.
Toggle Assisted
Mode
Use this option to display or hide the list of valid commands.
Find
Use this option to find the first occurrence of a specific objetc type in the
Tree View, or to find a string in a Value or Commands text box.
Find Next
Find the next occurrence.
Find Previous
Find the previous occurrence.
Replace
Use this option to search and optionally replace a string in a Value or
Commands text box.
Undo
Use this option to undo the last modification you performed in a Value or
Commands text box.
Redo
Use this option to redo the last modification you cancelled in a Value or
Commands text box.
Find Generator
Message
When generating a Model, the generator messages are displayed in the
tab.
Use this option to easily find a message in the displayed generation listing.
Find Next
Generator
Message
Use this option to find the next generator message.
Find Previous
Generator
Message
Use this option to find the previous generator message.
METASUITE METAMAP MANAGER - RELEASE 8.1.3
METAMAP MANAGER USER INTERFACE | 13
5.5. Wizard Toolbar
If the Wizard Toolbar option in the View menu is checked, the Wizard Toolbar is displayed underneath the
Menu Bar.
The Wizard Toolbar contains the following icons:
Icon
Meaning
Description
Source Wizard
Use this option to add a Source to your Model using the Wizard. See
Source Wizard on page 90.
Target Wizard
Use this option to add a Target to your Model using the Wizard. See Target
Wizard on page 125.
Mapping Wizard
Use this option to define 1-to-1 mappings between Source and Target
Fields. See Mapping Wizard on page 130.
Matching Wizard Use this option to define Matchings between Source Files. Matching is
only possible with this Wizard. See Matching Wizard on page 99.
Test Data Wizard Use this option to select a sample of input records. See Test Data Wizard
on page 151.
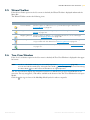
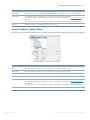
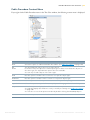
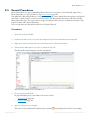
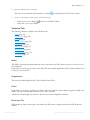
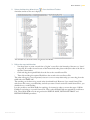
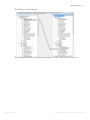
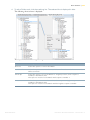
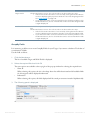
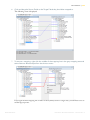
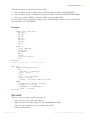
5.6. Tree View Window
If the Tree View Window option in the View menu is checked, the Tree View Window is displayed in the upper
left corner.
Note:
As this is a dockable window, you can modify its position (Docking a Window (page 44)).
You can also hide the window, by clicking the Auto Hide ( )icon in its upper right corner. Reclicking
the Auto Hide ( )icon will restore the window to its original position.
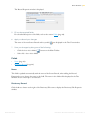
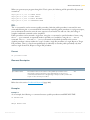
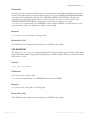
The Tree View Window displays the hierarchical structure of a Model. You can open several Models at the
same time. For easy navigation, a Tab will be available at the bottom of the Tree View Window for each open
Model.
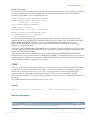
Click the plus sign in front of the MetaMap Model symbol in order to expand it.
IKAN Solutions
METASUITE METAMAP MANAGER - RELEASE 8.1.3
METAMAP MANAGER USER INTERFACE | 14
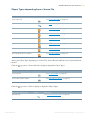
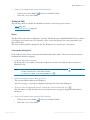
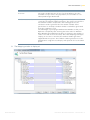
A screen similar to this one is displayed.
The following MetaMap Object Types exist:
Category
Object Type
Reference
Source File
See Source Files on page 50.
External Array
See External Arrays on page 71.
Parameter File or
Structured Field
See Parameter Files on page 83.
Target
Target File or Report
See Target Files or Reports on
page 104.
Procedures
Initial Program
Procedure
See Program Procedures on
page 144.
Read-Write Cycle
Program Procedure
See Program Procedures on
page 144.
End-of-Job Program
Procedure
See Program Procedures on
page 144.
Public Procedure
See Public Procedures on page 148.
Work Field
See Work Fields on page 135.
Source
Work Field
Symbol
For each of the Object Types a number of depending objects exist:
•
Object Types depending from a Source File (page 15)
•
Object Types depending from an External Array (page 16)
•
Object Types depending from a Parameter File (page 16)
•
Object Types depending from a Target Field or Target Report (page 16)
•
Object Types depending from a Work Field (page 18)
IKAN Solutions
METASUITE METAMAP MANAGER - RELEASE 8.1.3
METAMAP MANAGER USER INTERFACE | 15
Object Types depending from a Source File
Dependent Object Type
Symbol
Reference
Source Record
See Source Records on page 56.
Path
See Path on page 67.
Input File Procedure
See File Procedures on page 63.
End-of-File File Procedure
See File Procedures on page 63.
First Contact File Procedure
See File Procedures on page 63.
Initial Sort File Procedure
See File Procedures on page 63.
Initial Extract File Procedure
See File Procedures on page 63.
Initial Prepass File Procedure
See File Procedures on page 63.
Among the Object Types depending on a Source File, Source Records and Paths may contain third-level
Objects.
Click the sign next to a Source Record to display its dependent Object Types:
Dependent Object Type
Symbol
Reference
Source Field
See Source Fields on page 58.
Source Record Procedure
See Record Procedures on page 61.
Click the
sign next to a Path to display its dependent Object Types:
Dependent Object Type
Path Record
IKAN Solutions
Symbol
Reference
See Source Path Records on page 69.
METASUITE METAMAP MANAGER - RELEASE 8.1.3
METAMAP MANAGER USER INTERFACE | 16
Object Types depending from an External Array
The following table lists the possible Object Types that may depend on an External Array:
Dependent Object Type
Symbol
Reference
Source Record for an External
Array
See Source Records for an External Array on page 75.
Array Procedure
See Array Procedures on page 79.
Path
It is not possible to define a Path for an External Array.
Therefore this option is not unavailable.
Among the Object Types depending on an External Array, the Source Records contain third-level Objects.
Click the sign next to a Source Record to display them:
Dependent Object Type
Symbol
Source Field for an External
Array
Reference
See Source Fields for an External Array on page 76.
Object Types depending from a Parameter File
The following table lists the possible Object Types that may depend on a Parameter File:
Dependent Object Type
Symbol
Reference
See Source Records for a Parameter File on page 85.
Source Record for a
Parameter File
The Source Records contain third-level Objects. Click the
Dependent Object Type
Symbol
Source Field for a Parameter
File
sign next to a Source Record to display them:
Reference
See Source Fields for a Parameter File on page 87.
Object Types depending from a Target Field or Target Report
The following table lists the possible Object Types that may depend on a Target File or Target Report:
Dependent Object Type
Target Record
IKAN Solutions
Symbol
Reference
See Target Records on page 111.
METASUITE METAMAP MANAGER - RELEASE 8.1.3
METAMAP MANAGER USER INTERFACE | 17
Dependent Object Type
Symbol
Reference
Title
See Target Titles on page 119.
Heading
See Target Headings on page 119.
Endpage
See Target End Pages on page 120.
Target Procedure Detail
Output Post
See Target Procedures on page 121.
Target Procedure Detail
Output Pre
See Target Procedures on page 121.
Target Procedure End of File
See Target Procedures on page 121.
Target Procedure End of Job
See Target Procedures on page 121.
Target Procedure
Initialization
See Target Procedures on page 121.
Target Procedure Total
Output Post
See Target Procedures on page 121.
Target Procedure Total
Output Pre
See Target Procedures on page 121.
The Target Records contain third-level Objects. Click the
Dependent Object Type
Symbol
sign next to a Source Record to display them:
Meaning
Mapped Target Field
A Mapped Target Field is a Target Field, for which
mapping rules have been defined. See Target Fields
on page 114.
Unmapped Target Field
An Unmapped Target Field is a Target Field, for which
mapping rules have not yet been defined. See Target
Fields on page 114.
If a Target Field has not been mapped, when the
MetaMap Program is generated, it will contain the
default value:
• Numeric fields: zeroes
• Alphanumeric fields: spaces
It is not mandatory to map the Target Fields in this
way. Mappings can be defined in other ways as well.
Accumulated Target Field
An Accumulate Target Field is a mapped Target Field.
Instead of providing detailed information, the Target
Field will contain accumulated data. See Target Fields
on page 114.
IKAN Solutions
METASUITE METAMAP MANAGER - RELEASE 8.1.3
METAMAP MANAGER USER INTERFACE | 18
Object Types depending from a Work Field
The following table lists the Object Type that may depend on a Work Field:
Dependent Object Type
Symbol
Subfield
Meaning
See Subfields on page 142.
5.7. Context Menus
This section provides an overview of the context menus which you access by right-clicking an element.
Tree View - Title Bar
If you right-click the Model Name in the Title Bar, the following context menu is displayed:
These options have the following meaning:
Option
Meaning
New Model
Select this option to create a new Model.
See MetaMap Models on page 47.
Open Model
Select this option to open an existing Model. The list of existing Models
(with the .msm extension) available in the standard Model directory is
displayed. You typically open an existing Model if you want to verify or
modify its settings.
Generate Active Model
Select this option to generate the selected Model. You need to generate
a Model in order to obtain the MetaSuite program that will actually
perform the data transformation. See Transformation Programs on
page 163.
Export Active Model to CDIF
Select this option to export the selected Model to a CDIF format. You can
do this in order to obtain a .CDF file containing all Objects from your
Model with their Relationships. See Exporting a Model to CDIF format on
page 175.
Note: You need to register a Model before you can export it to CDIF.
IKAN Solutions
METASUITE METAMAP MANAGER - RELEASE 8.1.3
METAMAP MANAGER USER INTERFACE | 19
Option
Meaning
Save Active Model
Select this option to save the selected Model with its current settings.
Save Active Model As
Select this option to save the selected Model under another name.
Close Active Model
Select this option to close the selected Model. If there are any unsaved
changes, you will be asked if you want to save them or not.
Model Name Context Menu
If you right-click the Model name in the Tree View window, the following context menu is displayed:
These options have the following meaning:
Option
Meaning
New
Select this option to create a new Model. See MetaMap Models on
page 47.
Close Model
Select this option to close the Model.
Source Wizard
Select this option to start the Source Wizard. The Source Wizard can
assist you in selecting your data sources. See Source Wizard on
page 90.
Mapping Wizard
Select this option to start the Mapping Wizard. The Mapping
Wizard can assist you in defining one-to-one mappings between
Source and Target Fields. See Mapping Wizard on page 130.
Test Data Wizard
Use this option to select a sample of input records. See Test Data
Wizard on page 151.
Target Wizard
Select this option to start the Target Wizard. The Target Wizard can
assist you in defining your Data Targets. See Target Wizard on
page 125.
IKAN Solutions
METASUITE METAMAP MANAGER - RELEASE 8.1.3
METAMAP MANAGER USER INTERFACE | 20
Option
Meaning
Add > Source > Source File
Select this option to add a Source File to the Model.
See Source Files on page 50.
Add > Source > External Array
Select this option to add an External Array to the Model.
See External Arrays on page 71.
Add > Source > Parameter File
Select this option to add a Parameter File to the Model.
See Parameter Files on page 83.
Add > Target
Select this option to add a Target (File or Report) to the Model.
See Data Targets on page 104.
Add > Work Field
Select this option to add a Work Field to the Model.
See Work Fields on page 135.
Add > Program Procedure
Select this option to add a Program Procedure to the Model.
See Program Procedures on page 144.
There can be only one Initial Program Procedure and one End-ofJob Program Procedure.
Add > Public Procedure
Select this option to add a Public Procedure to the Model.
See Public Procedures on page 148.
Find
Use this option to find the first occurrence of a specific objetc type.
Find Next
Use this option to find the next occurrence of a specific objetc type.
Find Previous
Use this option to find the previous occurrence of a specific objetc
type.
Expand All
Select this option to expand all MetaMap Objects in the Model.
Properties
Select this option to display the Model's Properties window. You
typically display this window to verify or modify its settings. See
MetaMap Models on page 47.
You can also access the Properties window by double-clicking the
MetaMap Object.
In case you are using a Source Control System, the following options will also be available. If not, those
options are greyed out. For more information, refer to the chapter Version Management with Source Control
(page 181).
Option
Meaning
Get Latest Version
Select this option to get the latest version of the Model.
Check In
Select this option to check in a Model.
Check Out
Select this option to check out a Model.
Undo Check Out
Select this option to undo the check-out of a Model.
Add to Source Control
Select this option to add a Model to Source Control.
For more information on Version Management, refer to the chapter
Version Management with Source Control (page 181).
Open from Source Control
Select this option to open a Model which is already under Source
Control.
IKAN Solutions
METASUITE METAMAP MANAGER - RELEASE 8.1.3
METAMAP MANAGER USER INTERFACE | 21
Option
Meaning
Show History
Select this option to display the history for the Model.
Show Status
Select this option to display the status of the Model.
Source File Context Menu
If you right-click a Source File name in the Tree View window, the following context menu is displayed:
Option
Meaning
New
Select this option to add a Source File to the Model. See Source Files on
page 50.
Source Wizard
Select this option to start the Source Wizard. The Source Wizard can assist
you in selecting your data sources. See Source Wizard on page 90.
Add > Path
Select this option to add a Path to the Source File. The purpose of a Path
depends on the Source File type.
There can only be one Path for a Source File. If a Path has already been
defined, the Path option will not be active in the context menu.
Add > File Procedure
Select this option to add a File Procedure to the Source File. A File
Procedure is used to manipulate the Source File before it is processed. See
File Procedures on page 63.
There can only be one File Procedure of each type (Initial, Input and End-ofFile) for a Source File.
Add > Source Record
Select this option to add a Source Record to the Source File. Only Source
Records belonging to the Dictionary File that have not yet been assigned to
the Source File can be added.
Create a Copy
Select this option to create a copy of the Model.
Up
Down
The Up and Down options allow to reorder objects.
In the Tree View, the objects are ordered per type. If there are at least two
objects of the same type, the Up and Down options become available.
You can only reorder objects of the same type.
IKAN Solutions
METASUITE METAMAP MANAGER - RELEASE 8.1.3
METAMAP MANAGER USER INTERFACE | 22
Option
Meaning
Find
Use this option to find the first occurrence of a specific objetc type.
Find Next
Use this option to find the next occurrence of a specific objetc type.
Find Previous
Use this option to find the previous occurrence of a specific objetc type.
Expand All
Select this option to expand all MetaMap Objects belonging to the selected
Object.
Properties
Select this option to display the Source File's Properties window. You
typically display this window to verify or modify its settings. See Source Files
on page 50.
You can also access the Properties window by double-clicking the MetaMap
Object.
Remove
Select this option to remove the selected Source File from the MetaMap
Model.
Path Context Menu
If you right-click a Path name in the Tree View window, the following context menu is displayed:
Option
Meaning
Add > Path Record
Select this option to add a Path Record. See Source Path Records on page 69.
Find
Use this option to find the first occurrence of a specific objetc type.
Find Next
Use this option to find the next occurrence of a specific objetc type.
Find Previous
Use this option to find the previous occurrence of a specific objetc type.
Expand all
Select this option to expand all MetaMap Objects belonging to the selected
Object.
Properties
Select this option to display the Path's Properties window.
You typically display this window to verify or modify its settings. See Path on
page 67.
You can also access the Properties window by double-clicking the MetaMap
Object.
Remove
Select this option to remove this Path.
IKAN Solutions
METASUITE METAMAP MANAGER - RELEASE 8.1.3
METAMAP MANAGER USER INTERFACE | 23
Path Record Context Menu
If you right-click a Path Record name in the Tree View window, the following context menu is displayed:
Option
Meaning
Add > Path Record
Select this option to add a Path Record. See Source Path Records on page 69.
Find
Use this option to find the first occurrence of a specific objetc type.
Find Next
Use this option to find the next occurrence of a specific objetc type.
Find Previous
Use this option to find the previous occurrence of a specific objetc type.
Expand all
Select this option to expand all MetaMap Objects belonging to the selected
Object.
Properties
Select this option to display the Path Record's Properties window.
You typically display this window to verify or modify its settings. See Source Path
Records on page 69.
You can also access the Properties window by double-clicking the MetaMap
Object.
Remove
Select this option to remove this Path Record.
IKAN Solutions
METASUITE METAMAP MANAGER - RELEASE 8.1.3
METAMAP MANAGER USER INTERFACE | 24
Source Record Context Menu
If you right-click a Source Record name belonging to a Source File in the Tree View window, the following
context menu is displayed:
Option
Meaning
New
Select this option to add a Source Record. See Source Records on page 56.
Add > Source Field
Select this option to add a Source Field. See Source Fields on page 58.
Add > Record
Procedure
Select this option to add a Record Procedure. A Record Procedure can be used to
manipulate a Record in a Multi-Record Source File before it is processed. If a
Source File contains just one Record, there is no difference between an Input File
Procedure and Record Procedure. See Record Procedures on page 61.
There is only one type of Record Procedure (i.e. Input) and there can only be one
Record Procedure for a Source Record.
Up
Down
The Up and Down options allow to reorder objects.
In the Tree View, the objects are ordered per type. If there are at least two objects
of the same type, the Up and Down options become available.
You can only reorder objects of the same type.
Find
Use this option to find the first occurrence of a specific objetc type.
Find Next
Use this option to find the next occurrence of a specific objetc type.
Find Previous
Use this option to find the previous occurrence of a specific objetc type.
Expand All
Select this option to expand all MetaMap Objects belonging to the selected
Object.
Properties
Select this option to display the Source Record's Properties window.
You typically display this window to verify or modify its settings. See Source Files
on page 50.
You can also access the Properties window by double-clicking the MetaMap
Object.
Remove
Select this option to remove this Source Record.
IKAN Solutions
METASUITE METAMAP MANAGER - RELEASE 8.1.3
METAMAP MANAGER USER INTERFACE | 25
Source Field Context Menu
If you right-click a Source Field name in the Tree View window, the following context menu is displayed:
Option
Meaning
New
Select this option to add a Source Field. See Source Fields on page 58.
Add > Sub Source Field
Select this option to add a Subsource Field.
In the current version of MetaSuite, all fields and subfields are automatically
added when adding a record.
In earlier versions however, you had to add all fields one by one. This option
can be used, for example, to add subfields to old Models.
Find
Use this option to find the first occurrence of a specific objetc type.
Find Next
Use this option to find the next occurrence of a specific objetc type.
Find Previous
Use this option to find the previous occurrence of a specific objetc type.
Expand All
Select this option to expand all MetaMap Objects belonging to the selected
Object.
Properties
Select this option to display the Source Field's Properties window.
You typically display this window to verify or modify its settings.
You can also access the Properties window by double-clicking the MetaMap
Object.
Remove
Select this option to remove the selected Source Field.
IKAN Solutions
METASUITE METAMAP MANAGER - RELEASE 8.1.3
METAMAP MANAGER USER INTERFACE | 26
Record Procedure Context Menu
If you right-click a Record Procedure name in the Tree View window, the following context menu is displayed:
Option
Meaning
Find
Use this option to find the first occurrence of a specific objetc type.
Find Next
Use this option to find the next occurrence of a specific objetc type.
Find Previous
Use this option to find the previous occurrence of a specific objetc type.
Expand All
Select this option to expand all MetaMap Objects belonging to the selected Object.
Properties
Select this option to display the Record Procedure's Properties window.
You typically display this window to verify or modify its settings. See Record Procedures
on page 61.
You can also access the Properties window by double-clicking the MetaMap Object.
Remove
Select this option to delete the selected Record Procedure.
IKAN Solutions
METASUITE METAMAP MANAGER - RELEASE 8.1.3
METAMAP MANAGER USER INTERFACE | 27
External Array Context Menu
If you right-click an External Array name in the Tree View window, the following context menu is displayed:
Option
Meaning
New
Select this option to add an External Array to the Model.
See External Arrays on page 71.
Source Wizard
Select this option to start the Source Wizard. The Source Wizard can assist you
in selecting your data sources.
See Source Wizard on page 90.
Add > Path
It is not possible to add a Path to an External Array. Therefore this option is not
active.
Add > Array Procedure
Select this option to add an Array Procedure to the External Array. An Array
Procedure is used to program additional logic to the Array. See Array
Procedures on page 79.
There can only be one Array Procedure for an External Array.
Add > Source Record
Select this option to add a Source Record to the External Array. Only Source
Records belonging to the Dictionary File that have not yet been assigned to the
External Array can be added. See Source Records for an External Array on
page 75.
Create a Copy
Select this option to create a copy of the Model.
Up
Down
The Up and Down options allow to reorder objects.
In the Tree View, the objects are ordered per type. If there are at least two
objects of the same type, the Up and Down options become available.
You can only reorder objects of the same type.
Find
Use this option to find the first occurrence of a specific objetc type.
Find Next
Use this option to find the next occurrence of a specific objetc type.
Find Previous
Use this option to find the previous occurrence of a specific objetc type.
IKAN Solutions
METASUITE METAMAP MANAGER - RELEASE 8.1.3
METAMAP MANAGER USER INTERFACE | 28
Option
Meaning
Expand All
Select this option to expand all MetaMap Objects belonging to the selected
Object.
Properties
Select this option to display the External Array's Properties window. You
typically display this window to verify or modify its settings. See External Arrays
on page 71.
You can also access the Properties window by double-clicking the MetaMap
Object.
Remove
Select this option to remove the selected External Array from the MetaMap
Model.
External Array Source Record Context Menu
If you right-click a Source Record name belonging to an External Array in the Tree View window, the
following context menu is displayed:
Option
Meaning
New
Select this option to add a Source Record for the External Array. See Source Records for
an External Array on page 75.
Add > Source
Field
Select this option to add a Source Field to this Source Record. See Source Fields for an
External Array on page 76.
Up
Down
The Up and Down options allow to reorder objects.
In the Tree View, the objects are ordered per type. If there are at least two objects of
the same type, the Up and Down options become available.
You can only reorder objects of the same type.
Find
Use this option to find the first occurrence of a specific objetc type.
Find Next
Use this option to find the next occurrence of a specific objetc type.
Find Previous
Use this option to find the previous occurrence of a specific objetc type.
IKAN Solutions
METASUITE METAMAP MANAGER - RELEASE 8.1.3
METAMAP MANAGER USER INTERFACE | 29
Option
Meaning
Expand all
Select this option to expand all MetaMap Objects belonging to the selected Object.
Properties
Select this option to display the Source Record's Properties window.
You typically display this window to verify or modify its settings. See Source Records on
page 56.
You can also access the Properties window by double-clicking the MetaMap Object.
Remove
Select this option to delete this Source Record.
Array Procedure Context Menu
If you right-click an Array Procedure name in the Tree View window, the following context menu is displayed:
Option
Meaning
Find
Use this option to find the first occurrence of a specific objetc type.
Find Next
Use this option to find the next occurrence of a specific objetc type.
Find Previous
Use this option to find the previous occurrence of a specific objetc type.
Expand All
Select this option to expand all MetaMap Objects belonging to the selected Object.
Properties
Select this option to display the Array Procedure's Properties window.
You typically display this window to verify or modify its settings. See Array Procedures
on page 79.
You can also access the Properties window by double-clicking the MetaMap Object.
Remove
Select this option to remove this External Array Procedure.
IKAN Solutions
METASUITE METAMAP MANAGER - RELEASE 8.1.3
METAMAP MANAGER USER INTERFACE | 30
Parameter File Context Menu
If you right-click a Parameter File name in the Tree View window, the following context menu is displayed:
Option
Meaning
New
Select this option to add a Parameter File to the Model.
See Parameter Files on page 83.
Source Wizard
Select this option to start the Source Wizard. The Source Wizard can assist you in
selecting your data sources.
See Source Wizard on page 90.
Add > Source
Record
Select this option to add a Source Record to the Parameter File. See Source Records
for a Parameter File on page 85.
There can only be one Source Record for a Parameter File.
Create a Copy
Select this option to create a copy of the Model.
Up
Down
The Up and Down options allow to reorder objects.
In the Tree View, the objects are ordered per type. If there are at least two objects of
the same type, the Up and Down options become available.
You can only reorder objects of the same type.
Find
Use this option to find the first occurrence of a specific objetc type.
Find Next
Use this option to find the next occurrence of a specific objetc type.
Find Previous
Use this option to find the previous occurrence of a specific objetc type.
Expand All
Select this option to expand all MetaMap Objects belonging to the selected Object.
Properties
Select this option to display the Parameter File's Properties window. You typically
display this window to verify or modify its settings. See Parameter Files on page 83.
You can also access the Properties window by double-clicking the MetaMap Object.
Remove
Select this option to remove the selected Parameter File from the MetaMap Model.
IKAN Solutions
METASUITE METAMAP MANAGER - RELEASE 8.1.3
METAMAP MANAGER USER INTERFACE | 31
Parameter File Record Context Menu
If you right-click a Source Record name belonging to Parameter File in the Tree View window, the following
context menu is displayed:
Option
Meaning
New
Select this option to add a Source Record. See Source Records for a Parameter File on
page 85.
Add > Source
Field
Select this option to add a Source Field. See Source Fields for a Parameter File on
page 87.
Find
Use this option to find the first occurrence of a specific objetc type.
Find Next
Use this option to find the next occurrence of a specific objetc type.
Find Previous
Use this option to find the previous occurrence of a specific objetc type.
Expand all
Select this option to expand all MetaMap Objects belonging to the selected Object.
Properties
Select this option to display the Source Record's Properties window.
You typically display this window to verify or modify its settings. See Source Records for
a Parameter File on page 85.
You can also access the Properties window by double-clicking the MetaMap Object.
Remove
Select this option to delete this Source Record.
IKAN Solutions
METASUITE METAMAP MANAGER - RELEASE 8.1.3
METAMAP MANAGER USER INTERFACE | 32
Parameter File Field Context Menu
If you right-click a Source Field name belonging to Parameter File in the Tree View window, the following
context menu is displayed:
Option
Meaning
New
Select this option to add a Source Field. See Source Fields for a Parameter File on
page 87.
Add > Sub
Source Field
Select this option to add a Subsource Field.
In the current version of MetaSuite, all fields and subfields are automatically added
when adding a record.
In earlier versions however, you had to add all fields one by one. This option can be
used, for example, to add subfields to old Models.
Find
Use this option to find the first occurrence of a specific objetc type.
Find Next
Use this option to find the next occurrence of a specific objetc type.
Find Previous
Use this option to find the previous occurrence of a specific objetc type.
Expand All
Select this option to expand all MetaMap Objects belonging to the selected
Object.
Properties
Select this option to display the Source Field's Properties window.
You typically display this window to verify or modify its settings. See Source Fields
for a Parameter File on page 87.
You can also access the Properties window by double-clicking the MetaMap Object.
Remove
Select this option to delete this Source Field.
IKAN Solutions
METASUITE METAMAP MANAGER - RELEASE 8.1.3
METAMAP MANAGER USER INTERFACE | 33
Target Context Menu
If you right-click a Target name in the Tree View window, the following context menu is displayed:
Option
Meaning
New
Select this option to add a Target to the Model.
See Data Targets on page 104.
Mapping Wizard
Select this option to start the Mapping Wizard. The Mapping Wizard can
assist you in defining one-to-one mappings between Source and Target Fields.
See Mapping Wizard on page 130.
Add > Target Record
Select this option to add a Target Record to the Target. See Target Records on
page 111.
Add > Target Procedure
Select this option to add a Target Procedure to the Target. A Target Procedure
is used to define additional logic that will be executed before or after the
logic defined in the Value text box available on the Target Field Properties
windows. See Target Procedures on page 121.
There can only be one Target Procedure of each type for a Target File:
• Detail Output Post (DOT)
• Detail Output Pre (DOE)
• End of File (EOF)
• End of Job (EOJ)
• Initialization (INIT)
• Total Output Post (TOT)
• Total Output Pre (TOE)
Add > Title
Select this option to define a Title for the Target. See Target Titles on
page 119.
Add > Heading
Select this option to define a Heading for the Target. See Target Headings on
page 119.
IKAN Solutions
METASUITE METAMAP MANAGER - RELEASE 8.1.3
METAMAP MANAGER USER INTERFACE | 34
Option
Meaning
Add > EndPage
Select this option to define an EndPage for the Target. See Target End Pages
on page 120.
Create a Copy
Select this option to create a copy of the Model.
Up
Down
The Up and Down options allow to reorder objects.
In the Tree View, the objects are ordered per type. If there are at least two
objects of the same type, the Up and Down options become available.
You can only reorder objects of the same type.
Find
Use this option to find the first occurrence of a specific objetc type.
Find Next
Use this option to find the next occurrence of a specific objetc type.
Find Previous
Use this option to find the previous occurrence of a specific objetc type.
Expand all
Select this option to expand all MetaMap Objects belonging to the selected
Object.
Properties
Select this option to display the Target's Properties window. You typically
display this window to verify or modify its settings. See Data Targets on
page 104.
You can also access the Properties window by double-clicking the MetaMap
Object.
Remove
Select this option to remove the selected Target from the MetaMap Model.
Target Record Context Menu
If you right-click a Target Record name in the Tree View window, the following context menu is displayed:
Option
Meaning
New
Select this option to add a Record to the selected Target.
See Target Records on page 111.
IKAN Solutions
METASUITE METAMAP MANAGER - RELEASE 8.1.3
METAMAP MANAGER USER INTERFACE | 35
Option
Meaning
Mapping Wizard
Select this option to start the Mapping Wizard. The Mapping Wizard can assist
you in defining one-to-one mappings between Source and Target Fields. See
Mapping Wizard on page 130.
Add > Target Field
Select this option to add a Target Field to the selected Target Record. See
Target Fields on page 114.
Create a Copy
Select this option to create a copy of the Model.
Up
Down
The Up and Down options allow to reorder objects.
In the Tree View, the objects are ordered per type. If there are at least two
objects of the same type, the Up and Down options become available.
You can only reorder objects of the same type.
Find
Use this option to find the first occurrence of a specific object type.
Find Next
Use this option to find the next occurrence of a specific object type.
Find Previous
Use this option to find the previous occurrence of a specific object type.
Expand All
Select this option to expand all MetaMap Objects belonging to the selected
Object.
Properties
Select this option to display the Target Record's Properties window. You
typically display this window to verify or modify its settings. See Target Records
on page 111.
You can also access the Properties window by double-clicking the MetaMap
Object.
Remove
Select this option to remove the selected Target Record from the MetaMap
Model.
IKAN Solutions
METASUITE METAMAP MANAGER - RELEASE 8.1.3
METAMAP MANAGER USER INTERFACE | 36
Target Field Context Menu
If you right-click a Target Field name in the Tree View window, the following context menu is displayed:
Option
Meaning
New
Select this option to add a new Target Field. See Target Fields on page 114.
Add > Sub Target Field
Select this option to add a Sub Target Field.
Create a Copy
Select this option to create a copy of the Model.
Remove All Sub Fields
Select this option to remove all sub fields.
Up
Down
The Up and Down options allow to reorder objects.
In the Tree View, the objects are ordered per type. If there are at least two
objects of the same type, the Up and Down options become available.
You can only reorder objects of the same type.
Find
Use this option to find the first occurrence of a specific objetc type.
Find Next
Use this option to find the next occurrence of a specific objetc type.
Find Previous
Use this option to find the previous occurrence of a specific objetc type.
Expand All
Select this option to expand all MetaMap Objects belonging to the selected
Object.
Properties
Select this option to display the Target Field's Properties window.
You typically display this window to verify or modify its settings. See Target
Fields on page 114.
You can also access the Properties window by double-clicking the MetaMap
Object.
Remove
Select this option to remove the selected Target Field.
IKAN Solutions
METASUITE METAMAP MANAGER - RELEASE 8.1.3
METAMAP MANAGER USER INTERFACE | 37
Option
Meaning
Remove Field Mapping
Select this option to remove the Field Mapping.
Target Title, Heading and End Page Context Menu
Note:
These options are only relevant for Report Files.
If you right-click a Target Title, Heading or End Page name in the Tree View window, the following context
menu is displayed:
Option
Meaning
Create a Copy
Select this option to create a copy of the Model.
Find
Use this option to find the first occurrence of a specific objetc type.
Find Next
Use this option to find the next occurrence of a specific objetc type.
Find Previous
Use this option to find the previous occurrence of a specific objetc type.
Expand All
Select this option to expand all MetaMap Objects belonging to the selected Object.
Properties
Select this option to display the Target Title's, Heading's or EndPage's Properties
window.
You typically display this window to verify or modify its settings. Please refer to Target
Titles (page 119), Target Headings (page 119) and Target End Pages (page 120).
You can also access the appropriate Properties window by double-clicking the
MetaMap Object.
Remove
Select this option to remove the selected Target Title, Heading or EndPage.
IKAN Solutions
METASUITE METAMAP MANAGER - RELEASE 8.1.3
METAMAP MANAGER USER INTERFACE | 38
Target Procedure Context Menu
If you right-click a Target Procedure name in the Tree View window, the following context menu is displayed:
Option
Meaning
New
Select this option to add a new Target Procedure. See Target Procedures on page 121.
Find
Use this option to find the first occurrence of a specific objetc type.
Find Next
Use this option to find the next occurrence of a specific objetc type.
Find Previous
Use this option to find the previous occurrence of a specific objetc type.
Expand All
Select this option to expand all MetaMap Objects belonging to the selected Object.
Properties
Select this option to display the Target Procedure's Properties window.
You typically display this window to verify or modify its settings. See Target Procedures
on page 121.
You can also access the Properties window by double-clicking the MetaMap Object.
Remove
Select this option to remove the selected Target Procedure.
IKAN Solutions
METASUITE METAMAP MANAGER - RELEASE 8.1.3
METAMAP MANAGER USER INTERFACE | 39
Program Procedure Context Menu
If you right-click a Program Procedure name in the Tree View window, the following context menu is
displayed:
Option
Meaning
New
Select this option to add a new Program Procedure. See Target Procedures on
page 121.
Find
Use this option to find the first occurrence of a specific objetc type.
Find Next
Use this option to find the next occurrence of a specific objetc type.
Find Previous
Use this option to find the previous occurrence of a specific objetc type.
Expand All
Select this option to expand all MetaMap Objects belonging to the selected Object.
Properties
Select this option to display the Program Procedure's Properties window.
You typically display this window to verify or modify its settings. See Program
Procedures on page 144.
You can also access the Properties window by double-clicking the MetaMap Object.
Remove
Select this option to remove the selected Program Procedure.
IKAN Solutions
METASUITE METAMAP MANAGER - RELEASE 8.1.3
METAMAP MANAGER USER INTERFACE | 40
Public Procedure Context Menu
If you right-click a Public Procedure name in the Tree View window, the following context menu is displayed:
Option
Meaning
New
Select this option to add a new Public Procedure. See Public Procedures on page 148.
Up
Down
The Up and Down options allow to reorder objects.
In the Tree View, the objects are ordered per type. If there are at least two objects of
the same type, the Up and Down options become available.
You can only reorder objects of the same type.
Find
Use this option to find the first occurrence of a specific objetc type.
Find Next
Use this option to find the next occurrence of a specific objetc type.
Find Previous
Use this option to find the previous occurrence of a specific objetc type.
Expand All
Select this option to expand all MetaMap Objects belonging to the selected Object.
Properties
Select this option to display the Public Procedure's Properties window.
You typically display this window to verify or modify its settings. See Public Procedures
on page 148.
You can also access the Properties window by double-clicking the MetaMap Object.
Remove
Select this option to remove the selected Public Procedure.
IKAN Solutions
METASUITE METAMAP MANAGER - RELEASE 8.1.3
METAMAP MANAGER USER INTERFACE | 41
Work Field Context Menu
If you right-click a Work Field name in the Tree View window, the following context menu is displayed:
Option
Meaning
New
Select this option to add a new Work Field. See Work Fields on page 135.
Add > Sub Work Field
Select this option to add a Subfield to the selected Work Field. A Subfield can
be used to divide the Workfield in several parts. See Subfields on page 142.
Create a Copy
Select this option to create a copy of the Model.
Up
Down
The Up and Down options allow to reorder objects.
In the Tree View, the objects are ordered per type. If there are at least two
objects of the same type, the Up and Down options become available.
You can only reorder objects of the same type.
Find
Use this option to find the first occurrence of a specific objetc type.
Find Next
Use this option to find the next occurrence of a specific objetc type.
Find Previous
Use this option to find the previous occurrence of a specific objetc type.
Expand All
Select this option to expand all MetaMap Objects belonging to the selected
Object.
Properties
Select this option to display the Work Field's Properties window.
You typically display this window to verify or modify its settings.See Work Fields
on page 135.
You can also access the Properties window by double-clicking the MetaMap
Object.
Remove
Select this option to remove the selected Work Field.
IKAN Solutions
METASUITE METAMAP MANAGER - RELEASE 8.1.3
METAMAP MANAGER USER INTERFACE | 42
Option
Meaning
Auto Position
The auto-calculate position functionality.
Flagging this option makes it possible to automatically calculate the position. In
most cases this results in the end position of the last field +1.
There are some exceptions to this standard rule:
• The first field has no predecessor. Obviously, in this case the position will be 1.
• Redefines: in this case the position of the "redefined" field will be taken.
• Subfields: this is in fact a variation of redefines. The first subfield will have the
same position as the group field it belongs to. The second subfield will follow
the standard rule.
Sub Work Field Context Menu
If you right-click a Subfield name in the Tree View window, the following context menu is displayed:
Option
Meaning
New
Select this option to add a new Subfield to the Work Field. See Subfields on
page 142.
Add > Sub Work Field
Select this option to add an existing Subfield within a Subfield.
Create a Copy
Select this option to create a copy of the Model.
Find
Use this option to find the first occurrence of a specific objetc type.
Find Next
Use this option to find the next occurrence of a specific objetc type.
Find Previous
Use this option to find the previous occurrence of a specific objetc type.
Expand All
Select this option to expand all MetaMap Objects belonging to the selected
Object.
IKAN Solutions
METASUITE METAMAP MANAGER - RELEASE 8.1.3
METAMAP MANAGER USER INTERFACE | 43
Option
Meaning
Properties
Select this option to display the Subfield's Properties window.
You typically display this window to verify or modify its settings. See Subfields
on page 142.
You can also access the Properties window by double-clicking the MetaMap
Object.
Remove
Select this option to remove the selected Subfield.
Auto Position
Flagging this option makes it possible to automatically calculate the position.
In most cases this results in the end position of the last field +1.
There are some exceptions to this standard rule:
• The first field has no predecessor. Obviously, in this case the position will be
1.
• Redefines: in this case the position of the "redefined" field will be taken.
• Subfields: this is in fact a variation of redefines. The first subfield will have
the same position as the group field it belongs to. The second subfield will
follow the standard rule.
5.8. Workspace
The Workspace is the grey zone next to the Tree View Window, when all Windows are docked.
This area is used to display Properties windows, when you are working with MetaMap Objects.
5.9. Output
If the Output option in the View menu is checked, the Output window is by default displayed in the lower half
of the screen.
The Output window contains all messages generated during the current session of MetaMap.
5.10. Package/Compile/Generate Window
•
Generate window:
When generating, this window will display the MXL and the generator errors.
•
Package window:
When creating a package, the output of the package will be displayed in this window.
•
Compile window:
When executing a compile script, the listing will be displayed in this window.
IKAN Solutions
METASUITE METAMAP MANAGER - RELEASE 8.1.3
METAMAP MANAGER USER INTERFACE | 44
5.11. Statusbar
If the Statusbar option in the View menu is checked, the Statusbar is displayed in the bottom right corner of
the screen.
If the Properties window of an MetaMap Object (a Model, a Source File, a Procedure, etc.) is the active
window in the Workspace, the Statusbar contains the following information for this Object:
•
Creation timestamp
• Last Update timestamp
Both timestamps are displayed in the following format: YYYY-MM-DD-HH.MM, Where:
•
YYYY indicates the year
•
MM indicates the month
•
DD indicates the day
•
HH indicates the hours
•
MM indicates the minutes
5.12. Docking a Window
Dockable windows are windows that align themselves with the edge of another interface element, another
window or properties window.
1.
Click the window title bar and keep the mouse button pressed.
2.
Drag the selected window to the required position.
The window you are repositioning is displayed in grey and positioning anchors are displayed on the
screen.
IKAN Solutions
METASUITE METAMAP MANAGER - RELEASE 8.1.3
METAMAP MANAGER USER INTERFACE | 45
3.
Place the cursor on the anchor of your choice, and release the mouse button.
Note:
IKAN Solutions
You can also position the window outside the main MetaSuite window, on your Desktop.
METASUITE METAMAP MANAGER - RELEASE 8.1.3
CHAPTER 6
MetaMap Models - Overview
Creating a new Model involves the following steps:
Chapters
Sections
MetaMap Models (page 47)
Data Sources (page 49)
•
•
•
•
•
•
•
•
•
•
•
•
•
•
Source Files (page 50)
Source Records (page 56)
Source Fields (page 58)
Record Procedures (page 61)
Path (page 67)
Source Path Records (page 69)
File Procedures (page 63)
External Arrays (page 71):
Source Records for an External Array (page 75)
Source Fields for an External Array (page 76)
Array Procedures (page 79)
Parameter Files (page 83)
Source Records for a Parameter File (page 85)
Source Fields for a Parameter File (page 87)
Data Targets (page 104)
•
•
•
•
•
•
•
Target Files or Reports (page 104):
Target Records (page 111)
Target Fields (page 114)
Target Titles (page 119)
Target Headings (page 119)
Target End Pages (page 120)
Target Procedures (page 121)
Program Procedures (page 144)
Public Procedures (page 148)
Work Fields (page 135)
IKAN Solutions
METASUITE METAMAP MANAGER - RELEASE 8.1.3
CHAPTER 7
MetaMap Models
A MetaMap Model is a set of mapping rules determining how up to 99 Data Targets (Sequential Files,
Delimited Files or Reports) are derived from up to 99 Data Sources (Source Files, External Arrays or
Parameter Files). Next to the definition of the required Sources and Targets, the Model also contains the
definition of the Mapping Rules and Procedures.
1.
Click the New Model icon (
) on the Menu Bar.
The properties window is displayed in the Work Area.
2.
Fill out the required fields:
IKAN Solutions
Field
Description
Name
This field is mandatory.
Enter the name of the new Model. The Model name must be unique and may
contain up to 32 characters.
Version
The default setting of this field is 1, but you can enter a higher version
number, if required.
You can define multiple programs with the same name and a different version
number. You might want to do this, for instance, to ensure that programs
match maps of the same version.
METASUITE METAMAP MANAGER - RELEASE 8.1.3
METAMAP MODELS | 48
Field
Description
Dictionary
This read-only field displays the name of the MetaStore where the new Model
will be saved. The MetaStore also contains the Dictionary Files describing the
data sources and data targets that where defined using the MetaStore
Manager.
Note: When clicking the Browse button next to the Dictionary File name, the
Properties window of the MetaSuite MetaStore is displayed in read-only
mode. Open this Properties window in the MetaStore Manager to change
the settings.
Execution Name
This field is mandatory.
Enter the name of the COBOL program that will be generated on the basis of
the Model. This name must be unique and may contain up to 8 characters.
Exported By
When the Model is generated, this field will automatically be updated with
the name of the user who performed this action.
Exported At
When the Model is generated, this field will automatically be updated with
the timestamp when this action was performed.
Exported To
When the Model is generated, this field will automatically be updated with
the path and filename of the export file (extension .mxl = MetaSuite Export
Language).
The .mxl file describes the MetaMap in a readable format.
Saved To
When the Model is saved to the MetaStore, this field will automatically be
updated with the path and filename of the Model file (extension .msm =
MetaSuite Model).
Business Rule
In this field, you can enter a text describing the purpose of the Model.
Note: If you want to enter text in RTF (Rich Text Format), right-click and
select RTF from the context menu (or use the shortcut CTRL + R).
Note
In this field, you can enter any additional information pertaining to the
Model.
Note: If you want to enter text in RTF (Rich Text Format), right-click and
select RTF from the context menu (or use the shortcut CTRL + R).
3.
Click OK to save the new Model.
The properties window is closed and the new model is displayed in the Tree View window.
4.
Save your changes by doing one of the following:
5.
•
Click the Save Active Model (
•
Select File > Save Active Model.
) icon on the Main Toolbar.
The next possible step will be to generate or package the MetaMap Model.
•
When generating the MetaMap model, the model will be exported into MXL format, which is a
readable format for the Generator. Next, the Generator will transform this MXL into a COBOL
program and a run script, so that it can be run on a remote machine. The COBOL program will be
compiled using a compile script.
•
Packaging a MetaMap Model is nearly the same as generating a MetaMap Model, with this exception
that the compile procedure will be replaced by a packaging procedure.
Packaging can be used for delivering a model to a remote system via an Application Lifecycle
Management System, such as IKAN ALM.
IKAN Solutions
METASUITE METAMAP MANAGER - RELEASE 8.1.3
CHAPTER 8
Data Sources
Data Sources are a type of MetaMap Objects that can be assigned directly to a Model.
Apart from Data Sources, it is also possible to assign Data Targets, Program Procedures, Public Procedures
and Work Fields to a Model.
Data Source
Subobjects
Source Files (page 50)
• Source Records (page 56)
- Source Fields (page 58)
- Sub Source Fields (page 59)
- Record Procedures (page 61)
• File Procedures (page 63)
• Path (page 67)
- Source Path Records (page 69)
External Arrays (page 71)
• Source Records for an External Array (page 75)
- Source Fields for an External Array (page 76)
- Sub Source Fields for an External Array (page 77)
• Array Procedures (page 79)
• Path for an External Array (page 81)
Parameter Files (page 83)
• Source Records for a Parameter File (page 85)
- Source Fields for a Parameter File (page 87)
- Sub Source Fields for a Parameter File (page 88)
Source Wizard (page 90)
Matching Wizard (page 99)
IKAN Solutions
METASUITE METAMAP MANAGER - RELEASE 8.1.3
DATA SOURCES | 50
8.1. Source Files
Data Sources that are defined as Source Files will be read from the start to the end, one record at a time.
You will define a Data Source as a Source File, if you want to use it as an input file.
Procedure
1.
Open the required Model.
2.
Right-click the Model name and select Add > Source > Source File.
3.
Select the file description you want to add and click OK.
Two extra options are available at the top right of the pop-up window for selecting the required item:
•
Show all
When selecting this option, the Select Item drop-down list will be deactivated and all available fields
for all categories will be displayed underneath.
•
Indentation
When selecting this option, all fields displayed will be sorted per structure instead of alphabetically.
The Source File Properties window is displayed.
Two tabs are available: Technical and Business.
4.
5.
Fill out the required fields.
For a detailed description of the fields, refer to the sections:
•
Technical Tab (page 51)
•
Business Tab (page 56)
Apply or discard your changes.
The name of the new Source File and its symbol (
IKAN Solutions
) are displayed in the Tree View window.
METASUITE METAMAP MANAGER - RELEASE 8.1.3
DATA SOURCES | 51
6.
Save your changes by doing one of the following:
•
Click the Save Active Model (
•
Select File > Save Active Model.
) button on the Main Toolbar.
Technical Tab
The following fields are available on the Technical tab.
•
•
Source File Properties
-
Name (page 51)
-
Organization (page 51)
-
Prefix (page 51)
-
Dictionary File (page 52)
-
Sort Fields (page 52)
Advanced
-
Automatic Checkbox (page 53)
-
Manual Checkbox (page 54)
-
Special Write Only Checkbox (page 54)
-
Match With (page 54)
-
Match On (page 54)
-
Controlled By (page 54)
-
Control Key (page 55)
-
Match Field (page 56)
Name
This field is updated automatically with the name of the Dictionary File you selected when adding the Source
File.
If required, you can change the name in this field. This name will be displayed in the Tree View window. It
may contain up to 32 characters and must be unique.
Organization
This read-only field displays the File Type of the Dictionary File.
Prefix
In this field, you can enter a prefix for this Source File. You might for instance define the prefixes OLD- and
NEW-, if you are working with different versions of the same file.
A Prefix has a fixed length of 4 characters and must start with an alphabetic character.
IKAN Solutions
METASUITE METAMAP MANAGER - RELEASE 8.1.3
DATA SOURCES | 52
Dictionary File
Click the Browse button at the right of the Dictionary File name to display the Dictionary File Properties
window.
Sort Fields
It is interesting to define up to 16 Sort Fields for your Source File, if it is not ordered in the sequence you
want.
Use this field as follows:
1.
Double-click the New button.
The list of Fields available in the Records belonging to the Source File is displayed:
2.
Select the required field and click OK.
Two extra options are available at the top right of the pop-up window for selecting the required item:
•
Show all
When selecting this option, the Select Item drop-down list will be deactivated and all available fields
for all categories will be displayed underneath.
•
Indentation
When selecting this option, all fields displayed will be sorted per structure instead of alphabetically.
IKAN Solutions
METASUITE METAMAP MANAGER - RELEASE 8.1.3
DATA SOURCES | 53
The selected field is displayed in the Input Sort/Order Field Properties window.
Field
Meaning
Name
This field contains the name of the Sort Field.
You can enter another name containing up to 32 characters.
Descending
By default, this checkbox is not selected, so that the sorting is done in ascending
order.
If you select this checkbox, the sorting will be done in descending order.
Source Field
The Browse button next to this selection box can be used in two ways:
• If the field contains the name of a Sort Field, clicking the Browse button
results in displaying the Properties window of the matching Source Field.
See Source Files on page 50.
• If you empty the field, you can click the Browse button to redisplay the list
of Fields that can be selected as Source Field.
Note: The Name field will not be updated automatically. The Name is independent from the field where it points to. By default they are equal, but
this is not mandatory. A field with the MetaStore name "DSTR-NM" can
have a MetaMap name "DISTRIBUTOR-NAME".
Automatic Checkbox
This field applies for all Source File types.
By default, this checkbox is selected. This means that the source file will be read automatically, completely and
sequentially.
Clear this checkbox, if you want that MetaSuite automatically retrieves a record based on a key value each time
it reads a record from a "Controlling File", which you define in the Controlled By selection box.
The "Automatic" flag is disabled in case of Matching. The last file in the matching chain will have the
Automatic flag set, the other files in the matching chain will have the Automatic flag unset. The last file in the
chain will be treated somehow as the controlling file, the other files as controlled-by files. Note that the
mechanism for matching differs a great deal from the controlled-by mechanism.
For more information on defining Key fields, refer to the section File Keys in the MetaStore Manager User
Guide.
IKAN Solutions
METASUITE METAMAP MANAGER - RELEASE 8.1.3
DATA SOURCES | 54
Manual Checkbox
This checkbox only applies for IDMS Source Files.
Select this checkbox if you want to program the access commands to the IDMS database manually, using in a
Program Initial or an Initial Sort Procedure.
Clear this checkbox if you want MetaSuite to generate the access commands automatically.
Note:
If you select this checkbox, the Automatic checkbox automatically becomes cleared.
Special Write Only Checkbox
This checkbox only applies for Standard Source Files.
Select this checkbox if you want to be able to write Records to this Source File during the execution of the
Model. By activating this option, the File (although defined as a Source File) is considered as a Target. It is
empty when the program starts and it is filled with data during the execution.
Note:
If you select this checkbox, the Automatic checkbox automatically becomes cleared.
Match With
If this Source File is the origin of one or more matchings, this field contains the name of the Source File this
file is matched with.
You can then click the Browse button in order to access the Properties window of this Source File.
The Matchings themselves can only be defined with the Matching Wizard. See Matching Wizard on page 99.
Match On
If this Source File is the destination of one or more matchings, this field contains the name of the Source File
this file is matched on.
You can then click the Browse button in order to access the Properties window of this Source File.
The Matchings themselves can only be defined with the Matching Wizard. See Matching Wizard on page 99.
Controlled By
This field becomes accessible when the Automatic checkbox above is cleared.
It is used to define the File which contains the Control Key used for controlling this Source File. This Control
File is one of the other Source Files assigned to the MetaMap Model.
Perform the following steps to select the Control File:
1.
Click the Browse button next to the selection box.
The Source Files assigned to this Model are displayed.
IKAN Solutions
METASUITE METAMAP MANAGER - RELEASE 8.1.3
DATA SOURCES | 55
Two extra options are available at the top right of the pop-up window for selecting the required item:
•
Show all
When selecting this option, the Select Item drop-down list will be deactivated and all available fields
for all categories will be displayed underneath.
•
Indentation
When selecting this option, all fields displayed will be sorted per structure instead of alphabetically.
2.
Select the Source File that should control this one and click OK.
The name of the selected File is displayed in the Controlled By field.
Note:
If you click the Browse button while a Control File was already selected, the Properties window
of this Control File is displayed.
Control Key
This field becomes accessible, when you have selected the Control File in the Controlled By field above.
It allows you to select the Key field belonging to the selected Control File, which will control the access to the
Source File.
The meaning of a file being "controlled by" is that the file will be read as soon as a certain key value has
changed.
The record that is searched for has a file key value that is specified by the Control Field in the Control File.
The latter can be a work field as well.
In other words: the controlled file is triggered by the Control Field on the basis of the controlled file key. The
controlled file should support direct access.
1.
Click the Browse button next to the selection box.
The fields available in the Source File selected above are displayed.
2.
Select the required field and click OK.
Two extra options are available at the top right of the pop-up window for selecting the required item:
•
Show all
When selecting this option, the Select Item drop-down list will be deactivated and all available fields
for all categories will be displayed underneath.
•
Indentation
When selecting this option, all fields displayed will be sorted per structure instead of alphabetically.
The name of the selected field is displayed in the Control Key field.
Note:
IKAN Solutions
If you click the Browse button while a Control Key was already selected, the Properties window
of this Source Field is displayed.
METASUITE METAMAP MANAGER - RELEASE 8.1.3
DATA SOURCES | 56
Match Field
This read-only field lists the Fields belonging to this Source File, for which matching(s) have been defined.
The matchings can only be defined with the Matching Wizard. See Matching Wizard on page 99.
Business Tab
The following fields are available on the Business tab:
•
Business Rule (page 56)
•
Note (page 56)
Business Rule
In this field, you can enter a description of the Source File.
If you want to enter text in RTF (Rich Text Format), right-click and select RTF from the context menu (or use
the shortcut CTRL + R).
Note
In this field, you can enter additional information pertaining to the Source File.
If you want to enter text in RTF (Rich Text Format), right-click and select RTF from the context menu (or use
the shortcut CTRL + R).
8.2. Source Records
Source Records are a type of MetaMap Objects that can be assigned to a Source File. Apart from Source
Records, it is also possible to assign a Path (page 67) and File Procedures (page 63).
Note:
This option is only available if not all Source Records have been added.
When adding a Source Record, all Source Fields and Sub Source Fields will be added automatically.
Procedure
1.
Open the required Model.
2.
Expand the tree in such a way that the required Source File is displayed.
3.
Right-click the Source File name and select Add > Source Record.
4.
Select the file description you want to add and click OK.
Two extra options are available at the top right of the pop-up window for selecting the required item:
•
Show all
When selecting this option, the Select Item drop-down list will be deactivated and all available fields
for all categories will be displayed underneath.
IKAN Solutions
METASUITE METAMAP MANAGER - RELEASE 8.1.3
DATA SOURCES | 57
•
Indentation
When selecting this option, all fields displayed will be sorted per structure instead of alphabetically.
The Source Record Properties window is displayed.
5.
Fill out the required fields.
For a detailed description of the fields, refer to the sections Fields (page 57).
6.
Apply or discard your changes.
The name of the new Source Record and its symbol (
7.
) are displayed in the Tree View window.
Save your changes by doing one of the following:
•
Click the Save Active Model (
•
Select File > Save Active Model.
) button on the Main Toolbar.
Fields
The following fields are available.
•
Name (page 57)
•
Dictionary Record (page 57)
Name
This field is automatically updated with the name of the Source Record, when adding the Source Record.
If required, you can change the name in this field. This name will be displayed in the Tree View window. It
may contain up to 32 characters and must be unique in this Source File.
Dictionary Record
This read-only field displays the name of the Dictionary Record. You can click the Browse button to display its
properties.
IKAN Solutions
METASUITE METAMAP MANAGER - RELEASE 8.1.3
DATA SOURCES | 58
8.3. Source Fields
Source Fields are a type of MetaMap Objects that can be assigned to a Source Record. Apart from Source
Fields, it is also possible to assign Record Procedures (page 61).
Note:
This option is only available if not all Source Fields have been added.
When adding a Source Field, all Sub Source Fields will be added automatically.
Procedure
1.
Open the required Model.
2.
Expand the tree in such a way that the required Source File and Record are displayed.
3.
Right-click the Source Record name and select Add > Source Field.
4.
Select the file description you want to add and click OK.
Two extra options are available at the top right of the pop-up window for selecting the required item:
•
Show all
When selecting this option, the Select Item drop-down list will be deactivated and all available fields
for all categories will be displayed underneath.
•
Indentation
When selecting this option, all fields displayed will be sorted per structure instead of alphabetically.
The Source Field Properties window is displayed.
5.
Fill out the required fields.
For a detailed description of the fields, refer to the sections Fields (page 59).
6.
Apply or discard your changes.
The name of the new Source Field and its symbol (
7.
) are displayed in the Tree View window.
Save your changes by doing one of the following:
•
Click the Save Active Model (
•
Select File > Save Active Model.
IKAN Solutions
) button on the Main Toolbar.
METASUITE METAMAP MANAGER - RELEASE 8.1.3
DATA SOURCES | 59
Fields
The following fields are available.
•
Name (page 59)
•
Dictionary Field (page 59)
Name
This field is updated automatically with the name of the Source Field you selected when adding the Source
Field.
If required, you can change the name in this field. This name will be displayed in the Tree View window. It can
contain up to 32 characters and must be unique within the Record.
Dictionary Field
This read-only field displays the name of the Dictionary Field. You can click the Browse button next to it to
display its properties.
8.4. Sub Source Fields
Sub Source Fields are a type of MetaMap Objects that can be assigned to a Source Field.
Note:
This option is only available if not all Sub Source Fields have been added.
Procedure
1.
Open the required Model.
2.
Expand the tree in such a way that the required Source File, Record and Field are displayed.
3.
Right-click the Source Field name and select Add > Sub Source Field.
4.
Select the file description you want to add and click OK.
Two extra options are available at the top right of the pop-up window for selecting the required item:
•
Show all
When selecting this option, the Select Item drop-down list will be deactivated and all available fields
for all categories will be displayed underneath.
•
Indentation
When selecting this option, all fields displayed will be sorted per structure instead of alphabetically.
IKAN Solutions
METASUITE METAMAP MANAGER - RELEASE 8.1.3
DATA SOURCES | 60
The Source Field Properties window is displayed.
5.
Fill out the required fields.
For a detailed description of the fields, refer to the sections Fields (page 59).
6.
Apply or discard your changes.
The name of the new Sub Source Field and its symbol (
7.
) are displayed in the Tree View window.
Save your changes by doing one of the following:
•
Click the Save Active Model (
•
Select File > Save Active Model.
) button on the Main Toolbar.
Fields
The following fields are available.
•
Name (page 60)
•
Dictionary Field (page 60)
Name
This field is updated automatically with the name of the Source Field you selected when adding the Source
Field.
If required, you can change the name in this field. This name will be displayed in the Tree View window. It can
contain up to 32 characters and must be unique within the Record.
Dictionary Field
This read-only field displays the name of the Dictionary Field. You can click the Browse button next to it to
display its properties.
IKAN Solutions
METASUITE METAMAP MANAGER - RELEASE 8.1.3
DATA SOURCES | 61
8.5. Record Procedures
Record Procedures are a type of MetaMap Objects that can be assigned to a Source Record. Apart from a
Record Procedure, it is also possible to assign Source Fields (page 58).
You will define a Record Procedure for a Source Record, if you want to define filters that apply to this Record
only. This is mainly useful in a multi-record Source File. The Record Input Procedure is the only available
Record Procedure type. This means that for single-record Source Files, there is no difference between a File
Input Procedure and a Record Procedure.
You can only define one Record Procedure for each Source Record.
Procedure
1.
Open the required Model.
2.
Expand the tree in such a way that the required Source File and Record are displayed.
3.
Right-click the Source Record name and select Add > Record Procedure.
4.
Select the file description you want to add and click OK.
The Record Procedure Properties window is displayed.
Two tabs are available: Technical and Business.
5.
6.
Fill out the required fields.
For a detailed description of the fields, refer to the sections:
•
Technical Tab (page 62)
•
Business Tab (page 63)
Apply or discard your changes.
The name of the new Record Procedure and its symbol (
IKAN Solutions
) are displayed in the Tree View window.
METASUITE METAMAP MANAGER - RELEASE 8.1.3
DATA SOURCES | 62
7.
Save your changes by doing one of the following:
•
Click the Save Active Model (
•
Select File > Save Active Model.
) button on the Main Toolbar.
Technical Tab
The following fields are available. For detailed information, refer to the separate sections:
•
Name (page 62)
•
Commands Workspace (page 62)
Name
The Record Procedure name is displayed in this field. The default value is RECORD INPUT. You can delete
it and replace it by another name. It is advised to select a name that describes the action performed by the
Record Procedure.
The name in this field will be displayed in the Tree Window. It can contain up to 32 characters.
Commands Workspace
In this field, you can enter the commands that build the Record Procedure. These commands are written in
the MetaSuite Definition language.
1.
Enter the required commands.
By default, the list of available commands is displayed at the left of this field. Invalid commands are
displayed in red.
Note:
If you do not need the assisted mode, you can switch it off using the
Toolbar and enter the commands manually.
To switch it on again, click the Stop/Edit icon (
).
icon in the Edit
2.
Select the required command by clicking it.
The command will be added to the Workspace.
Any error messages or warnings are displayed underneath the Commands Workspace.
3.
Once you have finished entering the commands, click the Stop/Edit icon (
).
The Procedure is verified. If syntax errors are found, the errors message are displayed underneath the
Workspace.
4.
Save your changes by doing one of the following:
•
Click the Save Active Model (
•
Select File > Save Active Model.
IKAN Solutions
) button on the Main Toolbar.
METASUITE METAMAP MANAGER - RELEASE 8.1.3
DATA SOURCES | 63
Business Tab
The following fields are available. For detailed information, refer to the separate sections:
•
Business Rule (page 63)
•
Note (page 63)
Business Rule
In this field, you can enter a description of the Record Procedure.
If you want to enter text in RTF (Rich Text Format), right-click and select RTF from the context menu (or use
the shortcut CTRL + R).
Note
In this field, you can enter Notes for this Record Procedure.
If you want to enter text in RTF (Rich Text Format), right-click and select RTF from the context menu (or use
the shortcut CTRL + R).
8.6. File Procedures
File Procedures are a type of MetaMap Objects that can be assigned to a Source File. Apart from File
Procedures, it is also possible to assign Path (page 67) and Source Records (page 56) to a Source File.
You will define a File Procedure for a Source File, if you want to apply filters or other logic to this Source File
before processing it to the Targets.
There are several types of File Procedures, depending on the time of execution. You can define one File
Procedure of each type for each Source File:
•
End Of File: the File Procedure will be applied once after reading the complete Source File. This Procedure
type can be used for calculating a certain input field after reading all Records.
•
File Input: the File Procedure will be applied with each read of a Source Record. This Procedure type can
be used to check the value in an input field, so that a filter or a first selection can be applied.
•
Initial: the File Procedure will be applied only once, when the Source File is being read. This Procedure
type can be used to initialize Workfields.
The Initial Procedure type has four subtypes:
-
First Contact: This file procedure is executed when a file is opened and read until the first valid input
record is encountered. The actions that are defined in this procedure precede the actions in the
INITIAL procedures. The first valid input record is transferred to the Initial Sort, Initial Extract or
Initial Prepass procedure.
-
Initial Sort: This procedure will be executed for each valid input record in case the input file is to be
sorted. The developer uses this procedure for instance in order to rule out some of the input records or
in order to calculate a sort key. After the extraction phase, the input file will be closed and the sorted
file will be opened instead. From that moment on, the core processing starts (file input, target
procedures, ...).
Important note: In case no Sort is done, and no Prepass or Extract has been defined, the Initial Sort
procedure will still be executed, but only once.
IKAN Solutions
METASUITE METAMAP MANAGER - RELEASE 8.1.3
DATA SOURCES | 64
-
Initial Extract: If this procedure is defined, the file will be read by the generated program in order to
make an extract. The "extract logic", in the form of INCLUDE/EXCLUDE rules, must be defined
here. This procedure will be executed for each valid input record. After the extraction phase, the input
file will be closed and the extracted file will be opened. From that moment on, core processing starts
(file input, target procedures, ...).
-
Initial Prepass: If this procedure is defined, the file will be read twice by the generated program. The
first "pass" is used to determine some values, for instance totals or average values. This "prepass logic"
must be defined here. This procedure will be executed during the startup phase for each valid input
record. After the prepass phase, the input file will be closed and reopened again. From that moment
on, core processing starts (file input, target procedures, ...).
Procedure
1.
Open the required Model.
2.
Expand the tree in such a way that the required Source File is displayed.
3.
Right-click the Source File name select Add > File Procedure .
The File Procedure Properties window is displayed.
4.
Fill out the required fields.
For a detailed description of the fields, refer to the sections:
•
Technical Tab (page 65)
•
Business Tab (page 66)
IKAN Solutions
METASUITE METAMAP MANAGER - RELEASE 8.1.3
DATA SOURCES | 65
5.
Apply or discard your changes.
The name of the new File Procedure and its symbol are displayed in the Tree View window.
The symbol displayed depends on the execution time: Input File, End-of-File, First Contact, Initial Sort,
Initial Extract or Initial Prepass. For an overview of the icons, refer to the section Tree View Window
(page 13).
6.
Save your changes by doing one of the following:
•
Click the Save Active Model (
•
Select File > Save Active Model.
) button on the Main Toolbar.
Technical Tab
The following fields are available.
•
Name (page 65)
•
Execution Time (page 65)
•
Commands Workspace (page 65)
Name
Enter a name for the Procedure. It is advised to select a name that describes the action performed by the File
Procedure.
The name in this field will be displayed in the Tree View window. It may contain up to 32 characters.
Execution Time
Select the required execution time from the drop-down list. The following options are available:
•
First Contact
•
Initial Sort
•
Initial Prepass
•
Initial Extract
•
File Input
•
End of File
Commands Workspace
In this field, you can enter the commands that build the Array Procedure. These commands are written in
MDL (MetaSuite Definition language).
IKAN Solutions
METASUITE METAMAP MANAGER - RELEASE 8.1.3
DATA SOURCES | 66
1.
Enter the required commands.
By default, the list of available commands is displayed at the left of this field. Invalid commands are
displayed in red.
Note:
If you do not need the assisted mode, you can switch it off using the
Toolbar and enter the commands manually.
To switch it on again, click the Stop/Edit icon (
).
icon in the Edit
2.
Select the required command by clicking it.
The command will be added to the Workspace.
Any error messages or warnings are displayed underneath the Commands Workspace.
3.
Once you have finished entering the commands, click the Stop/Edit icon (
).
The Procedure is verified. If syntax errors are found, the errors message are displayed underneath the
Workspace.
4.
Save your changes by doing one of the following:
•
Click the Save Active Model (
•
Select File > Save Active Model.
) button on the Main Toolbar.
Business Tab
The following fields are available.
•
Business Rule (page 66)
•
Note (page 66)
Business Rule
In this field, you can enter a description of the File Procedure.
If you want to enter text in RTF (Rich Text Format), right-click and select RTF from the context menu (or use
the shortcut CTRL + R).
Note
In this field, you can enter Notes for this File Procedure.
If you want to enter text in RTF (Rich Text Format), right-click and select RTF from the context menu (or use
the shortcut CTRL + R).
IKAN Solutions
METASUITE METAMAP MANAGER - RELEASE 8.1.3
DATA SOURCES | 67
8.7. Path
Paths are a type of MetaMap Objects that can be assigned to a Source File. Apart from a Path, it is also
possible to assign Source Records (page 56) and File Procedures (page 63).
You will define a Source File Path in the following cases:
•
SQL data source: the Path allows you to tell the Model which Record information is available in the File.
•
Multiple-Record SQL data source: the Path and its assigned Path Records allow you to define inner joins
between the Records within the File.
•
Multi-Record non-SQL data source: the Path is used to combine multiple Records of the same File in up
to 50 Path Records. You can do this in order to define the subordinate Record and the Relationship
between the Records.
Note:
If you define a Path with a Sort Field for a SQL Source file, the resulting transformation program will
support restartability. The COBOL generator will implement the restart ability in the COBOL code,
if the EXEC mode in the Generator Dictionary is set to IMS or Restartable. Refer to the section
Adding MIL Instructions Using the Command Wizard in the Generator Manager Guide.
Procedure
1.
Open the required Model.
2.
Expand the tree in such a way that the required Source File is displayed.
3.
Right-click the Source File name and select Add > Path.
4.
Select the required Source Record.
Two extra options are available at the top right of the pop-up window for selecting the required item:
•
Show all
When selecting this option, the Select Item drop-down list will be deactivated and all available fields
for all categories will be displayed underneath.
•
Indentation
When selecting this option, all fields displayed will be sorted per structure instead of alphabetically.
The Data Path Properties panel is displayed.
IKAN Solutions
METASUITE METAMAP MANAGER - RELEASE 8.1.3
DATA SOURCES | 68
5.
Fill out the required fields.
For a detailed description of the fields, refer to the section Fields (page 68)
6.
Apply or discard your changes.
The name of the new Path and its symbol (
7.
) are displayed in the Tree View window.
Save your changes by doing one of the following:
•
Click the Save Active Model (
•
Select File > Save Active Model.
) button on the Main Toolbar.
Fields
The following fields are available.
•
Name (page 68)
•
Entry Record (page 68)
•
Distinct (page 68)
•
Where (page 68)
•
Input Order Fields (page 69)
Name
This field is updated automatically with the name of the Entry Record, when you select it in the Entry Record
field below. After having made the selection, you can change the name in this field. The name in this field will
be displayed in the Tree Window (preceded by the PTH indication). It can contain up to 18 characters.
Entry Record
Select the Record to be added to the path.
Distinct
This checkbox applies for SQL Source files.
Select this checkbox, if you want to use the SELECT DISTINCT SQL statement instead of the normal
SELECT statement. Per key, only one record will be selected. In other words, all selected rows will have a
unique key, duplicates will be removed.
Clear this checkbox, if you do not want to eliminate duplicate values.
Where
In this field, you can enter a clause containing a select statement. The data retrieved from the Data Source are
based on this statement.
IKAN Solutions
METASUITE METAMAP MANAGER - RELEASE 8.1.3
DATA SOURCES | 69
Input Order Fields
This field applies for SQL Data Sources. The Records that belong to the same Path Level will be ordered by
this Key.
8.8. Source Path Records
Source Path Records are a type of MetaMap Objects that can be assigned to a Source File Path.
You will define a Source File Path Record, if you work with:
•
a Multiple-Record SQL data source: the Path Records assigned to the Path allow you to define inner joins
between the Records within the File.
•
a Multi-Record non-SQL data source: the Path Records (up to 50) assigned to the Path are used to
combine multiple Records of the same File. You can do this in order to define the subordinate Record and
the Relationship between the Records.
Procedure
1.
Open the required Model.
2.
Expand the tree in such a way that the required Source File Path is displayed.
3.
Right-click the Source File Path name and select Add > Path Record.
4.
Select the required Source Record and click OK.
Two extra options are available at the top right of the pop-up window for selecting the required item:
•
Show all
When selecting this option, the Select Item drop-down list will be deactivated and all available fields
for all categories will be displayed underneath.
•
Indentation
When selecting this option, all fields displayed will be sorted per structure instead of alphabetically.
The Path Record Properties panel is displayed.
5.
Fill out the required fields.
For a detailed description of the fields, refer to the section Fields (page 68).
IKAN Solutions
METASUITE METAMAP MANAGER - RELEASE 8.1.3
DATA SOURCES | 70
6.
Apply or discard your changes.
The name of the new Source Path Record and its symbol (
7.
) are displayed in the Tree View window.
Save your changes by doing one of the following:
•
Click the Save Active Model (
•
Select File > Save Active Model.
) button on the Main Toolbar.
Fields
The following fields are available.
•
Name (page 70)
•
Occurrence (page 70)
•
Subordinate Record (page 70)
•
Relationship (page 70)
Name
Enter the name for the Path Record. The name in this field will be displayed in the Tree Window (preceded
by the PRD indication). It can contain up to 32 characters.
Occurrence
If required, enter the value indicating how many times a subordinate Record may occur.
Subordinate Record
Use this field as follows:
1.
Click the Browse button next to this selection box.
The list of Subordinate Records (or Source File Records) assigned to the Source File is displayed.
2.
Select the required Subordinate Record and click OK.
The selected Source File Record is displayed in the Subordinate Record field.
Relationship
This field applies for all RDBMS Source File types.
Use this field as follows:
1.
Click the Browse button next to this selection box.
The list of available Relationships is displayed.
IKAN Solutions
METASUITE METAMAP MANAGER - RELEASE 8.1.3
DATA SOURCES | 71
2.
Select the required Relationship and click OK.
The selected Relationship is displayed in the Relationship field.
8.9. External Arrays
If you want to use a Source File for binary or serial search, you can define it as an External Array. The layout of
an External Array is identical to a normal Source File, but the processing speed is a lot higher, because the
External Array is kept entirely in memory.
When using an External Array, you will need to:
•
define a unique key
•
define a maximum number of reads
Procedure
1.
Open the required Model.
2.
Right-click the Model name and select Add > Source > External Array.
3.
Select the file description you want to add and click OK.
Two extra options are available at the top right of the pop-up window for selecting the required item:
•
Show all
When selecting this option, the Select Item drop-down list will be deactivated and all available fields
for all categories will be displayed underneath.
•
Indentation
When selecting this option, all fields displayed will be sorted per structure instead of alphabetically.
The External Array Properties window appears.
Two tabs are available: Technical and Business.
4.
Fill out the required fields.
For a detailed description of the fields, refer to the sections:
•
Technical Tab (page 72)
•
Business Tab (page 74)
IKAN Solutions
METASUITE METAMAP MANAGER - RELEASE 8.1.3
DATA SOURCES | 72
5.
Apply or discard your changes.
The name of the new External Array and its symbol (
6.
) are displayed in the Tree View window.
Save your changes by doing one of the following:
•
Click the Save Active Model (
•
Select File > Save Active Model.
) button on the Main Toolbar.
Technical Tab
The following fields are available on the Technical tab.
•
Name (page 72)
•
Organization (page 72)
•
Prefix (page 72)
•
Dictionary File (page 72)
•
Occurrence (page 73)
•
Warning Rate (page 73)
•
Binary Search (page 73)
•
Use Sort Fields (page 73)
•
Sort Fields (page 73)
Name
This field is automatically updated with the name of the Dictionary File, when you select it in the Dictionary
File field below.
If required, you can change the name in this field. This name will be displayed in the Tree View window. It can
contain up to 32 characters.
Organization
This read-only field displays the File Type of the Dictionary File.
Prefix
In this field, you can enter a prefix for this Source File. You might for instance define the prefixes OLD- and
NEW-, if you are working with different versions of the same file.
A Prefix has a fixed length of 4 characters and must start with an alphabetic character.
Dictionary File
Click the Browse button at the right of the Dictionary File name to display the Dictionary File Properties
window.
IKAN Solutions
METASUITE METAMAP MANAGER - RELEASE 8.1.3
DATA SOURCES | 73
Occurrence
Enter the maximum number of Records. This value is needed, because the generated program must reserve a
certain amount of space for the Array.
Warning Rate
Enter a Warning Rate percentage. This percentage is derived from the value entered in the Occurrence field.
For instance, if you define 200 as Occurrence value (the maximum number of lines in the Array) and a Warning
rate of 80%, a warning will be generated if the number of lines in the Array exceeds 160.
When the program is run, this warning will be saved in the file ExecName.lst.
It has the following format: External Array almost full
Binary Search
This checkbox is only active, if a File Key has been defined on the selected Dictionary File or if the "Use Sort
Fields" flag has been set.
•
Select this checkbox to perform a Binary Search on the External Array.
•
Clear this checkbox to perform a Serial Search on the External Array.
Use Sort Fields
This checkbox is only active if Sort Keys have been defined for the selected Dictionary File.?Select this
checkbox in order to use the Sort Keys in stead of the File Keys for the sequential or binary search operations.
Sort Fields
It is interesting to define up to 16 Sort Fields for your External Array, if it is not ordered in the sequence you
want.
External Arrays are sorted in memory, no sort workfile will be used.
Use this field as follows:
1.
Double-click the New button.
The list of Fields available in the Records belonging to the External Array is displayed.
2.
Select the required field and click OK.
Two extra options are available at the top right of the pop-up window for selecting the required item:
•
Show all
When selecting this option, the Select Item drop-down list will be deactivated and all available fields
for all categories will be displayed underneath.
•
Indentation
When selecting this option, all fields displayed will be sorted per structure instead of alphabetically.
IKAN Solutions
METASUITE METAMAP MANAGER - RELEASE 8.1.3
DATA SOURCES | 74
The selected field is displayed in the Input Sort/Order Field Properties window.
Field
Meaning
Name
This field contains the name of the Sort Field.
You can edit this name. It may contain up to 32 characters.
Descending
By default, this checkbox is not selected, so that the sorting is done in ascending
order.
If you select this checkbox, the sorting will be done in descending order.
Source Field
The Browse button next to this selection box can be used in two ways:
• If the field contains the name of a Sort Field, clicking the Browse button
results in displaying the Properties window of the matching Source Field.
See Source Fields for an External Array on page 76.
• If you empty the field, you can click the Browse button to redisplay the list
of Fields that can be selected as Source Field.
Note: The Name field will not be updated automatically.
Business Tab
The following fields are available on the Business tab.
•
Business Rule (page 74)
•
Note (page 74)
Business Rule
In this field, you can enter a description of the External Array.
If you want to enter text in RTF (Rich Text Format), right-click and select RTF from the context menu (or use
the shortcut CTRL + R).
Note
In this field, you can enter additional information pertaining to the External Array.
If you want to enter text in RTF (Rich Text Format), right-click and select RTF from the context menu (or use
the shortcut CTRL + R).
IKAN Solutions
METASUITE METAMAP MANAGER - RELEASE 8.1.3
DATA SOURCES | 75
8.10. Source Records for an External Array
Source Records are a type of MetaMap Objects that can be assigned to an External Array. Apart from Source
Records, it is also possible to assign an Array Procedures (page 79) and Path for an External Array (page 81).
Note:
This option is only available if not all Source Records have been added.
When adding a Source Record, all Source Fields and Sub Source Fields will be added automatically.
Procedure
1.
Open the required Model.
2.
Expand the tree in such a way that the required External Array is displayed.
3.
Right-click the External Array and select Add > Source Record.
4.
Select the file description you want to add and click OK.
Two extra options are available at the top right of the pop-up window for selecting the required item:
•
Show all
When selecting this option, the Select Item drop-down list will be deactivated and all available fields
for all categories will be displayed underneath.
•
Indentation
When selecting this option, all fields displayed will be sorted per structure instead of alphabetically.
The Record Properties window is displayed.
5.
Fill out the required fields.
For a detailed description of the fields, refer to the section Fields (page 76).
6.
Apply or discard your changes.
The name of the new Source Record and its symbol (
7.
) are displayed in the Tree View window.
Save your changes by doing one of the following:
•
Click the Save Active Model (
•
Select File > Save Active Model.
IKAN Solutions
) button on the Main Toolbar.
METASUITE METAMAP MANAGER - RELEASE 8.1.3
DATA SOURCES | 76
Fields
The following fields are available.
•
Name (page 76)
•
Dictionary Record (page 76)
Name
This field is updated automatically with the name of the Source Record, when adding the Source Record.
If required, you can change the name in this field. This name will be displayed in the Tree View window. It can
contain up to 32 characters and must be unique within this File.
Dictionary Record
This read-only field displays the name of the Record. You can click the Browse button next to it to display its
properties.
8.11. Source Fields for an External Array
Source Fields are a type of MetaMap Objects that can be assigned to a Source Record for an External Array.
Note:
This option is only available if not all Source Fields have been added.
When adding a Source Field, all Sub Source Fields will be added automatically.
Procedure
1.
Open the required Model.
2.
Expand the tree in such a way that the required External Array and Source Record are displayed.
3.
Right-click the Source Record and select Add > Source Field.
The Source Field Properties window is displayed.
4.
Fill out the required fields.
For a detailed description of the fields, refer to the section Fields (page 77).
IKAN Solutions
METASUITE METAMAP MANAGER - RELEASE 8.1.3
DATA SOURCES | 77
5.
Apply or discard your changes.
The name of the new Source Field and its symbol (
Record.
6.
) are displayed as a dependent Object of the Source
Save your changes by doing one of the following:
•
Click the Save Active Model (
•
Select File > Save Active Model.
) button on the Main Toolbar.
Fields
The following fields are available.
•
Name (page 77)
•
Dictionary Field (page 77)
Name
This field is updated automatically with the name of the Source Field you selected when adding the Source
Field.
If required, you can change the name in this field. This name in this field will be displayed in the Tree View
window. It can contain up to 32 characters and must be unique within the Record.
Dictionary Field
This read-only fields displays the name of the Dictionary Field. You can click the Browse button next to it to
display its properties.
8.12. Sub Source Fields for an External Array
Sub Source Fields are a type of MetaMap Objects that can be assigned to a Source Field.
Note:
This option is only available if not all Source Fields have been added.
Procedure
1.
Open the required Model.
2.
Expand the tree in such a way that the required External Array, Record and Field are displayed.
3.
Right-click the Field name and select Add > Sub Source Field.
4.
Select the file description you want to add and click OK.
IKAN Solutions
METASUITE METAMAP MANAGER - RELEASE 8.1.3
DATA SOURCES | 78
Two extra options are available at the top right of the pop-up window for selecting the required item:
•
Show all
When selecting this option, the Select Item drop-down list will be deactivated and all available fields
for all categories will be displayed underneath.
•
Indentation
When selecting this option, all fields displayed will be sorted per structure instead of alphabetically.
The Source Field Properties window is displayed.
5.
Fill out the required fields.
For a detailed description of the fields, refer to the sections Fields (page 59).
6.
Apply or discard your changes.
The name of the new Sub Source Field and its symbol (
7.
) are displayed in the Tree View window.
Save your changes by doing one of the following:
•
Click the Save Active Model (
•
Select File > Save Active Model.
) button on the Main Toolbar.
Fields
The following fields are available.
•
Name (page 78)
•
Dictionary Field (page 78)
Name
This field is updated automatically with the name of the Source Field you selected when adding the Source
Field.
If required, you can change the name in this field. This name in this field will be displayed in the Tree View
window. It can contain up to 32 characters and must be unique within the Record.
Dictionary Field
This read-only fields displays the name of the Dictionary Field. You can click the Browse button next to it to
display its properties.
IKAN Solutions
METASUITE METAMAP MANAGER - RELEASE 8.1.3
DATA SOURCES | 79
8.13. Array Procedures
Array Procedures are a type of MetaMap Objects that can be assigned to an External Array. Apart from an
Array Procedure, it is also possible to assign a Source Record (page 56) to an External Array.
You will define an Array Procedure for an External Array, if you want to define a filter or a selection to the
External Array, before it is used for the binary or serial search.
You can define only one Array Procedure for each External Array.
Procedure
1.
Open the required Model.
2.
Expand the tree in such a way that the required External Array is displayed.
3.
Right-click the External Array and select Add > Array Procedure.
The Array Procedure Properties window is displayed.
Two tabs are available: Technical and Business.
4.
Fill out the required fields.
For a detailed description of the fields, refer to the sections:
•
Technical Tab (page 80)
•
Business Tab (page 81)
IKAN Solutions
METASUITE METAMAP MANAGER - RELEASE 8.1.3
DATA SOURCES | 80
5.
Apply or discard your changes.
The name of the new Array Procedure and its symbol (
6.
) are displayed in the Tree View window.
Save your changes by doing one of the following:
•
Click the Save Active Model (
•
Select File > Save Active Model.
) button on the Main Toolbar.
Technical Tab
The following fields are available on the Technical Tab:
•
Name (page 80)
•
Commands Workspace (page 80)
Name
Enter a name for the Procedure. It is advised to select a name that describes the action performed by the Array
Procedure.
The name in this field will be displayed in the Tree View window. It can contain up to 32 characters.
Commands Workspace
In this field, you can enter the commands that build the Array Procedure. These commands are written in
MDL (MetaSuite Definition language).
1.
Enter the required commands.
By default, the list of available commands is displayed at the left of this field. Invalid commands are
displayed in red.
Note:
If you do not need the assisted mode, you can switch it off using the
Toolbar and enter the commands manually.
To switch it on again, click the Stop/Edit icon (
).
icon in the Edit
2.
Select the required command by clicking it.
The command will be added to the Workspace.
Any error messages or warnings are displayed underneath the Commands Workspace.
3.
Once you have finished entering the commands, click the Stop/Edit icon (
).
The Procedure is verified. If syntax errors are found, the errors message are displayed underneath the
Workspace.
4.
Save your changes by doing one of the following:
•
Click the Save Active Model (
•
Select File > Save Active Model.
IKAN Solutions
) button on the Main Toolbar.
METASUITE METAMAP MANAGER - RELEASE 8.1.3
DATA SOURCES | 81
Business Tab
The following fields are available on the Business Tab:
•
Business Rule (page 81)
•
Note (page 81)
Business Rule
In this field, you can enter a description of the Array Procedure.
If you want to enter text in RTF (Rich Text Format), right-click and select RTF from the context menu (or use
the shortcut CTRL + R).
Note
In this field, you can enter Notes for this Array Procedure.
If you want to enter text in RTF (Rich Text Format), right-click and select RTF from the context menu (or use
the shortcut CTRL + R).
8.14. Path for an External Array
Some kinds of source files require a path, even if -at first sight- it seems to be obsolete. For instance: an SQL
table needs a path. In this path the user can provide extra SQL query logic in order to limit the input, in which
case the usage of a path is not superfluous.
Procedure
1.
Open the required Model.
2.
Expand the tree in such a way that the required External Array is displayed.
3.
Right-click the External Array and select Add > Path.
4.
Select the required Source Record.
Two extra options are available at the top right of the pop-up window for selecting the required item:
•
Show all
When selecting this option, the Select Item drop-down list will be deactivated and all available fields
for all categories will be displayed underneath.
•
Indentation
When selecting this option, all fields displayed will be sorted per structure instead of alphabetically.
IKAN Solutions
METASUITE METAMAP MANAGER - RELEASE 8.1.3
DATA SOURCES | 82
The Data Path Properties window is displayed.
5.
Fill out the required fields.
For a detailed description of the fields, refer to the section Fields (page 82).
6.
Apply or discard your changes.
The name of the new Path and its symbol (
7.
) are displayed in the Tree View window.
Save your changes by doing one of the following:
•
Click the Save Active Model (
•
Select File > Save Active Model.
) button on the Main Toolbar.
Fields
The following fields are available.
•
Name (page 82)
•
Distinct (page 82)
•
Entry Record (page 83)
•
Where (page 83)
•
Input Order Fields (page 83)
Name
This field is updated automatically with the name of the Entry Record, when you select it in the Entry Record
field below. After having made the selection, you can change the name in this field. The name in this field will
be displayed in the Tree Window (preceded by the PTH indication). It can contain up to 18 characters.
Distinct
This checkbox applies for SQL Source files.
Select this checkbox, if you want to use the SELECT DISTINCT SQL statement instead of the normal
SELECT statement. Per key, only one record will be selected. In other words, all selected rows will have a
unique key, duplicates will be removed.
Clear this checkbox, if you do not want to eliminate duplicate values.
IKAN Solutions
METASUITE METAMAP MANAGER - RELEASE 8.1.3
DATA SOURCES | 83
Entry Record
Select the Record to be added to the path.
Where
In this field, you can enter a clause containing a select statement. The data retrieved from the Data Source are
based on this statement.
Input Order Fields
This field applies for SQL Data Sources. The Records that belong to the same Path Level will be ordered by
this Key.
8.15. Parameter Files
Data Sources that are defined as Parameter Files will be stored in a memory buffer of the generated program.
A Parameter File is similar to an External Array, but it contains only one row. Its content is read at the start of
the Model.
Procedure
1.
Open the required Model.
2.
Right-click the Model name and select Add > Source > Parameter File.
3.
Select the file description you want to add and click OK.
Two extra options are available at the top right of the pop-up window for selecting the required item:
•
Show all
When selecting this option, the Select Item drop-down list will be deactivated and all available fields
for all categories will be displayed underneath.
•
Indentation
When selecting this option, all fields displayed will be sorted per structure instead of alphabetically.
The Parameter File Properties window is displayed.
Two tabs are available: Technical and Business.
IKAN Solutions
METASUITE METAMAP MANAGER - RELEASE 8.1.3
DATA SOURCES | 84
4.
5.
Fill out the required fields.
For a detailed description of the fields, refer to the sections:
•
Technical Tab (page 84)
•
Business Tab (page 85)
Apply or discard your changes.
The name of the new Parameter File and its symbol (
6.
) are displayed in the Tree View window.
Save your changes by doing one of the following:
•
Click the Save Active Model (
•
Select File > Save Active Model.
) button on the Main Toolbar.
Technical Tab
The following fields are available on the Technical tab:
•
Name (page 84)
•
Organization (page 84)
•
Prefix (page 84)
•
Dictionary File (page 84)
Name
This field is updated automatically with the name of the Dictionary File when adding the Parameter File.
If required, you can change the name in this field. This field will be displayed in the Tree View window. It can
contain up to 32 characters.
Organization
This read-only field displays the File Type of the Dictionary File.
Prefix
In this field, you can enter a prefix for this Source File. You might for instance define the prefixes OLD- and
NEW-, if you are working with different versions of the same file.
A Prefix has a fixed length of 4 characters and must start with an alphabetic character.
Dictionary File
Click the Browse button at the right of the Dictionary File name to display the Dictionary File Properties
window.
IKAN Solutions
METASUITE METAMAP MANAGER - RELEASE 8.1.3
DATA SOURCES | 85
Business Tab
The following fields are available on the Business tab:
•
Business Rule (page 85)
•
Note (page 85)
Business Rule
In this field, you can enter a description of the Parameter File.
If you want to enter text in RTF (Rich Text Format), right-click and select RTF from the context menu (or use
the shortcut CTRL + R).
Note
In this field, you can enter additional information pertaining to the Parameter File.
If you want to enter text in RTF (Rich Text Format), right-click and select RTF from the context menu (or use
the shortcut CTRL + R).
8.16. Source Records for a Parameter File
Source Records are a type of MetaMap Objects that can be assigned to a Parameter File.
Note:
This option is only available if not all Source Records have been added.
When adding a Source Record, all Source Fields and Sub Source Fields will be added automatically.
Procedure
1.
Open the required Model.
2.
Expand the tree in such a way that the required Parameter File is displayed.
3.
Right-click the Parameter File name and select Add Source Record.
4.
Select the file description you want to add and click OK.
Two extra options are available at the top right of the pop-up window for selecting the required item:
•
Show all
When selecting this option, the Select Item drop-down list will be deactivated and all available fields
for all categories will be displayed underneath.
•
Indentation
When selecting this option, all fields displayed will be sorted per structure instead of alphabetically.
IKAN Solutions
METASUITE METAMAP MANAGER - RELEASE 8.1.3
DATA SOURCES | 86
The Record Properties window is displayed.
5.
Fill out the required fields.
For a detailed description of the fields, refer to the section Fields (page 86).
6.
Apply or discard your changes.
The name of the new Source Record and its symbol (
7.
) are displayed in the Tree View window.
Save your changes by doing one of the following:
•
Click the Save Active Model (
•
Select File > Save Active Model.
) button on the Main Toolbar.
Fields
•
Name (page 86)
•
Dictionary Record (page 86)
Name
This field is updated automatically with the name of the Source Record, when adding the Record.
If required, you can change the name in this field. The name in this field will be displayed in the Tree
Window. It can contain up to 32 characters.
Dictionary Record
Click the Browse button at the right of the Dictionary File name to display the Dictionary File Properties
window.
IKAN Solutions
METASUITE METAMAP MANAGER - RELEASE 8.1.3
DATA SOURCES | 87
8.17. Source Fields for a Parameter File
Source Fields are the type of MetaMap Objects that can be assigned to a Source Record for a Parameter File.
Note:
This option is only available if not all Source Fields have been added.
When adding a Source Field, all Sub Source Fields will be added automatically.
Procedure
1.
Open the required Model.
2.
Expand the tree in such a way that the required Parameter File and Source Record are displayed.
3.
Right-click the Source Record name and select Add > Source Field.
4.
Select the file description you want to add and click OK.
Two extra options are available at the top right of the pop-up window for selecting the required item:
•
Show all
When selecting this option, the Select Item drop-down list will be deactivated and all available fields
for all categories will be displayed underneath.
•
Indentation
When selecting this option, all fields displayed will be sorted per structure instead of alphabetically.
The Source Field Properties window is displayed.
5.
Fill out the required fields.
For a detailed description of the fields, refer to the section Fields (page 88).
6.
Apply or discard your changes.
The name of the new Source Field and its symbol (
7.
) are displayed in the Tree View window.
Save your changes by doing one of the following:
•
Click the Save Active Model (
•
Select File > Save Active Model.
IKAN Solutions
) button on the Main Toolbar.
METASUITE METAMAP MANAGER - RELEASE 8.1.3
DATA SOURCES | 88
Fields
The following fields are available.
•
Name (page 88)
•
Dictionary Field (page 88)
Name
This field is updated automatically with the name of the Source Field you selected when adding the Source
Field.
If required, you can change the name in this field. The name in this field will be displayed in the Tree
Window. It can contain up to 32 characters.
Dictionary Field
This read-only field displays the name of the Dictionary Field. You can click the Browse button next to it to
display its properties.
8.18. Sub Source Fields for a Parameter File
Sub Source Fields are a type of MetaMap Objects that can be assigned to a Source Field for a Parameter File.
Note:
This option is only available if not all Sub Source Fields have been added.
Procedure
1.
Open the required Model.
2.
Expand the tree in such a way that the required Parameter File, Record and Field are displayed.
3.
Right-click the Source Field name and select Add > Sub Source Field.
4.
Select the file description you want to add and click OK.
Two extra options are available at the top right of the pop-up window for selecting the required item:
•
Show all
When selecting this option, the Select Item drop-down list will be deactivated and all available fields
for all categories will be displayed underneath.
•
Indentation
When selecting this option, all fields displayed will be sorted per structure instead of alphabetically.
IKAN Solutions
METASUITE METAMAP MANAGER - RELEASE 8.1.3
DATA SOURCES | 89
The Source Field Properties window is displayed.
5.
Fill out the required fields.
For a detailed description of the fields, refer to the sections Fields (page 59).
6.
Apply or discard your changes.
The name of the new Sub Source Field and its symbol (
7.
) are displayed in the Tree View window.
Save your changes by doing one of the following:
•
Click the Save Active Model (
•
Select File > Save Active Model.
) button on the Main Toolbar.
Fields
The following fields are available.
•
Name (page 60)
•
Dictionary Field (page 60)
Name
This field is updated automatically with the name of the Source Field you selected when adding the Source
Field.
If required, you can change the name in this field. This name will be displayed in the Tree View window. It can
contain up to 32 characters and must be unique within the Record.
Dictionary Field
This read-only field displays the name of the Dictionary Field. You can click the Browse button next to it to
display its properties.
IKAN Solutions
METASUITE METAMAP MANAGER - RELEASE 8.1.3
DATA SOURCES | 90
8.19. Source Wizard
Use the Source Wizard to:
•
Adding a Source File (page 90)
•
Adding an External Array (page 94)
•
Adding a Parameter File (page 97)
Adding a Source File
1.
Open an existing Model or create a new Model.
2.
Select the Source Wizard icon (
The following window is displayed:
) from the Wizard Toolbar.
The following fields are available:
IKAN Solutions
Field
Meaning
Name
This field will be updated automatically with the name of the Dictionary File,
after having selected the Dictionary File and the required Record(s). The name in
this field will be displayed in the Tree View window.
Note: If needed, you can modify the name later on. See Source Files on
page 50.
Prefix
In this field, you can enter a prefix for this Source File. You might for instance
define the prefixes OLD- and NEW-, if you are working with different versions of
the same file. A Prefix has a fixed length of 4 characters (including the dash).
Source Type
Select Source File from the drop-down list.
Organization
If you select a File Type from this drop-down menu, you will only be able to
select Dictionary Files of this type from the Dictionary File drop-down list below.
If you leave the default setting Any, you will be able to select any Dictionary File.
Dictionary Files
Select the required Dictionary File from the drop-down list.
If you selected a File Type in the Organization drop-down list, the Dictionary File
drop-down list only contains Dictionary Files of this type.
Once you have selected the Dictionary File, its Records are displayed in the
Dictionary Records selection box.
METASUITE METAMAP MANAGER - RELEASE 8.1.3
DATA SOURCES | 91
3.
Field
Meaning
History
Selecting this option, will display all existing versions of the Dictionary Files.
By default, this option is not selected and only the latest version of the
Dictionary Files will be displayed.
Dictionary
Records
After having selected the required Dictionary File from the drop-down list, select
one or more Records in the selection box.
Press and hold the Control key to make a selection of multiple, non-adjacent
Records.
Press and hold the Shift key to make a selection of multiple adjacent Records.
Fill out the fields as required and click Next.
The Technical definition window is displayed:
The following fields are available:
IKAN Solutions
Field
Meaning
Automatic
This field applies for all Source File types.
By default, this checkbox is selected. This means that the source file will be
read completely and sequentially.
Clear this checkbox, if you want that MetaSuite automatically retrieves a
record based on a key value each time it reads a record from a "Controlling
File", which you define in the Controlled By selection box.
For more information on specifying Control Keys, refer to the section
Control Key (page 55).
Manual
This checkbox only applies for IDMS Source Files.
Select this checkbox if you want to program the access commands to the
IDMS database manually, using in a Program Initial or an Initial Sort
Procedure.
Clear this checkbox if you want MetaSuite to generate the access
commands automatically.
Note: If you select this checkbox, the Automatic checkbox automatically
becomes cleared.
METASUITE METAMAP MANAGER - RELEASE 8.1.3
DATA SOURCES | 92
Field
Meaning
Special Write Only
This checkbox only applies for Standard Source Files.
Select this checkbox if you want to be able to write Records TO this Source
File during the execution of the Model. By activating this option, the File
(although defined as a Source File) is considered as a Target. It is empty
when the program starts and it is filled with data during the execution.
If you select this checkbox, the Automatic checkbox automatically
becomes cleared.
Sort Fields
It is interesting to define one or more Sort Fields for your Source File, if it is
not ordered in the sequence you want.
Double-click the New button (
) and select the required Sort Field from
the list. It will be displayed in the selection box.
If you double-click this entry, the Sort Field Properties window is displayed.
See Sort Fields on page 52.
4.
Fill out the fields as required and click Next.
The Business definition window is displayed:
The following fields are available:
IKAN Solutions
Field
Meaning
Business Rule
In this field, you can enter a Business Rule describing this Source File.
If you want to enter text in RTF (Rich Text Format), right-click and select RTF
from the context menu (or use the shortcut CTRL + R).
Note
In this field, you can enter additional information pertaining to this Source
File.
If you want to enter text in RTF (Rich Text Format), right-click and select RTF
from the context menu (or use the shortcut CTRL + R).
METASUITE METAMAP MANAGER - RELEASE 8.1.3
DATA SOURCES | 93
5.
Fill out the fields as required and click Next.
The Path definition window appears.
Note:
This window is only available for multi-record files and database files.
The following fields are available:
6.
Field
Meaning
Name
This field is automatically updated with the Record Name you select from the
Entry Record drop-down list below.
Entry Record
Select the required Record from the drop-down list.
Distinct
This checkbox applies for SQL Source files.
Select this checkbox, if you want to use the SELECT DISTINCT SQL statement
instead of the normal SELECT statement. Per key, only one record will be
selected. In other words, all selected rows will have a unique key, duplicates will
be removed.
Clear this checkbox, if you do not want to eliminate duplicate values.
Where
In this field, you can enter a clause containing a select statement. The data
retrieved from the Data Source are based on this statement.
Input Order Field
It is interesting to define InputSort Fields, if the file is not ordered in the
sequence you want.
This field is only available
• for RDBMS source files (Order field = SQL statement ORDER BY)
• if the ENTRY record has been specified
Via Index
This field applies for multi-record non-SQL Source Files only. The index of the
entry-level Record is used to define the access sequence at a higher level than
the preceding level.
Each subordinate record is assumed to be subordinate to the record specified
immediately previously. When this is not the case, the VIA option is used to
name the record to which the subordinate record is subordinate
Fill out the fields as required and click Finish.
The new Source File appears in the Tree View window.
IKAN Solutions
METASUITE METAMAP MANAGER - RELEASE 8.1.3
DATA SOURCES | 94
Adding an External Array
1.
Open an existing Model or create a new Model.
2.
Select the Source Wizard icon (
The following window is displayed:
) from the Wizard Toolbar.
The following fields are available:
IKAN Solutions
Field
Meaning
Name
This field will be updated automatically with the name of the Dictionary File, after
having selected the Dictionary File and the required Record(s). The name in this
field will be displayed in the Tree View window.
Note: If needed, you can modify the name later on. See External Arrays on
page 71.
Prefix
In this field, you can enter a prefix for this External Array. You might for instance
define the prefixes OLD- and NEW-, if you are working with different versions of
the same file. A Prefix has a fixed length of 4 characters (including the dash).
Source Type
Select External Array from the drop-down list.
Organization
If you select a File Type from the drop-down menu, you will only be able to select
Dictionary Files of this type from the Dictionary File drop-down list below.
If you leave the default setting Any, you will be able to select any Dictionary File.
Dictionary Files
Select the required Dictionary File from the drop-down list.
If you selected a File Type in the Organization drop-down list, the Dictionary File
drop-down list only contains Dictionary Files of this type.
Once you have selected the Dictionary File, its Records are displayed in the
Dictionary Records selection box.
History
Selecting this option, will display all existing versions of the Dictionary Files.
By default, this option is not selected and only the latest version of the Dictionary
Files will be displayed.
Dictionary
Records
After having selected the required Dictionary File from the drop-down list, select
one or more Records in the selection box.
Press and hold the Control key to make a selection of multiple, non-adjacent
Records.
Press and hold the Shift key to make a selection of multiple adjacent Records.
METASUITE METAMAP MANAGER - RELEASE 8.1.3
DATA SOURCES | 95
3.
Fill out the fields as required and click Next.
The Technical definition window appears:
The following fields are available:
Field
Meaning
Occurrence
Enter the maximum number of times this Source Record can occur. This value
must be defined, because the generated Program must reserve a certain
amount of space.
Binary Search
This checkbox is only active, if a File Key has been defined on the selected
Dictionary File.
Select this checkbox to perform a Binary Search on the External Array.
Clear this checkbox to perform a Serial Search on the External Array.
Input Sort Fields
Select this option if you want to use Sort Fields.
Sort Fields
It is interesting to define one or more Sort Fields for your External Array, if it is
not ordered in the sequence you want.
Double-click the New button (
) and select the required Sort Field from the
list. It will be displayed in the selection box.
If you double-click this entry, the Sort Field Properties window is displayed. See
Sort Fields on page 73.
IKAN Solutions
METASUITE METAMAP MANAGER - RELEASE 8.1.3
DATA SOURCES | 96
4.
Fill out the fields as required and click Next.
The Business definition window appears:
The following fields are available:
5.
Field
Meaning
Business Rule
In this field, you can enter a Business Rule describing this External Array.
If you want to enter text in RTF (Rich Text Format), right-click and select RTF
from the context menu (or use the shortcut CTRL + R).
Note
In this field, you can enter additional information pertaining to this Source
File.
If you want to enter text in RTF (Rich Text Format), right-click and select RTF
from the context menu (or use the shortcut CTRL + R).
Fill out the fields as required and click Next.
The Path definition window appears.
Note:
IKAN Solutions
This window is only available for multi-record files and database files.
METASUITE METAMAP MANAGER - RELEASE 8.1.3
DATA SOURCES | 97
The following fields are available:
6.
Field
Meaning
Name
This field is automatically updated with the Record Name you select from the
Entry Record drop-down list.
Entry Record
Select the required Record from the drop-down list.
Distinct
This checkbox applies for SQL Source files.
Select this checkbox, if you want to use the SELECT DISTINCT SQL statement
instead of the normal SELECT statement. Per key, only one record will be
selected. In other words, all selected rows will have a unique key, duplicates will
be removed.
Clear this checkbox, if you do not want to eliminate duplicate values.
Where
In this field, you can enter a clause containing a select statement. The data
retrieved from the Data Source are based on this statement.
Input Order Field
It is interesting Sort Fields, if your file is not ordered in the sequence you want.
Via Index
This field applies for multi-record non-SQL Source Files only. The index of the
entry-level Record is used to define the access sequence at the top of the Path.
Fill out the fields as required and click Finish.
The new External Array appears in the Tree View window.
Adding a Parameter File
1.
Open an existing Model or create a new Model.
2.
Select the Source Wizard icon (
The following window is displayed:
IKAN Solutions
) from the Wizard Toolbar.
METASUITE METAMAP MANAGER - RELEASE 8.1.3
DATA SOURCES | 98
The following fields are available:
3.
Field
Meaning
Name
This field will be updated automatically with the name of the Dictionary File,
after having selected the Dictionary File and the required Record(s). The name in
this field will be displayed in the Tree View window.
Note: If needed, you can modify the name later on.
Prefix
In this field, you can enter a prefix for this Source File. You might for instance
define the prefixes OLD- and NEW-, if you are working with different versions of
the same file. A Prefix has a fixed length of 4 characters (including the dash).
Source Type
Select Parameter File from the drop-down list.
Organization
As only Standard Files can be defined as Parameter Files, the drop-down list
becomes inactive and displays the Standard option, as soon as you select
Parameter File as Source type.
Dictionary Files
Select the required Dictionary File from the drop-down list.
Once you have selected the Dictionary File, its Records are displayed in the
Dictionary Records selection box.
History
Selecting this option, will display all existing versions of the Dictionary Files.
By default, this option is not selected and only the latest version of the
Dictionary Files will be displayed.
Dictionary
Records
After having selected the required Dictionary File from the drop-down list, select
the required Record in the selection box.
As Parameter Files can only have one Record, you are not able to select more
than one.
Fill out the fields as required and click Next.
The Business definition window appears:
IKAN Solutions
METASUITE METAMAP MANAGER - RELEASE 8.1.3
DATA SOURCES | 99
The following fields are available:
4.
Field
Meaning
Business Rule
In this field, you can enter a Business Rule describing this Source File.
If you want to enter text in RTF (Rich Text Format), right-click and select RTF
from the context menu (or use the shortcut CTRL + R).
Note
In this field, you can enter additional information pertaining to this Source
File
If you want to enter text in RTF (Rich Text Format), right-click and select RTF
from the context menu (or use the shortcut CTRL + R).
Fill out the fields as required and click Finish.
The new Parameter File appears in the Tree View window.
8.20. Matching Wizard
Matching is the process of viewing Records from up to 16 Source Files simultaneously. In order for the
generated program to determine what Records from which Source Files are to be viewed together, Match
Fields must be defined on all Source Files to be matched.
The Matching Wizard can be used to define these Match Fields.
1.
Open an existing Model or create a new Model.
For this procedure, the Model named ModelForMatchingWizard was opened:
•
This Model contains three Source Files and two Work Fields.
•
Each Source contains one or two Records with a number of fields.
IKAN Solutions
METASUITE METAMAP MANAGER - RELEASE 8.1.3
DATA SOURCES | 100
2.
Select the Matching Wizard icon (
) from the Wizard Toolbar.
A window similar to this one is displayed:
This window lists the Source Files assigned to this Model.
3.
Define the required Matches:
•
You always have to create a match from a “higher” source file in the hierarchy of the tree to a “lower”
source file. If a conflict occurs because of this hierarchical order, please modify the order of the files in
the Tree View window.
•
Click and drag the required Fields from the first to the second Source File
• Then click and drag the required Fields from the second to the next Source File
The order of dragging is very important, because in a one-to-many relationship, you must drag from the
ONE side to the MANY side.
The matching can be done using several values (combined keys). However, if you match Source File 1
with Source File 2 using a combined key, and next you want to match source file 2 with Source File 3, you
should also use a combined key.
It is also possible to use Work Fields for matching, for instance in order to convert data types. A Work
Field does not belong to a specific Source File. That is why all Work Fields are repeated for each Source
File. Those Work Fields must be assigned via the INITIAL SORT, INITIAL EXTRACT and
INITIAL PREPASS procedures.
IKAN Solutions
METASUITE METAMAP MANAGER - RELEASE 8.1.3
DATA SOURCES | 101
The following screen is displayed:
The defined Field Matches are displayed and numbered, in order to show the order of priority.
IKAN Solutions
METASUITE METAMAP MANAGER - RELEASE 8.1.3
DATA SOURCES | 102
4.
To edit a Field match, click the matching line. The selected line is displayed in blue.
The following shortcut menu is displayed:
These options have the following meaning:
IKAN Solutions
Option
Meaning
Remove
Select this option to remove the Match.
Remove Chain
Select this option to remove the Match Chain. All Matches with the same number
will be removed.
Move Up
Select this option to move the Match to a higher position (lower sequence
number) in the Match chain.
This option is inactive for the Match with sequence number 1.
Move Down
Select this option to move the Match to a lower position (higher sequence
number) in the Match chain.
This option is inactive for the Match with the highest sequence number.
METASUITE METAMAP MANAGER - RELEASE 8.1.3
DATA SOURCES | 103
5.
Once you have finished the definition of the Match Fields, you can check the Technical Tab of the
Source File Properties Window.
The Match fields will be completed as follows:
These Fields have the following meaning:
Field
Meaning
Match With
If the displayed File is the source of one or more Matches, this field displays the
Source File to which these Matches have been defined.
You can click the Browse button, in order to display the Properties window of the
displayed Source File.
Match On
If the displayed File is the destination of one or more Matches, this field displays
the Source File from which these Matches have been defined.
You can click the Browse button, in order to display the Properties window of the
displayed Source File.
Match Field
This selection box lists the Fields belonging to this Source File, for which Matches
have been defined.
Note:
IKAN Solutions
Before renaming or removing a file, first remove the match chains residing on this file.
METASUITE METAMAP MANAGER - RELEASE 8.1.3
CHAPTER 9
Data Targets
Data Targets are a type of MetaMap Objects that can be assigned directly to a Model.
Apart from Data Targets, it is also possible to assign Data Sources, Program Procedures, Public Procedures
and Work Fields to a Model.
Refer to the following sections, for more detailed information:
•
Target Files or Reports (page 104)
•
Target Records (page 111)
•
Target Fields (page 114)
•
Target Titles (page 119)
•
Target Headings (page 119)
•
Target End Pages (page 120)
•
Target Procedures (page 121)
9.1. Target Files or Reports
There are two types of Data Targets:
•
Target Files are based on Dictionary Files available in the MetaStore.
•
Target Reports are built manually during the creation of the Model.
IKAN Solutions
METASUITE METAMAP MANAGER - RELEASE 8.1.3
DATA TARGETS | 105
Procedure
1.
Open the required Model.
2.
Right-click the Model name and select Add > Target.
The Target File properties window appears.
Two tabs are available: Technical and Business.
3.
4.
Fill out the required fields.
For a detailed description of the fields, refer to the sections:
•
Technical Tab (page 105)
•
Business Tab (page 111)
Apply or discard your changes.
The name of the new Target and its symbol (
5.
) are displayed in the Tree View window.
Save your changes by doing one of the following:
•
Click the Save Active Model (
•
Select File > Save Active Model.
) button on the Main Toolbar.
Technical Tab
The following fields are available on the Technical tab:
•
Name (page 106)
•
Organization (page 106)
•
Prefix (page 106)
•
Dictionary File (page 107)
IKAN Solutions
METASUITE METAMAP MANAGER - RELEASE 8.1.3
DATA TARGETS | 106
•
Target Type (page 107)
•
Action (page 108)
•
Page Length (page 108)
•
Page Width (page 108)
•
Version (page 108)
•
Identifier/Title (page 109)
•
Grand Total (page 109)
•
Sort Fields (page 109)
•
GroupBy Fields (page 110)
Name
If the Target is based on a Dictionary File, available in the MetaStore, this field is updated automatically with
the name of this Dictionary File, when you select it in the Dictionary File field below. After having made the
selection, you can change the name in this field.
If the Target is not based on a Dictionary File, you can define it manually. In this case, you enter a name
describing the Target in this field.
The name in this field will be displayed in the Tree View window. It can contain up to 32 characters and must
be unique.
Organization
If you select a File Type from the drop-down list, you will only be able to select Dictionary Files of this type
with the Dictionary File field below.
If you leave the default setting Any, you will be able to select any Dictionary File.
The following options are available:
•
Any
•
ADABAS File Group
•
Datacom File Group
•
IMS PCB
•
SQL Table Group
•
Standard File
•
Standard File (XML)
•
IDMS Subschema
• Supra Database
For more information on the different source types, refer to the MetaStore Manager User Guide.
Prefix
It is possible to define several Targets in one Model. The default Prefix numbers these Targets in the following
format:
T99IKAN Solutions
METASUITE METAMAP MANAGER - RELEASE 8.1.3
DATA TARGETS | 107
Where:
•
T stands for Target
•
99 is replaced by the indication of the number of Targets in this Model. For instance: 02 means that this is
the second Target defined in this Model
• The dash (-) separates the Prefix from the actual name.
It is possible to edit, but not to delete the Prefix. You can blank out the Prefix.
A Prefix has a fixed length of 4 characters and must start with an alphabetic character.
Dictionary File
Click the Browse button at the right of the Dictionary File name to display the Dictionary File Properties
window.
Target Type
The following options are available:
Option
Meaning
Abacus/BRS
Select this option when you want to produce a Target File in the ABACUS/BRS
format.
Controlled Sequential
Select this option when the Dictionary file on which the TargetFile is based
contains complex structures such as redefines and occurring fields.
Delimited
Select this option if your Target must be a Delimited File. A Delimited File
contains a delimiter sign after every last digit or character of a field.
If a field can be 20 positions long, but contains only 5 characters, the delimiter
sign is placed on the sixth position. The unused 14 positions are not left
unused.
HTML
Select this option if your Target must be an HTML File.
Line Sequential
Used on open systems (Windows, UNIX and Linux).
Select this option if the records of the file are physically stored in sequential
order and may only be retrieved in the order in which they are written. Each
record is separated by a delimiter, which is the Carriage Return/Line Feed
character.
Parameter File
Select this option if your Target must be a Parameter File.
Record Sequential
Used on mainframes (Z/OS, BS2000 etc.).
Select this option if the records of the file are physically stored in sequential
order and may only be retrieved in the order in which they are written. Each
record is identified by its position within the file, and is not separated by a
special delimiter.
The length of each record is fixed or variable. If the length is variable, the value
is put in the four-byte Record Descriptor word that is put before each record.
Report
Select this option if your Target must be a readable report. A Target Report is
built during the creation of your MetaMap Model.
IKAN Solutions
METASUITE METAMAP MANAGER - RELEASE 8.1.3
DATA TARGETS | 108
Option
Meaning
Sequential
Select this option if your Target must be a Sequential Target File. A Sequential
File does not contain delimiter signs. The size of the fields is fixed, meaning
that any unused positions are left blank.
SQL
Select this option if your Target must be an SQL file.
User Defined
Select this option if your Target must be a User Defined File.
XML
Select this option if your Target must be an XML file.
Fixed
Select this checkbox, if you want to export the Target File as FIXED.
If not selected, the file will be exported as VARIABLE.
By default, the value defined in the MetaStore database will be proposed.
Action
Select the required Action from the drop-down list. The following options are available:
Option
Meaning
Delete
Remove the Records from the Database.
Insert
Use the INSERT command for every record.
Unknown
INSERT/UPDATE will be chosen.
Update
Use the INSERT command for every record.
Page Length
This field only applies if you selected Report in the Target Type drop-down list. Enter the Page Length of the
Report in number of lines per page.
If the length is set to 0, the default page length as specified in the Generator Dictionary will be taken.
Page Width
This field only applies if you selected Report in the Target Type drop-down list. Enter the Page Width of the
Report in number of characters per line.
If the length is set to 0, the default page width as specified in the Generator Dictionary will be taken.
Version
Enter the Version number of the Target File description.
IKAN Solutions
METASUITE METAMAP MANAGER - RELEASE 8.1.3
DATA TARGETS | 109
Identifier/Title
This field only applies if you selected Report in the Target Type drop-down list. Enter the Identifier/Title of
the Report.
Grand Total
Select this checkbox, if you use grouping levels in your Target and you want a Grand Total for a certain
calculation.
Sort Fields
It is interesting to define up to 16 Sort Fields for your Target, if it is not ordered in the sequence you want.
Use this field as follows:
1.
Double-click the New button.
The list of Fields available in the Records belonging to the Target is displayed.
2.
Select the required field and click OK.
Two extra options are available at the top right of the pop-up window for selecting the required item:
•
Show all
When selecting this option, the Select Item drop-down list will be deactivated and all available fields
for all categories will be displayed underneath.
•
Indentation
When selecting this option, all fields displayed will be sorted per structure instead of alphabetically.
The selected field is displayed in the Target Sort Field Properties window.
Available fields:
IKAN Solutions
Field
Meaning
Name
This field contains the name of the Sort Field.
You can edit this name. It can contain up to 32 characters.
Descending
By default, this checkbox is not selected, so that the sorting is done in
ascending order.
If you select this checkbox, the sorting will be done in descending order.
METASUITE METAMAP MANAGER - RELEASE 8.1.3
DATA TARGETS | 110
Field
Meaning
Target Field
The Browse button next to this selection box can be used in two ways:
• If the field contains the name of a Sort Field, clicking the Browse button
results in displaying the properties window of the matching Target Field.
See Target Fields on page 114.
• If you delete the name of the Sort Field from the field first, and then click
the Browse button, the list of Fields that can be selected as Target Fields
is again displayed.
Work Field
This field is only accessible if you select a Work Field in the Sort Field selection
box.
The Browse button next to this selection box can be used in two ways:
• If the field contains the name of a Sort Field, clicking the Browse button
results in displaying the properties window of the matching Work Field.
• If you delete the name of the Sort Field from the field first, and then click
the Browse button, the list of Fields that can be selected as Work Fields
is again displayed.
GroupBy Fields
It is interesting to define one or more GroupBy Fields for your Target, if you want to calculate a Total value of
a combination of fields.
Use this field as follows:
1.
Click the New button.
The list of available Target and Work Fields is displayed.
2.
Select the required field and click OK.
Two extra options are available at the top right of the pop-up window for selecting the required item:
•
Show all
When selecting this option, the Select Item drop-down list will be deactivated and all available fields
for all categories will be displayed underneath.
•
Indentation
When selecting this option, all fields displayed will be sorted per structure instead of alphabetically.
3.
The following panel is displayed.
Available fields:
IKAN Solutions
METASUITE METAMAP MANAGER - RELEASE 8.1.3
DATA TARGETS | 111
Field
Meaning
Name
This field contains the name of the GroupBy Field.
You can edit this name. It may contain up to 32 characters.
GroupBy Type
Select the required option from the drop-down list.
The following options are available for Reports:
• None: one line will be skipped following group processing
• Page: a page feed will be given after group processing
• Skip: a number of lines will be skipped after group processing.
Lines To Be
Skipped
This field is only available if Skip is selected as GroupBy Type.
Enter the number of line breaks to be inserted.
Target Field
The Browse button next to this selection box can be used in two ways:
• If the field contains the name of a Target Field, clicking the Browse button results in displaying the properties window of this Target Field. See
Target Fields on page 114.
• If you delete the name of the Sort Field from the field first, and then click
the Browse button, the list of Fields that can be selected as Target Fields
is again displayed.
Work Field
This field is only accessible, when a Work Field is selected.
The Browse button next to this selection box can be used in two ways:
• If the field contains the name of a Work Field, clicking the Browse button
results in displaying the properties window of this Work Field.
• If you delete the name of the Sort Field from the field first, and then click
the Browse button, the list of Fields that can be selected as Work Fields
is again displayed.
Business Tab
The following fields are available on the Business tab:
•
Business Rule (page 111)
•
Note (page 111)
Business Rule
In this field, you can enter a description of the Target.
If you want to enter text in RTF (Rich Text Format), right-click and select RTF from the context menu (or use
the shortcut CTRL + R).
Note
In this field, you can enter additional information pertaining to the Target.
If you want to enter text in RTF (Rich Text Format), right-click and select RTF from the context menu (or use
the shortcut CTRL + R).
9.2. Target Records
Target Records are a type of MetaMap Objects that can be assigned to a Target File.
IKAN Solutions
METASUITE METAMAP MANAGER - RELEASE 8.1.3
DATA TARGETS | 112
Apart from Target Records, it is also possible to assign Target Procedures (page 121), a Target Title
(page 119), a Target Heading (page 119)and a Target EndPage (page 120).
Procedure
1.
Open the required Model.
2.
Expand the tree in such a way that the required Target is displayed.
3.
Right-click the Target name and select Add > Target Record.
The Target Record properties window is displayed.
4.
Fill out the required fields.
For a detailed description of the fields, refer to the section Fields (page 112).
5.
Apply or discard your changes.
The name of the new Target Record and its symbol (
6.
) are displayed in the Tree View window.
Save your changes by doing one of the following:
•
Click the Save Active Model (
•
Select File > Save Active Model.
) button on the Main Toolbar.
Fields
The following fields are available:
•
Name (page 113)
•
Dictionary Record (page 113)
•
Detail and Total Checkboxes (page 113)
•
Page Checkbox (page 113)
•
Prefix (page 113)
•
Column Separator (page 113)
•
Row Terminator (page 114)
IKAN Solutions
METASUITE METAMAP MANAGER - RELEASE 8.1.3
DATA TARGETS | 113
Name
If you create a Target Record, it is based on a Dictionary Record available in the MetaStore and this field is
updated automatically with the name of this Dictionary Record, when you select it in the Dictionary Record
field below. After having made the selection, you can change the name in this field.
If you create a Target Report, it is not based on a Dictionary File and you must define it manually. In this case,
you enter a name describing the Target Record in this field.
The name in this field will be displayed in the Tree View window. It can contain up to 32 characters.
Dictionary Record
This field displays the name of the Dictionary Record. You can click the Browse button to select the required
Dictionary Record.
Detail and Total Checkboxes
The Detail and Total checkboxes operate as toggles.
Select the Detail checkbox, if you want to obtain every processed Record separately in your Target File or
Report.
Select the Total checkbox, if you have defined GroupBy Fields and want to obtain Totals based on these Fields
in your Target File or Report.
Note:
Setting the "Total" checkbox allows the user to set or unset the "Accumulate" flags of the fields
within the record. If one of these "Accumulate" flags has been set, it is not possible to unset the
"Total" flag of the record again. In that case, that flag is disabled.
Page Checkbox
The Page checkbox only applies for Target Reports.
Select this checkbox, if you want to insert a Page Break for each Record.
Prefix
In this field, you can enter a Prefix for this Target Record. The prefix will appear in the Tree View window,
between the Target Prefix (T99-) and the Record name.
A Prefix has a fixed length of 4 characters and must start with an alphabetic character.
Column Separator
In this field, you can enter the character(s) used as Column Separators for this Target Record. This can only be
specified for Delimited/BRS file types.
If the field contains a default value (for instance ;), this default value has been defined in the User Profile you
are currently using. The procedure on how to change this default value is explained in the MetaSuite INI
Manager Guide.
IKAN Solutions
METASUITE METAMAP MANAGER - RELEASE 8.1.3
DATA TARGETS | 114
Some alphabetic characters have been used to refer to special separators:
Alphabetic
character
Matching separator character
B
Blank character (space)
L
Low-value character - Hex-00
H
High-value character - Hex-FF
T
Tab character - Hex-09
Row Terminator
In this field, you can enter the character(s) used as Row Terminators for this Target Record.
If the field contains a default value (for instance //), this default value has been defined in the User Profile you
are currently using. The procedure on how to change this default value is explained in the MetaSuite INI
Manager User Guide.
9.3. Target Fields
Target Fields are the only type of MetaMap Objects that can be assigned to a Target Record.
IKAN Solutions
METASUITE METAMAP MANAGER - RELEASE 8.1.3
DATA TARGETS | 115
Procedure
1.
Open the required Model.
2.
Expand the tree in such a way that the required Target and Target Record are displayed.
3.
Right-click the Target Record name and select Add >Target Field.
4.
Select the file description you want to add and click OK.
The Target Field properties window is displayed.
5.
Fill out the required fields.
For a detailed description of the fields, refer to the section Fields (page 116).
6.
Apply or discard your changes.
The name of the new Target Field and its symbol (
Note:
7.
) are displayed in the Tree View window.
If the Value for the Target Field is not yet defined, the arrow in the symbol appears in grey. Your
Model is incomplete as long as one or more fields remain undefined.
Save your changes by doing one of the following:
•
Click the Save Active Model (
•
Select File > Save Active Model.
IKAN Solutions
) button on the Main Toolbar.
METASUITE METAMAP MANAGER - RELEASE 8.1.3
DATA TARGETS | 116
Fields
The following fields are available:
•
Name (page 116)
•
Accumulate (page 116)
•
Data Source (page 116)
•
Dictionary Field (page 117)
•
Nullability (page 117)
•
Skip Lines (page 118)
•
Skip (page 118)
•
Short (page 118)
•
Position (page 118)
•
Format (page 118)
Name
If you add a Field to a manually created Record, this field is empty and you must enter a Field name.
If you add a Field to a Record based on a Dictionary Record, this field will be updated automatically with the
name of the Target Field, when you select it in the Dictionary Field field below. After having made the
selection, you can change the name in this field. The name in this field will be displayed in the Tree View
window. It can contain up to 32 characters.
Accumulate
Only available for numeric fields in a record for which the Total option has been activated.
Select the Accumulate checkbox, if you want the numeric fields to be summed, based on the grouping levels.
If a numeric field is accumulated, the NULL indicators in accumulated fields can be "concatenated". The
concatenation rule is defined by the option OPTION-ACCUM-NULL.
The user can set this option to three different values in the MTL options table. For more information, refer to
the chapter The Dictionary Options Screen in the Generator Manager User Guide.
•
Standard: the null indicator of the accumulated field is null.
•
ONE: If one accumulated field is not null, then the accumulated result is not null.
• ALL: None of accumulated fields may be null, otherwise the accumulated value is null.
Those options can be set on a fixed value (Generator Manager definition) or dynamically using the SET
command.
Data Source
Target Fields can be defined in two ways:
•
by defining a Value: The value of a target field is not a simple literal, it is the formula or procedure that the
generated program must execute in order to assign the value. The window pane in which this formula is
put, is called "the structured editor". The area with the list of possible commands and parameters is called
"the look-ahead parser".
•
by defining a Data Source: A data source is a direct link to a source field or a work field.
IKAN Solutions
METASUITE METAMAP MANAGER - RELEASE 8.1.3
DATA TARGETS | 117
This section explains how to define a Data Source. You will use this method, if the Target Field is a one-toone match with a Source Field.
If a Data Source has been selected, the value of the Target Field is linked to a Source Field. It is a kind of
shortcut definition.
Use this field as follows:
1.
Click the Browse button next to this selection box.
The list of Dictionary Fields belonging to a Data Source (Source Files, External Arrays and Parameter
Files) is displayed.
2.
Select the required Dictionary Field and click OK.
The selected Dictionary Field is displayed in the Dictionary Field field.
3.
If you click the Browse button, when a Dictionary Field has already been selected, the Field
properties window is displayed.
Dictionary Field
This field only applies for Targets based on a Dictionary File available in the MetaStore.
When you add a Record to such a Target, the fields associated with the matching Dictionary Record are added
to the Target as well.
If you open the Target Field properties window for such a Field, both the Name and the Dictionary Field have
already been filled out.
You can click the Browse button in order to display the Field properties window in read-only mode. If you need
to change the displayed information, open this properties window in the MetaStore Manager.
Nullability
The Nullability reflects the Null possibility of a Target Field.
The following values are possible:
Option
Meaning
DEFAULT
System default.
NotNull
Set to the Target Field DBNAME.
InNull
The first character of the Target Field can contain a special character that marks the
Null value.
OutNull
The position to the left of the Target Field can contain a special character that marks
the Null value.
OutNulR
The position to the right of the Target Field can contain a special character that
marks the Null value.
You cannot change this value in MetaMap, as it is defined in the Dictionary Definition of the Target Field.
Refer to the MetaStore Manager User Guide.
IKAN Solutions
METASUITE METAMAP MANAGER - RELEASE 8.1.3
DATA TARGETS | 118
Skip Lines
This checkbox applies for Reports only.
Enter the number of lines to be skipped before printing the next specified value. The value entered must not
exceed the number of lines on an output page.
This value is applied, if the Skip checkbox is selected.
Skip
This checkbox applies for Reports only.
Select this checkbox, if you want to skip a certain number of lines before printing this value.
Short
This checkbox applies for Reports only.
Select this checkbox, if you want to suppress the printing of repetitive occurrences of the same value in a
report. The value of the field to which the Short option applies will be printed only when that value changes, or
if it is the first occurrence of the value appearing on a new page.
Clear this checkbox, if every occurrence of the same value must be printed.
Position
Enter the column position in which the following value is to begin. The start position specified must not
overlay a character position already occupied on the line, and must allow enough space on the line to contain
the specified value.
Format
This checkbox applies for Reports only.
This option is used to request that a numeric field be truncated at print time to a specified unit value . Select
the required option from the drop-down list. The following options are available:
Option
Meaning
Hundred
Select this option, if you want the numeric value to be divided by hundred at
printing time.
Million
Select this option, if you want the numeric value to be divided by a million at
printing time.
Thousand
Select this option, if you want the numeric value to be divided by thousand at
printing time.
Units
Select this option, if you do not want to alter the numeric value at printing time.
IKAN Solutions
METASUITE METAMAP MANAGER - RELEASE 8.1.3
DATA TARGETS | 119
9.4. Target Titles
Target Titles only apply to Target Reports. You can assign one Target Title to each Target Report.
The Title will be displayed on top of every page of the printed Report.
1.
Open the required Model.
2.
Expand the tree in such a way that the required Target is displayed.
3.
Right-click the Target name and select Add > Title .
The Target Title properties window is displayed.
It contains the following fields:
4.
Field
Meaning
Name
By default, this field contains the indication New Title. You can change this if
required.
Text
Enter the Target Title as it will appear on the Target File or Report.
Apply or discard your changes.
The name of the new Target Title and its symbol (
5.
) are displayed in the Tree View window.
Save your changes by doing one of the following:
•
Click the Save Active Model (
•
Select File > Save Active Model.
) button on the Main Toolbar.
9.5. Target Headings
Target Headings only apply to Target Reports. You can assign one Target Heading to each Target Report.
The Heading will be displayed on every page of the printed Report.
IKAN Solutions
METASUITE METAMAP MANAGER - RELEASE 8.1.3
DATA TARGETS | 120
1.
Open the required Model.
2.
Expand the tree in such a way that the required Target is displayed.
3.
Right-click the Target name and select Add > Heading .
The Target Heading properties window is displayed.
It contains the following fields:
4.
Field
Meaning
Name
By default, this field contains the indication New Heading. You can change this if
required.
Text
Enter the Target Heading as it will appear on the Target File or Report.
Apply or discard your changes.
The name of the new Target Heading and its symbol (
5.
) are displayed in the Tree View window.
Save your changes by doing one of the following:
•
Click the Save Active Model (
•
Select File > Save Active Model.
) button on the Main Toolbar.
9.6. Target End Pages
Target End Pages only apply to Target Reports. You can assign one Target EndPage to each Target Report.
The Title will be displayed at the bottom of the last page of the printed Report.
IKAN Solutions
METASUITE METAMAP MANAGER - RELEASE 8.1.3
DATA TARGETS | 121
1.
Open the required Model.
2.
Expand the tree in such a way that the required Target is displayed.
3.
Right-click the Target name and select Add > End Page.
The Target End Page properties window is displayed.
It contains the following fields:
4.
Field
Meaning
Name
By default, this field contains the indication End Page. You can change this if
required.
Text
Enter the text of the Target End Page as you want it to appear on the Target File
or Report.
Apply or discard your changes.
The name of the new Target End Page and its symbol (
5.
) are displayed in the Tree View window.
Save your changes by doing one of the following:
•
Click the Save Active Model (
•
Select File > Save Active Model.
) button on the Main Toolbar.
9.7. Target Procedures
Target Procedures are a type of MetaMap Objects that can be assigned to a Target.
Apart from Target Procedures, it is also possible to assign Records (page 111) to a Target. If the Target is a
Report, you can also assign a Title (page 119), a Heading (page 119) and an EndPage (page 120).
You will define a Target Procedure for a Target, if you want to define logic that must be executed before or
after the calculation of the Target Fields, based on the contents of the Value or Data Source (page 116) fields.
For more information, refer to the chapter Structured Editor (page 186).
There are several types of Target Procedures, depending on the time of execution. You can define one Target
Procedure of each type for each Target:
•
Detail Output Post
•
Detail Output Pre
•
End of File
•
End of Job
•
Initialization
IKAN Solutions
METASUITE METAMAP MANAGER - RELEASE 8.1.3
DATA TARGETS | 122
•
Total Output Post
• Total Output Pre
See Execution Time on page 123.
Procedure
1.
Open the required Model.
2.
Expand the tree in such a way that the required Target is displayed.
3.
Right-click the Target name and select Add > Target Procedure.
The Target Procedure properties window is displayed.
Two tabs are available: Technical and Business.
4.
5.
Fill out the required fields.
For a detailed description of the fields, refer to the sections:
•
Technical Tab (page 123)
•
Business Tab (page 124)
Apply or discard your changes.
The name of the new Target Procedure and its symbol are displayed in the Tree View window.
IKAN Solutions
METASUITE METAMAP MANAGER - RELEASE 8.1.3
DATA TARGETS | 123
6.
Save your changes by doing one of the following:
•
Click the Save Active Model (
•
Select File > Save Active Model.
) button on the Main Toolbar.
Technical Tab
The following fields are available.
•
Name (page 123)
•
Execution Time (page 123)
•
Commands Workspace (page 124)
Name
Enter a name for the Procedure. It is advised to select a name that describes the action performed.
The name in this field will be displayed in the Tree View window. It can contain up to 32 characters.
Execution Time
Select the required execution time from the drop-down list.
Note:
The "value" properties of the fields also contain procedures. Those "value assignment procedures"
will be executed between Detail Output Pre and Detail Output Post, except if the accumulate flag
has been deactivated and a GROUP KEY has been defined, in which case the "non-accumulate"
logic is situated between Total Output Pre and Total Output Post.
The following options are available:
Option
Meaning
Initialization
Procedure will be executed once at the start of the job.
Detail Output Pre
Procedure will be executed before the Value logic defined for the Target Fields.
You can for instance exclude some Records before they are processed.
Detail Output Post
Procedure will be executed after the Value logic defined for the Targets fields, but
before writing the Record (in case of automatic writing).
Total Output Pre
Procedure will be executed before the non Accumulate Column Logic for the
target processing of the group/total record.
You can use this type of Target Procedure if you are processing totals. See
explanation above.
This procedure will be executed before the SORT if a SORT Key has been defined.
IKAN Solutions
METASUITE METAMAP MANAGER - RELEASE 8.1.3
DATA TARGETS | 124
Option
Meaning
Total Output Post
Procedure will be executed after the non Accumulate Column Logic for the target
processing of the group/total record.
You can use this type of Target Procedure if you are processing totals with your
Target, which means that:
• you have added GroupBy Fields (page 110) (up to 16), AND
• you have selected the Total (page 113) checkbox in the Target Record properties window.
You may also have selected the Accumulate (page 116) checkbox, but this is not a
requirement.
Note: This procedure will be executed after the SORT if a SORT Key has been
defined.
End of File
Procedure will be executed each time when a Source File has been processed.
End of Job
Procedure will be executed once at the end of the job.
Commands Workspace
In this field, you can enter the commands that build the File Procedure. These commands are written in MXL
(MetaSuite Export Language).
1.
Enter the required commands.
By default, the list of available commands is displayed at the left of this field. Invalid commands are
displayed in red.
Note:
If you do not need the assisted mode, you can switch it off using the
Toolbar and enter the commands manually.
To switch it on again, click the Stop/Edit icon (
).
icon in the Edit
2.
Select the required command by clicking it.
The command will be added to the Workspace.
Any error messages or warnings are displayed underneath the Commands Workspace.
3.
Once you have finished entering the commands, click the Stop/Edit icon (
).
The Procedure is verified. If syntax errors are found, the errors message are displayed underneath the
Workspace.
4.
Save your changes by doing one of the following:
•
Click the Save Active Model (
•
Select File > Save Active Model.
) button on the Main Toolbar.
Business Tab
The following fields are available.
•
Business Rule (page 125)
•
Note (page 125)
IKAN Solutions
METASUITE METAMAP MANAGER - RELEASE 8.1.3
DATA TARGETS | 125
Business Rule
In this field, you can enter a description of the Target Procedure.
If you want to enter text in RTF (Rich Text Format), right-click and select RTF from the context menu (or use
the shortcut CTRL + R).
Note
In this field, you can enter Notes for this Target Procedure.
If you want to enter text in RTF (Rich Text Format), right-click and select RTF from the context menu (or use
the shortcut CTRL + R).
9.8. Target Wizard
The Target Wizard provides an alternative way to define Data Targets.
1.
Open an existing Model or create a new Model.
2.
Select the Target Wizard icon (
) from the Wizard Toolbar.
The following window is displayed:
The following fields are available:
IKAN Solutions
METASUITE METAMAP MANAGER - RELEASE 8.1.3
DATA TARGETS | 126
IKAN Solutions
Field
Meaning
Name
This field will be updated automatically with the name of the Dictionary File,
when you select it from the Dictionary File drop-down list below. After having
made the selection, you can change the name in this field. The name in this field
will be displayed in the Tree View window.
Note: When you use the Target Wizard, you can only define a Target based on a
Dictionary File available in the MetaStore.
Prefix
In this field, a default prefix is displayed in the following format: T##-, Where:
• T stands for Target.
• ## stands for the sequential Target number. Up to 99 Targets can be defined for a Model.
• - separates the Prefix from the Target Name.
You can replace the default Prefix by another 4-character Prefix, but you cannot
delete it.
Target Type
Select the required Target Type from the drop-down list.
The following options are available:
• Delimited
• Sequential
• Abacus/BRS
• Report
• XML
• Controlled Sequential
• HTML
• SQL
• User defined
• Parameter File
• Line Sequential
• Record Sequential
Select the required Target Type. Select User defined, if you want to take into
account the code-control table defined in the file properties.
Organization
If you select a File Type from the drop-down list, you will only be able to select
Dictionary Files of this type from the Dictionary File drop-down list below.
If you leave the default setting Any, you will be able to select any Dictionary File.
Dictionary File
Select the required Dictionary File from the drop-down list.
If you selected a File Type in the Organization drop-down list, the Dictionary File
drop-down list only contains Dictionary Files of this type.
Once you have selected the Dictionary File, its Records are displayed in the
Dictionary Records selection box.
Show history
Selecting this option, will display all existing versions of the Dictionary Files.
By default, this option is not selected and only the latest version of the
Dictionary Files will be displayed.
Dictionary
Records
After having selected the required Dictionary File from the drop-down list,
select one or more Records in the selection box.
Press and hold the Control key to make a selection of multiple, non-adjacent
Records.
Press and hold the Shift key to make a selection of multiple adjacent Records.
METASUITE METAMAP MANAGER - RELEASE 8.1.3
DATA TARGETS | 127
3.
Fill out the fields as required and click Next.
The technical properties windows for the Target File is displayed:
The following fields are available:
IKAN Solutions
METASUITE METAMAP MANAGER - RELEASE 8.1.3
DATA TARGETS | 128
IKAN Solutions
Field
Meaning
GroupBy Fields
Click the New button and select the required Target or Work Field(s). The
GroupBy Field Properties Windows will be displayed. For more information,
refer to the section GroupBy Fields (page 110).
The "GroupBy" property contains the GroupBy keys. If at least one GroupBy
key is specified for a target record, bundles of records will be grouped
together, namely the records that subsequently contain the same group key
value. Not only the detail records will be put in the target file, but the
representing records of each group will be put as well.
A group level is the group key index. If multiple group keys have been
defined, multiple group levels exist.
Per Groupby key, in other words per group level, additional subgroups will
be created, resulting in additional subgroup representatives being put.
Which record will represent the group or subgroup? If no target sort field is
defined, the FIRST record of the group/subgroup will represent the whole
group.
If at least one target sort field is defined, the LAST record of the group/
subgroup will represent the whole group.
It's up to the developer to decide if there is a need to exclude some of the
group levels or the detail level from being put. For this matter, please refer
to the SYS-GROUP and SYS-GROUP-LEVEL keywords in this manual.
Unlike the SORT fields order, the order of defining the GroupBy fields is:
from the "smallest" "detailistic" level, up to the "largest" "supergroup"
level.
Defining group levels is a pre-requisite to be able to set the TOTAL flag and
to define ACCUMULATE fields. The accumulation will be performed in the
numeric accumulator fields of the group/subgroup representatives.
Sort Fields
It is interesting to define one or more Sort Fields for your Target, if you want
to change the way the Target is sorted.
Click the New button and select the required Target or Work Field(s) from
the list. The Target Sort Field Properties Window will be displayed. For more
information, refer to Sort Fields (page 109)
When sort fields are defined on target records, a so-called target sort will be
performed.
The sort fields are ordered from the most significant sort key (highest sort
level) to the least significant, "fastest changing" sort key.
METASUITE METAMAP MANAGER - RELEASE 8.1.3
DATA TARGETS | 129
4.
Make the required selections and click Next.
The technical properties windows for the Target Record is displayed:
The following fields are available:
IKAN Solutions
Field
Meaning
Detail and Total
checkboxes
The Detail and Total checkboxes operate as toggles.
Procedure will be executed after the Value logic defined for the Targets fields, if
the Target is configured to report Total values.
Prefix
In this field, you can enter a Prefix for this Target Record. The prefix will appear in
the Tree View window, between the Target Prefix (T99-) and the Record name.
A Prefix has a fixed length of 4 characters and must start with an alphabetic
character.
Column
Separator
In this field, you can enter the character(s) used as Column Separators for this
Target Record.
If the field contains a default value (for instance ;), this default value has been
defined in the User Profile you are currently using. The procedure how to change
this default value is explained in the MetaSuite INI Manager User Guide.
Row Terminator
In this field, you can enter the character(s) used as Row Terminators for this Target
Record.
If the field contains a default value (for instance //), this default value has been
defined in the User Profile you are currently using. The procedure how to change
this default value is explained in the MetaSuite INI Manager User Guide.
METASUITE METAMAP MANAGER - RELEASE 8.1.3
DATA TARGETS | 130
5.
Fill out the fields as required and click Next.
The business properties windows is displayed:
The following fields are available:
Field
Meaning
Business Rule
In this field, you can enter a Business Rule describing this Target.
If you want to enter text in RTF (Rich Text Format), right-click and select RTF
from the context menu (or use the shortcut CTRL + R).
Note
In this field, you can enter additional information pertaining to this Target.
If you want to enter text in RTF (Rich Text Format), right-click and select RTF
from the context menu (or use the shortcut CTRL + R).
6.
Fill out the fields as required and click Finish.
The new Target appears in the Tree View window.
7.
The next logical step is to define or map the Target Fields.
Use the Mapping Wizard (page 130), if you want to define 1-to-1 mappings.
Use the Manual Procedure (page 114), if you want to define more complex mappings.
9.9. Mapping Wizard
Mapping means defining the rules to calculate between the Source and Target Fields.
You can use the Mapping Wizard, if you want to define 1-to-1 mappings.
1.
Open an existing Model or create a new Model.
For this procedure, the Model named ModelForMappingWizard was opened.
IKAN Solutions
METASUITE METAMAP MANAGER - RELEASE 8.1.3
DATA TARGETS | 131
2.
Select the Mapping Wizard icon (
The following window is displayed:
) from the Wizard Toolbar.
This window contains two selection areas:
•
Source selection area on the left
• Target selection area on the right.
In the Source selection area, each line represents a Source Record assigned to the Model. For each Source
Record, its name and the name of the Source File it belongs to are displayed.
In the Target selection area, each line represents a Target Record assigned to the Model. For each Target
Record, its name, the name of the Target File it belongs to, and the Subtype of the Target File are
displayed. The subtype for T01-TargetFile is Sequential, and the subtype for T02-TargetFile is Delimited.
Underneath, the following checkboxes are displayed:
•
Mapping by Sequence: Select this checkbox, if the sequence of the Source and Target Fields are
identical. The fields will be automatically mapped in the sequence they occur.
•
Mapping by Name: Select this checkbox, if fields with the same name must be mapped automatically.
Fields that are mutually incompatible (e.g. alphanumeric and date fields) will not be mapped.
IKAN Solutions
METASUITE METAMAP MANAGER - RELEASE 8.1.3
DATA TARGETS | 132
3.
Select the Source File Record you want to map.
4.
Select the Target Record you want to map this Source File Record with.
5.
Click Next.
A screen similar to this one is displayed:
On the left, the selected Source Record and its dependent fields are displayed.
On the right, the selected Target Record and its dependent fields are displayed.
IKAN Solutions
METASUITE METAMAP MANAGER - RELEASE 8.1.3
DATA TARGETS | 133
6.
Click and drag the Source Fields to the Target Fields they should be mapped to.
The following screen is displayed:
7.
To remove a mapping, right-click the middle of the mapping line in the grey mapping area and
select Remove Relationships from the shortcut menu:
If you right-click the mapping line in either of the 2 (white) source or target areas, you will have access to
another pop-up menu.
IKAN Solutions
METASUITE METAMAP MANAGER - RELEASE 8.1.3
DATA TARGETS | 134
8.
Option
Explanation
Allow Data Source Mapping (Hold Shift down)
When holding down the Shift key while creating
the mapping, the Data Source field will be used
instead. The mapping is displayed in green. This
is mainly used with on-the-fly creation of target
files.
Show MSL Procedure Mappings
When selecting this option, all fields used in
procedures will be displayed in purple.
Show Mapping Overview
Displays an extra window underneath the
overview of the mappings.
The mappings are created. If you open a Target Field, the value will be displayed as follows:
The commands used are explained in the Structured Editor (page 186) chapter.
In case of a Data Source mapping (green line), the Data Source property will be obtain the defined value:
IKAN Solutions
METASUITE METAMAP MANAGER - RELEASE 8.1.3
CHAPTER 10
Work Fields
Work Fields are a type of MetaMap Objects that can be assigned directly to a Model. Apart from Work
Fields, it is also possible to assign Data Sources, Data Targets, Program Procedures and Public Procedures to a
Model.
You will define a Work Field for a Model, if you want to use temporary fields to perform calculations that do
not have to be immediately stored in a Source or Target Field.
10.1. Work Fields
Procedure
1.
Open the required Model.
2.
Right-click the Model name and select Add > Work Field.
The Work Field Properties window is displayed.
Two tabs are available: Technical and Business.
3.
Fill out the required fields.
For a detailed description of the fields, refer to the sections:
•
Technical Tab (page 136)
•
Business Tab (page 142)
IKAN Solutions
METASUITE METAMAP MANAGER - RELEASE 8.1.3
WORK FIELDS | 136
4.
Apply or discard your changes.
The name of the new Work Field and its symbol (
5.
) are displayed in the Tree View window.
Save your changes by doing one of the following:
•
Click the Save Active Model (
•
Select File > Save Active Model.
) button on the Main Toolbar.
Technical Tab
The following fields are available on the Technical tab.
•
•
Work Field Properties
-
Name (page 136)
-
Occurrence (page 136)
-
Parameter (page 137)
-
Expose (page 137)
-
Starting Position (page 137)
-
Size (page 137)
Advanced
-
Type (page 137)
-
Date Format (page 138)
-
Decimals (page 139)
-
Edit Mask (page 139)
-
Unsigned (page 141)
-
Separated (page 141)
-
Leading (page 141)
-
CCSID (page 141)
-
Initial (page 141)
-
Code (page 142)
Name
Enter a name for the Work Field. It is advised to select a name that describes the nature or purpose of the
Work Field.
The name in this field will be displayed in the Tree Window. It can contain up to 32 characters.
Occurrence
You can enter an integer indicating the maximum number of times this field can occur. If you do not define a
specific value, the field is assumed to occur once.
IKAN Solutions
METASUITE METAMAP MANAGER - RELEASE 8.1.3
WORK FIELDS | 137
Parameter
Select the Parameter checkbox, if the Work Field will contain a runtime parameter included in your run-script
(as a PPTIPT value).
Typical values include dates or the maximum number of lines in a report.
Expose
Select the Expose checkbox, if you want to use the Work Field name instead of a generated field name that
changes with every MGL generation.
Starting Position
This field indicates the starting position for Subfields. It will be ignored for independent Workfields.
Size
Enter an integer indicating the field length as a number of bytes. If the field occurs more than once in the
record, this field indicates the length of a single occurrence of the field.
Type
Select the required type from the drop-down list. The following types are available:
Type
Meaning
Alphabetic
This datatype indicates that the field may contain alphabetic characters.
Binary
This datatype indicates that the field contains a binary numeric value that is stored as a
sequence of 0s and 1s. Only three sizes are allowed for binary fields: half-word (two
bytes), full-word (four bytes) and double-word (eight characters).
Binary Native
This datatype indicates that the field contains a binary numeric value that is stored as a
sequence of 0s and 1s. Only three sizes are allowed for binary fields: half-word (two
bytes), full-word (four bytes) and double-word (eight characters). Internal storage
depends on the operating system.
Bit
This datatype indicates a field occupying a single bit storage. A BIT type field may only
contain the binary values 0 or 1 and its size will always be 1. It is possible to perform
numeric operations on a BIT type field.
Byte
This datatype is currently not supported.
Character
This datatype indicates that the field may contain any possible character within the
character set being used (including unprintable characters). It is not possible to perform
numeric operations on a Character type field, even when the field contains only digits.
National
The National datatype is a subset of Unicode. The character set on which it is based is
UTF-16, but restricted to two bytes per character.
DBCS
This datatype is currently not supported.
IKAN Solutions
METASUITE METAMAP MANAGER - RELEASE 8.1.3
WORK FIELDS | 138
Type
Meaning
Decimal
This datatype indicates a field containing a packed decimal value. Packed decimal is the
most commonly used internal numeric data type. Two decimal digits are contained in
each byte of a packed decimal number. However, if the number is signed, the last half
byte contains a positive "F" or negative "D" sign indicator. If the number is null-signed,
the last half byte will be a dummy half byte, and will not contain any meaningful digit.
Float
This datatype indicates that the field contains floating-point numbers, stored in an
encoded exponential form.
Graphic
This datatype is currently not supported.
Hexadecimal
This datatype indicates that any hexadecimal characters are allowed within the field.
Long Varchar
This datatype is currently not supported.
Long Vargraphic
This datatype is currently not supported.
Numeric
This datatype indicates that any the field contains decimal numbers in a printable
character format, this means that a single digit is stored per byte.
Printed Numeric
This datatype indicates that the field contains a printed numeric value. The format in
which the printed numeric value is displayed must be defined in the Edit Mask. See Edit
Mask on page 139.
Printed Numeric
National
This datatype indicates that this is a National field that contains a numeric value. The
format in which the PRN-NATIONAL value is displayed must be specified with the EDIT
option.
Varchar
This datatype indicates that the field is a character field of variable length.
Vargraphic
This datatype is currently not supported.
Date Format
If the field must contain a date, select the required date format from the drop-down list. The system
automatically validates date fields whenever they are referenced in a MetaMap Model, and automatically
converts date fields whenever they are compared to another date or used in a calculation. In all the available
formats, YY or YYYY stands for the year and MM stands for the month. DD stands for the day within a
month and DDD stands for the day within the year.
When the format contains a '?’, this indicates the date delimiter that is used. Data formats with a '?’ are only
supported for CHARACTER and VARCHAR Field types. When the data format does not contain a '?’, the
different parts in the date are not delimited by a special character.
The Date format list is accessible for the following Field Types:
•
Binary
•
Binary Native
•
Character
•
Decimal
•
National
•
Numeric
•
Varchar
IKAN Solutions
METASUITE METAMAP MANAGER - RELEASE 8.1.3
WORK FIELDS | 139
Note:
When a date format is chosen, MetaStore Manager will reset the size of the field to the size that
corresponds to the chosen date format.
Decimals
If the field type allows the definition of decimals, this field contains the number of decimals. Decimals can be
entered for the following Data Types:
•
Binary
•
Decimal
• Numeric
If the field type does not allow the definition of decimals, this field contains the default value 0.
Edit Mask
This field is mandatory for PRINTED NUMERIC fields, but optional for other field types. It indicates how
the alphanumeric values must be formatted.
Note:
When the Edit Mask is set for a printed numeric field, MetaMap will reset the size of the field to the
size that corresponds to the chosen Edit Mask.
You can enter the characters defining a Mask in this text field. This Mask will override the default mask for
the field. There is a default mask for each Field Type. Both the default masks and the manually created masks
are composed of Replacement and Insertion characters.
The following table lists the Replacement characters and their meaning. Replacement characters indicate
positions in the printed field that may be replaced by (the corresponding types of ) characters from the input
field.
Replacement
Character
Meaning
$
Floating dollar sign before the first digit, with leading zero suppression
Z
Leading zero suppression
*
Asterisks to replace leading zeros
9
Numeric character
A
Alphabetic character
The following table lists the Insertion characters and their meaning. Insertion characters indicate characters to
be printed in addition to those contained in the stored field.
Insertion
Character
Meaning
$
Leading dollar sign
IKAN Solutions
METASUITE METAMAP MANAGER - RELEASE 8.1.3
WORK FIELDS | 140
Insertion
Character
Meaning
*
Leading asterisk (generally for check protection)
,
Comma
.
Decimal point
You can always modify the default decimal point using the Generator Manager. For
more information, refer to the chapter Create Dictionary/Enter License Key Screen in
the Generator Manager User Guide.
B
Blank
-
Trailing minus for negative values
+
Trailing plus or minus sign
CR
Trailing credit symbol for negative values only
DB
Trailing debit symbol for negative values
As mentioned above, there is a default Mask for each field type:
Field Type
Mask description
Signed numeric
fields
The default mask contains a minus sign as the rightmost character. All negative values
are printed with a trailing minus sign.
Numeric fields
with decimals
The default mask contains a decimal point and as many digit replacement characters
(9s) to the right of the decimal point as are specified by the Decimal option.
Numeric fields
The default mask contains as many digits as its size, without zero suppression.
Date fields
The default mask is its selected date format.
Alphanumeric
fields
The default mask contains as many alphanumeric character replacement characters (X)
as are required to print the field.
Examples of default masks:
Field Type
Size
Default mask
Signed numeric fields without decimal positions
6
999999-
Signed numeric fields with two decimals
6
9999.99-
Character Field
6
XXXXXX
You can also define customized masks.
Examples:
Field Type
Field Size
Mask
Field value
Printed value
Character
6
XXBXXXX
AB138B
AB 138B
IKAN Solutions
METASUITE METAMAP MANAGER - RELEASE 8.1.3
WORK FIELDS | 141
Field Type
Field Size
Mask
Field value
Printed value
Numeric with 2 decimal
positions
2
.99
.35
0
-.12
.35
.00
.12
Unsigned
Select Unsigned check box to indicate that a numeric value is not signed, i.e. that it does not contain a sign
indicator (+ or -).
This field applies for the following field types:
•
Binary
•
Binary Native
•
Decimal
•
Numeric
Separated
Select the Separated checkbox, when a sign indicator is stored as a separate digit. By default this separate digit
is appended at the end. When both the Separated and Leading checkboxes are selected, the sign digit is added
in front of the field.
This only applies for the numeric field type. When the Separated checkbox is checked, the size will include the
'sign digit’ as well.
Leading
Select the Leading checkbox when a sign indicator is stored in the first digit of the field. When both the
Separated and Leading checkboxes are selected, the sign digit is added in front of the field. This only applies for
the numeric field type.
CCSID
Enter the Coded Character Set Identifier.
CCSID is used by IBM as the abbreviation for "Coded Character Set Identifier". It is a 16-bit number that
represents a specific encoding of a specific code page.
CCSID is commonly used for the data subtype CHARACTER, in order to distinguish the different character
sets per country, language and the character encoding of the system. Despite of the philosophical approach of
Unicode, CCSID can also be used on data type NATIONAL.
This CCSID is an enriched property and will not be collected.
Initial
This field is optional.
IKAN Solutions
METASUITE METAMAP MANAGER - RELEASE 8.1.3
WORK FIELDS | 142
Enter the initial value for the Work field. This value will be stored in the field before processing begins. The
value specified must be of the same general data type as the Workfield being defined. The default initial value
is zero for all numeric type fields and blank(s) for non-numeric fields.
For most data types the initial value can be SYS-LOW-VALUE or SYS-HIGH-VALUE. This is not the case for
PRN fields, BIT fields and floating-point fields.
Code
Select the required code option from the drop-down list. The following options are available:
•
Code: Select this option to define a numeric field that is not considered to contain an amount as value, but
rather a numeric code.
•
No Code: Select this option when there is no additional information to be added for the field (which is the
default).
•
Time: Select this option to define a field that contains TIME information.
•
Timestamp: Select this option to define a field that contains TIMESTAMP information.
Business Tab
The following fields are available on the Business tab:
•
Business Rule (page 142)
•
Note (page 142)
Business Rule
In this field, you can enter a description for the Work Field.
If you want to enter text in RTF (Rich Text Format), right-click and select RTF from the context menu (or use
the shortcut CTRL + R).
Note
In this field, you can enter additional information pertaining to the Work Field.
If you want to enter text in RTF (Rich Text Format), right-click and select RTF from the context menu (or use
the shortcut CTRL + R).
10.2. Subfields
Subfields are a type of MetaMap Objects that can be assigned to a Work Field.
You will define a Subfield for a Work Field, if you want to scan a specific part of a Work Field. The Subfield
will automatically get the contents of the position it refers to.
IKAN Solutions
METASUITE METAMAP MANAGER - RELEASE 8.1.3
WORK FIELDS | 143
Procedure
1.
Open the required Model.
2.
Expand the tree in such a way that the required Work Field is displayed.
3.
Right-click the Work Field name and select Add > Sub Work Field.
The Work Field Properties window is displayed.
4.
Fill out the required fields.
For a detailed description of the fields, refer to the section Work Fields (page 135).
5.
Apply or discard your changes.
The name of the new Sub Work Field and its symbol (
6.
) are displayed in the Tree View window.
Save your changes by doing one of the following:
•
Click the Save Active Model (
•
Select File > Save Active Model.
IKAN Solutions
) button on the Main Toolbar.
METASUITE METAMAP MANAGER - RELEASE 8.1.3
CHAPTER 11
Program Procedures
Program Procedures are a type of MetaMap Objects that can be assigned directly to a Model. Apart from
Program Procedures, it is also possible to assign Data Sources (page 49), Data Targets (page 104), Public
Procedures (page 148) and Work Fields (page 135) to a Model.
You will define a Program Procedure for a Model, if you want to define logic to be executed before or after the
mapping logic (File, Record and Target Procedures; Target Field Value definitions).
There are three types of Program Procedures, depending on the time of execution. You can define one
Program Procedure of each type for a specific Model:
•
Initial
•
Read-Write Cycle
• End of Job
See Execution Time on page 146.
IKAN Solutions
METASUITE METAMAP MANAGER - RELEASE 8.1.3
PROGRAM PROCEDURES | 145
11.1. Procedure
1.
Open the required Model.
2.
Right-click the Model name and select Add > Program Procedure.
The properties window is displayed.
Two tabs are available: Technical and Business.
3.
4.
Fill out the required fields.
For a detailed description of the fields, refer to the sections:
•
Technical Tab (page 146)
•
Business Tab (page 147)
Apply or discard your changes.
The name of the new Program Procedure and its symbol (
Model.
5.
) are displayed as a dependent Object of the
Save your changes by doing one of the following:
•
Click the Save Active Model (
•
Select File > Save Active Model.
IKAN Solutions
) icon on the Main Toolbar.
METASUITE METAMAP MANAGER - RELEASE 8.1.3
PROGRAM PROCEDURES | 146
11.2. Technical Tab
The following fields are available on the Technical tab:
•
Name (page 146)
•
Execution Time (page 146)
•
Commands Workspace (page 146)
Name
Enter a name for the Procedure. It is advised to select a name that describes the action performed.
The name in this field will be displayed in the Tree Window. It can contain up to 32 characters.
Execution Time
Select the required execution time from the drop-down list. The following options are available:
Option
Meaning
Initial
Procedure will be executed before the mapping logic (File, Record and
Target Procedures; Target Field Value definitions).
Read-Write Cycle
This procedure will be performed in the normal read-write flow, between
the source file procedures and the target file procedures and before
execution of the first "DETAIL OUTPUT PRE" procedure.
The advantage of this procedure is the independency from any target file.
End of Job
Procedure will be executed after the mapping logic (File, Record and Target
Procedures; Target Field Value definitions).
Commands Workspace
In this field, you can enter the commands that build the Program Procedure. These commands are written in
MXL (MetaSuite Export Language). See Structured Editor on page 186.
1.
To start entering commands, click the Stop/Edit icon (
).
You can also right-click the Workspace and select Start/Stop Editing from the context menu (or use F7).
The list of available commands is displayed at the left of this field. Invalid commands are displayed in red.
Note:
If you do not need the assisted mode, you can switch it off using the
Toolbar.
icon in the Edit
2.
Select the required command by clicking it.
The command will be added to the Workspace.
Any error messages or warnings are displayed underneath the Commands Workspace.
3.
Once you have finished entering the commands, click the Stop/Edit icon (
).
The Procedure is verified. If syntax errors are found, the errors message are displayed underneath the
Workspace.
IKAN Solutions
METASUITE METAMAP MANAGER - RELEASE 8.1.3
PROGRAM PROCEDURES | 147
4.
Save your changes by doing one of the following:
•
Click the Save Active Model (
•
Select File > Save Active Model.
) icon on the Main Toolbar.
11.3. Business Tab
The following fields are available on the Business tab:
•
Business Rule (page 147)
•
Note (page 147)
Business Rule
In this field, you can enter a description of the Program Procedure.
If you want to enter text in RTF (Rich Text Format), right-click and select RTF from the context menu (or use
the shortcut CTRL + R).
Note
In this field, you can enter Notes for this Program Procedure.
If you want to enter text in RTF (Rich Text Format), right-click and select RTF from the context menu (or use
the shortcut CTRL + R).
IKAN Solutions
METASUITE METAMAP MANAGER - RELEASE 8.1.3
CHAPTER 12
Public Procedures
Public Procedures are a type of MetaMap Objects that can be assigned directly to a Model. Apart from Public
Procedures, it is also possible to assign Data Sources (page 49), Data Targets (page 104), Program Procedures
(page 144) and Work Fields (page 135) to a Model.
You will define a Public Procedure for a Model, if you want to create a block of logic that can be executed
independently from a fixed execution time. Public Procedures can be executed more than once: it is reusable
and can be part of a loop.
12.1. Procedure
1.
Open the required Model.
2.
Right-click the Model name and select Add > Public Procedure.
The properties window is displayed.
Two tabs are available: Technical and Business.
IKAN Solutions
METASUITE METAMAP MANAGER - RELEASE 8.1.3
PUBLIC PROCEDURES | 149
3.
4.
Fill out the required fields.
For a detailed description of the fields, refer to the sections:
•
Technical tab (page 149)
•
Business Tab (page 150)
Apply or discard your changes.
The name of the new Public Procedure and its symbol (
Model.
5.
) are displayed as a dependent Object of the
Save your changes by doing one of the following:
•
Click the Save Active Model (
•
Select File > Save Active Model.
) icon on the Main Toolbar.
12.2. Technical tab
The following fields are available on the Technical tab:
•
Name (page 149)
•
Commands Workspace (page 149)
Name
Enter a name for the Procedure. It is advised to select a name that describes the action performed.
The name in this field will be displayed in the Tree Window. It can contain up to 32 characters.
Commands Workspace
In this field, you can enter the commands that build the Public Procedure. These commands are written in the
MXL (MetaSuite Export Language). See Structured Editor on page 186.
1.
To start entering commands, click the Stop/Edit icon (
).
You can also right-click the Workspace and select Start/Stop Editing from the context menu (or use F7).
The list of available commands is displayed at the left of this field. Invalid commands are displayed in red.
Note:
If you do not need the assisted mode, you can switch it off using the
Toolbar.
icon in the Edit
2.
Select the required command by clicking it.
The command will be added to the Workspace.
Any error messages or warnings are displayed underneath the Commands Workspace.
3.
Once you have finished entering the commands, click the Stop/Edit icon (
).
The Procedure is verified. If syntax errors are found, the errors message are displayed underneath the
Workspace.
IKAN Solutions
METASUITE METAMAP MANAGER - RELEASE 8.1.3
PUBLIC PROCEDURES | 150
4.
Save your changes by doing one of the following:
•
Click the Save Active Model (
•
Select File > Save Active Model.
) icon on the Main Toolbar.
12.3. Business Tab
The following fields are available on the Business tab:
•
Business Rule (page 150)
•
Note (page 150)
Business Rule
In this field, you can enter a description of the Public Procedure.
If you want to enter text in RTF (Rich Text Format), right-click and select RTF from the context menu (or use
the shortcut CTRL + R).
Note
In this field, you can enter Notes for this Public Procedure.
If you want to enter text in RTF (Rich Text Format), right-click and select RTF from the context menu (or use
the shortcut CTRL + R).
IKAN Solutions
METASUITE METAMAP MANAGER - RELEASE 8.1.3
CHAPTER 13
Test Data Wizard
The Test Data Wizard selects a sample of input records using one of the following sampling techniques:
•
Percentage
•
Systematic Skipping
•
Fixed-size
•
Acceptance attribute
•
Discovery attribute
•
Variables
1.
Open an existing Model or create a new Model.
This is not mandatory. You can start the Test Data Wizard from scratch by immediately clicking the Test
Data Wizard icon. In that case, you will be asked to create a new Model first.
You can also start the Test Data Wizard via the Start menu, by selecting Start > MetaSuite > Test Data
Wizard.
2.
Select the Test Data Wizard icon (
The following window is displayed:
) from the Wizard Toolbar.
The following fields are available:
IKAN Solutions
Field
Meaning
Dictionary File
Select a Dictionary File from the drop-down list.
METASUITE METAMAP MANAGER - RELEASE 8.1.3
TEST DATA WIZARD | 152
3.
Field
Meaning
Dictionary Record
Select a Dictionary Record from the drop-down list.
No Input Data
Required
This option is only available for Standard Files.
Select this option if you want to use the Source File as a dummy file (it wil be
exported as a function file) and write the Target a specified number of times.
Fill out the fields as required and click Next.
If the Test Data Wizard is started from an existing Model and if an existing File has been selected as test
file, the following window is displayed. Select the appropriate answer.
Note:
If you answer Yes, be aware of the fact that existing File Procedures might be changed.
The following window is displayed:
4.
The following fields are available:
IKAN Solutions
Field
Meaning
Dictionary File
Select a Dictionary File from the drop-down list.
Dictionary Record
Select a Dictionary Record from the drop-down list.
Target Type
Select the Target type.
METASUITE METAMAP MANAGER - RELEASE 8.1.3
TEST DATA WIZARD | 153
5.
The Sampling Method selection window is displayed:
6.
Select the required sampling method.
The following methods are available:
IKAN Solutions
Field
Meaning
Percentage
The percentage method selects the approximate percentage of input
records for inclusion in a sample. Due to the random selection process
being used, you may obtain slightly more or slightly less records than
expected.
Systematic skipping
The systematic skipping method is used to select single records or groups
of records, after skipping a fixed number of records.
Fixed-size
The fixed-size method is used when you know the exact number of records
to be included in your sample.
Acceptance attribute
The acceptance attribute method is used to test the occurrence rate of an
attribute (usually an error situation) within the population, and to
guarantee that a sample is representative of the population as a whole.
Discovery attribute
The discovery attribute method is used when you are confident that you
"know" the occurrence rate of errors in the population from previous
attributes sampling experience, and want to verify that the current
occurrence rate is no greater than the "known" rate. The advantage of
discovery attributes sampling is that a much smaller sample size is obtained
than when using acceptance attributes sampling.
Variables
The variables method is used when you are concerned with the
"materiality" (i.e. gross amount) of error in the population, rather than just
the rate of errors.
METASUITE METAMAP MANAGER - RELEASE 8.1.3
TEST DATA WIZARD | 154
7.
Depending on the sampling method you selected, different fields will be available. Fill out the
fields as required and click Next.
7.1.Percentage
The following fields are available:
IKAN Solutions
Field
Meaning
Percentage
The approximate percentage of records to be included in the
sample. You can also enter the name of a non-subscripted Work
Field containing a value in the (inclusive) range 0.00001-99.99999.
Random Base Number
A one to eight-digit integer (or integer Work Field) to be used as a
"seed" by the random number generator. This seed is not itself the
first random number used, but it is the starting point for the
calculation used to generate the first random number. If this
specification is omitted, a random number seed will be generated
from the computer's clock.
The advantage of specifying a Random Base Number is that you
can duplicate a sample by later entering the same value for
Random Base Number (provided there has been no change in the
number or order of records on the Source File). All of the sampling
techniques employ (at one time or another) the random number
generator supplied with the system. This random number
generator uses the multiplicative congruence technique, with a
period of 2 to the 32nd power.
METASUITE METAMAP MANAGER - RELEASE 8.1.3
TEST DATA WIZARD | 155
7.2.Systematic Skipping
The following fields are available:
IKAN Solutions
Field
Meaning
Interval
The number of records to be skipped before each record (or group
of records) is selected. You can also enter the name of a nonsubscripted integer Work Field.
Start Record
The record number of the first record to be included in the sample.
You can also enter the name of a non-subscriptive integer Work
Field. If omitted, a random starting point in the range from 1
through n will be selected by the generated program, where n is
the interval specified above.
Cluster Size
The number of contiguous records to be included in the sample. If
omitted, it defaults to 1. You can also enter the name of a nonsubscriptive integer Work Field.
Random Base Number
A one to eight-digit integer (or integer Work Field) to be used as a
"seed" by the random number generator. This seed is not itself the
first random number used, but it is the starting point for the
calculation used to generate the first random number. If this
specification is omitted, a random number seed will be generated
from the computer's clock.
The advantage of specifying a Random Base Number is that you
can duplicate a sample by later entering the same value for
Random Base Number (provided there has been no change in the
number or order of records on the Source File). All of the sampling
techniques employ (at one time or another) the random number
generator supplied with the system. This random number
generator uses the multiplicative congruence technique, with a
period of 2 to the 32nd power.
METASUITE METAMAP MANAGER - RELEASE 8.1.3
TEST DATA WIZARD | 156
7.3.Fixed-size
The following fields are available:
Field
Meaning
Sample Size
The exact number of records to be included in the sample. You can
also enter the name of a non-subscripted integer Work Field.
Random Base Number
A one to eight-digit integer (or integer Work Field) to be used as a
"seed" by the random number generator. This seed is not itself the
first random number used, but it is the starting point for the
calculation used to generate the first random number. If this
specification is omitted, a random number seed will be generated
from the computer's clock.
The advantage of specifying a Random Base Number is that you
can duplicate a sample by later entering the same value for
Random Base Number (provided there has been no change in the
number or order of records on the Source File). All of the sampling
techniques employ (at one time or another) the random number
generator supplied with the system. This random number
generator uses the multiplicative congruence technique, with a
period of 2 to the 32nd power.
7.4.Acceptance attribute
IKAN Solutions
METASUITE METAMAP MANAGER - RELEASE 8.1.3
TEST DATA WIZARD | 157
The following fields are available:
Field
Meaning
Confidence Level
The statistical probability (expressed as a percentage) that the
selected sample is representative of the population. It is a number
or a non-subscripted Work Field having a value in de range of 80 to
99.9. The larger the value specified here, the larger the sample size
will be.
Precision
The accuracy of the sample as a percentage of the tolerable error. It
is a number or a non-subscripted Work Field having a value in the
range of 0.1 to 99.9. The lower the precision, the larger the sample
size will be.
Occurrence Rate
The expected occurrence rate of errors in the population,
expressed as a percentage. It is a number or a non-subscripted
Work Field having a value in the range of 0.00001 to 99.99999.
Random Base Number
A one to eight-digit integer (or integer Work Field) to be used as a
"seed" by the random number generator. This seed is not itself the
first random number used, but it is the starting point for the
calculation used to generate the first random number. If this
specification is omitted, a random number seed will be generated
from the computer's clock.
The advantage of specifying a Random Base Number is that you
can duplicate a sample by later entering the same value for
Random Base Number (provided there has been no change in the
number or order of records on the Source File). All of the sampling
techniques employ (at one time or another) the random number
generator supplied with the system. This random number
generator uses the multiplicative congruence technique, with a
period of 2 to the 32nd power.
7.5.Discovery attribute
IKAN Solutions
METASUITE METAMAP MANAGER - RELEASE 8.1.3
TEST DATA WIZARD | 158
The following fields are available:
Field
Meaning
Confidence Level
The statistical probability (expressed as a percentage) that the
selected sample is representative of the population. It is a number
or a non-subscripted Work Field having a value in de range of 80 to
99.9. The lower the precision, the larger the sample size will be.
Maximum Error Rate
The expected occurrence rate of errors in the population,
expressed as a percentage. It is a number or a non-subscripted
Work Field having a value in the range of 0.00001 to 99.99999.
Random Base Number
A one to eight-digit integer (or integer Work Field) to be used as a
"seed" by the random number generator. This seed is not itself the
first random number used, but it is the starting point for the
calculation used to generate the first random number. If this
specification is omitted, a random number seed will be generated
from the computer's clock.
The advantage of specifying a Random Base Number is that you can
duplicate a sample by later entering the same value for Random
Base Number (provided there has been no change in the number or
order of records on the Source File). All of the sampling techniques
employ (at one time or another) the random number generator
supplied with the system. This random number generator uses the
multiplicative congruence technique, with a period of 2 to the 32nd
power.
7.6.Variables
The following fields are available:
IKAN Solutions
Field
Meaning
Amount Field
The name of the field to be sampled. It must be a totalable nonsubscripted field defined on a Source File.
Confidence Level
The statistical probability (expressed as a percentage) that the
selected sample is representative of the population. It is a number
or a non-subscripted Work Field having a value in the range 8099.9. The larger a value specified here, the larger the sample size
will be.
METASUITE METAMAP MANAGER - RELEASE 8.1.3
TEST DATA WIZARD | 159
8.
Field
Meaning
Precision
The total tolerable amount of error for the population (not the
tolerable error per item in the population). It is a number or nonsubscripted integer Work Field.
Random Base Number
A one to eight-digit integer (or integer Work Field) to be used as a
"seed" by the random number generator. This seed is not itself the
first random number used, but it is the starting point for the
calculation used to generate the first random number. If this
specification is omitted, a random number seed will be generated
from the computer's clock.
The advantage of specifying a Random Base Number is that you can
duplicate a sample by later entering the same value for Random
Base Number (provided there has been no change in the number or
order of records on the Source File). All of the sampling techniques
employ (at one time or another) the random number generator
supplied with the system. This random number generator uses the
multiplicative congruence technique, with a period of 2 to the 32nd
power.
The Mapping window is displayed.
IKAN Solutions
METASUITE METAMAP MANAGER - RELEASE 8.1.3
TEST DATA WIZARD | 160
9.
Optionally, you can add User-defined or System Functions.
9.1.Double-click a field in the Target column.
The following screen is displayed.
9.2.Select the type of function you want to use for the Target field and click OK.
The following options are available:
•
User Function
•
System Function
•
Data List
9.3.If you select User Function or System Function, you must select the required function from the
drop-down list.
Depending on the function you select, another screen will be displayed asking you to fill out the
required parameters for this function.
For example:
For more detailed information on the different parameters, refer to the User-defined Functions User
Guide.
IKAN Solutions
METASUITE METAMAP MANAGER - RELEASE 8.1.3
TEST DATA WIZARD | 161
9.4.If you select Data List, the following screen is displayed.
The following fields are available:
Field
Meaning
Dictionary File
Select a Dictionary File from the drop-down list.
Dictionary Record
Select a Dictionary Record from the drop-down list.
Dictionary Field
Select a Dictionary Field from the drop-down list.
Occurrence
Select the occurrence rate.
This table has already been selected
for the field. If flagged, the same
row will be used for this field.
If a random table value is required from a table that has
already been used for a previous field, flagging this
option will make sure that the previously selected field
value and the current field value will be taken from the
same row.
For example:
Suppose you need a sample of post codes and
communes. You first select a random post code from a
table containing the communes. Next, you want to select
the commune corresponding to this post code. This can
be done by setting this flag.
Perform an integrity check and
exclude if not OK.
Set this flag if you do not want to select a value, but if
you just want to verify that the target field value is
available in the selected table.
10. The following buttons are available.
IKAN Solutions
Button
Meaning
Help
Display the on-line help files.
<Back
Return to the previous screen.
Save
Save the active Model.
Generate
Generate the test data.
METASUITE METAMAP MANAGER - RELEASE 8.1.3
TEST DATA WIZARD | 162
IKAN Solutions
Button
Meaning
Finish
Close the Test Data Wizard.
The changes to the Model will be displayed in the Tree View, but have
not yet been saved at this stage.
Cancel
Close the Test Data Wizard without generating or saving any changes.
METASUITE METAMAP MANAGER - RELEASE 8.1.3
CHAPTER 14
Transformation Programs
You create a Model in order to define the transformation rules between the available Data Sources and the
required Data Targets. Once this work is finished, you need to use this Model to generate the Transformation
Program. Subsequently, you need to execute this Transformation Program.
14.1. Generating a Transformation Program
1.
Open the required Model.
2.
Click the Generate Active Model icon (
The following window is displayed:
Note:
) on the Main Toolbar.
If the default generator has been specified on the MetaMap Manager Settings window in the
INI Manager, this window is not being displayed. For more information, refer to the MetaSuite
INI Manager User Guide.
The following options can be specified:
IKAN Solutions
METASUITE METAMAP MANAGER - RELEASE 8.1.3
TRANSFORMATION PROGRAMS | 164
Fields
Meaning
Choose operating system
and COBOL compiler
Select the required Generator from the selection list.
Trace
Select this checkbox, if you want to trace a certain field somewhere in
your program sequence.
Debug
Select this checkbox, if you want to include code table names in the
generated COBOL code (.mgl) and run-script (.mrl).
Note:
3.
If you want to use the options Trace or Debug, you have to select the option(s) BEFORE
selecting the compiler.
The generation starts immediately.
Results:
•
During the Program Generation, any messages are displayed in the Generate Tab.
Note: To find the messages within the generation listing, you can use the Find Generator Message
buttons on the Developer Toolbar. See Developer Toolbar on page 12.
•
The generated program in COBOL code will be named after the Execution Name defined in the
Model Properties window (page 47). Its extension is .mgl and it will be saved in the MGL default
directory, defined in the current User Profile. See User Profiles on page 180.
•
The generated run code will also be named after the Execution Name defined in the Model Properties
window (page 47). Its extension is .mrl and it will be saved in the MRL default directory, defined in
the current User Profile. The procedure to change these default directories is explained in the
MetaSuite INI Manager Guide.
The available compile scripts are located in the system folder that is defined with the INI manager. The
default is <ins>\<gen>\System.
You can copy the scripts to your personal environment in the TMP folder, which is defined with the INI
manager as well. The default value is <doc>\<gen>\tmp.
where:
•
<doc> is the MetaSuite work folder in “My Documents”
•
<gen> is the directory containing Generator specific files.
This name always starts with the indication Gen and is followed by the Generator Name. For
Fujitsu_Windows for instance, this directory is named GenFujitsu_Windows.
After having copied a script, you can customise it to your needs. You can use the following parameters:
%1 = program name
%2 = <gen> (the generator name)
%3 = "<mgl>" (the <mgl> folder)
%4 = "<mrl>" (the <mrl> folder)
Note:
IKAN Solutions
If there are no compile scripts available, the COBOL source code will not be compiled at this
stage. You will then perform this operation manually at a later stage. The script can be
something else than a compile script. It is possible that the script transfers the MGL and MRL
to another platform or that it performs a check-in procedure.
METASUITE METAMAP MANAGER - RELEASE 8.1.3
TRANSFORMATION PROGRAMS | 165
4.
5.
The compile script which is defined in the INI Manager will be executed.
Results:
•
The Transformation Program COBOL source code is compiled.
•
The compiled COBOL program (executable) is saved in directory where the Compile Scripts are
available. As for the COBOL source program, it is named after the Execution Name defined in the
Model Properties window.
The steps to take next are explained in the section Executing a Transformation Program
(page 166).
14.2. Finding Error Messages
To easily find any error messages that occurred during the generation of the Transformation Program, you can
use the buttons in the Developer Toolbar.
The following buttons are available:
•
Find Generator Message
•
Find Next Generator Message
•
Find Previous Generator Message
1.
Click the Find Generator Message button.
The following screen is displayed:
2.
Fill out the fields as required and click OK.
IKAN Solutions
Field
Meaning
Message Type
From the pop-up list, select the type of the message you want to find.
The following types are available:
• Any
• Error Messages
• Warning Messages
• Informational Messages
Condition
The following conditions can be selected:
• Contains
• Ends With
• Exact
• Starts With
Search String
Enter the search string.
METASUITE METAMAP MANAGER - RELEASE 8.1.3
TRANSFORMATION PROGRAMS | 166
3.
Use the Find Next and Find Previous Generator Message buttons to continue your search.
14.3. Executing a Transformation Program
1.
Transfer the compiled Transformation Program (ExecName.exe) and the run script
(ExecName.mrl) to the platform where the program must be executed.
Note:
2.
If the COBOL source code was not compiled automatically during the generation process
(page 163), transfer the COBOL source code (ExecName.mgl) to the required platform and
compile the code manually.
Edit the run script file in a text editor.
It has the following structure:
These lines have the following meaning:
IKAN Solutions
Lines
Meaning
rem Win/NT-95 Runscript for
ExecName-0001
This remarks (rem) line contains the following information:
• Platform type where the program will be executed, in this
case Windows NT or Windows 95 family.
• Name of the Program, in this case ExecName
• Version number of the run script, in this case 0001
del ExecName.*
These lines make sure that any old Target Files that might still
exist are deleted, before the new Target Files are generated.
METASUITE METAMAP MANAGER - RELEASE 8.1.3
TRANSFORMATION PROGRAMS | 167
Lines
Meaning
set PPTIPT=NUL
The PPTIPT line identifies the file containing the runtime
parameters for the Parameter Workfields (page 137) in the
Model. This file is manually created using a text editor. Its name
typically refers to the Model Execution Name, for instance:
ExecName.ini (for NT platforms).
It may be located in any directory. If it is located in another
directory than the run-script (MRL), the path must be included
on this line.
The values must be defined before the Model is actually
executed.
In the following example, the ExecName.ini defines the runtime
values for two Parameter Workfields: StartDate and ReportLines:
If no runtime parameters need to be defined, the PPTIPT
parameter must be set to the default value NUL.
IKAN Solutions
set PPTF01=SourceMDL1 set
PPTF02=SourceMDL2
The PPTF## lines contain the Dictionary File names that have
been defined as sources in the Model. There can be up to 99
data sources.
Attention:
• If the Dictionary File Names do not match the names of
the physical Source Files, you should replace them.
• If the Source Files are not located on the platform where
the program will be executed, you have to transfer it or
do your execution in two steps.
set PPTT01=ExecName.t01 set
PPTT02=ExecName.t02
The PPTT## lines contain the sorted temporary files that are the
result of Source Sorts. They will be used as temporary sort files.
In the last lines of the script, these temporary files are deleted.
set PPTLOG=ExecName.log
The PPTLOG file is the global log file generated during the
execution of the program.
This file can be used for debugging purposes.
set PPTLST=ExecName.lst
The PPTLST file is the COBOL Object Program list. It can be
opened and verified in a COBOL editor.
For a detailed description, refer to the Generator Manager
Guide.
set PPTDBG=ExecName.dbg
The PPTDBG file is a text format file containing debugging
information for the program.
set PPTTD01=ExecName.d01
set PPTTD02=ExecName.d02
The PPTTD## lines contain the Target File names defined in the
Model. There can be up to 99 data targets (Target Files and
Reports combined).
set PPTTR01=ExecName.R01
The PPTR## lines contain the Target Report names defined in
the Model. There can be up to 99 data targets (Target Files and
Reports combined).
ExecName.exe
After setting the filename variables in the lines above, this line
executes the MetaSuite Program.
METASUITE METAMAP MANAGER - RELEASE 8.1.3
TRANSFORMATION PROGRAMS | 168
3.
Lines
Meaning
del ExecName.t01 del
ExecName.t02
Once the MetaSuite Program has been executed, the temporary
sort files are deleted.
echo %errorlevel%
This line causes the Program Error Level to be displayed.
Perform the required changes to the Run Script.
Rename the run script, so that it can be executed on the applicable platform.
•
For execution on a Windows platform, replace the .mrl extension by .bat.
•
For execution on a UNIX platform, replace the .mrl extension by .sh
•
For execution on a z/OS platform, the file must be placed in a PDS of type CNTL.
•
For execution on another platform, remove the extension.
Note:
This step can be avoided if the MRL dictionary tables are adequately customized.
4.
Run the renamed run script.
The Target Files and Reports are generated in the directory where the run script and program are located.
5.
Load the flat files into the database.
Use the load scripts generated by MetaStore for this purpose. Refer to the section Collecting Target Files in
the MetaStore Manager Guide.
14.4. Programming Runtime Messages
The results of each generated program include a Runtime Messages report (PPTLST). This report includes:
•
Runtime parameter messages
•
Runtime error messages
•
Source File end-of-job statistics messages
•
Report end-of-job statistics messages
•
Target File end-of-job statistics messages
Runtime Parameter Messages
When you code runtime parameters, for each parameter, both new and changed initial values are shown.
In the following example, the SYS-READ-LIMIT and SELECTED-DEPARTMENT receive a new initial
value:
Runtime Error Messages
A data validation error message is produced for each error discovered in a numeric, date, or limits-checked
field. You will get one message for each invalid field referenced in your program.
IKAN Solutions
METASUITE METAMAP MANAGER - RELEASE 8.1.3
TRANSFORMATION PROGRAMS | 169
If a data validation error occurs, the error message will describe the location and contents of the erroneous data
field, and the record containing the invalid data will be excluded from the report. Note that this exclusion
occurs before any processing, and therefore cannot be affected by procedural code.
You may disable all data validation entirely at run time; however, you should do this only if you are certain that
all referenced data is valid.
The validation types are described in the following sections.
Numeric Validation
If a numeric exception is encountered, a dump of the record will be printed (after the validation process has
been completed for all fields in the record).
For example, the following message was produced when the system detected an invalid value in ANNUALSALARY:
Note:
You can control the numeric validation process and the production of record dumps through use of
the SYS-NUMERIC-CHECK (page 313) and SYS-RECORD-SNAP (page 314) runtime parameters.
Date Field Validation
If an invalid date field is encountered, a message in the following format will be produced:
Note:
You can control the numeric validation process and the production of record dumps through use of
the SYS-DATE-CHECK (page 311) and SYS-RECORD-SNAP (page 314) runtime parameters.
Limits Check Validation
If a numeric field exceeds the limits defined for it, a message in the following format will be produced:
Note:
You can control the numeric validation process and the production of record dumps through use of
the SYS-LIMITS-CHECK (page 313) and SYS-RECORD-SNAP (page 314) runtime parameters.
IKAN Solutions
METASUITE METAMAP MANAGER - RELEASE 8.1.3
TRANSFORMATION PROGRAMS | 170
Source File End-of-Job Messages
Source File EOJ messages summarize the processing of the files accessed by the program. There will be one set
of these messages for each Source File processed. Depending on how the Source Files are processed by the
program, the EOJ statistics will contain such information as:
•
The number of records read and processed from the file.
•
The number of records excluded by user code or error processing.
•
The number of records sorted or "extracted" in an initial sort procedure.
Note that this number will be one higher than you might expect, because a "control" record is written to
each of these files.
•
The number of buffers constructed and processed, if a PATH was defined for the Source File.
•
The number of the errors for each type of error that occurred during file processing.
Target File or Report End-of-Job Messages
Target File EOJ messages summarize the processing of the Target Files and Reports produced by the program.
There will be one set of messages for each Target providing information such as:
•
The number of input records read and processed by the Target.
•
The number of input records excluded from the Target, either by user code or due to computational errors.
•
The number of detail records written to the Target.
•
The number of total records written to the Report.
•
The number of the errors for each type of error that occurred during Target processing.
Program Exit Codes
The following message appear in the PPTLST file ExecName.lst, if problems occurred with a generated
MetaSuite program at execution time:
Program system exit status xxxx
where xxxx is replaced by one of the 4-digit codes from the following table:
Code
Meaning
8000
PPTIPT parameter file error, or parameter error encountered.
8001
Too much records to load for External Array. Processing stopped.
8002
Data validation error while loading External Array. Processing stopped.
8003
Number of data validation errors exceeded SYS-ERROR-LIMIT. Processing stopped.
8004
Sort returned with an error.
8005
A field value overflow has occurred on a numeric field.
8006
Computational error has occurred on a numeric field.
8007
I/O error or Connect error has occurred.
8008
Source File / TargetFile open error has occurred.
8009
Exception error on INVOKE
8010
Input Sort Error or EXTRACT SORT File Output Error. Processing stopped.
IKAN Solutions
METASUITE METAMAP MANAGER - RELEASE 8.1.3
TRANSFORMATION PROGRAMS | 171
Code
Meaning
8011
Input Sort Output to SORTWORK Error. Processing stopped.
8012
Extract File Write Error. Processing stopped.
8013
Extract File Open Input Error. Processing stopped.
8014
Extract File Open Output Error. Processing stopped.
8015
Target Sort Error. Processing Stopped
8016
Target Sort File Write Error. Processing Stopped
8018
Target File Write Error or IMS Insert record error. Processing Stopped
8020
Source File Close Error has occurred. Processing Stopped
8024
Extract File Close Error has occurred. Processing Stopped
8028
Target File Close Error has occurred. Processing Stopped
8030
A character field value error has occurred. Processing Stopped
File Status Codes
This is a list of file status codes that can be returned in a FILE STATUS data-item for a MicroFocus COBOL
compiler at run time. When the FILE STATUS code does not appear in this listing, please refer to your
COBOL documentation for more information on the status code.
Code
Meaning
9001
Insufficient buffer space. On OS/2, could indicate that the SWAPPATH has not been set
correctly or the SWAPPATH drive is full. Could also indicate an out of memory situation.
9002
File not open when access tried.
9003
Serial mode error.
9004
Illegal file name.
9005
Illegal device specification.
9006
Attempt to write to a file opened for input.
9007
Disk space exhausted.
9008
Attempt to input from a file opened for output.
9009
No room in directory (also, directory does not exist).
9010
File name not supplied.
9012
Attempt to open a file which is already open.
9013
File not found.
9014
Too many files open simultaneously.
9015
Too many indexed files open.
9016
Too many device files open.
9017
Record error: probably zero length.
IKAN Solutions
METASUITE METAMAP MANAGER - RELEASE 8.1.3
TRANSFORMATION PROGRAMS | 172
Code
Meaning
9018
Read part record error: EOF before EOR or file open in wrong mode.
9019
Rewrite error: open mode or access mode wrong.
9020
Device or resource busy.
9021
File is a directory.
9022
Illegal or impossible access mode for OPEN.
9023
Illegal or impossible access mode for CLOSE.
9024
Disk I/O error.
9025
Operating system data error.
9026
Block I-O error.
9027
Device not available.
9028
No space on device.
9029
Attempt to delete open file.
9030
File system is read-only.
9031
Not owner of file.
9032
Too many indexed files. This error can also happen when a sequential file is open for input and
an attempt is made to open the same file for output.
9033
Physical I-O error.
9034
Incorrect mode or file descriptor.
9035
Attempt to access a file with incorrect permission.
9036
File already exists.
9037
File access denied.
9038
Disk not compatible.
9039
File not compatible.
9040
Language initialization not set up correctly.
9041
Corrupt index file.
9042
Attempt to write on broken pipe.
9043
File information missing for indexed file.
9045
Attempt to open an NLS file using an incompatible program.
9047
Indexed structure overflow. (Could indicate that you have reached the maximum number of
duplicate keys.)
9065
File locked.
9066
Attempt to add duplicate record key to indexed file.
9067
Indexed file not open.
9068
Record locked.
9069
Illegal argument to ISAM module.
IKAN Solutions
METASUITE METAMAP MANAGER - RELEASE 8.1.3
TRANSFORMATION PROGRAMS | 173
Code
Meaning
9070
Too many indexed files open.
9071
Bad indexed file format.
9072
End of indexed file.
9073
No record found in indexed file.
9074
No current record in indexed file.
9075
Indexed data file name too long.
9077
Internal ISAM module failure.
9078
Illegal key description in indexed file
9081
Key already exists in indexed file.
9100
Invalid file operation.
9101
Illegal operation on an indexed file.
9102
Sequential file with non-integral number of records.
9104
Null file name used in a file operation.
9105
Memory allocation error.
9129
Attempt to access record zero of relative file.
9135
File must not exist.
9138
File closed with lock - cannot be opened.
9139
Record length or key data inconsistency.
9141
File already open - cannot be opened.
9142
File not open - cannot be closed.
9143
REWRITE/DELETE in sequential mode not preceded by successful READ.
9146
No current record defined for sequential read.
9147
Wrong open mode or access mode for READ/START.
9148
Wrong open mode or access mode for WRITE.
9149
Wrong open mode or access mode for REWRITE/DELETE.
9151
Random read on sequential file.
9152
REWRITE on file not opened I-O.
9158
Attempt to REWRITE to a line-sequential file.
9159
Malformed line sequential-file.
9161
File header not found.
9173
Called program not found.
9180
End-of-file marker error.
9182
Console input or console output open in wrong direction.
9183
Attempt to open line sequential file for I-O.
IKAN Solutions
METASUITE METAMAP MANAGER - RELEASE 8.1.3
TRANSFORMATION PROGRAMS | 174
Code
Meaning
9188
File name too large.
9193
Error in variable length count.
9194
File size too large.
9195
DELETE/REWRITE not preceded by a READ.
9196
Record number too large in relative or indexed file.
9210
File is closed with lock.
9213
Too many locks.
9218
Malformed MULTIPLE REEL/UNIT file.
9219
Operating system shared file limit exceeded.
IKAN Solutions
METASUITE METAMAP MANAGER - RELEASE 8.1.3
CHAPTER 15
Exporting a Model to CDIF format
CDIF is a published set of vendor and method-independent definitions for Metadata Concepts in general, and
for Data Modelling and related concepts in particular.
When you export a Model to CDIF format, a .CDF file is created. This file contains all Objects available in
the Model with their relationships and can be used to enter the MetaSuite Program definition in a Platinum
repository.
1.
Open the required Model.
2.
Click the Export Active Model to CDIF icon (
IKAN Solutions
) on the Standard Toolbar.
METASUITE METAMAP MANAGER - RELEASE 8.1.3
CHAPTER 16
Packaging a Model
Packaging a Model means saving the following files in a specific Package folder defined in the User Profile:
•
the MetaMap Model (.MSM)
•
the MetaMap Model translated in text-format (.MXL)
•
the COBOL source code (.MGL)
•
the run-script (.MRL)
• a summary file (.MUL) listing the used MDLs, the generated objects and the used run-script.
The purpose of packaging a model is allowing the user to use a change management tool to start a check-in (or
packaging) procedure in the background.
Note:
In case you are using a Version Control System by means of an SCC interface, this packaging
possibility might be redundant.
1.
Open the required Model.
2.
Click the Package Active Model icon (
) on the Toolbar.
If no default COBOL generator was defined in the initial settings (user profile or MetaSuite.ini), the
following window is displayed:
This window contains the following items:
IKAN Solutions
METASUITE METAMAP MANAGER - RELEASE 8.1.3
PACKAGING A MODEL | 177
Fields
Meaning
Choose operating system
and COBOL compiler
Select the required Generator from the selection list. In the example
above, only Fujitsu_Windows is available.
Fujitsu_Windows is also the default Generator in this example. This
default Generator has been defined in the active User Profile. See User
Profiles on page 180.
Refer to the MetaSuite INI Manager in the documentation folder on the
Installation CD for information on how to change the default Generator.
Debug
Select this checkbox, if you want to include code table names in the
generated COBOL code (.MGL) and run-script (.MRL).
Trace
Select this checkbox, if you want to trace a certain field somewhere in
your program sequence.
Note:
3.
If you want to use the options Trace or Debug, you have to select the option(s) BEFORE
selecting the compiler.
The packaging starts immediately.
The COBOL source code (MGL) and run-script (MRL) are generated. After successful completion of
this process, the MetaMap Model (MSM) will be saved.
Results:
•
Depending on the MetaMap Manager settings specified in the INI Manager, the Model Version
number is incremented or not. The MUL file is generated.
•
The following files are copied to the MSP directory (defined in the User Profile or in the metasuite.ini
file): package file (MUL), MetaMap Model (MSM), MetaMap Exported Model (MXL), COBOL
Source Code (MGL) and the run-script (MRL).
If no default Package script is defined in the User Profile or in the MetaSuite.ini file, no packaging can be
done.
The available package scripts are located in the system folder that is defined with the INI manager. The
default is <ins>\<gen>\System.
You can copy the scripts to your personal environment in the TMP folder, which is defined with the INI
manager as well. The default value is <doc>\<gen>\tmp.
where:
•
<doc> is the MetaSuite work folder in “My Documents”
•
<gen> is the directory containing Generator specific files.
This name always starts with the indication GEN and is followed by the Generator Name. For
Fujitsu_Windows for instance, this directory is named GENFujitsu_Windows.
After having copied a script, you can customise it to your needs. You can use the following parameters:
%1 = program name
%2 = <gen> (the generator name)
%3 = "<mgl>" (the <mgl> folder)
%4 = "<mrl>" (the <mrl> folder)
Note:
IKAN Solutions
All messages pertaining to the Packaging process are displayed in the Output Window.
METASUITE METAMAP MANAGER - RELEASE 8.1.3
CHAPTER 17
Display Options
It is possible to customize the font, font color and background color in text editing boxes allowing the
introduction of commands in MXL (MetaSuite Export Language):
•
Value boxes on Target Field Properties windows
•
Commands boxes on Procedure Properties windows.
1.
Select Options from the Tools menu.
The following window is displayed:
It contains two sections:
2.
•
Keyword Format on the left,
•
Font on the right.
Specifying color settings.
You can specify the color settings for the following items:
•
Text
•
Selected Text
•
Number
•
Operator
•
Comment
•
System
•
String
•
Comparison
•
Loop
•
Command
•
Conditional
IKAN Solutions
METASUITE METAMAP MANAGER - RELEASE 8.1.3
DISPLAY OPTIONS | 179
Select the required item.
If you want to modify the color settings, clear the checkbox Automatic next to the Foreground drop-down
list and choose your preferred color for that item. If you select Automatic, the default setting will be
applied.
The new setting will be displayed in the Sample box.
If necessary, do the same for the Background color.
3.
Specifying font settings by clicking the Choose Font button.
Specify the Font, Font Style and Size, and click OK. The new settings will be displayed in the Sample box.
4.
Click Reset, if you want to undo any unsaved changes.
5.
Click OK to save the displayed settings.
IKAN Solutions
METASUITE METAMAP MANAGER - RELEASE 8.1.3
CHAPTER 18
User Profiles
In MetaSuite, a User Profile is a combination of personalized settings that are saved in an INI file. The default
name of this INI file is MetaSuite.ini and it is located in the user’s AppData\Roaming\MetaSuite
folder. The initial settings were defined during the MetaSuite installation.
It is possible to change the settings in the MetaSuite.ini file or to create additional INI files with different
settings. The option User Profile from the Tools menu allows to select another User Profile or to reload a
modified User Profile, so that their settings become active.
Note:
The procedure on how to update User Profiles is explained in the MetaSuite INI Manager User
Guide.
1.
Select the User Profile option from the Tools menu.
A screen similar to this one appears, displaying the available INI files.
2.
Select the required INI file and click Open.
The path of the new INI file is displayed at the bottom, in the statusbar.
IKAN Solutions
METASUITE METAMAP MANAGER - RELEASE 8.1.3
CHAPTER 19
Version Management with Source
Control
It is possible to save multiple versions of a MetaMap Model. The versions are saved in a Source Control
system like Microsoft SourceSafe and can be retrieved as files written in the MSM (MetaSuite Export
Language) format.
19.1. Establishing the Connection Between MetaMap and the Source
Control System
When you start a new MetaMap session, the connection to the Source Control system is not automatically
established. If you want to use the Source Control, you need to establish the connection manually.
1.
Select Source Control > Connect to Source Control...
A screen similar to this one is displayed:
2.
Fill out the fields as required and click OK.
IKAN Solutions
Field
Description
Username
Enter a username you can use to access the Source Control database.
Password
Enter the required password.
Database
Enter the name of the Source Control database to be used.
You can also use the Browse button to access the required database.
METASUITE METAMAP MANAGER - RELEASE 8.1.3
VERSION MANAGEMENT WITH SOURCE CONTROL | 182
The following screen is displayed:
3.
Select MetaSuite > MSP and click OK.
If you do not have a SCC-compatible versioning tool, the MDL and MSM folders are not used for
checking in or out. In that case, those folders are considered to be “workspaces” and you will use a
packaging script in order to promote the Models with a non-SCC tool, e.g., remote check-in by means of
a scheduler.
It is not very likely that the “workspaces” (MDL/MSM folders) will be used to promote those files,
because often they are put within shared folders, and between the time of packaging and the scheduled
check-in time things might change. Therefore, a separate MSP folder has been provided containing
MSM and MDL folders and information files to bind them together.
Note:
The MSP folder is the default folder for MetaSuite Packages. You can modify the default folder
using the INI Manager (refer to the INI Manager User Guide for more information).
The following message is displayed in the Output Window: Source code-control: Connect to project was
successful.
19.2. Terminating the Connection Between MetaMap and the Source
Control System
If you do not want to work with Source Control any longer, you can terminate the connection.
1.
Select Source Control > Disconnect from Source Control...
Results:
•
The following message is displayed in the Message window: Source code control: Disconnect was successful
•
The special MetaMap icons (
Note:
IKAN Solutions
and
) are replaced by the standard MetaMap Model icon (
).
When you make changes to MetaMap Models while the connection to Source Control is
inactive, these changes will NOT be taken into account by the Source Control database. As a
result, a discrepancy will occur between the MetaMap and the Source Control database.
METASUITE METAMAP MANAGER - RELEASE 8.1.3
VERSION MANAGEMENT WITH SOURCE CONTROL | 183
19.3. Adding MetaMap Models to Source Control
The purpose of adding MetaMap Models to Source Control is to save multiple versions of these files and to be
able to retrieve each of these versions.
1.
Create or open the MetaMap Model you want to add to Source Control.
Note:
You can verify if a Model has already been added to Source Control by selecting Show Status
from the Source Control menu. See Showing the Source Control Status of Opened Source Files
on page 183.
2.
Right-click the Model name in the Tree View Window and select Add to Source Control.
The following screen is displayed:
3.
Enter a comment and click OK.
The MetaMap Model is now checked in. In the Tree View Window, checked-in Models are represented
by the
icon.
If you want to make changes to a checked-in Model, you first have to check out the Model. See
Performing Changes to MetaMap Models Under Source Control on page 184.
19.4. Showing the Source Control Status of Opened Source Files
1.
Open the MetaMap Model you want to display the status for.
2.
Select Show Status from the Source Control menu.
The applicable status message is displayed. The following table lists the different possibilities:
IKAN Solutions
METASUITE METAMAP MANAGER - RELEASE 8.1.3
VERSION MANAGEMENT WITH SOURCE CONTROL | 184
Status
Displayed message
Icon
MetaMap Model not added to
Source Control
MetaMap Model added to Source
Control, not checked out
MetaMap Model added to Source
Control, checked out by you.
This message does not exclude that
this file has also been checked out by
one or more other users.
MetaMap Model added to Source
Control, checked out by at least one
other user, but not by yourself.
19.5. Performing Changes to MetaMap Models Under Source Control
1.
Make the required MetaMap Model version available in the Tree View Window.
2.
Right-click the Model name and select Check Out.
The following screen is displayed:
IKAN Solutions
METASUITE METAMAP MANAGER - RELEASE 8.1.3
VERSION MANAGEMENT WITH SOURCE CONTROL | 185
3.
If required, enter a Comment and click OK.
The Comment will be available in the Source Control program (i.e., Visual SourceSafe)
The MetaMap Model is checked out. Its icon in the Tree View Window changes to
.
4.
If the selected Model was already checked out by another user, a warning is displayed. Click Yes
to check out the file as well.
When you and the other user check in the Model, they will both get a Version Number, and they will be
both managed by Source Control.
5.
Perform the required changes to the Model.
See Performing Changes to MetaMap Models Under Source Control on page 184.
6.
Once the required changes have been performed, select Check In from the Source Control
menu.
The following screen is displayed:
7.
If required, enter a Comment and click OK.
The Comment will be available in the Source Control program (i.e., Visual SourceSafe)
19.6. Undoing the Check-out of a MetaMap Model
You can undo the check-out of a MetaMap Model, if you want to revert to the last saved version of a
MetaMap Model while ignoring the changes made in the mean time.
1.
Select the required MetaMap Model in the Tree View Window.
2.
Select Undo Check Out from the Source Control menu.
The following message appears:
3.
Click Yes to confirm the operation.
The check-out is undone and the MetaMap Model icon on the Tree View Window changes to
You can also click No to cancel the operation and keep the file checked out.
IKAN Solutions
.
METASUITE METAMAP MANAGER - RELEASE 8.1.3
CHAPTER 20
Structured Editor
20.1. Using the Structured Editor
The Structured Editor is used to easily define the logic for MetaMap Procedures and Target Fields.
To activate the Structured Editor, click inside the Properties window.
You can also use the following buttons to activate or deactivate this feature:
•
to Start/Stop Editing
•
to Toggle the Assisted Mode
Once the structured editor has been activated, the list with available commands is displayed at the left side of
the Commands Workspace (the look-ahead parser).
•
When entering a character in the commands workspace, the cursor will automatically jump to the
commands starting with that character in the list.
•
Use the up and down arrow keys while holding down the Ctrl key to navigate through the list.
•
Double-click a command or use the Tab key to add the selected command to the workspace.
•
Use the Discard button to empty the commands workspace.
•
Find and Replace buttons are also available.
•
When adding the command Source Field, Target Field or Work Field, a pop-up window
IKAN Solutions
METASUITE METAMAP MANAGER - RELEASE 8.1.3
STRUCTURED EDITOR | 187
listing all available items is displayed.
Two extra options are available at the top right of the pop-up window for selecting the required item:
-
Show all
When selecting this option, the Select Item drop-down list will be deactivated and all available fields
for all categories will be displayed underneath.
-
Indentation
When selecting this option, all fields displayed will be sorted per structure instead of alphabetically.
Components Overview
The components used in the Structured Editor can be divided in the following categories:
•
META Syntax (page 187)
•
Notation Conventions (page 188)
•
Commands (page 188)
•
Miscellaneous Functions (page 245)
•
Variables (page 255)
•
Constants (page 264)
•
Attributes (page 274)
• System Functions (MetaSuite Export Language) (page 283)
Each of these categories is explained in a separate section.
20.2. META Syntax
The following table lists the basic structural elements of the Structured Editor:
Element
Description
Parentheses
Parentheses enclose a list of items or subscripts.
A subscript is a numeric value or a numeric variable containing the element number of a
table element.
Commas
Commas separate options in a list.
Spaces
One or more spaces serve as a delimiter between the other syntax elements. When
working with arithmetic expressions, there must be at least one space on each side of
the expression.
Full stop
Each command must be terminated by a full stop. If you use the Options box in the
Properties windows, select the END option.
As all new commands must start on a new line, the cursor returns to the start of the next
available line, when you select the END option.
IKAN Solutions
METASUITE METAMAP MANAGER - RELEASE 8.1.3
STRUCTURED EDITOR | 188
Element
Description
Carriage Return
The carriage return has no real function, but you can use it to improve the readability of
your logic. If you use the Options box in the Properties windows, select the CONTINUE
option to insert a Carriage Return.
Any number of blank lines may be inserted between the commands.
Single quotes
Single quotes are used to enclose string values. Maximum string length is 60. A string
must be entered on a single line (no carriage returns).
20.3. Notation Conventions
When the format of a command is explained in the Reference sections, the following additional characters are
used. These characters must not be included in the actual command.
Characters
Used for...
Example
Square brackets:
[]
indicating optional
command components.
COMMAND [OPTION1] [OPTION2]
This means that option 1 and 2 can be added, but this is
not required.
Options to a command can be coded in any order.
Exception: the RULE option must be entered as last
option.
Ellipsis: ...
indicating that one or
more similar values may
follow. These values are
separated by commas.
COMMAND (user-value1, user-value2, ...)
This means that option one or more user-values may be
added between the parentheses.
Curved brackets
{ } and pipes |
indicating alternative
choices of which one
MUST be selected.
COMMAND OPTION { A | B }
This means that if the option is defined, it requires one of
the two pre-defined values (A or B).
The possible definitions are:
• COMMAND OPTION A
• COMMAND OPTION B
20.4. Commands
Commands are reserved words that always appear in upper case. They must not be used as Object Names.
Category
Command
Assignment commands
Basic Assignments (=) (page 189)
Arithmetic Expressions (page 191)
Concatenation (page 193)
COMPUTE (page 194)
Conditional commands
CASE (page 196)
IF (page 222)
IKAN Solutions
METASUITE METAMAP MANAGER - RELEASE 8.1.3
STRUCTURED EDITOR | 189
Category
Command
Input/Output commands
EXEC-IDMS / END-EXEC (page 205)
EXEC SQL / END-EXEC (page 205)
EXCLUDE (page 207)
GET (page 217)
PUT Source (page 228)
PUT Target (page 230)
START (page 242)
Calling commands
DO ... (page 200)
DO … FOR (page 201)
DO … WHILE (page 203)
INVOKE (page 227)
Program terminating commands
EXIT (page 214)
HALT ALL (page 220)
HALT SOURCEFILE (page 221)
HALT TARGETFILE (page 221)
Miscellaneous commands
DEBUG (page 199)
REM (REMARKS) (page 232)
SAMPLE (page 233)
SET (page 242)
Basic Assignments (=)
An assignment is a simple content copy between two fields (working / source / target) or between a fixed value
and a field.
Format 1
Field-name-1 = [ Field-name-2 | fixed value ]
Rules
The following rules apply:
•
Both fields must have the same type: numeric, date or alphanumeric.
•
"Null" indicator move:
If both fields have a null-indicator assigned to them, the null-values will be copied from the Source Field
to the TargetField.
•
"Null" field move:
If the Source Field is null, then the Target Field value will be initialized automatically (spaces for alphanumeric fields, zeroes for numeric fields), independent of the fact that the Target Field is nullable or not.
•
Not-null move:
IKAN Solutions
METASUITE METAMAP MANAGER - RELEASE 8.1.3
STRUCTURED EDITOR | 190
If the Target Field is nullable and the Source Field is not, the Target Field null-indicator will be set to notnull.
•
Those rules about "nullability" are not applicable for arithmetic operations or concatenations.
•
Truncation rules (receiving field smaller than sending field) follow the COBOL standards: numeric fields
will be truncated to the left, and alphanumeric fields to the right.
•
Filling rules (receiving field larger than sending field) follow the COBOL standards: numeric fields will be
filled with zeroes at the left, and alphanumeric fields will be filled with spaces at the right.
Format 2
[ Field-name | Record-name ] SYS-STATUS = SYS-NULL-VALUE
Rules
The following rules apply:
•
This is a practical way to initialize a Field or a Record.
•
The field or record will be initialized via the standard COBOL initialization.
•
If the field is nullable, the status will be set to null.
Format 3
Record-name = [ Field-name | fixed value ]
Rules
The following rules apply:
•
Field-name or fixed value must be alphanumeric and not a date
•
The Record-name refers to a Target Record.
•
If the Target Record contains on-the-fly fields, then these fields are not accessible by this command. The
on-the-fly fields do not belong to the "target record structure" because they are directly transferred from
the source field buffers. So, if the expression "T01-targetrecord = 'AAA' " is evaluated, only the target fields
that are not part of the on-the-fly fields will be affected.
Initialization
The default rules on initializing fields after a null move are changed as follows:
•
Numeric date and numeric non-date fields are initialized to 0 (zero).
•
Alphanumeric non-date fields are initialized to low-values.
•
Alphanumeric date fields are initialized to spaces.
IKAN Solutions
METASUITE METAMAP MANAGER - RELEASE 8.1.3
STRUCTURED EDITOR | 191
Example
Arithmetic Expressions
The term "arithmetic expression" refers to the calculation between two or more fields (working / source /
target) for which the result is stored into a new field.
The result of the arithmetic expression is always a numeric value.
Format
Field-name = [ ROUND | TRUNCATE ]
( Operand Operator Operand
[ Operator Operand ...])
Elements Description
Element
Description
Required?
ROUND|TRUNCATE
The ROUND|TRUNCATE keyword defines whether the result of the
arithmetic expression is to be rounded or truncated.
When omitted, the result will be rounded.
No
IKAN Solutions
METASUITE METAMAP MANAGER - RELEASE 8.1.3
STRUCTURED EDITOR | 192
Element
Description
Required?
Operand
An operand is either a numeric constant or a numeric/date field.
Only one operand within an arithmetic expression may be defined
as a Date field. When a Date field is used in the expression, the
other operands will be considered as number of days to be added
or subtracted from the Date. The field in which the result will be
stored must be a Date field as well.
See Example 1 - Operand on page 192.
Yes
Operator
An operator indicates the arithmetic operation to perform on the
surrounding operands. An arithmetic expression is always
enclosed by brackets and contains as possible operators:
• Multiply
• Divide
• Add
• Subtract
• Power
See Example 2 - Operator on page 193.
Yes
Order of operations
When additional brackets are omitted to enforce the order of calculation, the following order of precedence
applies to operators:
•
Power
•
Multiplication and division
• Addition and subtraction
The following commands would produce the same results:
TOTAL-BONUS = (ANNUAL-SALARY * 0.05 + FIXED-BONUS)
TOTAL-BONUS = (FIXED-BONUS + ANNUAL-SALARY * 0.05)
TOTAL-BONUS = ((ANNUAL-SALARY * 0.05) + FIXED-BONUS)
Overflow errors
If the field in which the result is stored is too small to contain the computed value of the expression, the
following error message will be produced:
E Calculation Error in Rule 00000001
Within Target Record Number 1
The computation label is the same label as produced in the MetaSuite generator when an MXL is run.
T01-bonus = ( ANNUAL-SALARY * .01 )
Transformation label : 000001
Examples
Example 1 - Operand
To add 5 days to the aging date, the following assignment is needed:
DUE-DATE = ( AGING-DATE + 5 )
IKAN Solutions
METASUITE METAMAP MANAGER - RELEASE 8.1.3
STRUCTURED EDITOR | 193
Example 2 - Operator
To store 5 percent of the annual salary in a bonus field, the following assignment command is needed:
T01-BONUS = ( ANNUAL-SALARY * 0.05 )
or
T01-BONUS = ROUND ( ANNUAL-SALARY * 0.05 )
When the bonus should be the truncated value of the 5 percent, the following assignment command is needed:
T01-BONUS = TRUNCATE ( ANNUAL-SALARY * 0.05 )
Concatenation
Concatenation refers to the process of placing two or more values side-by-side to create a new, single value.
The result of the concatenation operation is always a character string. Thus, within the system, concatenation
may be used only to create values to be assigned to non-numeric fields in assignment (=) commands.
The concatenation operation is requested by coding the reserved word AND between each of the values to be
concatenated.
Format
Operand AND Operand [ AND Operand ... ]
Elements Description
Element
Description
Required?
operand
An operand can be a character constant, a character field, Unicode
field or a numeric field with the SYS-EDIT (page 288) function.
Concatenation on character fields will result in a concatenation
where leading or trailing spaces are removed.
Concatenation on numeric fields will use the edit mask of the
numeric fields in the concatenation.
Concatenation on Unicode fields results automatically in Unicode.
Mixing of Unicode and non-Unicode character fields is not
allowed.
Yes
Examples
Example 1
If the 14-character type CHARACTER field named FIRST-NAME contained the value:
"JOHN
",
and a 20-character type CHARACTER field named LAST-NAME contained the value:
"REED
",
the following assignment command:
WORK-NAME = FIRST-NAME AND '/ ' AND LAST-NAME
would result in the value "JOHN/ REED" being assigned to the field named WORK-NAME.
IKAN Solutions
METASUITE METAMAP MANAGER - RELEASE 8.1.3
STRUCTURED EDITOR | 194
Example 2
If the 15-character type CHARACTER field named CITY contained the value
"BOSTON
",
the two-character type CHARACTER field named STATE contained the value "MA",
and the five-digit type PACKED field named ZIP contained the value "02108" and had been defined with the
CODE option, the following command:
W-TEXT = CITY AND ', ' AND STATE AND ' ' AND ZIP SYS-EDIT
DETAIL 3 (W-TEXT)
would result in the character string "BOSTON, MA 02108" being printed as detail line number 3.
COMPUTE
The COMPUTE command calculates distribution statistics (minimum, maximum, etc.) for a single field.
It is used during an Initial Sort or input procedure. It may not be used in any other procedure type. Depending
on the statistics requested, up to six numeric work-fields are identified in the command. These fields will
contain the calculated statistics.
Only a single COMPUTE command may be coded in an Initial Sort. The calculated values of the statistical
work-fields will be set following the completion of the initial processing for that Source File and may be
accessed in any subsequent procedure. (This includes any subsequent Initial Sort, any Source File input or
end-of-file procedures, and Report or Target File procedures of any type.)
When used in a Source File input procedure, only a single COMPUTE command may be coded. The values of
the statistical work-fields are not set until that Source File reaches the end-of-file. Consequently, these values
cannot be accessed within that Source File's initial or input procedures, but may be accessed in that Source
File's end-of-file procedure. Additionally, these values cannot be accessed in any Report or Target File initial
or detail procedure, but may be accessed in any Report or Target File end-of-file or end-of-job procedure. If a
Report or Target File is sorted, the values of the statistical work-fields may be accessed in the group procedure
for that Report or TargetFile; however, if the report/Target File is unsorted, the values cannot be referenced in
a group procedure.
Format
COMPUTE field-name ( [count-work-field = COUNT]
[,value-work-field = VALUE]
[,std-work-field = STD-DEV]
[,min-work-field = MINIMUM]
[,max-work-field = MAXIMUM]
[,mean-work-field = MEAN])
Elements Description
Element
Description
Required?
field-name
The name of the numeric input field whose value is to be processed by
the specified statistical computations.
Field-name may not be a work-field.
Yes
IKAN Solutions
METASUITE METAMAP MANAGER - RELEASE 8.1.3
STRUCTURED EDITOR | 195
Statistics to be computed
([count-work-field = COUNT]
[,value-work-field = VALUE]
[,std-work-field = STD-DEV]
[,min-work-field = MINIMUM]
[,max-work-field = MAXIMUM]
[,mean-work-field = MEAN])
Required for at least one statistic. This syntax is used to request one or more statistics. For each statistic
desired, code the name of a work-field and the type of statistic to be placed in that work-field. Each allowable
specification is described below:
Element
Description
Required?
count-work-field
Indicates that the named work-field is to contain a count of all
occurrences of field-name processed by the COMPUTE command.
No
value-work-field
Indicates that the named work-field is to contain the total value of all
occurrences of field-name processed by the COMPUTE command.
No
std-work-field
Indicates that the named work-field is to contain the standard
deviation of all occurrences of field-name processed by the COMPUTE
command.
No
min-work-field
Indicates that the named work-field is to contain the minimum value of
all occurrences of field-name processed by the COMPUTE command.
No
max-work-field
Indicates that the named work-field is to contain the maximum value of
all occurrences of field-name processed by the COMPUTE command.
No
mean-work-field
Indicates that the named work-field is to contain the mean value of all
occurrences of field-name processed by the COMPUTE command.
No
Examples
Example 1 - Execution rules
While pre-processing the EMPLOYEE-MASTER file, to calculate the count, total value and mean value of
the ANNUAL-SALARY field for all salaried employees (PAY-CODE = 2), the following initial Source File
procedure might be coded:
BEGIN SOURCEFILE EMPLOYEE-MASTER INITIAL
IF PAY-CODE NE 2 EXCLUDE
COMPUTE ANNUAL-SALARY (EMPLOYEE-COUNT = COUNT TOTAL-SALARY = VALUE, AVG-SALARY = MEAN)
SORT (ANNUAL-SALARY DESCENDING)
EMPLOYEE-COUNT, TOTAL-SALARY, and AVG-SALARY are assumed to be numeric work-fields
defined in the program request. At the completion of the initial procedure for the EMPLOYEE-MASTER
file, the values of these fields will be set to the count, total salary amount and average salary amount,
respectively, of the ANNUAL-SALARY fields for salaried employees. These values can then be referenced in
any subsequent Source File, Report or Target File procedure contained in the program request.
IKAN Solutions
METASUITE METAMAP MANAGER - RELEASE 8.1.3
STRUCTURED EDITOR | 196
Example 2 - Statistics
Assume that you want to produce a report of only those salaried employees whose annual salary is greater than
the mean annual salary for all salaried employees, by more than one standard deviation. The following
procedural code could be used to accomplish this task:
BEGIN SOURCEFILE EMPLOYEE-MASTER INITIAL
COMPUTE ANNUAL-SALARY (AVG-SAL = MEAN, SAL-STD-DEV = STD-DEV)
SORT (ANNUAL-SALARY DESCENDING)
BEGIN REPORT 1 INITIAL
CUT-OFF-AMOUNT = (AVG-SAL + SAL-STD-DEV)
BEGIN SOURCEFILE EMPLOYEE-MASTER INPUT
IF ANNUAL-SALARY LE CUT-OFF-AMOUNT HALT SOURCEFILE EXCLUDE
The Source File Initial Sort procedure above selects all salaried employees, and calculates the mean and
standard deviations for the ANNUAL-SALARY field, placing those values in the work-fields named AVGSAL and SAL-STD-DEV, respectively. Next, it sorts the data referenced for reporting from the
EMPLOYEE-MASTER file according to the value of the ANNUAL-SALARY field, in descending
sequence (i.e., largest to smallest).
The report initial procedure (which is executed after the completion of all file initial processing) sets the value
of a work-field named CUT-OFF-AMOUNT to the sum of the computed mean and the standard deviation
for the ANNUAL-SALARY field.
The input procedure (which is executed against the sorted data from the EMPLOYEE-MASTER file)
terminates the processing of the file when an ANNUAL-SALARY is encountered that is less than or equal to
the cut-off amount. Only those records with an ANNUAL-SALARY greater than the mean plus one standard
deviation will be passed to the report(s) for processing.
CASE
The CASE command is used to select and execute a command (or a series of commands) based on the value of
a single field. The value of that field is tested against a series of value expressions, in sequence as specified.
The first time a value expression tests as "true," the command (or series of commands) following that
expression will be executed and all subsequent components of the CASE command will be ignored.
If the value of the field does not satisfy any of the specified tests, the optional ELSE command will be executed
(if coded).
The CASE-block can be terminated by means of END-CASE.
Format
CASE field-name {test true-command }... [ELSE
false-command] [END-CASE]
Elements Description
Element
Description
Required?
field-name
The name of the field whose value is being tested.
Yes
IKAN Solutions
METASUITE METAMAP MANAGER - RELEASE 8.1.3
STRUCTURED EDITOR | 197
Element
Description
Required?
test
At least one test, consisting of a relationship and one or more values,
must be coded. Refer to the section Conditional Keywords (page 300)
for an overview of the allowable test specifications.
A note is appropriate here about the order of tests. Since each test
will be performed in the sequence specified, it is important that you
code your tests beginning with the most restrictive and ending with
the least restrictive.
Yes
true-command
A true-command must be coded for each specified test. The command
associated with the first test found to be true, will be executed; all
others will be ignored. True-command may be any command or
sequence of procedural commands, except another CASE command
or an IF command. (In other words, the true command may not
contain conditional expressions.)
The NEXT command may be used to exit the CASE statement.
If the true-command consists of two or more procedural commands,
you may find it useful to code a DO command, and to place the series
of commands to be executed in a separate public procedure
(referenced by the DO command). This not only simplifies the coding of
the CASE command, but makes your program easier to read and
maintain.
Yes
false-command
The ELSE option is used to specify a false-command, which will be
executed only if every test in the CASE command is evaluated as false.
False-command may be any command or sequence of commands,
except another CASE command or an IF command. (In other words,
the false command may not contain conditional expressions.)
No
Refer also to the section Conditional Keywords (page 300).
Examples
Example 1 - Field-name
To set a numeric work-field named TAX-RATE according to one of several possible values of the STATECODE field, you might use the following CASE command:
CASE STATE-CODE EQ 'MA' TAX-RATE = .05
EQ 'VT' TAX-RATE = .04
EQ 'CT' TAX-RATE = .07
EQ 'ME' TAX-RATE = .03
ELSE TAX-RATE = 0
END-CASE
IKAN Solutions
-
METASUITE METAMAP MANAGER - RELEASE 8.1.3
STRUCTURED EDITOR | 198
Example 2 - Test
Assume that four types of calculations have to be performed, depending on whether a sales branch number is
in the city of New York (BRANCH 5), in the eastern sales region (BRANCH 1 through 13), in the state of
Wyoming (BRANCH 22) or in the western sales region (any other BRANCH number). A CASE command
to execute a separate routine for each of these values of the BRANCH field would be coded as follows:
CASE BRANCH-NUMBER
EQ 5 DO NY-CITY-CALC
LE 13 DO EASTERN-CALC
EQ 22 DO WYOMING-CALC
ELSE DO WESTERN-CALC
END-CASE
Note:
-
If the first and second tests were switched, the New York City calculation routine, NY-CITY-CALC,
would never be executed because a BRANCH number of 5 would satisfy the LE 13 (less than or
equal to 13) test.
Example 3 - True-command
In the following example, the true-commands for the first and second tests each contain two assignment
commands, while the true-command for the third test contains only a single assignment command:
CASE BALANCE-DUE LT 0 NEG-COUNT = (NEG-COUNT + 1) NEG-TOT = (NEG-TOT + BALANCE-DUE) GT 0 POS-COUNT = (POS-COUNT + 1) POS-TOT = (POS-TOT + BALANCE-DUE) EQ 0 ZERO-COUNT = (ZERO-COUNT + 1)
END-CASE
Example 4 - False-command
The previous example could be modified to use the ELSE option instead of the last test (EQ 0), since the only
possible values for the BALANCE-DUE field would be negative, positive or zero.
CASE BALANCE-DUE LT 0 NEG-COUNT = (NEG-COUNT + 1) NEG-TOT = (NEG-TOT + BALANCE-DUE) GT 0 POS-COUNT = (POS-COUNT + 1) POS-TOT = (POS-TOT + BALANCE-DUE) ELSE ZERO-COUNT = (ZERO-COUNT + 1)
END-CASE
This version of the command would be slightly more efficient than the previous example, because the code
generated for the command would contain two tests instead of three.
IKAN Solutions
METASUITE METAMAP MANAGER - RELEASE 8.1.3
STRUCTURED EDITOR | 199
DEBUG
The DEBUG command is used to print debugging information on controlled points in your generated program.
The debugging information will only be produced if your program is generated in the MetaSuite generator
through the Trace option.
Format
DEBUG 'Debug-label'
[( [ Field-name | SourceRecord-name ],...)]
Elements Description
Element
Description
Required?
Debug-label
Debug-label is a literal of 40 characters enclosed between single
quotes, which will be printed as a label before the real debugging
information.
If the debug-label contains as many occurrences of the special
character "#" as the number of parameters behind, then the
debug-label will act as a mask: Every character "#" in the debug
mask will be replaced by a parameter value. The output format of
a numeric field depends on the edit mask of that field. Spaces will
not be truncated.
Yes
Field-name
Field-name identifies a field for which debugging information must
be printed. You can specify up to 32 parameters in the DEBUG
command.
No
SourceRecord-name
SourceRecord-name identifies a record for which debugging
information must be printed. You can specify up to 32 parameters
in the DEBUG command.
No
Examples
Example 1
Assume you want to check the EMPLOYEE-NUMBER's value for your EMPLOYEE-MASTER. You
might code
DEBUG 'CHECK SOURCES' (EMPLOYEE-NUMBER)
When you generate your program through the 'Trace' option, the following will be printed for all processed
occurrences:
Debug : CHECK SOURCES
EMPLOYEE-NUMBER 03715
Example 2
Assume you want to make a nice debug output with the same information. You might code:
DEBUG 'employee nr # is #.' ( W-NR , T01-employee_name )
IKAN Solutions
METASUITE METAMAP MANAGER - RELEASE 8.1.3
STRUCTURED EDITOR | 200
When you generate your program through the 'Trace' option, the following will be printed for all processed
occurrences:
employee
employee
employee
employee
nr
nr
nr
nr
3,715
3,941
1,939
3,502
is
is
is
is
IRENE HIRSH
ANNE FAHEY
EMILY WELLMET
CATHERINE WREN
.
.
.
.
DO ...
The DO command is used to execute a public procedure. After the public procedure is executed, the next
command following the DO command will be executed. By employing public procedures in a program request,
you can eliminate the need to write the same sequence of commands over and over. Also, the coding of
complex conditional commands can be simplified.
Public procedures can be executed a single time, using the DO command, a specified number of times, using
the DO...FOR command, or repeatedly under a specified set of conditions, using the DO...WHILE
command. The DO...FOR and DO...WHILE commands are described separately in this section.
A public procedure is always within the "scope" of either a single file procedure or a single Report or Target
File procedure. That is, it may be executed directly (or indirectly via another public procedure) only from
within a single Source File, Report or Target File procedure.
Format
DO procedure-name
Elements Description
Element
Description
Required?
procedure-name
Procedure-name is the name of the public procedure to be
executed. It must match the name appearing on the BEGIN
command that delimits the beginning of the procedure, within the
scope of the current procedure.
Yes
Refer also to the section Conditional Keywords (page 300).
Examples
Example 1
As an example, the following DO command executes a public procedure named RECALC-TAX:
DO RECALC-TAX
.
.
BEGIN RECALC-TAX
.
IKAN Solutions
METASUITE METAMAP MANAGER - RELEASE 8.1.3
STRUCTURED EDITOR | 201
Note that, within the program request, the public procedure identified by the BEGIN RECALC-TAX
command must appear within the scope of the procedure containing the DO command. In other words, that
procedure must be coded before another BEGIN SOURCEFILE, BEGIN REPORT or BEGIN
TARGETFILE command.
Public procedures may be "nested," which is to say that within the named procedure other public procedures
(within the scope of the current main Source File, Report or Target File procedure) can be executed.
Example 2
The most common use of the DO command is to simplify the coding of conditional commands. The example
below illustrates this use. The following conditional command is difficult to code and follow, because each
condition of the IF command (true or false) results in the execution of multiple commands:
IF SALES-REGION EQ (1,2) EAST-COUNT = (EAST-COUNT + 1) EAST-AMT = (EAST-AMT + BALANCE-DUE) PUT (2,3) ELSE WEST-COUNT = (WEST-COUNT + 1) WEST-AMT = (WEST-AMT + BALANCE-DUE) PUT (4,5)
This command is not only cumbersome to code (it is very easy to omit a continuation character, for example),
but also difficult to read. The same process could be defined using the DO and BEGIN commands below:
IF SALES-REGION EQ (1,2) DO EAST-CUST ELSE DO WEST-CUST
.
.
BEGIN EAST-CUST
EAST-COUNT = (EAST-COUNT + 1)
EAST-AMT = (EAST-AMT + BALANCE-DUE)
PUT (2,3)
BEGIN WEST-CUST
WEST-COUNT = (WEST-COUNT + 1)
WEST-AMT = (WEST-AMT + BALANCE-DUE)
PUT (4,5)
Coded this way, the IF command is much easier to understand. It is also less likely that coding errors will be
made in the public procedures, as none of the commands are continued across several lines.
DO … FOR
The DO...FOR command is used to execute a public procedure a specified number of times. A public
procedure is simply a set of one or more procedural commands. After the specified number of executions of the
public procedure, the next command following the DO...FOR command will be executed. Use of the
DO...FOR command and public procedures eliminates the need to write the same sequence of commands
over and over.
Public procedures can be executed a specified number of times, using the DO...FOR command, a single time,
using the DO command, or repeatedly under a specified set of conditions, using the DO...WHILE command.
The DO and DO...WHILE commands are described separately in this section.
A public procedure is always within the "scope" of either a single Source File procedure, a single report
procedure or a single Target File procedure. That is, it may be executed directly (or indirectly via another
public procedure) only from within a single Source File, Report or Target File procedure.
IKAN Solutions
METASUITE METAMAP MANAGER - RELEASE 8.1.3
STRUCTURED EDITOR | 202
Format
DO procedure-name FOR counter = start-value
[BY increment]
TO end-value
Elements Description
Element
Description
Required?
procedure-name
Procedure-name is the name of the public procedure to be
executed. It must match the name appearing on the BEGIN
command that delimits the beginning of the procedure, within the
scope of the current procedure.
Yes
counter
Counter is the name of the numeric Work Field that will be used to
maintain the count of times the procedure has been executed.
Yes
start-value
Start-value is the value to be assigned to the counter Work Field
before the first execution of the public procedure.
Yes
end-value
End-value defines the number of times the named procedure is to
be executed (i.e., from start-value to end-value times).
Before each execution of the procedure (including the first), the
value of the counter is checked against the specified end value. If
the counter is greater than the end value, the processing of the
DO...FOR command is complete.
Yes
increment
Following each execution of the procedure, the default (1) or user- No
specified increment is added to the counter, and the test against
the specified end value is repeated. This process continues until
the value of the counter exceeds the specified end value, at which
point no further executions of the public procedure will be
performed.
Examples
Example 1 - Procedure-name
As an example, the following DO...FOR command executes a public procedure named CALC-TOTALS
four times:
DO CALC-TOTALS FOR QUARTER = 1 TO 4
.
.
BEGIN CALC-TOTALS
.
Note that, within the program request, the public procedure identified by the BEGIN CALC-TOTALS
command must appear within the scope of the procedure containing the DO...FOR command. In other
words, that procedure must be coded before another BEGIN SOURCEFILE, BEGIN REPORT, or BEGIN
TARGETFILE command.
Public procedures may be "nested," which is to say that within the named procedure other public procedures
(within the scope of the current main Source File, Report or Target File procedure) can be executed.
IKAN Solutions
METASUITE METAMAP MANAGER - RELEASE 8.1.3
STRUCTURED EDITOR | 203
Example 2 - Increment
Assume that an employee record on a payroll master file contains from 1 to 52 occurrences of the EMP-PAY
field, representing the employee's weekly pay for each week of the year. To calculate the year-to-date salary for
the employee, each entry up to (and including) the entry for the current week (identified by the value
contained in the CURRENT-WEEK Work Field) could be accumulated in the Work Field named YTDPAY, using the following commands:
YTD-PAY = 0
DO YTD-TOTALS FOR WEEK = 1 TO CURRENT-WEEK
.
.
.
BEGIN YTD-TOTALS
YTD-PAY = (YTD-PAY + EMP-PAY (WEEK))
If the value of CURRENT-WEEK is 22, the procedure named YTD-TOTALS will be executed 22 times.
Following the final execution of the procedure, the value of the WEEK Work Field will be 23.
Remarks
Remember that the processing of the DO...FOR command is completed whenever the value of the counter
Work Field exceeds the specified end value. In this version, exceeding means surpassing the boundaries of the
specified range. For that reason, the increment, if specified, can be positive or negative.
If the start value is less than or equal to the end value, the increment value should be positive otherwise, the
procedure will not be executed.
If the start value is greater than or equal to the end value, the increment value should be negative otherwise,
the procedure will not be executed.
Examples:
DO CALC-TOT FOR QUARTER = 4 TO 1 BY -1
will be executed correctly.
DO CALC-TOT FOR MONTH = LAST-MONTH TO FIRST-MONTH
will result in no executions of the CALC-TOT procedure, assuming that the value of LAST-MONTH is
greater than the value of FIRST-MONTH.
Note:
The DO...WHILE command is more appropriate than the DO...FOR command for certain types of
iterative processes.
DO … WHILE
The DO...WHILE command is used to conditionally execute a public procedure repeatedly for as long as the
specified condition is true. A public procedure is simply a set of one or more procedural commands. If the
condition is not true (or when the condition is no longer true), the next command following the
DO...WHILE command will be executed. Use of the DO...WHILE command with public procedures
eliminates the need to write the same sequence of commands over and over.
Public procedures can be executed repeatedly under a specified condition, using the DO...WHILE command,
a specified number of times, using the DO...FOR command, or a single time only, using the DO command.
The DO...FOR and DO commands are described separately in this section.
IKAN Solutions
METASUITE METAMAP MANAGER - RELEASE 8.1.3
STRUCTURED EDITOR | 204
A public procedure always remains within the "scope" of either a single Source File procedure, a single report
procedure or a single Target File procedure. That is, it may be executed directly (or indirectly via another
public procedure) only from within a single Source File, Report or Target File procedure.
Format
DO procedure-name WHILE conditional-expression
Elements Description
Element
Description
Required?
procedure-name
Procedure-name is the name of the public procedure to be
executed. It must match the name appearing on the BEGIN
command that delimits the beginning of the procedure, within the
scope of the current procedure.
Yes
conditionalexpression
Conditional-expression identifies the condition or conditions
under which the specified public procedure is to be executed. In
the DO...WHILE command, a conditional expression is coded
exactly the same way as a conditional expression within the IF
command. For a complete description of the rules that apply to
the coding of conditional expressions, refer to the section
Conditional Keywords (page 300).
It is important to note that at least one of the values that are
contained in the specified conditional expression, must be
modified within the performed procedure. Otherwise, if the
condition is true, the program will execute the public procedure
repeatedly until it either "times out" or encounters a processing
error (such as an invalid subscript or an arithmetic overflow).
Examples
Example 1 - procedure-name
As an example, the function of the following sequence of commands is to locate the last week in which an
employee received a pay-check. The search begins with the current week and proceeds "backward" through the
occurrences of the EMP-PAY field, until either a non-zero value of EMP-PAY is encountered or the value of
the subscript field WEEK is zero.
WEEK = CURRENT-WEEK
DO FIND-LAST-PAY-PERIOD WHILE WEEK GT 0 AND EMP-PAY (WEEK) EQ 0
.
.
BEGIN FIND-LAST-PAY-PERIOD
WEEK = (WEEK - 1)
IKAN Solutions
METASUITE METAMAP MANAGER - RELEASE 8.1.3
STRUCTURED EDITOR | 205
Note that, within the program request, the public procedure identified by the BEGIN FIND-LAST-PAYPERIOD command must appear within the scope of the procedure containing the DO...WHILE command.
In other words, that procedure must be coded before another BEGIN SOURCEFILE, BEGIN REPORT or
BEGIN TARGETFILE command is coded. Public procedures may be "nested," which is to say that within
the named procedure other public procedures (within the scope of the current main Source File, Report or
Target File procedure) can be executed.
Example 2 - conditional-expression
If the DO...WHILE command in the previous example had been coded as shown below:
WEEK = CURRENT-WEEK
DO FIND-LAST-PAY-PERIOD WHILE EMP-PAY (WEEK) EQ 0 .
.
.
BEGIN FIND-LAST-PAY-PERIOD
WEEK = (WEEK - 1)
and all occurrences of the EMP-PAY field in an employee record contained the value of zero, a subscripting
error would occur when the value of the WEEK field reached zero, and processing of the generated program
would be halted.
EXEC-IDMS / END-EXEC
The EXEC-IDMS command is used for inserting IDMS commands into the MetaSuite logic.
Some of the IDMS commands are automatically inserted into the MetaSuite logic.
If the User wants more advanced functionality, he can insert the EXEC-IDMS command. The IDMS
commands must be terminated with the END-EXEC command.
For more information about the syntax of the supported IDMS commands, please refer to MetaSuite IDMS
File Access Guide.
EXEC SQL / END-EXEC
The EXEC SQL command is used for inserting SQL commands into the MetaSuite logic.
Some of the SQL commands are automatically inserted into the MetaSuite logic, like declarations, opening
and closing the database, defining the cursor, getting data. But sometimes the User wants more, updates for
instance.
In that case the user can insert EXEC SQL in order to define the UPDATE command. The User must end the
command with END-EXEC. The User can test weather the operation was successful using the system variable
SQLCODE.
Supported SQL commands are (in alphabetic order):
•
ALTER
•
CLOSE
•
CREATE
•
DECLARE
•
DELETE
•
DROP
•
EXECUTE
•
FETCH
•
OPEN
IKAN Solutions
METASUITE METAMAP MANAGER - RELEASE 8.1.3
STRUCTURED EDITOR | 206
•
PREPARE
•
SELECT
•
SET
• UPDATE
It is clear that those SQL commands must be supported by your SQL database also. For more information
about the syntax of those commands, refer to the SQL guide of the database in question.
Host Variables
Host variables are variables that are known to the SQL environment as well as to the COBOL environment.
A semi-colon prefixes every host variable.
MetaSuite does not support occurring host variables.
External array variables are not supported either. They are also occurring.
Examples
BEGIN SYS-LOCAL-INP-T1-1
IKAN1-GX-FROM-DAT = W-DAT1
EXEC SQL INSERT INTO UDM.V93IKAN1 ( IKNR, I2NR, GX_FROM_DAT, GX_TO_DAT ) VALUES (:IKAN1-IKNR,:IKAN1-I2NR, :IKAN1-GX-FROM-DAT, :IKAN1-GX-TO-DAT ) END-EXEC
IF SQLCODE NE 0 AND SQLCODE NE -803 TxtII-Error-TEXT = K-Error-Insert DO SYS-LOCAL-INP-T1-6
-----------------------------------------------EXEC SQL SET :q1 = ADD_MONTHS ( LAST_DAY(:W-DATE), -1) END-EXEC
-----------------------------------------------EXEC SQL –
UPDATE UDM.VWZ1 –
SET G_B_DAT = :QF0146 :QF0147 –
WHERE DNNR = :QF0141 –
AND FANR = :QF0142 –
AND G_V_DAT = :QF0145
END-EXEC.
Null Status Field Support
The fields that are indicated as INNULL, OUTNULL or OUTNULR will be filled automatically when
using the standard input control tables of MetaSuite. However, if you perform the fetches and updates by your
own, you will have to program the null status handling yourself.
IKAN Solutions
METASUITE METAMAP MANAGER - RELEASE 8.1.3
STRUCTURED EDITOR | 207
There are three ways to indicate the null status field:
1.
You can indicate the host variable null status field separately via field name SYS-STATUS.
2.
You can indicate the host variable plus the null status field via field name STATUS-INCLUDED.
3. You can set a field to NULL by indicating NULL in the embedded SQL.
If a host variable needs a null status according to the embedded SQL statements, the host variable will
automatically be set to OUTNULR.
Examples
INSERT INTO IKAN_FACT (IKAN_KEY, DEP_KEY, OFF_NR, OFF_IND, FMP_NR, FMP_IND, P_IND, ) VALUES (:W-ACT_IKAN_KEY, :W-DEP_KEY, :W-OFPNR, NULL, :W-FMP, :W-FMP SYS-STATUS, NULL ) END-EXEC
-----------------------------------------------EXEC SQL UPDATE TFLIGHTPLAN_FACT SET , IKAN_KEY = :W-IKAN_KEY , ONR = :W-ONR –
, NULL
, FW = :W-FW SYS-STATUS , FCMP = :W-FCMP , POSTNR = :W-POSTNR STATUS-INCLUDED WHERE ACT_IKAN_KEY = :W-ACT_ IKAN_KEY , PLNKEY = :W-PLN_KEY , PLNARRKEY = :W-PLNARRKEY , OFPNR = :W-OFPNR END-EXEC
EXCLUDE
The EXCLUDE command is used in a procedure to:
•
bypass the processing of the current Record
•
bypass the current set of Records in case of ControlledBy Source Files
•
bypass the current Path in case of Source Files with a Path
•
exit from the Procedure
IKAN Solutions
METASUITE METAMAP MANAGER - RELEASE 8.1.3
STRUCTURED EDITOR | 208
Most Reports and Target Files that you produce will only be interested in some subset of records from a
Source File. The EXCLUDE command can be used in a number of ways to bypass unnecessary records. In order
to optimize the coding of your program request and the processing of the generated program, this should be
done as early as possible.
Format
EXCLUDE [record-name | SourceFile-name]
Elements Description
Element
Description
Required?
record-name
When the Source File contains a path, you can specify which
record within the path needs to be excluded. For more
information on excluding on a record-level, please refer to
Excluding at Record Level (page 212).
No
SourceFile-name
When the Source File is a controlling Source File, you can exclude
a controlling set of records from within the Controlled By Source
File logic. For more information on excluding on a Source File,
please refer to Excluding at Source Level (page 213).
No
Depending on the type of procedure in which the command appears, the current record may be excluded only
from a specific Report or TargetFile, or from all reports and Target Files in the program request.
The EXCLUDE processing that occurs within each type of procedure is described below.
Note:
An EXCLUDE in a public procedure is treated like an EXCLUDE in the Source File, Report or Target
File procedure from which the public procedure is invoked.
Procedure
Meaning
Initial File
Procedure
The EXCLUDE command can be included in an Initial File Procedure that reads input
records using an EXTRACT, SORT or PRE-PASS command.
Used in this type of Procedure, the EXCLUDE command has then the following effects:
• the current input record is rejected
• the current procedure is exited, which means that no further commands will be executed for the current record
• the generated program will try to read the next input record.
If the SORT or EXTRACT command is coded in this type of procedure, any excluded
records will not be available for processing in any other procedure. If the PRE-PASS
command is coded, excluded records will again be available for processing during the
input processing phase of the generated program.
IKAN Solutions
METASUITE METAMAP MANAGER - RELEASE 8.1.3
STRUCTURED EDITOR | 209
Procedure
Meaning
Record
Procedure
Used in this type of Procedure, the EXCLUDE command has the following effects:
• the current input record is rejected,
• the current procedure is exited, meaning that no further commands will be executed
for the current record,
• the generated program will try to read the next record of the type specified in the
EXCLUDE command
Records excluded in a Record Procedure are not available for processing in subsequent
procedures, except when a Record Procedure excludes a record during the initial
processing phase, where the Initial Sort procedure contains a PRE-PASS command. In
this case, the same record will again be available for processing during the input phase
of the generated program, and the record input procedure will be executed again at
that time.
Input File
Procedure
Used with this type of procedure, the EXCLUDE command has the following effects:
• the current input record is rejected,
• the current procedure is exited, meaning that no further commands will be executed
for the current record,
• the generated program will attempt to read the next record from the Source File (or
the extract file, if a SORT or EXTRACT command was coded in that Source File's initial
procedure)
None of the reports or Target Files contained in the generated program will ever "see"
input records excluded by Input File Procedures.
Detail Target
Procedure
Used with this type of procedure, the EXCLUDE command has the following effects:
• the procedure is exited immediately
• no further commands are executed and no additional detail formats are output for
the excluded record
• subsequent reports and Target Files will still have access to an input record excluded
in a Report or Target File detail procedure.
Total Target
Procedure
Used with this type of procedure, the EXCLUDE command has the following effects:
• the procedure is exited immediately
• no further commands are executed
• no additional total formats are produced for that group entity
• any totals accumulated for the current group will not be added to the totals for the
next (higher) group process.
An EXCLUDE command in a group procedure has no effect on subsequent report and
Target File procedures.
Excluding Unwanted records
Most reports and Target Files that you produce will be concerned only with some subset of records from a
Source File. Input records can be bypassed in a number of ways. Both the coding of your program request and
the processing of the generated program can be optimized by excluding all unwanted data as early as possible.
Example 1
Assume that all reports within a program request are concerned only with those employees in the
EMPLOYEE-MASTER file having an annual salary of $35,000 or more, and are to be printed in sequence by
social security number. The following Initial Sort procedure would be coded to eliminate all of the unwanted
records before sorting the input data into social security number sequence:
BEGIN SOURCEFILE EMPLOYEE-MASTER INITIAL
IF ANNUAL-SALARY LT 35000 EXCLUDE
SORT (SOCIAL-SECURITY-NUMBER)
IKAN Solutions
METASUITE METAMAP MANAGER - RELEASE 8.1.3
STRUCTURED EDITOR | 210
If the IF command containing the EXCLUDE were omitted, not only would the sort have to handle additional
records unnecessarily, but the unwanted data would still have to be excluded in either a Source File input
procedure or in every individual Report or Target File detail procedure.
Example 2
If all reports and Target Files in the program request are interested in the same subset of input data, but are to
be sorted in a variety of ways (so that the sort cannot occur in the Initial Sort procedure), the common subset
of unwanted records can be excluded in a Source File input procedure. For example, assume that all reports in
a program request are interested only in those employees having an annual salary of less than $20,000. The
following Source File input procedure would be coded:
BEGIN SOURCEFILE EMPLOYEE-MASTER INPUT
IF ANNUAL-SALARY GE 20000 EXCLUDE
Here, the only records that any of the reports and Target Files in the program will "see" are those for
employees with an annual salary less than $20,000. If the Source File input procedure were omitted, the
exclusion of the unwanted records would be required in every report and Target File detail procedure.
Note:
A record input procedure could have been used in the example above, and would have been just
as efficient as the Source File input procedure. Generally, however, record input procedures are
used with multi-record input, where they are generally more efficient than Source File procedures.
Example 3
Continuing the above example, if the third report in the program request were only interested in those
employees having an annual salary of less than $15,000, the following report detail procedure would be coded:
BEGIN REPORT 3 INPUT
IF ANNUAL-SALARY GE 15000 EXCLUDE
This procedure bypasses all employees with an annual salary greater than or equal to $15,000, for the third
report only. Any subsequent Report or Target File detail procedures will have access to the records bypassed by
the third report.
Excluding Within a Path
With records within a path, two or more individual records are "seen" together as a single logical record.
Example
A structured sequential file named CUST-SALES might contain CUSTOMER records, with a variable
number of INVOICE records for each CUSTOMER. To list all invoices for each customer, the following
simple program request might be coded:
SOURCEFILE CUST-SALES PATH (CUSTOMER,INVOICE)
REPORT 1
DETAIL 1 (CUST-NUMBER SHORT, INVOICE-NUMBER)
The first nine paths passed to the report might result in the output below (with the path number shown on the
right):
CUST
NUMBER
******
162092
IKAN Solutions
INVOICE
NUMBER
*******
SC22021
(path)
(1)
METASUITE METAMAP MANAGER - RELEASE 8.1.3
STRUCTURED EDITOR | 211
207389
298330
312048
.
.
.
SC20344
SC39374
SC15083
SC18938
SC47835
SC36254
SC41048
SC20924
(2)
(3)
(4)
(5)
(6)
(7)
(8)
(9)
During report processing, nine paths of data were constructed, using the four CUSTOMER and nine
INVOICE records accessed. (The same CUSTOMER record remains in the path until all of the INVOICE
records associated with that CUSTOMER are processed.)
At the run-level (that is, for all reports and Target Files in the program), you might want to exclude individual
paths (but build all paths), or you might want to limit the records read into the path by excluding high-level
records before lower-level records are read.
EXCLUDING INDIVIDUAL PATHS
To exclude an individual path, use the EXCLUDE command in a Source File input or record input procedure
(to exclude the path from all subsequent processing), or in a Report or Target File detail procedure (to exclude
the path for the report/TargetFile).
Example
BEGIN SOURCEFILE CUST-SALES INPUT
IF INVOICE-NUMBER IR (SC10000 TO SC29999) EXCLUDE
Using this input procedure, the report would contain the information shown above in paths 3, 6, 7, and 8. All
paths would be constructed, however. Following the exclusion of a path, the generated program will simply
read the next INVOICE record for the same customer, or (if there are no more INVOICE records), the next
CUSTOMER record.
LIMIT RECORDS READ INTO THE PATH
The most efficient way to exclude a high-level record in a path -- based on information in that record (or a
higher-level record) -- is to use a record input procedure, as illustrated below. This limits the records read into
the path: if a record is excluded, no subordinate records are read for it. Remember that records excluded in a
record input procedure are not available to any subsequent processing.
Example
To exclude processing of customer numbers beginning with the digit 2, the following record input procedure
would be coded:
BEGIN RECORD CUSTOMER INPUT
IF CUST-NUMBER IR (200000 TO 299999) EXCLUDE
Using this input procedure, the report would contain only the information shown above in paths 1, 2, 3, and 9.
The CUSTOMER record would be read for paths 4 and 7, but would be excluded before any invoice records
were read. Following the exclusion of a CUSTOMER record, the generated program will simply read input
records, bypassing the data validation and path construction processes, until the next CUSTOMER record is
obtained.
IKAN Solutions
METASUITE METAMAP MANAGER - RELEASE 8.1.3
STRUCTURED EDITOR | 212
Excluding at Record Level
Optional: applicable only in Initial Sort, Source File input, or record input procedures. The record-name option
is used when a path of records is being accessed, to limit the paths built for the named record, based on data in
another record that is subordinate to the named record. Record-name must be the name of a record specified
on the PATH option of the SOURCEFILE command. When the EXCLUDE falls within a record input
procedure, record-name must be at the same level in the path, or higher, than the record named by the BEGIN
RECORD command.
When an EXCLUDE command with the record-name option is executed, the generated program will skip
occurrences of any other record types, until the next occurrence of the named (excluded) record is encountered.
Processing time will be improved, because the overhead of constructing unwanted record buffers is eliminated.
Example
Using our CUSTOMER-INVOICE example, to discontinue processing of a customer once an invoice record
has been found containing an INVOICE-CODE of 1, the following Source File input procedure would be
coded:
BEGIN SOURCEFILE CUST-SALES INPUT
IF INVOICE-CODE EQ 1 PUT (1)
EXCLUDE CUSTOMER
Following the exclusion of a CUSTOMER record, the generated program will simply keep reading input
records (bypassing the data validation and path construction processes), until the next CUSTOMER record is
obtained. This can result in a dramatic reduction in processing time.
Note:
If the record-name option had been omitted from the EXCLUDE command, the same output would
have been produced, but at a greater processing cost. Specifically, each buffer would have to be
constructed fully.
Processing Controlled Sets
Controlled sets are built only after any Source File or record procedures for the controlling Source File have
been processed. Therefore, to exclude an individual path based on information in the controlling Source File,
use an Initial Sort, Source File input, or record input procedure for the controlling Source File.
Example
Assume that you have a (controlling) Source File called the EMPLOYEE-SELECTION file, which contains
EMPLOYEE-SELECT-NUMBER fields, and the EMPLOYEE-MASTER indexed file. To obtain a report
of employee information, you might use the code below:
SOURCEFILE EMPLOYEE-SELECTION
SOURCEFILE EMPLOYEE-MASTER CONTROLLED BY EMPLOYEE-SELECTION KEY = EMPLOYEE-SELECT-NUMBER
REPORT 1
DETAIL 1 (EMPLOYEE-NUMBER,DEPARTMENT,JOB-CODE, EMPLOYEE-NAME,SOCIAL SECURITY-NUMBER)
At the run-level (that is, for all reports and Target Files in the program), there are two ways in which you can
exclude paths at the level of the controlling Source File: either before any controlled sets are built, or after a
controlled set is built. (You might also want to build controlled sets, then exclude on the controlled-Source
File level.)
IKAN Solutions
METASUITE METAMAP MANAGER - RELEASE 8.1.3
STRUCTURED EDITOR | 213
EXCLUDING BEFORE THE CONTROLLED SET IS BUILT
To exclude individual paths from the controlling Source File before any controlled sets are built, use an Initial
Sort, Source File input, or record input procedure for the controlling Source File.
Example
For our example above, we might include the following procedure to eliminate all controlling records with an
EMPLOYEE-SELECTION-NUMBER greater than 3000:
BEGIN SOURCEFILE EMPLOYEE-SELECTION INPUT
IF EMPLOYEE-SELECTION-NUMBER GT 3000 EXCLUDE
A record input procedure would have been just as effective:
BEGIN RECORD EMPLOYEE-SELECT-RECORD INPUT
IF EMPLOYEE-SELECTION-NUMBER GT 3000 EXCLUDE
EXCLUDING AFTER THE CONTROLLED SET IS BUILT
To exclude a record in the controlling Source File after the controlled set is built, use the EXCLUDESourceFilename command in a Source File input procedure for the controlled Source File. This is described below.
Excluding at Source Level
This is only applicable in Source File input procedures. The SourceFile-name option is used when one Source
File is controlled by another Source File, to identify the controlling Source File data in which you are no
longer interested. SourceFile-name must be the name of a controlling Source File that is higher in the
controlled/ controlling hierarchy than the Source File named in the BEGIN SOURCEFILE procedure.
When an EXCLUDE command with the SourceFile-name option is executed, the generated program will stop
processing the existing controlled set, and will build a new set of controlled records starting with the excluded
file-name.
In this way, processing time will be improved because the overhead of constructing unwanted sets of records is
eliminated.
Example
To continue with our example, if we are interested in only those employees from Department 6, then we could
add the following Source File input procedure to our code:
BEGIN SOURCEFILE EMPLOYEE-MASTER INPUT
IF DEPARTMENT NE 6 EXCLUDE EMPLOYEE-SELECTION
When the generated program encounters an employee who is not from Department 6, it will bypass processing
for that employee and it will read the next record from the EMPLOYEE-SELECTION file. This has the
potential of reducing processing time and resources significantly.
Note that you would have get the same results with the simple EXCLUDE command:
IF DEPARTMENT NE 6 EXCLUDE
However, in this case processing would not have been as efficient, because the system would have read all the
EMPLOYEE-MASTER records for the employee from Department 6, before retrieving another
EMPLOYEE-SELECTION record.
IKAN Solutions
METASUITE METAMAP MANAGER - RELEASE 8.1.3
STRUCTURED EDITOR | 214
EXIT
The EXIT command is used to leave the current procedure and return to the "calling" procedure. For Source
File and report / Target File procedures, the calling procedure is one of the generated control procedures of the
(generated) program. For public procedures, the calling procedure is the one containing the DO command that
requested execution of the public procedure.
Following the execution of an EXIT command, no further commands in the procedure will be executed.
Unlike the EXCLUDE command (described earlier in this section), the EXIT command does not cause any
input records to be bypassed. Rather, it is used only to bypass execution of the remaining commands in the
procedure.
You need not code an EXIT command at the end of each procedure. An exit is implied by a BEGIN command
or the end of the input command stream.
Example
The EXIT command is illustrated by the report group procedure below. There, the last three procedural
commands will be executed only when there is no record found in the keyed EMPLOYEE-MASTER file for
an employee on the payroll file:
BEGIN REPORT 1 GROUP
GET EMPLOYEE-MASTER KEY = PD-EMPLOYEE-NUMBER
IF EMPLOYEE-MASTER SYS-IO-STATUS EQ SYS-OK EXIT
EMPLOYEE-NUMBER = PD-EMPLOYEE-NUMBER
SOCIAL-SECURITY-NUMBER = 0
EMPLOYEE-NAME = '*** MISSING ***'
When the GET command is successful (i.e., the status returned from the get operation is "ok"), the final three
commands of the procedure are bypassed. If the random access is unsuccessful, however, those fields to be
printed from the keyed employee record are reset, so that information from the prior keyed employee record is
not reported with the current payroll file data.
FOR … END-FOR
The FOR...END-FOR command is used to repeat a series of commands a number of times.
The block of commands that will be repeated starts behind the FOR statement and ends when END-FOR is
met.
Format
FOR counter = start-value TO end-value [BY step-value]
[content of the procedure]
END-FOR
IKAN Solutions
METASUITE METAMAP MANAGER - RELEASE 8.1.3
STRUCTURED EDITOR | 215
Elements Description
Element
Description
Required?
counter
Counter is the name of the numeric Work Field that will be used to
maintain the count of times the procedure has been executed.
Each time the inner block of commands is executed, this variable
gets incremented (or decremented, if the step-value is negative).
Yes
start-value
Start-value is the value to be assigned before the first execution of
the public procedure.
Yes
end-value
End-value defines the last value of 'Variable' for which the named
procedure is to be executed.
Yes
step-value
Step-value defines the number that is added to 'counter' when
END-FOR is met. Step-value can be negative. This makes sense if
start-value is higher than end-value.
No
Examples
FOR wn-index = 10 TO 1 BY -1
DEBUG 'wn-index = #' ( wn-index )
END-FOR .
The generated program will return
wn-index
wn-index
wn-index
wn-index
wn-index
wn-index
wn-index
wn-index
wn-index
wn-index
=
=
=
=
=
=
=
=
=
=
10
9
8
7
6
5
4
3
2
1
Remarks
•
FOR ... END-FOR structures can be nested. This means that the series of instructions can contain another
FOR ... END-FOR block. The level of nesting is limited to 100 levels.
•
The number of FOR ... END-FOR blocks within a procedure is limited to 1000.
FUNCTION
The FUNCTION command is used to execute an external subroutine. When processing by the external
subroutine is completed, control returns to the command immediately following the FUNCTION. External
subroutines can be used to perform special security functions, to compress or expand data, or to perform other
types of processing operations unique to your site.
One or more fields from the generated program can be made available ("passed") to the external subroutine,
and these fields may be modified by the subroutine.
IKAN Solutions
METASUITE METAMAP MANAGER - RELEASE 8.1.3
STRUCTURED EDITOR | 216
The name of the function is limited to 8 characters.
The returned value can be a numeric value, an alpha-numeric value or a data field.
Format
FUNCTION 'Subroutine-name[/Language]'
[( [ Field-name | SourceRecord-name | TargetRecord-name ],...)]
Elements Description
Element
Description
Required?
Subroutine-name
Subroutine-name identifies the external subroutine to be
executed.
Yes
Language
You can enter the language in which the external subroutine is
written when it is not written in COBOL.
Subroutine-name/Language should be enclosed by single quotes.
The entire literal is limited to 40 characters.
No
Field-name
Field-name identifies a field to be passed to the external
subroutine. You can include up to 16 field names with this
command. The named fields will be made available to the
subroutine for processing.
You should not name numeric Source Fields in the field-name list,
because in the process of validating a numeric input field the
system may convert that field to a different internal data type and
size than was originally defined for it. When you need to pass the
value of a numeric input field to an external subroutine, you should
define a Work Field with the internal data type and size expected
by the subroutine, move the input field to the Work Field, and
then name the Work Field in the field-name list.
No
SourceRecord-name
SourceRecord-name identifies a record to be passed to the
external subroutine. You can include up to 16 record names with
this command. The named records will be made available to the
subroutine for processing.
No
TargetRecord-name
TargetRecord-name identifies a record to be passed to the
external subroutine. You can include up to 16 record names with
this command. The named records will be made available to the
subroutine for processing.
No
Example
TARGETFIELD1 = FUNCTION "FUN-X" (A1, B1, C1)
TARGETFIELD2 = FUNCTION "NUMVAL" (WORK1)
IKAN Solutions
METASUITE METAMAP MANAGER - RELEASE 8.1.3
STRUCTURED EDITOR | 217
Remark
Note that external subroutines almost always demand that:
•
A fixed number of records/fields should be made available by the calling program (i.e., by your program
request).
•
Each record/field made available by the calling program is in exactly the same internal data format as is
expected by the subroutine.
• The records/fields named in the field name list appear in a predefined sequence.
Failure to adhere to these requirements may result in unpredictable action on the part of the called subroutine.
GET
The GET command is used to read records from within procedural code. The Source File containing the
records to be read must have been identified already in the program request as
•
a Controlled Source File
• a Table/Tree Source File.
A single GET command can be used to request a single record from the Source File. However, if the PATH
option has been specified for Controlled Source Files, you can request a collection of related Records.
Records can be obtained sequentially from any Source File. If the file being accessed allows random retrieval
(i.e., is an ISAM, BDAM, VSAM, database file, or a table/tree Source File), then you can obtain records
randomly based on a specified KeyField value. Note that special considerations apply when accessing the
records of database files.
When using the GET command to access database files, refer to the appropriate database supplement.
You cannot use the GET command in a record input procedure.
Format
GET { record-name | SourceFile-name }
[KEY = [ KeyField-value_1 , … , KeyField-value_n ] | RANDOM ]
Elements Description
Element
Description
Required?
Record or
Source File
identification
If the Source File being accessed does not
contain the PATH option, record-name
must be specified, to identify the type of
record to be obtained.
If the Source File does contain the PATH
option, SourceFile-name must be
specified instead, and the generated
program will retrieve the group of related
records described by the PATH option for
that Source File.
Yes
IKAN Solutions
METASUITE METAMAP MANAGER - RELEASE 8.1.3
STRUCTURED EDITOR | 218
Element
Description
Required?
KeyField-value
The KEY option is coded to indicate that
the records of the Source File are to be
accessed according to a specified
KeyField-value. This value must be of the
same data type as the KeyField defined
for the SourdeFile being accessed.
Required for Table/Tree Source Files
Optional for Controlled Source Files
Not allowed for VSAM/Sequential fields
with no Key option
RANDOM
The field will be accessed randomly.
Required Coding for the GET Command
Element
Description
SYS-DIRECT-KEY
When the GET command is used for an external array, you can use the
SourceFile-name SYS-DIRECT-KEY field to determine the index to access
the wanted occurrence within the Table/Tree Source File. This field contains the
value 0, when no occurrence is found for the wanted key value. It contains the
index value, when the occurrence is found for the wanted key value.
When the GET command is used for an external array without key, you need to
assign the proper start value to the SourceFile-name SYS-DIRECT-KEY
field, prior to the GET command.
See Example 4 - SYS-DIRECT-KEY on page 219.
SYS-CURRENT-KEY
When the GET command is used on an external array, the returned value is not
only obtainable by means of the expression SourceFile-name SYS-DIRECTKEY. The return value can also be obtained by means of SYS-CURRENT-KEY.
The advantage of using SYS-CURRENT-KEY is that it can be used as an index.
SYS-IO-STATUS
When the GET command is used for a Controlled Source File, you can check the
success or failure of the requested operation by verifying the content of the
SourceFile-name SYS-IO-STATUS field.
This field will contain one of the following values:
• SYS-OK: The GET operation was successful and the record(s) requested are
available for processing
• SYS-EOF: The GET operation was unsuccessful because the end-of-file has
been reached. You will receive this file status only when the GET command requests are sequential retrievals, with no KEY option coded.
• SYS-ERROR: The GET operation was unsuccessful. If the KEY option was coded, this status means either that a record with the specified KeyField value
does not exist in the Source File, or that an I/O error has occurred. If no KEY
option was coded, it means that an I/O error has occurred. In either of these
cases, if the Source File is a VSAM or database file, you can check the contents
of the SYS-INTERNAL-STATUS field for a more precise error code (provided
by the access method).
SYS-PATH-COUNT
When multiple records are requested using a single GET command (i.e., the PATH
option is coded for the Source File being accessed), you should always check the
contents of the record-name SYS-PATH-COUNT fields, to determine how
many records of each type were obtained. For each record named in the PATH
option, the corresponding record-name SYS-PATH-COUNT field contains a
count of the number of records (of the type identified by record-name) currently
in the Path.
IKAN Solutions
METASUITE METAMAP MANAGER - RELEASE 8.1.3
STRUCTURED EDITOR | 219
Examples
Example 1 - Identifying Records To Be Read
Consider the following SOURCEFILE and GET commands:
SOURCEFILE PAYROLL-DETAIL CONTROLLED
SOURCEFILE TRANSACTION-MASTER CONTROLLED PATH (CLIENT,ACCOUNT,TRANSACTION OCCURS 10)
SOURCEFILE DRIVER-FILE
.
.
GET PAYROLL-DETAIL-RECORD
.
.
GET TRANSACTION-MASTER
The first GET command will retrieve a single PAYROLL-DETAIL-RECORD from the PAYROLLDETAIL file. The second GET command will retrieve a collection of records from the TRANSACTIONMASTER file, consisting of one CLIENT record, the first ACCOUNT record associated with that CLIENT
record, and up to ten TRANSACTION records associated with that ACCOUNT record.
If the KEY option is not coded (as in this example), the record retrieved is the next in sequence in the Source
File.
Example 2 - Keyfield-value
The following command requests that an EMPLOYEE-DATA record from the EMPLOYEE-MASTER
file be obtained for an employee whose employee number (EMPLOYEE-NUMBER on the EMPLOYEEMASTER file) is equal to an employee number (PD-EMPLOYEE-NUMBER field) from the PAYROLLDETAIL file:
GET EMPLOYEE-DATA KEY = PD-EMPLOYEE-NUMBER
Example 3
The following command requests that a DEPARTMENT record from the DEPARTMENT-DETAIL file
be obtained for an employee whose department number (DEPARTMENT and SUB-DEPARTMENT on
the EMPLOYEE-MASTER file) is equal to the department (DD-DEPARTMENT, DDSUBDEPARTMENT field) from the DEPARTMENT-DETAIL file:
GET DEPARTMENT-DATA KEY = DEPARTMENT , SUB-DEPARTMENT
Example 4 - SYS-DIRECT-KEY
To find the department description from the DEPARTMENT-DETAIL file for the above mentioned
employee, the following commands are needed:
W-INDEX = DEPARTMENT-DETAIL SYS-DIRECT-KEY
IF W-INDEX EQ 0 –
PUT ('NO DEPARMENT INFORMATION FOUND') –
ELSE –
W-DEPARTMENT-DESC = DD-DESCRIPTION(W-INDEX)
Example 5 - SYS-CURRENT-KEY
To find the department description from the DEPARTMENT-DETAIL file for the above mentioned
employee, the following commands can be used as well:
IF SYS-CURRENT-KEY EQ 0
THEN
W-DEPARTMENT-DESCRIPTION = 'NO DEPARMENT INFORMATION FOUND'
IKAN Solutions
METASUITE METAMAP MANAGER - RELEASE 8.1.3
STRUCTURED EDITOR | 220
ELSE
W-DEPARTMENT-DESCRIPTION = DD-DESCRIPTION ( SYS-CURRENT-KEY )
END-IF
Example 6 - GET-RANDOM
GET DEPARTMENT-DATA KEY = RANDOM?
W-DEPARTMENT-DESCRIPTION = DD-DESCRIPTION ( SYS-CURRENT-KEY )
After the GET-RANDOM operation the value of SYS-CURRENT-KEY will be a non zero value. Testing
on ZERO is useless.
Example 7 - SYS-RANDOM-KEY
Example 6 can also be written as:
W-DEPARTMENT-DESCRIPTION = DD-DESCRIPTION ( SYS-RANDOM-KEY )
The value of SYS-RANDOM-KEY will be copied to SYS-CURRENT-KEY.
The following command blocks will have a different result:
1.
W-DEPARTMENT-NAME = DD-NAME ( SYS-RANDOM-KEY )
W-DEPARTMENT-DESCRIPTION = DD-DESCRIPTION ( SYS-RANDOM-KEY )
2.
W-DEPARTMENT-NAME = DD-NAME ( SYS-RANDOM-KEY )
W-DEPARTMENT-DESCRIPTION = DD-DESCRIPTION ( SYS-CURRENT-KEY )
In the second example, W-DEPARTMENT-NAME and W-DEPARTMENT-DESCRIPTION will point to the
same row in the external array.
HALT ALL
The HALT ALL command is used to stop all processing. After a HALT ALL is encountered, the system will
execute no further procedures or system routines, and no further output will be produced. This command is
useful when an unexpected event occurs that will produce invalid output.
For example, if you write a program that depends on the value of a Work Field being set as a runtime parameter
and no value is supplied for that parameter at execution time, the program should be halted to prevent the (perhaps costly) production of unwanted reports and Target Files.
The HALT ALL command is allowed within any type of procedure.
Format
HALT ALL
Example
Consider the following example:
BEGIN SOURCEFILE EMPLOYEE-MASTER INITIAL
IF SELECT-JOB-CODE EQ ' ' HALT ALL
This Initial Sort procedure checks the contents of a Work Field named SELECT-JOB-CODE. If no value
has been supplied for that field (i.e., no runtime parameter was entered), the run is halted.
Note:
IKAN Solutions
The HALT SOURCEFILE, HALT REPORT, and HALT TARGETFILE commands differ from the HALT
ALL command, in that they halt only particular parts of the processing, not the entire program
request.
METASUITE METAMAP MANAGER - RELEASE 8.1.3
STRUCTURED EDITOR | 221
HALT SOURCEFILE
The HALT SOURCEFILE command is used to halt the processing of one or more Source Files. Once the
HALT SOURCEFILE command is encountered in a run, normal processing continues until the generated
program attempts to read the next input record from the halted Source File. At that time, input processing
ceases for the Source File, and any end-of-file procedures applicable are executed. The HALT SOURCEFILE
command is allowed only within initial or input procedures.
Format
HALT SOURCEFILE [(SourceFile-name,...)]
Elements Description
Element
Description
Required?
SourceFile-name
SourceFile-name identifies the Source File whose processing is
being halted. It must specify a Source File that does not include
the CONTROLLED option (although it can include the CONTROLLED
BY option). If SourceFile-name is omitted from the command
within a Source File procedure, it defaults to the Source File in
whose (initial or input) procedure the command is contained.
No
Example
The HALT SOURCEFILE command is most useful when a range of records is being processed in sequence. In
this case, you might halt the Source File once the upper bound of the desired range is exceeded, thereby
reducing processing time significantly (assuming that the Source File contains records following the group of
processed records). Assume that the records of an EMPLOYEE-HISTORY file are in ascending sequence by
a field named HIRE-DATE. To report only on those employees hired before January 1, 1978, the
EMPLOYEE-HISTORY file should be halted when the first employee with a hire date of January 1, 1978 or
later is encountered, as illustrated below:
BEGIN SOURCEFILE EMPLOYEE-HISTORY INPUT
IF HIRE-DATE GE 780101 HALT SOURCEFILE EXCLUDE
Note:
An EXCLUDE command has been coded following the HALT SOURCEFILE command. HALT
SOURCEFILE does not "exclude" the current record; therefore, if it is your intention to exclude the
current record as well as to not process any additional records from the Source File, you should
include the EXCLUDE command.
HALT TARGETFILE
The HALT TARGETFILE command is used to stop the processing for a Target File. The location of the
HALT TARGETFILE command in your Target File request determines when the processing will be stopped:
IKAN Solutions
METASUITE METAMAP MANAGER - RELEASE 8.1.3
STRUCTURED EDITOR | 222
If HALT TARGETFILE is in this type of
procedure
Action Taken
INITIAL
No Target File output will be produced.
INPUT or EOF
No further detail lines will be produced, but totals will be
generated for any detail lines printed already.
GROUP
Total processing will stop and no further totals will be produced.
EOJ
No action.
Specification Language Format
HALT TARGETFILE [(TargetFile-number,...)]
MetaMap Format
HALT TARGETFILE [(TargetFile-name,...)]
Elements Description
Element
Description
Required?
TargetFile-name
The name of one or more Target Files for which processing is being
halted. It must specify a Target File for which a TARGETFILE command
has been coded. If TargetFile-name is omitted from the command
within a Target File procedure, it defaults to the Target File in whose
procedure the command is contained.
No
Example
The HALT TARGETFILE command is useful in a program request that optionally produces several Target
File. Assume that the fourth file in a program request is an "optional" TargetFile; that is, it is produced only
upon request at execution time. A Work Field named WRITE-SUMMARY, defined as a CHARACTER
field with an initial value of "N", has been defined to control production of the Target File.
The following initial procedure will suppress the production of the transfer unless the value of WRITESUMMARY has been changed to a "Y" (using a runtime parameter):
BEGIN TARGETFILE 4 INITIAL
IF WRITE-SUMMARY NE 'Y' HALT TARGETFILE
IF
The IF command enables you to test a condition and execute a command (or sequence of commands) if the
condition is true, and optionally, to execute an alternative command (or sequence of commands) if the
condition is false.
IKAN Solutions
METASUITE METAMAP MANAGER - RELEASE 8.1.3
STRUCTURED EDITOR | 223
For example, the following command causes the routine named HOURLY-CALC to be executed when the
value of PAY-CODE is 1, and the routine named SALARIED-CALC to be executed for all other values:
IF PAY-CODE EQ 1 DO HOURLY-CALC ELSE DO SALARIED-CALC
An IF command can be terminated by means of END-IF.
Format
IF Conditional-expression
[THEN]
true-commands
[ELSE]
false-commands
[END-IF]
Elements Description
Element
Description
Required?
Conditionalexpression
A conditional-expression examines a logical relationship and
produces a "true" or "false" answer. A comprehensive description
of the use and coding of conditional expressions can be found
under Conditional Keywords (page 300)
Yes
true-command
True-command will be executed when the conditional expression
tests as "true". True-command may be any command or sequence
of procedural commands, except a CASE command. The NEXT
command may be used to exit the IF statement.
Note that the true-command may be another IF command,
resulting in what is referred to as a "nested IF" command.
Yes
false-command
The ELSE option is used to specify a false-command, which will be
executed when the conditional expression is evaluated as "false".
False-command may be any command or sequence of procedural
commands, except a CASE command.
The NEXT command may be used to exit the IF statement, but it
is advised to use the more structured END-IF command. NEXT
and END-IF are mutual exclusive.
Note that the false-command may be another IF command,
resulting in what is referred to as a "nested" IF command.
No
Refer also to the section Conditional Keywords (page 300).
ABSENT
The ABSENT conditional keyword is used in a Report or Target File detail procedure, or in a Public Procedure
called by a Report or Target File detail procedure, to determine whether a record from the specified Source
File is absent from the current set of matched records. (Conversely, the PRESENT condition, may be used to
determine whether a record from the specified Source File is present in the current set of matched records.)
IKAN Solutions
METASUITE METAMAP MANAGER - RELEASE 8.1.3
STRUCTURED EDITOR | 224
When matching the records from two or more Source Files, the system always designates one or more Source
Files as being "present" in the current matched set, and may designate one or more Source Files as being
"absent". The "current matched set" consists of one or more input records whose match keys are equal to the
current match key.
For example, assume that three Source Files are being matched on an employee number, and the first two
Source Files contain records with an employee number of 12345, but the third does not. When employee
number 12345 becomes the current match key, the first two Source Files will be present in the matched set and
the third Source File will be absent.
Note:
Both the PRESENT and ABSENT match conditions can only be tested within Report or Target File
detail procedures, or within Public Procedures performed by Report or Target File detail
procedures.
Format
IF SourceFile-name ABSENT
[THEN]
true-commands
[ELSE]
false-commands
[END-IF]
Elements Description
Element
Description
Required?
SourceFile-name
The name of one of the Source Files being matched.
Yes
true-command
The IF SourceFile-name ABSENT true-command sequence
specifies the action to be taken if the match key from the current
record from the named Source File is not equal to the current
match set key. SourceFile-name identifies one of the Source Files
being matched.
If the match key of the current record from the named Source File
is not equal to the current match key, the condition will test as true
and the specified true-command will be executed.
If the match key is equal to the current match key, the condition
will test as false, the true-command will be bypassed, and any
specified false-command (described below) will be executed.
True-command may be any procedural command or sequence of
procedural commands, except the CASE command.
Yes
false-command
The ELSE option specifies the action to be taken if the ABSENT
condition tests as false (i.e., the current record from the specified
Source File contains a record with a match key equal to the current
match key). When this occurs, the previously described truecommand will be bypassed, and any specified false-command will
be executed.
False-command may be any procedural command or sequence of
procedural commands, except the CASE command.
No
Cautions
1.
When matching Source Files, always code a detail procedure for every report and Target File to determine
the present/absent status of each Source File before printing or otherwise processing any input data (for
that Report or TargetFile).
IKAN Solutions
METASUITE METAMAP MANAGER - RELEASE 8.1.3
STRUCTURED EDITOR | 225
2.
When a Source File is "absent" from the current matched set, the current record for that Source File will
be either the next record from the Source File or "garbage" (if the end-of-file has been reached).
Accordingly, you should never access fields from a Source File that is not "present" in the current matched
set. In other words, never print, sort on or group on a field from an "absent" Source File.
PRESENT
The PRESENT conditional keyword is used in a Report or Target File detail procedure, to determine whether
a record from the specified Source File is present in the current set of matched records. (Conversely, the
ABSENT condition, may be used to determine whether or not a record from the specified Source File is absent
from the current set of matched records.)
When matching the records from two or more Source Files, the system always designates one or more Source
Files as being "present" in the current matched set, and may designate one or more Source Files as being
"absent". The "current matched set" consists of one or more input records whose match keys are equal to the
current match key. For example, assume that three Source Files are being matched on an employee number,
and the first two Source Files contain records with an employee number of 12345, but the third does not.
When employee number 12345 becomes the current match key, the first two Source Files will be present in
the matched set and the third Source File will be absent.
Note:
Both the PRESENT and ABSENT match conditions can be tested only within Report or Target File
detail procedures, or within public procedures performed by Report or Target File detail
procedures.
Format
IF SourceFile-name PRESENT
[THEN]
true-commands
[ELSE]
false-commands
[END-IF]
Elements Description
Element
Description
Required?
SourceFile-name
The name of one of the Source Files being matched.
Yes
true-command
The IF SourceFile-name PRESENT true-command sequence
specifies the action to be taken if the match key from the current
record from the named Source File is equal to the current match set
key. SourceFile-name identifies one of the Source Files being matched.
If the match key of the current record from the named Source File is
equal to the current match key, the condition will test as true and the
specified true-command will be executed. If the match key is not equal
to the current match key, the condition will test as false, the truecommand will be bypassed, and any specified false-command
(described below) will be executed.
True-command may be any procedural command or sequence of
procedural commands, except the CASE command.
See Example 1 - True-command on page 226.
Yes
IKAN Solutions
METASUITE METAMAP MANAGER - RELEASE 8.1.3
STRUCTURED EDITOR | 226
Element
Description
Required?
false-command
The ELSE option specifies the action to be taken if the PRESENT
condition tests as false (i.e., the current record from the specified
Source File contains a record with a match key other than the current
match key). When this occurs, the previously described true-command
will be bypassed, and any specified false-command will be executed.
False-command may be any procedural command or sequence of
procedural commands, except the CASE command.
See Example 2 - False-command on page 226.
No
Examples
Example 1 - True-command
For example, if the current match key is 12345 and the current record from the EMPLOYEE-MASTER
Source File contains that match key value, the following command:
IF EMPLOYEE-MASTER PRESENT PUT (4)
tests as true and the fourth detail line is printed.
However, if the current record from the Source File contains a record with a match key other than 12345, this
condition tests as false and the fourth detail line is not printed.
Example 2 - False-command
For example, if the current match key is 12345 and the current record from the EMPLOYEE-MASTER
Source File does not contain that match key value, the following command:
IF EMPLOYEE-MASTER PRESENT PUT (4) ELSE PUT (5)
tests as false and the fifth detail line is printed. If the current record from the EMPLOYEE-MASTER Source
File does contain a match key equal to 12345, this condition tests as true, the fourth detail line is printed, and
the false-command is bypassed.
Cautions
•
When matching Source Files, always code a detail procedure for every report and TargetFile, to determine
the present/absent status of each Source File before printing or otherwise processing any input data (for
that Report or TargetFile).
•
When a Source File is "absent" from the current matched set, the current record for that Source File will
be either the next record from the Source File or "garbage" (if the end-of-file has been reached).
Accordingly, you should never access fields from a Source File that is not "present" in the current matched
set. In other words, never print, sort on or group on a field from an "absent" Source File.
Nested IF
A nested IF command is one that is coded as a component of the "true" or "false" clause of another IF
command.
Note:
Nesting of conditions is allowed only with the IF and the FOR command.
To illustrate the nested IF command, assume that a special calculation has to be performed for hourly
employees only (PAY-CODE=1), but there are two variations of that calculation:
•
one for those employees with an hourly wage (PAY-RATE) of $12.50 or more
•
one for all other employees
IKAN Solutions
METASUITE METAMAP MANAGER - RELEASE 8.1.3
STRUCTURED EDITOR | 227
If the two calculations are contained in routines named CALC-A and CALC-B, the appropriate routine for
each hourly employee could be executed by coding the following nested conditional command:
IF PAY-CODE EQ 1
IF PAY-RATE GE 12.50
DO CALC-A
ELSE DO CALC-B
ELSE EXCLUDE.
This expression is equal to:
IF PAY-CODE EQ 1
THEN
IF PAY-RATE GE 12.50
THEN
DO CALC-A
ELSE
DO CALC-B
END-IF
ELSE
EXCLUDE
END-IF.
Obviously, the second expression is much easier to interpret.
The first conditional expression tests whether the value of the PAY-CODE field is equal to 1. Whenever that
condition is true, the second (nested) conditional expression is tested. One of two routines is executed,
depending on the evaluation of that expression.
INVOKE
The INVOKE command is used to execute an external subroutine. When processing by the external subroutine
is completed, control returns to the command immediately following the INVOKE. External subroutines can
be used to perform special security functions, to compress or expand data, or to perform other types of
processing operations unique to your site.
One or more fields from the generated program can be made available ("passed") to the external subroutine,
and these fields may be modified by the subroutine.
Format
INVOKE 'Subroutine-name[/Language]'
[( [ Field-name | SourceRecord-name ],...)]
Elements Description
Element
Description
Required?
Subroutine-name
Subroutine-name identifies the external subroutine to be
executed.
Yes
IKAN Solutions
METASUITE METAMAP MANAGER - RELEASE 8.1.3
STRUCTURED EDITOR | 228
Element
Description
Required?
Language
You can enter the language in which the external subroutine is
written when it is not written in COBOL.
Subroutine-name/Language should be enclosed by single quotes.
The entire literal is limited to 40 characters.
No
Field-name
Field-name identifies a field to be passed to the external
subroutine. You can include up to 16 field names with this
command. The named fields will be made available to the
subroutine for processing.
You should not name numeric Source Fields in the field-name list,
because in the process of validating a numeric input field the
system may convert that field to a different internal data type and
size than was originally defined for it. When you need to pass the
value of a numeric input field to an external subroutine, you should
define a Work Field with the internal data type and size expected
by the subroutine, move the input field to the Work Field, and
then name the Work Field in the field-name list.
No
SourceRecord-name
SourceRecord-name identifies a record to be passed to the
external subroutine. You can include up to 16 record names with
this command. The named records will be made available to the
subroutine for processing.
No
TargetRecord-name
TargetRecord-name identifies a record to be passed to the
external subroutine. You can include up to 16 record names with
this command. The named records will be made available to the
subroutine for processing.
No
Remark
Note that external subroutines almost always demand that:
•
A fixed number of records/fields should be made available by the calling program (i.e., by your program
request).
•
Each record/field made available by the calling program is in exactly the same internal data format as is
expected by the subroutine.
• The records/fields named in the field name list appear in a predefined sequence.
Failure to adhere to these requirements may result in unpredictable action on the part of the invoked
subroutine.
PUT Source
This format of the PUT command is used to write a record to an output Source File (which is NEW
CONTROLLED) from within any procedure. You can only write sequentially, and to (new) output Source
Files defined as type SEQUENTIAL, INDEXED, or VSAM. You cannot use the system to update existing
Source Files, and you cannot create type RANDOM or database Source Files.
Format
PUT record-name
IKAN Solutions
METASUITE METAMAP MANAGER - RELEASE 8.1.3
STRUCTURED EDITOR | 229
Elements Description
Element
Description
Required?
record-name
Yes
record-name must be the name of a record defined within a
Source File that is identified by a SOURCEFILE command
containing the NEW CONTROLLED option. For example, the
following SOURCEFILE command identifies an output SourceFile:
SOURCEFILE EMPLOYEE-MASTER PREFIX 'OUT-' NEW CONTROLLED
And the following PUT command writes a record to that
SourceFile:
PUT OUT-EMPLOYEE-DATA
Note that because the prefix "OUT-" has been defined for the
output Source File, the record name (as well as all other references
to any component of that SourceFile) must include that prefix.
A more complete example follows the "Cautions and Hints"
section, below.
Cautions and hints
1.
All fields on the record being written should be assigned appropriate values before each PUT command is
executed. Fields to which no values have been assigned will contain unpredictable data.
2.
If you want to copy a record from an existing Source File to a new Source File, the easiest way to do this is
to define a CHARACTER field, beginning in the first character position of each record, with a size equal
to the record size. All field values from the existing Source File can then be assigned to the fields of the
new Source File, using a single assignment command.
3.
When copying records from an existing Source File to a new Source File, use the same Source File
definition for both the existing and new Source Files, by coding the PREFIX option on the
SOURCEFILE command for one or both of the Source Files.
4.
When creating a type INDEX or (keyed) VSAM Source File, you must write the records of the Source
File sequentially, in KeyField order. This is a restriction due to the access methods involved. Take care,
therefore, to ensure that the data input to the procedure executing the PUT command is in the proper
sequence for the new Source File. Also, make sure to assign an appropriate KeyField value to the field
designated as a KeyField (on the KEY option) when the Source File was defined.
5.
If you are creating a VSAM Source File, it must first be defined to VSAM, using the IDCAMS utility.
Refer to the appropriate IBM documentation for information on this subject.
6.
Remember that all program requests must contain at least one Report or Target File. If no other formatting
commands are coded (that is, no TITLE, HEADING, DETAIL, TOTAL, or ENDPAGE commands),
no Report or Target File will be produced.
Example
The most common situation in which you would want to create an output Source File is the case where a
selected number of records from an existing Source File are to be copied to a separate Source File. This may be
desirable if a large number of programs are to be run against the same subset of data from a Source File, or if it
is necessary to preserve certain records from a volatile Source File in their current state.
IKAN Solutions
METASUITE METAMAP MANAGER - RELEASE 8.1.3
STRUCTURED EDITOR | 230
For example, prior to running a salary update program, you might want to create a Source File consisting only
of those employees from the EMPLOYEE-MASTER Source File whose salaries will be adjusted. Assuming
that the name of the transaction Source File used to apply the salary adjustments is SALARYADJUSTMENTS, the following Source File commands would be coded:
SOURCEFILE SALARY-ADJUSTMENTS
SOURCEFILE EMPLOYEE-MASTER CONTROLLED
SOURCEFILE EMPLOYEE-MASTER PREFIX 'OUT-' NEW CONTROLLED
The first command identifies the main Source File, the second identifies the controlled Source File, and the
third identifies the new output Source File. Note that the prefix "OUT-" will have to be coded to reference all
components of the new output Source File.
The records of the SALARY-ADJUSTMENTS Source File are not in any particular sequence, so to ensure
that the records of the new Source File will be written in KeyField sequence, an initial Source File sort is
performed. This sort will order the data from the SALARY-ADJUSTMENTS Source File in sequence by a
field named SA-EMPLOYEE-NUMBER:
BEGIN SOURCEFILE SALARY-ADJUSTMENTS
SORT (SA-EMPLOYEE-NUMBER)
Within a report detail procedure, the following commands would be coded to access the EMPLOYEEMASTER Source File record for each employee from the SALARY-ADJUSTMENTS Source File, copying
that record to the output Source File, and writing a record to the OUT-EMPLOYEE-MASTER SourceFile:
GET EMPLOYEE-DATA KEY = SA-EMPLOYEE-NUMBER
IF EMPLOYEE-MASTER SYS-IO-STATUS NE SYS-OK PUT (1) EXCLUDE
OUT-WHOLE-EMP = WHOLE-EMP
PUT OUT-EMPLOYEE-DATA
IF OUT-EMPLOYEE-MASTER SYS-IO-STATUS NE SYS-OK PUT (2) HALT ALL
Using the KeyField value from the SALARY-ADJUSTMENTS Source File, the first command attempts to
get a record from the EMPLOYEE-MASTER Source File. If the read is unsuccessful, detail line 1 is printed
(presumably an error message), and the current record from the SALARY-ADJUSTMENTS Source File is
excluded. If the read is successful, the value of the OUT-WHOLE-EMP field in the new Source File is set
equal to the value of WHOLE-EMP in the existing Source File. (WHOLE-EMP is a single field defined to
the dictionary as consisting of the entire EMPLOYEE-DATA record.)
Following the assignment command, the new record is written and the Source File status checked. If the write
operation fails, detail line 2 is printed (again, presumably an error message) and the run is halted. In this case,
since it is known that the KeyField for the old record is a valid KeyField value, and that those KeyField values
are occurring in the appropriate sequence, the only type of write error possible would be one that would
prohibit the writing of any further records to the output Source File (i.e., an unrecoverable I/O error). In other
cases, where the validity or sequence of the KeyField value may be open to question, other types of errors could
occur, which might allow for subsequent output to the new Source File.
PUT Target
This format of the PUT command is used to dynamically select one or more detail or total records for output to
a Report or Target File. It is allowed only within report and Target File procedures. Detail records may be
selected for output in Report or Target File initial, input or end-of-file procedures. Total records may be
selected for output in Report or Target File total or end-of-job procedures.
IKAN Solutions
METASUITE METAMAP MANAGER - RELEASE 8.1.3
STRUCTURED EDITOR | 231
A PUT command in a Report or Target File detail procedure deactivates the automatic writing of all detail
records for that Report or TargetFile, for all non-excluded records. From a Report or Target File detail
procedure, the PUT command has the effect of:
•
Sending each specified DETAIL format to the internal sort (if SORT was specified on the REPORT or
TARGETFILE command).
•
Sending each specified DETAIL format to the Report or Target File (if no sort was requested and the
DETAIL format does not include the ACCUMULATE option).
From a Report or Target File detail procedure only, the PUT command has the effect of accumulating the
specified DETAIL format field values (if the DETAIL format specified ACCUMULATE).
If no PUT command is coded in a report's or TargetFile's detail procedure, all detail records for that Report or
Target File are output automatically by the system, for all non-excluded records. An exception to this occurs if
you include the NOAUTO (DETAIL) option on the REPORT or TARGETFILE command. This option
suppresses output of all detail records.
A PUT command in a Report or Target File group procedure deactivates the automatic writing of all total
records for that Report or TargetFile, for all non-excluded groups. If no PUT command is coded in a group
procedure (and the NOAUTO (TOTAL) option is not specified on the REPORT or TARGETFILE
command), all total records are written automatically by the system, for all non-excluded groups.
The use of the PUT command in a Report or Target File initial, end-of-file, or end-of-job procedure has no
effect on the automatic production of detail or total records. Thus, to produce a Report or Target File that
includes data only from within initial, end-of-file, or end-of-job procedures, you must code EXCLUDE
commands in the report's or TargetFile's input and total procedures.
In all cases with the PUT command, you have the choice of processing ALL formats, or only specific formats.
Format Specification Language
PUT {ALL | (format-number,...)}
Format MetaMap
PUT {ALL | (format-name,...)}
Elements Description
Element
Description
Required?
ALL
The ALL option is used to indicate that all detail or total record
formats should be output. In an initial, input, or end-of-file
procedure, ALL indicates that all detail record formats should be
written to the Report or Target File. In a total or end-of-job
procedure, ALL indicates that all total record formats should be
written out.
No
IKAN Solutions
METASUITE METAMAP MANAGER - RELEASE 8.1.3
STRUCTURED EDITOR | 232
Element
Description
Required?
Format-number
The Format-number list is used to identify one or more detail or
total record formats to be output. Format-number must be an
integer, and it may not be an input field or a Work Field. In Report
or Target File initial, input, or end-of-file procedures, formatnumber must be the number of a detail record format. In Report or
Target File group or end-of-job procedures, it must be the number
of a total record format.
No
Examples
ALL
If the STATE-CODE field is equal to "MA", the following command would result in the output of all detail
records (in an initial, input, or end-of-file procedure); or all total records (in a total or end-of-job procedure):
IF STATE-CODE EQ 'MA' PUT ALL
Format-number
Within a Target File detail procedure, the following command would result in the output of different detail
record formats, depending on the value of a field named PAY-CODE:
IF PAY-CODE EQ 1 PUT (1,2) ELSE PUT (3,4)
When the PAY-CODE field is equal to 1, detail formats 1 and 2 are written out. For all other values of PAYCODE, detail formats 3 and 4 are written.
REM (REMARKS)
The REMARKS command allows you to insert lines of comments anywhere in a program request. Liberal use of
remarks is recommended, to document the functions performed by your program.
Format
REMARKS text
Text
Text consists of any amount of descriptive text. For example, the following REMARKS command spells out very
clearly what's happening in the Source File procedure that follows:
REMARKS EMPLOYEES FROM ONLY ONE DEPARTMENT ARE SELECTED
BEGIN SOURCEFILE EMPLOYEE-MASTER INPUT
IF DEPARTMENT NE SELECT-DEPT EXCLUDE
Note that, in the example above, a blank line has been left following the REMARKS command, so that the
comments will stand out in the program request listing. Liberal use of blank command lines is another valuable
technique for making your programs more "readable", and hence more easily maintained.
When coding multiple lines of comments, be sure to include the continuation character at the end of each line
of text to be continued:
REMARKS EMPLOYEES FROM ONLY ONE DEPARTMENT ARE SELECTED
IKAN Solutions
METASUITE METAMAP MANAGER - RELEASE 8.1.3
STRUCTURED EDITOR | 233
SAMPLE
The SAMPLE command selects a sample of input records using any one of several sampling techniques. If a
record is selected for inclusion in the sample, processing continues with the next command (if any) in the
procedure; however, if a record is not selected for inclusion in the sample, that record is excluded from any
further processing in the procedure in which the command is coded.
Multiple sample commands can be coded in a single report, Target File or Source File Procedure, with a
maximum of 100 SAMPLE commands per program request.
Format
SAMPLE sample-type [RANDOM random-number-seed]
The following table lists the available sample types:
Element
Used to...
Fixed size
Define a specific number of records to be included in the sample
Percentage
Define an approximate percentage of all input records.
Systematic (SKIP)
Select single records or groups of records, separated by a fixed number of records.
Acceptance
attribute
Test the occurrence rate of an attribute (usually an error situation) within the
population.
Discovery attribute
Verify that the occurrence rate of an attribute is currently no greater than the
expected occurrence rate.
Variables
Find out the "materiality" of errors in the population, rather than just the error
occurrence rate.
Unit variables
Favour the larger amount values in the population to be included in the sample.
Cumulative
Find a sample that tests for the overstatement of amounts, when few errors are
expected.
Elements Description
Element
Description
Required?
sample-type
See table above
Yes
IKAN Solutions
METASUITE METAMAP MANAGER - RELEASE 8.1.3
STRUCTURED EDITOR | 234
Element
Description
Required?
random-number- Specify a one to eight-digit integer (or integer Work Field) to be used
seed
as a "seed" by the random number generator. This seed is not itself
the first random number used, but it is the starting point for the
calculation used to generate the first random number. If this
specification is omitted, a random number seed will be generated
from the computer's clock. The RANDOM option is not allowed on all
formats of the SAMPLE command.
The advantage of specifying a random-number-seed is that you can
duplicate a sample by later entering the same value for randomnumber-seed (provided there has been no change in the number or
order of records on the Source File). All of the sampling techniques
employ (at one time or another) the random number generator
supplied with the system. This random number generator uses the
multiplicative congruence technique, with a period of 2 to the 32nd
power.
No
Detailed Descriptions
SAMPLE SIZE
This format of the SAMPLE command is used when you know the exact number of records to be included in
your sample. The only other information you will need with this format is the number of records contained in
the population from which the sample will be drawn. This number can be obtained from a previous run against
the same subset of data from your Source File(s), or by using the COMPUTE command in a Source File initial
procedure.
Format:
SAMPLE SIZE sample-size POPULATION population-count[RANDOM random-number-seed]
Elements:
Element
Description
Required?
sample-size
Enter the exact number of records to be included in the sample. You
can also enter the name of a non-subscripted integer Work Field.
Yes
populationcount
Enter the exact count of records contained in the population from
Yes
which the sample will be drawn. You can also enter the name of a nonsubscriptive integer Work Field
random-number- See general description above
seed
No
How it works:
Each time the SAMPLE command is executed, the generated program will calculate the probability of the
current input record being included in the sample as follows:
P = SS / N
Where:
•
P is the probability, which is calculated to seven decimal places
•
SS is the sample size minus the number of records selected for the sample thus far
•
N is the population count minus the number of records previously processed
IKAN Solutions
METASUITE METAMAP MANAGER - RELEASE 8.1.3
STRUCTURED EDITOR | 235
Thus, if the requested sample size is 10 and the population count is 100, the calculated probability of including
the first record in the sample is 10/100, or .1000000. Having established the probability of including the
current record in the sample, the random number generator is then invoked to generate a random fraction in
the range of .0000001 through .9999999. If the generated fraction is less than or equal to the calculated
probability of inclusion, the current record will be included in the sample; otherwise, the current record will be
excluded.
SAMPLE PERCENT
This format of the SAMPLE command is used to select an approximate percentage of the input records for
inclusion in a sample. Due to the random selection process used, you may obtain slightly more or slightly fewer
records than expected. Because only whole records can be selected, the result may be calculated to a fractionally
different percentage than the one you requested.
Format:
SAMPLE PERCENT approximate-percent [RANDOM random-number-seed]
Elements:
Element
Description
Required?
approximatepercent
Enter the approximate percentage of records to be included in the
sample. You can also enter the name of a non-subscripted Work Field
containing a value in the (inclusive) range 0.00001-99.99999.
Yes
populationcount
Enter the exact count of records contained in the population from
Yes
which the sample will be drawn. You can also enter the name of a nonsubscriptive integer Work Field
random-number- See general description above
seed
No
How it works:
The probability of selecting any record in the population is set to a constant value, as follows:
P = percent / 100
Where:
• P is the probability calculated to seven decimal places.
Thus, if you specify a percent of 1.52, the probability of including any particular input record in the sample is
.0152000. Each time the SAMPLE command is executed, the random number generator is invoked to generate
a random fraction in the range of .0000001 through .9999999. If the generated fraction is less than or equal to
the calculated probability of inclusion, the current record will be included in the sample; otherwise, the current
record will be excluded.
SAMPLE SKIP
This format of the SAMPLE command is used to select single records or groups of records, after skipping a
fixed number of records.
Format:
SAMPLE SKIP (interval [, [ start-record] [, cluster-size]] ) [RANDOM random-numberseed]
Elements:
IKAN Solutions
METASUITE METAMAP MANAGER - RELEASE 8.1.3
STRUCTURED EDITOR | 236
Element
Description
Required?
interval
Enter the number of records to be skipped before each record (or
group of records) is selected. You can also enter the name of a nonsubscripted integer Work Field.
Yes
start-record
Enter the record number of the first record to be included in the
sample. You can also enter the name of a non-subscriptive integer
Work Field. If omitted, a random starting point in the range from 1
through n will be selected by the generated program, where n is the
interval specified above.
No
cluster-size
Enter the number of contiguous records to be included in the sample.
If omitted, it defaults to 1. You can also enter the name of a nonsubscriptive integer Work Field.
No
random-number- See general description above
seed
No
How it works:
To begin the selection process, a "skip" counter is initialized to the (user-specified or system-generated) startrecord value, and an "include" counter is initialized to the (user-specified or default) cluster size. Then, each
time that the SAMPLE command is executed, the skip counter is decremented by 1. As long as the value of the
skip counter is greater than zero, the current record will be excluded. When the value of the skip counter
reaches zero (or is negative), the current record will be selected for inclusion in the sample, and the include
counter will be decremented by 1.
Subsequent records will be selected for inclusion, as long as the include counter is greater than zero. As each
record is selected for inclusion, the include counter will be decremented by 1. When the include counter
reaches zero, the skip counter will be reset to the defined interval plus 1, and the include counter will be reset
to the cluster size.
SAMPLE with confidence-level and precision
This format of the SAMPLE command is used to test the occurrence rate of an attribute (usually an error
situation) within the population, and to guarantee that a sample that is representative of the population as a
whole.
Format:
SAMPLE (confidence-level,precision,occurrence-rate) POPULATION population-count
[RANDOM random-number-seed]
Elements:
Element
Description
Required?
confidence-level
Enter the statistical probability (expressed as a percentage) that the
selected sample is representative of the population. It is a number or a
non-subscripted Work Field having a value in de range of 80 to 99.9.
The larger the value specified here, the larger the sample size will be.
Yes
precision
Enter the accuracy of the sample as a percentage of the tolerable
error. It is a number or a non-subscripted Work Field having a value in
the range of 0.1 to 99.9. The lower the precision, the larger the sample
size will be.
Yes
IKAN Solutions
METASUITE METAMAP MANAGER - RELEASE 8.1.3
STRUCTURED EDITOR | 237
Element
Description
Required?
occurrence-rate
Enter the expected occurrence rate of errors in the population,
expressed as a percentage. It is a number or a non-subscripted Work
Field having a value in the range of 0.00001 to 99.99999.
Yes
populationcount
Enter the exact count of records contained in the population from
which the sample will be drawn. It is an integer or a non-subscripted
integer Work Field.
Yes
random-number- See general description above
seed
No
How it works:
The first time the SAMPLE command is executed, the sample size, SS, is calculated as follows:
SS = R * (1 - R) + ((P/T)**2 + R*(1-R)/N))
SS is rounded up to the next integer value.
The remaining terms used in the calculation are:
•
R the expected occurrence rate of errors
•
P the precision of the sample
•
T the statistical "t-value" derived from the specified confidence level
• N the population count
Once the acceptance sample size has been calculated, the selection process is exactly the same as the fixed-size
sample selection process described earlier.
SAMPLE with confidence-level and maximum error rate
This format of the SAMPLE command is used when you are confident that you "know" the occurrence rate of
errors in the population from previous attributes sampling experience, and want to verify that the current
occurrence rate is no greater than the "known" rate. The advantage of discovery attributes sampling is that a
much smaller sample size is obtained than when using acceptance attributes sampling.
Format:
SAMPLE (confidence-level,maximum-error-rate,0) POPULATION population-count [RANDOM random-number-seed]
Elements:
Element
Description
Required?
confidence-level
Enter the statistical probability (expressed as a percentage) that the
selected sample is representative of the population. It is a number or a
non-subscripted Work Field having a value in de range of 80 to 99.9.
The lower the precision, the larger the sample size will be.
Yes
maximum-errorrate
Enter the expected occurrence rate of errors in the population,
expressed as a percentage. It is a number or a non-subscripted Work
Field having a value in the range of 0.00001 to 99.99999.
Yes
occurrence-rate
Enter the expected occurrence rate of errors in the population,
expressed as a percentage. It is a number or a non-subscripted Work
Field having a value in the range of 0.00001 to 99.99999.
Yes
IKAN Solutions
METASUITE METAMAP MANAGER - RELEASE 8.1.3
STRUCTURED EDITOR | 238
Element
Description
Required?
discoverysampling, must
be equal to 0
Enter a zero value, as this is required for every discovery sampling. It
may be in the form of a literal or a non-subscripted Work Field
containing a zero value.
Yes
populationcount
Enter the exact count of records contained in the population from
which the sample will be drawn. It is an integer or a non-subscripted
integer Work Field.
Yes
random-number- See general description above
seed
No
How it works:
The first time that the SAMPLE command is executed, the sample size, SS, is calculated as follows:
SS = (log (1 - C) / log (1 - R))
SS is then rounded up to the next integer value.
The remaining terms used in the calculation are:
•
log: the logarithmic function
•
C: the confidence level
• R: the maximum expected error rate
Once the discovery sample size has been calculated, the sample selection process is exactly like the fixed-size
sample selection process described earlier.
SAMPLE with amount-field and standard deviation
This format of the SAMPLE command is used when you are concerned with the "materiality" (i.e. gross
amount) of error in the population, rather than just the rate of errors.
Format:
SAMPLE amount-field (confidence-level, precision)POPULATION population-count STDDEV standard-deviation [RANDOM random-number-seed]
Elements:
Element
Description
Required?
amount-field
Enter the name of the field to be sampled. It must be a totalable nonsubscripted field defined on a Source File.
Yes
confidence-level
Enter the statistical probability (expressed as a percentage) that the
selected sample is representative of the population. It is a number or a
non-subscripted Work Field having a value in the range 80-99.9. The
larger a value specified here, the larger the sample size will be.
Yes
precision
Enter the total tolerable amount of error for the population (not the
tolerable error per item in the population). It is a number or nonsubscripted integer Work Field.
Yes
populationcount
Enter the exact count of records contained in the population from
which the sample will be drawn. It is an integer or a non-subscripted
integer Work Field.
Yes
IKAN Solutions
METASUITE METAMAP MANAGER - RELEASE 8.1.3
STRUCTURED EDITOR | 239
Element
Description
Required?
standarddeviation
The STD-DEV option is used to specify the standard deviation of the
amount field being sampled. This statistic is necessary for the
computation of the variables sample size. The larger the standard
deviation of the amount field, the larger the sample size.
If your population contains a large standard deviation, you will find
that the variables sampling algorithm requires that nearly all (or in
some cases, all) of your input records be included in the sample. When
this occurs, you should consider stratifying the population of amount
fields, and drawing separate variables samples from each stratum.
Using this approach, the total number of records selected will be
reduced (mainly because the standard deviation within each stratum
will be reduced).
Yes
random-number- See general description above
seed
No
How it works:
The first time the SAMPLE command is executed, the sample size, SS, is calculated as follows:
SS = 1 / ((R²/T²) + (1 / N))
SS is rounded up to the next integer value.
The remainder of the terms used in the calculation are as follows:
•
R the ratio of the average sampling error to the standard deviation (i.e., the specified precision divided by
the population count, divided by the standard deviation)
•
T the statistical "t-value" derived from the specified confidence level
• N the population count
Once the variables sample size has been calculated, the sample selection process is exactly like the fixed-size
sample selection process described earlier.
SAMPLE with amount-field, Unit and standard deviation
This format of the SAMPLE command is used when you want to favour inclusion of the larger values of the
amount field indicated.
Format:
SAMPLE amount-field (confidence-level, precision)UNIT total-amount-field-value
POPULATION population-count STD-DEV standard-deviation [RANDOM random-number-seed]
Elements:
Element
Description
Required?
amount-field
Enter the name of the field to be sampled. It must be a totalable nonsubscripted field defined on a Source File.
Yes
confidence-level
Enter the statistical probability (expressed as a percentage) that the
selected sample is representative of the population. It is a number or a
non-subscripted Work Field having a value in the range 80-99.9. The
larger a value specified here, the larger the sample size will be.
Yes
precision
Enter the total tolerable amount of error for the population (not the
tolerable error per item in the population). It is a number or nonsubscripted integer Work Field.
Yes
IKAN Solutions
METASUITE METAMAP MANAGER - RELEASE 8.1.3
STRUCTURED EDITOR | 240
Element
Description
Required?
total-amountfield-value
Enter total value of the amount field in the population being sampled.
It must be the exact total amount of the specified amount-field, and
can most easily be obtained using the VALUE option of the COMPUTE
command in a Source File initial procedure.
Yes
populationcount
Enter the exact count of records contained in the population from
which the sample will be drawn. It is an integer or a non-subscripted
integer Work Field.
Yes
standarddeviation
The STD-DEV option is used to specify the standard deviation of the
amount field being sampled. This statistic is necessary for the
computation of the variables sample size. The larger the standard
deviation of the amount field, the larger the sample size.
If your population contains a large standard deviation, you will find
that the variables sampling algorithm requires that nearly all (or in
some cases, all) of your input records be included in the sample. When
this occurs, you should consider stratifying the population of amount
fields, and drawing separate variables samples from each stratum.
Using this approach, the total number of records selected will be
reduced (mainly because the standard deviation within each stratum
will be reduced).
Yes
random-number- See general description above
seed
No
How it works:
A sample size is calculated using the standard variables sampling calculation shown previously. The system
then calculates the number of units, SU, of the total value of the population that must be sampled:
SU = (V/N * SS)
The components of this calculation are as follows:
•
V the total value of the amount field
•
N the population count
• SS the sample size, calculated using the standard variables sampling formula.
Rather than assign an equal probability of selection to each input record (as for standard variables sampling),
the system now assigns an equal probability of selection to each unit (tens, hundreds, thousands, etc.) in the
total value of the sampled field. Here, a record having an amount value of $100 will be ten times more likely to
be selected than one having a value of $10; a record having an amount value of $5000 will be fifty times more
likely to be selected than one having value of $100; etc.
For each input record, the probability of selection is thus:
P = (A * SU / T)
where P, the probability, is calculated to seven decimal places.
The remaining terms in the calculation are as follows:
•
A the value of the amount field from the current record
•
SU the total number of units to be sampled, minus the number of units already included in the sample
•
T the total number of units of the amount field in the population, minus the number of units already
processed by the SAMPLE command
IKAN Solutions
METASUITE METAMAP MANAGER - RELEASE 8.1.3
STRUCTURED EDITOR | 241
Once the probability of inclusion of the current input record is calculated, the selection process proceeds as
described earlier for fixed-size sampling. (Specifically, the system generates a random number in the range of
.0000001 through .9999999, and if that number is less than or equal to the probability of inclusion, the current
input record is included in the sample.)
SAMPLE with CUMULATIVE
This format of the SAMPLE command is used when you want to test for the overstatement of amounts when
few errors are expected (that is, when the rate of overstatement is relatively low). This technique cannot be
used for understatement because it never selects zero or negative values. Note that a high incidence of error
will produce a skewed distribution.
Format:
SAMPLE amount-field CUMULATIVE (confidence-level,precision,expected-error-rate)
Elements:
Element
Description
Required?
amount-field
Enter the name of the field to be sampled. It must be a totalable nonsubscripted field defined on a Source File.
Yes
total-value
Enter the total value of all positive occurrences of the selected
amount-field. It can be a number or a non-subscripted numeric Work
Field.
Yes
confidence-level
Enter the statistical probability (expressed as a percentage) that the
selected sample is representative of the population. It is a number or a
non-subscripted Work Field having a value in the range 80-99.9. The
larger a value specified here, the larger the sample size will be.
Yes
precision
Enter the total tolerable amount of error for the population (not the
tolerable error per item in the population). It is a number or nonsubscripted integer Work Field.
Yes
expected-errorrate
Enter the expected occurrence rate of errors in the population,
expressed as a percentage. It is a number or a non-subscripted Work
Field containing a value in the range of 0.00001 to 99.99999.
Yes
How it works:
This technique is a combination of two sampling techniques: Acceptance Sampling and Fixed Interval
Sampling. Cumulative Sampling draws a sample based on the total value of all positive occurrences of the
specified field, starting from a calculated point and using a calculated interval value. The sample size is
controlled by the stated confidence level, precision, and expected error rate. The selection interval is a ratio of
the total value of the specified field and the sample size. Each record with a positive value is evaluated for
inclusion in the sample. The evaluation is based on an algorithm that uses the starting point, the calculated
interval, and the field value.
This technique first calculates a series of values that are then used in the actual selection of the sample. The
values are calculated using a procedure that performs the following steps in the order shown.
A random number seed is computed using system date and time. The seed value is determined as follows:
RANDOM-SEED = ((SYS-TDX-SS * 1.000.000) + (SYS-TDX-MM* 1.000) + (SYS-TDX-HH * 100)
+ 01)
User values are loaded from the program, as specified by the confidence-level, precision, and expected-errorrate.
A T-VALUE is determined from a table of T values using the following formula:
IKAN Solutions
METASUITE METAMAP MANAGER - RELEASE 8.1.3
STRUCTURED EDITOR | 242
LOOK-UP-VALUE = (confidence-level-079 * 100) ROUNDEDUP
The LOOK-UP-VALUE will range between 1 and 21, with corresponding T values in the range 1.28 to 3.0.
The size of the sample is calculated from the specified confidence-level, precision, expected-error-rate, and the
already determined T value.
The formula used is as follows:
SAMPLE-SIZE = (A/B + C)
Where:
A = (expected-error-rate + ( 1 - expected-error-rate)
B = (precision / T-VALUE) SQUARED ROUNDED
C = (A / CUMULATIVE-TOTAL-VALUE)
Once the sample size has been determined, the selection interval is calculated using the following formula:
INTERVAL = CUMULATIVE-TOTAL-VALUE / SAMPLE-SIZE
A starting point for the selection procedure is determined by multiplying the interval by the random number
seed.
The formula used is as follows:
CUMULATIVE-START-POINT = (INTERVAL * RANDOM-SEED* -1)
The record selection process for cumulative sampling includes the following steps:
•
As each record is read, the value of field-name is added to CUMULATIVE-START-POINT.
•
If CUMULATIVE-START-POINT is less than zero, the record is not selected. If CUMULATIVESTART-POINT is positive, the record is selected for inclusion.
•
INTERVAL is subtracted from the current value of CUMULATIVE-START-POINT.
•
The process continues reading each record in sequence. The value of each occurrence of field-name is added
to CUMULATIVE-START-POINT until CUMULATIVE-START-POINT becomes positive again.
At that point, the current record is selected for inclusion in the sample.
The process continues looping through Steps 3 and 4 until it reaches the end of the Source File. In other
words, after it selects a record, it subtracts INTERVAL from the current value of CUMULATIVE-STARTPOINT, reads subsequent records and adds their field values to CUMULATIVE-START-POINT. Each time
CUMULATIVE-START-POINT becomes positive, the process selects the current record.
SET
The SET command is used in the Program Initial Procedure. It allows you to change the Generator Options
(MTL Options) dynamically in order to influence the Generator Process.
Format:
SET 'option-CVS-separator' = '\'
Now the program can read from delimited files with separator '\'.
START
The START command is used to position a Source File. It allows you to begin accessing records at a specified
point, bypassing all preceding input records. Note that START does not read a record for processing; it simply
excludes the current record (if any), and then positions the Source File at the desired record.
The START command is used only in the Initial Sort or input procedure for the Source File to be started.
START may be used with any Source File type. If it is used on a sequential (i.e., non-keyed) Source File, the
Source File must be in sequence by the field being used as the start key. Any number of START commands
can be coded in a program request.
IKAN Solutions
METASUITE METAMAP MANAGER - RELEASE 8.1.3
STRUCTURED EDITOR | 243
There are two types of start operations: a generic-key start and an exact-key start:
•
A generic-key start allows you to specify a partial, or inexact, starting key value. If an exact match for the
specified key value cannot be found, the Source File will be positioned to the first record whose KeyField
is greater than the specified key. (If the Source File contains no record with a KeyField value greater than
that specified, the Source File will be positioned at the "end-of-file" and the next read request will raise the
end-of-file condition.)
•
An exact-key start requires an exact KeyField value. If a record containing the specified value does not exist
in the Source File, the Source File will be positioned at the end-of-file, even if records with higher KeyField
values exist. It follows, then, that if you are performing a start operation on a Source File for which only
exact-key starts are allowed, you must know the exact KeyField value of the record at which you want to
begin processing.
The system determines which type of start operation is performed. This determination depends on operating
system and/or access method restrictions governing the Source File being accessed. Wherever possible, a
generic-key start will be used.
CAUTION: It is easy to create an infinite loop when using the START command.
The following table shows when each type of start will be performed. When using the START command to
position a database Source File, refer to the appropriate database supplement.
Source File Type
z/OS Start Operation
VSE Start Operation
Sequential
generic-key
generic-key
Indexed (ISAM)
exact-key
generic-key
Random (BDAM)
exact-key
exact-key
VSAM
generic-key
generic-key
Format
START SourceFile-name KEY = start-key
Elements Description
Element
Description
Required?
SourceFile-name
SourceFile-name is the name of a Source File (specified on a
SOURCEFILE command) in the program request. It may be any type of
Source File, but the corresponding SOURCEFILE command cannot
contain either the CONTROLLED or the TABLE option.
Yes
IKAN Solutions
METASUITE METAMAP MANAGER - RELEASE 8.1.3
STRUCTURED EDITOR | 244
Element
Description
Required?
start-key
The KEY option is used to specify a starting KeyField value, start-key.
The coding of start-key varies, depending on whether the Source File
being started is a keyed or sequential Source File. For keyed Source
Files, the KeyField is defined to the MetaStore and the system
"knows" which field is the access key. For sequential Source Files, you
must identify the KeyField to be used.
STARTING KEYED SOURCEFILES:
If the Source File to be started is a keyed Source File, start-key must
be any Source File or literal of the same general data type as the
KeyField defined for the Source File.
STARTING SEQUENTIAL SOURCEFILES
If the Source File to be started is a sequential (i.e., non-keyed) file:
• Start-key must be the name of a field in the Source File (i.e., it may
not be a Work Field or the name of a field in another SourceFile).
• The records of the Source File must appear in ascending sequence
by the value of the start-key field.
• Prior to coding the START command, a starting value must be assigned to the field that is named as the start-key field.
Yes
Examples
Example 1 - Starting Keyed SourceFiles
The following Initial Sort procedure might be coded to begin processing a VSAM version of the
EMPLOYEE-MASTER Source File at the first employee number equal to or greater than 30000. The
KeyField for this Source File is defined as a 5-digit packed numeric field.
BEGIN SOURCEFILE EMPLOYEE-MASTER INITIAL
START EMPLOYEE-MASTER KEY = 30000
Example 2 - Starting Sequential SourceFiles
Assume that the records of the payroll-detail Source File are in sequence by employee number. The following
initial Source File procedure positions that Source File at the first record for the first employee whose
employee number is equal to or greater than 30000:
BEGIN SOURCEFILE PAYROLL-DETAIL INITIAL
PD-EMPLOYEE-NUMBER = 30000
START PAYROLL-DETAIL KEY = PD-EMPLOYEE-NUMBER
Example 3 - Infinite Loops
BEGIN SOURCEFILE EMPLOYEE-MASTER INITIAL
START EMPLOYEE-MASTER KEY = 30000
SORT (ANNUAL-SALARY DESCENDING)
Because the initial Source File procedure contains the SORT command (indicating that Source File preprocessing will occur), the procedure will be executed first just after the read of the first record on the Source
File. At that time, the START command will position the EMPLOYEE-MASTER Source File at the first
employee whose employee number is greater than or equal to 30000. It will then exclude the current (first)
input record, read the first employee record with a key equal to or greater than 30000, and re-execute the
START command. The effect is an infinite loop, with the generated program rejecting the current input
record and then repositioning itself at that same record.
This procedure should have been coded as follows:
IKAN Solutions
METASUITE METAMAP MANAGER - RELEASE 8.1.3
STRUCTURED EDITOR | 245
BEGIN SOURCEFILE EMPLOYEE-MASTER INITIAL
IF EMPLOYEE-MASTER SYS-READ-COUNT EQ 1 START EMPLOYEE-MASTER KEY = 30000
SORT (ANNUAL-SALARY DESCENDING)
By coding the START command as the "true" subcommand of the IF that checks the number of input records
read, the programmer ensured that the START would be executed only one time.
When you use the START command in an Initial Sort procedure where pre-processing occurs (i.e., with the
SORT, EXTRACT, or PRE-PASS command); and when you use the START command in a Source File
input procedure: the START command should be executed conditionally, to prevent execution of an infinite
loop.
20.5. Miscellaneous Functions
In assignments, the arguments do not always have to consist of basic strings, numbers or variables. The
arguments can be more complicated. For instance, you can use a part of a string or the difference between two
dates.
This section treats the possibilities that are available in simple assignments.
AGE
The AGE function calculates the difference in days between two date fields. The AGE function is used only on
the right-hand side of an assignment command.
Format
Field-Name = AGE ( Date-field [,Aging-date])
Elements Description
Element
Description
Required?
Date-field
Date-field specifies the name of the field that will be aged against
either the current system aging date (SYS-AGE-DATE) or a usersupplied reference date Aging-date.
Yes
Aging-date
If you do not specify an aging date, the field will be aged against
SYS-AGE-DATE. The aging-field must be defined with the DATE
option.
See Example - Aging-date on page 245.
No
Examples
Example - Aging-date
As an example, if the field named DUE-DATE contained the date March 14, 2010 (in any date format) and
the current system aging date was April 10, 2010, the following command:
DAYS-LATE = AGE (DUE-DATE)
IKAN Solutions
METASUITE METAMAP MANAGER - RELEASE 8.1.3
STRUCTURED EDITOR | 246
Would result in the number 27 being assigned to the numeric field DAYS-LATE.
If the same date of April 10, 2010 were assigned to a Work Field named AGING-DATE, the following
command would produce the same result:
DAYS-LATE = AGE (DUE-DATE , AGING-DATE )
INSTRING
INSTRING is a function that returns the position (1-based positions) of a substring within a main string. You
can also specify a starting position.
You can use this function for:
1.
Replacing a string with a string of the same length (page 248)
2.
Replacing a string at a specific location (page 249)
Format
numfield-0 = INSTRING ( string-1 , { string-2 | litteral-2 } [ , [{ numfield-3 |
numeric-3 }] [ , { numfield-4 | numeric-4 } ] ] )
Elements Description
Element
Description
Required?
string-1
The main string
yes
string-2
The substring you are searching for within the main string
yes
numfield-3
The size of the substring. If omitted, the size is derived
from the LENGTH (without trailing spaces) of the second
parameter.
no
numfield-4
The starting position. If omitted, the starting position is 1.
no
Example
MY-STRING1 = 'Captain Haddoc will go to the doctor tomorrow'
MY-STRING2 = 'Captain'
POS1 = INSTRING ( MY-STRING1 , 'doc' , 3 , 20 )
POS2 = INSTRING ( MY-STRING1 , MY-STRING-2 )
POS3 = INSTRING ( MY-STRING1 , MY-STRING-2 , , 3 )
POS4 = INSTRING ( MY-STRING1 , 'go to' , , 4 )
POS1 will become 31, because this is the first occurrence of the substring 'doc' when starting to search at
position 20
POS2 will become 1
POS3 will become 0 because starting from position 3, the word 'Captain' can not be found anymore
POS4 will become 21
IKAN Solutions
METASUITE METAMAP MANAGER - RELEASE 8.1.3
STRUCTURED EDITOR | 247
LENGTH
This is the length of the remainder after trimming all spaces, low-values and non displayable characters from
the right.
Format
numeric-field = LENGTH (string-field)
Elements Description
Element
Description
Required?
LENGTH
Returns the length of the remainder after trimming all spaces, low- yes
values and non-displayable characters from the right.
Examples
w-num = LENGTH (W-PAY-CODE-CHAR )
MANUAL-INPUT
This function allows to ask information while the program is running using manual input.
Format
field-name = MANUAL-INPUT ( { literal-1 | string-1 } )
Elements Description
Element
Description
Required?
field-name
The receiving field. This can be a numeric field, a date field or a
character field.
yes
literal-1
The text that will be displayed on the console.
string-1
A character variable that contains the text that will be displayed on
the console.
Examples
Comment1 = 'Please enter a name (or part of a name) for selection:'
W-CHAR = MANUAL-INPUT (Comment1)
IKAN Solutions
METASUITE METAMAP MANAGER - RELEASE 8.1.3
STRUCTURED EDITOR | 248
Sample Screenshots
REPLACE
REPLACE is a function that can be applied on a string.
You can use this function for:
1.
Replacing a string with a string of the same length (page 248)
2.
Replacing a string at a specific location (page 249)
Replacing a string with a string of the same length
This function changes only the first occurrence of a specific character sequence.
Format
<RETURNCODE> = REPLACE (MAIN-STRING, { SUBSTRING-1 | Literal-1 }, { SUB-STRING2 |
literal-2 } [, { LENGTH | numfield] [, { START-POSITION | numfield }])
IKAN Solutions
METASUITE METAMAP MANAGER - RELEASE 8.1.3
STRUCTURED EDITOR | 249
Elements Description
Element
Description
Required?
MAIN-STRING
The name of the alphanumeric field (Target, Source or
Work Field) that contains the string in which the
replacement will occur.
yes
SUB-STRING1 | literal-1
The substring or literal that needs to be replaced.
yes
SUB-STRING2 | literal-2
The replacement substring or litteral.
yes
LENGTH | numfield
The length of both the replacement string and the string
that will be replaced. The length of both strings must be
identical.
Note: If the value of LENGTH is not given, the default
value will be the value of the function LENGTH applied to
SUB-STRING 1.
no
START-POSITION | numfield
The position at which the REPLACE should start. If the
position is not specified, or set to 0 or a negative value,
the position will be set to 1.
no
RETURNCODE
Numeric field.
The result is the position of the replaced string.
The result is 0 if no replacement took place. For example:
the SUB-STRING1 is not found or does not completely fit
in the MAIN-STRING.
yes
Note:
All strings are 1-byte encoded or National, length and position are 1-byte encoded and the result
will be 1-byte encoded or National.
Example
MAIN-STRING = 'You can insert Documentation Comments, also called Doc
Comments'
SUB-STRING1 = 'Doc'
SUB-STRING2 = 'Cod'
NUM1 = REPLACE (MAIN-STRING, SUB-STRING1, SUB-STRING2, 3, 4)
Result: You can insert Codumentation Comments, also called Doc Comments
The function returns 16. This is the position at which the replacement took place.
NUM1 = REPLACE (MAIN-STRING, SUB-STRING1, SUB-STRING2, 3, 31)
Result: You can insert Documentation Comments, also called Cod Comments
The function returns 53. This is the position at which the replacement took place.
Replacing a string at a specific location
Format
<RETURNCODE> = REPLACE (MAIN-STRING, { SUB-STRING1 | literal-1 } , { AT-POSITION
| numfield } [, { LENGTH | numfield }])
IKAN Solutions
METASUITE METAMAP MANAGER - RELEASE 8.1.3
STRUCTURED EDITOR | 250
Elements Description
Element
Description
Required?
MAIN-STRING
The name of the alphanumeric field (Target, Source or
Work Field) that will provide the Source string in which the
replace will take place.
yes
SUB-STRING1 | literal-1
The replacement substring or literal.
yes
AT-POSITION | numfield
The position at which the replacement string must be
inserted.
yes
LENGTH | numfield
The length of the replacement string.
no
RETURNCODE
Numeric field.
The result is the position of the replaced string.
The result is 0 if no replacement took place. For example:
SUB-STRING1 does not completely fit in the MAINSTRING.
yes
Example
MAIN-STRING = 'You can insert Documentation Comments, also called Doc
Comments'
SUB-STRING1 = '***'
NUM1 = REPLACE (MAIN-STRING, SUB-STRING1, 21, 3)
Result: You can insert Docum***ation Comments, also called Doc Comments.
The function returns 21. This is the position at which the replacement took place.
REPLACE-ALL
The REPLACE-ALL function replaces all occurrences of a substring within a string. The substring
concerned will be replaced by a string with an identical size.
Format
<numfield> = REPLACE-ALL (MAIN-STRING, { SUBSTRING-1 | Literal-1 }, { SUB-STRING2
| literal-2 } [, { LENGTH | numfield] [, { START-POSITION | numfield }])
IKAN Solutions
METASUITE METAMAP MANAGER - RELEASE 8.1.3
STRUCTURED EDITOR | 251
Elements Description
Element
Description
Required?
MAIN-STRING
The name of the alphanumeric field (Target, Source or
Work Field) that contains the string in which the
replacement will occur.
yes
SUB-STRING1 | literal-1
The substring or literal that needs to be replaced.
yes
SUB-STRING2 | literal-2
The replacement substring or litteral.
yes
LENGTH | numfield
The length of both the replacement string and the string
that will be replaced. The length of both strings must be
identical.
Note: If the value of LENGTH is not given, the default
value will be the value of the function LENGTH applied to
SUB-STRING 1.
no
START-POSITION | numfield
The position at which the REPLACE-ALL should start. If the
position is not specified, or set to 0 or a negative value,
the position will be set to 1.
no
Note:
All strings are 1-byte encoded or National, length and position are 1-byte encoded and the result
will be 1-byte encoded or National.
Example
MAIN-STRING = 'You can insert Documentation Comments, also called Doc
Comments'
SUB-STRING1 = 'Doc'
SUB-STRING2 = 'Cod'
NUM1 = REPLACE-ALL (MAIN-STRING, SUB-STRING1, SUB-STRING2, 3, 4)
Result:
MAIN-STRING will be changed: 'Doc' will be replaced by 'Cod', both literals of size 3.
The change will start from position 4 to the end of MAIN-STRING.
NUM1 is irrelative, of no importance.
MAIN-STRING becomes 'You can insert Codumentation Comments, also called Cod Comments'
SUBSTRING
SUBSTRING is a function that can be applied on a string. The result of the SUBSTRING function is a part of
the string on which the SUBSTRING function is applied.
The result of the SUBSTRING function is also a string. Thus, within the system, SUBSTRING may be used
only to create values to be assigned to non-numeric fields in assignment (=) commands.
IKAN Solutions
METASUITE METAMAP MANAGER - RELEASE 8.1.3
STRUCTURED EDITOR | 252
Format
String-T = SUBSTRING ( String-S , position
[, length] )
Elements Description
Element
Description
Required?
String-S
The name of the alphanumeric field (Target, Source or Work Field) that Yes
will provide the Source string from which the Substring will be derived.
position
This can be a numeric field or a hard-coded numeric value. This refers
to a position within the string String-S. From this position on,
characters will be copied from String-S to String-T. Position must be a
value between one and the length of String-S.
Yes
length
This can be a numeric field or a hard-coded numeric value. This refers
to a length within the string String-S.
This value refers to the number of characters that will be copied from
String-S to String-T.
Length must be a value between one and the number of bytes in
String-S from position position to the end of String-S.
This length parameter is not mandatory. When omitted, its intrinsic
value will become the size of the part of the string that starts at the
specified position and ends at the end of String-S.
No
Example 1
If the 20-character type CHARACTER field named NAME contained the value
"ELVIS PRESLEY
",
then the instruction
WORK-NAME = SUBSTRING ( NAME , 3 , 5 )
would result in the value "VIS P" being assigned to the field named WORK-NAME.
Example 2
If the 20-character type CHARACTER field named NAME contained the value
"ELVIS PRESLEY
",
then the instruction
WORK-NAME = SUBSTRING ( NAME , 3 )
would result in the value "VIS PRESLEY
" being assigned to the field named WORK-NAME.
SYSTEM-FUNCTION
The SYSTEM-FUNCTION command is used to execute an external function. When processing by the external
function is completed, control returns to the command immediately following the SYSTEM-FUNCTION.
External functions can be used to perform special security functions, to compress or expand data, or to perform
other types of processing operations unique to your site.
One or more fields from the generated program can be made available ("passed") to the external function, and
these fields may be modified by the function.
IKAN Solutions
METASUITE METAMAP MANAGER - RELEASE 8.1.3
STRUCTURED EDITOR | 253
The name of the function is limited to 8 characters.
The returned value can be a numeric value, an alpha-numeric value or a data field.
Format
FUNCTION 'Function-name'
[( [ Field-name | Litteral ],...)]
Elements Description
Element
Description
Required?
Function-name
Function-name identifies the system function to be executed.
Yes
Field-name
Field-name identifies a field to be passed to the external
subroutine. You can include up to 16 field names with this
command. The named fields will be made available to the
subroutine for processing.
You should not name numeric Source Fields in the field-name list,
because in the process of validating a numeric input field the
system may convert that field to a different internal data type and
size than was originally defined for it. When you need to pass the
value of a numeric input field to an external subroutine, you should
define a Work Field with the internal data type and size expected
by the subroutine, move the input field to the Work Field, and
then name the Work Field in the field-name list.
No
Litteral
Can be fixed text, a number or a date.
No
Example
TARGETFIELD1 = SYSTEM-FUNCTION "FUN-X" (A1, B1, C1)
TARGETFIELD2 = SYSTEM-FUNCTION "FUN-Y" (WORK1, “tax payer”)
Remark
Note that external functions almost always demand that:
•
A fixed number of fields should be made available by the calling program (i.e., by your program request).
•
Each field made available by the calling program is in exactly the same internal data format as is expected
by the function.
•
The fields named in the field name list appear in a predefined sequence.
•
If a USER-FUNCTION and a SYSTEM-FUNCTION have the same name, MetaMap will
automatically ignore the SYSTEM-FUNCTION because of the duplicate names. However, you can still
explicitely call the SYSTEM-FUNCTION with that name by adding the name in a string. For more
information, refer to the User-defined Functions Guide (this additional option is sold separately).
Failure to adhere to these requirements may result in unpredictable action on the part of the called function.
IKAN Solutions
METASUITE METAMAP MANAGER - RELEASE 8.1.3
STRUCTURED EDITOR | 254
USER-FUNCTION
The USER-FUNCTION command is used to execute an external function. When processing by the external
function is completed, control returns to the command immediately following the USER-FUNCTION.
External functions can be used to perform special security functions, to compress or expand data, or to perform
other types of processing operations unique to your site.
One or more fields from the generated program can be made available ("passed") to the external function, and
these fields may be modified by the function.
The name of the function is limited to 8 characters.
The returned value can be a numeric value, an alpha-numeric value or a data field.
Format
FUNCTION 'Function-name'
[( [ Field-name | Litteral ],...)]
Elements Description
Element
Description
Required?
Function-name
Function-name identifies the user function to be executed.
Yes
Field-name
Field-name identifies a field to be passed to the external
subroutine. You can include up to 16 field names with this
command. The named fields will be made available to the
subroutine for processing.
You should not name numeric Source Fields in the field-name list,
because in the process of validating a numeric input field the
system may convert that field to a different internal data type and
size than was originally defined for it. When you need to pass the
value of a numeric input field to an external subroutine, you should
define a Work Field with the internal data type and size expected
by the subroutine, move the input field to the Work Field, and
then name the Work Field in the field-name list.
No
Litteral
Can be fixed text, a number or a date.
No
Example
TARGETFIELD1 = USER-FUNCTION "FUN-X" (A1, B1, C1)
TARGETFIELD2 = USER-FUNCTION "FUN-Y" (WORK1, “tax payer”)
Remark
Note that external functions almost always demand that:
•
A fixed number of fields should be made available by the calling program (i.e., by your program request).
•
Each field made available by the calling program is in exactly the same internal data format as is expected
by the function.
IKAN Solutions
METASUITE METAMAP MANAGER - RELEASE 8.1.3
STRUCTURED EDITOR | 255
•
The fields named in the field name list appear in a predefined sequence.
•
If a USER-FUNCTION and a SYSTEM-FUNCTION have the same name, MetaMap will
automatically ignore the SYSTEM-FUNCTION because of the duplicate names. However, you can still
explicitely call the SYSTEM-FUNCTION with that name by adding the name in a string. For more
information, refer to the User-defined Functions Guide (this additional option is sold separately).
Failure to adhere to these requirements may result in unpredictable action on the part of the called function.
20.6. Variables
The following variables are available.
Category
Variable
MetaMap Objects
Source File, SourceRecord, Source Field TargetFile,
TargetRecord, Target Field, Work Field
System variable, also usable as runtime parameter
SYS-AGE-DATE (page 308)
SYS-APPLICATION (page 309)
SYS-APPLICATION-GROUP (page 309)
SYS-AUTO-SQLCODE (page 310)
SYS-CURRENT-KEY (page 256)
SYS-DATE (page 311)
System variable, not usable as runtime parameter
SYS-GROUP (page 257)
SYS-GROUP-COUNT (page 257)
SYS-GROUP-LEVEL (page 257)
SYS-LINE-NUMBER (page 258)
SYS-PAGE-NUMBER (page 258)
SYS-RECORD (page 259)
SYS-RECORD-LENGTH (page 260)
SYS-RESTART (page 261)
SYS-RUNTIME-STATUS (page 263)
SYS-RETURN-CODE (page 262)
SYS-SQL-AREA (page 262)
SYS-SQLSTATE (page 262)
SYS-TIME (page 263)
SYS-TIMESTAMP (page 264)
IKAN Solutions
METASUITE METAMAP MANAGER - RELEASE 8.1.3
STRUCTURED EDITOR | 256
SYS-CURRENT-KEY
The SYS-CURRENT-KEY is automatically defined in each procedure. SYS-CURRENT-KEY contains the
index of the current external array record. At all times, an external array field must be subscripted.
Usage within an array procedure
In the external array procedure, the index of the array record that was read is put into SYS-CURRENT-KEY.
SourceField (SYS-CURRENT-KEY)
Example
BEGIN SOURCEFILE DEPARTMENT-ARRAY INITIAL
IF DEPARTMENT-NUMBER#03453 (SYS-CURRENT-KEY) EQ 3 EXCLUDE
IF DEPARTMENT-NUMBER#03453 (SYS-CURRENT-KEY) SYS-STATUS –
EQ SYS-NULL-VALUE EXCLUDE
DO SYS-LOCAL-INI-A1-1
SORT ( DEPARTMENT-NUMBER#03453 ( ), WF-SRT2 )
Remark
SYS-CURRENT-KEY is not an exclusive property of the array procedures. This keyword can also be used in
other procedures.
Within an array procedure, the values SYS-READ-COUNT and SYS-CURRENT-KEY are similar to each
other. However, only SYS-CURRENT-KEY can be used as an index.
Usage in other procedures
In non-array procedures, the SYS-CURRENT-KEY variable contains the result of the last GET statement.
SourceField (SYS-CURRENT-KEY)
Example
GET POSTALCODE-ARRAY KEY = 3000
IF SYS-CURRENT-KEY NE 0
THEN
WS-COMMUNE = POSTALCODE-COMMUNE (SYS-CURRENT-KEY)
END-IF
Remark
When taking a random element of an array, using SYS-RANDOM-KEY as an index, the value of SYSCURRENT-KEY will be adapted automatically.
When using SYS-CURRENT-KEY independently (not as an index), its value is the result of the last GET
statement. Therefor you should be careful when using SYS-CURRENT-KEY in combination with multiple
external arrays.
IKAN Solutions
METASUITE METAMAP MANAGER - RELEASE 8.1.3
STRUCTURED EDITOR | 257
SYS-GROUP
The SYS-GROUP field is defined automatically in all generated programs, and may be referenced in report or
Target File total procedures. It is a 38-character field containing the name of the field that just triggered a
grouping process. You may test the contents of the field in a report or Target File total procedure, to control
the output of total formats or to perform other processing specific to a given group. Note that when the grand
total group is processed, this field will contain the value "GRAND-TOTAL".
SYS-GROUP can be used as an alternative to the SYS-GROUP-LEVEL field, to determine what action
should occur at each group process.
Example
To print total line format 1 for the grand totals and total line format 2 for all other groups, you would use the
following command:
IF SYS-GROUP EQ 'GRAND-TOTAL' PUT (1) ELSE PUT (2)
SYS-GROUP-COUNT
The SYS-GROUP-COUNT field is defined automatically in all generated programs, and may be referenced in
report or Target File total procedures. It contains a count of the detail formats produced in the current group,
and is useful for calculating averages.
Example
Assuming that ANNUAL-SALARY is a field named on a detail line in a report and only one detail format is
produced for each input record, the following command from the report's total procedure calculates an average
of the salaries printed for the current group:
AVG-SALARY = (ANNUAL-SALARY / SYS-GROUP-COUNT)
SYS-GROUP-LEVEL
The SYS-GROUP-LEVEL field is defined automatically in all generated programs, and may be referenced in
report or Target File total procedures. It contains a relative group level number, where 1 is the lowest level
GroupBy field and the highest numbered GroupBy field is for the grand totals. SYS-GROUP-LEVEL can be
used as an alternative to the SYS-GROUP field, to determine what action should occur at each group process.
Example
Assume that a report contains the following levels of GroupBy fields:
Level 1 = Division
Level 2 = Grand-total
or
REPORT 1 GROUP (DIVISION,GRAND-TOTAL)
To print total line format 1 for the grand totals and total line format 2 for the "division" group, you would use
the command below:
IF SYS-GROUP-LEVEL EQ 2 PUT (1) ELSE PUT (2)
IKAN Solutions
METASUITE METAMAP MANAGER - RELEASE 8.1.3
STRUCTURED EDITOR | 258
SYS-LINE-NUMBER
The SYS-LINE-NUMBER field, which contains the current line number of the current page of the report, is
defined automatically for each report in a generated program. Use this field to print line numbers on a report,
to force page breaks, as a target for an assignment (=) command, or as part of a conditional test.
Forcing page breaks
To force a page break, assign the value 999 to SYS-LINE-NUMBER.
When to use
In an unsorted report, use SYS-LINE-NUMBER in a report detail procedure to control page breaks or printing
of detail lines.
In a sorted report, use SYS-LINE-NUMBER in a report total procedure to control page breaks or printing of
total lines.
Example
The following commands test the current line number to determine if an entire set of four DETAIL lines will
fit on a given page; if not, the entire set should be printed on the next page.
REPORT
DETAIL
DETAIL
DETAIL
DETAIL
1
1
2
3
4
PAGE (55,80)
(field,...)
(field,...)
(field,...)
(field,...)
BEGIN REPORT 1 INPUT
IF SYS-LINE-NUMBER GE 52 SYS-LINE-NUMBER = 999
If there is no SORT option for the report, the output lines are printed as they are prepared. SYS-LINENUMBER can be referenced in a report detail procedure to control printing of detail lines, as shown above.
If there is a SORT option for the report, the output detail lines are released to the sort utility and then written
to a temporary work file. The report is printed after the detail lines are sorted. It is during this printing that
SYS-LINE-NUMBER can be used with a sorted report. However, the only procedure that can be used at this
point in processing is a report total procedure, to process accumulated totals and print total lines. Therefore,
you cannot use SYS-LINE-NUMBER to control printing of detail lines in a sorted report.
SYS-PAGE-NUMBER
The SYS-PAGE-NUMBER field, a 5-digit numeric field that contains the report's current page number, is
defined automatically for each report. Use this field to reposition page numbers on a report, as a target for an
assignment (=) command, or as part of a conditional test.
Printing page numbers on reports
If you specify this number on any print line, the current page number will print.
IKAN Solutions
METASUITE METAMAP MANAGER - RELEASE 8.1.3
STRUCTURED EDITOR | 259
Resetting the page number
You can set the page number by using the field in the following format:
SYS-PAGE-NUMBER = n
Where n is a number that is one less than the page-number you want to print on the report.
Example
To set the page number to 5, you would enter:
SYS-PAGE-NUMBER = 4
Before the title area of a report page is prepared, SYS-PAGE-NUMBER is incremented by 1. Therefore, by
setting SYS-PAGE-NUMBER to one less than the desired page number, it will automatically be incremented to
the correct number when the page is prepared.
SYS-RANDOM-KEY
The SYS-RANDOM-KEY is automatically defined in each procedure. SYS-RANDOM-KEY contains the index
of a random external array record.
Usage
TargetField = SourceField (SYS-RANDOM-KEY)
This has the same meaning as:
GET ARRAY KEY = RANDOM
TargetField = SourceField (SYS-CURRENT-KEY)
Example
WS-NUMBER = POSTALCODE-NUMBER (SYS-RANDOM-KEY)
WS-COMMUNE = POSTALCODE-COMMUNE (SYS-CURRENT-KEY)
Remark
When taking a random element of an array, using SYS-RANDOM-KEY as an index, the value of SYSCURRENT-KEY will be adapted automatically.
If SYS-RANDOM-KEY would have been used twice in the example, WS-NUMBER and WSCOMMUNE would not correspond to each other.
SYS-RECORD
The SYS-RECORD field is defined automatically in all generated programs. It contains the name of the last
Source Record read. When processing a Source File containing multiple record types, it is often necessary to
check the contents of this field in order to take the appropriate action.
IKAN Solutions
METASUITE METAMAP MANAGER - RELEASE 8.1.3
STRUCTURED EDITOR | 260
Example
If the first detail line of a report contains information from the CLIENT record, the second detail line
contains information from the ACCOUNT record, and the third detail line contains information from the
TRANSACTION record, the following command would insure that only data from the current record from
the Source File was printed:
CASE SYS-RECORD –
EQ 'DWH-CLIENT'
PUT ( 1 ) EQ 'S03-ACCOUNT'
PUT ( 2 ) EQ '----TRANSACTION' PUT ( 3 )
In the example you can see that the prefix is taken in account in order to distinguish different Source Files with
the same record name. If no prefix has been set for the Source File, the leading characters of SYS-RECORD
will be "----".
SYS-RECORD-LENGTH
SYS-RECORD-LENGTH is a numeric property of Files and Records. It will be used to get the predefined
record length of a record (as defined in the MetaStore database) or to get the record length of the current read
record in the file.
The practical use of this property is to determine the length of the last read record and to compare it with the
predefined length of a record, for instance to determine the current record type.
Format
[ SourceFile-name | SourceRecord-name ] SYS-RECORD-LENGTH
Elements Description
Element
Description
Required?
SourceFile-name
SourceFile-name can be any Source File, but will mainly be used
on multi record source files or on variable length source files. The
result of the function SYS-RECORD-LENGTH on a Source File is
the record length of the last record that was read. In other
words: the current record length.
SourceRecord-name
SourceRecord-name can be any Source Record. The result of the
function SYS-RECORD-LENGTH on a SourceRecord is the
predefined record length of that record. This predefined length
can be found in the MetaStore database.
Example
A multi record file has no useful record key. The only way to filter one record type from another is the record
length. The user can do this as follows:
BEGIN TARGETFILE 1 INPUT
IF Personal-addressbook SYS-RECORD-LENGTH IKAN Solutions
METASUITE METAMAP MANAGER - RELEASE 8.1.3
STRUCTURED EDITOR | 261
NE Address-US#30319 SYS-RECORD-LENGTH EXCLUDE
T01-Address-US = Address-US#30319 SYS-RAW
BEGIN TARGETFILE 2 INPUT
IF Personal-addressbook SYS-RECORD-LENGTH NE Address-European#30311 SYS-RECORD-LENGTH EXCLUDE
T02-Address-European = Address-European#30311 SYS-RAW
BEGIN TARGETFILE 3 INPUT
IF Personal-addressbook SYS-RECORD-LENGTH NE Address-Other#30319 SYS-RECORD-LENGTH EXCLUDE
T03-Address-Other = Address-Other#30319 SYS-RAW
SYS-RESTART
The SYS-RESTART system variable is automatically defined in each generated program, but has no meaning
if the program is not generated with the RESTARTABLE execution mode. For more information on the
EXEC mode refer to the Generator Manager User Guide.
This variable is valid at runtime.
It contains nothing (spaces) if the execution mode is non-restartable.
If a program is generated restartable, then the program remembers which records it has already read from the
database.
If the previous run has ended correctly then the next start will be a "COLD" start.
If the previous run failed due to a system crash or something else, the next start will be a "WARM" start.
This state can be tested by the system variable "SYS-RESTART" which can contain "COLD" or "WARM".
Example
IF SYS-RESTART = 'WARM'
DEBUG 'SEVERE ERROR – PREVIOUS RUN HAS FAILED!!!'
DEBUG 'STANDARD METASUITE RESTART PROCEDURE'
DEBUG 'WILL BE HALTED'
HALT ALL.
Remarks
SYS-RESTART can be validated in INITIAL procedures (program initial, initial sort or targetfile initial)
The COBOL function implementation only works
•
on IMS databases
•
on RDBMS type databases if special restart information is saved by a user program. (By example a
customized version of MSRSTxxx)
IKAN Solutions
METASUITE METAMAP MANAGER - RELEASE 8.1.3
STRUCTURED EDITOR | 262
SYS-RETURN-CODE
The SYS-RETURN-CODE system field is defined automatically in all generated programs. Its value is passed
to 'Program user exit status'. The 'Program user exit status' will be assigned to the system return code that is
passed to the operating system when the generated program did not have any serious errors itself. The possible
values returned by the generated program vary with the operating system. For example, in z/OS, a return code
of 0 (all zeroes) indicates a successful completion of program execution.
SYS-RETURN-CODE is used in MetaMap to replace the automatically set value with a different value in order
to influence processing of subsequent steps in a job stream. The replaced value of SYS-RETURN-CODE is
displayed as a 'user exit status' in the PPTLST, the system set value of the SYS-RETURN-CODE is
displayed as the 'system exit status' in the PPTLST. When the 'system exit status' is 0, the 'user exit status' is
passed to the operating system. When the 'system exit status' is not 0, the 'system exit status' is passed to the
operating system.
Example
Two programs are scheduled to be executed one after another. The first program writes records to a target file
that is read as a source into the second program. If, in a given execution of the first program, no records are
written to the target file then SYS-RETURN-CODE is set so that the computer operators can identify
quickly that the second program should not be executed. (By default, the code returned to the operating
system would identify the first program as having executed successfully.) The pertinent commands from the
first program are:
BEGIN REPORT 1 INPUT
IF true-condition EXCLUDE
OUTPUT-FIELD = INPUT-FIELD
PUT (1)
OUT-COUNT = (OUT-COUNT + 1)
BEGIN REPORT 1 EOJ
IF OUT-COUNT EQ 0 SYS-RETURN-CODE = 16
SYS-SQL-AREA
The SYS-SQL-AREA is automatically defined in each generated program that accesses an RDBMS through
SQL (either as an SQL Source File, or as an embedded SQL statement). It contains the SQLCA contents of
the last executed SQL statement.
You can either check the SYS-SQL-AREA in the Source File Input procedure (to check the SQLCA for the
selected row within the SQL SourceFile) or after an embedded SQL statement.
SYS-SQLSTATE
The SYS-SQLSTATE is automatically defined in each generated program that accesses an RDBMS through
SQL (either as an SQL Source File, or as an embedded SQL statement). It contains the SQLSTATE after the
execution of an SQL statement.
The SQLSTATE is a 5 character field that is filled by the RDBMS when an embedded SQL statement is
executed.
You can check the SYS-SQLSTATE after an embedded SQL statement.
IKAN Solutions
METASUITE METAMAP MANAGER - RELEASE 8.1.3
STRUCTURED EDITOR | 263
SYS-RUNTIME-STATUS
The SYS-RUNTIME-STATUS system variable is automatically defined in each generated program. This
variable contains the status of the last executed statement when:
•
either the command is a computation assignment (in this case, when an error occurs, the program will
return 8006);
•
or the assignment is a date-assignment;
•
or in case of an I/O operation
• or any other case that calls the error routine that puts error messages on the output list.
It can be used to trigger some program states or error conditions.
It can be tested on the following values:
*
*
*
*
*
*
*
*
*
*
SYS-OK
SYS-NOT-NUMERIC
SYS-NULL-VALUE
SYS-OUT-OF-LIMIT
SYS-INVALID-DATE
SYS-OUT-OF-RANGE
SYS-OVERFLOW
Not in buffer
I/O error
String error
(0)
(-1)
(-2)
(-3)
(-4)
(-5)
(-6)
(-7)
(-8)
(-9)
You can trigger for instance a SYS-OVERFLOW when a COBOL "ON SIZE ERROR" occurs. When
testing this variable, you can take appropriate action from within the program.
Resetting
The SYS-RUNTIME-STATUS is not reset automatically. You can set it to any value, so you can reset it to zero
at any place.
This makes it possible to test the status:
•
on field level, by resetting the status before using the field, and testing afterwards;
•
on record level, by testing it in the OUTPUT POST-mapping, and resetting it again.
•
or on program level, by resetting the status in the PROGRAM INIT, and testing it in the PROGRAM
END.
Example
BEGIN TARGETFILE 1 INPUT
T01-employee_number = ( EMPLOYEE-NUMBER#11288 * 5000 )
IF SYS-RUNTIME-STATUS EQ SYS-OVERFLOW DEBUG 'OVERFLOW !!'
SYS-TIME
The SYS-TIME field is defined automatically for each report. It contains the current system time in hh:mm:ss
format. Use this field to print the time on a report, as a target for an assignment (=) command, or as part of a
conditional test.
IKAN Solutions
METASUITE METAMAP MANAGER - RELEASE 8.1.3
STRUCTURED EDITOR | 264
SYS-TIMESTAMP
The SYS-TIMESTAMP field is defined automatically in each generated program. It contains the current
timestamp of the moment formatted as a 21-character alphanumeric value that represents the calendar date,
time of day, and local time differential factor provided by the system on which the function is evaluated.
Usage
Field-name = SYS-TIMESTAMP
SYS-TIMESTAMP can only be used in the right-hand side on an assignment.
Field-name
Field-name is a character field that will be assigned the current timestamp.
It is implemented as the CURRENT_DATE function within COBOL. Positions within the returned
timestamp are:
•
Position 1 - 4 : Year on 4 positions
•
Position 5 - 6 : Month of the year ( 01 through 12 )
•
Position 7 - 8 : Day of the month ( 01 through 31 )
•
Position 9 - 10: Hours past midnight ( 00 through 23 )
•
Position 11- 12: Minutes past the hour ( 00 through 59 )
•
Position 13- 14 : Seconds past the minute ( 00 through 59 )
•
Position 15- 16: Hundredths of a second past the second ( 00 through 99 )
•
Position 17 : Indicator whether time is behind or ahead GMT ( + or - )
•
Position 18- 19: Number of hours that the time is behind or ahead of GMT
•
Position 20- 21 : Number of additional minutes that the time is behind or ahead of GMT
Remark for z/OS
The COBOL function implementation only works on COBOL 370 or higher.
20.7. Constants
The following constants are available.
•
SYS-DUPLICATE (page 265)
•
SYS-EOF (page 265)
•
SYS-ERROR (page 266)
•
SYS-HIGH-VALUE (page 266)
•
SYS-INVALID-DATE (page 267)
•
SYS-INVOKE-RETURN (page 267)
•
SYS-LOW-VALUE (page 268)
•
SYS-NOT-NUMERIC (page 268)
IKAN Solutions
METASUITE METAMAP MANAGER - RELEASE 8.1.3
STRUCTURED EDITOR | 265
•
SYS-NOT-RELATED (page 269)
•
SYS-NULL-VALUE (page 269)
•
SYS-NUMVALIDATE (page 270)
•
SYS-OK (page 271)
•
SYS-OUT-OF-LIMIT (page 271)
•
SYS-OUT-OF-RANGE (page 272)
•
SYS-PROGRAM (page 273)
•
SYS-WHEN-COMPILED (page 273)
SYS-DUPLICATE
The SYS-DUPLICATE Source File status is used to check whether a duplicate occurrence is read from a
Source File based on the values of the Source File Sort fields. It can be used in a Source File Input procedure,
or on a Target File Detail procedure.
Usage
IF SourceFile-name SYS-IO-STATUS EQ SYS-DUPLICATE
Example
The following code prevents the processing of duplicate values for the EMPLOYEE-NUMBER in the
EMPLOYEE-MASTER SourceFile:
BEGIN SOURCEFILE EMPLOYEE-MASTER INITIAL –
SORT (EMPLOYEE-NUMBER)
...
IF EMPLOYEE-MASTER SYS-IO-STATUS EQ SYS-DUPLICATE EXCLUDE
When a row is read from the EMPLOYEE-MASTER, that has the same EMPLOYEE-NUMBER as the
previous row, the EMPLOYEE-MASTER SYS-IO-STATUS field will be equal to SYS-DUPLICATE. In
this case, the row will be excluded for further processing.
SYS-EOF
The SYS-EOF Source File status is used to check whether a Source File has reached the end of file (i.e.,
whether there are no more records to be read for the SourceFile). This information is useful following the
execution of a GET command, or during Source File matching.
Usage
IF SourceFile-name SYS-IO-STATUS EQ SYS-EOF
Example
Assume that two Source Files named PARTS-MASTER and BACKLOG are being matched and you are
only interested in reporting those cases where there are records on both Source Files. You know that the
PARTS-MASTER contains many more records than are contained on the BACKLOG Source File. The
following command in a Source File input procedure or a report or Target File detail procedure will cause the
generated program to stop reading from the PARTS-MASTER Source File once all of the BACKLOG
records have been read:
IKAN Solutions
METASUITE METAMAP MANAGER - RELEASE 8.1.3
STRUCTURED EDITOR | 266
IF BACKLOG SYS-IO-STATUS EQ SYS-EOF HALT SOURCEFILE PARTS-MASTER
SYS-ERROR
The SYS-ERROR Source File status is used to check the success of a GET command when performing
controlled access to a Source File. Following a GET command, it is always good practice to check the results
of the operation to ensure that valid data has been obtained.
Usage
IF SourceFile-name SYS-IO-STATUS EQ SYS-ERROR
Example
The following code prevents the printing of invalid values in the EMPLOYEE-NUMBER and
EMPLOYEE-NAME fields of the EMPLOYEE-MASTER Source File when a random access to that
Source File fails:
GET EMPLOYEE-MASTER KEY = SELECTED-EMPLOYEE
IF EMPLOYEE-MASTER SYS-IO-STATUS EQ SYS-ERROR EMPLOYEE-NUMBER = 0 EMPLOYEE-NAME = '** NOT ON SOURCEFILE **'
If the GET operation fails to locate a record on the EMPLOYEE-MASTER Source File with the KeyField
value equal to that in the SELECTED-EMPLOYEE field, the EMPLOYEE-MASTER SYS-IO-STATUS
field will be set equal to SYS-ERROR. When this is the case, the EMPLOYEE-NUMBER field will be set
to zero and the EMPLOYEE-NAME field will be set to "** NOT ON SOURCEFILE **".
Note that when a GET operation fails, the fields for that Source File will contain values from the last record
retrieved successfully or, if no records have been retrieved, unpredictable data.
SYS-HIGH-VALUE
The SYS-HIGH-VALUE field is defined automatically in all generated programs. SYS-HIGH-VALUE is a
full-word binary field containing hex high values. It can be used in assignment or conditional commands
exactly as the COBOL reserved word HIGH-VALUE[S] would be.
Example
The following assignment statement assigns high values to a Work Field:
WK-FIELDA = SYS-HIGH-VALUE
The following conditional statement uses high values as a test for the NE operator:
IF KEY-FIELDA NE SYS-HIGH-VALUE
SYS-HIGH-VALUE can be used in the ADD RECORD command to identify a record in a multiple record
type SourceFile:
ADD RECORD record-name KEY (key-field EQ SYS-HIGH-VALUE)
IKAN Solutions
METASUITE METAMAP MANAGER - RELEASE 8.1.3
STRUCTURED EDITOR | 267
SYS-INVALID-DATE
The SYS-INVALID-DATE Source Field status will be set when the Source Field that is defined as a date
does not have a valid date value. When the Source Field is a numeric date, you must first check whether the
value in the Source Field is indeed numeric (through SYS-NOT-NUMERIC) before checking whether the
field contains a valid date.
Usage
IF Field-name SYS-STATUS EQ SYS-INVALID-DATE
Example
If you want to check whether the date-of-hire in the EMPLOYEE-MASTER file contains a valid date, you
can add following logic in your program:
CASE date-of-hire SYS-STATUS –
EQ SYS-NOT-NUMERIC...
EQ SYS-INVALID-DATE...
Runtime Setting
To prevent the invalid date Source Fields to be excluded during initial processing from the normal program
logic, you must set the runtime setting SYS-DATE-CHECK. Additionally when the date is a numeric date,
you must set the runtime setting SYS-NUMERIC-CHECK to prevent the invalid numeric Source Fields to be
excluded during initial processing from the normal program logic.
Example
SYS-NUMERIC-CHECK = IGNORE
SYS-DATE-CHECK = IGNORE
Note
Source date-fields with value 0 or spaces (all zeroes for numeric fields and all spaces for character fields) are
considered as NULL dates, and not as incorrect dates (SYS-STATUS EQ SYS-NULL-VALUE is true
instead of SYS-STATUS EQ SYS-INVALID-DATE).
Meaning:
•
Numeric dates with value 0 are considered as NULL dates, but numeic dates with value space are
considered as incorrect dates.
•
Character dates with value 0 are considered as incorrect dates, but with value space are considered as NULL
dates.
For numeric dates the SYS-INVALID-DATE status is more important than the SYS-NOT-NUMERIC
status. (Please refer to the SYS-STATUS keyword description.)
SYS-INVOKE-RETURN
The SYS-INVOKE-RETURN system field is defined automatically in all generated programs. It contains the
system return code of the last invoked program.
The SYS-INVOKE-RETURN parameter is independent of the SYS-INVOKE-RETURN code.
It is up to the user to decide what action should be done after a non-zero SYS-INVOKE-RETURN code.
IKAN Solutions
METASUITE METAMAP MANAGER - RELEASE 8.1.3
STRUCTURED EDITOR | 268
Example
The 'MRNUMVAL' is invoked here, with an invalid number of decimals after the comma.
IN-DECIMALS#01754 = 99
IN-FIELD#01755 = W-SALARY-1 AND '.' AND W-SALARY-DEC
INVOKE 'MRNUMVAL' ( IN-PARMS )
W-RETURN-CODE = SYS-RETURN-CODE
W-INVOKE-RETURN = SYS-INVOKE-RETURN
DEBUG 'RETURN CODE AFTER INVOKE' ( W-RETURN-CODE )
DEBUG 'INVOKE-RETURN CODE AFTER INVOKE' ( W-INVOKE-RETURN)
The result of this is:
Debug : RETURN CODE AFTER INVOKE
W-RETURN-CODE
Debug : INVOKE-RETURN CODE AFTER INVOKE
W-INVOKE-RETURN
000000000
000000001
If the user wants MetaSuite to act the same way as in version 7.1.6., the user will have to add following code:
IF SYS-RETURN-CODE EQ 0 SYS-RETURN-CODE = SYS-INVOKE-RETURN
SYS-LOW-VALUE
The SYS-LOW-VALUE field is defined automatically in all generated programs. SYS-LOW-VALUE is a fullword binary field containing hex low values. It can be used in assignment or conditional commands exactly as
the COBOL reserved word LOW-VALUE[S] would be.
Example
The following assignment statement assigns low values to a Work Field:
WK-FIELDB = SYS-LOW-VALUE
The following conditional statement uses low values as a test for the NE operator:
IF KEY-FIELDB NE SYS-LOW-VALUE
SYS-LOW-VALUE can be used in the MetaStore to identify a record in a multiple record type SourceFile:
ADD RECORD record-name KEY (key-field EQ SYS-LOW-VALUE)
SYS-NOT-NUMERIC
The SYS-NOT-NUMERIC Source Field status will be set when the numeric Source Field does not have a
numeric value.
Usage
IF Field-name SYS-STATUS EQ SYS-NOT-NUMERIC
IKAN Solutions
METASUITE METAMAP MANAGER - RELEASE 8.1.3
STRUCTURED EDITOR | 269
Example
If you want to check whether the employee-number in the EMPLOYEE-MASTER file contains a valid
number, you can add following logic in your program:
IF employee-number SYS-STATUS EQ SYS-NOT-NUMERIC...
Runtime setting
To prevent the numeric Source Fields to be excluded during initial processing from the normal program logic,
you must set the runtime setting SYS-NUMERIC-CHECK.
Example
SYS-NUMERIC-CHECK = IGNORE
Note
For numeric dates the SYS-INVALID-DATE status is more important than the SYS-NOT-NUMERIC state.
(Please refer to the SYS-STATUS keyword description.)
SYS-NOT-RELATED
The SYS-NOT-RELATED Source File status is used to check for an IDMS Source File whether the 'EXEC
IDMS IF setname MEMBER' has detected a relation between the IDMS member and the IDMS owner.
Following a 'EXEC IDMS IF setname MEMBER' command, it is always good practice to check whether a
relation exists between owner and member to insure that valid data has been obtained.
Usage
IF SourceFile-name SYS-IO-STATUS EQ SYS-NOT-RELATED
Example
The following code sets the customer name to not found for an invoice without customer:
EXEC IDMS IF CUST-INVOICE MEMBER
IF IDMSCUST SYS-IO-STATUS EQ SYS-NOT-RELATED CUSTOMER-NAME = 'NOT FOUND'
If the 'IF ... MEMBER' operation fails to locate an owner for the INVOICE, the IDMSCUST SYS-IOSTATUS field will be set to SYS-NOT-RELATED. In this case, the CUSTOMER-NAME will be set to
'NOT FOUND'.
SYS-NULL-VALUE
The SYS-NULL-VALUE status will be set when the field contains a NULL value. It can be used on both
Source Fields as Target Fields, and can be set by the user as well.
Usage
IF Field-name SYS-STATUS EQ SYS-NULL-VALUE
IKAN Solutions
METASUITE METAMAP MANAGER - RELEASE 8.1.3
STRUCTURED EDITOR | 270
Or
Field-name SYS-STATUS = SYS-NULL-VALUE
Example
If you want to check whether the employee-number in the EMPLOYEE-MASTER file is NULL, you can
add following logic in your program:
IF employee-number SYS-STATUS EQ SYS-NULL-VALUE
If you want to assign a NULL value to the T01-Date_of_hire, you can add the following logic in your
program:
T01-Date_of_hire SYS-STATUS = SYS-NULL-VALUE
Note
This new SYS-STATUS value replaces entirely the use of 'SYS-NULL' and 'SYS-SQL-NULL' keywords
that were used in MetaSuite V6.3 or earlier.
Source date-fields with value 0 or spaces (all zeroes for numeric fields and all spaces for character fields) are
considered as NULL dates, and not as incorrect dates (SYS-STATUS EQ SYS-NULL-VALUE is true
instead of SYS-STATUS EQ SYS-INVALID-DATE).
Meaning:
•
Numeric dates with value 0 are considered as NULL dates, but with value space are considered as incorrect
dates.
•
Character dates with value 0 are considered as incorrect dates, but with value space are considered as NULL
dates.
SYS-NUMVALIDATE
The Field-name SYS-NUMVALIDATE Source Field function converts the Source Field contents into its
numeric value. It will give you the possibility to determine the numeric value of a character field.
The difference with previous functions, SYS-NUMVAL and SYS-NUMVALC, is that the SYS-NOTNUMERIC flag of the receiving field will be set if the original field contents are not numeric.
Format
Field-name SYS-NUMVALIDATE
Field-name
Field-name must be a character field that contains a printed numeric value. When the field-name contains a
numeric value with decimals, the expected decimal point is set by the 'CHANGE DEFAULT DECIMAL'
command within the MetaSuite generator. The 'CHANGE DEFAULT DECIMAL' will switch the
representation of a decimal point from Point to Comma, and vice versa. For more information on the
'CHANGE DEFAULT DECIMAL' command refer to the Generator Manager User Guide.
Example
In order to test if a Work Field is numeric or not, the user can use NUMVALIDATE
IKAN Solutions
METASUITE METAMAP MANAGER - RELEASE 8.1.3
STRUCTURED EDITOR | 271
RAWVALUE = SUBSTRING ( T01-Car-Number-Plate , 4 , 3 )
NUMVAL = RAWVALUE SYS-NUMVALIDATE
IF NUMVAL SYS-STATUS EQ SYS-NOT-NUMERIC DEBUG '# IS NOT NUMERIC' ( RAWVALUE ) EXCLUDE ELSE DEBUG '# IS NUMERIC' ( RAWVALUE )
Remarks
SYS-NUMVALIDATE can not be used on occurring fields.
SYS-OK
The SYS-OK Source File status is used to check the success of a GET when performing controlled access to a
Source File. Following a GET command, it is always good practice to check the results of the operation to
insure that valid data has been obtained.
Usage
IF SourceFile-name SYS-IO-STATUS EQ SYS-OK
Example
The following code prevents the printing of invalid values in the EMPLOYEE-NUMBER and
EMPLOYEE-NAME fields of the EMPLOYEE-MASTER Source File, when a random access to that
Source File fails:
GET EMPLOYEE-MASTER KEY = SELECTED-EMPLOYEE
IF EMPLOYEE-MASTER SYS-IO-STATUS NE SYS-OK EMPLOYEE-NUMBER = 0 EMPLOYEE-NAME = '** NOT ON SOURCEFILE **'
If the GET operation fails to locate a record on the EMPLOYEE-MASTER Source File with the KeyField
value specified in the SELECTED-EMPLOYEE field, the EMPLOYEE-MASTER SYS-IO-STATUS
field will not be equal to SYS-OK. In this case, the EMPLOYEE-NUMBER field will be set to zero and the
EMPLOYEE-NAME field will be set to "** NOT ON SOURCEFILE **". Note that when a GET operation
fails, the fields for that Source File will contain values from the last record successfully retrieved or, if no
records have been retrieved, unpredictable data.
SYS-OUT-OF-LIMIT
The SYS-OUT-OF-LIMIT Source Field status will be set when the Source Field that has limits defined in
the MetaStore does not have a value within the defined limits. When the Source Field is a numeric field, you
must first check whether the value in the Source Field is indeed numeric (through SYS-NOT-NUMERIC)
before checking whether the field contains a value within its limits.
Usage
IF Field-name SYS-STATUS EQ SYS-OUT-OF-LIMIT
IKAN Solutions
METASUITE METAMAP MANAGER - RELEASE 8.1.3
STRUCTURED EDITOR | 272
Example
Suppose the department within the EMPLOYEE-MASTER file should have a value between 1 and 4. If you
want to check whether the department in the EMPLOYEE-MASTER file contains a department number
within its limits, you can add following logic in your program:
CASE department SYS-STATUS –
EQ SYS-NOT-NUMERIC...
EQ SYS-OUT-OF-LIMIT...
Runtime setting
To prevent the Source Fields to be excluded during initial processing from the normal program logic, you must
set the runtime setting SYS-LIMITS-CHECK. Additionally when the field is a numeric field, you must set
the runtime setting SYS-NUMERIC-CHECK to prevent the invalid numeric Source Fields to be excluded
during initial processing from the normal program logic.
Example
SYS-NUMERIC-CHECK = IGNORE
SYS-LIMITS-CHECK = IGNORE
SYS-OUT-OF-RANGE
The SYS-OUT-OF-RANGE Source Field status will be set when the Source Field defines the number of
occurrences for an OCCURS DEPENDING ON Source Field, and the value of the Source Field is bigger
than the maximum number of occurs for the OCCURS DEPENDING ON field. You must additionally first
check whether the value in the Source Field is indeed numeric (through SYS-NOT-NUMERIC) before
checking whether the field contains a value within its range.
Usage
IF Field-name SYS-STATUS EQ SYS-OUT-OF-RANGE
Example
Suppose the voluntary-deductions within the EMPLOYEE-MASTER file is an OCCURS DEPENDING
ON Counter field. If you want to check whether the Counter in the EMPLOYEE-MASTER file contains a
value within the range of possible occurring voluntary deductions, you can add following logic in your
program:
CASE Counter SYS-STATUS –
EQ SYS-NOT-NUMERIC...
EQ SYS-OUT-OF-RANGE...
Runtime setting
You must set the runtime setting SYS-NUMERIC-CHECK to prevent the invalid numeric Source Fields to be
excluded during initial processing from the normal program logic.
Example
SYS-NUMERIC-CHECK = IGNORE
IKAN Solutions
METASUITE METAMAP MANAGER - RELEASE 8.1.3
STRUCTURED EDITOR | 273
SYS-PROGRAM
The SYS-PROGRAM is set automatically in each generated program. It will contain the COBOL program
name of the extraction program. It can not be overwritten in the extraction program.
Usage
Field-name = SYS-PROGRAM
SYS-PROGRAM can only be used on the right-hand side of an assignment.
Field-name
Field-name is a character field that will be assigned the COBOL program name of the extraction program.
SYS-WHEN-COMPILED
The SYS-WHEN-COMPILED is defined automatically in each generated program. It contains the timestamp
the program was compiled, formatted as a 21-character alphanumeric value that represents the calendar date,
time of day, and local time differential factor provided by the system on which the function is evaluated.
Usage
Field-name = SYS-WHEN-COMPILED
SYS-WHEN-COMPILED can only be used in the right-hand side on an assignment.
Field-name
Field-name is a character field that will be assigned the timestamp of compilation.
It is implemented as the WHEN-COMPILED function within COBOL. Positions within the returned
timestamp are:
•
Position 1 - 4 : Year on 4 positions
•
Position 5 - 6 : Month of the year ( 01 through 12 )
•
Position 7 - 8 : Day of the month ( 01 through 31 )
•
Position 9 - 10: Hours past midnight ( 00 through 23 )
•
Position 11- 12: Minutes past the hour ( 00 through 59 )
•
Position 13- 14 : Seconds past the minute ( 00 through 59 )
•
Position 15- 16: Hundredths of a second past the second ( 00 through 99 )
•
Position 17 : Indicator whether time is behind or ahead GMT ( + or - )
•
Position 18- 19: Number of hours that the time is behind or ahead of GMT
•
Position 20- 21 : Number of additional minutes that the time is behind or ahead of GMT.
Remark for z/OS
The COBOL function implementation only works on COBOL 370 or higher.
IKAN Solutions
METASUITE METAMAP MANAGER - RELEASE 8.1.3
STRUCTURED EDITOR | 274
20.8. Attributes
The following attributes are available:
Category
Attribute
File Attributes
SYS-DBNAME (page 274)
SYS-DIRECT-KEY (page 275)
SYS-INPUT-COUNT (page 276)
SYS-INTERNAL-STATUS (page 277)
SYS-IO-STATUS (page 277)
SYS-MATCH-COUNT (page 278)
SYS-PATH-COUNT (page 279)
SYS-READ-COUNT (page 280)
Field Attributes
SYS-SQL-LENGTH (page 281)
SYS-STATUS (page 281)
SYS-DBNAME
SYS-DBNAME can be used to assign a value to the PCB-name of an IMS Source File or Target File. This
PCB-name will be used to obtain the corresponding PCB-address. Assigning a value using SYS-DBNAME
will overrule the DBNAME as specified on the file-definition. Refer to the IMS DLI File Access Guide for
more information about IMS processing.
Usage
SourceFile-name SYS-DBNAME = string-value.
TargetFile-name SYS-DBNAME = string-value.
File-name
Required.
The File-name is defined as an IMS-type file or a standard-type file that will be processed under IMS
execution.
string-value
Required.
The PCB-name will be used to obtain the corresponding PCB-address as defined in the PSB.
Example
The following command shows how to assign a PCB-name to an IMS file.
IMS-FILE_A SYS-DBNAME = 'PCB01'
IKAN Solutions
METASUITE METAMAP MANAGER - RELEASE 8.1.3
STRUCTURED EDITOR | 275
SYS-DIRECT-KEY
The SourceFile-name SYS-DIRECT-KEY field is automatically defined for each TABLE/TREE
Source File (which defines an external array) specified in the generated program. It will contain the index for
the row-to-be-found in the external array after the GET statement is done.
Format
SourceFile-name SYS-DIRECT-KEY
SourceFile-name
Required.
The SourceFile-name is defined as a TABLE/TREE Source File for which a Source File key is defined.
Usage
To find the index of a certain row-to-be-found within the external array, move the field's full value into a Work
Field and then reference the external array fields indexed with the found index. When no row can be found in
the external array that matches the key value, a value 0 will be returned.
When you are searching in a TABLE Source File, you can determine yourself the starting point from which
the search must start. Before looking for the row-to-be-found by specifying the GET command, please make
sure that you initialize properly the SourceFile-name SYS-DIRECT-KEY. In case you want to make sure that
you are searching from the first occurrence onwards, please initialize the SourceFile-name SYS-DIRECTKEY to 0.
Table Example
The following commands could be used to find the description of a certain department.
SOURCEFILE DEPARTMENT-CODES TABLE (DEPARTMENT-DATA OCCURS 10)
FIELD WK-KEY TYPE BINARY SIZE 4
FIELD W-DEPARTMENTTEXT TYPE CHARACTER SIZE 20
.
.
REPORT 1
DETAIL 1 (DEPARTMENT, W-DEPARTMENTTEXT)
BEGIN REPORT 1 INPUT
DEPARTMENT-CODES SYS-DIRECT-KEY = 0
GET DEPARTMENT-CODES KEY = DEPARTMENT
WK-KEY = DEPARTMENT-CODES SYS-DIRECT-KEY
IF WK-KEY EQ 0 EXCLUDE ELSE - W-DEPARTMENTTEXT = DEPARTMENT-DESCRIPTION(WK-KEY)
Tree Example
The following commands could be used to find the description of a certain department.
SOURCEFILE DEPARTMENT-CODES TREE (DEPARTMENT-DATA OCCURS 10)
FIELD WK-KEY TYPE BINARY SIZE 4
IKAN Solutions
METASUITE METAMAP MANAGER - RELEASE 8.1.3
STRUCTURED EDITOR | 276
FIELD W-DEPARTMENTTEXT TYPE CHARACTER SIZE 20
.
.
REPORT 1
DETAIL 1 (DEPARTMENT, W-DEPARTMENTTEXT)
BEGIN REPORT 1 INPUT
GET DEPARTMENT-CODES KEY = DEPARTMENT
WK-KEY = DEPARTMENT-CODES SYS-DIRECT-KEY
IF WK-KEY EQ 0 EXCLUDE ELSE - W-DEPARTMENTTEXT = DEPARTMENT-DESCRIPTION(WK-KEY)
SYS-INPUT-COUNT
The SYS-INPUT-COUNT field is defined automatically in all generated programs for each Source File (or its
records). It contains a count of records read and processed for the named Source File (i.e., all records read and
not excluded from within Source File or record input procedures, or because of validation errors). Do not
confuse this field with the SYS-READ-COUNT, which contains a count of all records read from the Source
File (including those records excluded for any reason).
Format
[ SourceFile-name | SourceRecord-name ] SYS-INPUT-COUNT
SourceFile-name
When SourceFile-name is given, the count of all the record read and processed for the named Source File will
be kept in SYS-INPUT-COUNT.
SourceRecord-name
When SourceRecord-name is given, the count of this specific record read and processed will be kept in SYSINPUT-COUNT.
The SYS-INPUT-COUNT field may be referenced anywhere in a program request. If it is referenced within a
Source File, report or Target File initial procedure -- or a record input procedure during the initial processing
phase -- it refers to the number of records input to the INITIAL SORT/EXTRACT/PREPASS procedure. If
it is referenced anywhere else, it refers to the number of records input to, but not excluded by, the Source File
input procedure.
The value of SYS-INPUT-COUNT is set at the end of the Source File input procedure, before any report or
Target File processing begins.
The only exception to this is a reference to the SYS-INPUT-COUNT for an external array (a Source File with
the TABLE/TREE option). In this case, the reference is always to the number of records read into storage and
processed during the initial processing of the external array.
Example
Assuming that in a Source File input procedure the total salary for all employees has been accumulated in a
field named TOT-SAL, the following command in an end-of-file procedure would calculate an average salary
for all employees:
AVG-SAL = (TOT-SAL / EMPLOYEE-MASTER SYS-INPUT-COUNT)
IKAN Solutions
METASUITE METAMAP MANAGER - RELEASE 8.1.3
STRUCTURED EDITOR | 277
SYS-INTERNAL-STATUS
A SourceFile-name SYS-INTERNAL-STATUS field is defined automatically for each Source File. The value
of this field is reset following each read or write operation to a VSAM or database Source File, and its value is
the value returned by the VSAM processor or the database system. For Source File types other than VSAM or
database, this field always contains blanks. SYS-INTERNAL-STATUS is defined as a field with datatype
character.
The possible value for SYS-INTERNAL-STATUS will vary, depending on whether a VSAM or database
Source File is being accessed. To determine what the possible internal status values are for each of these Source
File types, refer to the appropriate VSAM or database management system documentation.
Usage
IF SourceFile-name SYS-INTERNAL-STATUS EQ internal-status...
This field is of use when you anticipate several possible "read errors" on a VSAM or database Source File, with
each type of error requiring different processing.
Internal-status
The value of internal-status is operating system dependent.
Example
When accessing a database Source File, the database management system might return a status of 212 when a
requested record cannot be found in the database, and a status of 214 when the requested record can be found
but not accessed (because the database (or a part of it) has been corrupted). Within your program, then, you
would want to check for each of these status codes and handle each one differently. Consider the code below:
GET SALES-REC KEY = SALESPERSON
IF SALES-DB SYS-IO-STATUS EQ SYS-OK PUT (1,2,3) EXIT
CASE SALES-DB SYS-INTERNAL-STATUS EQ '212' MESSAGE = 'NOT FOUND' PUT (4) EXIT EQ '214' MESSAGE = 'DATABASE UNUSABLE - 214' PUT (4) HALT ALL ELSE
MESSAGE = 'UNEXPECTED STATUS: ' AND SALES-DB SYS-INTERNAL-STATUS PUT (4) HALT ALL
Following the GET command, if the status code is "normal," the first three detail line formats are printed and
no further commands in the procedure are executed. If a 212 status is returned by the database management
system, "NOT FOUND" is assigned to the field MESSAGE, and the fourth detail line is printed (presumably
containing the field MESSAGE). If a 214 status is returned, a different error message is produced and the run
is terminated. If any other error status is returned, a third error message is printed (this time containing the
actual status code) and all processing is halted.
SYS-IO-STATUS
One SourceFile-name SYS-IO-STATUS field is defined automatically for each Source File. It contains any
of several values indicating the current status of the Source File. The possible values for SourceFile-status are
summarized below:
IKAN Solutions
METASUITE METAMAP MANAGER - RELEASE 8.1.3
STRUCTURED EDITOR | 278
Usage
IF SourceFile-name SYS-IO-STATUS EQ Source File status
Source File Status
Source File Status
Meaning
SYS-OK
Last operation was successful
SYS-EOF
Source File has reached end-of-file
SYS-ERROR
Last operation was unsuccessful
SYS-DUPLICATE
Last operation retrieved duplicate row
SYS-NOT-RELATED
Last operation retrieved a not related row
Each of these Source File status values is described in more detail as a separate topic.
It is recommended that you check the status of a Source File following each GET or PUT command, and
during processing of CONTROLLED BY Source Files (for each new set of records). By checking the status,
you can determine the success or failure of the operation.
Example
The following sequence of commands illustrates the testing of the SourceFile-name SYS-IO-STATUS field to
determine which of two routines to perform:
GET EMPLOYEE-MASTER KEY = SELECTED-EMPLOYEE
IF EMPLOYEE-MASTER SYS-IO-STATUS EQ SYS-OK DO PRINT-EMPLOYEE-DATA ELSE DO EMPLOYEE-MISSING-ROUTINE
If the GET command is successful, a routine named PRINT-EMPLOYEE-DATA will be executed. If the
GET command is unsuccessful, a routine named EMPLOYEE-MISSING-ROUTINE will be executed
instead.
Note that when VSAM or database Source Files are accessed, a more precise error status code can be obtained
(specifically the exact status code returned by the VSAM or database access method) by checking the contents
of the field, SourceFile-name SYS-INTERNAL-STATUS.
SYS-MATCH-COUNT
The SourceFile-name SYS-MATCH-COUNT field is automatically defined for each Source File specified in
the generated program with the MATCH option. This field may be referenced only in report or Target File
detail procedures, and indicates whether the current record from the named Source File matches the current
match key; that is, whether the Source File is PRESENT in the current match set.
If the current record from SourceFile-name does not match the current match key, this field will contain a
value of zero. For the first record (from the Source File indicated by SourceFile-name) that matches the
current match key, SourceFile-name SYS-MATCH-COUNT will contain the value 1, for the next record from
the Source File that matches the current match key it will be 2, and so forth.
IKAN Solutions
METASUITE METAMAP MANAGER - RELEASE 8.1.3
STRUCTURED EDITOR | 279
Format
SourceFile-name SYS-MATCH-COUNT
Example
The following sequence of commands illustrates the use of the SourceFile-name SYS-MATCH-COUNT field
to control the printing of selected detail lines. The first two detail lines are printed for the first occurrence of an
employee on the PAYROLL-DETAIL SourceFile; only the second detail line is printed for each subsequent
record for the same employee.
CASE PAYROLL-DETAIL SYS-MATCH-COUNT –
EQ 1 PUT (1,2) GT 1 PUT (2)
SYS-PATH-COUNT
The record-name SYS-PATH-COUNT field is defined automatically in all generated programs containing:
•
A Source File that has a path defined
•
A Source File that is CONTROLLED BY another SourceFile
• An external array
The record-name SYS-PATH-COUNT fields can be used in a Source File Input procedure, or on a Target File
Detail procedure.
Format
Record-name SYS-PATH-COUNT
Record-name
Required.
The record-name specifies the Source Record of the Source File for which the count of records must be given.
On Source Files with PATH
For Source Files with a path, there is a record-name SYS-PATH-COUNT field for each record named in the
PATH option of the Source File command. That field contains the count of records identified by record-name
currently in the input path.
Example
Assume that the following SOURCEFILE command has been coded:
SOURCEFILE SALES PATH (CLIENT,ACCOUNT OCCURS 5)
Within a report or Target File detail procedure, the CLIENT SYS-PATH-COUNT field will always contain
a value of 1 and the ACCOUNT SYS-PATH-COUNT field will always contain a value of 0-5. If the first
detail line of a report contains information from the CLIENT record and the second detail line contains
information from the ACCOUNT record (subscripted by the field X), the following sequence of commands
would result in information being printed from all records currently in the path:
PUT (1)
DO PRINT-ACCOUNT FOR X EQ 1 TO ACCOUNT SYS-PATH-COUNT
.
.
IKAN Solutions
METASUITE METAMAP MANAGER - RELEASE 8.1.3
STRUCTURED EDITOR | 280
.
BEGIN PRINT-ACCOUNT
PUT (2)
Note that if the value of ACCOUNT SYS-PATH-COUNT is zero, the PRINT-ACCOUNT routine will
not be executed at all for the current path.
With CONTROLLED BY SourceFiles
For CONTROLLED BY Source Files, there is a record-name SYS-PATH-COUNT field for each record
referenced in both the controlled and controlling Source Files. This field contains the count of records
identified by record-name currently in the controlled set of records. You should test the value of these fields to
determine the contents of the controlled set of records.
Example:
If you specify the commands below, considering that CUST-REFERENCE is a field of the RECEIVABLES
Source File:
SOURCEFILE RECEIVABLES
SOURCEFILE CUSTOMER-INFO CONTROLLED BY RECEIVABLES KEY = CUST-REFERENCE
The value of CUST-REC SYS-PATH-COUNT will be 1 if there is a (CUST-REC) record to correspond to
a given RECEIVABLES record; otherwise (if there is no corresponding record) the value of CUST-REC
SYS-PATH-COUNT will be zero (0).
On External Arrays
For External Arrays, the record-name SYS-PATH-COUNT field contains the number of records actually read
into storage. This number will be less than or equal to the occurs-number identified in the External Array.
Example
Assume that the following SOURCEFILE command has been coded:
SOURCEFILE JOBS TABLE JOB-TITLES OCCURS 44
Within a report or Target File detail procedure, the JOB-TITLES SYS-PATH-COUNT field will always
contain the real number of jobs read into storage, which will be in a range of 0 to 44.
SYS-READ-COUNT
The SYS-READ-COUNT field is defined automatically in all generated programs for each Source File. It
contains a count of records read for the named Source File. The count includes all records not named in a
PATH option, all records excluded from within Source File or record procedures, and all records excluded
because of validation errors. Do not confuse this field with SYS-INPUT-COUNT, which contains a count of
all records read and processed from the Source File (i.e., all records read and not excluded in a Source File
procedure for any reason).
Format
[ SourceFile-name | SourceRecord-name ] SYS-READ-COUNT
SourceFile-name
When SourceFile-name is given, the count of all the record read for the named Source File will be kept in
SYS-READ-COUNT.
IKAN Solutions
METASUITE METAMAP MANAGER - RELEASE 8.1.3
STRUCTURED EDITOR | 281
SourceRecord-name
When SourceRecord-name is given, the count of this specific record read will be kept in SYS-READ-COUNT.
The SYS-READ-COUNT field may be referenced anywhere in a program request. If it is referenced with a
Source File, report or Target File initial procedure -- or within a record input procedure executed during the
initial processing phase -- it refers to the number of records read in the INITIAL SORT/EXTRACT/
PREPASS procedure. If it is referenced anywhere else, it refers to the number of records read in the Source
File input procedure.
The only exception to this is a reference to the SYS-READ-COUNT for an external array (i.e. a Source File
with the TABLE/TREE option). In this case, the reference is always to the number of records read into
storage during the initial processing of the external array, unless you use the SYS-READ-COUNT in the initial
processing of that external array.
Example
To print the total number of records read from the PAYROLL-DETAIL Source File on a total line, the
following code could be used:
TOTAL 5 (W-TEXT)
BEGIN TOTAL 5 GROUP
W-TEXT = 'RECORDS READ = ' AND PAYROLL-DETAIL SYS-READ-COUNT
SYS-SQL-LENGTH
Field-name SYS-SQL-LENGTH contains the length (number of characters) of a VARCHAR SQL Source
Field. As stored in a table, each VARCHAR field is preceded by a length-field that contains the length of the
value of the field. When the field is retrieved by an SQL call, relational returns this length-field in addition to
its value.
Format
Field-name SYS-SQL-LENGTH
Field-name
Field-name must be a VARCHAR field within an SQL Source File. The field-name will always be presented
as 'TableName.ColumnName'.
Remarks
SYS-SQL-LENGTH can not be used on occurring fields.
Exception: Sesam database on Siemens BS/2000.
SYS-STATUS
A field-name SYS-STATUS is defined automatically in each generated program for all fields. It describes the
status on the contents of the field.
In case of a NULL value, which is also considered as a specific status on the contents of a field, the status can
be set by the user as well.
IKAN Solutions
METASUITE METAMAP MANAGER - RELEASE 8.1.3
STRUCTURED EDITOR | 282
Dependent on the field-name's data type, SYS-STATUS can contain other values.
Usage
IF Field-name SYS-STATUS EQ SYS-STATUS-Value
Or
Field-name SYS-STATUS = SYS-NULL-VALUE
Field-name
Field-name is the name of the field on which the status is checked, or to which the SYS-NULL-VALUE
status is assigned.
SYS-STATUS Values
Possible values for Field-name SYS-STATUS, ordered by importance, are:
ORDER
SYS-STATUS
INTERNAL VALUE
5
SYS-NULL-VALUE
-2
4
SYS-INVALID-DATE
-4
3
SYS-OUT-OF-LIMIT
-3
2
SYS-OUT-OF-RANGE
-5
1
SYS-NOT-NUMERIC
-1
0
SYS-OK
0
Meaning of the order of importance for status codes:
When different status codes could be given to a specific field, the most important will be taken.
For instance: For DATES the SYS-INVALID-DATE status is more important than the SYS-NOTNUMERIC status, so if a numeric date field contains a non-numeric value, the state of this field will become
SYS-INVALID-DATE.
More detailed information about the SYS-STATUS values is described separately under their keyword.
Remarks
SYS-STATUS cannot be checked on occurring fields.
IKAN Solutions
METASUITE METAMAP MANAGER - RELEASE 8.1.3
STRUCTURED EDITOR | 283
20.9. System Functions (MetaSuite Export Language)
The following system functions are available:
Category
System Function
Numeric System Functions
SYS-ABSOLUTE-VALUE (page 284)
SYS-ASCII (page 284)
SYS-ASCII-UNICODE (page 285)
SYS-BINARY (page 285)
SYS-DATE-OF-INTEGER (page 286)
SYS-DAY-OF-INTEGER (page 286)
SYS-EBCDIC (page 287)
SYS-EBCDIC-UNICODE (page 288)
SYS-EDIT (page 288)
SYS-HEXADECIMAL (page 289)
SYS-INTEGER (page 289)
SYS-INTEGER-OF-DATE (page 290)
SYS-INTEGER-OF-DAY (page 291)
SYS-INTEGER-PART (page 291)
SYS-LENGTH (page 292)
SYS-LENGTH-R (page 292)
SYS-LOG (page 293)
SYS-LOG10 (page 293)
SYS-NUMVAL (page 294)
SYS-NUMVALC (page 294)
SYS-RANDOM (page 295)
SYS-RAW (page 296)
SYS-REVERSE (page 296)
SYS-SQRT (page 297)
SYS-TRIM (page 297)
SYS-UNICODE-ASCII (page 298)
SYS-UNICODE-EBCDIC (page 298)
String System Functions
SYS-LOWERCASE (page 299)
SYS-UPPERCASE (page 299)
IKAN Solutions
METASUITE METAMAP MANAGER - RELEASE 8.1.3
STRUCTURED EDITOR | 284
SYS-ABSOLUTE-VALUE
The SYS-ABSOLUTE-VALUE function can be used on all numeric fields. The result will be a positive value.
Usage
Field-name SYS-ABSOLUTE-VALUE
Field-name
Field-name must be a numeric field.
Example
Y = X SYS-ABSOLUTE-VALUE
If argument X is a negative value, then the resulting Y will be minus X.
If argument X is a positive value, then the resulting Y will be X.
Remarks
SYS-ABSOLUTE-VALUE can not be used on occurring fields.
SYS-ASCII
The SYS-ASCII Source Field function converts the Source Field contents from the EBCDIC character set
to ASCII character set.
The EBCDIC character set is used on mainframes (Z/OS, BS/2000, …). ASCII is used on midframes and
personal systems.
Usage
Field-name SYS-ASCII
Field-name
Field-name must be an alphanumeric field.
Example
Suppose that the user has transferred a fixed length file from mainframe to a windows system, in binary
format.
All binary and packed-numeric fields can be read as they are.
Zoned numeric and Character fields can not be read, because they are in EBCDIC format and they have to be
converted before being interpreted.
Now you can code following lines:
ASC-ZONED-1 = EBC-ZONED-1 SYS-ASCII
ASC-ZONED-2 = EBC-ZONED-2 SYS-ASCII
ASC-CHAR-1 = EBC-CHAR-1 SYS-ASCII
IKAN Solutions
METASUITE METAMAP MANAGER - RELEASE 8.1.3
STRUCTURED EDITOR | 285
Remarks
SYS-ASCII can not be used on occurring fields.
SYS-ASCII-UNICODE
The SYS-ASCII-UNICODE Source Field function converts the Source Field contents from the ASCII
character set to the Unicode character set.
The ASCII character set is a one-byte character set which is used on open systems (Windows, UNIX, Linux).
Unicode is a multiple byte character set.
Usage
Field-name SYS-ASCII-UNICODE
Field-name
Field-name must be an alphanumeric field.
Example
UCS2-CHAR-20 = ASC-CHAR-10 SYS-ASCII-UNICODE
ASC-CHAR-10 contains 10 characters, UCS2-CHAR-20 contains 20 characters, UTF-16 based. This
example is perfectly possible since each 2-byte couple will be translated into one byte.
Remarks
SYS-ASCII-UNICODE can not be used on occurring fields.
SYS-BINARY
The SYS-BINARY Source Field function converts a hexadecimal string into its BINARY form.
This function can be used to store special character sequences.
The SYS-HEXADECIMAL function converts the BINARY values back to the original format.
Usage
Field-name SYS-BINARY
Field-name
Field-name must be an alphanumeric field.
The number of characters in Field-name must be even.
All characters in Field-name must belong to the following range: 0 to 9, A to F, or space. Space is treated as
zero.
The resulting string length will be half of the original length.
IKAN Solutions
METASUITE METAMAP MANAGER - RELEASE 8.1.3
STRUCTURED EDITOR | 286
Example
W-HEX
C-BIN
DEBUG
DEBUG
= '3242'
= W-HEX SYS-BINARY
'W-HEX IS #' (W-HEX)
'C-BIN IS #' (C-BIN)
RESULT:
W-HEX IS 3242
C-BIN IS 2B
Remarks
SYS-BINARY can not be used on occurring fields.
SYS-DATE-OF-INTEGER
The Field-name SYS-DATE-OF-INTEGER is automatically defined in each generated program for numeric
fields of type binary (either Source Field, Work Field or Target Field). It will give you the possibility to
determine the date value of the binary field, for which the value is seen as the number of days since the 31th of
December 1600.
The date format that is returned is determined by the date format of the field to which the assignment is made.
Format
Field-name SYS-DATE-OF-INTEGER
Field-name
Field-name must be a numeric field of type binary, that contains the number of days since the 31th of
December 1600.
SYS-DATE-OF-INTEGER is implemented as the DATE-OF-INTEGER function within COBOL.
Remarks
SYS-DATE-OF-INTEGER can not be used on occurring fields.
Remark for z/OS
The COBOL function implementation only works on COBOL 370 or higher.
SYS-DAY-OF-INTEGER
The Field-name SYS-DAY-OF-INTEGER is automatically defined in each generated program for numeric
fields of type binary (either Source Field, Work Field or Target Field). It will give you the possibility to
determine the date value of the binary field, for which the value is seen as the number of days since the 31th of
December 1600. The date format that is returned is determined by the date format of the field to which the
assignment is made.
IKAN Solutions
METASUITE METAMAP MANAGER - RELEASE 8.1.3
STRUCTURED EDITOR | 287
Format
Field-name SYS-DAY-OF-INTEGER
Field-name
Field-name must be a numeric field of type binary, that contains the number of days since the 31th of
December 1600.
SYS-DAY-OF-INTEGER is implemented as the DAY-OF-INTEGER function within COBOL.
Remarks
SYS-DAY-OF-INTEGER can not be used on occurring fields.
Remark for z/OS
The COBOL function implementation only works on COBOL 370 or higher.
SYS-EBCDIC
The SYS-EBCDIC Source Field function converts the Source Field contents from the ASCII character set to
EBCDIC character set.
The EBCDIC character set is used on mainframes (z/OS, BS/2000, …). ASCII is used on midframes and
personal systems.
Usage
Field-name SYS-EBCDIC
Field-name
Field-name must be an alphanumeric field.
Example
Suppose that the user has transferred a fixed length file from Windows to a mainframe system, in binary
format.
All binary and packed-numeric fields can be read as they are. Zoned numeric and Character fields can not be
read, because they are in ASCII format and they have to be converted before being interpreted.
Now you can code following lines:
EBC-ZONED-1 = ASC-ZONED-1 SYS-EBCDIC
EBC-ZONED-2 = ASC-ZONED-2 SYS-EBCDIC
EBC-CHAR-1 = ASC-CHAR-1 SYS-EBCDIC
IKAN Solutions
METASUITE METAMAP MANAGER - RELEASE 8.1.3
STRUCTURED EDITOR | 288
Remarks
SYS-EBCDIC can not be used on occurring fields.
SYS-EBCDIC-UNICODE
The SYS-EBCDIC-UNICODE Source Field function converts the Source Field contents from the EBCDIC
character set to the Unicode character set.
The EBCDIC character set is a one-byte character set which is used on mainframe systems (Z/OS, BS/2000,
OS400, VMS).
Unicode is a multiple byte character set.
Usage
Field-name SYS-EBCDIC-UNICODE
Field-name
Field-name must be an alphanumeric field.
Example
UCS2-CHAR-20 = EBC-CHAR-10 SYS-EBCDIC-UNICODE
EBC-CHAR-10 contains 10 characters, UCS2-CHAR-20 contains 20 characters, UTF-16 based. This
example is perfectly possible since each 2-byte couple will be translated into one byte.
Remarks
SYS-EBCDIC-UNICODE can not be used on occurring fields.
SYS-EDIT
The Field-nameSYS-EDIT field is automatically defined in all generated programs for fields with an edit
mask. It will use the edit mask of the field to determine the value.
Format
Field-name SYS-EDIT
Field-name
Field-name can be any field with an edit mask defined. The result of the SYS-EDIT will be a character value.
Example
When your want to use the edit mask of ANNUAL-SALARY on your TargetFile, you can use SYS-EDIT:
ADD FIELD ANNUAL-SALARY OF EMPLOYEE-DATA POSITION 16 SIZE 9 TYPE ZONED UNSIGNED
IKAN Solutions
METASUITE METAMAP MANAGER - RELEASE 8.1.3
STRUCTURED EDITOR | 289
DECIMAL 2 EDIT '+9999999.99'
W-ANNUAL-SALARY = ANNUAL-SALARY SYS-EDIT
Remarks
SYS-EDIT can not be checked on occurring Source Fields.
SYS-EDIT can not be checked on a DATE field (nor numeric DATE field, neither alphanumeric DATE
field), since using a DATE field will automatically transform the value according to its DATE format (which
is its edit mask).
SYS-HEXADECIMAL
The SYS-HEXADECIMAL Source Field function converts the Source Field contents into its hexadecimal
representation.
This function can be used when the user needs to transfer binary or packed-decimal values from one system to
another, in non-binary file format.
The SYS-BINARY function converts the hexadecimal values back to the original format.
Usage
Field-name SYS-HEXADECIMAL
Field-name
Field-name must be an alphanumeric field.
The resulting string length will be the double of the original length.
Example
C-BIN = '1A'
W-HEX = C-BIN SYS-HEXADECIMAL
DEBUG 'C-BIN IS # AND W-HEX IS #' (C-BIN, W-HEX)
RESULT:
C-BIN IS 1A AND W-HEX IS 3141
Remarks
SYS-HEXADECIMAL can not be used on occurring fields.
SYS-INTEGER
The Field-nameSYS-INTEGER is automatically defined in each generated program for numeric fields (either
Source Field, Work Field or Target Field). It will determine for you the greatest integer value that is less than
or equal to the numeric field value.
IKAN Solutions
METASUITE METAMAP MANAGER - RELEASE 8.1.3
STRUCTURED EDITOR | 290
Format
Field-name SYS-INTEGER
Field-name
Field-name must be a numeric field.
SYS-INTEGER is implemented as the INTEGER function within COBOL.
Remarks
SYS-INTEGER can not be used on occurring fields.
Remark for z/OS
The COBOL function implementation only works on COBOL 370 or higher.
SYS-INTEGER-OF-DATE
The Field-name SYS-INTEGER-OF-DATE is automatically defined in each generated program for numeric
date fields with a date format of YYYYMMDD (either Source Field, Work Field or Target Field). It will give
you the possibility to determine the number of days since the 31th of December 1600 for the date value within
the field.
Format
Field-name SYS-INTEGER-OF-DATE
Field-name
Field-name must be a numeric date field with date format YYYYMMDD.
SYS-INTEGER-OF-DATE is implemented as the INTEGER-OF-DATE function within COBOL.
Remarks
SYS-INTEGER-OF-DATE can not be used on occurring fields.
Remark for z/OS
The COBOL function implementation only works on COBOL 370 or higher.
IKAN Solutions
METASUITE METAMAP MANAGER - RELEASE 8.1.3
STRUCTURED EDITOR | 291
SYS-INTEGER-OF-DAY
The Field-name SYS-INTEGER-OF-DAY is automatically defined in each generated program for date fields
with a date format of YYYYDDD (either Source Field, Work Field or Target Field). It will give you the
possibility to determine the number of days since the 31th of December 1600 for a given date in the field.
Format
Field-name SYS-INTEGER-OF-DAY
Field-name
Field-name must be a numeric date field with format YYYYDDD.
SYS-INTEGER-OF-DAY is implemented as the INTEGER-OF-DAY function within COBOL.
Remarks
SYS-INTEGER-OF-DAY can not be used on occurring fields.
Remark for z/OS
The COBOL function implementation only works on COBOL 370 or higher.
SYS-INTEGER-PART
The Field-nameSYS-INTEGER-PART is automatically defined in each generated program for numeric fields
(either Source Field, Work Field or Target Field). It will determine for you the integer portion of the numeric
field value.
Format
Field-name SYS-INTEGER-PART
Field-name
Field-name must be a numeric field.
SYS-INTEGER-PART is implemented as the INTEGER-PART function within COBOL.
If the value of Field-name is zero, the returned value is zero. If the value of Field-name is positive, the returned
value is the greatest integer less than or equal to the value of Field-name. If the value of Field-name is negative,
the returned value is the least integer greater than or equal to the value of Field-name.
Remarks
SYS-INTEGER-PART can not be used on occurring fields.
IKAN Solutions
METASUITE METAMAP MANAGER - RELEASE 8.1.3
STRUCTURED EDITOR | 292
Remark for z/OS
The COBOL function implementation only works on COBOL 370 or higher.
SYS-LENGTH
This is the length of the field as defined in the MetaStore or in MetaMap if it is a Work Field.
Format
Field-name SYS-LENGTH
Field-name
Field-name can be a character or a numeric field.
SYS-LENGTH is implemented as the LENGTH function within COBOL.
Remarks
SYS-LENGTH can not be used on occurring fields.
Remark for z/OS
The COBOL function implementation only works on COBOL 370 or higher.
SYS-LENGTH-R
The Field-name SYS-LENGTH-R is automatically defined in each generated program for fields (either
Source Field, Work Field or Target Field). It will determine the length in number of characters after having
trimmed all spaces, low-values and non-displayable characters from the right.
Format
Field-name SYS-LENGTH-R
Field-name
Field-name can be a character or a numeric field.
SYS-LENGTH-R is implemented as the LENGTH function within COBOL.
Remarks
SYS-LENGTH-R can not be used on occurring fields.
IKAN Solutions
METASUITE METAMAP MANAGER - RELEASE 8.1.3
STRUCTURED EDITOR | 293
Remark for z/OS
The COBOL function implementation only works on COBOL 370 or higher.
SYS-LOG
The Field-name SYS-LOG is automatically defined in each generated program for numeric fields (either
Source Field, Work Field or Target Field). It will determine for you the logarithm to the base e of the numeric
field value.
Format
Field-name SYS-LOG
Field-name
Field-name must be a numeric field.
SYS-LOG is implemented as the LOG function within COBOL.
Remarks
SYS-LOG can not be used on occurring fields.
Remark for z/OS
The COBOL function implementation only works on COBOL 370 or higher.
SYS-LOG10
The Field-nameSYS-LOG10 is automatically defined in each generated program for numeric fields (either
Source Field, Work Field or Target Field). It will determine for you the logarithm to the base 10 of the
numeric field value.
Format
Field-name SYS-LOG10
Field-name
Field-name must be a numeric field.
SYS-LOG10 is implemented as the LOG10 function within COBOL.
IKAN Solutions
METASUITE METAMAP MANAGER - RELEASE 8.1.3
STRUCTURED EDITOR | 294
Remarks
SYS-LOG10 can not be used on occurring fields.
Remark for z/OS
The COBOL function implementation only works on COBOL 370 or higher.
SYS-NUMVAL
The Field-nameSYS-NUMVAL is automatically defined in each generated program for character fields (either
Source Field, Work Field or Target Field). It will give you the possibility to determine the numeric value of a
character field.
Format
Field-name SYS-NUMVAL
Field-name
Field-name must be a character field that contains a printed numeric value. When the Field-name contains a
numeric value with decimals, the expected decimal point is set by the 'CHANGE DEFAULT DECIMAL'
command within the MetaSuite generator. The 'CHANGE DEFAULT DECIMAL' will switch the
representation of a decimal point from Point to Comma, and vice versa. For more information on the
'CHANGE DEFAULT DECIMAL' command refer to the Generator Manager User Guide.
SYS-NUMVAL is implemented as the NUMVAL function within COBOL. It can therefore be used to move
the numeric value of an alphanumeric field in a numeric field.
Remarks
SYS-NUMVAL can not be used on occurring fields.
Remark for z/OS
The COBOL function implementation only works on COBOL 370 or higher.
SYS-NUMVALC
The Field-nameSYS-NUMVALC is automatically defined in each generated program for character fields (either
Source Field, Work Field or Target Field). It will give you the possibility to determine the numeric value of a
character field.
Format
Field-name SYS-NUMVALC
IKAN Solutions
METASUITE METAMAP MANAGER - RELEASE 8.1.3
STRUCTURED EDITOR | 295
Field-name
Field-name must be a character field that contains a printed numeric value. When the field-name contains a
numeric value with decimals, the expected decimal point is set by the 'CHANGE DEFAULT DECIMAL'
command within the MetaSuite generator. The 'CHANGE DEFAULT DECIMAL' will switch the
representation of a decimal point from Point to Comma, and vice versa. For more information on the
'CHANGE DEFAULT DECIMAL' command refer to the Generator Manager User Guide.
SYS-NUMVALC is implemented as the NUMVALC function within COBOL. It can therefore be used to
move the numeric value of an alphanumeric field in a numeric field.
Remarks
SYS-NUMVALC can not be used on occurring fields.
Remark for z/OS
The COBOL function implementation only works on COBOL 370 or higher.
SYS-RANDOM
The Field-name SYS-RANDOM is automatically defined in each generated program for numeric fields (either
Source Field, Work Field or Target Field). It will generate a random sequence number, for which the numeric
field is taken as a seed.
Format
Field-name SYS-RANDOM
Field-name
Field-name must be a numeric field.
SYS-RANDOM is implemented as the RANDOM function within COBOL.
Remarks
SYS-RANDOM can not be used on occurring fields.
Remark for z/OS
The COBOL function implementation only works on COBOL 370 or higher.
IKAN Solutions
METASUITE METAMAP MANAGER - RELEASE 8.1.3
STRUCTURED EDITOR | 296
SYS-RAW
The SYS-RAW field is automatically defined in all generated programs for all its Source Records and Source
Fields. It will be used to get the 'raw contents' of a record or a field, without numeric validation conversions.
The result of the SYS-RAW will be a character value.
Format
[ SourceField-name | SourceRecord-name ] SYS-RAW
SourceField-name
SourceField-name can be any Source Field, but will mainly be used to find the non-numeric contents of a
numeric field, or to get the contents of an invalid date.
Example
When your Source File EMPLOYEE-MASTER contains invalid EMPLOYEE-NUMBER, and you want
to output the invalid values, you can use SYS-RAW:
IF EMPLOYEE-NUMBER SYS-STATUS EQ SYS-NOT-NUMERIC W-INVALID-EMPLOYEE = EMPLOYEE-NUMBER SYS-RAW
SourceRecord-name
SourceRecord-name can be any Source Record. The full contents of the Source Record will be taken as is.
Example
When your Source File EMPLOYEE-MASTER contains too much invalid data, and you want to output the
invalid rows, you can use SYS-RAW:
IF W-ERRORS GT 0 T01-ERROR-ROW = EMPLOYEE-DATA SYS-RAW
Remarks
SYS-RAW can not be checked on occurring Source Fields.
It is advised not to use the SYS-RAW in a concatenation, since a concatenation will apply an Edit mask to the
field as well, which could produce unexpected results.
SYS-REVERSE
The Field-name SYS-REVERSE is automatically defined in each generated program for character fields
(either Source Field, Work Field or Target Field). It will determine for you the value of the character field in
reverse sequence.
Format
Field-name SYS-REVERSE
IKAN Solutions
METASUITE METAMAP MANAGER - RELEASE 8.1.3
STRUCTURED EDITOR | 297
Field-name
Field-name must be a character field.
SYS-REVERSE is implemented as the REVERSE function within COBOL.
Remarks
SYS-REVERSE can not be used on occurring fields.
Remark for z/OS
The COBOL function implementation only works on COBOL 370 or higher.
SYS-SQRT
The Field-nameSYS-SQRT is automatically defined in each generated program for numeric fields (either
Source Field, Work Field or Target Field). It will determine for you the square root of the numeric field value.
Format
Field-name SYS-SQRT
Field-name
Field-name must be a numeric field.
SYS-SQRT is implemented as the SQRT function within COBOL.
Remarks
SYS-SQRT can not be used on occurring fields.
Remark for z/OS
The COBOL function implementation only works on COBOL 370 or higher.
SYS-TRIM
The SYS-TRIM Source Field function removes all leading spaces in a string.
Usage
Field-name SYS-TRIM
IKAN Solutions
METASUITE METAMAP MANAGER - RELEASE 8.1.3
STRUCTURED EDITOR | 298
Field-name
Field-name must be an alphanumeric field.
Example
W-TRIM = ' (XYZ) '
W-TRIM = W-TRIM SYS-TRIM
DEBUG 'TRIM=#' ( W-TRIM )
RESULT:
TRIM=(XYZ)
Remarks
SYS-TRIM can not be used on occurring fields.
SYS-UNICODE-ASCII
The SYS-UNICODE-ASCII Source Field function converts the Source Field contents from the Unicode
character set to the ASCII character set.
The ASCII character set is a one-byte character set which is used on open systems (Windows, UNIX, Linux).
Unicode is a multiple byte character set. Information loss is inevitable when using this function.
Usage
Field-name SYS-UNICODE-ASCII
Field-name
Field-name must be an alphanumeric field.
Example
ASC-CHAR-10 = UCS2-CHAR-20 SYS-UNICODE-ASCII
ASC-CHAR-10 contains 10 characters, UCS2-CHAR-20 contains 20 characters, UTF-16 based. This
example is perfectly possible since each 2-byte couple will be translated into one byte.
Remarks
SYS-UNICODE-ASCII can not be used on occurring fields.
SYS-UNICODE-EBCDIC
The SYS-UNICODE-EBCDIC Source Field function converts the Source Field contents from the Unicode
character set to the EBCDIC character set.
The EBCDIC character set is a one-byte character set which is used on mainframes (Z/OS, BS/2000, …)
Unicode is a multiple byte character set. Information loss is inevitable when using this function.
IKAN Solutions
METASUITE METAMAP MANAGER - RELEASE 8.1.3
STRUCTURED EDITOR | 299
Usage
Field-name SYS-UNICODE-EBCDIC
Field-name
Field-name must be an alphanumeric field.
Example
EBC-CHAR-10 = UCS2-CHAR-20 SYS-UNICODE-EBCDIC
EBC-CHAR-10 contains 10 characters, UCS2-CHAR-20 contains 20 characters. This is perfectly possible
since each 2-byte couple will be translated into one byte.
Remarks
SYS-UNICODE-EBCDIC can not be used on occurring fields.
SYS-LOWERCASE
The Field-nameSYS-LOWERCASE is automatically defined in each generated program for character fields
(either Source Field, Work Field or Target Field). It will determine for you the value of the character field in
lower case.
Format
Field-name SYS-LOWERCASE
Field-name
Field-name must be a character field.
SYS-LOWERCASE is implemented as the LOWERCASE function within COBOL.
Remarks
SYS-LOWERCASE can not be used on occurring fields.
Remark for z/OS
The COBOL function implementation only works on COBOL 370 or higher.
SYS-UPPERCASE
The Field-nameSYS-UPPERCASE is automatically defined in each generated program for character fields
(either Source Field, Work Field or Target Field). It will determine for you the value of the character field in
upper case.
IKAN Solutions
METASUITE METAMAP MANAGER - RELEASE 8.1.3
STRUCTURED EDITOR | 300
Format
Field-name SYS-UPPERCASE
Field-name
Field-name must be a character field.
SYS-UPPERCASE is implemented as the UPPERCASE function within COBOL.
Remarks
SYS-UPPERCASE can not be used on occurring fields.
The MTL option OPTION-NATIONAL-UPPERCASE has been created in order to perform uppercasing
of national characters like "é", "ç", "ü" etc… More information about this option can be found in the MTL
options table, when using the MetaSuite Generator Manager.
Remark for z/OS
The COBOL function implementation only works on COBOL 370 or higher.
20.10.Conditional Keywords
The production of a Report or Target File will often require the evaluation of one or more logical relationships
in order to produce the desired output. An example of such an evaluation might be: "If an employee belongs to
department four, do not include that employee in the report."
A logical relationship compares the value of a single field with one or more other values, and the relationship is
always determined to be either "true" or "false". Within the language of the program generator, logical
relationships are referred to as conditional expressions, which are used in the IF, CASE, and DO...WHILE
commands.
Format
field-namerelational-operatorvalue
Elements Description
Element
Description
field-name
Field-name is the name of any field whose value is to be tested.
relational-operator
Relational-operator identifies the relationship to be tested.
value
Value is the value to be tested against the named field.
IKAN Solutions
METASUITE METAMAP MANAGER - RELEASE 8.1.3
STRUCTURED EDITOR | 301
Coding Conditional Keywords
The following table summarizes the combinations of relational operators and values that may be coded within
conditional expressions:
Relational Operators and Values
Conditional Expression is Evaluated as True if Field-Name is
EQ value
equal to value
NE value
not equal to value
LT value
less than value
LE value
less than or equal to value
GT value
greater than value
GE value
greater than or equal to value
EQ (value,...)
equal to any value in the list
NE (value,...)
not equal to any value in the list
IR (low TO high)
in the range of the low to high values
NI (low TO high)
not in the range of the low to high values
The first six entries in the table above illustrate simple conditional expressions, i.e., expressions used to
compare a single field to a single specified value. Any conditions to be tested can always be broken down into a
series of simple conditional expressions.
The last four entries in the table illustrate the use of conditional expressions to compare a single value with
multiple values.
If a single value must be compared to multiple values, the use of any of the last four formats of the conditional
keyword not only reduces the amount of coding required, but optimizes the code produced by the system. The
use of each of the last four formats of conditional expressions is illustrated below.
TESTING FOR A VALUE EQUAL TO ONE OF THE VALUES IN A LIST
When a list of values follows the EQ relational operator, the system will test the value of each entry in the list,
in sequence as specified, against the value of the selected field. The first time that a condition is found to be
true, the conditional expression is considered to be true and no further tests are performed.
See Example 1 - Testing for a value equal to one of the values in a list on page 303.
TESTING FOR A VALUE NOT EQUAL TO ANY OF THE VALUES IN A LIST
This type of conditional expression is actually an abbreviated format of a compound conditional expression,
where field-name is always the same, the conditional operator is always NE and all components of the
compound expression are joined by the word AND. That could be coded as follows:
DO SYS-LOCAL-INP-T1-1
WHILE
DEPARTMENT NE 1 AND DEPARTMENT NE 3
When a list of values follows the relational operator NE in a conditional expression, each value in the list is
compared to the value of field-name, in sequence as specified. If the named field is not equal to any of the
specified values, the condition is considered to be true.
IKAN Solutions
METASUITE METAMAP MANAGER - RELEASE 8.1.3
STRUCTURED EDITOR | 302
However, the first time a test fails (i.e., the first time the field value is found to be equal to one of the specified
values), the condition is considered to be false and no further tests are performed.
See Example 2 - Testing for a value not equal to any of the values in a list on page 304.
TESTING FOR A RANGE OF VALUES
It is sometimes necessary to determine whether or not the value of a field lies within a specific range of values.
See Example 3 - Testing for a range of values on page 305.
TESTING THE ABSENCE OF A RANGE OF VALUES
Conversely to the inclusive range option, you may want to take a particular action only when a field is not
within a specified range of values.
See Example 4 - Testing the absence of a range of values on page 305.
Nested IF
A nested IF command is a command that is coded as a component of the "true" or "false" clause of another IF
command.
Note:
The nesting of conditions is allowed only with the IF command (i.e., it is not allowed with the CASE
or DO...WHILE commands).
See Example 5 - Nested IF on page 305.
Compound Conditional Expressions - Combining Conditional Keywords
A compound conditional expression is used to indicate that a conditional specific action is to occur if a
combination of conditions is true, or if one of a series of conditions is true. A compound conditional expression
comprises two or more simple conditional expressions joined by a logical operator. The logical operator can be:
•
AND (logical conjunction)
The compound conditional expression is true if both the preceding and following conditions are true. The
compound conditional expression is false if either condition is false.
•
OR (logical disjunction)
The compound conditional expression is true if either the preceding or the following condition is true. If
both of the conditions are false, the compound conditional expression is false.
When multiple ANDs and/or ORs are coded in a single compound conditional expression, the evaluation of the
simple conditional expressions proceeds from left to right. Parentheses may be used to indicate the conjunction
of one condition with two or more disjunctive conditions.
See Example 6 - Compound conditional expressions - combining conditional keywords on page 306.
Parentheses in Compound Conditional Expressions
Remember that logical operators are used to "join" the preceding and the following conditions. Parentheses
may be coded in compound conditional expressions to indicate the conjunction of one condition with two or
more disjunctive conditions. The following command could be coded:
IF UNITS GT 200 OR COST GT 4500 AND IKAN Solutions
METASUITE METAMAP MANAGER - RELEASE 8.1.3
STRUCTURED EDITOR | 303
INVENTORY-STATUS EQ 'NA' PUT (4)
This command contains three simple conditional expressions, which, for the purposes of this discussion, will
be numbered as follows:
1.
UNITS GT 200
2.
COST GT 4500
3. INVENTORY-STATUS EQ 'NA'
The command, as coded, indicates that the fourth line is to be printed under two sets of circumstances: if the
first condition is true, or if both the second and third conditions are true.
If parentheses are inserted around the first two (disjunctive) conditions:
IF (UNITS GT 200 OR COST GT 4500) AND INVENTORY-STATUS EQ 'NA' PUT (4)
the meaning of the command is changed to indicate that the fourth line is to be printed if both the first and
third conditions are true, or if both the second and third conditions are true. This second version of the
command is the equivalent of the following command (coded without parentheses):
IF UNITS GT 200 AND INVENTORY-STATUS EQ 'NA' OR COST GT 4500 AND INVENTORY-STATUS EQ 'NA' PUT (4)
Although it has no effect on the evaluation of a compound conditional expression, you may find it useful to
enclose pairs of conjunctive conditions in parentheses and to "spread out" compound conditional expressions,
to simplify the reading of the code that you create. To illustrate this, consider the command below:
IF (UNITS GT 250 AND INVENTORY-STATUS EQ 'NA') OR (COST GT 4500 AND INVENTORY-STATUS EQ 'BO') PUT (5)
The intent of this command is somewhat clearer than the intent of the following identical compound
conditional command:
IF UNITS GT 250 AND
INVENTORY-STATUS
COST GT 4500 AND
INVENTORY-STATUS
PUT (5)
EQ 'NA' OR EQ 'BO' -
Examples
Example 1 - Testing for a value equal to one of the values in a list
The following command could be coded to print detail line number 3 whenever the DEPARTMENT field
contains the value 1, 3 or 4.
IF DEPARTMENT EQ (1,3,4) PUT (3)
This type of conditional expression is actually an abbreviated format of a compound conditional expression,
where field-name is always the same, the relational-operator is always EQ and all components of the
compound expression are joined by the word OR. The command above could have been coded as follows:
IKAN Solutions
METASUITE METAMAP MANAGER - RELEASE 8.1.3
STRUCTURED EDITOR | 304
IF DEPARTMENT EQ 1 OR DEPARTMENT EQ 3 OR DEPARTMENT EQ 4 PUT (3)
However, in the case of this compound conditional expression, more keystrokes are required and the command
is harder to read.
Note that both of the two IF commands above are equal to and more efficient than the following series of
simple conditional commands:
IF DEPARTMENT EQ 1 PUT (3)
IF DEPARTMENT EQ 3 PUT (3)
IF DEPARTMENT EQ 4 PUT (3)
These commands produce the same result, but each time the DEPARTMENT field contains the value 1, the
subsequent two conditions will be tested unnecessarily, and each time the DEPARTMENT contains the value
2, the third condition will be tested, again unnecessarily. Thus, not only is more coding required (increasing
the likelihood of a coding error), but more code will be executed as well.
Example 2 - Testing for a value not equal to any of the values in a list
To exclude all records except those containing the values 1 and 3 in the DEPARTMENT field, the following
command could be coded:
IF DEPARTMENT NE (1,3) EXCLUDE
This type of conditional expression is actually an abbreviated format of a compound conditional expression,
where field-name is always the same, the relational-operator is always NE and all components of the
compound expression are joined by the word AND. The command above could be coded as follows:
IF DEPARTMENT NE 1 AND DEPARTMENT NE 3 EXCLUDE
However, in the case of this compound conditional expression, more keystrokes are required and the command
is harder to read.
Note that neither of the two IF commands above, is equal to the following sequence of two simple conditional
commands:
IF DEPARTMENT NE 1 EXCLUDE
IF DEPARTMENT NE 3 EXCLUDE
These two commands exclude all input records: the first excludes all records except those for
DEPARTMENT 1, the second excludes all DEPARTMENT 1 records.
Although the function of the NE operator followed by a list of values cannot be duplicated by coding separate
simple NE conditional commands, the function can be duplicated by "nesting" the conditions, as follows:
IF DEPARTMENT NE 1 IF DEPARTMENT NE 3 EXCLUDE
In this case, the second condition is executed only when the first condition is true; but again, more coding is
required.
IKAN Solutions
METASUITE METAMAP MANAGER - RELEASE 8.1.3
STRUCTURED EDITOR | 305
Example 3 - Testing for a range of values
To print the third detail line only if the value of the PD-GROSS-PAY field is within the range $1000-$2000,
you might use the command below:
CASE prn-ANNUAL-SALARY ?
IR ( 0 TO 12499 ) ?
W-NUM1 = prn-ANNUAL-SALARY ?
IR ( 12500 TO 24999 ) ?
W-NUM1 = ( prn-ANNUAL-SALARY + 100 )?
IR ( 25000 TO 99999 ) ?
W-NUM1 = ( prn-ANNUAL-SALARY + 500 )
This form of the conditional expression first tests the value of the specified field, to see if it is greater than or
equal to the first specified value. If so, it tests whether the value of the field is less than or equal to the second
specified value. If both tests are true, the condition is true and the action indicated will occur.
The command above is equal to both of the following commands:
CASE prn-ANNUAL-SALARY
GE 0 AND LE 12499
W-NUM1 = prn-ANNUAL-SALARY
GE 12500 AND LE 24999
W-NUM1 = ( prn-ANNUAL-SALARY + 100 )
GE 25000 AND LE 99999
W-NUM1 = ( prn-ANNUAL-SALARY + 500 )
The first alternative is a compound conditional command.
Example 4 - Testing the absence of a range of values
If two work-fields (FIRST-EMP and LAST-EMP) contain the starting and ending employee numbers that
you wanted to include in a report, you could eliminate all unwanted employees from the report using the
following command:
IF EMPLOYEE-NUMBER NI (FIRST-EMP TO LAST-EMP) EXCLUDE
If the NI ("not in the range of ") relational operator is coded, the value of the specified field is tested against the
first value to determine if it is lower than that value. If not, it is tested against the second value to determine if
it is higher than that value. If either of these tests is true, the condition is true and the specified action will
occur.
The command above is essentially an abbreviation of the following compound conditional command:
IF EMPLOYEE-NUMBER LT FIRST-EMP OR EMPLOYEE-NUMBER GT LAST-EMP EXCLUDE
However, the compound conditional command requires more keystrokes and is more difficult to read.
Example 5 - Nested IF
To illustrate the nested IF command, assume that a special calculation has to be performed for hourly
employees only (PAY-CODE = 1), but there are two variations of that calculation: one for those employees
with an hourly wage (PAY-RATE) of $12.50 or more, and one for all other employees. If the two calculations
are contained in routines named CALC-A and CALC-B, the appropriate routine for each hourly employee
could be executed by coding the following nested conditional command:
IKAN Solutions
METASUITE METAMAP MANAGER - RELEASE 8.1.3
STRUCTURED EDITOR | 306
IF PAY-CODE EQ 1 IF PAY-RATE GE 12.50 DO CALC-A ELSE DO CALC-B
The first conditional expression tests whether the value of the PAY-CODE field is equal to 1. Whenever that
condition is true, the second (nested) conditional expression is tested. One of the two routines is executed,
depending on the evaluation of that expression.
Example 6 - Compound conditional expressions - combining conditional keywords
The examples below illustrate the use of logical operators to create compound conditional commands. The use
of parentheses is described separately, following those examples.
Assume that you want to print the second output line for only those employees from the third
DEPARTMENT having a PAY-RATE of $15 or more. The following command could be coded:
IF DEPARTMENT EQ 3 AND PAY-RATE GE 15 PUT (2)
In this example, the AND logical operator joins the two simple conditional expressions which must be
evaluated as true in order for the second line to be printed.
Note that if AND is used with an IF command, it is identical to a nested IF. To illustrate this point, the
command above could have been coded as a nested IF command, where the second conditional expression is
tested only when the first conditional expression is true:
IF DEPARTMENT EQ 3 IF PAY-RATE GE 15 PUT (2)
Note:
The meaning of the first (AND) command above changes if the word OR is substituted for the word
AND:
IF DEPARTMENT EQ 3 OR PAY-RATE GE 15 PUT (2)
Here, the second line will be printed whenever an employee belongs to the third department or the employee's
pay rate is greater than or equal to $15. This version of the command is not the same as the following sequence
of two separate conditional commands, which would cause the second line to be printed twice for those
employees from the third DEPARTMENT having a PAY-RATE of $15 or more:
IF DEPARTMENT EQ 3 –
PUT (2)
IF PAY-RATE GE 15 PUT (2)
None of the examples shown thus far have used both the AND and OR logical operators in a single compound
conditional expression. When both operators are used in a single expression, the evaluation of the simple
conditional expressions proceeds from first to last (i.e., from left to right). In other words, the following
command:
IF DEPARTMENT EQ 3 OR PAY-RATE LT 15 AND STATE-CODE EQ 'NH' EXCLUDE
excludes all employees in the third DEPARTMENT or any other employee whose PAY-RATE is less than
$15 and who is from the state of New Hampshire.
IKAN Solutions
METASUITE METAMAP MANAGER - RELEASE 8.1.3
CHAPTER 21
Runtime Parameters
Runtime Parameters are defined outside the MetaMap GUI, on separate lines in a runtime INI file often
called program-name.ini.
Runtime parameters are used to modify the initial value of a parameter Work Field or to reset various systemdefined fields or processing limits at the start of execution of the generated program.
The ability to modify an initial value for a parameter Work Field allows you to design generalized programs
whose processing can be controlled at execution time. The advantage is that a program does not need to be
regenerated each time you want to vary selection criteria or other processing variables. You simply generate the
program once, store it as a load module, and execute the program any number of times with the appropriate
(varying) settings for the initial parameter Work Field values.
Certain system fields and default processing limits can also be modified using runtime parameters. This allows
you to do such things as limit the number of input records to be read (especially useful when running a new
program for the first time). All system fields and processing limits that can be modified using runtime
parameters begin with the letters "SYS-", and are described in the following sections.
21.1. Parameter Files vs Parameter Fields
Parameter Files
A Parameter File is a Standard File that is added in MetaMap as a Parameter File. It is opened, read and
closed during the program initialization phase. Only one record is read from a Parameter File. The fields in
this Parameter File are called Parameter File Fields.
Example: Ex24 reads payroll-detail. Only the first record is read.
After the reading of payroll-detail, the file employee-master will be read sequentially.
A Parameter File behaves as an External Array with only one record.
IKAN Solutions
METASUITE METAMAP MANAGER - RELEASE 8.1.3
RUNTIME PARAMETERS | 308
Parameter Fields
A Parameter Field is a work field of which the parameter flag has been set.
Parameter (Work) Fields are fed during the program initialization phase, even before the reading of the
Parameter Files.
Their values can be defined in the program.ini file. This file is referred to by the logical data name PPTIPT.
Note:
A Parameter Field is not a Parameter File Field!
Example:
The program EXUDB35A, that is displayed below, contains several Work Fields. Among those Work Fields,
two fields have the parameter flag set: W-DBCONNECT and W-DBUSER.
Some system parameters, such as SYS-USER-NUM or SYS-DB-DATABASE, behave like Parameter Fields.
During the run of the generated program, the Parameter Fields receive their values from the program-name.ini
file. Some system parameters can receive their content by means of the same file.
An alternate way to enter values in the Parameter Fields is to specify these parameters in the program
execution command line:
For example in Windows this is done as follows:
EXUDB35A.EXE "W-DBCONNECT = 'IKAN020', W-DBUSER = 'db2admin'"
21.2. SYS-AGE-DATE
The SYS-AGE-DATE field is defined automatically in all generated programs. It contains the default date
used in aging calculations, stored in the format YYYYMMDD. The SYS-AGE-DATE field may be
referenced anywhere in a program request.
Example
The following reference to SYS-AGE-DATE on a detail line will result in the value of SYS-AGE-DATE being
printed on the detail line of a report:
DETAIL 1 ( W-TEXT)
BEGIN REPORT 1 INPUT
W-TEXT = SYS-AGE-DATE
IKAN Solutions
METASUITE METAMAP MANAGER - RELEASE 8.1.3
RUNTIME PARAMETERS | 309
Runtime Parameter Usage
SYS-AGE-DATE = yyyymmdd
The value of the default system aging date (SYS-AGE-DATE) may be set at execution time, using a runtime
parameter that provides the date in yyyymmdd format, where yyyy is a four-digit year, mm is a two-digit
month, and dd is a two-digit day. Each component of the date must consist of all digits and must include
leading zeros, where appropriate. If no runtime parameter is specified for SYS-AGE-DATE, the value defaults
to the value of the SYS-DATE field.
Example
The following runtime parameter establishes June 1, 2012 as default system aging date:
SYS-AGE-DATE = 20120601
In the generated program, any reference to SYS-AGE-DATE will use the value 20120601. Note that when the
AGE function is used a user-supplied reference date, the reference date in that function defaults to the value of
SYS-AGE-DATE.
21.3. SYS-APPLICATION
The SYS-APPLICATION field is available in all generated programs, and can be assigned a value
representing the application name of the program.
An application name will be used to give a more logical name to the program than its execution name.
The assigned value is stored in the PPTLOG file during execution of your MetaSuite generated program.
SYS-APPLICATION will be initialized with the program name.
21.4. SYS-APPLICATION-GROUP
The SYS-APPLICATION-GROUP field is available in all generated programs, and can be assigned a value
representing the application group name of the program.
An application group name will be used to group all programs that are run in one execution flow. You will have
to assign all these programs to the same application group name to document this logical execution flow.
The assigned value is stored in the PPTLOG file during execution of your MetaSuite generated program.
You can assign a value to SYS-APPLICATION-GROUP either on runtime (in PPTLID-file or in PPTIPTfile) or in the MetaSuite program.
PPTLID
The value, which is set in PPTLID, will be assigned automatically to the SYS-APPLICATION-GROUP
system constant.
PPTIPT
The assignment done in PPTIPT ( SYS-APPLICATION-GROUP = ...) will overwrite the PPTLID value
when present.
IKAN Solutions
METASUITE METAMAP MANAGER - RELEASE 8.1.3
RUNTIME PARAMETERS | 310
21.5. SYS-AUTO-SQLCODE
The SYS-AUTO-SQLCODE field is automatically defined in each generated program that accesses an
RDBMS through embedded SQL statements. Its value can be either 0 or 1 and will determine whether all
embedded SQL statements for which the SQLCODE is not equal to (0,100) must be handled by an SQL
handling module.
Usage
SYS-AUTO-SQLCODE = [ 0 | 1 ]
When the value is set to 1, all embedded SQL statements for which the returned SQLCODE is different to 0
or to 100 will be handled by an SQL handling module.
A default SQL handling module which contains display logic for all SQLCODE different to 0 or to 100 can
be found in the following table:
SQL Dialect
SQL Dialect Name
Runtime Module
0
Not specified
MSSQL
1
DB2 for z/OS
MSDMX
2
DB2 for VSE
MSDVX
3
DB2/2
MSD2X
4
DB2 for OS4
MSD4X
5
DB2 for UNIX
MSD6X
6
ORACLE
MSORX
7
INGRES
MSIGX
8
SYBASE
MSSYX
9
SQL SERVER
MSSQX
10
INFORMIX
MSIFX
11
SESAM
MSSEX
12
RDBMS
MSRDX
13
ODBC
MSODB
14
TERADATA
MSTRX
15
DB2/LUW
MSD2X
You can customize this SQL handling module according to your company standards.
IKAN Solutions
METASUITE METAMAP MANAGER - RELEASE 8.1.3
RUNTIME PARAMETERS | 311
21.6. SYS-DATE
The SYS-DATE field is defined automatically in all generated programs. It contains the date used on the
default title line of all reports, and is defined in the format YYYYDDD. The SYS-DATE field can be
referenced anywhere in a program request.
The following command results in the field NEXT-REPORT-DATE being set to two weeks from the current
system date:
NEXT-REPORT-DATE = (SYS-DATE + 14)
Runtime Parameter Usage
SYS-DATE = yyyymmdd
The value of the default system date (SYS-DATE) field may be set at execution time, using a runtime
parameter that provides the date in yyyymmdd format. yyyy is a four-digit year, mm is a two-digit month, and
dd is a two-digit day. Each component of the date must consist of all necessary digits and must include leading
zeros, where appropriate. If no runtime parameter is specified, the value defaults to the current system date
(from the computer).
Example
The following runtime parameter establishes June 1, 2012 as default system date:
SYS-DATE = 20120601
In the generated program, any reference to SYS-DATE will use the value 20120601.
21.7. SYS-DATE-CHECK
The SYS-DATE-CHECK runtime parameter is used to control system error handling for invalid date input
fields. You can:
•
Specify the maximum number of invalid date fields to be trapped (and excluded)
•
Instruct the system to display an error message only once when it first encounters an invalid date
• Instruct the system to ignore all invalid dates
A date is considered invalid when it does not contain appropriate values for the year, month, and/or day
portions of the field, as defined via the DATE option of the field definition. The normal system action when
an invalid date is encountered is to print an error message and bypass the processing of the record containing
the invalid date.
Format:
SYS-DATE-CHECK = {number > OFF > IGNORE}
Use the number option to specify a number of invalid date values to be trapped. Trapped values are listed in the
error listing and excluded from the run. Once the indicated number of errors has occurred, the system will
convert any subsequent invalid dates to zero and accept those fields as valid data (i.e., continue processing).
Use the OFF option to specify that although the system will perform error checking, it will print an error
message only for the first error it encounters, not for any subsequent errors. The system will bypass processing
of the record containing the invalid data.
Use the IGNORE option instead of a number of errors to be trapped, if you want the system to convert all
invalid dates to zero and accept them as valid data. It will return a count of such errors.
IKAN Solutions
METASUITE METAMAP MANAGER - RELEASE 8.1.3
RUNTIME PARAMETERS | 312
21.8. SYS-DB-CONNECT
This runtime parameter is applicable for some types of database, for instance for Informix, Oracle and
SQLServer.
In order to connect the generated program to some database types, a connection string is required. That
connection string can be provided by means of this runtime parameter.
Sample:
Oracle users should supply the following runtime variables in the PPTIPT file to connect to a specific
database:
SYS-DB-CONNECT = 'connect string'
SYS-DB-USER = 'user-id'
SYS-DB-PASSWORD = 'password'
21.9. SYS-DB-DATABASE
This runtime parameter is applicable on Windows systems for ODBC access to a database.
If the SYS-DB-CONNECT variable contains the word '(DBNAME)', the database name within the first
MDL file of file type SQL will be used to form the connection string.
However, if this database name is not correct, the value of the runtime parameter SYS-DB-DATABASE will
overrule this.
So the logical order is:
1.
SYS-DB-CONNECT
2.
File-specific DBNAME (if SYS-DB-CONNECT=’(DBNAME)’ and SYS-DB-DATABASE are empty)
3.
SYS-DB-DATABASE (if SYS-DB-CONNECT=’(DBNAME)’ and SYS-DB-DATABASE are not
empty)
21.10.SYS-DB-PASSWORD
The password needed to connect to the database can be provided by means of this runtime parameter.
21.11.SYS-DB-USER
The name of the user, needed to connect to the database, can be provided by means of this runtime parameter.
21.12.SYS-ERROR-LIMIT
To detect in time that you are running a generated program on the wrong physical Source File, or to prevent
the running of a generated program on a Source File with too much data errors, you can limit the number of
errors that can occur in a program by the SYS-ERROR-LIMIT. When the read limit (number) is met by any
Source File, all processing will stop, and a return code of 8003 is given.
Usage:
SYS-ERROR-LIMIT = number
Number will set a maximum number of errors that can be found before the generated program is halted.
IKAN Solutions
METASUITE METAMAP MANAGER - RELEASE 8.1.3
RUNTIME PARAMETERS | 313
21.13.SYS-INPUT-LIMIT
When running a generated program for the first time against a large-volume input Source File, it is often
useful to restrict the amount of data to be processed, in order to validate that your program will produce the
desired results. The SYS-INPUT-LIMIT runtime parameter is used to specify a maximum number of records
to be input to the generated program from any single Source File being accessed. When the input limit
(number) is met, all input Source Files will be treated as if they were at the end-of-file.
Note that "input" refers only to those records not excluded in Source File procedures, because of validation
errors or because of being omitted in a PATH option. Do not confuse this parameter with the SYS-READLIMIT parameter, which sets a maximum number of records to be read (including those records excluded for
any reason).
Usage:
SYS-INPUT-LIMIT = number
Number will set a maximum number of records to be input to the generated program from any single Source
File being accessed.
21.14.SYS-LIMITS-CHECK
The SYS-LIMITS-CHECK runtime parameter is used to control the system's error handling, when values for
an input field are found to lie outside of the limits specified for the field in the MetaStore. (Limits for a field
are defined using the LIMITS option of the ADD FIELD command.) You can:
•
Specify the maximum number of errors to be trapped (and excluded).
•
Instruct the system to display an error message only once when it first encounters an invalid value.
• Instruct the system to ignore all limits errors.
The normal system action when an invalid limit is encountered is to print an error message and bypass the
processing of the record containing the invalid data.
Usage:
SYS-LIMITS-CHECK = {number > OFF > IGNORE}
Number is used to specify a number of invalid values to be trapped. Trapped errors are listed in the error listing
and excluded from the run. Once the indicated number of errors have occurred, the system will simply ignore
all subsequent limits checking.
OFF is used to specify that although the system will perform error checking, it will print an error message only
for the first error it encounters, not for any subsequent errors. The system will bypass processing of the record
containing the invalid data.
IGNORE is used to instruct the system not to perform any limits checking.
21.15.SYS-NUMERIC-CHECK
The SYS-NUMERIC-CHECK runtime parameter is used to control the system's error handling for invalid
numeric input fields.
You can:
•
Specify the maximum number of invalid numeric fields to be trapped, reported on, and excluded.
•
Instruct the system to display an error message only once when it first encounters an invalid field.
•
Instruct the system to ignore all invalid numeric data (and substitute a value of zero for each invalid numeric
value).
IKAN Solutions
METASUITE METAMAP MANAGER - RELEASE 8.1.3
RUNTIME PARAMETERS | 314
A packed or zoned numeric field is invalid when it does not contain appropriate numeric digits or sign
indicators. (Floating-point and binary numbers are always valid, in that any possible bit configuration is a valid
floating-point or binary number.) When an invalid numeric is encountered, the normal system action is to
print an error message and bypass the processing of the record containing the invalid data.
Usage:
SYS-NUMERIC-CHECK = {number > OFF > IGNORE}
Use the number option to specify a number of invalid numeric values to be trapped. Trapped numeric errors are
listed in the error listing and excluded from the run. Once the indicated number of errors has been met, the
system will discontinue numeric checking. A subsequent invalid numeric will cause an abnormal termination
of the generated program.
Use the OFF option to specify that although the system will perform error checking, it will print an error
message only for the first error it encounters, not for any subsequent errors. The system will bypass processing
of any record containing the invalid data.
Use the IGNORE option instead of a number of errors, if you want the system to convert all invalid numeric
values to zero and accept them as valid data. The total number of invalid numeric fields encountered will be
printed in the end-of-job statistics, but no "invalid numeric" error messages will be produced.
21.16.SYS-READ-LIMIT
When running a generated program for the first time against a large-volume Source File, it is often useful to
restrict the amount of data to be processed, in order to validate that your program will produce the desired
results. The SYS-READ-LIMIT runtime parameter is used to specify a maximum number of records to be
read by the generated program from any single Source File being accessed. When the read limit (number) is
met by any Source File, all input Source Files will be treated as if they were at the end-of-file. Do not confuse
this parameter with the SYS-INPUT-LIMIT parameter, which sets a maximum number of records to be read
and processed (i.e., read and not excluded in a Source File procedure or because of validation errors).
Usage:
SYS-READ-LIMIT = number
Number will set a maximum number of records to be input to the generated program from any single Source
File being accessed.
21.17.SYS-RECORD-SNAP
The SYS-RECORD-SNAP runtime parameter allows you to request a hexadecimal dump of the entire
contents of any input record that contains invalid numeric data, for up to the number of times identified by an
integer.
Usage:
SYS-RECORD-SNAP = number
Number specifies a maximum number of "snapshot" dumps to be produced. After the specified number of
dumps have been obtained, the system will print only the hex values of the field(s) found to contain invalid
numeric data (and not their corresponding records).
IKAN Solutions
METASUITE METAMAP MANAGER - RELEASE 8.1.3
RUNTIME PARAMETERS | 315
21.18.SYS-USER-DATE
SYS-USER-DATE is a runtime parameter of type DATE that can be used for different purposes. It avoids
having to create a workfield with a parameter flag and a date format.
Usage:
SYS-USER-DATE = yyyyddd
A value is supplied to SYS-USER-DATE at runtime, in yyyyddd format. Only one value can be supplied to
SYS-USER-DATE per program execution.
21.19.SYS-USER-MIX
SYS-USER-MIX is a runtime parameter of type CHARACTER that can be used for different purposes. It
avoids having to create a workfield of type CHARACTER with a parameter flag.
Usage:
SYS-USER-MIX = 'text'
In this format, text is a value is supplied to SYS-USER-MIX at runtime. It can be up to 32 characters long.
Only one value can be supplied to SYS-USER-MIX per program execution.
21.20.SYS-USER-NUM
SYS-USER-NUM is a runtime parameter of type NUMERIC that can be used for different purposes. It avoids
having to create a workfield of type NUMERIC with a parameter flag.
Usage:
SYS-USER-NUM = number
SYS-USER-NUM is defined automatically to the generated program as a full word binary field. Number is any
numeric value. Only one value can be supplied to SYS-USER-NUM per program execution.
IKAN Solutions
METASUITE METAMAP MANAGER - RELEASE 8.1.3
CHAPTER 22
Calling the MetaMap Manager in
Batch
Users can call the MetaMap Manager in batch in order to export existing MetaMap Models to an MXL file
The MSBMAP.exe program (for MetaSuite Batch MetaMap) is located in the MetaSuite installation folder.
It can be used with an MS-DOS prompt or in batch mode.
For more information on how the utility works, type 'msbmap -h' on an MS-DOS prompt, where the
executable is located in the current folder or in a directory that is contained in the Windows PATH.
22.1. Using MSBMAP to Export MetaMap Models to the MXL Files
Command format:
msbmap [options] {MSM_Filename | * }
Where MSM_Filename is the name of the file containing the MetaMap Model. If * is used as a filename, all
models in the msm folder will be loaded and exported.
Options overview:
Option
Description
-h or -?
Help. Displays this page.
-u:userid
The User ID to log on to the MetaStore (optional).
-p:password
The password to log on to the MetaStore (optional).
-s:DSN
The data source name for the ODBC connection to the MetaStore (optional).
-d:database
The database to log on to the MetaStore (optional).
-o:owner
The owner of the MetaStore tables (optional).
-f:filename
The MSM to be generated.
A wildcard can be used for multiple file selection. (i.e. '*', '?').
[-f:] is optional.
-m:folder
Folder of the MetaMap Models (MSM files).
-x:folder
Folder of the MXL files.
-i:filename
INI file with preset settings for MetaSuite.
Mandatory if no user, password, etc. are supplied.
The INI settings will be overridden by the specified ones.
-z
The Model will be saved in the current file format.
IKAN Solutions
METASUITE METAMAP MANAGER - RELEASE 8.1.3
CALLING THE METAMAP MANAGER IN BATCH | 317
Command:
msbmap -i:MetaSuite.ini -f:ex0.msm
Results:
Metasuite MetaMap Manager Batch Tool Version 08.01.02 Build 267
No path information specified FOR INI file, assuming C:\Documents and Settings\fib\Application Data\MetaSuite.
Logging on as 'Metasuit' to database 'Metasuit' at server 'MetaStore:813:MsAccess'
...
Caching completed. The dictionary 'MetaSuite MetaStore' contains 61 files (versions included).
Generating "D:\Program Files\IKAN Solutions\MetaSuite813\MSM\ex0.msm". . .
Started loading of D:\Program Files\IKAN Solutions\MetaSuite813\MSM\ex0.msm ...
The version 1 of Dictionary File 'employee-master' was used in your program.
However the version 2 is the latest version of the Dictionary File 'employee-master' in MetaStore.Which file do you want to use? ...
Started loading of D:\Program Files\IKAN Solutions\MetaSuite813\MSM\ex0.msm ...OK
Generating "EX0". . .
Successful completion
Batch command(s) succeeded.
22.2. MSBMAP Return Codes
There are two possible Return Codes after an MSBMAP run:
•
0 (zero): Export successful. A message is written to stdout.
•
4: Export failed. An appropriate message is written to stdout and to the msbmap.log file. This file is located
in the MetaSuite Temporary folder.
22.3. Calling MetaMap Manager Via the Commandline
MetaMap Manager can be called by means of the following command:
MetaMap [TDW] [filename1 ... filenameN] <Ins>
TDW
optional
This parameter specifies that the Test Data Wizard must be
started when logged on.
filename1 ... filenameN
optional
The MetaMap Models to be opened.
Ins
mandatory
The installation directory specified during installation.
IKAN Solutions
METASUITE METAMAP MANAGER - RELEASE 8.1.3
Index
B
Logging on to MetaMap 6
File Procedure 63
Source Field 58
Source Record 56
Sub Source Field 59, 88
Source Wizard 90
Structured Field 83
Target
Target End Page 120
Target Field 114
Target Heading 119
Target Procedure 121
Target Record 111
Target Title 119
Target File 104
Target Report 104
Target Wizard 125
Model creation
Defining record procedures 61
Defining source fields for parameter files 87
Defining source file path records 69
Defining source file paths 67
Defining source records for parameter files 85
Model Packaging 176
MSBMAP 316
Export to MXL 316
Return Codes 317
M
P
Mapping Wizard 130
Matching Wizard 99
MetaMap
Key notions 4
Prerequisites 5
Purpose 3
MetaMap Models
Create 47
Overview 46
Model Creation
External Array 71
Array Procedure 79
Source Field 76
Source Record 75
Sub Source Field 77
Mapping Wizard 130
Matching Wizard 99
Parameter File 83
Source File 50
Packaging 176
Parameter File 83
Prerequisites 5
Program Procedures 144
Public Procedures 148
Batch 316
Export to MXL 316
Return Codes 317
D
Data Sources 49
Data Targets 104
Display Options 178
E
Exporting a Model to CDIF format 175
External Array 71
Array Procedure 79
Source Field 76
Source Record 75
Sub Source Field 77
L
IKAN Solutions
R
Run-time Parameters 307
SYS-DATE-CHECK 311
SYS-ERROR-LIMIT 312
SYS-INPUT-LIMIT 313
SYS-LIMITS-CHECK 313
SYS-NUMERIC-CHECK 313
SYS-READ-LIMIT 314
SYS-RECORD-SNAP 314
SYS-USER-DATE 315
SYS-USER-MIX 315
SYS-USER-NUM 315
METASUITE METAMAP MANAGER - RELEASE 8.1.3
INDEX | 319
S
Source
External Array 71
Array Procedure 79
Source Field 76
Source Record 75
Sub Source Field 77
Parameter File 83
Source File 50
File Procedure 63
Source Field 58
Source Record 56
Sub Source Field 59, 88
Structured Field 83
Source Control (Version Management) 181
Source File 50
File Procedure 63
Source Field 58
Source Record 56
Sub Source Field 59, 88
Source Wizard 90
Structured Editor 186
Attributes 274
Commands 188
Constants 264
Notation Conventions 188
Structural Elements 187
System Functions 283
Structured Field 83
Subfields 142
SYS-DATE-CHECK 311
SYS-ERROR-LIMIT 312
SYS-INPUT-LIMIT 313
SYS-LIMITS-CHECK 313
SYS-NUMERIC-CHECK 313
SYS-READ-LIMIT 314
SYS-RECORD-SNAP 314
SYS-USER-DATE 315
SYS-USER-MIX 315
SYS-USER-NUM 315
T
Target
Target End Page 120
Target Field 114
Target File 104
Target Heading 119
Target Procedure 121
Target Record 111
Target Report 104
Target Title 119
Target End Page 120
Target Field 114
Target File 104
Target Heading 119
Target Procedure 121
IKAN Solutions
Target Record 111
Target Report 104
Target Title 119
Target Wizard 125
Test Data Wizard 151
Transformation Programs 163
Execute 166
Generate 163
Run-time Messages 168
U
User Interface
Compile Window 43
Context Menus 18
Developer Toolbar 12
Docking a Window 44
Logging on to MetaMap 6
Main Toolbar 11
Menu bar 9
Output Window 43
Package Window 43
Statusbar 44
Tree View Window 13
Wizard Toolbar 13
Workspace 43
User Profiles 180
V
Version Management
Add MetaMap Models 183
Connection 181
Establish 181
Terminate 182
Source Control Status 183
Undo Check-out 185
Version Management (Source Control) 181
W
Wizards
Matching Wizard 99
Source Wizard 90
Target Wizard 125
Work Fields 135
METASUITE METAMAP MANAGER - RELEASE 8.1.3