1
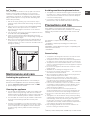
VI205PNF Français Mode d’emploi Congelatéur Sommaire Mode d’emploi, 1 Assistance, 3 Description de l’appareil, 7 Installation, 17 Mise en marche et utilisation, 17 Entretien et soin, 18 Précautions et conseils, 18 Anomalies et remèdes, 19 Italiano Istruzioni per l’uso Congelatore Deutsch Gebrauchsanleitungen Gefrierfachs Sommario Inhaltsverzeichnis Istruzioni per l’uso, 1 Assistenza, 3 Descrizione dell’apparecchio, 6 Installazione, 11 Avvio e utilizzo, 11 Manutenzione e cura, 12 Precauzioni e consigli, 12 Anomalie e rimedi, 13 Gebrauch sanleitungen, 1 Kundendienst, 3 Beschreibung Ihres Gerätes, 7 Installation, 20 Inbetriebsetzung und Gebrauch, 20 Wartung und Pflege, 21 Vorsichtsmaßregeln und Hinweise, 21 Störungen und Abhilfe, 22 English Español Operating Instructions Manual de instrucciones Freezer Congelador Contents Sumario Operating Instructions, 1 Assistance, 3 Description of the appliance, 6 Installation, 14 Start-up and use, 14 Maintenance and care, 15 Precautions and tips, 15 Troubleshooting, 16 Manual de instrucciones, 2 Asistencia, 4 Descripción del aparato, 8 Instalación,26 Puesta en funcionamiento y uso, 26 Mantenimiento y cuidados, 27 Precauciones y consejos, 27 Anomalías y soluciones,28 Assistenza Prima di contattare l’Assistenza: • Verificare se l’anomalia può essere risolta autonomamente (vedi Anomalie e Rimedi). • In caso negativo, contattare il Numero Unico Nazionale 199.199.199. Comunicare: • il tipo di anomalia • il modello della macchina (Mod.) • il numero di serie (S/N) Queste informazioni si trovano sulla targhetta caratteristiche posta nel vano frigorifero in basso a sinistra. Non ricorrete mai a tecnici non autorizzati e rifiutate sempre l’installazione di pezzi di ricambio non originali. Assistance Avant de contacter le centre d’Assistance : • Vérifiez si vous pouvez résoudre l’anomalie vous-même (voir Anomalies et Remèdes). • Si, malgré tous ces contrôles, l’appareil ne fonctionne toujours pas et si l’inconvénient persiste, appelez le service après-vente le plus proche. Signalez-lui : • le type d’anomalie • le modèle de l’appareil (Mod.) • le numéro de série (S/N) Vous trouverez tous ces renseignements sur l’étiquette signalétique placée dans le compartiment réfrigérateur en bas à gauche. Ne vous adressez jamais à des techniciens non agréés et exigez toujours l’installation de pièces détachées originales. Assistance Before calling for Assistance: • Check if the malfunction can be solved on your own (see Troubleshooting). • If after all the checks, the appliance still does not operate or the problem persists, call the nearest Service Centre Communicating: • type of malfunction • appliance model (Mod.) • serial number (S/N) This information can be found on the data plate located on the bottom left side of the refrigerator compartment. Never call on unauthorized technicians and always refuse spare parts which are not originals. Kundendienst Bevor Sie sich an den Kundendienst wenden: • Prüfen Sie, ob die Störung selbst behoben werden kann (siehe Störungen und Abhilfe). • Sollte trotz aller Kontrollen das Gerät nicht funktionieren und der von Ihnen festgestellte Fehler weiter bestehen bleiben, dann fordern Sie bitte den nächstgelegenen technischen Kundendienst an und teilen Sie dort zusammen mit Ihrer Fehlerbeschreibung folgende Daten mit: Geben Sie bitte Folgendes an: • die Art der Störung • das Gerätemodell (Mod.) • die Modellnummer (S/N). Entnehmen Sie diese Daten bitte dem Typenschild (befindlich im Kühlraum unten links). Beauftragen Sie auf keinen Fall einen nicht befugten Kundendienst und lassen Sie ausschließlich OriginalErsatzteile einbauen. - modello - model - modèle - modell - model - modelo - modelo - model - modell - модель - numero di serie - serial number - numéro de série - modellnummer - serienummer - número de serie - número de série - serienummer - serienummer 3 Descrizione dell’apparecchio Description of the appliance Vista d’insieme Overall view Le istruzioni sull’uso valgono per diversi modelli per cui è possibile che la figura presenti particolari differenti rispetto a quelli dell’apparecchio acquistato. La descrizione degli oggetti più complessi si trova nelle pagine seguenti. The instructions contained in this manual are applicable to different model refrigerators. The diagrams may not directly represent the appliance purchased. For more complex features, consult the following pages. 1 Manopola REGOLAZIONE DELLA TEMPERATURA. 2 Spia SUPER FREEZE. 3 Spia ALLARME. 4 Spia ALIMENTAZIONE. 5Pulsante SUPER FREEZE 6Vano CONSERVAZIONE. 7Vano CONGELAMENTO e CONSERVAZIONE 8Vano CONSERVAZIONE. 9 Bacinella GHIACCIO 1 2 3 4 5 6 7 8 9 1 2 5 TEMPERATUE CONTROL Knob SUPER FREEZE Indicator light WARNING Indicator light POWER Indicator light SUPER FREEZE Button STORAGE Compartment Flap FREEZING and STORAGE Compartment STORAGE Compartment ICE3 ICE TRAY 3 4 6 7 8 * Variabili per numero e/o per posizione, presente solo in alcuni modelli. 6 9 * Varies by number and/or position, available only on certain models. GB Installation Start-up and use ! Before placing your new appliance into operation please read these operating instructions carefully. They contain important information for safe use, for installation and for care of the appliance. ! Please keep these operating instructions for future reference. Pass them on to possible new owners of the appliance. Starting the appliance Positioning and connection ! The appliance comes with a motor protection control system which makes the compressor start approximately 8 minutes after being switched on. The compressor also starts each time the power supply is cut off whether voluntarily or involuntarily (blackout). Positioning 1. Place the appliance in a well-ventilated humidity-free room. 2. Do not obstruct the rear fan grills. The compressor and condenser give off heat and require good ventilation to operate correctly and save energy. 3.Ensure the appliance is away from any sources of heat (direct sunlight, electric stove, etc.). Electrical connections After the appliance has been transported, carefully place it vertically and wait at least 3 hours before connecting it to the electricity mains. Before inserting the plug into the electrical socket ensure the following: • The appliance is earthed and the plug is compliant with the law. • The socket can withstand the maximum power of the appliance, which is indicated on the data plate located inside the freezer (e.g. 150 W). • The voltage is in the range of values indicated on the data plate located inside the freezer (e.g. 220-240V). • The socket is compatible with the plug of the appliance. If the socket is incompatible with the plug, ask an authorised technician to replace it (see Assistance). Do not use extension cords or multiple sockets. ! Once the appliance has been installed, the power supply cable and the electrical socket must be easily accessible. ! The cable must not be bent or compressed. ! The cable must be checked regularly and replaced by authorised technicians only (see Assistance). ! The manufacturer declines any liability should these safety measures not be observed. ! Before starting the appliance, follow the installation instructions (see Installation). ! Before connecting the appliance, clean the compartments and accessories well with lukewarm water and bicarbonate. 1. Insert the plug into the socket and make sure that the green POWER indicator light illuminates (the TEMPERATURE ADJUSTMENT knob must be in the OFF position). 2. Turn the TEMPERATURE ADJUSTMENT knob to an average value and press the SUPER FREEZE button (rapid freezing): will illuminate. It the SUPER FREEZE indicator light will switch off once the freezer has reached its optimal temperature. At this point food may be placed inside the appliance. Using the freezer to its full potential • Use the TEMPERATURE CONTROL knob to adjust the temperature. MIN = warmest MAX = coldest • • • • • is the optimal temperature for energy saving levels. We recommend, however, a medium position. Do not re-freeze food that is defrosting or that has already been defrosted. These foods must be cooked and eaten (within 24 hours). Fresh food that needs to be frozen must not come into contact with food that has already been defrosted. Fresh food must be stored in the top FREEZER and STORAGE compartment. Do not place glass bottles which contain liquids, and which are corked or hermetically sealed in the freezer because they could break. The maximum quantity of food that may be frozen daily is indicated on the plate containing the technical properties located within the freezer (for example: Kg/24h: 4). To freeze (if the freezer is already operating): - for small quantities which are less than those indicated on the data plate, press the rapid freezing SUPER FREEZE button (corresponding indicator light illuminates), insert the food and close the door. The function is disabled automatically after 24 hours or when optimal temperatures have been reached (indicator light goes out); - for large quantities which are greater than the maximum load indicated on the data plate, hold down the rapid freezing SUPER FREEZE button until the corresponding indicator light begins to flash. After 24 hours the indicator light stops flashing and remains on constantly. Place the food inside the freezer and close the door. After another 24 hours, the function will be disabled automatically (indicator light goes out). ! Do not open the door during freezing. * Varies by number and/or position, available only on certain models. 14 ! If there is a power cut or malfunction, do not open the freezer door. This will help maintain the temperature inside the freezer, ensuring that foods are conserved for at least 9 -14 hours. Ice3 ice tray The fact that they are situated on the top part of the freezer drawers ensures greater cleanliness: the ice no longer comes into contact with the food placed inside the freezer compartment; furthermore, the dripping of the water during filling is avoided (a lid to cover up the hole after filling with water is also provided). 1. Pull out the tray by pushing it up. Check that the tray is ompletely empty and fill it with water through the opening provided. 2. Take care not to exceed the level indicated (MAX WATER LEVEL). Excess water prevents the ice cubes from dispensing (if this happens, wait for the ice to melt and empty the tray). 3. Turn the tray 90°: due to the connected compartments each mould fills with water (see diagram). 4. Close the opening with the lid provided and put the tray back, placing the top part in the corresponding housing and allowing it to drop in again. 5. When the ice has formed (minimum time approximately 8 hours) knock the tray against a hard surface and wet the outside so that the ice cubes come loose and take them out through the opening. Avoiding mould and unpleasant odours • The appliance is manufactured with hygienic materials which are odour free. In order to maintain an odour free refrigerator and to prevent the formation of stains, food must always be covered or sealed properly. • If you want to switch the appliance off for an extended period of time, clean the inside and leave the doors open. Precautions and tips ! The appliance was designed and manufactured in compliance with international safety standards. The following warnings are provided for safety reasons and must be read carefully. This appliance complies with the following Community Directives: - 73/23/EEC of 19/02/73 (Low Voltage) and subsequent amendments; -89/336/EEC of 03.05.89 (Electromagnetic Compatibility) and subsequent amendments; - 2002/96/CE.. A WATER LEVEL General safety A WATER LEVEL A WATER LEVEL Maintenance and care Switching the appliance off During cleaning and maintenance it is necessary to disconnect the appliance from the electricity supply: 1.set the TEMPERATURE CONTROL Knob on OFF; 2.pull the plug out of the socket. Cleaning the appliance • The external and internal parts, as well as the rubber seals may be cleaned using a sponge that has been soaked in lukewarm water and bicarbonate of soda or neutral soap. Do not use solvents, abrasive products, bleach or ammonia. • The removable accessories may be soaked in warm water and soap or dishwashing liquid. Rinse and dry them carefully. • The back of the appliance may collect dust which can be removed by delicately using the hose of a vacuum cleaner set on medium power. The appliance must be switched off and the plug must be pulled out before cleaning the appliance. • The appliance was designed for domestic use inside the home and is not intended for commercial or industrial use. • The appliance must be used to store and freeze food products by adults only and according to the instructions in this manual. • The appliance must not be installed outdoors, even in covered areas. It is extremely dangerous to leave the appliance exposed to rain and storms. • Do not touch the appliance with bare feet or with wet or moist hands and feet. • WARNING: do not damage the refrigerant circuit. • Do not touch the internal cooling elements: this could cause skin abrasions or frost/freezer burns. • When unplugging the appliance always pull the plug from the mains socket, do not pull on the cable. • Before cleaning and maintenance, always switch off the appliance and disconnect it from the electrical supply. It is not sufficient to set the temperature adjustment knobs on OFF (appliance off) to eliminate all electrical contact. • In the case of a malfunction, under no circumstances should you attempt to repair the appliance yourself. Repairs carried out by inexperienced persons may cause injury or further malfunctioning of the appliance. • Do not use utensils other than the scraper provided, or electrical equipment which is not of the type specified by the manufacturer, inside the frozen food storage compartments. • Do not put ice cubes taken directly from the freezer into your mouth. • This appliance is not intended for use by persons (including children) with reduced physical, sensory or lack of experience and knowledge unless they have been given supervision or instruction concerning use of the appliance by a person responsible for their safety. Children should be supervised to ensure that they do not play with the appliance. • Keep packaging material out of the reach of children! It can become a choking or suffocation hazard. * Varies by number and/or position, available only on certain models. 15 GB GB Disposal Troubleshooting • Observe local environmental standards when disposing packaging material for recycling purposes. If the appliance does not work, before calling for Assistance (see Assistance), check for a solution from the following list. • The European Directive 2002/96/EC on Waste Electrical and Electronic Equipment (WEEE), requires that old household electrical appliances must not be disposed of in the normal unsorted municipal waste stream. Old appliances must be collected separately in order to optimise the recovery and recycling of the materials they contain and reduce the impact on human health and the environment. The crossed out “wheeled bin” symbol on the product reminds you of your obligation, that when you dispose of the appliance it must be separately collected. Consumers should contact their local authority or retailer for information concerning the correct disposal of their old appliance. Respecting and conserving the environment • Install the appliance in a fresh and well-ventilated room. Ensure that it is protected from direct sunlight and do not place it near heat sources. • Try to avoid keeping the door open for long periods or opening the door too frequently in order to conserve energy. • Do not fill the appliance with too much food: cold air must circulate freely for food to be preserved properly. If circulation is impeded, the compressor will work continuously. • Do not place hot food directly into the refrigerator. The internal temperature will increase and force the compressor to work harder and will consume more energy. • Regularly check the door seals and wipe clean to ensure they are free of debris and to prevent cold air from escaping (see Maintenance). does not illuminate. The green POWER indicator light • The plug has not been inserted into the electrical socket, or not far enough to make contact, or there is no power in the house. The motor does not start. • The appliance comes with a motor protection control (see Start-up and use). is illuminated and the buzzer The ALARM indicator light sounds at regular intervals. a) The temperature in the freezer is too high. Check the quality of the food products and dispose if necessary. The ALARM indicator light is illuminated and the buzzer sounds at regular intervals. b) The temperature in the freezer has reached a dangerous level. The food must be disposed immediately. a/b) In both these cases the freezer will maintain a certain temperature so that the food does not re-freeze. To restore normal operation bring the TEMPERATURE CONTROL knob setting to OFF and turn the appliance on again. The buzzer sounds at regular intervals. • The appliance door has been left open for longer than 2 minutes. The buzzer will stop sounding when you shut the door. remains illuminated The ALARM indicator light constantly. • The door has been opened too frequently. • The TEMPERATURE CONTROL knob is not in the correct position. The motor runs continuously. • The appliance has not been installed on a level surface (see Installation). • The appliance has been installed between cabinets that vibrate and make noise. • The internal refrigerant makes a slight noise even when the compressor is off. This is not a defect, it is normal. The appliance makes a lot of noise. • The appliance has not been installed on a level surface (see Installation). • The appliance has been installed between cabinets that vibrate and make noise. • The internal refrigerant makes a slight noise even when the compressor is off. This is not a defect, it is normal. is flashing. The green POWER indicator light • The appliance is not operating correctly. Contact the Technical Assistance Centre. 16