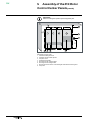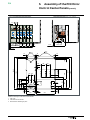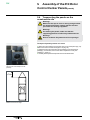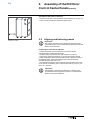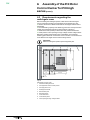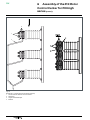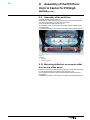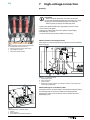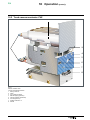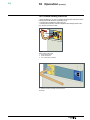
1
Medium Voltage Distribution
PIX
Motor Control Center up to 7,2 kV
Installation
Operation Maintenance
Technical Manual
No. AGS 531 500-02
Edition 03/2010
www.schneider-electric.com
Schneider Electric
35, rue Joseph Monier
CS 30323
92506 Rueil-Malmaison Cedex, France
www.schneider-electric.com
Manufacturer:
Schneider Electric Sachsenwerk GmbH
Service:
Should you have any queries regarding our Service, please do not hesitate to contact:
Schneider Electric Sachsenwerk GmbH
© Schneider Electric
All rights for this Technical Manual reserved.
Reproduction and distribution of this Technical Manual - completely or partially - to third parties is prohibited. Only reproduction of this
Technical Manual in full is admissible subject to the written approval of Schneider Electric Energietechnik GmbH – Sachsenwerk
Mittelspannung.
Electronic copies, e.g. in pdf format or as a scanned version, have the status ”for information only”.
The Technical Manuals which are exclusively valid are always supplied by the manufacturer together with the product in question.
PIX
Content
Remarks on this manual������������������������������������������������������������������������� 5
Purpose and target group������������������������������������������������������������������������� 5
Reference documents������������������������������������������������������������������������������� 5
Terms and symbols used�������������������������������������������������������������������������� 5
Abbreviations used������������������������������������������������������������������������������������ 6
Any questions or suggestions?����������������������������������������������������������������� 6
1
Safety provisions��������������������������������������������������������������������������� 7
2
2.1
2.2
2.3
2.4
2.5
2.6
2.7
2.8
Panel description��������������������������������������������������������������������������� 8
Panel design������������������������������������������������������������������������������������� 8
Applied standards��������������������������������������������������������������������������� 10
Environmental and operating conditions���������������������������������������� 10
Technical data�������������������������������������������������������������������������������� 11
Nameplate�������������������������������������������������������������������������������������� 11
Dimensions and weights���������������������������������������������������������������� 12
Intended use����������������������������������������������������������������������������������� 13
Disposal after the end of service life���������������������������������������������� 13
3
3.1
3.2
3.3
Packaging, transport, storage���������������������������������������������������� 14
Shipping units��������������������������������������������������������������������������������� 14
Transport���������������������������������������������������������������������������������������� 14
Storage������������������������������������������������������������������������������������������� 15
4
Access to the main circuit compartments��������������������������������� 16
4.1 Safety provisions and important information���������������������������������� 16
4.2 Access to the cable compartment�������������������������������������������������� 16
4.2.1 Removing the cable compartment cover����������������������������������� 16
4.2.2 Removing the truck carrier�������������������������������������������������������� 16
4.3 Access to the switching device compartment�������������������������������� 17
4.3.1 Opening and closing the cover of the switching device compartment��17
4.4 Connection and removal of the low-voltage connector������������������ 18
4.5 Removing the truck from the panel������������������������������������������������ 18
4.6 Access to the busbar compartment����������������������������������������������� 19
5
5.1
5.2
5.3
5.4
5.5
5.6
5.7
5.8
Assembly of the PIX Motor Control Center Panels������������������ 21
Safety provisions���������������������������������������������������������������������������� 21
Important instructions for assembly����������������������������������������������� 21
Requirements regarding the switchgear room������������������������������� 21
Transporting the panels on the construction site��������������������������� 24
Aligning and fastening panels�������������������������������������������������������� 25
Screw-fastening the panels to one another����������������������������������� 26
Busbar assembly���������������������������������������������������������������������������� 27
Mounting the earth bus������������������������������������������������������������������ 29
6
Assembly of the PIX Motor Control Center for PIX High series�� 31
6.1 Safety provisions���������������������������������������������������������������������������� 31
6.2 Wichtige Montagehinweise������������������������������������������������������������� 31
6.3 Requirements regarding the switchgear room������������������������������� 32
6.4 Transporting the panels on the construction site��������������������������� 34
6.5 Mounting the switchgear sidewalls������������������������������������������������� 35
6.6 Installation of panels���������������������������������������������������������������������� 35
6.7 Screw-fastening the panels to one another����������������������������������� 36
6.8 Busbar assembly���������������������������������������������������������������������������� 36
6.8.1 Access to the busbar compartment������������������������������������������� 36
6.8.2 Busbar installation��������������������������������������������������������������������� 37
6.9 Assembly of the earth bus������������������������������������������������������������� 39
6.10 Mounting deflectors or pressure relief duct on top of the panel���� 39
AGS 531 500-02
3
PIX
Content (contd.)
7
High-voltage connection������������������������������������������������������������� 40
7.1 Connection of high-voltage cables������������������������������������������������� 40
8
Low-voltage connection�������������������������������������������������������������� 42
8.1 Connecting the ring circuits in the low-voltage compartment�������� 42
8.2 Connecting external cables������������������������������������������������������������ 43
9
9.1
9.2
9.3
9.4
Final steps / commissioning������������������������������������������������������� 44
Final steps�������������������������������������������������������������������������������������� 44
Checking switching functions and interlocks���������������������������������� 45
Power frequency test of busbar (optional)������������������������������������� 45
Cable test after assembly��������������������������������������������������������������� 46
10 Operation�������������������������������������������������������������������������������������� 48
10.1 Operating interface of the panel����������������������������������������������������� 48
10.2 Truck vacuum contactor CVX�������������������������������������������������������� 49
10.3 Operation accessories�������������������������������������������������������������������� 50
10.4 Interlocks���������������������������������������������������������������������������������������� 50
10.4.1 Mechanical interlocks����������������������������������������������������������������� 51
10.4.2 Electromagnetic interlocks (optional)����������������������������������������� 51
10.4.3 Lock-out by means of padlocks (not included in the scope of supplies)������������������������������������������������������������������������������������ 52
10.4.4 Interlocks by means of cylinder locks (optional)������������������������ 53
10.5 Operating specifications����������������������������������������������������������������� 54
10.6 Switching the vacuum contactor���������������������������������������������������� 54
10.7 Fuse tripping����������������������������������������������������������������������������������� 55
10.8 Moving the truck into disconnected/service position���������������������� 56
10.9 Operating the earthing switch manually����������������������������������������� 56
10.9.1 Switch earthing switch ON��������������������������������������������������������� 57
10.9.2 Switch the earthing switch OFF������������������������������������������������� 58
11
11.1
11.2
11.3
11.4
11.5
11.6
11.7
Maintenance���������������������������������������������������������������������������������� 59
Safety provisions���������������������������������������������������������������������������� 59
Maintenance schedule������������������������������������������������������������������� 59
Cleaning����������������������������������������������������������������������������������������� 60
Avoid condensation������������������������������������������������������������������������ 60
Corrosion protection����������������������������������������������������������������������� 60
Replacement of components and panels��������������������������������������� 60
Lubrication instructions������������������������������������������������������������������� 61
12 Annex�������������������������������������������������������������������������������������������� 63
12.1 Auxiliary products��������������������������������������������������������������������������� 63
12.2 How to treat the contact surfaces�������������������������������������������������� 63
12.3 Specifications for screw connections��������������������������������������������� 64
12.4 Required tools (not included in the scope of supplies)������������������ 65
12.5 Transport trolley for truck��������������������������������������������������������������� 65
4
AGS 531 500-02
PIX
Remarks on this manual
As our products are subject to continuous further development, we reserve
the right to make changes regarding standards, illustrations and technical
data.
All dimensions specified in this manual are in millimeters.
Purpose and target group
This Technical Manual describes assembly, operation and maintenance of
medium-voltage switchgear of the PIX Motor Control Center series.
The work described in this manual may only be performed by specialist
electricians with proven experience regarding
■■ the PIX series (training certificate)
■■ all relevant safety provisions.
This Technical Manual is an integral part of the product and must be stored
such that it is at all times readily accessible for and can be used by persons
who are to work on the switchgear. If the switchgear is sold to new owners,
they must receive this document along with the switchgear.
This Technical Manual does not include information regarding the safety of
buildings in case of internal faults (pressure load of the switchgear room
and necessary pressure relief ports). Pressure calculations for switchgear
rooms incl. recommendations regarding pressure relief ports can be
provided on request against a fee. For further details, please contact the
manufacturer.
This Technical Manual cannot describe every imaginable individual case or
every customer-specific version of the product.
For information which is not included in this manual, please contact the
manufacturer.
Reference documents
The following additional documents must be complied with:
■■ Purchase agreement containing the stipulations on the specific
equipment of the switchgear and the legal details
■■ the switchgear-specific circuit diagrams / documentation
■■ the operating manuals of the low-voltage devices installed in the
switchgear (e.g. voltage presence indicating systems, devices in lowvoltagecompartment, GEMSTART monitoring and motor protection device)
■■ the assembly drawings supplied with the switchgear
■■ the Assembly and Operating Manuals of the switching device Vacuum
Contactor CVX (no. NTV 132 2E)
■■ the Assembly Instructions of the manufacturer of the cable connection
systems to be connected to the switchgear
■■ the switchgear configuration PIX
■■ the Technical Manual for PIX switchgear panels with circuit-breaker
■■ the Technical Manual for PIX additional equipment (No. AMTNoT
077-02)
■■ the assembly, operating and maintenance instructions of PIX High (No.
AGS 531502-02
Terms and symbols used
This manual uses certain terms and symbols. They warn about dangers or
provide important information which must be complied with in order to
avoid danger to persons and damage to equipment:
AGS 531 500-02
5
PIX
Remarks on this manual (contd.)
Danger!”
This danger symbol warns about dangerous
electrical voltage. Contact with voltage may result in
fatal injury!
”Warning!”
This danger symbol warns about the risk of injury.
Please comply with all the provisions identified by
this symbol in order to avoid death or serious injury.
”Warning!”
This danger symbol warns about the risk of falling.
”Important:”
This instruction symbol is used for information which is
important to avoid material damage.
Abbreviations used
“PIX High MCC”: PIX Motor Control Center for PIX High series
“CVX”:
Vacuum contactor with high voltage fuse link on a truck
Any questions or suggestions?
Do you have any questions or suggestions regarding this manual, or do
you require further information?
We always strive to provide you with the best-possible information for
optimum, safe use of our products. Thus, do not hesitate to contact us if
you have any recommendations, amendments or proposals for
improvement.
6
AGS 531 500-02
PIX
1
Safety provisions
The work described in this manual may only be performed by specialist
electricians who have proved their experience with the PIX Motor Control
Center and the applicable safety provisions.
Please read the whole manual carefully before working on the panel.
Applicable standards and regulations
■■ Metal-enclosed AC switchgear for rated voltages > 1 kV up to including
52 kV: IEC 62271-200
■■ the locally applicable accident prevention, operating and work
instructions
■■ Assembly and maintenance: IEC 61936-1/HD 637 S11
■■ Operation of electrical equipment: EN 50110-11
The national standards applicable in the country where the equipment is
to be installed must be complied with.
1
Before performing work on the panel, it is essential that you comply with the
following instructions:
Danger!
Risk of fatalities due to high voltage. Isolation from
high voltage and earthing must always be ensured
before performing assembly or maintenance work.
Danger!
Risk of fatalities due to high supply voltage. Isolation
from supply voltage before must always be ensured
before performing assembly or maintenance work.
Warning!
Risk of injury due to movable parts in mechanical
drives. For maintenance work,
-- isolate from supply voltage
-- switch ON via the make-proof earthing switch.
Warning!
After the removal of covers from a switchgear,
operator safety regarding internal arcs may be
reduced unless the switchgear is isolated from the
power supply. Optimum operator safety is only
ensured if the switchgear is completely disconnected
from the power supply and grounded during
assembly.
Behaviour in case of incidents or accidents
The panels of the PIX Motor Control Center series feature pressure relief
ports for the case of an internal fault; these ensure operator safety
according to IEC 62271-200.
In case of fire or of internal faults, toxic and caustic decomposition products
may be produced. Comply with the locally applicable accident and safety
provisions.
In case of personal injury, take first-aid measures or cause them to be
taken.
AGS 531 500-02
7
PIX
2
Panel description
2.1 Panel design
16
1
15
14
2
3
4
13
12
11
10
5
6
7
9
8
Fig. 1
PIX Motor Control Center
1
2
3
4
5
6
7
8
9
10
11
12
13
14
15
16
8
Low-voltage cabinet with GEMSTART 5 control unit
Voltage indicator (option)
Nameplate
Cover of switching device compartment
Operation of the earthing switch
Earthing switch position indicator
Cable compartment cover
Current transformer
Cable connection
Pressure relief duct for cable compartment
Shutter actuation
Truck-type vacuum contactor CVX with fuses
Bushings
Busbars
Pressure relief flap for busbar compartment
Pressure relief flap for switch compartment
AGS 531 500-02
PIX
2
Panel description (contd.)
14
1
2
3
4
13
12
11
10
5
6
9
7
8
Fig. 2
PIX Motor Control Center for PIX High series
1
2
3
4
5
6
7
8
9
10
11
12
13
14
Low-voltage cabinet with GEMSTART 5 control unit
Voltage indicator (option)
Nameplate
Cover of switching device compartment
Operation of the earthing switch
Earthing switch position indicator
Cable compartment cover
Current transformer
Cable connection
Pressure relief duct for cable compartment
Shutter actuation
Truck-type vacuum contactor CVX with fuses
Bushings
Busbars
AGS 531 500-02
9
PIX
2
Panel description (contd.)
2.2 Applied standards
Type PIX Motor Control Center panels are
■■ metal-enclosed; loss of service continuity category acc. to IEC 62271200: LSC 2B-PM
■■ air-insulated
■■ type-tested
■■ tested for internal faults (IAC AFLR)
■■ dimensioned for indoor installation
Panels of the PIX Motor Control Center series meet the
following standards and regulations:
Designation
IEC
standard
EN
standard
Switchgear
IEC 62271-200 EN 62271-200
IEC 62271-1
EN 62271-1
Internal arc classification (IAC)
IEC 62271-200 IEC 62271-200
Vacuum contactor
IEC 60470
IEC 60470
High-voltage fuse link
IEC 60282-1
IEC 60644
IEC 60282-1
IEC 60644
Earthing switch
IEC 62271-102 IEC 62271-102
Isolating function
IEC 62271-102 IEC 62271-102
Current transformer
IEC 60044-1
EN 60044-1
Voltage detection systems
IEC 61958
IEC 61243-5
(optional)
IEC 61958
IEC 61243-5
Protection against accidental contact,
foreign bodies and water
IEC 60529
EN 60529
Degrees of protection against accidental contact and
foreign objects according to IEC 62271-200 and IEC
60529
1
Degree of protection of switchgear enclosure
IP3X1
Degree of protection of the accessible claddings in the panel
IP2X
other values available on request
2.3 Environmental and operating
conditions
PIX is an indoor switchgear and may only be operated under normal
conditions in acc. with IEC 62271-1.
The ambient air must be free of dust, smoke or vapours.
Operation under conditions deviating from these is only admissible subject
to consultation with and written approval from the manufacturer.
Ambient conditions in accordance with IEC 62271-1
and IEC 60694
Temperature class
1
10
“Minus 5 indoors”1
Min./max. ambient temperature
°C
–5/+401
Average value over 24 hours
°C
≤ 351
mean rel. air humidity: 24 hour/1 month
%
≤ 95/≤ 90
Installation altitude above sea-level
m
≤ 10001
higher values available on request
AGS 531 500-02
PIX
2
Panel description (contd.)
2.4 Technical data
Technical data
Rated voltage Ur
[kV]
3.6/7.2
Rated lightning impulse withstand voltage Up
[kV]
40/60
Rated power frequency withstand voltage Ud
[kV]
20 (32)1
Rated normal current, busbar Ir
[A]
≤ 4000
Rated normal current, outgoing feeder panel Ir
[A]
≤ 400
Rated short-time current Ik of busbar
[kA]
≤ 40 (3 s)
≤ 50 (3 s)2
Rated frequency fr
[Hz]
50 / 60
on request (optional)
Declaration true for PIX Motor Control Center for PIX High series
For the technical data of the vacuum contactor CVX, please refer to its
separate Operating Instructions (no. NTV 132 2E).
1
2
2.5 Nameplate
The nameplate on the panel (Fig. 1 on page 8, item 3 and Fig. 2 on page 9,
item 3) specifies essential technical data. They are mounted on the cover
of switching device compartment and in the switching device compartment.
The following data on the nameplate are relevant in case of any queries:
■■ Type designation
■■ Serial number
■■ Year of construction
3
1
2
4
Fig. 3
Nameplate of the PIX Motor Control Center PIX High series on the cover of switching
device compartment
1 Type designation
2 Serial number
3 Year of construction
4 Technical data
AGS 531 500-02
11
PIX
2
Panel description (contd.)
2.6 Dimensions and weights
Dimensions of PIX switchgear panel
PIX Motor Control Center PIX High series
100/300
1265
40
400
1405/1605
968
2
2
932
558
490
1
600
1590
1
562
400
2330/2430
2130/2230/2330
630/730
530/630/730
PIX Motor Control Center
751
757
1 Pressure relief duct
2 Deflector
Weights
Max. weight
■■ with CVX truck,
■■ without packaging,
■■ incl. low-voltage compartment an with average extent of equipment mounted
≤ 700 kg
■■ incl. shutters or pressure relief duct.
■■ The busbars have been taken into consideration with a maximum weight at 4000 A.
12
AGS 531 500-02
PIX
2
Panel description (contd.)
2.7 Intended use
PIX Motor Control Center medium-voltage switchgear units are exclusively
intended for switching and distributing electrical energies. They may only
be used in the scope of the specified standards and the switchgear-specific
technical data. Any other utilization constitutes improper use and may
result in dangers and damage.
Liability Disclaimers
The manufacturer shall not be held responsible for damage which occurs if
■■ instructions in this manual are not complied with;
■■ the switchgear is not operated according to its intended use (see above);
■■ the switchgear is assembled, connected or operated improperly;
■■ accessories or spare parts are used which have not been approved by
the manufacturer;
■■ the switchgear is converted without the manufacturer’s approval, or if
inadmissible parts are added.
No liability is accepted for parts provided by customers, e. g. current
transformers.
2.8 Disposal after the end of service life
Upon request, a material and recycling data sheet is available for disposal
of switchgear of the PIX Motor Control Center series at the end of its
service life.
Disposal is performed as a service by the manufacturer’s Service Center
and is subject to a fee.
AGS 531 500-02
13
PIX
3 Packaging, transport,
storage
3.1 Shipping units
■■ The conditions and types of transport have been stipulated in the contract
details.
■■ The type of packaging depends on the type of transport and the storage
conditions.
■■ The panels are delivered individually and are fastened on transport aids.
The standard accessories are included.
■■ The vacuum contactor CVX truck is supplied in assembled condition,
already mounted in the panel.
■■ The panels are delivered in upright position.
Important:
The weight of the entire transport unit is indicated on the
packaging/ wooden crate.
Packaging
■■ If packed exclusively for truck transport, the panels are delivered on a
pallet with PE protective film (Fig. 4).
■■ For sea transport, the panels are packed in sealed aluminium film with
desiccant and in a closed wooden crate with tightly closed wooden base
(also for container transport, (Fig. 5).
■■ In case of air transport, the panels are packaged in wooden crates with a
protective PE film hood (dust protection) or in wooden crates, also with
closed wooden bases, however without protective hoods (dust protection,
Fig. 5).
Fig. 4
Packed in PE protective film on a pallet
Fig. 5
Packed in a wooden case
3.2 Transport
Warning!
Risk of injury if load is not sufficiently secured! Make
sure that the transported units do not slip or tilt
during transport of the panels.
Important:
For transporting the trucks, comply with the transport
specifications in the appropriate manuals.
14
AGS 531 500-02
PIX
3 Packaging, transport,
storage (contd.)
Transport using a forklift truck
For transport, the panels must be packaged completely. The entire length
of the forks must be placed under the transport unit (Fig. 7).
Fig. 6
Do not tip the transport unit
Fig. 7
Transport using a forklift truck
3.3 Storage
Warning!
Sufficient stability and evenness of the supporting
area (floor) must be ensured.
+ 40 ºC
– 5 ºC
Fig. 8
Schematic diagram of storage conditions for PIX
Motor Control Center
AGS 531 500-02
If the panels are not installed immediately after delivery, they can be stored
under the following conditions:
■■ Panels must be stored in vertical position, and must not be stacked.
■■ Storage only admissible indoors
■■ Panels and accessories must be packed in a wooden crate with a
dessicant and sealed in aluminium foil (storage period max. 2 years after
date of packaging).
15
PIX
4 Access to the main circuit
compartments
4.1 Safety provisions and important
information
Warning!
Risk of injury due to non-respect of the safety
provisions in Chapter 1, page 7.
Important:
The panels can be equipped optionally with additional interlocks
for the cable compartment cover and the switching device
compartment cover. In this context, also refer to Chapter 10.4
”Interlocks” as of page 51.
4.2 Access to the cable compartment
Danger!
The cable compartment may only be opened if the
earthing switch is ON (see Chapter 10.9.1, page 57).
4.2.1 Removing the cable compartment cover
■■ Release the securing bolts of the cable compartment cover (Fig. 9, item 1).
■■ Lift and remove the cable compartment cover (2).
2
1
Fig. 9
1 Release securing bolts of cable compartment
cover
2 Lift cable compartment cover and remove it in
forward direction
Mounting the cable compartment cover
After terminating assembly work, position cable compartment cover right
on the panel, lower it and fasten it again using the securing bolts.
4.2.2 Removing the truck carrier
2
The truck carrier can be removed if required, for example for maintenance
work (Chapter 11, as of page 59) or to improve access to the cable
compartment.
1
3
4
■■ Remove the truck from the panel (see Chapter 4.5, page 19).
■■ Remove the auxiliary switch block for the truck (Fig. 10, item 1) and
deposit it carefully in the cable compartment.
■■ Remove the securing bolts of the truck carrier (2).
■■ First raise truck carrier on the front, then pull it out (3).
Fig. 10
Removing the truck carrier
1 Fastening the auxiliary switch block
2 Securing bolts of the truck carrier
3 Raise truck carrier on the front and pull it ut
4 Slide for earthing switch actuation
16
AGS 531 500-02
PIX
4 Access to the main circuit
compartments (contd.)
Re-install truck carrier
Re-install truck carrier and removed components by reversing the above
order. When screwing the truck carrier down, make sure that the slide (Fig.
10, item 4) to open the insertion opening for the earthing switch operates
smoothly. If necessary, release bolts and reposition the truck carrier.
4.3 Access to the switching device
compartment
Danger!
The switching device compartment may only be
opened if the truck is in disconnected position (see
Chapter 10.8 on page 56).
4.3.1Opening and closing the cover of the
switching device compartment
2
Opening the cover
3
■■ To unlock the door, insert the appropriate double-bit key (Fig. 11, item 1)
in the door lock (2) and turn it counter-clockwise to its stop. The cover is
unlocked.
■■ Lift the cover of the switching device compartment (3) using the two
handles (4) and remove it.
■■ Remove the double-bit key and keep it in a safe place.
4
1
1
Fig. 11
1
2
3
4
Double-bit key
Door lock
Switching device compartment cover
Handles
Closing the cover
■■ Pick up the switching device compartment cover (Fig. 11, item 3) using
the two handles (4), place it in the cutout on the panel and lower it.
■■ Insert the double-bit key (1) used to unlock the door into the lock (2) on
the switching device compartment cover and turn it clockwise to its stop.
The cover is locked.
■■ Remove the double-bit key and keep it in a safe place.
Removing the transport securing device of the truck
3
3
1
2
■■ Remove the cable compartment cover (see Chapter 4.2 on page 17) and
the switching device compartment cover (see Chapter 4.3 on page 18).
■■ Remove the locking mechanism of the vacuum contactor CVX in the
switch compartment (Fig. 12):
□□ Release the 4 front screws of the CVX (1).
□□ Release the 2 lateral securing bolts M8x25 (2).
□□ Remove both fixing brackets (3).
□□ Re-fasten the 4 screws (1) to the CVX.
■■ Remove the vacuum contactor CVX from the panel (see Chapter 4.5,
page 21).
Fig. 12
Transport catch of the vacuum contactor CVX in the
panel
AGS 531 500-02
17
PIX
4 Access to the main circuit
compartments (contd.)
4.4 Connection and removal of the lowvoltage connector
Initial situation:
-- Vacuum contactor
OFF
-- Truck in disconnected position
-- Switching device compartment cover removed (see Chapter 4.3 on page 18).
Removing the low-voltage connector
■■ Unlock the interlock of the low-voltage connector (3) and remove the
connector.
■■ Store the low-voltage connector in the storage tray above the vacuum
contactor CVX (Fig. 13, item 1).
1
2
Fig. 13
Vacuum contactor CVX with locked lowvoltage connector
1 Storage tray for low-votage connector
2 Low-voltage connector
3
2
Connecting the low-voltage connector
■■ Take the low-voltage connector out of the storage tray above the vacuum
contactor CVX (Fig. 13, item 1).
■■ Insert the low-voltage connector into the vacuum contactor CVX (Fig. 14,
item 2) and lock the connector interlock (3).
Fig. 14
2 Low-voltage connector
3 Connector interlock with actuating directions
4.5 Removing the truck from the panel
Danger!
Fixed contacts behind the shutters may be under
high voltage. Use a U lock to lock the shutter
mechanism (see Chapter 10.4.3, page 53), or earth
busbar and cable connection.
Important:
Observe the description of the trolley (see Chapter 12.5, page
65). See the Technical Manual PIX Panels with circuit-breaker
for a detailed description of the rack-in/rack-out procedure.
Initial situation:
-- Vacuum contactor
OFF
-- Truck
in disconnected position
-- Switching device compartment cover removed (see Chapter 4.3 as of
page 18).
-- Low-voltage connector removed (see Chapter 4.4, page 19).
18
AGS 531 500-02
PIX
4 Access to the main circuit
compartments (contd.)
Removing the truck from the panel
■■ Adjust the trolley to the CVX track width (see Chapter 12.5, page 65).
■■ Move the transport trolley in front of the panel and lock it onto the panel.
■■ Unlock the CVX vacuum contactor in the panel and, using the handle,
pull it onto the trolley until it is automatically locked there. Check interlock.
Fig. 15
Vacuum contactor CVX on the transport trolley
Inserting the truck into the panel
■■ Move the transport trolley right in front of the panel and lock it to the
panel.
■■ Unlock the CVX vacuum contactor on the trolley and rack it into the panel
until it is automatically locked in the panel. Check interlock.
4.6 Access to the busbar compartment
Danger!
Risk of fatalities due to high voltage. The busbar
compartment may only be opened if the busbar is
earthed (see Technical Manual PIX Panels with
circuit-breaker).
The busbar compartment is accessible from the top and, in case of first
assembly, also from the side.
For top access, the busbar compartment cover must be removed first (Fig. 16).
Warning!
The top sides of the panels are not meant to be
walked on. Persons may fall through them, get
injured or may damage the panel. When work has to
be performed on the panel top - e.g. assembly of
deflectors, fans or pressure relief ducts - temporarily
position a solid base plate to step on.
AGS 531 500-02
19
PIX
4 Access to the main circuit
compartments (contd.)
■■ In order to walk on the top of the panels, fix a solid base plate to step on
above the pressure relief duct (3).
■■ Release the 6 securing bolts from the cover (2). Keep the securing bolts
and the cover for the subsequent reassembly.
■■ Remove the cover (1).
1
3
2
Fig. 16
Top access to the busbar compartment
1 Busbar compartment cover
2 Securing bolts (6x)
3 Solid base plate to step on
20
AGS 531 500-02
PIX
5 Assembly of the PIX Motor
Control Center Panels
5.1 Safety provisions
The switchgear panels may only be installed and assembled by the
manufacturer’s staff or by persons who have been certified for this work.
PIX Motor Control Center are delivered with the earthing switch ON.
Warning!
Risk of injury due to movable parts in mechanical
drives. The energy-storing device of the earthing
switch must not be tensioned during assembly.
Warning!
Risk of accidents! Watch out for floor openings in the
switchgear room.
Warning!
The top sides of the panels are not meant to be
walked on. Persons may fall through them, get
injured or may damage the panel. When work has to
be performed on the panel top - e.g. assembly of
deflectors, fans or pressure relief ducts - temporarily
position a solid base plate to step on.
Warning!
Risk of injury due to non-respect of the safety
provisions in Chapter 1 on page 8.
5.2 Important instructions for assembly
Important:
-- Condensation, dirt and dust during assembly should be
avoided on all accounts, in order to prevent damage to the
panels.
-- For assembly, observe the assembly drawings supplied with
the equipment. Read them before you commence assembly
work.
-- For all screw connections, refer to the tightening torques
specified in Chapter 12.3 on page 64.
-- Assembly of the switchgear-specific equipment (e.g.
sidewalls, deflectors, pressure relief ducts, etc.) is described in
the manual for PIX additional equipment AMT NoT077-02.
5.3 Requirements regarding the
switchgear room
Before installing the switchgear panels, make sure that the switchgear
room is checked according to the switchgear documentation (Fig. 17).
■■ Observe the minimum distance between the switchgear and the wall of
the building.
■■ The load-bearing capacity of the fastening areas must correspond to the
weight of the switchgear (perform a stress analysis of the building).
■■ Check base frame (if used) for dimensions and positional tolerances.
■■ Check position of floor openings for high-voltage and low-voltage cables.
Before the swichgear is positioned at its site of installation, check that the
fastening points are level. Unevenness must not exceed ± 2 mm/meter and
6 mm difference in height over the entire switchgear width.
AGS 531 500-02
21
PIX
5 Assembly of the PIX Motor
Control Center Panels (contd.)
Important:
Observe switchgear-specific space assignment plan.
≥ 100
1
8
≥ 100
2
2
2
3
4
630
7
4
5
6
5
Fig. 17
Switchgear room (top view)
1 Wall of the switchgear room
2 PIX Motor Control Center panels
3 PIX panel 12 kV
4 Switchgear side walls
5 Bushings for high-voltage cables
6 Bushings for low-voltage cables
7 Bushing for the connection of the switchgear earth with the earthing duct
8 Gap cover
22
AGS 531 500-02
PIX
5 Assembly of the PIX Motor
Control Center Panels (contd.)
1
2
2130-2330
25
0
800
400
400 400
2800
400 400
≥100
25
1405/1605
≥100
12.5
12.5
18
18
(100)
18
3
215
185
185
1405
1290
109 109
440
3x 75.5
1290
1405
35
(40)
400
383
28.5
28.5
800
(40)
26
74
3
26
50
126
12.5
492
200
200
106
50
226
74
166
226
91
Fig. 18
Dimension drawing for PIX Motor Control Center
1 PIX 12 kV
2 PIX Motor Control Center
3 Bore-holes for fastening of pane
AGS 531 500-02
23
PIX
5 Assembly of the PIX Motor
Control Center Panels (contd.)
5.4 Transporting the panels on the
construction site
Warning!
Make sure the rope or chain is strong enough to bear
the weight of the panel. Comply with the relevant
provisions for hoisting equipment.
Warning!
On lowering the panels, make sure that the
supporting platform is sufficiently stable and even.
Warning!
Risk of accidents. Pay attention to floor openings!
Transport of panel by means of a crane
■■ Attach the crane straps in the four jack rings on top of the panel (Fig. 19).
Make sure to leave a minimum height of 1 m (Fig. 20).
■■ Release the front and rear panel screw fastening from the transport
packaging. To this effect, remove the cable compartment cover (see
Chapter 4.2, page 17).
■■ Carefully lift the panel and deposit it at the intended location.
Fig. 19
Jack rings for crane transport on the
panel top
≥ 1m
Fig. 20
Observe the minimum height
24
AGS 531 500-02
PIX
5 Assembly of the PIX Motor
Control Center Panels (contd.)
Transport of the panel on the floor
■■ Push panel onto three cylindrical rollers (minimum diameter 30 mm) (Fig. 21).
■■ Thus, move the panel until it reaches its final location.
Fig. 21
Transport on rollers
5.5 Aligning and fastening panels
Important:
The position of the first panel is decisive for placement of the
subsequent panels, thus it is essential that measuring is effected
with the utmost precision!
Fastening on concrete foundations
■■ Position first panel on the foundations in accordance with the
switchgearspecific space assignment plan.
■■ Remove cable compartment cover (see Chapter 4.2, page 17).
■■ Align panel. Check the panel front for correct horizontal and vertical
position. If applicable, lift the panel and place shims in the direct vicinity of
the fastening areas, until the horizontal position has been reached.
Assembly drawing: SEM 102 173-01
■■ Screw-fasten the panel to the two fastening points provided on the front
and to at least one fastening point on the rear (see also Fig. 22); hex. bolt
M10 x 30 + dowel pin.
Important:
Panel fastening with seismic qualification or vibration-proof
characteristics can be supplied on request. For further details,
please contact the manufacturer.
AGS 531 500-02
25
PIX
5 Assembly of the PIX Motor
Control Center Panels (contd.)
≥1000 mm
≥100 mm
Bolts
M10x30
+ Lock washer
+ Spacer
+ Dowel pin
Bolts M10x30
Lock washer
Spacer
Sectional
view
Dowel pin
0, 1 or 2 spacers
Top view
Spacers
Fig. 22
Fastening of panels on concrete foundations
5.6 Screw-fastening the panels to one another
Assembly drawing: SEM 102056-01
■■ Screw-fasten panel fronts to one another using 6 fastening points (Fig. 23).
■■ Fasten panels to one another at the top on the rear side using a connecting link. To this effect, use the
screws provided on the panel.
3
4
2
1
Fig. 23
Screw-fastening the panels to one another
1 Screw M8
2 Spring washer
3 Hex. nut M8 with lock washer
4 Connecting link
26
AGS 531 500-02
PIX
5 Assembly of the PIX Motor
Control Center Panels (contd.)
5.7 Busbar assembly
Arrangement of busbars in branch-circuit panels
Number of busbars
per phase
1 busbar 2 busbars 3 busbars
Diameter [mm2]
80 x 10
80 x 10
80 x 10
Busbar arrangement to the
outgoing feeder bar
Busbar assembly
Access to the busbar compartment: see Chapter 4.6, page 20.
Important:
Comply with the specifications on treatment of contact surfaces
and the tightening torques for busbar screw fastenings in the
Annex (Chapter 12 as of page 63).
■■ Clean all contact areas of the busbars and outgoing feeder bars in the
switchgear panels and coat them with lubricant KL (see Chapter 12.2, page
63).
■■ Screw-fasten busbars to the outgoing feeder bar using two screws in
accord. with Fig. 24. Observe location of busbars and outgoing feeder bars.
1
2
3
7
6
4
5
Fig. 24
Busbar assembly
1 Busbar 3x80x10
2 Screw M12
3 Spring washer
4 Busbar 3x80x10
5 Nut M12
6 Spring washer
7 Outgoing feeder bar
AGS 531 500-02
27
PIX
5 Assembly of the PIX Motor
Control Center Panels (contd.)
1x / 3x / 5x / ... PIX Motor Control Center
(odd number)
L1
PIX 12 kV
L2
L3
PIX 12 kV
3x PIX Motor Control Center
(odd number)
Fig. 25
Busbar attachment for PIX Motor Control Center switchgear configuration (odd number)
2x / 4x / 6x / ... PIX Motor Control Center
(even number)
L1
PIX 12 kV
L2
L3
PIX 12 kV
4x PIX Motor Control Center
(even number)
Fig. 26
Busbar attachment for PIX Motor Control Center switchgear configuration (even number)
28
AGS 531 500-02
PIX
5 Assembly of the PIX Motor
Control Center Panels (contd.)
5.8 Mounting the earth bus
Important:
Comply with the specifications on treatment of contact surfaces
and the tightening torques for busbar screw fastenings in the
Annex (Chapter 12 as of page 63).
Connection between a PIX 12 kV circuit-breaker panel and a
Motor Control Center (see Fig. 27)
■■ Route the earthing cable to the Motor Control Center through the cutout
in the circuit-breaker panel and fix it to the copper brackets (Fig. 27, item 1).
Screw fastening M8
■■ Screw-fasten both sides of the connecting bar (5) to the earthing cable of
the circuit-breaker panel (4). Screw fastening M8
Connection between two Motor Control Centers (see Fig. 27)
■■ Slip the connecting bar (3) into the adjacent panel through the cutout in
■■ the panel.
■■ Screw-fasten the connecting bar, the earth bar and the copper bracket to
one another (4). Screw fastening M8
■■ Connect the earth bus to the earthing system of the switchgear building
(connecting lines and screw accessories are not included in the scope of
supplies).
Observe the specific standards referring to earthing systems which apply in
the country in question.
AGS 531 500-02
29
PIX
5 Assembly of the PIX Motor
Control Center Panels (contd.)
1
2
3
PIX 12 kV
PIX Motor
Control Center
PIX Motor
Control Center
5
4
3
6
Fig. 27
Mounting the earth bus (top view)
Illustrated: Example of a panel arrangement
1 Earthing cable of the PIX 12 kV panel
2 Connecting bar to the earthing cable of the PIX 12 kV panel
3 Screw fastening M8
4 Earthing bar for a PIX 12 kV panel
5 Copper bracket for panel attachment
6 Connecting bar to another PIX Motor Control Center
30
AGS 531 500-02
PIX
6 Assembly of the PIX Motor
Control Center for PIX High
series
6.1 Safety provisions
The switchgear panels may only be installed and assembled by the
manufacturer’s staff or by persons who have been certified for this work.
PIX Motor Control Center are delivered with the earthing switch ON.
Warning!
Risk of injury due to movable parts in mechanical
drives. The energy-storing device of the earthing
switch must not be tensioned during assembly.
Warning!
Risk of accidents! Watch out for floor openings in the
switchgear room.
Warning!
The top sides of the panels are not meant to be
walked on. Persons may fall through them, get
injured or may damage the panel. When work has to
be performed on the panel top - e.g. assembly of
deflectors, fans or pressure relief ducts - temporarily
position a solid base plate to step on
Warning!
Risk of injury due to non-respect of the safety
provisions in Chapter 1 on page 8.
6.2 Wichtige Montagehinweise
Wichtig:
-- Condensation, dirt and dust during assembly should be
avoided on all accounts, in order to prevent damage to the
panels.
-- For assembly, observe the assembly drawings supplied with
the equipment. Read them before you commence assembly
work.
-- For all screw connections, refer to the tightening torques
specified in Chapter 12.3 on page 64 .
-- Assembly of the switchgear-specific equipment (e.g.
sidewalls, deflectors, pressure relief ducts, etc.) is described in
the PIX High manual AGS 531502-02.
AGS 531 500-02
31
PIX
6 Assembly of the PIX Motor
Control Center for PIX High
series (contd.)
6.3 Requirements regarding the
switchgear room
Before installing the switchgear panels, make sure that the switchgear
room is checked according to the switchgear documentation (Fig. 28):
■■ Observe the minimum distance between the switchgear and the wall of
the building.
■■ The load-bearing capacity of the fastening points must correspond to the
weight of the switchgear (perform a stress analysis of the floor).
■■ Check base frame (if used) for dimensions and positional tolerances.
■■ Check position of floor openings for high-voltage and low-voltage cables.
Before the panel is positioned at its site of installation, check that the
fastening points are level. Unevenness must not exceed ± 2 mm/meter and
6 mm difference in height over the entire locating surface.
Important:
Observe switchgear-specific space assignment plan.
6
5
4
100
200
1
35
2
3
1460
2
7
400
8
400
50
9
800/1000
100
Fig. 28
Switchgear room (top view)
1 Wall of the switchgear room
2 PIX High Motor Control Center panels
3 PIX High panel 12 kV
4 Switchgear side wall
5 Rear fixation point
6 Rear base frame
7 Front base frame
8 Front fixation points
9 Floor openings for high-voltage cables
32
AGS 531 500-02
PIX
6 Assembly of the PIX Motor
Control Center for PIX High
series (contd.)
100
3
200
4
4
3
11
22
2900/3000
1
5
0
400 800/1000
1590
400
6
100
400
35
7
1553
1460
1590
1
116,5
70
266
8
166
10
40
50
9
116,5
Fig. 29
Dimension drawing for PIX High Motor Control Center
1 PIX High Motor Control Center panel
2 PIX High 12 kV panel
3 Deflectors
4 Switchgear room wall/ceiling
5 Switchgear side wall
6 Rear fixation point
7 Rear base frame
8 Front fixation points
9 Floor opening for high and low voltage connection
10 Front base frame
AGS 531 500-02
33
PIX
6 Assembly of the PIX Motor
Control Center for PIX High
series (contd.)
6.4 Transporting the panels on the
construction site
Warning!
Make sure the rope or chain is strong enough to bear
the weight of the panel. Comply with the relevant
provisions for hoisting equipment.
Warning!
On lowering the panels, make sure that the
supporting platform is sufficiently stable and even.
Warning!
Risk of accidents. Pay attention to floor openings!
Transport of panel by means of a crane
■■ Attach the crane straps in the four jack rings on top of the panel (Fig. 30).
Make sure to leave a minimum height of 1 m (Fig. 31).
■■ Release the front and rear panel screw fastening from the transport
packaging. To this effect, remove the cable compartment cover (see
Chapter 4.2, page 17).
■■ Carefully lift the panel and deposit it at the intended location.
Fig. 30
Jack rings for crane transport on the
panel top
≥ 1m
Fig. 31
Observe the minimum height
34
AGS 531 500-02
PIX
6 Assembly of the PIX Motor
Control Center for PIX High
series (contd.)
Transport of the panel on the floor
■■ Push panel onto three cylindrical rollers (minimum diameter 30 mm) (Fig.
32).
■■ Thus, move the panel until it reaches its final location.
Fig. 32
Transport on rollers
6.5 Mounting the switchgear sidewalls
Assembly drawing: AGS C73040-02
The mounting of the sidewalls to PIX MCC panels is identical with the
mounting to PIX High panels.
For detailed information, please refer to PIX High manual AGS 531502-02.
6.6 Installation of panels
Fixation on the ground / base frame:
Standard version:
Assembly drawing: SEM 102173-01
Fasten the panels on the floor by two points in the front cross arm (1) and
one point on the rear side (2).
The fixation is identical with the fixation of PIX High panels.
For detailed information, please refer to PIX-High manual AGS 531502-02.
1
2
Fig. 33
1 Front fixation points
2 Rear fixation point
AGS 531 500-02
35
PIX
6 Assembly of the PIX Motor
Control Center for PIX High
series (contd.)
Fixation for seismic requirements:
Assembly drawing: AGS C73040-05
Fasten the panels on a base frame by two points in the front cross arm (3)
and two points on the rear side (4) (screws M20).
For detailed information, please refer to the assembly drawing.
3
4
Fig. 34
3 Front fixation points
4 Rear fixation points
6.7 Screw-fastening the panels to one
another
Fixation between PIX High MCC panels and between PIX High MCC panel
and PIX High panel:
The fixation is identical with the fixation between PIX High panels.
For detailed information, please refer to PIX High manual AGS 531502-02
Panel interconnecting points:
Assembly drawing: AGS C73 038-01
Top cap cover:
Assembly drawing: AGS C73 479-01
Rear gap cover: (only necessary in case IAC AFLR is requested)
Assembly drawing: AGS C73 483-01
6.8 Busbar assembly
6.8.1 Access to the busbar compartment
See Chapter 4.6, page 20.
36
AGS 531 500-02
PIX
6 Assembly of the PIX Motor
Control Center for PIX High
series (contd.)
6.8.2 Busbar installation
Assembly drawings for busbar assembly:
Panel
type
Busbar
Centre panel
End panel
In (busbar) ≤ 1250A (2x80x10)
Assembly
drawing
EIB AE 1096-01
1600A ≤ Ir (busbar) ≤ 2500A (3x80x10)
EIB AE 1096-02
3150A ≤ Ir (busbar) ≤ 5000A (4x80x10)
EIB AE 1096-03
Ir (busbar) ≤ 1250A (2x80x10)
EIB AE 1096-07
1600A ≤ Ir (busbar) ≤ 2500A (3x80x10)
EIB AE 1096-08
3150A ≤ Ir (busbar) ≤ 5000A (4x80x10)
EIB AE 1096-09
Wichtig:
-- Comply with the specifications regarding coating of the
contact surfaces and the tightening torques for the busbar links
and screw fastenings (see Chapter 12.2, page 63 and Chapter
12.3, page 64).
-- Remove transport spacers and transport fixation (Fig. 35).
-- Observe specified direction of screws and bolts, and correct
position of nut.
1
2
Fig. 35
1 Transport fixation
2 Transport spacers
Busbar and busbar feeder arrangement
Number of
busbars per
phase
2 busbars
3 busbars
4 busbars
Busbar
arrangement to
the feeder
AGS 531 500-02
37
PIX
6 Assembly of the PIX Motor
Control Center for PIX High
series (contd.)
View X
4
1
View X
4
2
2
3
1
3
Fig. 36
Busbar link in a center panel with 3 busbars (example)
1 Screws M10 with washers and lock washers
2 Feeder bar
3 Copper intermediate layer
4 Busbars
38
AGS 531 500-02
PIX
6 Assembly of the PIX Motor
Control Center for PIX High
series (contd.)
6.9 Assembly of the earth bus
Assembly drawing AGS C73 030-01)
Earth bars are screw-fastened from panel to panel using connecting bars.
The connecting bars are included in the accessories.
First remove the transport spacers (Fig. 37).
The assembly of the connecting bars in PIX MCC panels is identical with
PIX High panels.
For detailed information, please refer to PIX High manual AGS 531502-02 .
2
1
Fig. 37
Earth bus
1 Earth bar
2 Transport spacers
6.10 Mounting deflectors or pressure relief
duct on top of the panel
Deflectors or a pressure relief duct are necessary to ensure personal safety
in case of internal faults in accordance with IEC 62271-200.
The mounding to PIX MCC panels is identical with the mounting to PIX
High panels.
For detailed information, please refer to PIX High manual AGS 531502-02.
AGS 531 500-02
39
PIX
7
High-voltage connection
7.1 Connection of high-voltage cables
Access to cable compartment: see Chapter 4.2, page 17.
Preparation of cable compartment
■■ Remove cable clamps (Fig. 38, item 1) and take out rubber sleeves (2).
■■ If necessary, remove the base plates.
Mount cable box
1
2
■■ Route the individual cables outwards through the cable compartment of
the panel to enable assembly of the cable ends.
■■ Cut the rubber sleeves to fit the cable diameter, and push them onto the
cables (Fig. 39).
■■ Strip cable ends and assemble the cable box as specified by the cable
manufacturer.
Warning!
Danger due to contact corrosion in case of
inadmissible matching of materials! Do not use
aluminium cable lugs for the cable connection.
Fig. 38
Floor opening for high-voltage cables in the floor of the
cable compartment
1 Cable clamps
2 Rubber sleeves
Fig. 39
Cut rubber sleeves to size and slip them onto the
cables
Fig. 40
Mount cable lug
40
AGS 531 500-02
PIX
7
High-voltage connection
(contd.)
Important:
-- Unless otherwise specified by the cable manufacturer:
Comply with specified tightening torques (Chapter 12.3, page
64) and pre-coat contact areas (Chapter 12.2, page 63).
-- Observe phase grouping of the switchgear panel.
4
■■ Fasten the individual cables to the appropriate connection areas.
■■ Re-mount the base plates.
■■ Fasten high-voltage cable to the floor opening using clamping
assemblies (Fig. 41, item 5).
■■ Connect earth screens (2) of the cables to the panel (3).
5
3
Cable connection and surge arrester
If two cables are connected per phase, arrange and mount the cables as
shown in Fig. 42.
Fig. 41
Cable compartment with the high-voltage cables
connected (plastic screen not shown)
3 Earthing connection of the cable screen
4 High-voltage connection
5 Clamps with rubber sleeves
1
465
2
3
5
4
Fig. 42
Assembly of 2 cables per phase
1 High-voltage cables
2 Cable connection
3 Surge arrester
4 Regarding the surge arresters, the cable earth screens must be positioned according to the illustration.
2
Cable fastening for 3-conductor cable
1
150
3
A maximum of two 3-conductor cables can be fastened using the clamps.
The fastening insert is screwed-in instead of the standard model,
increasing the cable connection area by 150 mm towards the cable
basement (Fig. 43).
Fig. 43
Cable fastening for 3-conductor cable
1 Clamps
2 Earth conductor
3 Screw-fastening to the panel (8 screws)
AGS 531 500-02
41
PIX
8
1
2
Low-voltage connection
8.1 Connecting the ring circuits in the
low-voltage compartment
■■ Open the door of the low-voltage cabinet using a double-bit key.
■■ Route the cables to the adjacent panel through the bushings (Fig. 44,
item 2) of the low-voltage compartment.
■■ Connect the ring circuits to the terminal strip according to the circuit
diagram.
1
2
42
AGS 531 500-02
PIX
8
Low-voltage connection
(contd.)
8.2 Connecting external cables
External cables supplied by the customer may be routed upwards to the
low-voltage compartment through the right-hand cable duct inside of the
panel (Fig. 45).
■■ Remove the protective cover of the cable duct in the panel (Fig. 46) (3x
nuts M6, wrench size 10 mm).
■■ Open the four cut-outs required for the cable bushings (Fig. 47).
■■ Route the cable through the cable duct to the low-voltage cabinet (Fig.
48).
Fig. 48
Fig. 46
Fig. 47
Fig. 45
Placing external connections
Fig. 46
Removing the protective cover
4 cutouts
Fig. 47
Cut-outs for cable bushings
1
Fig. 48
Connecting external cables (1) in the low-voltage
compartment
AGS 531 500-02
43
PIX
9
Final steps / commissioning
9.1 Final steps
Danger!
The high-voltage supply must not be connected. All
active parts must be earthed.
Important:
-- Whenever you detect anomalies, faults or malfunctions, do
not commission the switchgear, but inform the manufacturer.
-- For switching operations, comply with Chapter 10 ”Operation”
as of page 48.
-- In case supply voltage is not available, the vacuum contactor
CVX cannot be actuated.
Cleaning the panel and checking panel assembly
■■ Clean the switchgear, removing contamination resulting from assembly
work.
■■ Remove the transport securing device of CVX truck (Chapter 4.3.1 as of
page 18).
■■ Remove all the attached information tags, cards, brochures and
instructions no longer needed.
■■ Check the tightening torques of all screw fastenings and connections
established on the site of installation:
□□ High-voltage connection
□□ Earth conductor
□□ Busbar links
□□ Panel screw fastenings
□□ Low-voltage wiring
□□ Special attachments
Damaged paint
The panels are powder-coated. Minor damage to the paint can be repaired
using commercially available paint (standard colour RAL 7044 or
customized colour).
Inspection
■■ Check the switchgear for damage which might be due to transport or
assembly work.
■■ Compare data on nameplate to the required ratings.
■■ Check data of high-voltage fuse for the CVX.
■■ Check striker position and correct assemby of the high-voltage fuse in
the CVX.
■■ Check phase coincidence of the cables connected (see Technical
Manual PIX panels with circuit-breaker).
Re-mount the covers:
■■ Demounted partition and cover plates in the busbar and switching device
compartments.
■■ Cable duct covers of the external control and measurement cables.
■■ Cable compartment cover (see Chapter 4.2, page 17)
■■ Remove temporary base from the panel top, if such a base has been
used (see Chapter 4.6, page 20).
Racking-in truck CVX
See Chapter 4.5, page 19.
Re-fastening the cover of the switching device compartment
See Chapter 4.3.1, page 18.
44
AGS 531 500-02
PIX
9
Final steps / commissioning
(contd.)
9.2 Checking switching functions and
interlocks
Danger!
The high-voltage supply must not be connected. All
active parts must be earthed.
Important:
-- For switching operations, comply with Chapter 10 ”Operation”
as of page 49.
-- In case supply voltage is not available,
• blocking coils (optional) are in locked position; manual
switching operations are thus blocked;
• electrical actuation of the vacuum contactor CVX is not
possible.
■■ Apply supply voltage.
■■ Operate truck and earthing switch manually.
■■ Check switch position indicators.
■■ Check electrical functions of control and operating devices:
□□ closing and opening function for the vacuum contactor CVX
□□ optional motor-operated drive for the earthing switch
■■ Check switch position indicators and interlocks (see Chapter 10 as of
page 49).
9.3 Power frequency test of busbar
(optional)
Warning!
Comply with the safety provisions in Chapter 1, page 8 .
A test unit and a test adapter (not included in scope of supplies) are
required for the power frequency test.
Preparation
■■ All panels must be isolated from the power supply and earthed (Fig. 49).
■■ Busbar: Disconnect voltage transformer (MTX) and surge arrester. Earth
voltage detection systems.
■■ Incoming feeder panel for voltage test: Remove cable compartment
cover and disconnect voltage transformer and surge arrester. Earth voltage
detection systems.
Important:
Make sure that no high-voltage cables are connected. Observe
the assembly and operating instructions for the test unit and the
test adapter.
AGS 531 500-02
45
PIX
9
Final steps / commissioning
(contd.)
Performing the power frequency tests
5
1
2
3
4
Fig. 49
Switch position during the power frequency test
(example: five panels)
1 Incoming feeder panel for test voltage
2 Test unit (e. g. high-voltage source, test
transformer)
3 Test cable
4 Branch-circuit panels
5 Busbar
■■ Perform the power frequency test of the busbar on the feeder panel:
□□ Connect test unit to the test cable.
□□ Switch the earthing switch OFF.
□□ Move circuit-breaker into service position and switch ON.
□□ Perform the power frequency test successively for all three phases (L1,
L2, L3) in accordance with the specifications of the test unit manufacturer.
Make sure to earth the adjacent phases.
Important:
Observe admissible test values for the switchgear and the
admissible test values for power-frequency tests after
installation of the switchgear in accordance with IEC 62271-200.
After the power frequency test
■■ Switch circuit-breaker OFF and put it into disconnected position; switch
earthing switch ON.
□□ Remove test unit and test cables.
□□ Reconnect disconnected voltage transformers and surge arresters.
9.4 Cable test after assembly
Warning!
Comply with the safety provisions in Chapter 1, page 7.
Admissible limits for the switchgear in case of cable tests available on
request from the manufacturer’s.
During the cable test, the busbar can be operated at rated voltage (see
nameplate Chapter 2.5, page 11). For qualification of the current
transformers for cable tests, enquire at the appropriate manufacturer’s.
A test unit and a test adapter (not included in scope of supplies) are
required for the cable test.
Important:
Observe the assembly instructions for the test adapters and the
operating and inspection instructions for the test unit.
Preparation
■■ Isolate outgoing feeder cable of the panel which is to be tested.
■■ Isolate outgoing feeder cable in remote station.
■■ Earth outgoing feeder cable of the panel which is to be tested.
■■ Remove cable compartment cover (see Chapter 4.2, page 16).
■■ Disconnect voltage transformer and surge arrester; earth voltage
detection systems.
Performing the cable test
■■ Connect the test adapter to a free cable connection in the panel and on
the test unit. To this effect, observe the specifications of the test unit’s
manufacturer.
46
AGS 531 500-02
PIX
9
Final steps / commissioning
(contd.)
Important:
Make sure that the metallic components of the test adapter are
at a sufficient distance from the earthed switchgear components
(e.g. housing).
■■ Set switchgear panel to test position: Switch the earthing switch OFF.
Vacuum contactor CVX:
OFF
Truck:
in disconnected position
Earthing switch:
OFF
■■ Perform cable test according to the cable manufacturer’s specifications.
When doing so, do not exceed the admissible limits.
After the cable test
■■ Earth outgoing feeder cable again.
■■ Remove test set.
■■ Reconnect voltage transformer, surge arrester and voltage detection
systems or de-earth them.
■■ Reposition cable compartment cover (see Chapter 4.2, page 17).
AGS 531 500-02
47
PIX
10 Operation
10.1 Operating interface of the panel
1
2
3
4
5
6
7
Fig. 50
Operating interface of the panel
* only in case of CVX truck with manual tripping (drive mechanically latched)
1 Combined monitoring and motor protection device GEMSTART
2 Front cover with handle
3 OFF push-button (optional) *
4 Vacuum contactor CVX
5 Inspection port
6 Interlocking slide for manual actuation of the truck
7 Locking mechanism for switching device compartment cover via double-bit key
8 Insertion opening for racking the truck in/out manually
9 Earthing switch position indicator
10 Interlocking slide for manual actuation of the earthing switch
11 Insertion opening for manual actuation of earthing switch
48
8
9
10
11
AGS 531 500-02
PIX
10 Operation (contd.)
10.2 Truck vacuum contactor CVX
2
1
3
4
5
6
7
8
Fig. 51
Vacuum contactor CVX
* Drive is mechanically latched
1 Moving contacts
2 Fuses
3 Low-voltage connector
4 Manual tripping (optional) *
5 Fuse trip indicator (green/red)
6 Counter (optional)
7 Position indicator I - O
8 Handle
AGS 531 500-02
49
PIX
10 Operation (contd.)
10.3 Operation accessories
Important:
-- These accessories are supplied with the panel. The panel
may only be operated by means of these accessories.
Designation
Item no.
Double-bit key for the
switching device
compartment cover
SEM101137-01
Double-bit key for the
low-voltage compartment
SEM101137-02
Operating rod to switch the
vacuum contactor CVX off
manually
(optional)
AGS H35446-01
Operating lever for earthing
switch
AMT 000223-09
Crank for truck
AGS H31601-01
Illustration
10.4 Interlocks
Important:
Complete switchgear interlocking can only be ensured with
complete locking devices.
If no mechanical or electromagnetic interlocks are available for switchgear
interlocking, mechanical lock-outs with cylinder or padlock must be
provided.
PIX Motor Control Center have mechanical basic interlocks which help
avoid operating errors.
You must be familiar with these interlocks before operating panels.
50
AGS 531 500-02
PIX
10 Operation (contd.)
10.4.1 Mechanical interlocks
Interlock
Function of interlock
Method of operation of interlock
Between truck and low-voltage
connector
The truck cannot be actuated unless the
lowvoltage connector is inserted
The opening for the moving crank handle is
locked
The truck cannot be moved into service
position while the earthing switch of the
switchgear panel is in “ON” position
The moving crank handle is uncoupled
automatically.
The earthing switch cannot be switched
on once the truck has left its disconnected
position.
The rotary movement of the earthing switch
lever is blocked. Do not apply force!
The cable compartment cover can only be
removed if the earthing switch is ON.
The cable compartment cover is locked
mechanically by means of a sheet metal
plate.
The switching device compartment cover
can only be opened if the truck is in its
disconnected position.
The switching device compartment cover
cannot be lifted via the opening handle
unless the truck is in disconnected position.
Between truck and earthing
switch
Between the cable compartment
cover and the earthing switch
(optional)
Between the truck and the
switching device compartment
cover (optional)
If the switching device compartment cover The crank of the truck cannot be inserted if
is opened, the truck cannot be moved into the switching device compartment cover is
service position.
open.
The truck cannot be racked in or out while
the vacuum contactor is switched on.
Between truck and operating
state of the vacuum contactor
The opening for the moving crank handle is
locked.
The vacuum contactor cannot be switched
on unless
■■ it has completely reached its
The vacuum contactor cannot be switched on
disconnected or service position and
or off.
■■ the operating crank for the rack-in
mechanism has been removed
10.4.2 Electromagnetic interlocks (optional)
Electromagnetic blocking coils can be used for inter-panel as well as intrapanel interlocks:
■■ Manual actuation of the disconnector truck is blocked.
■■ Manual actuation of the earthing switch is blocked.
Important:
-- In case of failure of the supply voltage, all electrical interlocks are in their ”locked” position. Measure: Re-establish
the supply voltage.
-- Please note the switchgear-specific circuit diagram as regards the design of the interlocking systematics.
AGS 531 500-02
51
PIX
10 Operation (contd.)
10.4.3 Lock-out by means of padlocks (not included
in the scope of supplies)
The boreholes are provided for padlock yokes of Ø ≤ 8 mm.
Fig. 52
Mechanical lock-out of earthing switch via padlock
Fig. 53
Padlock on truck
Fig. 54
Mechanical lock-out for shutter (same
principle for left-hand and right-hand sides)
Fig. 55
Interlocking of truck via padlock (optional)
52
AGS 531 500-02
PIX
10 Operation (contd.)
10.4.4 Interlocks by means of cylinder locks
(optional)
1
2
Fig. 56
1 Interlocking of earthing switch in closed condition
2 Interlocking of earthing switch in open condition
3
Fig. 57
3 Truck interlock
4
Fig. 58
4 Interlock of the switching device compartment cover
5
Fig. 59
5 Interlock of the cable compartment cover
AGS 531 500-02
53
PIX
10 Operation (contd.)
10.5 Operating specifications
The switchgear unit may only be operated by specialist electricians who
have proven experience (training certificate) in conjunction with the PIX
series and all the relevant safety standards.
Refer also to the safety provisions in Chapter 1, page 7.
Warning!
To rule out faulty switching operations, the operating
sequences described below must be complied with.
Each switching operation must be completed.
Important:
-- After each switching operation for which you have used a
crank or a lever, remove this tool and store it in the tool board.
-- In case supply voltage is not available,
• blocking coils (locking the interrogation slides, depending on
design) are in “locked” position;
• the vacuum contactor CVX can no longer be actuated
electrically.
Measure: Re-establish the supply voltage.
10.6 Switching the vacuum contactor
CVX
Position indicator
Whether the vacuum contactor CVX is switched ON or OFF is indicated
directly on the device (Fig. 60 and Fig. 61).
Fig. 60
I Vacuum contactor switched ON
CVX
Fig. 61
O Vacuum contactor switched OFF
Switching
The vacuum contactor CVX is switched on and off only by means of a
remote control device or the monitoring and motor protection device
GEMSTART.
A separate manual is provided for GEMSTART.
54
AGS 531 500-02
PIX
10 Operation (contd.)
Switching OFF manually (optional)
This feature is only available for mechanically latched vacuum contactors
CVX. In this case, the vacuum contactor CVX can be switched off directly
on the panel (Fig. 62 and Fig. 63).
■■ Put the operating rod (see Chapter 10.3, page 51) through the guide hole
in the switching device compartment cover until the vacuum contactor
switches off automatically (Fig. 62). Check the position indicator (Fig. 61,
page 54).
■■ Alternatively: switch OFF via push-button (Fig. 63). To this effect, move
the push-button extension (1) downwards to its stop and press the pushbutton O (2). Check the position indicator (Fig. 61, page 54).
Fig. 62
Switching OFF the vacuum contactor by means of an
operating rod
1
2
Fig. 63
Switching OFF the vacuum contactor by means of a push-button
1 Push-button extension
2 Push-button OFF
CVX
10.7 Fuse tripping
The inspection glass of the vacuum contactor on the panel front indicates
the status of the fuses (Fig. 64):
1
CVX
3
2
Fig. 64
Fuse trip indicator
1 green: fuses OK
2 red: one or several fuses have tripped
3 vacuum contactor has switched off automatically
AGS 531 500-02
55
PIX
10 Operation (contd.)
Measures to be taken in case of fuse tripping
■■ Rack the vacuum contactor CVX out of the panel (see Chapter 4.5, page
19).
■■ Always exchange all 3 fuses. Fuse replacement is described in the
Operating Manual of the vacuum contactor CVX (no. NTV 132 2E).
10.8 Moving the truck into disconnected/
service position
Initial situation:
-- Vacuum contactor CVX
-- Earthing switch
OFF
OFF
Moving the truck from operating into disconnected position
4
1
3
2
■■ Push the interlocking slide (Fig. 65, item 1) to the left to open the crank
insertion opening.
■■ Insert operating crank incl. the integrated slip coupling (2) and move it
counter-clockwise to its stop or until the slip coupling reacts (3); the vacuum
contactor moves to its disconnected position. Check the position of the
vacuum contactor in the panel through inspection port (4).
■■ Remove crank.
Fig. 65
Moving the truck from operating into disconnected
position
Moving the truck from disconnected into service position
4
1
3
2
Fig. 66
Moving the truck from disconnected into service
position
Push the interlocking slide (Fig. 66, item 1) to the left to open the crank
insertion opening.
■■ Insert operating crank incl. the integrated slip coupling (2) (see Chapter
10.3, page 51) and move it clockwise to its stop or until the slip coupling
reacts (3); the vacuum contactor moves to its service position. Check the
position of the vacuum contactor in the panel through inspection port (4).
■■ Remove crank.
10.9 Operating the earthing switch manually
Initial situation
-- Vacuum contactor CVX OFF
-- Truck in disconnected position
56
AGS 531 500-02
PIX
10 Operation (contd.)
10.9.1Switch earthing switch ON
■■ Push the slide (Fig. 67, item 1) upwards and insert the control lever of the
earthing switch with the lever rod pointing up (2).
■■ Turn the lever clockwise by approx. 95° (3).
■■ Check position indicator. It must indicate that the earthing switch is ON
(Fig. 68, item 4). Remove crank.
3
1
2
Fig. 67
Switch earthing switch ON:
1 Press slide upwards
2 Insert control lever
3 Turn control lever clockwise
Fig. 68
4 Position indicator indicates: Earthing switch is
turned ON
AGS 531 500-02
57
PIX
10 Operation (contd.)
10.9.2 Switch the earthing switch OFF
■■ Push the slide (Fig. 69, item 1) upwards and insert the control ever of the
earthing switch with the lever rod pointing to the right (2).
■■ Turn the lever counter-clockwise by approx. 95° (3).
■■ Check position indicator: It must indicate that the earthin switch is OFF
(Fig. 70, item 4). Remove crank.
1
2
3
Fig. 69
Switching the earthing switch OFF:
1 Press slide upwards
2 Insert control lever
3 Turn control lever counter-clockwise
Fig. 70
4 Position indicator indicates: earthing switch is OFF
58
AGS 531 500-02
PIX
11 Maintenance
11.1 Safety provisions
Only specialist electricians certified by the manufacturer for maintenance
work and who have the required knowledge regarding handling of mediumvoltage switchgear of the series PIX and all the relevant safety provisions
are permitted to perform maintenance and cleaning work.
Warning!
Comply also with the safety provisions in Chapter 1,
page 7.
11.2 Maintenance schedule
PIX series indoor switchgear has been designed for normal operating
conditions in accordance with IEC 62271-1.
Visual inspection
It is recommended to check the panels visually at regular intervals
depending on the strain they are subject to during operation and in
accordance with the national regulations.
Important:
In case of frequent condensation or air pollution (dust, smoke or
corrosive gases), the maintenance intervals must be adapted to
the actual conditions.
A visual inspection includes a complete check of the panels for
contamination, condensation and damage, to be performed by certified
staff.
If there are signs of contamination or condensation, the panels must be
cleaned in an expert manner (see Chapter 11.3, page 60, and Chapter
11.4, page 60) and subsequently the drives, interlocks and position
indicators checked for proper functioning (see Chapter 10, page 49).
If damage is detected on the panels, these must be repaired or
components be replaced (see Chapter 11.5, page 59, and Chapter 11.6,
page 60).
For cleaning and maintenance work, please refer to Chapter 4 ”Access to
the main circuit compartments” as of page 16.
In case of ambiguities or irregularities, please contact the manufacturer’s
Service Center immediately.
AGS 531 500-02
Mantenance
interval
Work to be
carried out
Qualification /
Work performed
by
12 years
■■ Clean and grease
drives and movable
main current contacts
(see Chapter 11.7,
page 61).
■■ Check releases and
blocking coils for
proper function.
Staff who have been
certified for this work.
After 1,000 actuations
of the truck or the
earthing switch
Revision of the
switching device in
question
Manufacturer’s
Service Center
Vacuum contactor
CVX
see Technical Manual NTV 132 2E
59
PIX
11 Maintenance (contd.)
11.3 Cleaning
Warning!
Risk of injury: the drives must not be disassembled
for service and maintenance work.
To ensure the specified insulating level, the insulating components must be
clean. On principle, cleanliness deserves utmost attention.
When deposited dirt is detected, the panels must be cleaned in an expert
manner.
When cleaning, make sure that the lubrication in the drive mechanisms is
not removed. If the drive mechanisms are no longer sufficiently lubricated,
new lubrication must be applied.
Slight contamination:
Clean using a dry, lint-free cloth. Depending on the degree of soiling,
replace cloth as often as necessary.
Serious contamination:
Cleaning agent, 1 l can (see Chapter 12.1, page 62). The use of other
cleaning agents is not admissible.
■■ The operator should wear protective gloves.
■■ Use cleaning agent according to manufacturer’s instructions.
■■ Soak the cloth thoroughly and wipe the insulating components. Keep
duration of exposure as short as possible.
■■ Expose the cleaned surface to the air for at least two hours.
11.4 Avoid condensation
To ensure the specified insulating level, the switchgear panels – especially
their insulating components – must not be exposed to condensation.
Measures to take in case of condensation:
■■ Should condensation be detected in or on the panels, clean the panels in
accordance with Chapter 11.3, page 60.
■■ Installation or inspection of panel heating. It must provide a sufficient
heating performance to prevent condensation on the panels.
■■ Condensation can also be prevented by ensuring suitable ventilation and
heating of the station or by using de-humidification devices.
11.5 Corrosion protection
Drive mechanisms and covers have a long-term protection against
corrosion. Any damage to the paint, scratches and other damage must be
repaired immediately to avoid corrosion.
11.6 Replacement of components and
panels
The drive mechanisms, current transformers and voltage transformers as
well as the testing and monitoring systems can be replaced if necessary.
Also, entire panels can be replaced.
Should you have any queries regarding replacement of components or
panels, please contact the manufacturer’s Service Center.
The data on the nameplate are relevant for replacement of components or
panels or in case of any queries (see also Chapter 2.5, page 12).
60
AGS 531 500-02
PIX
11 Maintenance (contd.)
11.7 Lubrication instructions
Important:
-- The bearings and joints must not be washed out by the
cleaning agent.
-- The following elements must not be lubricated:
• Motor
• Ball bearings
• Auxiliary releases
• Push switches
• Blocking coils
• Auxiliary switch
-- Only approved lubricants may be used (see Chapter 12.1,
page 62).
Preparation
■■ Remove the truck from the panel (see Chapter 4.5, page 19).
■■ Clean lubrication points using a lint-free cloth; use cleaning agent in case
of serious contamination (see “Annex”, Chapter 12.1, page 63). Use
cleaning agents sparingly; lubricating points must only be moistened.
Lubrication
Lubrication
points (see
also Fig. 71
on page 61)
Lubricants
(see
“Annex“,
Lubrication procedure
Chapter 12.1,
page 62)
Sliding contact
surfaces
Synthetic
lubricant
Apply a thin and uniform film of
lubricant
All accessible
friction points and
sliding surfaces
Synthetic
lubricant
Clean lubrication points with
lint-free cotton cloth; apply a thin
film of lubricant (using e.g. a
paintbrush).
Liquid lubricant
Pour drops of liquid lubricant (oil
can, drip feed lubricator) into the
bearing gap. Liquid lubricant
gets between the bearing
surfaces due to the capillary
effect. In case of inaccessible
lubrication points, use an
extension tube or spray.
Bearings and
joints
AGS 531 500-02
61
PIX
11 Maintenance (contd.)
5
6
6
4
3
1
2
7
Fig. 71
Points of lubrication/maintenance
1 Earthing switch drive
2 Earthing switch contacts
3 Tracks for the truck
4 Shutter mechanism
5 Fixed contacts for the truck
6 Switching device (lubrication in acc. with lubrication instructions in the operating manual CVX)
7 Trolley, handling: see Chapter 12.5 on page 65).
Once maintenance work is complete
■■ Remove all the tools and auxiliary equipment used.
■■ Reinsert truck into the panel (see Chapter 4.5, page 19).
■■ Reposition covers, close doors and check switching functions (see Chapter 9 as of page 44).
62
AGS 531 500-02
PIX
12 Annex
12.1 Auxiliary products
The auxiliary products are available from the manufacturer. The use of
alternative auxiliary products is not permissible.
Warning!
Risk of injury in case of inappropriate handling.
Observe the safety data sheets of the manufacturers
of the auxiliary products.
Auxiliary products
Ref. no.
Cleaning agent
S 008 152
Synthetic lubricant, 0.5 kg can
ST 312-111-835
Liquid lubricant FL, 0.5 kg can
S 008153
Touch-up pen RAL 7044, silk-grey, 50 ml
S 009 561
12.2 How to treat the contact surfaces
Important:
-- Caution when handling bars insulated by heat-shrinkable
sleeves: The heat-shrinkable sleeve must not get into contact
with lubricant (swelling).
-- Contact areas coated with synthetic lubricant should not
betouched, if possible.
■■ Contact areas must be subjected to preliminary treatment before
screwfastening (see Table below).
■■ Immediately after the pre-treatment, coat the contact surfaces sparingly
with a thin and uniform film of synthetic lubricant so that the space between
the contact surfaces is completely filled once the screws have been
fastened.
Material of contact surfaces Pre-treatment
Silver-plated
Clean1
Nickel-plated
Remove passivation layer4
Copper or copper alloy
Clean1, expose metallic surface2
Aluminium
Clean1, expose metallic surface2
Steel
Clean1, expose metallic surface2
Zinc-plated steel
Remove passivation, not,
however, the zinc layer3
Hot-galvanized sheet-metal
Clean1, passivation need not be
removed
1
Clean by means of lint-free cloth; use cleaning agent in case of serious
contamination
2
Expose metallic surface
□□ by treating the entire surface with emery cloth or a rotating grinding tool (grain
size 100 or 80) or
□□ using a wire brush which is clearly marked for use exclusively for aluminium or
exclusively for copper
3
using a brass brush, steel brush
4
rub slightly by hand using Scotchbrite abrasive agent (Ni layer must not be
reduced)
AGS 531 500-02
63
PIX
12 Annex (contd.)
12.3 Specifications for screw connections
Important:
-- The threads of screws and bolts must generally not be
pretreated
-- Max. tolerance for the effective tightening torques: ±15 %
-- The nut must correspond in strength to the grade of the screw/
bolt used or be of better quality.
General screw connections
Grade or material
Screw/bolt
Plastics
Thread Ø
≥ 8.8 ≤ 10.9
Self-locking screw ≥ 8.8
Tightening torques (Nm)
M4
0.25
2.6
M5
0.5
5.0
7.0
M6
0.8
8.8
12.3
M8
1.8
21.0
30.0
M 10
3.5
42.0
59.0
M 12
6.0
70.0
97
M 16
12
170
M 20
330
Screw fastening for power transmission
Screws and bolts: Grade ≥ 8.8
Conductor material: copper
Thread Ø
Tightening torques (Nm)
M6
6,5
M8
17
M 10
35
M 12
68
M 16
135
Screw connection for terminal strips
64
Thread Ø
Tightening torques (Nm)
M 2.5 (M 2.6)
0.5
M3
0.7
M 3.5
1.0
M4
1.5
M5
2.5
AGS 531 500-02
PIX
12 Annex (contd.)
12.4 Required tools (not included in the
scope of supplies)
Cutter
Nail puller
approved torque wrenches with different bits for
hexagon socket screws and socket-head screws
and nuts; bits for screw and nut grades M 5, M 6,
M 8, M 10, M 12
Screwdriver and Philips screwdriver
Cutting pliers
4 crane straps/chains of L ≥ 2000 mm each,
capacity ≥ 1500 kg
lint-free, clean rags
12.5 Transport trolley for truck
Transport trolley for truck
1
2
3
4
5
12
6
7
11
10
9
8
Fig. 72
Transport trolley for truck
1
2
3
4
5
6
7
8
9
Autonomous interlocking of the racked-in truck on the trolley
Variable screw connection of rail
Positioning of rail to adjust the various track widths
Rail
Interlocking with panel
Variable screw connection of unlocking bar
Positioning of unlocking bar to match various panel versions
Tray for accessories (lever, keys, handle)
Lever to lock / unlock the transport trolley on the panel. Table of trolley is lifted or
lowered.
10 Unlocking bar. The truck is unlocked in the panel.
11 Handle of trolley
12 Slide to unlock the truck from the trolley
AGS 531 500-02
65
PIX
12 Annex (contd.)
Rated
voltage Ur
Panel
of the panel width [mm]
[kV]
≤ 12
1
400/650/800
Truck
Item number
of trolley
HVX/UTX/MTX/
CVX
EIB AE1 148-011
The trolley can be used for panel widths of 400, 650 and 800 mm
Adjusting the track width of the rails
■■ Release 3 screws on each rail (Fig. 72, item 2).
■■ Adjust the two rails to the appropriate panel track width and check them.
Re-mount the six screws.
■■ Adapt position of unlocking bar (10) also to the appropriate panel (same
procedure).
66
AGS 531 500-02
Appendices
67
Notes
AGS 531 500-02
© 2011 Schneider Electric - All rights reserved
Schneider Electric
35, rue Joseph Monier
CS 30323
92506 Rueil-Malmaison Cedex, France
As standards, specifications and designs change from time to time, please ask for
confirmation of the information given in this publication.
RCS Nanterre 954 503 439
Capital social 896 313 776 €
www.schneider-electric.com
Publishing: Schneider Electric
Design: Schneider Electric
Printing:
AGS 531 500-02
This document has been printed
on ecological paper
01-2011