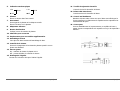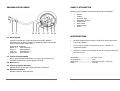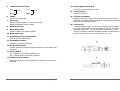
1
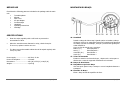
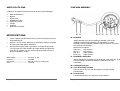
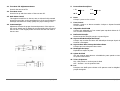
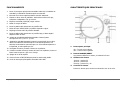
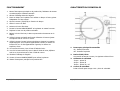
ENGLISH
FEATURES
•
±10% or ±20% pitch adjustment
•
All metal tone arm
•
High torque platter motor
•
Start / Stop button
•
High torque braking
•
33/45/78 RPM speeds
•
Forward and reverse platter direction
•
Pop-up stylus target light
•
Shaped tone arm assembly with
•
•
•
•
•
•
Counterweight
Height adjustment
Skating adjustment
Height lock
Lever lift with height adjustment
Tone arm holder with locking mechanism
•
Quartz lock of 0% speed position
•
45 RPM adapter and holder
•
Extra stylus holder
•
Output for
• Audio (left, right and ground)
• Platter speed - to be used with external process devices
• External start/stop control
•
Adjustable feet for leveling
•
Easily removable smoked plastic lid
High Q30 D
1
MAIN FEATURES
1.
2.
OPERAÇÃO
2.
Ligue e eleve a luz que ilumina a ponta da agulha através do botão
da luz.
3.
Coloque um disco no slipmat do gira-discos. Quando estiver a tocar
um disco de 45 RPM com um orifício central grande, coloque o
adaptador no fuso central.
4.
Seleccione a velocidade de rotação ( 33/45/78 ) para igualar o disco.
5.
Liberte a braçadeira do braço.
6.
Coloque a alavanca na posição cima.
7.
Pressione o botão Start/Stop e o prato do gira-discos irá começar a
rodar.
8.
Mova o braço até ao sitio desejado.
9.
Seleccione o ajuste de pitch desejado. Primeiro terá que desligar o
trinco de quartzo.
Power Dial
ON - rotate right
OFF - rotate left
11. Mova o controlo de pitch para cima e para baixo para ajustar a
velocidade.
12. Para parar a reprodução, levante o braço através da alavanca.
START / STOP
Platter Revolution Speed Buttons
13. Quando acabar a reprodução, levante a alavanca do braço, mova o
braço para o seu suporte e tranque-o com a braçadeira.
14. Desligue a luz.
15. Pressione o botão Start/Stop para parar o prato.
33 rpm - press 33
45 rpm - press 45
78 rpm - press 33 and 45
4.
Rode o interruptor de potência para a direita para ligar o aparelho.
O Indicador de velocidade e o iluminador dos pontos estroboscópicos
irão acender.
10. Ajuste o pitch á velocidade desejada. Durante a reprodução, observe
os pontos estroboscópicos, se os pontos parecerem mover-se para a
direita, isto significa que o pitch é inferior á velocidade ideal, se os
pontos parecerem mover-se para a esquerda significa que o pitch é
superior á velocidade ideal, se os pontos parecerem estar parados,
isto significa que o prato está na velocidade ideal
Pressing once engages high torque motor; pressing again engages
brake.
3.
1.
16. Desligue o aparelho.
Pitch Button
Press the button to switch between 10% and 20% pitch.
2
High Q30 D
35
High Q30 D
21. Parafuso de Ajuste da Elevação do Braço.
5.
Controla a quantidade de elevação.
Strobe Dots
y 30
y 30
50 Hz
22. Alavanca do Braço
z 45
Controla a acção de subir e descer do elevador do braço.
60 Hz
z 45
23. Controlo Anti Deslizamento
Aplica força interior ao braço para que este não salte para fora
através do disco devido á força centrifuga do disco a girar.
6.
Platter
Put this on the center spindle.
Os fabricantes das cabeças de leitura geralmente indicam as
configurações ideais.
7.
Center Spindle
Keeps platter and records centered. Place the supplied slipmat on the
center spindle.
24. Contra Peso
O Ajuste deste peso cria a pressão ideal da agulha sobre o disco.
8.
Deslize o contra peso para a traseira o braço do gira-discos.
Torcer ligeiramente o contra peso e ele irá enroscar na parte traseira
do braço.
45 Adapter
Put on the center spindle for playing 7” records with large center
hole.
9.
Direction Buttons
Determines the direction the platter will spin.
10. Lid Hinge Holder
Place the bottom tabs of your lid hinges in here after finishing
assembly.
11. Extra Stylus Holder
Put an extra headshell here.
12. Tone Arm Assembly
Explained in tone arm section.
13. Pitch Adjustment
Use this to change the speed of the platter when quartz lock is
inactive.
14. Quartz Lock
ON - will hold the revolution speed to 0%
OFF - will allow use of the Pitch Adjustment
15. Target Light
Press the button to the right and a light will pop up directed at the
stylus position.
High Q30 D
34
High Q30 D
3
BEFORE USE
MONTAGEM DO BRAÇO
Check that the following parts are included in the package with the main
unit:
•
•
•
•
•
•
•
•
Turntable platter
Slipmat
Dust cover
45 rpm adapter
Counterweight
Headshell
Operating instructions
Cartridge
SPECIFICATIONS
16. Headshell
•
Clean the stylus regularly with a soft brush to prevent the
accumulation of dust.
•
When the sound becomes distorted or noisy, check the stylus.
If worn out, replace it with a new one.
•
The dust cover and turntable cabinet should be wiped regularly with
a soft, dry cloth.
Instale a cabeça de leitura aqui. Quando estiver a instalar a cabeça
de leitura, refira-se ao manual de instruções fornecido pelo fabricante
da cabeça. Durante a instalação, coloque o protector da agulha para
evitar danificá-la.
Ligue os fios de acordo com o seguinte:
Branco (L+)
Canal Esquerdo +
Azul (L-)
Canal Esquerdo –
Vermelho (R+)
Canal Direito +
Verde (R-)
Canal Direito –
17. Trinco do Cartucho
Power supply:..........................AC 230V, 50 Hz
Power consumption: ................13 Watts
Dimensions: ............................450 (W) x 352 (D) x 148,5 (H)
Weight: ...................................12,45 Kg
Encaixe o cartucho na frente do braço, depois rode o trinco para a
direita com o cartucho segurado firmemente na horizontal.
18. Braço do Gira-Discos
19. Braçadeira e Apoio do Braço
Use este apoio para o braço e tranque-o com a braçadeira durante o
transporte.
20. Elevador do Braço
Eleva o braço acima da superfície do disco.
4
High Q30 D
33
High Q30 D
ANTES DE UTILIZAR
TONE ARM ASSEMBLY
Verifique se as seguintes partes se encontram dentro da embalagem:
•
•
•
•
•
•
•
•
Prato do Gira-discos
Slipmat
Contra Peso
Adaptador 45 RPM
Cabeça de Leitura
Tampa
Cartucho
Manual de Instruções
SPECIFICATIONS
•
Limpe a agulha periodicamente com uma escova suave para evitar a
acumulação de pó.
•
Quando o som se tornar distorcido ou barulhento, verifique a agulha.
Se esta se encontrar gasta, substitua-a.
•
De tempos a tempos, limpe o gira-discos e a tampa de protecção
com um pano seco. Não deverão ser usados produtos voláteis tais
como álcool, benzina, etc. pois estes produtos poderão remover a
pintura ou danificar o lustre.
16. Headshell
Install cartridge here. When installing a cartridge, refer to the
installation instructions supplied by the manufacturer of that
cartridge. During installation, atttach the stylus protector to protect
the stylus tip from damage.
Attach wires as follows:
White (L+)
Left channel +
Blue (L-)
Left channel Red (R+)
Right channel +
Green (R-)
Right channel 17. Headshell Locking Nut
Alimentação: ...........................AC 230V, 50 Hz
Consumo:................................13 Watts
Dimensões: .............................450 (W) x 352 (D) x 148,5 (H)
Peso: ......................................12,45 Kg
Attach headshell by inserting into the front end of the tone arm, then
turn the locking nut clockwise with the headshell firmly held
horizontally.
18. S-Shaped Tone Arm
19. Tone Arm Clamp and Rest
Use this rest for the tone arm and clamp it in position during
transportation.
20. Tone Arm Lift
This elevates the tone arm above the record surface.
High Q30 D
32
High Q30 D
5
21. Tone Arm Lift Adjustment Screw
5.
Controls the amount of lift.
Pontos Estroboscópicos
y 30
y 30
50 Hz
22. Tone Arm Lever
z 45
Controls the up and down action of the tone arm lift.
60 Hz
z 45
23. Anti-Skate Control
This applies inward force to the tone arm so it doesn’t skip outward
across the record due to the centrifugal force of the record spinning.
Cartridge manufacturers usually specify the proper setting of this.
6.
Coloque o prato no fuso central.
7.
24. Counterweight
Adjustment creates the proper downward pressure of the stylus to
the record. Attach now by sliding the counterweight onto the rear of
the tone arm. Twist it lightly and it will screw onto the rear shaft of
the tone arm.
Prato
Fuso Central
Mantém o prato e os discos centrados. Coloque o slipmat fornecido
no fuso central.
8.
Adaptador de 45 RPM
Coloque este adaptador no fuso central para reproduzir discos de 7”
com o orifício central maior.
9.
Botões de Direcção
Determina qual a direcção para que o prato irá girar.
10. Suporte das Dobradiças da Tampa
Coloque aqui as abas de baixo das dobradiças da tampa depois de
terminar a montagem.
11. Suporte Para Uma Cabeça De Leitura Extra
Coloque aqui uma cabeça de leitura extra
12. Montagem do Braço.
Explicado na secção do prato.
13. Ajuste de Pitch
Use este controlo para alterar a velocidade do prato quando o trinco
de quartzo está inactivo.
14. Trinco de Quartzo
ON – Não permite o uso do ajuste de Pitch
OFF – Permite o uso do ajuste de Pitch
15. Luz
Pressione este botão para a direita e irá aparecer uma luz dirigida á
posição da agulha.
6
High Q30 D
31
High Q30 D
FUNÇÕES
OPERATING
1.
Turn the power dial on and the speed indicator and the strobe
illuminator will light up.
2.
Turn on and raise the target light for illuminating the stylus tip by
pushing the target light button.
3.
Put a record on the turntable mat. When playing a 45 rpm record
with a large center hole; place the 45 rpm adapter on the center
spindle.
4.
Set the rotation speed (33/45/78) to match the record.
5.
Release the arm clamp.
6.
Set the cueing lever to the upwards position.
7.
Press the start/stop button and the turntable platter will start to
rotate.
8.
Move the tone arm over the desired groove.
9.
Set the cueing lever to the down position, the tone arm will descend
slowly onto the record and playing begins.
10. Set the desired pitch adjustment range by depressing the QUARTZ
button untill the desired pitch is reached. Options are ±10% or
±20%.
1.
11. Adjust the pitch to the desirable speed. During play, observe the
strobe dots. If they appear on the right, the pitch is slower than the
rated speed. If they flow to the left, the rated speed is used. When
the strobe dots appear stationary, wich means the platter is in normal
turntable speed, move the pitch control slider up or down to adjust
the speed.
Interruptor de Potência
Ligar – Rodar para a direita
Desligar – Rodar para a esquerda
2.
START/STOP
Ao pressionar uma vez inicia o motor do prato, se pressionar activa o
bravão.
3.
Botões de Velocidade do Prato
13. When playing has finished, raise the cueing lever, move the tone arm
to the armrest and secure the tone arm with the arm clamp.
14. Turn off the target light by pushing the light down.
33 – 33 RPM
45 – 45 RPM
78 – Pressione os botões 33 e 45
4.
12. To stop play, lift tone arm with cueing lever.
15. Press the start/stop button to stop the platter from rotating.
16. Turn the power dial to turn off the power.
Botão de Pitch
Pressione este botão para alternar entre o pitch entre 10% e 20%.
High Q30 D
30
High Q30 D
7
FRANÇAIS
PORTUGUÊS
CARACTERISTIQUES
CARACTERISTICAS
•
Contrôle de la vitesse ±10% / ±20%
•
Ajuste de pitch de +/- 10% ou +/- 20%
•
Bras métallique en forme de ‘S’
•
Braço em metal
•
Moteur avec haut niveau de traction
•
Motor do prato de alto torque
•
Bouton marche/arrêt
•
Botão Start/Stop
•
Frein très puissant
•
Travão de alto torque
•
3 vitesses : 33/45/78
•
Velocidades de 33/45/78 RPM
•
Direction du plateau avant/arrière
•
Rotação do prato para a esquerda e para a direita
•
Eclairage de l’aiguille
•
Luz
•
Bras équipé de :
•
Contre-poids
•
Réglage de la hauteur
•
Réglage anti-skating
•
Verrou de hauteur
•
Levier avec réglage de la hauteur
•
Porte-bras avec verrou
•
Braço constituído por:
•
Vitesse contrôlée par quartz 0%
•
Adaptateur 45 rpm
•
Emplacement pour cellule supplémentaire
•
Sorties :
•
Audio (gauche, droite et masse)
•
Possibilité de contrôle de 2 paramètres ‘marche/arrêt’ à partir
d’un interrupteur externe (mixer)
•
Réglage du niveau des pieds
•
Couvercle en plexi fumé amovible
8
•
•
•
•
•
•
•
High Q30 D
Contra peso
Ajuste de altura
Ajuste de deslizamento
Trinco de altura
Elevador de alavanca com ajuste de altura
Suporte para o braço com mecanismo de trinco
Trinco de quartzo com o pitch a 0%
•
Adaptador de 45 RPM e suporte
•
Suporte para uma cabeça de leitura extra
•
Saída para:
• Audio ( Esquerda, Direita e Terra )
• Velocidade do prato – Para ser usado com equipamentos de
processamento exteriores
• Controlo exterior de Start/Stop
•
Pés ajustáveis para nivelar o prato.
•
Tampa facilmente removível
29
High Q30 D
FUNCIONAMIENTO
CARACTERISTIQUES PRINCIPALES
1. Poner el interruptor principal de encendido sobre ON, el indicador de
velocidad y la indicación estroboscopica se encienden.
2. Encender la luz de la capsula pulsando el botón adecuado.
3. Placese un disco sobre el patinador. Para utilizar un disco 45 rpm,
coloquese el adaptador el el eje central.
4. Elijase la velocidad (33/45/78) segun el disco.
5. Soltar el cerrojo del brazo.
6. Poner la palanca del eleva brazo en posición alta.
7. Pulsar el boton STRAT/STOP y el platillo empezara a girar.
8. Disponga el brazo sobre la posicion deseada.
9. Poner la palanca del eleva brazo en posición baja, el brazo bajará
despacio sobre el disco.
10. Ajustar la velocidad deseada desactivando el boton Quartz.
Las opciones son +/-10% o +/-20%.
11. Ajustese la velocidad deseada. Durante la reproducción de un disco,
observe la indicación estroboscopica. Si las marcas aparecen a la
derecha, la velocidad es mas lenta que 0%. Si las marcas aparecen a
la izquierda, es mas rapida que 0%.
1.
12. Para parar la lectura, levante el brazo con la palanca.
13. Cuando se acabe la lectura, levante el brazo con la palanca, mueva el
brazo hasta el soporte y fije con el cerrojo.
Interrupteur principal
On – Tourner vers la droite
Off – Tourner vers la gauche
2.
14. Apagar la luz de la capsula.
Bouton MARCHE/ARRET
Une pression démarre le moteur, la suivante le freine.
15. Pulsar el boton START/STOP para parar la rotacion del platillo.
3.
16. Poner el interruptor principal de encendido sobre OFF.
Sélecteur de vitesse
33 tours - pousser 33
45 tours - pousser 45
78 tours - pousser 33 y 45
4.
Contrôle de vitesse
Pousser le bouton pour choisir une vitesse de 10% et de 20%.
High Q30 D
28
High Q30 D
9
5.
Indication stroboscopique
y 30
y 30
50 Hz
z 45
6.
21. Tornillo de ajuste de elevación
Controla el nivel de elevación del brazo.
60 Hz
22. Palanca del eleva brazo
z 45
Permite accionar la elevación del brazo.
Plateau
23. Control anti deslizante
Placer ce dernier dans l’axe central.
7.
Mantiene el brazo sobre el disco sin que el brazo sea influido por la
fuerza centrifuga. Los fabricantes de capsulas suelen especificar las
caracteristicas de peso.
Axe central
Permet garder le plateau et les disques centrés.
Placer la feutrine sur le plateau.
8.
Adaptateur 45 tours
9.
Bouton de direction
24. Contra peso
Una vez instalado este en la parte trasera, se equilibra el brazo y
ajusta el peso correspondiente a la capsula con un jiro de izquierda a
derecha.
Indique le sens de rotation du plateau.
10. Charnière pour couvercle
11. Emplacement pour une cellule supplémentaire
12. Assemblage du bras
Voire plus loin dans la section d’assemblage du bras.
13. Contrôle de la vitesse
Permet le changement de la vitesse du plateau quand le verrou
Quartz est désactivé.
14. Verrou Quartz
On – maintien la vitesse du plateau a 0%
Off – permet d’utiliser le contrôle de vitesse
15. Eclairage de l’aiguille
Pousser sur le bouton droit pour éclairer l’aiguille.
10
High Q30 D
27
High Q30 D
ENSAMBLAJE DEL BRAZO
AVANT L’UTILISATION
Vérifiez que les éléments suivants se trouvent dans l’emballage :
•
•
•
•
•
•
•
•
Plateau
Feutrine
Couvercle plexi
Adaptateur 45 tours
Contre-poids
Porte-cellule
Mode d’emploi
Cellule
SPECIFICATIONS
16. Porta capsula
Instalar la capsula aquí. Seguír las instrucciones de instalación
disponibles con la capsula. Durante la instalación, dejar la protección
sobre la capsula para evitar daños.
•
Nettoyer régulièrement la cellule à l’aide d’une brosse douce pour
enlever la poussière.
Esquema de instalación :
Blanco (L+) Canal izquierdo +
Azul (L-)
Canal izquierdo Rojo (R+)
Canal derecho +
Verde (R-)
Canal derecho -
•
S’il y a trop de souffle ou de distorsion du son, contrôlez ou
remplacez l’aiguille.
•
Nettoyer le couvercle et le plateau de temps en temps à l’aide d’un
tissu doux et sec.
17. Tuerca de porta capsula
Fijar el porta capsula insertiendolo en el brazo, girar la tuerca a la
izquierda manteniendo el porta capsula horizontal.
18. Brazo en ‘S’
Alimentation:........................... AC 230V, 50 Hz
Consommation: ....................... 13 W
Dimensions: ............................ 450 (W) x 352 (D) x 148,5 (H)
Poids: ..................................... 12,45 Kg
19. Cerrojo y soporte del brazo
Utilizese el cerrojo para fijar el brazo durante el transporte.
20. Elevacion del brazo
Permite levantar el brazo del disco.
26
High Q30 D
High Q30 D
11
ASSEMBLAGE DU BRAS
ANTES DEL USO
Verifique que los componentes siguientes estén incluidos en el bulto con
la unidad principal :
•
•
•
•
•
•
•
•
Platillo
Patinador
Tapa anti-polvo
Adaptador 45 rpm
Contra peso
Porta capsula
Instrucciones de funcionamiento
Capsula
ESPECIFICACIONES
16. Porte-cellule
Installer la capsule ici. Suivre les instructions d’installation fournies
avec la cellule. Durant l’installation, placer le cache de protection sur
l’aiguille pour éviter les dégâts.
Schéma d’installation:
Blanc (L+)
Canal gauche +
Bleu (L-)
Canal gauche Rouge (R+) Canal droit +
Vert (R-)
Canal droit 17. Verrou du porte-cellule
Serrer le porte cellule sur l’avant partie du bras en le tenant bien
horizontal.
•
Limpiar periodicamente la capsula con un cepillo suave para evitar la
acumulación de polvo.
•
Si distorsión o ruido, controlar el estado de la capsula. Si necesidad,
remplazarla por una nueva.
•
Limpiar la tapa y el platillo de vez en cuando con un trapo suave y
seco.
Alimentación: .......................... AC 230V, 50 Hz
Potencia total: ......................... 13 W
Dimensiones: .......................... 450 (W) x 352 (D) x 148,5 (H)
Peso: ...................................... 12,45 Kg
18. Bras en forme de ‘S’
19. Verrou et porte-bras
Utiliser le verrou pour immobiliser le bras durant le transport.
20. Lève-bras
Permet de surélever le bras du disque.
12
High Q30 D
High Q30 D
25
5.
Indicación estroboscopica
y 30
y 30
50 Hz
z 45
6.
21. Vis de réglage du lève-bras
Contrôle le niveau d’élévation du bras.
60 Hz
22. Levier lève-bras
z 45
Actionne le lève-bras.
Platillo
23. Contrôle anti-skating
Plazese en el eje central.
7.
Maintient le bras sur le disque sans que celui-ci ne subisse la force
centrifuge. Les caractéristiques de poids sont généralement précisées
dans le mode d’emploi des cellules.
Eje central
Permite guardar el platillo y los discos centrados.
Plazese el patinador sobre el platillo.
8.
Adaptador 45 rpm
9.
Botón de dirección
24. Contre-poids
La bague chiffrée orientée vers la cellule, fait glisser le contre-poids
dans l’axe du bras jusqu’à un parfait équilibre horizontal. Au niveau
de la bague, placez le « 0 » face au trait sur l’axe du bras. Le bras
toujours en équilibre, ajoutez maintenant le poids correspondant à la
cellule en faisant tourner tout le contre-poids ( ex: 3 gr).
Indica el sentido que seguirá el platillo.
10. Bisagra para tapa
11. Emplazamiento para capsula estra
Placese aqui una capsula estra.
12. Ensamblaje del brazo
Explicado en la sección del brazo.
13. Contról de velocidad
Permite cambíar la velocidad del platillo cuando el cerrojo Quartz esta
inactivado.
14. Cerrojo Quartz
On – mantiene la velocidad del platillo a 0%
Off – permite utilizar el control de velocidad
15. Alumbrado de la capsula
Pulsar el botón derecho para encender la luz situada en la posición de
la capsula.
24
High Q30 D
13
High Q30 D
FONCTIONNEMENT
CARACTERISTICAS PRINCIPALES
1. Mettre l’interrupteur principal sur la position ON, l’indicateur de vitesse
et stroboscopique s’allument aussitôt.
2. Allumer l’éclairage direct de l’aiguille.
3. Placer un disque sur la platine. Pour utiliser un disque 45 tours, placer
l’adaptateur sur l’axe central.
4. Choisir la vitesse (33/45/78) en fonction du disque.
5. Lâcher le verrou du bras.
6. Actionner le levier lève-bras.
7. Presser le bouton MARCHE/ARRET et le plateau se mettra à tourner.
8. Déplacer le bras vers la position souhaitée.
9. Baisser le levier lève-bras, le bras se posera alors doucement sur le
disque.
10. Régler la vitesse souhaitée après avoir désactiver le bouton Quartz.
Les options sont de ±10% ou ±20%.
11. Régler la vitesse. Durant la lecture du disque, observer les repaires
stroboscopiques. Si les repaires apparaissent à droite, la vitesse est
inférieure à 0%. Si elles apparaissent à gauche, la vitesse est
supérieure à 0%.
1.
12. Pour arrêter la lecture, lever le bras à l’aide du levier.
Interruptor principal de encendido
On - Rotación Derecha
Off - Rotación Izquierda
13. Une fois la lecture achevée, lever le bras à l’aide du levier, déplacer
celui-ci sur la porte-bras et le fixer à l’aide du verrou.
2.
14. Eteindre l’éclairage de l’aiguille.
Botón START/STOP
Una presión arranqua el motor y la siguiente utiliza el freno.
15. Presser le bouton MARCHE/ARRET pour arrêter le plateau.
3.
16. Mettre l’interrupteur principal sur la position OFF.
Selectado de velocidad
33 rpm - pulsar 33
45 rpm - pulsar 45
78 rpm - pulsar 33 y 45
4.
Control de velocidad
Pulsar el botón para escoger 10% y 20% de velocidad.
High Q30 D
14
High Q30 D
23
ESPAGŇOL
NEDERLANDS
CARACTERISTICAS
KENMERKEN
•
Control de velocidad ±10% o ±20%
•
±10% of ±20% snelheidsregeling
•
Brazo en ‘S’ metalico
•
Volledig metalen pick-up arm
•
Motor con alto nivel de traccion
•
Krachtige draaimotor
•
Puesta en marcha
•
Start / Stop toets
•
Freno potente
•
Krachtige rem
•
3 velocidades : 33/45/78
•
33/45/78 toeren snelheid
•
Direccion adelante/atras
•
Voorwaarts en achterwaarts draaien
•
Iluminacion de capsula
•
Naaldverlichting
•
Brazo equipado de :
•
Contrapeso
•
Reglage de altura
•
Reglage anti-deslizante
•
Cerrojo de altura
•
Ajuste de elevacion
•
Porta brazo con pestillo
•
Pick-up arm met
•
Velocidad controlada por quartz 0%
•
Adaptador 45 rpm
•
Emplazamiento para capsula estra
•
Salidas :
•
Audio (izquierda/derecha & massa)
•
Posibilidad de arranque desde mezclador
•
Ajuste de pies a nivel
•
Tapa descapotable
22
•
•
•
•
•
Tegengewicht
Hoogteregeling
Skating regeling
Hefboom met hoogteregeling
Armhouder
•
Quartz lock
•
45 toeren adaptor en houder
•
Extra naaldhouder
•
Uitgang voor
• Audiosignaal
• Snelheid van het draaiplateau
• Externe start/stop functie
High Q30 D
•
Regelbare voeten
•
Afneembaar plexi stofkap
High Q30 D
15
BELANGRIJKSTE KENMERKEN
BEDIENING
1.
Schakel het toestel aan. De snelheidsindicator en de stroboverlichting
lichten op.
2.
Schakel de naaldverlichting in door op de toets te drukken.
3.
Leg een plaat op de draaitafelmat.
4.
Stel de draaisnelheid in, afhankelijk van de plaat (33/45/78 toeren).
5.
Maak de arm los uit de houder.
6.
Plaats de lift in opwaartse positie.
7.
Druk op de start/stop toets en het draaiplateau zal beginnen te
draaien.
8.
Breng de arm naar de gewenste groef.
9.
Laat de arm zakken met behulp van de lift, de arm zal langzaam op
de plaat zakken en het spelen begint.
10. Stel de gewenste pitch variatie in door de quartz toets in te drukken.
U heeft de keuze tussen ±10% of ±20%.
11. Stel de pitch in op de gewenste snelheid. Kijk tijdens het afspelen
naar de strobo punten. Wanneer deze op het plateau vast lijken te
staan, speelt u de plaat op normale snelheid af (pitch=0%).
1.
2.
3.
Voedingsschakelaar
12. Om te stoppen met afspelen, brengt u de arm met behulp van de lift
weer omhoog.
AAN - draai naar rechts
UIT - draai naar links
13. Breng de pick-up arm weer in de armhouder en zet de arm vast.
14. Zet de naaldverlichting uit door deze naar beneden te duwen.
START / STOP
15. Duw op de start/stop toets om het draaiplateau te stoppen.
Eénmaal drukken start de draaimotor, nogmaals drukken activeert de
rem.
16. Schakel het toestel uit.
Toerental Toets
33 toeren - druk 33
45 toeren - druk 45
78 toeren - druk op 33 en 45
4.
Pitch Toets
Druk op deze toets om tussen 10% en 20% snelheidsvariatie te
wisselen.
16
High Q30 D
High Q30 D
21
21. Correctieschroef Lift
5.
Met deze schroef kunt u de instelling van de hendel aanpassen.
Strobo Punten
y 30
y 30
50 Hz
22. Hendel voor manipulatie van de pick-up arm lift
z 45
23. Anti-Skate Controle
Dit oefent een binnenwaartse druk uit op de arm zodat deze niet
over de plaat naar buiten schuift, te wijten aan de middelpuntvliedende kracht tijdens het draaien van de plaat.
Gelieve de specificaties van de naald te raadplegen voor de exacte
instelling van de anti-skate.
24. Tegengewicht
Deze instelling zorgt voor de juiste neerwaartse druk van de naald op
de plaat. Bevestig het door het tegengewicht op het achterstuk van
de arm te schuiven en draai lichtjes totdat de arm perfect in balans is
(=zweeft). Zet het indicatieplaatje op ‘0’ (draai enkel het
indicatieplaatje). Draai nu het volledige tegengewicht door tot op het
gewenste gewicht (zie specificaties van de naald).
6.
60 Hz
z 45
Draaiplateau
Leg deze op de centrale as.
7.
Centrale As
Houdt het draaiplateau en de platen in het midden.
Plaats de bijgeleverde slipmat op de centrale as/draaiplateau.
8.
45 Toeren Adaptor
Leg deze op de centrale as wanneer u 7” plaatjes met groot gat in
het midden afspeelt.
9.
Richtingstoets
Geeft aan in welke richting het draaiplateau zal draaien.
10. Scharnierhouders van de stofkap
11. Extra naaldhouder
12. Pick-up arm
Zie verder voor specifieke uitleg.
13. Snelheidsregeling
Gebruik deze fader om de snelheid aan te passen wanneer de quartz
lock niet actief is.
14. Quartz Lock
AAN - de snelheid blijft constant 0%
UIT - snelheid kan aangepast worden met de fader
15. Naaldverlichting
Druk op de rechtertoets en de naaldverlichting zal opspringen en zich
op de naald richten.
20
High Q30 D
High Q30 D
17
VOOR GEBRUIK
PICK-UP ARM
Controleer of de volgende delen in de verpakking zitten:
•
•
•
•
•
•
•
•
Draaiplateau
Slipmat
Stofkap
45 toeren adaptor
Tegengewicht
Celhouder
Handleiding
Cartridge
SPECIFICATIES
•
Reinig de naald regelmatig met een zacht borsteltje om opeenhoping
van stof te vermijden.
•
Wanneer de klank vervormd is of veel ruis bevat, controleer dan de
naald. Indien deze versleten is, vervang dan door een nieuwe naald.
•
De stofkap en de draaitafel moeten regelmatig worden
schoongemaakt met een zachte, droge doek.
16. Celhouder
Monteer de cartridge hier. Gebruik de installatie instructies
meegeleverd met de cartridge. Laat tijdens de installatie de
naaldbescherming zitten, zodat de punt van de naald niet wordt
beschadigd.
Bevestig de draden als volgt:
Wit (L+)
Links kanaal +
Blauw (L-)
Links kanaal Rood (R+)
Rechts kanaal +
Groen (R-)
Rechts kanaal -
Voeding: .................................AC 230V, 50 Hz
Verbruik: .................................13 Watts
Afmetingen: ............................450 (W) x 352 (D) x 148,5 (H)
Gewicht:..................................12,45 Kg
17. Celhouder vergrendeling
Breng de celhouder in op het voorste stuk van de arm, draai de
vergrendeling vast in wijzerrichting terwijl u de celhouder stevig
horizontaal houdt.
18. S-vormige Pick-up Arm
19. Pick-up armhouder
De houder dient om de arm vast te zetten tijdens rust of transport.
20. Pick-up Arm Lift
Hiermee kunt u de arm optillen tot boven de plaat.
18
High Q30 D
High Q30 D
19