1
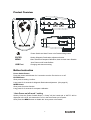
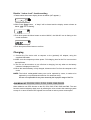
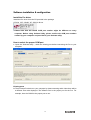
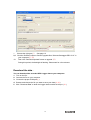
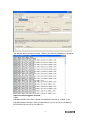
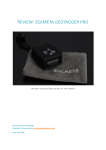
SOLMETA
Geotagger Pro
User’s Manual
Shenzhen Solmeta Technology Co., Ltd
Address: Room 327, Building 5, Zhongxing Industrial Chuangye
Road, Nanshan District, Shenzhen, China
Tel:
:0755-
-27809717 Fax:
:0755-
-27809719
Email: [email protected]
Website: www.solmeta.com
Version updated on 2009/12/30
Introduction
Thank you for purchasing Solmeta Geotagger Pro GPS unit, a geo-tagging device
especially for Nikon cameras which the GPS information can be directly inputted,
the GPS data information such as latitude, longitude, altitude and Coordinated
Universal Time(UTC)can be automatically written in the photo files.
And it also can be used as a GPS Data Logger with 8MB flash memory.
Be sure to read this manual thoroughly before use.
Unique Features
﹡ Used with a Nikon camera, the Geotagger Pro provides real time position (latitude,
longitude, altitude) and UTC time information to your DSLR camera and records the
locations to each digital image files taken by your camera.
﹡ Equipped with 3-axis electronic compass which can record the heading and pitching
angle and roll angle. Its magnetic delination is adjustable.
﹡ Easy to read LCD display, showing real-time related information.
﹡ Built in internal rechargeable battery, lasting up to 10 hours. Automatically switch over
to Nikon camera for power source when the device is in low on power.
﹡ Auto Power on/off design. The Pro will turn on when the camera is turned on and will
turn off when the camera is turned off. ( For mode setting see page 4)
﹡ Indoor Lock GPS signal fixing ability.
﹡Built in a 8MB flash memory, can be used as a GPS Data Logger.
﹡Also for use with other digital cameras with hot shoe, each time the camera takes a
picture with the Pro attached ,the device automatically records GPS data in its memory,
the GPS data information can later be matched with the photos by software.
﹡Firmware upgradeable.
NOTE
﹡Universal Time Coordinated (UTC)
The UTC data is provided by the GPS and is independent of the camera clock.
﹡Indoor Lock GPS signal fixing ability
It is a unique feature of Solmeta GPS products .The feature allows the Pro device to
continuously to supply location information to the camera, even if the signals from GPS
satellites are blocked. If you should enter a place, such as a building, where the roof
blocks the signals from the GPS satellites, the Pro device memorizes the last location
fix and sends this location to the camera for each photograph taken. Once you leave
the covered area, the Pro device will automatically reacquire the GPS signal and will
continue to record the new location information to the files on your camera as usual.
(The default is Lock. Disable Lock function please see page 5)
Packing List
1×Geotagger Pro GPS Unit.
1×Protection bag.
1×Y-1 cable for connection to cameras with 10-pin remote terminals.
1×Y-2 cables for connection to cameras with accessory terminals,such as Nikon D90
or D5000.
1×USB cable for charging and data transmission.
1×Camera strap adapter.
1×One CD containing user’s manual and software utilities.
Optional item(for non Nikon cameras)
1x Flash hot shoe adapter
Supported Cameras
The Pro can be used with the following cameras:
Camera
Required cable
D3,D700,D300,D2X<D2XS,D2HS,D200
Y-1
D90,D5000
Y-2
3
Product Overview
Power Switch and Auto Power on/off mode setting button
ENTER
MENU
USB Port
Setting /Magnetic Declination adjustment button
Menu selection/Compass Calibration ,back to main menu Disable
Auto Power on/off mode button
Charging and data connecting
Button Instruction
Power Switch Button
Press the power switch button for 2 second to turn the Pro device on or off.
ENTER Button
Short press to setting / confirm.
Long press for 2 seconds for Magnetic Declination adjustment. (See page10)
MENU Button
Short press for select function.
Long press for 2 seconds for compass calibration.
“Auto Power on/off mode” setting
Quickly Press the Power Switch Button, a “beep” will be heard and a “AUTO” will be
displayed in the LCD, this means the Pro is in the Auto Power on/ off mode.
Short press the MENU button to disable the “Auto power on/off mode”.
4
Disable “ Indoor Lock” function setting
1.Please select the screen display shown as below (LAT appears )
2.Short Press Enter button, a “beep” will be heard and the display screen shown as
below, LOC icon is flashing
3.Then short press the Menu button to select UNLOC, the UNLOC icon is flasing on the
screen as below
4.Then short press Enter button to confirm.
Charging
1. Connect the Pro device with a computer or the (optional) AC adaptor, using the
supplied USB cable.
2. Make sure the computer provides power. Full charging time for the Pro is around two
and half hours.
3. The Pro can be turned on or turn off when in charging, but only when on the battery
indicator is displayed in the LCD.
4. When the internal battery is fully charged, disconnect the Pro from the computer or AC
outlet.
NOTE: The built-in rechargeable battery can not be replaced by users; it needs to be
replaced by our professional technician if it needs servicing.
We are not responsible for any loss caused by the improper usage of the Pro.
Auto Meter off: D3,D3X, D3S, D700, D300, D90,D5000
Nikon added a new GPS function to the D3, D3X, D3S, D700, D300 and D90. The new
function resolved a battery drain issue by allowing the user to select the metering system
to stay On or auto Off when GPS signals are received to reduce power consumption.
5
LCD Display overview
1.Function indicator
2.GPS indicator
3.Battery indicator
4.Latitude , longitude indicator
5.Data indicator
LON=Longitude, W-west, E-east
LAT=Latitude ,S-south N-north
ALT=Altitude (unit: meter)
SPE=Speed (unit: km/h)
DAT=Date (UTC)
TIM=Time (UTC)
6
SAT=The numbers of satellite which are used for signal acquisition.
DIR=The numbers indicates the compass heading information .
GRA=Gradienter. The numbers in the left is the pitching angle data, the numbers in the
right is the roll angle date, and the bar immediately in the position left of the
numbers indicates the status of the object.
MEM=Memroy . The numbers indicates the used memory capacity in percent.
CON=Continuous icon indicates the Pro continues to record the GPS data in logging
mode.
GPS indicator: GPS Icon indicates the Geotagger Pro is receiving a signal or not. A
flashing GPS icon indicates that the Pro is sesearching for a GPS signal.
A static GPS icon indicates that the Pro is providing the GPS data to the
camera.
Battery indicator: The icon indicates the battery level.When the internal battery of the Pro
is low, battery icon will flash. When internal battery of the Pro is
extremely low, the battery icon will flash and users can hear “beep”
tone. For Nikon camera users, the Pro will automatically switch to use
the camera battery once its own battery is depleted.
7
Others
Backlight is automatically on with every button-press. It will turn off automatically after 6
seconds.
Beep tone:
Short press the button for 1 second, and you will hear one beep.
Long press the button for 2-3 second, no beep .
Automatically cycle display in over 3 minutes without pressing button.
LON, LAT, TIM, DIR 2 seconds for one display.
Setting up instruction
Fix the Pro with GPS satellites signal
﹡To get a quick fix, please take the Pro and your camera to an open outside space and
stand still before connecting the Pro with camera. Holding the Pro in one of your hand
still will enable faster acquisition process.
﹡Turn it on, then wait for the GPS signal to be fixed.
The GPS icon displayed on the LCD first will be flashing, a flasing GPS icon indicates
that the GPS device is searching for satellite signal, and after a while, the GPS icon
will be static, this means that the GPS signal on the Pro is now fixed. The LCD will
now display related information,latitude, longitude, time, compass heading.
Connecting the Pro with camera
1.Turn the camera off.
2.Mount the Pro onto the hot shoe or attach to the camera strap(see the photo instruction
below)
3. Insert the 10-pin connector of Y-1 into the camera’s 10-pin remote terminal and tighten
the locking nut (for cameras with 10-pin Remote Terminals)OR insert the 8- pin
connector of Y-2 into the GPS terminals of Nikon D90 and D5000, be sure that the
connector is in the correct orientation. Do not force the connector and ensure the pins
line up in the correct way. Then insert the mini USB connector of Y-1 or Y-2 into the
USB terminal of the Pro.
4.Turn the camera On, a GPS icon will be displayed in the control panel on top of the
camera, and as soon as the icon will stay steady the photos you are taking will be
recorded with geographical information.
Camera GPS ICON indication
No GPS icon
Not connected with the camera
GPS icon Flashing
Not fixed, signal searching
GPS icon displayed
GPS fixed
8
Mounting the Pro on the camera
Fixing the Pro onto the hot shoe of the camera
Using the adapter and camera strap
Notes
1. If the Pro unit is properly connected, the camera will display a blinking GPS icon in the
top LCD control panel as the GPS receiver is searching for a signal. The icon will
stop blinking when a signal has been established and the Pro is ready to supply the
current position.
2. If there is no blinking GPS icon, check the connection, and make sure the device is
powered on.
3. To improve the GPS data accuracy, we suggest holding the camera steady for a few
minutes when initially fixing the signal, this is especially important for the value of
altitude.
4. The Pro may require a longer time to obtain a position fix when first started up. Initial fix
can take around two minutes or even longer in a weak signal environment. Following
the initial fix signal acquisition in the same location is much faster, even if the Pro has
been manually turned off (around 20 seconds). An open sky, outdoor environment will
enable even faster acquisition process.
5. Some Nikon cameras have an‘auto meter off’option that is also a power saving
method. We suggest adjusting it to 30 seconds or more to avoid missing the GPS data
during acquisition, or half press the shutter to activate the GPS when taking a photo.
9
Compass Calibration Procedure
Why calibrate?
?
The compass in the Pro is sensitive to nearby magnetic objects that could cause
measuring error. To compensate for this error it is sometime necessary to perform an
calibration. (If the compass is accurate, there is no need to perform the calibration)
How to calibrate
1. Mount the Pro onto the camera’s hot shoe and turn the Pro and the camera on.
2. Long press MENU button for 2 seconds. LCD display as below:
3. Rotate the Pro device 360°clockwise slowly, during this period, ensure you keep Pro
level. Take as much as 30 seconds to complete a circle.
4. With the Pro mounted on the hot shoe, turn camera forward through 180°and return
the camera to its original position. Take as much as 30 seconds to complete a circle.
5. Press MENU button again to confirm.
6. Repeat 3, 4 ,5 steps one or two times if necessary.
Magnetic declination adjustment.
1. Turn on the Pro device.
2. Long press ENTER Button for 2 seconds , LCD displays as below:
3. Point the Pro to the True North (see picture above , you should find the True North in
you location with help of map or other compass), and keep it level to the ground.
4. Continue to hold the Pro pointing the true North for approximately 20 seconds, until
the GPS icon blinks. The magnetic declination has been calibrated.
10
System Reset
If the compass is not accurate after the self calibration, it should be reset.
With the Pro device switched on, firmly press both the ENTER and MENU button together
for about 2 seconds. The screen will display as below:
Press ENTER button to confirm system reset.
Other digital camera with hot shoe
1. Fix the Pro with GPS satellites signal,same as the using of Nikon camera.
2. Turn the camera off.
3. Mount the Pro onto the hot shoe, same as when using a Nikon camera.
4. Turn the camera on and take pictures, then each time you press the shutter, the GPS
data will be automatically recorded into the memory,
5. Download the data to your pc by using the “Solmeta Utility.exe” provided in the CD,
then match photos with the GPS data by software provided in mini CD.
GPS Data Logger function
1. Power On the device.
2. Connect the device to a computer with the USB cable provided in the package.
3. Install the USB driver “Pro driver set up. exe” from the CD provided in the package.
4. Using the application software “Solmate Utility.exe” provided in the CD to download the
log data to the PC, the data will be saved as Solmeta-TIME.txt, eg.
Solmeta_2009923.txt, and can then easily be exported the data to Google Earth,
Picassa, Panoramio, etc.
Please go to the relevant websites for further information.
Setting Continuous Record Mode
1. Select this interface by press the Menu Button.
2. Press the Enter Button ,the CON icon and time will be flashing .
3. Press Menu Button to select the record time.
0.05, 0.10, 0.15, 30, 1.00, 2.00, 4.00, 8.00, 16.00, 32.00, con OFF.
4. Press Enter button to confirm.
11
Software installation & configuration
Install the Pro driver
Install the Pro driver from the CD provided in the package
CP210x_VCP_Win2K_XP_S2K3 4.40.exe
Please note that the virtual COM port number might be different on every
computer .Before using Solmeta Utility, please confirm the COM port numbers
created by your computer and provided to your Solmeta utility.
How to select the proper COM port
1. Open the “Solmeta Utility “, check the existing port before connecting the Pro to your
computer.
Existing ports
2. Then connect Pro device to your computer by data connecting cable. Now there will be
a different Port code displayed. The different Port is the proper port for the Pro. For
example, here the COM3 is the proper port to use.
12
Firmware upgrading
The Pro can be firmware upgraded.
1. Click the
2.
3.
4.
5.
6.
from the CD provided from the package.
Connect the Pro device to your computer with your data connecting cable.
Turn off the Pro.
Press firmly Power button and MENU button together.
You can see the backlight is on
Open the application software “ Solmeta Utility”,
13
7. Choose the right port.(Ⅰ) See page 12.
8,9 Click the “Browse” button to find the upgrade files “Solmeta Geotagger-PRO V1.0” in
your computer.(Ⅱ,Ⅲ)
10. Then click “Download Updata” button to upgrade.(Ⅳ)
During this period, the backlight is flashing. Please wait for a few minutes.
Download the data .
You can download the recorded GPS Logger data to your computer.
1. Turn on the Pro.
2. Connect the Pro to your computer.
3. Choose the proper COM port.(I )
4. Browse and choose the file you want to save your data.( II, III )
5 Click “Download Data” to down the logger data recorded in the pro.( IV )
14
The data file will be saved as Solmeta_TIME.txt (eg. Solmeta_2009923.txt ) as below
Data of hot shoe triggered as below
*flash*
$GPRMC,030223.570,A,2231.1466,N,11355.0952,E,0.40,156.78,131009,,,A*65
$GPGGA,030223.570,2231.1466,N,11355.0952,E,1,04,4.3,39.5,M,-2.6,M,,0000*71
$PTNTHPR,319.4,N,-69.7,N,-82.4,N,A*7C
15
Erase memory
1. Turn on the Pro device
2. Connect Pro device to your computer with data cable provided
3. Select the proper COM port.
4. Click the “Erase Memory” button
Warranty
•
•
•
•
•
•
Solmeta Technology Co., Limited guarantees its product from manufacturing
defects and workmanship for a period of one-year from the date of original
purchase. During the one-year warranty, Solmeta Technology will repair or
replace the product free of charge. Please keep your original invoice as proof
of purchase.
Customers who have products covered under the warranty are required to contact
Solmeta Technology by e-mail for troubleshooting issues before returning the
product.
Customers are responsible for shipping and insurance charges for returning
the product to Solmeta Technology.
Charges will be imposed for repairing product, which is out of warranty
coverage or invalid warranty.
The guarantee is not valid if defect is due to damage caused by incorrect use,
poor maintenance or if persons not authorized by Solmeta Technology have
carried out alterations or repairs.
For the device to be used correctly, the user should strictly adhere to all
instructions included in the user guide and should abstain from any actions
or uses that are described as undesired or which are warned against in the
user guide.
16
Information in this document is subject to change without notice. Solmeta
Technology reserves the right to change or improve their products and to
make changes in the content without obligation to notify any person or
organization of such changes or improvements.
Specifications
GPS
ELECTRICAL CHARACTERISTICS
GPS Chipset
SiRF Star III
Frequency
L1, 1575.42 MHz
C/A Code
1.023 MHz chip rate
Channels
20 channel all-in-view tracking
Tracking sensitivity
-159dBm
ACCURACY
Position Horizontal
10 meters, 2D RMS
1-5 meters 2D RMS, SBAS corrected (WASS,EGNOS,MSAS)
Velocity
0.1m/sec.
Time
1 micro-second synchronized to GPS time
DATUM& PROTOCOL
Datum
WGS-84
GPS Protocol
NMEA 0138 ASCII
Baud Rate
4,800 bps
ACQUISITION RATE
Hot start
1 sec., average
Warm start
38 sec., average
Cold start
42 sec., average
Reacquisition
0.1 sec., average
DYNAMIC CONDITION
Acceleration Limit
Less than 4g
Altitude Limit
18,000 meters (60,000 feet) max
Velocity Limit
515 meters/sec. (1,000 knots) max
Jerk Limit
20 m/sec*3
3 AXIS ELECTRONIC COMPASS
Magnetic Measuring scope
50A/m
Azimuth Range
0-359°
Accuracy
±5°
Resolution
3°
3 AXIS
ACCELERATION SERSOR
Measuring scope
+/- 60°
17
Accuracy
±5°
Resolution
+/- 5°
BATTERY
Battery
500mAh Li-ion
Operation Current
Lower than 60mA
Charging Current
300mA
Operating Conditions
Operating temperature
-10°C -50°C(-2°F ~ 122°F)
Humidity
Operational up to 95% non-condensing
SIZE & WEIGHT
Dimension
56 (L)mmX36(W)mm X 19(H)mm (2.2” [L] x 1.4” [W] x 0.7” [H])
Weight
50g (1.8 oz)
INTERFACE
12 pin USB port, Nikon 10 pin port, Nikon 8 pin port(for Nikon D90), USB charging port, Φ2.5mm remote port
Precautions
•
Do not open, disassemble, o r repair t h e p r o d u c t b y yourself under any
circumstances. Doing so may be dangerous and will invalidate your warranty.
•
Do not expose the product to extremely high temperatures, which can cause
permanent damage. (For example, leaving the device in a closed vehicle
under the sun or in other areas subject to extremely high temperatures.)
•
Do not handle with wet hands, i mme rs e in , or expose to water or rain.
Failure to observe this precaution could result in fire or electric shock.
•
Keep away from fire or flammable gas
•
Turn Off immediately in the event of malfunction. Should you notice smoke or
an unusual smell coming from this product, remove the GPS connector
immediately, and send it back to Solmeta Company. For more information,
please visit our website at www.solmeta.com
18