1
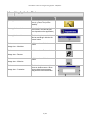
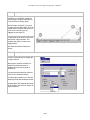
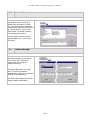
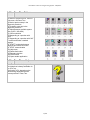
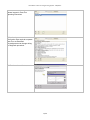
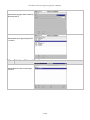
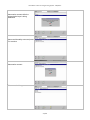
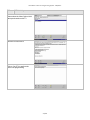
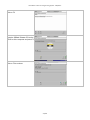
User Manual “Pass Thru Programming System - SAEJ2534”
User Manual
Programming & SCN-Coding
of Emission Related Control Units
with “Pass-Thru Programming System –
SAEJ2534”
Version 0.7.
1/28
User Manual “Pass Thru Programming System - SAEJ2534”
Table of Content
1. General Introduction on Pass Thru SAEj2534 Compliant application
1.1 Using Application Windows
1.2 Star Utilities: Functions Overview
1.2.1 Star Pad: Operation and Interface
1.2.1.1 Star Pad Tool bar detailed description
1.2.1.1.1 Create a new document
1.2.1.1.2 Open a document
1.2.1.1.3 Save a document
1.2.1.1.4 Delete a document
1.2.1.1.5 Print a document
1.2.1.1.6 Page preview
1.2.1.1.7 Page orientation
1.2.1.1.8 Copy/Cut/Insert
1.2.1.1.9 Undoing and Redoing
1.2.1.1.10 Zoom in/out
1.2.1.2 Star Pad formatting bar detailed description
1.2.1.2.1 Functions of the formatting bar
1.2.1.2.2 Using tabs
1.2.1.2.3 Orientation help
1.2.1.2.4 Navigating within a document
1.2.1.2.5 Formatting functions
1.2.2 Version Information
1.2.3 License Manager
1.2.4 Self Diagnosis
1.3 Introduction on the Pass Thru application
1.3.1 Start the Application
1.3.2 Pass Thru Buttons
1.3.3 Pass Thru Help
3
4
5
6
6
6
7
7
7
8
8
9
9
9
10
10
11
12
13
13
14
14
15
16
16
17
17
2. Example of control unit programming with SDflash Release-CD: Control Unit ME 2.8
2.1 Establish connection
19
2.2 Specify the device
19
2.3 Specify the automobile
20
2.4 Selection of the control unit
21
2.5 Initial startup
23
2.6 SCN Code
28
2/28
User Manual “Pass Thru Programming System - SAEJ2534”
1.1
Using Application Windows
What do you want to do?
How to do it.
Open application window
<double click> on the application
icon (e.g. Pass Thru) on the
desktop.
Close application window
<double click> on the application
icon button in the title bar (the
icon depends on the application)
Move application window
Position the pointer on the blue
title bar and drag it with the left
mouse button.
Window
<Click> on the <Maximize>
button
Change size – Maximize
Window
<Click> on the <Restore> button
Change size – Restore
Window
<Click> on the <Minimize>
button
Change size – Minimize
Window
Change size – Customize
Position the pointer to a window
frame or window corner. When
the two-sided arrow appears,
drag with the left mouse button.
3/28
Where to do it.
User Manual “Pass Thru Programming System - SAEJ2534”
1.2
Star Utilities: Fucntions Overview
Utilities are service applications which assist you in your work.
To access Star Utilities Utilities, select
Programs/PassThru/StarUtilities in the
<Start> menu.
⇒ The Star Utilities applications are
started via the menu item Programs.
⇒ The application symbol is displayed
and hidden via Options.
⇒ Window allows you to arrange
several active applications on the
screen.
The applications can also be started
using the buttons below the menu bar.
The following applications are available:
⇒ Star Pad - A user-friendly word
processor, well suited for the workshop
environment. See Chapter 1.2.1.
⇒ Version Information -- This
contains current version and release
status information for Pass Thru. This
page should be printed for possible
future use as an extra support aid. See
Chapter 1.2.2.
⇒ Licensemanager – Used to enter
the current Pass Thru license keys.
This can be displayed in five-digit
fields. This window also contains the
LAN ID (network identification). See
Chapter 1.2.3.
⇒ Self Diagnosis – A diagnostic
function which supplies information
which is important for the Call Center.
See Chapter 1.2.4.
⇒ Select Printer – If you have more
than one printer at your disposal, you
are offered a selection of appropriate
printer drivers (control programs). See
Chapter 1.2.5.
⇒ Closing Star Utilities – To close
the service applications select the
menu item Close or <click> on the
STAR Utilities logo in the title bar to
select the Close option.
4/28
User Manual “Pass Thru Programming System - SAEJ2534”
1.2.1
Star Pad: Operation and Interface
Star Pad opens in a full-screen view to make it easier and more comfortable to work in the application.
Various buttons are available for working in Star Pad:
1. Open new document.
2. Open a previously saved document.
3. Save a newly created document.
4. Delete a previously saved
document.
5. Print a document.
6. View document in page layout.
7. Arrange page in portrait or
landscape orientation.
8. Cut text and paste elsewhere.
9. Copy text or graphics onto the
clipboard. See Chapter 1.2.1.1.8
10. Paste text or graphics from the
clipboard into your document.
11. Protocol view and processing
Pass Thru.
12. Last action in the test is undone.
13. The undone action is redone.
14.+15. Zoom in/out.
The toolbar contains some data
processing options, for example
- Create file (new)
- Open file
- Save file
- Delete file
A compete list of processing options
can be found under File and Edit.
Menu item View
The menu item View includes a Zoom
option and the option of removing all
bars form the screen display. If a bar is
visible on the screen, this is indicated
by a tick beside the name of the bar.
Note: In our example the format bar
and the ruler are activated. The 100%
zoom setting is also activated.
5/28
User Manual “Pass Thru Programming System - SAEJ2534”
1.2.1.1 Star Pad: Tool bar detailed description
1.2.1.1.1 Create a new document
After Star Pad has been started, an
empty document will appear. If this is
saved and closed, a new document
can be created using button (1). The
standard name Document 2 is given in
the title bar until the user has given the
file a name. Until Star Utilities is
closed, each new document is given a
number in succession. When Star
Utilities Utilities/ Star Pad is started
again, Document 1 is automatically
given as the default file name.
1.2.1.1.2 Open a document
In the selection shown opposite,
<click> with the TrackPoint on the file
to be worked on. This is then
highlighted in blue and is opened by
<clicking> on the <Open> button.
6/28
User Manual “Pass Thru Programming System - SAEJ2534”
1.2.1.1.3 Save a document
The finished document should be
named and saved to the hard disk for
later editing.
A default file name appears in the open
window. This is overwritten with the
actual file name. The name may
contain spaces, but periods are not
allowed.
Note: Use a name which has some
relation to the actual document. This
will make it easier to find the document
at a later date.
Note: If changes have been made to
the document or a new document has
been created, a message will appear
on the screen to this affect when Star
Pad is being closed down.
<Clicking>on <OK> will close the
current document without saving any
changes. By default, the <Cancel>
button is pre-selected to ensure that
the document is not accidentally closed
without having been saved.
1.2.1.1.4 Delete a document
To delete a document, select the
document required. The document
selected will appear marked in blue.
<Click> on the <Delete> button to start
the deletion process. A message will
appear asking for confirmation of final
deletion. Simply <click> on <Yes>.
After this point, the deletion process
can no longer be interrupted. The file is
finally deleted.
1.2.1.1.5 Print a document
The settings in the “Print” dialog box
are preset and do not have to be
adjusted. Select <OK> to print the
document. To print multiple copies,
overwrite the number 1 (5.1) with the
number of copies required or use the
scroll bar arrow (5.2) beside the
number.
Note: Example: Pages 2-4 of a 5-page
document are to be printed. Enter the
number 2 in the box after the word
from (5.3) and the number 4 after the
word to (5.4).
<Click> on <OK> to start printing.
7/28
User Manual “Pass Thru Programming System - SAEJ2534”
1.2.1.1.6 Page preview
The print preview option provides an
overview of the appearance and the
individual pages of a document. These
pages are displayed with a grey
background. Text cannot be read in
this mode. The current page numbers
are displayed in the upper left corner.
Use the scroll bars located at the
bottom right-hand corner to move to
the next or previous page. If you wish
to print the document, <click> on the
print button.
1.2.1.1.7 Page orientation
By default, documents and forms are
displayed on the screen and printed in
portrait orientation. The landscape
orientation can be selected via the
option <Page setup> setup>. To
change the orientation, < click> on the
required selection and confirm by
<clicking> on <OK>.
8/28
User Manual “Pass Thru Programming System - SAEJ2534”
1.2.1.1.8 Copy / Cut / Insert
Cut
Mark the required text and <click> on
the scissors symbol. The marked text
is “cut out”.
Copy
Mark the required text and <click> on
the symbol with the “two pages”. The
marked text can then be copied
elsewhere.
Insert
After “cutting out” or “copying”, the text
is inserted into the current position of
the cursor by <clicking> the third
symbol.
1.2.1.1.9 Undoing and Redoing
Text actions such as deleting
characters, changing the font type and
size, settings tabs and formatting
characters can be undone by
<clicking> on the undo button (12).
If this does not produce the desired
result, the action can be redone by
<clicking> on the redo button (13).
1.2.1.1.10 Zoom in / out
The text display on the screen can be
magnified. <Clicking> on the magnifier
button with the plus sign enlarges the
view. This process can be repeated by
<clicking> again. To return to a smaller
view <click> on the magnifier icon with
the minus sign. The change in size is
only in the screen display and does not
affect the font size in print.
9/28
User Manual “Pass Thru Programming System - SAEJ2534”
1.2.1.2 Star Pad: Formatting bar detailed description
1.2.1.2.1 Functions of the formatting bar
The formatting bar is located beneath
the tool bar buttons.
Star Pad offers a selection of different
fonts. The current font type is
displayed in a window.
1. To select another font, use the
TrackPoint button to <click> once on
the arrow to the right of the window. A
list will appear. A scroll bar is located
to the right of this list. The available
fonts are displayed by scrolling down
the list by <clicking> on the arrow.
<Click> on the upper arrow to return to
previous font.
2. The font size is also displayed in a
drop-down list.
10/28
User Manual “Pass Thru Programming System - SAEJ2534”
Other functions in the formatting bar:
3. Align text to the left.
4. Center text.
5. Align text to the right.
6. Justify text.
7. Bold selected text.
8. Italicize text (at a slight angle).
9. Underline selected text.
Star Pad has four types of tab settings:
10. Left tab - text is aligned to the left.
11. Right tab - text is aligned to the
right.
12. Decimal tab - fractional digit is
placed to the right of the decimal point.
13. Centered tab - text is centered in
the tab.
1.2.1.2.2 Using Tabs
Selecting tab:
Tabs are selected by <clicking> on the
tab you require. The selection remains
active until the next change is made.
When Star Pad is started, the default
setting (left tab) is displayed.
Inserting tabs:
- After selecting a tab, it is inserted by
<clicking> on the gray tab area (1) in
the position at which the tab is to be
inserted.
- To remove tabs position the
TrackPoint pointer on the tab to be
removed, hold down the left TrackPoint
button and drag it down into the
workspace. This removes the tab.
11/28
User Manual “Pass Thru Programming System - SAEJ2534”
1.2.1.2.3 Orientation help
A ruler with dividing lines facilitates
better orientation.
Star Pad offers additional help in the
form of symbols which are located
directly above the ruler:
- The left margin is indicated by a
bisected arrow pointing to the right.
- The right margin is indicated by a
solid arrow pointing to the left.
- Star Pad has a default page width of
approximately 17.5 cm.
Changing margins:
-The left margin can be moved further
to the right by holding down the
TrackPoint button. Ensure that you
drag the bottom corner of the arrow
using the TrackPoint.
- If the TrackPoint button is positioned
on the upper corner, only this corner
will be moved. This causes the margin
of the text line in which you are
currently positioned to move, whilst the
other lines remain unchanged.
- Use the arrow at the end of the line to
change the right hand margin.
12/28
User Manual “Pass Thru Programming System - SAEJ2534”
1.2.1.2.4 Navigating within a text document
The right scroll bar (1) is used for
orientation in a document containing
several pages. Drag the rectangle (2)
in the scroll bar to change page.
Use the bottom scroll bar (1) to move
the page to the far left margin. This can
be done either using the TrackPoint to
<click> on the arrows (3) or by
dragging the scroll bar (2).
Another “position indicator” is offered in
the status bar at the bottom of the Star
Pad window. Page numbers, line
numbers and column numbers are
displayed here.
Note: Each character constitutes a
column.
1.2.1.2.5 Formatting functions
As in the formatting bar, the menu
Format/ Font allows you to change the
font type and size.
Other options are also available, for
example font attributes such as
strikethrough and various types of
underlining.
To superscript and subscript numbers
<click> on the desired selection.
The Page option allows you to choose
between portrait and landscape format.
The description with appropriate image
can be found in the previous section on
Page Orientation.
13/28
User Manual “Pass Thru Programming System - SAEJ2534”
1.2.2
Version Information
Version Information in Star Utilities
This contains current version and
release status information for Pass
Thru. This page should be printed for
possible future use as an extra support
aid. To print directly, <click> on the
<Print> button. No further questions
will be asked by the system.
Thus, the printer must be ready for
operation before you < click> on the
print button
1.2.3
License Manager
License Manager in Star Utilities
Used for entering the current license
keys for Pass Thru. Select DAS
(means Pass Thru) using the
dropdown arrows (1).
This can be displayed in “four-digit”
fields. This can be activated or
deactivated by <clicking> on the button
indicated on the diagram (2).
This window also contains the LAN ID
display (network identification)
14/28
User Manual “Pass Thru Programming System - SAEJ2534”
1.2.4
Self Diagnosis
Self Diagnosis ins Star Utilities
Before contacting the Call Center, the
faulty module should be checked. To
do so, select the button < Self
Diagnosis> under Star Utilities.
All currently active analyses can be
carried out via these buttons.
15/28
User Manual “Pass Thru Programming System - SAEJ2534”
1.3
Introduction into the Pass Thru Application
1.3.1
Start the Application
Information on General Graphics
To start the application, <click> on the
Pass Thru symbol on the desktop.
Alternative: Start/Programs/Pass-Thru
The Pass Thru application is opened in
a new window.
Display of current Pass Thru release
and version information.
Pass Thru is operated using the
keyboard or via the Pass Thru buttons
using the mouse.
16/28
User Manual “Pass Thru Programming System - SAEJ2534”
1.3.2
Pass Thru Buttons
(1) Return to previous menu, return to
main menu, exit Pass Thru
(2) Back to previous step in the
diagnostic procedure
(3) Forward to next step in the
diagnostic procedure
(4) Switch between available system
units (SI=EU / US=USA)
(5) Confirm selection
(6) Responding to a question with
“YES”
(7) Responding to a question with “NO”
or confirm and select a marked
segment
(8) “START” monitoring between
diagnosis and vehicle or control
(9) “STOP” communication
(10) Help menu
(14) Delete fault codes
(15) Repeat a decision
(18) Print function
(19) Open another application
1.2.3
Pass Thru – Help
Pass Thru contains a help system for
quick help that is always available via
the <F6> key.
The function <F6> depends on the
vehicle being diagnosed and the
process position in Pass Thru.
17/28
User Manual “Pass Thru Programming System - SAEJ2534”
General support in Pass Thru
Operating instructions
All function keys
The function keys required to operate
Pass Thru are described.
Key assignments can change during
the diagnostic procedure!
Modification and new features
18/28
User Manual “Pass Thru Programming System - SAEJ2534”
2.
2.1
Example of control unit programming with SDflash release-CD. Control
unit ME2.8.
Establish Connection
Connect the PC via SAE J2435 Device
with vehicle and start “Pass-Thru”.
Please use a battery charger for
backup.
Click on F2 to continue.
Continue with “F2”.
2.2
Specify the Device
Continue with F3
19/28
User Manual “Pass Thru Programming System - SAEJ2534”
Please select your device and press
F3
2.3
Specify the vehicle
Select the vehicle and press F3
Please wait a moment.
20/28
User Manual “Pass Thru Programming System - SAEJ2534”
Please select the type and the steering
side and press F3
Please select motor type and press F3
to continue
2.4
Selection of the control unit
Please select the control Unit and go
on with F3
21/28
User Manual “Pass Thru Programming System - SAEJ2534”
Please wait a moment while the
communication layer is being
established.
Please read the safety notes and press
F3 to continue
Please wait a moment.
This screen should appear.
22/28
User Manual “Pass Thru Programming System - SAEJ2534”
2.5
Initial startup
Please select the Menu Option initial
startup and continue with F3
Start the Process with F2
Click on Yes (F3) to perform the
control unit programming
23/28
User Manual “Pass Thru Programming System - SAEJ2534”
Click on F2
Insert the SDflash Release-CD into the
CD Drive of the computer and press F2
Click on F2 to continue
24/28
User Manual “Pass Thru Programming System - SAEJ2534”
Please wait while the control unit is
being programmed
Please switch OFF the Ignition f the
car and then switch OFF the ignition
box
Please wait
25/28
User Manual “Pass Thru Programming System - SAEJ2534”
Please switch ON the Ignition of the
car and then switch ON the Ignition
Box
Please wait
If the download process has been
successful, there is a selection of 2
options available.
Pushing “F2” finally completes the
downlaod, not erasing any stored faults
(see “Illustration –13-“).
“F3” erases all current faults stored in
any ECU hooked up to the CAN-C bus.
Only select “F3” in case you are
absolute positive that you don’t need
those faults information any more.
26/28
User Manual “Pass Thru Programming System - SAEJ2534”
If you press F3 the following screen will
appear.
Please first switch OFF the ignition of
the car and then switch OFF the
ignition Box
Please wait a moment
Please switch ON the Ignition of the
car and then switch ON the Ignition
Box
27/28
User Manual “Pass Thru Programming System - SAEJ2534”
2.6
SCN code
The control unit programming has
been successful. Now the control unit
needs to be coded.
If necessary insert the VIN and click on
F2
Enter the SCN Code and continue the
procedure of SCN coding depending of
the chosen process: Office, Offline, or
Online (see separate documentation
that is enclosed with the J2534 PassThru software for information and
procedures required to obtain SCN
Codes)
28/28