1
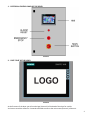
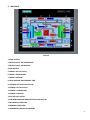
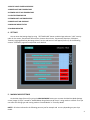
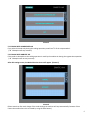
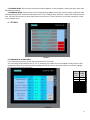
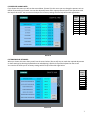
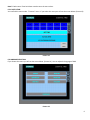
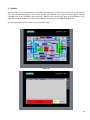
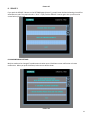
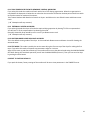
SIEMENS SIMATIC HMI TOUCH SCREEN
BLOWER PURGE
DESICCANT AIR DRYER
HMI USER MANUAL V4
1- ELECTRICAL CONTROL PANEL OF THE DRYER
Picture 1
2- FIRST START OF THE DRYER
Picture 2
At the first start of the dryer you will see the logo (Picture 2) of the brand of the dryer for a while.
You have to touch the screen for 5 seconds to be able to enter to the main screen (Picture 3) of the unit.
2
3- MAIN PAGE
Picture 3
1-START BUTTON
2-DRYER’S OUTLET AIR TEMPERATURE
3-DRYER’S OUTLET AIR PRESSURE
4-STOP BUTTON
5-TOWER 2 ACTUAL STATUS
6-TOWER 2 TEMPERATURE
7-TOWER 2 PRESSURE
8-TOTAL RUNTIME AND ECONOMY TIME
9- ENTERING SETTINGS PAGE BUTTON
10-TOWER 1 ACTUAL STATUS
11-TOWER 1 TEMPERATURE
12-TOWER 1 PRESSURE
13- ACTUAL STEP STATUS
14- ENTERING MACHINE MODE SELECTION PAGE BUTTON
15-BLOWER’S AIR PRESSURE
16-DEWPOINT INDICATOR
17-PNEUMATIC CONTROL AIR PRESSURE
3
18-CHECK VALVE CONTROL PRESSURE
19-DRYER INLET AIR TEMPERATURE
20-TOWER OUTLET AIR TEMPERATURE
21- HEATER TEMPERATURE
22-TOWER INLET AIR TEMPERATURE
23-DRYER INLET AIR PRESSURE
24-MACHINE MODE STATUS
25-ALARM INDICATOR
4- SETTINGS
You can enter the Settings Page by using “SETTINGS PAGE” button on Main Page and enter “1112” security
code. On the screen; Temperature Alarm Limits, Pressure Alarm Limits, Temperature Setpoints, Calibration,
Timesets, Language Selection, Mainpage, Alarms, Service and Service 2 will appear (Picture 4). In the following
sections “SETTINGS” page will be explained more detailed.
Picture 4
5- MACHINE MODE SETTINGS
On the Main Page (Picture 3) by using the MACHINE MODE button you can enter the Machine Mode Settings
screen (Image 3). Dryer is setted to “Heated Blower Purge Desiccant Air Dryer” runing mode as a default. Then you
can select the cooling type and running mode as “Normal Mode” or “Economy Mode”
NOTE!!: All values indicated in the following parts are just for example and can vary depending on your dryer
modal.
4
Picture 5
5.1 COOLING WITH COMPRESSED AIR
If you select this mode only during the cooling operation you will use %7 of the compressed air.
(- 40 C dewpoint will stay constant)
5.2 COOLING WITH AMBIENT AIR
If this mode is selected then the cooling operation is made by the ambient air during the regeneration operation
(- 40 C dewpoint will not stay constant)
After this settings screen, the Mode Selection Screen will appear. (Picture 6)
Picture 6
(Please note that after each change of the mode settings the machine will stop automatically. Because of that
reason the machine has to be re-started by using the Start button.)
5
5.3 NORMAL MODE: Sets the dryer to the Normal Running Mode. In normal mode the towers will switch each other
depending on timesets.
5.4 ECONOMY MODE: Sets the dryer to the Economy Running Mode. In economy mode, the towers will switch each
other depending on both timesets and dew point value. If the “chemical dryer dewpoint” actual value is below set value
then the dryer will not switch to other tower with the time limit of “Tower1 economy” and “Tower2 economy” values
in the Timesets menu.
6- SETTINGS
Picture 7
6.1 TEMPERATURE ALARM LIMITS:
If you select this menu then you will see the screen below. (Picture 8)
You can change the temperature unit to °C or °F according your needs. You can also adjust the lower and or upper
temperature limits of the operations with the help of this menu. You can also set the dryers to its factory settings
with the help of the table right below.
Lower
Limit
(°C)
0
0
0
0
0
0
0
0
Upper
Limit
(°C)
250
250
100
120
250
250
250
15
Picture 8
6
6.2 PRESSURE ALARM LIMITS:
If you choose this menu you will see the screen below. (Picture 9) In this menu you can change the pressure unit to
BAR or PSI according your needs. You can also adjust the lower and or upper pressure limits of the operations with
the help of this menu. You can also set the dryers to its factory settings with the help of the table right below.
Lower
Limit
(bar)
4
4
4
4
0.5
0.08
4
Upper
Limit
(bar)
2
2
16
16
4
0.3
16
Picture 9
6.3 TEMPERATURE SETPOINTS:
When you choose this menu then you will see the screen below. (Picture 10) You can make the required adjustment
on these settings by selecting the desired menu and adjusting it with the help of the keyboard on the screen.
You can also set the dryers to its factory settings with the help of the table right below.
Set
Values
(°C)
160
140
160
140
-40
110
10
Picture 10
7
6.4 CALIBRATION:
If you choose this menu you will see the screen below. (Picture 11) You can make the required adjustment on these
settings by selecting the desired menu and adjusting it with the help of the keyboard on the screen.
To turn back the dryer to its factory settings you have to enter the values which are given in the table right below.
MIN
MAX
-20
0
0
0
0
0
0
0
+80
16
16
16
16
1
16
16
Picture 11
6.5 TIMESETS:
For changing the time settings you can use the keyboard on the touch screen. (Picture 12) The factory settings are
mentioned in the table right below. These settings can be used for turning back the dryer to its factory settings.
Tower2
set
values
(minutes)
1
5
1
180
30
1
5
480
Tower1
set
values
(minutes)
1
5
1
180
30
1
5
480
Picture 12
8
Note!!: Both towers Time Set Values must be set to the same values.
6.5.1 DATE & TIME
You can find this menu under “Timesets” menu. If you select this menu you will see the screen below. (Picture 13)
Picture 13
6.6 LANGUAGE SELECTION:
If you choose this menu you will see the screen below. (Picture 14) You can adjust the language of HMI.
Picture 14
9
7- ALARMS
When an alarm occurs, a triangle with an exclamation mark will pop-up on the screen. (Picture 15) If you press this
icon, you will automatically go to alarms page. (Picture 16) Otherwise you can go to alarms page by choosing
“ALARMS” icon on the “SETTINGS” page. (Picture 4) . When an alarm occurs in the dryer, you can display it in this
page. After fixing the problem, then you can reset the alarm by pushing the “ALARM RESET BUTTON” .
Also existing program version number is shown on Alarms Page.
Picture 15
10
Picture 16
8- SERVICE 2
If you push the SERVICE 2 button on the SETTINGS page (picture 7), you will enter the Service Settings. You will be
asked about a code. The required code is “1113”. If you push the SERVICE 2 button again then you will see the
screen below. (Picture 17)
Picture 17
8.1 MACHINE MODE SETTINGS
Machine mode can be changed if a predicament situation occurs like blower motor malfunction or heater
malfunction. When you push this button, below screen will be shown.
Picture 18
11
8.1.1 TWIN TOWERS HEATLESS WITH DEWPOINT CONTROL AIR DRYERS:
If you select this mode the machine will work with a loss of 15% during regeneration. When the regeneration is
completed if the dew point is below the set value then the controller will monitor the dew point and will not switch
to the other tower for maximum 20 minutes.
Twin Towers Heatless With Dew Point Control Air Dryers would be use in case of both heater and blower motor
crash.
(- 40 C dewpoint will stay constant)
8.1.2 EXTERNALLY HEATED AIR DRYERS:
If you select this mode the dryer will make the required drying operation by heating %7 of the compressed air.
You will lose %7 of the compressed air by selecting this mode.
Externally Heated Air Dryer would be use in case of just blower motor crash.
(- 40 C dewpoint will stay constant)
8.1.3 HEATED BLOWER PURGE DESICCANT AIR DRYER
This is the default running mode of the dryer. In this mode both blower motor and heater is used for heating the
saturated tower.
8.1.4 TEST MODE: This mode is used by the service team during the first start-up of the dryer for making the first
tests. If you select this mode, all timeset step parameters adjust to 1 minute.
After the first start-up and tests of the dryer, the machine will be set to the desired mode using the MACHINE MODE
SETTINGS. During the Test Mode operation you will see the MAIN SCREEN (Picture 1). Then you can start the dryer
by pushing the Start button.
8.2 RESET TO FACTORY DEFAULTS
If you push this button, factory settings of the machine will be set to time parameters in the TIMESETS menu.
12