1
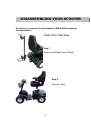
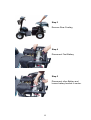
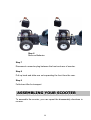
Owners Manual
TABLE OF CONTENTS
INTRODUCTION…………………………………………………………3
AS S S E M B L Y SEAT FRAME ……………………………………………..4
I M P O R T AN T P R E C AU T I O N S … … … … … … … … … … … … … … … … … … 5
I D E N T I F I C AT I O N O F P AR T S … … … … … … … … … … … … … … … … … … 7
O P E R AT I N G Y O U R S C O O T E R … … … … … … … … … … … … … … … … … 9
DI S AS S E MBLI NG YO UR SCOOTER………………………………………12
AS S E M B L I N G Y O U R S C O O T E R … … … … … … … … … … … … … … … … 1 4
BATTERIES CARE & MAINTENANCE………………………………………………15
CHARG I NG THE BATTE RI E S … … … … … … … … … … … … ………………16
C A R E A N D M A I N T E N A N C E … … … … … … … … … … … … … … … … …20
T R O U B L E S H O O T I N G … … … … … … … … … … … … … … … … … … … … … 21
T E C H N I C AL S P E C I F I C AT I O N S … … … … … … … … … … … … … … … … … 22
Thank you and congratulations on purchasing your new LAWIA
Golf Mobility Scooter.
We pride ourselves on providing safe and comfortable products. We
sincerely hope that you will enjoy your LAWIA Golf Mobility Scooter.
Please read and observe all warnings and instructions given in the
owner’s manual for this unit before using the various convenient
functions of this scooter.
Also, retain this booklet for future
reference.
If you have any questions, you can contact:
Your local distributor
or importer:
MOBY DICK AB, 031-681002
3
,
Assembly seat frame as
per illustrated.
4
Only one person at a time can ride a LAWIA Golf Mobility Scooter.
Maximum load is 150 kg including bag and clubs for Bronco model.
or 120 kg including bag and clubs for Golf Solo model.
Always drive carefully and be aware of others using the same area
as yourself.
Always use pedestrian crossings where possible. Take extreme care
crossing roads.
Follow traffic laws when you ride outside.
Go straight up and down gradients. Sit forward when going up sharp
gradients.
Do not turn key switch off while on downhill.
Accelerate and decelerate slowly.
Do not use full speed when turning sharp corners.
Take great care and use low speeds for backing up, downhill, uneven
surfaces.
Apply hand brake when stopped on slopes.
The electronic system is protected by digital current cutoff. If the
scooter stops whilst going up a sharp gradient the key switch must
be turned to the OFF position and then to the ON position to
continue.
5
When vehicle is to be left unattended, engage park (hand) brake,
turn key to ‘OFF’ position and remove key.
Use extra care and reduced speed when driving on poor surfaces,
such as loose dirt, wet grass, gravel, etc.
All travel should be directly up or down hills.
Use extra care when driving the scooter across an incline.
Stay in designated areas and avoid steep slopes. Use the front park
brake whenever the vehicle is parked.
Avoid extremely rough terrain.
Check area behind the scooter before operating in reverse.
Slow down before and during turns. All turns should be executed at
reduced speed.
Always bring vehicle to a complete stop before shifting the direction
selector. (forward / reverse)
Battery posts, terminals and related accessories contain lead
and lead compounds. Wash hands after handling.
6
IDENTIFICATION OF PARTS
Before attempting to drive this scooter on your own, it is important
that you familiarize yourself with the controls, and how to operate
them.
F
FU
UN
NC
CT
TIIO
ON
NO
OF
FP
PA
AR
RT
TS
S
TTO
PA
AN
NE
ELL
ON
NTTR
RO
OLL P
OP
PC
CO
Speed throttle
This operates by twisting slowly towards the operator similar to a
motor cycle. It also controls the electro-dynamic braking. Braking is
controlled by twisting the throttle away from the operator.
Speed knob
This operates the speed that meet with your preference by turning
from left to right direction.
Horn
Press the red button when the key switch is ON.
Battery Indicator
This is the lights on the twist throttle.
Green light: Power on – when the key switch turns on.
Yellow light: This gives an accurate guide to the battery condition
over time. For example when the Yellow amber light starts coming
on before the completion of nine holes it is time to consider new
batteries.
When the Yellow light is come on the scooter should have 3-4 holes
left at worst case.
Red light: If the red light comes on you should go back immediately
for recharging. (except when going up sharp gradients.)
For heavy users you should recommend changing the batteries to
75AH.
The controller will not shut down but continue until motor will not
turn.
7
There is a time delay built in to prevent the red light coming on under
short voltage drop conditions such as a short steep climb. The red
light may come on under very heavy load.
Forward / Reverse Switch
This is mounted on the tiller. Reverse can be ascertained by the
reverse beeper before operation.
Emergency Hand Brake
Mounted on the tiller (handlebar), to be used for parking.
: Do not use when power is applies as it may
result in limited steering due to front wheels locking and loss of
control.
A
ATT B
BA
AS
SE
EO
OFF S
STTE
EE
ER
RIIN
NG
G TTIILLLLE
ER
R
Steering Column Lever
Twist the lever to loosen the tiller and adjust. Ensure that the tiller
locking device is on fully open before use.
B
BE
ELLO
OW
WS
SE
EA
ATT
Seating Position Adjuster
Push lever up to adjust forward and backward position.
Armrest width Adjustment Thumbscrews. (Bronco only)
Rotate the adjustment for different arm rest angles and positions.
R
RE
EA
AR
RB
BO
OD
DY
Y
Rear Cover
Protects batteries, controller, motor & gear box from damage.
Anti-tip wheels
An optional extra that helps keep the scooter from tipping over.
Free-Wheeling Lever (Bronco Only)
When lever is in the Release position, the scooter can be moved
without power. When lever is in the Engage position, the scooter can
be driven. Normal position is Engage.
8
GENERAL OPERATION
Always use the scooter in a responsible manner and maintain the
scooter in safe operating condition.
Always read and observe all warnings and operation instruction
labels affixed to the scooter.
Always follow all safety rules established in the area where the
scooter is being operated.
Always reduce speed to compensate for poor terrain or conditions.
Always maintain adequate distance between vehicles.
Always reduce speed in wet areas.
Always use extreme caution when approaching sharp or blind turns.
Always use extreme caution in areas where pedestrians are present.
Gradients
All gradients shall be descended at a reduced speed. Excessive speed
while descending grades adversely affects the stability of the golf
scooter and its ability to stop. Avoid parking on steep hills. Avoid sharp
turns on gradients.
Wet areas or icy terrain
Extreme caution should be used when driving on wet or icy terrain. Wet
grassy areas or ice may cause a golf scooter to lose traction and may
affect operator control.
Loose Terrain
Extreme caution shall be used when driving in areas of loose terrain.
Loose terrain, for example, sand or gravel, can cause a golf scooter to
lose traction and may affect stability.
You can make the following adjustments to increase your comfort
when driving.
Adjust steering column to comfortable position.
Adjust armrest.
Remember your LAWIA golf mobility scooter has operational
characteristics similar to a motorcycle and requires appropriate
weight distribution during operation.
9
Before operating your scooter, check the following:
• Free-wheeling device in the Engage position on the Bronco.
• Forward / Reverse switch is in the correct position.
• Speed knob adjustable switch is in the preferable location.
1. Sit on scooter and turn on key. The Indicator light should be green.
2. When your hands rest comfortably on the handlebars, the twist
control should be within easy reach. Twisting towards the operator in
the seat moves the scooter. When you release both levers the
scooter will slow to a stop unless it is on an incline.
3. The scooter has a regenerative braking system. This means that
when the throttle is wound back the scooter generates electricity into
the batteries slowing it down. The operator should practice this
braking method which will be suitable for most operational
applications.
The hand brake should only be used for
emergencies and when stopped for parking.
4. Steer the scooter by turning the whole steering column the way you
want to go.
5. Practice driving where there are no obstacles. Start at the slowest
speed and drive forward and backward; make some turns. As you
get more comfortable you can use high speed.
6. If the Battery Indicator changes to yellow you should plan to recharge
the batteries very soon.
7. If the scooter stops, reset the key and try again. In some cases when
used under heavy loads and high temperatures the scooter may not
go again until the control unit has cooled down. This is because
when the scooter is turned ON the control unit checks all the
parameters and if still hot will not operate until cooled. This may take
several minutes. This can be avoided by not turning the scooter off
when stopping when playing. Ie the control unit does not reset and
therefore will not stop. Caution should be taken with this type of
operation.
10
8. When you are finished riding, turn off the key before getting off.
9. If you are finished riding for the day, immediately recharge the
batteries. See CHARGING THE BATTERIES, page 20.
K
Keeeepp iinn m
miinndd tthheessee rruulleess::
• Release throttle and allow scooter to stop completely before
changing from forward to reverse, or reverse to forward.
• When turning a corner, swing the front wheels wide, because the
back wheels will turn more tightly.
• Use the scooter only where it would be safe to walk.
• Use low speeds for reverse, down hills, ramps, kerbs, or uneven
surfaces.
O
maattiioonn
Oppeerraattiinngg IInnffoorrm
Otthheerr O
Hill climbing: You may need to use a higher speed.
Down slopes: To proceed down steep slopes slowly, set throttle to
minimum speed. Avoid using the hand brake as this will lock the front
wheels with loss of steering and cause loss of control of the scooter.
The scooter will not self accelerate down hills due to the automatic
braking taking effect.
Kerb climbing: Approach slowly at a slight angle to the Kerb. Do not
attempt greater than a 2” kerb.
If the scooter breaks down and must be moved, get off the scooter, push
the Free-Wheeling Lever to Release (Bronco only), move the scooter
slowly to a safe location, and move the lever back to Engage.
NOTE: In the unlikely event of a display console error, you need to re-set
the display system by cycling the on/off main switch. The display
circuitry is independent of the motor control system. A display console
error does not affect scooter speed control.
11
No tools are necessary to disassemble LAWIA Golf scooter for
transportations.
P
Plleeaassee FFoollloow
w TThheessee S
Stteeppss::
Step 1
Remove Golf Bag Carrier (Rack).
Step 2
Remove Seat
12
Step 3
Remove Rear Cowling
Step 4
Disconnect First Battery
Step 5
Disconnect other Battery and
loosen battery bracket in centre.
13
Step 6
Remove Batteries
Step 7
Disconnect connector plug between the front and rear of scooter.
Step 8
Pull up knob and slide rear out separating the front from the rear.
Step 9
Fold down tiller for transport
To assemble the scooter, you can repeat the disassembly directions in
reverse.
14
To prolong the life cycle of the batteries: Here are some hints:
• Before the first time use of your batteries, put it on charge for 24
hours, even the batteries is already charged.
• Do not place the batteries on a concrete floor for charging, have the
batteries raised off the floor on wooden blocks or place the batteries
on a shelf. (If remove batteries out of scooter for recharging)
• For fully charge the batteries, choose a place where ambient
temperature is above 10 degrees Celsius (+10ºC).
• Always recharge your batteries as soon as possible after use.
• Always keep your batteries on charge between games, if you play
golf regularly every week.
• Never play more than 18 holes without fully recharging. You will
discharge the batteries below its designated voltage and damage it.
• Do not drop the battery. Avoid storing the battery in the trunk of
your car as it might roll around and be damaged.
• STORAGE: If you know that you will not be playing for next 3
weeks or so. REMOVE BATTERIES FROM THE CHARGER AND
STORE IN A PLACE WHERE THE AMBIENT TEMPERATURE IS
ABOVE 10 DEGREES AND LOWER THAN 30 DEGREES
CELSIUS. Recharge it before your next round or every 2 months
(No more than 2 months) if it is not used in that period.
Disconnect charger from power supply.
• Always contact your local distributor before you try to replace the
batteries or the charger. Using an incompatible battery or charger
may damage the scooter and void your warranty.
15
Batteries must be charged before using the scooter for the first time and
should be recharged after each day use. You will need the scooter and
the battery charger.
BATTERY CHARGER
1. IMPORTANT
Read charger instruction first (packed together with charger) before
you start to use your charger.
To charge batteries, the following either way can be choose:
a. Charging direct from back side of scooter. b. Or have batteries removed out of
from scooter, and use connector
adaptor supplied.
2. Precautions Before Operation
(1) Before operating the charger ensure:
The input voltage selection switch is in the correct position.
The available voltage is from 110 - 230V, make sure it is in
correct position for meet with your local electric voltage.
The power lead is fully inserted into the socket of the charger.
16
(2) The charger is not intended for use by young children or infirm
persons without supervision.
(3) Ensure young children are supervised so they do not play with
the charger.
(4) During operation care should be taken to ensure that the
appliance has adequate ventilation to allow the cooling fan to be
effective – ENSURE THE CHARGER IS NOT COVERED
WHEN IN USE.
(5) Ensure the charger is not exposed to rain, water or humid
places.
(6) Ensure that the batteries to be charged and the voltage output
value are compatible. The charger should only be used on
sealed lead acid batteries (SLA) and gel type sealed lead acid
batteries. Failure to do so may result in an explosion.
(7) The operator is responsible for following these procedures and
failure to do so shall indemnify the Manufacturer, Importer or its
agents from liability or any responsibility for any occurrence that
may result as a consequence.
3. Operating Procedures
(1) Ensure the AC power switch is in “off” (O) position until the
charger has been connected to the supply and the battery.
(2) Ensure that the output end of charger corresponds with the
positive/ negative terminals of battery.
(3) Having observed the precautions before turning on and the
steps above, turn on the AC power switch to position (I). The
LED will come on indicating the power is on.
17
4. Troubleshooting
(1) The power switch is “on” but no LED is lit up:
• Check the connection of power cord and ensure that it is fully
inserted.
• Check the connection of the output socket.
• Check the fuse in the charger.
(2) The power switch is “on” but the LED does not light up
completely and the fan does not operate:
• Check if the output is short circuited.
• Batteries may fail to use, refer to authorized dealer.
(3) The power switch is “on”, the LED lights up, but the no charging
occurs:
• Check the connection between output connector and the
battery
• Check the battery connection for correct polarity.
• Check that the battery is actually connected.
(4) The fuse is blows as soon as the power is switched on:
• Replace the fuse with a new one of the correct type
• If problem persists refer to authorized dealer.
(5) The charger continues for a longer duration than normal:
• Refer to an authorized dealer to check the charger and the
batteries.
(6) The LED has not reach full charging over last 24 hours:
• Refer to an authorized dealer to check the batteries.
(7) The battery heats excessively:
• Stop charging and refer to an authorized dealer.
18
NOTE: The time needed to recharge will vary depending on the
depletion of the batteries. Charging for longer than
necessary will not harm the batteries. They can not be
overcharged.
K
Keeeepp iinn m
miinndd tthheessee rruulleess::
Fully charge batteries at least once a month, more if you use the
scooter regularly. Charge after each trip exceeding 6 kilometers or
18 holes of golfing.
If storing your scooter for some time (1 month or more) make sure
that the batteries are fully charged, and on returning, charge them
again before using scooter.
Batteries will only give maximum performance after the scooter has
been used, and the batteries have been recharged up to 10 times. A
bit like running in a new car.
19
CARE
Cleaning Your Scooter
If your scooter is dirty, use a damp or lightly soapy cloth to wipe it down.
Do not use running water to wash or rinse the scooter in order to protect
the electrical parts. Polish with an automotive liquid polish.
Maintaining Your Scooter
All maintenance and repair of your scooter should be done by an
authorized dealer. The following areas required periodic inspection:
• Tire pressure between 20- 25 psi (138- 172 kpa).
• All electrical connections are firmly attached.
Storing Your Scooter
Between uses, your scooter is best stored in a dry location.
MAINTENANCE
Be sure that the key switch is off and all electrical accessories are
turned off before starting work on scooter.
Always insulate any tools used within the battery area in order to prevent
sparks or battery explosion caused by shorting the battery terminals or
associated wiring.
Always check the polarity of each battery terminal and be sure to rewire
the batteries correctly.
Always maintain the scooter in an area away from exposed flame or
persons who are smoking.
Always be aware that a scooter that is not performing as designed is a
potential hazard and must not be operated.
Always test drive the scooter after any repairs or maintenance. All tests
must be conducted in a safe area that is free of both vehicular and
pedestrian traffic.
Battery posts, terminals and related accessories contain lead
and lead compounds. Wash hands after handling.
20
Most problems arise from batteries and chargers.
•
•
•
•
Ensure that you use good quality batteries.
Ensure that the batteries are fully charged before use.
Be careful not to move the connecting plug on the floor of the
scooter. It is a good idea to cable tie it together so it is not
accidentally knocked and a poor circuit produces a fault.
Allow the scooter to cool down if turned off after use in heavy hot
conditions so it can reset. If this is a concern do not turn the scooter
off for short stops see instructions.
O
Otthheerr P
Prroobblleem
mss
Low tyre pressure: pump up tyres to 20- 25 psi (138- 172 kpa).
During charging, the led light of the charger does not change to
full: Contact your authorized dealer.
Scooter will not move when key is turned on:
1.
Check Indicator on the throttle. It should be lit in the green, If the
scooter has just been turned off after heavy use it may take a few
moments to cool and reset.
2.
Check all electrical connections to be sure they are tight.
Particularly the plug at the rear of the foot platform.
3.
If none of these correct the problem, contact your authorized dealer.
21
Specification
Bronco
4 wheels
13 x 5.00 – 6”
730mm
1250mm
100mm
125 kgs / 275.60 lbs.
Wheels
Overall Width
Overall Length
Ground Clearance
Weight (w/ batteries)
Comfortable seat with
adjustable slide, recline
and arm rest
Seat
Batteries
Charger
Gear box
Golf set Rack
Speed
2 x 75 ah
Fully Automatic 24V 8a
Transaxle
Detachable
14 KMPH
40KM / 25miles (varies
with terrain and weight of
rider) or 18 holes golfing.
900Watt
12° + 1°
150kg with bag and clubs
6
Back section: 31 kgs (68.5
lbs)
Dynamic
• ON/OFF key
• horn button
• self-diagnostic warning
light
• forward/reverse switch
• speed adjustable knob
Travel Range
Motor Size
Grade Climbable
Carrying Capacity
Disassembly:
Number of major parts
Weight of heaviest part
Brake
Electronics
Specification subject to change without notice.
22