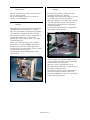
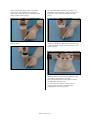
1
1.0
1.1
ETHOS 900
1.2
INTRODUCTION
In the world of microwave sample preparation,
Milestone continue to quietly lead the evolution of
technology.
Our only focus is to provide you with the most
technologically advanced instrumentation for total
microwave sample preparation.
In 1994, the ETHOS project was started to develop a
new generation of microwave chemistry systems
based on the experience of several thousands users
worldwide, who process some of the most difficult
samples (ores, coal, fly ash, ceramics, and plastics).
Milestone R&D engineers were given the goal to
develop the safest, highest performing and most
flexible microwave platform for laboratory
applications.
No limits were set, only goals.
This is ethical.
This is ETHOS.
TECHNICAL
SPECIFICATIONS
• Microwave labstation for quality control for
digestion, drying and evaporation/concentration
procedures.
• Patented self-sealing explosion resistant door.
• Single magnetron with static microwave diffuser
for homogeneous microwave distribution.
• Installed microwave power 900Watt.
• Delivered microwave power 900Watt in 10Watt
increments.
• Variable microwave pulse width from 0,1” to 5”.
• Unpulsed microwave emission at 250Watt.
• Microwave cavity all made of 18/8 stainless steel
housing with multilayer Teflon plasma coating
applied at 350°C.
• Dimensions 35cm x 35cm x 35cm (ca. 45L
volume).
• Built-in exhaust system with automatic constant
flow control, acid and organic solvent resistant;
with flow rate 5m3/minute.
• Control terminal “240”, with high resolution
graphic (128 x 240) LCD display black/white with
backlight and flat keyboard; alphanumeric
display, 12 special function keys.
• Storage of up to 20 programs; each program has
up to 10 time/power/pressure/internal
temperature/external temperature steps.
• Outputs: 1 parallel Centronix for external printer
(to print out reports); 2 serial ports (RS-232) for
connecting PC (for data base reporting and
programming of the unit), balance (for weighing
data storage); 1 additional port for analog data (for
connecting a laboratory recorder).
• Dimensions of the microwave unit: 55cm large x
55cm long and 70cm high.
• Power supply 230V, 50 or 60Hz, 7A, 1.600Watt.
• Weight approximately 85kg.
P/N
Description
44006
44056
ETHOS 900 complete
ETHOS 900 complete
ETHOS 900 Page 1
Power
supply
220V/50Hz
220V/60Hz
1.2.1
A LOOK AT THE HIDDEN SIDE OF THE
ETHOS UNIT
The most important safety features are the ones you
don’t see from the outside.
For this reasons Milestone lets you see under the
cabinet cover of the ETHOS.
1.2.2
SAFETY THROUGH MECHANICAL
DESIGN
The ETHOS is not a kitchen type nor a commercially
modified kitchen microwave unit; it is a rugged,
heavy duty professional system designed to guarantee
years and years of trouble free and safe operation.
The hardware The microwave cavity is quite large, to
accommodate different types of accessories.
Dimensions are 35cm x 35cm x 35cm, for a volume
of approximately 43L.
The door is, as standard feature, made of stainless
steel; however, on request (ETHOS 1600 only), it is
possible to have a door with a high impact shock
resistant 27cm x 27cm glass window for easy viewing
of the illuminated cavity (picture).
is manufactured with 18/8 stainless steel, 1,5mm
gauge (picture).
1.2.3
SAFETY THROUGH PATENTED DOOR
DESIGN
The door design is the most critical issue when
developing new microwave hardware.
Mechanical strength and perfect sealing of the cavity
to avoid microwave leaks are prerequisites.
Milestone’s engineers, on the basis of the “movable
door” principle used in high pressure autoclaves,
designed a door with an innovative opening/self
resealing mechanism.
The door frame is mounted on four spring-loaded
high strength steel bars (picture).
In the event of a sudden overpressure inside the
cavity, the entire door opens horizontally (“moves
out”) presenting a large surface area for immediate
and safe release of the overpressure.
Microwave power is instantaneously cut off.
Immediately afterward, the door is “pulled back” by
the springs, resealing the cavity.
The microwave cavity door opens downwards to a
flat horizontal position, forming a stable work
platform for handling microwave accessories before
and after digestion procedures.
ETHOS 900 Page 2
1.2.4
SAFETY TROUGH ELECTRICAL
DESIGN
1.2.5
The ETHOS microwave platform is equipped with a
total of 10 microswitches to assure the highest safety
conditions.
Four (two on each side of the door) fast release
microswitches instantaneously interrupt the
microwave emission whenever the door is opened
(previous picture).
One safety switch on the cabinet cuts off microwave
emission whenever the cabinet is detached (picture).
Two thermal switches on magnetron’s body and other
two on both wave guides cut off power in case of
overheating (picture).
SAFETY THROUGH NOX MONITORING
When HNO3 is used in the digestion process NOX
gases are generated.
NOX gases may diffuse through the vessel walls or
they are released in case of vessel overpressurization,
in the microwave cavity (picture).
By monitoring the presence of NOX in the microwave
cavity (optional device), when the preset NOX limits
are exceeded, the microwave power is automatically
reduced, triggering a “beep” signal.
Microwave emission increases again after the NOX
concentration has returned to the preset limits.
Volatile losses are prevented resulting in safer
working conditions and more consistent results.
ETHOS 900 Page 3
1.2.6
PERFORMANCE THROUGH
MICROWAVE HARDWARE DESIGN
The “heart” of the ETHOS platform is the innovative
and patented microwave feed/distribution system to
the working cavity.
Two 800Watt industrial magnetron (ETHOS 1600
only), each with its own high voltage power supply,
assure a powerful 1.600Watt of microwave installed
power (picture).
Two high flow cooling fans guarantee peak
performance of the magnetrons.
The microwaves are first fed into a “pre-mixing
chamber.
From here an ingenious “pyramid shaped” rotating
metal diffuser evenly distributes the microwaves in
the cavity (picture).
Surfaces are Teflon coated with the diffuser protected
by an inert high density polypropylene plate.
This unique microwave design and the advanced
microprocessor control assures optimal microwave
distribution in the cavity, thus preventing “hot spots”.
The installed power of 1.600Watt has been limited by
design to operate at approximately 2/3 of the
maximum power (1.000Watt) to assure longer
magnetrons lifetime.
The 1.000Watt of delivered power are delivered in
10Watt increments to fit all types of applications.
The ETHOS 900 platform is powered by a 900Watt
magnetron with a specially designed static diffuser to
guarantee optimal microwave distribution in the
cavity.
ETHOS 900 Page 4
1.2.7
PERFORMANCE THROUGH
VERSATILITY
1.2.9
To fulfill the goals of making the ETHOS the most
versatile microwave platform, Milestone’s engineers
built 13 microwave leakage protected (inlet/outlet)
connectors.
Temperature and pressure sensor, connectors for
vacuum and inert gas supply, can be all easily
installed without any hardware modifications.
1.2.8
PERFORMANCE THROUGH
MODULARITY
The ETHOS microwave platform has been designed
with the microwave emission into the cavity from the
back wall instead of the conventional position on top
of the cavity.
This unique construction allows both the top and the
bottom of the cavity to be free.
A free top allows the installation of batch reactors,
while the free bottom makes possible the installation
of a continuous flow reactor or of an advanced
magnetic stirring device.
The ETHOS microwave platform can be upgraded
with suitable modules/accessories to carry out: acid
digestion, vacuum drying, evaporation/concentration,
protein/peptide hydrolysis, solvent extraction, batch
organic synthesis and continuous flow organic
synthesis.
DURABILITY THROUGH CORROSION
RESISTANCE
One of the key issues was assuring a long lifetime of
our unit when performing digestions with aggressive
acids (HNO3, H2SO4, HCl, H3PO4, HF).
The all stainless steel hardware undergoes a
pretreatment (sandblasting plus heat cycles) to assure
best “bonding” conditions between the Teflon coating
and metal surfaces.
The microwave cavity, the top cavity, the door and
even the external surface of the air inlet (grid) are
plasma coated with 5 layers of Teflon applied at
350°C (picture).
1.2.10
DURABILITY THROUGH CHASSIS
DESIGN
The cabinet chassis is manufactured with magnetic
18/8 stainless steel (1,0mm gauge) to act as a Faraday
cage to eliminate potential interference to other
instruments (picture).
It is protected against acid/organic solvent vapors
through high temperature polymer coating on both the
outside and inside surfaces.
ETHOS 900 Page 5
1.2.11
DURABILITY THROUGH ADVANCED
EXHAUST/COOLING SYSTEM
This is another important factor for assuring long life
of digestion vessels and safe working conditions.
The ETHOS platform is supplied with one (two up on
request) heavy duty, 5m3/minute exhaust fan placed
above the cavity and installed separately from the
electronics to eliminate the danger of acid corrosion
of the electronics (previous picture).
The air flow from the grids at the bottom of the cavity
cools the external surfaces of the rotor and carries
away any acid vapors released in the cavity.
An acid resistant flexible hose connects the exhaust
fan to a fume hood assuring a safe working
environment.
1.2.12
DURABILITY THROUGH USERFRIENDLY SERVICE
As perfection is not of this world, easy access in case
of servicing is a must.
Please refer to the separate ETHOS Service Manual
for further information.
ETHOS 900 Page 6
1.3
ETHOS 900 SAFETY AND
MONITORING CONTROL
OPTIONS
1.4
ETHOS 900 COMPATIBILITY
WITH DIGESTION, DRYING
AND CONCENTRATION
ROTORS
The ETHOS 900 microwave labstation can be fitted
with any of the safety and monitoring control options
below.
The ETHOS 900 can accomodate the following acid
digestion vessels and rotors:
P/N
33684
P/N
41400
86300
33981
33962
30009
Description
IRTC-500 Infrared temperature
control
APC-55E Automatic pressure
control
ATC-300 Automatic temperature
control without sensor
Temperature sensor model MW1Au
gold plated
SoftWAVE Method Development
rev. 2.0 (requires PC, not supplied)
34181
35301
41100
41200
35100
35180
Description
AC-10 Advanced Carousel complete
with 10 Vessels and Shields
MDR-1000/3 complete
MDR-1000/6S complete
MDR-300/10S complete with PFA
vessels
MDR-300/10S complete with TFM
vessels
HPR-1000/10S rotor complete
MPR-300/12S Rotor complete
The ETHOS 900 can accomodate the following
drying and evaporation/concentration rotors:
P/N
34670
40103
34649
34940
34510
Description
MCR-1 Drying rotor in
polypropylene 3,5L
MCR-1 Drying rotor in
polypropylene 6,5L
MCR-6 Concentration rotor 6
position empty
MCR-8 Concentration rotor 8
position empty
MCR-12 Concentration rotor 12
position empty
The MCR series rotors require a vacuum source.
Below are the options available.
P/N
40018
40019
84245
84254
ETHOS 900 Page 7
Description
FAM-40 Fume absorbing module
220V/50Hz
FAM-40 Fume absorbing module
115V/60Hz
VAC-20P Vacuum pump system
220V/50Hz
VAC-60 Vacuum pump system
220V/50Hz
1.5
ETHOS 900 INSTALLATION
WARNING
Never install the ETHOS 900 under a fume hood!
In fact, if you should install the microwave system
under a fume hood, the acid vapors might
contaminate the air used for ventilating the electronic
components, exposing them to a possible corrosion.
1.5.1
UNPACKING AND CHECKING LIST
When unpacking, verify that all parts correspond to
the packing list included in the shipment.
Utmost care must be taken during unpacking of the
ETHOS 900 to avoid any scratch or damage to the
special acid and organic solvent resistant external
coating.
Remove the carton box located in the upper part of
the box (picture) and keep it apart.
It contains accessories which will be taken during the
installation of the ETHOS 900.
The carton box should include the following:
• n. 1 Milestone ETHOS 900 microwave
labstation;
• n. 1 Power cord for ETHOS 900;
• n. 1 Plastic hose 2m long;
• n. 1 Control terminal model “240”;
• n. 1 Interface cable 5-pin for connecting the
ETHOS 900 to the control terminal model “240”.
Carefully cut the protective belts, as shown in the
next picture.
ETHOS 900 Page 8
Lift-up the main carton box to facilitate the removal
of the ETHOS 900 (picture).
The ETHOS 900 comes protected by a plastic bag to
avoid problems of wetting during its transportation.
WARNING
The weight of the ETHOS 900 is approximately 85kg.
At least 3 persons should remove the system from its
box and locate it on the bench.
Provide a bench of at least 1m length and 80cm wide
and locate the ETHOS 900 on the bench.
A proper location of the ETHOS 900 is next to a fume
hood, since the microwave unit should be connected
to the fume hood by using the hose supplied (details
will follow).
Open now the boxes containing the accessories of the
ETHOS 900.
Notice the ETHOS 900 power cord (picture).
ETHOS 900 Page 9
Notice the plastic hose 2ml long (picture).
Notice also the control terminal model “240” with its
interface cable 50 pins (picture).
ETHOS 900 Page 10
1.5.2
ETHOS 900 OVERVIEW
WARNING
During the ETHOS 900 installation both the switches
should be in the “OFF” position.
Notice some of the most important details of the
ETHOS 900.
Main swicth (picture).
Note the two openings at the side of the ETHOS 900
(picture).
WARNING
During the ETHOS 900 installation the main switch
should be in the “OFF” position.
Those are the air inlets for the air exhaust system,
located in the upper part of the system.
Not to be worry about microwave leakages!
A metal grit, which can be seen through the plastic
connection, does reflect microwaves back to the
cavity, not allowing any leak through the opening.
Do not block or obstruct the openings, since air
circulation trough the microwave cavity is an
important safety aspect of microwave closed vessel
acid digestion.
Overiew of the back side of the ETHOS 900 (picture).
Exhaust module main switches (picture).
The ETHOS 900 comes with one exhaust module as
standard feauture.
Optionally it is possible to install a second exhaust
module.
The “VENT 1” swicth refers to the exhaust module
built-in as standard feature, while the “VENT 2”
swicth refer to the second optional exhaust module.
ETHOS 900 Page 11
Detail of the left panel of the ETHOS 900 (picture),
showing the connection to the power cord (at right,
down), the power connection to external devices
(right, up), and two fuses.
More details about this subject are available in the
ETHOS Service Manual.
Notice in the upper part (left) the open connection for
the plastic hose and at right the second connection
(closed) for a second otional blower.
Detail of the interfaces of the ETHOS 900 (picture);
at left a standard RS-232 9 pin interface port, to be
used for connecting the microwave to external
devices; at righ the special 50 pin interface port to be
used for connecting the ETHOS 900 to the control
terminal model “240”.
ETHOS 900 Page 12
1.5.3
CONTROL TERMINAL “240”
INTERFACE PORTS
1.5.4
The picture below shows the back side of the control
terminal model “240”.
From left to right it is possible to see the following
interface ports:
• RS-232 9 pin for connecting the ETHOS 900 to an
external PC;
• RS-232 9 pin for connecting the ETHOS 900 to an
external balance (a limited number of balances
can be interfaced);
• special 50 pin interface port for connecting the
control terminal “240” to the ETHOS 900 main
unit;
• Centronix interface for connecting the ETHOS
900 to any printer (parallel port);
• analogue port for connecting the ETHOS 900 to
an external laboratory recorder.
ETHOS 900 SETUP
Connect the 50 pin interface cable supplied to the
back side port of the ETHOS 900 and use a
screwdriver to fix them well (picture).
Connect the other end of the 50 pin cable to the
control terminal “240” and again use a screwdriver to
fix them well (picture).
ETHOS 900 Page 13
WARNING
Both the 50 pin connections must be very tight;
damages may occour when the ETHOS 900 and the
control terminal “240” are not properly connected.
The free end of the exhaust hose should be placed
under a fume hood or directly outside
the laboratory (picture).
Plug-in the supplied power cord at the back side of
the ETHOS 900 (picture).
Introduce now the “L” shaped adapter to the
exhaust outlet located at the left of the ETHOS 900
back panel.
Connect the exhaust hose to the “L” shaped adapter
(picture).
Your new ETHOS 900 is now ready to work!
ETHOS 900 Page 14
A LOOK AT THE HIDDEN SIDE OF THE ETHOS UNIT
The most important safety features are the ones you don’t see from the outside.
For this reasons Milestone lets you see under the cabinet cover of the ETHOS.
SAFETY THROUGH MECHANICAL DESIGN
The ETHOS is not a kitchen type nor a commercially modified kitchen microwave unit; it is a rugged, heavy duty
professional system designed to guarantee years and years of trouble free and safe operation.
The microwave cavity is quite large, to accommodate different types of accessories.
Dimensions are 35cm x 35cm x 35cm, for a volume of approximately 43L.
As a standard feature, the door is made of stainless steel; however, on request (ETHOS 1600 only), it is possible to
install a door with a high impact shock resistant 27cm x 27cm glass window for easy viewing of the illuminated cavity
(picture).The hardware is manufactured with 18/8 stainless steel, 1.5mm gauge (picture).
SAFETY THROUGH PATENTED DOOR DESIGN
The door design is the most critical issue when developing new microwave hardware.
Mechanical strength and perfect sealing of the cavity to avoid microwave leaks are prerequisites.
Milestone’s engineers, on the basis of the “movable door” principle used in high pressure autoclaves, designed a door
with an innovative opening/self resealing mechanism.
The door frame is mounted on four spring-loaded high strength steel bars (picture).
In the event of a sudden overpressure inside the cavity, the entire door opens horizontally (“moves out”) presenting a
large surface area for immediate and safe release of the overpressure. Microwave power is instantaneously cut off.
Immediately afterward, the door is “pulled back” by the springs, resealing the cavity.
The Milestone Safety Guide Page 2
The microwave cavity door opens downwards to a flat horizontal position, forming a stable work platform for handling
microwave accessories before and after digestion procedures.
SAFETY TROUGH ELECTRICAL DESIGN
The ETHOS microwave platform is equipped with a total of 10 microswitches to assure the highest safety conditions.
Four (two on each side of the door) fast release microswitches instantaneously interrupt the microwave emission
whenever the door is opened (previous picture).
One safety switch on the cabinet cuts off microwave emission whenever the cabinet is detached (picture).
Two thermal switches on magnetron’s body and two other on both wave guides cut off power in case of overheating
(picture).
The Milestone Safety Guide Page 3
SAFETY THROUGH NOX MONITORING
When HNO3 is used in the digestion process NOX gases are generated.
NOX gases may diffuse through the vessel walls or are released during vessel overpressurization, in the microwave cavity
(picture).
By monitoring the presence of NOX in the microwave cavity (optional device), when the preset NOX limits are exceeded,
the microwave power is automatically reduced, triggering a “beep” signal.
Microwave emission increases again after the NOX concentration has returned to the preset limits.
Volatile losses are prevented resulting in safer working conditions and more consistent results.
PERFORMANCE THROUGH MICROWAVE HARDWARE DESIGN
The “heart” of the ETHOS platform is the innovative and patented microwave feed/distribution system to the working
cavity.
Two 800Watt industrial magnetron (ETHOS 1600 only), each with its own high voltage power supply, assure a powerful
1600Watt of microwave installed power (picture).
The Milestone Safety Guide Page 4
Two high flow cooling fans guarantee peak performance of the magnetrons. The microwaves are first fed into a “premixing chamber. From here an ingenious “pyramid shaped” rotating metal diffuser evenly distributes the microwaves in
the cavity (picture).
Surfaces are Teflon coated, with the diffuser protected by an inert high density polypropylene plate.
This unique microwave design and the advanced microprocessor control assures optimal microwave distribution in the
cavity, thus preventing “hot spots”.
The installed power of 1600Watt has been limited by design to operate at approximately 2/3 of the maximum power
(1000Watt) to assure longer magnetrons lifetime.
The 1000Watt of delivered power is delivered in 10Watt increments to fit all types of applications.
The ETHOS 900 platform is powered by a 900Watt magnetron with a specially designed static diffuser to guarantee
optimal microwave distribution in the cavity.
PERFORMANCE THROUGH VERSATILITY
To fulfill the goals of making the ETHOS the most versatile microwave platform, Milestone’s engineers built 13
microwave leakage protected (inlet/outlet) connectors.
Temperature and pressure sensor, connectors for vacuum and inert gas supply, can be all easily installed without any
hardware modifications.
PERFORMANCE THROUGH MODULARITY
The ETHOS microwave platform has been designed with the microwave emission into the cavity from the back wall
instead of the conventional position on top of the cavity.
This unique construction allows both the top and the bottom of the cavity to be free.
A free top allows the installation of batch reactors, while the free bottom makes possible the installation of a continuous
flow reactor or of an advanced magnetic stirring device.
The Milestone Safety Guide Page 5
The ETHOS microwave platform can be upgraded with suitable modules/accessories to carry out: acid digestion,
vacuum drying, evaporation/concentration, protein/peptide hydrolysis, solvent extraction, batch organic synthesis and
continuous flow organic synthesis.
DURABILITY THROUGH CORROSION RESISTANCE
One of the key issues was assuring a long lifetime of our unit when performing digestions with aggressive acids (HNO3,
H2SO4, HCl, H3PO4, HF).
The all stainless steel hardware undergoes a pretreatment (sandblasting plus heat cycles) to assure best “bonding”
conditions between the Teflon coating and metal surfaces.
The microwave cavity, the top cavity, the door and even the external surface of the air inlet (grid) are plasma coated with
5 layers of Teflon applied at 350°C (picture).
DURABILITY THROUGH CHASSIS DESIGN
The cabinet chassis is manufactured with magnetic 18/8 stainless steel (1.0mm gauge) to act as a Faraday cage to
eliminate potential interference to other instruments (picture).
It is protected against acid/organic solvent vapors through high temperature polymer coating on both the outside and
inside surfaces.
The Milestone Safety Guide Page 6
ETHOS 900 SAFETY AND MONITORING CONTROL OPTIONS
The ETHOS 900 microwave labstation can be fitted with any of the safety and monitoring control options below.
P/N
33684
86300
33981
33962
30009
Description
IRTC-500 Infrared temperature
control
APC-55E Automatic pressure
control
ATC-300 Automatic temperature
control without sensor
Temperature sensor model MW1Au
gold plated
SoftWAVE Method Development
rev. 2.0 (requires PC, not supplied)
The Milestone Safety Guide Page 7
MDR TECHNOLOGY
Milestone patented microwave digestion rotor (MDR) technology provides analysts with unsurpassed performance
capabilities and the highest standard of safety in closed vessel microwave digestion.
MDR rotors hold multiple microwave digestion vessels in a high strength one piece “monobloc” rotor body.
This unique design securely retains sample vessels during microwave digestion and subsequent venting of decomposition
gases, for maximum user safety.
The digestion vessels used in MDR rotors have no molded or machined threads to be chemically attacked and weakened
by acid vapors during vessel venting and opening.
This unique feature is an important factor in the durability and safety of Milestone digestion vessels.
All digestion vessels in MDR rotors are protected by a patented reclosing (vent and reseal) relief valve mechanism.
Vessels fitted into a MDR rotor body are sealed for microwave digestion and proper relief valve functioning using a
calibrated torque wrench.
The torque wrench ensures vessels are sealed for maximum operating pressure, and will safely vent when a buildup of
decomposition gases in excess of vessel’s maximum operating pressure is reached.
Microwave digestion of organic samples frequently involves exothermic reactions which instantaneously generate large
amount of decomposition gasese (CO2 and NOX) as the sample is oxidized.
For proper overpressurization protection of microwave digestion vessels, the venting capacity of the relief device must
be equal or higher than the rate of decomposition gas formation.
Only Milestone’s relief valve is capable of instantaneously venting excess decomposition gases and resealing the vessel
for completation of the digestion procedure.
The digested sample is retained inside the vessel for analysis.
The Milestone Safety Guide Page 8
MDR SAFETY
The above drawing clearly show the instantaneous
release of overpressure due to the deformation of the
HTC safety spring.
The figure at left represents a vessel in normal
working conditions.
When pressure increases over the maximum spring
working pressure (figure in the center), the entire
cover is allowed to lift up because of the elastic
deformation of the safety spring.
The overpressure is instantaneously released thanks
to the large surface area.
The larger the surface area the shorter the time
required to release the pressure.
Once the pressure inside the vessel has returned
within the vessel limit, the cover reseal the vessel,
permitting the operator to continue with the acid
digestion without any loss (figure at right).
This is the unique operating principle of the microwave digestion rotor technology of Milestone.
An indicator ring located next to the cover remains in the upper position in case of vessel venting.
The picture shows at left a vessel in normal conditions and at right a vessel after venting.
The Milestone Safety Guide Page 9
GUIDELINES FOR MICROWAVE ACID DIGESTION
INTRODUCTION TO THE REAGENTS MOST COMMONLY USED IN
MICROWAVE DIGESTION
The acids used in microwave digestion may be classified in two main groups:
• nonoxidizing acids, such as hydrochloric acid, hydrofluoric acid, phosphoric acid, diluted sulfuric acid and diluted
perchloric acid;
• oxidizing acids, such as nitric acid, hot concentrated perchloric acid, concentrated sulfuric acid and hydrogen
peroxide.
NITRIC ACID
Nitric acid has the following properties:
• boiling point is 120°C at 65% concentration;
• poor oxidizing strength at concentrations less than 2M; oxidizing strength increases with concentration and reaction
temperature;
• most common acid for oxidation of organic matrices with this typical reaction: (CH2)X + 2HNO3 -> CO2(g) + 2NO +
2H2O;
• it dissolves most metals forming soluble nitrates, exceptions are Au and Pt (not oxidated) and Al, B, Cr, Ti and Zr
(passivated);
• these metals require acid mixtures or diluted nitric acid;
• often mixed with H2O2, HCl and H2SO4;
• available in high purity for trace level analysis.
The above graphic represents the temperature and pressure profile of nitric acid up on microwave heating.
Notice that pressure has been controlled at 25bar, resulting in a temperature of 225°C.
The Milestone Safety Guide Page 10
HYDROGEN PEROXIDE
Hydrogen peroxide is an oxidizing agent (2H2O2 -> 2H2O + O2); added to nitric acid it reduces the nitrous vapours and it
accelerates the digestion of organic samples by raising the temperature.
A typical mixture ratio is HNO3:H2O2= 4:1 (volume/volume).
HYDROCHLORIC ACID
Hydrochloric acid has the following properties:
• boiling point of azeotropic mixture with H2O with 20,4% HCl is 110°C;
• available with 38% concentration;
• it dissolves salts of weak acids (carbonates, phosphates) and most metals are soluble with the exception of AgCl,
HgCl and TiCl;
• excess of HCl improves the solubility of AgCl, converted into AgCl2-;
• strong complexing nature;
• widely used for iron-based alloys because of its ability to hold large amounts of chloro-complex in solution;
• other complexes formed are Ag (I), Au (II), Hg (II), Ga (III), Tl (III), Sn (IV), Fe (II) and Fe (III);
• it does not dissolve oxides of Al, Be, Cr, Ti, Zr, Sn and Sb; sulphates of Ba and Pb, group II fluorides, SiO2, TiO2 and
ZrO2.
The graphic above represents the temperature and pressure profile of hydrochloric acid up on microwave heating.
Notice that pressure has been controlled at 25bar, resulting in a temperature of 205°C.
The Milestone Safety Guide Page 11
HYDROFLUORIC ACID
Hydrochloric acid has the following properties:
ACID DIGESTION
•
•
•
•
•
Boiling point is 108°C at 40% concentration;
nonoxidizing, strong complexing nature;
used in digestion of minerals, ores, soils, rocks and even vegetables containing silicates;
major use is the decomposition of silicates according with this reaction: SiO2 + 6HF -> H2SiF6 + 2H2O;
often used in combination with HNO3 or HClO4.
EVAPORATION/CONCENTRATION
• Following dissolution, many analyses require removal of HF to prevent equipment damage or to resolubilize
insoluble fluorides;
• many analytes such as As, B, Se, Sb, Hg and Cr may volatilize.
COMPLEXATION
• Alternative approach to remove HF from the solution, by addition of Boric acid;
• the following reactions take place: H3BO3 + 3HF -> HBF3(OH) + 2H2O and HBF3(OH) + HF -> HBF3 + H2O;
• 10-50 times excess Boric acid enhances reaction rate.
The above graphic represents the temperature and pressure profile of hydrofluoric acid up on microwave heating.
Notice that pressure has been controlled at 25bar, resulting in a temperature of 240°C.
The Milestone Safety Guide Page 12
SULFURIC ACID
Sulfuric acid has the following properties:
• boiling point is 340°C at 98% concentration, exceeding the maximum working temperature of TFM Teflon vessels;
• careful reaction monitoring is required to prevent vessel damages;
• it destroys organics by dehydrating action;
• many sulfates are insoluble (Ba, Sr, Pb).
The above graphic represents the temperature and pressure profile of sulfuric acid up on microwave heating.
Notice that temperature has been controlled at 300°C (for 1 minute only), without any pressure increase.
It is clear that the use of concentrated sulfuric acid in the MDR rotors poses significant problems because of its high
boiling point.
300°C are critical for TFM Teflon vessels and simply too high for PFA Teflon vessels (they melt down at such
temperature).
It is therefore advisable to use sulfuric acid only with a strict temperature control.
The Milestone Safety Guide Page 13
1.0
MDR TECHNOLOGY
1.1 MONOBLOC MDR
ROTORS
Milestone patented microwave digestion rotor
(MDR) technology provides analysts with
unsurpassed performance capabilities and the
highest standard of safety in closed vessel
microwave digestion.
MDR rotors hold multiple microwave digestion
vessels in a high strength one piece “monobloc”
rotor body.
This unique design securely retains sample vessels
during microwave digestion and subsequent venting
of decomposition gases, for maximum user safety.
The digestion vessels used in MDR rotors have no
molded or machined threads to be chemically
attacked and weakened by acid vapors during
vessel venting and opening.
This unique feature is an important factor in the
durability and safety of Milestone digestion vessels.
All digestion vessels in MDR rotors are protected
by a patented reclosing (vent and reseal) relief
valve mechanism.
Vessels fitted into a MDR rotor body are sealed for
microwave digestion and proper relief valve
functioning using a calibrated torque wrench.
The torque wrench ensures vessels are sealed for
maximum operating pressure, and will safely vent
when a buildup of decomposition gases in excess of
vessel’s maximum operating pressure is reached.
Microwave digestion of organic samples frequently
involves exothermic reactions which
instantaneously generate large amount of
decomposition gasese (CO2 and NOX) as the sample
is oxidized.
For proper overpressurization protection of
microwave digestion vessels, the venting capacity
of the relief device must be equal or higher than the
rate of decomposition gas formation.
Only Milestone’s relief valve is capable of
instantaneously venting excess decomposition gases
and resealing the vessel for completation of the
digestion procedure.
The digested sample is retained inside the vessel for
analysis.
Rotor
P/N
Vessels
Vessel material
Maximum pressure
Maximum temperature
MDR-300/10S
41100
10
PFA Teflon
30bar
240°C
Rotor
P/N
Vessels
Vessel material
Maximum pressure
Maximum temperature
MDR-300/10S
41200
10
TFM Teflon
30bar
240°C
Rotor
P/N
Vessels
Vessel material
Maximum pressure
Maximum temperature
MDR-1000/6S
35301
6
TFM Teflon
100bar
300°C
1.2 SEGMENTED MDR
ROTORS
Rotor
P/N
Vessels
Vessel material
Maximum pressure
Maximum temperature
MPR-300/12S
35180
12
PFA Teflon
30bar
240°C
Rotor
P/N
Vessels
Vessel material
Maximum pressure
Maximum temperature
HPR-1000/10S
35100
10
TFM Teflon
100bar
300°C
MDR technology Page 1
1.3 MDR MAJOR
COMPONENTS
The rotor consists of a high density polypropylene
core in which a number of niches have been
“carved” along the periphery by a numerical control
machining center.
The compact core has the required strength to
withstand the extreme pressure generated inside the
vessel during digestion.
The core tolerates this pressure without any
deformation and therefore with high safety.
Special plastic compression screws are located on
the top of the rotor next to each “niche”.
Suitable pressure is applied to the dome-shaped
spring holding the cover to the top of the vessel by
tightening the screws to the appropriate degree.
The dome-shaped, flat-top spring is the “heart” of
the MDR technology and is made of HTC, a new
high-performance plastic.
HTC is crystalline and can act as a powerful and
very reliable spring.
The adapter plate is placed on top of the cover.
Made of a plastic with high resistance to
mechanical compression, it allows a very
homogeneous and repeatable distribution of the
preset pressure limit.
The cover has a flat bottom rim and perfectly fits
the top rim of the vessel.
Sealing between cover and vessel takes place on a
very large surface area without any intermediate
seal ring which could deteriorate in contact with
acid vapors.
The elimination of a threaded cover prevents all
problems connected with thread deformation or
impurities on threads.
The vessel has normally a volume of 100mL.
A high resistant HTC safety shield prevent lateral
deformation of the vessel.
1.4
MATERIALS USED FOR
THE MANUFACTURE OF
MDR VESSELS AND
SAFETY SHIELD
1.4.1
TFM TEFLON
TFM is often used for the manufacture of covers
and vessels of the MDR rotors.
TFM is a Hoechst trade name for chemically
modified PTFE.
TFM Teflon has a very dense structure with smooth
surface and low permeability to gases and vapors.
TFM Teflon is chemically inert to most mineral
acids and combinations thereof.
It is a thermal insulator, with a very high stability to
temperature extremes.
TFM Teflon is microwave transparent.
Its maximum working temperature for extended use
is 260°C, for short time 300°C.
The melting range is 320-340°C.
1.4.2
PFA TEFLON
PFA is often used for the manufacture of vessels of
the MDR rotors.
PFA Teflon is a melt-processable fluoroplastic
material which can be extruded and therefore
manufactured in relatively low-cost vessels.
It shows a good all-round chemical resistance.
It is microwave transparent and termal insulator.
The maximum working temperature is up to 260°C;
the melting temperature is about 300°C.
1.4.3
HTC
HTC plastics are used for the manufacture of safety
spring, adapter plate and safety shield.
They are characterized by the sequence ether-etherketon-keton.
When HTC are used for the safety shield they are
reinforced with glass fiber.
HTC have high mechanical strength to high
temperatures and good chemical resistance.
The maximum service temperature for extended use
is 250°C.
MDR technology Page 2
1.5
ACCESSORIES OF THE
MDR MONOBLOC
ROTORS
1.5.1
WORK STATION
1.5.2
TORQUE WRENCH
The torque wrench (P/N 34000) is used to properly
and safely close/open the vessels of the MDR
rotors.
The work station (P/N 34030) allows fixing of
every kind of monobloc rotors in order to properly
close and open the vessels (drawing).
The work station is made of polypropylene and it is
provided with four anti-skid rubber feet.
1.5.3
INSTRUCTION OF USE
Apply a smooth steady pull until you hear a click.
Release your pressure on the handle and the torque
wrench will automatically reset itself provided the
ratchet reverse lever G is in position 1 (toward the
indicator H).
Refer to the drawing above.
The torque function does work only when the
reverse lever G is in position 1.
By placing it in position 2 the torque function is
neutralized, the the wrench becomes a normal
reversible ratchet.
The torque is factory-set at 22,5Nm for all MDR
rotors.
Note that for correct torque setting, the tool should
be gripped properly on the middle of the handle and
not on the selection knurl A.
MDR technology Page 3
1.5.4
COOLING SYSTEM
1.5.5
The cooling system (P/N 40014) can accomodate
every kind of monobloc rotors.
Its design allows a continuous tangential water
circulation and exchange inside the container,
therefore permitting a very rapid cooling of the
rotor.
The complete cooling system includes the
following items (drawing).
•
•
•
•
•
•
•
COOLING SYSTEM INSTALLATION
AND OPERATION
To install the cooling system, simply follow the
procedure below.
1. Unpack the cooling system.
2. Connect it to the water supply (junction
diameter is 1/2”).
3. Place the cooling system near the ETHOS
900/1600 and next to a water supply and a water
drain.
4. Connect with rubber hose the inlet (3) to the
water supply which must be provided with a
suitable valve.
5. Connect the drain (5) to the laboratory drain.
The cooling system is ready for operation.
After the microwave digestion, take the rotor out of
the unit and place it inside the cooling tank, after
removing the plexiglass cover of the system.
Relocate the plexiglass cover in its position.
The bottom of the rotor closes the drain 1 at the
bottom of the tank.
Carefully supply water and see that water slowly
fills up the tank until the maximum level (overflow)
is reached.
Adjust, if required, the water flow by using the
valve of the water supply.
Let the rotor cool for at least 10 minutes; during
this time any water surplus will be drained by the
overflow.
Check that the water is circulating around the rotor
and that the level is below the indicator rings of the
vessels by about 10mm.
Close the water inlet.
Take away the plexiglass cover and remove the
rotor.
The drain 1 opens and in few seconds the tank will
be completely empty.
Dry the rotor body with a tissue and place it on the
work station.
Polypropylene bottom plate (1);
Plexiglass transparent container (2);
Water inlet complete with junction (3);
Water outlet for drain (4);
Outlet junction for drain (5);
Plexiglass protection cover (6);
Overflow control device (7).
MDR technology Page 4
1.6
MDR SAFETY
The larger the surface area the shorter the time
The above drawing clearly show the instantaneous
release of overpressure due to the deformation of
the HTC safety spring.
The figure at left represents a vessel in normal
working conditions.
When pressure increases over the maximum spring
working pressure (figure in the center), the entire
cover is allowed to lift up because of the elastic
deformation of the safety spring.
The overpressure is instantaneously released thanks
to the large surface area.
required to release the pressure.
Once the pressure inside the vessel has returned
within the vessel limit, the cover reseal the vessel,
permitting the operator to continue with the acid
digestion without any loss (figure at right).
This is the unique operating principle of the
microwave digestion rotor technology of Milestone.
An indicator ring located next to the cover remains
in the upper position in case of vessel venting.
The picture belows shows a vessel in normal
conditions and at right a vessel after venting.
MDR technology Page 5
1.7
MDR-300/10S
1.7.1
The MDR-300/10S medium pressure rotor contains
10 vessels for acid digestion of routine and
moderately difficult samples at operating pressure
up to 30bar (435psi).
The MDR-300/10S is available in two different
versions: with PFA Teflon vessels or with TFM
Teflon vessels.
• P/N 41100 MDR-300/10S with PFA Teflon
vessels.
• P/N 41200 MDR-300/10S with TFM Teflon
vessels.
MDR-300/10S CONFIGURATIONS
The MDR-300/10S rotor with PFA Teflon vessels
has P/N 41100 and it is composed by the following
items.
P/N
34642
34021
34114
34115
34049
34121
34602
Quantity
1
10
10
10
10
10
1
Description
Rotor body
Safety spring
Adapter plate
TFM Teflon cover
Indicator ring
PFA Teflon vessel
Safety shield (set of 10)
The MDR-300/10S rotor with TFM Teflon vessels
has P/N 41200 and it is composed by the following
items.
P/N
34642
34021
34114
34115
34049
33802
34602
MDR technology Page 6
Quantity
1
10
10
10
10
10
1
Description
Rotor body
Safety spring
Adapter plate
TFM Teflon cover
Indicator ring
TFM Teflon vessel
Safety shield (set of 10)
1.7.2
HOW TO OPERATE WITH THE MDR300/10S ROTOR
The above procedure relates to the use of a MDR300/10S with TFM Teflon vessels (P/N 41200).
The same sequence can be followed when using a
MDR-300/10S with PFA Teflon vessels (P/N
41100).
1.7.3
WARNING
The wall surfaces of the HTC protection shield as
well as the outer wall of the TFM Teflon vessel
must be dry and clean.
Damages may occour otherwise!
SAMPLE WEIGHING, REAGENTS
ADDITION AND VESSEL CAPPING
Place a TFM Teflon vessel directly on the balance
plate.
The weight of the TFM Teflon vessel is about 75g,
therefore most analytical balances may be used for
the pourpose.
Add suitable reagents to the sample.
When part of the sample is left on the inner wall of
the TFM Teflon vessel, try to wet it by adding acids
drop by drop.
Tare the vessel and directly weigh the sample by
placing it inside the vessel.
Try to reduce as much as possible sample transfer,
to avoid any contamination.
Gently swirl the solution, to homogenise the sample
with the acid.
Place the TFM Teflon cover on the TFM Teflon
vessel.
Push it by end and check that the cover fits well
onto the vessel.
Introduce the TFM Teflon vessel into the HTC
protection shield.
MDR technology Page 7
Place now the HTC adapter plate on the TFM
Teflon cover, with the flat part of it at facing
downwards, to have the space for the HTC safety
spring on the top side (picture).
Place the TFM Teflon indicator ring on the cover
and push it down completely, until it fits the groove
of the HTC safety shield, as shown by the next
picture.
Locate the HTC safety spring onto the HTC adapter
plate (picture).
Position the polypropylene rotor body on the work
station; use the black coloured dot on the rotor body
as reference point to fit the rotor body on the work
station (picture).
Introduce the vessel vertically into one of the
numbered niches carved along the periphery of the
10-position polypropylene rotor body.
Notice the position of the venting hole located in
the TFM Teflon indicator ring.
The hole must face outside, so that in case of
venting no hot acid vapors can damage the
polypropylene rotor body (picture).
MDR technology Page 8
Repeat the same operations for the remaining nine
vessels; then put the external protection
ring around the rotor body (picture).
It may be useful now to fix the vessel inside its
location, without a complete closing.
Take the torque wrench and remove the plastic
adaptor (picture).
Take the torque wrench and set the indicator to the
“CLOSE” position, as shown in the next picture.
Use the adaptor to fix the vessels, as shown in the
next picture.
Tighten the HTC screw in the upper part of the
rotor body using the torque wrench.
Make long rotations (refer to the two next pictures)
instead of short ones and do proceed slowly until
you hear a clicking sound informing that the vessel
is properly closed inside its niche.
WARNING
Stop turning the torque wrench when the click is
heard.
In fact the torque wrench may overload the HTC
safety spring if further rotation is applied.
MDR technology Page 9
Make slow 90° rotations with the torque wrench, to
get a better control of the correct closing of the
vessel (click sound).
Look at the position of the HTC drive adaptor of
the ETHOS 900/1600.
Press “F7” on the control terminal keyboard to
rotate the HTC drive adaptor until it reaches the
position shown in the picture above, with the flat
side facing the ETHOS 900/1600 door.
The MDR-300/10S rotor is now ready to be
introduced inside the ETHOS 900/1600; open the
door of the microwave unit by pressing down the
door handle (picture).
Slide-in the MDR-300/10S rotor inside the
microwave cavity of the ETHOS 900/1600.
Notice the position of the black coloured dot on the
polypropylene rotor body, facing the door of the
microwave unit.
In this way the rotor is perfectly aligned with the
HTC drive adaptor.
MDR technology Page 10
Close the door of the ETHOS 900/1600 (picture).
1.7.4
COOLING DOWN AND UNCAPPING
THE VESSEL
Once the digestion program is completed, high
temperature and pressure are reached inside the
vessels, according with the sample preparation
procedure applied.
It is therefore necessary to cool down the rotor
before opening the vessels.
To facilitate this operating step Milestone has
developed a cooling system able to reduce the
cooling time to about 10 minutes.
Switch on the ETHOS 900/1600 (picture).
Introduce the rotor body complete with vessels and
protection ring inside the cooling system (picture
above).
Start a suitable microwave acid digestion program.
Put the cover back on the cooling system itself and
turn on the (tap) water.
MDR technology Page 11
Get a good control of the opening step rotating the
torque wrench with wide angles.
Let the (tap) water flow in for approximately 10-15
minutes.
Turn off the water supply and move the rotor body
from the cooling system to the work station,
preferably located under a fume hood.
Dry with the utmost care rotor and vessels prior
uncapping.
Take the torque wrench and set the indicator to the
“OPEN” position, as shown in the next picture.
Remove the external protection ring (picture).
Place the rotor complete with vessels on the work
station, located under a fume hood.
Carefully loosen the screw in the upper part of the
rotor body, by using the tension wrench.
Open vessels very slowly, since a certain pressure
may still be present (depending on sample type)
even if temperature is as low as room temperature.
Open the vessel opposite to your position, as shown
by the next picture.
Take the vessels out of the rotor body (picture).
MDR technology Page 12
Slide the TFM Teflon vessel out of the HTC
protection shield (picture).
Carefully take up the vessel cover together with the
TFM Teflon protection ring (picture).
Pour the solution in a laboratory volumetric flask,
washing repeatedly the TFM Teflon vessel with
distilled water (picture).
Rinse the lower part of the TFM Teflon cover with
distilled water, collecting the same inside the vessel
(picture).
Repeat the same operation with all vessels in the
rotor.
Your samples are now ready to be analysed.
MDR technology Page 13
1.8
MDR-1000/6S
The MDR-1000/6S high pressure rotor contains 6
vessels for acid digestion of routine and difficult
samples at operating pressure up to 100bar
(1.450psi).
1.8.1
MDR-1000/6S SETUP
The MDR-1000/6S has P/N 35301 and it is
composed by the following items.
P/N
35320
34010
34019
34043
34056
34040
34048
Quantity
1
6
6
6
6
6
6
Description
Rotor body
Safety spring
Adapter plate
TFM Teflon cover
Indicator ring
TFM Teflon vessel
Safety shield
MDR technology Page 14
1.8.2
HOW TO OPERATE WITH THE MDR1000/6S ROTOR
1.8.3
SAMPLE WEIGHING, REAGENTS
ADDITION AND VESSEL CAPPING
Place a TFM Teflon vessel directly on the balance
plate.
The weight of the TFM Teflon vessel is about 120g,
therefore most analytical balances may be used for
the pourpose (picture).
Try to reduce as much as possible sample transfer,
to avoid any contamination.
Introduce the TFM Teflon vessel into the HTC
protection shield.
Tare the vessel and directly weigh the sample by
placing it inside the vessel (picture).
WARNING
The wall surfaces of the HTC protection shield as
well as the outer wall of the TFM Teflon vessel
must be dry and clean.
Damages may occour otherwise!
MDR technology Page 15
Add suitable reagents to the sample.
When part of the sample is left on the inner wall of
the TFM Teflon vessel, try to wet it by adding acids
drop by drop (picture).
Gently swirl the solution, to homogenise the sample
with the acid.
Place the TFM Teflon cover on the TFM Teflon
vessel.
Push it by end and check that the cover fits well
onto the vessel (picture).
Locate the HTC safety spring onto the HTC adapter
plate (picture).
Place the TFM Teflon indicator ring on the cover
and push it down completely, until it fits the groove
of the HTC safety shield, as shown by the next
picture.
Position the polypropylene rotor body on the work
station (picture).
Place now the HTC adapter plate on the TFM
Teflon cover, with the flat part of it at facing
downwards, to have the space for the HTC safety
spring on the top side (picture).
MDR technology Page 16
Introduce the vessel vertically into one of the
numbered niches carved along the periphery of the
6-position polypropylene rotor body.
Notice the position of the venting hole located in
the TFM Teflon indicator ring.
The hole must face outside, so that in case of
venting no hot acid vapors can damage the
polypropylene rotor body (picture).
Repeat the same operations for the remaining nine
vessels; then put the external protection
ring around the rotor body (picture).
It may be useful now to fix the vessel inside its
location, without a complete closing.
Take the torque wrench and remove the plastic
adaptor (picture).
Take the torque wrench and set the indicator to the
“CLOSE” position, as shown in the next picture.
Use the adaptor to fix the vessels, as shown in the
next picture.
Tighten the HTC screw in the upper part of the
rotor body using the torque wrench.
Make long rotations (refer to the two next pictures)
instead of short ones and do proceed slowly until
you hear a clicking sound informing that the vessel
is properly closed inside its niche.
WARNING
Stop turning the torque wrench when the click is
heard.
MDR technology Page 17
In fact the torque wrench may overload the HTC
safety spring if further rotation is applied.
Make slow 90° rotations with the torque wrench, to
get a better control of the correct closing of the
vessel (click sound).
Slide-in the MDR-1000/6S rotor inside the
microwave cavity of the ETHOS 900/1600
(picture).
Turn the rotor until it matches the drive adaptor
located at the center of the microwave cavity base
(picture).
The MDR-1000/6S rotor is now ready to be
introduced inside the ETHOS 900/1600; open the
door of the microwave unit by pressing down the
door handle (picture).
MDR technology Page 18
Close the door of the ETHOS 900/1600 (picture).
Switch on the ETHOS 900/1600 (picture) and start
a suitable microwave acid digestion program.
MDR technology Page 19
1.8.4
COOLING DOWN AND UNCAPPING
THE VESSEL
Once the digestion program is completed, high
temperature and pressure are reached inside the
vessels, according with the sample preparation
procedure applied.
It is therefore necessary to cool down the rotor
before opening the vessels.
To facilitate this operating step Milestone has
developed a cooling system able to reduce the
cooling time to about 10 minutes.
Introduce the rotor body complete with vessels and
protection ring inside the cooling system (picture
above).
Turn off the water supply and move the rotor body
from the cooling system to the work station,
preferably located under a fume hood.
Dry with the utmost care rotor and vessels prior
uncapping.
Take the torque wrench and set the indicator to the
“OPEN” position, as shown in the next picture.
Put the cover back on the cooling system itself
(picture).
Place the rotor complete with vessels on the work
station, located under a fume hood.
Carefully loosen the screw in the upper part of the
rotor body, by using the tension wrench.
Open vessels very slowly, since a certain pressure
may still be present (depending on sample type)
even if temperature is as low as room temperature.
Open the vessel opposite to your position, as shown
by the next two pictures.
Get a good control of the opening step rotating the
torque wrench with wide angles.
Turn on the water supply and let the water flow in
for approximately 10-15 minutes (picture).
MDR technology Page 20
Take the vessels out of the rotor body (picture).
Carefully take up the vessel cover together with the
TFM Teflon protection ring (picture).
Remove the external protection (picture).
Rinse the lower part of the TFM Teflon cover with
distilled water, collecting the same inside the vessel
(picture).
MDR technology Page 21
Slide the TFM Teflon vessel out of the HTC
protection shield (picture).
Pour the solution in a laboratory volumetric flask,
washing repeatedly the TFM Teflon vessel with
distilled water (picture).
Repeat the same operation with all vessels in the
rotor.
Your samples are now ready to be analysed.
MDR technology Page 22
1.9
MDR ROTORS
MAINTENANCE
1.9.3
As general rules:
• do not use any organic solvent to clean or dry
any part of the rotor, with the exception of the
TFM Teflon covers and of the TFM or PFA
Teflon vessels.
• Dry every component including the vessels
thoroughly with paper towel or cloth before
placing the rotor in the microwave unit.
Any moisture or acid trace would heat up in the
microwave field and it could possibly damage
the components.
This is especially true if any trace of water or
acid is left between the internal wall of the
safety shields and the external walls of the
vessels.
• Do not use ice to cool down the rotor after
microwave heating, as the thermal shock could
damage the safety shield.
• To wash all kind of vessels it is advisable to
make use of one of the following procedures
1.9.1
1.
2.
3.
4.
5.
After long time digestions and long term use the
HTC-made springs are flattened and lowered.
The lifetime of the spring may vary depending on
the working conditions (pressure, temperature) of
the rotor, but it can be estimated in approximately
100+ digestions.
A new spring is 8,0mm thick (picture).
8 mm
If the lowering measures less than 0,7mm,
replacement is necessary.
A special propylene tool (P/N 40053) able to check
the spring thickness is available from Milestone.
As shown by the picture below, the slot measures
7,3mm; if the spring can be introduced without
forcing inside the slot, then the spring has to be
replaced.
RAPID CLEANING PROCEDURE
Add 5mL HNO3 in each vessel;
close the vessels inside the rotor as for a
normal digestion;
start the following microwave program (6
vessels): 10 minutes @ 500Watt or (10
vessels): 10 minutes @ 650Watt;
cool down and open the vessels;
rinse the vessels with bidistilled water.
1.9.2
SAFETY SPRING
WARNING
It is mandatory to replace springs with thickness
lower than 7,3mm.
Their use may cause severe damages to other
components of the rotor.
“US EPA” RECOMMANDED
CLEANING PROCEDURE
The cleaning procedure briefly described here is
part of the US EPA approved method 3052 for the
microwave acid digestion of environmental
samples.
1. Store TFM and PFA Teflon parts in 1:1
subboiled HCl overnight at 80-120°C;
2. rinse with bidistilled water;
3. Store in 1:1 subboiled HNO3 overnight at 80125°C;
4. rinse with bidistilled water;
5. store in bidistilled water;
6. allow parts to dry in a particle and fume-free
environment.
MDR technology Page 23
1.9.4
HTC ADAPTER PLATE, TFM TEFLON
COVER, TFM TEFLON INDICATOR
RINGS AND TFM OR PFA TEFLON
VESSEL
The HTC adapter plates, the TFM Teflon covers,
the TFM Teflon indicator rings and the TFM or
PFA Teflon vessels (shown in a picture below) do
not practically undergo any deformation if properly
used.
They have to be replaced only in case of damage or
deformation.
A visual inspection of the above items has to be
done before every digestion.
1.9.5
PRESSURE SCREW
The pressure screw (picture) in the rotor may
slightly lose smoothness.
Threads can be re-made by a Service Technician
using a proper stainless steel tool.
1.9.6
SAFETY SHIELDS
After long time operation the safety shields may
show some swelling due to the high heating
conditions.
Lifetime is estimated to be hundreds of digestions.
Check for visible deformation at the bottom of the
safety shields (approximately 2cm from the base at
the level of the solution).
Putting two shields aside the deformation may be
evidenced (picture) and replacement is necessary.
If HNO3 is often used to digest samples, than the
upper part of the safety shield may assume an
orange-like color, due to a chemical attack of the
HTC surface by the HNO3.
This is normally not a problem, unless the
mechanical properties of HTC are compromised.
MDR technology Page 24
1.0
SOFTWARE MODEL LEVEL 6.17 FOR ETHOS 900
1.1
HOW TO CREATE AND STORE A NEW PROGRAM
NOTE
In order to make understanding of the following chapter clearer and easier, we have opted for the representation only
of the upper window shown by the control terminal display.
The following example will be described.
Step
1
2
3
Ventilation
Time (hh:mm:ss)
00:05:00
00:05:00
00:04:00
00:03:00
PROGRAM 1
Power (Watt)
Pressure (bar)
250
3
400
6
500
10
Int. Temp. (°C)
150
180
210
Ext. Temp (°C)
70
80
80
Switch on the main switch of the ETHOS 900, located on the front panel.
The control terminal “240” display will alternatively show:
*****
MLS GmbH
MultiQUANT
*****
*****
MLS GmbH
SW V 6.17 (M 9_1d77)
*****
After a few seconds the display will show:
F1=WORK
F3=READIN
F2=EDIT
F4=READOUT
Press “F2” key, the display will show:
EDIT PROGRAM
(1-20)
1
ENT=OK
Press “ENT” to confirm; the display will show:
TIME
hh:mm:ss
1/1
ENT=OK
Introduce the desired time of the 1st step (5 minutes in our case) by pressing “0”, “0”, “0” and “5” on the keyboard.
The display will show:
TIME
00:05:ss
1/1
ENT=OK
Press “ENT” to confirm; the display will show:
POWER
(-> 900)
0W
1/1
ENT=OK
It is now possible to enter the microwave power level of the 1st step (250Watt in our case).
Press “2” and “5” on the keyboard and the display will show:
POWER 1
250 W
1/1
Software mod. lev. 6.17 Page 1
(-> 900)
ENT=OK
Press “ENT” to confirm; the display will now request the values for pressure, internal temperature and external
temperature.
WARNING
The values of pressure, internal temperature and external temperature shall be set only when the ETHOS 900 is
supplied with either one of the following control devices: APC-55 (Automatic Pressure Control), ATC-300
(Automatic Temperature Control) and IRTC-500 (Infra Red Temperature Control).
If these devices are not installed in the ETHOS 900, simply press “ENT” three times to skip these steps.
The display will show:
PRESSURE
(-> 100)
_B
1/1
ENT=OK
Press “3” on the keyboard and the display will show:
PRESSURE
(-> 100)
3B
1/1
ENT=OK
Press “ENT” to confirm the value; the following message will appear:
TEMP 1
(-> 400)
_ °C
1/1
ENT=OK
Press “1”, “5” and “0” (150°C) on the keyboard and the display will show:
TEMP 1
(-> 400)
150 °C
1/1
ENT=OK
Press “ENT” to confirm the value; the following message will appear:
TEMP 2
(-> 500)
_ °C
1/1
ENT=OK
Press “7” and “0” (70°C) on the keyboard and the display will show:
TEMP 2
(-> 500)
70 °C
1/1
ENT=OK
Press “ENT” to confirm the value; the display will now show the 2nd step of the program 1.
TIME
hh:mm:ss
2/1
ENT=OK
Introduce the desired time of the 2nd step (5 minutes in our case) by pressing “0”, “0”, “0” and “5” on the keyboard.
The display will show:
TIME
00:05:ss
2/1
ENT=OK
Press “ENT” to confirm; the display will show:
POWER
(-> 900)
0W
2/1
ENT=OK
Software mod. lev. 6.17 Page 2
It is now possible to enter the microwave power level of the 2nd step (400Watt in our case).
Press “4” and “0” on the keyboard and the display will show:
POWER 1
(-> 900)
400 W
2/1
ENT=OK
Press “ENT” to confirm; the display will show:
PRESSURE
(-> 100)
_B
2/1
ENT=OK
Press “6” on the keyboard and the display will show:
PRESSURE
(-> 100)
6B
2/1
ENT=OK
Press “ENT” to confirm the value; the following message will appear:
TEMP 1
(-> 400)
_ °C
2/1
ENT=OK
Press “1”, “8” and “0” (150°C) on the keyboard and the display will show:
TEMP 1
(-> 400)
180 °C
2/1
ENT=OK
Press “ENT” to confirm the value; the following message will appear:
TEMP 2
(-> 500)
_ °C
2/1
ENT=OK
Press “8” and “0” (80°C) on the keyboard and the display will show:
TEMP 2
(-> 500)
80 °C
2/1
ENT=OK
Press “ENT” to confirm the value; the display will now show the 3rd step of the program 1.
TIME
hh:mm:ss
3/1
ENT=OK
Introduce the desired time of the 3rd step (4 minutes in our case) by pressing “0”, “0”, “0” and “4” on the keyboard.
The display will show:
TIME
00:04:ss
3/1
ENT=OK
Press “ENT” to confirm; the display will show:
POWER
(-> 900)
0W
3/1
ENT=OK
It is now possible to enter the microwave power level of the 3rd step (500Watt in our case).
Press “5” and “0” on the keyboard and the display will show:
Software mod. lev. 6.17 Page 3
POWER 1
(-> 900)
500 W
3/1
ENT=OK
Press “ENT” to confirm; the display will show:
PRESSURE
(-> 100)
_B
3/1
ENT=OK
Press “6” on the keyboard and the display will show:
PRESSURE
(-> 100)
10 B
3/1
ENT=OK
Press “ENT” to confirm the value; the following message will appear:
TEMP 1
(-> 400)
_ °C
3/1
ENT=OK
Press “2”, “1” and “0” (210°C) on the keyboard and the display will show:
TEMP 1
(-> 400)
210 °C
3/1
ENT=OK
Press “ENT” to confirm the value; the following message will appear:
TEMP 2
(-> 500)
_ °C
3/1
ENT=OK
Press “8” and “0” (80°C) on the keyboard and the display will show:
TEMP 2
(-> 500)
80 °C
3/1
ENT=OK
Press “ENT” to confirm the value; the display will now show the 4th step of the program 1.
TIME
hh:mm:ss
4/1
ENT=OK
Our example program requires only 3 steps.
To skip step 4 through step 10 simply press “ENT” on the keyboard.
The display will show:
ROTOR CTRL=OFF
MODE 1=ON/OFF
1
ENT=OK
Standard setting is ROTOR CTRL=OFF.
This function may be set ON when the optional IRTC-500 Infra Red Temperature Control device is installed in the
ETHOS 900.
Press the key “MODE 1” to switch the function to ON; then confirm by pressing “ENT” on the keyboard.
The display will now show:
TIME AT TEMPERATURE 1=OFF
MODE 1=ON/OFF
1
ENT=OK
Standard setting is TIME AT TEMPERATURE=OFF.
Software mod. lev. 6.17 Page 4
The “TIME AT TEMPERATURE” function may be used when the ETHOS 900 is supplied with an optional ATC300 Automatic Temperature Control device.
It allows to hold preset temperature values for preset times.
Press the key “ENT” if an ATC-300 is not installed in the ETHOS 900 or if the “TIME AT TEMPERATURE”
function is not required.
By pressing the key “MODE 1”, the “TIME AT TEMPERATURE” function is activated.
In the latter case, the microwave program will be composed by:
• ramping steps: step 1, 3, 5, 7 and 9;
• holding steps: step 2, 4, 6, 8 and 10.
The diagram below better explains the “TIME AT TEMPERATURE” function.
Step
1
2
3
4
5
6
7
8
9
10
Time (hh:mm:ss)
00:05:00
00:05:00
00:05:00
00:08:00
00:00:00
00:00:00
00:00:00
00:00:00
00:00:00
00:00:00
Power (Watt)
500
500
800
800
0
0
0
0
0
0
Pressure (bar)
0
0
0
0
0
0
0
0
0
0
Temp. 1 (°C)
60
60
150
150
0
0
0
0
0
0
Temp. 2 (°C)
0
0
0
0
0
0
0
0
0
0
TIME AT TEMPERATURE
160
150
HOLD
150
140
120
Temp. 1 (°C)
RAMP
100
80
60
60
HOLD
60
RAMP
40
20
20
0
0
5
10
15
20
25
Time (minutes)
If, during the 1st step, the temperature will reach 60°C, then the program will skip the remaining time of the 1st step to
proceed directly with the 2nd step (time at temperature, 5 minutes at 60°C).
If, during the 3 rd step, the temperature will reach 150°C, then the program will skip the remaining time of the 3 rd step
to proceed directly with the 4th step (time at temperature, 8 minutes at 150°C).
Press “ENT” on the keyboard and the display will show:
TWIST=ON
MODE 1=ON/OFF
1
ENT=OK
Software mod. lev. 6.17 Page 5
The “TWIST” function allows an alternate 360°C rotation of the carousel or of the rotor.
This is required when the ETHOS 900 comes with an APC-55 Automatic Pressure Control or with an ATC-300
Automatic Temperature Control device, to avoid bending of the Teflon connecting tubing between the reference
vessel and the pressure transducer (APC-55) and to avoid the bending of the temperature sensor (ATC-300).
Press the key “MODE 1” to activate (ON) or deactivate (OFF) the “TWIST” function.
Press “ENT” on the keyboard and the display will show:
VENT
hh:mm:ss
1
ENT=OK
The ventilation step is very important and should not be omitted.
It serves to cool down the vessels inside the microwave cavity before removing the rotor for further water cooling.
It is therefore an important safety issue.
In the above mentioned example the ventilation step lasts 3 minutes; therefore digit 0, 0, 0 and 3.
The display will show:
VENT
00:03:ss
1
ENT=OK
Press “ENT” on the keyboard to confirm and the display will show:
PROGRAM 1 IS READY
And then:
F1=WORK
F3=READIN
F2=EDIT
F4=READOUT
End of program setting.
Software mod. lev. 6.17 Page 6
1.2
HOW TO VISUALIZE A STORED PROGRAM
Switch on the ETHOS 900 unit; the display will show:
F1=WORK
F3=READIN
F2=EDIT
F4=READOUT
Press the “F2” key; the display will show:
EDIT PROGRAM
(1-20)
*1
ENT=OK
The asterisk (*) indicates that the program number 1 has been previously stored.
Press the key “ENT” and the display will show:
PROGRAM 1 EXISTS
DEL=NEW
ENT=OK
Press the key “ENT” to visualize in sequence the previously entered program and parameters.
To end the visualization, press the “STOP” key and the display will show:
EDIT PROGRAM 1
ABORTED!
And then, after pressing the “STOP” key, the display will show:
F1=WORK
F3=READIN
F2=EDIT
F4=READOUT
Software mod. lev. 6.17 Page 7
1.3
HOW TO DELETE A PROGRAM
F1=WORK
F3=READIN
F2=EDIT
F4=READOUT
Press the “F2” key and the display will show:
EDIT PROGRAM
(1-20)
*1
ENT=OK
Press the “ENT” key and the display will show:
PROGRAM 1 EXISTS
DEL=NEW
ENT=OK
Press the “DEL” key and the display will show:
TIME
Hh:mm:ss
1/1
ENT=OK
The previous program has been deleted and a new program can be stored.
Cancellation of a program can be verified as no asterisk (*) will appear before the program number.
Press the “STOP” key twice and the display will show:
F1=WORK
F3=READIN
F2=EDIT
F4=READOUT
Software mod. lev. 6.17 Page 8
1.4
HOW TO DELETE ALL PROGRAMS
F1=WORK
F3=READIN
F2=EDIT
F4=READOUT
Press the “F2” key and the display will show:
EDIT PROGRAM
(1-20)
*n
ENT=OK
Press the “0” key and the display will show:
EDIT PROGRAM
(1-20)
_
ENT=OK
The symbol “_” will blink.
Press the “ENT” key and the display will show:
KILL ALL PROGRAMS
SURE?
DEL=YES
When the “DEL” key is pressed, all the programs in memory will be cancelled; if the “STOP” key is pressed twice,
then the display will return to the main menu.
Software mod. lev. 6.17 Page 9
1.5
HOW TO VERIFY DELETION OF A PROGRAM
F1=WORK
F3=READIN
F2=EDIT
F4=READOUT
Press the “F1” key and the display will show:
WORK PROGRAM
(1-20)
1
ENT=OK
Press the “ENT” key and the display will show:
PROGRAM 1
NOT FOUND
Software mod. lev. 6.17 Page 10
1.6
ARROWS FUNCTIONS
When the display shows:
WORK PROGRAM
(1-20)
*1
ENT=OK
The arrow keys allow selection of the work program sequence (for instance upwards from 1 to 2, 3 etc. with -> and
downwards from 3 to 2, 1 etc. with <-).
When the display shows:
EDIT PROGRAM
(1-20)
1
ENT=OK
The arrow keys allow to select the program to be created.
Note that the arrow keys allow the selection of the stored programs only in both work and edit mode.
Software mod. lev. 6.17 Page 11
1.7
HOW TO MODIFY A PREVIOUSLY STORED PROGRAM
When the display shows:
PROGRAM 1 EXISTS
DEL=NEW
ENT=OK
Press the “ENT” key and the display will show:
TIME
00:05:00
1/1
ENT=OK
Using the arrow keys as well as the number keys, it is possible to modify microwave emission time, power,
parameters as P, T1 and T2 in each of the ten steps included in the program.
As soon as the parameter has been modified, press the “STOP” key to come back to the main menu.
Software mod. lev. 6.17 Page 12
1.8
PARAMETERS CHOICE
1.8.1
MICROWAVE POWER
The desired microwave power can be set in 10Watt increments up to a maximum of 900Watt.
For any value, for instance 300Watt, it is sufficient to introduce 30 as the first 0 is already fixed.
1.8.2
PRESSURE
The APC-55E Automatic Pressure Control is required.
A pressure up to 55bar can be set (when operating with a MDR-1000/6S rotor).
At the set pressure level the microwave emission will be controlled.
1.8.3
TEMPERATURE 1
The ATC-300 Automatic Temperature Control is required.
A temperature up to 240°C can be set, starting from which the microwave emission will be controlled.
1.8.4
TEMPERATURE 2
The IRTC-500 Infrared Temperature Control is required.
An external temperature up to 120°C can be set, starting from which the microwave emission will be controlled.
1.8.5
ROTOR CONTROL
Rotor control ON/OFF.
When operating with an IRTC-500, if rotor control is set ON, then the infrared sensor will read the highest value out
of a complete turn of the rotor.
This value will be used for controlling the microwave output emission.
1.8.6
TWIST
The “twist” function must be activated in case of pressure and internal temperature control in the reaction vessels.
A 360° alternate rotation of the MDRs is activated, to avoid bending of the sensor connections.
In case the “twist” function is off, the unit presents no alternate rotation and before program running the following
message will appear “TWIST NOT READY” and “POWER IS OFF”.
1.8.7
VENTILATION
Insert the ventilation time to cool down the vessels prior water cooling.
Software mod. lev. 6.17 Page 13
1.9
HOW TO USE A PREVIOUSLY STORED PROGRAM
Switch on the ETHOS 900 and the display will show alternatively the two following messages:
*****
MLS GmbH
MultiQUANT
*****
*****
MLS GmbH
SW V 6.01 (M10 1d77)
*****
After a few seconds the display will show:
F1=WORK
F3=READIN
F2=EDIT
F4=READOUT
Press the “F1” key to activate the “WORK” function; the display shows:
WORK PROGRAM
(1-20)
*1
ENT=OK
Select the number corresponding to the program to be used (for instance, 1).
Confirm the choice of program number 1 by pressing the “ENT” key and the display shows:
START=RUNNING PRG
P=0
1
T2=0
T1=0
Note that when the APC-55E, the ATC-300E or the IRTC-500 options are installed in the ETHOS 900, the actual
values of pressure, internal temperature and external temperature will be shown.
Press the “START” key to start the program number 1; the display shows:
0W
00:00:05
CHECK AND START
P1
During the brief pause that follows, the magnetron will be warmed-up; after 5 seconds the program is started.
During running of the program the display shows, step by step, the microwave power (in Watt), the time remaining
(in hours, minutes and seconds) and the actual values of pressure, internal temperature and external temperature.
However the following circumstances may occur:
>DOOR NOT CLOSED<
The door of the ETHOS 900 has not been properly closed; the microwave program is hold until the door is closed.
>TWIST NOT READY<
The “twist” function is not properly working; this may cause damages to the pressure and temperature sensors.
The microwave program is interrupted.
The microwave program can be stopped at anytime by pressing the “STOP” key or by lowering the door handle.
Pressing the “STOP” key, the display shows:
USER BREAK
Only if ventilation time was preset, the program will automatically proceed with the ventilation time.
After the ventilation time, the display shows:
Software mod. lev. 6.17 Page 14
PROGRAM 1 IS READY
POWER IS OFF
On the contrary, if no ventilation time was preset, the display shows immediately the above message.
To restart the program it is necessary to press the “START” key twice.
In case the microwave program is stopped by lowering the ETHOS 900 door handle, the four built-in switches are
activated and the display shows:
DOOR NOT CLOSED
Followed by:
P=0
CONTINUE=CLOSE DOOR
T1=0
T2=0
After closing the door, the program starts again exactly where it had been interrupted, whereas pressing “STOP” the
display shows:
START=RUNNING PRG
P=0
1
T2=0
T1=0
Press “START” to make the program start from the beginning.
Software mod. lev. 6.17 Page 15
1.10
SETUP
Anytime, whatever the message on the display (obviously with the ETHOS 900 in stand-by position), it is possible to
run the “SETUP” program, by pressing the “F6” key on the control terminal.
The display shows:
F1=SYSTEM
F3=BALANCE
F2=VALUES
F4=PC
Press the “F1” key to visualize the “SYSTEM” sub-menu; the display shows:
DATE
30.03.1998
ENT=OK
Adjust the date, if necessary, by pressing the appropriate numbers on the keyboard; then confirm by pressing the
“ENT” key.
The display shows:
TIME
11:55:00
ENT=OK
Adjust the time, if necessary, by pressing the appropriate numbers on the keyboard; then confirm by pressing the
“ENT” key.
The display shows:
BALANCE TYPE
(1,2,3)
2
ENT=OK
Adjust the type of balance to be interface by pressing 1, 2 or 3.
Default value is 2; confirm by pressing the “ENT” key and the display shows:
PULSE WIDTH
(1-50)
50/10s
ENT=OK
The ETHOS 900 operate with “unpulsed” emission of microwave at 250Watt.
When other power levels are selected, then a “pulsed” mode is used.
The standard setting for pulse width is 10/10s, equal to 1 second.
Microwave power is therefore regulated with alternate ON/OFF microwave emission, with duty cycles of 1 seconds,
as for the following examples:
• 450Watt is equal to 0,5 seconds of magnetron ON and 0,5 seconds of magnetron OFF;
• 90Watt is equal to 0,1 seconds of magnetron ON and 0,9 seconds of magnetron OFF.
If the operator select a pulse width of 50/10s, equal to 5 seconds, then the following table will apply:
• 450Watt is equal to 2,5 seconds of magnetron ON and 2,5 seconds of magnetron OFF;
• 90Watt is equal to 0,5 seconds of magnetron ON and 4,5 seconds of magnetron OFF.
Confirm the choice of pulse width by pressing the “ENT” key and the display shows:
TWIST CHECK: ON
MODE1=OFF
ENT=OK
This function enables the electronic check of the twist function.
Default mode is “ON”.
Press the key “MODE1” to disable the function; it is however recommended to leave it “ON” when the APC and/or
the ATC sensors are installed.
Press the key “ENT” to confirm and the display shows:
GAS SENSOR
OFF
Software mod. lev. 6.17 Page 16
MODE1=SELECT (0)
ENT=OK
If a gas sensor is installed in the ETHOS 900, it can be activated with this section of the software.
Also the gas sensor sensitivity can be set.
There are four sensitivity steps: HIGH, MEDIUM, LOW and OFF.
It is possible to select one of these possibilities with the “MODE1” key.
When the gas sensor is activated, during a microwave program run microwave are turned OFF if the preset level is
reached.
A warning message appears on the display.
When the gas concentration decreases below the preset level, the microwave program is continued and the warning
message disappear.
Select HIGH, MEDIUM, LOW or OFF and confirm the choice by pressing “ENT” key.
The display shows:
DATE
30.03.98
ENT=OK
Press the “STOP” key to leave the “SYSTEM” sub-menu and the display shows:
F1=SYSTEM
F3=BALANCE
F2=VALUES
F4=PC
Press the “F2” key to visualize the “VALUES” sub-menu; the display shows the software model level, as well as the
actual values of pressure, internal temperature and external temperature.
P=0
SW_V: 6.17 (M 9_0d77)
T1=0
T2=0
Press the “STOP” key to leave the “VALUES” sub-menu and the display shows:
F1=SYSTEM
F3=BALANCE
F2=VALUES
F4=PC
Press the “F3” key to visualize the “BALANCE” sub-menu; the display shows direct readout of the balance, when
this is connected.
WEIGHT=
0=ZERO
0.2308g
ENT=PRINT
Press the “0” key to tare the balance or press the “ENT” key to printout the balance readout.
By pressing the “STOP” key the display turns back to the main menu:
F1=SYSTEM
F3=BALANCE
F2=VALUES
F4=PC
Press “F4” to interface the ETHOS 900 to an external computer.
By an appropriate software the ETHOS 900 is fully operated by an external computer.
COMPUTER
ON LINE
Press the “STOP” key to return to the main menu.
By pressing the “F5” key from the main menu a printout of whatever the display shows is activated.
Software mod. lev. 6.17 Page 17
1.11
ERROR MESSAGES
In case the operator has any difficulty with the control terminal software, the basic rule is to press the “STOP” key to
return to the main menu.
Switching ON/OFF the unit will cause resetting and going back to the main menu.
Work programs remain unchanged.
1.11.1
TWIST FUNCTION
This function has been introduced for higher safety of operation.
Basic setting is TWIST=ON.
If the operator is using an MDR rotor fitted with pressure and/or internal temperature control, the twist function must
be ON, as otherwise the sensor tubing will be damaged.
TWIST not ready!
-POWER IS OFF1.11.2
ROTOR CONTROL
If the ETHOS 900 is fitted with an IRTC-500, it is important to activate the rotor control; therefore at the following
step:
ROTOR-CTRL=ON1
MODE1-ON/OFF ENT=OK
1.11.3
OVERHEATING
As an extra safety the ETHOS 900 magnetron are provided with overheating thermal safety switches.
In the remote event of hardware overheating, the following message appears:
>DOOR NOT CLOSED<
And then:
CONTINUE=CLOSE DOOR
ABORT=STOP
If this error message is not due to the ETHOS 900 door left open, then interrupt the microwave program.
After cooling, the system can be regularly operated again.
1.11.4
BATTERY
The ETHOS 900 CPU is provided with a Lithium battery to save the storing in memory of the working programs.
The lifetime of the memory buffer battery is approximately 3 years and therefore it should be replaced after this time
period.
If the battery is empty, the software will give a user message and delete all programs.
BATTERY IS EMPTY
ALL PROGRAMS ARE KILLED
A double beep follows this message.
If you still want to work with a low battery, you have to enter the whole program after power on the ETHOS 900.
1.11.5
LONG TIME OPERATION PROGRAM
Software mod. lev. 6.17 Page 18
All reactions over 30 minutes and above 250Watt should only be carried out with the ATC-300 Automatic
Temperature Control device installed and in use and only after contacting first the Milestone representative in your
country for advise.
The next function has been introduced to protect the ETHOS 900 from overheating problems caused by long time
programs (more than 1 hour).
If the program being used is longer than 1 hour, when pressing F1=WORK a three times warning message appears:
**
WARNING
TOTAL PRG TIME > 1h
**
Press the “ENT” key and the display shows:
**
ARE YOU SURE
TOTAL PRG TIME > 1h
**
Press the “ENT” key and the display shows:
**
ARE YOU REALLY SURE
TOTAL PRG TIME > 1h
**
Press the “ENT” key and the display shows:
P=0
START=RUNNING PRG ...
T1=0
T2=0
Now the program is available to work.
Otherwise if you want to change the program, press the “STOP” key when the warning message appears, then press
again the “STOP” key until the main menu is reached.
F1=WORK
F3=READIN
F2=EDIT
F4=READOUT
Software mod. lev. 6.17 Page 19
1.12
SOFTWARE INITIALIZATION
Every time either a CPU board or a EPROM is replaced, the system needs to be reinitialized.
Proceed as follows:
• start with ETHOS 900 in OFF conditions;
• press the “STOP” key on the control terminal;
• keeping pressed, switch ON the ETHOS 900;
• remain in this position until a buzzer sound is heard;
• enter a new working program as previously described.
Software mod. lev. 6.17 Page 20
1.13
MULTIQUANT MODE
The ETHOS 900, besides being a digestion system, can also operate as moisture/solids analyzer.
For determination of volatile elements the operator must go to the program part “READIN” by pressing the “F3” key
from the main menu.
Refer to this section only when a balance and a printer are connected to the ETHOS 900.
The basic principle of the multiQUANT mode is that volatile/moisture in samples are determined by weighing the
samples themselves before and after a drying process.
The difference between the initial weight (“read-in”) and the final weigh (“read-out”) is determined and statistically
calculated.
Quitting the main menu and pressing “F3=READIN”, the operator gets into the multiQUANT menu.
Introduce the sample identification (maximum 9 letters) replacing the writing MLS GmbH word.
• ID NO.
Use the arrow keys to go forward and backwards in the alphabet; use the asterisk (*) to switch from capital to
small letters; use the 0... 9 keys to write numbers.
• NO. SAMPLES
Indicates the number of samples to be weighed/tested.
• 1 TARA
Store the tare of the 1st sample.
• 1 TARA+S
The 1st sample is weighed and the value is stored in memory.
• 2 TARA
Store the tare of the 2nd sample.
• 2 TARA+S
The 2nd sample is weighed and the value is stored in memory, and so on.
• F4=READOUT
Weighing of final weight and statistical calculation with print-out of reports.
In case during weighing, both read-in and read-out, there are one or more errors (sample lost/burnt, defective
vessel etc.), it is not necessary to repeat the complete sequence, but single values can be rejected with the
“READOUT” step.
An exclamation mark will appear and the value will remain out of the statistical calculation.
The procedure is reversible.
Before quitting with the “STOP” key, it is suggested to press the “F5” key to have printout of the modified
values.
Software mod. lev. 6.17 Page 21
1.0
GUIDELINES FOR MICROWAVE ACID DIGESTION
1.1
INTRODUCTION TO THE REAGENTS MOST COMMONLY USED
IN MICROWAVE DIGESTION
The acids used in microwave digestion may be classified in two main groups:
• nonoxidizing acids, such as hydrochloric acid, hydrofluoric acid, phosphoric acid, diluted sulfuric acid and
diluted perchloric acid;
• oxidizing acids, such as nitric acid, hot concentrated perchloric acid, concentrated sulfuric acid and hydrogen
peroxide.
1.2
NITRIC ACID
Nitric acid has the following properties:
• boiling point is 120°C at 65% concentration;
• poor oxidizing strength at concentrations less than 2M; oxidizing strength increases with concentration and
reaction temperature;
• most common acid for oxidation of organic matrices with this typical reaction: (CH2)X + 2HNO3 -> CO2(g) +
2NO + 2H2O;
• it dissolves most metals forming soluble nitrates, exceptions are Au and Pt (not oxidated) and Al, B, Cr, Ti
and Zr (passivated);
• these metals require acid mixtures or diluted nitric acid;
• often mixed with H2O2, HCl and H2SO4;
• available in high purity for trace level analysis.
The above graphic represents the temperature and pressure profile of nitric acid up on microwave heating.
Notice that pressure has been controlled at 25bar, resulting in a temperature of 225°C.
Acid digestion guidelines Page 1
1.3
HYDROGEN PEROXIDE
Hydrogen peroxide is an oxidizing agent (2H2O2 -> 2H2O + O2); added to nitric acid it reduces the nitrous
vapours and it accelerates the digestion of organic samples by raising the temperature.
A typical mixture ratio is HNO3:H2O2= 4:1 (volume/volume).
1.4
HYDROCHLORIC ACID
Hydrochloric acid has the following properties:
• boiling point of azeotropic mixture with H2O with 20,4% HCl is 110°C;
• available with 38% concentration;
• it dissolves salts of weak acids (carbonates, phosphates) and most metals are soluble with the exception of
AgCl, HgCl and TiCl;
• excess of HCl improves the solubility of AgCl, converted into AgCl2-;
• strong complexing nature;
• widely used for iron-based alloys because of its ability to hold large amounts of chloro-complex in solution;
• other complexes formed are Ag (I), Au (II), Hg (II), Ga (III), Tl (III), Sn (IV), Fe (II) and Fe (III);
• it does not dissolve oxides of Al, Be, Cr, Ti, Zr, Sn and Sb; sulphates of Ba and Pb, group II fluorides, SiO2,
TiO2 and ZrO2.
The graphic above represents the temperature and pressure profile of hydrochloric acid up on microwave
heating.
Notice that pressure has been controlled at 25bar, resulting in a temperature of 205°C.
Acid digestion guidelines Page 2
1.5
HYDROFLUORIC ACID
Hydrochloric acid has the following properties:
1.5.1
•
•
•
•
•
ACID DIGESTION
Boiling point is 108°C at 40% concentration;
nonoxidizing, strong complexing nature;
used in digestion of minerals, ores, soils, rocks and even vegetables containing silicates;
major use is the decomposition of silicates according with this reaction: SiO2 + 6HF -> H2SiF6 + 2H2O;
often used in combination with HNO3 or HClO4.
1.5.2
EVAPORATION/CONCENTRATION
• Following dissolution, many analyses require removal of HF to prevent equipment damage or to resolubilize
insoluble fluorides;
• many analytes such as As, B, Se, Sb, Hg and Cr may volatilize.
1.5.3
COMPLEXATION
• Alternative approach to remove HF from the solution, by addition of Boric acid;
• the following reactions take place: H3BO3 + 3HF -> HBF3(OH) + 2H2O and HBF3(OH) + HF -> HBF3 +
H2O;
• 10-50 times excess Boric acid enhances reaction rate.
The above graphic represents the temperature and pressure profile of hydrofluoric acid up on microwave heating.
Notice that pressure has been controlled at 25bar, resulting in a temperature of 240°C.
Acid digestion guidelines Page 3
1.6
SULFURIC ACID
Sulfuric acid has the following properties:
• boiling point is 340°C at 98% concentration, exceeding the maximum working temperature of TFM Teflon
vessels;
• careful reaction monitoring is required to prevent vessel damages;
• it destroys organics by dehydrating action;
• many sulfates are insoluble (Ba, Sr, Pb).
The above graphic represents the temperature and pressure profile of sulfuric acid up on microwave heating.
Notice that temperature has been controlled at 300°C (for 1 minute only), without any pressure increase.
It is clear that the use of concentrated sulfuric acid in the MDR rotors poses significant problems because of its
high boiling point.
300°C are critical for TFM Teflon vessels and simply too high for PFA Teflon vessels (they melt down at such
temperature).
It is therefore advisable to use sulfuric acid only with a strict temperature control.
Acid digestion guidelines Page 4
1.7
PERCHLORIC ACID
Perchloric acid has the following properties:
• boiling point is 203°C at 72% concentration;
• hot and concentrated is the strongest oxidizing acid;
• rapid, sometimes explosive, reaction with organic matrices;
• often mixed with nitric acid for a controllable digestion of organic matrices;
• all perchlorate are soluble with the exception of KClO4;
• perchloric acid decomposes at 245°C in a closed microwave vessel, developing gaseous by-products and a
tremendous excess pressure.
WARNING
Special care has to be taken when the use of perchloric acid is required.
Do not use at all perchloric acid with organic samples.
It may be possible to use perchloric acid with inorganic samples when the temperature does not exceed 200°C
and when the amount of perchloric acid is below 20% (volume/volume) of the total solution volume.
1.8
AQUA REGIA
Aqua regia properties are the following:
• made up by hydrochloric acid and nitric acid in a 3:1 (volume/volume) mixture;
• it produces NOCl (nitrosyl chloride), which decomposes in NO and Cl2 up on heating;
• it dissolves precious metals;
• it must be freshly prepared and used immediately, otherwise it evolves chlorine gas overpressurizing and
venting the vessel
The above graphic represents the temperature and pressure profile of aqua regia up on microwave heating.
Notice that pressure has been controlled at 25bar, resulting in a temperature of 200°C.
Acid digestion guidelines Page 5
2.0
MICROWAVE ACID DIGESTION OF ORGANIC SAMPLES
Organic samples group includes food, feed, tissues, botanicals, biological etc.
Nitric acid is the most common oxidizing agent used to digest organic samples, according to the following
reaction: ORG + HNO3 -> NOX + CO2 + H2O.
Metals are converted into soluble nitrates, available for analysis.
When operating the ETHOS 900 with ATC-300 Automatic Temperature Control device, set the digestion
temperature at 140°C or higher for samples rich in carbohydrates (wheat, sugar, etc.), at 150°C or higher for
samples rich in proteins (serum, albumin etc.) and at 170°C or higher for fatty samples (cheese, butter, vegetable
oil etc.).
Those temperature represent minimum target digestion temperature for the above matrices.
The sample amount directly influence the pressure generated inside the vessel, as sample is decomposed into
CO2 gas.
Therefore some limitation in regards to the sample amount may apply.
Follow the scheme below.
Note that the above sample amounts do refer to organic matter.
Therefore the moisture content of the sample should not be considered (for instance, if a sample contains about
80% of moisture, up to 5 gram could be digested).
When operating the ETHOS 900 without ATC-300 Automatic Temperature Control, follow the basic programs
recommended by Milestone.
Microwave power and heating time strictly depend on the number of samples being prepared simultaneously.
To organic samples 4-8mL of nitric acid (depending on sample amount) should be added, as well as 1-2mL of
hydrogen peroxide.
Acid digestion guidelines Page 6
2.1
BASIC PROGRAM FOR 3 SAMPLES
Step
1
2
3
2.2
Power (Watt)
250
600
300
BASIC PROGRAM FOR 6 SAMPLES
Step
1
2
3
2.3
Time (minutes)
5
3
2
Time (minutes)
5
5
5
Power (Watt)
250
500
650
BASIC PROGRAM FOR 12 SAMPLES
Step
1
2
3
Time (minutes)
8
8
8
Acid digestion guidelines Page 7
Power (Watt)
250
500
750
3.0
MICROWAVE ACID DIGESTION OF ENVIRONMENTAL SAMPLES
A number of microwave digestion methods for environmental samples have been approved by the US EPA
(Environmental Protection Agency).
• US EPA 3015 SW-846 Update II
Microwave assisted acid digestion of aqueous samples
• US EPA 3051 SW-846 Update II
Microwave assisted acid digestion of sediments, slugs, soils and oils
• US EPA 3052 SW-846 Update III
Microwave assisted acid digestion of siliceous and organically based matrices
A brief explanation of the methods is given here; more detailed information are available from your Milestone
local supplier up on request.
3.1 US EPA METHOD 3015
• Sample amount 45mL.
• Reagents 2,5mL HNO3 and 2,5mL HCl when analyzing the solution with FLAA or ICP, 5mL HNO3 only
when analyzing the solution with FLAA, GFAA, ICP or ICP-MS.
• Microwave digestion time 20 minutes.
• Temperature to reach 160°C within 10 minutes and to remain between 165-170°C for other 10 minutes.
3.2
•
•
•
•
•
US EPA METHOD 3051
Sample amount 0,5g.
Reagent 10mL HNO3.
Acid leaching method.
Microwave digestion time 10 minutes.
Temperature to reach 170°C within 5,5 minutes and to remain between 170-180°C for the balance of 10
minutes.
3.3
US EPA METHOD 3052
• Sample amount up to 1,0g.
• Basic reagents 9mL HNO3 and 3mL HF.
• Alternative combinations include HCl (for Erg, BA, SB, Fe and Al determination), H2O2 (for organic
samples) and H2O (to slow down exothermal reaction).
• Goal is total sample decomposition.
• Microwave digestion time 15 minutes.
• Temperature to reach 180°C within 5 minutes and to remain between 175-185°C for 10 minutes.
Acid digestion guidelines Page 8
4.0
MICROWAVE ACID DIGESTION OF INORGANIC SAMPLES
Inorganic samples group includes metals, alloys, oxides, ores, rocks, slags, ceramics etc.
4.1
CHEMISTRY
Sample preparation procedure are strongly dependent on the chemical nature of the material to be digested abd
on the elements to be determined.
The microwave acid(s) choice is often the same as used with “conventional” methods.
4.2
MICROWAVE PROGRAM
Most inorganic samples show non-exothermal reactions and do not produce large amount of gases.
The sample amount does not affect the ratio temperature/pressure as much as with organic samples.
The digestion efficiency strongly depends on the digestion temperature; therefore the target is to bring the
solution to the highest temperature in the shortest time (first step) and to hold this temperature until the digestion
is complete (second step).
For difficult samples, requiring temperatures higher than 200°C, a high pressure rotor MDR-1000/6S should be
used, while for easier samples, requiring temperature below 200°C, a medium pressure rotor MDR-300/10S is
enough.
As a matter of fact, when samples such as sand (1g) are to be digested with 4mL HF and 1mL HNO3, a suitable
program would be:
Step
1
2
Time (minutes)
10
10
Power (Watt)
650
350
The above program refers to the simultaneous digestion of 6 samples.
A library of nearly 400 sample preparation methods is available from your local Milestone distributor.
Acid digestion guidelines Page 9