1
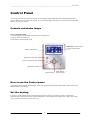
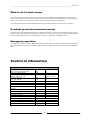
___________________________________________________________________ EcoDan
User Guide
-11
Version 1.4
___________________________________________________________________ EcoDan
Contents
For the user.............................................................................................................................................. 3
Important information........................................................................................................................... 3
General .................................................................................................................................................... 4
This is how the EcoDan works................................................................................................................. 5
Principles in different demand situations ............................................................................................. 5
Control unit ME 900 ................................................................................................................................. 6
Water heating is given priority over space heating.............................................................................. 6
The Control unit’s two methods to control the heat pump................................................................... 6
Control with outdoor sensor................................................................................................................. 6
Control with an outdoor sensor supplemented with room sensor ....................................................... 7
Control Panel ........................................................................................................................................... 8
Controls and status lamps ................................................................................................................... 8
How to use the Control panel .............................................................................................................. 8
Set the heating .................................................................................................................................... 8
Heat curve ........................................................................................................................................... 9
Change the curve slope..................................................................................................................... 10
Set extra heat curve with mixing valve .............................................................................................. 11
Extra Heat curve ................................................................................................................................ 11
Set the heat curve slope or adjust the heat curve ............................................................................. 12
Set the desired room temperature..................................................................................................... 13
Set the heat pump for extra water heating ........................................................................................ 13
Water heating peak ........................................................................................................................... 14
Time schedule ................................................................................................................................... 14
Temperature ...................................................................................................................................... 15
Electrical heat .................................................................................................................................... 15
Service............................................................................................................................................... 15
Date/clock .......................................................................................................................................... 15
Solar energy ...................................................................................................................................... 15
Pool.................................................................................................................................................... 15
Component parts ................................................................................................................................... 16
EcoDan without plate heat exchanger............................................................................................... 16
EcoDan with plate heat exchanger.................................................................................................... 17
Maintenance ...............................................................................................................................18
What to do if a fault occurs .................................................................................................................... 19
Overheat protection immersion heater .............................................................................................. 19
Emergency operation...............................................................................................................19
Technical data
19
-22
Version 1.4
___________________________________________________________________ EcoDan
For the user
Important information
EcoDan is used together with a Mitsubishi Electric air water heat pump for production of tap water and heating
of a radiator or floor heating system.
The system is controlled by ME 900 control unit which is built in the unit controls and monitors the total system
using different settings for heating, hot water, other operations and maintenance. The settings are made by the
installer and the user via a control panel.
Note
Only a trained and qualified technician may carry out repairs to this product. Incorrect repairs can lead to
serious risk to the user.
Visits from an authorised service representative to make corrections or adjustments after such a repair, cannot
in such case be carried out free of charge, not even during the warranty period.
-33
Version 1.4
___________________________________________________________________ EcoDan
General
EcoDan can not be used without a connection to a Mitsubishi Electric heat pump, which forms a complete
solution for both heating and hot water. The EcoDan hot water cylinder is in stainless steel and has a protector
anode that maintenance free and is suitable for all types of water.
The EcoDan is installed indoors and the heat pump is installed outdoors. The heat pump collects energy from
outside air and the energy is transferred via heated water to EcoDan for further transfer out into the house’s
heating system (radiators and/or floor heating) and for heating the tap water.
The control unit ME 900 controls and monitors the whole installation. It contains a control panel with graphic
presentation. Most settings needed to give the installation the best possible function in your house, are made via
the control panel by the installer (or are preset/in the factory). In addition, you can affect operation in different
ways, for example, by increasing or decreasing the heating, obtaining extra hot water etc, using the control panel.
There are a number of sensors in the system to assist adjusting heating and hot water production for different
demands. These give the control unit information about for instance the current outdoor temperature and hot
water temperature.
-44
Version 1.4
___________________________________________________________________ EcoDan
This is how the EcoDan works
The EcoDan together with an Mitsubishi Electric air water heat pump produce hot water and heating, (additional
heat together with an immersion heater built into the EcoDan). The EcoDan hot water tank contains a tank in
tank solution to produce hot water heat. There is an additional immersion heater which heats the water when the
heat pump don’t carry the demand or when the heat pump stop after outdoor limited temperature.
The system heats the hot water based on information from a sensor in the hot water heater and the settings in the
control unit. The electrical patron is also used to produce extra high hot water temperature, which is reached via
a hot water peak.
Principles in different demand situations
Heat pumps produce space heating and there is no hot water
heating requirement:
The heat pump heats the space heating water according to the sensor
T1 and temperature settings in the control unit. The control unit ME
900 controls the capacity from the heat pump.
Heat pump produce space heating and there is a water
heating requirement:
In this case, the water heating sensor T3 indicates that the
water heating needs be heated. The warm water from the heat
pump passes through the water heater cylinder’s outer shell
and heats up the water heater until the requirement is met.
While it is doing so, no space heat is produced. The switch
between space heating and water heating production occurs
automatically at a certain time interval.
Extra hot water and hot water peaks:
When these requirements must be met, the control unit ensures
that hot water is first heated by the heat pump, then only by
the immersion heater until demand is met.
T2 Outdoor
sensor
Control
Panel
Hot water
oooooooooooooooooooooooooooooooooooooooooo
oooooooooooooooooooooooooooooooooooooooooo
oooooooooooooooooooooooooooooooooooooooooo
oooooooooooooooooooooooooooooooooooooooooo
oooooooooooooooooooooooooooooooooooooooooo
oooooooooooooooooooooooooooooooooooooooooo
oooooooooooooooooooooooooooooooooooooooooo
oooooooooooooooooooooooooooooooooooooooooo
oooooooooooooooooooooooooooooooooooooooooo
oooooooooooooooooooooooooooooooooooooooooo
oooooooooooooooooooooooooooooooooooooooooo
oooooooooooooooooooooooooooooooooooooooooo
oooooooooooooooooooooooooooooooooooooooooo
oooooooooooooooooooooooooooooooooooooooooo
oooooooooooooooooooooooooooooooooooooooooo
oooooooooooooooooooooooooooooooooooooooooo
oooooooooooooooooooooooooooooooooooooooooo
oooooooooooooooooooooooooooooooooooooooooo
oooooooooooooooooooooooooooooooooooooooooo
oooooooooooooooooooooooooooooooooooooooooo
T3
Hot water
sensor
E lectric p atro n
.
T4 Indoor sensor
option
Heat pump
3-way valve
T1
Return temp
Heating water
Radiator/floor heating
At outdoor temperatures lower than -20 degrease C:
In the event of too low an outdoor temperature, the heat pump stops and all heating of heating water and water
heating occurs via an immersion heater in EcoDan. The outdoor temperature is displayed via the outdoor sensor
T2.
Summer season:
In this case, there is no heat production and the heat pump is idle. When a water heating requirement occurs, the
heat pump starts and meets the demand. Extra water heating and hot water peaks function as described
previously.
-55
Version 1.4
___________________________________________________________________ EcoDan
Control unit ME 900
The control unit is the brains of the system. It makes sure the het pump and EcoDan gives the best energy
savings and that it runs for many years. The control unit controls and monitors the heating and hot water supply
in your house. The monitoring function is especially important. It shuts down the heat pump in the event of
operational disturbances so no critical parts are damage.
Water heating is given priority over space heating
In a house with water based heating a difference is made between space heating and water heating. The space
heating is for radiators/floor heating and water heating is for showers and taps. The water heating is fitted with a
sensor that senses the temperature of the water heating. The space heating passes through the water heater
cylinder’s outer shell and heats up the inner tank. The control unit makes sure the heating of water heating is
always given priority over the space heating. This means you never need to be without water heating. The
control unit controls a tree-way valve that switches between space heating the water heating. Once the water
heating have been heated the three-way switches so that the space heating water is heated.
The Control unit’s two methods to control the heat pump
The control unit uses two different methods to control the heat pump. These two methods are: Control with an
outdoor sensor and Control with an outdoor sensor supplemented with a room sensor.
Control with outdoor sensor
Control with an outdoor sensor is the most common method used by the control unit to control the heat pump.
When the heat pump is delivered it is set for this control method. A sensor is fitted on the outside wall of the
house. It sends signals to the control unit ME 900 in EcoDan. Control with an outdoor sensor means that heat
pump automatically regulates the heating in the house depending on the outdoor temperature. If the outdoor
temperatures drops, it becomes colder, the radiators inside the house will become warmer.
You determine the temperature of the radiators, in relation to the outdoor temperature, with help of a number of
settings such as selection the heat curve on the control unit. A lower curve gives higher energy savings,
-66
Version 1.4
___________________________________________________________________ EcoDan
Control with an outdoor sensor supplemented with room
sensor
Control with an outdoor sensor supplemented with a room sensor (accessory) means that you also place a sensor
in a position inside the house this is connected to EcoDan and provides the control unit with information about
the current room temperature. The signals affect the heat curve’s flow temperature. For example, it falls when
the room sensors shows a higher temperature than the one set.
This control method is used when factors other than the outdoor temperature influence the indoor temperature.
Examples include the use of a stove or fan-assisted radiator or if the house is sensitive to the wind.
Note: It is only the room where the room sensor is located that can influence regulation of the temperature.
-77
Version 1.4
___________________________________________________________________ EcoDan
Control Panel
All settings are made from the control panel. It also displays heat production statistic and information about
alarms. ´When you have made your settings, the control panel makes sure they are saved in the control unit ME
900 to carry out your wishes.
Controls and status lamps
Power switch (ON/OFF)
You start and stop the heat pump using the power switch button.
Lamp on: The heat pump is on
Lamp flashes: The heat pump is off
Important scroll list shows
you have under menus.
Display information
Menu button Go back
Power switch (ON/OFF)
Menu buttons Enter
Menu buttons
Menu buttons
adjust settings
How to use the Control panel
The principal of the control panel is based on the user using the buttons and the menu dial to move between the
different menus and settings.
Set the heating
It is easy to set the heating level on the heat pump. However, before we explain to do this is important to
understand the relation between the outdoor temperatures, return temperature and heat curve slope. The easiest
way to explain the relation is with a heat curve.
-88
Version 1.4
___________________________________________________________________ EcoDan
Heat curve
You use the heat curve to help set the indoor temperature you would like. The heat pump is controlled by the
outdoor temperature. When the weather becomes colder, the heat pump ensures more heating is produced
automatically.
Example below present when the outdoor temperature is -2,5°C give an return temperature on 36°C with actual
curve slope.
Return temperature (°C)
100
80
H
60
40
20
V
0
20
15
10
5
0
-5
-10
-15
-20
-25
Outdoor temperature (°C)
Return temperature:
The return temperature is the temperature of the water returns to the heat pump from the radiators. The water led
out from the heat pump to the heat pump to the heating system is normally 7-10°C higher than the return
temperature. When the outdoor temperature is -10°C and curve 4 is set, the pump attempts to keep the return
water at approximately 40 °C.
Note: On delivery the heat pump curve slope is set to position 4. This means that the return temperature is
+35°C when is 0°C outdoors.
Outdoor temperature:
The outdoor temperature determines how much heating the heat pump should produce. A sensor placed outdoors
sends signals to the control unit, which then adjusts the heat pump.
Curve slope:
You can change the curve slope to increase or decrease the heating in the house. By offsetting the left (V) and
right (H) end points, the slope of the heat curve can be altered. Use the left end point to adjust the flow
temperature at high outdoor temperatures and the right en point to adjust the flow temperature at low
temperatures.
Adjust a single value:
You can also adjust a signle value on the curve up or down every fifth outdoor degree. You can, for example,
create an increase in the heat curve at 0°C.
-99
Version 1.4
___________________________________________________________________ EcoDan
Change the curve slope
The heat pump’s production of heating is adjusted by increasing or decreasing the curve slope. By setting the
curve slope with menu bottom + and – can you adjust the production of heat from the heat pump.
Return temperature (°C)
100
80
H
60
40
V
20
0
20
15
10
5
0
-5
-10
-15
-20
-25
Outdoor temperature (°C)
Curve slope:
V= 20, H= 24 Normal basic setting for under floor heating in concrete.
V= 20, H= 29 Normal basic setting for under floor heating in wooden joists.
V= 20, H= 48 Normal basic setting for radiators.
V= 20, H= 58 Abnormal high setting.
From the heat curve we see that curve slope V=20 and H=55 gives a return temperature of +35°C when it is 0°C
outdoors. If the outdoor temperature drops we can se that the return temperature increases. Colder outdoor
temperature gives a higher return temperature. At an outdoor temperature of approximately -30°C we see the
curve slope has neatly reached the limit value (+57°C) for the return temperature.
If the return temperature exceeds 57°C and the outdoor temperature is -10°C you need a higher curve slope.
-10
10
Version 1.4
___________________________________________________________________ EcoDan
Set extra heat curve with mixing valve
If you have floor heating combined with radiators, you should set an extra heat curve with mixing valve. The
mixing valve is a valve that lets water through in different amounts. It prevents the floor from becoming too hot
and destroying the flooring. You activate the extra heat curve to select Floor heat/Enable in the main menu for
heat. You can adjust the PID regulation through settings in the menu for heat.
Extra Heat curve
Example below present when the outdoor temperature is 0°C give an outgoing temperature on
42°C with actual curve slope.
Outgoing temperature (°C)
100
80
H
60
40
20
V
0
20
15
10
5
0
-5
-10
-15
-20
-25
Outdoor temperature (°C)
Outgoing temperature:
The outgoing temperature is the temperature of the space water who controls by the three way valve normally
connected to the under floor heating. The water led out from the heat pump to the heat pump to the space. When
the outdoor temperature is -10°C and curve 6 is set, the pump attempts to keep the return water at approximately
48 °C.
Note: On delivery the heat pump curve slope is set to position 6. This means that the return temperature is
+38°C when is 0°C outdoors.
Outdoor temperature:
The outdoor temperature determines how much heating the heat pump should produce. A sensor placed outdoors
sends signals to the control unit, which then adjusts the heat pump.
Curve slope:
Se below, Set the heat curve slope or adjust the heat curve.
Adjust a single value:
Se below, Set the heat curve slope or adjusts the heat curve
-11
11
Version 1.4
___________________________________________________________________ EcoDan
Set the heat curve slope or adjust the heat curve
If you don’t is satisfied with the indoor temperature when there is 0°C outdoor, you can set a higher curve slope
or adjust the curve in the current outdoor temperature.
This is to do:
1.
Select Heat in the main menu and the Radiator heat, Heat
curve. The current curve is shown here. The value 33,1 is the
flow temperature at 5°C in outdoor temperature. When you
step by step in 5°C intervals of outdoor temperature is the
return temperature calculated from the curve slope showed.
2.
Start by finding the value you wish to change. It can be V, H
or some other value. To find the current value, press the
menu bottom right > left <. At the top of the display, various
outdoor temperatures with corresponding flow values on the
curve are shown, at the bottom, a dash can be shown that
shows the position on the outdoor temperature axis. Continue
turning the dial and you will eventually find the H value.
3.
4.
The most common adjustment is to increase the H value
slightly to obtain more heating in cold weather. In the
display you will see that the H value has been located and
then marked by pressing enter. When you press the menu
bottom + or - adjusts the H value. When you are satisfied
with the H value, press bottom enter to save the adjustment.
Select Heat
V=value
H=value
It may also be necessary to change a specific value on the
curve, e.g. to increase the heating at temperature around 5°C.
Press the menu bottom left or right to mark 5°C and press
enter to mark the value. Press menu bottom + or - to adjust
the value. When you are satisfied with the new value, press
bottom enter to save the adjustment.
5. In the example to the right, the value at 5°C outdoor
temperature has been changed to 40°C the flow temperature
has been increased from 33,1°C by 6,9°C.
Step by step 5°C
Important you should wait at least twenty-four hours when increasing or decreasing the heating before making
a new adjustment. Only change one value at a time until you are happy with your temperature settings.
-12
12
Version 1.4
___________________________________________________________________ EcoDan
Set the desired room temperature
If you have a room sensor connected to the EcoDan you can set the required temperature in the room from the
Room temperature menu. From the menu Room Temperature Influence set how much you want the sensor to
influence the heating system. If you don’t have a Room sensor connected to the system the Room Temperature
Influence settings is 0, who is the delivery settings.
Roomtemperature
This is what to do:
1.
Press the Radiator heat button in the initial menu.
2.
Select Room sensor to adjust the room’s temperature.
The range is 10°C to 30°C. To make the room sensor
active set a value between 1,0 – 10,0.
Room sensor influence temperature
Select Heat
This is what to do:
1.
Press the Arrow down in Room sensor menu to go to
Room Sensor Influence menu.
2.
Select Room sensor influence temp to adjust the
influence. The range is between 0,0 – 10,0.
3.
Pres the bottom (+) to increase the room temperature
press bottom (-) to lower the room temperature.
4.
Adjust room’s temperature
Save the new value by pressing the Save button Enter.
Adjust room sensor influence
temperature
Set the heat pump for extra water heating
You can obtain extra water heating by temporarily increasing the temperature of the water in the water heating
cylinder. A higher water temperature gives more water heating when, for example, a large number of people
need to shower. You choose how long the function should run using in the menu extra Water heating.
-13
13
Version 1.4
___________________________________________________________________ EcoDan
This is what to do:
1. Press the Water heating button in the initial menu.
2.
Turn the menu dial with the buttons to reach the menu
Extra Water heating.
3.
Turn the bottom (+) to choose the number of hours
that the immersion heater should be on (e.g. 24 hours)
4.
Save the value by pressing the Save button Enter.
5.
Turn the menu down to set stop temp extra hot water,
standard setting 65°C.
6.
When the set time has elapsed you must repeat the
settings to.
Select Water heating
Select hours
.
Water heating peak
Recurring increase in the water heating temperature
The water heating menu is used to set the interval for a recurring increase in the water heating temperature. If for
example, you set the value seven days, the temperature is increased once a week to approximately 65°C. You can
also specify Start time for when the temperature increase is to start, factory setting is 03:00.
1.
First menu set stop temperature, standard 65°C
2.
Second menu value for days of hot water peak.
3.
Third menu start time to produce hot water peak factory setting 03:00.
4.
Fourth menu max time for production of hot water peak factory setting 2 tim.
Time schedule
Function to use a time to start hot water production.
1.
Select time schedule below menu for hot water.
2.
Adjust the time to start the hot water production with bottom Enter. Adjust the time with the bottom +
or – and save the settings with Enter bottom.
3.
Select Enabled to make the function active or inactive.
-14
14
Version 1.4
___________________________________________________________________ EcoDan
Extra function
Temperature
All temperatures are readable in this menu.
Electrical heat
In this menu you can select the size of immersion heater that is
installed, choose 6 or 9 kW. With the + or – bottom and save with
Enter.
Menu below can you select the time before you like to add the
electrical heater. Use + or – bottom to adjust the time save with
Enter bottom.
Service
In these menu are all parameters for ME 900 control unit readable.
Date/clock
In these menu sets time and date, use arrow bottoms and + or – to
set save with Enter bottom.
Solar energy
Option, not available in standard.
Pool
Option, not available in standard.
-15
15
Version 1.4
___________________________________________________________________ EcoDan
EcoDan with plate heat exchanger
-17
17
Version 1.4
___________________________________________________________________ EcoDan
Maintenance
Important
The first thing to do is to shut off the unit and switch off the electrical main supply.
If the unit is installed with out a main switch be sure that the fuses for the main
supply is taken out.
Remove the front panel
To accomplish the maintenance it is necessary to remove the front panel on the unit. Unscrew the two screws
that is placed on the foot of the front panel. Draw out the lower end of the front panel and then lift it up a bit.
Check the pressure gauge
(Twice a year)
The pressure gauge in the lower section of the EcoDan must be checked twice a year. This is particularly
important during autumn when the heating season starts. Then pressure gauge should be at 0,5 -1,5 bar. If the
pressure is lower that 0,5 bar, fill with water up to around 1,0 bar. The knob for tapping up the heating water is
located in the connection area.
Check the safety valves
(Twice a year)
Check the safety valves for tap water and heating water by opening and closing them using the valve knobs.
Water may drip from the escape pipe, this is normal. The pipe opening must never be sealed.
If the water heater must be drained, call a service engineer.
Check the anode
(once a year)
Turn off the incoming fresh water. Then open a hot water tap to release the pressure in the hot water tank.
Unscrew the anode fitting on top of the unit. Pull up and check the condition of the anode. If the anode is
very much affected, it has to to be changed.
Check the expansion vessel
(Twice a year)
Check the pre-pressure of the expansion vessel by connecting a manometer on the airvent located on the
bottom of the vessel. The pre-pressure should be 0,3bar + 0,1bar/m from the highest point of the system.
Check the filter ball
(Twice a year)
Turn the lever on the filter ball and unscrew the cap. Take out the filter and clean it if necessary.
-18
18
Version 1.4
___________________________________________________________________ EcoDan
What to do if a fault occurs
The control unit has an advanced monitoring system that gives alarms if anything unforeseen happen in the
system. Most alarms correct themselves. There is never a risk of affecting something when you reset an alarm
once or twice. In the event of recurring alarms, contact your dealership/service technician.
This is described further in the Mitsubishi Electrical guide and also describes what actions you can take.
Overheat protection immersion heater
The button for resetting the immersion heater overheats protection is on the front of the electrical box. This is a
protection device that should normally not trip. If, however, it dose trip, reset it by pressing in the button firmly.
If the overheat protection device trips frequently, call a service engineer to establish the cause.
Emergency operation
If the heat pump stops to work the additional immersion heater takes over the heat production during emergency
operation. Heating can therefore be obtained until the dealer or authorised service technician has remedied the
fault.
Technical information
Model EcoDan A/W 190
Output Electric heater UK, FR
Output Electric heater SE, DE
Output circulation pump
Electric supply, SE, DE
Electric supply, UK, FR
Fuse size, SE, DE
Fuse size, UK,FR
Hot water heater volume
Max working pressure
Heating water (Double section
volume)
Max working pressure, SE, DE
Max working pressure, UK, FR
Expension tank
Overheat protection
Min flow heating system
Pump for heating system
Dimensions (WxDxH
Weight, excluding water
Weight, including water
kW
kW
kW
AT
AT
liters
bar (MPa)
3
9
0,2
400V 3N 50Hz
220V 1N 50Hz
16
16
185
9 (0,9)
liters
45
bar (MPa)
1,5 (0,15)
bar (MPa)
2,5 (0,25)
liters
12
C
90
l/s
0
Wilo Star RS 25/6-3
mm
600x650x1920
kg
147
kg
377
-19
19
Version 1.4