1
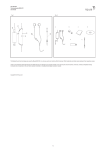
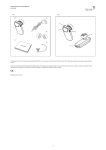
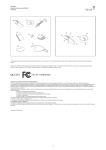
The style of communicating
Bluetooth® Wireless Headset
BHS – 301
User Guide
About Bluetooth® Technology
Bluetooth is a technology for wireless communication between devices.
Bluetooth technology is based on a radio with a receiver and a transmitter, which have been built
into a tiny microchip. One of these microchips is incorporated in the Wireless Headset, and
another is integrated into the compatible mobile phone.
Bluetooth offers the ability to create wireless connections between the headset and mobile phone
within a radius of up to 10 meters, without a physical cable or line-of-sight connection.
®
The BHS-301 can be used with any brand of Bluetooth mobile phones that support the Headset
or Handsfree profiles. For the latest compatibility information, please visit www.iqua.com.
The Bluetooth word mark and logos are owned by the Bluetooth SIG, Inc. and any use of such marks by IQUA is under
license. Other trademarks and trade names are those of their respective owners.
Iqua Bluetooth® Wireless Headset BHS – 301
Getting to Know Your Headset
Charging socket
Talk -button
Volume up -button
Volume down -button
Indicator light
1.
Charging the Wireless Headset BHS-301
Before using the headset, you must first charge it for approximately 3 hours. When fully charged,
the battery will provide up to 4 hours of talktime and up to 120 hours of standby time.
To Charge The Headset:
1. Connect the DC plug of the charger to the charging jack of the headset.
2. Plug the charger into a wall socket. When the battery is charging the amber LED of the
headset will light.
Note: The amber LED will be turned “Off” when the headset battery is fully charged. The
recommended charging time is 3 hours.
3. Unplug the charger from the wall socket after the headset is fully charged.
2.
Pairing BHS-301 To Your Mobile phone
®
Pairing is the process in which you link the headset with your Bluetooth mobile phone. Before
you use the BHS-301 headset with your mobile phone, you must first pair the devices. After this
process is completed, you can then use the headset with the mobile phone. If you wish to use the
headset with a different mobile phone, you must repeat the pairing process with the new mobile
phone. In this case, the headset will no longer work with the original mobile phone. Before you
pair the headset, please ensure the battery is fully charged.
To Pair The Devices
1. With the headset turned “Off,” press and hold the Talk -button for 5 seconds. Once the blue
and amber LEDs flash alternately, you will hear the “Pairing” tone.
2. Release the Talk -button. The headset is now in Pairing mode.
3. Turn “On” the mobile phone and place it within 10 meters of the headset.
4. Initiate the Searching for new Bluetooth accessories -feature on the mobile phone. (Please
refer to the User Guide of your mobile phone for instructions to initiate this feature.)
5. When prompted by the mobile phone, select “BHS-301” and enter the pass code “0000”.
Upon successful completion of the pairing process, the blue LED on the headset will flash at
a 3-second interval. For some mobile phone models, after the pairing process you may need
to “Connect” the headset to activate the Bluetooth connection before use. (Please refer to the
User Guide of your mobile phone.) The headset is now in Standby mode and ready to make
and receive calls.
To Cancel Pairing Mode
1. While the headset is in Pairing mode, you can “Cancel” the pairing process and turn “Off” the
headset.
2. Press and hold the Talk -button for three seconds, both the LED will be turned “Off”. You will
now hear the “Off” tone.
3.
Fitting Headset On Your Ear
The headset is designed to fit comfortably in your ear. For additional comfort, you can add the
optional ear hook and/or ear plug provided within the sales package.
To Place Headset On Your Ear
Place the headset’s speaker in your ear, with the microphone angled toward your mouth. The
headset should fit snugly in your ear. However, if the speaker is too small for your ear, you can
change to the other 2 ear plugs which are provided within the headset sales package.
To Add The Ear Hook
1. To wear the headset on your right/left ear, insert the bottom of the ear hook into the small
hole on the right/left side of the headset and push until it stops.
2. To remove the ear hook, gently pull the ear hook away from the headset.
3. To adjust the snugness of the ear hook, press on the gray rubber section.
4.
Powering The Headset
To Turn “On” The Headset
Press and hold the Talk -button for 4 seconds until you hear the tone. The headset is now turned
“On” and set in standby mode. The blue LED on the headset will flash at a 3-second interval.
Depending on the mobile phone model, you may need to “Connect” the Bluetooth communication
between your phone and the headset EACH TIME you turn “On” your headset. Some mobile
phones will do an “Auto Search and Connect” when Bluetooth is turned “On”. You are now ready
to make and receive calls.
To Turn “Off” The Headset
When the headset is “On”, press and hold the Talk -button for 4 seconds. You will now hear the
“Off” tone signaling that the headset is being turned “Off”. The blue LED will no longer flash.
5.
Make Calls
Make Regular Calls From Your Mobile phone
When you dial a call from your mobile phone, the call is automatically connected to your headset.
Use Voice Command From Your Mobile phone
Please ensure all voice-dialing settings have been enabled and voice tags have been recorded, if
required. You can make direct calls from the headset by using the Voice Dialing commands (if
this feature is supported by your mobile phone).
1. Press the Talk -button on your headset. You will hear a short “Beep” tone.
2. Speak the name of the person you wish to call with the activated Voice Command to
automatically connect to your headset. For details using Voice Dialing, please refer to your
mobile phone’s User Guide.
Receive Calls
You must configure your mobile phone to answer calls directly on your BHS-301 headset. (Please
refer to the mobile phone’s User Guide for instructions on initiating this feature.) Turn on “Auto
Answer” function of your mobile phone to make the headset answer calls automatically.
Otherwise, when your mobile phone rings, press the Talk -button on your headset to answer the
call.
End Calls
When you have finished your call, press the Talk -button on your headset to disconnect.
Switch Between Headset and Phone mode
You can transfer calls between BHS-301 and mobile phone.
1. To transfer calls from your headset, press and hold the Talk -button for three seconds to
transfer the call to your phone.
2. To transfer calls from your mobile phone, with the call connected to your mobile phone, press
the Talk -button on your headset.
Note: This function is phone dependent. You may also transfer calls through the main menu of
your mobile phone. (Please refer to the User Guide of your mobile phone.)
6.
Adjust Volume
To Increase Volume
Press/click the + Volume -button to increase the volume. Repeat this procedure until you have
reached the desired level.
Note: Increasing the Volume level to “High” may cause static noise and echo from your speech. If
this happens, press the - Volume -button until you no longer hear these echoes.
To Decrease Volume
Press/click the - Volume -button to decrease the volume. Repeat this procedure until you have
reached the desired level.
Mute Headset
You can temporarily mute and un-mute the microphone to block the connected party from
hearing.
NOTE: This function is phone dependent.
To Mute Headset
Press and hold the - Volume -button for 3 seconds.
To Un-Mute Headset
When the microphone is muted, press and hold the - Volume -button for 3 seconds.
Visual Indicators
The two LEDs (blue and amber) indicate the status of the headset:
Status Indication
While battery is charging (with charger plugged to wall socket) the Amber LED is “On”.
When charging is complete (with power adapter plugged to wall socket) Amber LED is “Off”.
When battery is low the Amber LED flashes.
When the headset is in Standby mode the Blue LED flashes at 3-second intervals.
When the headset is in Pairing mode Blue and Amber LED flash alternately.
Warning
Headset
– Please turn off this headset before putting it into your pocket or bag. If it is not turned off and
Talk -button is pressed accidentally, this headset may answer a call with unknown.
– Do not expose the headset under liquid, moisture or humidity as it is not waterproof.
– Do not use abrasive cleaning solvents to clean the headset.
– Do not expose the headset under high or low temperatures.
– Do not expose your headset to contact with sharpness objects as this will cause scratches
and damage.
– Do not stick anything on inside of the headset as this may damage internal components.
– Do not attempt to disassemble the headset as it does not contain serviceable components.
Built-In Battery
– Do not attempt to replace the headset's battery by yourself as it is built-in and is not
changeable.
– Do not disassemble the charger as it may expose you to dangerous voltages or other risks.
– Please charge your headset only with the chargers provided by the manufacturer.
– Incorrect reassembly can cause electric shock when the headset is subsequently used.
– Do not use the charger outdoors or under humid environment.
– Avoid charging the headset in extremely high or low temperatures.
Product Specifications
Bluetooth Specification:
Bluetooth Profile Supported:
Rang of Frequency:
Dimensions:
Weight:
Nominal Charging Time:
Talk time:
Standby time:
Version 1.1
Headset and Handsfree Profiles
2.4GHz Spectrum
50mm (L) x 30mm (W) x 33mm (H)
15 g
Within 3 hours
Up to 4 hours
Up to 120 hours
Because operation of Bluetooth is dependent on individual phone, please refer to phone user
guide.
®
Bluetooth Identifier: B01944
12 MONTH LIMITED WARRANTY
IQUA Ltd. warrants that this product is free from material and workmanship defects for a period of
12 months from date of purchase provided the following terms of this warranty are satisfied. The
warrant applies to the original owner of this product, only.
1. The purchaser must be able to proof the purchase by presenting original sales receipt
describing the product to establish the validity of the warranty claim to IQUA Ltd. at the
provider of warranty service. IQUA Ltd. shall have the right to deny warranty without
dated proof-of-purchase. Any evidence of alteration, erasure, or forgery results in
termination of the right of warranty.
2. IQUA Ltd. agrees to repair or replace without charge to the original owner any defective
product under warranty.
3. IQUA Ltd. will supply replacement parts free of charge for any IQUA product under
warranty upon request. Replacement or repair do not extend original warranty period.
4. This warranty is not valid for product owners who attempt to repair defective units.
5. Under Certain product liability regulations may apply to you as the owner of the Product,
however under no circumstances is IQUA Ltd. liable for any indirect or consequential
damages to person or property by the use of any IQUA products.
6. The warranty is not valid in case of fire, lighting, earthquake, accident, misuse, unusual
physical or electrical stress or any other cause beyond normal usage and care of the
product.
7. IQUA Ltd. reserves the right to make changes or improvements in design or manufacture
without having any obligation to install such changes in existing and sold products.
8. Warranty does not cover normal wear and tear of the product or the operation time of the
battery.
Iqua Ltd.
Innopoli 1, Tekniikantie 12, 02150 Espoo, Finland
[email protected]
www.iqua.com