1
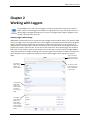
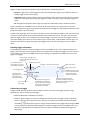
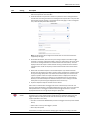
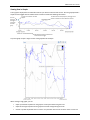
HOBOmobile™ User’s Guide
Onset Computer Corporation
470 MacArthur Blvd.
Bourne, MA 02532
www.onsetcomp.com
Mailing Address:
P.O. Box 3450
Pocasset, MA 02559-3450
Phone: 1-800-LOGGERS (1-800-564-4377) or 508-759-9500
Fax: 508-759-9100
Email: [email protected]
Technical Support Hours: 8AM to 8PM ET, Monday through Friday
Customer Service Hours: 8AM to 5PM ET, Monday through Friday
© 2014 Onset Computer Corporation. All rights reserved. Onset, HOBO, HOBOware, and HOBOmobile are trademarks or registered trademarks of Onset Computer Corporation. iPhone, iPad,
and iPod touch are registered trademarks of Apple Inc. Bluetooth is a registered trademark of Bluetooth SIG, Inc. All other trademarks are the property of their respective companies.
17841-A
HOBOmobile User’s Guide
Contents
Chapter 1 Getting Started ...................................................................................................................3
Chapter 2 Working with Loggers .........................................................................................................5
Viewing Loggers within Range ........................................................................................................... 5
Checking Logger Information ............................................................................................................. 6
Connecting to a Logger ...................................................................................................................... 6
Configuring a Logger .......................................................................................................................... 8
Checking Logger Status .................................................................................................................... 14
Chapter 3 Working with Data Files .................................................................................................... 15
Reading Out the Logger and Finding Data Files ............................................................................... 15
Viewing Data in Graphs .................................................................................................................... 16
Viewing Logged Data and Sharing Files ............................................................................................ 17
Viewing Data File Details.................................................................................................................. 17
Deleting Data Files ........................................................................................................................... 18
Chapter 4 Settings, Support, and FAQs .............................................................................................. 19
Changing Settings............................................................................................................................. 19
Support ............................................................................................................................................ 19
Frequently Asked Questions ............................................................................................................ 19
1-800-LOGGERS
2
www.onsetcomp.com
HOBOmobile User’s Guide
Chapter 1
Getting Started
HOBOmobile is software for the iPhone®, iPod touch®, and iPad® and designed for Bluetooth Smart-enabled HOBO
MX series loggers. For specifications and detailed information about your logger, refer to the logger manual at
www.onsetcomp.com/HOBOmobile or from the About screen within HOBOmobile.
To get started with HOBOmobile:
1.
Go to the App store and download HOBOmobile to your iPhone, iPod touch, or iPad.
2.
Install the batteries in the logger. Open the battery door on the back of the logger and insert two AAA
batteries, observing polarity. Reinsert the battery door and snap it back into place.
3.
Open HOBOmobile. Enable Bluetooth® in your device settings if prompted.
4.
. The logger should appear in the list of Recently Seen/In Range devices as
In HOBOmobile, tap
shown below. If the logger does not appear, make sure it is within range of your phone or tablet.
5.
Tap the row in the Recently Seen/In Range list to connect to the logger.
Tap the row with
the logger to
connect to it
6.
Once connected, tap Configure to set up and start the logger.
Tap Configure
7.
Make your selections and then tap Start in the upper right corner of the Configure screen. The logger will
begin logging based on the settings you selected (see Chapter 2 for details on settings).
Tap Start after you
select the logger
configuration
settings
1-800-LOGGERS
3
www.onsetcomp.com
HOBOmobile User’s Guide
8.
To offload data from the logger to your phone or tablet, connect to it as described in steps 4 and 5 then
tap Readout.
Tap Readout
The data from the logger is saved to your phone or tablet. Tap
a larger version of the graph or to share the file.
and then tap a mini-graph to view
All the features within HOBOmobile are accessed through the four icons at the bottom of the screen.
Tap this icon:
Do to this:
View loggers within range of your phone or tablet. Connect to a logger to configure it, check the
status, read out data, and more. See Chapter 2 for details.
View logger readouts in a graph and share the data files with others. See Chapter 3 for details.
Change the app settings, including the unit type and time zone. See Chapter 4 for details.
Get help with the app and view contact information if you have additional questions. See Chapter 4
for details.
1-800-LOGGERS
4
www.onsetcomp.com
HOBOmobile User’s Guide
Chapter 2
Working with Loggers
Tap the HOBOs icon to view a list of the loggers currently in communication range of your phone or
tablet as well as any other loggers that had been in range within the last day. You can also search for a
specific logger, find loggers within groups, or connect to any logger within range to configure it, read
out data, check the status, and more.
Viewing Loggers within Range
HOBOmobile uses Bluetooth Smart to communicate with all loggers within broadcast range of your phone or tablet
(refer to the logger manual for range specifications). These loggers are displayed in the Recently Seen/In Range list.
Loggers that were previously within range of your phone or tablet within the last day, but are currently out of
range are shown in the Others Seen in Last Day list. Swipe the screen up and down to view all loggers in both lists;
pull the screen down to refresh the lists. You can also use the search tool to find a specific logger. Tap the Search
field, select a search category, and then type the label, serial number (SN), or group name for the logger. Note: If
“Show Only My Devices” is enabled in Settings, then only those loggers that your phone or tablet has connected to
will be displayed in this list. Disable this setting if you want to show all loggers within range of your phone or
tablet.
Tap Edit to delete a
logger or group (see
next page for details)
View the list of
loggers within
range of your
phone or tablet
Tap the Search field
to find a logger by its
label, serial number,
or group name
View the list of
loggers that
were in range
within the past
day, but are
currently out of
range
View loggers
categorized into
groups; tap a
group name to
view the loggers
within that group
(see next page for
details)
1-800-LOGGERS
5
www.onsetcomp.com
HOBOmobile User’s Guide
Loggers are also categorized into groups to help you identify them. The default groups are:
• Favorites. Loggers that you have tagged as favorite (see Configuring a Logger in this chapter for details on
adding a logger to the Favorites group).
• Ungrouped. Loggers that have been in range of your phone or tablet within the past day, but have not been
added to a custom group. See Configuring a Logger for details on creating a group and adding a logger to a
group.
• All. All loggers that have been within range of your phone or tablet either today or within the past day.
Swipe to the bottom of the HOBOs screen to view the list of groups and then tap a group name to see which
loggers are included in that group. Data files that are read out from the logger are also categorized within the same
groups (see Chapter 3 for more details).
Tap Edit in the upper right corner to remove a row from any of the lists within the HOBOs screen. Select the row(s)
you wish to remove from the view and then tap Delete at the bottom of the screen. This does not permanently
delete the logger or group; it only temporarily removes the logger or group from the list. If the logger remains in
range after deleting it from view or it returns within range at a future point, it will be added to the list again. Use
the Show Only My Devices option in Settings to hide loggers that you are not connecting to with your mobile
device.
Checking Logger Information
The following key information about each logger is shown in the HOBOs screen. To check full status details for a
logger such as how much memory has been used or the settings used to configure the logger, you must connect to
it as described in the next section. Note: Current sensor readings are displayed in the HOBOs screen even if the
logger is not logging.
Label for logger; the logger serial
number is displayed if a label has not
been set up
A password has been set
for the logger (or not set if
unlocked icon is displayed)
Logger battery indicator
The logger is part of the favorites group
Logger serial number
Logger model number
Current logger status
Additional information; tap
to view more details about
logger, including map
coordinates if available
Custom group the
logger belongs to, if
any (default group
names are not listed)
One or more alarms
have tripped
Current sensor readings; these
are updated every minute and
may not match what is displayed
on the logger as the logger LCD
refreshes every 15 seconds
Strength of the logger’s Bluetooth
signal being received by the phone or
tablet; the more blue bars there are,
the stronger the signal
Connecting to a Logger
A logger must be within range of the phone or tablet to connect to it (refer to the logger manual for range
specifications). Tips for connecting to the logger:
• Make sure Bluetooth is enabled for your device.
• Check the signal strength icon as shown in the previous section to see if the logger is within range of the
phone or tablet and move closer if necessary. Only one or two blue bars indicates the Bluetooth signal is
indicates that a signal is no longer found (all details for that logger will also be gray). Note:
weak while
You can pull down the Recently Seen/In Range list to refresh the loggers shown in the HOBOs screen. This
will move any grayed devices to the Others Seen in Last Day list and help you identify which loggers are
within range.
1-800-LOGGERS
6
www.onsetcomp.com
HOBOmobile User’s Guide
To connect to a logger:
1.
Tap
2.
Find the logger you want the device to connect to in the Recently Seen/In Range list or in the groups listed
at the bottom of the HOBOs screen. You can also search for a specific logger with the Search field.
3.
Tap the row in the Recently Seen/In Range list, in the Search Results on the HOBOs screen, or within a
group to connect to a specific logger.
.
Once connected, additional details about the logger are displayed at the top of the Connected screen, including its
logging status and memory used (if applicable). Note: The logging status shown in this screen can show more detail
than the status displayed in the Recently Seen/In Range list. While both screens can show a status of configured,
logging, stopped, stopped due to a power reset, or awaiting a delayed or button start, the logging status in the
Connected screen can also indicate whether the logger memory has wrapped, is awaiting a button restart, or is
full.
Check the logging
status and other
current information
Check the memory
used in the logger (if
applicable)
Choose any of
these actions
while connected
You can perform the following actions while the logger is connected to your phone or tablet.
Icon
Action
Description
Configure
Tap Configure to set up the logger and start logging. See the next section Configuring a
Logger for details.
Readout
Tap Readout to offload logged data from the logger to your phone or tablet. Once the
readout is complete, tap Data Files at the bottom of the screen to view the graph and share
the data (see Chapter 3 for details).
Full Status
Details
Tap Full Status Details to view the configuration settings currently selected for the logger,
including the logging interval, any alarm settings, and logging mode. See Checking Logger
Status later in this chapter for details.
Start Logging
or Restart
Logging
These options will appear depending on the Start and Stop Logging settings selected as
described in the next section. If the logger was configured to start logging On Button Push,
then you can either tap Start Logging or press and hold the Start/Stop button on the logger
for 3 seconds. Start Logging may also be disabled when the logger is awaiting a start at a
specific date and time or interval or if the logger was stopped.
Restart Logging may appear if the logger was configured to stop logging On Button Push and
to “Allow Button Restart.” Tap Restart Logging or press and hold the Start/Stop button on
the logger for 3 seconds to resume logging.
Stop Logging
1-800-LOGGERS
Tap Stop Logging to force the logger to stop recording data. This will override any stop
logging settings that may have been configured for the logger.
7
www.onsetcomp.com
HOBOmobile User’s Guide
Icon
Action
Description
Page
Use Page to locate the logger. Tap Page and the logger will beep one time. Press and hold
Page and the logger will continue beeping.
Clear Audible
Alarm
If the Audible Alarms setting has been enabled (described later in this chapter), Clear Audible
Alarm is added to the list of available actions. If an audible alarm has sounded and is waiting
to be cleared, tap Clear Audible Alarm to stop the beeping on the logger. If an audible alarm
is not currently tripped or sounding, then this option is disabled in the Actions list.
Logger
Password
Tap Logger Password to create a password for the logger that will be required if another
phone or tablet running HOBOmobile attempts to connect to it. This is recommended to
ensure that a deployed logger is not mistakenly stopped or purposely altered by others. Type
a password up to 10 characters, and tap Done. Only the phone or tablet used to set the
password can then connect to the logger without entering a password; all other mobile
devices will be required to enter the password. For example, if you set the password for the
logger with your iPad and then try to connect to the device later with your iPhone, you will
be required to enter the password on the iPhone but not with your iPad. Similarly, if
someone else attempts to connect to the logger with a different iPad, then they would also
be required to enter the password. To reset a password, simultaneously press both the
Start/Stop button and the Alarm/Stats button on the top of the logger for 3 seconds or tap
Reset to Factory Default on the Set Logger Password screen.
Update
Firmware
If new logger firmware is available for the logger, Update Firmware is added to list of
available actions. Tap Update Firmware and follow the onscreen instructions. Note that if
there is a communication failure during the firmware update process, the logger will revert
to the previous firmware.
Important: Before updating the firmware on the logger, always read out the logger first.
Check the remaining battery level by selecting Full Status Details and make sure it is no
less than 30%. Make sure you have the time to complete the entire update process,
which requires that the logger remains connected to the device during the upgrade.
Force Offload
If there is a problem when loading configure settings, Force Offload is added to the list of
available actions. A message will also appear above the actions indicating that an error was
found in logger configuration. It is recommended that you tap Force Offload any time it
appears in the list to ensure you have saved all data currently stored in the logger. Note that
“Data Error” will be displayed on the Data Files screen above any graphs that resulted from a
Force Offload action. To correct a logger that has encountered an error, repeat the
configuration steps described in the next section.
Configuring a Logger
When your phone or tablet is connected to a logger, you can configure the logger with your desired logging
settings, including the logging interval, when to start and stop logging, which sensors should record data, sensor
alarm limits, and the logging mode.
To configure a logger:
. Find the logger you wish to configure and tap it to connect to it.
1.
Tap
2.
Tap Configure on the Connected screen.
3.
From the Configure screen, you can view the currently selected options and change them for the next
logger deployment. Tap an option (described in the table in this section), make any changes as desired,
and tap Done.
4.
When you are finished making selections in the Configure screen, tap Start in the upper right corner.
1-800-LOGGERS
8
www.onsetcomp.com
HOBOmobile User’s Guide
Tap Start to begin
logging based on
your settings
Important: If the connection is lost between the logger and your phone or tablet before tapping Start, you will
need to reconnect and reconfigure the logger. Configure settings are not loaded onto the logger until you tap
Start.
The following settings are available when configuring a logger.
Icon
Setting
Description
Label
The default label for the logger is the serial number, but you can change this to better
identify the logger in the HOBOs screen. The label is also used for the data file name and the
graph title. To change the label, tap Label, type a label name up to 20 characters, and then
tap Done.
Group
Loggers can be sorted into groups to help identify them and their resulting data files. For
example, if you have loggers deployed on three floors of a building, you can create a group
for each of the three floors and then add each of the loggers to the appropriate group. Tap
Group and then:
• Tap Add to Favorites to add the logger to the Favorites group.
• Tap Create New Group, type a group name up to 20 characters, and then tap Done. The
logger is automatically added to the new group. Note: When you add a logger to a
custom group, it is removed from the default Ungrouped category.
• Tap an existing group name to add or remove the logger from that group.
• Swipe a group name and then tap Delete to delete the group. Any loggers and data files
previously assigned to the deleted group will be added to the Ungrouped category.
Location
This displays the map coordinates for the mobile device. Tap the coordinates to view the
location on the map (if Location services are enabled on your device and enabled for
HOBOmobile under Settings > Privacy > Location Services). The location is detected
automatically and cannot be changed.
Deployment
Number
This is how many times the logger has been deployed, or configured. A new deployment
begins when you tap Start and the settings from the Configure screen are loaded onto the
logger.
Logging
Interval
This is how often the logger will record data unless operating in burst logging mode
(described later in this section). Tap Logging Interval and then choose a rate from 1 second
to 18 hours keeping in mind that the faster the logging interval, the greater the impact on
battery life and the shorter the logging duration. Tap Done.
Logging
Duration
This is the approximate time it will take to fill the logger memory based on the logging
interval, logging mode, and sensors currently selected. This is an estimate only; battery life
and other factors, such as the number of readouts performed, audible alarms, and paging,
will also affect the deployment.
Start Logging
This controls when logging will begin. Tap Start Logging, choose one of the following, and
then tap Done:
• Now. Logging will begin immediately after tapping Start in the Configure screen.
• On Next Logging Interval. Logging will begin at the next even interval as determined by
1-800-LOGGERS
9
www.onsetcomp.com
HOBOmobile User’s Guide
Icon
Setting
Description
the selected logging interval. This is useful if you want the logger to start and then
subsequently log data on an even minute.
• On Button Push. Logging will begin once you press the Start/Stop logging button on the
logger for 3 seconds or tap Start Logging within HOBOmobile.
• On Date/Time. Logging will begin on the date and time you specify. Select the date and
time and tap Done.
Stop Logging
This controls when logging should end. To set the Stop Logging options:
1. Tap Stop Logging.
2. Choose one of two memory options for stop logging:
• When Memory Fills. The logger will continue recording data until the memory is full.
• Never (Wrap When Full). The logger will continue recording data indefinitely, with
newest data overwriting the oldest. This option is not available if the logging mode is
set to Burst (described later in this section).
3. Select On Button Push if you want to be able to stop logging by pushing the Start/Stop
button on the logger for 3 seconds. Note that if you also select On Button Push for the
Start Logging setting, then you will not be able to stop logging with the Start/Stop button
until 30 seconds after logging begins.
If you select the On Button Push setting for Stop Logging, then you also have the option
to select Allow Button Restart. This allows you to stop and then restart logging during the
deployment by pushing the Start/Stop button on the logger for 3 seconds.
Important: When Allow Button Restart is selected and you use the Start/Stop button,
logging will restart on the next even logging interval. For example, a logger started
logging at 7:00 AM with a logging interval set to 1 hour. If you press the Start/Stop
button to stop the logger at 8:45 AM and then press the button again at 10:15 AM,
logging will not begin immediately at 10:15 AM. Instead, logging will begin again at
11:00 AM, which is the next even interval time based on your 1-hour logging interval.
Therefore, depending on the logging interval, the gap between the time you press the
button to resume logging and the time actual logging begins could be significant. The
faster the logging interval, the less time will elapse before logging resumes.
4. Select one of the following time options for when to stop logging:
• Never. Select this if you do not want the logger to stop at any predetermined time
frame.
• On Date/Time. Select this if you want the logger to stop logging on a specific date and
time. Select the date and time and then tap Done.
• After. Select this if you want to control how long the logger should continue logging
once it starts. Choose the amount of time you want the logger to log data and then tap
Done. For example, select 30 days if you want the logger to log data for 30 days after
logging begins.
Note: Regardless of the options you select for Stop Logging, you can stop the logger at
any time by connecting to it and then selecting Stop Logging from the Connected screen.
This will override all Stop Logging settings set up from the Configure screen.
5. Tap Done.
Sensor &
Alarm Setup
Select the sensors that will be logged. By default, all sensors are enabled. Even if only one
sensor is enabled, HOBOmobile will display current readings for all sensors. Note: If
Temperature and RH measurements are being logged, then a dew point series will also be
calculated and available in the data file upon readout.
You can also set alarms to trip on enabled sensors when a sensor reading rises above or falls
below a specified value. To set up a sensor alarm:
1. Tap an enabled sensor.
2. Enable the High Alarm if you want an alarm to trip when the sensor reading rises above
the high alarm value. Drag the slider to the reading that will trip the alarm or tap the
1-800-LOGGERS
10
www.onsetcomp.com
HOBOmobile User’s Guide
Icon
Setting
Description
value field and type a specific reading. In the example on the next page, an alarm will trip
when the temperature rises above 85°F.
3. Enable the Low Alarm if you want an alarm to trip when the sensor reading falls below
the low alarm value. Drag the slider to the reading that will trip the alarm or tap the value
field and type a specific reading. In the example on the next page, an alarm is configured
to trip when the temperature falls below 32°F.
Note: The actual values for the high and low alarm limits are set to the closest value
supported by the logger.
4. Under Raise Alarm After, select how many out-of-range samples are needed to trigger
the alarm. For example, if Raise Alarm After is set to 5 as shown above, then there needs
to be 5 sensor readings above 85°F or below 32°F before the alarm will trip. The time
displayed next to the sample number indicates how long it would take for the alarm to
trip based on the number of samples you entered and the fixed 15-second LCD refresh
interval.
5. Select either Cumulative Samples or Consecutive Samples. If you select Cumulative
Samples, then the alarm will trip after a specific number of samples are outside the limits
at any point during deployment. If you select Consecutive Samples, then the alarm will
trip after a specific number of samples outside the limits are displayed on the LCD in a
row. For example, if there are 5 readings in a row above 85°F, then an alarm will trip.
However, if Cumulative Samples was selected instead, then the 5 readings could have
taken place at any time during the deployment for the alarm to trip.
6. Tap Done. Repeat the steps for another sensor if desired.
Alarm limits are checked when the logger’s LCD screen refreshes every 15 seconds. The
alarm icon will be illuminated on the logger LCD when the alarm trips. You can also press the
Alarms/Stats button on the logger to view the value that triggered the alarm. The LCD
displays the farthest out-of-range sample during the deployment.
Audible
Alarms
This controls whether an audible alarm beeps on the logger when a sensor alarm trips
(available only if a sensor alarm has been configured). If you enable this setting, then the
logger will beep once every 30 seconds when an alarm trips until one of the following
happens (whichever occurs first):
• The alarm is cleared from HOBOmobile (connect to the logger and then tap Clear Audible
Alarm).
• Either button on the top of the logger is pressed.
• Seven days have passed.
Once cleared, an audible alarm will start beeping again if the sensor values go out of the
1-800-LOGGERS
11
www.onsetcomp.com
HOBOmobile User’s Guide
Icon
Setting
Description
normal range. Even if an audible alarm is cleared, a visual alarm may remain on the logger
LCD and in HOBOmobile depending on the settings selected for maintaining visual alarms or
because the alarm condition may still be in effect. In addition, an audible alarm will continue
beeping when the sensor values have returned to the normal range until it is cleared as
described above.
It is recommended that you only enable this feature if you have regular access to the logger
so that you can easily turn off the beeping. Note that battery life will be slightly reduced each
time the audible alarm sounds.
Maintain
Visual Alarms
Until
If a sensor alarm is configured, select one of the following options to determine how long the
alarm icon will remain illuminated on the logger LCD screen after an alarm trips:
• Logger Reconfigured. The alarm icon will remain visible on the LCD until the next time
the logger is reconfigured (by connecting to a logger, tapping Configure, selecting
settings, and tapping Start).
• Sensor in Limits. The alarm icon will remain visible on the LCD until the sensor reading
returns to the normal range between any configured high and low alarm limits.
• Alarm Button Pressed. The alarm icon will remain visible until you press the Alarm/Stats
button on the logger.
Note: Although an audible alarm and a visual alarm can occur at the same time when a
sensor alarm is tripped, they are cleared in different ways. The audible alarm can be cleared
as described on the previous page. Meanwhile, a visual alarm is cleared as determined by the
three settings above. You may clear a beeping audible alarm, but the visual alarm remains on
the LCD and in HOBOmobile until the logger is reconfigured, the sensor is in limits, or the
alarm button is pressed--whichever setting you selected. If the logger was configured to stop
logging with a button push, any tripped alarms will be cleared automatically when logging is
stopped and no Alarm Cleared event will be logged in the data file. This ensures that the
logger will start checking for alarm conditions when logging resumes (if the logger was
configured with Allow Button Restart selected).
Logging Mode
There are two logging modes:
• Fixed Interval Logging. The logger records data for enabled sensors and/or selected
statistics at the logging interval selected. (Statistics are calculated at a sampling rate you
specify with the results recorded at each logging interval.)
• Burst Logging. The logger records data for enabled sensors at the normal logging interval
until the readings rise above or fall below specific limits, at which time the logger
switches to a faster burst logging rate until the readings return to normal (burst limits are
checked every 15 seconds, which is the rate the logger LCD refreshes). For example, the
logger is configured with a logging interval of 5 minutes and burst logging is configured to
log every 30 seconds when the temperature rises above 85°F (the high limit) or falls
below 32°F (the low limit). This means the logger will record data every 5 minutes as long
as the temperature remains between 32°F and 85°F. Once the temperature rises above
85°F, for example, the logger will switch to the faster logging rate and record data every
30 seconds until the temperature falls back to 85°F. At that time, logging then resumes
every minute at the normal logging interval. Similarly, if the temperature falls below 32°F,
for example, then the logger would switch to burst logging mode again and record data
every 30 seconds. Once the temperature rises back to 32°F, the logger will then return to
normal mode, logging every 5 minutes. Note: Sensor alarms, statistics, and the Stop
Logging option Wrap When Full are not available in burst logging mode.
To configure a logging mode, tap Logging Mode and select Fixed Interval Logging or Burst
Logging, any applicable settings as described below, and then tap Done.
If you select Fixed Interval Logging:
1. Select Normal to record the current reading for each enabled sensor at the logging
interval shown at the top of the screen. Do not select this if you only want to log
statistics.
1-800-LOGGERS
12
www.onsetcomp.com
HOBOmobile User’s Guide
Icon
Setting
Description
2. Select the statistics you want the logger to record at each logging interval:
•
Maximum, the highest value from the sampling period (as determined by the
statistics sampling interval).
•
Minimum, the lowest value from the sampling period (as determined by the
statistics sampling interval).
•
Average, the mean of all values from during the sampling period (as determined
by the statistics sampling interval).
•
Standard deviation from the average for all sampled values (requires average).
Note that the selected statistics will be logged for all enabled sensors.
3. Tap Statistics Sampling Interval and select the rate to use for calculating statistics. The
rate must be less than, and a factor of, the logging interval. For example, if the logging
interval is 1 minute and you select 5 seconds for the sampling rate, then the logger will
take 12 sample readings between each logging interval (one sample every 5 seconds for a
minute) and use the 12 samples to record the resulting statistics at each 1-minute logging
interval. Note that the more frequent the sampling rate, the greater the impact on
battery life.
4. Tap Done.
5. Tap Done again to return to the Configure screen. Once the logger is logging, you can
press the Alarm/Stats button on the logger to cycle through the current reading and
statistics, if applicable. (The logger will always display the current sensor readings in
HOBOmobile even if they are not being logged.)
If you select Burst Logging:
1. Tap a sensor under Burst Sensor Limits.
2. Enable High Limit if you want burst logging to occur when the sensor reading rises above
a specific reading. Drag the slider to the reading that will trigger burst logging or tap the
value field and type a specific reading. In this example, the logger will switch to burst
logging when the temperature rises above 85°F.
3. Enable Low Limit if you want burst logging to occur when the sensor reading falls below a
specific reading. Drag the slider to the reading that will trigger burst logging or tap the
value field and type a specific reading. In this example, the logger will switch to burst
logging when the temperature falls below 32°F.
Note: The actual values for the high and low burst limits are set to the closest value
supported by the logger.
4. Tap Done.
5. Repeat steps 1–4 for another sensor if desired.
6. Tap Burst Logging Interval.
1-800-LOGGERS
13
www.onsetcomp.com
HOBOmobile User’s Guide
Icon
Setting
Description
7. Select an interval faster than the logging interval and then tap Done.
8. Tap Done to exit the Logging Mode screen.
Notes:
• Once the logger is configured, the high and low burst logging limits are only checked
when the logger's LCD screen refreshes once every 15 seconds. Therefore, if you set the
logging interval to less than 15 seconds and the sensor reading falls outside the limits, the
burst logging will not begin until the next 15-second refresh cycle.
• Once the high or low condition clears, the logging interval time will be calculated using
the last recorded data point in burst logging mode, not the last data point recorded in
normal mode. For example, a logger has a 10-minute logging interval and logged a data
point at 9:05. Then, the high level was surpassed and burst logging began at 9:06. Burst
logging then continued until 9:12 when the sensor reading fell back below the high level.
Now back in normal mode, the next logging interval will be 10 minutes from the last burst
logging point, or 9:22 in this case. If burst logging had not occurred, the next data point
would have been at 9:15.
• If the logger is stopped with a button push while in burst logging mode, then a New
Interval event is automatically logged and the burst condition is cleared, even if the
actual high or low condition has not cleared. The logger will check the high and low
conditions when logging resumes (if the logger was configured with Allow Button Restart
selected).
Show LCD
This setting controls whether the LCD on the logger will remain illuminated while the logger
is logging. If you disable Show LCD, the LCD on the logger will not show the current reading,
status, or other information while the logger is logging. If this setting is enabled, you can still
temporarily turn the LCD screen on by pressing the Start/Stop button on the logger for 1
second. The LCD will then remain on for 10 minutes. In addition, you can always view the
status of any in-range logger on your phone or tablet regardless of the logger’s LCD setting.
Checking Logger Status
You can view the current sensor readings and other basic information about the logger in the HOBOs screen as
described under Checking Logger Information earlier in this chapter. To get more detailed status information,
connect to a logger and tap Full Status Details. You can then view the following information in the Status Details
screen:
•
Configuration Information. Tap Current Configuration to see the settings selected when the logger was
last configured, including Logging Interval, Start Logging and Stop Logging settings, Logging Mode, and any
Alarm Limits or Burst Logging Limits as applicable. (When finished viewing the configuration information,
tap Status Details at the top left of the Current Configuration screen to return to the Status Details
screen.)
•
Current Readings. These are the current sensor readings. Note that even if sensor data is not being
logged, the current readings are still displayed.
•
Device Identification. This information includes the logger model, serial number, and firmware version.
•
Device Details. This shows the current battery level, the percentage of memory used (if applicable), and
the current status of the logger (e.g. Configured, Logging or Stopped).
Tap Connected at the top left of the Status Details screen to return to the Connected screen when done. You can
also check logger status on the logger LCD, which refreshes every 15 seconds. If the LCD has been disabled, press
the Start/Stop button on the logger for 1 second to temporarily turn on the LCD. Note that the logger LCD displays
current readings for enabled sensors only while HOBOmobile displays readings for all sensors regardless of
whether data is being logged.
1-800-LOGGERS
14
www.onsetcomp.com
HOBOmobile User’s Guide
Chapter 3
Working with Data Files
Tap the Data Files icon to view data that has been read out from the logger in a graph. You can see
details about a data file, including the settings used to configure the logger, view logged data points,
and share the file in multiple formats for analysis in other software.
Reading Out the Logger and Finding Data Files
Logger data files are created by reading out, or offloading, the data recorded by the logger to your phone or tablet.
To read out the logger:
and select a logger to connect to it.
1.
Tap
2.
From the Connected screen, tap Readout. The data from the logger is offloaded to your device. A message
displays when the readout is complete and a number appears on the
available for viewing.
3.
icon indicating a new file is
. The data that was read out from the logger is displayed in a mini-graph in the Recent Data
Tap
Files list. The 10 most recent data files are shown in this list and the data file with the most recent readout
time is at the top. Data files can also be sorted by groups. Tap a group name to view a list of the data files
associated with the loggers in that group. Tap All to see all data files available. You can also search for a
specific data file. Tap the Search field, select a search category, and then type the label, serial number, or
group name for the logger that has the data file you want to find.
1-800-LOGGERS
15
www.onsetcomp.com
HOBOmobile User’s Guide
Viewing Data in Graphs
A mini-graph is displayed for each data file saved on your device in the Data Files screen. The mini-graph provides a
snapshot of the logged data for enabled sensors and also includes the following information:
This icon
appears if
the logger is
part of the
Favorites
group
An alarm icon indicates an alarm
tripped
The label used for the deployment; the logger serial
number is listed if no custom label was created
The date/time when this data file was
read out from the logger
Tap a mini-graph to open a larger version of the graph like this example:
When viewing a large graph, you can:
•
Swipe up and down anywhere on the graph to scroll up and down along the Y axis.
•
Swipe left and right anywhere on the graph to scroll left and right along the X axis.
•
Stretch or spread the plotted series to zoom in to a particular date or time. Pinch the series to zoom out.
1-800-LOGGERS
16
www.onsetcomp.com
HOBOmobile User’s Guide
•
Press and hold anywhere on a series to view the sensor data point logged at that particular date/time at
the intersection of two crosshairs (as shown in the example above).
•
Tap the
icon at the top of the graph to restore the graph to its original view.
The large graph displays the label used for the deployment at the top of the graph and a legend if more than one
series is displayed. By default, logger events (such as Alarm Tripped or Alarm Cleared), derived series (such as dew
point), and statistics are not displayed on the graph. To show or hide different sensors, events, or statistic series on
and select the sensors or events you want to include or exclude and then tap
again. The large
the graph, tap
graph is updated to show the sensors and events that you selected. Note that this does not change the view of the
mini-graphs in the Data Files screen or the data included in shared files.
Viewing Logged Data and Sharing Files
You can view the individual logged data points and share, or export, data files and graph images for analysis in
other software.
To view data or share a data file:
.
1.
Tap
2.
Tap the mini-graph that has the data you wish to view or share.
3.
Tap
4.
In the Share screen, select a data file or graph format as described in the following table. Note that the
options available for sharing depend on the apps installed on your mobile device.
Icon
at the top of the large graph.
Data File
Description
XLSX
Microsoft®
Excel® file
Tap XLSX to generate an Excel file with data, logger events, and details, including
information about the file and each data series. Mail or copy the file, or open it in a
supported app. Tap Quick Look to see a preview of the data, events, and details.
CSV
commaseparated
values file
Tap CSV to generate a comma-separated values file with data and logger events. Mail or
copy the file, or open it in a supported app. Tap Quick Look to see a preview of the data
and events.
Text
plain text
file
Tap TEXT to generate a text file with data and logger events. Mail or copy the file, or open
it in a supported app. Tap Quick Look to see a preview of the data and events.
HOBO
HOBOware®
file
Tap HOBO to generate a HOBOware file with data, logger events, and details, including
information about the file and each data series. Mail or copy the file and open it in
HOBOware.
Image
.png file
Tap Image to create a screen shot of the large graph. Mail, message, copy, print, or save
the image to your photos. Tap Quick Look to see a preview of the image.
Viewing Data File Details
To see information about a data file, such as the settings used to configure the logger:
.
1.
Tap
2.
Tap the mini-graph that has the data you wish to view or share.
3.
Tap
4.
In the Data Files Details screen, the logger part number, serial number, and firmware version is listed. Tap
Logger Configuration to see the following settings that were in place when the logger was started:
1-800-LOGGERS
at the top right corner of the graph.
17
www.onsetcomp.com
HOBOmobile User’s Guide
•
Label. The custom name entered for the logger or the serial number if no name was entered.
•
Group. The name of the custom group the logger belongs to, if any.
•
Location (if enabled). The map coordinates saved to the logger from the mobile device during
configuration.
•
Config Date. The date and time the logger was configured (this may be different than the time
logging began depending on the Start Logging settings in place).
•
Deployment Number. The number of times the logger has started logging as configured by the
software. Note: If the logger was stopped and restarted during the deployment, the deployment
number will remain unchanged. Only reconfiguring the logger will change the deployment number.
•
Logging Interval. The rate at which the logger was recording data during fixed interval logging.
•
Logging Duration. The approximate length of time the logger could have continued logging given the
configuration settings in place (does not indicate the actual time the logger was logging).
•
Start Logging. The option used to begin logging.
•
Stop Logging. The options used to end logging.
•
Sensor & Alarm Setup. The sensors enabled and any associated alarms or burst logging limits. If
alarms were configured, the settings selected for Maintaining Visual Alarms and Audible Alarms are
also listed.
•
Logging Mode. The type of logging used during deployment.
•
Show LCD. An indication of whether the LCD was enabled or disabled during the deployment.
•
Statistics. The statistics that were logged during the deployment and the sampling rate used (if
applicable).
•
Burst Logging Interval. The interval used during burst logging mode (if applicable).
Deleting Data Files
There are two ways to delete a data file:
.
1.
Tap
2.
Find the file you want to delete and swipe it to the left.
3.
Tap Delete and confirm that you want to delete the file when prompted.
1.
Tap
2.
Tap Edit at the top right corner of the Data Files screen.
3.
Scroll to the file you want to delete. Tap it to select it.
4.
Tap Delete at the bottom of the Data Files screen and confirm that you want to delete the file when
prompted.
Or:
1-800-LOGGERS
.
18
www.onsetcomp.com
HOBOmobile User’s Guide
Chapter 4
Settings, Support, and FAQs
Changing Settings
Tap
to change the following settings in HOBOmobile:
•
Units. Switch between US and SI units. Readouts that take place after changing the units will
automatically use the new units. The units displayed on existing mini-graphs will not be updated; minigraphs will continue to display the units in place at the time of the readout. Large graphs, however, will
display the unit change (tap the mini-graph to view the large graph with the new units). Shared data in
existing data files will also display the unit change. The units displayed on the logger LCD will be updated
the next time the logger is configured.
•
Time Zone for Data. This setting controls the time zone used in the graphs and for shared data files. Select
Set Automatically if you want HOBOmobile to use the same time zone as your phone or tablet. If you want
HOBOmobile to use a different time zone than your device, disable Set Automatically and then select the
desired time zone. Readouts that take place after changing the time zone will automatically use the new
time zone. The time zone displayed on existing mini-graphs will not be updated; mini-graphs will continue
to display the time zone in place during the readout. Large graphs, however, will display the time zone
change (tap the mini-graph to view the large graph with the new time zone). Time zone changes are
updated for all data file types except .hobo files. You can adjust the time zone for .hobo files within
HOBOware. Note that the time listed with the Config Date for a file (which can viewed in the Full Status
Details and Data File Details screens) and the Configure Time in an .xlsx file (viewable from the Details tab)
will retain the time zone used while configuring the logger.
•
Show Only My Devices. This setting determines which loggers are displayed in the Recently Seen/In
Range list in the HOBOs screen. Enable the setting if you only want to display the loggers that your phone
or tablet has connected to in the list. Disable this setting if you want all loggers within range of the phone
or tablet to be displayed regardless of whether your device has connected to them. Note: This setting
must be disabled to edit the Recently Seen/In Range list.
•
Enable Logging. Use this setting only as directed by Onset Technical Support. When you enable this
setting, the option to View and Share Log is also enabled. Click that as directed by Onset Technical
Support to share the log file as instructed.
Support
Tap
to check the software version, access manuals that you can open in iBooks while offline, and get support
information.
Frequently Asked Questions
The following questions can help with troubleshooting issues with the software. For additional help, contact Onset
Technical Support at 1-800-LOGGERS or 508-759-9500 or at [email protected].
Why isn’t my logger appearing in the Recently Seen/In Range list on the HOBOs screen?
•
The logger may need new batteries. Symbols will appear on the logger LCD if the batteries have enough
voltage remaining and are installed properly.
1-800-LOGGERS
19
www.onsetcomp.com
HOBOmobile User’s Guide
•
The logger is not within range of the phone or tablet or something is obstructing the communication.
Move closer to the logger. The range for successful wireless communication is approximately 30.5 m (100
ft) with full line-of-sight.
•
Make sure Bluetooth is enabled in your phone or tablet’s settings.
•
Try disabling the “Show Only My Devices” setting if necessary.
I see my logger in the Recently Seen/In Range list, but I can’t connect to it. What can I do?
•
Close HOBOmobile and then reopen it.
•
Power cycle the mobile device and try connecting again.
My logger is listed in the wrong group. How can I change that?
Connect to the logger, tap Configure, and then tap Group. Select a group for the logger or create a new group. If
you do not want the logger to be listed in any group, then remove it from all groups (no checkmark should be
displayed next to any group name). Tap Add to Favorites if you want the logger to be in the Favorites group. Tap
Start when you are done. The logger needs to be reconfigured for any group changes to take effect.
I was setting up my logger and then I lost the connection. Will my logger still start?
If you did not tap Start before the connection was lost, then the logger will not start logging. Connect to the logger
again, finish choosing your settings, and then tap Start.
Can I check how much battery power is remaining or whether the logger is logging or stopped with HOBOmobile
instead of checking the logger LCD?
If your device is within range of the logger, you can view the logging status in the Recently Seen/In Range List on
the HOBOs screen. You can also connect to the logger and tap Full Status Details to see remaining battery power
and check configure settings.
How do I lock my logger so that no one else can configure it?
Connect to the logger and tap Logger Password. Enter a password up to 10 characters. The password will then be
required any time another mobile device attempts to connect to the logger. The device that configured the logger,
however, will automatically retain the password so you do not have to type in a password each time that device
connects to the logger.
How do I reset the password on a logger?
Simultaneously press both the Start/Stop button and the Alarm/Stats button on the top of the logger for 3 seconds
or tap Reset to Factory Default on the Set Logger Password screen.
An alarm was tripped on the logger. How do I clear it?
Visual alarms are cleared based on the settings selected under “Maintain Visual Alarms Until” when configuring
the logger. This means the visual alarm will clear when the logger is reconfigured, when the sensor is back within
limits, or when the alarm button on the logger is pressed depending on which option you selected.
If an audible alarm is sounding, press any button on the logger to stop it or connect to the logger and tap the Clear
Audible Alarm action.
How do I offload my logger?
Connect to the logger and tap Readout. Once the readout is complete, tap the Data Files icon to view the offloaded
data.
It is taking more than a minute to read out my logger. Is this normal?
A logger with a full memory should take a minute or less to read out. If the readout is taking longer than a minute,
move the mobile device closer to the logger, within a few feet if possible. The further away the mobile device is
from the logger, the longer the readout can take.
1-800-LOGGERS
20
www.onsetcomp.com
HOBOmobile User’s Guide
I zoomed in on a graph. How do I get it back to the original view?
Tap
at the top of the graph. If you have activated the crosshair tool while zoomed out on a graph, it is possible
that this button will not restore the graph to its original scale. Tap Done and then tap the mini-graph again to
resume viewing the graph at its original scale.
How do I view the individual data points in a list instead of a graph?
at the top of the graph, select CSV or TEXT to view the data points, or select XLSX and then tap Quick Look.
Tap
Open the files in a spreadsheet or text editor for more analysis.
My graph is blank. What happened?
Viewing the graph of a full data file or adding more sensors to the view of a graph (through the sensor selector)
may occasionally draw a blank graph. Try doing a small pinch to refresh the plot and correctly draw all series. If this
at the top of the graph) to see if the plot redraws correctly. You can also
does not work, try hiding sensors (tap
tap Done and then tap the mini-graph again to see if this corrects the issue. If not, restart the app and try viewing
the graph again.
How do I add or remove series or events from the graph?
at the top of the graph and then enable or disable the sensors, statistics, and events you wish to show or hide
Tap
again when you are done.
on the graph. Tap
How can I print a graph?
Tap a mini-graph in the Data Files screen to view the larger version of the graph. Tap
tap Print.
and tap Image and then
I don’t have email set up on my mobile device. What should I do if I want to email my data?
If you would like to email data files or images from HOBOmobile, set up your mail account information before
attempting to share these files. Go to Settings > Mail, Contacts, Calendars in your device to set up an account.
Can I use AirDrop® for sharing .hobo files?
If you would like to AirDrop a .hobo file, consider using the AirSharing app, which allows sharing of this file type.
Can I change the groups for the data files?
Group names are set when the logger is configured and retained with any data files read out from the logger. As a
result, you cannot change the group in which the data file is categorized.
I changed the units in Settings. Why is the logger still displaying the old units?
The units displayed on the logger LCD can only be changed if the logger is reconfigured. To change the units on the
logger LCD, select the desired units in Settings, connect to the logger, tap Configure, choose any settings as
desired, and tap Start in the upper right corner. The new units will be displayed on the LCD when logging restarts.
I changed the units in Settings, but the mini-graphs still show the old units. Can the mini-graphs show the new
units?
Mini-graphs from readouts that occurred before changing the settings will always display the units in place at the
time of the readout. However, you can tap the mini-graph and see the new units on the large graph.
I changed the time zone in Settings, but the mini-graphs still show the old time zone. Can the mini-graphs show
the new time zone?
Mini-graphs from readouts that occurred before changing the settings will always display the time zone in place
during the readout. However, you can tap the mini-graph and see the new time zone on the large graph.
1-800-LOGGERS
21
www.onsetcomp.com
HOBOmobile User’s Guide
I switched to another app and when I returned to HOBOmobile, the HOBOs screen was blank. What should I do?
Switch to another screen in HOBOmobile (tap
appear again as normal.
for example) and then tap
. The screen should then
My device is showing too many loggers. How can I view only the loggers that I configured?
and then enable Show Only My Devices. The Recently Seen/In Range List on the HOBOs screen will now
Tap
show only the devices configured with your phone or tablet.
1-800-LOGGERS
22
www.onsetcomp.com