1
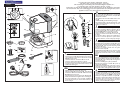
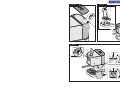
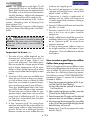
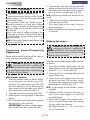
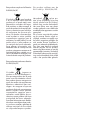
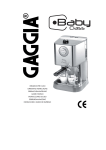
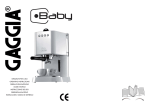
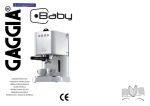
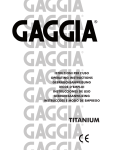
ISTRUZIONI PER L’USO
OPERATING INSTRUCTIONS
GEBRAUCHSANWEISUNG
MODE D’EMPLOI
INSTRUCCIONES DE USO
GEBRUIKSAANWIJZING
INSTRUCÇOES E MODO DE EMPREGO
La prima volta che usate il pannarello, dovete ...
The first time you use the frother, you must...
Bei erstmaliger Verwendung des Schaumschlägers müssen Sie ….
La première fois que vous utilisez le mixeur, il faut.....
La primera vez que usa el esquema, siga las instrucciones que se detallan a continuación
De eerste keer dat u het stoompijpje voor het opschuimen van melk gebruikt, moet u .....
Quando se usa o bico pela primeira vez, deve-se ...
FIG.01
3
5
4
1
6
2
-
22
25
5
7
-
27
-
1
15
2
26
-
3
16
14
4
-
17
8
-
6
29
10
7
-
11
18
23
13
-
12
20
-
24
21
-
9
19
I
Infilare la Ghiera filettata 1 sul tubo vapore.
Inserire il gommino 3 nell’Iniettore 4, inserire il Premigommino 2 sopra al Gommino 3, calzare l’assieme
2-3-4 sul tubo vapore.
Avvitare la Ghiera 1 sull’Iniettore 4. Serrare 5.
Inserire il canotto esterno 6 come in figura.
Il canotto interno 7 va montato correttamente, facendo
sporgere la parte inferiore dal canotto esterno, come
evidenziato nella figura.
-
GB
28
INOX
-
CLEANER
-
Slide the Ring Nut 1 onto the steam hose.
Place the Gasket 3 into the Injector 4, and place the
Gasket Press 2 over the Gasket 3. Slide the assembly
2-3-4 over the steam hose.
Screw the Ring Nut 1 onto the Injector 4. Tighten 5.
Attach the external housing 6 as shown in the Figure.
The internal sleeve 7 must be correctly installed, by
protruding the lower part of the external sleeve, as
shown in figure.
-
D
Gewindenutmutter auf Dampfrohr aufsetzen.
Gummiring 3 in Düse 4 einsetzen, Gumminiederhalter
2 auf Gummiring 3 aufsetzen, Komplex 2-3-4 in
Dampfrohr einführen.
Gewindenutmutter 1 auf Düse 4 schrauben. Festschrauben 5.
Außenbüchse 6 gemäß Abbildung einfügen.
Das innere Rohr 7 ist korrekt anzubringen, wobei der
untere Teil des Außenrohrs herausragt, wie es auf Abbildung zu ersehen ist.
F
Glisser la douille filetée 1 sur le tuyau de la vapeur.
Insérer le caoutchouc 3 dans l’injecteur 4, insérer le
presse-caoutchouc 2 sur le caoutchouc 3, emmancher
l’ensemble 2-3-4 sur le tuyau de la vapeur.
Visser la douille 1 sur l’injecteur 4. Serrer 5.
Insérer le manchon externe 6 comme il est indiqué sur
la figure.
Le manchon intérieur 7 doit etre installé de la façon
correcte, en laissant dépasser la partie inférieure du
manchon extérieur, comme indiqué par la figure.
E
Introduzca el casquillo roscado 1 en el tubo de vapor.
Introduzca la empaquetadura de anillo 3 en el inyector
4, introduzca el aprieta-empaquetadura 2 en la empaquetadura 3. Acto seguido, ubique el grupo 2-3-4
en el tubo de vapor.
Enrosque el casquillo roscado 1 en el inyector 4.
Enroscar hasta el tope 5.
Introduzca el forro exterior 6 como se aprecia en la figura.
Monte correctamente el tubo interior 7, sobresaliendo
el lado inferior del tubo exterior, como señalado en la
figura.
NL
Schuif de getapte sluitring op het stoompijpje.
Schuif het rubbertje 3 in het spuitstuk 4, schuif de rubberhouder 2 op het rubbertje 3, zet het geheel 2-3-4
op het stoompijpje.
Draai het einddopje 1 op het spuitstuk 4.
Bevestig het buitenste mondstuk 6 op het spuitstuk,
volgens de afbeelding.
De binnenste schuif 7 wordt op de juiste manier gemonteerd door het onderste gedeelte van de buitenste schuif
uit te laten steken zoals getoond wordt in figuur.
P
Enfie o casquilho roscado no tubo de vapor.
Introduza a borracha 3 no injector 4. Introduza o pressionador da borracha 2 por cima da borracha 3; a
seguir introduza o grupo 2-3-4 no tubo de vapor.
Enrosque o casquilho roscado 1 no injector 4.
Introduza o canote externo 6 como ilustrado na figura.
O pequeno tubo interno 7 deve ser montado corretamente, fazendo sair a parte inferior do pequeno tubo
externo, como evidenciado na figura.
FIG.02
FIG.04
FIG.03
GAGGIA S.p.A.
20087 Robecco sul Naviglio - MI - Italia
Tel. 02 94 99 31
Fax 02 94 70 888
Internet: www.gaggia.it
E-mail: [email protected]
COD.4332077000 - Rev. 00
GAGGIA S.p.a. si riserva il diritto di apportare tutte le modifiche ritenute necessarie.
GAGGIA S.p.a. reserves the right to carry out all modifications which might be considered necessary.
GAGGIA S.p.a. hält das Recht alle notwendigen Aenderungen durchzuführen.
GAGGIA S.p.a. se réserve le droit d’apporter toute modification qui se rend nécessaire.
GAGGIA S.p.a. se reserva el derecho de hacer toda modificación que cree necesaria.
GAGGIA S.p.a. behoudt zich het recht voor alle nodig geachte wijzigingen aan te brengen.
A GAGGIA S.p.a. reserva-se o direito de efetuar todas as modificações consideradas necessárias.
ENGLISH
Congratulations on your wise choice!
As the proud owner of the Gaggia machine,
you can now experience the taste of a delicious
cup of espresso or cappuccino in the comfort of
your own home.
Espresso coffee, originally created in Italy, is
made by rapidly forcing water that has been
heated to the correct brewing temperature,
through a special finely ground coffee.
The heart of the espresso machine is a precision
engineered pump.
The pump and water flow is easily controlled
with just a flick of the switch.
CAUTION:
This appliance is for household use
Any repairs or servicing operations, with the
exception of normal cleaning and maintenance
operations must be undertaken by an authorized service centre.
1. Check voltage to be sure that the voltage
indicated on the plate agrees with your
voltage.
2. Never use warm or hot water to fill the water
tank. Use cold water only.
3. Keep your hands and the cord away from hot
parts of the appliance during operation.
4. Never clean with scouring powders or hard
implements.
5. To avoid your machine scaling up, use
purified or bottled water.
6. Do not immerse base in water.
IMPORTANT
SAFEGUARDS
When using electrical appliances,
basic safety precautions should always
be followed to reduce the risk of fire,
electric shock, and/or injury to persons,
including the following:
1 Read all instructions and information in this
instruction book and any other literature
included in this packaging referring to this
product before operating or using this appliance.
2 Do not touch hot surfaces. Use handles or knobs.
3 To protect against fire, electric shock and
personal injury do not immerse cord, plugs,
or appliance in water or other liquid.
4 Close supervision is necessary when any
appliance is used by or near children.
5 Unplug from outlet when not in use and before cleaning. Allow to cool before putting
on or taking off parts and before cleaning
the appliance.
6 Do not operate any appliance with a damaged cord or plug or in the event of appliance
faults or damages. Return appliance to the
nearest authorized service centre for examination, repair or adjustment.
7 The use of accessory attachments not recommended by the appliance manufacturer may result
in fire, electric shock or personal injury.
8 Do not use outdoors.
9 Do not let cord hang over edge of table or
counter, or touch hot surfaces.
10 Do not place on or near a hot gas or electric
burner, or in a heated oven.
11 Always turn appliance to “Off”, then plug
cord into the wall outlet. To disconnect, turn
switch to “Off”, then remove plug from
wall outlet.
12 Do not use appliance for other than intended
household use.
13 Use extreme caution when using hot
steam.
SAVE THESE INSTRUCTIONS
•8•
ENGLISH
Description of parts:
Preparation:
FIG. 01
1. Remove the water tank cover (22) and fill
with cold water to the MAX line indicated
on tank (26). See FIG. 2.
1
2
3
4
5
6
7
8
9
10
11
12
13
14
15
16
17
18
19
20
21
22
23
24
25
26
27
28
29
Main switch
Coffee dispensing button-1 strong/2 weak
Coffee dispensing button-1 weak/2 weak
Hot water supply button
Steam supply light
Dose programming/Manual dispensing
button
Correct temperature light
Turbo frother steam nozzle (removeable)
Filterholder
1 cup filter (or coffee pod)
2 cup filter
Basin (removable)
“Perfect crema” device (OPTION)
Brewing head
Filterholder gasket
Shower disc holder
Shower disc
Tamper
Power cable and plug
Measuring spoon
Delivery spout
Tank cover
Grid (removable)
Cappuccino maker kit (OPTION)
Steam/hot water knob
Removable water tank
Overflowing protection hole
Anti-fingerprint cleaner for stainless steel
Level indicator for the basin
Instructions for the power supply cord
A A short power-supply cord is provided to
reduce risks of getting tangled up or tripping
over a longer cord.
B Longer extension cords are available and
may be used if care is exercised in their
use.
C If a long extension cord is used:
1 the marked electrical rating of the extension
cord should be at least as great as the electrical rating of the appliance.
2 if the appliance is of the grounded type, the
extension cord should be a grounding type
3 the cable does not hang from the table to
avoid the risk of getting caught up in it.
N.B.: Near the word MAX on the tank there is
the overflowing safety hole (27) in case of
tank overfilling.
The water tank can also be removed, after
removing the tank cover (22) using the
handle.
Re-install tank with water and cover (22).
2. Insert plug (19) into a suitable wall outlet (see
point 1 under “Caution”).
3 Push the main switch (1). The temperature
light (7) will flash until the temperature is
reached; when the temperature is reached
the light will remain on.
The lights of buttons 2 - 3 - 5 - 6 will remain
on in a fixed way (stand-by mode).
Starting up
This procedure fills the water boiler with fresh
water.
This should be done whenever the machine is
switched on.
This machine, featuring a pump to brew coffee,
is equipped with a self-priming system.
Put an empty cup below the steam frother (8),
press the hot water button (4) and turn the steam
knob (25) clockwise.
You will hear the noise of the enabled pump
and after a few seconds water will come down
from steam rod (8).
When the cup is filled close the steam knob (25)
and press the hot water button (4) again.
The Gaggia machine is now ready to be
used.
•9•
ENGLISH
NOTE: The temperature ready-light (7) will
automatically flash as the machine boiler
heats. After switching on the machine for the
first coffee, wait 6 minutes until the machine
has fully heated up, while for all subsequent
coffees the machine will be ready to use.
Another feature of the machine is the “no-drip
system”, eliminating most of dripping from
brewing head (14).
After coffee brewing, however, a little dripping
may occur due to wet coffee grinds in the filterholder.
Caution: Never operate pump
without water in machine as damage
to the pump may occur.Damage of
pump run without water is not covered by
warranty.
Important to know……
1. The taste of your coffee depends on the
characteristics of the beans from which it
is made, the type of bean, where it was
grown and processed. The coffee beans
that are roasted for a longer period of time
and at higher temperatures will be much
darker in colour.Darker beans will produce
a richer cup of coffee than the lightly-roasted
beans.
2. A variety of dark roasts are available from
which you can choose to brew your espresso. Each of these roasts is a blend of coffee
beans that are roasted at a specific temperature producing a specific type of flavour.
There are decaffeinated beans that have
up to 98% of the caffeine content removed.
The next time you purchase coffee for your
espresso maker, experiment with one of the
many kinds of coffee being sold. You may
just find that it tastes better than the blend
you have been using.
3. A fine “espresso grind” for pump-driven
machines must be used. Be sure to ask for this
when buying coffee or when having beans
ground. Do not use a blade-type grinder
because it makes too much coffee dust and
produces an irregular grind.
4. The mark of real espresso is its dark color,
rich taste and the light brown, natural froth
called “crema” in Italian.
5. Cappuccino is simply a combination of
espresso and hot, frothy milk.Cappuccino
is usually topped with cinnamon, nutmeg or
cocoa powder.
6. Espresso Coffee should be served immediately after it is made.
7. Espresso is served in 2 to 2 ½ oz. demitasse
cups. A 4 or 6 oz. cup or glass is used for
cappuccino
8. Ideally, coffee beans should be ground immediately before using. Remember, it must
be an “espresso grind” for pump-driven
espresso machines.
9. It’s best to store ground coffee or beans in
an airtight container in the freezer of your
refrigerator. Ground coffee tends to absorb
food odours.
How to make a good Espresso coffee:
Coffee dose programming
With this Gaggia appliance two different water
doses can be programmed to obtain one or two
cups of coffee. To adjust the water doses and
store them for a following dispensing request,
first of all carry out the “COFFE PREPARATION”
procedure on page 11- sections 2-3-4, and then
proceed as follows:
1 Press the programming button (6) for 3 sec.
until the light (6) starts flashing.
At the same time the symbols of buttons 2
- 3 will switch on.
2 After introducing the one-cup filter, press key
(2) and let the coffee flow down.
3 Press the same key (2) again until the desired
optimum dose for one coffee is reached.
4 Now the water dose assigned for one coffee
to key (2) will be stored and the light placed
below the key will turn off.
5 Repeat steps 3 and 4 to program the water
dose for key (3).
• 10 •
ENGLISH
Every user will be free to program the doses
to obtain a more or less strong coffee and
to assign bigger or smaller doses to buttons
(2 and 3) to use 1 or 2 cup filter.
6 After storing these doses, press “MENU” key
(6) again to exit from the programming function. The symbols placed under the buttons
will re-start lighting up alternatively.
The appliance is now ready to dispense
excellent coffees.
N.B.: to brew 1 coffee press button (2 or 3)
once; to brew 2 coffees press button (2 or
3) twice.
3
4
Pre-Infusion
The machine allows you to adjust the dosage
settings so that the water produced for the COFFEE dose is preceded by a pre-infusion step.
Press the dose button (2) and the normal coffee
cycle is preceded by a brief, timed jet of water
that moistens the coffee wafer before the actual
coffee making cycle starts.
This function allows you to get the most flavor
out of the coffee wafer.
5
6
PRE-INFUSION is not available on the dose
button (3).
N.B.: the machine comes from the factory with
PRE-INFUSION function set to ON. Should
you choose to deactivate this function you
will need to enter the programming mode
(see “Coffee dose programming”)
and press the hot water supply button (4).
The indicator light on the button will turn off.
7
8
The indicator light on the hot water supply
button (4) is ON when the PRE-INFUSION
function is ON. Vice versa, if the indicator
light is OFF, then the PRE-INFUSION function
is OFF.
Coffee preparation
1 Follow the procedure described under “Preparation”.
2 Select the correct filter basket (10 or 11) and
insert it in the filter holder (9).
9
• 11 •
Use the small filter for 1 cup and the large
filter for 2 cups of espresso.
Then insert filter-holder (9) into the appliance
and wait at least 10 minutes.
After the warm-up period, remove the warm
filter-holder (9) from the brewing head and
fill with correctly ground espresso coffee
using the measuring spoon provided.
Place one level measure of coffee in basket
for each cup of espresso. Do not overfill.
Gently tamp down coffee with the tamper
(18) provided. Do not compress too firmly.
Clean any excess coffee from the rim of
filter holder (9). Insert filter holder into brew
head by holding handle approximately 45
degrees to the left as you face machine.
When properly aligned,move handle firmly
to the right to lock into position.
The handle should point to the front of the
machine or slightly to the right.
Place one or two espresso cups on the drip plate
to line up with the spouts of the filter holder. Press
the button corresponding to the stored coffee
dose. Espresso will start to flow into cups.
The coffee dispensing will automatically stop
when the preset level is reached (see Coffee
dose programming);however it is possible to stop the coffee dispensing by pressing
the button (2 or 3) as previously selected.
When properly made, the espresso will have a
light brown foam “crema” floating on the top.
If not, refer to “In the event of faulty
function”.
Remove cups and serve.
To make more espresso, carefully and slowly
remove the filter holder by moving handle to
the left. Be careful as hot water will be on top
of the coffee grinds in the holder. Some water will continue to drip from brewing head
as filter holder is removed. That is normal
and due to the pump pressure in the system.
Knock out used coffee grinds from filter. For
more espresso repeat steps 2 to 7 above.
To prepare coffee manually, carry out steps 2
through 5 and then press button 6. When you
have obtained the desired quantity of coffee
in the cup, press button 6 again to stop the
cycle. Then proceed with steps 6 and 7.
N.B.: Dispensing should not exceed 40
seconds.
ENGLISH
OPTIONAL
“Perfect crema” device (13)
To ensure the optimum function of the “Perfect
cream” device, insert the frothing jet device
into the filter holder.
We recommend that the “Perfect cream”
device be cleaned on a daily basis, before
use, in order to prevent any blockage of the
delivery holes. A pin may be used to clean
out the hole.
Even if the type of coffee grinding is not
correct the use of the “Perfect cream” device
will produce the typical creamy froth of an
espresso coffee.
N.B.: Only use the “perfect cream device with
a large 2-cup filter.
Supplying steam/Preparing
Cappuccino
Steam can be used to froth the milk for cappuccinos and also to heat beverages.
Caution! Scalding hazard! Splashing
may occur at the start – scalding hazard! The hot water nozzle and pipe
can reach high temperatures: avoid touching
it directly with your hands.
Milk frother version:
1 With the machine ready to deliver coffee,
convey the pipe over the drip tray (12),
open the “Hot water/steam” tap knob (25)
for a few seconds so to let the remaining
water come out of the steam pipe; after a
few seconds only steam will come out.
2 Close the steam/hot water tap knob (25).
3 Make espresso (in a large cups) as described
above.
4 Fill 1/3 of the container to be used to prepare
the cappuccino with cold milk.
IMPORTANT: To obtain a better cappuccino, the milk and the cup must be cold.
5 Immerse the steam pipe into the milk to be
heated and open the tap knob (25); turn the
container slowly from downwards to upwards so to obtain a smooth foam (Fig. 03).
N.B.: Dispensing should not exceed 60 seconds.
6 After using the steam for the desired time
close the tap knob (25).
7 The same system can be used to heat up
other beverages.
8 After this operation clean the steam pipe with
a wet cloth.
Making hot water:
Caution! Scalding hazard! Splashing
may occur at the start – scalding hazard! The hot water nozzle and pipe
can reach high temperatures: avoid touching
it directly with your hands.
With the machine ready to brew coffee, proceed
as follows:
1 Press the hot water supply button (4), the
button light will switch on, while the lights of
buttons 2 - 3 - 5 - 6 will switch off.
2 Put a cup and /or a container below the hot
water/steam pipe.
3 Open slowly and clockwise the hot water/steam tap knob (25) to allow supply.
Throughout the supply the hot water supply
button light (4) will flash (Fig. 03).
N.B.: A max.supply of 40 seconds is recommended.
4 Take the desired quantity of hot water; to
stop the hot water supply turn knob (25)
counterclockwise.
5 Press button (4) again; the machine will return to normal running mode. Then remove
the cup and/or the container.
• 12 •
The lights of buttons 2 - 3 - 5 - 6 will switch
on in a fixed mode.
ENGLISH
Keeping it clean:
1 IMPORTANT: the steam nozzle should
be cleaned after each use in order to avoid
build up of milk deposits that are very difficult
to clean. Cleaning is made easy as can be
seen in the DESCRIPTION OF PARTS. The
outer part of nozzle can be removed by
pulling downward.
The outside of the steam pipe can be cleaned
with a damp cloth.
The steam jet is cleaned by running a shot
of steam through it.
The hole in the steam nozzle must be kept
open. A needle may be used.
6 The shower disc (17) should be unscrewed
and cleaned periodically depending on
frequency of use.
7 If the machine is not used for a long period
of time, completely discharge the water
from the boiler by turning the steam knob
(25) clockwise. Press steam switch (5) until
completely discharged. Close the steam
knob (25) by turning it counterclockwise and
switch off the machine.
Never run the pump without water.
8 NOTE: It is very normal for an espresso
machine to emit steam and drip occasionally
as the water pressure changes during use.
Be certain to empty drip tray (12) as required.
2 Clean filter holder and filter in warm water
after use.
3 Wipe body of machine with a damp cloth
as required.
4 Remove basin and grid (12, 23) and rinse
with water. Do not use abrasive substances.
5 Clean the seal (15) inside of the brewing
head (14) and keep it clean.
Descaling:
In hard water areas, minerals found in the water
will accumulate and affect operation of the unit.
Approximately every two months (this can vary
depending on use and water condition), clean
the machine with Gaggia descaler (in which
case follow the instructions on the packet).
Pay attention as the
Turbo-Frother steam
nozzle could be hot!
Air intake to be kept clean
and free from residues.
Remove shower disc (17) and clean.
Dilute the solution before pouring it into the tank.
Pour the solution into the coffee dispensing group
and into the steam nozzle for a few seconds.
Wait 20 minutes, then repeat. process until
solution has been run through. Rinse machine
thoroughly by running plain cold water through
machine. Replace shower disc (17).
NOTE: Product failure due to scale accumulation is not covered by warranty. No other
servicing should be attempted by the user. Use
“Gaggia cleaner” for best results.
• 13 •
ENGLISH
In the event of faulty function
Problem:
Check to ensure against the following:
Water is in tank.
Coffee does not flow.
Filter basket clogged because coffee is too fine or compressed too firmly.
Shower disc requires cleaning.
Coffee is ground too coarsely.
Coffee flows too quickly.
Coffee is not pressed down with tamper.
No water in tank.
Pump makes loud noise.
Pump not primed.
Coffee is ground too coarsely.
Filter holder not properly inserted in brew head.
Water leaking excessively
Gasket in brewing head dirty or worn.
from filter holder.
Coffee grinds not cleaned off the rim of filter holder.
Coffee is ground too coarsely.
Espresso has little creamy
Coffee is not pressed down with tamper.
froth.
Coffee is too old or dried out.
Machine is not warmed up (10 min).
Espresso is too cold.
Coffee is ground too coarsely.
Steam nozzle and/or air intake hole clogged.
Not enough milk froth.
Milk is too hot.
Alarms - When the button being used flashes:
Empty tank
Fill tank and repeat boiler filling procedures.
No water
Pump noise
Too fine grinding
Modify grinding
Dirty filter
Clean shower (17)
Too pressed coffee
Avoid press coffee excessively
• 14 •
Istruzioni per il trattamento a fine vita
Instructions for end-of-life disposal treatment
Hinweise für die Behandlung bei Außerbetriebnahme
Instructions pour le traitement de fin de vie utile
Instrucciones para el tratamiento al final de vida útil
Instruções para o tratamento em fim de vida útil
Instructies voor de behandeling aan het einde van de levensduur
Questo prodotto è conforme
alla Direttiva EU 2002/96/EC.
This product complies with
EU Directive 2002/96/EC.
Il simbolo
apposto sull’
apparecchiatura o sulla confezione
indica che l’ apparecchiatura, alla
fine della propria vita utile, non
deve essere trattata come un rifiuto
domestico generico ma deve essere
portata in uno dei centri di raccolta
differenziata per apparecchiature
elettriche ed elettroniche approntati
dalla Pubblica Amministrazione.
Oppure puo’ essere consegnata al
rivenditore al momento dell’acquisto di un’ apparecchiatura nuova
equivalente. L’utente è responsabile
del conferimento dell’apparecchio
a fine vita alle appropriate strutture
di raccolta, pena le sanzioni previste
dalla vigente legislazione sui rifiuti.
L’adeguata raccolta differenziata
per l’avvio successivo dell’apparecchio dismesso al riciclaggio,
al trattamento e allo smaltimento
ambientalmente compatibile contribuisce ad evitare possibili effetti
negativi sull’ambiente e sulla salute
umana e favorisce il riciclo dei materiali di cui è composto il prodotto.
Per informazioni più dettagliate
inerenti i sistemi di raccolta disponibili, rivolgersi al servizio locale di
smaltimento rifiuti, o al rivenditore
in cui è stato effettuato l’acquisto. Il
produttore e/o l’importatore ottemperano alle proprie responsabilità
per il riciclaggio, il trattamento e
lo smaltimento ambientalmente
compatibile sia individualmente sia
partecipando a sistemi collettivi.
on the product
The symbol
or on its packaging indicates that
this product may not be treated as
household waste. Instead it shall
be handed over to the applicable
collection point for the recycling of
electrical and electronic equipment.
By ensuring this product is disposed
of correctly, you will help prevent
potential negative consequences
for the environment and human
health, which could otherwise be
caused by inappropriate waste
handling of this product. For more
detailed information about recycling
of this product, please contact your
local city office, your household
waste disposal service or the shop
where you purchased the product.
Dieses Produkt entspricht der
EU-Richtlinie 2002/96/EG
auf dem
Das Symbol
Produkt oder seiner Verpackung
weist darauf hin, dass das Produkt
nicht als normaler Haushaltsabfall
zu behandeln ist, sondern an einem
Sammelpunkt für das Recycling
von elektrischen und elektronischen
Geräten abgegeben werden muss.
Durch Ihren Beitrag zum korrekten
Entsorgen dieses Produkts schützen
Sie die Umwelt und die Gesundheit
Ihrer Mitmenschen.
Umwelt und Gesundheit werden
durch falsches Entsorgen gefährdet.
Weitere Informationen über das
Recycling dieses Produkts erhalten
Sie von Ihrer Gemeinde, der Müllabfuhr oder dem Geschäft, in dem
Sie das Produkt gekauft haben.
L’ appareil est en conçu et fabriqué pour
faciliter sa valorisation, son recyclage
ou sa réutilisation conformément à la
directive européenne 2002/96/CEE
relative aux appareils électriques et
électroniques usagés (waste electrical
and electronic equipment - WEEE).
ci-contre apposé
Le logo
sur l’appareil indique que ce produit ne peut pas être éliminé avec
les déchets ménagers non triés.
Lorsque vous aurez décidé de vous en
séparer définitivement, il convient de
faire procéder à la collecte sélective
de cet appareil en vous conformant
au mode de reprise mis en place dans
votre commune (collecte ponctuelle des
encombrants, déchèterie), ou en
aisant appel au service de reprise proposé par votre distributeur, ou bien, en le confiant à des
organisations caritatives et des
associations à but non lucratif.
En vous assurant que ce produit est
éliminé correctement, vous favorisez la prévention des conséquences
négatives pour l’environnement et
la santé humaine.
Este producto cumple con la Directiva
EU2002/96/EC.
Dit product voldoet aan de
EU-richtlijn 2002/96/EG.
en el producto
El simbolo
o en su empaque indica que este
producto no se puede tratar como
desperdicios normales del hogar.
Este producto se debe entregar al
punto de recolección de equipos eléctricos y electrónicos para reciclaje.
Al asegurarse de que este producto se deseche correctamente,
usted ayudará a evitar posibles
consecuencias negativas para el
ambiente y la salud pública, lo cual
podria acurrir si este producto no
se manipula de forma adecuada.
Para abtener información más
detallada sobre el reciclaje de este
producto, póngase en contacto con la
administración de su ciudad, con su
servicio de desechos del hogar o con
la tienda donde compró el producto.
Het symbool
op het product of op verpakking wijst erop
dat dit product niet als huishoudafval mag worden behandeld.
Het moet echter naar een plaats
worden gebracht waar elektrische
en elektronische apparatuur worden
gerecycled.
Als u ervoor zorgt dat dit product
op de correcte manier wordt verwijderd, voorkomt u mogelijk voor
het milieu negatieve gevolgen die
zich zouden kunnen voordoen in
geval van verkeerde afvalbehandeling. Voor meer details in verband
met het recyclen van dit product,
neemt u het best contact op met de
gemeentelijke instanties, het bedrijf
of de dienst belast met de verwijdering van huishoudafval of de winkel
waar u het product hebt gekocht.
Este produto está conforme a directiva
EU 2002/96/EC.
O simbolo
impresso no
produto ou na sua embalagem indica que este produto não se pode
tratar como lixo doméstico normal.
Este produto deve ser entregue num
ponto de recolha de equipamentos
eléctricos e electrónicos para reciclagem. Ao assegurar-se que este
produto é eliminado correctamente,
estará a ajudar a evitar possiveis
consequências negativas para o
ambiente e saúde pública que resultariam se este produto não fosse
manipulado de forma adquada.
Para obter informações mais detalhadas sobre a reciclagem deste produto, por favor contacte o gabinete da
câmara municipal da sua cidade
ou a loja onde comprou o produto.