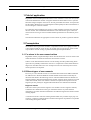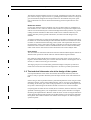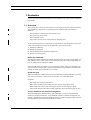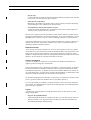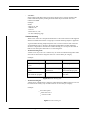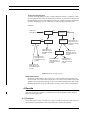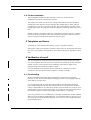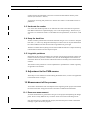
1
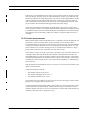
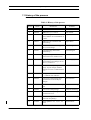
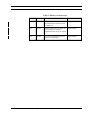
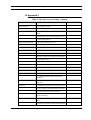
LiTH
2006-01-17
RUT - utvecklingshandbok
2.4 Writing of user manual v 8.0
Kjell Enblom 2005
ABSTRACT
This document describes how the writing of a user manual for a computer program
is done. It is possible to write different types of user manuals depending on how
much previous experiences the reader has.
To ease the use of the user manual the disposition must be clear. In this document
an appropriate course of action to get a good disposition is explained.
At the actual authoring as simple as possible language should be used, use explanatory figures in an suitable amount and a well thought-out layout. It is of great importance that the subject index is thoroughly worked through and the writer of the
user manual have to predict all imaginable words the reader may want to search for.
When the user manual finally is finished it has to be checked before it goes to print.
To ease the checking it is appropriate to follow checklists, in particularly if it is inexperienced persons who checks the document. In this document there is two
checklists, one for check of proof and one for check of language.
To be able to evaluate the user manual there is a questionnaire last in this document.
RUT - utvecklingshandbok 2.4 Writing of user manual v 8.0
1
Field of application
1 Field of application
Regardless of how well designed and intuitive a user interface is a new user of a system
will need a detailed user manual. A beginner shall from that be able to learn a system’s
functions and get examples on how he or she can get benefits from them. An expert who
has the need to find answers to a limited question shall quickly be able to find what he or
she is looking for in the user manual.
It is often first when something goes wrong or when problems arises that one will read
the user manual. One should still remember that a user manual does get its value first
when someone is using it. The user manual shall be produced to be used and not just to
exist.
This document describes an appropriate course of action to produce a good user manual.
2 Prerequisites
To be able to write a good user manual it is important to know who is going to read it. It
is also important that the writer as early as possible gets in to the project so that in that
way be able to start the writing in parallel with design and implementation.
2.1 For whom is the user manual written
Regardless of if the program developers know who the future user can be or not have the
technical informer to decide for whom the user manual is written.
Often it can be determined who the user will be starting from the product being developed. One can probably assume that a user of a C-compiler have some technical knowledge but on the other hand a user of a word processor do not necessarily have to have
much experience of computers.
2.2 Different types of user manuals
Do not try to cover all kinds of users in one manual but instead write different manuals
for different users. What the different manuals should contain and to whom they are
directed is described in the following sections. The three different kind of manuals are
beginner manual, reference manual and user manual. All parts do not need to be covered
in the same manual; if the user manual is directed to experienced computer users the
beginner part can possibly be skipped and instead do the user manual more detailed.
Beginner manual
If the users of the system will be beginners it is suitable to write a beginners manual,
sometimes also called tutorial. This type of manual contains very little technical
information. Too much technical information can make the beginner feel unsure instead
of being helpful.
A tutorial can also be a real short training manual which only contains step by step instructions. A tutorial is a manual which is used for training basic steps before or in parallel
with reading the beginner manual..
2
RUT - utvecklingshandbok 2.4 Writing of user manual v 8.0
Prerequisites
The beginner manual should be written in a simple, straightforward style and to the most
part consist of step-by-step instructions. A good beginner manual consists too a large degree of illustrations, diagrams and simple instructions. Nevertheless the picture space
may not dominate over the text but should instead support and explain the text more
clearly.
Reference manual
For the more advanced users information of a more technical nature is needed and it is
then suitable to write a reference manual. These readers are experienced computer users
and one can assume that they have some knowledge about similar products or is good at
reading technical information. What these readers need is a manual where they can
quickly and easily look up specific information, new functions and changes to the
interface.
A reference manual also set some special demands on the table of contents which has to
be detailed. To write a detailed subject index demands that the writer familiarizes oneself
in and be in command of the terminology of the system. The experienced user will use
the terminology of the system when searching in the table of contents and subject index.
Furthermore cross-references must be included and the choices of main and secondary
index words must be done with care. More about this in the section Subject index.
User manual
The user manual is somewhere between the reference manual and the beginner manual. It
should contain parts from both the reference manual and the beginner manual.
One could for example divide the user manual in two parts where one part is used as a
beginner manual and the other part is used as reference manual. I discourage this sort of
division, it is better to have all types of manuals.
The target group for a user manual has general knowledge of computer systems and
needs fewer instructions than absolute beginners to be able to proceed by themselves.
2.3 The technical informants role at the design of the system
It is important that the writer of the user manual, the technical informant, enters the
project as early as possible. Both the system developer and the writer will benefit from
that.
If the writing is done in parallel with the system development the writer will get a better
feeling for how the system is built and functioning. This is of course a great benefit for
the writing. If the writer gets in later in the project there is a risk that the feeling for how
the system is functioning will be fuzzier and this can result in a worse user manual.
Everything that can effect the user manual, the user interface, functions and such, is often
specified in the design phase, even if adjustments of the systems interfaces can happen
late during the implementation. Because of this the writer can start writing the manual already during the design phase and later do the final changes in the end of the implementation phase. This results in that the user manual can be ready for use and testing in the
system test phase.
RUT - utvecklingshandbok 2.4 Writing of user manual v 8.0
3
Prerequisites
Another benefit is that the writer of the user manual can discover if there are any inconsistency or bad wording in the user interface that should be changed before the release of
the program. One example is using different words for the same concept.
The system developer can also get benefit from the cooperation because the technical informant often has a closer contact with the user and through that can bring views on the
systems usability at an early stage. In addition to that the thought of a certain target group
is brought in already in the development phase which can be of great use at the creation
of a good and usable system.
4
RUT - utvecklingshandbok 2.4 Writing of user manual v 8.0
Realization
3 Realization
A writer of a user manual should think of some different steps. These will be handled in
this chapter.
3.1 Overview
This section gives a brief overview of how to create a good overview of the user manual.
Start with doing a disposition. A good disposition will fill at least four important
functions:
*
*
*
*
A large subject is broken down into smaller pieces.
Every piece fits in the whole.
The reader finds easier.
The reader can select parts of the manual by skipping parts.
To get a good disposition it is appropriate to concentrate on such things that concerns the
reader. The following four steps can be followed to get a good overview:
1. Define the readership.
2. Decide the goal/goals.
3. Choose method for the manuals arrangement.
4. Put the overview together.
Define the readership
The definition of the readership decides the strategy for the rest of the writing. Make sure
that sufficient time is spent at this, because all of the rest of the writing is dependent on
how the readers of the manual are defined.
If the intended users are beginners, write a beginner manual. If they are advanced users,
write a reference manual. This is important because that the procedures are different depending on which type of manual is to be written.
Decide the goal
When the readership is defined, it has to be specified which goal the manual is. This step
may seem trivial, but as a matter of fact very usable, if it is done thoroughly.
Examples:
Bad: Help users of the program XYZ.
OK, but not completely good: Help new users to learn the program XYZ.
Better: Help new users to learn the program XYZ to be able to prepare threedimensional diagram. Give them a study guide who shows the learning step by step.
Choose method for the manuals arrangement
When the readership is defined and the goal is decided, it is time to choose the best
method to organize the material. A good method to follow is that the arrangement of a
manual is sensible to even the least experienced users. Which arrangement gets chosen is
also dependent on which kind of manual that is written.
RUT - utvecklingshandbok 2.4 Writing of user manual v 8.0
5
Realization
To organize the beginner part after the structure of the program is not recommended,
while the reference manual can be organized, at least partly, after the structure of the program.
Many writers are so busy with the program that they organize the manual after the structure of the program.
It is better to let the manual be arranged in accordance with what the readers need and
they do not think in terms of menus and modules. Here follow three methods for the arrangement of the manual.
One way to organize the manual is to have time as a starting point i.e. in which order a
user performs the session. Chronological order is easy to understand for both reader and
writer.
Example:
1. Start the program
2. Create your first document
3. Complement the document with pictures
If one can assume that the user are not interested in reading through all the commands
that the program offers one can do a event oriented user manual. In this as few facts and
step-by-step instructions as possible is presented. One starts from realistic problem solving situations and tasks.
The user shall learn through performing actions and get inspiration. One should also encourage the user to explore the program on their own.
Example:
1. Do a invoice
2. Do a newsletter
3. Do a dictionary
Finally one could arrange the manual around different knowledge levels. Here only what
the reader needs to know at every phase of the work is presented.
Example:
1. Do simple reports
2. Do reports with several columns
3. Do advanced reports with illustrations
At organization after different levels of knowledge some material is withheld until the
reader is ready to take part of the new information. This method has the advantage of that
already from the beginning it let the user get going with productive work.
3.2 Detailed description
In this section concrete suggestion on steps that should be used on a detailed level on the
writing of the manual is given.
6
RUT - utvecklingshandbok 2.4 Writing of user manual v 8.0
Realization
General writing rules
When a manual is to be written one should use a simple and straightforward language. If
theuser feels unsure on a new system it becomes an extra problem if the language in the
user manual is unnecessary complicated.
A good rule of thumb to follow is “to write simple is equal to write short”. Use at most
one subordinate clause and keep the paragraphs to three to four sentences long. It is easier for the reader to digest a small piece at a time.
It is also utmost important to be consistent in your terminology, both regarding notations
within the program and in different places in the user interface and the user manual. Do
not call the same thing two different names; is it called scroll bar it shall be called that
throughout the whole manual. As help use some software company’s language standard
for example to maintain the unity of the language. It can also be good to have an own
glossary over notations to be used to ensure consistency.
It is also desirable to divide the information in to small parts, this also applies to chapters
and sections. Preferably many small sections instead of one large section mainly to ease
searching in the text.
Try to always be task and user oriented. Use an encouraging tone in the manual.
Example:
*
*
*
Have Windows open and put in “Floppy disk 1” in preferred station.
Choose Run in the program handlers Archive menu.
(The dialog pane Run is shown.)
Write a:\setup and press on OK.
It is important to not use changeable details in the system to explain or show.
Example: “Click on the blue field in the window to move it.” (the title field in a win95
window is here referred).
The user gets problem here with identifying the right field if the field have been given an
other colour.
If a figure is used as an example of parts of the graphical user interface one should make
sure that the user will not risk to mix the general and the example specific in the figure
up. It is for example unfortunate if a user thinks that the notion of icon means a small picture with a lighthouse on, as the Netscape icon.
Beginner manual
It is important that the manual is written for the readership that it is intended. At the
writing of a beginner manual one must take in concern the special demands such one
have.
When the manual is being written has to do with beginners it is especially important to
from time to time describe the current state of the system, preferably with the aid of pictures. This gives the user a feeling of security and he can confirm that he has performed
the tasks right or right away get feedback when something goes wrong:
RUT - utvecklingshandbok 2.4 Writing of user manual v 8.0
7
Realization
*
*
*
Step by step.
It s important that in a beginner manual present the different element step by step and
one at a time, else the user easily gets confused.
From the easy to the hard.
Belonging to the model of presenting step by step is also the principal of beginning
with presenting the easy and then move on to the hard.
Consideration to the normal sequence of work.
A beginner manual should take in to consideration what is the normal sequence of
work for an less experienced user in the area.
Because it is a beginner that will read what is written shall as much as possible normal
language be used instead of a more technical language. To use special notations gives the
advantage that it is always exact but it can be confusing to the not so experienced user.
A good rule of thumb to not use too many technical notations is to always explain introduced words. If it later shows that in each and every sentence a technical word is explained the number should be cut down.
Reference manual
At the writing of a reference manual it is of course most important to be easy to find in
the document. It is also important to predict all headwords that a user may think of to get
all these in the subject index. Further it is important to think very carefully on which
headlines is being used so that these become significant and thereby helps the user to find
that he or she is looking for with help of the table of contents.
Pictures and figures
A picture or a figure can sometimes say more than a thousand words and they also
lightens up the text and gives a natural break.
The less experienced a user is all themore important it is with clear pictures. A beginner
has hard to remember all definitions and know what the program manufacturer means
with different expressions. A beginner may not know what the difference is between an
icon and a dialog pane. A simple picture explains this immediately. To think about is that
the pictures shall not dominate over the text but instead support it.
To document the graphical user interface in a good way is crucial for the manual to function in a good way. How this should be done is presented in [Rut 8.1].
It is also a good thing to use figures. Complex structures can be more easily explained
with a figure. Too detailed figures confuses more than they help. You should keep the figures as simple as possible.
Layout
A good layout of the document can make the manual easier to read. There are a few
things to think about:
*
8
Page size for printed manuals
A printed manual should be in a handy format like A5 or S5. My opinion is that A4and Letter formats is too big and cloumsy and they do not fit well in bookshelves,
Användarhandledningar Enblom [2004].
RUT - utvecklingshandbok 2.4 Writing of user manual v 8.0
Realization
*
Manuals in digital format
To make it easier for the user so he or she always knows where in the manual he or
she is, the digital format manual should include som structure that shows the manual
organization. One way to do this is to use a menu that shows the structure and shows
where in the structure the user is. Let the menu items be able to be expanded or
collapsed like a file tree. In that way the manual is easier to follow and it is easier to
jump to another section.
+1. introduction
+2. Installation
+3. Basic configuration
- 4. Firewall rules
+ 4.1 Rules
- 4.2 Networks
4.2 Networks
Here, you have different
computers and networks.
These names are used when
you set Rules. The rows are
sorted in alphabetic order.
+5. Administration
+Appendix A
+Appendix B
Figure 1 Example of using a menu.
*
*
*
*
*
With a clear structure that shows the manual organization and always shows where in
the manual the user are, thous it makes the user less confused and irritated.
Empty spaces
To keep the headlines short and often add pictures gives empty spaces on the page.
This breaks the page and makes it easier for the user to localise the information. It
can also be good to use a wide outer margin or a new line after each paragraph to
create a larger empty space.
Alignments
The text can be aligned left, right or have a straight right margin. It is however
unusual to write right aligned text, because it is hard to read. Whether a straight right
margin is to be used is a matter of taste. But to use a straight right margin makes the
document more easily read.
Central notions
If the text is aligned left with extra wide left margin can the notions that are central to
the system and explained in the text be listed in the left margin, preferably with an
other typeface. This would ease the learning and look up in the subject index on
these.
Lists
Do not put in serial instructions in the text but use lists instead. If the order is
important use a numbered list. Simple lists can also consist of points. Use points on
lists that are between three and seven steps long. For longer lists numbering of the list
should be used.
Headline levels
Strive to use different headline levels and preferably number them. To use headlines
eases for the reader to understand the point of the section.
RUT - utvecklingshandbok 2.4 Writing of user manual v 8.0
9
Realization
*
*
Typefaces
With todays modern word processing systems follows a multitude of different
typefaces. A word of warning should be raised for using more than a few different
typefaces, it can take the attention away from the subject.
It is important to choose a easily read typeface, for example Times or Palatino, in
running text. As in all running text shall always a typeface with serifs be chosen. In
headlines one can beneficially use typefaces without serifs i.e. Helvetica. It can also
be appropriate to choose a deviating typeface for showing examples directly from the
screen.
Example:
This is how text from the program looks.
Character design
In modern word processors it is also possible to vary the character design with italic
or bold style, underlining should though be avoided. This can be used for example to:
Present important ideas.
Emphasize central words.
When different character designs are used one should be utmost consistent with what
the different character designs means. Preferably you explain what they mean in the
beginning of the document in the section “Typographical Conventions”, that should
be placed before the first chapter.
Table of contents
In the table of contents the headline of each section is stated and the page it starts on.
The table of contents shall illustrate the organization of the manual. If a hierarchic
organization of the headlines is used it should be reflected in the table of contents.
Example:
3
3.1
3.2
3.3
Usage . . . . . . . . . . . . . . . . . . . . . . . . . . . . . . . . . . . . . . . . . . . . . . . . . . . . . . . 29
Choice of work area. . . . . . . . . . . . . . . . . . . . . . . . . . . . . . . . . . . . . . . . . 30
Choice of tools . . . . . . . . . . . . . . . . . . . . . . . . . . . . . . . . . . . . . . . . . . . . . 31
Change properties . . . . . . . . . . . . . . . . . . . . . . . . . . . . . . . . . . . . . . . . . . 32
3.3.1 Properties for tools . . . . . . . . . . . . . . . . . . . . . . . . . . . . . . . . . . . . 32
3.3.2 Properties for work area . . . . . . . . . . . . . . . . . . . . . . . . . . . . . . . . . . . 34
Subject index
Logical thinking is a prerequisite to be able to do a good subject index. The difficulty is
to come up with all the different ways a user can search for a subject and then add page
reference to each such word.
Only essential information should be indexed. Each occurrence of a word should not be
taken up, but only the times when important information concerning the notation is
present should be taken up and together with the current word.
Remember that most headlines contain words that must be in the subject index. Beginning lower-case letter should be used if the word is not spelled with upper-case letter of a
natural reason. The following points can be good to think about during the work with a
subject index:
10
RUT - utvecklingshandbok 2.4 Writing of user manual v 8.0
Realization
*
*
*
Main word
There is a multitude of ways to reference to a subject. As a main word the word that
the user probably will be using the most times is chosen.
The unity is of great importance in all indexes, but especially if it is done
electronically. It is not sure that the program is made so that it distinguishes between
different forms of the words. If for example the words “edit”, “editable”, “editing” or
“text editing” is chosen the program would do separate index entries for all four. In
general it is best to use only singular form of a substantive, if not the plural form is
the form that usually is used to refer to the subject. For verb the common case should
be used.
Subordinate word
Words who are used in many places in the document can be divided into subordinate
sections. If a subject occur more than three times subordinate words should be used.
Example:
frames
- add 32, 44, 188
- definition 29
- erase 35
- frame lines 63, 122
”See”
When the main words are added it is suitable to try and associate them with other
words who has similar meaning. Then do a cross-reference to these possibilities
through index entries as “See”.
Example:
picture panes,
see frames
It only takes a few moments to add extra cross-references at the same time it can save
hours for a frustrated reader. During the work with these cross-references the phrases
should be mirrored when it is necessary. If for example the main word is “Underlying
page”, a cross-reference should also exists for the reversed expression.
Example:
page, underlying
see underlying page
RUT - utvecklingshandbok 2.4 Writing of user manual v 8.0
11
Realization
*
”See also”
In the subject index there often exists many subjects who is closely related. If the
reader would be helped by reading about the other subject should a “See also”
reference be added.
Example:
frames
- add 32, 44, 188
- definition 29
- erase 35
- frame lines 63, 122
- see also underlying page
Trouble-shooting
When a user comes to a unexpected situation he or she wants to know what happend
and how to handle the situation. A big help is a trouble-shooting chapter or appendix.
A good trouble-shooting chapter helps the user to come to a known state. There are
several different ways to do this in the manual. Independent of which method is
chosen it is important to structure the trouble-shooting so it is easy for the reader to
find an error description and settle on a correct diagnosis.
*
Trouble-shooting table
A table is one way to do it. It is relative easy to create a trouble-shooting table. Table
form can be structured in categories with one or more tables per category.
Example:
Error description
What the error is
Actions to take
I can not start the program.
Program not installed.
Install program.
I can not install the program.
You do not have the right
permissions.
Login as super user and
then install the program.
I can
not install the program.
The hard drive is full.
Make space or install a
new disk.
Figure 2 Trouble-shooting table
*
Trouble-shooting list
A bullet list or numbered list is similar to a table but have a different layout. Lists can
be structured in similary way as tables with one or more lists per category.
Example:
Error description
What the error is
Actions to take
Figure 3 Trouble-shooting list
12
RUT - utvecklingshandbok 2.4 Writing of user manual v 8.0
Realization
*
Trouble-shooting tree
Trouble-shooting can be organized as trees. A good way to structure the trouble
shooting is to have one tree per category. Trouble-shooting trees have the
disadvantage that they can grow very fast and can become large and wide, therefore
become cumbersome and hard to read and use.
Example:
Wide error description
A more
detailed
error
description
A more
detailed
error
description
Description of
what the error is
and what actions
to take.
A more
detailed
error
description
A more
detailed
error
description
Description of
what the error is
and what actions
to take.
Description of
what the error is
and what actions
to take.
A more
detailed
error
description
A more
detailed
error
description
Description of
what the error is
and what actions
to take.
Description of
what the error is
and what actions
to take.
Figure 4 Trouble-shooting tree
RUT - utvecklingshandbok 2.4 Writing of user manual v 8.0
13
Results
*
Trouble-shooting diagnosis
A trouble-shooting diagnosis is like a medical diagnosis scheme. A diagnose is built
up with questions that can be answered with yes and no. A good way to structure the
trouble shooting is to have one diagnosis scheme per category. Diagnosis scheme has
the same disadvantage as trees in that they can become large and cumbersome.
Example:
Wide error
description
Question
Yes
Question
No
Yes
No
No
Question
Question
Question
No
Yes
No
Yes
Description of
what the error is
and what actions
to take.
Yes
Description of
what the error is
and what actions
to take.
Description of
what the error is
and what actions
to take.
Description of
what the error is
and what actions
to take.
Question
No
Description of
what the error is
and what actions
to take.
Yes
Description of
what the error is
and what actions
to take.
Description of
what the error is
and what actions
to take.
Figure 5 Trouble-shooting diagnose
Name and version
Remember to add software name and version on the manual front page. If the user
has more than one version of the software he or she wants to know what software and
software version the manual belongs to. If it is a printed manual the name and version
should be printed on the spine of the book so it easily can be found in a bookshelve.
4 Results
The result of writing a manual is a informative and well arranged document which is
adapted to the target group.
4.1 Products
The product when writing a manual is of course a manual of some kind. If the advises in
this document is followed the result will probably be a well-written manual.
14
RUT - utvecklingshandbok 2.4 Writing of user manual v 8.0
Templates and forms
4.2 Product templates
The FrameMaker template that this document is written in could with a few
modifications also fit as a template for a manual.
The changes who needs to be done is for example that headline level three should be
numbered and that references must be changed. This should make it clearer and ease
considerably for the user to navigate in the text. The text should also be written with a
straight right margin. The page size should be changed to something smaller like A5-format.
Studies of manual’s arrangement which is in the market could be instructive. A manual
need not be good just because it have been published. Therefore be deterred from that
which is less good and take learning from that which is good.
5 Templates and forms
A template for a user manual is described in section 4.2, Product templates.
Some forms, which can be used for verification of the result, are among others the checklists who is in Appendix 1 and Appendix 2. For evaluation the form in Appendix 3 can be
used.
6 Verification of result
It is extra important to verify the result when a manual is written, because all existing
errors can complicate the work for the user. Therefore the manual has to be checked on a
number of levels. On the lowest level proofreading is performed. In higher levels
language check and verification of outline is made.
For a true feedback the real readers must be contacted. A common way is that a
evaluation is sent out together with the manual to a number of readers.
6.1 Proofreading
At the proofreading small things shall be looked for as typing-errors or forgotten
character etc. Do not mix proofreading with language check. At the language check the
focus shall be on larger issues.
It is not appropriate that the writer do the proofreading of the document because he
knows what it should be and reads this instead of the errors. The document should be
read by a independent person. Thus always hand over the document, the proof, for proofreading before it goes to check and inspection. A good idea for the writer could yet be to
first check the document oneself with the help of the checklist in Appendix 1.
It is a very good help to use a standard för proofreading marks like the Swedish standard
SIS 03 62 01 or the British standard BS 5261. Using standards makes it more easy to be
clear and concise to what should be changed. As a writer it is easier to understand what
the proofreader means.
RUT - utvecklingshandbok 2.4 Writing of user manual v 8.0
15
Examples with explanations
6.2 Feedback from users
Apart from doing an evaluation of the finished user manual it is also a good idea too do
evaluations with people from the target group during the development of the document. It
is very good to get a check of that one writes at a good level during the development and
not get to know afterwards that the user feels that the text is to hard or to easy. The
evaluation form in Appendix 3 can with benefit be used for such an evaluation.
6.3 Language check
The language check is also difficult to be performed by the writer himself. It is also hard
to see the errors made because the writer often knows the text inside out when it is time
to be checked. As with proofreading it is important to hand it over for commenting. A
checklist for language check is in Appendix 2.
6.4 Check of facts
It is naturally very important that what is written about the program also corresponds
with how the program looks and how it functions in reality. This has to be checked very
carefully because it can be very confusing for the reader.
It is good to let someone else do this check. The risk of missing an factual error is greater
because it is often both correctly spelled and linguistically correct.
It is often good to let some of the developers check the facts. They can often easily find
factual errors.
7 Examples with explanations
Se example in section 3, Realization.
8 Solutions to common problems
Below a number of common problems that exist at the writing of a manual are presented
and what the writer can do about them.
8.1 Errors in the program
A commonly existing problem at the writing of a manual is what should be done about
typing-errors and other sort of errors in the program. If the program constructor have
misspelt for example in a menu should also the writer do this if it Is not very obviously
wrong. The meaning of making errors in the manual is to be consistent. However it can
be appropriate to do a bug report to those who have made the program.
8.2 Overrate the reader
It is also easy to overrate the user. Because the writer of the user manual often know the
system well it is easy to believe that the user knows more than he or she actually knows.
Consider that the technical jargon that exists is not general language use. Therefore
16
RUT - utvecklingshandbok 2.4 Writing of user manual v 8.0
Adjustment to the PUM-course
explain notions and remember to not leave out facts and information that may seem
obvious (see section 2.1 and 2.2).
A good way of solving this problem is to ask the users what is a reasonable level of explanations.
8.3 Underrate the reader
It is on the other hand important not to underrate the reader. This takes the expression
that different element is explained lengthy even so the simplest things. The best way to
solve this is to ask the user what is a reasonable level of explanations, see section 2.1 and
2.2.
8.4 Keep the back free
Another common problem that a technical informant can get in to is to want to “keep the
back free”, i.e. write every thing about the subject so that no one can say that information
have been withheld. The text then becomes long and hard to get trough.
Therefore consider that everything can not be described and still have a simple and easily
read document. Remove the less important parts.
8.5 Linguistic problems
Particularly at the writing of manuals for computer systems many technical notions and
notions are used. For persons, read the writer, who are knowledgable in the business it
often feels natural to use the notions and notations that are normally used. This should be
avoided.
The solution to this problem is to write explanations in parenthesises or attach a glossary
as appendix to the manual.
9 Adjustment to the PUM-course
These days no user manuals are written during the PUM-courses, so this is not applicable
to the PUM-course no longer.
10 Measurement of the process
To be able to estimate the time consumption in the beginning of the project and evaluate
the result in the after study presents here some ideas on different measurements.
10.1 Resource measurement
As earlier mentioned is it good if the writer gets in the project already during the design
phase. There is many different ways to let the writer be involved in the design work.
If an external person is called into the project, therefore this person needs to attend the
meetings to get a feel for the program.
RUT - utvecklingshandbok 2.4 Writing of user manual v 8.0
17
Measurement of the process
If the writer is recruited from the own ranks it can be good to let him or her take an active
part in the design. Then the writer can when the design is ready move on full time with
the writing while the rest of the design group can move on to the implementation. In that
way the documents can be almost ready and can be tested in the system test phase. In
time counted this will mean that at least one person is occupied during most part of the
project with the user manual and during part of the time in the design.
The writer can benefit from documents produced earlier in the project. In the requirements specification there is for example often information about the knowledge level and
work method of those who will read the document. Also different use cases from the test
documentation can be interesting to take part of. Reuse is important and is hereby encouraged.
10.2 Product measurement
Before the document is delivered should section 6, Verification of result be followed. If a
preliminary version is available at the system test phase can it be tested so that it
corresponds with the system and it can be used for customer training. Then the feedback
can be used to improve the final version. For evaluation the form from section 10.3 can
be used. If there is no customer training one can try to hand out the manual to a target
group similar to the real one, so that they can come with critique.
At the delivery a form, see section 10.3 below, can follow to the users where they are encouraged to fill in what they think about the manual. The feedback from this has one
clear disadvantage. It comes so late that it is hard to do rewriting and print a new edition.
The feed back information can instead be used in version 2 of the project. Another form
of feedback, at least in larger projects, can come from the “helpdesk” i.e. telephone support for the user.
With the help of the three different sections in section 6 one can do an assessment of the
quality of the document.
Usable measurements could be:
*
*
*
The number of proof errors, see 6.1.
The number of language errors, see 6.3.
The number of factual errors, see 6.4.
One example of a goal could be: At most one proof error per five pages, at most one language error per 20 pages and no factual errors.
Another method for measurement of how good a manual is to let test persons test run the
system both with and without manual. Afterwards one can get a measurement on how
much the usability increases, or in worst case, decreases, with the help of the manual. For
evaluation of the test refers to [Löwgren, 1993].
18
RUT - utvecklingshandbok 2.4 Writing of user manual v 8.0
Measurement of the process
10.3 Forms for collection of data
Then it is the user who is best suited for determine if a manual is good or bad it can be
suitable to let this answer a few questions about the manual. A questionnaire that could
be used for the evaluation can look something like the form in Appendix 3.
It is important to think about when a questionnaire is sent out with the final product is
that there is resources to compile and evaluate the result.
RUT - utvecklingshandbok 2.4 Writing of user manual v 8.0
19
History of the process
11 History of the process
Table 1: History of the process
Version
20
Datum
Kommentar
Redaktör
1.0
940218
This version is examined.
Henrik Sörnäs
1.1
940520
Addition to 2, 3.1 and 3.2.
Paul Annala
2.0
960215
Restructuring of and addition to 2
and 3, addition to 8 and addition of
5 and 9.
Kajsa Åhlin
2.1
960611
Addition of two checklists and
restructuring
Kajsa Åhlin
3.0
970214
Addition of section 10 and appendix 3, restructurings.
Jonas Boegård
3.1
970607
Complementing and smaller
restructuring.
Jonas Boegård
4.0
980613
Complementing in section 3 and 12
and corrections av smaller errors.
Eric Linde
4.1
990609
Linguistic adjustments, correction
of misspellings and changes in section 3.2, 4.2 and 8.1.
Tobias Lagergren
5.0
000608
Correction of misspellings and language. Layout changes. Smaller
changes in section 4. Added section
6.2.
Janne Kalian
6.0
000530
Changes in foremost section 1 and
3.1. Added a new reference.
Patrik Thalin
6.1
020528
Correction of misspellings and
grammatical errors and layout
changes.
Per Connman
7.0
030430
Translation from swedish into english.
Johannes Holmberg
7.1
030806
Correction of misspellings.
Johannes Holmberg
7.2
030816
Correction of misspellings and
grammatical errors.
Johanes Holmberg
7.3
030909
Correction of grammatical errors
and some misspellings.
Johannes Holmberg
7.4
051229
Small updates to 2.3, 3.2, 6.1, 6.4
and 9.
Kjell Enblom
RUT - utvecklingshandbok 2.4 Writing of user manual v 8.0
History of the process
Table 1: History of the process
Version
Datum
Kommentar
Redaktör
7.5
051230
Added page size for printed manuals and manuals in digital formats
in chapter 3.2.
Kjell Enblom
7.6
060110
Added Trouble-shooting table, list,
tree and diagnosis scheme.
Added name and version in chapter
3.
Kjell Enblom
8.0
060117
Correction of grammatical errors
and some misspellings.
Kjell Enblom
RUT - utvecklingshandbok 2.4 Writing of user manual v 8.0
21
Changes not yet attended to
12 Changes not yet attended to
A checklist for check of that the program corresponds with the manual could be added
and more information about how this is done best.
13 References
Macro, Allen och Buxton, John (1987), ”The craft of software engineering”, 262-264.
Lindberg, Ann-Sofi (1996), ”Problemlösning, operatörens vardag”, Högskolan i Skövde.
SIS 03 62 01 http://www.sis.se/
BS 5261 http://www.publishers.org.uk/paweb/paweb.nsf/0/
DDC138D779D6EFF780256D6D003EF638?opendocument
Enblom, Kjell (2004), användarhandledningar http://www.lysator.liu.se/~kjell-e/tekla/linux/dokument.html .
13.1 Method description
Berst, Jesse (1990), ”Desktop publishing handboken”.
Mynatt, Barbee Teasley (1990), ”Software engineering with student project guidance”.
Microsoft Lingua, from the course compendium ”Pumproj” 1996, Linköpings Tekniska
Högskola.
Mårdsjö, Karin (1992), ”Människa, text, teknik - tekniska handböcker som kommunikationsmedel”, TEMA Universitetet i Linköping
Mårdsjö, Karin (1990), ”Utformning av datorhandböcker”, TEMA Universitetet i
Linköping
Rut 8.1 (2003), ”Documentation of user interface”
13.2 Method evaluation
Mynatt, Barbee Teasley (1990), ”Software engineering with student project guidance”.
Fenton, Norman E. Pfleeger, Shari Lawrance (1996), Software Metrics: A Rigorous and
Practical Approach, Second Edition, International Thomson Computer Press.
Löwgren, Jonas (1993), ”Human-computer interaction, what every system developer
should know”. Studentlitteratur.
13.3 Internal comments
Good luck with the writing!
22
RUT - utvecklingshandbok 2.4 Writing of user manual v 8.0
Appendix 1
14 Appendix 1
Table 2: Checklist for proofreading of manual
Area
General design
Content of inspection
Comments
Is the margins correct?
Are there any lonely rows at the top of a page?
Is there any lonely rows at the bottom of a
page?
Is the distance between the paragraphs correct?
Is it the right typeface?
Page header and footer
Is the page numbering correct?
Is the design good?
Is the spelling correct?
Are the contents correct?
Titles and headlines
Are they correctly spelled?
Are there capital letters where there should be?
Is the design correct?
Is it good built up?
Words
Is the word correctly hyphenated?
Is the words correctly spelled?
Is upper case letters correctly used?
Is only allowed abbreviations used?
Does the abbreviations follow the decided
standards?
Is the decided standard for bold and italic style
followed?
Sentences
Is all sentences ended with correct punctuation?
Is every sentence started with upper case letter?
Are there unnecessary long sentences?
Tables
Does all tables have the same format and consistent numbering?
Is there headlines and explaining text to every
table?
Are there any references to the table in the text?
RUT - utvecklingshandbok 2.4 Writing of user manual v 8.0
23
Appendix 1
Table 2: Checklist for proofreading of manual
Area
Numbers
Content of inspection
Does dates follow the decided standard?
Is the numerals used correctly?
Are figures correctly numbered?
Is tables correctly numbered?
Is chapters and subchapters correctly numbered?
Figures
Is the pictures correctly placed?
Are there any references in the text to all the
pictures?
Is there any explaining captions to all the pictures?
Remaining
Is the table of contents correct?
Is the subject index correct?
24
RUT - utvecklingshandbok 2.4 Writing of user manual v 8.0
Comments
Appendix 2
15 Appendix 2
Table 3: Checklist for language check of user manual
Area
Contents
Content of inspection
Comments
Is the material logically arranged?
Is the material in the right sequence?
Are important areas missing?
Are there areas that should be deleted?
Does the document contain all parts?
Is the abstract good?
Are there fact errors?
Is the document directed to the target right
group?
Are the use cases easy to understand?
Are there enough examples?
Is the document easily navigated?
Does it correspond with the program?
Unity
Does the document follow the document template?
Is the document uniformly built up?
Is the spelling uniform and correct?
Grammar
Is the grammar in the document correct?
Language style
Is the material as concise as possible?
Is the level of the language correct?
Has the material the correct tone of address?
Is the shade of the language the same in the
whole document?
Is the instructions and explanations complete?
Does the transitions give fluidity through the
whole document?
Is all references checked?
RUT - utvecklingshandbok 2.4 Writing of user manual v 8.0
25
Appendix 3
16 Appendix 3
Table 4: Questionnaire for users.
Area
General
Question
Agree
Have you used the manual?
Have you used the manual as a reference?
Do you miss any section?
In that case which?
Do you think that any section is unnecessary?
Which?
Language
Was the language at the right level?
Were there words that you missed in the glossary?
Which?
Index/outline
Is the index complete?
If not, what was missing?
Was it easy to navigate in the manual?
Was the layout/outline good?
Example
Are the use cases easy to understand?
Are there enough examples?
Figures
Are there enough figures?
Are the figures understandable?
26
RUT - utvecklingshandbok 2.4 Writing of user manual v 8.0
Do not
agree
Do not
know