1
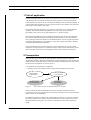
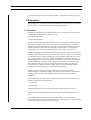
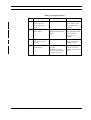
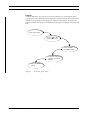
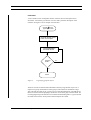
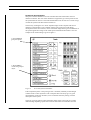
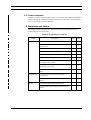
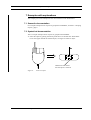
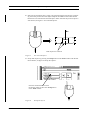
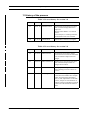
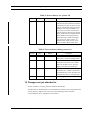
LiTH
2006-01-17
RUT - Development handbook
8.1 Documentation of user
interface v3.1
Eduardo Llanos
ABSTRACT
It is important to document the user interface to explain how a system works. The
user is seldom interested in how the system is constructed but more how it looks
and if it fulfils the stated requirements.
The process of documenting the user interface is a hard task. Several questions
have to be answered before the work can begin. The answers of these questions are
often quite decisive for the outcome of the documentation. Some of the most
important questions are presented below.
• How much knowledge does the user have?
• How large and complex is the system?
• Is the system supposed to be general and re-usable?
The documentation is done in two steps presented below.
• semantic documentation
• syntactical documentation.
This document gives directions on how an interface can be documented and does
not provide a general method.
RUT - Development handbook 8.1 Documentation of user interface v3.1
1
Field of application
1 Field of application
The documentation of the user interface is an important part of product development. A
user manual must both explain the functions of the program as well as document the
system interface in order for the user to take full advantage of the system functionality. It
is the interface that decides how easy the program will be to use and how the connection
between the system and the user works.
The problem when documenting a user interface is that there are no general methods
available. The documentation is dependent on the size of the system, the user’s
knowledge or the system´s level of development (i.e. a general system).
The language and different types of graphical elements such as pictures and diagrams
have to be considered with special care during the documentation. It is often useful to
have a prototype of the user interface in the documentation. It is also of great importance
to make the documentation of an interface in a way that compels the reader to actually
read and understand the documentation.
The documentation will be useful if the user is unaccustomed to the system or lacks
experience of computer usage. A textual description of the system’s functionality can be
hard to interpret especially if no thorough description of the system has been given.
2 Prerequisites
There are three types of interfaces, menu interface, command interface and direct
manipulation interface. How the documentation is designed depends on the construction
of the interface. The documentation of the user interface can begin after the steps shown
below have been completed, as seen in Figure 1.
• the requirement specification is completed.
• a prototype of the user interface has been tested and accepted by the customer.
Requirementspecification
Documentation
of user interface
Figure 1.
Acceptance of
user interface
Creation of
user manual
Description of when the documentation can be done.
The user manual and the documentation of the user interface should be produced
concurrently. In this way a direct connection between the functions of the system and the
usage of these can be established.
It should be noted that a change in the requirement specification or in the user interface
has a direct impact on the creation of the documentation. It is also important to review
the documentation with great care so that no inconsistencies exists that confuses the
reader.
2
RUT - Development handbook 8.1 Documentation of user interface v3.1
Realization
A suitable check list for review is found in chapter 5, "Templates and forms", page 11.
3 Realization
This chapter gives a presentation of how documentation of a user interface can be done.
A brief overview is given followed by a more detailed description.
3.1 Overview
During the planning stage of the documentation of a user interface, two models can be
chosen and are presented below. [Mordsjö, 1992]
• Specific documentation.
• General documentation.
Specific documentation means that specific functions of the system are documented in
detail. The description of how a file is saved or how a graphical object is rescaled are
examples of specific documentation, see Figure 2. Specific documentation is foremost
directed towards users that have little experience with computers. It is also used in
systems where it is of utter importance that functions are done in a correct way.
General documentation is directed towards the general design of the system. Instead of
describing specific functions, more general functions as menus, windows and input fields
are described. It can be a time consuming process to describe all functions in a specific
way in a large system. In this case a general documentation could be an advantage. A
good example that is well suited for general documentation is a window system. These
systems usually have a standard for how different components behave. By describing
these components the user receives enough knowledge to be able to use almost all
programs that runs under this window system. Some computer knowledge might be
required to be able to fully take use of a general documentation.
Whatever model is chosen it is of great importance to remember that unread
documentation gives absolutely nothing. This fact forces the maker of a documentation
of a user interface to make a documentation that seduces the reader to read and
understand.
The documentation of the user interface should be divided into two parts according to
[Mynatt, 1990] and are presented below.
• semantic part.
• syntactical part.
The semantic part describes how commands and command sequences are given.
The syntactical part describes how the screen looks like when different functions are
used.
It is preferable that the semantic part of the documentation is written before the
syntactical, because it is easier to decide which screens descriptions are needed when the
access of the systems functions has been described.
RUT - Development handbook 8.1 Documentation of user interface v3.1
3
Realization
3.2 Detailed description
The two parts that should be included in the documentation of the user interface are
described in this chapter. The description is not supposed to be a template but rather a
source for ideas to continue working with.
Semantic documentation
When describing how commands are executed and/or in which sequence they are
executed, a thorough analysis of the system´s specification documents must be done. The
documents must be consistent as to that all the functions described in the documents
must be executable, exist in all relevant documents and execute in a way described in all
relevant documents. Therefore the writing of the user manual gives a review of the
quality of these documents.
Three variants of semantic documentation are presented in this section: tables, diagrams
and flowcharts. As illustration examples we are going to use different graphical
operations from FrameMaker’s tool palette.
Please note that these descriptions are well suited for menu interfaces and direct
manipulation interfaces, but less suited for command interfaces. Command interfaces
have a characteristic of a more parametric nature which makes parametric documentation
more suitable. This applies especially if the user is well accustomed to this type of
interface.
Tables
Tables can on a systematical way be used to present different aspects of every step in an
operation. The most important parts are what the user is expected to do and how the
program responds to the given data. Table 1 presents an example.
Table 1: Grouping objects
4
Step
Do
1
Press the triangle i.e.
the Tools icon found in
the right upper corner
of the FrameMaker
window.
2
Place the mouse
pointer above the
object.
3
Click with the left
mouse button.
What happens?
A window, Tools,
appears on the work
area.
Comments
This window is used to
work with objects.
The mouse is placed
over one of the objects
that will be grouped.
The object gets surrounded with small black
boxes.
The object is now
marked and executed
commands affects this
object.
RUT - Development handbook 8.1 Documentation of user interface v3.1
Realization
Table 1: Grouping objects
Step
Do
4
Place the mouse
pointer above the
object you want to
group.
5
Click with the middle
mouse button.
6
If you want to group
more objects, go to
step 4.
7
Choose Group in the
Tools window.
What happens?
Comments
The mouse is placed
above another of the
objects that will be
grouped.
The object gets surrounded with small black
boxes.
More objects have
now surrounding black
boxes. All these
objects are now
marked.
It is possible to repeat
step 4-5 an arbitrary
number of times.
The objects are now
grouped.
The group of obejcts
have now a sourronding
of small black boxes.
The whole group
becomes one object
and can now be moved
as one.
RUT - Development handbook 8.1 Documentation of user interface v3.1
5
Realization
Diagram
A simpler and easier way to get an overview of a function is to use a diagram where
every step is a node containing a simple description of what should be done. This method
lacks however information of the program’s response. This method is best suited for
simpler interfaces that are easy to understand. Figure 2 gives an example of how this can
look.
Click on the object
in the
Choose
upper right corner
Choose Scale... in
the Tools window
Enter the scalingfactor in percent at
Factor.
Press the Scalebutton
Figure 2.
6
Re-scaling of an object.
RUT - Development handbook 8.1 Documentation of user interface v3.1
Realization
Flowcharts
A more formal version of diagrams that also contains choices and repetitions are
flowcharts. A flowchart gives both an overview and a powerful description of the
interface. See figure 3 for an example of a flowchart
Choose
in the
upper right corner
Click with the left mouse
button on the object
Choose Ungroup in
the Tools window
Ungroup
more?
Yes
No
Done!
Figure 3.
Ungrouping grouped objects.
The three variants of documentation demand a relatively large amount of space. It is
important to group commands into small groups if the number of commands is large.
This will help the reader to get a good overview of the documentation. It should also be
taken into account that the groupings should exist on the same page in the document. If a
lot of flipping through the document is needed for understanding there is a great risk that
the reader will loose the whole picture and misinterpret the content
RUT - Development handbook 8.1 Documentation of user interface v3.1
7
Realization
Syntactical documentation
This part of the documentation of a user interface describes in detail how the user
interface looks like. The user of the document is supposed to get a clear picture of how
the system behaves when it is used. This documentation can be seen as a real-time image
of what the system looks like and how it behaves.
The best way of doing this is to insert snapshot images of the complete and current
interface. If the interface is not available, images from a prototype, used during
development of the user interface, can be used. Such images have a great resemblance of
the system appearance and gives the reader quick information about what is said. An
example of an inserted image is given in figure 4.
1. Press Group to
group the objects
2. Press Scale to
rescale the grouped
object.
Figure 4.
Screenshot from FrameMaker.
If the completed system or the prototypes aren´t available, manually created images
could be used. To draw by hand or with a computer does not always give as good
documentation of the user interface, but it is still better than only having a textual
description of the system.
There are occasions when a simple schematic image of the system can give a better
understanding depending of parts that can divert the readers concentration from the
8
RUT - Development handbook 8.1 Documentation of user interface v3.1
Realization
important parts and can be left out. Another way of explaining important parts is to draw
arrows, circles or in some other way highlighting the important parts of the picture.
All commands and sequences of commands that are described in the semantic
documentation should also be brought up in the syntactical documentation. To save some
space everything does not have to be very detailed if the system is very large.
Command driven interfaces
There are several ways of documenting a command driven user interface. The type of
command driven interface gives a rough selection of the possibilities regarding the
documentation. A command driven program with a graphical user interface, such as
AutoCAD needs to be documented and indexed with respect to both the types of
commands and to the individually executable commands.
A program that is started from a shell, performs a task and then terminates can be
documented according to the possible parameters that can be given to the program. Such
a program can be documented in two separate planes described below.
• by having the program write information when it is started without any parameters a
• by providing a help-file to the program “man” in UNIX environments.
3.3 Writing seductive documentation
Writing documentation that people actually uses is not the most trivial thing to do. A
common mistake is to think that technical documentation must be boring and gray. Sadly
enough too many technical documents are both boring and gray, but it does not have to
be that way! This chapter will give some hints in how to make documentation seductive
for a reader.
Cover
Readers do actually judge the book after its cover. So a good idea is to put a little time
reflecting over which message the cover shouts out. Use pictures as they easily can
attract attention.
Layout
Invite to browsing by making the layout of the documentation light. This can be done by
including pictures, dividing text mass and having plenty of white space.
textetxtetxtetxtetctxtte
textetxtetxtetxtetctxtte
textetxtetxtetxtetctxtte
textetxtetxtetxtetctxtte
textetxtetxtetxtetctxtte
textetxtetxtetxtetctxtte
textetxtetxtetxtetctxtte
textetxtetxtetxtetctxtte
textetxtetxtetxtetctxtte
textetxtetxtetxtetctxtte
textetxtetxtetxtetctxtte
textetxtetxtetxtetctxtte
Figure 5.
Heading
textetxtetxtet
textetxtetxtet
textetxtetxtet
textetxtetxtet
Heading
textetxtetxtetxtetctxtte
textetxtetxtetxtetctxtte
textetxtetxtetxtetctxtte
textetxtetxtetxtetctxtte
textetxtetxtetxtetctxtte
Example of good and bad layout.
RUT - Development handbook 8.1 Documentation of user interface v3.1
9
Results
An example of how good and bad layout is presented in Figure 5. The layout must allow
fast scanning as the reader of this type of documentation often skims, skips and scans.
This can for example be done by making the headings stand out of the ordinary text,
distinguishing different levels of headings or by separating the labels from the text.
Graphics
Use graphics to provide the reader with overviews of procedures, functions or
components. This gives the reader a clearer picture of the product and makes
understanding easier.
Structure and cull
Many tecnical documentations have too much information and have a poor structure
forcing the reader to look after a needle in a haystack. This results in many cases in a user
giving up. Therefore it is important to have good structure with a good table of content,
relevant and proper headings and minimal of unnessesary information.
3.4 General advice
• Do not use any difficult technical words without explaining them. Include a glossary in
any larger document.
• Use coherent standard in the document, [Krysander, 1994].
• Write, or generate automatically, a good table of content in the begining and an index
at the end of the document to ease the search for interesting parts of the document.
• Make sure that all text that appears on screen, for example in buttons and menus etc.,
are in the index.
• Make sure that all images have a good quality as images with low quality can worsen
the impression of the system and complicate the understanding of it.
• Use graphics to make understanding easier.
• Make sure that the images that are inserted into the document are adapted for the
designated media. An image with very high resolution will work fine printed, but not
necessarily optimal when the document is read in electronic form.
• Make sure the structure and the layout of the document enables fast scanning.
• Make sure to define the target group early in order to adapt the level of the language.
4 Results
This chapter gives a presentation of the product the process description results in. It also
discusses the use of templates in the process.
4.1 Products
This document gives directions to create documentations of user interfaces. This
documentation should be a part of the delivery to the customer, either as a part of the user
manual or, for large user interfaces, as a supplement to it.
10
RUT - Development handbook 8.1 Documentation of user interface v3.1
Templates and forms
4.2 Product templates
It is hard to construct general templates since user interfaces looks different for different
systems. The figures and tables presented in this document should be seen as guidelines
of how a user interface could be described.
5 Templates and forms
This chapter presents a proposal of a check list that can be used during review of a
documentation of an user interface.
Table 2: Proposal of a check list
Field
Content
Test point
Yes
Now
Does the document fulfil its purpose?
Does the document describe the interface in a
correct way?
Is the content complete?
Does the document have a logical structure?
Does it contain sufficient information?
Does it contain necessary information?
Is the document usable even with incomplete
knowledge of the system?
Does the document contain navigational hints
(groupings, overviews)?
Is the content suited for the target group’s knowledge?
Compatibility
Is the document coherent with the operator’s
expectations?
Is the document coherent with the operator’s
goals?
Layout
Does the document follow the template?
Is the resolution of the images suited for the document?
RUT - Development handbook 8.1 Documentation of user interface v3.1
11
Verification of results
Table 2: Proposal of a check list
Field
Language
Test point
Yes
Now
Are unknown words and definitions explained?
Does the document include a glossary?
Are the given instructions in the document unambiguous?
Are the terms used in the document coherent?
Is the language correct (shape, spelling)?
Is the language on a correct level?
6 Verification of results
This chapter describes how the documentation of the user interface can be verified before
delivery.
6.1 Performance of the verification
The documentation can be verified against the system specification and the requirement
specification. An important verification is that the documentation of the user interface is
tested at the same time as the system is tested. The user might need more or less
explanations.
6.2 Forms to be used
When reviewing, several check lists and/or rapports focusing on different aspects are
needed. Errors are inserted into the rapport with references and notes about follow-ups
according to the routines of the project. One example of a check list for documentation of
user interfaces is given in chapter 5 "Templates and forms", page 11.
12
RUT - Development handbook 8.1 Documentation of user interface v3.1
Examples with explanations
7 Examples with explanations
This chapter gives some examples of how user interfaces can be documented.
7.1 Semantic documentation
For a simple example of how objects are grouped in FrameMaker, see table 1 "Grouping
objects", page 4.
7.2 Syntactical documentation
This is a simple example of how objects are grouped in FrameMaker.
1. Select the object by placing the mouse pointer above it and left click. Small black
boxes will appear around the selected object, see Figure 6. Select an object.
No
Done!
Black boxes that shows
that the object is selected.
Figure 6.
Select an object.
RUT - Development handbook 8.1 Documentation of user interface v3.1
13
Examples with explanations
2. Select the second object that is going to be grouped with the first object by position-
ing the mouse pointer above the object and press the middle mouse button. Small
black boxes will surround the selected object. Please note that the previous object is
still selected, see figure 7 "Two selected objects".
.
No
Done!
Both objects are selected
Figure 7.
Two selected objects
3. Group both objects by pressing the Group button in the Tools window with the left
mouse button, see figure 8 "Group the objects".
Press the left mouse button when
the mouse pointer is above the Group button
in the Tools window.
Figure 8.
14
Group the objects
RUT - Development handbook 8.1 Documentation of user interface v3.1
Examples with explanations
4. Both objects are now selected as one, see figure 9 "Grouped object".
No
Done!
Both the objects are now
selected as one.
Figure 9.
Grouped object
RUT - Development handbook 8.1 Documentation of user interface v3.1
15
Solutions to common problems
8 Solutions to common problems
To be able to write the document on the right level the steps presented below are
recommended.
• Carefully investigate who the intended reader of the document is.
• Verify that all specifications are implemented in the system and that they are
documented.
• Let a representative for the systems target group, who is not involved in the project,
read the document and simultaneously do a test run of the system.
9 Adjustments to the SEP course
This chapter presents some tips that can be applied in the Software Engineering Project
course.
9.1 Point in time for production
The production of the user interface documentation can be started during the design
phase. The person responsible to document the interface can start the work as soon as the
interface had been decided. The user manual and the documentation of the user interface
can be merged into one document since most of the systems in the course are relatively
small. The combined user manual can be of high quality if the work is started early. It is
important to keep the manual updated so it is consistent with the requirements and the
design.
9.2 Screenshots
Make sure to get good screenshots to the documentation. A good tool which is available
on IDA is XV. XV is started by the command “xv &” in a terminal. Another tool
available in the backdrop menu in OpenWindows at IDA is “Kamera”. In Microsoft
Windows the “Print Screen” button can be used to copy screenshot to the clipboard.
It can be a problem to import images into FrameMaker. Try not to rescale the images
since this will drastically reduce the quality of the image. Instead try to change the
resolution when the import is done, this will probably give a much better result.
9.3 Target group
Find out what the target group of the document is. Things in the document that are
obvious to the reader can many times create annoyance and result in a bad impression.
Write the document so that it is on a suitable level.
16
RUT - Development handbook 8.1 Documentation of user interface v3.1
Measurement of the process
10 Measurement of the process
This chapter describes different measurements that can be used to evaluate how well a
process works.
10.1 Resource measurement
A resource measurement describes how much resources have been spent during the
production of the product. Only few types of resources exist since the product of the
process is a document. The persons that have done the user interface, together with the
persons writing the user manual should do the documentation of the user interface. This
will prevent usage of extra personnel.
The process naturally takes quite some time and this is the largest resource usage. The
process also uses personnel that could work on other parts of the project. To have time to
test the documentation some test personnel and test subjects are required. This is also a
use of resources.
10.2 Product measurement
The most important measurement of the product is how well it fulfils its purpose, i.e.
how well it explains how the user interface works. It is difficult to say how “good” the
documentation of a user interface fulfils its goal.
A method is to test the systems usability with and without the documentation. By
comparing the results from the tests an understanding of how well the documentation
fulfils its purpose is given. In other words, how much the usability is increased with a
description of the user interface available. How to test usability is described in [Löwgren,
1993].
10.3 Forms for collection of data
Since there are several different methods to collect data regarding usability it is hard to
give any general templates for collection of data for measurement.
RUT - Development handbook 8.1 Documentation of user interface v3.1
17
History of the process
11 History of the process
Table 3: Process history for version 3.0
Version
Date
Editor
Comments
3.1
06-01-12
Eduardo Llanos
Grammatical and spelling error have
been corrected. Images have been
improved.
Text has been added in 3.4 General
advice.
A new chapter, 3.3 Writing seductive
documentation has been included.
3.0
03-12-24
Niklas Barsk
Translated the document to english.
Table 4: Process history for version 2.0
18
Version
Date
Editor
Comments
2.4
01-06-06
Markus Storm
Grammatical and content related
errors have been corrected. Some additions of material. Improvement of
images.
2.3
00-06-06
Marcus Petersson
Spelling errors and wrong facts have
been corrected. Improvement of
images has been done.
2.2
98-06-15
Stefan Wallström
Some proposed changes have been
done. Spelling errors have been corrected.
2.1
97-06-07
Peter Elgåker
Some results that appeared during the
course have been added. For example
under “Syntactical documentation,
part 3.2 and “Adjustments to the SEP
course”, chapter 9. The Check list in
chapter 5 has been extended. A general
correction of the document has been
done.
RUT - Development handbook 8.1 Documentation of user interface v3.1
Changes not yet attended to
Table 4: Process history for version 2.0
Version
Date
2.0
97-02-14
Editor
Peter Elgåker
Comments
Language and spelling have been corrected in the whole document. Chapter
2 Prerequisites, page 2, has been completely remade to be coherent with the
headline. Text has been added to 3.1
Overview, sid 3. Some text has been
moved around to decrease the reading
effort. Tables have been adjusted to the
RUT standard. The page layout has
been improved so tables and images
only covers one page. Chapter 10
Measurement of the process, sid 17,
has been added. Home exam 1997.
Table 5: Process history during version 1.0
Version
Date
Editor
Comment
1.3
96-05-23
Marcus Comstedt
Improved version for the end of the
SEP course . Proposed changes made.
1.2
96-02-15
Marcus Comstedt
Improved version. Added the topics
“Templates and forms” and “Adjustments to the SEP course”. Ny paragraph in Semantic documentation.
1.1
95-02-16
Farshid Saidbahr
Improved version as an examination in
the SEP course. Added a check list for
documentation of a user interface and
changed some lines in “Prerequisites”.
1.0
94-02-18
Claes Andersson
Exam assignment in SEP course 1994.
12 Changes not yet attended to
Several solutions to common problems should be identifiable.
The directions for documentation of command driven interfaces can be expanded. If this
is done chapter 3 might be split into a GUI concentrated part and a command
concentrated part (GUI - Graphical User Interface).
RUT - Development handbook 8.1 Documentation of user interface v3.1
19
References
13 References
The following literature has been used as sources during the development of this
document.
13.1 Method description
Horton, William (1991), “Illustrating computer documentation”
Horton, William (1997), “Secrets of User-Seductive Documents”
Krysander Christian (1994), “Kursmaterial TDDB60, Programutvecklingsmetodik och
programmeringsprojekt”, Riktlinjer för översättare
Liljestrand, Birger & Arwidson, Mats (1989), “Skrivstrategi”
Mynatt,Barbee Teasley (1990), “Software engineering with student project guidance”,
Documentating the User Interface Design, s 129-130
Mårdsjö, Karin (1992), “Människa - Text - Teknik”, kapitel 2 och 5
Kursbiblioteket “RUT”
Addison-Wesley Publishing Co, Inc (1990), “OPEN LOOK”
RUT 2.4 - “Skrivning av användarhandbok”
13.2 Method evaluations
Löwgren, Jonas (1993), “Human-computer interaction, what every system developer
should know”, kapitel 3, Specifying and testing usability. Studentlitteratur
RUT 10.2 - “Granskning enligt Fagan”
13.3 Internal comments
20
RUT - Development handbook 8.1 Documentation of user interface v3.1