1
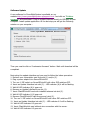
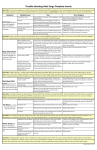
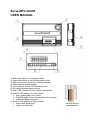
ServerRFLink600 USER MANUAL 1) 2) 3) 4) 5) 6) 7) 8) Smart card slot for a subscription card. Smart card slot for a second subscription card. SMA connector to connect an internal antenna. PWR outlet for power adaptor. RJ11 outlet to connect ClientWireLink card. DIP switch allowing access control. Red 2 LED indicator to inform about slots activity. Green 8 LED indicator to inform about: user's authorization to a server, ClientRFLink600 card communication with a server, system forbidden processes. 9) Green 3 LED indicator to inform about: client cards signal level, system process state RJ-11 Plug Wiring for ClientWireLink card Installation of the ServerRFLink600 and authorization of the ClientRFLink600 and ClientRFLink100 cards. 1. Install antenna into ServerRLink600. 2. Insert active subscription card into server's SmartCard slot (1) with chip downwards. 3. Turn switch 1. ON, with other switches OFF. 4. Install the antenna into ClientRFLink600 card. 5. Insert ClientRFLink600 or ClientRFLink100 card into slot (2). 6. Plug the power adapter into ServerRFLink600. 7. Plug the power adapter connected to ServerRFLink600 into the mains socket. 8. Wait till LED (8).1 is OFF ( it will be only few miliseconds). 9. Unplug the power adapter connected to ServerRFLink600 from the mains socket 10.Remove ClientRFLink600 or ClientRFLink100 card from the server's SmartCard slot (2). ClientRFLink600 or ClientRFLink100 card is ready to install into a digital satellite receiver or CI module. To authorize another ClientRFLink600 or ClientRFLink100 card repeat the above steps from 5. to 10., remember to turn another switch ON, with other switches OFF, for each ClientRFLink600 or ClientRFLink100 card. To authorize ClientWireLink card repeat the above steps from 5. to 10. With all switches OFF. Then use the wire and connect the client card with the server ServerRFLink600. Remember ! Client cards ClientRFLink600 and server ServerRFLink600 cannot work without antennas. Always make sure antennas are properly installed. Otherwise final power stage- RF may be damaged. Installing client cards into your digital satellite receiver don’t forget to plug off the receiver first and then put your client card into smart card slot. Software Update A new software for GreenEightSystem is available on our website:http://www.greeneightsystem.pl/support.html. Just click on ''Pobierz program" and download it. Plug an update interface directly to USB port of your computer. Install update application. At the last step you will get the following window on your computer : Then you need to click on ''Ładowanie firmware'' button. Wait until download will be completed. Next uplug the update interface and you need to follow the below procedure: 1. Remove your subscription card from slot (1) and/or (2). 2. Plug a power adaptor into ServerRFLink600. 3. Turn on 4. DIP switch on ServerRFLink600 with other DIP switches OFF. 4. Insert an Update Interface into slot (2) – LED indicator (8).4 will be flashing. 5. Wait till LED indicator (8).4 goes out. 6. Remove an Update Interface from slot (2). 7. Insert ClientRFLink600 card with installed antenna into slot (2). 8. Wait till LED indicator 8.(4) goes out. 9. Remove ClientRFLink600 card from server’s slot (2). 10. Turn on 2. DIP switch on ServerRFLink600 with other DIP switches OFF. 11. Insert an Update Interface into slot (2) – LED indicator 8.2 will be flashing. 12. Wait till LED indicator 8.2 goes out. 13. Insert ClientWireLink card without wire connection with the server. 14. Wait till LED indicator 8.2 goes out. 15. Remove ClientWireLink card from server’s slot (2). 16.Turn on 1. DIP switch on ServerRFLink600 with other DIP switches OFF. 17. Insert Update Interface into slot (2) – LED indicator 8.1 will be flashing. 18. Wait till LED indicator 8.1 goes out. 19. Remove Update Interface from slot (2). 20. Unplug the power adapter connected to ServerRFLink600 from the mains socket After the software update please install your GreenEightSystem devices again according to the page nr.2.