1
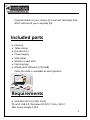
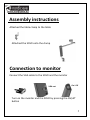
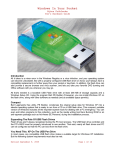
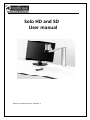
Solo HD and SD User manual Nordic
SOLO user manual version V131015‐1
1
SOLO from Nordic Eye is available in two models. We use the same manual to both systems. SOLO + HD is black and silver and SOLO + is blue / silver. Some functions are not available in the HD system and the manual will describe this. Also the technical data differs VS. the two systems. 2
Contents • Included parts…………………………………………..page 4 • System requirements………..……………………….page 4 • Assembly………………………………..……………………page5 • Connection monitor…………………………………….page 5 • Functions……………………………...........................page 7 • Advanced settings.………..……………………………..page 9 • Connections to computer and installation ….page15 • Technical data and maintenance…………………page 16 3
Congratulation to your choice of visual aid. We hope that
SOLO will enrich your everyday life. Included parts •
•
•
•
•
•
•
•
Camera Table clamp Handcontrol Powersupply USB‐cabel Monitor cabel VGA Carrying bag Media with software ( CD/USB) Plate for table is available as extra feature. Requirements • VGA Monitor (4:3 eller 16:9) PC with USB 2.0, Windows XP SP2 / Vista / Win7 Mac Snow Leopard 10.6 4
Assembly instructions Attached the table clamp to the table Attached the SOLO onto the clamp
Connection to monitor Connect the VGA cable to the SOLO and the monitor VGA out
On / Off
Turn on the monitor and the SOLO by pressing the On/off button 5
SOLO will confirm with a sound signal when it turns on and off or when the battery is out of power. • 2 beep when it starts • 1 beep then it turns off • 4 beep when battery capacity is ended , SOLO turns off To check the battery capacity, hold down the On/off button and keep it down for 3 sec, SOLO will indicate with sound back with the following. • 1 beep fully charged • 2 beep approx 1 hour battery capacity left • 3 beep solo needs to be charged.
6
Remote • Z+ zoom in (increase magnification) • Z‐ zoom out (decrease magnification) • Arrow left increase brightness • Arrow right increase brightness • FUNC turns picture 180° MODE changes the picture in three different modes, high contrast positive, high contrast inverted and normal full color mode. To pairing the remotes and the SOLO after changes batteries or if the units have been swapped: Power on the SOLO and press and hold down one of the remotes buttons for at least 4 seconds, at the same time you hold the remote as close to the SOLO´s plastic body cover as possible. A red LED will lit up and flashing on the remotes keypad during the synchronization process if the SOLO and remote is not paired. Release the button and see if there is some response from the SOLO when pressing down a button again. 7
MODE and FUNC buttons are only available in the SOLO’s reading position as default. This can be changed under menu options and turn tilt on and off. Reading position
Distance position
When camera is in distance position, only the zoom and brightness can be changed. Other settings can be changed when camera is in reading position.
8
Advanced settings
Settings that are made to your SOLO will be saved automatically. Example, if one have the camera in reading position and the picture mode in negative and then change to distance viewing, the camera will change to full color. All values like brightness, zoom, flip and color mode will save automatically. All values are individual to each color mode as well as distance position. The remote buttons has multi functions. Menus and alternative will be available when hold down the MODE and FUNC buttons. 9
Camera in reading position
Reading line • Press the FUNC button for 3 sec and a reading line will appear in the live picture • One can move the line vertically by pressing Z+ or Z‐ • When right position is reached a short press on the FUNC button will store the settings Blinds • Press the FUNC button for 3 sec and the reading line will appear in the live picture • Press the right arrow and the blinds will be present • Use the Z+ or Z‐ to change the gap, a short press to the FUNC confirming the settings. To turn off the line or blinds, press FUNC for 3 sec and the left arrow to turn off the line or right arrow to turn off the blinds. 10
Contrast modes SOLO gives 2 personal settings for contrast modes • Choose contras mode • Press MODE for 3 sec • Contrast can be changed for text or background • Z+ and Z‐ changes text color • Arrow right or left changes background color. Colors are: Yellow, Green, Light green, Amber, Blue, Light blue, red, white and Black • When done press MODE and your settings are stored. Global settings Have the camera in full color mode and reading position, then press the mode button for 3 sec. An OSD menu will appear and give the possibilities to change the global settings. 11
• Z+ and Z‐ up and down in menus. • Arrow left or right chooses the alternative in the menu or goes back to previous menu. Change the value by pressing left or right arrow. Leave the menu by pressing mode. Brightness 12
Contrast Saturation Sharpness Camera settings White balance gives the camera different conditions to compensate the picture in different light conditions. We recommend auto trace.
13
Factory reset
Reset all settings to default
14
Connect to computer and software installation Install the SOLO computer software from the attached CD or the downloaded files and follow the instructions Connect the special USB cable to the SOLO and then put in to a free USB port on the computer. Press ON/OFF button to start the SOLO, Windows will now detect new hardware and install the SOLO drivers. When the hardware installation is ready, you can start the SOLO software. to USB To power supply
15
Short command PC Key combination
CTRL-WIN-S
CTRL-WIN -↑
CTRL-WIN-↓
CTRL-WIN-I
CTRL-WIN-C
CTRL-WIN-V
CTRL-WIN-F1
CTRL-WIN-F2
CTRL-WIN-F3
CTRL-WIN-T
CTRL-WIN-E
CTRL-WIN-M
CTRL-WIN-L
CTRL-WIN-U
CTRL-WIN-Z
1-9 on keyboard
(not on numeric keys)
CTRL-WIN-N
CTRL-WIN-J
Function
Windows position
Zoom Increase
magnification
Zoom decrease
magnification
Save picture
Increase brightness
Decrease brightness
Color mode
High contrast mode 1
High contrast mode 2
Turn picture 180°
End program
Maximize/ minimize
program
Splitt picture left/right
Splitt picture up/down
Freeze-/release picture
Preset values for
magnification, only in
active window
Version information
Save picture files
as…..
16
Technical data Magnification(19” 4:3) Focus Working distance Resolution monitor 4:3 Resolution monitor wide Resolution PC Connections Power consumption Power Weight OS SOLO HD 1.3‐85x Autofocus 270 mm 1024x768, 60 Hz 1280x720 (720p) 832x624 USB or VGA 18 W Battery or 12 volt 1,15 Kg XPSP2/Vista / Win 7 /win8 32 bit, 64 bit MAC , Snow Leopard 10.6x SOLO SD 1,8‐85x Autofocus 270 mm 1024x768,60Hz 1280x720(720p) 832x624 USB or VGA 18 W Battery or 12 volt 1.1 Kg XPSP2/Vista / Win 7 /win8 32 bit, 64 bit MAC , Snow Leopard 10.6x EMC: Product is tested according to EMC immunity and emission. By EN 60 601‐1‐2(2001) Class B, Group 1. 17
Maintenance
Cleaning, do not use any cleaning methods that can result in moisture or water at the electronics. Deal with the equipment as standard home electronics. When cleansing the lens be careful so no scratches will appear. SOLO should be recycled as electronic parts and not be places in the garbage. Contact your reseller or community to have the product recycled in a non pollutions way. Contact If you have any further questions or requests please don’t hesitate to contact us. Or if you only want to leave comments, we are pleased to hear your opinion regarding our products Nordiceye AB Illervägen 15 352 45 Växjö Sverige Tel +46 470 72 98 88 Fax + 46 470 74 95 80 [email protected] www.nordiceye.eu 18