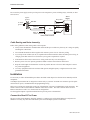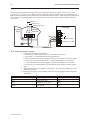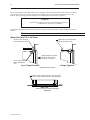
1
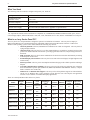
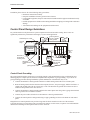
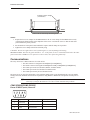
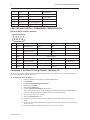
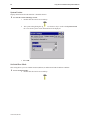
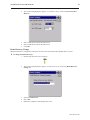
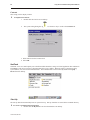
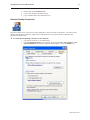
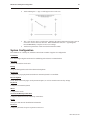
COPYRIGHT NOTICE This manual is a publication of Maple Systems, Inc., and is provided for use by its customers only. The contents of the manual are copyrighted by Maple Systems, Inc.; reproduction in whole or in part, for use other than in support of Maple Systems equipment, is prohibited without the specific written permission of Maple Systems. HMI600 and Ivory Series are trademarks of Maple Systems, Inc. IBM, PC/AT, and PS/2 are trademarks of International Business Machines Corporation. Windows CE, Windows XP Embedded and ActiveSync are trademarks of Microsoft Corporation. WebStudio is a trademark of Indusoft Corporation. All other brand and product names mentioned herein are trademarks or registered trademarks of their respective holders. LIMITATIONS OF USE The XPe device may not be used in any device or system in which a malfunction of the operating system would result in foreseeable risk of personal injury, death to the operator of the device or system, or to others, or severe physical or environmental damage. WARRANTY Maple Systems warrants each product to be free from electrical and mechanical defects in materials and workmanship for a period of two years from the date of shipment. This warranty does not apply to defects in the Products caused by abuse, misuse, accident, casualty, alteration, negligence, repair not authorized by Maple Systems, use on current or voltages other than specified by Maple Systems, or application or installation not in accordance with published instruction manuals. This warranty is in lieu of any other warranty either expressed or implied. Maple Systems’ liability is limited to the repair or replacement of the Product only, and not costs of installation, removal, or damage to user’s property or other liabilities. If Maple Systems is unable to repair or replace a nonconforming Product, it may offer a refund of the amount paid to Maple Systems for such Product in full satisfaction of its warranty obligation. Maximum liability of Maple Systems is the cost of the Product. Information furnished by Maple Systems, Inc., is believed to be accurate and reliable. However, no responsibility is assumed by Maple Systems for the use of this information nor for any infringements of patents or other rights of third parties which may result from its use. No license is granted by implication, or otherwise, under any patent or patent rights of Maple Systems, Inc. Maple Systems retains the right to revise or change its products and documentation at any time without notice. IF SERVICE IS REQUIRED Package the unit in its original packaging container or, if unavailable, any suitable rigid container. If a substitute container is used, surround the unit with shock absorbing material; damage in shipment is not covered by the warranty. Include a letter with the unit describing the difficulty and designating a contact person. Send to the following address: Maple Systems, Inc., 808 134th Street SW, Suite 120, Everett, WA 98204-7333. Only Products that have been issued a Return Material Authorization (RMA) number from Maple Systems may be returned. All RMAs must be accompanied with a written purchase order for tracking purposes or, in the case of out-of-warranty repairs, for repair charges on a time and material basis. All returns will be tested to verify customer claims of noncompliance with the product warranty. Improper return packaging, which makes verification impossible, will void the warranty. Products passing the tests will be returned “AS IS” to the customer. If noncompliance is verified and is not due to customer abuse or the other exceptions described with product warranty, Maple Systems will, at its option, repair or replace the Product returned to it, freight prepaid, which fail to comply with the foregoing warranty, provided Maple Systems is notified of such noncompliance within the two-year warranty period. APPLICATIONS ASSISTANCE This manual is designed to provide the necessary information for trouble-free installation and operation of your new Ivory Series Panel PC; however, if you need assistance, please call Maple Systems at 425-745-3229 or visit our web site at www.maplesystems.com. Table of Contents About Your Documentation . . . . . . . . . . 1 Conventions. . . . . . . . . . . . . . . . . . . 1 What You Need . . . . . . . . . . . . . . . . 2 What is an Ivory Series Panel PC?. . . 2 Windows CE Basics. . . . . . . . . . . . . . . . . 3 Windows XPe Basics . . . . . . . . . . . . . . . . 3 List of Features. . . . . . . . . . . . . . . . . . . . 3 Connecting to a PC . . . . . . . . . . . . . . . . 3 Chapter 1 - Installation Instructions . . . . . . . . . 5 Before You Begin . . . . . . . . . . . . . . . . . . 5 Unpacking the Unit . . . . . . . . . . . . . 5 Managing Electrostatic Discharge . . . 5 CE Compliance . . . . . . . . . . . . . . . . 5 NEMA Rating . . . . . . . . . . . . . . . . . . 5 FCC Class A Rating . . . . . . . . . . . . . 5 Environmental Considerations . . . . . 5 Safety Precautions . . . . . . . . . . . . . . 6 Control Panel Design Guidelines . . . . . . 7 Control Panel Grounding . . . . . . . . . 7 Connect Panel PC Chassis Ground to Control Panel. . . . . . . . . . . . . . . . . . 8 Power Supply Selection . . . . . . . . . . 8 Cable Routing and Noise Immunity . 9 Installation. . . . . . . . . . . . . . . . . . . . . . . 9 Connect the Panel PC to Power . . . . 9 Panel Preparation . . . . . . . . . . . . . . 11 Mount the Panel PC to the Panel . . . 12 Communications . . . . . . . . . . . . . . . . . . 13 COM1 [RS232]/COM2 [RS232] . . . . 13 COM1 [RS-485 2/4 W] Port , COM3[RS485], COM3[RS232] Port. . 14 Connecting to the Panel PC Using Ethernet . . . . . . . . . . . . . . . . . . . . . . 14 USB Host Port . . . . . . . . . . . . . . . . . 15 USB Client Port . . . . . . . . . . . . . . . . 15 Compact Flash . . . . . . . . . . . . . . . . . . . . 15 Printing - Windows CE . . . . . . . . . . . . . . 15 Printing - Windows XPe . . . . . . . . . . . . . 16 Using a Networked Printer - Windows CE and Windows XPe . . . . . . . . . . . . . . . . . 16 Factory Configuration. . . . . . . . . . . . . . . 17 What Comes with the Ivory Series Panel PC? . . . . . . . . . . . . . . . . . . . . . . . . . 17 Dip Switch Settings. . . . . . . . . . . . . . 17 Chapter 2 - Using Windows CE.net & Windows XPe. . . . . . . . . . . . . . . . . . . . . . . . . . . . . . . . . . 19 TM What is Windows CE.net 5.0? . . . . . . 19 Utilities . . . . . . . . . . . . . . . . . . . . . . . . . 19 Soft Keyboard . . . . . . . . . . . . . . . . . 19 System Settings . . . . . . . . . . . . . . . . 20 NorFlash . . . . . . . . . . . . . . . . . . . . . 24 Start Up . . . . . . . . . . . . . . . . . . . . . . 24 Remote Desktop Connection . . . . . . 25 About Windows XPe . . . . . . . . . . . . . . . . 26 Chapter 3 - Networking. . . . . . . . . . . . . . . . . . 27 Networking Via Ethernet Using Windows CE. . . . . . . . . . . . . . . . . . . . . . 27 Networking Via Ethernet Using Windows XPe . . . . . . . . . . . . . . . . . . . . . 27 Networking via Serial Port Using Windows CE. . . . . . . . . . . . . . . . . . . . . . 27 Installing Active Sync . . . . . . . . . . . . 27 Web Browser . . . . . . . . . . . . . . . . . . . . . 29 Chapter 4 - Developing Applications . . . . . . . . 31 Windows CE. . . . . . . . . . . . . . . . . . . . . . 31 Microsoft Visual Studio 2008 . . . . . . 31 Microsoft eMbedded Visual C++ 4.0 31 Ivory Series SDK . . . . . . . . . . . . . . . . 31 Windows XPe . . . . . . . . . . . . . . . . . . . . . 31 Chapter 5 - Using Third Party Software to Configure the Ivory Series Panel PCs . . . . . . . . 33 Indusoft WebStudio . . . . . . . . . . . . . . . . 33 Other HMI Configuration Software . . . . . 33 Chapter 6 - Maintenance and System Configuration . . . . . . . . . . . . . . . . . . . . . . . . . 35 Fuse Maintenance . . . . . . . . . . . . . . . . . 35 Cleaning the Overlay . . . . . . . . . . . . . . . 35 Calibrating the Touchscreen . . . . . . . . . . 35 System Configuration . . . . . . . . . . . . . . . 37 Introduction 1 Introduction - Welcome Welcome to the Maple Systems' Ivory Series of Panel PCs. This powerful family of Panel PCs can be configured with any Windows CE or Windows XP Embedded compatible HMI software, such as WebStudio, to connect to programmable logic controllers (PLCs) and motion controllers to provide the human-machine interface in industrial applications. This manual explains the installation and operation of the Ivory Series. About Your Documentation Conventions In most cases, we will describe each method when the task is first discussed. The menu method is then used whenever the task is used in later procedures. Other conventions used in this book are listed in the following table. Convention Meaning Bold Characters that you must type exactly as they appear. For example, if you are directed to type a:\setup, you should type all the bold characters exactly as they are printed. Italic Placeholders for information you must provide. For example, if you are directed to type filename, you should type the actual name for a file instead of the word shown in italic type. Italics are also used to indicate a glossary term. ALL CAPITALS Directory names, file names, key names, and acronyms KEY1+KEY2 A plus sign (+) between key names means to press and hold down the first key while you press the second key. click When referring to the touch screen, click means to tap icon onscreen once with either a finger or stylus. When referring to a computer with a mouse, click refers to clicking the left mouse button once. Double-click When referring to the touchscreen, this refers to quickly tapping an onscreen icon twice in rapid succession with either a finger or a styles. When discussing a computer with a mouse, refers to quickly clicking the primary mouse button (usually the left mouse button) twice. Right-click Refers to clicking the secondary mouse button (usually the right mouse button) once. Right-clicking usually opens shortcut menus. The following terminology will be used when referring to computers and PCs: Term Meaning Panel PC Refers to the Ivory Series Panel PC PC Refers to a desktop PC - not the Ivory Series Panel PC The following table identifies symbols and margin icons. Icon 4 4 Meaning Identifies a procedure. Indicates a reference to additional information. Indicates an important note. 1010-1010 Rev 02 2 Ivory Series Installation & Operation Manual What You Need The following items are needed to configure and operate your Panel PC. Configuration Software WebStudio or other CE or Windows XP Embedded (XPe)-compatible HMI software. Configuration Cable (Panel PC to PC) 7431-0106 Personal Computer1 User Provided Power Cable 6030-0009 24VDC Power Supply User Provided (for details refer to Appendix A: Specifications) PLC User Provided 1PC requirements include at least a Pentium IV-compatible PC; 256MB RAM; 500MB available hard disk space; VGA or SVGA display adapter; Microsoft Windows 2000, XP, Vista, 2003/2008 server or NT, and one available RS-232 serial port. What is an Ivory Series Panel PC? The Ivory Series is a compact Panel PC designed to operate in an industrial environment. The Ivory Series employs a RISC-based ARM processor and Flash technology embedded with the Microsoft® Windows® CE.net™ or Microsoft Windows XPe operating system. These models include the following key features: • All-in-one platform: The CPU, DRAM and even Windows CE or XPe are integrated. The Ivory Series is a plug-and-play machine. • Slim but robust: The Ivory Series is very thin (50mm thickness); nevertheless, its plastic bezel provides protection in harsh industrial environments - protecting against dust and water, and providing resistance to chemicals. • EMI protection: The Ivory Series meets standards for electrical noise emissions and immunity according to the European CE directives. • Excellent display characteristics: The Ivory Series uses 65K color TFT displays for high brightness and contrast clarity. • Fanless operation: The low power consumption and fanless design provide reliable operation and longer lifespan. • Powerful communications capability: The Ivory Series provides serial ports, Ethernet port, USB ports and sound and IDE expansion ports (HMI 615X, HMI612X, HMI610X and HMI608T models). Compact flash is available on T models only. • Windows CE or Windows XPe Support: The Ivory Series offers platform support for either Windows CE.net (5.0) or Windows XPe. These operating systems allow the user to develop his own application software or use a number of available third-party applications. There are currently EIGHT models in the Ivory Series: Display Size Resolution LCD Type Brightness (cdm2) Contrast Ethernet Compact Flash Operating System HMI606T 5.7" 320x234 65K-color TFT 500 250:1 Yes Yes CE HMI608T 8.8" 640 x480 65K-color TFT 400 250:1 Yes Yes CE HMI610X-CE 10.4" 640x480 65K-color TFT 400 300:1 Yes No CE HMI610X-XP 10.4" 640x480 65K-color TFT 400 300:1 Yes No XPe HMI612X-CE 12.1" 800x600 65K-color TFT 450 600:1 Yes No CE HMI612X-XP 12.1" 800x600 65K-color TFT 450 600:1 Yes No XPe Model 1010-1010 Rev 02 Introduction 3 HMI615X-CE 15" 1024x768 65K-color TFT 350 700:1 Yes No CE HMI615X-XP 15" 1024x768 65K-color TFT 350 700:1 Yes No XPe Windows CE Basics The Ivory Series comes preloaded with either MicrosoftÒ WindowsÒ CE.netÔ 5.0 or Windows XPe. Windows CE.net is a real-time embedded operating system for use in small foot print and mobile devices. With a complete operating system feature set and comprehensive development tools, Windows CE.net contains the features developers need to build, debug, and deploy customized Windows CE.net-based devices. Some basic benefits of Windows CE.net 5.0 include: • Secure networking • Enhanced real-time processing • High-speed performance • Multimedia and Web browsing capabilities • Connectivity with PCs, Servers, PLCs, and other devices Windows XPe Basics Windows XP for Embedded (Windows XPe) Systems is an edition of Windows XP that contains the full feature set of Windows XP Professional, but has restrictions on licensing that requires that it be used in a process-specific application. Some of the benefits of XPe include: • Secure networking • Enhanced real-time processing • High-speed performance • Multimedia and Web browsing capabilities • Connectivity with PCs, Servers, PLCs, and other devices • USB or Network Boot capability • File sharing capability List of Features The Ivory Series has a host of features that make it the ideal open-platform Panel PC for every application: • One Ethernet port for networking or Internet connection • Two device-ready USB ports on the HMI606 and three on the HMI615X/HMI612X HMI610X/HMI608T • Two serial ports for RS232, RS422 or RS485 communications • One RS232 port for downloading application software • Built-in 32 MB Flash memory (T Models) • Built-in 256 MB DOM (X models with CE) • Built-in 2 G DOM (X models with XPe) • 64 MB DRAM • 256 MB DDR (all X models) • Built-in compact flash port is available on T models • Fanless, low-power operation Connecting to a PC To connect the Ivory Series to a PC for configuration, refer to Chapter 3, under Networking via Serial Port. 1010-1010 Rev 02 4 1010-1010 Rev 02 Ivory Series Installation & Operation Manual Installation Instructions 5 Chapter 1 - Installation Instructions Before You Begin Please read the following for proper handling of your new Ivory Series Panel PC. Unpacking the Unit Carefully unpack the Panel PC. Please read any instructions or cautions that appear on the shipping container. Check all material in the container against the enclosed packing list. Maple Systems, Inc. will not accept responsibility for shortages against the packing list unless notified within 30 days. The equipment and its accessories were inspected and tested by Maple Systems before shipment; all of the equipment should be in good working order. Examine the equipment carefully; if any shipping damage is evident, notify the carrier immediately. You are responsible for claim negotiations with the carrier. Save the shipping container and packing material in case the equipment needs to be stored, returned to Maple Systems, or transported for any reason. Managing Electrostatic Discharge It is best NOT to remove the rear enclosure of the Panel PC. When the rear part of the enclosure is removed, the circuitry inside is exposed to possible damage by electrostatic discharge during handling. Minimize the possibility of electrostatic discharge by: • Discharging personal static by grounding yourself prior to handling the computer • Handling the computer at a static-free grounded workstation • Connecting the frame ground ( FG ) connector of the computer to a clean earth ground • Placing the computer in an anti-static bag during transport CE Compliance The Ivory Series Panel PCs have been tested to conform to European CE requirements per Council Directive 89/336/EEC. The European Union created these requirements to ensure conformity among products traded in those countries. Specifically, the Ivory Series Panel PCs meet or exceed the noise emissions and immunity requirements as set forth in the EN50081 (Emissions) and EN50082 (Immunity) standards. These products are designed to withstand electrical noise in harsh industrial environments. They also conform to requirements that limit electrical emissions. However, this does not guarantee that the products will be totally immune from possible malfunction in cases where severe electrical noise occurs. Therefore, we strongly recommend that you follow the guidelines outlined in this chapter for proper wire routing and grounding to insure the proper operation of the Ivory Series Panel PC. NEMA Rating The Ivory Series Panel PCs are rated for NEMA 4 (indoor). This means that when the Panel PC is properly mounted to a panel or other enclosure, the front enclosure of the Panel PC will provide protection to the inside of the panel from splashing water, wind blown dust, or hose-directed water. The computer must be installed according to the instructions in this chapter to be properly sealed. FCC Class A Rating This equipment has been tested and found to comply with the limits for a Class A digital device, pursuant to Part 15 of the FCC Rules. These limits are designed to provide reasonable protection against harmful interference when the equipment is operated in a commercial environment. This equipment generates, uses and can radiate radio frequency energy. If not installed and used in accordance with this user’s manual, it may cause harmful interference to radio communications. Operation of this equipment in a residential area is likely to cause harmful interference, in which case the user will be required to correct the interference at his own expense. Environmental Considerations The Ivory Series is designed to operate in temperatures from 0-45° C. It is intended for indoor installations and not designed for outdoor applications. Avoid installing the Ivory Series in environments with severe mechanical 1010-1010 Rev 02 6 Ivory Series Installation & Operation Manual vibration or shocks. Do not install the computer in enclosures with rapid temperature variations or high humidity. Either will cause condensation of water inside the device and eventual damage to the computer. Safety Precautions Please observe the following precautions when installing the Ivory Series Panel PCs. Failure to comply with these restrictions could result in loss of life, serious personal injury, or equipment damage. Warning: Disconnect this equipment from any AC outlet before cleaning. Do not use liquid or spray detergents for cleaning. Use a damp cloth. Warning: Keep this equipment away from humidity. Warning: The openings on the enclosure are for air convection. Protect the equipment from overheating. DO NOT COVER THE OPENINGS. Warning: Make sure the voltage of the power source is correct before connecting the equipment to the power outlet. Warning: Position the power cord so that people cannot step on it. Do not place anything over the power cord. Warning: If the equipment is not used for a long time, disconnect it from the power source to avoid damage by transient over-voltage. Warning: Never pour any liquid into an opening. This could cause fire or electrical shock. Warning: Never open the equipment. For safety reasons, the equipment should be opened only by a qualified service technician. Warning: If any of the following situations arise, get the equipment checked by qualified service personnel • • • • The power cord or plug is damaged. Liquid has penetrated into the equipment. The equipment has been exposed to moisture. The equipment does not work well, or you cannot get it to work according to the installation reference guide. • The equipment has been dropped and damaged. • The equipment has obvious signs of breakage. DO NOT LEAVE THIS EQUIPMENT IN AN UNCONTROLLED ENVIRONMENT WHERE THE STORAGE TEMPERATURE IS BELOW - 20°C (-4° F) OR ABOVE 60°C (140° F). IT MAY DAMAGE THE EQUIPMENT. 1010-1010, Rev 02 Installation Instructions 7 In addition, please observe all of the following safety precautions: • Read these instructions carefully. • Keep this installation reference guide for later reference. • For pluggable equipment, the power outlet must be installed near the equipment and must be easily accessible. • Put this equipment on a reliable surface during installation. Dropping it or letting it fall could cause damage. • All cautions and warnings on the equipment should be noted. Control Panel Design Guidelines Pay careful attention to the placement of system components and associated cable routing. These items can significantly enhance the performance and integrity of your control application. Control panel is tied to a reliable earth ground Shielded power cable Ground strap Ivory Series Panel PC (rear side) GND 24V COM1 [RS-485 2/4W] COM1 [RS-232] COM3 [RS-485] COM3 [RS-232] COM2 [RS-232] Power Supply PLC/Host PLC [RS-232] Panel PC is grounded to control panel Shielded communication cable Quiet ground Line Filter Power line filter I / O control lines Ground wires Quiet ground (isolated) Control Panel Example Control Panel Grounding The control panel should be connected to a good, high-integrity earth ground both for safety considerations and shielding purposes. Maple Systems cannot overemphasize the importance of good grounding. If you fail to use good grounding procedures during installation, sporadic malfunction of the Panel PC may occur: · Connect the Panel PC's chassis ground terminal to a reliable earth ground with a low-resistance path. · Route all earth ground wires that lead from the computer, the PLC, the power supply, and the line filter to a central earth ground point such as a barrier strip. This will ensure that no ground current from one device influences the operation of the other devices. · Connect the Panel PC's chassis ground terminal to the control panel door using a heavy-gauge short braided cable or ground wire to minimize resistance. · Connect the power cable’s shield wire to the Panel PC’s chassis ground terminal. · Connect the control panel to earth ground using a copper grounding rod close to the Panel PC and control panel. Hinged doors on control panels do not provide a long-term electrical connection to the rest of the enclosure. Corrosion develops over time and prevents good electrical contract. For this reason, a separate wire braid should be installed from the hinged control panel to the rest of the enclosure. 1010-1010, Rev 02 8 Ivory Series Installation & Operation Manual For a more in-depth overview of ground wiring techniques, refer to technical note #1027, “HMI Ground Wiring and Electrical Noise Reduction,” which you can find at http://www.maplesystems.com in the Support Center section. Connect Panel PC Chassis Ground to Control Panel To reduce the possibility of electrical interference, connect the chassis ground terminal of the computer to a clean earth ground. If the control panel is metal, make sure it is properly grounded. Then connect a short heavy-gauge wire (#18 AWG) from the chassis ground terminal of the computer to a mounting bolt on the control panel door. The mounting bolt must have good electrical contact to the control panel; scrape away any paint that may be covering the panel to provide a good connection. If the control panel is made of a non-conductive material, it is essential that you connect the chassis ground terminal of the computer to a clean earth ground point located close to the panel. Frame ground (marked FG) Stud or screw Control Panel Area on panel free of paint. Panel PC Chassis Ground connection Power Supply Selection The power supply used to power the computer should provide an output of +24 VDC 5% measured at the Panel PC power terminal block. A 24VDC regulated power supply dedicated to the computer is required. The power cable for the computer should be 18AWG, 2-conductor wire with a shield drain wire and protective shield (foil or braid). The shield drain wire must be connected to earth ground at both ends of the cable. Please refer to the “Connect the Panel PC to Power” section for more information. A power line filter installed at the AC input to the computer power supply is highly recommended as a safeguard against conducted RF noise, which is often present on factory power lines. The wires connecting the output of the power line filter to the power supply should be kept as short as possible to minimize any additional noise pickup. The case of the power line filter should be connected to a quiet earth ground. The power line filter should have a current rating of at least 3 Amps with common mode and differential mode attenuation. 1010-1010, Rev 02 Installation Instructions 9 Do not use the power supply used to provide power to the computer to power switching relays, solenoids, or other active devices. "Quiet” ground To earth ground Keep short Power Supply Bus bar Green White to 110Vac neutral Black to 110Vac load (hot) N N AC G Line Filter L L White GND AC AC Black Power Line Filter Connection Cable Routing and Noise Immunity Follow these guidelines when routing cable to the computer: · Always route the Panel PC communication cable and the power cable away from any AC voltage or rapidly switching DC control lines. · Never bundle the Panel PC cables together with 120VAC power wires or with relay wiring. · Try to keep at least 8 inches (20 cm) of separation between the Panel PC cables and other power wiring. If voltages greater than 120VAC are used in the system, greater separation is required. · If the Panel PC cables must come near AC wiring, make sure they cross at 90 degrees. · Run AC power wires in a separate grounded conduit to reduce electrical noise interference. · Keep the cable lengths for the Panel PC as short as possible. Do not coil excess cable and place it next to AC powered equipment. · Cover any equipment used in the enclosure that operates at high frequency or high current levels with a grounded metal shield. Installation It is necessary to follow all installation procedures described in this chapter for electrical noise immunity and CE compliance. Your Maple Systems Panel PC is designed to connect easily to your PLC. External rear connectors provide quick connections for power, communications and programming wiring. There are two serial port connections on the rear of the Panel PC. These are D-subminiature 9-pin connectors. The female connector can be used for RS232 or RS485 connection to a PLC. The male connector can be used for RS232 connections to a PLC or to the PC used for configuration. Use the supplied separate 3-position terminal block to provide power to the Panel PC. Connect the Panel PC to Power The power cable for the Panel PC should be 18AWG, 2-conductor wire with a shield drain wire and protective shield foil. You may buy cable P/N 6030-0009 by the foot from Maple Systems to make these. 1010-1010, Rev 02 10 Ivory Series Installation & Operation Manual Always run the DC ground wire directly back to the signal return of the power supply. Do not use the chassis ground wire as your signal return! Maple Systems recommends using an axial ferrite coil with each Panel PC to further reduce the electrical interference that may be conducted on the power lines. Thread the positive and negative wires of the power cable through the ferrite coil so that the coil is no more than two inches from the Panel PC’s power input. Red wire (+) Black wire (-) Shield wire (bare) Control panel 24Vdc power supply Panel PC side) (rear (+) (-) 24V GND FG 120Vac Shield drain Black Red FG DC Output -V (Gnd) DC Output +V (+24V) Panel PC Power Inputs 4To connect the Panel PC to power: 1. Connect the power cable to the Panel PC a. Strip the power cable shield to expose 2” of the black and red wires. b. Strip about ¼” of insulation from the black and red wires. c. Thread the black and red wires through the ferrite core. The shield wire must be outside. d. Connect the red wire to the DC positive (+) input of the Panel PC power terminal. e. Connect the black wire to the DC negative (-) input of the Panel PC power terminal. f. Connect the power cable shield wire to the Panel PC power terminal’s chassis ground input. 2. Route the power cable to the Panel PC power supply. The power cable should not be any longer than necessary. 3. Install the power supply wires as follows (with colors shown for Maple Systems cable P/N 6030-0009): Color Power Supply Panel PC Red +Output/+24 Vdc +24V Black -Output/+24 Vdc return GND Shield Case ground FG 1010-1010, Rev 02 Installation Instructions 11 The power connector on the Ivory Series is a terminal block with wire clamps. Lugs are not required. 24+VDC 0V FG Ivory Series Power Wiring Panel Preparation A metal panel or mounting surface with a minimum thickness of 15 gauge (0.059 inch/3.3mm) if cold-rolled steel or hardened steel, or 10 gauge (0.101 inch/2.6mm) if aluminum alloy (6061-T6 preferred) is required. Thinner panels or surfaces may bow between the mounting clamps and not form a seal with the gasket. 1010-1010, Rev 02 12 Ivory Series Installation & Operation Manual The area of the panel or mounting surface where the gasket comes into contact must be flat and free of scratches, pits, and other features that prevent the gasket from sealing properly. If the panel or mounting surface is not uniform, thick, flat, stiff, or smooth enough, then a sealant such as silicone may be required. WARNING The Panel PC requires a stiff, flat, smooth mounting surface free of blemishes to seal properly to NEMA 4. The diagrams in Appendix B show the dimensions of the panel cutout required for proper installation of the all models. Clean and deburr the panel cutout before the Panel PC is installed. Mount the Panel PC to the Panel Ends of screws must not protrude from the clamp Tighten all screw clamps until they are uniformly snug Panel Panel Hold the Panel PC against the panel until all screw clamps are in position Screw clamp locking tabs go through the slots Screw Clamp Placement Clamps Tightened Installing Screws on the Panel PC Position screw clamps 6 places in slots provided: 2 screw clamps each side and one top and bottom Panel Side View Position of the Six Screw Clamps for Mounting the HMI615/612/610 1010-1010, Rev 02 Installation Instructions 13 Position 4 screw clamps (2 each side) Panel Position of the Four Screw Clamps for Mounting the HMI606/608 STEPS: 1. Prepare the four screw clamps for the HMI606/608 or the six screw clamps for the HMI615/612/610 by positioning the metal brackets at the midpoints of the screws. Position the screws so that the ends don’t protrude from the plastic portions. 2. Set the Panel PC in the panel cutout and hold it in place until all clamps are in position. 3. Tighten the screw clamps until all are uniformly snug. CAUTION: Do not over-tighten the screws beyond snugness, or you may damage the housing. REINSTALLATION: Because the gasket will take a “set” to the panel, be sure to reinstall the Panel PC to the same panel cutout when a NEMA 4 seal is required. For best results, also replace the gasket itself. Communications The Ivory Series have 2 DE9 connectors for serial devices. • The male connector is designated COM1[RS232]/COM2[RS232] • The female connector is designated COM1[RS485 2/4W]/COM3[RS485]/COM3[RS232]. • The COM1 port can be used in RS232, RS485, or RS422 modes. • The COM3 port can be used in RS232 or RS485 modes. • The COM2 port can only be used in RS232 mode. The ports are set up using the CECP utility’s Set Serial Port Mode option. Note that although the com port number setting is the same, different connections are required for using RS232 or RS422/485. The pinouts for each port are shown. Restrict cable length to less than 500 feet (150m) for RS-422/RS485 devices and less than 50 feet (15m) for RS-232 devices in order to avoid communication problems. COM1 [RS232]/COM2 [RS232] Pinout of DE9P (male) connector Pin # Symbol COM1[RS232] 1 Not Used 2 RxD Received Data 3 TxD Transmit Data COM2[RS232] 1010-1010, Rev 02 14 Ivory Series Installation & Operation Manual 4 TxD Transmit Data 5 GND 6 RxD 7 RTS Ready to send output 8 CTS Clear to send input 9 Not Used Signal Ground Receive Data COM1 [RS-485 2/4 W] Port , COM3[RS485], COM3[RS232] Port Pinout of DE9S (female) connector Pin# Symbol COM1 [RS485 2W] COM1 [RS485 4W] COM3[RS485 2w] COM3[RS232] 1 Rx- RS485 Receive Data - RX - 2 Rx+ RS485 Receive Data + RX + 3 Tx- RS485 Transmit TX - 4 Tx+ RS485 Transmit TX + 5 GND Signal Ground 6 Data- Data - 7 TxD RS232 Transmit Transmit Data 8 RxD RS232 Receive Receive Data 9 Data+ Data + Connecting to the Panel PC Using Ethernet - Windows CE The Ivory Series comes equipped with a 10/100BaseT Ethernet port. By default, the Ivory Series' Ethernet port is set to get an IP address from a DHCP server. 4To change the static IP address: 1. 2. 3. 4. 5. 6. 7. From the Windows CE.net desktop, click the Start button. Click Settings. Click Network and Dial-up Connections. Double-click CS89501. Select the IP Address tab. Click the Specify an IP address option button. Enter an IP Address and Subnet Mask. Make sure that the IP Address and Subnet mask are consistent with the IP addresses that the Panel PC will be connected to. 8. Enter a Default Gateway if needed. 9. Select the Name Servers tab. 10. If required, enter the IP addresses of the Primary and Secondary Domain Name Service servers. 11. If required, enter the IP addresses of the Primary and Secondary Windows Internet Naming Service servers. 12. Click the OK button. Then close the Network Connections window. 1010-1010, Rev 02 Installation Instructions 15 13. Select the CECP icon from the system tray. 9. 10. 11. 12. Select the Save tab from the System Settings dialog box. Click Save registry. Click OK. Reboot the Panel PC to make settings take effect. Connecting to the Panel PC Using Ethernet - Windows XPe 4To connect to a network on an Windows XPe unit: 1. 2. 3. 4. 5. Click Start - Network Connections. Double-click Local Area Connection (RealTek RTL8139). Under This connection uses the following items, double click Internet Protocol (TCP/IP). On the General tab, select Obtain an IP address automatically if your network uses a DHCP server; otherwise, select Use the following IP address and then enter the appropriate information. Click OK on each dialog to accept the new settings. USB Host Port The USB Host Port has the following uses: • Connect to USB mouse. • Connect to USB keyboard. • Connect to USB mass storage device that has been connected to an external power source. The USB Host port supports a USB 2.0 full-speed host at 12 Mbps. USB Client Port The Windows XPe units support the USB client ports and work with plug and play devices. Windows CE units do not support USB Client Port. Compact Flash The Ivory Series can accommodate a standard Type 1 Compact Flash (CF) card. When installed, the CF card will be recognized as StorageCard by the Ivory Series’ Windows CE operating system. Files and folders can be manipulated on the card just like any other device. The CF card is also the mechanism by which the WindowsCE operating system is repaired or reinstalled. Windows XPe Panel PCs do not support CompactFlash. 1010-1010, Rev 02 16 Ivory Series Installation & Operation Manual Printing - Windows CE The Ivory Series Windows CE Panel PCs support HP PCL printers. The printer connection can be obtained via USB Host port or network connection to a shared printer. 4To print: 1. From the Internet Explorer or User's Application menu, select File-Print…and follow the onscreen prompts to select print settings. 2. 3. 4. 5. 6. 7. Printer: Use drop-down menu to select printer type. Port: Use drop-down menu to select COM port. Net Path: If printer selected is a network printer, enter network path. Print Range: Select All for entire document or Selection to print selected area. Orientation: Select Portrait or Landscape. Margins: Set margins here. Printing - Windows XPe XPe supports any plug and play printer. 1010-1010, Rev 02 Installation Instructions 17 Using a Networked Printer - Windows CE and Windows XPe 4 To share a network printer connected to a desktop PC: 1. On your desktop PC, select Start-Settings-Printers and Faxes. 2. Right click on the printer you wish to set as the network computer, then select Properties. The printer properties dialog appears. 3. 4. Select the Sharing tab and select Share this Printer. Assign a name to the printer. Click OK. 1010-1010, Rev 02 18 Ivory Series Installation & Operation Manual Factory Configuration What Comes with the Ivory Series Panel PC? The Ivory Series Panel PC arrives from the factory with the following components: • One Ivory Series Panel PC, preloaded with Microsoft Windows CE.net 5.0 or Windows XPe. • CD containing Ivory Series Installation and Operation Manual, Windows CE/XPe image files, and the software development kit (SDK) for the Ivory Series. Not included with the Ivory Series Panel PC: • HMI configuration software must be purchased separately. The Ivory Series can be configured with any CE or XPe-compatible HMI configuration software. We recommend WebStudio. • Power supply and cabling must be purchased separately. Contact Maple Systems for more information. • Development tools for creating Windows CE/XPe applications. Dip Switch Settings The following table shows factory-configured dip switch settings of the Ivory Series. Calibration Mode SW1 SW2 SW3 SW4 Mode ON OFF OFF OFF Touchscreen OFF ON OFF OFF Reserved OFF OFF ON OFF Boot loader mode OFF OFF OFF ON Reserved OFF OFF OFF OFF Normal Operation Boot Loader Mode This mode allows users to load a new Windows CE or Windows XPe image file. 4 To load a new image file from compact flash: 1. Turn off Panel PC. 1010-10010, Rev 02 Installation Instructions 2. 3. 4. 5. 6. 7. 19 Load the image onto compact flash Insert Compact Flash into unit or Compact Flash reader. Set dip SW3 to ON. Reapply power to the Ivory Series Panel PC. Panel PC will boot in boot loader mode. The image file will automatically load and Panel PC automatically reboots when the download is complete. While loading the CPU LED will flash continuously. The download takes approximately 10 minutes to complete. Be sure to reset all dip switches to OFF before turning on the Panel PC the next time, or it will load in Boot Loader Mode. Contact Maple Systems for information on the operating system image files. 1010-1010, Rev 02 20 1010-1010, Rev 02 Silver Series Installation & Operation Manual Using Windows CE.net and Windows XPe 21 Chapter 2 - Using Windows CE.net & Windows XPe What is WindowsTM CE.net 5.0? The Ivory Series Panel PC is designed to be a Windows CE or Windows XPe platform. MicrosoftÒ WindowsÒ CE is a compact operating system that occupies less storage space or system resources than other operating systems. By its modular nature, it is possible to choose those functions that are useful for specific applications, not only reducing the system resources required, but also reducing start-up time. In the field of industrial automation or for operator interface terminal, this is an appealing feature because the impact of downtime is minimized. Furthermore, the small storage space it needs makes operating systems on solid-state disk possible. Utilities There are several useful utilities that come with the Windows CE.net v. 5.0 operating system of the Ivory Series. Soft Keyboard There are two options available on the Ivory Series for keyboard input - a separate keyboard that can be connected to the USB port or a built-in ‘software keypad’ that can be activated and displayed on the touchscreen of the Panel PC. To use the soft keyboard, click on the small keyboard icon located on the right side of the Task bar. Soft keyboard options include smaller or larger keys and the use of "gestures" for space, backspace, shift and enter. 4To access keyboard options 1. Click Start…Settings..Control Panel. 2. Double click on the Input Panel icon. The Input Panel ialog box appears. 1010-1010 Rev 02 22 Ivory Series Installation & Operation Manual 3. Click Options… System Settings Several system components can be configured using CE.net system settings. Whenever a change is made, the settings must be saved to the registry. See Save Settings section later in this chapter. Backlight Settings The backlight can be configured to operate in backlight saver mode, which directs the backlight to turn off after a certain period of inactivity. 4 To configure the backlight 1. From the desktop, double click on the CECP icon. This will display the System settings dialog. 2.. Click on the LCD Settings tab. 3. 4. Select the backlight setting option you desire in the dropdown box for Turn off backlight if device not used for. Click OK. MAC Address 4 To view the Media Access Controller Address (MAC Address): 1010-1010, Rev 02 Using Windows CE.net and Windows XPe 1. Double-click on the CECP icon on desktop. 2. The system setting dialog box appears. Select the MAC Address tab. 23 3. The network MAC address shows in the block. Save Settings It is possible to save current registry data so that CE.net will use it the next time the computer is booted. It is important to save the registry whenever a change is made to the Panel PC's configuration. 4 To save the registry : 1. Double click CECP icon on desktop. 2. The system setting dialog box appears. Use the arrow key to scroll to the Save tab. 3. 4. Click Save Registry. Click OK. 1010-1010, Rev 02 24 Ivory Series Installation & Operation Manual System Version Displays information about the Panel PC’s installed software. 4 To view the current CE image version: 1. Double click the CECP icon on desktop. 2. The system setting dialog box appears. Use the arrow key to scroll to the System Version tab. The current system version information will be displayed. 3. Select OK. Set Serial Port Mode This setting allows you to set COM1 for RS232, RS485, or RS422 and COM3 for RS232 or RS485. 4 To set serial port mode: 1. 1010-1010, Rev 02 Double click the CECP icon on desktop. Using Windows CE.net and Windows XPe 25 2. The system setting dialog box appears. Use the arrow key to scroll to the Set Serial Port Mode tab. 3. 4. 5. Select COM1 mode from the drop down box. Select COM3 mode from the drop down box. Click OK. Home Directory Change When the Panel PC is configured as a Web Server, this sets the local folder where HTML files are stored. 4 To change the Home Directory: 1. Double click the CECP icon on desktop. 2. The system setting dialog box appears. use the arrow key to scroll to the Home Directory Change tab. 3. 4. 5. Enter the new directory. Select OK. Reboot the computer so that changes take effect. 1010-1010, Rev 02 26 Ivory Series Installation & Operation Manual Contrast This setting sets the display contrast. 4 To adjust LCD contrast: 1. Double click the CECP icon on desktop. 2. The system setting dialog box appears. Use the arrow key to scroll to the Contrast tab. 3. Slide control to desired contrast level. 4. Select OK. NorFlash NorFlash serves as a small-capacity non-volatile hard disk that allows storage of critical application files and data in Flash ROM. This can prevent loss of important data due to power failure. When the registry is backed up using system utilities, it is stored in the NorFlash folder. The NorFlash folder can be located by double clicking My Device from the desktop. Start Up The start up function automatically boots on system boot up. Start up functions are stored in the NorFlash directory. 4 To create a customized start up function: 1. 1010-1010, Rev 02 Double click the My Device icon from the Windows CE desktop. Using Windows CE.net and Windows XPe 2. 3. 4. 27 Double click on the NorFlash folder. Create a new directory and call it start up. Copy executable files to the Startup directory. Remote Desktop Connection This feature allows users to use the Ivory Series Panel PC to connect remotely to another PC. To use the remote desktop connection, the remote PC (which will be controlled by the Ivory Series) must have Windows XP Professional installed on it. 4 To enable Remote Desktop Connection on the 1. 2. Panel PC: Log onto the remote PC as an administrator. Click the Remote Desktop icon, if available. If not, choose Start - My Computer - View System Information. The System Properties Dialog appears. Select the Remote tab. 1010-1010, Rev 02 28 4 Ivory Series Installation & Operation Manual 3. Check the Allow users to connect remotely to this computer checkbox, and then click Select Remote Users… The remote users dialog appears. 4. Click Add.. and add the host computer. Click OK. To connect to the remote PC using the Ivory Series Panel PC: 1. Click on Remote Desktop Connection. The Logon to Windows dialog appears. 2. Type user name, password and domain, if required. Click OK. About Windows XPe Windows XP for Embedded (Windows XPe) Systems is an edition of Windows XP that contains the full feature set of Windows XP Professional, but has restrictions on licensing that requires that it be used in a process-specific application. XPe works in much the same fashion as Windows XP depending on the features provided by the developer (Maple Systems). Discussion of Windows XP operations is beyond the scope of this manual. For information on using XPe, visit Microsoft's website: http://www.microsoft.com/windows/embedded/products/wexpe/default.mspx. 1010-1010, Rev 02 Networking 29 Chapter 3 - Networking Networking Via Ethernet Using Windows CE The Ivory Series Panel PCs are equipped with an Ethernet 10/100Base-T port. The port comes already activated and set to obtain an IP address via DHCP. 4To specify an IP address on a Windows CE Unit: 1. 2. 3. 4. 5. Click the Start button on the Windows Task Bar. Click Settings and then click Network and Dial-Up Connections. Double-click on the CS89501 icon. The EP9312 Ethernet Driver Settings dialog box displays. Under the IP Address tab, select Specify an IP address, then fill in the correct IP address information for your network. To make the change permanent, the settings must be saved to the registry as described in the previous chapter under Save Settings. Networking Via Ethernet Using Windows XPe 4To connect to a network on an Windows XPe unit: 1. 2. 3. 4. 5. Click Start - Network Connections. Double-click Local Area Connection (RealTek RTL8139). Under This connection uses the following items, double click Internet Protocol (TCP/IP). On the General tab, select Obtain an IP address automatically if your network uses a DHCP server; otherwise, select Use the following IP address and then enter the appropriate information. Click OK on each dialog to accept the new settings. Networking via Serial Port Using Windows CE The Ivory Series with built-in Windows CE supports serial connections to host computers. The host computer must install the Microsoft ActiveSync service offered by Microsoft. Use Maple Systems’ cable 7431-0106 to connect the serial ports of the host computer and the Panel PC. Then activate ActiveSync service on the host computer. See the next section for information about setting up communications. The cable drawing can be downloaded here: http://www.maplesystems.com/1029/10290106.pdf . Installing Active Sync ActiveSync is a Microsoft product for connecting to Windows CE devices. The first ActiveSync connection to the Ivory Series must be made via the serial port. Once ActiveSync has been properly installed and opened: 1. 2. 3. 4. 5. 6. 7. Connect the RS232 ActiveSync cable between the PC and the Ivory Series Panel PC's COM1/COM2 port. On the Ivory Series Panel PC, click the Start button, then select Run. The Run dialog box appears. Enter repllog. Do not click the OK button yet. On the PC, click the Next button in the Get Connected dialog box. On the Ivory Series Panel PC, click the OK button in the Run dialog box. ActiveSync should recognize the Ivory Series Panel PC. On the Ivory Series Panel PC, use the CECP utility to save the registration so that the Panel PC will remember the partnership. Double click the CECP icon. This will start the Panel PC’s configuration utility. 1010-1010, Rev 02 30 Ivory Series Installation & Operation Manual 8. Select the Save tab. 9. Click the Save registry button. 10. When the registry has been saved, OK. ActiveSync takes several seconds to scan each serial port. The higher the serial port number (COM1, COM2, COM3, etc.), the longer it will take ActiveSync to recognize the Panel PC. 4If ActiveSync fails to connect to the Ivory Series Panel PC: 1. From ActiveSync’s File menu, select Connection Settings. 2. Check the Allow serial cable or infrared connection to this COM port box, and select the COM port to which the cable is connected. 3. Uncheck the Allow USB… and Allow Network… boxes. The Panel PC does not support ActiveSync via USB because it is a USB Host itself, not a USB client. ActiveSync via network connection is supported, but a serial connection must be established first. 4. Click the Get Connected button, and follow the on-screen instructions. ActiveSync will begin looking for the Panel PC. 5. On the Ivory Series Panel PC, click the Start-Run. 6. In the dialog that is displayed, enter repllog, and click OK. ActiveSync should recognize the Panel PC and connect. 7. On the Ivory Series Panel PC, use the CECP utility to save the registration so that the Panel PC will remember the partnership. Double click the CECP icon. This will start the Panel PC’s configuration utility. 8. Select the Save tab. 9. Click the Save registry button. 10. When the registry has been saved, OK. 1010-1010, Rev 02 Networking 31 Once ActiveSync has established a partnership, a network connection can be set up (the IP addresses of the Panel PC and the PC must be on the same subnet): 1. Disconnect the RS232 cable. 2. Open ActiveSync. 3. Select Connection Settings… from the File menu. 4. Check the Allow network (Ethernet) and Remote Access Service (RAS) server connection with this desktop computer box. 5. Uncheck the Allow Serial… and Allow USB… boxes. 6. Click the Get Connected button, and follow the on-screen instructions. ActiveSync will begin looking for the Ivory Series Panel PC. 7. On the Panel PC, click the Start button, then Run. 8. In the dialog that is displayed, enter repllog /remote, and click the OK. 9· In the next dialog, select Network Connection, and the name of the computer to establish the connection with. Click Connect. The Ethernet connection between the PC and the Panel PC should now be established. Once a connection (serial or Ethernet) has been established, ActiveSync provides a mechanism for transferring files between the Panel PC and the PC. 4 To transfer files between the Panel PC and PC: 1. On the ActiveSync window, click the Explore button. An explorer window will be displayed, showing all the files and folders on the Ivory Series. 2. Files and folders can be dragged and dropped, copied, deleted, renamed, etc., just like any other folder. Web Browser The Microsoft Windows CE operating system included with the Ivory Series has a built-in web browser called Microsoft Pocket Internet Explorer. With Internet Explorer, you can connect to the internet and browse web pages via LAN or dial-up connection. Windows XPe comes with a full version of Internet Explorer for Internet browsing. To access, click the Internet Explorer icon on the desktop or select Start-Internet. 1010-1010, Rev 02 32 . 1010-1010, Rev 02 Ivory Series Installation & Operation Manual Developing Applications 33 Chapter 4 - Developing Applications The Ivory Series comes with either the Microsoft Windows CE.net v. 5.0 or the Windows XP Embedded operating system. Because of this, users can create their own application programs that can be installed onto the Panel PC. Windows CE Tools for building Windows CE applications. • Microsoft Visual Studio • Microsoft eMbedded C++ 4.0 Microsoft Visual Studio 2008 This can be used to develop Windows CE 5.0 Compact Framework applications. For Ivory Series T models, the target processor is an ARM v4i. The X Series target processor is the Intel x86. Microsoft eMbedded Visual C++ 4.0 Please refer to the Microsoft eMbedded Visual C++ 4.0 documentation for the specifics of application programming. Ivory Series SDK The Ivory Series SDK provides developers with access to a set of functions that are specific to the Ivory Series hardware. 4 To install Ivory Series SDK: 1. 2. 4 To use SDK: 1. 2. From the Ivory Series Utility CD, locate the EP931X_SDK.msi file in the \SDK folder. Double click on the file icon to start the installation wizard. Follow the onscreen instructions to install SDK. Open eVC++. In the WCE configuration toolbars, select EP931X Device. Windows XPe XPe has built in support for: • .Net Framework 2.0 • Active Template Library • Common Control Libraries Version 5 • Common Control Libraries Version 6 [6000] • Common Control Libraries Version XPSP2 • Common File Dialogs • Microsoft Visual C++ Run Time (Legacy) 1010-1010, Rev 02 34 Ivory Series Installation & Operation Manual • • • • • • • • Microsoft Visual C++ Run Time Visual Basic 50 Runtime Library Visual Basic 60 Runtime Library Visual C++ Runtime Libraries (Side X Side) Visual C++ Runtime Libraries Policy XPSP2 Visual C++ Runtime Libraries XPSP2 Visual Studio 2008 Any other development tool that can target a Windows XP platform Support for a number of other technologies is also included. Please contact Maple Systems for more information. 1010-1010, Rev 02 Using Third Party Software to Configure the Ivory Series Panel PCs 35 Chapter 5 - Using Third Party Software to Configure the Ivory Series Panel PCs Indusoft WebStudio Although you can use any application development software that is compatible with Windows CE.net 5.0 or Windows XPe, Maple systems recommends WebStudio. For more information, visit our website at www.maplesystems.com. Other HMI Configuration Software There are many companies that offer HMI configuration software that is compatible with Windows CE.net 5.0. We have not tested any of this software with the Ivory Series Panel PCs. Below is a partial list: • Iconics Embedded Genesis32 • Rockwell RSView Machine Edition • GE Fanuc Proficy View Machine Edition 1010-1010 Rev 02 36 1010-1010, Rev 02 Ivory Series Installation & Operation Manual Maintenance and System Configuration 37 Chapter 6 - Maintenance and System Configuration Fuse Maintenance Fuse The fuse used on Ivory Series Panel PCs is: BUSSMANN GDBI Fast Acting, Glass Tube Rating: 250VAC, 1A Size: 5x20mm Make sure the power is off before replacing the fuse. Do not replace the fuse with a fuse that has a different rating. Cleaning the Overlay Use a soft, lint-free cloth to gently wipe dust and debris off of overlay. Do not use alcohol or ammonia based products to clean overlay. For hard-to-remove soil, use a damp soft cloth dipped in warm soapy water. Be certain to wring out any excess fluid. Calibrating the Touchscreen It is necessary to calibrate the touchscreen for use with Windows CE. 1010-1010, Rev 02 38 Ivory Series Installation & Operation Manual 4 To calibrate the touchscreen: 1010-1010, Rev 02 1. Double click the CECP icon. 2. Under the Touchscreen Settings tab, choose Calibrate. 3. The screen displays a "+" sign in the center. Maintenance and System Configuration 39 4. Touch and drag the "+" sign. It will begin to move on its own. 5. The + sign will now move to each corner, starting in the upper left and moving from corner to corner in a counter-clockwise direction. When calibration is done, the + sign disappears. Press the ENTER key or tap the screen to save settings. Touchscreen parameters will be stored in the Panel PC's Flash. 6. System Configuration Like Windows for a desktop PC, Windows CE includes a number of applets for configuration. Certificates Lists and manages Digital Certificates for establishing safe and secure communications. Date/Time Sets the date and time for the unit. Dialing Set up the Dialing Rules used with modems and telephones. Input Panel Configures the pop-up keyboard used when an external keyboard is not available. Internet Options Set the Home and Search pages used by Internet Explorer, as well as connection and security settings. Keyboard Configures an external keyboard. Mouse Configures the mouse. Network and Dial-up Connections Configures additional network and dial-up connections. Owner Sets up user and network identification information. Password Configures passwords for power-up and/or screen saver. 1010-1010, Rev 02 40 Ivory Series Installation & Operation Manual PC Connection Lists the available connections for communicating with another PC. Regional Settings Set the number, date, time, and currency formats. Remove Programs Lists the installed applications, and allows their proper and complete removal. Storage Manager Configures how the Ivory Series' internal non-volatile memory is allocated. System Displays hardware and operating system information. Volume and Sounds Configures the sound volume, and whether sounds are played for various system events. Windows XPe also has a number of applets: MS Word Viewer Allows viewing of word documents. .NET Framework Improves scalability and performance of applications with improved caching, application deployment and updating with ClickOnce, support for a broad array of browsers and devices with ASP.NET 2.0 controls and services. Administration Support Tools Advanced Configuration and Power Interface (ACPI) Common interfaces for hardware recognition, motherboard and device configuration and power management. ASP.NET 2.0 A web application framework that programmers can use to build dynamic web sites, web applications and web services. Common Control Libraries Versions 5, 6 and XPSP2 Provides common user interface (UI) controls. Common File Dialogs Allows for viewing of files in easily recognizable formats such as thumbnails. Communications Port Support for communications ports. Device Manager Allows management of recognized devices. DHCP Client Service Manages network configuration by registering and updating IP addresses and DNS names. 1010-1010, Rev 02 Maintenance and System Configuration 41 Dial-up Networking Common Libraries Provides support for the Dial-Up Networking Common Libraries. This component includes common resources that are used by the Remote Access Service (RAS) client and the RAS Server. Dial-up Server for Windows Enables dial-up connection. DirectMusic Core Provides core functionality for applications using DirectMusic, including loading data and managing the synthesizer. DirectShow A multimedia framework and API for software developers to perform various operations with media files or streams. File Sharing Allows files to be shared between network users. Generic USB Composite Device Provides support for generic USB composite devices. This component supplies the USB Common Class Generic Parent driver in the usbccgp.sys file. This driver represents the interfaces of a composite device as separate devices. The interfaces of a composite device can then be separately managed by different drivers. HTML Help Engine The standard Help system for the Microsoft Windows platform. This component includes the run-time ActiveX controls and executable files that are used to display compiled Help (.chm) files. IIS Web Server A group of Internet servers (including a Web or Hypertext Transfer Protocol server and a FTP server) with additional capabilities for Microsoft’s XPe. Internet Explorer Microsoft's web browser. IP Security Services Internet protocol security. Microsoft Foundation ClassLibrary (Legacy and MFC) A library that wraps portions of the Windows API in C++ classes, including functionality that enables them to use a default application framework. Microsoft Visual C++ Run Time Installs runtime components of Visual C++ Libraries required to run applications developed with Visual C++ on a computer that does not have Visual C++ 2005 installed. Offline Browsing for Internet Explorer Provides the architecture needed to synchronize when your computer is offline and online with Internet Explorer. Registry Editor Allows editing of registries. 1010-1010, Rev 02 42 Ivory Series Installation & Operation Manual Remote Registry Service Enables remote users to modify registry settings on this computer. If this service is stopped, the registry can be modified only by users on this computer. If this service is disabled, any services that explicitly depend on it will fail to start. Shockwave Flash Views rich-media content on the web including animations, interactive presentations, and online entertainment. TCP/IP Networking & Utilities Enables use of TCP/IP protocol. USB 20, 20 Common, Mass Storage Device, Printing Support and User Interface Enables use of USB ports. Visual Basic Runtime Library (50 & 60) Allows Visual Basic applications to be run on the Panel PC. Windows API-User Application programming interfaces. Windows Firewall Control Panel Allows control of the firewall. Windows Image Acquisition Core and User Interface Provides both an application programming interface (API) and a device driver interface (DDI). It supports still digital cameras and scanners. Windows Installer Service Allows installation of Windows applications. 1010-1010, Rev 02 Index 43 Index Installing the OIT . . . . . . . . . . . . . . . . . . 9 A Internet Explorer . . . . . . . . . . . . . . . . . . 31 applets, Windows XPe . . . . . . . . . . . . . . . 40 Internet Explorer . . . . . . . . . . . . . . . . . 31 B Internet Options . . . . . . . . . . . . . . . . . . 39 Backlight Settings . . . . . . . . . . . . . . . . . 22 IP address . . . . . . . . . . . . . . . . . . . . . 14 Boot Loader Mode . . . . . . . . . . . . . . . . . 18 IP address, static . . . . . . . . . . . . . . . . . . 14 Ivory Series CE Touchscreen Computer . . . . . . 2 C Cable Routing . . . . . . . . . . . . . . . . . . . . 9 K Cable Routing and Noise Immunity. . . . . . . . . 9 Keyboard. . . . . . . . . . . . . . . . . . . . . . 39 Calibrating the Touchscreen . . . . . . . . . . . . 37 L CE Compliance . . . . . . . . . . . . . . . . . . . 5 LCD contrast. . . . . . . . . . . . . . . . . . . . 26 Certificates . . . . . . . . . . . . . . . . . . . . . 39 M Compact Flash . . . . . . . . . . . . . . . . . . 15 MAC Address . . . . . . . . . . . . . . . . . . . 23 connect the HMI to power . . . . . . . . . . . . . 10 Maintenance . . . . . . . . . . . . . . . . . . . . 37 Control panel grounding . . . . . . . . . . . . . . 7 Microsoft eMbedded Visual C++ 4.0 . . . . . . . 33 Control panel, requirements. . . . . . . . . . . . . 7 Microsoft support for XPe . . . . . . . . . . . . . 28 D Mount the HMI to the Panel . . . . . . . . . . . . 12 Date/Time . . . . . . . . . . . . . . . . . . . . . 39 N Dialing . . . . . . . . . . . . . . . . . . . . . . . 39 NEMA rating . . . . . . . . . . . . . . . . . . . . 5 Dip Switch Settings . . . . . . . . . . . . . . . . 18 NEMA Rating . . . . . . . . . . . . . . . . . . . . 5 E Network and Dial-up Connections. . . . . . . . . 39 Electrostatic Discharge, managing . . . . . . . . . 5 Networking via Ethernet . . . . . . . . . . . . . . 29 Ethernet. . . . . . . . . . . . . . . . . . . . . 14,29 Noise Immunity . . . . . . . . . . . . . . . . . . . 9 Ethernet, Windows CE. . . . . . . . . . . . . . . 14 NorFlash . . . . . . . . . . . . . . . . . . . . . . 26 Ethernet, Windows XPe . . . . . . . . . . . . . . 15 O F Owner . . . . . . . . . . . . . . . . . . . . . . . 39 FCC Class A Rating. . . . . . . . . . . . . . . . . 5 P Fuse Maintenance . . . . . . . . . . . . . . . . . 37 Panel Preparation . . . . . . . . . . . . . . . . . 11 G PC Connection . . . . . . . . . . . . . . . . . . . 40 Grounding . . . . . . . . . . . . . . . . . . . . . . 7 Port wiring . . . . . . . . . . . . . . . . . . . . . 9 H Power Supply . . . . . . . . . . . . . . . . . . . . 8 Home Directory . . . . . . . . . . . . . . . . . . 25 Power supply requirements . . . . . . . . . . . . . 8 I Indusoft WebStudio . . . . . . . . . . . . . . . . 35 Installing Active Sync . . . . . . . . . . . . . . . 29 printer, networked . . . . . . . . . . . . . . . . . 16 Printing - Windows CE . . . . . . . . . . . . . . 16 Printing - Windows XPe . . . . . . . . . . . . . . 16 1010-1010, Rev 02 44 printing, Windows CE . . . . . . . . . . . . . . . 16 printing, Windows XPe . . . . . . . . . . . . . . 16 R Regional Settings . . . . . . . . . . . . . . . . . 40 registry . . . . . . . . . . . . . . . . . . . . . . 23 Remote Desktop . . . . . . . . . . . . . . . . . . 27 S Safety Precautions. . . . . . . . . . . . . . . . . . 6 Save Settings. . . . . . . . . . . . . . . . . . . . 23 Serial Port . . . . . . . . . . . . . . . . . . . . . 24 Soft Keyboard . . . . . . . . . . . . . . . . . . . 21 System Configuration . . . . . . . . . . . . . . . 39 System Settings . . . . . . . . . . . . . . . . . . 22 System Version . . . . . . . . . . . . . . . . . . 24 T transfer files . . . . . . . . . . . . . . . . . . . 31 U Unpacking . . . . . . . . . . . . . . . . . . . . . . 5 USB Client Port . . . . . . . . . . . . . . . . . . 15 USB Master Port . . . . . . . . . . . . . . . . . . 15 Utilities. . . . . . . . . . . . . . . . . . . . . . . 21 W Windows XP Embedded . . . . . . . . . . . . . . 3 Windows XPe . . . . . . . . . . . . . . . . . . 3,28 X XPe . . . . . . . . . . . . . . . . . . . . . . . 3,28 1010-1010, Rev 02 Ivory Series Installation & Operation Manual