1
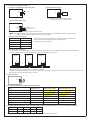
LCM-40(DA), LCM-60(DA) installation ma nual
1
1
0M
F
M
S
E
L
V
Features
‧180~295VAC input only
‧Built-in active PFC
‧Output current level selectable by DIP switch
‧Built-in DALI interface and push dimming function (DA version)
‧Built-in 0~10Vdc and PWM signal dimming function (Non-DA version)
‧Power supply synchronization function up to 10 units
‧Temperature compensation function by external NTC
‧ClassⅡpower unit, ungrounded
‧Built-in 12V/50mA auxiliary output
‧Full plastic case enclosed
‧No load power consumption <1W (1.2W for DA version)
‧Protections: Short circuit / Over voltage / Over temperature
‧3 year warranty
‧Suitable for intelligent LED lighting
Wiring
‧Housing with cable clamp for remote installation
‧Use wires with an adequate cross-section (see 5)
‧Use suitable mounting tools to do the wiring and mounting (see 5)
‧Use a MCB (miniature circuit breaker) with an adequate current rating to protect the lighting system (see 6)
Environmental limitations
‧Maximum ambient temperature must not exceed 60℃
‧Always allow adequate ventilation clearances, 50mm, around the unit in use to prevent it from overheating
‧Only install the unit in interior environments
Cautions
‧This unit must be installed by a qualified electrician
‧This unit is not suitable for applications that DC/DC converters are connected before LED lamps
Settings and connections
1. Output Current Level Settings
The LCM can provide various output currents by setting the DIP switch. The settings of the DIP switch are shown in the tables below.
LCM-40(DA)
Voltage Selectable
range
Current
LCM-60(DA)
1
2
3
4
5
6
Voltage Selectable
range
Current
1
2
3
4
5
6
2-100V
350mA
---
---
---
---
---
---
2-90V
500mA
---
---
---
---
---
---
2-80V
500mA
ON
---
---
---
---
---
2-90V
600mA
ON
---
---
---
---
---
2-67V
600mA
ON
ON
---
---
---
---
2-86V
700mA*
ON
ON
---
---
---
---
2-57V
700mA*
ON
ON
ON
---
---
ON
2-67V
900mA
ON
ON
ON
---
---
ON
2-45V
900mA
ON
ON
ON
ON
---
ON
2-57V
1050mA
ON
ON
ON
ON
---
ON
2-40V
1050mA
ON
ON
ON
ON
ON
ON
2-42V
1400mA
ON
ON
ON
ON
ON
ON
Note : 1.Factory default setting is 700mA.
2.Output voltage and output wattage must not exceed the rated values.
Terminal blocks assignment for LCM
123.5mm
23mm
6 5 4 3 2 1
ON
-Vo
81.5mm
+Vo
+
+
SYN.
-DIM
+DIM
-NTC
+NTC
-FAN
+FAN
DADA+
PUSH
AC/N
AC/L
2. Connection of LED Lamps
Press down the "push button" by a slotted screw driver to insert or remove the cable.
VoVo+
AC/N
AC/L
NEUTRAL (Blue or white)
LIVE (Brown or black)
http://www.meanwell.com
3. Connection of Dimming Functions
a. 0-10Vdc or 10V PWM (non-DA version only)
b. DALI (DA version only)
-
DIMDIM+
0~10VDC
DA+
DA-
+
DALI
contr olle r
Note : Maximum DALI cable length is 300m
(based on a 1.5mm2 or 14AWG cable)
c. Push dim (DA version only)
PUSH
AC/N
AC/L
Push Button
NEUTRAL (Blu e or whit e)
LIVE (Brown or bla ck)
Note: ONLY use open push button without indicator light.
Warning: Risk of short circuit. The push button can only be linked between the PUSH and the AC/L (brown or black).
DO NOT connect the push button to the AC/N (blue or white).
Dimming control mechanism
Function
Pushing time
Turn ON/OFF
0.1 ~ 1 sec
Dim UP/DOWN
1.5 ~ 10 sec
Reset
> 11 sec
None
< 0.05 sec
‧It will always dim up when light intensity is lower than 10%, whereas it will
always dim down when light intensity is higher than 90%
‧Factory dimming setting: 100%
d. Synchronization operation
The lights driven by LCM units (slaves) can be dimmed synchronously through a LCM unit (the master) directly controlled via
0-10Vdc, 10V PWM, DALI or push dim dimming function. The wiring is shown as below.
Master
Slave 1
Slave 2
SYN.
SYN.
SYN.
- + - +
- + - +
- + - +
‧Mating housing for SYN. connectors : JST B2B-XH or equivalent
‧Maximum number of the LCM units : 10 (1 master + 9 slaves)
‧Maximum cable length between each units : 20m (based on a cable with cross-section of 0.15mm2~0.3mm2 or AWG No. of 22 ~ 26)
Note: DO NOT connect dimming circuitry to slaves.
4. NTC Connection
NTCNTC+
5. Recommended Screwdriver, Wire and Torque Setting
Type
The cover
(the blue one)
Screw terminal
(FAN±, NTC±, DIM±)
Push terminal
(ACL/N, PUSH, DA±, Vo±)
Solid wire
-----
ψ0.404 -ψ0.643mm
ψ1.024 -ψ1.628mm
2
0.823 - 2.08mm 2
Stranded wire
-----
0.129 - 0.326mm
American wire gauge
-----
22 - 26AWG
14 - 18AWG
Wire stripping length
-----
7mm (0.27")
10mm (0.39")
Screwdriver
6mm Philips
3mm Philips
3mm Philips
Recommended tightening torque
4.6 kgf-cm (4 lb-in)
2.88 kgf-cm (2.5 lb-in)
-----
Suggested push-down strength
-----
-----
3 - 4 kp (1.36-1.81 lb F )
6. Suggested Maximum Number of the LCM Units that can be Connected to a MCB (miniature circuit breaker) at 230Vac
Model
B10
B16
C10
C16
LCM-40(DA)
10
16
17
28
LCM-60(DA)
9
15
16
26
Note: These calculated values are based on MCB S201 series manufactured by ABB.
http://www.meanwell.com