1
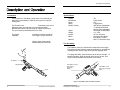
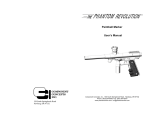
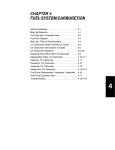
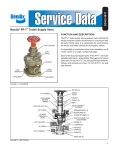
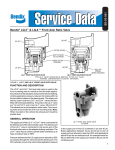
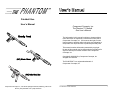
Paintball Gun
User’s Manual
Component Concepts, Inc.
The Phantom™ Paintball
Gun User’s Manual
The information in this manual is subject to change without
notice and does not represent a commitment on the part of
Component Concepts, Inc. CCI reserves the right to make
improvements to products without incurring any obligation to
incorporate such improvements in products previously sold.
This manual contains information protected by copyright.
No part of this manual may be photocopied or reproduced in
any form without prior written consent from Component
Concepts, Inc.
Copyright© 1989-2002 by Component Concepts, Inc.
All rights are reserved.
The PHANTOM™ is a registered trademark of
Component Concepts, Inc.
Component Concepts, Inc., 530 South Springbrook Road, Newberg, OR 97132
Phone: (503) 554-8095 Fax: (503) 554-9370
The Phantom™ User’s Manual
i
Safety-Your Responsibility
Precautions
Safety-Your Responsibility...................................... 1
Description and Operation
Introduction .............................................................
Specifications..........................................................
The Gun Safety.......................................................
CO2 Installation .......................................................
Puncture Adapter Removal…………………………..
Load and Fire Paintballs .........................................
Velocity Adjustment ................................................
2
3
3
4
4
5
6
Service and Maintenance
Field Stripping .........................................................
Cup Seal and O-ring Replacement .........................
General Maintenance..............................................
Service Notes..........................................................
Parts List .................................................................
Exploded View ........................................................
Accessories.............................................................
7
8
8
10
12
13
14
Warranty and Disclaimers
Warranty ................................................................. 15
Disclaimers ............................................................. 16
ii
The Phantom™ User’s Manual
The Phantom is designed and built to provide safe and
dependable service if handled according to instructions.
Read and understand the instructions and warnings in this
manual before using the Phantom. Failure to do so could result
in personal injury or property damage.
Phantom owners must comply with the following basic safety
precautions. These precautions are given here for your safety
and for the protection of the gun. Review them carefully before
using or performing general maintenance or repairs on the gun.
WARNING
The Phantom is a dangerous weapon if mishandled. This gun is not a
toy nor is it intended for use by persons under the age of 18. Follow
the basic rules of safe firearms handling and the laws governing the
ownership and use of gas-fired guns. Careless handling of the
Phantom or any other CO2 powered gun may cause serious injury.
Do not handle this gun until you are thoroughly familiar with its
mechanical characteristics.
Always wear approved eye protection when operating this or any
paintball gun.
Pressurize with CO2 only while the gun is in use.
Keep exposed flesh away from escaping CO2 .
Always carry the gun with the safety “ON”.
Never point the gun in the direction of anything you do not intend
to mark.
Never look directly into the barrel.
Use only .68 caliber paintballs.
Do not attempt to service the gun without first removing the CO2.
Do not fire the gun at a target that is less than three feet away.
For everyone’s protection, exercise common sense and safety
during all situations.
The Phantom™ User’s Manual
1
Description and Operation
Introduction
Specifications
The Phantom is a .68 caliber, pump action, CO2 powered gun
designed to fire paintballs, which burst on impact to mark the
aiming point.
The Phantom cocks and loads a paintball when the pump arm is
pulled fully back and returned to its full forward position.
Releasing the safety and squeezing the trigger fires the gun.
The gun must be pressurized with CO2 to cock.
The design of the trigger firing mechanism includes a rapid fire
capability. With constant pull on the trigger, the gun fires with
each pump action.
Identified in Figure 1 are the Phantom’s major components.
This illustration will aid you in understanding the instructions
contained in this manual.
Caliber
Mechanism
Power
Safety
Muzzle Velocity
Sights
Weight
Length
Barrel
Material
.68
Pump Action
CO2
Trigger Block
180-325 fps (Adjustable)
“F” Stamped less than
200 fps (Non-Adjustable)
Rear sight w/ Slide Rails
1.8 - 2 lbs.
20½ to 34 inches
Aluminum Alloy Roller
Burnished 8-14 inch
6061 T-6 Aluminum Alloy
The Gun Safety
The Phantom safety is a push button located next to the trigger.
The safety provides protection against accidental or unintentional
discharge under normal usage when properly engaged (ON).
Ammo Box
To engage the safety, push the button all the way to the right. To
release the safety, push the button all the way to the left. See
Figure 2 which illustrates the positions of the safety.
Air Adapter
Trigger Safety
Pump
Push button on right
side of gun to
disengage
safety.
Push Button on left
side of gun to engage
safety.
Figure 2. The Safety “ON” and “OFF” Positions.
2
The Phantom™ User’s Manual
The Phantom™ User’s Manual
3
Description and Operation
Description and Operation
CO2 Installation
CO2 Installation
CO2 Tank:
Stock Class:
Place 12 gram CO2 cartridge in stock housing. Screw
stock housing with cartridge onto puncture adapter.
This action pierces cartridge and pressurizes gun.
Thread the CO2 tank into the air adapter. Tighten with
hand to prevent leaks. If you have a leak check O-ring
on tank. The gun is now pressurized.
Puncture Adapter
Tank
12 gram CO2
Air Adapter
Figure 3. Stock Housing CO2 Installation.
Puncture Adapter Removal
Figure 5. CO2 Tank Installation.
To remove the puncture adapter use a 3/8 hex key.
Load and Fire Paintballs
Observe all safety precautions. Pour paintballs into ammo box
or insert paintball tube with paintballs into horizontal feed for
stock class gun.
Hold the gun firmly in the shooting hand while using the other
hand grasp the pump and pull it to the rear as far as it will go;
then push forward in a continuous movement. This action
chambers a paintball and cocks the firing hammer.
The gun is now fully loaded. When ready to fire, push the safety
button to the “OFF” position and squeeze the trigger.
Figure 4. Puncture Adapter Removal.
4
The Phantom™ User’s Manual
The Phantom™ User’s Manual
5
Description and Operation
Velocity adjustment
Field Stripping
Temperature and altitude influences the performance of CO2.
The force generated by the main spring is adjustable to
compensate for these environmental effects.
Although many playing fields allow velocities up to 320 feet per
second (fps), the Phantom performs best at 280 fps.
To adjust velocity:
Observe all safety precautions. Visually check to be
sure that no paintballs remain in the chamber. Use
adjusting rod or unscrew barrel and use standard screw
driver to turn the tuned port compensator. Turning the
compensator clockwise will increase velocity and
counterclockwise will decrease velocity.
Caution: Turning the compensator clockwise more
than six turns unseats it causing inconsistent
performance and damage to threads.
Adjust the nylon set screw to provide enough drag to
prevent the compensator from moving freely. Do not
overtighten, you will strip out the nylon set screw.
Adjustment
Rod
Decrease
Compensator
Drag Set
Screw
WARNING
The Phantom is a dangerous weapon if mishandled. Never clean,
lubricate, disassemble, assemble, or work on the gun while it is
pressurized. Observe safety precautions.
The working parts of the Phantom are either hard anodized,
black-oxide, electroless nickeled or stainless steel. These
materials and plating procedures ensure long life; however, the
bolt and hammer must be kept clean and lightly oiled. Do not
put oil on the O-ring seals.
To field strip:
Remove the CO2 and paintballs.
Remove the front and rear frame mounting
thumbscrews and separate the grip frame assembly
from the breech/barrel assembly.
Pull the air adapter out of the breech. The hammer
and main spring will slide out.
Remove the bolt by pulling the bolt rod up slightly to
release the bolt and tilt the breech so the bolt slides
out.
Increase
WARNING
Any attempted modification, unauthorized service, or tampering
may cause the Phantom to become unsafe or malfunction.
Figure 6. Compensator Adjustment
6
The Phantom™ User’s Manual
The Phantom™ User’s Manual
7
Service and Maintenance
Service and Maintenance
Cup Seal and O-ring Replacement
Service Notes
An extra O-ring and cup seal has been supplied to help you
sustain top performance of your gun. The O-ring is used in both
the bolt and power tube assembly. The white seal is for the cup
seal assembly.
To replace nylon tubing push the collet of the fitting in and pull
the tubing.
Observe safety precautions.
Field strip the air adapter from the breech and use a 11/16 open
end wrench to remove the power tube assembly. Unscrew the
tube from the seal and turn seal over or replace if performance
is poor or during normal operation the gun does not fire.
General Maintenance
Do not store with CO2 or with gun cocked.
The gun must be kept clean for safe and reliable operation.
The bore of the barrel must be clean and dry for ultimate
performance. Use a paintball squeegee and/or swab for a
.68 caliber barrel. The barrel may be unscrewed for easy
cleaning.
To prevent leaks make sure that the end of the nylon tube is cut
smooth and round. The end of the tube must be inserted pass
the O-ring at the base of the fitting.
The vertical air system may have or may be replaced with a
hard line metal tube. To install or replace, remove the rear
thumb screw and pull air adapter back but not out of the breech.
Slide the short angle of metal tube into the vertical adapter.
Rotate the vertical adapter until tube is aligned with center of air
adapter fitting. Push the air adapter back into place and secure
with thumb screw.
Inspect components to determine if they are in proper working
order. If you are unsure, contact Component Concepts, Inc.
or your dealer. If the performance changes dramatically you
may need to return for repair. Before shipping, be absolutely
sure that the CO2 is removed.
8
The Phantom™ User’s Manual
The Phantom™ User’s Manual
9
Service and Maintenance
Service and Maintenance
Service Notes
Service Notes
If your fitting should leak the internal O-ring in the fitting needs
to be replaced. De gas the marker. Remove the tube by pushing in the collet and pulling the tube out. If you have a metal
type tube you also need to remove the rear thumb screw.
Pull and wiggle the collet back and forth to extract from fitting
body. Replace the O-ring. (#9428)
Compression metal line assembly is the newest type vertical
air connection and requires a 7/16 wrench for disassembly.
The rubber sleeve is designed for positive seal with proper
compression.
10
The Phantom™ User’s Manual
The Phantom™ User’s Manual
11
Service and Maintenance
Service and Maintenance
Parts List
Item #
15
16
17
18
19
20
21
21A
22
23
24
25
26
27
28
29
30
31
32
33
34
35
36
37
38
39
40
41
42
43
44
45
46
47
48
49
50
51
52
53
54
55
12
Exploded View
Part#
9115
9103
9116
9062
9051
9052
9045
9049
9048
9068
9200
9212
9311
9300
9306
9307
9304
9305
9316
9029
9070
9003
9011
9013
9410
9038
9039
9806
9415
9805
9414
9015
9024
9458
9424
9429
9434
9435
9417
9206
9205
3045
9441
9442
Description
Retainer
Power Tube, Modified Short
Power Tube Assembly, Modified
Anti-Kink Hammer Assembly
Main Spring
Tuned Port Compensator
Bolt (21A, 14)
Nylon Set Screw 10-32x1/8”
Bolt Assembly (TPC)
Adjusting Rod, Hex ¼”
Pump
Bolt Rod with Nut
8-32 Thumbscrew, Front
Frame Assembly (28,29,30,31)
Lock Washer, ¼”
Grip Screw, 1/4-20x3/4” SHCS
Grip Cover
Grip
10-32 Thumbscrew, Rear
Feed Port Cover
Adjusting Rod (TPC)
Breech, Top Feeding
Horizontal Feed
Screw 8-32x5/8” SHCS
Stock Housing
Puncture Pin Assembly (includes #40)
Puncture Seal
O-ring, #77-614
Stock Puncture Adapter Assembly (39,40,41,43)
O-ring, #15
10 Round Extension Tube
15 Round Extension Tube
Ball Retainer
Vertical Adapter Screw 8-32x1/4” BHSS
Vertical Adapter
Push-to-Connect Elbow
Vibra-Lock Elbow
Metal High Pressure Tube
Air Adapter Side Fitting
Nylon Washer
Return Spring
45 Grip Frame
Sleeve
Compression Nut
The Phantom™ User’s Manual
Item #
2
3
4
5
9
10
11
12
13
14
Part#
9009
9006
9007
9008
9069
9420
9036
9112
9111
9113
9110
9046
The Phantom™ User’s Manual
Description
Gravity Feed Breech
11” Screw-in Barrel
9” Screw-in Barrel
14” Screw-in Barrel
Hex to Slot, Adjusting Rod Adapter
Air Adapter
Valve Spring
Cup
Seal
Eyelet
Cup Seal Assembly (10,11,12)
O-ring, #12
13
Service and Maintenance
Warranty
Accessories
To confirm your warranty, fill out and return the enclosed
warranty registration card.
Bottom Line Air Adapter
3090
SS Braided Air Line
9439
Hose Adapter
9455
The 180-day limited warranty begins on the date of purchase.
This warranty applies to all models of the Phantom products
and accessories manufactured or sold by Component Concepts,
Inc. (CCI).
You are the owner if you are the original purchaser of the
Phantom products from either CCI or an authorized dealer. This
warranty only applies to original owners and is not transferable.
CCI pledges to you, the owner, that the Phantom products are
free from defects in materials and workmanship for 180 days
from the date of purchase.
Hard Line Kit
9460
45 Style Grip
3045
During the term of this warranty, at no additional charge to the
owner, excluding shipping, CCI will repair or replace any
defective parts of the Phantom products with new or, at the
option of CCI, refurbished parts.
The owner must prepay any shipping charges. In addition, the
owner is responsible for insuring any product returned and
assumes the risk of loss during shipping. All parts and products
replaced under this warranty become the property of CCI.
Vertical Adapter Kit
9467
Telescope "T" Stock
9325
45 Air Adapter
3050
To obtain this repair or replacement service, the owner must
return the entire Phantom product to:
Component Concepts, Inc.
530 South Springbrook Road
Newberg, OR 97132
We are open 9AM to 5PM PST Monday through Friday.
“L” Stock Adapter
9327
Telephone: (503) 554-8095
Fax: (503) 554-9370
Twist Change Adapter
9042
The Phantom™ User’s Manual
14
The Phantom™ User’s Manual
15
Warranty and Disclaimers
FOLD DOWN AND TAPE AFTER COMPLETING REGISTRATION FORM
Disclaimers
This limited warranty does not extend to any products not
purchased from Component Concepts, Inc. (CCI) or an
authorized dealer. This limited warranty also does not extend to
any products damaged or made defective (A) as a accident,
misuse, abuse; (B) by the use of parts not manufactured or sold
by CCI; (C) by modifications, or (D) as a result of service or
modifications by anyone other than CCI or an authorized dealer
or service provider.
Except as expressly set forth above, CCI makes no other
warranties, express or implied, including, but not limited to, any
implied warranties of merchantability and fitness for a purpose
beyond its designed use, and CCI expressly disclaims all
warranties not stated here.
In the event the Phantom product is not free from defects as
warranted above, your sole remedy as the owner shall be repair
or replacement as provided above. CCI will not be liable to the
owner, or to any user, for any damages, including any incidental
or consequential damages, expenses, lost wages, or other
damages arising out of the use of or inability to use safely CCI
products.
(fold)
Warranty Registration Card
Product Purchased________________________________Price ____________________
Some states do not allow the exclusion or limitation of incidental
or consequential damages for consumer products, and some do
not allow limitations on how long an implied warranty last, so the
above limitations may not apply to you. This warranty gives you
specific legal rights and you also have other rights which vary
from state to state.
Serial Number_________________________________Date Purchased ______________
Owner __________________________________________________________________
Address _________________________________________________________________
City_______________________State_____Zip_________Phone____________________
Purchased From __________________________________________________________
Address _________________________________________________________________
City_______________________State_____Zip_________Phone____________________
Comments _______________________________________________________________
________________________________________________________________________
________________________________________________________________________
________________________________________________________________________
16
The Phantom™ User’s Manual
______________________
______________________
______________________
PLACE
NECESSARY
POSTAGE
HERE
Component Concepts, Inc.
530 South Springbrook Road
Newberg, OR 97132
530 South Springbrook Road
Newberg, OR 97132
www.phantomonline.com