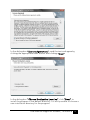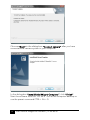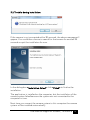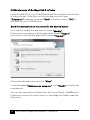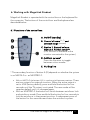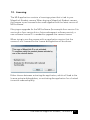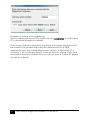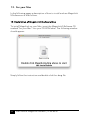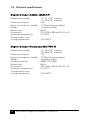
1
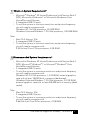
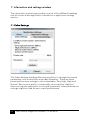
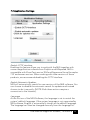
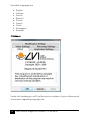
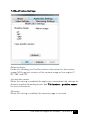
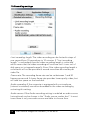
User Manual MagniLink Student This product is manufactured by: LVI Low Vision International AB, Verkstadsgatan 5, 352 46 Växjö, SWEDEN Copyright 2010 LVI Low Vision International AB MagniLink® Student CONTENTS 1. GENERAL INFORMATION ........................................................... 4 1.1 MINIMUM SYSTEM REQUIREMENTS*...................................................... 5 1.2 RECOMMENDED SYSTEM REQUIREMENTS* ............................................. 5 2. SAFETY INFORMATION .............................................................. 7 3. FCC STATEMENT (USA AND CANADA ONLY) ........................... 8 4. INSTALLATION OF MAGNILINK S .............................................. 9 4.1 UNPACKING .................................................................................. 9 4.2 PACKING ........................................................................................ 9 4.3 CONNECTION GUIDE FOR THE MAGNILINK STUDENT .............................. 10 4.4 ACCESSORIES ................................................................................ 11 4.5 INDICATOR LAMP ON THE SYSTEM....................................................... 11 5. FOR YOUR PC ............................................................................ 12 5.1 INSTALLATION OF MAGNILINK S SOFTWARE ......................................... 12 5.2 TROUBLE DURING INSTALLATION ........................................................ 15 5.3 MAINTENANCE OF THE MAGNILINK S SOFTWARE .................................. 16 6. WORKING WITH MAGNILINK STUDENT .................................. 17 6.1 FUNCTIONS OF THE CONTROL BOX ..................................................... 17 6.2 FUNCTIONS OF THE KEYBOARD .......................................................... 18 7. INFORMATION AND SETTINGS WINDOW .............................. 24 7.1 VIDEO SETTINGS ............................................................................ 24 7.2 APPLICATION SETTINGS ................................................................... 25 7.3 ABOUT ........................................................................................ 26 7.4 MODIFICATION SETTINGS ................................................................ 27 7.5 RECORDING SETTINGS ..................................................................... 28 8. VIDEO RECORDING .................................................................. 29 9. TILT FUNCTION – POSITION SENSOR ..................................... 30 10. LICENSING ................................................................................ 31 11. MS WINDOWS COMMANDS .................................................... 33 12. FOR YOUR MAC ........................................................................ 34 12.1 INSTALLATION OF MAGNILINK S SOFTWARE MAC ................................ 34 13. WORKING WITH MAGNILINK STUDENT .................................. 36 13.1 FUNCTIONS OF THE CONTROL BOX ................................................... 36 13.2 FUNCTIONS OF THE KEYBOARD ........................................................ 37 2 User manual MagniLink Student | 79 40 657d 13.3 GESTURES .................................................................................. 41 14. INFORMATION AND SETTINGS WINDOW .............................. 42 14.1 VIDEO SETTINGS .......................................................................... 42 14.2 ABOUT ...................................................................................... 43 14.3 MODIFICATION SETTINGS............................................................... 43 14.4 RECORDING SETTINGS ................................................................... 44 15. VIDEO RECORDING .................................................................. 45 16. TILT FUNCTION – POSITION SENSOR ..................................... 46 17. MAC OS X COMMANDS ........................................................... 47 18. TECHNICAL SPECIFICATIONS .................................................. 48 LVI Low Vision International AB was founded in 1978 and is one of the world’s leading manufacturers of magnifying TV- and computer systems for visually impaired. New products are developed in close cooperation with users and professional personnel of vision rehabilitation. LVI is a Quality System Certified ISO 9001 and Environmental System Certified ISO 14001 company. The information in this manual has been carefully checked and is believed to be accurate. However, LVI assumes no responsibility for any inaccuracies that may be contained in this manual. In no event will LVI be liable for direct, indirect, special, exemplary, incidental, or consequential damages resulting from any defect or omission in this manual. In the interest of continued product development, LVI reserves the right to make improvements in this manual and the products it describes at any time, without notice or obligation. User Manual MagniLink Student | 79 40 657d 3 1. General information Congratulations on your choice of your MagniLink. Our goal is to make you feel satisfied with your choice of supplier and visual aids. MagniLink Student (MLST) is a portable autofocus camera system, for connection to a laptop, stationary computer or VGA-screen. The unit can be controlled by the computer keyboard or through an external control box. MagniLink Student is available in two different models: • MagniLink Student Professional (MLSTPRO-F) is equipped with a High Definition camera and is used with a computer or a VGA monitor. • MagniLink Student Addition (MLSTA-F) is equipped with a standard camera and can furthermore be connected to a TV. Copyright 2010 LVI Low Vision International AB The equipment complies with all requirements for CE approval of medical devices according to directive 93/42/EEC with amendment of directive 2007/47/EC. The MagniLink S Series software is written in such a way that it does not interfere with other software. It has been tested in combination with a variety of software without any conflicts. LVI cannot, however, guarantee compatibility with all other software since the behaviour of such software is outside of LVI’s control. 4 User manual MagniLink Student | 79 40 657d 1.1 Minimum System Requirements* PC: - Microsoft® Windows® XP Home/Professional with Service Pack 2 (SP2), Microsoft® Windows® 7 or Microsoft® Windows® Vista Home/Business/Ultimate - 2 integrated USB 2.0 ports - To use the system in minimum resolution and picture frequency you will need a computer with: Windows XP: 1.6-GHz processor, 512 MB RAM. Windows Vista and Windows 7: 2.0-GHz processor, 1024 MB RAM. Mac: - Mac OS X Version 10.6 - 2 integrated USB 2.0 ports - To use the system in minimum resolution and picture frequency you will need a computer with: 2.53 Hz Intel Core 2 Duo processor, 4 GB RAM 1.2 Recommended System Requirements* PC: - Microsoft® Windows® XP Home/Professional with Service Pack 2 (SP2), Microsoft® Windows® 7 or Microsoft® Windows® Vista Home/Business/Ultimate - 2 integrated USB 2.0 ports - To use the system in maximum resolution and picture frequency you will need a computer with: Windows XP: 2.0-GHz processor, 1.5 GB RAM, external graphics card with at least 128 MB built in memory (dedicated). Windows Vista and Windows 7: 2.0-GHz processor, 2.0 GB RAM, external graphics card with at least 256 MB built in memory (dedicated). Mac: - Mac OS X Version 10.6 - 2 integrated USB 2.0 ports - To use the system in maximum resolution and picture frequency you will need a computer with: 2.66 GHz Intel Core 2 Duo processor, 4 GB RAM User Manual MagniLink Student | 79 40 657d 5 * The MagniLink Student has been tested on several computers at LVI without any problems, but there is no guarantee that it will work on all computers following the specification. LVI recommends that you test your MagniLink Student together with the computer you intend to buy, in order to confirm their compatibility. Higher computer specifications render possible higher camera performance. Warning! Do not connect the camera system before installing the MagniLink S software. The installation requires administrator’s rights on the computer and that the installation is run in the context of the intended user. 6 User manual MagniLink Student | 79 40 657d 2. Safety information MagniLink Student is only intended for use as a reading aid in an indoor environment. It is important that the only external power adapter used is the one belonging to the MagniLink Student. The external power adapter has a red mark and is to be connected to the socket on the MagniLink Student that also has a red mark. Using the wrong external power adapter can cause severe damage to both the system and the computer. Devices that will be connected to the system such as VGA monitors or computers must comply with general electrical safety regulations for the current country. The system is delivered with a round base. To avoid injuries, always disconnect the camera from the base before lifting the camera. Never operate the product if the unit has been exposed to water, rain or other liquids, or if the casing is damaged. Unplug the USB cables and have the product inspected by a service technician before further use. During transportation MagniLink Student is folded together. Hold the camera arm steady while folding or unfolding it. Fold the camera arm for further transportation. Moving the system from a cold to a warm place may cause condensation (water droplets) on its internal surfaces or on the lens. To avoid condensation install the system in the room at least 30 minutes before use. Do not exposure the system to sudden or extreme changes in temperature. If cleaning is required, unplug the USB cables and use a slightly damp (not wet) cloth. Only use water or a detergent specially made for cleaning monitors and computers. If you are unable to restore normal operation by following the operation instructions, do not attempt any further adjustments. Unplug the USB cables and call your dealer or service technician. Use only replacement parts specified by LVI. In uncertainty, please contact your supplier. User Manual MagniLink Student | 79 40 657d 7 3. FCC statement (USA and Canada only) This device complies with Part 15 of the FCC rules. Operation is subject to the following two conditions: (1) This device may not cause harmful interference. (2) This device must accept interference received, including interference that may cause undesired operation. Class B Digital Device This equipment has been tested and found to comply with the limits for a Class B digital device pursuant to Part 15 of the FCC rules. These limits are designed to provide reasonable protection against harmful interference in a residential installation. This equipment generates, uses, and can radiate radio frequency energy and, if not installed and used in accordance with the instructions, may cause harmful interference to radio communications. However, there is no guarantee that interference will not occur in a particular installation. If this equipment does cause harmful interference to radio or television reception, which can be determined by turning the equipment off and on, the user is encouraged to try to correct the interference by one or more of the following measures: • Reorient or relocate the receiving antenna. • Increase the separation between the equipment and receiver. • Connect the equipment to an outlet on a circuit different from that to which the receiver is connected. • Consult LVI or an experienced radio/TV technician for help. Caution to the user: The Federal Communications Commission warns the user that changes or modifications of the unit not expressly approved by the party responsible for compliance could void the user’s authority to operate the equipment. To comply with the FCC rules, the system shall only be used with the enclosed LVI power adapter. 8 User manual MagniLink Student | 79 40 657d 4. Installation of MagniLink S Follow these instructions to get started with the MagniLink Student. 4.1 Unpacking MagniLink Student is delivered in a bag containing: • Camera unit • A round plate • External power supply (must be used when the camera is connected to an external screen) • Control box • RCA cable for TV connection (only MLSTA) • Software CD-ROM Inspect the package for exterior damage. Note that severe damage should be reported to the transport business company. If everything looks fine, put the camera unit in the round base and place it under the laptop or wherever you want. To avoid injuries, always disconnect the camera from the base before lifting the camera. LVI recommends the user to keep all packing material to be reused for future shipping. 4.2 Packing If the system for some reason is moved or returned, it is important to place the parts in the included case and then place the case in an external box. User Manual MagniLink Student | 79 40 657d 9 4.3 Connection guide for the MagniLink Student When used with a computer only the USB connection is necessary (B). The features can be handled from the keyboard. When used with a VGA monitor or TV monitor the power adapter (C) and control box (E) is necessary. A. B. C. D. 10 Computer USB cables Power adapter VGA monitor E. F. G. Control box (LVI no 1038535) The connections on the unit (backside) TV-monitor (only MLSTA-F) User manual MagniLink Student | 79 40 657d 4.4 Accessories • Laptop bag with space enough for a 15” laptop and the MagniLink Student • Laptop backpack with space enough for a 15” laptop and the MagniLink Student • MagniLink Reading Table (MLRT), portable reading table • MagniLink Docking Station (MLDS), stationary reading table • USB lamp, which is powered from a USB port and gives extra light in dark rooms. 4.5 Indicator lamp on the system For both MLSTA-F and MLSTPRO-F: • Yellow constant light: System is in standby mode, power is on. • Green light flashing: System is starting up. • Green constant light: System is up and running. For MLSTPRO-F only: • Yellow flashing light: Just one USB cable is connected. The other one must be connected too. A red light or a flashing red light indicates a system error. Restart the system by disconnecting all cables and start the system up again. If there is still a red light, please contact a service technician. User Manual MagniLink Student | 79 40 657d 11 5. For your PC In the following pages a description of how to install and use MagniLink S Software on a PC follows. If you are using Mac, turn to page 34. 5.1 Installation of MagniLink S Software Insert the MagniLink S Software CD marked “for your PC” into your CDROM drive and the installation should start in a few seconds. If the Auto run function does not start, type “D:\autorun” under the command “Run” in the Start menu if “D:\” is the letter for your CD-ROM drive. When the installation program starts, follow the instructions on the screen to complete the installation of the software. See below for a more detailed description. In the dialog box “Welcome to the InstallShield Wizard for LVI MagniLink S”, click “Next”. 12 User manual MagniLink Student | 79 40 657d In the dialog box “License Agreement”, read the text and agree by clicking the appropriate radio button and clicking “Next”. In the dialog box “Choose Destination Location”, click “Next” to install the program in the default directory. It is also possible to choose a new installation directory for the program. User Manual MagniLink Student | 79 40 657d 13 Choose “Next” in the dialog box “Connect camera” after you have connected the camera system to your computer. In the dialog box “InstallShield Wizard Complete”, click “Finish”. Start the software from the “LVI MLS” icon at the computer desktop or use the preset command CTRL + Alt + S. 14 User manual MagniLink Student | 79 40 657d 5.2 Trouble during installation If the camera is not connected within 90 seconds, the above message will appear. You could then choose to search for the camera for another 90 seconds or quit the installation for now. In the dialog box “Installation failed”, click “Finish” to finalise the installation. The application is installed on the computer, but the installation of the camera system failed because the system was not connected to the computer in time. Next time you connect the camera system to this computer the camera system will be installed automatically. User Manual MagniLink Student | 79 40 657d 15 5.3 Maintenance of the MagniLink S software Insert the MLS CD in your CD-ROM drive and the installation should start in a few seconds. If the Auto run function does not start, type “D:\autorun” under the command “Run” in the Start menu if “D:\” is the letter for your CD-ROM drive. Read the instructions on the screen for the desired action. If you want to modify the application choose “Modify”. If there are any problems with the application choose “Repair”. If you want to uninstall the application choose “Remove”. Choose the desired action and click “Next”. In the dialog box “Maintenance compete”, click “Finish” to finalise the maintenance. You can also remove the software from the Control Panel – Add/Remove software or from the Uninstall shortcut in the MagniLink folder under the Start menu. 16 User manual MagniLink Student | 79 40 657d 6. Working with MagniLink Student MagniLink Student is operated with the control box or the keyboard for the computer. The buttons of the control box and the keyboard are described below. 6.1 Functions of the control box A. On/Off (standby) B. Control of zoom (+,-) and contrast range (arrows) C. Option 1. Natural colours Option 2. Format switch** (This function is available with a monitor connected to the system) D. Artificial colours* Press the A button to toggle between colour modes E. Guiding line * The secondary function of button A (D) depends on whether the system is an MLSTA-F or an MLSTPRO-F. • With an MLSTA-F the button A (D) is used to switch between monitors. There are two outputs for external monitors. When the active output is set to VGA (factory default), press and hold the button for four seconds until the TV output is activated. The new mode will be saved as default until it is changed again. • With an MLSTPRO-F the button will switch between autofocus lock and autofocus mode. Press and hold the button for four seconds to lock the autofocus in the present position. A subsequent press of the button for four seconds reactivates the autofocus system. User Manual MagniLink Student | 79 40 657d 17 **There are two different picture formats included; 4:3 and 16:9. The system starts in 16:9 (factory default). To change format, press and hold the button for four seconds until the picture format changes. This new format will be saved as default until it is changed again. 6.2 Functions of the keyboard MagniLink Student is presented in a MS Windows application and all features in the system can be controlled from the keyboard. Default hotkey settings from the computer keyboard: F1 Natural colours F2 Positive picture with increased contrast Artificial colours; White/Black, Yellow/Black, Green/Black, Red/Black, Yellow/Blue, White/Blue Press F2 to toggle through the different colours. (Shift + F2 toggles backwards.) F3 Negative picture with increased contrast Artificial colours; Black/White, Black/Yellow, Black/Green, Black/Red, Blue/Yellow, Blue/White Press F3 to toggle through the different colours. (Shift + F3 toggles backwards.) F5 Take snapshot Press F5 to open the Picture saving dialog box. A file name (today’s date and time) and folder (My Pictures) is automatically suggested. Just press Enter to save the picture. If you want to save the picture somewhere else or with another name or format (JPG is standard) you can manually change this. Shift + F5 Take snapshot – fast To save a snapshot picture fast without specifying file name and folder, press Shift + F5. This command will save the snapshot to the My Pictures folder or to the last folder that was selected with F5. Ctrl + F5 Start/Stop video recording Press Ctrl + F5 to open the Video recording dialog box. A file name (today’s date and time) and folder 18 User manual MagniLink Student | 79 40 657d (My Videos) is automatically suggested. Just press Enter to save the video. If you want to save the video somewhere else or with another name or format you can manually change this. Stop the video recording by pressing Ctrl + F5 once again. See Video recording for more information. Ctrl + Shift + F5 Start video recording – fast Press Ctrl + Shift + F5 to start video recording at once, without specifying file name and folder. This command will quick save the video to the My Video folder or to the last folder that was used. See Video recording for more information. F6 View stored snapshots Press F6 to view stored pictures. Mark the picture and press Enter or choose open. The picture is normally opened in the standard Windows pictureviewing program, where you can, for example, magnify the picture. Shift + F6 View last stored snapshot – fast Press Shift + F6 to open the last saved snapshot. If no snapshots have been saved during this program cycle, the functionality will be the same as for F6. Ctrl + F6 View stored videos Press Ctrl + F6 to view recorded video sequences. Mark the video to view and press Enter or choose Open. The video is opened in the standard video viewer. See Video recording for more info regarding video recording. Shift + Ctrl + F6 View last stored video – fast Press Ctrl + Shift + F6 to open the last saved video recording. If no video recording have been saved during this program cycle, the functionality will be the same as for Ctrl + F6. F8 Preset split modes User Manual MagniLink Student | 79 40 657d 19 Press F8 to toggle among the preset split modes. If multiple monitors are used, the split modes will toggle over all monitors, starting with the primary monitor. The window can also be controlled using the mouse or the standard Windows commands (see page 31). F9 Information and settings window Pressing F9 opens up a window in which you can adjust different settings and optimize your MLS. The window contains different headings, see Information and settings window. F11 Return to default settings Press F11 to return to the default settings (normal window, natural colours and normal brightness) Arrow up Zoom in Arrow down Zoom out Arrow right Increase brightness Arrow left Decrease brightness Ctrl + Arrow left Guiding line left/up Ctrl + Arrow up Guiding line left/up Ctrl + Arrow right Guiding line right/down Ctrl + Arrow down Guiding line right/down Ctrl + A 20 Toggle “always on top” This key combination will toggle “always on top” for the application window. If this option is activated, the camera application window will be placed above all other application windows that are not set as “always on top”. This will make the camera application window viewable even if the application window does not have focus and would otherwise have been covered by another application window. This, for example, facilitates writing in Word, while viewing the camera image. User manual MagniLink Student | 79 40 657d Ctrl + L Reset localization Pressing Ctrl + L will reset the application localization settings back to the default language settings. This can be useful if the wrong language is selected. Press Ctrl + L and the settings will return to the previous chosen settings. Ctrl + M Minimizes the application Ctrl + R Rotates the camera picture clockwise Each time you press this key combination the picture rotates 90° (90°, 180°, 270°, 0°). Shift + Ctrl + R Rotates the camera picture counter clockwise Each time you press this key combination the picture rotates 90° counter clockwise (270°, 180°, 90°, 0°). Ctrl + C Disable CCTV interface The CCTV interface mode is activated by default, which makes the MLS software compatible with ZoomText version 9.04 (and later) and SuperNova/ Lunar/LunarPlus 7.01 (and later). When working with older versions of these products, LVI recommends disabling the CCTV interface. Ctrl + Alt + S Global hotkey (fast activation of the MLS software) You can change this by right clicking the MLS icon on the desktop, choosing properties and changing the last letter in the hotkey combination. Ctrl + I Mirror camera image By pressing Ctrl + I, you can mirror the camera image. This is a useful feature if you for example would like to use the camera as a magnifying makeup mirror. Ctrl + F Freeze camera image By pressing this key combination, the camera image is frozen until the key combination is pressed again. Ctrl + J Autofocus on/off (only MLSTPRO-F) User Manual MagniLink Student | 79 40 657d 21 Press this key combination to lock the autofocus in the present position. This could be used, for example, when writing by hand without risk of disturbing the focusing system with the hand or the pen. A subsequent press reactivates the autofocus system. Shift + Ctrl + Arrow left / right Shift + Ctrl + Arrow up / down Pan (Distance camera only) If the camera is a distance camera, this command can be used to pan the camera left or right. Tilt (Distance camera only) If the camera is a distance camera, this command can be used to tilt the camera up or down. The following user functions are available when using MLS together with ZoomText or SuperNova/Lunar/LunarPlus Shift + Arrow left/right Adjusts the width of the video window when video is being shown in a vertical split video window. Shift + Arrow up/down Adjusts the height of the video window when video is being shown in a horizontal split video window. MLS combined with iZoom To get MLS to work with iZoom do the following 1. Start iZoom. 2. While iZoom is running start MLS (last version is 6:08). 3. Press the key combination Ctrl + Alt + c (this activates iZoom's CCTV mode) 4. To switch the position of the MLS-camera window, press Alt + F8. NOTE! if step 2 is not working, (you end up with your desktop without any magnification at all), press ctrl + alt + c again to return to the MLS camera window and then press the F8 key as usual to switch to the split screen. Now in split-screen press the combination ctrl + alt + c again and everything should work. 22 User manual MagniLink Student | 79 40 657d MagniLink S Software can be upgraded when a new version is released. Visit www.lvi.se to learn about the latest features and upgrade your MagniLink Student. User Manual MagniLink Student | 79 40 657d 23 7. Information and settings window The information and settings window consists of five different headings that all contain either application information or application settings options. 7.1 Video Settings The Video Settings heading offers the possibility to change the camera parameters such as resolution and video frequency. There are three preset performance settings to choose between, Very High, High and Normal. Best picture quality is achieved by choosing Very High, but when running the application on low-end computers, lower performance settings might be used for best overall performance. 24 User manual MagniLink Student | 79 40 657d 7.2 Application Settings Enable CCTV interface: Enabling this feature allows you to work with the MLS together with screen magnification software from Dolphin and AiSquared. MLS is compatible with ZoomText version 9.04 and Supernova/Lunar/Lunarplus 7.01 and newer versions. When working with older versions of these products, we recommend disabling the CCTV interface. Enable Automatic Updates: MLS will automatically search for new versions of the MLS software. You can choose to disable the automatic search for updates and instead choose to do it manually. (NOTE: Both these actions require a connection to the Internet). Language At the first run of the MLS Software, the language is set to match the system’s default language. If the system language is not supported by MLS software, English is automatically chosen as the default language. The language can then be changed manually from the language list. User Manual MagniLink Student | 79 40 657d 25 Available languages are • • • • • • • • • English German Danish Spanish Finnish French Dutch Norwegian Swedish 7.3 About Under this heading you will find the version number of your software and information regarding copyright law. 26 User manual MagniLink Student | 79 40 657d 7.4 Modification Settings Rotation Angle Under this heading, you find the rotation alternatives for the camera image. MLS supports rotation of the camera image at four angles: 0°, 90°, 180° and 270°. Use position sensor When this setting is enabled, the application remembers the settings for distance mode and reading mode. See Tilt function – position sensor for more information. Mirroring When this setting is enabled, the camera image is mirrored. User Manual MagniLink Student | 79 40 657d 27 7.5 Recording settings Limit recording length: The video recording can be limited in steps of one second from 10 seconds up to 10 minutes. If “Limit recording length” is unchecked, then the video recording length is unlimited, which means that the video recording will continue until it runs out of disk space or is stopped manually. Even if the video recording length is unlimited it will not be possible to record more than 60 minutes per video file. Frame rate: The recording frame rate can be set between 1 and 30 frames per second. A lower frame rate provides lower quality video, but will take less space on the hard disk. Audio recording: If the computer is equipped with a microphone (internal or external) sound can be added to the video recording by activating this setting. Audio source: If the Audio recording setting is enabled an audio source (microphone) can be chosen in the “Audio source combo box”. In most cases there is only one audio source available to choose from. 28 User manual MagniLink Student | 79 40 657d 8. Video recording Before using the MLS video recording feature, please read this section carefully. The MLS software can record video sequences from the MLS camera in the Windows Media Video (WMV) format. Windows Media Video is a commonly used format for video sequences in Microsoft Windows with several compatible media players to use when viewing the recorded video sequences, for example the Windows Media Player (the MLS is tested together with Windows Media Player 11). MLS can record video both without audio and with audio (such as audio from a microphone). The camera image is viewable in the application window while recording video, but since the video recording is quite CPU demanding, the frame rate of the camera is lowered to 30 Hz while the recording is in progress. This will affect the camera image quality compared to the image quality of 60 Hz frame rate. Since the video recording is relatively CPU demanding, the quality of the recorded video can vary on some computers. In that case, the recording frame rate can be lowered to reduce the CPU load, see Recording Settings. When video recording is started (Ctrl + F5 or Ctrl + Shift + F5) there must be at least 300 MB of free disk space where the video sequence will be stored. If disk space while recording goes below 100 MB, the video recording automatically stops. One minute of video recording at 10 Hz will acquire approximately 65 MB of disk storage. It is recommended to always record on the local hard disk. If the recorded video sequence is needed on another drive, move it to an external storage when recording is finished. External disks may be to slow to use when recording live video. While recording, the F9 menu or the live rotation (Ctrl + R) cannot be accessed. User Manual MagniLink Student | 79 40 657d 29 9. Tilt function – position sensor The MagniLink Student camera delivered with the MLS v6 software is equipped with a position sensor. This sensor enables the application and camera to remember different settings for reading (camera looking downwards) and distance mode. When switching between these modes (when flipping the close-up lens), the settings for the current mode are automatically loaded. Settings that are stored for these two modes are • Artificial colours • Negative/positive/natural mode • Brightness • Zoom level • Guiding line • Camera picture rotation • Camera picture mirroring 30 User manual MagniLink Student | 79 40 657d 10. Licensing The MLS application contains a licensing system that is tied to your MagniLink Student camera. When buying a MagniLink Student camera, the camera is pre-licensed to be used together with the latest version of MLS software. If buying an upgrade for the MLS software (for example from version 5 to version 6 or from version 6 to a future subsequent software version), a new software license ID is needed to upgrade the camera license. When trying to use the camera with an application version that the camera is not licensed for the license dialog below will be shown. Either choose between activating the application, which will lead to the license-activate dialog below, or evaluating the application for a limited time with reduced quality. User Manual MagniLink Student | 79 40 657d 31 Example of license-activating dialog Serial number and license ID in figure are only examples; a valid license ID is obtained through your dealer. If the correct license information is entered, the license information will be stored in the camera and make the camera work for all MLS application up to the licensed application version. If the license ID is incorrect, it will not be possible to continue past this dialog. If you have received an erroneous license ID or you do not have a license ID, please contact your dealer. 32 User manual MagniLink Student | 79 40 657d 11. MS Windows Commands The window can be controlled with the mouse or the standard MS Windows commands. The most common Windows commands in connection with MLS Student are presented below. For more information about MS Windows, please consult your Windows user’s manual. (Please note that if compatible magnification software is used together with the MLS software, the application frame is not present). Switch between open applications Press “Alt” + “Tab” Switch between full screen (maximized window) and normal window With the mouse: Click on the “Restore” icon in the upper right corner of the window (between maximize and minimize). With the keyboard: Press “Alt” + “Spacebar” and the application control menu opens. Choose “Restore” in the menu to go to normal window. Choose “Maximize” to go to full screen. Change the size of the window Make sure you are in the normal window mode (see above). With the mouse: Use the mouse to pull each side of the window to the preferred position. With the keyboard: Press “Alt” + “Space” and choose “Change size” in the application control menu. Set the preferred size of the window using the arrow keys. Ex. 1: To change the height of the window: Start by pressing the “down arrow” key in order to move the bottom of the window and set the preferred position with the “up arrow” key. Ex. 2: To change the width of the window: Start by pressing the “left arrow” key in order to move the left side of the window and then set the preferred position with the “right arrow” key. User Manual MagniLink Student | 79 40 657d 33 12. For your Mac In the following pages a description of how to install and use MagniLink S Software on a Mac follows. 12.1 Installation of MagniLink S Software Mac To install MagniLink on your Mac, insert the MagniLink S Software CD marked “for your Mac” into your CD-ROM drive. The following window should appear. Simply follow the instruction and double click the .dmg file. 34 User manual MagniLink Student | 79 40 657d In the dialog box “License Agreement”, read the text and agree by clicking the button”Agree”. After you pressed the “Agree” button, the following window will appear. To install the MagniLink application, drag the MagniLink icon to the Applications folder. This completes the installation. User Manual MagniLink Student | 79 40 657d 35 13. Working with MagniLink Student MagniLink Student is operated with the control box or the keyboard for the computer. The buttons of the control box and the keyboard are described below. 13.1 Functions of the control box A. On/Off (standby) B. Control of zoom (+,-) and contrast range (arrows) C. Option 1. Natural colours Option 2. Format switch** (This function is available with a monitor connected to the system) D. Artificial colours* Press the A button to toggle between colour modes E. Guiding line * The secondary function of button A (D) depends on whether the system is an MLSTA-F or an MLSTPRO-F. • With an MLSTA-F the button A (D) is used to switch between monitors. There are two outputs for external monitors. When the active output is set to VGA (factory default), press and hold the button for four seconds until the TV output is activated. The new mode will be saved as default until it is changed again. • With an MLSTPRO-F the button will switch between autofocus lock and autofocus mode. Press and hold the button for four seconds to lock the autofocus in the present position. A subsequent press of the button for four seconds reactivates the autofocus system. **There are two different picture formats included; 4:3 and 16:9. The system starts in 16:9 (factory default). To change format, press and hold 36 User manual MagniLink Student | 79 40 657d the button for four seconds until the picture format changes. This new format will be saved as default until it is changed again. 13.2 Functions of the keyboard MagniLink Student is presented in a Mac application and all features in the system can be controlled from the keyboard. If you are using a MacBook and want to use the standard F1, F2, etc. keys without pressing the (fn) key. You can change the keyboard settings. This setting can be accessed from the Apple menu → System Preferences → Hardware → Keyboard. Default hotkey settings from the computer keyboard: fn + F1 Natural colours fn + F2 Positive picture with increased contrast Artificial colours; White/Black, Yellow/Black, Green/Black, Red/Black, Yellow/Blue, White/Blue Press F2 to toggle through the different colours. (Shift + fn + F2 toggles backwards.) fn + F3 Negative picture with increased contrast Artificial colours; Black/White, Black/Yellow, Black/Green, Black/Red, Blue/Yellow, Blue/White Press F3 to toggle through the different colours. (Shift + fn + F3 toggles backwards.) fn + F5 Take snapshot Press fn + F5 to open the Picture saving dialog box. A file name (today’s date and time) and folder (MagniLink) is automatically suggested. Just press Enter to save the picture. If you want to save the picture somewhere else or with another name or format (JPG is standard) you can manually change this. fn + Shift + F5 Take snapshot – fast To save a snapshot picture fast without specifying file name and folder, press fn + Shift + F5. This command will save the snapshot to the MagniLink folder or to the last folder that was selected with F5. User Manual MagniLink Student | 79 40 657d 37 fn + Alt + F5 Start/Stop video recording Press fn + Alt + F5 to open the Video recording dialog box. A file name (today’s date and time) and folder (MagniLink) is automatically suggested. Just press Enter to save the video. If you want to save the video somewhere else or with another name or format you can manually change this. Stop the video recording by pressing fn + Alt + F5 once again. See Video recording for more information. fn + Alt + Shift + F5 Start video recording – fast Press fn + Alt + Shift + F5 to start video recording at once, without specifying file name and folder. This command will quick save the video to the MagniLink folder or to the last folder that was used. See Video recording for more information. fn + F6 View stored snapshots Press fn + F6 to view stored pictures. Mark the picture and press Enter or choose open. The picture is normally opened in the standard Mac pictureviewing program, where you can, for example, magnify the picture. fn + Shift + F6 View last stored snapshot – fast Press fn + Shift + F6 to open the last saved snapshot. If no snapshots have been saved during this program cycle, the functionality will be the same as for fn + F6. fn + Alt + F6 View stored videos Press fn + Alt + F6 to view recorded video sequences. Mark the video to view and press Enter or choose Open. The video is opened in the standard video viewer. See Video recording for more info regarding video recording. fn + Alt + Shift + F6 View last stored video – fast 38 User manual MagniLink Student | 79 40 657d Press fn + Alt + Shift + F6 to open the last saved video recording. If no video recording have been saved during this program cycle, the functionality will be the same as for fn + Alt + F6. fn + F8 Preset split modes Press fn + F8 to toggle among the preset split modes. If multiple monitors are used, the split modes will toggle over all monitors, starting with the primary monitor. The window can also be controlled using the mouse or the standard Mac OS X commands (see page 25). fn + Alt + F9 Information and settings window Pressing fn + Alt + F9 opens up a window in which you can adjust different settings and optimize your MLS. The window contains different headings, see Information and settings window. fn + Alt + F11 Return to default settings Press fn + Alt + F11 to return to the default settings (normal window, natural colours and normal brightness). Arrow up Zoom in Arrow down Zoom out Arrow right Increase brightness Arrow left Decrease brightness Alt + Arrow left Guiding line left/up Alt + Arrow up Guiding line left/up Alt + Arrow right Guiding line right/down Alt + Arrow down Guiding line right/down User Manual MagniLink Student | 79 40 657d 39 Alt + A Toggle “always on top” This key combination will toggle “always on top” for the application window. If this option is activated, the camera application window will be placed above all other application windows that are not set as “always on top”. This will make the camera application window viewable even if the application window does not have focus and would otherwise have been covered by another application window. This, for example, facilitates writing in Word, while viewing the camera image. Cmd + M Minimizes the application Alt + R Rotates the camera picture clockwise Each time you press this key combination the picture rotates 90° (90°, 180°, 270°, 0°). Shift + Alt + R Rotates the camera picture counter clockwise Each time you press this key combination the picture rotates 90° counter clockwise (270°, 180°, 90°, 0°). Alt + I Mirror camera image By pressing Alt + I, you can mirror the camera image. This is a useful feature if you for example would like to use the camera as a magnifying makeup mirror. Alt + F Freeze camera image By pressing this key combination, the camera image is frozen until the key combination is pressed again. Alt + J Autofocus on/off (only MLSTPRO-F) Press this key combination to lock the autofocus in the present position. This could be used, for example, when writing by hand without risk of disturbing the focusing system with the hand or the pen. A subsequent press reactivates the autofocus system. 40 User manual MagniLink Student | 79 40 657d Shift + Arrow left / right Shift + Arrow up / down Pan (Distance camera only) If the camera is a distance camera, this command can be used to pan the camera left or right. Tilt (Distance camera only) If the camera is a distance camera, this command can be used to tilt the camera up or down. Cmd + , Open the preferences dialog This key combination is the standard way to open the preferences dialog in a Mac application. Cmd + ? Open the manual This key combination opens the manual pages in the standard application for viewing pdf-files. 13.3 Gestures If the computer is equipped with a multi-touch pad, some functionality can be controlled from the touchpad. Zoom Place two fingers on the touchpad; pinch to zoom out and expand to zoom in. Rotate camera image Place two fingers on the touchpad and do a rotating motion to rotate the camera image. Pan (Distance camera only) Place two fingers on the touchpad and move them either left or right to pan the camera. Tilt (Distance camera only) Place two fingers on the touchpad and move them either up or down to tilt the camera. User Manual MagniLink Student | 79 40 657d 41 14. Information and settings window The information and settings window consists of four different headings that all contain either application information or application settings options. 14.1 Video Settings The Video Settings heading offers the possibility to change the frame rate of the camera. 42 User manual MagniLink Student | 79 40 657d 14.2 About Under this heading you will find the version number of your software and information regarding copyright law. 14.3 Modification Settings Use position sensor: When this setting is enabled, the application remembers the settings for distance mode and reading mode. See Tilt function – position sensor for more information. User Manual MagniLink Student | 79 40 657d 43 Mirroring: When this setting is enabled, the camera image is mirrored. 14.4 Recording settings Limit recording length: The video recording can be limited in steps of one second from 10 seconds up to 10 minutes. If “Limit recording length” is unchecked, then the video recording length is unlimited, which means that the video recording will continue until it runs out of disk space or is stopped manually. Even if the video recording length is unlimited it will not be possible to record more than 60 minutes per video file. Frame rate: The recording frame rate can be set between 30 and 60 frames per second. A lower frame rate provides lower quality video, but will take less space on the hard disk. Audio recording: If the computer is equipped with a microphone (internal or external) sound can be added to the video recording by activating this setting. 44 User manual MagniLink Student | 79 40 657d 15. Video recording Before using the MLS video recording feature, please read this section carefully. The MLS software can record video sequences from the MLS camera in the QuickTime (.mov) format. QuickTime is a commonly used format for video sequences in Mac OS with several compatible media players to use when viewing the recorded video sequences, for example Apples QuickTime Player (the MLS is tested together with QuickTime 10.0). MLS can record video both without audio and with audio (such as audio from a microphone). The camera image is viewable in the application window while recording video, but since the video recording is quite CPU demanding, the frame rate of the camera is lowered to 30 Hz while the recording is in progress. This will affect the camera image quality compared to the image quality of 60 Hz frame rate. Since the video recording is relatively CPU demanding, the quality of the recorded video can vary on some computers. In that case, the recording frame rate can be lowered to reduce the CPU load, see Recording Settings. When video recording is started (Alt+ F5 or Alt + Shift + F5) there must be at least 300 MB of free disk space where the video sequence will be stored. If disk space while recording goes below 100 MB, the video recording automatically stops. One minute of video recording at 30 Hz will acquire approximately 18 MB of disk storage. It is recommended to always record on the local hard disk. If the recorded video sequence is needed on another drive, move it to an external storage when recording is finished. External disks may be too slow to use when recording live video. While recording, the fn + Alt + F9 menu cannot be accessed. User Manual MagniLink Student | 79 40 657d 45 16. Tilt function – position sensor The MagniLink Student camera delivered with the MagniLink S Software is equipped with a position sensor. This sensor enables the application and camera to remember different settings for reading (camera looking downwards) and distance mode. When switching between these modes (when flipping the close-up lens), the settings for the current mode are automatically loaded. Settings that are stored for these two modes are • Artificial colours • Negative/positive/natural mode • Brightness • Zoom level • Guiding line • Camera picture mirroring 46 User manual MagniLink Student | 79 40 657d 17. Mac OS X Commands The window can be controlled with the mouse or the standard Mac OS X commands. The most common Mac OS X commands in connection with MLS Student are presented below. For more information about Mac OS X, please consult your Mac OS X user’s manual. Switch between open applications Press “Cmd” + “Tab” Switch between full screen (maximized window) and normal window With the mouse: Click on the green “+” icon in the upper left corner of the window. Change the size of the window Make sure you are in the normal window mode (see above). With the mouse: Grab the window at the bottom right corner and move the mouse to resize the window. User Manual MagniLink Student | 79 40 657d 47 18. Technical specifications MagniLink Student Addition (MLSTA-F) Magnification range Power consumption Power consumption, standby Weight Refresh rate Dimensions Operation temperature Transportation- and storing temperature 1.4 - 51 x (14” monitor) 1.5 - 55 x (15” monitor) 5W 1.7 W (with power supply) 1.5 kg (incl. base) 60 Hz 310 x 250 x 380 mm (B x D x H) 0 till 30°C -20 till 60°C MagniLink Student Professional (MLSTPRO-F) Magnification range Power consumption Power consumption, standby Weight Camera resolution Refresh rate Dimensions Operation temperature Transportation- and storing temperature 48 1.5 - 56 x (14” monitor) 1.8 - 66 x (15” monitor) 7W 1.9 W (with power supply) 1.6 kg (incl. base) 1280 x 720 (720p) 60 Hz 320 x 250 x 390 mm (B x D x H) 0 till 30°C -20 till 60°C User manual MagniLink Student | 79 40 657d DECLARATION OF CONFORMITY according to the Medical Devices Directive, 93/42/EEC with amendments from directive 2007/47/EC Type of equipment: Reading Aid Brand name or trade mark: MagniLink Type designation: MLSTA-F, MLSTPRO-F Product class: Class 1. Manufacturer: LVI Low Vision International AB Address: Verkstadsgatan 5 S-352 46 Växjö Sweden Web: http://www.lvi.se Phone: Fax: +46 470 - 72 77 00 +46 470 - 72 77 25 As the manufacturer, we declare under our sole responsibility that: the product follows the provisions of the Council Directive 93/42/EEC with amendments from directive 2007/47/EC. we will keep the technical documentation described in section 3 of Annex VII available to the national authorities for a period ending at least five years after the last product has been manufactured. the device meets the Essential Requirements of Annex 1 which applies to it, taken into account the intended purpose of the device. to follow the requirements regarding products placed on the market as described in section 4 of Annex VII. Manufacturer Date Manufacturer´s authorized representative Signature 2010-04-21 Position Managing Director Clarification Erik Bondemark User Manual MagniLink Student | 79 40 657d 49 A comfortable work place around your MagniLink is important! It could be useful to keep the following in mind. - The chair should have a backrest. - The seat of the chair should be of a height that does not make your legs become numb. - Let your feet rest on the floor. - The reading table should be at a height that allows your forearm to rest horizontally on the table. - Shield off daylight. Lights from ceiling lamps, table lamps and windows can be reflected on the monitor. - Always consult an ergonomist to get the best working position for your needs. Disposal of old Electrical & Electronic Equipment (Applicable throughout the European Union and other European countries with separate collection programs) This symbol, found on your product or on its packaging, indicates that this product should not be treated as household waste when you wish to dispose of it. Instead, it should be handed over to an applicable collection point for the recycling of electrical and electronic equipment. By ensuring this product is disposed of correctly, you will help prevent potential negative consequences to the environment and human health, which could otherwise be caused by inappropriate disposal of this product. The recycling of materials will help to conserve natural resources. For more detailed information about the recycling of this product, please contact your local city office, household waste disposal service or the retail store where you purchased this product. 50 User manual MagniLink Student | 79 40 657d