1
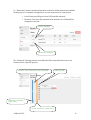
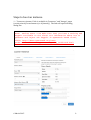
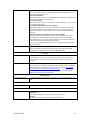
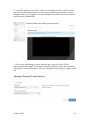
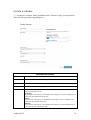
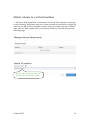
User Manual for Smog Cloud Author: Salman Toor Reviewer: Paviln Mitev Important: Smog is currently running as a test system. UPPMAX is NOT responsible for any data loss. Smog cloud is an UPPMAX resource based on OpenStack cloud suite. The deployed system release is OpenStack’s JUNO. This guide provides basic steps to interact with the Smog cloud via web interface (Dashboard). Like other OpenStack based private clouds, Smog offers following services: 1 – Instance management (NOVA) 2 – Volume management (CINDER) 3 – Network access for the instances (NEUTRON) 4 – Object Store (Soon will be available) (SWIFT) 5 – Image management (GLANCE) 6 – Identity management (KEYSTONE) This document only covers the dashboard (web client), for Comand-‐Line-‐ Interface (CLI) or APIs please refer the latest OpenStack-‐User-‐Guide. http://docs.openstack.org/user-guide/content/ For questions, issues and resource allocation requests, please send a mail to: [email protected] In order to access UPPMAX resources users need to have an UPPMAX account. If you already have an account, you can apply for access to the cloud resources at support email address. Mail should contain following information: Name: Project: Principal Investigator (PI): Project Description (100 words max): Motivation for using clouds (100 words max): 6 March 2015 1 Get started with Smog cloud 1 – Enter the following URL in your preferred browser: http://smog.uppmax.uu.se/dashboard 2 – Enter your username and password. 3 – First page shows the overall resource usage and limit summary. 6 March 2015 2 3a – The page has three major sections: • Information (top frame). User information Project name • Limit summary (middle frame). • Control panel (left frame). Access panel for the resources Boot, view, and terminate VMs Create, delete, attach or detach volumes Access to the available images Create and store access keys, and security groups Access panel to the available Networks 6 March 2015 Panel for managing tenant/project, user(s) and role 3 4 -‐ The “Instances” menu shows the information of running virtual machines (VMs). Terminate running Launch VMs instance Instance name gives detailed information regarding the VM 4a – Following are the possible actions one can perform on the VMs. Save running state of the instance Attach or detach live IP Edit or Add firewall rules to the VMs Access VM via VNC console Different states for the VM 6 March 2015 4 5 – “Volume” menu shows the status of the created volumes. Detailed information about volumes Create new volumes VM name to which volume is attached 5a– Actions on the available volume(s). Volume is available as /dev/vdb User can modify the volume attachment Create another copy of the volume based on its current state 6 March 2015 Allow external volume images to be uploaded in the cloud 5 6-‐ Images are the entire state of the operating system stored on a non-‐volatile form such as files. “Images” menu shows the available images and their status in the system. Images can be private Name gives detailed (project), shared within information about images a group or public 7 – Access and Security page. Useful to write codes that needs to interact with the cloud 6 March 2015 6 7a – Security Groups tab in Access & Security page. Users can define firewall rules for the VMs 7b – By default VMs are not allowed to respond to any network traffic. In order to make a VM respond to e.g. ping or connect to SSH, one needs to open the appropriate ports. 6 March 2015 Allow ping for IPv4 Allow SSH connection on port 22 7 8 – “Networks” menu contains information related to all the networks available in the project. In common settings there are two networks for each project • Local: Each new VM gets a local IP form this network • External: To access the machine from Internet, live IP should be assigned to the VM. Local network External network 8b – Network Topology shows how different VMs, networks and routers are connected for a specific project. Router that connects the networks Running VMs External Network (ext-net) 6 March 2015 Local network (smog-net) 8 Steps to boot an instance 1 – “Create new instance” link is available in “Instances” and “Images” pages (revisit point 4(Create Instance) or 6(Launch)). The link will open following dialog box. Note: Before start a VM make sure that you have a working ssh keypair available in the cloud. For information about how to generate and inject ssh keypair in OpenStack based cloud, visit: http://docs.openstack.org/userguide/content/Launching_Instances_using_Dashboard.html 6 March 2015 9 1b – Security tab 1c – Networking tab Parameters details Instance Name Assign a name to the virtual machine. Flavor Specify the size of the instance to launch. Instance Count To launch multiple instances, enter a value greater than 1. The default is 1. 6 March 2015 10 Instance Boot Source Boot from image If you choose this option, a new field for Image Name displays. You can select the image from the list. Boot from snapshot If you choose this option, a new field for Instance Snapshot displays. You can select the snapshot from the list. Boot from volume If you choose this option, a new field for Volume displays. You can select the volume from the list. Boot from image (creates a new volume) With this option, you can boot from an image and create a volume by entering the Device Size and Device Name for your volume. Click the Delete on Terminate option to delete the volume on terminating the instance. Boot from volume snapshot (creates a new volume) Using this option, you can boot from a volume snapshot and create a new volume by choosing Volume Snapshot from a list and adding a Device Name for your volume. Click the Delete on Terminate option to delete the volume on terminating the instance. Since you are launching an instance from an image, Boot from image is chosen by default. Image Name This field changes based on your previous selection. Since you have chosen to launch an instance using an image, the Image Name field displays. Select the image name from the dropdown list. Security Keypair Specify a key pair. If the image uses a static root password or a static key set (neither is recommended), you do not need to provide a key pair to launch the instance. Security Groups Activate the security groups that you want to assign to the instance. Security groups are a kind of cloud firewall that define which incoming network traffic is forwarded to instances. For details, see the section called “Add a rule to the default security group”. If you have not created any security groups, you can assign only the default security group to the instance. Network tab Selected Networks To add a network to the instance, click the + in the Available Networks field. Port-‐Creation tab Customization Script Specify a customization script that runs after your instance launches. Advanced Option Disk Partition Select the type of disk partition from the dropdown list. Automatic Entire disk is single partition and automatically resizes. Manual Faster build times but requires manual partitioning. 6 March 2015 11 2 – Once the instance is in “active” state, one can login via VNC console (revisit 4a). Click on the instance name to connect your keyboard (sometimes require multiple clicks). For example, to activate displayed console click on the instance name (instance-‐00000258). 3 – The newly build image is active and one can access it via VNC (SSH is inaccessible at this stage). To connect using SSH requires a VM to be attached to a floating IP. “Attach floating IP” option is available from “Instances” page (revisit 4a). 6 March 2015 12 Create a volume 1 – “Create new volume” link is available in the “Volumes” page (revisit point 5). The link will open following dialog box. Parameters details Volume Name Specify a name for the volume. Description Optionally, provide a brief description for the volume. Type Leave this field blank. Size (GB) The size of the volume in gigabytes. Volume Source No source, empty volume Creates an empty volume. Snapshot If you choose this option, a new field for Use snapshot as a source displays. You can select the snapshot from the list. Image If you choose this option, a new field for Use image as a source displays. You can select the image from the list. Volume If you choose this option, a new field for Use volume as a source displays. You can select the volume from the list. 6 March 2015 13 Attach volume to a virtual machine 1 – Based on LVM, OpenStack consisted private clouds offer dynamic connection to the volume(s). Remember that one volume can only be attached to a single VM whereas one VM can have multiple volumes. Select a volume from the “Volumes” page, click on “Edit attachments” (revisit point 5 and 5a). The link will open the following page: Select the instance name to attach the selected volume 6 March 2015 14