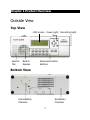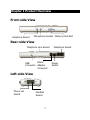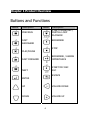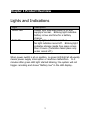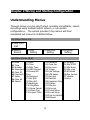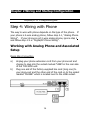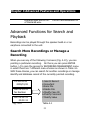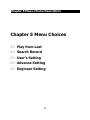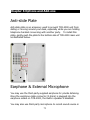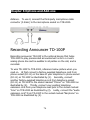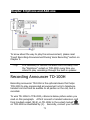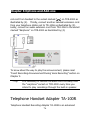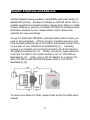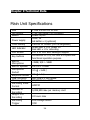
1
MicroLog TCR-2000
User’s Manual
Version 1.20
Contents are subject to change without prior notice.
Not all features stated in this manual are standard.
SW v1.2.0
Table of Contents
MICROLOG TCR-2000 ..........................................................1
USER’S MANUAL...................................................................1
PRECAUTIONS ............................................................................ A
GENERAL NOTICE ........................................................................ I
LIMITED LIABILITY ....................................................................... I
CHAPTER 1 PRODUCT OVERVIEW........................................1
OUTSIDE VIEW .......................................................................... 2
Top View ............................................................................. 2
Bottom View ........................................................................ 2
Front-side View.................................................................... 2
Front-side View.................................................................... 3
Rear-side View..................................................................... 3
Left-side View ...................................................................... 3
BUTTONS AND FUNCTIONS ............................................................ 4
LIGHTS AND INDICATIONS............................................................. 5
CHAPTER 2 WIRING AND STARTUP CONFIGURATION ........6
STEP 1: CONNECT MAINS ADAPTER ................................................. 7
STEP 2: TURN ON POWER ............................................................. 7
Turn Power On .................................................................... 7
Turn Power Off .................................................................... 9
Understanding Menus......................................................... 10
Introduction for working with menus................................... 11
I
Table of Contents
STEP 3: SET UP DATE AND TIME ................................................... 11
Set up date........................................................................ 12
Set up time........................................................................ 12
Configure date format ........................................................ 13
STEP 4: WIRING WITH PHONE ..................................................... 14
Working with Analog Phone and Associated Setup ............... 14
Working with Digital/IP Phone and Associated setup ............ 16
STEP 5 INSERT MEMORY CARD .................................................... 17
Insert memory card ........................................................... 17
Format Memory Card ......................................................... 18
Remove Memory Card ........................................................ 19
STEP 6 TRY ON RECORDING AND PLAYBACK .................................... 19
Try on Recording ............................................................... 19
Try on Playback ................................................................. 20
Adjust Volume ................................................................... 20
CHAPTER 3 BASIC FUNCTIONS AND OPERATIONS............21
RECORD VOICES ....................................................................... 22
Unattended Recording for Outbound Calls ........................... 22
Unattended Recording for Inbound Calls ............................. 23
Manual Recording for Inbound/Outbound Calls .................... 24
Use Microphone to Record Face-to-Face Conversations ........ 24
Assign a Recording for Importance ..................................... 25
Bookmark a Recording during Voice Recording .................... 26
Add Database Info During Voice Recording.......................... 26
Character Input Method ..................................................... 29
Insert Recording Announcement During Voice Recording...... 30
PLAYBACK RECORDING FILE ........................................................ 31
Employ “Instant Playback” Function .................................... 31
Employ “Play from Last” Menu Choice ................................. 32
Move Pointer and Play........................................................ 32
II
Table of Contents
Scroll Screens to Checkup Information of a Recording.......... 34
SEARCH FOR RECORDINGS .......................................................... 36
Use One-touch Speedy Search ............................................ 36
Use “Search All” Function ................................................... 37
CHAPTER 4 ADVANCED FEATURES AND OPERATIONS.......38
PASSWORD PROTECTION ............................................................ 39
Introduction ...................................................................... 39
Way to Enable Protection and Advance Password Change .... 40
Way to Disable Protection................................................... 40
Login Authentication .......................................................... 40
User Password Change....................................................... 41
ADVANCED FUNCTIONS FOR RECORDING ........................................ 42
Choice of Recording Trigger................................................ 42
Gain Adjustment ................................................................ 45
AGC .................................................................................. 45
Cycle Recording ................................................................. 45
Encryption ......................................................................... 46
Store Only Important Call ................................................... 46
Call Monitoring................................................................... 47
Comment Field Text ........................................................... 48
Arrange Customized Recording Announcement .................... 49
ADVANCED FUNCTIONS FOR SEARCH AND PLAYBACK .......................... 51
Search More Recordings or Manage a Recording .................. 51
Insert Bookmark during Playback ........................................ 54
Enable or Disable AVC During Playback ............................... 54
Cancel Noises .................................................................... 55
SEARCH WITH MULTIPLE OPTIONS ................................................ 55
Set Criteria ........................................................................ 55
Clear All Criteria ................................................................. 57
Launch Search Action ......................................................... 57
III
Table of Contents
Play Recordings ................................................................. 58
CHAPTER 5 MENU CHOICES ...............................................59
PLAY FROM LAST (TOP MENU A)................................................... 60
SEARCH RECORD (TOP MENU B) .................................................. 60
USER SETTING (TOP MENU C)..................................................... 60
ADVANCE SETTING (TOP MENU D) ............................................... 63
ENGINEERING SETTING (TOP MENU D).......................................... 68
SYSTEM SOFTWARE UPGRADE PROCEDURE ...................................... 70
CHAPTER 6 OPTIONS AND ADD-ONS .................................72
ANTI-SLIDE PLATE .................................................................... 73
EARPHONE & EXTERNAL MICROPHONE ........................................... 73
RECORDING ANNOUNCER TD-100P .............................................. 74
RECORDING ANNOUNCER TD-100H.............................................. 75
TELEPHONE HANDSET ADAPTER TA-100R ...................................... 76
TOUCH-TONE COMMANDER TC-100P ............................................ 78
EXTENDED MICROPHONE POD MRD-01 ......................................... 79
CHAPTER 7 MAINS ADAPTER AND BATTERY......................81
INTRODUCTION ........................................................................ 82
USING MAINS POWER ADAPTER ................................................... 82
USING CAR POWER ADAPTER....................................................... 82
USING AA BATTERY .................................................................. 83
Install AA Batteries............................................................. 83
AA Battery Low Alert .......................................................... 84
Battery Safety Guidelines.................................................... 84
IV
Table of Contents
SYSTEM CLOCK BATTERY CHANGE ................................................. 85
CHAPTER 8 USB CONNECTION AND COMPUTER
MANAGEMENT....................................................................86
INTRODUCTION TO TCR-2000 PLAYER .......................................... 87
INSTALL TCR-2000 PLAYER ....................................................... 87
CONNECT TO COMPUTER ............................................................ 89
Using USB Cable Connection............................................... 89
Using USB SD/SDHC Card Reader ....................................... 90
DISCONNECT TO COMPUTER ........................................................ 91
CHAPTER 9 TECHNICAL DATA ............................................92
DIAGRAM FOR ALL SUPPORTED ITEMS............................................ 93
APPLICATION SUMMERY FOR ADD-ONS ........................................... 94
MAIN UNIT SPECIFICATIONS........................................................ 96
APPENDIX .............................................................98
SYMBOLS FOR LCD DISPLAY........................................................ 99
SYSTEM ALERT TONE ................................................................100
QUESTIONS AND ANSWERS ........................................................101
TROUBLESHOOTING ..................................................................104
V
General Safety Precautions
Precautions
To maximize the life and safe use of your unit, always be sure to
follow the warnings, precautions and maintenance recommendations
in this user’s guide.
■
■
■
■
■
■
■
To prevent the risk of fire of shock hazards, do not expose this
product to rain or moisture.
Please do not disassemble the product nor to change electronic
components as this may cause electric shock or fire.
Unplug and move power adapter away from 110/220V
commercial power outlet in case you smelled something
burning. Remove AA battery out of the chamber if there is
any.
Keep the product in dry and cool storage if you don’t intend to
use it.
Unplug and move power adapter away from 110/220V
commercial power outlet in case you discovered
over-temperature on this product.
Do not use this product under direct sunshine or aside high
heat apparatus such as fire stove.
Do not use this product at the location that is reachable from
babies or young children.
a
Usage Notice
General Notice
■
■
Unless otherwise you have obtained written consent from
Multisuns, you can’t adapt, translate, or broadcast this manual
for the purpose other than the user’s manual of this product.
Multisuns reserve the right to update or change the content of
this manual without prior notice to the readers.
Limited Liability
Multisuns Corp. liability for death or personal injury caused by their
negligence or for any liability that shall not be capable of limitation
under applicable law shall not be excluded or limited.
1)
2)
3)
Multisuns Corp. aggregate liability in respect of any claim or
series of connected claims, or any other legal or equitable
action shall not exceed the total amount paid by the buyer to
Multisuns Corp’s for the applicable copy or copies of the
products or for the services that gave rise to the claim; and
By applicable law, in no event shall Multisuns Corp. be liable to
resellers or end users for special, exemplary, punitive,
consequential or incidental damages, including loss of profits,
software, data or equipment, costs of procurement of
alternative products; or
Services, loss of contracts, or loss of business opportunity,
whether or not reasonably foreseeable, even if advised of the
possibility of such damages, in any manner relating to the
product or the breach of any warranty or obligation contained.
i
Chapter 1 Product Overview
Chapter 1 Product Overview
Outside View
Buttons and Functions
Lights and Indications
1
Chapter 1 Product Overview
Outside View
Top View
LCD Screen Power Light
Built-in
Mic.
Built-in
Speake
Recording Light
Numeric/Function
Buttons
Bottom View
AA Battery
Chamber
Clock Battery
Chamber
2
Chapter 1 Product Overview
Front-side View
Earphone Socket
Microphone Socket Memory Card Slot
Rear-side View
Telephone Line Socket
Mains
USB
Connector Adapter
Connector
Left-side View
Phone set
Socket
Handset
Socket
3
Telephone Socket
Power
Switch
Chapter 1 Product Overview
Buttons and Functions
Name
Description
Name
PREVIOUS
Description
START PHONE REC /
PARTIAL LOOP
PLAYBACK
BOOKMARK
FAST
BACKWARD
STOP
PLAY/PAUSE
FAST FORWARD
BOOKMARK / ASSIGN
IMPORTANCE
NEXT
START MIC REC
AVC
ESCAPE
ENTER
UP
VOLUME DOWN
DOWN
VOLUME UP
4
Chapter 1 Product Overview
Lights and Indications
Light
Green LED
Red LED
Description
Steady light indicates power is on and
supply is normal. Blinking light indicates
battery is low and time for a battery
change.
Steady light: indicates record on.
No light indicates record off. Blinking light
indicates storage media free space is less
than 2 hours. (Indication takes place only
under record off.)
When power switch is at on position, no green LED light at all usually
means power supply interruption or machine malfunction. In 3
minutes after green LED light started blinking, the system will not
trigger recording and shows “Battery low” in the LED display.
5
Chapter 2 Wiring and Startup Configuration
Chapter 2 Wiring and Startup
Configuration
Step 1: Connect Mains Adapter
Step 2: Set Power On
Step 4: Set Current Date and Time
Step 5: Make Connection with
Phone
Step 6: Insert Memory Card
Step 7: Test recording and playback
6
Chapter 2 Wiring and Startup Configuration
Step 1: Connect mains adapter
Firstly, plug the two-pronged pins to 110VAC (220VAC) power outlet.
Secondly, plug the power adapter connector into DC 5V socket on
the back of the unit.
Step 2: Turn on power
Turn Power On
When the power switch was initially set to on
position, LED screen shows momentarily the
model and system software version number
(Fig. 2-1) and enter into STANDBY screen (Fig.
2-2)
On Fig. 2-2, the first line (2009/01/01)
indicates current date in YYYY/MM/DD format
and the second line (09:01:06) indicates
current time in HH/MM/SS format.
In the case that system detected current date
7
TCR-2000
Ver 1.0.0
Fig. 2-1
2009/01/01
09:01:06
Fig. 2-2
Date
2005/01/01
Fig. 2-3
Chapter 2 Wiring and Startup Configuration
is 2005/01/01, it will automatically show the
date/time setup screen (Fig. 2-3), inviting
users to set up today’s date and time now.
Use the numeric buttons 0-9 to enter today’s
date. Once date entries were done, press
ENTER button (). The system will prompt you
for confirmation (Fig.2-4). Press ENTER
button () to save your date entries.
Save:
Yes
Fig. 2-4
Time
09:01:06
Fig. 2-5
Again, use the numeric buttons 0-9 to enter
Save:
today’s date. Once time entries were done,
Yes
press ENTER button (). The system will
Fig. 2-6
prompt you for confirmation (Fig.2-5). Press
ENTER button () to save your time entries. After completion, you
enter into STANDBY screen.
Tips:
»
»
Date format can be changed to MM/DD/YYYY or
DD/MM/YYY thru “User Setting” (See later part
of this chapter.)
System date will be reset to 2005/01/01 if
power supply interruption occurred under the
circumstance that the lithium battery for
preserving system clock time was not available.
Under STANDBY screen, pressing UP (△) or DOWN (▽) button can
scroll storage information.
Thee are 3 informational screens. First one is
default screen showing today date and current
time. As shown on left-side figure, today’s
date is 2009/01/01 and current time is 09:01:06
a.m.
8
2009/01/01
09:01:06
Chapter 2 Wiring and Startup Configuration
The second one is for the total number of
recordings on SD card. As shown in the
left-side figure, there are 345 recordings on SD
card.
The third one is how is the remaining free
storage space. As shown in left-side figure,
SD card is having free storage space for 125
hours and 43 minutes.
Total Record
345
Rec Remain
125:43
Notations on LED Screen
Graphic
Description
Memory card near full. (< 1 hour)
(Blink)
Memory card full or write protect
(Blink)
Memory card not present
(Blink)
Battery power low
Battery power in use
Turn Power Off
Setting the power switch to OFF position will turn off power.
Caution:
You may crash memory card if you turn off
power or remove memory card out of the slot
when recording is going. Always turn off
power or remove memory card under the time
the system is not taking recording.
9
Chapter 2 Wiring and Startup Configuration
Understanding Menus
Through menus you can play the last recording immediately, search
recordings using multiple search options, or run system
configurations. The system provides 5 top menus and their
associated sub menus as indicated below.
Top Menu Items A-E
A.Play from
Last
B.Search
Record
C.User
Setting
D.Advance
Setting
E.Engineer
Setting
Sub-Menu Items (B-E)
B1.Date
B2.Time
B3.Number
B4.Important
B5.Case ID
B6.Comment
B7.Value
B8.Clear All
B9.Search
C1.Date
C2.Time
C3.Date Type
C4.USB Connect
C5.Format SD
Card
C6.Password
C7.Rec AGC
C8.Play AVC
C9.BackLight
C10.PlayMode
C11.Noise Cancel
C12.Direct Play
C13.Logout Time
D1.Password
D2.Cycle Rec
D3.Rec from
D4.Trigger
D5.Line Voltage
D6.VOX Setup
D7.Gain Set
D8.Field Sel
D9.Important Only
D10.Delete
D11.Monitor
D12.Encrypt
D13.Save Setup
D14.Load Setup
D15.Set to Default
D16.Reboot
10
E1.RingOff
E2.Min DTMF
E3.Min Noise
E4.Min Loop
E5.Kill Mode
E6.Rec Format
E7.Update
Version
Chapter 2 Wiring and Startup Configuration
Introduction for working with menus
a)
b)
c)
d)
e)
f)
Enter into top menu: Press ENTER button ( ) under STANDBY
date/time screen.
Scroll top menu: Press the UP button (△) or DOWN button (▽)
to scroll.
Pick a top menu item: Press ENTER button () and immediately
you access the first available item of that submenu.
Scroll a sub-menu item: Press the UP button (△) or DOWN
button (▽) to scroll.
Pick a sub-menu item: Press ENTER button () and
immediately you access the first available value of that
sub-menu item.
Return to previous menu: Press ESCAPE button (2) and you
return to the previous menu.
Cursor left
(Volume Down)
Scroll up
Cursor right
(Volume Up)
Enter or confirm
Scroll down
Abort and return
to previous menu
Step 3: Set up date and time
Be sure to run date and time c configuration for assuring your voice
11
Chapter 2 Wiring and Startup Configuration
recording to have accurate time stamps.
Set up date
a)
b)
c)
d)
C.User
Enter top menu by pressing ENTER
Setting
button () on STANDBY date/time
Fig.
2-7
screen.
Press DOWN button (▽) to scroll menu choice and pick “C.User
Setting” (Fig. 2-7) by pressing ENTER button (). Now you
should see “C1.Date” screen (Fig. 2-8).
Press ENTER button () on “C1.Date”
C1.Date
screen to launch editing mode. (Fig.
2009/01/01
2-9) Input year, month and date by
Fig. 2-8
pressing numeric buttons 0-9 to input
today’s date. Or, input year, month and
C1.Date
date by pressing LEFT ( ) or RIGHT ( )
2009/01/01
button to move the cursor to a particular
Fig.
2-9
digital and then pressing the UP (△) or
DOWN (▽) button to change the digit
Save: ().
number.
Yes
When you completed your entries, press
Fig.
2-10
ENTER button (). Then you are
prompted with “Save Yes” screen. (Fig.
Save: ().
2-10) Press ENTER button () to
No
confirm the change. Or, press UP
Fig.
2-11
button (△) or DOWN button (▽) to
change “Yes” to “No” (Fig. 2.11), then
press ENTER button () to abort the change.
Set up time
a)
Scroll to “C2.Time” screen (Fig. 2-12) by pressing DOWN
12
Chapter 2 Wiring and Startup Configuration
b)
c)
button (▽) from “C1. Date”screen.
Press ENTER button to launch editing
mode. (Fig. 2-13) Press numeric
buttons 0-9 to input today’s date. If
required, press LEFT ( ) or RIGHT ( )
button to move down the cursor for
editing digit entries.
When you completed your entries, press
ENTER button (). Then you are
prompted with “Save Yes” screen. (Fig.
2-14) Press ENTER button () to
confirm the change. Or, press UP
button (△) or DOWN button (▽) to
change “Yes” to “No” (Fig. 15), then
press ENTER button () to abort the
change.
C2.Time
09:01:06
Fig. 2-12
C2.Time
09:01:06
Fig. 2-13
Save:
Yes
Fig. 2-14
Save: ().
No
Fig. 2-15
Configure date format
a)
b)
c)
Scroll to “C3.Date Type” (Fig. 2-16) by
C3.Date Type
pressing DOWN button (▽).
YYYY/MM/DD
Press UP button (△) or DOWN button (())
to scroll menu choice and then pick your
C3.Date Type
desired format by pressing ENTER button
MM/DD/YYYY
().
C3.Date Type
Press ESCAPTE button (2) once to return
DD/MM/YYYY
to “C.User Setting” and press ESCAPTE
button (2) once again to return STANDBY Fig. 2-16
date/time screen.
Tips:
YYYY/MM/DD = year/month/day
MM/DD/YYYY = month/day /year
13
Chapter 2 Wiring and Startup Configuration
DD/MM/YYYY = day/month/year
Step 4: Wiring with Phone
The way to wire with phone depends on the type of the phone. If
your phone is 2-wire analog phone, follow step 4-1, “Analog Phone
Wiring”. If your phone is not 2-wire analog phone, ignore step 1
and follow step 4-2 or “Digital/IP Phone Wiring”.
Working with Analog Phone and Associated
Setup
Doing Wire Connection
a)
b)
Unplug your phone extension cord from your phone set and
change to plug into the socket marked “LINE”on the rear side
of the TCR-2000 unit.
Plug one end of the factory-supplied line cord (long one) to
your phone set and the other end of the cord on to the socket
marked “PHONE” which is located next to the LINE socket.
14
Chapter 2 Wiring and Startup Configuration
Doing Associated Setup
a)
b)
c)
D3.Rec from
Line
Set “Record from Line”: Press ENTER
Fig. 2-17
button () from STANDBY date/time
screen. Then scroll and pick “D.Advance
D4.Trigger
Setting” and again scroll to “D3.Rec from”
Hook
screen. (Fig. 2-17) If the second line
of the screen doesn’t show “Line”, press
Fig. 2-18
ENTER button and then press DOWN
button (▽) to locate. Press ENTER () from the “D3. Rec
from Line” screen to save your setup.
Set “Trigger Hook”: Press DOWN button
D5.Line
(▽) to enter “D4.Trigger” menu choice.
Voltage -48V
If the second line of the screen doesn’t
Fig. 2-19
show Hook, press ENTER button and
proceed to press DOWN button (▽) to locate. Press ENTER ()
from the “D4. Trigger Hook” screen to save your setup.
Set “Line Voltage -48V”: Press DOWN button (▽) to enter
“D5.Line Voltage” menu choice. If the second line of the
screen shows “-24V” (Fig. 2-20), press
D5.Line
ENTER button and proceed to press
Voltage -24V
DOWN button (▽) to locate “-48V” (Fig.
Fig. 2-20
2-19). Press ENTER () from the “D5.
Line Voltage -48V” screen to save your setup. Use -48V (Fig.
2-19) setting if it is the real case or you found recording cannot
be triggered properly.
Tip:
»
Once “D3. Rec from Line” was set, the system
automatically configure “D4. Trigger Hook” for
you. Therefore you are advised to configure
“D3.Rec from” menu choice first.
15
Chapter 2 Wiring and Startup Configuration
»
The sockets marked “ ” and “ ” on the rear
side of the unit should be left empty if “D3. Rec
from Line” is set.
Working with Digital/IP Phone and
Associated setup
Doing Wire Connection
a)
b)
Unplug your handset coil cord from your phone set body and
change to plug to the socket marked “ ”on the rear side of
the unit.
Plug one end of the factory-supplied handset cord (short one)
to your phone set body and the other end of the cord to the
socket marked “ ”which is located next to the “ ” socket.
Doing Associated Setup
a)
Set “Record from Handset”: Press
D3.Rec from
ENTER button () from STANDBY
Handset
date/time screen. Then scroll and pick
Fig.
2-21
“D.Advance Setting” and again scroll to
“D3.Rec from” screen. (Fig. 2-17) If
the second line of the screen doesn’t show “Handset”, press
ENTER button and then press DOWN button (▽) to locate.
16
Chapter 2 Wiring and Startup Configuration
b)
Press ENTER () from the “D3.Rec from Handset” screen to
save your setup.
Set “Trigger VOX”: Press DOWN button
D4.Trigger
(▽) to enter “D4.Trigger” menu choice.
VOX
If the second line of the screen doesn’t
Fig. 2-22
show “VOX”, press ENTER button and
proceed to press DOWN button (▽) to
locate. Press ENTER () from the “D4. Trigger VOX” screen to
save your setup.
Tips:
»
»
If your setup is“D4.Trigger Manual”, it means
recording will not be automatically started
when you start a call conversation and be
automatically stopped when you finish the call
conversation. It means recording is started
against your depressing of the START PHONE
REC button (▼) and is stopped against your
depressing of the STOP RECORDING button
().
When your setup is “D3. Rec from Handset”,
the sockets marked “LINE” and “PHONE”
should be left empty.
Step 5 Insert Memory Card
Insert memory card
Locate your memory card and find the slot marked “SD”. When you
insert the card into the slot, the gold finger side should face down.
17
Chapter 2 Wiring and Startup Configuration
Gold figure
side faces
down.
Tips:
If you insert memory card with gold figure side up
forcefully, you may damage the card slot.
Supported memory card type is either SD or SDHC.
Format Memory Card
If you inserted an unformatted memory card into the slot, follow the
following procedures to format it.
a)
b)
c)
d)
Enter into top menu by pressing ENTER
C.User
button () from STANDBY date/time
Setting
screen.
Fig. 2-23
Scroll to and pick “C.User Setting” (Fig.
C5.Format SD
2-23) by pressing DOWN button (▽)
Card
twice and pick it by pressing ENTER
button.
Fig. 2-24
Scroll to C5.Format SD Card” menu choice
Format:
by pressing DOWN button (▽) several
Yes
times and pick it by pressing ENTER
Fig. 2-25
button (). (Fig. 2-24)
You are now prompted with “Format: Yes.
Format OK
(Fig. 2-25) Press ENTER button () to
confirm to launch the formatting process.
A few seconds after the ENTER button was Fig. 2-26
18
Chapter 2 Wiring and Startup Configuration
e)
pressed, the system will prompt you with “Format OK” screen.
Or, press DOWN button (▽) to change to “Format: No” and
then press ENTER button () to abort.
Press ESCPATE button (2) to return the “C.User Setting” and
press ESPACE button (2) again to return to the STANDBY
date/time screen.
Caution:
Don’t remove memory card out of slot nor turn off
power during SD card formatting, or voice
recording, or USB connection with computer.
Otherwise you may run the risk of crashing
memory card.
Remove Memory Card
Push the memory card downward gently and release, enabling the
memory card to bounce out slightly.
Step 6 Try on Recording and Playback
Try on Recording
Lift up the handset for initiating an outgoing call.
Tel
-27dB
If the screen now looks like Fig. 2-27, it signals
00:00:01
that recording was started. The red LED light
Fig. 2-27
on the top of the unit should be lit too. Once
recording stopped, STANDBY date/time screen
is back and the red LED light goes off too.
Tips
»
If the setting is “D4. Trigger Manual”, you
require to press the START PHONE REC button (
19
Chapter 2 Wiring and Startup Configuration
»
▼) to start recording and press STOP button
() to stop recording.
If the setting is “D4. Trigger VOX” and recording
can’t be started or stopped in the way it should,
it means there is a need to adjust SN threshold
value thru “D6.VOX Setup”.
Try on Playback
Press PLAYBACK button (f∥) to start playback
for your recording. Your screen should look
like Fig. 2-28. The right arrow symbol (the
graphic on the upper left corner) indicates
“current mode is playback” and 09:35:34
indicates the clock time of the recording and
00:01:03 indicates the length of time the
playback has been initiated. Press STOP
button to stop the playback.
`
09:35:34
00:01:03
Fig. 2-28
Tel 09:35:33
2009/01/01
Fig. 2-29
Adjust Volume
Press LEFT ( ) to decrease or RIGHT ( ) button to increase sound
volume when required. Volume can be set with any value from 1 to
32 and the factory default volume is 20.
20
Chapter 3 Basic Functions and Operations
Chapter 3 Basic Functions and
Operations
Record Voices
Playback Recording Files
Search Recording Files
21
Chapter 3 Basic Functions and Operations
Record Voices
Unattended Recording for Outbound Calls
The articles in this section are provided that your setup is either “D4.
Trigger Hook” or “D4. Trigger VOX”. Skip this section and jump to
section “Manual Recording for Outbound/Inbound Calls” if your setup
is “D4.Trigger Manual”.
Recording is started right after handset was
Tel
-27dB
lifted up. Your LED screen will look like Fig.
00:00:00
3-1. The notation “Tel” on the first line
Fig. 3-1
denotes telephone and it is the source of voice,
and voice strength is “-27dB”.
The figure on the second line dynamically indicates recording has
started for “00” hours, “00” minutes and “00” seconds.
The LED screen will change to show the
5554321
telephone number you have dialed thereafter.
00:00:10
(Fig. 3-2) The figure on the first line indicates
Fig. 3-2
the telephone number you have dialed is
“5554321”. The figure on the second line indicates recording has
started for “00” hours, “00” minutes and “10” seconds.
When the handset is placed back to the cradle, the STANDBY
date/time screen is back.
Tip:
The telephone number you have dialed will be shown
only when your setup is “D3. Rec from Line”.
Use UP button (△) or DOWN button (▽) to scroll the
two screens as shown in Fig. 3-1 and Fig. 3-2 if
22
Chapter 3 Basic Functions and Operations
desired.
Unattended Recording for Inbound Calls
The articles in this section are provided that your setup is either “D4.
Trigger Hook” or “D4. Trigger VOX”. Skip this section and jump to
section “Manual Recording for Outbound/Inbound Calls” if your setup
is “D4.Trigger Manual”.
As soon as your telephone is rung, the LED
screen would look like Fig. 3-3. The number
on the second line indicates Caller ID
“25431122”.
Call From
25431122
Fig. 3-3
Recording is started right after you lifted up the
25431122
handset to answer the call. The LED screen
00:00:02
will follow to erase the text “Call From” and
change to indicate for how long recording has
Fig. 3-4
started as shown in Fig. 3-4. The number on
the first line indicates Caller ID “25431122”.
The number on the second line indicates recording has started for
“00” hours, “00” minutes and “02” seconds.
Recording will stop after you placed the handset back to the cradle.
The STANDBY date/time screen is back accordingly.
Tips:
»
»
If your setup is “D4. Trigger VOX”, recording is
started as soon as your telephone is rung (Fig.
3-1) and the STANDBY date/time screen is
back when recording is stopped.
Use UP button (△) or DOWN button (▽) to
scroll the Caller ID or signal strength screen.
23
Chapter 3 Basic Functions and Operations
»
Caller ID display may not be valid as it
depends on your telephone system and your
public switching network. Consult your
vendor if you have doubt with this feature.
Manual Recording for Inbound/Outbound
Calls
The articles in this section are provided that your setup is “D4.Trigger
Manual”. Read the sections “Unattended Recording for Outbound
Calls” and “Unattended Recording for Inbound Calls” if your setup is
either “D4. Trigger Hook” or “D4. Trigger VOX”.
Press the START PHONE REC button (▼) to trigger recording when
you want to and press STOP button () to stop recording when you
want to.
If you press the START PHONE REC button (▼) once again during
recording, the system immediately closes the ongoing recorded file
and immediately starts to create a new voice file for holding
upcoming voices. In response to the depressing of the START
PHONE REC button (▼) the second time, the system will display
“Div” in the first line (for 3 seconds) and reset the recording time
length to zero (“00:00:00”).
Use Microphone to Record Face-to-Face
Conversations
Press START MIC REC button ( ) when you want to start recording
by using the built-in or external microphone. It is provided that the
system is under STANDBY mode. Once the button is pressed, the
24
Chapter 3 Basic Functions and Operations
LED screen will look like Fig. 3-5. The
notation “Mic” on the first line denotes
Mic
-27dB
microphone and it is the source of voice, and
00:00:02
voice strength is “-27dB”.
Fig. 3-5
The figure on the second line dynamically
indicates recording has started for “00” hours, “00” minutes and “02”
seconds.
Press STOP button () when you want to. The STANDBY date/time
screen is back after STOP button was pressed.
If you press the START MIC REC button ( ) once again during
recording, the system immediately closes the ongoing file and
immediately starts to create a new voice file for holding upcoming
voices. In response to the depressing of the START MIC REC button
( ) the second time, the system will display “Div” in the first line (for
3 seconds) and reset the recording time length to zero (“00:00:00”).
Tips:
»
»
The articles in this section are applied when
either built-in or external microphone is used.
The max length of a recording is 24 hours even
if it is of recording face-to-face recording with
microphone.
Assign a Recording for Importance
To assign a recording for importance, press the STAR button (*).
Once a recording is assigned for importance, the system shall never
erase it even if your setup is “D2.Cycle Rec
Tel
-20dB
On”.
﹡ 00:01:30
The star symbol (*) on the second line (Fig.
Fig. 3-6
25
Chapter 3 Basic Functions and Operations
3-6) indicates the ongoing-recorded file has been assigned for
importance. Assigning a call for importance provides two benefits:
Allow you to use the criteria “important” to filter out “important” calls
for voice reproduction and forbid the system from erasing any
“important” calls under the mode of cycle recording (D2.Cycle Rec
On).
Bookmark a Recording during Voice
Recording
You can press BOOKMARK button ( ) to save a position to your
recording during voice recording for stating that the conversation in
this position is essential. With the bookmark, you can immediately
jump to the first saved position when you start to replay the
recording and you can skip from one bookmark to the next. In a
recording, you can add 3 different bookmarks, but you can’t delete
any of them thereafter.
The Notations 1 (Fig. 3-7), 2, 3
represents the first, second and third
bookmark.
Add Database Info During
Voice Recording
The system provides you 3 fields (Case ID,
Comment and Value), allowing you to insert 3
different types of database information in a
recording during voice recording. When
applying search function, you can narrow down
search results by using the key on these 3
26
Tel
-45dB
1 00:02:55
Fig. 3-7
Case ID
A
Comment
Meeting
Value
0
Fig. 3-8
Chapter 3 Basic Functions and Operations
fields.
Press ENTER button () during voice recording and you enter into
Case ID editing screen. Pressing the ENTER button () the second
time will bring you to Comment editing screen. Pressing the ENTER
button () the third time will bring you to the Value editing screen.
Refer to Fig. 3-8 for these screens. Press ESCAPE button (2)
whenever you want to abort and exit the editing screen.
Insert texts to Case ID field
Use numeric buttons 0-9 to input texts. Case ID field accepts 1-12
characters of texts, which can be any combination from 0-9, a-z, A-Z
and certain ASCII symbols such as “-“ and “%”. Refer to “Character
Input Method” in below section about how to input a-z, A-Z and
ASCII symbols. To erase a digit letter, move cursor to it and press
DOWN button (▽).
If you don’t input any texts, the system will leave the Case ID field to
blank.
Insert texts to Comment field
Use UP button (△) or DOWN button (▽) to scroll system-supplied
choices of texts and press ENTER button () to pick your desired one.
The system-supplied choices of texts are Buy, Sale, Loan, Pay, RMA,
VIP, ROD and Meeting, 8 pieces of texts in total. If you don’t
manually pick a piece of text out from the system-supplied choices
nor type down any characters, the system will automatically take one
of the following actions for you.
a)
Pick “ROD” and insert if the system found you manually trigger
27
Chapter 3 Basic Functions and Operations
b)
c)
call recording thru depressing of Start Phone Rec button for
recording on demand.
Pick “Meeting” and insert if the system found you manually
trigger call recording thru depressing of Start Mic Recording
button for recording via built-in microphone.
Pick nothing and insert blank if the system found itself triggers
call recording thru VOX or loop voltage detect.
If you don’t like any piece of the 8 system-supplied texts (i.e. Buy,
Sale, Load, Pay, RMA, VIP, ROD and Meeting) and you want to have
your own piece of texts, press a numeric button (0-9) to erase the
system-supplied piece and get the system to wait for your inputs.
Same as for Case ID field, use numeric buttons 0-9 to input a new
piece of texts and refer to “Character Input Method” in below section
about how to input a-z, A-Z and ASCII symbols. Comment field
accepts 1-12 characters of texts, which can be any combination from
0-9, a-z, A-Z and certain ASCII symbols such as “-“ and “%”. To
erase a digit letter of your new text input, move cursor to it and press
DOWN button (▽).
Tip
»
You can customize system-supplied texts.
Refer to Chapter 4, “Recording Triggered by VOX
Detection” section for details.
Insert a number to Value field.
Use numeric buttons 0-9 to input data. Value field accepts any digit
number from 1-999999999. To erase a digit letter, move cursor to
it and press DOWN button (▽).
If you don’t input any number, the system will insert “0” (zero) to the
Value field automatically.
28
Chapter 3 Basic Functions and Operations
Character Input Method
To input character digits 0-9, simply press numeric buttons 0-9.
To input English character letters a-z, A-Z and the supported ASCII
symbols press the letter’s corresponding button as indicated in Table
3-1. Then press LEFT (Y) or RIGHT (Z) button to move cursor
back to the digit number you just typed. Lastly press UP button (△)
successively until you get desired character letter.
To change the case of a letter, say from “A” to “a”, move cursor to it
(i.e. “A”) first. Then, press and hold down the UP button and follow
to press zero button (0). Once you release the zero button, you
have switched the letter case. Press the UP button to re-choose your
desired character letter.
Keypad Button
1
2
3
4
5
6
7
8
9
0
Table 3-1
Corresponding Character Letter
1 Space - _ + ! @ # $ %
2ABC
3DEF
4GHI
5JKL
6MNO
7PQRS
8TUV
9WXYZ
0
29
Chapter 3 Basic Functions and Operations
Insert Recording Announcement During
Voice Recording
The system allows you to insert pre-recorded voices (for example,
This call is being recorded for transaction verification purposes.) in a
recording at any time during your conversation. If you have only
one piece of pre-recorded voice, simply press
Tel `0 -27dB
PLAY button(f∥) to trigger the
00:01:30
announcement. (See the notation “`0” on Fig.
Fig. 3-9
3-9.) The system will stop the
announcement when it reaches to end of the
pre-recorded voices. Press STOP button if you like to stop the
announcement earlier. If you like to repeat the announcement,
press the PLAY button(f∥) once again.
The system supports announcement for 10 different pieces of
pre-recorded voices. If you have 5 pieces of pre-recorded voices,
for example, pressing the NEXT button () will immediately jump to
the second announcement. (See the notation “`1” on Fig. 3-9-A.) If
you like to repeat it, press PLAY button(f∥) once again. If you like
to jump to the third announcement (See the
Tel `1 -27dB
notation “`2” on Fig. 3-9-B.), press NEXT
00:01:30
button () again. If you like to replay the first
3-9-A
Fig.
announcement (“`0”), press PREVIOUS button
(). If there is a need to adjust the
Tel `2 -27dB
announcement sound volume, press VOLUME
00:01:30
UP (Z) and VOLUME DOWN button (Y).
Fig. 3-9-B
Tip:
For announcement to be audible to all parties on
the call, and is recorded, the optional recording
announcement adapter TD-100P or TD-100H is a
30
Chapter 3 Basic Functions and Operations
must. Refer to Chapter 6 about the use and
wiring.
Playback Recording File
Employ “Instant Playback” Function
The newest recording is played immediately after you pressed PLAY
button (f∥) on STANDBY date/time screen. Accordingly you jump
into a PLAYBACK screen from STANDBY date/time screen. Press
STOP button () when you want to. Continue to press ESCAPE
button (2) if you want to quit Playback and return to STANDBY
date/time screen.
Tips
»
»
If you setting is “C10.PlayMode All File”,the
system will continue to play back the previous
recording when having finished the playback of
the newest recording. The system shall
repeat the same action until it finishes the
playback for the oldest recording.
If password protection is enabled (D1.
Password on), you will asked to enter the
memory card’s password unless you press the
PLAY button (f∥) in 10 seconds from end of
the last recording. The 10 seconds time is
factory-default value and is
user-programmable.
31
Chapter 3 Basic Functions and Operations
Employ “Play from Last” Menu Choice
Press ENTER button () to enter into the first top menu choice
“A.Play from Last” and the newest recording is played right after the
ETNER button () is pressed the second time. The “Play from Last”
provides same functions as Instant Playback function.
Move Pointer and Play
When playback is ongoing, you may get the screen like Fig. 3-10 in
which the notation “`” on the upper left corner
`
09:35:36
indicates “playback” is being active and the
00:00:01
numbers on the first line“09:35:36” indicates
Fig. 3-10
the call was recorded on 9 o’clock, 35 minutes
and 36 seconds and the numbers on the second
line indicates playback to have been started for one second
(00:00:01).
Press the PLAY button (f∥) to pause the
playback. The notation “||” will appear on the
upper left corner (Fig. 3-11) indicating that
playback is now in a pause. Press the PLAY
button (f∥) again and you resume the
playback.
|| 09:35:36
00:00:01
Fig. 3-11
Press STOP button () to cancel the playback.
Tel 09:35:35
Once a playback is cancelled, PLAYBACK
2009/01/01
STANDBY main screen (e.g. Fig. 3-12) is shown.
Fig.
3-12-A
On Fig. 3-12, the notation “Tel” indicates source
of currently pointed recording is telephone, the numbers “09:35:35”
and “2009/01/01” indicate that recording was made on 9 o’clock 35
minutes and 35 seconds a.m. dated Jan. 1, 2009.
32
Chapter 3 Basic Functions and Operations
Press PREVIOUS button () to move
PLAYBACK pointer to the previous recording.
Mic 08:15:20
Press the NEXT button to move PLAYBACK
2009/01/01
pointer to the next recording. If either of the
Fig. 3-12-B
two buttons is pressed during “playback” period
other than “stop” period, the system immediately jumps to the
correspondent recording and plays the sound from the beginning
part.
Press FAST BACKWARD button () to move PLAYBACK pointer
though the current recording in high speed and will keep on moving
the pointer to the previous recording and pass through it in high
speed too, and will continue to move back until having reached to the
oldest recording. Press FAST FORWARD button () to advance
PLAYBACK pointer through the current recording in high speed and
will continue to go to the next recording and pass through it in high
speed too, and so on until having reached to the newest recording.
During the time the pointer is moving back or advancing, the system
doesn’t play any sounds.
During playback period, press PARTIAL LOOP
A->B
PLAYBACK button (
) and you save the
09:35:45
beginning position of a portion of the recording.
On Fig 3-13-A, the notation “A->B” (in which
Fig. 3-13-A
letter “B” is flashing) on the upper left corner of
the screen indicates that the system is waiting
A->B
to set the end position. Press you PARTIAL
09:35:45
LOOP PLAYBACK button (
) the second
3-13-B
Fig.
time and you save the end position of the
portion of the recording. Following the
buttons you pressed, the system repeatedly plays your chosen
portion of the recording (Fig. 3-13-B). To stop partial loop playback
33
Chapter 3 Basic Functions and Operations
and resume normal playback, press PARTIAL LOOP PLAYBACK
button (
) once again.
To return to the STANDBY date/time screen, press ESCAPE button
(2).
Scroll Screens to Checkup Information of a
Recording
Under PLAYBACK STANDBY screen, press UP
button (U) or DOWN button (V) and you can
scroll 6 different screens for viewing the
information of the currently pointed recording.
Fig 3-14 is an example for the screens of a
typical telephone call recording.
1st Screen: The notation “Tel” indicates source
of voice is telephone and the recording was
made on 11:35:31 a.m. dated January 1, 2009.
The two notations (* and ) indicates that the
recording was assigned “importance” and
bookmarked respectively.
2nd Screen: The notation “Out” indicates an
outgoing call and the recording was made on
11:35:31 and the dialed number is 321-5544.
Tel 11:35:31
* 2009/01/01
Out 11:35:31
321-5544
Len 11:35:31
*
00:01:15
CID 11:35:31
No Case ID
CMT 11:35:31
No Comment
VAL 11:35:31
3rd Screen: The notation “Len” means length of
0
recording, the recording was made on 11:35:31
and which length is 1 minute and 15 seconds
Fig. 3-14
(00:01:15). The notation “*
” means the
recording was assigned “importance”, bookmarked and encrypted.
34
Chapter 3 Basic Functions and Operations
4th Screen: The notation “CID” means “Case ID” and the recording
was made on 11:35:31. As there is no data, the system shows “No
Case ID” on the second line.
5th Screen: The notation “CMT” means Comment” and the recording
was made on 11:35:31. As there is no data, the system shows “No
Comment” on the second line.
6th Screen: The notation “VAL” means Value and the recording was
made on 11:35:31. If you don’t manually input a number, the
system automatically assigns“0” (zero)
Pressing PREVIOUS button () or NEXT button () in any of the 6
screens will lead you to view the same type of information for the
previous or the next pointed recording.
Tips:
»
»
»
In any of the 6 screens, you can press PLAY
button (f∥) to initiate sound replay. Once
the PLAY button is pressed, the time display
(e.g. 11:35:31) will change dynamically along
with the time passed (i.e. 11:35:32, 11:35:33,
11:35:34 and so on).
On the third screen or length information
screen, the figures in the second line (e.g.
00:01.14) represent the time length to the end
of recording so that the figures will count down
dynamically along with the time passed (i.e.
00:01:13, 00:01:12, 00:01:11 and so on).
The system will provide a beep tone once the
pointer has reached to the oldest or the newest
recording.
35
Chapter 3 Basic Functions and Operations
Search for Recordings
Use One-touch Speedy Search
You must be in PLAYBACK standby mode and you can use On-touch
Speedy Search feature. The One-touch Speed Search is done by
either of the two buttons, FAST BACKWARD and FAST FORWARD.
Press FAST BACKWARD button () and you move PLAYBACK pointer
though the current recording in high speed and will keep on moving
the pointer back to the previous recording and pass through it in high
speed too, and will continue to move back the pointer and so on until
having reached to the oldest recording. Press FAST FORWARD
button () to advance PLAYBACK pointer through the current
recording in high speed and will continue to advance to the next
recording and pass through it in high speed too, and so on until
having reached to the newest recording.
During the time the pointer is moving back or
__11:35:31
advancing, the system doesn’t play any sounds.
2009/01/01
The pointer moving speed can be increased by
100% by pressing the button at the second
time and another 100% by pressing the button
at the third time. Fig. 3-15-A indicates the
PLAYBACK pointer is moving back in 100%
speed, Fig. 3-15-B indicates the PLAYBACK
pointer is moving back in 200% speed, and Fig.
3-15-C indicates the PLAYBACK pointer is
moving back in 300% speed.
36
Fig. 3-15-A
___11:35:31
2009/01/01
Fig. 3-15-B
____11:35:31
2009/01/01
Fig. 3-15-C
Chapter 3 Basic Functions and Operations
You may stop forward or backward movement at any time by
pressing STOP button ().
Use “Search All” Function
You will search for all recordings if you use Search menu choice
without setting any search criteria. Read Chapter 4 if you like to
know more about search.
B.Search
1)
Press ENTER button () to enter into the
Record
top menu.
Fig. 3-16
2)
Press DOWN button (▽) to reach to
“B.Search Record” screen. (Fig. 3-16)
3)
Press ENTER button ( ) to pick “B.Search Record” menu choice.
(Fig. 3-17)
4)
Press UP button (▽) to access the
B9.Search
sub-menu choice “B9.Search”.
5)
Press ENTER button ( ) to activate search
action. The system shall bring you to the Fig. 3-17
oldest recording right after you press the
button.
6)
You may use the NEXT button () to access the next recording
one after another.
37
Chapter 4 Advanced Features and Operations
Chapter 4 Advanced Features
and Operations
Password Protection
Advanced Functions for Recording
Advanced Functions for Search and
Playback
Search with Multiple Options
System Software Upgrade
Procedure
38
Chapter 4 Advanced Features and Operations
Password Protection
Introduction
Each TCR-2000 unit is inclusive of 3 different secret codes or
passwords. Among them, two are used to control the access for
two different system password-protected areas and one is used to
prove identity to read recorded data from a memory card.
User Password: This is the code for gaining the access for the User
Setting (“C.User Setting”).
Advance Password: This is the code for gaining the access for User
Setting (“C.User Setting”), Advance Setting (“D.Advance Setting”),
Engineer Setting (“E.Engineet Setting”).
Memory Card Password: This is the code to prove identity to read
recorded data out from memory card. With this password, you can
play recordings by using “Instant Playback”function, operating Play
from Last menu (“A.Play from Last”), Search Record menu
(“B.Search Record”).
Tips
»
»
When the system stores the first recording to a
newly formatted memory card, it will
automatically and silently write the code of User
Password currently found on “C6. Password” to
the memory card as well. Once this code is
stored in the memory card it is given with the
name “Memory Card Password”.
Due to design structure, Memory Card Password
is not user-programmable. Once the code is
39
Chapter 4 Advanced Features and Operations
successfully written to the memory card, there is
no way to change this code.
Way to Enable Protection and
Advance Password Change
1)
2)
3)
Enter to “D1.Password” menu and set it to
“On” (Fig. 4-1).
Type down your code for Advance PWD or
Advance Password (Fig. 4-2). The code
can be any number from 0-9 with max
length of 12 digits.
Retype the code when prompted for
confirmation. (Fig. 4-3)
Tip:
D1.Password
On
Fig. 4-1
Advance
PWD:
Fig. 4-2
Confirm:
8888
Fig. 4-3
The factory default code for Advance password is
8888.
Way to Disable Protection
Enter to D1.Password menu and set to “Off”.
(Fig. 4-4)
D1.Password
Off
Fig. 4-4
Login Authentication
Whenever you intend to login for entering into
Password:
system password-protected areas or play a
0
recording, which is always stored in a memory
Fig. 4-5
card, you will be asked for a password. (Fig.
4-5) Type down User Password, Advance
Password and/or Memory Card Password according to your identity
40
Chapter 4 Advanced Features and Operations
or situation. Check up the Introduction section of this chapter if you
have doubts.
You will gain the access to the system password-protected areas or
be permitted to play recordings accordingly if password
authentication is passed. You will be brought back to STANDBY
mode if password authentication is failed.
Tip:
Auto logout function will automatically become active
as soon as password protection is enabled. The
system will auto log out if you don’t press any buttons
within the time period set forth in “C13. Logout time”.
The factory default for auto logout is 30 seconds.
User Password Change
1)
2)
3)
Enter to “C6.Password” menu and press
ENTER button.
Type down your code for User PWD or
User Password (Fig. 4-6-A). The code
can be any number from 0-9 with max
length of 12 digits.
Retype the code when prompted for
confirmation. (Fig. 4-6-B)
Tip:
User PWD:
0000
Fig. 4-6-A
Confirm:
0000
Fig. 4-6-B
The factory default code for User Password is 0000.
41
Chapter 4 Advanced Features and Operations
Advanced Functions for Recording
Choice of Recording Trigger
TCR-2000 allows you choose a recording trigger thru “D4.Trigger”
menu. Read below descriptions to understand which trigger type
will fit you best.
Recording Triggered by Voltage Detection
Recording is triggered by loop voltage change.
(Fig. 4-7) Needless to say, this trigger type
can only be applied to the 2-wire analog line
(POTS) in which the on-hook loop voltage is
either –48V or –24V.
D4. Trigger
Hook
Fig. 4-7
Since hook trigger can only be applied to 2-wire analog line, the
“D3.Rec From” menu choice must be set to “Line”, which presents
“2-wire analog line”. Additionally on-hook loop voltage can be
either –48V or 1-24. The D5. Line Voltage must be set according to
your telephone line specification.
Tip:
You can use the setting “D4.Trigger Hook” and
“D3.Rec from Handset” only when the Multisuns
optional handset adapter TA-100R is added between
your phone and TCR-2000.
Recording Triggered by VOX Detection
Recording is triggered by VOX. VOX means system starts recording
as soon as it detected substantial amount of” noises” and the system
42
Chapter 4 Advanced Features and Operations
stops recording after it detected real amount of “silence” to have
passed through predetermined period of time.
VOX Trigger (“D4.Trigger VOX”) can be applied to 2-wire analog line
(“D3.Rec from Line”) or Handset (“D3.Rec from Handset”). But
VOX Trigger is your only choice if your phone is digital phone or VoIP
phone in which your setup is “D3.Record from Handset”.
What level of noises is regarded as “substantial amount”? It is
based on the decibel value set forth in
D6.VOX Setup
“D6.VOX Setup”. (Fig. 4-8A) How long of
-44dB 6 Sec
“silence” is regarded as “real amount of
Fig. 4-8-A
silence”? The figure followed to the decibel
SN Threshold
value is.
-44dB
Fig. 4-8-B
On second line of Fig. 4-8-A, “-44 dB 6 Sec”
indicates that the system triggers recording as
Silence Time
soon as it detected a signal which strength is
6 Sec
not less than –44dB (i.e. “noise”) and the
Fig. 4-8-C
system stops the recording after it found
“silences” to have been lasting for 6 seconds already. The “silence”
denotes the signal which strength is less than –44dB.
To change their values, press ENTER button from “D6.VOX Setup”
screen. Once the ENTER button is pressed (Fig. 4-8-B), type an
appropriate value for SN Threshold (Silence/Noise threshold value in
decibel scale). Unless otherwise it is under special condition, this
value should range between –44dB to –34dB. The factory default
is –44dB. Press ENTER button to complete your change and roll
into the next screen “Silence Time”. Again, type an appropriate
value for Silence Time. Unless otherwise it is under special
condition, the time should range between 4 to 10 seconds. The
factory default is 6 seconds.
43
Chapter 4 Advanced Features and Operations
Tips:
»
»
If SN Threshold value setting is lower than it
should be, the system will falsely trigger
recording and/or the system can never stop a
recording. If SN Threshold value is higher
than it should be, the system will never
trigger recording and/or the system will stop
recording even if you are still conversing.
When trigger setting is VOX (“D4.Trigger
VOX”), the system cannot trigger recording
when a voice recording is being played.
Therefore it is important that you press STOP
button () to stop the ongoing playback
before you answer
Special Note: You are not recommended to make changes to the SN
Threshold value unless you are told to do or you know for sure what
you are doing.
Manual-controlled Recording
Once this choice is selected (Fig. 4-9), the
D4. Trigger
system starts recording once you pressed
Manual
START PHONE REC button and the system
Fig. 4-9
stops recording once you press STOP button.
Be noticeable that the selection for ”Manual” is
irrelevant to microphone recording. The “Manual” selection is
relevant to either “Line” setting (i.e. “D3.Rec from Line”) or
“Handset” setting (“D3.Rec from Handset”).
44
Chapter 4 Advanced Features and Operations
Gain Adjustment
When you play a recording and you see weak sounds, you may
adjust the signal input gain for Line, Handset, or Microphone
individually basing on your particular case. Enter to “D7.Gain Set”
and use the UP button (△) or DOWN button (▽) to adjust the input
gain for Line, Handset and Microphone individually.
AGC
The system supports recording AGC (Automatic Gain Control).
Enter to “C7.Rec AGC” menu to enable or disable recording AGC.
There is no definite guideline that can help you to decide to enable or
disable AGC. Try by yourself and see which setting fits you best.
Or, simply use the factory default setting, which is AGC off.
Tips:
»
»
Any change for AGC setting cannot be applied
to the ongoing recording. It will be applied to
the next and subsequent new recordings.
AVC function is not applied to any of the
recordings that have used AGC function for
recording. In other word, choose either AVC
or AGC function, instead of choosing the both.
If you usually have the need to pass your
recordings to else persons, you are
recommended to use AGC function.
Cycle Recording
TCR-2000 can be set to apply” Cycle Recording” function to manage
the space of memory card. Cycle Recording means the system will
45
Chapter 4 Advanced Features and Operations
start to erase the oldest recording when memory card free space is
less than 4 hours and it will stop as soon as the memory card free
space is back to 4 hours or more.
If you don’t like the system to erase recordings for you, go to
“D2.Cycle Rec” sub-menu and set the setting to off (“D2.Cycle Rec
Off”). Factory default setting is on.
Tip:
The system erases recordings only under the time point
that doesn’t take a recording.
Encryption
When recording encryption function is enabled, all recording will be
encrypted according to the Multisuns exclusively developed algorism.
Only TCR-2000 and TCR-2000 Player can play the encrypted
recordings. If you like to encrypt your recordings, go to
“D12.Encrypt” sub-menu and set it to “on”.
Store Only Important Call
D9.Important
When “D9.Important Only On” is set (Fig.
Only On
4-10-A), the system will abandon the ongoing
recording at the end of the call unless you press Fig. 4-10-A
ASSIGN IMPORTANCE button ( ) before end
of the call. Once the ASSIGN IMPORTANCE
Tel
-27dB
button ( ) was pressed, the notation “*” on
*
00:00:15
the screen will change from flashing to steady
Fig. 4-10-B
symbol (Fig. 4-10) and meanwhile the system
will store the call recording onto the memory card at end of the call.
Additionally it is treated as an “important call” so that the system will
never erase it.
46
Chapter 4 Advanced Features and Operations
Go to “D9.Import Only” sub-menu and set it to on if desired.
Tips:
»
»
“Important Only” function is irrelevant to manual
call recording (“D4.Trigger Manual) and
microphone recording.
As long as Important Only function is set to on,
the system will alert you with a beep tone and a
flashing “*” symbol on the screen every time you
started a new call.
Call Monitoring
Once call-monitoring function is enabled, any of sounds from the
monitored source (namely the third party’s telephone line) will go out
from the built-in speaker dynamically. Use earphone for private
listening. Otherwise, disable this function and you can mute the
built-in speaker.
Enter to “D11.Monitor” sub-menu and set to on if desired. Once the
monitor source started a call, a flashing “R” symbol will appear on the
LCD screen.
Tips:
»
»
This function is primarily used for dynamic on line
supervision purpose.
To use the function, it is necessary to wire with
the monitored party’s telephone line in parallel.
Consult your telephone vendor or Multisuns
vendor if you have doubts with the wiring plan.
47
Chapter 4 Advanced Features and Operations
Comment Field Text
By default, the system-supplied texts available for your choice on
Comment field are Buy, Sale, Loan, Pay, RMA, VIP, ROD, and
Meeting (8 in total). In the manual recording situation (i.e.
“D4.Trigger Manual”), the system shall automatically write “ROD” to
the Comment field for you unless otherwise you select another
system-supplied piece of texts or you input by yourself manually
before end of the recording. In the microphone recording situation,
the system shall automatically write “Meeting” to the Comment field
for you unless otherwise you select another system-supplied piece of
texts or you input by yourself manually before end of the recording.
In the total recording situation (i.e. “D4.Trigger Hook” and
D4.Trigger VOX), the system doesn’t automatically write any texts to
the Comment field.
By the reason that the system always writes “ROD” or “Meeting” to
the Comment field under the above-mentioned conditions, the pieces
of system-supplied texts that can be left for your change will be Buy,
Sale, Loan, Pay, RMA and VIP (6 in total). Before you make your
change happen, there are a few conditions and steps you need to
know and follow.
At first, prepare a pure text file named COMMENT.TXT at your own
computer using Windows Notepad or other text editor. The content
of this file should not be more than 6 lines (max 6 lines) and each line
should not have more than 12 characters (max 12 characters).
48
Chapter 4 Advanced Features and Operations
Secondly, the memory card inserted on the slot of TCR-2000 must
have your COMMENT.TXT file on the root directory. You may use a
memory card reader or connect your TCR-2000 unit with your
computer thru a USB cable to copy your COMMENT.TXT file from
your computer to the memory card.
As long as the memory card currently inserted on the slot of
TCR-2000 has your COMMENT.TXT file on the root directory, the
system provides your customized pieces of texts. If you like to
restore the factory default system-supplied texts, your simply
remove this COMMENT.TXT from the memory card.
Tip:
The system takes spaces (printable space) and blank
lines into account when it reads texts out from
COMMENT.TXT.
Arrange Customized Recording
Announcement
The earlier section “Insert Recording Announcement During Voice
Recording” indicates that the system allows you to insert
49
Chapter 4 Advanced Features and Operations
pre-recorded voices (for example, this call is being recorded for
transaction verification purposes.) in a recording at any time during
your conversation and the system supports announcement for 10
different pieces of pre-recorded voices. This section explains how
to prepare your own recording announcements.
If you are used to use a third-party sound recording software on your
computer, keep on using it. If you are not, use the Sound Recorder
that can be found on all versions of Microsoft Windows.
To open Sound Recorder, click Start, point to All Programs, point to
Accessories, point to Entertainment, and then click Sound Recorder.
Be aware that you must have a sound card and speakers installed on
your computer and a microphone plugged into the sound card.
Start your recording announcement recording by clicking RECORD
button ( ) and stop recording by clicking STOP button (). If you
like to learn more about operation of Sound Recorder, click the Help
menu in Sound Recorder.
To save recording on to your hard drive, follow these steps: Click File
-> pick Save As -> clock Change button from the dialog box -> pick
IMA ADPCM from Format pull down menu -> pick 8.000 KHz, 4 bit,
Mono from Attribute pull down menu -> click OK button to exit the
Change dialog box -> type down Declare0 to file name textbox ->
clock OK to complete.
Copy “Declare0.wav” to the root directory of your memory card.
Tip:
TCR-2000 supports 10 different recording
announcements max. The first announcement is of
Declare0.wav and the second announcement is of
Declare1.wav and third announcement is of
50
Chapter 4 Advanced Features and Operations
Declare2.wav and so on.
of Declare9.wav.
The 9th announcement is
Advanced Functions for Search and
Playback
Recordings can be played through the speaker build-in or an
earphone connected to the unit.
Search More Recordings or Manage a
Recording
When you see any of the following 3 screens (Fig. 4-10), you are
pointing a particular recording. On there you can press ENTER
button () to gain the access for RECORDING MANAGEMENT menu
in which there are 7 different menu choices as shown in Table 4-1.
With these choices, you can search for another recordings or manage
identify and database record of the currently pointed recording.
Tel 09:35:33
2009/01/01
Out 09:35:33
No Number
Len 09:35:33
00:00:11
Fig. 4-10
1.Search Record
2.Important
3.Save File
4.Delete File
5.Modify Case ID
6.Modify Comment
7.Modify Value
Table 4-1
51
Chapter 4 Advanced Features and Operations
Search Another Records
The “1.Search Record” menu (Fig. 4-11-A)
allows you to search and jump to another
recording without the need to quit the playback
standby state. The “1.Search Record” menu
provides exactly the same features as
“B.Search Record”. (Fig. 4-11.B) Check up the
“B.Search Record” section about how to use.
Assign Importance
The “2.Important Yes->No” menu (Fig. 4-12-A)
allows you to assign the currently pointed
recording from normal (non-importance) to
“importance” or reverse it back to normal (Fig.
4-12-B). Once a recording is assigned to
“importance”, the notation “*” appears on the
screen (Fig. 4-12-C), which signals that the
system is not permitted to erase.
1.Search
Record
Fig. 4-11-A
B.Search
Record
Fig. 4-11-B
2.Important
Yes→No
Fig. 4-12-A
2.Important
No→Yes
Fig. 4-12-B
Tel 09:35:33
* 2009/01/01
Fig. 4-12-C
3.Save File
No→Yes
Save a Recording
The “3.Save File No->Yes” menu (Fig. 4-14-A)
allows you to insert the “S” mark (Fig. 4-14-B)
to the currently pointed recording for indicating
that system is not permitted to erase that
recording. Therefore the system will not
delete it when the system is trying to make
more free space under the case that Cycle Rec
is enabled. You can remove the “S” market by
52
Fig. 4-14-A
Tel 09:35:33
S 2009/01/01
Fig. 4-14-B
3.Save File
Yes→No
Fig. 4-14-C
Chapter 4 Advanced Features and Operations
using the “3.Save File Yes -> No” menu (Fig. 4-14-C) for reversing
the said recording back to original state.
4.Delete
Delete a Recording
File
The “4.Delete File” menu (Fig. 4-15-A) allows
you to go to erase the currently pointed
recording. The system will ask you to
reconfirm (Fig. 4-15-B). The system will erase
it after you pressed ENTER button. Once the
system erased the recording, it places a X”
mark on the screen. (Fig. 4-15-C)
Tips:
»
»
Fig. 4-15-A
Delete File:
Yes
Fig. 4-15-B
Tel 09:35:33
X 2009/01/01
/ /
Fig. 4-15-C
The system deletes only the pointed recording
file. The system doesn’t delete the associated
database data stored in separated database.
Once a recording was deleted, it has no way to
restore or undo the delete.
Modify Content of “Case ID”, “Comment” and “Value” Fields
The “5.Modify Case ID”, “6.Modify Comment”
and “7.Modify Value” menus allows you to
modify the content of the respective database
fields quickly. These 3 menus provide same
features as you enter into the CID screen (Fig.
4-16-A), CMT screen (Fig. 4-16-B) and VAL
screen (Fig. 4-16-C) by pressing DOWN or UP
button from PLAYBACK STANDBY main screen.
Refer to previous sections about how to modify
the content of the 3 fields.
53
CID 08:00:45
No Case ID
Fig. 4-16-A
CMT 08:00:45
Meeting
Fig. 4-16-B
VAL 08:00:45
0
Fig. 4-16-C
Chapter 4 Advanced Features and Operations
Insert Bookmark during Playback
You can press BOOKMARK button ( ) to save a
Tel
-45dB
position to your recording (Fig. 4-17) during
1 00:02:55
playback ongoing time period for stating that the
Fig. 4-17
conversation in this position is essential. With
the bookmark, you can immediately jump to the
saved position when you start to replay the recording and you can
skip from one bookmark to the next. In a recording, you can add 3
different bookmarks, but you can’t delete any of them thereafter.
If it has been 3 bookmarks already and you
press BOOKMARK button again trying to add a
new one, you will be prompted to delete one of
the 3 existed marks. Use UP or DOWN button
to move to the first (BM 1 as on Fig. 4-18-A),
second (BM 2) or the third (BM 3) and press
ENTER button to confirm to delete (Fig.
4-18-B).
BM Full
Delete BM 1
Fig. 4-18-A
Delete BM 1
Yes
Fig. 4-18-B
Bookmark number (i.e. BM1, BM2 or BM3) is assigned according to
the sequence you press BOOKMARK button if you insert them at one
single playback attempt. If there are bookmarks added at another
new playback attempt, bookmark numbers will be re-arranged
according their position saved.
Enable or Disable AVC During
Playback
You can enable or disable AVC (Automatic
Volume Control) dynamically by pressing AVC
54
AVC 14:20:45
00:01:55
Fig. 4-20-A
avc 14:20:58
00:02:03
Fig. 4-20-B
Chapter 4 Advanced Features and Operations
button at any time point playback is going. If your setup is “C8.Play
AVC On”, pressing AVC button once will change the state from” on”
to “off” (Fig. 4-20-A) and pressing AVC button once again will reverse
the state from “off” back to “on” (Fig. 4-20-B).
Cancel Noises
Use the setting “C11.Noise Cancel On” if you wish to use the noise
cancellation function.
Tip:
Noise Cancel function is intended to reduce the noise
level of microphone recording. If this function
doesn’t actually improve sound quality, it is
recommended to disable this function.
Search with Multiple Options
You can search recordings by using criteria for date, time, phone
number, Important, Case ID, Comment and Value.
Set Criteria
“B1.Date” Menu
This allows you enter a specific date to search for the recordings that
are matched to this date. If you don’t enter any date, you mean
“any date” is matched.
“B2.Time” Menu
55
Chapter 4 Advanced Features and Operations
This allows you enter a specific time point to search for the
recordings that are matched to this time point. If you don’t enter
any time, you mean “any time” is matched.
“B3.Number” Menu
This allows you to enter the telephone number to search for the call
recordings which Caller ID or dialed string is matched to this number.
You are free to input only a portion of the phone number. For
example, you may enter “532” for any phone number that include
this digit string. If you don’t enter any number, you mean any
number including “no telephone number”.
“B4.Important” Menu
This allows you for the call recordings that are
assigned “importance”. If you don’t select
this menu, you mean any recordings assigned
or not assigned importance are matched.
B4.Important
Yes
Fig. 4-21
“B5. Case ID” Menu
This allows you to search for the recordings, which Case ID matches
to the codes you entered to this menu. If you don’t input any data
to this menu, you mean any ID number including “no number” is
matched.
“B6.Comment” Menu
This allows you to search for the recordings which comment matches
to the codes you entered to this menu. If you don’t input any data
to this menu, you mean any comments including “no comment” is
matched.
56
Chapter 4 Advanced Features and Operations
“B7.Value” Menu
This allows you to search for the recordings which value number
matches to the number you entered to this menu. If you don’t input
any data to this menu, you mean any value including “0” (zero) is
matched.
Clear All Criteria
Got to “B8.Clear All” menu and press ENTER button. You
immediately clear all criteria you have entered with a single
keystroke.
Launch Search Action
Once you finished all your criteria entries, go to “B9.Seach” menu
and press ENTER button. The system starts to search recordings
according to your criteria. Once the search action is done, the
system shows the first matched recording on the LCD screen.
Tip:
You can clear all criteria using “B8.Clear All” menu
and then apply“B9.Search”menu to search for all
available recordings.
Check Recording Information or Move Around Matched Recordings
Use the UP button (U) or DOWN button (V) to view the information
of the currently pointed recording. Or, use PREVIOUS button ()
and NEXT button () to jump to another matched recording. Or,
use FAST BACKWARD button () and FAST FORWARD button ()
to move another matched recordings in high speed.
57
Chapter 4 Advanced Features and Operations
Play Recordings
Playback will start once PLAY button is pressed and stop at the end of
the recording if your setup is “single file” (“C10.PlayMode 1 File”).
The subsequent matched recording will follow to play and will not
stop until having reached to the end of the last matched recording if
your setup is “all files” (“C10.PlayMode All File”) instead.
Tips:
»
»
Sounds are played exactly from the time point
that is applied on the search. For example,
there is a one-hour recording that starts on
09:00:01 and ends on 09:59:59. The time
criteria you input for search is 09:20:00, sounds
to be played will from 09:20:00 till 09:59:59.
If FAST FORWARD or BACKWARD button is
used for locating the next matched recording
but no more matched file can be found, the
system will present you the newest or oldest
recording.
58
Chapter 5 Menu Choice Description
Chapter 5 Menu Choices
Play from Last
Search Record
User’s Setting
Advance Setting
Engineer Setting
59
Chapter 5 Menu Choice Description
Play from Last (Top menu A)
Use this menu to play the newest recording. Refer to Chapter 3
Employ “Play from Last” Menu Choice section for details.
Search Record (Top Menu B)
Use this menu to search and play recordings. Refer to Chapter 4,
Advanced Functions for Search and Playback section for details.
User Setting (Top Menu C)
Menu Name
C1.Date
C2.Time
C3.Date
Format
C4.USB
Connect
C5.SD Format
C6.Password
Description
Set today’s date
Set current time
Set date format
Choices
Default
Remark
YYYY/MM/DD
V
Year/month/date
MM/DD/YYYY
Month/date/year
DD/MM/YYYY
Date/month/year
Activating this selection by pressing ENTER
button will initiate Windows USB Mass Storage
driver, enabling the memory card on TCR-2000
to become a removable storage device on My
Computer. Refer to Chapter 8 USB
Connection and Computer Management for
more information.
Format the memory card inserted in the slot.
Change User’s Password. Factory-default
60
Chapter 5 Menu Choice Description
C7.Record
AGC
Menu Name
C8.Play AVC
pass code is 0000 and the code can be any
combination from 0-9 and up to 12 digits.
Enable or disable record AGC (Automatic Gain
Control).
Choice
Default
Remark
On
AGC enable
Off
V
AGC disable
Description
Enable playback AVC (Automatic Volume
Control).
Choice
Default
Remark
On
V
Off
C9.BackLight
Set or shutdown LCD backlight
Choice
On
Default
V
Off
Idle over time for 5,
10, 20, 30 or 60
seconds
C10.PlayMode
AVC enable
AVC disable
Playback Mode
Choice
Default
61
Remark
Open LCD backlight
permanently
Shutdown LCD back
permanently
System shutdowns
backlight when idle
time reaches to the
limit.
Remark
Chapter 5 Menu Choice Description
All File
C11.Noise
Cancel
C12.Direct
Play
C13.Logout
Time
V
System plays the
first matched file and
then plays the next
the file and will
continue until having
played all the
matched files.
1 File
System plays the
first matched file
only and stops when
having reached to
the end of the
recording.
Enable or disable noise cancellation function.
The noise cancellation function is useful only
when playing microphone recordings.
Choice
Default
Description
On
V
Noise Cancel enable
Off
Noise Cancel disable
This defines the time period the system need to
enable password authentication in the case
that password protection function is enabled
Choice
Default
Remark
“0”means Instant
Playback always
0-99 Sec
10 Sec
requires password
authentication.
This defines the time period the system
activates auto logout under password
protection mode when idle over reaches to the
limit.
Choice
Default
Remarks
62
Chapter 5 Menu Choice Description
0-999 Sec
30 Sec
“0” means auto
logout function is
disabled.
Advance Setting (Top Menu D)
D1.Password
D2.Cycle Rec
D3.Rec from
The menu to enable or disable password
protection function and reprogram Advance
password. Factory-default Advance Password
is 8888 and it can be any combination from 0-9
and up to 12 digits. If Advance Password and
User Password are set with same code, the
system will treat this code as Advance
Password.
Choice
Default
Remark
On
Password
protection enable
Off
V
Password
protection disable
Enable or disable the action to erase recordings
when memory card free space is less than 4
hours. When enabled, the system will erase
the oldest recording first to make space for the
new recording and will stop as long as the
memory card free space is more than 4 hours.
Choice
Default
Remark
On
V
Cycle Rec enable
Off
Cycle Rec disable
Set telephone connection type
Choice
Default
Remark
63
Chapter 5 Menu Choice Description
Line
V
Handset
D4.Trigger
Hook
D5.Line
Voltage
D6.VOX Setup
Set recording trigger
Choice
Default
Hook
V
Line socket on
TCR-2000 is wired
with telephone set.
Handset socket on
TCR-2000 is wired
with telephone
handset.
Remark
Recording is
started or stopped
according to loop
voltage detect.
Manual
Recording is
started or stopped
according to the
depressing of
Start/Stop keypad
buttons.
VOX
Recording is
started or stopped
according to
“Noise” or “Silence”
detect.
Set the voltage of the connected phone line.
Choice
Default
Remark
-48V
V
Line voltage
-48VDC
-24V
Line voltage
-24VDC
Set “noise” and “silence” threshold and “silence
time”
64
Chapter 5 Menu Choice Description
Choice
SN
Threshold
D7.Gain Set
D8.Field Sel
Default
-44dB
Remark
Signal Noise level in
decibel. Valid
range is from -0 to
-99dB.
Silence Time 6 Sec
The time period to
define “no talking”
or telephone call
ended. Valid
value is 0-99
seconds.
Set the gain for Line, Handset and Microphone
Choice
Default
Remark
Line Gain
0dB
Volume of gain can
be increased with
0, 1.5, 3, 4.5, 6,
7.5, 9, 10.5, 12,
13.5, 15, 16.5, 18,
19.5, 21 or 22.5dB.
Handset
0dB
Same as above
Gain
Mic Gain
18dB
Same as above
Decide which of the 3 fields (i.e. Case ID,
Comment and Value) will be present when
recording is going.
Choice
Default
Remark
Case ID
On
On to enable and
off to disable
Comment
On
Same as above
65
Chapter 5 Menu Choice Description
D9.Important
Only
D10.Delete
D11.Monitor
Value
On
Same as above
This is the interface to enable or disable
Important Only feature. Refer to Chapter 4,
Store Only Important Call section for details.
Choice
Default
Remark
On
Important Only
enable
Off
V
Important Only
disable
Decide if the user using User Password is
permitted to erase recordings.
Choice
Default
Remark
On
V
Delete is permitted.
Off
Delete is not
permitted.
Activate live monitoring function. Once
call-monitoring function is enabled, any of
sounds from the monitored source (namely the
third party’s telephone line) will go out from the
built-in speaker dynamically. Use earphone for
private listening. Otherwise, disable this
function and you can mute the built-in speaker.
Choice
Default
Remark
On
Monitoring function
enable
Off
V
Monitoring function
disable
66
Chapter 5 Menu Choice Description
D12.Encrypt
D13.Save
Setup
D14.Load
Setup
D15.Set to
Default
D16.Reboot
Tips:
Decide if recording will be encrypted or not.
When recording encryption function is enabled,
all recording will be encrypted according to the
Multisuns exclusively developed algorism.
Only TCR-2000 and TCR-2000 Player can play
the encrypted recordings.
Choice
Default
Remark
On
Recording
encryption enable
Off
V
Recording
encryption disable
Export system setup to memory card
Import system setup from memory card.
Set all settings back to factory default.
The interface to reboot system.
Following steps will allow you to make multiple unit of
TCR-2000 to have identical setting in a flash.
1.
Pick up one unit and complete your setup
basing on your decision.
2.
Apply“D13.Save Setup” menu to export
your setup to memory card. Then remove
the memory card away the slot.
3.
Insert the memory card to another unit of
TCR-2000.
4.
Apply“D14.Load Setup” menu to load
setting from the memory card.
The “D13.Save Setup”, “D14.Load Setup” and “D15.Set
to Default” menu don’t involve in date and time setting.
67
Chapter 5 Menu Choice Description
You must manually adjust the date and time of a
particular unit according to the time clock.
Engineering Setting (Top Menu D)
Menu Name
E1.RingOff
E2.Min DTMF
E3.Min Noise
E4.Min Loop
Description
This specifies the time between two different
incoming rings. This helps to avoid false
Caller ID detection.
Default
Remark
6 sec.
Input range: 0-999 sec.
This specifies minimum length of a DTMF
signal. This helps to eliminate false DTMF
detection.
Default
Remark
30 ms
Input range: 0-9999 ms
This is for the system to justify a signal to be a
“valid noise”. This prevents the system from
recording unexpected line noises or
surrounding noises.
Default
Remark
50 ms
Input range: 0-9999 ms.
This is for the system to justify a loop voltage
change to be a “valid voltage change”. This
eliminates false detection on loop voltage
change.
Default
Remark
100 ms
Input range: 0-9999 ms
68
Chapter 5 Menu Choice Description
E5.Kill Mode
E6.Rec Format
This specifies when the system can undertake
recording file erase. The setting takes effects
only when cycle recording mode is enabled
(“D2.Cycle Rec On”).
Choices
Default
Description
In
The system is
Record
permitted to go to
delete recordings even
when it is carrying out
voice recording. Due
to the system has
limited processing
power and memory
card has limited
read/write speed, it is
not recommended to
use this option,
especially when your
memory card capacity
is larger than 2GB.
Not In
V
The system is
Rec
permitted to go to
delete recordings only
when it is not carrying
out voice recording.
Recording file voice format
Choice
Default
Remark
ADPCM
V
IMA ADPCM WAVE 8k
Hz 4 bits (32kbps)
Linear
PCM WAV 64kbps for
engineering testing
purpose only
69
Chapter 5 Menu Choice Description
E7.Update
Version
This allows you to upgrade the system
software version. Refer to the below procedure
for system software upgrade.
System Software Upgrade Procedure
1)
Obtain the software upgrade file named “MainCode.bin” from
Multisuns or your TCR-2000 vendor and copy it to the root
directory of a memory card thru a memory card reader.
2)
Insert the memory card to the slot.
3)
Turn on the power of TCR-2000. To
avoid power shortage, it is strongly
recommended to use mains adapter,
other than AA battery when you run
system software upgrade.
Update Code:
Yes
Fig. 5-1
4)
Enter into “E7.Update Version” menu and
press ENTER button. The code upgrade
confirmation screen as shown in Fig. 5-1
is displayed. Press ENTER button to
reconfirm code upgrade.
1.0.0 US -〉
1.1.0 US Yes
Fig. 5-2-A
Erase …
The screen for the current
version-language and upgrade
version-language number (Fig. 5-2-A) is
Fig. 5-2-B
displayed. The notation “US” means
English language and “JP” means Japanese language. Press
ENTER button to reconfirm your acceptance with the version
and language to upgrade.
70
Chapter 5 Menu Choice Description
5)
6)
The system starts to erase current
software (Fig. 5-2-B) and follows to the
software upgrade file to the system. You
can see the write progressing screen
similar to Fig. 5-2-C. If the system
software is successful, the upgrade OK
screen (Fig. 5-2-D) will be displayed.
Fig. 5-2-C
Turn power off and on to reboot.
Fig. 5-2-D
Write …
Update OK
Note: In case upgrade fail screen is displayed, repeat steps 4 and 5
until upgrade success screen is displayed. Do NOT turn power off in
case you encounter upgrade fail.
71
Chapter 6 Options and Add-ons
Chapter 6 Options and
Add-ons
Anti-slide Plate
Earphone and External Microphone
Recording Announcer TD-100P
Recording Announcer TD-100H
Telephone Handset Adapter
TA-100R
Touch-tone Commander TC-100P
Extended Microphone Pod MRD-01
72
Chapter 6 Options and Add-ons
Anti-slide Plate
Anti-slide plate is an accessory used to prevent TCR-2000 unit from
sliding or moving around your desk, especially while you are holding
telephone handset conversing with another party. To install this
plate, gently push the plate to the bottom side of TCR-2000 main unit
as illustrated below.
Earphone & External Microphone
You may use the third-party supplied earphone for private listening.
Once the earphone cable connector (3.5mm) is plugged into the
earphone socket on TCR-2000, the built-in speaker is disabled.
You may also use third-party microphone to record sound source in
73
Chapter 6 Options and Add-ons
distance. To use it, connect the third-party microphone cable
connector (3.5mm) to the microphone socket on TCR-2000.
Recording Announcer TD-100P
Recording announcer TD-100P is the optional device that helps
TCR-2000 to play prerecorded announcement onto to a 2-wire
analog phone line and be audible to all parties on the call, and is
recorded.
To wire TD-100P to TCR-2000, reference below picture when you
read on. At first connect a factory-supplied telephone cord from
phone socket (RJ-11) on the base of your telephone to phone socket
(RJ-11) on TD-100P as illustrated by (1). Secondly, connect
another factory-supplied telephone cord from telephone socket
(RJ-11) on TD-100P to the socket marked “Phone” on TCR-2000 as
illustrated by (2). Thirdly, connect your existing telephone
extension cord from your telephone wall jack to the socket marked
“Line” on TCR-2000 as illustrated by (3). Lastly, connect the “audio
extension cord” from TD-100P to the socket marked “Earphone” on
TCR-2000 as illustrated by (4).
74
Chapter 6 Options and Add-ons
To know about the way to play the announcement, please read
“Insert Recording Announcement During Voice Recording” section on
Chapter 3.
Tip:
It is necessary to remove the audio line cord away from
the “Earphone” socket on TCR-2000 every time you
intend to play recordings through the built-in speaker.
Recording Announcer TD-100H
Recording announcer TD-100H is the optional device that helps
TCR-2000 to play prerecorded announcement onto to telephone
handset coil cord and be audible to all parties on the call, and is
recorded.
To wire TD-100H to TCR-2000, reference below picture when you
read on this paragraph. At first connect a handset extension cord
from handset socket (RJ-9) on TD-100H to the socket marked “ ”
on TCR-2000 as illustrated by (1). Secondly, connect your handset
75
Chapter 6 Options and Add-ons
coil cord from handset to the socket marked “ ” on TCR-2000 as
illustrated by (2). Thirdly, connect another handset extension cord
from your telephone station set to TD-100H as illustrated by (3).
Lastly, connect an audio extension cord from TD-100H to the socket
marked “Earphone” on TCR-2000 as illustrated by (4).
To know about the way to play the announcement, please read
“Insert Recording Announcement During Voice Recording” section on
Chapter 3.
Tip:
It is necessary to remove the audio line cord away from
the “earphone” socket on TCR-2000 every time you
intend to play recordings through the built-in speaker.
Telephone Handset Adapter TA-100R
Telephone Handset Recording Adapter TA-100R is an advanced
76
Chapter 6 Options and Add-ons
handset adapter having excellent compatibility with wide variety of
digital/VoIP phones. Because it includes an infrared sensor that is
capable to detect the handset position change from sitting on cradle
to being lifted up or vis-à-vis, it enables TCR-2000 to implement auto
start/stop recording by line voltage detect, which relieves the
potential for noise recordings.
To use TA-100R with TCR-2000, reference below picture when you
read on this paragraph. At first connect a handset extension cord
from handset socket (RJ-9) on TA-100R to the handset socket (RJ-9)
on the base of your telephone as illustrated by (1). Secondly,
connect your handset coil cord from handset to the RJ-9 socket on
TA-200R as illustrated by (2). Thirdly, connect an audio extension
cord from TA-100R to the socket marked “Line” on TCR-2000 as
illustrated by (3). Lastly, plug in the AC Adapter to a nearby 120
VAC (220 VAC) outlet and into the power jack on TA-100R as
illustrated by (4).
To know more about TA-100R, please check up the TA-100R user’s
manual.
77
Chapter 6 Options and Add-ons
Touch-tone Commander TC-100P
Touch Tone Commander TC-100P is a peripheral hardware designed
for working with wide variety of digital/VoIP phone and full range of
the Multisuns call recorders including TCR-2000. It is the device
plugged in between the handset coil cord and the phone.
Touch Tone Commander TC-100P is intended to provide the user of
the technical essence that can shoot touch-tones in any combination
from 0-9, # and * to the phone recorder logger (i.e. TCR-2000) from
place of incapability and reach the goal of tagging a special ID to a
call recording. Because it also includes a circuit that enables
TCR-2000 to implement auto start/stop recording by line voltage
detect, it frees the voice recorder logger from having noise
recordings.
To use TC-100P with TCR-2000, reference below picture when you
read on this paragraph. At first connect a handset extension cord
from TC-100P to the handset socket (RJ-9) on the base of your
telephone as illustrated by (1). Secondly, connect your handset coil
cord from handset to the handset socket (RJ-9) on TA-200R as
illustrated by (2). Thirdly, connect an audio extension cord from
TA-100R to the socket marked “Line” on TCR-2000 as illustrated by
(3). Lastly, plug in the AC Adapter to a nearby 120 VAC (220 VAC)
outlet and into the power jack on TC-100P as illustrated by (4).
78
Chapter 6 Options and Add-ons
Extended Microphone Pod MRD-01
Microphone Recording Pod MRD-01 is the microphone pod that is
exclusively developed by Multisuns for working with the Multisuns
voice loggers or call recorders including TCR-2000 for recording
person talking, room and surrounding sounds in indoor area.
Microphone Recording Pod MRD-01 features a cardioids pickup
pattern that allows the microphone to be aimed at the desired area
of coverage and reject sound coming from the sides and rear to
minimize the potential for surrounding noises. Thus, it can focus on
person talking, not on background noise, assuring that the person
voices for delivery to a voice recorder are crystal clear.
To use MRD-01 with TCR-2000, simply plug the telephone extension
cord from Connector Box to the socket marked “Line” on TCR-2000
as illustrated in below picture. The rest follows the MRD-01
standard wiring plan.
79
Chapter 6 Options and Add-ons
80
Chapter 7 Mains Adapter and Battery
Chapter 7 Mains Adapter and
Battery
Introduction
Using Mains Power Adapter
Using Car Power Adapter
Using AA Battery
System Clock Battery Change
81
Chapter 7 Mains Adapter and Battery
Introduction
To allow the system to work, three types of power supply can be of
your choice. You are recommended to use the mains adapter that
comes with the TCR-2000 unit if you use it in door as a desktop
device. You may have to use the AA battery that you purchase by
yourself if you intend to use it at outdoor as a portable device. You
may use your car’s battery power if you use it only it in your car.
The system has time clock built-in. The time clock needs an internal
battery to maintain the current time when external power supply (i.e.
mains adapter) is interrupted.
Using Mains Power Adapter
Use the mains adapter that comes with the unit.
output is DC 5V/1A.
Tip:
The mains adapter
Use the mains adapter supplied by Multisuns. If you
use other vendor’s adapter, you are likely to get
unexpected humming noises.
Using Car Power Adapter
You may use the car power adapter to get TCR-2000 to work when
you are using it inside the card. Car power adapter is an optional
item that needs to be purchased separately.
82
Chapter 7 Mains Adapter and Battery
Using AA Battery
Use 2 AA type batteries to get the system to work. The batteries
can be alkaline / Ni-Cd 1.5V type, or Ni-Cd / Ni-MH rechargeable 1.2V
type.
Tips:
»
»
»
Zinc-carbon battery is not supported.
TCR-2000 unit does not charge AA battery. Use
third-party battery charger to charge your
rechargeable AA battery.
Take batteries away the chamber if you have no
plan to use them for system operation purpose in
the next few days. TCR-2000 can still consume
battery power even if it uses the power from the
mains adapter.
When battery capacity is 2100 mA, it is expected to allow the unit to
work for around 2 hours. When batter capacity is 2400 mA, it is
expected to allow the system to work for 3 hours.
Note: The above data is based on the condition that TCR-2000 is
either standby or taking calls with 2 Ni-MH 1.2V fully charged
batteries.
Install AA Batteries
1)
2)
3)
Put the power switch to off position to shutdown TCR-2000.
Turn the unit upside down and remove battery cover as shown
in Fig. 7-1.
Insert batteries with the direction as illustrated in the battery
chamber.
83
Chapter 7 Mains Adapter and Battery
4)
Put the battery cover back and put the power switch to on
position.
Fig. 7-1
AA Battery Low Alert
When AA battery power is low, a blinking battery symbol will show on
LCD screen and the green LED light on the topside will be blinking
too. When AA battery power is totally out, the system will
automatically shutdown.
Battery Safety Guidelines
7)
8)
9)
10)
11)
Set the power switch to on position prior to battery change.
When changing batteries, always change the both batteries
with same brand and same capacity.
Do not try to use the not supported battery.
Don’t reverse the polarity when you install batteries.
If you have no plan to use battery power, you are advised to
remove batteries away from the chamber.
84
Chapter 7 Mains Adapter and Battery
System Clock Battery Change
1)
2)
3)
4)
5)
Put power switch to off position to shutdown TCR-2000.
Turn the unit upside down and remove clock battery cover by
making use of the tip of a ballpoint pen or other suitable hand
tool with the direction as described in the plastic cover.
Remove the existing battery, if any, and insert a new CR2032
battery as shown in Fig. 7-2.
Put the clock battery cover back and fasten the cover.
Put the power switch to on position.
Fig. 7-2
85
Chapter 8 USB Connection and Computer
Management
Chapter 8 USB Connection
and Computer Management
Introduction to TCR-2000 Player
Install TCR-2000 Player
Connect to Computer
Disconnect to Computer
86
Chapter 8 USB Connection and Computer
Management
Introduction to TCR-2000 Player
TCR-2000 Player is the Windows-based desktop software (supplied
on CD) intended for allowing you to remove the memory card away
from TCR-2000 to list, search, play, backup and email recordings, or
to edit recording database information, in your computer. It can
also allow you to list, search, play and email recordings thru direct
USB cable connection, providing that the memory card currently
inserted on the slot of TCR-2000 doesn’t store over 10,000
recordings and among which not much of them exceed 20 minutes in
length.
Install TCR-2000 Player
Before installation, your computer needs to have DirectX v9.0c or
higher installed in advance. To install this software onto your
computer, you must get the Administrator privilege on your
computer.
A few seconds after the CD-ROM disc was inserted into your
computer, you see the setup dialog box as shown in below.
87
Chapter 8 USB Connection and Computer
Management
Press the NEXT button as guided. Once you are in Setup Complete
screen (see blow), click “Yes, I want to restart my computer now”
and then press FINISH button to restart your computer.
After your computer was restarted, a shortcut icon (see below) will
appear on your desktop. Double clock this shortcut icon and you
will be ready to use this software.
88
Chapter 8 USB Connection and Computer
Management
Check up on-line help or separate manual if you wish to explore how
to operate this software.
Connect to Computer
You have two choices. First choice is to apply the factory-supplied
USB cable and the second choice is to use a USB SD/SDHC card
reader.
Using USB Cable Connection
Connect the factory-supplied USB cable from
TCR-2000 to your computer. Once the cable
connection is done, enter into “C4.USB Connect”
setup screen (Fig. 8-1-A) and then press ENTER
button. Then you will see “USB Connect SD to
PC” screen (Fig. 8-1-B) in which the wording
“Connect” is flashing. In a few seconds after,
the USB mass storage device icon will appear on
the lower left corner of your computer screen.
C4.USB
Connect
Fig. 8-1-A
USB Connect
SD to PC
Fig. 8-1-B
In the meantime, a message screen (see below) will pop up
89
Chapter 8 USB Connection and Computer
Management
indicating that TCR-2000 DB or database has been found. Press
YES button to load; or press NO button to abort, TCR-2000 Player.
Using USB SD/SDHC Card Reader
Remove your memory card out of the slot and insert it to your card
reader and then connect the card reader to your computer. Once
the connection is done, the USB mass storage device icon will appear
on the lower left corner of your computer screen.
In the meantime, a message screen (see below) will pop up
indicating that TCR-2000 DB or database has been found. Press
YES button to load; or press NO button to abort, TCR-2000 Player.
90
Chapter 8 USB Connection and Computer
Management
Disconnect to Computer
Double click the USB mass storage device icon (see below) and click
the REMOVE button as illustrated on the “Safely Remove Hardware”
screen to disconnect the removable device from computer. Once
the removable device disconnection has been successfully done, the
“USB Connect SD to PC” screen (Fig. 8-1-B) will disappear and go
back to the “C4.USB Connect” screen (Fig. 8-1-A).
Do NOT press ESCAPE button while the “USB Connect SD to PC”
screen is active. This is because such an action will lead to the
result of “unsafe removal of USB mass storage device”. Be sure to
follow the Windows “Safely Remove Hardware” procedure to
disconnect to computer.
Tip:
If data backup from memory card to you computer to
PC has not fully completed, do not attempt to
disconnect to computer.
91
Chapter 9 Technical Data
Chapter 9 Technical Data
Diagram for All Supported Items
Application Summery for Add-ons
Main Unit Specifications
92
Chapter 9 Technical Data
Diagram for All Supported Items
93
Chapter 9 Technical Data
Application Summery for Add-ons
Add-ons
Anti-slide Plate
Car battery
changer DC
5V/1A
Rechargeable
AA Battery
SDHC Card
Reader
TD-100P
Recording
Announcer
TD-100H
Recording
Announcer
TA-100R
Telephone
Handset
Adapter
TC-100P
Touch-tone
Commander
Application
The application is same as its name. It is a
rectangular thin plate a telephone can place
on the top so that TCR-2000 won’t slide.
This gives users the option of using car
battery power to operate TCR-2000 inside a
car.
This gives users the option of using AA
battery power to operate TCR-2000 when
commercial power supply is unavailable.
This gives users an option of using the card
reader to read data from memory card.
This is a compact adapter for connection
between TCR-2000 and analog telephone
line. By which TCR-2000 can plays
pre-recorded announcements to phone line
and then record.
It provides same function as TD-100P, but for
connection between TCR-2000 and the
handset of a digital or IP phone.
This enables TCR-2000 to implement auto
start/stop recording by line voltage detect,
which relieves the potential for noise
recordings.
It is plugged in between the handset coil cord
and the phone. It allows the user to shoot
touch-tones to TCR-2000 from place of
incapability and reach the goal of tagging a
94
Chapter 9 Technical Data
MRD-01
Extended
Microphone
Pod
Memory card
special ID to a call recording.
It is an extended microphone featuring a
cardioids pickup pattern that allows the
microphone to be aimed at the desired area
of coverage and reject sound coming from
the sides and rear to minimize the potential
for surrounding noises.
2GB, 4GB, 8GB, 16GB and 32GB SD/SDHC
cards supported
95
Chapter 9 Technical Data
Main Unit Specifications
Size
Net Weight
Switch
Power supply
Clock battery
LED Indicator
LCD Screen
Key buttons
Built-in
Microphone
Built-in Speaker
Microphone
Socket
Earphone Socket
USB connector
Memory Card
Recording Voice
Format
Number of
Recording
Length of a
Recording
Recording
Trigger
L 168 x W 62 x H 21 mm
175g (AA battery not included)
Power on/off
5VDC 1A
AA batter x 2 (optional)
CR2032 3V lithium (not rechargeable)
Green LED x 1 for power on
Red LED x 1 for recording
12C x 2L LCD with backlight support
16 buttons for 0-9, A-Z and a-z inputs and
functional operation purpose
-49dB, S/N > 58dB
1W S.P.L 104dB
3.5Φ < 64KΩ
3.5Φ > 6Ω
Mini USB 2.0 Full Speed
SD/SDHC max 32GB
ADPCM
9,999,999 max per memory card
24 hours max
Line voltage detect
VOX
96
Chapter 9 Technical Data
Recording Info
Signal
Processing
LCD Language
Manual
Date, time, phone number,
inbound/outbound, duration time,
Importance, Save, bookmark, Case ID,
Comment and Value
Recording AGC
Playback AVC
Gain
Volume control
Noise Reduction
English
Specifications are subject to change without prior notice.
97
Appendix
Appendix
Symbols for LCD Display
System Alert Tones
Frequently Asked Questions
Troubleshooting
98
Appendix
Symbols for LCD Display
Symbol
Description
Memory card space near full (less than 2 hours)
(Blink)
Memory card space full or write protected
(Blink)
Memory card not present
AA battery being in use
(Blink)
AA battery low and changeover needed
Having bookmark
Playback in progress
Encrypted recording
Importance assigned
Save permanently assigned
Playback in pause
Recording deleted already
99
Appendix
System Alert Tone
Tone
Beep
Beep Beep
Description
Memory card near full (less than 2 hours)
Move or play up to the first/last recording
Recording duration exceeding 24 hours
Voice input source changed
Recording mode is “Importance only”. Press
the “*” button before end of the call and call
recording will be saved to memory card.
AA battery low
Memory card space full
Memory card write protected
Memory card error or malfunction
100
Appendix
Questions and Answers
Question
Questions in General
How do I use menu?
Key word
How do I find the total number of
recording?
How do I find remaining storage
space?
What are supported memory
card?
How do I know AA battery low?
What are supported add-ons?
System Configuration
How do I change date and time?
How do I change auto log off
time?
How do I shutdown LCD
backlight.
What is factory default
password? How do I change it?
How do I activate password
protection?
How do I store system setup
back to factory default?
101
Page
Working with
menu
Standby screen
11
Insert memory
card
Light indicator
LCD icon
Alert tone
Add-ons
18
5
99
100
72
Set date
Set time
Date format
C13.Log off Time
12
12
13
62
C9.BackLight
61
Password
protection
User/Advance
passwords
Password
protection
D15.Set to Default
39
9
39
39
39
67
Appendix
How do I upgrade system
software?
Recording
How do I record meeting or
face-to-face voice?
How do I use microphone
recording?
How do I use manual call
recording?
How do I assign a recording for
importance?
How do I tag “comments” to a
recording during recording
period?
How do I add a bookmark to a
recording?
How do I enable/disable the 3
system supported database
fields?
What should I do if the voice
input signals are week?
How do I enable/disable
“Important only” function?
How do I use call monitoring
function?
How do I enable/disable cycle
recording function?
How do I enable/disable
recording encryption function?
Playback
How do I play the last recording
instantly?
102
System software
upgrade
70
Microphone
recording
Microphone
recording
Manual recording
24
Importance
assignment
Database fields
25
Bookmark
26
D8.Field Sel
65
D7.Gain Set
C7.Rec AGC
D9.Importance
only
Live monitoring
65
61
66
Cycle recording
46
D12.Encryption
67
Instant playback
31
24
24
26
47
Appendix
How do I play the previous or
next recording?
How do I view the database
information of a recording?
How do I adjust sound volume
during playback?
How do I use AVC function?
How do I change the playback
mode?
How do I use the speedy search
function?
Playback
33
View information
34
Volume
adjustment
AVC function
C10.PlayMode
20
54
61
Speedy search
36
How do I search recordings with
criteria?
Search options
55
Search conditions
55
How do I assign a recording for
importance?
Assign importance
25
How do I save a recording
permanently in the memory
card?
How do I delete an unwanted
recording?
How do I edit database
information?
Save Recording
52
Delete Recording
53
Manage recording
5.Modify Case ID
6.Modify Comment
7.Modify Value
Insert bookmarks
51
53
C12.Direct Play
62
How do I change bookmarks?
How do I reconfigure the time for
“Direct Play?
103
54
Appendix
Troubleshooting
Problem
Can’t power
on system
LCD screen
showing
Low Battery
Can’t format
memory card
Can’t record
voices
Cause and Solution
Power connection error: Check up
power source. Power source can be
one of the 3 sources: mains adapter,
car battery and AA battery. If using
either of the first two sources, check
up if the wire connections are securely
fastened. If using the last source,
check up if battery power is too low or
has been used out completely.
Low battery power or incorrect type of
AA battery used: Change battery or
alternatively use mains power adapter
or car battery. When battery is low or
not supported type of battery, the
system gets insufficient power supply,
so “low battery” sign will appear on
LCD screen and recording service is
halted.
Memory card write protected: Eject
the memory card and slide the write
protection lever to another side of the
slot.
Memory card full: Delete unwanted
recordings or use a new memory
card.
Memory card write protected:
Disable the write protection.
Line disconnected: Secure the
connection with phone or phone
line.
104
Page
14
83
-
-
Appendix
Can’t play a
recording
Can’t connect
computer
thru USB
cable
D9.Important Only is ON: Always
remember to press the “*” button
before end of call.
D4.Trigger is VOX: Stop playback,
allowing the system to activate
recording. System can’t activate
recording during the period sound
replay is progressing.
Recording in progress: Wait for
recording to stop, as system can’t
support playback during the period
recording is progressing.
Date/time error: System’s date/time
is earlier than the date/time stamp
of the recording.
Recording database crashed:
Contact your reseller or Multisuns
technical support.
File deleting or voice recording in
progress: Wait until it’s done, as
system can’t support USB
connection when the system
performs either of the two tasks.
Line connection error: Ensure USB
cable is securely fastened between
TCR-2000 and computer.
Slow data transmission: Wait
patiently as it takes a while for
computer to read data from SDHC
card thru USB port.
105
46
-
-
-
-
Multisuns Corporation
Nangkang Software Park
12F, No. 19-3, San Chung Road,
Nankang District, Taipei, 115, Taiwan
Tel: +886-2-8170-2568
Fax: +886-2-2655-3636
Email: [email protected]
http://www.multisuns.com