1
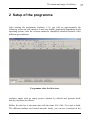
bomots.com PROFESSIONAL OPEN-SOURCE- AND LINUX-KNOW-HOW Markus Priemer Audacity compact Professional sound processing with the best free audio editor Markus Priemer Audacity compact User Manual With foreword and contributions by Markus Meyer 2 Audacity compact All rights reserved. This book may not be copied, reproduced or transmitted by photocopying, recording or in any other way in its entirety or in part without the expressed written consent of the publisher. Likewise, in accordance with the right of communication to the public, prior consent of the publisher is needed to exhibit the book and its contents. The publisher notes that the mentioned company and brand names as well as product trademarks are as a rule protected by trademark and patent laws. Publisher and author do not guarantee the functional capability of the described procedures and standards. © 2009 bomots verlag Publisher: Dr. Holger Reibold Translation: Heike Mieth, M.A.; Susanne Fahn, M.A. Cover design: bomots verlag Text design: bomots verlag Cover: Photocase/Sascha Duffner Printing: COD ISBN: 978-3-939316-65-7 www.bomots.de 3 Table of Contents FOREWORD............................................................................7 1 INTRODUCTION................................................................9 1.1 Sounds, sound waves and digital audio.................................................. 9 1.2 Audio data and compression ................................................................ 17 1.3 Via microphone directly onto the computer ........................................ 17 1.4 What exactly is Audacity?.................................................................... 24 1.5 The functional range of Audacity ........................................................ 25 2 SETUP OF THE PROGRAMME ......................................27 2.1 The various toolbars............................................................................. 28 2.2 Selection toolbar................................................................................... 36 2.3 Computer latency................................................................................. 40 2.4 Calculating the computer latency ........................................................ 40 3 WORKING WITH AUDACITY..........................................43 3.1 Opening and importing files................................................................. 43 3.2 Marking of audio tracks....................................................................... 47 3.3 Editing audio tracks ............................................................................. 51 3.3.1 Cut and delete with preliminary check............................................. 51 Aucacity compact Table of Contents 4 3.3.2 3.3.3 3.3.4 3.3.5 3.3.6 3.3.7 3.3.8 3.4 Cut and split cut.............................................................................. 53 Copy .............................................................................................. 53 Paste............................................................................................... 54 Trim ............................................................................................... 56 Split delete ..................................................................................... 57 Silence Audio ................................................................................. 58 Split ............................................................................................... 59 Command menu ................................................................................... 60 3.5 Placing cuts optimally .......................................................................... 61 3.5.1 Cut preview.................................................................................... 62 3.5.2 Variable playback regions............................................................... 63 3.5.3 Finding zero crossings .................................................................... 65 3.6 The different tracks.............................................................................. 65 3.6.1 Audio tracks ................................................................................... 66 3.6.2 Label track ..................................................................................... 69 3.6.3 Time track ...................................................................................... 72 3.6.4 MIDI track ..................................................................................... 74 3.7 Recordings............................................................................................ 76 3.8 Working with shortcuts........................................................................ 76 4 EXAMPLES OF USE .......................................................81 4.1 Cut audio tracks via labels................................................................... 81 4.2 Removing background noises............................................................... 84 5 5.1 EFFECTS.........................................................................87 Appliance of effects .............................................................................. 87 5.2 Standard effects.................................................................................... 88 5.2.1 Fade in/out ..................................................................................... 89 5.2.2 Auto duck....................................................................................... 90 5.2.3 Bass boost ...................................................................................... 91 5.2.4 Echo............................................................................................... 92 www.bomots.de 5 5.2.5 5.2.6 5.2.7 5.2.8 5.2.9 5.2.10 5.2.11 5.2.12 5.2.13 5.2.14 5.2.15 5.2.16 5.2.17 5.2.18 5.2.19 5.2.20 5.2.21 5.2.22 Equalization ................................................................................... 92 Change speed ................................................................................. 94 Invert.............................................................................................. 95 Click removal ................................................................................. 96 Compressor .................................................................................... 97 Leveller .......................................................................................... 98 Normalize....................................................................................... 98 Nyquist prompt............................................................................... 99 Phaser .......................................................................................... 100 Noise removal .............................................................................. 101 Repair .......................................................................................... 103 Reverse ........................................................................................ 103 Truncate silence............................................................................ 103 Change tempo............................................................................... 104 Change pitch ................................................................................ 105 Amplify........................................................................................ 106 Wahwah ....................................................................................... 107 Repeat .......................................................................................... 108 5.3 Problems and possible solutions......................................................... 109 5.3.1 Recording with interruptions and disturbances .............................. 109 5.3.2 Recording has differing recording levels ....................................... 110 5.3.3 Recordings do not run “centred“ ................................................... 111 6 PREFERENCES ............................................................113 6.1 Audio I/O............................................................................................ 113 6.2 Quality................................................................................................ 115 6.3 Import / Export .................................................................................. 116 6.4 Spectrograms...................................................................................... 118 6.5 Directories .......................................................................................... 119 6.6 Adjusting the programme interface................................................... 120 6.7 Keyboard............................................................................................ 123 6.8 Mouse setup........................................................................................ 124 Aucacity compact Table of Contents 6 7 COMMAND LIST ...........................................................127 7.1 File ...................................................................................................... 127 7.2 Edit ..................................................................................................... 129 7.3 View.................................................................................................... 131 7.4 Tracks................................................................................................. 132 7.5 Generate ............................................................................................. 133 7.6 Analyze ............................................................................................... 134 7.7 Help .................................................................................................... 135 8 DOWNLOAD AND INSTALLATION..............................137 8.1 Windows ............................................................................................. 138 8.2 Mac OS............................................................................................... 139 8.3 Linux .................................................................................................. 139 8.4 Installing the MP3-Encoder ............................................................... 141 6 10 GLOSSARY ...................................................................143 APPENDIX..................................................................147 INDEX ..................................................................................149 www.bomots.de 7 Foreword Dear reader, In Taylor Hackford‘s brilliant movie “Ray“, which is about the life of the musician Ray Charles, the protagonist, who had just become famous, is led through the newly built up recording studios of his record label in the middle of the 60s of the past century. A representative of the label shows him the – for the time period – excellent equipment and comments: “Totally state-of-the-art. Tom Dowd built an eight-track mixing console ...”. When I saw the movie at the theatre in 2005, this scene amused several visitors, which proves the enormous technical progress of recording engineering in the past 50 years. Nowadays, we are able to produce recordings of music and language in excellent quality, record them on compact disc or share them online with very little financial and technical effort. Not only can users make their own recordings via microphone, but they can also use existing material – thus, a song from the internet turns into a ring tone on one’s own mobile phone, a symphony by Mozart is embedded into one’s podcast and the song of the favourite artist becomes a karaoke version for the next birthday party. A whole generation of the Internet, the Web 2.0, lives solely on the contents of users and their creativity, thereby generating a culture of creating and re-creating, “a ‘cut and paste’ culture enabled by technology”, which releases unexpected resources of creativity, as Lawrence Lessing, American professor of law, describes in his book “Free Culture: The Nature and Future of Creativity”. Part of this culture of creativity is the digital audio editor Audacity. This programme, which is published as so-called open source software on SourceForge.net and licensed under the GNU GPL, not only allows users the free use and transfer of the application, but also the inspection of its source code and hence the possibility to upgrade and adjust the tool oneself. Developed by the original author of the software, Dominic Mazzoni, merely for process analysis as part of a project at the Carnegie Mellon University, the programme has soon become an editor to be reckoned with for audio data of every kind since its introduction in 1999. The software is available for the operating systems Windows as well as Linux and Mac OS. Aucacity compact 8 Foreword By now, Audacity has evolved from an insider tip to the probably best known software of its kind. Ever since the release of the first version of Audacity, the programme has been downloaded over 40 million times just from the official homepage alone. Furthermore, the software is available on countless download sites on the Internet and is enclosed on booklet-CDs in computer magazines all over the world. A google-search for “audio editor” leads directly to Audacity’s homepage. Although Audacity in the meantime is not the only free programme for editing of audio data anymore, many users, who for example appreciate the easy and intuitional operability, favour it to other similar applications. Despite its popularity, Audacity is still developed further by volunteers in their spare time. I myself have been part of this pleasant team of dedicated software developers from all over the world since 2003. With this book, we want to give you all the information you need to apply Audacity reasonably. The author, Markus Priemer, made a point of giving you both an overview of the handling of the programme as well as a detailed description of every function. Furthermore, you will find interesting background information, for example about microphone technologies, as well as several step-by-step tutorials. You are in good company, no matter if you are playing in a band and want to edit your recordings with Audacity, or if you use the programme as a journalist, editor or podcaster to edit your interviews or articles. It is clear: A free software does of course not replace neither singing lessons nor the studies of audio engineering, but Audacity is a tool, with which people can express their creativity. On this note, I wish you a fun time and success while reading this book. Yours, Markus Meyer Markus Meyer, graduated computer scientist, was born in 1979 and has been a member of the “Audacity Technical Leadership Council“ since 2005, which is responsible for the further development of Audacity. He is CEO of a software engineering company and lives and works in Nuremberg, Germany. For further details, contact Markus Meyer by e-mail: [email protected]. www.bomots.de Sounds, sound waves and digital audio 1 Introduction The following introduction is intended for those who are not familiar with the basic terms and procedures in the field of audio techniques. Only a very rough overview will be given, which shall assist to get a basic understanding of the subject. Basic physical correlations and related terms will not only help later on for a better understanding of the programme Audacity and the tasks, which can be realized with it, but will also help in many cases to achieve better results. We shall cover a wider range of topics, beginning with analogue acoustic waves and ending with digital audio recording. Additionally, we will also take a look at the compression of audio data and microphone technics in this chapter. 1.1 Sounds, sound waves and digital audio Sounds are sound waves, which – from a physical point of view – form barometric variations, which are strung together. However, only sound waves, which can be heard by us humans, with frequencies of about 16 to 20,000 Hz or 20 kHz respectively, are called sounds. The frequency indicates in this context, how often the sound wave oscillates per second. At the same time, the frequency also defines the physical length of a sound wave. The formula for this is: Acoustic Velocity Length of Sound Wave Frequency The acoustic velocity is, however, furthermore dependent on the medium, in which the sound wave moves. Relevant properties are in this case the mass density and the respective temperature. Sound waves cannot move in a vacuum due to the lack of medium. In the air, acoustic velocity is for example about 760 mph at 59 °F and decelerates consistently with falling temperature. Barometric pressure on the other hand has no effect on acoustic velocity, even though this has often incorrectly been assumed. Aucacity compact 9 10 Introduction Medium Temperature Acoustic Velocity Air 59 °Fahrenheit 760 mph Air 32 °Fahrenheit 740 mph Water 68 °Fahrenheit 3,320 mph Aluminium 68 °Fahrenheit 11,408 mph Examples of acoustic velocities. For humans, the most important transport medium for sound waves is the air. From a temperature of 59 °F the following wave lengths exemplarily result. Other frequencies can also be calculated easily with the aid of the beforehand mentioned formula. Wavelengths of different frequencies. Sound waves below 16 Hz, the lowest frequency audible for humans, are called infrasound. These are probably used for communication by blue whales, elephants and giraffes. www.bomots.de Sounds, sound waves and digital audio 11 On the other side of the scale, in the range not audible for humans, from about 20 kHz (20,000 oscillations per second) to 1 gHz (1 billion oscillations per second) the sound waves are called ultrasound. The possibilities for the use of these sound waves are extremely diversified. Thus, ultrasound is used for instance in medical science as a diagnostic imaging technique or to remove calculus and to break up kidney stones. It is, furthermore, used in seafaring for measuring water depths, locating shoals and for navigating, and in materials engineering for example for non-destructive material testing. But let us return to those sound waves, which are audible for humans. Many mediums are limited to a frequency range, which is necessary for hearing or communicating. On the one hand, this has very practical reasons, for example to store a sufficient number of songs on a CD, or with regards to telephony, because it is simply cheaper to build a microphone or a speaker respectively, which only records or reproduces a relatively small frequency range. Here are some examples: Medium Sample Frequency Frequency Range Channels Sample format Telephone 8 kHz 300 - 3400 mono 8 bit AM Radio 11,025 kHz 50 - 5000 mono 8 bit FM Radio 20,05 kHz 20 - 15000 stereo 16 bit CD 44,1 kHz 20 - 20000 stereo 16 bit 48 kHz 20 - 20000 stereo 16 bit 44,1 to 192 kHz 20 - 20000 stereo or up to max. 6 channels 16, 20 or 24 bit DAT-Recorder Audio-DVD The development of digital technique finally brought the distinction between analogue and digital signals. If you record, for example, analogue sounds like speech or singing with a microphone using a tape recorder, the result will stay analogue. The analogue signal can in this case take every possible value of a certain scale. Aucacity compact 12 Introduction However, if you save an audio signal via computer, the signal will be digitised, which means that it is converted into discrete, that is integral, numerical values. The analogue digital converter and for the reconversion the digital analogue converter (a/d, d/a converter) are hereby used, which are both located on the sound card. Example of an anlogue signal. In this process, which is also called quantisation, the analogue signal is measured in certain intervals (the so-called sampling rate) and converted into a discrete value. In the following figure, every vertical line stands for such a sampling sequence. www.bomots.de Sounds, sound waves and digital audio 13 Sampling of an analogue signal. The calculated value is allocated to the next raster value by rounding up or down. The following figure of the measured and converted values shows clearly the disadvantages of this method. The horizontal lines are here the converted raster values. Aucacity compact 14 Introduction Rounding up or down respectively of the measurement results to given raster values. The difference between the calculated value and the next possible raster value displays the error of quantisation. This error occurs, because the sampled value of the signal does not always lie exactly on the given value of the used raster and, therefore, has to be rounded up or down. This consequentially causes minimal divergencies of the digital signal in comparison with the original one. The advantages of digitalisation are, however, obvious: digital data is a lot easier to process and to handle, does not underlie any aging process and, moreover, they can be copied as often as you want to without any loss in quality. The data can, furthermore, be saved very efficiently in digital form through compression or be made available worldwide via the Internet. www.bomots.de Sounds, sound waves and digital audio 15 During digitising, the amplitude or respectively the volume of the audio signal is sampled with a certain frequency and the thereby calculated values are saved. The sampling sequencies, which are executed every second, are called sampling rate. Audio CDs, for example, have a sampling rate of 44.1 kHz, which means, that the audio signal is sampled 44,100 times per second and the thereby calculated values are saved. The second important factor for digitising analogue signals is the so-called sample format or sample range. It practically sets up the size of the scale or raster, in which the conversion of the numerical values takes place, and, thus, determines the number of possible increments. The beforementioned audio CD usually uses a sample range of 16 bits, with which exactly 65,536 different values can be displayed. Sample Format or Possible Values Sample Range 4 16 8 256 4 bit (2 ) 8 bit (2 ) 16 65536 24 16777216 32 4294967296 48 281474976710656 96 79228162514264337593543950336 16 bit (2 ) 24 bit (2 ) 32 bit (2 ) 48 bit (2 ) 96 bit (2 ) Common sample ranges. The higher the chosen sample rate, the bigger on the one hand the memory requirements, but on the other hand also the dynamic range, that is the difference between the lowest and loudest sound. For 16 bit stereo, the dynamic range is, for example, about 96 db (approximately 6 db per bit sample range). At the same time, Aucacity compact 16 Introduction a higher sample range reduces the quantisation error in relation to the original signal. The Nyquist-Shannon sampling theorem shows, moreover, the direct correlation between sample rate and frequency range, and states, that the sample range must be at least twice as high as the maximum displayable frequency: Maximum displayable Frequency Sample Rate 2 The maximum displayable frequency, in turn, is geared to the recipient, that is to the frequency range audible for humans. Therefore, a sampling rate of 44.1 kHz has been defined for CDs, resulting in a maximum frequency signal of 22.5 kHz, which already is beyond the human perception of maximal 20 kHz. By using several channels, it is, moreover, possible to produce surround sound, which is not possible for mono recordings with only one channel. Stereo recordings use two separated channels, which can be output to a right and left speaker during rendering. Even more channels are used, for example, on quadraphonics (4-channel stereophony) or Dolby surround (multi-channel sound reproduction with five speakers) and 5.1-audio with six channels. If we take, for example, a regular audio CD: At a sample rate of 44.1 kHz and a sample range of 16 bit as well as 2 channels for stereo effect, the data rate is calculated as follows: (44.100∗16)∗2 = 1.411.200 bit/s Thus, audio recording, if uncompressed, needs quite a lot of memory capacity. A recording of three minutes in CD-quality already needs about 30 MB disc space. This equates, for example, to an amount of data of about 6,000 pages of text or to the capacity of more than 20 floppy disks. Just a few years ago, computers were simply overextended by these amounts of data. www.bomots.de Audio data and compression 1.2 17 Audio data and compression As you could see in the last chapter, it can be extremely memory intensive to save audio files, which is why different methods are used in order to achieve a compression of the data. This saves memory capacity, but also makes it possible to work more efficiently with the data. Algorithms for the compression of digital data, such as movies or documents, search during this process mostly for repetitions in order to overwrite the area of repetition, subsequently saving disc space. Since identical repetitions in music are rare, audio data does not lend itself easily to compression. Most of the lossless compressors, therefore, use predictive encoding, which first makes a prognosis of the amplitude and afterwards saves the actual difference to the prognosis. The attainable compression, nevertheless, is strongly dependent on the respective audio data and averages at about 25–70 % of the original, while the lossy compression reaches a reduction of the data to about 10 % of the original without audible differences in quality. The most popular audio format definitely is MP3, which was developed by the Frauenhofer Institute in collaboration with the companies AT&T, Bell Labs and Thomson. This procedure, which in the meantime has qualitatively been outrun by other formats like Vorbis or AAC, uses data reduction by leaving out not or hardly audible frequency ranges as well as heterodyne frequencies or sequences with changes in volume (such as low sounds, which directly follow sequences of very high volume), which the human sense of hearing cannot separate from each other or respectively cannot perceive. The most important audio data formats for working with Audacity are discussed in more detail in the glossary at the end of the book. 1.3 Via microphone directly onto the computer The first step of editing digital audio is usually the recording of language, music and sounds via microphone. All you need for direct recording of audios onto your computer is the programme Audacity, a sound card and a microphone. Mistakes, which are made here at the beginning of the working process, are typically hard or impossible to correct later on. The recording itself and the Aucacity compact Introduction 18 selection of the microphone are, therefore, of crucial importance. Let us begin with the microphones, which can today be classified into three main categories: Dynamic microphones (moving coil microphones) Condenser microphones Electret condenser microphones (variant of the condenser microphone) These microphone types have in common, that they convert sound waves via a mechanically oscillating membrane into an electrical signal. Dynamic microphones convert via the movement of an induction coil within a magnetic field. This is also called induction principle. Dynamic microphones can bear enormous acoustic pressure without distorting and are, therefore, very popular for live on-stage use and for recording loud instruments, such as bass drums and trumpets. Another advantage is the fact, that they – in contrast to condenser microphones – do not need any electric power supply. A disadvantage, however, is the higher weight of the membrane, which leads to an impulse repeating of lower quality and a longer post-pulse oscillation. This in turn has a negative effect on the frequency response, which does not process more or less in-line, as it does with condenser microphones, but usually declines in the lower and upper frequency spectrum. Additionally, the frequency spectrum of dynamic microphones themselves is generally lower than that of condenser and electret microphones. Condenser microphones are typical studio or respectively speaker microphones. If you want to use Audacity, for example, for podcasting, a condenser microphone is recommendable. They are virtually always used, when a recording as accurate as possible of the original sound is desired. A slight disadvantage is, as previously mentioned, that the condenser microphone needs supply voltage to load the membrane and the preamplifier. This problem is often solved by using 9-volt batteries for on-stage microphones, while it is energised in studios via so-called phantom power, usually a 48-volt direct current voltage, provided by microphone inputs. Electret condenser microphones are a variant of the condenser microphone, but they use an electret membrane, which is located between the condenser plates, for sound propagation. This type of microphone is nowadays the most popular one, because of the very compact construction and the low cost manufacturing, and it can be found in many devices, such as (mobile) phones, interphone systems, laptops, baby monitors or even hearing aids. www.bomots.de Via microphone directly onto the computer 19 One really important aspect is the directional characteristic of a microphone, which provides information about how well the sound can be absorbed from different directions. Some modern condenser microphones already provide a selectable directional characteristic as optional equipment. Four basic characteristics can generally be distinguished: Omnidirectional: These microphones absorb sound from all directions equally well. This type of microphone is also called nondirectional and is mainly used for the recording of background atmosphere or in studios. Bi-directional: Microphones of this directionality are also called „figure 8 microphones“. They are pressure gradient receivers, which absorb sound from both the front and the back of the membrane. Through constructive changes, even cardioid characteristics can be reached. Omnidirectional and bi-directional characteristics. Cardioid: Microphones of this characteristic mainly record from the direction, in which they are held, while sound from the back is practically completely shielded. Moreover, their directionality matches aproximately the human ear, which is why they are prefered for recording of ambient sounds. Supercardioid and Hypercardioid: These polar patterns are – in comparison with normal cardioids – significantly more directed and can, therefore, supress background sounds significantly better. Hence, they are usually used for more distant acoustic sources, such as movie and television shots, where the microphone has to be outside of the display window. Aucacity compact Introduction 20 Cardioid and hypercardioid characteristics. Finally, you should also pay attention to the right connector for the microphone or respectively remember to buy the applicable adapter. Standard microphones usually use the following four connectors: 3.5 mm TRS connector: The so-called „miniature TRS connector“ fits every standard sound card as well as the outputs of every walkman or MP3-player. But beware: A slightly smaller 2.5 mm TRS connector for subminiature devices, like for example Dictaphones, also exists. 6.35 mm TRS connector: The big TRS connector is used for mixing desks, keyboards and amplifiers. An adapter will be needed for the connection with a computer. XLR connector: A popular connector for professional devices, used for mixing desks, preamplifiers and so forth. It can only be connected to a standard sound card via adapter. If you own a condenser microphone with XLR connector, additional phantom power is, moreover, required, which sounds cards generally do not provide. It is, therefore, in this case obligatory to interconnect a separate microphone amplifier or a mixing desk between microphone and sound card. USB connector: Still relatively new on the market, but downright handy, because this kind of microphone can be connected directly to a free USBport on your computer. Even the necessary electric power supply can be obtained thereby via USB. www.bomots.de Via microphone directly onto the computer 21 USB, 3.5 mm TRS connector, 6.35 mm TRS connector, XLR (female), XLR (male). The question of which microphone to choose can actually only be answered individually. The microphone just has to suit the voice or instrument. You can read long consumer reports and discussions about this subject in various online forums, which can definitely help to make a buying decision. Our advice is, therefore: First of all, read consumer reports by ambitious users, decide exactly upon the desired applicability and compare the technical specifications as well. The Audacity forum, available at http://audacityteam.org/forum, can also give you a good overview. Those, who have the possibility – for example at a large music store, a conferrer or the like –, should certainly test the various microphones beforehand. Once you have decided on a microphone, nothing will get in the way of making your first recording. Here are some tips for successful recording: Initially, adjust the settings for the recording level. Regulate the sound level in a way, so that the sound will be recorded as loud as possible, but you absolutely try to avoid clipping. If applicable, run a test recording of several seconds, before the actual recording, and check the result for possible interferences, falsifications, clippings and so forth. Try to eliminate or avoid background noises. For indoor recordings you should, for example, locate a quiet room free from echo. For outdoor Aucacity compact Introduction 22 recordings you could, for example, use a wind deflector against the sounds of wind, mask flapping parts of clothing and turn off other disturbing sources beforehand, such as possibly ringing mobile phones. If you have background noise that you cannot turn off, you should bring the microphone as close as possible to the source of sound, which is to be recorded. This way, the background noise is at least recorded mutedly. Recordings of speech should be carried out at a volume as constant as possible, meaning without any outliers upwards or downwards. When recording musical instruments, you should familiarise yourself with the individual directional characteristics of that musical instrument to be able to place the microphone as optimal as possible. If there are, nevertheless, interferences, or if there is a clearly audible hissing, you systematically have to go through all elements of the recording chain, test them individually if possible and, where necessary, substitute those components, which could be responsible for the error. But before you act blindly, you should always test the wiring and the conducted settings first. www.bomots.de Via microphone directly onto the computer 23 Recording from other playback devices If you have another playback device, like e. g. an MP3-player or a CD-player, you can record its output signal, which comes from the line-out jack or a green jack, via the line-in input or respectively the blue jack of your computer. The following colours are usually used for the different ports of a computer: Colour Function Silver (grey) Side speaker output (stereo) Black Back speaker output (stereo) Orange Subwoofer output and centre output. Often alternatively switchable to the digital output. Pink Microphone input (mono) Green Speaker output, line-out (stereo) Blue (light blue) Line-in (stereo) If you want to record from the output of another programme, you should initially check, whether the respective programme itself allows recording. You can then edit the result with Audacity subsequently. Many sound cards allow you to choose the entire output as the input channel. Different terms are used in this context, such as Wave Out or What U Hear. Using this setting, you can utilise Audacity to record sound, while a different programme replays something. Conflicts may occur in isolated cases, because two programmes access the sound card simultaneously. Using newer drivers or a different operating system might solve this problem. Alternatively, a temporary solution could simply be to directly pass the ouput line out (green jack) via wire to the line in jack (blue jack) and to record the input via Audacity from line in. Aucacity compact 24 1.4 Introduction What exactly is Audacity? Audacity is a free and cross-platform programme for audio editing. Free does in this context not only refer to free of charge, but above all free in terms of liberty. This includes primarily the liberty to be able to use this software for all, even commercial purposes. The software may, furthermore, be copied, circulated as well as adjusted to one’s own requirements and demands. Other distinct characteristics of a free software are the licensing under the GNU General Public License (GPL), which is also known as a free copyleft license for software, and the fact, that the source code is available for everyone. The developing trend of such free software, which is also called open source projects, is directly dependent on the composition and interests of the respective team of developers as well as the requests and suggestions of the users. Many teams, however, offer, moreover, individual enhancements of the respective software. Simply contact the respective team, if need be. Audacity was originally created for a project at the Carnegie Mellon University in Pittsburgh, USA, which dealt with frequency analysis. Dominic Mazzoni has been envolved right from the start and is still significantly supervising the project today. He and an international group of volunteers, organising themselves via Internet, continuously develop Audacity further. Audacity is written in the programming language C++. A special feature is the fact that Audacity has been developed for all three major operating systems (Windows, Mac OS X and Linux). To provide a similar graphical user interface for the different operating systems, the wxWidgets software library is used. The latest release is 1.3.6 (beta), which has been launched in October 2008; and the latest stable release is 1.2.6 respectively, which is recommended for efficient working. Audacity enables the individual user to handle different tasks independently, which previously could only be realised time, work and price intensive at a recording studio. Linked to an Internet connection and a website or respectively the access to the according Internet portal, these products can be made available worldwide. This development has already gained ground in the form of self-recorded and mixed music, audio blogs and podcasts and has enriched cultural life for a while. In the following, the latest release 1.3.6 (beta) will be described. www.bomots.de The functional range of Audacity 1.5 25 The functional range of Audacity With Audacity, you can complete a lot of tasks. Pay attention to the fact, that you may possibly need additional devices or software for certain tasks and functions. Thus, for the already mentioned live-recording of speech, sounds or music, you need, for example, at least a microphone, which has to be connected to the computer via a mixing desk or directly via sound card. The most important features are: Importing of different audio formats, such as WAV, FLAC, AIFF, AU, Ogg Vorbis and MPEG data Importing of audio raw data Creating of an unlimited number of audio tracks Compiling live-recordings Digitising of analogue data mediums like cassette tapes or vinyl records Cutting, copying, deleting and mixing of audio data Providing audio data with special effects, such as changing speed or pitch of a recording Unlimited undo actions and restoring of work steps Recording via microphone and other sources via the line-in input, like for example mixing desks or amplifiers and online sources (dependent on the capabilites of the used sound card). Recordings with a sample rate of up to 96 kHz and a sample and a floating point of up to 32 bit are hereby supported. Changing and mixing of an unlimited number of tracks Deleting of continuous background noises Manual deleting of disturbances via the drawing tool Displaying of the recording level before, during and after recording Recording in 16-, 24- or 32-bit (floating point) Exporting of WAV-, AIFF-data and via the optional LAME Encoder Library even MP3-files Spectrogram mode to show frequencies Plot spectrum commands for a more precise frequency analysis Mixing together of different sample rates and formats in real time As a mere audio editor, Audacity does not offer any advanced features, which may be known from so-called sequencer programmes. This means more specifically, Aucacity compact 26 Introduction that MIDI-data can indeed be imported and shown by Audacity, but they cannot be edited, replayed or saved. However, these functions are already planned for future releases. www.bomots.de The functional range of Audacity 27 2 Setup of the programme After starting the programme Audacity 1.3.6, you will see approximately the following screen on your monitor. It can vary slightly graphically depending on the operating system, since the versions cannot be completely identical because of the different preconditions. Programme after the first start. Audacity opens with an empty project window by default and presents itself, thereby, top down as follows: Bellow the title bar is the menu bar with the items File, Edit, View and so forth. The different toolbars are located beneath. Lastly, you can see a timeline in the Aucacity compact Setup of the programme 28 upper area above the empty project window. Below the empty project window, there is the time and project rate bar as well as the status bar, which shows the currently used frequency. 2.1 The various toolbars The symbols of the control toolbar should be familiar to most of you from other audio equipment. The Audacity Control toolbar. Though, some of these buttons have extended features in conjunction with the SHIFT-key (also known as the key used to type capital letters). Symbol Name Function Pause Pauses current recordings or playbacks. To resume, press Pause anew. Play Loop-play Playback starts at the current position of the selection cursor or at the beginning of a selected section. If you hold down SHIFT while pressing Play, the image of the button and its function will change. The track or the selected section of the track will now be played over and over (loop-play) until you press Stop. www.bomots.de The various toolbars Symbol Name Stop Skip to start Skip to end Record 29 Function Pressing this button, you will stop the current recording or playback. If pausing was activated, both the foregoing action and pause will immediately be stopped. Moves the cursor to the beginning of the project (time position 0). Holding down SHIFT will mark the audio track section from the current position to the starting point of the project. Moves the cursor to the end of the project. Holding down SHIFT will mark the audio track section from the current position to the end of the project. After pressing the Record-button, a new track will be created. Recording begins at the current cursor position with the set recording rate and can be paused by pressing Pause and ended by pressing Stop. The tools toolbar, which looks rather unimpressive, is also important for the work via mouse and will be described in the following. Audacity tools toolbar. Aucacity compact 30 Setup of the programme The individual devices can also be chosen comfortably via keyboard, since they are usually allocated from left top to right bottom with the function keys F1 to F6. Symbol Name Function Selection tool By activating this device, you can define the cursor position in a track via mouse click or mark a certain area via holding down the mouse button. Envelope tool Using this device, you can change the volume for a selection. This is, for example, useful for fading tracks in and out manually. Draw tool Start by zooming in on the audio track until you can spot the individual samples as dots. Holding down the mouse button, you can now draw the samples anew. This is, for example, useful for removing short background noises manually. Zoom tool Allows to zoom in (left mouse button) or to zoom out (right mouse button or SHIFT + left mouse button respectively) in order to change the perspective of the audio track. Time shift tool With the aid of this device, you can shift an entire audio track horizontally – thus, on the timeline. For this purpose, you drag the audio track by holding down the mouse button to the desired position. Small arrows will indicate, if parts of the audio track are moved into the negative time-line. Multi-tool mode Device, which combines the different features, depending on the image of the mouse pointer and position of application: Enables the positioning of the point of www.bomots.de The various toolbars Symbol Name Function playback via mouse click and of the markings by holding down the mouse button. A right mouse click zooms out the perspective, whereas selecting while holding down the right mouse button fits the marking directly into the perspective. The mouse pointer looks like this at the margin of the envelope, which you can then shift by holding down the mouse button. By holding down the CTRL-key, you can shift audio tracks on the timeline. A selected area can also be moved by beginning to move right where the selection starts. To the right of the device tool bar, you can find the meter toolbar. Meter toolbar with menus. Aucacity compact 31 Setup of the programme 32 The individual commands of the menus: Disable Meter: Disables the respective meter, which is then displayed in grey. Enable/Disable Meter: Enables or disables the input level meter (microphone icon). Horizontal Stereo: Standard display, which shows the meter horizontally from left to right. Vertical Stereo: Shows the meter vertically from bottom to top. Linear: Switches to a linear scale in the meter (0.0 = silence, 1.0 = maximum level meter). db: Standard display, which shows the scale of the level meter logarithmically (0 dB = maximum level meter). Further settings for this display range can be made via Edit> Preferences> Interface> Display range minimum. Preferences: Here you can determine, how often per second the display is refreshed. Possible values are 1 to 100. Please bear in mind, that a high rate requires correspondingly higher processing power. Next, you find the mixer toolbar below the control toolbar. With its help, the output volume is adjusted on the left and the input volume on the right. The input source can be chosen via the right pull-down menu. www.bomots.de The various toolbars 33 Level control for output and input volume. You can change settings by either pulling the controller to the desired position by holding down a mouse button, or by opening the respective window by double clicking on the scale to directly enter the value. The edit toolbar offers further important features for the editing and viewing of the audio tracks. The edit toolbar. Aucacity compact 34 Setup of the programme Symbol Name Function Cut Cuts out the selected section from an audio track. The potentially remaining part of the audio track is shifted to the left and is attached seemlessly to the remains of the left-hand audio track. Accordingly, the new audio track is shorter exactly the length of the removed part of the audio track. Following clips will, furthermore, be shifted or not – depending on the settings. The settings can be changed via Edit> Preferences> Interface> Editing a clip can move other clips. Copy Paste Trim The selected area is copied to the clipboard while the original audio track remains untouched. The copied area can be pasted to other areas as often as desired. Clipboard contents of cut or copied areas of an audio track can be inserted at the position of the cursor with this feature. Trimming is the opposite of cutting. Trimming deletes everything, but the selected area. The trimmed area keeps its position. The selected area is replaced by silence. Silence The last editing operation will be undone. Undo www.bomots.de The various toolbars Symbol Name 35 Function This feature restores an undone operation. Redo Zoom in This feature magnifies the displayed audio track. This operation can be repeated, until, for example, the single samples are clearly visible and can be edited with the drawing tool. Zoom out Causes the opposite of the feature Zoom in and demagnifies the view. Fit selection Fits the display of a marked area to the Audacity window. Depending on the current perspective, it will be zoomed in or out. Fit project Fits the whole project into the window. Depending on the current perspective, it will respectively be zoomed in or out. This feature is especially useful to give you a quick overview over the project as a whole. To the right of the edit toolbar, there is the transcription toolbar, which offers the option to play audio data faster or slower. Aucacity compact 36 Setup of the programme Transcription toolbar with input window. Besides the slider, which you can drag by holding down a mouse button via the mouse pointer, you also have the option to open the input window Playback Speed by double clicking on the scale and to enter a value directly. To play the current project faster or slower, set the slider first to the desired speed. The factor 1.0 hereby stands for the original speed. The factor 0.5 stands for a speed reduced by 50 %, the factor 1.5 respectively for a speed raised by 50 %. Then click on the button with the green arrow on the transcription toolbar to play the current selection with the chosen speed. 2.2 Selection toolbar Finally, there is the selection toolbar below the project window. The selection toolbar allows the setting of the project rate on the left side. If the feature Snap to is activated, it only allows selections in the chosen unit. If, for example, the format hours:minutes:seconds was chosen, selections may only start and end at integer seconds. A format for video films, such as hh:mm:ss + PAL frames (25 fps), has the advantage, that the sound editing exactly matches the screen change, so that frame accurate editing is possible. This avoids, furthermore, needless clicking and other disturbances in the audio track, which can occur otherwise. www.bomots.de Selection toolbar 37 The format is changed for all three display ranges at a time, no matter in which pull-down menu the change has been set. You can choose between End and Length as an indication in the second display, while the third display (Audio Position) shows the current cursor position or allows its setting. The selection toolbar. To work completely accurately, you can also edit the values directly in the selection toolbar. For this purpose, you click directly on the respective display with the mouse pointer and enter the desired value. Small arrows indicate if parts of the audio track are moved to the negative time range. Aucacity compact 38 Setup of the programme The arrows show, that the beginning of the audio track is in the negative time range. The following table explains the different time formats: Format Explanation Seconds Counts full seconds in a six-figure display. Example: 000.047 seconds. hh:mm:ss Here, h stands for hours, m for minutes and s for seconds. Example: 02 h 16 m 34 s for 2 hours 16 minutes and 34 seconds. dd:hh:mm:ss For extremely long recordings, this format additionally shows d for days. This means, that the display changes after 00 days 23 h 59 m 59 s to 01 days 00 h 00 m 00 s. www.bomots.de Selection toolbar Format Explanation hh:mm:ss milliseconds + This format shows in addition to hours, minutes and seconds also milliseconds. Example: 02 h 16 m 34.986 s. hh:mm:ss + samples This format divides the seconds into the respective samples. To reach CD quality, this means that every second contains 44,100 samples. samples Counts samples in a nine-figure display. hh:mm:ss + film frames A time and cut format, which is suitable for film shots, (24 fps) where 24 frames per second are exposed (fps means “frames per second"). Here, the display 01:00:00:00 follows 00:59:59:23. film frames (24 fps) Format for film shots with 24 frames per second, which displays the single frames in six figures. Example: 073.396. hh:mm:ss: NTSC drop NTSC-productions use 29.97 frames per second. To frames achieve this odd number, NTSC drop frames initially work with 30 frames per second, but then omit or th respectively “drop” every 900 frame. Example: 00 h 02 m 48 s+29 frames. hh:mm:ss: NTSC non This format works with 29.97 frames per second, drop frames without omitting or “dropping” frames. Example: 00 h 02 m 48 s+29 frames. NTSC frames Only counts the frames in a six-figure display. Example: 002.481 frames. hh:mm:ss + PAL frames Displaying format for the European video standard (25 fps) PAL, which exposes 25 frames per second. Example: 01 h 23 m 45 s + 15 frames. PAL frames (25 fps) hh:mm:ss + Counts PAL frames in a six-figure display. Example: 025.832 frames. CDDA Displaying format for audio CDs. One second consists of 75 frames at CDDA. At the same time, one frame is Aucacity compact 39 Setup of the programme 40 Format Explanation frames (75 fps) the smallest sector, which can be burned on an audio CD. Example: 00 h 01 m 27 s+08 frames. CDDA frames (75 fps) Counts the frames in a six-figure display. Example: 018.481 frames. At the lower end of the programme window, there is the status bar, which gives you various useful tips, such as “Click and pull to shift the left selection margin”. The individual areas and toolbars can be moved almost entirely user-defined. The serrated left edges are the respective parting lines. To move a unit, run the mouse pointer on the serrated left edges and move the unit to the new position by holding down the mouse button. If you want to restore the original arrangement, choose View> Toolbars> Reset Toolbars. 2.3 Computer latency Every computer has a certain amount of latency, thus, a certain delay. Even if it is just a matter of a few milliseconds, the processing of a signal also requires a certain time for its way, e. g. to the sound card and from there to the speakers. If the latencies are, however, too great, certain works cannot be carried out reasonably anymore. 2.4 Calculating the computer latency An optimal setting of the latency is necessary, if you, for example, want to record and play an audio track simultaneously. In the following, we will try to find the optimal settings for the latency of your computer. Pay attention to the fact, that the preference Multiplay has to be activated in the register Audio I/O, and make sure to choose the right recording device (e. g. Microsoft Soundmapper) or use, for example, a wire between line-in www.bomots.de Calculating the computer latency 41 and line-out to be able to play and record an audio track at the same time. Then execute the following steps: First, set the display in the selection toolbar so that it shows millisceonds. Now choose Generate> Click Track, which opens the corresponding window, and create a metronome-like click track. For this purpose you can keep the given settings and just accept by clicking OK. Now click on the record button and record the click track while playing. Stop the operation after a few measures via the stop-button. Depending on the quality of the sound card, the audio signal is recorded more or less clearly. The rendered audio signal is recorded slightly out of phase in a second audio track. In the following example, the signal first had to be amplified to meassure the latency. High noise component and a latency of 0.072 seconds. To measure the latency, mark the beginning of the signal on the click track to the beginning of the same signal on the recorded track. Now you can read the latency of your computer in the selection toolbar. The above example used a standard installed sound card with a latency of 72 milliseconds. Aucacity compact 42 Setup of the programme Adjust the latency. To adjust the latency, you have to enter the calculated number as a negative number in milliseconds into the window Preferences, register Audio I/O under Latency correction. Now you can repeat the above mentioned recording. Both of the recorded tracks should now be synchronous to each other. www.bomots.de