1
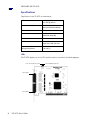
PCI-AC51 USER’S GUIDE
FORM 1459-050120—JANUARY, 2005
43044 Business Park Drive • Temecula • CA 92590-3614
Phone: 800-321-OPTO (6786) or 951-695-3000
Fax: 800-832-OPTO (6786) or 951-695-2712
www.opto22.com
Product Support Services
800-TEK-OPTO (835-6786) or 951-695-3080
Fax: 951-695-3017
Email: [email protected]
Web: support.opto22.com
PCI-AC51 User’s Guide
Form 1459-050120—JANUARY, 2005
Copyright © 2005 Opto 22.
All rights reserved.
Printed in the United States of America.
The information in this manual has been checked carefully and is believed to be accurate; however, Opto 22
assumes no responsibility for possible inaccuracies or omissions. Specifications are subject to change without
notice.
Opto 22 warrants all of its products to be free from defects in material or workmanship for 30 months from the
manufacturing date code. This warranty is limited to the original cost of the unit only and does not cover installation,
labor, or any other contingent costs. Opto 22 I/O modules and solid-state relays with date codes of 1/96 or later are
guaranteed for life. This lifetime warranty excludes reed relay, SNAP serial communication modules, SNAP PID
modules, and modules that contain mechanical contacts or switches. Opto 22 does not warrant any product,
components, or parts not manufactured by Opto 22; for these items, the warranty from the original manufacturer
applies. These products include, but are not limited to, OptoTerminal-G70, OptoTerminal-G75, and Sony Ericsson
GT-48; see the product data sheet for specific warranty information. Refer to Opto 22 form number 1042 for
complete warranty information.
Opto 22 FactoryFloor, Cyrano, Optomux, and Pamux are registered trademarks of Opto 22. Generation 4, ioControl,
ioDisplay, ioManager, ioProject, ioUtilities, mistic, Nvio, Nvio.net Web Portal, OptoConnect, OptoControl,
OptoDisplay, OptoENETSniff, OptoOPCServer, OptoScript, OptoServer, OptoTerminal, OptoUtilities, SNAP Ethernet
I/O, SNAP I/O, SNAP OEM I/O, SNAP Simple I/O, SNAP Ultimate I/O, and SNAP Wireless LAN I/O are trademarks of
Opto 22.
ActiveX, JScript, Microsoft, MS-DOS, VBScript, Visual Basic, Visual C++, and Windows are either registered
trademarks or trademarks of Microsoft Corporation in the United States and other countries. Linux is a registered
trademark of Linus Torvalds. Unicenter is a registered trademark of Computer Associates International, Inc. ARCNET
is a registered trademark of Datapoint Corporation. Modbus is a registered trademark of Schneider Electric.
Wiegand is a registered trademark of Sensor Engineering Corporation. Nokia, Nokia M2M Platform, Nokia M2M
Gateway Software, and Nokia 31 GSM Connectivity Terminal are trademarks or registered trademarks of Nokia
Corporation. Sony is a trademark of Sony Corporation. Ericsson is a trademark of Telefonaktiebolaget LM Ericsson.
All other brand or product names are trademarks or registered trademarks of their respective companies or
organizations.
ii
PCI-AC51 User’s Guide
Table of Contents
Chapter 1: Installing the PCI-AC51 ............................................................ 1
Introduction ............................................................................................................................1
System Requirements .....................................................................................................1
Specifications..................................................................................................................2
LEDs..........................................................................................................................2
What’s in this Guide........................................................................................................3
For Help ...........................................................................................................................3
Quick Start..............................................................................................................................4
Installing Hardware.........................................................................................................4
Installing Software..........................................................................................................4
Testing the Card ..............................................................................................................5
Changing Your Application for the PCI-AC51..................................................................6
Chapter 2: Programming with the PCI-AC51 Toolkit in Windows ......... 7
Overview.................................................................................................................................7
What Is the PCI-AC51 Toolkit?........................................................................................7
Installation..............................................................................................................................8
Pamux Functions.....................................................................................................................8
Required Function Calls...................................................................................................8
Naming Conventions .......................................................................................................8
Banks and Points .............................................................................................................8
Common Function Parameters and Return Values..........................................................9
Return Values ...........................................................................................................9
Developing the I/O Application..............................................................................................9
Special Directions for Visual Basic Programmers...........................................................9
Special Directions for Visual C++ Programmers .............................................................9
Function Command Reference .............................................................................................10
PCI-AC51 Operations ....................................................................................................10
Digital Bank Operations ...............................................................................................11
Digital Point Operations ...............................................................................................12
PCI-AC51 User’s Guide
iii
Digital “Fast” Operations .............................................................................................12
Analog Bank Operations ...............................................................................................13
Analog Point Operations ..............................................................................................13
Analog Watchdog Operations ......................................................................................14
Analog Status Operations ............................................................................................14
Pamux Utility Operations ..............................................................................................15
Error Codes ...........................................................................................................................17
Converting Applications to the PCI-AC51 ............................................................................19
Applications that Used the OptoPMUX.DLL for the AC5 ..............................................19
Converting Applications that Use Inp( ) and Outp( )......................................................19
For the Windows 95/98 or Windows NT Historic OptoPMux User ..............................19
Functions No Longer in Use ..................................................................................20
Changed Functions .................................................................................................20
Special Precautions for the Software Developer.................................................................20
iv
PCI-AC51 User’s Guide
CHAPTER 1
Chapter 1
Installing the PCI-AC51
Introduction
The PCI-AC51 adapter card brings industry-standard Pamux® to the world of Peripheral
Component Interconnect (PCI), a local bus standard developed by Intel®. The PCI-AC51 adapter
card is an ideal choice for customers who must replace an older ISA bus-based PC that currently
uses an Opto 22 AC28 adapter card. The PCI-AC51 is compatible with computers that feature a
33 MHz PCI bus. Note that the PCI-AC51 requires a 5.0- and 3.3-volt environment.
NOTE: The PCI-AC51 itself is no faster than its ISA cousin, the AC28, but it is the better choice if
you have no available ISA slots or available I/O addresses. The PCI-AC28 is not recommended
for new designs; use the PCI-AC51 instead.
With the PCI-AC51 adapter card, your PCI computer can communicate with Opto 22 classic B4,
B5, and B6 brain boards and with SNAP-B4 and SNAP-B6 brains.
•
Each Pamux bus can access up to 32 remote brains.
•
Each Pamux bus supports up to 512 points.
•
Up to 32 PCI-AC51s are supported by the PCI-AC51 Toolkit.
System Requirements
Operating System
Microsoft® Windows® 2000
Windows XP
Development Environment
Microsoft Visual Basic® 6.0
Microsoft Visual C++® 6.0
Hardware Requirements
Platform: x86 compatible processor, 1 GHz or higher.
The most recent version of BIOS must be installed.
PCI-AC51 User’s Guide
1
INSTALLING THE PCI-AC51
Specifications
Specifications for the PCI-AC51 are shown below:
Power requirements
5 VDC @ 500 mA
3.3 VDC @ 300 mA
Toolkit compatibility
32-bit, 33 MHz PCI bus,
Microsoft Windows 2000/XP
PCI compliance
PCI Specification Revision 2.2
Opto 22 brain compatibility
B4, B5, B6,
SNAP-B4, SNAP-B6
Switches
For software use
LEDs
Four, indicating board access,
reset level, read, and write
Operating temperature
Storage temperature
0 to 70 °C
-30 to 85 °C
LEDs
The PCI-AC51 adapter card, its four LEDs, and their functions are shown in the following diagram.
LED 1: Reset level (On = Low)
LED 3: Write
LED 4: Read
2
PCI-AC51 User’s Guide
LED 2: Hardware accessed
INSTALLING THE PCI-AC51
What’s in this Guide
This guide assumes that you are familiar with Pamux and the brains, racks, and input/output
modules used with Pamux. For more information on Pamux, see Opto 22 form #726, Pamux User’s
Guide. If you are going to program the PCI-AC51 using the PCI-AC51 Toolkit, this guide assumes
that you are already familiar with programming in Microsoft® Visual Basic® or Visual C++®.
This guide includes two sections:
Chapter 1, “Installing the PCI-AC51,” provides a Quick Start section to install the card,
Product Support information, and specifications for the card.
Chapter 2, “Programming with the PCI-AC51 Toolkit in Windows,” includes a command
reference as well as suggestions for customers moving from the AC28 or PCI-AC28 adapter cards
to the newer PCI-AC51 adapter card.
For Help
If you have problems installing or programming the PCI-AC51 adapter card and cannot find the
help you need in this guide, contact Opto 22 Product Support.
Phone:
800-TEK-OPTO (835-6786)
951-695-3080
(Hours are Monday through Friday,
7 a.m. to 5 p.m. Pacific Time)
Fax:
951-695-3017
Email:
[email protected]
Opto 22 Web site:
support.opto22.com
NOTE: Email messages
and phone calls to
Opto 22 Product Support
are grouped together and
answered in the order
received; neither takes
priority.
When calling for technical support, be prepared to provide the following information about your
system to the Product Support engineer:
•
PC configuration (type of processor, speed, memory, operating system, and service packs)
•
A complete description of your hardware and operating systems, including:
– additional accessories installed (such as sound cards, NICs, etc.)
– type of power supply
– types of I/O units installed
– third-party devices installed (for example, barcode readers)
•
Software and version being used
•
Specific error messages and/or numbers seen.
PCI-AC51 User’s Guide
3
INSTALLING THE PCI-AC51
Quick Start
Follow the steps in this section to:
•
Install hardware
•
Install software
•
Use the utilities provided to identify and test the card
•
Change your application for the PCI-AC51.
Installing Hardware
The PCI-AC51 adapter card installs into any PCI expansion slot of a PCI-capable computer. The
toolkit supports a maximum of 32 PCI-AC51 cards. You may add multiple PCI-AC51 adapter cards
for convenience, but note that multiple cards do not increase Pamux throughput. The number of
Pamux accesses per computer is constant.
Follow these steps to install the card:
1. Turn off the computer. Remove the power cord and the computer’s cover.
The power cord must be removed, or any sudden spike may cause the computer to
automatically boot.
2. Before handling the PCI-AC51, discharge excess static electricity by touching the
computer’s metal chassis.
3. Install the card in one of the PCI expansion slots.
CAUTION: Do not scratch this card or other cards in the computer, as scratching may
irreversibly damage the card or other devices.
4. Verify that the PCI-AC51 card is properly seated in the motherboard PCI socket. Secure the
card with the screw.
5. Reinstall the power cord. Leave the computer cover off temporarily so you can see the
card’s LEDs.
Installing Software
To install software, read and follow the instructions in the Readme file in the software packet.
Installation automatically places the necessary files in the correct locations for the operating
system you are using.
4
PCI-AC51 User’s Guide
INSTALLING THE PCI-AC51
Testing the Card
The easiest way to test the card is to use the PamScan PCI utility, included in the PCI-AC51
Toolkit. Using PamScan PCI, you can read and write directly to points on the I/O unit, without
going through your application. Before testing, attach the I/O unit using a flat HH-series ribbon
cable with a 50-pin header connector. Connections are shown in the diagram below. For
additional information, see Opto 22 form #726, Pamux User’s Guide.
PamScan PCI also serves as an application example, as
source code is provided for both Visual Basic and Visual C.
1. Locate PamScan PCI in the Toolkit folder under
Demo Apps. Double-click PamScan PCI to launch it.
The main window appears, as shown at right.
2. Enter the board’s ID number in the Board ID field.
(PCI board ID numbers start at zero.)
3. Set the Reset Level to match the brain configuration
on the Pamux bus.
We recommend that the Reset Level be set to Low. If
the computer is turned off while racks and brains are
still running, some of the outputs may change state.
If the Reset Level is set to Low, however, in this
situation the brains will reset and the system will go
to a safe state. (Reset level is indicated by LED 1; if
reset level is low, LED 1 is on. See page 2.)
IMPORTANT: The reset level set here and the reset
level set on all the Pamux brains in your system must
match.
PCI-AC51 User’s Guide
5
INSTALLING THE PCI-AC51
4. Click Open PCI Card.
5. Test the card by doing any of the following:
• Update the brain’s address.
• Click the Read button and watch as points are updated.
• To write to a point, click to put a check mark in the Out box. Enter a value in the field
that appears. Click the Write button to write to that point.
• Check Auto Read or Auto Write. (Watch values change once per second as they are
automatically read. Change values and watch them automatically written.)
6. When you have finished testing the card, click Exit.
Changing Your Application for the PCI-AC51
If you have been using an AC28 adapter card for the ISA bus, you will need to make some
changes to your application because of the new PCI adapter card. See Chapter 2 for specific
information.
6
PCI-AC51 User’s Guide
CHAPTER 2
Chapter 2
Programming with the PCI-AC51
Toolkit in Windows
Overview
To simplify communication to the Pamux bus, you can use Opto 22’s PCI-AC51 Toolkit. This
chapter explains how to use the toolkit.
What Is the PCI-AC51 Toolkit?
The PCI-AC51 Toolkit provides an interface between Pamux stations and application programs
written in Microsoft Visual C++ and Visual Basic 6.0. The toolkit saves you time and effort that
would otherwise be spent learning the intricacies of the Pamux bus structure.
The toolkit is 32-bit Microsoft Windows software, a dynamically linked library called
OptoPM32.dll. The toolkit may be used with Microsoft Visual Basic or Visual C++.
NOTE: Release 2.0 and higher support only the PCI-AC51—not the AC28 and PCI-AC28 adapter
cards.
The toolkit performs the following functions:
•
Converts the data returned by Pamux to a form that is easily manipulated in a high-level
language.
•
Transparently handles input masking on write operations for digital stations.
•
Performs error checking and returns diagnostic codes.
To use the toolkit in your application program, you need to know the following:
•
How to call a subroutine or function from the language you chose for your application
•
How to tell the toolkit what Pamux command to send by assigning values to parameters
•
How to interpret the data passed back by the toolkit.
The PCI-AC51 toolkit may be used only with the PCI-AC51 adapter card.
PCI-AC51 User’s Guide
7
PROGRAMMING WITH THE PCI-AC51 TOOLKIT IN WINDOWS
Installation
The PCI-AC51 toolkit comes on a CD with the card. If you do not have the CD, you can order it
through Product Support, or you can download the toolkit free from our Web site,
www.opto22.com/products/softdevkits.asp.
Pamux Functions
Required Function Calls
For many applications, only four Pamux functions are required:
1. Open a PCI-AC51 to get a handle.
2. Configure outputs.
3. Read and write to I/O.
4. Close the PCI-AC51 when the application is about to end.
Naming Conventions
Function names in the Pamux library start with “Pamux.” Example: “PamuxDigPointRead.”
Function names follow the object-operation format, with the object first and the operation
second. Example: “PamuxDigPointRead,” where “PamuxDigPoint” (the object) is first and “Read”
(the operation) follows.
Utility functions, provided primarily for Visual Basic, start with “PamuxUtil.” Example:
“PamuxUtilBitEqual.”
Specific PCI-AC51 functions start with “PamuxPCI.”
Banks and Points
Some I/O points can be addressed in multiple ways. A 16-channel I/O board has two banks.
Point 0, the first point, is accessed using a bank number of 0 and a point number of 0. Point 8 can
be accessed in two ways:
8
•
A bank number of 0 and a point number of 8, or
•
A bank number of 1 and a point number of 0.
PCI-AC51 User’s Guide
PROGRAMMING WITH THE PCI-AC51 TOOLKIT IN WINDOWS
Common Function Parameters and Return Values
int hHandle
Handle to a PCI-AC51 card. Handles are acquired using
PamuxPCICardOpen().
int Bank
A bank number (0 to 63).
int Point
A point or channel number on a rack starting with zero.
OutputMask
A “1” bit represents an output. Used to configure outputs.
Return Values
All functions in the OptoPM32.dll return an error value. A non-zero value indicates an error has
occurred. For proper application operation, make sure your program checks error codes. See the
list of error codes on page 17.
Developing the I/O Application
Use the following basic steps in your application (in Visual Basic or Visual C++):
1. Open a handle to the board using the function PamuxPCICardOpen.
2. Inspect the error code of the device open function.
3. Configure the direction of the points.
4. Start the application loop that continuously reads or writes points. At the same time,
continue to inspect the error codes from the OptoPM32.DLL.
5. When the application loop is complete, close the handle to the board using
PamuxPCICardClose.
Special Directions for Visual Basic Programmers
Include the OptoPM32.bas file as a module in your project. This file includes subroutine
declarations, function declarations, and access paths to the OptoPM32.dll.
These files may be found in the toolkit under \Vb\VB dll header.
Special Directions for Visual C++ Programmers
Include the header OptoPM32.h in your source code modules that reference the OptoPM32.dll
functions. Also include the DLL link library OptoPM32.lib in your project so the DLL references are
resolved.
These files may be found in the toolkit under \Vc\VC Project Includes.
PCI-AC51 User’s Guide
9
PROGRAMMING WITH THE PCI-AC51 TOOLKIT IN WINDOWS
Function Command Reference
The functions listed in this section include parameters and descriptions.
PCI-AC51 Operations
Function
Type
long
long
Function
PamuxPCICardOpen
PamuxPCICardOpenNoReset
Parameter
Type
Parameters
long
* phHandle
long
BoardID
long
ResetLevel
long
* phHandle
long
BoardID
long
ResetLevel
Opens access to a PCI-AC51 card.
phHandle gets a handle.
Three parameters must be specified: the I/O Port
addresses for the PCI-AC51 base port, its reset port,
and the reset level. These three parameters must
correspond to the PCI-AC51 card.
ResetLevel: 1 = high reset; 0 = low reset.
This function also performs a Pamux bus reset.
Opens access to a PCI-AC51 card.
phHandle gets a handle.
Three parameters must be specified: the I/O Port
addresses for the PCI-AC51 base port, its reset port,
and the reset level. These three parameters must
correspond to the PCI-AC51 card.
ResetLevel: 1 = high reset; 0 = low reset.
This function does not reset the Pamux bus.
long
PamuxPCICardClose
long
hHandle
Releases the handle to the PCI-AC51 and turns on
LEDs 1 and 2.
long
PamuxCardReset
long
hHandle
Resets the PCI-AC51 card and resets the Pamux bus.
long
PamuxReadType
long
hHandle
Bank
*pType
Accesses the board ID for the specified bank.
Note: Not all Pamux boards support the
self-identification feature.
long
PamuxReadTypeNoRead
long
hHandle
Bank
*pType
Accesses the board IP for the last Pamux Board Read
(does not access the Pamux Bus).
Note: Not all Pamux boards support the
self-identification feature.
* Note for Visual Basic users: * indicates a “by reference” argument.
10
Description
PCI-AC51 User’s Guide
PROGRAMMING WITH THE PCI-AC51 TOOLKIT IN WINDOWS
Digital Bank Operations
The term “bank” refers to groups of eight digital I/O points. A 32-channel Pamux board with a B4
brain board has four banks. It is faster to read a bank all at once than to read each point
individually.
Note that channel 0 corresponds to the least significant bit. For example, if you read a bank with
channels 0, 3, and 4 on and all other channels off, the returned value would be 19 hex (11001
binary, or 25 decimal).
Function
Type
long
long
long
long
long
long
long
long
long
Function
PamuxDigBankConfig
PamuxDigBank16Config
PamuxDigBank32Config
PamuxDigBankRead
PamuxDigBank16Read
PamuxDigBank32Read
PamuxDigBankWrite
PamuxDigBank16Write
PamuxDigBank32Write
Parameter
Type
Parameter
long
hHandle
long
Bank
long
OutputMask
long
Byte Qty
long
hHandle
long
Bank
long
OutputMask
long
hHandle
long
Bank
long
OutputMask
long
int hHandle
long
Bank
long
* pData
long
int hHandle
long
Bank
long
* pData
long
int hHandle
long
Bank
long
* pData
long
hHandle
long
Bank
long
Data
long
hHandle
long
Bank
long
Data
long
hHandle
long
Bank
long
Data
Description
Configures a bank of digital I/O points
as either inputs or outputs. A “1” in the
mask indicates an output. Use
PamuxDigBankConfig for configuring
between 8 and 32 points,
PamuxDigBank16Config for 16 points,
or PamuxDigBank32Config for 32
points.
The Byte Qty parameter in
PamuxDigBankConfig indicates how
many banks to configure (Byte Qty = 4
for 32 points).
Reads inputs and outputs and places
the result in pData. Use
PamuxDigBankRead for reading eight
points, PamuxDigBank16Read for 16
points, or PamuxDigBank32Read for 32
points.
Writes outputs using the value in Data.
Inputs are not affected if written to. Use
PamuxDigBankWrite for writing to eight
points, PamuxDigBank16Write for 16
points, or PamuxDigBank32Write for 32
points.
* Note for Visual Basic users: * indicates a “by reference” argument.
PCI-AC51 User’s Guide
11
PROGRAMMING WITH THE PCI-AC51 TOOLKIT IN WINDOWS
Digital Point Operations
Function
Type
Function
Parameter
Type
long
PamuxDigPointConfig
long
hHandle
long
Bank
long
Position
long
bOutput
long
hHandle
long
Bank
long
Point
long
* pData
long
hHandle
long
Bank
long
Point
long
Data
long
PamuxDigPointRead
long
PamuxDigPointWrite
Parameter
Description
Configures a point as either an input or
output. A non-zero value in bOutput
configures the point as an output.
Reads the value of a point and puts the
value in pData. The value is either 1 for on
or 0 for off.
Writes to a point using the value in Data. A
non-zero value for Data turns the point on.
* Note for Visual Basic users: * indicates a “by reference” argument.
Digital “Fast” Operations
For high-speed applications, these functions can be used to bypass some error-checking and port
calculations. The configure functions should be used to configure outputs.
Function
Type
Function
Parameter
Type
long
PamuxDigIoPortGet
long
hHandle
long
* pBank
long
* pPoint
long
* pIoPort
long
hHandle
long
Bank
long
*Data
long
hHandle
long
Bank
long
Data
long
void
PamuxDirectRead
PamuxDirectWrite
Parameter
* Note for Visual Basic users: * indicates a “by reference” argument.
12
PCI-AC51 User’s Guide
Description
Provides the Pamux metrics needed: the
PCI-AC51 handle, the bank number, and
the point number.
Reads one byte (eight bits) from the
specified I/O port.
Writes one byte (eight bits) to the
specified port.
PROGRAMMING WITH THE PCI-AC51 TOOLKIT IN WINDOWS
Analog Bank Operations
Function
Type
long
long
long
Function
PamuxAnaBank16Config
PamuxAnaBank16Read
PamuxAnaBank16Write
Parameter
Type
Parameter
long
hHandle
long
Bank
long
OutputMask
long
hHandle
long
Bank
long
DataArray16[]
long
hHandle
long
Bank
long
DataArray16[]
Description
Configures a bank of analog I/O points as
either inputs or outputs. A 1 in the mask
indicates an output.
Reads a bank of 16 analog points and
places the values in the DataArray
(channel 0 in element 0 and channel 15
in element 15).
Writes values to a bank of analog points
(channel 0 value in element 0).
* Note for Visual Basic users: * indicates a “by reference” argument.
Analog Point Operations
Function
Type
Function
Parameter
Type
long
PamuxAnaPointConfig
long
hHandle
long
Bank
long
Point
long
bOutput
long
hHandle
long
Bank
long
Point
long
* pData
long
hHandle
long
Bank
long
Point
long
Data
long
long
PamuxAnaPointRead
PamuxAnaPointWrite
Parameter
Description
Configures an analog point as either an
input or output. A non-zero value to
bOutput configures the point as an output.
Reads the value of an analog point.
Writes the value in Data to an analog point.
* Note for Visual Basic users: * indicates a “by reference” argument.
PCI-AC51 User’s Guide
13
PROGRAMMING WITH THE PCI-AC51 TOOLKIT IN WINDOWS
Analog Watchdog Operations
Function
Type
long
long
Function
PamuxAnaWatchdogSet
PamuxAnaWatchdogTime
Parameter
Type
Parameter
long
hHandle
long
Bank
long
Time100
long
Data 16[]
long
hHandle
long
Bank
long
Time100
Description
Sets up the watchdog timer for an analog
point. Time100 units are hundredths of a
second.
Sets the value of the watchdog timer in units
of hundredths of a second. Setting Time100
to 0 disables the watchdog. Setting the time
to 0 can also be used to reset the watchdog
error flag if it has tripped. This and any other
analog function can be used to “tickle” the
watchdog to prevent it from tripping.
* Note for Visual Basic users: * indicates a “by reference” argument.
Analog Status Operations
Function
Type
Function
Parameter
Type
Parameter
long
PamuxAnaStatusGetAsError
long
hHandle
long
Bank
* Note for Visual Basic users: * indicates a “by reference” argument.
14
PCI-AC51 User’s Guide
Description
Gets an analog board’s status and
returns an equivalent error. Analog read
functions also return the same result after
performing their read. An analog
configure function can be used to clear
the “power-up” error. The “old data” error
is cleared by the B6 processor as it
updates inputs. This function could be
used to wait for fresh input data.
PROGRAMMING WITH THE PCI-AC51 TOOLKIT IN WINDOWS
Pamux Utility Operations
The following utility functions are provided primarily for Visual Basic applications. These are not
Pamux-specific functions.
Function
Type
Function
Parameter
Type
Parameter
Description
Bit Operations
void
void
void
long
PamuxUtilBitSetTo
PamuxUtilBitSet
PamuxUtilBitClr
PamuxUtilBitTest
long
* pData
long
BitNumber0
long
bBitValue
long
* pData
long
BitNumber0
long
* pData
long
BitNumber0
long
Data
long
BitNumber0
These bit operations are useful in Visual Basic
applications to access individual bits within an
integer. The BitSetTo function either sets or
clears the specified bit based on the value of
bBitValue. Any non-zero value for Data turns
on the bit. The BitSet and BitClr functions set
and clear the specified bit. Bit numbers start at
zero for the least significant bit (LSB).
The zero at the end of the parameter name
“BitNumber0” serves as a reminder of this fact
for anyone looking through the function
definitions in either the .BAS file or the .H
header files. PamuxUtilBitTest returns true if bit
number BitNumber0 in Data is set.
* Note for Visual Basic users: * indicates a “by reference” argument.
Function
Type
Function
Parameter
Type
Parameter
Description
Pack/Unpack Utility Operations
void
void
PamuxUtilBitPackArray2I
PamuxUtilBitUnPackI2Array
long
* DestInt
long
SourceArray[]
long
Qty
long
DestArray[]
long
SourceInt
long
Qty
Converts an array of boolean (0 or not
0) values to a bit packed integer.
Converts a bit packed integer to an
array of boolean (1 or 0) values.
Qty indicates the number of bits to be
packed or unpacked.
* Note for Visual Basic users: * indicates a “by reference” argument.
PCI-AC51 User’s Guide
15
PROGRAMMING WITH THE PCI-AC51 TOOLKIT IN WINDOWS
Function
Type
Function
Parameter
Type
Parameter
Description
Scaling Operations
long
float
float
long
PamuxUtilScaleI2I
PamuxUtilScaleI2F
PamuxUtilScaleF2F
PamuxUtilScaleF2I
long
X1
long
X2
long
Y1
long
Y2
long
Xin
long
X1
long
X2
float
Y1
float
Y2
long
Xin
float
X1
float
X2
float
Y1
float
Y2
float
Xin
float
X1
float
X2
long
Y1
long
Y2
float
Xin
These interpolation functions are useful for
converting between engineering units and
raw analog counts. Pamux analog input and
output values range between 0 and FFF hex
(4,095 decimal). These values typically
correspond to engineering units, such as pH
and psi. For example, to convert raw counts
(from 0 to FFF hex) to a percentage, use:
float fPercent=PamuxUtilScaleI2F
(0,0xFFF,0.0,100.0,RawCount);
* Note for Visual Basic users: * indicates a “by reference” argument.
16
PCI-AC51 User’s Guide
PROGRAMMING WITH THE PCI-AC51 TOOLKIT IN WINDOWS
Error Codes
In general, most functions return an integer error number. Zero indicates no error. You may see
the following error codes when working with the PCI-AC51 Toolkit.
Code
Decimal
Code
Hex
Description
Remedy
0
0x0000
No Error Occurred
Not an error.
8192
0x2000
Invalid Handle
The handle that was passed to the OptoPM32.DLL is
invalid. The handle may represent a closed handle, or the
value of the handle may be corrupted. Inspect when the
handle flaw is first detected and ensure that the handle
was allocated with a successful open. Also trace a sudden
change in the value of the handle. The handle should
remain static between a PamuxPCICardOpen and a
PamuxPCICardClose.
8193
0x2001
Bad bank number used
The bank number specified is either less than zero or
greater than 63.
8194
0x2002
Bad I/O port used
A historic WinRT error that doesn’t apply to the
OptoPM32.DLL.
8195
0x2003
Out of handles to
allocate
The PCI-AC51 you attempted to open is already open.
8196
0x2004
The Open command has
conflicting parameters
Not currently used in the OptoPM32.DLL.
8197
0x2005
Point number is bad
The point argument is lower than zero or greater than 7.
8198
0x2006
Could not acquire
access to B6 DPRAM
The attempt to gain access to the B6 or SNAP-B6 analog
memory failed. This is not an error; it may mean that the
brain was involved in reading and writing to this memory
array.
8199
0x2007
Power-up clear /B6
needs configuring
The B6 or SNAP B6 was recently powered up due to a
manual power enable or from a power dip event, causing
the brain to reset. This brain may require special
reconfiguration.
8200
0x2008
B6 didn’t update – PC
polling too quick
The rate of the PC’s polling is very fast. This is not an
error. It only indicates that the application should be
modified to decrease the analog scan intervals. This code
may be seen on faster CPU computers.
8201
0x2009
Watchdog timeout has
occurred
The brain reports a watchdog timeout. This is caused
when a communication cycle to the bus exceeds the
watchdog timeout time.
8202
0x200A
Wrong OptoPMux DLL
(trying to open ISA card)
This error indicates that a call was made to a function that
is not currently supported in this version of the
OptoPM32.DLL.
8203
0x200B
Board ID doesn’t exist in
system
The PCI board number matching the Opto 22 vendor ID
(0x148A) and device ID (0xAC51) could not be found.
Remember that board IDs start from zero and end at “n-1”
(where n is the number of boards).
PCI-AC51 User’s Guide
17
PROGRAMMING WITH THE PCI-AC51 TOOLKIT IN WINDOWS
18
Code
Decimal
Code
Hex
8204
0x200C
A closed handle tried to
be used
The handle that was sent to this function is closed. This
may represent corruption of the handle, failure to
successfully open the handle, or a PamuxPCICardClose
may have been previously executed on this handle.
8205
0x200D
A handle number out of
range tried to be used
The handle submitted is invalid, as it is beyond the number
of handles the OptoPM32.DLL supports. Inspect the
handle for corruption. Also, validate that the handle
number does not change when PamuxPCICardOpen
opens a valid handle. It is also possible that an incorrect
argument is being passed to the function.
8206
0x200E
Specified device is
already open
When inspecting the opening of a PCI-AC51, the handle’s
data structure is marked as open. The OptoPM32.DLL
does not support multiple access handles to individual
PCI-AC51s.
8207
0x2010
Registry entry does not
exist.
A historic WinRT error that doesn’t apply to the
OptoPM32.DLL.
8384
0x20C0
Specified PCI board ID
was not found.
The board ID is beyond the range of valid board ID
numbers. The range is always from zero to one less than
the number of adapters installed in the computer.
8385
0x20C1
The device layer was not
found.
The customer application is copied onto a system that
does not have the toolkit layer installed.
8386
0x20C2
The device layer file
version is too old for the
toolkit.
May happen if a toolkit with an older WinDriver version is
installed onto the system. Update all toolkit installations
with the latest toolkits.
8387
0x20C3
OptoPM32 does not
support this function.
An unsupported PCI-AC51 function is called from the
application. The PCI-AC51 does not support the identify
type and does not support a reset level function.
8388
0x20C4
The device layer could
not create a handle.
Another open is blocking the requested device. Call
Product Support if this error is detected.
8389
0x20C5
The requested PCI
board doesn’t exist, or
the device layer is
improperly configured.
With a DOS prompt box, try the command “wdreg install”.
If this command fails, reinstall the toolkit. Otherwise, call
Product Support.
8390
0x20C6
The PCI board failed to
register with the PCI
BIOS.
Try on a system with a newer PCI-BIOS or see if the
manufacturer has a PCI-BIOS or BIOS ugrade for the
system.
PCI-AC51 User’s Guide
Description
Remedy
PROGRAMMING WITH THE PCI-AC51 TOOLKIT IN WINDOWS
Converting Applications to the PCI-AC51
This section describes how to convert applications that used the AC28 and PCI-AC28 adapter
cards.
Applications that Used the OptoPMUX.DLL for the AC5
The Windows 32/PCI version of this library does not support the AC5 adapter card. Special
historic versions of the OptoPMux.dll supported the AC5. This support is not possible due to
independent hardware identification issues and the PCI bus. For more information, please see
the PCI-AC5 and AC5 User’s Guide, Opto 22 form #1211.
Converting Applications that Use Inp( ) and Outp( )
This PCI toolkit library provides a consistent application code model for Windows 2000 and
Windows XP operating systems. Inp() and Outp() function calls at the user level are unsupported
because of the Windows hardware abstraction layer.
The PCI-AC51 interfaces to the existing Pamux interface by mimicking the 50-wire IDC connector
and the Pamux timing interface. The hardware model to the PC is radically different compared to
the AC28. The AC28 relied on jumper settings for configuration, but the PCI-AC51 has no jumpers.
The primary advantage of converting your application to this library is the encapsulation of the
Pamux functions. This library provides high-level functionality, as opposed to setting and clearing
bits. Additionally, porting the application to a 32-bit operating system takes advantage of 32-bit
optimized processors and other current operating system features.
For the Windows 95/98 or Windows NT Historic OptoPMux
User
This new library eliminates the need for a WinRT/OptoPort utility. Each PCI card is referenced by
PCI slot number. The lowest numbered board, zero, is the PCI-AC51 installed in the lowest PCI
slot number and bus number. Note that internal PCI slot numbers have no correlation with any
“SLOT” number that may appear on the motherboard.
You may want to use a cyclic reset command to flash the LEDs on and off, in order to identify the
board in a final application.
The following tables list obsolete and changed functions.
PCI-AC51 User’s Guide
19
PROGRAMMING WITH THE PCI-AC51 TOOLKIT IN WINDOWS
Functions No Longer in Use
Function
Comments
PamuxDigBankWriteFast
Always returns an incorrect DLL version error number
O22_PM_WRONG_PMUX_DLL. Use the new function PamuxDirectWrite.
PamuxDigBankReadFast
Always returns an incorrect DLL version error number
O22_PM_WRONG_PMUX_DLL. Use the new function PamuxDirectRead.
PamuxCardOpen
Always returns an incorrect DLL version error number
O22_PM_WRONG_PMUX_DLL. Use the new function
PamuxPCICardOpen.
PamuxCardClose
Always returns an incorrect DLL version error number
O22_PM_WRONG_PMUX_DLL. Use the new function
PamuxPCICardClose.
Changed Functions
Function
Comments
PamuxDigIoPortGet
Historic function used an absolute I/O port address to generate references. Since
the PCI card hides the base address of the hardware, this function is modified to
only compute the bank number and the point number.
PamuxCardSetReset
Always returns an incorrect DLL version error number
O22_PM_WRONG_PMUX_DLL. This ISA function sets the reset level of the
Pamux bus.
Special Precautions for the Software Developer
No exclusive access—The PCI-AC51 Toolkit allows up to 32 PCI-AC51 cards to be used. Only
a single handle to a card is permitted. If you use a multiple threaded application, implement a
mutex on the handle to avoid thread collision. If multiple applications are required to access the
hardware, another application is required to synchronize the access. Multiple applications
cannot access the PCI-AC51s simultaneously.
20
PCI-AC51 User’s Guide