1
OpenShift All Versions User Guide
OpenShift
User Guide
Using OpenShift to manage your applications in the cloud
Edition 2.0
1
2
Legal Notice
Legal Notice
Copyright © 2012 Red Hat, Inc.
T he text of and illustrations in this document are licensed by Red Hat under a Creative Commons
Attribution–Share Alike 3.0 Unported license ("CC-BY-SA"). An explanation of CC-BY-SA is available at
http://creativecommons.org/licenses/by-sa/3.0/. In accordance with CC-BY-SA, if you distribute this
document or an adaptation of it, you must provide the URL for the original version.
Red Hat, as the licensor of this document, waives the right to enforce, and agrees not to assert, Section
4d of CC-BY-SA to the fullest extent permitted by applicable law.
Red Hat, Red Hat Enterprise Linux, the Shadowman logo, JBoss, MetaMatrix, Fedora, OpenShift, the
Infinity Logo, and RHCE are trademarks of Red Hat, Inc., registered in the United States and other
countries.
Linux® is the registered trademark of Linus T orvalds in the United States and other countries.
Java® is a registered trademark of Oracle and/or its affiliates.
XFS® is a trademark of Silicon Graphics International Corp. or its subsidiaries in the United States
and/or other countries.
All other trademarks are the property of their respective owners.
1801 Varsity Drive
Raleigh, NC 27606-2072 USA
Phone: +1 919 754 3700
Phone: 888 733 4281
Fax: +1 919 754 3701
OpenShift All Versions User Guide
Abstract
T his guide provides an introduction to OpenShift and documents its application management functions.
3
4
Table of Contents
Table of Contents
Preface
1. Document Conventions
1.1. T ypographic Conventions
1.2. Pull-quote Conventions
1.3. Notes and Warnings
2. Getting Help
2.1. Do You Need Help?
2.2. We Need Feedback!
1. OpenShift Architecture Overview
1.1. Platform Overview
1.2. System Resources and Application Containers
1.3. OpenShift Applications
1.3.1. Using Scaled Applications
1.4. Cartridges
2. OpenShift Web Interface
2.1. Accessing the OpenShift Management Console
2.2. Managing Your OpenShift Account
2.2.1. Changing Your Password
2.2.2. Resetting Your Password
2.2.3. Changing Namespaces
2.2.4. Managing SSH Keys
2.3. Creating Applications
2.3.1. Creating Basic Applications
2.3.2. Creating Preconfigured Applications
2.3.3. Cloning Application Files
2.4. Monitoring Application Resources
2.5. Editing and Deploying Applications
2.5.1. Preparing Your Application for Deployment
2.5.2. Deploying Your Application to the Cloud
2.6. Deleting Applications
2.6.1. Deleting Remote Application Data
2.6.2. Deleting Local Application Data
2.7. Using Cartridges
2.7.1. Adding Cartridges
3. OpenShift Command Line Interface
3.1. Secure Shell Authentication
3.1.1. Resolving Authentication Issues
3.1.2. Managing Multiple SSH Keys
3.2. Working With Domains
3.2.1. Creating a Domain
3.2.2. Altering a Domain
3.2.3. Deleting a Domain
3.3. Viewing User Information
3.4. Creating Applications
OpenShift All Versions User Guide
3.4.1. Introduction
3.4.2. Creating Non-scaled Applications
3.4.3. Creating Scaled Applications
3.4.4. Using Arbitrary DNS Names
3.5. Editing and Deploying Applications
3.5.1. Preparing Your Application for Deployment
3.5.2. Deploying Your Application to the Cloud
3.5.3. Hot Deploying Applications
3.5.4. Deploying JBoss Applications
3.6. Using Cartridges with the CLI
3.6.1. Adding Cartridges with the CLI
3.6.2. Managing Cartridges
3.6.3. Working With Database Cartridges
3.7. Creating Application Snapshots
3.8. Managing Applications
3.8.1. Using Application Management Commands
3.8.2. Managing Applications in a Shell Environment
3.8.3. Managing Applications in a Secure Shell Environment on Windows
3.8.4. Using the Jenkins Embedded Build System
3.8.5. Managing Application Builds with Jenkins
3.8.6. Using Environment Variables
3.8.7. Using Node.js
3.8.8. Scheduling T imed Jobs with Cron
3.8.9. Sending and Receiving Email
4. Application Maintenance, Monitoring and T roubleshooting
4.1. Monitoring Applications with the MongoDB Monitoring Service (MMS)
4.1.1. Setting up MMS
4.1.2. Monitoring Your Applications with MMS
4.2. Managing Your Application Disk Space
4.2.1. T he Disk Space Cleanup T ool
4.3. T roubleshooting JBoss Applications
4.3.1. Using T hread Dumps to T roubleshoot JBoss Applications
4.3.2. Inspecting Server, Boot and Other Log Files
4.4. Performing Application Maintenance from Your Workstation
4.4.1. Port Forwarding
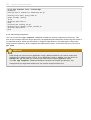
5. Storage Management
5.1. Backing up and Restoring Configuration and User Data
5.1.1. Creating Snapshots
5.1.2. Restoring Snapshots
A. Revision History
Index
5
6
Preface
Preface
OpenShift is an enterprise-class Platform-as-a-Service (PaaS). OpenShift provides enterprise
developers with a wide selection of programming languages and frameworks including Java, Ruby, PHP,
Perl, Python, and Node.js. It also provides integrated developer tools to support the application lifecycle,
including Eclipse integration, JBoss Developer Studio, Jenkins, Maven, and GIT . OpenShift uses an open
source ecosystem to provide key platform services for mobile applications (Appcelerator), NoSQL
services (MongoDB), SQL services (Postgres, MySQL), and more. JBoss provides an enterprise-class
middleware platform for Java applications, providing support for Java EE6 and integrated services such
as transactions and messaging, which are critical for enterprise applications.
T he foundation of the OpenShift platform is Red Hat Enterprise Linux, which provides a secure and
scalable multi-tenant operating system to address the needs of enterprise-class applications as well as
providing integrated application runtimes and libraries.
T his guide provides an overview of the OpenShift architecture, and continues with detailed descriptions
and procedures for how to use the OpenShift client tools to create namespaces, to create, deploy, and
update applications, to monitor and troubleshoot applications, and to perform remote application
maintenance and other tasks.
1. Document Conventions
T his manual uses several conventions to highlight certain words and phrases and draw attention to
specific pieces of information.
In PDF and paper editions, this manual uses typefaces drawn from the Liberation Fonts set. T he
Liberation Fonts set is also used in HT ML editions if the set is installed on your system. If not, alternative
but equivalent typefaces are displayed. Note: Red Hat Enterprise Linux 5 and later includes the
Liberation Fonts set by default.
1.1. T ypographic Conventions
Four typographic conventions are used to call attention to specific words and phrases. T hese
conventions, and the circumstances they apply to, are as follows.
Mono-spaced Bold
Used to highlight system input, including shell commands, file names and paths. Also used to highlight
keys and key combinations. For example:
T o see the contents of the file m y_next_bestselling_novel in your current working
directory, enter the cat m y_next_bestselling_novel command at the shell prompt
and press Enter to execute the command.
T he above includes a file name, a shell command and a key, all presented in mono-spaced bold and all
distinguishable thanks to context.
Key combinations can be distinguished from an individual key by the plus sign that connects each part of
a key combination. For example:
Press Enter to execute the command.
Press Ctrl+Alt+F2 to switch to a virtual terminal.
T he first example highlights a particular key to press. T he second example highlights a key combination:
a set of three keys pressed simultaneously.
OpenShift All Versions User Guide
If source code is discussed, class names, methods, functions, variable names and returned values
mentioned within a paragraph will be presented as above, in m ono-spaced bold. For example:
File-related classes include filesystem for file systems, file for files, and dir for
directories. Each class has its own associated set of permissions.
Proportional Bold
T his denotes words or phrases encountered on a system, including application names; dialog box text;
labeled buttons; check-box and radio button labels; menu titles and sub-menu titles. For example:
Choose System → Preferences → Mouse from the main menu bar to launch Mouse
Preferences. In the Buttons tab, click the Left-handed m ouse check box and click
Close to switch the primary mouse button from the left to the right (making the mouse
suitable for use in the left hand).
T o insert a special character into a gedit file, choose Applications → Accessories →
Character Map from the main menu bar. Next, choose Search → Find… from the
Character Map menu bar, type the name of the character in the Search field and click
Next. T he character you sought will be highlighted in the Character T able. Double-click
this highlighted character to place it in the T ext to copy field and then click the Copy
button. Now switch back to your document and choose Edit → Paste from the gedit menu
bar.
T he above text includes application names; system-wide menu names and items; application-specific
menu names; and buttons and text found within a GUI interface, all presented in proportional bold and all
distinguishable by context.
Mono-spaced Bold Italic or Proportional Bold Italic
Whether mono-spaced bold or proportional bold, the addition of italics indicates replaceable or variable
text. Italics denotes text you do not input literally or displayed text that changes depending on
circumstance. For example:
T o connect to a remote machine using ssh, type ssh username@ domain.name at a shell
prompt. If the remote machine is exam ple.com and your username on that machine is
john, type ssh john@ exam ple.com .
T he m ount -o rem ount file-system command remounts the named file system. For
example, to remount the /hom e file system, the command is m ount -o rem ount /hom e.
T o see the version of a currently installed package, use the rpm -q package command. It
will return a result as follows: package-version-release.
Note the words in bold italics above — username, domain.name, file-system, package, version and
release. Each word is a placeholder, either for text you enter when issuing a command or for text
displayed by the system.
Aside from standard usage for presenting the title of a work, italics denotes the first use of a new and
important term. For example:
Publican is a DocBook publishing system.
1.2. Pull-quote Conventions
T erminal output and source code listings are set off visually from the surrounding text.
Output sent to a terminal is set in m ono-spaced rom an and presented thus:
7
8
Preface
books
books_tests
Desktop
Desktop1
documentation
downloads
drafts
images
mss
notes
photos
scripts
stuff
svgs
svn
Source-code listings are also set in m ono-spaced rom an but add syntax highlighting as follows:
package org.jboss.book.jca.ex1;
import javax.naming.InitialContext;
public class ExClient
{
public static void main(String args[])
throws Exception
{
InitialContext iniCtx = new InitialContext();
Object
ref
= iniCtx.lookup("EchoBean");
EchoHome
home
= (EchoHome) ref;
Echo
echo
= home.create();
System.out.println("Created Echo");
System.out.println("Echo.echo('Hello') = " + echo.echo("Hello"));
}
}
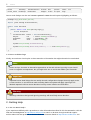
1.3. Notes and Warnings
Finally, we use three visual styles to draw attention to information that might otherwise be overlooked.
Note
Notes are tips, shortcuts or alternative approaches to the task at hand. Ignoring a note should
have no negative consequences, but you might miss out on a trick that makes your life easier.
Important
Important boxes detail things that are easily missed: configuration changes that only apply to the
current session, or services that need restarting before an update will apply. Ignoring a box
labeled 'Important' will not cause data loss but may cause irritation and frustration.
Warning
Warnings should not be ignored. Ignoring warnings will most likely cause data loss.
2. Getting Help
2.1. Do You Need Help?
If you experience difficulty with a procedure or other information described in this documentation, visit the
Red Hat Knowledgebase at http://kbase.redhat.com to search or browse through technical support
articles about Red Hat products, or visit the Red Hat Customer Portal at http://access.redhat.com. You
OpenShift All Versions User Guide
can also access the OpenShift web site at https://openshift.redhat.com/ to find blogs, FAQs, forums, and
other sources of information.
Red Hat also hosts a large number of electronic mailing lists for discussion of Red Hat software and
technology. You can find a list of publicly available mailing lists at https://www.redhat.com/mailman/listinfo.
Click the name of any mailing list to subscribe to that list or to access the list archives.
2.2. We Need Feedback!
If you find a typographical or any other error in this manual, or if you have thought of a way to make this
manual better, we would love to hear from you! Please submit a report in Bugzilla:
http://bugzilla.redhat.com/ against the product OpenShift Origin.
When submitting a bug report, be sure to mention the manual's identifier: Docs User Guide
If you have a suggestion for improving the documentation, try to be as specific as possible when
describing it. If you have found an error, please include the section number and some of the surrounding
text so we can find it easily.
9
10
Chapter 1. OpenShift Architecture Overview
Chapter 1. OpenShift Architecture Overview
1.1. Platform Overview
OpenShift enables you to create, deploy and manage applications within the cloud. It provides disk
space, CPU resources, memory, network connectivity, and an Apache or JBoss server. Depending on
the type of application you are building, you also have access to a template file system layout for that
type (for example, PHP, Python, and Ruby/Rails). OpenShift also generates a limited DNS for you.
OpenShift provides dedicated /var/tm p and /tm p directories for each user application. T he
/var/tm p directory is a symbolic link to /tm p. Each /tm p directory is completely isolated from the
/tm p directories of all other applications. Files not touched in these directories for any 10-day period
are deleted.
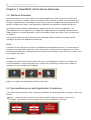
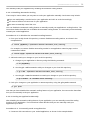
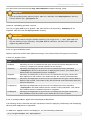
T he two basic functional units of OpenShift are the Broker, which provides the interface, and the
Cartridges, which provide application frameworks.
Broker
T he Broker is the single point of contact for all application management activities. It is responsible for
managing user logins, DNS, application state, and general orchestration of the application. Customer
interaction with the broker is generally performed using either the Web console, CLI tools, or JBoss tools,
using a REST -based API.
Cartridges
Cartridges provide the actual functionality necessary to run applications. Numerous cartridges are
currently available to support languages such as Perl, PHP, and Ruby, as well as many database
cartridges, such as PostgreSQL and MySQL.
Figure 1.1. High-level OpenShift Platform Overview
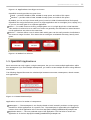
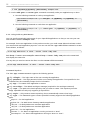
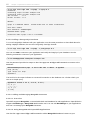
1.2. System Resources and Application Containers
T he system resources and security containers provided by the OpenShift platform are gears, nodes and
districts.
Gears — Gears provide a resource-constrained container where you can run one or more
cartridges. T hey limit the amount of RAM and disk space available to a cartridge.
OpenShift All Versions User Guide
Figure 1.2. Application Cartridges on Gears
OpenShift currently provides two gear sizes:
Small — provides 512MB of RAM, 100MB of swap space, and 1GB of disk space
Medium — provides 1GB of RAM, 100MB of swap space, and 1GB of disk space
By default, you can use up to three small gears (a total of 1.5GB of RAM and 3GB of disk space).
OpenShift can assign these three gears to a single application and its cartridges (Cron, MySQL, etc.)
or you can use each gear for a separate application.
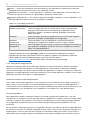
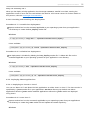
Nodes — T o enable resource sharing, multiple gears run on a single physical or virtual machine.
T his machine is referred to as a node host. Gears are generally over-allocated on nodes because
not all applications are active at the same time.
Districts — Districts define a set of nodes within which gears can be easily moved to load-balance
the resource usage of nodes. T his means that no node gets overloaded with many, heavily-used
gears.
Figure 1.3. Nodes in a District
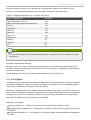
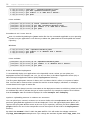
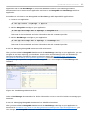
1.3. OpenShift Applications
Each username can only support a single namespace, but you can create multiple applications within
this namespace. If you need multiple namespaces, you need to create multiple accounts using different
usernames.
T he following diagram illustrates the relationships between usernames, namespaces, domain names,
and applications:
Figure 1.4 . Name Relationships
Applications consist of a number of components:
Namespace — T he namespace is not directly related to DNS, instead it provides a unique group
identifier for all the applications of a specific user. T he namespace is appended to the application
name to form a final application URL of the form http://[APP NAME]-[NAMESPACE].example.com
Application Name — T he user-selected name of the application. T he final URL to access the
application is of the form http://[APP NAME]-[NAMESPACE].example.com
11
12
Chapter 1. OpenShift Architecture Overview
Aliases — Users can provide their own DNS names for the application by registering an alias with
OpenShift and pointing the DNS entry to the OpenShift servers.
Application GIT repository — A GIT repository is created for each application. You can modify your
code in the repository and then run git push to deploy the revised code.
Application dependencies — You need to specify the cartridges required to run your application. T he
following table describes the functions provided by cartridges:
T able 1.1. Cartridge Functions
Function
Description
Framework (required)
T hese cartridges allow you to choose from a variety of programming
languages and frameworks for developing your application. Every
application requires a framework cartridge. Examples include PHP,
JBoss, and Ruby.
Database
T hese cartridges provide your application with one of several database
back ends. Examples include MySQL and PostgreSQL.
Database
management
T hese cartridges, such as phpMyAdmin, provide functionality for
managing your application's database using third-party software.
Monitoring and
Management
T hese cartridges provide a range of options for managing and monitoring
your application. Examples include the Cron task scheduler, the Jenkins
Client, and OpenShift Metrics.
OpenShift supports the use of package.json as a mechanism for applications to specify
dependencies and other requirements. When you deploy or update your application, OpenShift
invokes npm , the NodeJS package manager, to process that file. Refer to
http://npmjs.org/doc/json.html for information about the NodeJS package manager.
1.3.1. Using Scaled Applications
Application scaling provides for the automatic allocation of resources based on demand. OpenShift
monitors the resource requirements of scaled applications, and increases or decreases available
resources accordingly. You need to specify whether an application is scaled or not when you create the
application. A scaled application cannot be converted to a non-scaled application. Likewise, a non-scaled
application cannot be converted to a scaled application.
Scaled Versus Non-scaled Applications
If you create a non-scaled application, it only consumes one of the default quota of gears assigned to
users. T hat is, it only consumes one of the available three gears. If you create a scaled application, it
consumes two of the available gears; one for the high-availability proxy (HAProxy) itself, and one for your
actual application. If you add MySQL to your application, it is installed in its own dedicated gear.
How Scaling Works
Each application created on OpenShift always has the web cartridge associated with it. T he web
cartridge can, for example, be a PHP cartridge. When an application is scaled, a second cartridge, called
HAProxy, is added to the application. T he HAProxy cartridge listens to all incoming web page requests
for an application and passes them on to the web cartridge, following defined guidelines for load
monitoring.
As the number of web page requests to an application increase, the HAProxy will inform OpenShift when
an overload of requests is detected. OpenShift will then create a copy of the existing web cartridge on a
separate gear. In such a case, the web cartridge now has been scaled up two times. T his process is
repeated as more web page requests are detected by the HAProxy cartridge, and each time a copy of
OpenShift All Versions User Guide
the web cartridge is created on a separate gear, the application scale factor increases by one.
However, not all OpenShift applications can be scaled, as detailed in the table below.
T able 1.2. Applications that can or cannot be scaled
T ype of Application
Scalable
JBoss Application Server 7.1
Yes
JBoss Enterprise Application Platform 6.0
Yes
PHP 5.3
Yes
Python 2.6
Yes
Perl 5.10
Yes
Ruby 1.9
Yes
Ruby 1.8.7
Yes
Node.js 0.6
Yes
Jenkins
No
HAProxy
No
DIY
No
Note
You can only add MySQL 5.1, MongoDB, PostgreSQL, or Jenkins Client 1.4 cartridges to scaled
applications.
Automatic and Manual Scaling
By default, when you create a scaled OpenShift application, it is automatically scaled based on the
number of requests. But OpenShift also allows you to manually scale your application by disabling the
automatic scaling feature.
Scaled applications can be created with the OpenShift client tools using the CLI.
1.4. Cartridges
Cartridges are the components of an OpenShift application, and include databases, build systems and
management capabilities. Adding a cartridge to an application provides the desired capability without
requiring you to administer or update the included feature.
Examples of cartridges include the different language cartridges (PHP, Ruby, etc.) that you select from
when creating an application, database cartridges such as PostgreSQL and MySQL, and management
cartridges such as the cron scheduler cartridge that lets you set up timed jobs for your applications.
At the time of writing, the following cartridges are available:
Database Cartridges
MySQL Database 5.1 — MySQL is a multi-user, multi-threaded SQL database server
MongoDB NoSQL Database 2.0 — MongoDB is a scalable, high-performance, open source NoSQL
database
PostgreSQL Database 8.4 — PostgreSQL is an advanced object-relational database management
system
13
14
Chapter 1. OpenShift Architecture Overview
Management Cartridges
phpMyAdmin 3.4 — phpMyAdmin is a web-based MySQL administration tool
RockMongo 1.1 — RockMongo is a web-based MongoDB administration tool
10gen MMS agent 0.1 — 10gen's MongoDB Monitoring Service (MMS)
Jenkins Client 1.4 — a client for managing Jenkins-enabled applications
HAProxy 1.4 — a high-performance T CP/HT T P load balancer
Cron 1.4 — Cron is a daemon that runs specified programs at scheduled times
OpenShift Metrics 0.1 — OpenShift Metrics is an experimental cartridge for monitoring applications
T o add cartridges using the web Management Console, refer to Section 2.7.1, “Adding Cartridges”. T o
add cartridges using the command line client tools, refer to Section 3.6.1, “Adding Cartridges with the
CLI”.
OpenShift All Versions User Guide
15
Chapter 2. OpenShift Web Interface
Note
Before you start working through the procedures and examples in the following chapters, refer to
the Getting Started Guide to ensure that you have performed all of the necessary steps to set up
your environment for OpenShift.
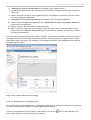
2.1. Accessing the OpenShift Management Console
OpenShift applications can be created and managed using the OpenShift Management Console, a
graphical user interface accessed with a browser. T he Management Console also allows you to manage
your OpenShift account settings and provides links to OpenShift documentation and community
resources.
Procedure 2.1. T o access the OpenShift Management Console:
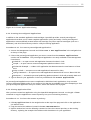
1. On the OpenShift homepage, click SIGN IN T O MANAGE YOUR APPS in the upper-right corner.
2. On the sign in screen, enter your login name and password details then click Sign in.
Figure 2.1. Sign In Screen
If you do not have any applications, the Create a New Application screen opens. If you have
applications, you are taken to the My Applications screen.
2.2. Managing Your OpenShift Account
2.2.1. Changing Your Password
Your OpenShift user account password can be changed using the Management Console.
When choosing a password we recommend using a combination of numbers, symbols, and upper and
lower case letters for extra security.
Procedure 2.2. T o change your password:
1. Access the Management Console and click My Account in the navigation bar at the top of the
page.
2. In the Personal Inform ation section, click Change password then follow the on-screen
16
Chapter 2. OpenShift Web Interface
instructions.
2.2.2. Resetting Your Password
If you forget your OpenShift user account password, you can have a new password sent to your email
address.
Procedure 2.3. T o reset your password:
1. On the OpenShift homepage, click SIGN IN T O MANAGE YOUR APPS in the upper-right corner.
2. On the sign in screen, click Forgot your password?
3. Enter your email address and click Reset Password.
A new password is sent to your email address. Use this password to access the OpenShift
Management Console and change your password.
2.2.3. Changing Namespaces
Changing your namespace deletes the old namespace and creates a new one. It also automatically
updates the public URLs and repository addresses for your applications. In order to git push future
changes to your applications after changing your namespace, the git config file must be updated with
the new repository address.
OpenShift uses a blacklist to restrict the list of available namespace and application names that you can
use. T his list is maintained on the server. If you try to change your namespace to any members of this
blacklist, the command will fail.
Important
T his procedure alters the URLs for your applications. You need to update any bookmarks and
external links you have made to these URLs. Links made using an alias do not need to be
changed. See Section 3.4.4, “Using Arbitrary DNS Names”.
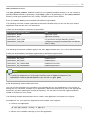
Procedure 2.4 . T o change your namespace:
1. Access the Management Console and click My Account in the navigation bar at the top of the
page.
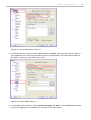
2. Scroll down to the Nam espace section and click Change your nam espace.
3. Enter your desired namespace in the box provided and click Save.
Figure 2.2. Change Namespace Dialog
T he public URLs and repository addresses of your applications automatically update with the new
namespace. T o enable the git push command to function properly, update the git config file using
the following procedure.
OpenShift All Versions User Guide
17
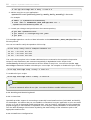
Procedure 2.5. T o update the git config files:
1. Access the Management console and click My Applications in the navigation bar at the top of
the page.
2. Click on your first application.
3. Copy the entire SSH address located in the GIT REPOSIT ORY box.
4. Open the git config file located in path/to/appdirectory/.git/ and replace the remote URL
address with the new SSH address for your application.
5. Repeat the previous four steps for each of your applications to update their git config files.
Figure 2.3. Application Details Screen Showing Git Repository Address
2.2.4 . Managing SSH Keys
Using the OpenShift Management Console you can add, remove, and update public keys to control the
access of other contributors to your OpenShift applications.
T o view the public keys associated with your account, access the Management Console and click My
Account in the navigation bar at the top of the page. Your current SSH public keys are listed in the
Public Keys section.
2.2.4 .1. Generating New Keys
T he ssh-keygen command generates a new pair of RSA or DSA keys as specified. You can then use
the Management Console to add the new keys to your account.
Procedure 2.6. T o generate new SSH keys with the ssh-keygen command:
1. Manually generate a new pair of keys, replacing KeyType with the type of key your want to
generate, either dsa or rsa:
$ ssh-keygen -t KeyType
2. By default the new SSH keys are located in the /hom e/username/.ssh/ directory.
2.2.4 .2. Adding a Key
Procedure 2.7. T o add a key:
1. Access the Management Console and click My Account in the navigation bar at the top of the
page.
2. In the Public Keys section, click Add a new key.
3. Enter a name for your key then paste the public key in the space provided.
18
Chapter 2. OpenShift Web Interface
4. Click Create to add your public key.
Important
If you copy and paste your SSH key from an editor or terminal with the word wrap function
enabled, the key may include unnecessary line breaks. T herefore, the OpenShift web console will
reject the SSH key and the upload process will fail. Make sure that when you paste your key into
the web console, the key contents are correct and do not contain any unnecessary line breaks.
2.2.4 .3. Removing a Key
Procedure 2.8. T o remove a key:
1. Access the Management Console and click My Account in the navigation bar at the top of the
page.
2. In the Public Keys section, click Delete next to the key you want to remove.
3. A dialog box appears asking you to confirm the deletion. Click OK to confirm.
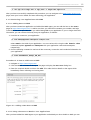
2.3. Creating Applications
Creating applications using the OpenShift Management Console is a simple process.
2.3.1. Creating Basic Applications
OpenShift provide a selection of application types that you can use to build your applications.
Procedure 2.9. T o create an application:
1. Access the Management Console and click Create a New Application in the navigation bar
at the top of the page.
2. Choose the application type you want to create from the Web Cartridges section and click
Select. T he application types currently available on the Management Console are:
PHP 5.3 — for PHP applications
Python 2.6 — for Web Server Gateway Interface applications
Ruby 1.9 — for Ruby Webserver Interface applications
Ruby 1.8.7 — for Ruby Webserver Interface applications
Perl 5.10 — for Perl applications
JBoss Application Server 7.1 — for JBoss AS applications running on Java 6 or Java 7
JBoss Enterprise Application Platform 6.0 — for JBoss EAP applications running on Java 6 or
Java 7
Node.js 0.6 — for Node.js applications
Jenkins Server — a continuous integration (CI) server that enables complex builds
Do-It-Yourself (DIY) — a blank slate for trying unsupported languages, frameworks, and
middleware on OpenShift
3. T ype a name for your application in the box provided and click Create Application.
OpenShift All Versions User Guide
19
Figure 2.4 . Create Application Dialog
2.3.2. Creating Preconfigured Applications
In addition to the standard application web cartridges, OpenShift provides several preconfigured
applications that allow you to create complete applications quickly and easily. T hese preconfigured
applications are automatically created with a web cartridge, any other required cartridges (such as a
database), and all of the necessary code for a fully functioning application.
Procedure 2.10. T o create a preconfigured application:
1. Access the Management Console and click Create a New Application in the navigation bar
at the top of the page.
2. Choose the preconfigured application you want to create from the Instant Applications
section and click Select. T he preconfigured applications currently available on the Management
Console are:
CakePHP — an open source web application framework written in PHP
Drupal — an open source content management platform written in PHP
Kitchensink Example — a JBoss AS7 application that demonstrates the new features of Java
EE 6
Ruby on Rails — an open source web application framework for Ruby
Spring Framework — an open source web application framework that runs on JBoss EAP 6.0
Wordpress — a semantic personal publishing platform written in PHP with a MySQL back end
3. T ype a name for your application in the box provided and click Create Application.
As preconfigured applications are more complicated to build than basic applications, they can take
longer to become available online. If you receive a 503 Service Unavailable error when attempting to view
your preconfigured application after you create it, wait a few minutes and try again.
2.3.3. Cloning Application Files
After you have created an application using the OpenShift Management Console, run the git clone
command to copy the application's remote repository into your local working directory.
Procedure 2.11. T o clone the remote repository:
1. Click My Applications in the navigation bar at the top of the page and click on the application
you want to clone.
2. Copy the entire SSH address located in the GIT REPOSIT ORY box.
3. Open a terminal and use the following command to clone the remote repository to the working
directory, replacing the example SSH address with the address for your application:
20
Chapter 2. OpenShift Web Interface
$ git clone ssh://[email protected]/~/git/crossword.git/
T he git clone command copies the template application files from the remote repository into the
working directory. Edit the template application files to develop your own application.
2.4. Monitoring Application Resources
As described earlier in Section 1.3.1, “Using Scaled Applications”, scaled applications are automatically
allocated increased OpenShift resources based on demand. A scaled application can be allocated
multiple gears as the demand increases. T he amount of resources utilized by an application can be
easily monitored and viewed from the OpenShift Management Console. Follow the instructions below to
monitor and view application resources. T he instructions below assume that a scaled application has
already been created.
Procedure 2.12. T o monitor application resources:
1. After you have created a scaled application, access the OpenShift Management Console.
2. Click on the My Applications tab to view all of your applications, as highlighted in the figure
below.
Figure 2.5. My Applications
3. Under the All Applications section, click on the name of the scaled application for which you
wish to monitor resource information, as highlighted in the figure below.
OpenShift All Versions User Guide
Figure 2.6. Select Application to Monitor
4. T he OpenShift Management Console will display the number of gears, along with the size of the
gears, used by the selected application, as highlighted in the figure below.
Figure 2.7. Application Resource Information
5. If you hover over the gear size information with your mouse, a popup message will display more
detailed information, showing exactly how the gears are being utilized, as shown in the figure
below.
Figure 2.8. Application Gear Details
6. Because a scaled application is monitored by the HAProxy cartridge, this information is displayed
in the OpenShift Management Console under your application information, as highlighted in the
figure below. Click Scales with HAProxy to get information about testing the scaling function
of your application.
Figure 2.9. HAProxy Information
21
22
Chapter 2. OpenShift Web Interface
Note
At the time of this writing, the scaling function cannot be disabled from an application. T he
only way to disable scaling is to remove the scaled application, and create a new
application without the scaling option.
2.5. Editing and Deploying Applications
T o deploy your application to the cloud, you need to make any required changes to your application code
base, commit those changes to your local repository, and then update the remote repository. Application
files are stored in the local git repository that was cloned in the Section 2.3, “Creating Applications”
procedure.
For advanced deployment options, refer to Section 3.5, “Editing and Deploying Applications” in the
Command Line Interface chapter.
2.5.1. Preparing Your Application for Deployment
T he git clone command used in Section 2.3, “Creating Applications” creates a starting point, or
template, for you to create and develop your own applications. T o synchronize your application files with
the remote cloud repository, you need to commit all of your files to the appropriate directories in the local
git repository, and then push them to the remote repository. For example, you may be developing your
own PHP application and need to add new files and directories to the
$_ENV['OPENSHIFT _APP_NAME']/php/ or other directories.
Procedure 2.13. T o prepare your application for deployment:
1. Open a terminal and use the following command to add each new file or directory to the git index:
$ git add /path/to/newfile
2. Use the following command to commit your application files to your local repository, replacing
commit message with your own message:
$ git commit -m "commit message"
Your application files are now ready to be deployed to the cloud.
2.5.2. Deploying Your Application to the Cloud
After you have committed your application files to the local repository, you need to push them to the
remote repository. OpenShift will automatically stop, build, and restart your application with the committed
changes.
Procedure 2.14 . T o deploy your application to the cloud:
Use the following command to deploy your application to the remote repository:
$ git push
Your updated application is now publicly available.
OpenShift All Versions User Guide
23
2.6. Deleting Applications
If you no longer need a particular application, you can choose to delete it.
2.6.1. Deleting Remote Application Data
Warning
Application removal is irreversible. All remote data associated with the application will be removed.
Procedure 2.15. T o delete an application:
1. Access the Management Console and click My Applications in the navigation bar at the top of
the page.
2. Click on the application you want to delete.
3. Click Delete next to the application name.
4. You are asked to confirm the request. Click Delete to confirm.
T his process deletes your remote application data. If you want to delete application data stored on your
local machine, you must do so manually.
2.6.2. Deleting Local Application Data
Warning
T he following procedure deletes the selected directory and all the files it contains. Ensure you
enter the correct directory and that you no longer need the files it contains before running this
command.
Procedure 2.16. T o delete local application data
Open a terminal and use the following command to delete the application data stored on your local
machine:
$ rm -rf ~/path/to/app_directory/
2.7. Using Cartridges
T he OpenShift Management Console provides an intuitive interface for managing your application's
cartridges.
You can view the cartridges associated with an application by clicking My Applications in the
navigation bar at the top of Management Console then clicking on the application you want to view.
2.7.1. Adding Cartridges
T he OpenShift Management Console allows you to add cartridges to your applications easily. Note that
certain cartridges are only available to be added after a prerequisite cartridge is added. Cartridge
descriptions in the Management Console detail these dependencies.
24
Chapter 2. OpenShift Web Interface
Note
You can only add MySQL 5.1, MongoDB, PostgreSQL, or Jenkins Client 1.4 cartridges to scaled
applications.
Procedure 2.17. T o add a cartridge:
1. Access the OpenShift Management Console and click My Applications in the navigation bar at
the top of the page.
2. Click on the application to which you want to add a cartridge.
3. Click Add Cartridge.
4. Choose the cartridge to add to your application and click Select.
5. Click Add Cartridge to confirm the selection.
OpenShift All Versions User Guide
25
Chapter 3. OpenShift Command Line Interface
Note
Before you start working through the procedures and examples in the following chapters, refer to
the Getting Started Guide to ensure that you have performed all of the necessary steps to set up
your environment for OpenShift.
3.1. Secure Shell Authentication
OpenShift uses the Secure Shell (SSH) network protocol to authenticate your account credentials to the
OpenShift servers for secure communication. Successful authentication is necessary to manage your
cloud environment, and OpenShift supports both RSA and DSA keys for SSH authentication. T his
section describes briefly how OpenShift authentication works, and provides information on how to
manage SSH keys for OpenShift user accounts.
For successful authentication, the public SSH key on your computer must match the public key that has
been uploaded to the OpenShift server. When you perform the initial configuration of the OpenShift client
tools, the interactive setup wizard generates a new pair of SSH keys in the default .ssh folder of your
home directory. T he SSH key pair consists of the public key, id_rsa.pub, and the private key, id_rsa.
As part of the initial configuration, you have the option of automatically uploading the public key,
id_rsa.pub, to the OpenShift server.
If you have not performed the initial configuration of the OpenShift client tools, refer to the Getting Started
Guide for more information.
3.1.1. Resolving Authentication Issues
Occasionally your local public key may not match the public key for your account on the OpenShift
server, or your key may not be found on the local file system. T his can cause connection issues, or the
SSH key authentication process can fail, in which case a new pair of SSH keys must be generated. If you
are having problems authenticating, there are two ways you can generate a new pair of SSH keys:
Use the interactive setup wizard (recommended)
Generate and upload SSH keys manually
3.1.1.1. Using the Interactive Setup Wizard
T he recommended method of resolving authentication issues is to use the interactive setup wizard to
generate a new pair of SSH keys. T he interactive setup wizard will also provide the option of
automatically uploading your new public key to the OpenShift server. Use the command as shown below
to launch the setup wizard and follow the onscreen instructions.
$ rhc setup
Refer to the Getting Started Guide for more information about the OpenShift client tools interactive setup
wizard.
3.1.1.2. Generating and Uploading SSH Keys Manually
Although not recommended, advanced users can manually generate a new pair of SSH keys, and upload
the public key to the OpenShift server. Follow the instructions below.
26
Chapter 3. OpenShift Command Line Interface
Procedure 3.1. T o manually generate a new pair of SSH keys and upload the public key to
the server:
1. Generate a new pair of keys:
$ ssh-keygen -t <KeyType>
where KeyType is the type of key you want to generate, either DSA or RSA.
2. Add the new public key to the user account:
$ rhc sshkey add -i <KeyName> -k <KeyPath> -l <UserName>
where <KeyPath> is the path and filename of the public key that you want to add, and <KeyName>
is a name that you specify to identify this key.
3. Add the new public key to the SSH agent:
$ ssh-add <KeyPath>
3.1.2. Managing Multiple SSH Keys
OpenShift provides command line tools to manage multiple SSH keys to control access to applications
among different users. Multiple SSH key management is provided with the rhc sshkey command, with
options available to view, add, update, and remove public keys on the OpenShift server. Refer to the
subsequent sections for more information.
3.1.2.1. Viewing Public Keys
Use the rhc sshkey list command to view all public keys that have been added to the OpenShift
server for the specified user account:
$ rhc sshkey list -l <UserName>
Password:
SSH keys
========
Name: default
Type: ssh-rsa
Key: AAAAB3NzaC1yc2EAAAABIwAAAQEAqT20LZBFrzbq
3.1.2.2. Adding a Key
Use the rhc sshkey add command to add a public key to the OpenShift server for the specified user
account:
$ rhc sshkey add -i <KeyName> [-k <KeyPath>] -l <UserName>
Password:
Success
where <KeyName> is the user-specified identifier for the SSH key, and <KeyPath> is the path to an
existing key (optional). If an existing key is not specified, a new key is generated and uploaded to the
server.
Run rhc sshkey add --help for more information.
3.1.2.3. Removing a Key
OpenShift All Versions User Guide
27
Use the rhc sshkey rem ove command to remove an existing public key from the OpenShift server for
the specified user account:
$ rhc sshkey remove -i <KeyName> -l <UserName>
3.2. Working With Domains
You must create a domain before you can create an application. OpenShift uses non-strict domain
names (that is, there is no preceding period), and the domain name forms part of the application name.
T he syntax for the application name is ApplicationName–DomainName.example.com.
Each username can only support a single domain, but you can create multiple applications within the
domain. If you need multiple domains, you need to create multiple accounts using different usernames.
3.2.1. Creating a Domain
Use the rhc dom ain create command to create a new domain. T his command uses the following
syntax:
$ rhc domain create -n <DomainName> -l <rhlogin> -p <password>
[OptionalParameters]
DomainName — specifies the domain that you want to create. T his must contain a maximum of 16
alphanumeric characters.
rhlogin — this can be your Red Hat Network login or the email address that you used to apply for
your OpenShift account.
password — the password that you used to apply for your OpenShift account.
Optional Parameters
Further optional parameters exist that you can pass to the rhc dom ain create command. Refer to
rhc dom ain create --help for details.
Note
T he rhc dom ain create command creates a local configuration file in
~/.openshift/express.conf and updates it with your rhlogin. T he rhc client tools use the
login specified in the ~/.openshift/express.conf file by default when you run further
commands. If no default login is configured, or if you want to use a different login, include the -l
rhlogin parameter as a command line argument.
28
Chapter 3. OpenShift Command Line Interface
Note
You do not need SSH keys to create a domain. You only need to create SSH keys and upload
them to the server when you want to create applications and communicate with your domain.
OpenShift uses a blacklist to restrict the list of available domain and application names that you
can use. T his list is maintained on the server. If you try to use rhc dom ain create or rhc
app create with any members of this blacklist, the command will fail.
3.2.2. Altering a Domain
If you need to modify the name of an existing domain, use the rhc dom ain alter command as
shown below.
Important
T he rhc dom ain alter command alters the URLs of your applications. You need to update
any bookmarks and external links you have made to these URLs. Links made using an alias do
not need to be changed. Refer to Section 3.4.4, “Using Arbitrary DNS Names” for more
information.
$ rhc domain alter -n <DomainName>
Password: *******
OpenShift key found at /home/user/.ssh/id_rsa.
Alteration successful.
Reusing...
Note
If no SSH keys are found in the .ssh folder of your home directory, the rhc dom ain alter
command generates a new pair of keys for you. You will then be prompted to upload the public
SSH key to the OpenShift server. Refer to Section 3.1, “Secure Shell Authentication” for more
information.
3.2.3. Deleting a Domain
If you no longer need a particular domain, you can use the rhc dom ain destroy command to
remove, or destroy, that domain. Before you can destroy a domain, however, you need to ensure that it
does not contain any applications.
Procedure 3.2. How to destroy a domain
1. Ensure that the domain does not contain any applications.
$ rhc domain show
Password:
Application Info
================
If any applications are listed, use the rhc app destroy command to remove them.
OpenShift All Versions User Guide
$ rhc app destroy -a <ApplicationName>
Warning
Application removal is irreversible. All remote data associated with the application will be
removed.
2. Use the rhc dom ain destroy command to destroy the domain.
$ rhc domain destroy -n <DomainName>
Password:
Success
After you have destroyed your domain, you need to create a new one before you can create any new
applications or use the other client tools.
3.3. Viewing User Information
Use the rhc dom ain show command to display information about all of the current applications. You
can view the Framework Type, Creation Date, GitURL and PublicURL details for each application.
T he following example demonstrates how to display application information for user:
$ rhc domain show
Password: <user password>
Contacting https://broker.example.com
Application Info
================
racer
Framework: php-5.3
Creation: 2011-04-13T08:35:02-04:00
Git URL:
ssh://[email protected]/~/git/racer.git/
Public URL: http://racer-ecs.example.com/
3.4. Creating Applications
3.4 .1. Introduction
OpenShift provides both browser-based and command-line tools for you to create and deploy your
applications. If you use the command-line tools to create a new application, a new, remote git repository
is created and automatically cloned to your current directory on your local machine. Further, the
hostname and IP address of your application is added to the list of known hosts
(~/.ssh/known_hosts).
Prerequisites
Application creation requires a reliable network connection. T he rhc app create command only
makes a single attempt to create your application. OpenShift makes up to seven checks for the DNS
entry to exist, and returns a failure message if not found.
If you continue to experience timeout issues, you may need to use the --tim eout option on the
29
30
Chapter 3. OpenShift Command Line Interface
command line to override the default values. OpenShift uses two timeout parameters: a connection
timeout, which determines how long the client tries to connect to the server before timing out; and a read
timeout, which determines how long the client waits for a response from the server. T he default
connection timeout value is 20 seconds. T he default read timeout value is 120 seconds.
T he --tim eout option affects both timeout parameters, but it can only be used to increase values from
the default. You cannot set the timeout value to be less than the default. For example, if you use -tim eout 50, it sets the connection timeout value to 50 seconds, but does not affect the read timeout
value. If you use --tim eout 150, it sets both the connection and read timeout values to 150 seconds.
3.4 .2. Creating Non-scaled Applications
Use the rhc app create command to create OpenShift applications. T his command creates an
application with the specified name, and in your domain namespace.
T he following example demonstrates creating a PHP application called "racer" in the ecs domain that
was created in Example 3.1, “Creating a new domain”:
$ rhc app create -a racer -t php-5.3
Password: <user password>
Creating remote application space: racer
Contacting https://broker.example.com
RESULT:
Successfully created application: racer
Adding example.com to ~/.ssh/config
Warning: Permanently added 'racer-ecs.example.com,50.17.130.104' (RSA) to the
list of known hosts.
Receiving objects: 100% (19/19), done.
Confirming application racer is available
Attempt # 1
Success!
Your application is now published here:
http://racer-ecs.example.com/
The remote repository is located here:
ssh://[email protected]/~/git/racer.git/
As mentioned in Section 3.2.1, “Creating a Domain”, each domain can support multiple applications. T his
means that you could run the same command, change only the application name (for example, create an
application named "monitor"), resulting in a domain containing the following applications:
http://racer-ecs.example.com
http://monitor-ecs.example.com
3.4 .3. Creating Scaled Applications
Scaled applications automatically allocate resources based on demand. Use the rhc app create
command with the -s (or --scaling) option to create a scaled application, as shown in the example
below. Refer to Section 1.3.1, “Using Scaled Applications” for more information.
$ rhc app create -a [AppName] -t [AppType] -s
When you create a scaled application, the automatic scaling feature is enabled by default. However, you
OpenShift All Versions User Guide
31
can manually scale your application by disabling the automatic scaling feature.
3.4 .3.1. Disabling Automatic Scaling
T here may be cases where you may want to scale your application manually. Such cases may include:
If you are anticipating a certain load on your application and wish to scale it accordingly.
You have a fixed set of resources for your application.
You want to manually control the cost.
You can disable the automatic scaling feature to manually control your application's scaling function. T he
instructions below describe how to disable the automatic scaling feature. It is assumed you have already
created your scaled application.
Procedure 3.3. T o disable the automatic scaling feature:
1. From your locally cloned Git repository, create a disable autoscaling marker, as shown in the
example below.
$ touch [AppName]/.openshift/markers/disable_auto_scaling
For example, to create a disable autoscaling marker for an application named myapp, run the
command as follows:
$ touch myapp/.openshift/markers/disable_auto_scaling
2. Add and commit your changes to your local Git repository.
a. Change to your application's directory using the following command:
$ cd [AppName]
b. Use the git add command to add your changes to your local Git repository.
$ git add .openshift/markers/disable_auto_scaling
c. Use the git com m it command to commit your changes to your local Git repository.
$ git commit -m "disable auto-scaling"
3. Push your changes to your application's remote repository using the git push command.
$ git push
Now that you have disabled the automatic scaling feature of your application, the next section describes
how you can manually scale your application.
3.4 .3.2. Scaling an Application Manually
After disabling the automatic scaling feature of your application, you can manually control the scaling
function of your application. T he instructions below describe how you can manually scale your
application up or down.
Procedure 3.4 . T o manually scale an application:
1. Create an SSH connection to your scaled application, as shown in the example below.
32
Chapter 3. OpenShift Command Line Interface
$ ssh [AppUUID]@[AppName]-[DomainName].example.com
2. Use the add-gear or rem ove-gear command to manually scale your application up or down.
a. Run the following command to scale up an application:
[app-domain.example.com ~]\> add-gear -a [AppName] -u [AppUUID] -n
[DomainName]
b. Run the following command to scale down an application:
[app-domain.example.com ~]\> remove-gear -a [AppName] -u [AppUUID] -n
[DomainName]
3.4 .4 . Using Arbitrary DNS Names
You can specify meaningful DNS names for your OpenShift applications so that you can use your own
DNS entries instead of exam ple.com .
For example, for the two applications in the previous section, you could create aliases that better suited
your own domain and application purposes. You can use the rhc app add-alias command to create
these aliases, as follows:
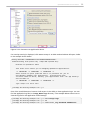
$ rhc app add-alias -a racer --alias "racer.indy.com"
Both http://racer-ecs.exam ple.com and http://racer.indy.com point to the same DNS
and display the same site.
If at any time you need to remove the alias, use the rem ove-alias command:
$ rhc app remove-alias -a racer --alias "racer.indy.com"
Command Options
T he rhc app create command supports the following options:
-l|--rhlogin — T he login name of the user creating the application.
-p|--password — T he login password of the user creating the application. If not specified on the
command line, the command prompts for this information.
-a|--app — T he name of the application to create.
-c|--cartridge — T he added cartridge to manage (required for the cartridge command).
-r|--repo — T he path to the local repository that you want to create. T his repository must be
empty. OpenShift currently only supports git repositories.
-n|--nogit — Only create a remote repository; do not automatically create a local copy.
-t|--type — T he framework type to create. OpenShift currently supports the following application
types:
php-5.3 — for PHP applications
python-2.6 — for Web Server Gateway Interface applications
ruby-1.9 — for Ruby Webserver Interface applications
ruby-1.8 — for Ruby Webserver Interface applications
perl-5.10 — for Perl applications
jbossas-7 — for JBoss AS applications running on Java 6 or Java 7
jbosseap-6.0 — for JBoss EAP applications running on Java 6 or Java 7
OpenShift All Versions User Guide
33
jenkins-1.4 — for Jenkins applications
nodejs-0.6 — for Node.js applications
diy-0.1 — a "Do it Yourself (DIY)" cartridge type used to create applications of no specific type
Note
You need to specify the version of the application type. T his is to enable support for multiple
versions in later releases of OpenShift.
-d|--debug — Enable debugging mode to produce more verbose output to assist in
troubleshooting.
-h|--help — Display command usage information.
Refer to rhc app create --help for a complete list of options.
3.4 .4 .1. Using DIY Cartridges
You can use OpenShift to create applications of no specific type, for build or other testing purposes. T he
syntax for using this cartridge type is the same as all other cartridge types:
$ rhc app create -a myapp -t diy-0.1
T his creates an application that is not publicly available nor does it have anything running. You need to
use git push and the .openshift/action_hooks/ scripts to perform all required operations.
3.5. Editing and Deploying Applications
T o deploy your application to the cloud, you need to make any required changes to your application code
base, commit those changes to your local repository, and then update the remote repository. Application
files are stored in the local git repository that was cloned as part of the application creation process.
3.5.1. Preparing Your Application for Deployment
T he rhc app create command creates a starting point, or template, for you to create and develop
your own applications. T o synchronize your application files with the remote cloud repository, you need
to commit all of your files to the appropriate directories in the local git repository, and then push them to
the remote repository. For example, you may be developing your own PHP application and need to add
new files and directories to the $_ENV['OPENSHIFT _APP_NAME']/php/ or other directories.
Procedure 3.5. T o prepare your application for deployment using the command line:
1. Use the following command to add each new file and directory to the git index:
$ git add /path/to/newfile
2. Use the following command to commit your application to your local repository:
$ git commit -m "commit message"
3.5.2. Deploying Your Application to the Cloud
After you have added your application files to the local repository, you need to push them to the remote
repository. OpenShift will automatically stop, build, and restart your application with the committed
34
Chapter 3. OpenShift Command Line Interface
changes.
Procedure 3.6. T o deploy your application to the cloud using the command line:
Use the following command to deploy your application to the remote repository:
$ git push
3.5.3. Hot Deploying Applications
When you run the git push command to upload code modifications, OpenShift stops, builds, deploys
and restarts your application. T his entire process takes time to complete and is unnecessary for many
types of code changes. Hot deploying your application allows your changes to take effect without
restarting the application cartridge, thus increasing deployment speed and minimizing application
downtime.
OpenShift provides support for hot deployment through a hot_deploy marker file. If the marker is
present, supported application cartridges automatically hot deploy when you run the git push
command.
T able 3.1. Application types that can or cannot be hot deployed
T ype of Application
Hot Deploy
JBoss Application Server 7.1
Yes
JBoss Enterprise Application Platform 6.0
Yes
PHP 5.3
Yes
Perl 5.10
Yes
Ruby 1.9
Yes
Ruby 1.8.7
Yes
Python 2.6
Yes
Node.js 0.6
Yes
Jenkins
No
HAProxy
No
DIY
No
3.5.3.1. Hot Deployment Build Details
JBoss AS 7.1 and JBoss EAP 6.0
When you hot deploy JBoss AS 7.1 and JBoss EAP 6.0 applications, the Maven build is executed (either
with Jenkins or without), but the server does not restart. Following the build, the JBoss HDScanner
notices any modifications and redeploys them. If previously deployed artifacts are removed as part of the
update, they are undeployed automatically.
PHP 5.3, Perl 5.10, Python 2.6 and Node.js 0.6
When you hot deploy PHP 5.3, Perl 5.10, Python 2.6 and Node.js 0.6 applications, the application code is
built (dependencies are processed and user build action_hooks are run) and deployed to the application
server. T he server does not restart. T his is true for both Jenkins and non-Jenkins enabled applications.
For Jenkins enabled applications, the build is performed on a Jenkins slave instance and then synced to
the gear(s) where the application server is running.
OpenShift All Versions User Guide
35
Ruby 1.9 and Ruby 1.8.7
When you hot deploy a Ruby application, the Passenger restart.txt file is touched, causing the
application server to serve the new code without the need for a full server restart. For further details on
this process, view the Passenger Documentation.
3.5.3.2. Enabling and Disabling Hot Deployment
Procedure 3.7. T o enable hot deployment:
Open a terminal and run the command applicable to your operating system from your application's
root directory to create the hot_deploy marker file:
Windows
C:\app_directory> copy NUL > .openshift\markers\hot_deploy
Linux and Mac
[user@user app_directory]$ touch .openshift/markers/hot_deploy
Procedure 3.8. T o disable hot deployment:
Hot deployment is disabled by deleting the hot_deploy marker file. T o delete this file run the
command applicable to your operating system from your application's root directory:
Windows
C:\app_directory> del .openshift\markers\hot_deploy
Linux and Mac
[user@user app_directory]$ rm .openshift/markers/hot_deploy
3.5.4 . Deploying JBoss Applications
3.5.4 .1. Deploying on Java 6 or Java 7
You can run JBoss AS 7 and JBoss EAP 6.0 applications on either Java 6 or Java 7. T he Java version is
specified by a java7 marker file in your application's m arkers directory. By default, new JBoss
applications have the java7 marker enabled. Applications without the java7 marker are deployed
using Java 6.
Procedure 3.9. T o use Java 7:
Open a terminal and run the commands applicable to your operating system from your application's
root directory to create the java7 marker file and update the remote repository:
Windows
36
Chapter 3. OpenShift Command Line Interface
C:\app_directory>
C:\app_directory>
C:\app_directory>
C:\app_directory>
copy NUL > .openshift\markers\java7
git add .openshift\markers\java7
git commit -a -m "Add Java 7 marker"
git push
Linux and Mac
[user@user
[user@user
[user@user
[user@user
app_directory]$
app_directory]$
app_directory]$
app_directory]$
touch .openshift/markers/java7
git add .openshift/markers/java7
git commit -a -m "Add Java 7 marker"
git push
Procedure 3.10. T o use Java 6:
Java 6 is enabled by deleting the java7 marker file. Run the commands applicable to your operating
system from your application's root directory to delete the java7 marker file and update the remote
repository:
Windows
C:\app_directory> del .openshift\markers\java7
C:\app_directory> git commit -a -m "Remove Java 7 marker"
C:\app_directory> git push
Linux and Mac
[user@user app_directory]$ rm .openshift/markers/java7
[user@user app_directory]$ git commit -a -m "Remove Java 7 marker"
[user@user app_directory]$ git push
3.5.4 .2. Automatic Deployment
T o automatically deploy your applications to the OpenShift server runtime, you can place your
deployment content, for example, .war, .ear, .jar, and .sar files, in the JBoss Application Server (AS) or
JBoss Enterprise Application Platform (EAP) deploym ents/ directory.
T he file system deployment scanner in JBoss AS 7 and JBoss EAP 6.0 relies on a system of marker
files. You can add or remove various marker files and the scanner deploys, withdraws, or redeploys
content based on the type of marker file.
T hese marker files always have the same name as the deployment content to which they relate, but with
an additional file suffix to indicate the type of action to perform. For example, the marker file to indicate
that the exam ple.war file should be deployed is named exam ple.war.dodeploy.
Option 1: Uploading content in a Maven src structure
You can upload your content in a Maven src structure similar to the example ROOT .war file. When you
perform a git push the application is built and deployed. T his is the typical deployment option, and
requires that your pom .xm l be stored at the root of your repository, and that you have a maven-warplugin similar to the one in the example file to move the output from the build to the deploym ents/
directory.
By default the warName is ROOT within the pom .xm l file. T his will render the webapp contents at
http://app_name-namespace.example.com. If you change the warName in pom .xm l to app_nam e, then
OpenShift All Versions User Guide
your base URL would become http://app_name-namespace.example.com/app_name.
Important
If you are building locally, add any output .war and .ear files in the deploym ents/ directory
from the build to your .gitignore file.
Option 2: Uploading prebuilt content
You can use git push to push prebuilt .war files (with the corresponding .dodeploy file for
exploded .war files) into the deploym ents/ directory.
Important
If you use this method using the default repository, first run git rm -r src/ pom .xm l from
the root directory of your repository. If the pom .xm l file still exists, the build will run again and
replace any prebuilt content.
3.5.4 .3. T ypes of Marker Files
Different marker file suffixes have different meanings. T he relevant marker file types are as follows:
T able 3.2. Sample T able
Marker File
T ype
Description
.dodeploy
Placed by the user to indicate that the given content should be deployed into the
runtime (or redeployed if already deployed in the runtime.)
.deploying
Placed by the deployment scanner service to indicate that it has detected a
.dodeploy file and is in the process of deploying the content. T his marker file is
deleted when the deployment process completes.
.deployed
Placed by the deployment scanner service to indicate that the given content has
been deployed to the runtime. If you delete this file, the content will be withdrawn.
.faileddeploy
Placed by the deployment scanner service to indicate that the given content failed to
deploy to the runtime. T he content of this file will include some information about the
cause of the failure.
.undeploying
Placed by the deployment scanner service to indicate that it has detected a
.deployed file has been deleted and the content is being withdrawn. T his marker
file is deleted when the withdrawal process completes.
.undeployed
Placed by the deployment scanner service to indicate that the given content has
been withdrawn from the runtime. If you delete this file, it has no impact.
3.5.4 .4 . Example JBoss Application Deployment Workflows
T he following sections describe the basic workflows involved in deploying, withdrawing, and redeploying
JBoss prebuilt applications to OpenShift.
T o add new, zipped content and deploy it, run the following command:
$ cp target/example.war deployments/
37
38
Chapter 3. OpenShift Command Line Interface
T o add new, unzipped content and deploy it, run the following commands:
$ cp -r target/example.war/ deployments/
$ touch deployments/example.war.dodeploy
T o withdraw deployed content, run the following command:
$ git rm deployments/example.war.dodeploy deployments/example.war
T o replace currently deployed, zipped content with a new version and deploy it, run the
following command:
$ cp target/example.war deployments/
T o replace currently deployed, unzipped content with a new version and deploy it, run the
following commands:
$ git rm -rf deployments/example.war/
$ cp -r target/example.war/ deployments/
$ touch deployments/example.war.dodeploy
3.6. Using Cartridges with the CLI
T he OpenShift client tools provide a full range of commands for managing cartridges that you add to
your applications.
You can view the cartridges associated with your applications by running the rhc dom ain show
command. T o view an individual application's information, use rhc app show -a AppName. Installed
cartridges are listed under the Em bedded heading.
3.6.1. Adding Cartridges with the CLI
T he current list of available cartridges can be viewed by running the rhc app cartridge list
command. Note that certain cartridges can only be added after a prerequisite cartridge is added.
Cartridge descriptions in the OpenShift website Management Console detail these dependencies.
Note
You can only add MySQL 5.1, MongoDB, PostgreSQL, or Jenkins Client 1.4 cartridges to scaled
applications.
Procedure 3.11. T o add a cartridge using the CLI:
Run the following command, replacing AppName and CartType with the name of the application to
which you want to add a cartridge and the type of cartridge you want to add:
$ rhc app cartridge add -a AppName -c CartType
3.6.2. Managing Cartridges
OpenShift All Versions User Guide
39
You can use the following options with the rhc app cartridge command, specifying the application
and cartridge to manage with the -a AppNam e and -c CartType arguments:
T able 3.3. Application management command argument options
Option
Details
list
Lists supported cartridges.
add
Adds a cartridge.
remove
Removes an added cartridge.
stop
Stops an added cartridge.
start
Starts an added cartridge.
restart
Restarts an added cartridge.
status
Returns the status of an added cartridge.
reload
Reloads the configuration of an added cartridge.
3.6.3. Working With Database Cartridges
OpenShift provides support for several database back ends, including PostgreSQL and MySQL. T he
procedures for adding these databases to your applications are the same in each case.
MongoDB provides some extended management features; these are discussed in Section 3.6.3.4,
“Adding and Managing MongoDB Instances”.
3.6.3.1. Using Database Environment Variables
When you add a database cartridge, OpenShift automatically creates a database with the same name as
the application and creates several environment variables. T he following are examples of these
variables:
OPENSHIFT_DB_CTL_SCRIPT="/var/lib/libra//48afdc700f6240dabbb313f2a824f9ea//mysql5.1//wootle_mysql_ctl.sh"
OPENSHIFT_DB_HOST="127.1.1.10"
OPENSHIFT_DB_PASSWORD="ad3eR$4agk8z"
OPENSHIFT_DB_PORT="3306"
OPENSHIFT_DB_SOCKET="/var/lib/libra//48afdc700f6240dabbb313f2a824f9ea//mysql5.1//socket/mysql.sock"
OPENSHIFT_DB_TYPE="mysql-5.1"
OPENSHIFT_DB_URL="mysql://admin:[email protected]:3306/"
OPENSHIFT_DB_USERNAME="admin"
OpenShift does not currently support user changes to environment variables. T his includes changing
the default MySQL admin password (even outside of phpmyadmin). If you change your password, ensure
that the change takes effect correctly.
T his restriction applies to the default administrative user. You can add more users as required, and
specify a password of your own choosing for these users.
3.6.3.2. Adding a MySQL Database
T he following example illustrates how to add a MySQL database to the application "MyApp".
40
Chapter 3. OpenShift Command Line Interface
$ rhc app cartridge add -a MyApp -c mysql-5.1
Password:
Contacting https://broker.example.com
Contacting https://broker.example.com
API version:
1.1.1
Broker version: 1.1.1
RESULT:
Mysql 5.1 database added.
Please make note of these credentials:
Root User: admin
Root Password: ad3eR$4agk8z
Database Name: MyApp
Connection URL: mysql://127.1.1.10:3306/
3.6.3.3. Adding a PostgreSQL Database
T o use a PostgreSQL database with your application, use the same procedure as described above for
adding a MySQL database, but use the PostgreSQL cartridge instead:
$ rhc app cartridge add -a MyApp -c postgresql-8.4
You can use SSH to connect to your application and verify the integrity of your database. Use the
following command to connect to your application:
$ ssh [email protected]
Use the password provided as output to the rhc app cartridge add command to connect to the
database:
PGPASSWORD=password psql -h 127.0.251.129 -U admin -d appname
psql (8.4.9)
Type "help" for help.
appname=#
T he last line in the output indicates a successful connection to the database. As a further check, you
can run a simple query:
appname=# select 1 as a, 2 as b, 3 as c;
a | b | c
---+---+--1 | 2 | 3
(1 row)
3.6.3.4 . Adding and Managing MongoDB Instances
3.6.3.4 .1. Overview
OpenShift supports MongoDB, a customizable back end database for web applications. OpenShift also
supports RockMongo, a MongoDB administration tool. You can add RockMongo to your applications
and use it to manage your MongoDB instances.
3.6.3.4 .2. Using MongoDB with OpenShift Applications
Use the rhc app cartridge add command to add a MongoDB database instance to your
OpenShift All Versions User Guide
41
application and to add RockMongo to control that database instance. T he following procedure
demonstrates how to create a new application and how to use MongoDB and RockMongo with that
application.
Procedure 3.12. How to use MongoDB and RockMongo with OpenShift applications
1. Create a new application.
$ rhc app create -a myMongo -t php-5.3
2. Add the MongoDB cartridge to your application.
$ rhc app cartridge add -a myMongo -c mongodb-2.0
T ake note of the credentials and other information that this command provides.
3. Add the RockMongo cartridge to your application.
$ rhc app cartridge add -a myMongo -c rockmongo-1.1
T ake note of the credentials and other information that this command provides.
3.6.3.4 .3. Managing MongoDB Instances with a Browser
After you have added a MongoDB database and the RockMongo cartridge to your application, you can
navigate to and start exploring your database. Use the URL and RockMongo User and RockMongo
Password credentials provided as output from the last step in the Procedure 3.12, “How to use
MongoDB and RockMongo with OpenShift applications” procedure. In this example, the URL is
https://myMongo-myDomain.example.com/rockmongo/. Below is an example of the RockMongo web
interface.
Figure 3.1. RockMongo Web Interface
Refer to RockMongo documentation for further information on how to use this interface to manage your
database.
3.6.3.4 .4 . Managing MongoDB Instances in a Shell Environment
After you have added a MongoDB database and the RockMongo cartridge to your application as
described in Procedure 3.12, “How to use MongoDB and RockMongo with OpenShift applications”, you
can manage your MongoDB instance in a shell environment.
42
Chapter 3. OpenShift Command Line Interface
Important
Shell access is quite powerful and it is possible to damage an application accidentally. T herefore
it is recommended you only use shell access when necessary.
Use the rhc dom ain show command to display information about all of your available applications.
T ake note of the UUID and Public URL information that this command provides for your MongoDB
instance.
T he example below shows viewing information for the myMongo application:
Example 3.2. Viewing Application Information
$ rhc domain show
Password:
Application Info
================
myMongo
Framework: php-5.3
Creation: 2011-12-07T01:07:33-05:00
UUID: 0bd9d81bfe0a4def9de47b89fe1d3543
Git URL: ssh://[email protected]/~/git/racer.git/
Public URL: http://myMongo-ming.example.com/
Embedded:
rockmongo-1.1 - URL: https://myMongo-ming.example.com/rockmongo/
mongodb-2.0 - Connection URL: mongodb://127.1.2.129:27017/
You will also need the Root username and the Root Password for your MongoDB instance that was
provided as output from Step 2 in Procedure 3.12, “How to use MongoDB and RockMongo with
OpenShift applications”.
When you have the necessary information, use the ssh command to open a shell environment for your
MongoDB instance, substituting the UUID and Public URL parameters noted previously, as
demonstrated below:
$ ssh [email protected]
When you have accessed your OpenShift application in the shell environment, you can type help at the
shell prompt to get a list of the specialized shell commands.
3.6.3.4 .4 .1. Opening a Mongo Shell
From the shell prompt, use the following command to open an authenticated Mongo shell to run all
Mongo shell commands, substituting the Root Username and Root Password obtained previously for
your MongoDB instance:
[myMongo-ming.example.com~]\> mongo -u admin -p zVumUTBNKbXz admin
T he example below demonstrates an open Mongo shell, and use of the show users Mongo shell
command:
OpenShift All Versions User Guide
43
Example 3.3. Running Mongo Shell Commands
mongo -u admin -p zVMongoDB shell version: 2.0.2-rc1
connecting to: 127.0.250.129:27017/admin
umUTBNKbXz admin
show users
{
"_id" : ObjectId("4ee55d39078e94193206e157"),
"user" : "admin",
"readOnly" : false,
"pwd" : "aba43436961fbc6145261a12ed94b8f7"
}
Refer to the MongoDB website and documentation for more information on Mongo shell commands.
3.7. Creating Application Snapshots
You can use the rhc app snapshot save command to create a snapshot of your application and
download it as a gzip archive. T his also downloads any locally created log and other files, and maintains
the directory structure that exists on the server. For example:
$ rhc app snapshot save -a ApplicationName --filepath
Local/Path/To/Save/Tarball
Refer to Section 5.1, “Backing up and Restoring Configuration and User Data” for further information
about this command.
3.8. Managing Applications
Use the rhc app command to manage your applications, view application status, and start, stop,
restart, reload and destroy applications. You can also use it to list, add, or remove cartridges. Refer to
rhc app --help for more information and a full list of the available options. T his command uses the
following syntax:
$ rhc app <action> -a ApplicationName [Optional Arguments]
3.8.1. Using Application Management Commands
T he following table describes the application management command options that you can use to
manage an existing application in the cloud.
T able 3.4 . Application management command argument options
Option
Details
start
Start an application in the cloud.
stop
Stop an application that is currently running in the cloud.
restart
Restart an application in the cloud.
reload
Reload an application in the cloud.
status
Display the current status of an application in the cloud.
destroy
Remove an application from the cloud.
44
Chapter 3. OpenShift Command Line Interface
3.8.2. Managing Applications in a Shell Environment
You can manage your OpenShift applications in a shell environment to perform specialized operations
and general debugging. T he shell access provides specialized tools for managing your applications.
Important
Shell access is quite powerful and it is possible to accidentally damage an application. T herefore
it is recommended you only use shell access when necessary.
3.8.2.1. Opening a Shell Environment for an Application Node
Before you can access your application in a shell environment, ensure that you have completed the
following:
Create a domain as described in Example 3.1, “Creating a new domain”. T he examples in this section
assume you have created the ecs domain.
Create an application as described in Section 3.4, “Creating Applications”. T he examples in this
section assume you have created the "racer" application.
After you have created your domain and your application, use the rhc dom ain show command to
display information about all of the current applications:
Example 3.4 . Viewing Application Information
$ rhc domain show
Password:
Application Info
================
racer
Framework: php-5.3
Creation: 2011-12-07T01:07:33-05:00
UUID: 0bd9d81bfe0a4def9de47b89fe1d3543
Git URL: ssh://[email protected]/~/git/racer.git/
Public URL: http://racer-ecs.example.com/
T ake note of the UUID and Public URL information for the application you wish to manage in the shell
environment. Use the ssh command to open a shell environment for your application, substituting the
UUID and Public URL parameters noted previously.
T he example below demonstrates opening a shell environment to the "racer" application:
OpenShift All Versions User Guide
45
Example 3.5. Opening a Shell Environment for an Application Node
$ ssh [email protected]
Warning: Permanently added 'racer-ecs.example.com,174.129.154.20' (RSA) to the
list of known hosts.
Welcome to OpenShift shell
This shell will assist you in managing openshift applications.
type "help" for more info.
[racer-ecs.example.com ~]\>
Note
T he shell environment to access your OpenShift applications is protected and restricted with
Security-Enhanced Linux (SELinux) policies.
When you have accessed your OpenShift application in the shell environment, you can type help at the
shell prompt to get a list of the specialized shell commands. As mentioned previously, you can also use
general Linux commands to perform routine operations in the shell environment.
3.8.3. Managing Applications in a Secure Shell Environment on Windows
Managing OpenShift applications in a Secure Shell (SSH) environment on Windows requires the PuT T Y
SSH and T elnet client, and PuT T Ygen SSH key generator. T his section provides instructions on how
you can use PuT T Y to establish an SSH connection to your OpenShift applications. T he instructions are
provided in four easy steps, as outlined below:
Step 1: Download PuT T Y and PuT T Ygen for Windows
Step 2: Convert OpenSSH keys to PuT T Y format
Step 3: Locate application username and hostname
Step 4: Establish SSH connection using PuT T Y
Important
Secure Shell (SSH) access is quite powerful, and it is possible to accidentally damage an
application. T herefore, it is recommended you only use SSH access when necessary.
Note
T he screenshots shown in the instructions below were taken on Windows XP. Where necessary,
the differences among other Windows operating systems have been noted.
It is assumed that the application you want to establish an SSH connection to has already been created.
In the examples used in this section, an SSH connection will be established to the application named
testapp.
46
Chapter 3. OpenShift Command Line Interface
Step 1: Download PuT T Y and PuT T Ygen
Go to http://www.chiark.greenend.org.uk. Download the executable files of the latest version of PuT T Y
and PuT T Ygen to your desired directory. Alternatively, you can also download the PuT T Y installer file
that will install all required PuT T Y packages on your computer.
Step 2: Convert OpenSSH Keys to PuT T Y Format
By default, the pair of SSH keys generated when installing client tools on Windows are in OpenSSH
format. T he pair consists of a private key, named id_rsa, and a public key, named id_rsa.pub. T o
establish an SSH connection to your application using PuT T Y, the private SSH key must be converted to
PuT T Y format. T he pair of SSH keys generated during initial configuration of OpenShift client tools are
stored in the following folders:
c:\Docum ents and Settings\user\.ssh for Windows XP
c:\Users\user\.ssh for Windows 7
Follow the instructions below to convert your private OpenSSH key to PuT T Y format.
1. Double-click puttygen.exe to launch PuT T Ygen. If necessary, click Run in the Security Warning
window. If you installed the PuT T Y software with the installer file, click Start, point to All Programs,
point to PuT T Y, and then click PuT T Ygen.
2. Click Conversions, then click Im port key to select your private OpenSSH key, as shown in the
figure below.
Figure 3.2. Import SSH Key
3. Navigate to the \user\.ssh folder, and select the id_rsa key file to import, as shown in the
figure below.
OpenShift All Versions User Guide
47
Figure 3.3. Select SSH Key to Import
4. Your private SSH key should now be imported to PuT T Ygen, as shown in the figure below. Click
Save private key, and save the id_rsa.ppk file in the \user\.ssh folder where the original
keys are stored.
Figure 3.4 . Save Key
5. Navigate to the \user\.ssh folder and verify that you now have three SSH key files. T he
id_rsa.ppk key will be used to establish an SSH connection to your OpenShift application. You
can close PuT T Ygen.
Step 3: Locate Application Username and Hostname
Each application created on OpenShift gets a unique UUID and gear name that is used to clone the
remote Git repository to your local repository. You can use the rhc dom ain info command, or the
OpenShift Management Console to get this information for the application to which you wish to establish
an SSH connection. Both examples are shown below.
48
Chapter 3. OpenShift Command Line Interface
Use the rhc dom ain info command and note down the UUID and gear name of your application, as
highlighted in the figure below. In this example the UUID and gear name are highlighted for the
application named testapp.
Figure 3.5. Application UUID and Gear Name
Alternatively, you can use the OpenShift Management Console to get the required information for your
application. From the OpenShift Management Console, click on the My Applications tab, then click
the name of the application you wish to access. T he UUID and gear name can be found under the GIT
REPOSITORY heading, as highlighted in the figure below.
Figure 3.6. Application UUID and Gear Name_WebUI
T ake note of this information, because in the next step you will use the UUID as the username, and gear
name as the hostname to configure PuT T Y, and establish an SSH connection to your application. T o
avoid errors, it is recommended you cut and paste this information into PuT T Y.
Step 4 : Establish SSH Connection Using PuT T Y
Now that you have the necessary information, you are ready to configure PuT T Y to establish an SSH
connection to your application. Follow the instructions below to configure PuT T Y using the information
from the previous step.
1. Double-click putty.exe to launch the PuT T Y SSH and T elnet client. If necessary, click Run in the
Security Warning window. If you installed the PuT T Y software with the installer file, click Start,
point to All Programs, point to PuT T Y, and then click PuT T Y.
2. In the left window pane under Category, click Session. Now copy and paste the gear name of
your application in the Host Name text box, as highlighted in the figure below.
OpenShift All Versions User Guide
49
Figure 3.7. Enter Hostname in PuT T Y
3. In the expanded list of options under Connection, click Data. Now copy and paste the UUID of
your application in the Auto-login username text box, as highlighted in the figure below. Because
the UUID is quite long, it may not be fully visible.
Figure 3.8. Enter UUID in PuT T Y
4. In the expanded list of options under Connection|SSH, click Auth. T hen click Browse to locate
the id_rsa.ppk file you created earlier, as shown in the figure below.
50
Chapter 3. OpenShift Command Line Interface
Figure 3.9. Find SSH Key
When you have browsed to the id_rsa.ppk file, click Open, as shown in the figure below.
Figure 3.10. Select SSH Key
5. With your id_rsa.ppk key selected, click Open, as shown in the figure below. T his will open an
SSH connection to your application gear.
OpenShift All Versions User Guide
Figure 3.11. Connect to Application Gear
If a security warning is displayed, click Yes to accept it. An SSH terminal window will open, similar
to the example shown below.
Using username "aa8d89ed311741e7b84d4edb82b11e0d".
Authenticating with public key "imported-openssh-key"
Welcome to OpenShift shell
This shell will assist you in managing OpenShift applications.
!!! IMPORTANT !!! IMPORTANT !!! IMPORTANT !!!
Shell access is quite powerful and it is possible for you to
accidentally damage your application. Proceed with care!
If worse comes to worst, destroy your application with 'rhc app destroy'
and recreate it
!!! IMPORTANT !!! IMPORTANT !!! IMPORTANT !!!
Type "help" for more info.
[testapp-doctesting.example.com ~]\>
One of the useful features of secure shell access is the ability to view application logs. You can
find the application log files in the App_Name/logs directory. T he example below shows how to
view the log file for the application named testapp.
[testapp-doctesting.example.com ~]\> cd testapp/logs
[testapp-doctesting.example.com ~]\> ls
[testapp-doctesting.example.com ~]\> view error_log-20120618-000000-EST
51
52
Chapter 3. OpenShift Command Line Interface
Note
T he Secure Shell environment to access your OpenShift applications is protected and
restricted with Security-Enhanced Linux (SELinux) policies.
With an SSH connection established to your OpenShift application, you can type help at the shell
prompt to get a list of specialized shell commands. You can also use general Linux commands to
perform routine operations in the shell environment.
3.8.4 . Using the Jenkins Embedded Build System
3.8.4 .1. Introduction to Jenkins
Jenkins integrates with other OpenShift applications. T o start building with Jenkins, you need to add the
Jenkins Client to an existing application. From then on, running a git push command initiates a build
process inside a Jenkins builder instead of inside your normal application compute space. For custom
applications, or applications that have no upstream repositories, the build process can be initiated
directly from the Jenkins web interface, without having to run the git push command.
Using the embedded Jenkins Client build system provides numerous benefits:
Archived build information
No application downtime during the build process
Failed builds do not get deployed (leaving the previous working version in place)
Jenkins builders have additional resources, for example memory and storage
A large community of Jenkins plug-ins
3.8.4 .2. T he Build and Deploy Process in OpenShift
T he OpenShift build and deploy process comprises four steps:
1. Pre-receive - T his occurs when you run a git push command, but before the push is fully
committed.
2. Build - T his builds your application, downloads required dependencies, executes the
.openshift/action_hooks/build script and prepares everything for deployment.
3. Deploy - T his performs any required tasks necessary to prepare the application for starting,
including running the .openshift/action_hooks/deploy script. T his step occurs
immediately before the application is issued a start command.
4. Post-deploy - T his step allows for interaction with the running application, including running the
.openshift/action_hooks/post_deploy script. T his step occurs immediately after the
application is started.
Building Without Jenkins
Building without Jenkins uses your application space as part of the build and test process. Because of
this, the application is shut down so that its memory can be used for building.
Building with Jenkins
Building with Jenkins uses dedicated application space, which can be larger than the application runtime
space. Because the build occurs in its own dedicated jail, the running application is not shut down or
changed in any way until after the build succeeds. If the build fails, the currently active application will
OpenShift All Versions User Guide
53
continue to run. However, a failure in the deployment process (deploy → start → post_deploy) may still
leave the application partially deployed or inaccessible.
3.8.4 .3. Resource Requirements for Jenkins
You can use the Jenkins application to build any number of applications; this is limited only by the
number of gears you have available. For example, if you create a PHP application and MySQL database
on the first gear, then Jenkins will be added to a separate gear. A third gear will be used for the Jenkins
builder. In other words, whenever the Jenkins builder is active, it occupies one of your available gears.
3.8.5. Managing Application Builds with Jenkins
3.8.5.1. Setting up Jenkins
T his section describes how to set up Jenkins to automatically rebuild your application when you make
changes to your local repository and then push those changes to the remote repository.
Note
T he following procedures assume that you already have a valid user account for OpenShift.
3.8.5.1.1. Creating a Jenkins-enabled Application
You can enable Jenkins with new applications, either scaled or non-scaled. Use the rhc app create
command to create a scaled or non-scaled application with an associated Jenkins application, and to
add the Jenkins client to your application.
Creating a Non-scaled Jenkins-enabled application
Use the rhc app create command as shown below to create a non-scaled application with an
associated Jenkins application, and to add the Jenkins client to your application.
Ensure that you take note of the login credentials that this command outputs to the screen. You will need
these credentials to log in to the Jenkins home page.
$ rhc app create -a App01 -t php-5.3 --enable-jenkins
Creating a Scaled Jenkins-enabled Application
Use the rhc app create command with the -s (or --scaling) option to create a scaled application,
and the --enable-jenkins option to add the Jenkins client to your application, as shown below:
$ rhc app create -a App01 -t php-5.3 --enable-jenkins -s
Important
T ake note of the login credentials that this command outputs to the screen. You will need these
credentials to log in to the Jenkins home page.
Confirming Your Jenkins-enabled Application
54
Chapter 3. OpenShift Command Line Interface
You can now run rhc dom ain status to confirm that your Jenkins-enabled application has been
created. You can also navigate to the public URL returned by the rhc app create command to view
your Jenkins home page.
Note
As part of the process of adding the Jenkins application to your domain, the Jenkins repository is
downloaded to your local machine. T his repository is not required for normal operations, and it is
safe to delete this local copy.
3.8.5.2. Building Applications Without Jenkins
As described in Building Without Jenkins, creating new builds of your application without using Jenkins
requires that the currently running application be shut down in order to use its memory. T his means that
your application will be unavailable for the duration of the build and all associated tasks. T hese tasks
are described below:
1. T he user issues a git push command and the application is shut down.
2. T he git application files are put in place.
3. .openshift/action_hooks/build is executed.
4. .openshift/action_hooks/deploy is executed.
5. .openshift/action_hooks/post_deploy is executed.
6. T he application is restarted.
3.8.5.3. Building Applications with Jenkins
T he Jenkins online build system monitors applications that have an embedded Jenkins Client, and will
automatically rebuild and deploy those applications whenever changes to the git repository are pushed
to the remote server. T he existing application is not affected until a new, successful build has been
created. Should the build fail, the existing application continues to run. No further interaction is required
by the user.
T he actual build and deployment process that Jenkins executes involves numerous steps, as described
below.
1. T he user issues a git push command, and Jenkins is notified that a new push is ready.
2. A dedicated Jenkins slave (a builder) is created. You can use the rhc dom ain show command
to display this slave information. T he application name is the same as the originating application,
but with a "bldr" suffix.
Important
T he first 28 characters of the application name must be unique or builders will be shared
across applications. T his can lead to build issues.
3. Jenkins runs the build.
4. Content from the originating application is downloaded to the builder application using git (for
source code) and rsync (for existing libraries).
5. ci_build.sh is called from the Jenkins shell. T his sets up the builder application for the Jenkins
environment and performs some built-in bundling steps (PHP pear processing, Python virtual
environment, etc).
OpenShift All Versions User Guide
6. .openshift/action_hooks/build is executed on the Jenkins builder.
7. Any additional desired steps are executed from the Jenkins shell (Maven build, Gem install, test
cases, etc).
8. Jenkins stops the currently running application, and runs rsync to synchronize all new content
over to the originating application.
9. .openshift/action_hooks/deploy is executed on the originating application.
10. Jenkins starts the originating application, and .openshift/action_hooks/post_deploy is
executed on this application.
11. Jenkins archives all build artifacts for later reference.
12. After 15 minutes of idle time, the "build app" will be destroyed and will no longer appear in the
output of the rhc dom ain show command. T he build artifacts however, will still exist in Jenkins
and can be viewed there.
You can monitor the build job using the Jenkins interface. T he interface provides an extensive range of
information about the current build, build history, artifacts, as well as plug-ins to graph, track, run tests
and perform other operations. T he following is an example build history of an application built using the
embedded Jenkins Client.
Figure 3.12. Jenkins Build History Page
3.8.5.3.1. Building Custom Applications
You can also build custom applications, or applications that have no upstream repositories, directly from
the Jenkins web interface instead of using the git push command.
T o build your application from the Jenkins web interface, click on the
wish to build, located on the right side of the interface.
icon for the application you
55
56
Chapter 3. OpenShift Command Line Interface
Figure 3.13. Build from Jenkins Interface
T he status of the build process can be viewed in the web interface under the section labeled Build
Executor Status.
Figure 3.14 . Build Process Status
3.8.6. Using Environment Variables
Environment variables are named values that change the way running processes behave in computing
environments. T hey can be used to store a variety of different values: application names, commonly
accessed directory names, usernames, passwords, hostnames, and IP addresses.
3.8.6.1. Common Environment Variables in OpenShift
T he following are some common OpenShift environment variables. Note that this list is not exhaustive.
T able 3.5. Environment variables in OpenShift
Environment Variable Name
Use
OPENSHIFT _APP_NAME
Application name
OPENSHIFT _GEAR_DIR
Application directory
OPENSHIFT _DAT A_DIR
For persistent storage (between pushes)
OPENSHIFT _T MP_DIR
T emporary storage (unmodified files are deleted
after 10 days)
T he following environment variables apply to the rhc app command when it is used to add a database:
T able 3.6. Environment Variables Applicable to Database Operations
Environment Variable Name
Use
OPENSHIFT _DB_HOST
Database host
OPENSHIFT _DB_PORT
Database port
OPENSHIFT _DB_USERNAME
Database username
OPENSHIFT _DB_PASSWORD
Database password
OpenShift All Versions User Guide
57
Note
T o retrieve a complete list of environment variables, add an export statement to the
<appnam e>/.openshift/action_hooks/build script, and then run git push.
3.8.6.2. JBoss Environment Variables
OpenShift uses environment variables in the /<appnam e>/.openshift/config/standalone.xm l
file that is part of jbossas-7. T he following example code from this standalone.xm l file displays three
environment variables:
<connectionurl>jdbc:mysql://${env.OPENSHIFT_DB_HOST}:${env.OPENSHIFT_DB_PORT}/${env.OPENSHIFT
_APP_NAME}</connection-url>
You can save environment variables on the server, which means that you do not have to pass sensitive
information repeatedly to the command line.
Procedure 3.13. How to set environment variables on the server
1. Open the <appnam e>/.openshift/config/standalone.xm l file.
2. Specify the required values for any of your environment variables, then save and close the file.
3. Commit and push the changes to the server:
$ git commit -a -m "COMMIT MESSAGE"
$ git push
Important
Sensitive information stored in your environment variables is visible if you use the
rhc app snapshot commands.
3.8.7. Using Node.js
T his section provides the basic information required for running Node.js applications on OpenShift.
3.8.7.1. Repository Layout
When you create a new Node.js application on OpenShift, the application directory is populated with
several files. T he following table displays this layout:
58
Chapter 3. OpenShift Command Line Interface
T able 3.7. Node.js Repository Layout
File
Use
node_modules/
Node modules packaged with the application
deplist.txt
Deprecated — List of npm modules to install with the application
npm_global_module_list
List of globally installed and available npm modules
server.js
OpenShift sample Node application
package.json
Package descriptor for npm
README
Information about using Node.js with OpenShift
.openshift/
Location for OpenShift specific files
.openshift/action_hooks/pre_bui
ld
Script that gets run every git push before the build
.openshift/action_hooks/build
Script that gets run every git push as part of the build process (on
the CI system if available)
.openshift/action_hooks/deploy
Script that gets run every git push after build but before the
application is restarted
.openshift/action_hooks/post_d
eploy
Script that gets run every git push after the application is restarted
You can create additional directories if needed, but do not delete the node_m odules and .openshift
directories.
Note
When you git push, everything in your remote repository directory is recreated. Place items that
you want to persist between pushes, such as a database, in the ../data directory on the gear
where your OpenShift application is running.
3.8.7.2. Installing Node Modules
If you want to install Node modules from the npm registry, you can specify the modules in the
package.json file. Package.json describes how your package is structured and is used by npm to
install and manage your application. T he dependencies hash in the package.json file can be used to
specify the Node modules (and optionally the version) to install alongside your application ("locally") on
the OpenShift environment when you git push your application. For more information, see
https://npmjs.org/doc/json.html.
Example package.json entry:
"dependencies": {
"coffee-script":
"connect":
"1.3.3",
"*",
"optimist": "<=0.3.4",
"socket.io": ""
},
Node modules not included in the npm registry can be installed by packaging them in the
OpenShift All Versions User Guide
59
node_m odules directory.
T he npm _global_m odule_list file contains a list of globally installed modules. You can override a
globally available module by specifying it in package.json or by packaging it in the node_m odules
directory. Node gives preference to the "locally" installed version of that module.
3.8.7.3. Common Node.js Environment Variables in OpenShift
T he following are some common OpenShift environment variables that you can use with your Node.js
application. Note that this list is not exhaustive.
T able 3.8. Environment variables in OpenShift
Environment Variable Name
Use
OPENSHIFT _NAME
Application name
OPENSHIFT _DIR
Application directory
OPENSHIFT _DAT A_DIR
For persistent storage (between pushes)
OPENSHIFT _T MP_DIR
T emporary storage (unmodified files are deleted
after 10 days)
T he following environment variables apply to the rhc app command when it is used to add a database:
T able 3.9. Environment Variables Applicable to Database Operations
Environment Variable Name
Use
OPENSHIFT _DB_HOST
Database host
OPENSHIFT _DB_PORT
Database port
OPENSHIFT _DB_USERNAME
Database username
OPENSHIFT _DB_PASSWORD
Database password
Note
T o retrieve a complete list of environment variables, add an export statement to the
.openshift/action_hooks/build script, and then run git push.
3.8.8. Scheduling T imed Jobs with Cron
You can use the OpenShift cron scheduler to set up timed jobs for your applications. T his consists of
adding the cron scheduler cartridge to your application, adding the required cron jobs to the appropriate
directories, and then updating the remote git repository. You can also use the rhc app command to
enable or disable your cron scripts.
T he following example demonstrates how to create a new application and enable cron support.
Procedure 3.14 . T o create an application and enable cron support:
1. Create a new application:
$ rhc app create -a holy -t php-5.3
2. Add the cron scheduler cartridge to your new application:
60
Chapter 3. OpenShift Command Line Interface
$ rhc app cartridge add -a holy -c cron-1.4
3. Add the cron jobs to your application's
.openshift/cron/{m inutely,hourly,weekly,daily,m onthly}/ directories.
For example:
$ mkdir -p .openshift/cron/minutely
$ echo 'date >> $OPENSHIFT_REPO_DIR/php/date.txt' >
.openshift/cron/minutely/date.sh
4. Commit your changes and push them to the remote repository.
$ git add .openshift/cron/
$ git commit -m "configuring cron jobs"
$ git push
T his example appends a new line of date information to the $OPENSHIFT _REPO_DIR/php/date.txt
file every minute.
You can use curl to verify the operation of this script:
$ curl http://holy-roller.example.com/date.txt
Thu Feb
Thu Feb
Thu Feb
2 01:02:01 EST 2012
2 01:03:01 EST 2012
2 01:04:01 EST 2012
T he scripts that you place in the /cron subdirectories are executed at the respective frequencies.
Scripts in each subdirectory are executed sequentially, in alphabetical order. Scripts in the
/cron/hourly directory are executed on the first minute of every hour. You can use the rhc app
cartridge command to enable or disable your cron scripts. For example, to disable all of your scripts:
$ rhc app cartridge stop -a holy -c cron-1.4
T o enable all of your scripts:
$ rhc app cartridge start -a holy -c cron-1.4
Note
T he cron commands affect all cron jobs. You cannot disable or enable individual cron jobs.
3.8.9. Sending and Receiving Email
3.8.9.1. Overview
OpenShift provides support for connecting to externally hosted email services (POP, IMAP, and SMT P).
For developers, this means that you can establish a connection from your application to your own email
server, or to one of the popular public email services, such as Gmail or YahooMail. If you are deploying
popular blogging or wiki software on OpenShift, such as Drupal, Joomla, MediaWiki, or WordPress, you
can also take advantage of this feature by altering the email settings of the software to point to the
appropriate email service.
3.8.9.2. Email Port Configuration
OpenShift All Versions User Guide
T he specific ports that have been enabled to support this are as follows:
SMT P/submission (25, 465, 587)
IMAP (143, 220, 993)
POP (109, 110, 995)
Communication occurs at a limited rate. Port 587 (submission) is restricted to a maximum rate of
256 Kbps. Ports 25 (SMT P) and 465 (SMT PS) are restricted to a maximum rate of 24 Kbps. Both will
consume an extremely small share of the available bandwidth if congestion exists.
Important
Be aware that access to email servers from cloud providers may be blocked by Realtime
Blackhole Lists (RBLs). T his may affect your ability to connect to some email servers. If you are
unable to make a connection to one of these services, make sure that your email provider allows
authenticated connections from Amazon AWS EC2 hosts.
61
62
Chapter 4. Application Maintenance, Monitoring and Troubleshooting
Chapter 4. Application Maintenance, Monitoring and
Troubleshooting
4.1. Monitoring Applications with the MongoDB Monitoring Service
(MMS)
T he MongoDB Monitoring Service (MMS) is a cloud-based monitoring service, designed by 10gen, to
monitor the health of MongoDB deployments. MMS provides an agent that runs on MongoDB servers,
and this agent reports information such as opcounters, memory information, number of connections,
network I/O, database storage size, and more. All of this information is available in customizable charts
that are displayed in your web browser.
OpenShift provides built-in support for MMS; you can add the MMS agent to your application using the
same commands as for other cartridges. T he only pre-requisite for using MMS is that you have an
account with 10gen; you can sign up for a free MMS account at https://mms.10gen.com/.
4 .1.1. Setting up MMS
T he following procedure describes how to configure your application to take advantage of the services
provided by MMS. T his procedure assumes that you have successfully created an application and
added the MongoDB cartridge.
Procedure 4 .1. How to set up your application to use MMS
1. Download the agent.
When you log into MMS, you will see a "download the agent" link on the Hosts page. Click this link
to download an agent preconfigured with your group credentials.
2. Create a directory named m m s in your application's .openshift directory with the following
command, replacing app_directory with the root directory for your application:
$ mkdir ~/app_directory/.openshift/mms
3. Add the settings.py file to the m m s directory:
$ cp ~/mms-agent/settings.py ~/app_directory/.openshift/mms/
Important
T he settings.py file contains the MMS agent settings that contain the API keys for
connecting to your MMS account and updating the monitoring metrics. T he MMS agent will
not function without this file.
4. Use git to add and commit the m m s directory to your local repository, then push it to your remote
repository:
$
$
$
$
cd app_directory/
git add .openshift/mms/
git commit -m "mms settings" -a
git push
5. Use the following command to add the agent to your application:
OpenShift All Versions User Guide
$ rhc app cartridge add -a app_name -c 10gen-mms-agent-0.1
After you have successfully completed this procedure, you can navigate to the https://mms.10gen.com/
page, enter your host's details and start monitoring your application.
4 .1.2. Monitoring Your Applications with MMS
4 .1.2.1. Adding Hosts to MMS
After you have created an application and added the MMS agent, you can add the host to the Hosts
page on https://mms.10gen.com/. T o add a new host, you need the hostname, port number, and login
credentials that were provided when you added MongoDB to your application. If you no longer have this
information, you can retrieve it directly from your application, as follows:
1. Use SSH to connect to your application:
$ ssh [email protected]
where UUID is the UUID of your application. You can retrieve this using the rhc dom ain show
command. Replace appname and namespace with your application name and namespace,
respectively.
2. Run the following command to retrieve all the necessary connection and credential information for
your application:
$ echo $OPENSHIFT_NOSQL_DB_URL
Procedure 4 .2. How to add hosts to MMS
1. Navigate to https://mms.10gen.com/
2. Click the Hosts + button at the top of the page to display the New Host dialog box.
3. Enter the required details and then click Add. T his adds the host details to the agent, which
immediately starts collecting and storing data.
Figure 4 .1. Adding a New Host to MMS
4 .1.2.2. Using a Browser to Monitor Your Applications
After you have added the MMS agent to your application and added your host details to MMS, you can
63
64
Chapter 4. Application Maintenance, Monitoring and Troubleshooting
use the web interface to monitor your application's performance.
Procedure 4 .3. How to monitor your applications with MMS
1. Navigate to https://mms.10gen.com/ and click the Hosts tab.
2. Click the name of the host that you want to monitor to view the available data collection streams.
You can customize this page to suit your own requirements. Refer to the 10gen documentation for
full details.
Figure 4 .2. Data Monitoring Using MMS
4.2. Managing Your Application Disk Space
As you develop your applications and push changes to the git repository, you will slowly reduce the
amount of disk space that is available to run your applications. T his is because git stores all repository
information, whether it is still required or not. Other aspects of developing and running your applications
also result in wasted disk space, such as old log files and unused application libraries.
OpenShift provides tools to help you optimize your disk space to help achieve the best possible
performance of your applications.
4 .2.1. T he Disk Space Cleanup T ool
OpenShift provides a Disk Space Cleanup Tool to help you manage your application disk space. T his
tool is part of the rhc app command suite, and performs the following functions:
Runs the git gc command on your application's git repository on the server
Clears the application's /tm p and log file directories. T hese are specified by the application's
OPENSHIFT _LOG_DIR and OPENSHIFT _T MP_DIR environment variables.
OpenShift All Versions User Guide
65
Important
OpenShift does not automatically back up or rotate log files. T he Disk Space Cleanup T ool
runs the rm -rf command to clear the contents of these directories. If you want to save their
contents, you should use the rhc app snapshot save command first to create a snapshot
of your system.
Clears unused application libraries. T his means that any library files previously installed by a
git push command are removed.
T he Disk Space Cleanup T ool uses the following syntax:
$ rhc app tidy -a <ApplicationName>
Note
T he rhc client tools use the login specified in the ~/.openshift/express.conf file by default.
If no default login is configured, or if you want to use a different login, include the -l parameter as
a command line argument.
4.3. Troubleshooting JBoss Applications
OpenShift provides some basic tools to help you troubleshoot your JBoss applications should any
problems arise. T his includes the ability to inspect the log files and also to trigger a thread dump for
JBoss AS applications.
4 .3.1. Using T hread Dumps to T roubleshoot JBoss Applications
T hread dumps are a useful debugging tool. If an application appears to have stalled or is running out of
resources, a thread dump can help to reveal the state of the server, to identify what might be causing
any issues and ultimately to resolve the problem. You can use the rhc app threaddum p command to
trigger a thread dump for a JBoss AS application.
T he following example demonstrates the use of this command:
Note
T his example assumes that you have a valid account and have already created a domain and
JBoss AS application called "myJBoss".
$ rhc app threaddump -a myJBoss
NOTE: The threaddump command is only applicable to applications of type jbossas-7.
The thread dump file will be available via 'rhc app tail -f myJBoss/jbossas7/stdout.log'
Password:
RESULT:
Success
You can now use the rhc app tail command to inspect the resultant thread dump:
66
Chapter 4. Application Maintenance, Monitoring and Troubleshooting
$ rhc app tail -a myJBoss -f myJBoss/jbossas-7/stdout.log
Password:
Attempting to tail files: myJBoss/jbossas-7/stdout.log
Use ctl + c to stop
Heap
PSYoungGen
total 5888K, used 3806K [0x00000000fe000000, 0x00000000fe5e0000,
0x0000000100000000)
eden space 5760K, 65% used
[0x00000000fe000000,0x00000000fe3af830,0x00000000fe5a0000)
from space 128K, 25% used
[0x00000000fe5a0000,0x00000000fe5a8000,0x00000000fe5c0000)
to
space 128K, 0% used
[0x00000000fe5c0000,0x00000000fe5c0000,0x00000000fe5e0000)
PSOldGen
total 64896K, used 9239K [0x00000000fa000000, 0x00000000fdf60000,
0x00000000fe000000)
object space 64896K, 14% used
[0x00000000fa000000,0x00000000fa905ce8,0x00000000fdf60000)
PSPermGen
total 33344K, used 33326K [0x00000000f4200000,
0x00000000f6290000, 0x00000000fa000000)
object space 33344K, 99% used
[0x00000000f4200000,0x00000000f628b930,0x00000000f6290000)
<output truncated>
4 .3.2. Inspecting Server, Boot and Other Log Files
You can use the rhc app tail command to inspect other JBoss application log files. If you include
your application name as the only argument, this command will tail the contents of all files in the
<appName>/logs/ directory. T he following shows abbreviated output from this command:
$ rhc app tail -a myJBoss
Password:
Attempting to tail files: myJBoss/logs/*
Use ctl + c to stop
==> myJBoss/logs/server.log <==
00:21:45,831 INFO [org.apache.catalina.core.AprLifecycleListener] (MSC service
thread 1-1) The Apache Tomcat Native library which allows optimal performance in
production environments was not found on the java.library.path: /usr/lib/jvm/java1.6.0-openjdk-1.6.0.0.x86_64/jre/lib/amd64/server:/usr/lib/jvm/java-1.6.0-openjdk1.6.0.0.x86_64/jre/lib/amd64:/usr/lib/jvm/java-1.6.0-openjdk1.6.0.0.x86_64/jre/../lib/amd64:/usr/java/packages/lib/amd64:/usr/lib64:/lib64:/li
b:/usr/lib
00:21:46,569 INFO [org.jboss.as.server.deployment] (MSC service thread 1-2)
Starting deployment of "ROOT.war"
00:21:46,657 INFO [org.jboss.as.jpa] (MSC service thread 1-2) added
javax.persistence.api dependency to ROOT.war
==> myJBoss/logs/boot.log <==
sun.jnu.encoding = UTF-8
sun.management.compiler = HotSpot 64-Bit Tiered Compilers
user.country = US
user.dir = /tmp
00:21:45,337 INFO [org.jboss.as.logging] Removing bootstrap log handlers
<output truncated>
OpenShift All Versions User Guide
67
T he ability to obtain thread dumps and to inspect log files can greatly enhance your ability to
troubleshoot your applications should any problems arise.
4.4. Performing Application Maintenance from Your Workstation
4 .4 .1. Port Forwarding
You can forward remote ports on your server to your workstation to make it easier to manage various
services, such as MySQL. T he rhc-port-forward command provides a wrapper for the ssh
command, and determines which remote ports should be forwarded to your workstation.
Note
Ensure that your application is running before attempting to configure port forwarding.
Refer to the following example:
$ rhc-port-forward -a App01
Password:
Checking available ports...
Binding httpd -> 127.0.251.1:8080...
Use ctl + c to stop
In this example, you could now open a browser and connect to your remote application as if it were
running locally.
T he current implementation of the rhc-port-forward command forwards all open ports on your
running application to your local workstation. If you have multiple cartridges added to your application,
you will see further messages indicating which remote services are being bound to local ports. Refer to
the following example:
$ rhc-port-forward -a Pearl
Password:
Checking available ports...
Binding httpd -> 127.0.252.1:8080...
Binding mysqld -> 127.0.252.1:3306...
Use ctl + c to stop
If you need to forward only specific ports, you need to use the ssh command with the -L option. Refer to
the ssh manual page for details.
4 .4 .1.1. Port Forwarding on Mac OS X
Currently, out of the box, Mac OS X only provides the following interfaces for loopback addresses:
localhost
127.0.0.1
T herefore, you may experience error messages similar to those shown below when attempting to
configure port forwarding using the IP address for your OpenShift application.
68
Chapter 4. Application Maintenance, Monitoring and Troubleshooting
$ rhc-port-forward -a qnodejs
Password: ******
Checking available ports...
Binding httpd -> 127.11.25.2:8080...
Binding mysqld -> 127.11.25.1:3306...
Binding node -> 127.11.25.1:8080...
Use ctl + c to stop
Error trying to forward ports. You can try to forward manually by running:
ssh -N -L 127.11.25.1:3306:127.11.25.1:3306 -L 127.11.25.1:8080:127.11.25.1:8080 -L
127.11.25.2:8080:127.11.25.2:8080 [email protected]
T he current workaround to enable port forwarding on Mac OS X is to manually configure an alias using
the ifconfig command for each IP address used by your application, using the command as shown
below:
$ sudo ifconfig lo0 alias application_IP_address
For example, if the IP address used by your application is 127.10.51.129, run the command as shown
below:
$ sudo ifconfig lo0 alias 127.10.51.129
If your application uses multiple IP addresses, as shown in the example above, you must configure an
alias for each IP address. For example, suppose you have a Node.js application with both MySQL and
phpMyAdmin cartridges added, and it uses the IP addresses 127.11.25.1 and 127.11.25.2. T o correctly
enable port forwarding, you must configure an alias for each IP address, as shown in the example below.
$ sudo ifconfig lo0 alias 127.11.25.1
$ sudo ifconfig lo0 alias 127.11.25.2
Note
T he ifconfig command on Mac OS X requires root/administrative privileges to execute.
You can now use the rhc-port-forward command to enable port forwarding.
Important
T he IP address alias you configure for your OpenShift application is not persistent through
system reboots. If you reboot your computer, you must repeat these steps to correctly enable port
forwarding on Mac OS X.
OpenShift All Versions User Guide
69
Chapter 5. Storage Management
OpenShift provides up to 512 megabytes of storage space for your application. You can also use your
allocated storage space to store databases. T he following table lists the currently supported database
formats:
T able 5.1. Databases Supported by OpenShift
Database
Supported
MySQL
Yes
MySQLi
Yes
PDO MySQL
Yes
PDO SQLite
Yes
Amazon-RDS
Yes
Note
PHP Database Object (PDO) drivers are available only for MySQL and SQLite databases. If your
application contains a database, place it in a new folder in your git repository. If you place the
database in the ../data folder, git push will not affect it.
5.1. Backing up and Restoring Configuration and User Data
Use the rhc app snapshot save command to create backups of your OpenShift applications, and
also to restore those backups to the server. As a back-up tool, this command creates a gzipped tar file
not only of your application but also of any locally-created log and other files, which is then downloaded
to your local machine. T he directory structure that exists on the server is maintained in the tar file.
Important
OpenShift does not maintain backups of your applications or user data on the OpenShift servers.
T he files created by this process are always downloaded to your local machine.
5.1.1. Creating Snapshots
T he rhc app snapshot save command uses the following syntax to create a snapshot:
$ rhc app snapshot save -a Application_Name
T he command will prompt for any missing information, such as your rhlogin and password. T he default
filename for the snapshot is $Application_Name.tar.gz. You can override this path and filename with
the --filepath option.
T he following example demonstrates the process of creating and downloading a snapshot:
70
Chapter 5. Storage Management
$ rhc app snapshot save -a MasterApp
Password:
Pulling down a snapshot to MasterApp.tar.gz
Running extra dump: mysql_dump.sh
Mysql already running
72.7%
Stopping application...
Done
Creating and sending tar.gz
Running extra cleanup: mysql_cleanup.sh
Starting application...
Done
5.1.2. Restoring Snapshots
You can use the rhc app snapshot restore command to restore snapshots to the server. T his
form of the command restores the git repository, the application data directories and the log files found in
the specified archive. When the restoration is complete, OpenShift runs the deployment script on the
newly-restored repository, which completes the deployment process in the same way as if you had run
git push.
Important
Even though you can save your application using a different filename, you cannot restore that
application to a different name. T hat is, if your application name is "MyApp", you can save it as
OurApp.tar.gz, but when you restore it you must use the original application name.
T he rhc app snapshot restore command overwrites the remote git repository. Any
changes that you might have made since you took the snapshot will be lost.
OpenShift All Versions User Guide
Revision History
Revision 2.0.21-0
T ue Dec 11 2012
OpenShift Online 2.0-21 release.
Add Python and Node.js to hot deploy app types.
Update Bugzilla component to OpenShift Origin.
Brian Moss
Revision 2.2.20-4
Wed Nov 21 2012
Brian Moss
Bug 878728: Couple of typos.
Bug 878724: Add a note that RH does not provide support for Mongo.
Bug 878722: Replace references to rhcloud.com with example.com
Bug 878318: Change product name from OpenShift to OpenShift Enterprise.
Bug 856924: Update references to man pages.
Updated OpenShift logo.
Revision 2.2.19-2
T ue Nov 06 2012
BZ 865028: Heading uses non-standard capitalization.
Update sub-title and abstract for OpenShift Enterprise version.
Brian Moss
Index
A
Applications
- alias, Using Arbitrary DNS Names
- backing up
- command line, Creating Application Snapshots
- cloud
- git command, Deploying Your Application to the Cloud
- Web GUI, Editing and Deploying Applications
- committing, Preparing Your Application for Deployment
- creating, Introduction
- command, Creating Non-scaled Applications
- multiple, Creating Non-scaled Applications
- network issues, Introduction
- timeout, Introduction
- troubleshooting, Introduction
- Web GUI, Creating Applications, Creating Basic Applications
- customized domain names
- alias, Using Arbitrary DNS Names
- deleting
- command line, Using Application Management Commands
- locally, Deleting Local Application Data
- Web GUI, Deleting Remote Application Data
- deploying
- command line, Editing and Deploying Applications
71
72
Revision History
- destroying
- command line, Using Application Management Commands
- directories, Platform Overview
- security, Platform Overview
- files, Cloning Application Files
- managing
- command line, Managing Applications
- preparing, Preparing Your Application for Deployment
- reloading
- command line, Using Application Management Commands
- removing
- command line, Using Application Management Commands
- restarting
- command line, Using Application Management Commands
- starting
- command line, Using Application Management Commands
- stopping
- command line, Using Application Management Commands
- testing, Using DIY Cartridges
- types
- no type, Using DIY Cartridges
- supported, Creating Basic Applications
- viewing
- command line, Using Application Management Commands
B
Build System
- Jenkins, Introduction to Jenkins
- memory considerations, T he Build and Deploy Process in OpenShift
- steps, T he Build and Deploy Process in OpenShift
D
Do-It-Yourself, Creating Basic Applications
- (see also Applications)
OpenShift All Versions User Guide
F
feedback
- contact information for this manual, We Need Feedback!
H
help
- getting help, Do You Need Help?
J
JBOSS AS, Creating Basic Applications
- (see also Applications)
JBOSS EAP, Creating Basic Applications
- (see also Applications)
Jenkins, Introduction to Jenkins
- (see also Build System)
- benefits, Introduction to Jenkins
- building
- space requirements, T he Build and Deploy Process in OpenShift
Jenkins Server, Creating Basic Applications
- (see also Applications)
N
Node.js, Creating Basic Applications
- (see also Applications)
P
Perl, Creating Basic Applications
- (see also Applications)
PHP, Creating Basic Applications
- (see also Applications)
Python, Creating Basic Applications
- (see also Applications)
73
74
Revision History
R
Ruby Webserver Interface, Creating Basic Applications
- (see also Applications)
S
Security
- Environmental variables, JBoss Environment Variables
SSH, Managing SSH Keys
- (see also Users)
Storage
- amount, Storage Management
- types
- Amazon-RDS, Storage Management
- MySQL, Storage Management
- MySQLi, Storage Management
- PDO MySQL, Storage Management
- PDO SQLite, Storage Management
U
Users
- managing
- access, Managing SSH Keys
- public keys, Managing SSH Keys