1
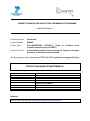
COMPETITIVENESS AND INNOVATION FRAMEWORK PROGRAMME
Call FP7-ICT-2011-7
Project Acronym:
Cassandra
Project Number:
288429
Project Type:
COLLABORATIVE PROJECT: Small
focused research project (STREP)
Project Full Title:
A multivariate platform for assessing the impact of strategic
decisions in electrical power systems
or
medium
scale
Work programme topic addressed: ICT-2011.6.2 ICT systems for energy efficiency
D4.4.2 Cassandra Final Platform
Nature:
Dissemination Level:
Version #:
Delivery Date:
Deliverable Leader:
Author(s):
Status:
Reviewed on
Reviewed by:
P
PU
1.0
15 November, 2013
CERTH
Kyriakos C. Chatzidimitriou (CERTH), Antonis
Chrysopoulos (CERTH)
Final
nd
12 November, 2013
Christos Diou (CERTH)
Abstract
This document contains the manual of the Cassandra early platform prototype. The prototype platform and source
code are available online at https://github.com/cassandra-project/platform.
Grant Agreement No. 288429
D4.4.2 Cassandra Final Platform – Version 1.0
Page 2 of 75
Grant Agreement No. 288429
D4.4.2 Cassandra Final Platform – Version 1.0
Document History
Version1 Issue Date
#1.0
12nd November
2013
Stage2
Draft
Content and changes
Initial version of the document (CERTH)
List of participants:
Participant no. *
Participant organisation name
Part. short name
Country
1
(Coordinator)
Centre for Research and Technology
Hellas/ Informatics and Telematics
Institute
CERTH-ITI
Greece
AUTH
Greece
2
Aristotle University of Thessaloniki
3
VaasaETT Global Energy Think Tank
VAASA
Finland
4
Politecnico di Milano
POLIMI
Italy
5
Coventry University Enterprises Ltd
COVUNI
UK
6
Luleå University of Technology
LTU-CDT
Sweden
7
Cleopa GmbH
CLEOPA
Germany
8
Erasmus
research
Management
ERASMUS
Netherlands
9
DRAXIS S.A
DRAXIS
Greece
1
Institute
of
Please use a new number for each new version of the deliverable. Add the date when this version was issued
and list the items that have been added or changed. The „what‟s new‟ column will help the reader in identifying the
relevant changes. Do not forget to update the version number and date on the front page and the header.
2
A deliverable can be of these stages: either “draft” or “final”. For each stage, several versions of a document can
be issued. Draft: Work is being done on the contents. Final: All chapters have been completed.
Page 3 of 75
Grant Agreement No. 288429
D4.4.2 Cassandra Final Platform – Version 1.0
Table of contents
DOCUMENT HISTORY .......................................................................................................... 3
TABLE OF CONTENTS ......................................................................................................... 4
1
INTRODUCTION ............................................................................................................ 8
1.1
2
THE CASSANDRA PLATFORM....................................................................................... 8
CASSANDRA FINAL PLATFORM MANUAL .......................................................... 11
2.1
AUTHENTICATION ..................................................................................................... 11
2.2
WORKSPACE.............................................................................................................. 11
2.3
LIBRARIES ................................................................................................................. 13
2.4
USAGE WORKFLOW .................................................................................................. 14
2.5
PROJECTS .................................................................................................................. 16
2.6
SCENARIOS ................................................................................................................ 16
2.7
INSTALLATIONS ......................................................................................................... 17
2.8
PERSONS.................................................................................................................... 18
2.9
ACTIVITIES ................................................................................................................ 19
2.10
ACTIVITY MODELS .................................................................................................... 20
2.11
APPLIANCES .............................................................................................................. 21
2.12
SIMULATION PARAMETERS (GRID) ............................................................................ 22
2.13
PRICING SCHEMES ..................................................................................................... 23
2.14
DEMOGRAPHICS (GRID) ............................................................................................ 24
2.15
RUNS ......................................................................................................................... 26
2.16
CSNS ........................................................................................................................ 28
2.17
PROJECT .................................................................................................................... 28
2.18
SCENARIO .................................................................................................................. 29
2.19
INSTALLATION........................................................................................................... 31
2.20
PERSON ..................................................................................................................... 33
2.21
ACTIVITY .................................................................................................................. 34
2.22
ACTIVITY MODEL...................................................................................................... 36
2.23
APPLIANCE AND CONSUMPTION MODEL ................................................................... 39
2.24
SIMULATION PARAMETERS (FORM) ........................................................................... 41
2.25
PRICING SCHEME ....................................................................................................... 42
2.25.1
Page 4 of 75
SCALAR ENERGY PRICING ........................................................................................... 42
Grant Agreement No. 288429
D4.4.2 Cassandra Final Platform – Version 1.0
3
2.25.2
SCALAR ENERGY PRICING TIME ZONES ...................................................................... 44
2.25.3
COMBINED ENERGY AND POWER PRICING.................................................................. 45
2.25.4
ALL-INCLUSIVE PRICING ............................................................................................. 46
2.25.5
TIME-OF-USE PRICING ................................................................................................ 47
2.26
RUN........................................................................................................................... 49
2.27
CSN .......................................................................................................................... 50
TRAINING MODULE .................................................................................................. 53
3.1
IMPORT DATA TAB .................................................................................................... 54
3.1.1
3.2
USAGE WORKFLOW .......................................................................................................... 55
TRAINING ACTIVITY MODELS TAB............................................................................ 59
3.2.1
3.3
USAGE WORKFLOW .......................................................................................................... 61
CREATE RESPONSE MODELS TAB .............................................................................. 62
3.3.1
3.4
USAGE WORKFLOW .......................................................................................................... 63
EXPORT MODELS TAB ............................................................................................... 67
3.4.1
4
INSTALLATION MANUAL ........................................................................................ 73
4.1
5
USAGE WORKFLOW .......................................................................................................... 68
SECURING TOMCAT ................................................................................................... 73
SUMMARY..................................................................................................................... 75
Page 5 of 75
Grant Agreement No. 288429
D4.4.2 Cassandra Final Platform – Version 1.0
Table of Figures
Figure 1 CASSANDRA modules ............................................................................................... 9
Figure 2. Overall CASSANDRA platform technical architecture ........................................... 10
Figure 3: Login screen.............................................................................................................. 11
Figure 4: Main screen ............................................................................................................... 12
Figure 5: Cassandra and User libraries .................................................................................... 14
Figure 6 Activity diagram from creating a project to viewing the simulation results ............. 15
Figure 7: Projects grid .............................................................................................................. 16
Figure 8: Scenarios grid ........................................................................................................... 17
Figure 9: Installations grid ....................................................................................................... 18
Figure 10: Persons grid ............................................................................................................ 19
Figure 11: Activities grid ......................................................................................................... 20
Figure 12: Activity Models grid ............................................................................................... 21
Figure 13: Appliances grid ....................................................................................................... 22
Figure 14: Simulation parameters grid ..................................................................................... 23
Figure 15: Pricing schemes grid ............................................................................................... 24
Figure 16 Activity diagram for creating a dynamic scenario ................................................... 25
Figure 17: Demographics grid.................................................................................................. 26
Figure 18: Runs grid ................................................................................................................. 27
Figure 19: Comparison functionality ....................................................................................... 27
Figure 20: CSNs ....................................................................................................................... 28
Figure 21: Project form ............................................................................................................ 29
Figure 22: Scenario form.......................................................................................................... 30
Figure 23: Complete scenario .................................................................................................. 31
Figure 24: Installation form...................................................................................................... 32
Figure 25: Completed installation form ................................................................................... 33
Figure 26: Person form ............................................................................................................. 33
Figure 27: Completed person form .......................................................................................... 34
Figure 28: Activity form .......................................................................................................... 35
Figure 29: Completed activity form ......................................................................................... 36
Figure 30: Activity Model form ............................................................................................... 38
Figure 31: Completed activity model form .............................................................................. 39
Figure 32: Appliance form ....................................................................................................... 40
Figure 33: Completed appliance form ...................................................................................... 41
Figure 34: Simulation parameters form ................................................................................... 42
Figure 35: Scalar Energy Pricing form .................................................................................... 43
Figure 36: Scalar Energy Pricing Time Zones form ................................................................ 44
Figure 37: Combined Energy and Pricing form ....................................................................... 45
Figure 38: All Inclusive Pricing form ...................................................................................... 47
Figure 39: TOU pricing form ................................................................................................... 48
Figure 40: Run window ............................................................................................................ 49
Figure 41: CSN graph creation................................................................................................. 50
Figure 42: CSN clustering ........................................................................................................ 51
Figure 43: CSN result ............................................................................................................... 52
Figure 44: Training Module's Main Screen.............................................................................. 53
Figure 45: Import Data Tab ...................................................................................................... 55
Figure 46: Enabled setting after selecting the data file ............................................................ 56
Page 6 of 75
Grant Agreement No. 288429
D4.4.2 Cassandra Final Platform – Version 1.0
Figure 47 Imported data in case of installation ........................................................................ 57
Figure 48 Imported data in case of single appliance ................................................................ 58
Figure 49: Disaggregation results ............................................................................................ 59
Figure 50: Training Tab ........................................................................................................... 60
Figure 51: Results of training an example behaviour model ................................................... 61
Figure 52 Create Response Models tab .................................................................................... 63
Figure 53 Committing the pricing scheme ............................................................................... 64
Figure 54 Visualizing pricing scheme and choosing response model ..................................... 65
Figure 55 Response Preview .................................................................................................... 66
Figure 56 Export Models tab .................................................................................................... 68
Figure 57 Export Installation models ....................................................................................... 69
Figure 58 Export Person models .............................................................................................. 69
Figure 59 Export Appliance models......................................................................................... 70
Figure 60 Export Activity/Response models ........................................................................... 70
Figure 61 Connect to the Cassandra Server ............................................................................. 71
Figure 62 Exporting models as Base or Response installation ................................................ 72
Page 7 of 75
Grant Agreement No. 288429
D4.4.2 Cassandra Final Platform – Version 1.0
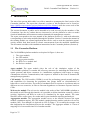
1 Introduction
The aim of the present deliverable is to offer a manual to accompany the final version of the
Cassandra platform. The up-to-date electronic version of this document can be found at:
https://github.com/cassandra-project/platform/wiki/User-Manual, while the source code of the
platform is located at: https://github.com/cassandra-project/platform.
The current document is public and is intended to be read, not only by the members of the
Consortium, but also by readers that are interested to use the platform in order to model
electrical installations and consumers and run demand side management scenarios.
The report corresponds to the user manual of the platform (Section 2), with each subsection
corresponding to each entity modelled through the platform. Section 3 contains the manual of
the training module, an external application that can be used to train the simulation agents‟
activity models form data based on electric measurements from the modelled installations.
The document concludes with installation instructions for the Cassandra platform (Section 4).
1.1 The Cassandra Platform
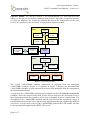
The CASSANDRA platform modules are depicted in Figure 1; these are:
1.
2.
3.
4.
5.
The Agent module,
the CSN module,
the Aggregation module,
the Web service module and
the End-user module.
Agent module The agent module plays the role of the simulation engine of the
CASSANDRA platform. It contains the necessary structures for modelling the behaviour of
agents (persons) and object constructs (i.e. installations, appliances) with respect to energy
consumption activities, communication, and response to stimuli in the form of demand side
management programmes.
CSN module. The CSN module (CSNM) is a tool for performing general network analyses
and capabilities for clustering the population into groups based on (dis)similarities of
behaviour or social activities. It provides a benchmark tool for experts to experiment and test
different use case scenarios, in order to fine-tune hypotheses on consumer response based on
CSNs.
Web-service module. The web service module is the socket of the CASSANDRA platform to
the outside world. Through this interface it is possible to define simulation scenarios, policies
(pricing, legislative) and KPIs in order to be simulated by the agent module. The same
interface can be used to query for results and for post-simulation reporting and analysis.
Aggregation module. The aggregation module serves as the interface between the agent
module (simulation engine), the CSN module (graph/clustering studies) and the web-service
module (API). Even though it is depicted as a box in Figure 1, it is actually the wrapper code
that implements the interactions between the modules. The aggregate module is a form of
mapping I/O of one module into I/O of another module.
Page 8 of 75
Grant Agreement No. 288429
D4.4.2 Cassandra Final Platform – Version 1.0
End-user module. The end-user module is an implementation of a front end-client that
adheres to the web-service module communication protocol. It provides a graphical interface
for using the platform. We should also mention that due to the incorporation of the webservices it is possible for any developer to implement an end-user module.
Agent
module
Entity
module
Behavior
module
+
Communication
module
Consumption
module
+
Response
module
CSN module
CSN
Participation
module
+
CSN Analysis
module
Web service
module
Policy module
Aggregation
module
Scenario
module
+
KPI module
End-user module
Reporting
module
Administration
module
Assessment
module
Figure 1 CASSANDRA modules
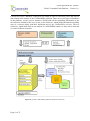
The overall CASSANDRA platform architecture as projected from the conceptual
CASSANDRA platform (Figure 1) is depicted in Figure 2. Besides the aforementioned
CASSANDRA modules, several technical layers have been introduced from the conceptual to
the implementation design.
As proposed, the CASSANDRA platform was designed to follow the Software-as-a-Service
paradigm, where the software along with its data will be hosted on the cloud and access to
their computational and data resources will be met, on-demand, by users via thin clients. The
decoupling of the CASSANDRA platform and the end-user interface introduced a layer of
communication between the server and the client implemented through a lightweight RESTful
web-service. For the final version of the CASSANDRA platform the CSN module will also
be incorporated and supplied with a REST API as well.
Page 9 of 75
Grant Agreement No. 288429
D4.4.2 Cassandra Final Platform – Version 1.0
Last but not least, a database component was added in order to efficiently store and retrieve
data related to the entities of the CASSANDRA platform. There are several types of databases
in the platform: (a) the projects database, which holds all the modelling information to run
the scenarios defined by the user, (b) the results database, which holds information regarding
runs of a scenario along with their definition and (c) the CASSANDRA and user libraries
databases, which hold ready-to-use models of CASSANDRA entities so they can be used and
re-used in different scenarios.
Figure 2. Overall CASSANDRA platform technical architecture
Page 10 of 75
Grant Agreement No. 288429
D4.4.2 Cassandra Final Platform – Version 1.0
2 CASSANDRA Final Platform Manual
This section is the user guide for the current version of the Cassandra platform. The source
code of the platform is located at: https://github.com/cassandra-project/platform. A working
version of the platform can be found at: https://cassandra.iti.gr:8443/cassandra/app.html.
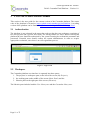
2.1 Authentication
The platform is user-oriented in the sense that each user has her own workspace consisting of
her own projects and a private user library for storing entities for reuse. Before entering the
platform the user should be authorized by the system inserting her credentials (username and
password). Potential users should contact the system administrator in order to acquire
appropriate credentials, since there is no self-registration process.
Figure 3: Login screen
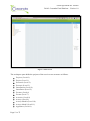
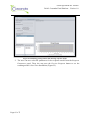
2.2 Workspace
The Cassandra platform user interface is separated into three panes:
1. The projects' or workspace pane, at the left of the screen (My Projects),
2. the working pane at the middle of the screen (Main Panel) and the
3. libraries pane on the right part of the screen (Libraries).
The libraries pane includes both the User library tree and the Cassandra library tree.
Page 11 of 75
Grant Agreement No. 288429
D4.4.2 Cassandra Final Platform – Version 1.0
Figure 4: Main screen
The workspace pane holds the projects of the user in a tree structure as follows:
Projects (Level 0)
Project (Level 1)
Scenarios (Level 2)
Scenario (Level 3)
Installations (Level 4)
Installation (Level 5)
Persons (Level 6)
Person (Level 7)
Activities (Level 8)
Activity (Level 9)
Activity Models (Level 10)
Activity Model (Level 11)
Appliances (Level 6)
Page 12 of 75
Grant Agreement No. 288429
D4.4.2 Cassandra Final Platform – Version 1.0
Appliance and Consumption Model (Level 7)
Simulation Parameters (Grid) (Level 4)
Simulation Parameters (Form) (Level 5)
Demographics (Grid) (Level 4)
Demographics (Form) (Level 5)
Pricing Schemes (Level 2)
Pricing Scheme (Level 3)
CSNs (Level 2)
CSN (Level 3)
Runs (Level 2)
Run (Level 3)
Each tree node represents an entity. The user should click on the links to see instructions
about individual entities. Double-clicking a node opens it in a tab on the working pane.
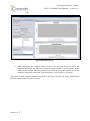
2.3 Libraries
The libraries (User and Cassandra) contain pre-specified entities that can be drag'n'dropped
into working scenarios to facilitate scenario building (Figure 5). The supported entities are of
type:
Installation (along with its Person and Appliance entities and their children entities),
Person (along with its children entities)
Appliance (along with its Consumption Model)
Activity Model (along with their Distributions)
Pricing Schemes
The User library is a read-write library, i.e. a library that the user can store and retrieve
entities, while the Cassandra library is read-only, meaning that the user can only get entities
and not put.
Once a model is placed from a library into a scenario or vice-versa, a copy of the entity is
created under the scenario, which can be further customised according to user needs. The user
can also store models produced in any scenario from the workspace into the user library for
future use. The Cassandra library is updated by system administrators only. In general,
copies are recursive (deep copies), that is they copy recursively all the entities under the entity
being dragged'n'dropped. If the user would like to create a shallow copy, then the Shift key
must be kept pressed while dragging and dropping an entity. With respect to deep-copying
there is an exception as far as the Activity Models are concerned. In general when an entity is
dragged‟n‟dropped that includes Activity Models (i.e. Activity Model, Activity, Person) the
appliances listed to participate in the Activity Model are not copied and are dropped from the
copied Activity Model, since the entity under consideration does not include them. On the
other hand if a scenario or an installation is dragged‟n‟dropped, the Activity Models carries
the appliances because they are copied as well.
Page 13 of 75
Grant Agreement No. 288429
D4.4.2 Cassandra Final Platform – Version 1.0
Figure 5: Cassandra and User libraries
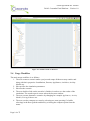
2.4 Usage Workflow
The main usage workflow is as follows:
1. The user creates a scenario under a project and setups all the necessary entities and
along with their properties: Installations, Persons, Appliances, Activities, Activity
Models etc.
2. She specifies the simulation parameters.
3. She runs the scenario.
4. The user double-clicks on the run after it finishes in order to see the results of the
simulation. The results open in a new tab on the browser window.
5. The user can run alternative scenarios by changing for example Appliances, Activity
Models, Pricing Schemes etc.
6. The user can also compare two runs by selecting two runs (pressing Ctrl while
selecting) in the Runs grid tab and then by selecting the compare option from the
menu.
Page 14 of 75
Grant Agreement No. 288429
D4.4.2 Cassandra Final Platform – Version 1.0
It is possible to automatically compute model parameters based on measurements obtained
from actual consumer installations. This will allow analysis of consumption, as well as the
accurate simulation of a range of „what if‟ type scenarios. The Training and Response module
will be responsible for this process. An activity model of the process can be found in Figure 6.
Figure 6 Activity diagram from creating a project to viewing the simulation results
Page 15 of 75
Grant Agreement No. 288429
D4.4.2 Cassandra Final Platform – Version 1.0
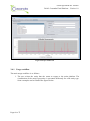
2.5 Projects
The workspace consists of Projects. Every project contains scenarios relevant to the project
and runs (simulation executions) of those scenarios.
By double-clicking the Projects node, the user can see in a grid the projects of the workspace
(Figure 7). The available commands are to create a new one and edit or delete an existing one,
by first selecting the corresponding row and then pressing either edit or delete. The user can
also edit a project by double clicking the corresponding row. A similar grid exists for all other
entities in CASSANDRA platform.
Figure 7: Projects grid
2.6 Scenarios
Scenarios enclose information about electrical loads, consumers and their behavior, as well as
simulation parameters. A project can have multiple scenarios, corresponding to different
consumer setup, simulation parameters etc.
Page 16 of 75
Grant Agreement No. 288429
D4.4.2 Cassandra Final Platform – Version 1.0
By double-clicking the Scenarios node, the user can see in a grid the scenarios of the project
(Figure 8). The available commands are to create a new one and edit or delete an existing one,
by first selecting the corresponding row and then pressing either edit or delete.
Figure 8: Scenarios grid
2.7 Installations
By double-clicking the Installations node, the user can see a grid with the installations of the
scenario (Figure 9). Examples of Installations include households, buildings, individual rooms
and generally, loads that lie beneath a metering point. Installations are containers of
Appliances that have associated Consumption Models and Persons that have associated
Activity Models for Appliance usage.
The available commands are to create a new installation and edit or delete an existing one, by
first selecting the corresponding row and then pressing either edit or delete.
Page 17 of 75
Grant Agreement No. 288429
D4.4.2 Cassandra Final Platform – Version 1.0
Figure 9: Installations grid
2.8 Persons
By double-clicking the Persons node, the user can see a grid with the persons of an
installation (Figure 10). The available commands are to create a new one and edit or delete an
existing one, by first selecting the corresponding row and then pressing either edit or delete.
Page 18 of 75
Grant Agreement No. 288429
D4.4.2 Cassandra Final Platform – Version 1.0
Figure 10: Persons grid
2.9 Activities
A person can have one or more associated Activities. These describe how a person uses the
Appliances in an Installation. By double-clicking the Activities node, the user can see a grid
with the activities of a person (Figure 11). The available commands are to create a new one
and edit or delete an existing one, by first selecting the corresponding row and then pressing
either edit or delete.
Page 19 of 75
Grant Agreement No. 288429
D4.4.2 Cassandra Final Platform – Version 1.0
Figure 11: Activities grid
2.10 Activity Models
Activities consist of Activity Models that include probability distributions for the start time
and duration of use of Appliances.
By double-clicking the Activity Models node, the user can see a grid with the activity models
of a given activity (Figure 12). The available commands are to create a new one and edit or
delete an existing one, by first selecting the corresponding line and then pressing either edit or
delete.
Page 20 of 75
Grant Agreement No. 288429
D4.4.2 Cassandra Final Platform – Version 1.0
Figure 12: Activity Models grid
2.11 Appliances
By double-clicking the Appliances node, the user can see a grid with the appliances of an
installation (Figure 13). The available commands are to create a new one and edit or delete an
existing one, by first selecting the corresponding row and then pressing either edit or delete.
Page 21 of 75
Grant Agreement No. 288429
D4.4.2 Cassandra Final Platform – Version 1.0
Figure 13: Appliances grid
2.12 Simulation Parameters (Grid)
By double-clicking the Simulation Parameters node, the user can see a grid with the
simulation parameters corresponding to a scenario (Figure 14). The available commands are
to create a new one and edit or delete an existing one, by first selecting the corresponding row
and then pressing either edit or delete.
Page 22 of 75
Grant Agreement No. 288429
D4.4.2 Cassandra Final Platform – Version 1.0
Figure 14: Simulation parameters grid
2.13 Pricing Schemes
By double-clicking the Pricing Schemes node, the user can see a grid with the pricing
schemes of a scenario (Figure 15). The available commands are to create a new one and edit
or delete an existing one, by first selecting the corresponding row and then pressing either edit
or delete.
Page 23 of 75
Grant Agreement No. 288429
D4.4.2 Cassandra Final Platform – Version 1.0
Figure 15: Pricing schemes grid
2.14 Demographics (Grid)
The Demographics (node) is included when the scenario is chosen to be a dynamic one. In
this case the user does not build the installations one by one, but rather builds a Collection
installation with a lot of appliances and person types, adding statistics on the distribution of
appliances and person types among the generated installations. This way it is easy to construct
a variety of installations in the order to 1K, 10K or more installations in an automated
manner.
The process is as follows (Figure 16):
1. Declare the scenario as dynamic. A Demographics node will appear.
2. Create one installation with the name Collection.
3. Add in the Collection as many persons (with activities and activity models) and
appliances (with consumption models) you wish.
4. Create a demographics parameter set.
5. Set the number of entities (Installations for now) you wish to create.
Page 24 of 75
Grant Agreement No. 288429
D4.4.2 Cassandra Final Platform – Version 1.0
6. Drag and drop persons and appliances from the Collection installation to the grid
Entities, also setting their probability of participating. The probabilities for person
types should sum up to 1, while probabilities for each appliance should be between 0
and 1.
Figure 16 Activity diagram for creating a dynamic scenario
By double-clicking on the Demographics node, the user can see a grid with the demographics
parameter sets of a dynamic scenario (Figure 17). The available commands are to create a
new one and edit or delete an existing one, by first selecting the corresponding row and then
pressing either edit or delete.
Page 25 of 75
Grant Agreement No. 288429
D4.4.2 Cassandra Final Platform – Version 1.0
Figure 17: Demographics grid
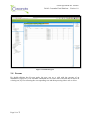
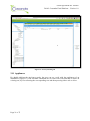
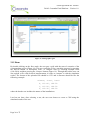
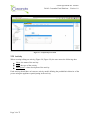
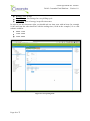
2.15 Runs
By double-clicking on the Runs node, the user gets a grid with the runs of scenarios of the
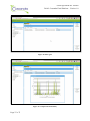
corresponding project (Figure 18). The user can delete a Run, watch the progress by pressing
the Refresh button of incomplete Runs, or compare runs by selecting multiple Runs
(Ctrl+click) and then pressing the Compare button (Figure 19). Through this tab the user can
also upload a file with electrical measurements in order to compare it with the simulation
results. The format of the uploaded file should be CSV and it structure should be like the
following example:
minute, inst1, inst2
0, 123.00, 100.50
1, 123.50, 100.50
2, 120.32, 100.50
where the header row includes the names of the installations.
Last but not least, after selecting a run, the user can choose to create a CSN using the
simulated results of the run.
Page 26 of 75
Grant Agreement No. 288429
D4.4.2 Cassandra Final Platform – Version 1.0
Figure 18: Runs grid
Figure 19: Comparison functionality
Page 27 of 75
Grant Agreement No. 288429
D4.4.2 Cassandra Final Platform – Version 1.0
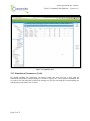
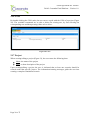
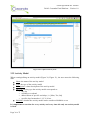
2.16 CSNs
By double-clicking the CSNs node, the user can see a grid with the CSNs of a project (Figure
20). The available commands are to edit or delete an existing one, by first selecting the
corresponding row and then pressing either edit or delete.
Figure 20: CSNs
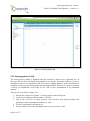
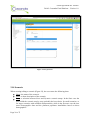
2.17 Project
When creating/editing a project (Figure 21), the user enters the following data:
Name: the name of the project
Notes: a short description of the project
Upon creating/editing a project the user is informed that at least one scenario should be
created under that specific project. The information/warning messages guide the user into
creating a complete simulation scenario.
Page 28 of 75
Grant Agreement No. 288429
D4.4.2 Cassandra Final Platform – Version 1.0
Figure 21: Project form
2.18 Scenario
When creating/editing a scenario (Figure 22), the user enters the following data:
Name: the name of the scenario
Notes: a short description of the scenario
Setup: a selection between Static and Dynamic scenario setups. In the Static case the
user builds the scenario step-by-step (probably the best choice for small scenarios, or
for larger scenarios with available measurements), while in the Dynamic case the user
enters demographic data and the platform populates installations based on those
demographics.
Page 29 of 75
Grant Agreement No. 288429
D4.4.2 Cassandra Final Platform – Version 1.0
Each scenario should have at least one complete installation and the necessary simulation
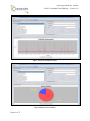
parameters set so that it can be simulated.
Figure 22: Scenario form
In a complete scenario, the user may observe statistics on person types and appliances
comprising the scenario (pie chart diagrams - Figure 23).
Page 30 of 75
Grant Agreement No. 288429
D4.4.2 Cassandra Final Platform – Version 1.0
Figure 23: Complete scenario
2.19 Installation
When creating/editing an installation (Σθάλμα! Το αρτείο προέλεσζης ηης αναθοράς δεν
βρέθηκε., Figure 25), the user enters the following data:
Name: the name of the installation
Type: the type of the installation
Description: a description of the installation
Transformer ID: a label indicating the ID of the transformer under which the
installation is located.
Location: the location of the installation
Lat: the latitude of the installation's geolocation
Long: the longitude of the installation's geolocation
Each installation should be consisted of at least one complete person and appliance.
Page 31 of 75
Grant Agreement No. 288429
D4.4.2 Cassandra Final Platform – Version 1.0
Figure 24: Installation form
Page 32 of 75
Grant Agreement No. 288429
D4.4.2 Cassandra Final Platform – Version 1.0
Figure 25: Completed installation form
2.20 Person
When creating/editing a person (Σθάλμα! Το αρτείο προέλεσζης ηης αναθοράς δεν
βρέθηκε., Figure 27), the user enters the following data:
Name: the name of the person
Type: the type of the person
Description: a short description of the person
Figure 26: Person form
Page 33 of 75
Grant Agreement No. 288429
D4.4.2 Cassandra Final Platform – Version 1.0
Figure 27: Completed person form
2.21 Activity
When creating/editing an activity (Figure 28, Figure 29), the user enters the following data:
Name: the name of the activity
Type: the type of the activity
Description: a short description of the activity
Each activity should have at least one activity model defining the probabilistic behavior of the
person using the appliances participating in the activity.
Page 34 of 75
Grant Agreement No. 288429
D4.4.2 Cassandra Final Platform – Version 1.0
Figure 28: Activity form
Page 35 of 75
Grant Agreement No. 288429
D4.4.2 Cassandra Final Platform – Version 1.0
Figure 29: Completed activity form
2.22 Activity Model
When creating/editing an activity model (Figure 30, Figure 31), the user enters the following
data:
Name: the name of the activity model
Type: the type of the activity model
Description: a short description of the activity model
Day type: the day type the activity model corresponds to:
o any day
o weekday or weekend
o abbreviations of specific weekdays, i.e. [Mon, Tue, Sat]
o specific days formated as 1/12, 31/10 etc.
Shiftable: whether the activity model can be considered shiftable or not
It is important to note that for every activity and every time tick only one activity model
is fired.
Page 36 of 75
Grant Agreement No. 288429
D4.4.2 Cassandra Final Platform – Version 1.0
So if you have specified in an activity one activity model of Day type any and one of Day
type weekdays and the simulation day is Monday then the more specific of the two will be
fired, i.e. the activity model with Day type weekdays.
For every activity model the user can drag-n-drop appliances that participate in it.
To complete the activity model the user must provide the properties and parameters of three
distributions that specify an activity model:
Duration,
Start-time, and
Number of times per day,
All the above are probabilistic models of how long the activity takes, at what time in day it
starts and how many times per day is executed.
For the first two characteristics the user can select between several types of distributions:
Uniform Distribution, in the form of an expression with start and end values:
[{"start":100,"end":200}]
Histogram, in the form of values: [1,2,3,4...]
Normal Distribution, in the form of an expression with mean and std values:
[{"mean":45,"std":10}]
Gaussian Mixture Models, in the form of tuples of w, mean and std: [{"w":0.5 ,
"mean":45,"std":10}, {"w":0.5 , "mean":100,"std":10}]
Another important note is that in GMMs weights should sum up to 1.
Under normal system operation, these distributions will be automatically computed via
measurements obtained from the actual installation, or by altering an Activity Model found in
the Libraries.
Page 37 of 75
Grant Agreement No. 288429
D4.4.2 Cassandra Final Platform – Version 1.0
Figure 30: Activity Model form
Page 38 of 75
Grant Agreement No. 288429
D4.4.2 Cassandra Final Platform – Version 1.0
Figure 31: Completed activity model form
2.23 Appliance and Consumption Model
When creating/editing an appliance (Figure 32, Figure 33), the user enters the following data:
Name: the name of the appliance
Type: the type of the appliance
Description: a short description of the appliance
Energy Class: the energy class of the appliance
Stand By: the stand-by consumption power
Base: whether the appliance constitutes a base load
Shiftable: whether the appliance is shiftable
Controllable: whether the appliance is controllable
and with respect to the consumption model:
Name: the name of the consumption model
Description: a short description of the consumption model
P-Expression: the expression that provides the active power curve
Q-Expression: the expression that provides the re-active power curve
Page 39 of 75
Grant Agreement No. 288429
D4.4.2 Cassandra Final Platform – Version 1.0
P-Expression and Q-Expression have the following form:
{m {n1 [p1,d1,s1] [p2,d2,s2]}, {n2 [p3,d3,s3]}, ...}
and
{m {n1 [q1,d1,s1] [q2,d2,s2]}, {n2 [q3,d3,s3]}, ...}
respectively, with:
p: active power
q: reactive power
d: duration in minutes
s: slope
Tuples p1 and p2 will be executed for n1 timesteps and then p3 tuple for n2 timesteps. Those
n1*2+n2 timesteps (since there will be n1 steps for p1/q1 and n1 steps for p2/q2) will be
executed m times. Of course there can be n3, n4 etc. For loops we can set either m or n to 0.
For example, lamp: {m=0 {n1=1 [60,1,0]}}, refrigerator:
{"n":0,"params":[{"n":1,"values":[{"p":140,"d":20,"s":0},{"p":117,"d":18,"s":0},{"p":0,"d":7
3,"s":0}]}]}
Every appliance should have a consumption model.
Figure 32: Appliance form
Page 40 of 75
Grant Agreement No. 288429
D4.4.2 Cassandra Final Platform – Version 1.0
Figure 33: Completed appliance form
2.24 Simulation Parameters (Form)
When creating/editing simulation parameters (Figure 34), the user enters the following data:
Name: the name of the parameters set
Location: the location of the simulation
Monte Carlo Runs: how many times will the simulation run
Date Started: the starting date of the simulation
Date Ends: the ending date of the simulation
Response Type: Choices are None, Optimal, Normal and Discrete. Consult the
theoretical models deliverable for specifics on each one of the choices.
Notes: notes on the simulation parameters set
CO2 factor per KWh: this factor is multiplied per KWh in order to provide th CO2
emissions KPI in the results.
Pricing Scheme: the pricing scheme under which the energy consumption of the
installations will be billed. The pricing scheme is inserted through drag'n'drop from
the Pricing Schemes nodes.
Page 41 of 75
Grant Agreement No. 288429
D4.4.2 Cassandra Final Platform – Version 1.0
Baseline Pricing Scheme: pricing scheme needed when the user would like to have a
demand response scenario. The pricing scheme is inserted through drag'n'drop from
the Pricing Schemes nodes.
In order to perform a DR simulation Response Type should be other than None and both
Pricing Scheme and Baseline Pricing Scheme should be present.
Figure 34: Simulation parameters form
2.25 Pricing Scheme
The CASSANDRA platform at the moment supports five pricing schemes:
Scalar Energy Pricing
Scalar Energy Pricing with Off-peak time zones
Combined Energy and Power Pricing
All-Inclusive Pricing
Time-Of-Use Pricing
The schemes are presented in the Sections below along with examples.
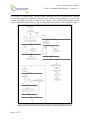
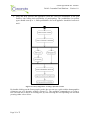
2.25.1 Scalar Energy Pricing
The properties that need to be filled by the user are (Figure 35):
Name: the name of the scheme
Type: Scalar Energy Pricing
Description: a short description of the scheme
Page 42 of 75
Grant Agreement No. 288429
D4.4.2 Cassandra Final Platform – Version 1.0
Billing Cycle: in days
Fixed Charge: fixed charge for every billing cycle
Levels: pairs of price and energy levels
For example:
Billing cycle: 4 months
Measured consumption: 1500 kWh
Fixed charge: 15
Price Level 1: [500 Kwh,0.06]
Price Level 2: [400 Kwh,0.07]
Price Level 3: [400 Kwh,0.08]
Price Level 4: [0.1]
Cost = 0.06 * 500 + 0.07 * 400 + 0.08 * 400 + 0.01 * 200 + 15 = 125
Figure 35: Scalar Energy Pricing form
Page 43 of 75
Grant Agreement No. 288429
D4.4.2 Cassandra Final Platform – Version 1.0
2.25.2 Scalar Energy Pricing Time Zones
The properties that need to be filled by the user are (Figure 36):
Name: the name of the scheme
Type: Scalar Energy Pricing Time Zones
Description: a short description of the scheme
Billing Cycle: in days
Fixed Charge: fixed charge for every billing cycle
Levels: pairs of price and energy levels
Offpeak: define the off peak hours of pricing
Figure 36: Scalar Energy Pricing Time Zones form
For example:
Billing cycle: 4 months
Measured consumption: 1000 kWh in peak and 500 Kwh in off-peak
Fixed charge: 15
Price Level 1: [500 Kwh,0.06]
Price Level 2: [400 Kwh,0.07]
Price Level 3: [400 Kwh,0.08]
Price Level 4: [0.1]
Offpeak price: [0.05]
Page 44 of 75
Grant Agreement No. 288429
D4.4.2 Cassandra Final Platform – Version 1.0
Cost = 0.06 * 500 + 0.07 * 400 + 0.08 * 100 + 0.05 * 500 + 15 = 105
2.25.3 Combined Energy and Power Pricing
The properties that need to be filled by the user are (Figure 37):
Name: the name of the scheme
Type: Combined Energy and Power Pricing
Description: a short description of the scheme
Billing Cycle: in days
Fixed Charge: fixed charge for every billing cycle
Contracted Capacity: The contracted power capacity
Energy Price: The price of energy consumed
Power Price: The power pricing of the contracted capacity
Figure 37: Combined Energy and Pricing form
Page 45 of 75
Grant Agreement No. 288429
D4.4.2 Cassandra Final Platform – Version 1.0
For example:
Billing cycle: 1 month
Measured consumption: 350 kWh with contracted capacity of 10kW
Fixed charge: 2
Energy price: 0.08
Power price: 2.5
Cost = 0.08 * 350 + 2.5 * 10 + 2 = 55
2.25.4 All-inclusive pricing
The properties that need to be filled by the user are (Figure 38):
Name: the name of the scheme
Type: All-inclusive pricing
Description: a short description of the scheme
Billing Cycle: in days
Fixed Charge: fixed charge for every billing cycle
Contracted Energy: The contracted energy
Fixed cost: The price of energy contracted
Additional cost: The price of additional energy
Page 46 of 75
Grant Agreement No. 288429
D4.4.2 Cassandra Final Platform – Version 1.0
Figure 38: All Inclusive Pricing form
For example:
Billing cycle: 1 month
Fixed charge: 0
Measured consumption: 300 kWh
Fixed cost for contracted kWh consumption: 20
Energy price for additional consumption above the contracted: 0.25
Contracted consumption: 200
Cost = 20 + 0.25 * 100 + 0 = 45
2.25.5 Time-Of-Use pricing
The properties that need to be filled by the user are (Figure 38):
Name: the name of the scheme
Type: TOU pricing
Description: a short description of the scheme
Page 47 of 75
Grant Agreement No. 288429
D4.4.2 Cassandra Final Platform – Version 1.0
Billing Cycle: in days
Fixed Charge: fixed charge for every billing cycle
Timezones: price of energy in specific timezones
In order to set the timezones right, you should end one time zone with an hour (for example
18:00) and start the other timezone with the ending time (18:00 in the example). So a valid
scheme would be:
00:00 - 17:00
17:00 - 23:00
23:00 - 00:00
Figure 39: TOU pricing form
Page 48 of 75
Grant Agreement No. 288429
D4.4.2 Cassandra Final Platform – Version 1.0
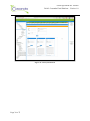
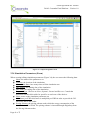
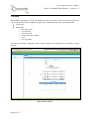
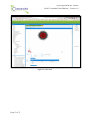
2.26 Run
When double-clicking on a Run, the platform opens a new tab in the browser where the user
can see the results of the simulation (Figure 40). In particular the user is presented with:
Load curves
Initial KPIs
o Max Power (W)
o Avg Peak (W)
o Avg Power (W)
o Energy consumed (KWh)
o Cost
o CO2 (kg/KWh)
The run also includes a snapshot of the scenario entities, the moment it was ordered to run by
the user.
Figure 40: Run window
Page 49 of 75
Grant Agreement No. 288429
D4.4.2 Cassandra Final Platform – Version 1.0
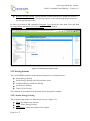
2.27 CSN
In the Runs grid the user can select a Run and create a CSN. The first step is to input the
parameters for graph clustering:
Graph Type
Minimum Weight
Run ID (inserted by default)
No edges (Boolean)
Figure 41: CSN graph creation
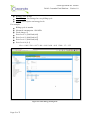
After the CSN graph is created, clustering takes place. The clustering parameters are:
Name
Cluster Based On
Cluster Method, select between Kmeans, Hierachical, Graph edge betweenness
n (number of clusters)
Page 50 of 75
Grant Agreement No. 288429
D4.4.2 Cassandra Final Platform – Version 1.0
Figure 42: CSN clustering
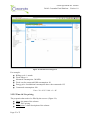
After clustering takes place the user can choose to provide different pricing schemes (main
and baseline) to each cluster in order to have more targeted demand response simulations.
Page 51 of 75
Grant Agreement No. 288429
D4.4.2 Cassandra Final Platform – Version 1.0
Figure 43: CSN result
Page 52 of 75
Grant Agreement No. 288429
D4.4.2 Cassandra Final Platform – Version 1.0
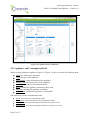
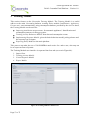
3 Training Module
This section focuses on the Cassandra Training Module. The Training Module is a useful
add-on to the main Cassandra platform, creating Entity models (Installations, Appliances,
Persons etc.) semi-automatically, using consumption datasets provided by the user. In detail,
the Training Module can be used for:
Importing installation measurements, for automatic appliances‟ identification and
consumption patterns via Disaggregation.
Training Activity Behaviour Models from detected consumption events.
Implementing Response Models, given the basic behaviour model, pricing scheme and
the response type as inputs.
Exporting Entity Models to the main platform.
This process can make the use of CASSANDRA much easier for a naïve user, who may not
be an expert on Power Systems.
The Training Module user interface is separated into four tabs (as seen in Figure 44):
1.
2.
3.
4.
Import Data
Training Activity Models
Create Response Models
Export Models
Figure 44: Training Module's Main Screen
Page 53 of 75
Grant Agreement No. 288429
D4.4.2 Cassandra Final Platform – Version 1.0
The user should note that not all of the tabs are enabled when launching the Training Module,
in order to guide the user over the procedure, making sure that the correct steps are followed.
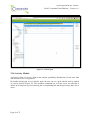
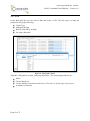
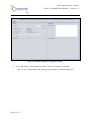
3.1 Import Data Tab
Import Data Tab is used in order to import available installation consumptions into the
Training Module. It is comprised by 4 different panels, each used for choice selection or data
visualization (Figure 45).
Data File Panel: This panel is used for choosing the data files of the available
installation measurements, as well as several data attributes, which will help parsing
the data set. The dataset can contain either consumption data from a single appliance
(if plug-wise measurements are available) or from an installation as a whole.
It is recommended that the measurements included in the file are both of active and
reactive power, in order for the disaggregation to work optimally. In case only active
power measurements are available, the resulting appliance identification shall be
suboptimal.
In case of a single appliance, the consumption model of the appliance should be
provided, in order to create the consumption event dataset.
Disaggregation Panel: This panel contains the detected appliance(s) from the
disaggregation process.
Data Preview Panel: The consumption data contained in the file is visualized in this
panel, so that the user has a first overview over the selected data set. The visualization
shows the time series of the active and the reactive power, if available.
Consumption Model Panel: In this panel, the consumption model of the selected
appliance from the (detected) appliances list is presented here. The visualization
shows both the consumption pattern for the active and the reactive power of the
model.
Page 54 of 75
Grant Agreement No. 288429
D4.4.2 Cassandra Final Platform – Version 1.0
Figure 45: Import Data Tab
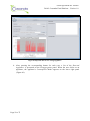
3.1.1 Usage workflow
The main usage workflow is as follows:
1. The user browses through her files to choose the data file with the consumption
measurements of an installation or a single appliance. The allowed file types for the
consumption data sets are .xls (excel files) and .csv (comma separated files). More
details on the structure of the files can be found in the Specifications Document
[D3.6].
2. The file selection enables the Data Parameters buttons (Figure 46). These buttons
allow for the user to provide some more details on the data contained within the
chosen file: The source of data measurements (installation or single appliance in case
of plug-wises) and the type of measurements (Active and Reactive Power).
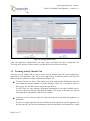
After setting the parameters, the user should press the import button which is
responsible for parsing the provided file and visualizing the data. In case of an error in
the data file, the parser returns an error message, including the line where the error
was found, to help the user fix the erroneous data entry.
Also, the Export tab is enabled, even though the only exportable entities up to now
should be the installation and the equivalent person inhabiting it.
Page 55 of 75
Grant Agreement No. 288429
D4.4.2 Cassandra Final Platform – Version 1.0
Figure 46: Enabled setting after selecting the data file
3. Given the choice of measurements' source, one of two buttons is enabled:
In case of installation, the Disaggregation button is enabled (Figure 47).
Page 56 of 75
Grant Agreement No. 288429
D4.4.2 Cassandra Final Platform – Version 1.0
Figure 47 Imported data in case of installation
In case of a single appliance, the user must provide the file containing the
appliance‟s Consumption Model. After that, the Create Event button is enabled
(Figure 48).
Page 57 of 75
Grant Agreement No. 288429
D4.4.2 Cassandra Final Platform – Version 1.0
Figure 48 Imported data in case of single appliance
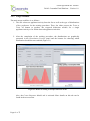
4. After pressing the corresponding button for each case, a list of the Detected
Appliances is presented on the Disaggregation panel. When the user clicks on an
appliance, the appliance‟s Consumption Model appears on the lower right panel
(Figure 49).
Page 58 of 75
Grant Agreement No. 288429
D4.4.2 Cassandra Final Platform – Version 1.0
Figure 49: Disaggregation results
After the appliances identification, the data import procedure has been completed. The
Training tab is activated. More details over this tab can be on the next section.
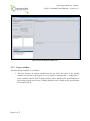
3.2 Training Activity Models Tab
Training Activity Models tab is used to create activity models from the events imported or
detected for each appliance. This tab is also comprised by 4 different panels, each used for
different choice selections or data visualizations (Figure 50).
Training Parameters Panel: This panel is used for choosing the distributions used for
each behaviour model attribute at model training. There are 3 alternative choices:
Histogram, Normal Distribution and Gaussian Mixture.
For the Times per Day attribute, Histogram Distribution is the only available choice,
since the values are discrete and small in number. The usage of the other two options
would produce suboptimal results for this variable.
Appliance/Activity Selection Panel: In this panel, the list of the detected appliances is
presented.
In case of a single appliance, the list contains the same appliance with the appliance on
the previous tab. In case of an installation, the activities that were identified as a result
Page 59 of 75
Grant Agreement No. 288429
D4.4.2 Cassandra Final Platform – Version 1.0
of the disaggregation process are presented. These activities encapsulate all the
installation's detected appliances presented in the previous tab.
Distribution Preview Panel: After training behaviour models, this panel presents the
distributions produced during the training procedure for the selected
appliance/activity. There are 4 buttons, each corresponding to a different activity
attribute: Daily Times, Duration, Start Time and Start Time Binned Distribution.
The last distribution is produced by aggregating the Start Time Distribution in 10minutes intervals and is used only for better visualization purposes (meaning this
distribution is not used in the modelling of the activities/appliances)
Example Consumption Model Panel: Same as the previous page. In case of an activity,
the panel presents the consumption model of the first appliance in the activity's
appliance list, in order to give a representative sample of the activity‟s consumption.
Figure 50: Training Tab
Page 60 of 75
Grant Agreement No. 288429
D4.4.2 Cassandra Final Platform – Version 1.0
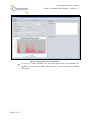
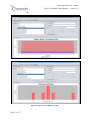
3.2.1 Usage workflow
The main usage workflow is as follows:
1. The user selects an appliance/activity from the list as well as the type of distributions
of her preference for the training procedure. Then, she either presses the Train or
Train All button to produce the expected behaviour models for a single
appliance/activity or for all the detected appliances/activities.
2. After the completion of the training procedure, the distributions are graphically
presented in the Distribution Preview panel and the buttons for choosing which
distribution should become enabled (Figure 51).
Figure 51: Results of training an example behaviour model
Also, the Create Response Models tab is activated. More details on this tab can be
found in the next section.
Page 61 of 75
Grant Agreement No. 288429
D4.4.2 Cassandra Final Platform – Version 1.0
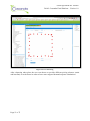
3.3 Create Response Models Tab
Create Response Models tab is responsible for the creation of new behaviour models resulting
from providing monetary incentives to the customer in order to change her consumption
patterns. In order to do so, the pricing scheme and the response type must be provided.
It comprises 5 different panels, each used for choice selection or data visualization, as before
(Figure 52).
Response Parameters Panel: This panel is used for choosing the parameters that
matter as far as the response of the customer to certain incentives (monetary or
otherwise) is concerned. The user may select the model's sensitivity to money or its
environmental awareness, as well as which case scenario the response trainer will use:
Optimal, Normal or DiscreteCase Scenario. More details on the response types can be
found in the Theoretical Modeling Deliverable [D3.4.2]
Activity Model Selection Panel: In this panel, the list of the behaviours that are already
produced by the training process (from the previous tab) is presented. The user can
choose which one will be her baseline behaviour on which the new pricing scheme
will be applied.
Pricing Scheme Selection Panel: This panel gives user the capability to set up the base
pricing schema, as well as the new pricing policy she wants to test over the behaviour
models. There is a parser that checks for the correctness of the schema and provides
help in case of an error.
Activity Model Change Preview Panel: This panel is responsible for the visualization
of the behavioural change when the user wants to preview the result of the pricing
policy to the selected behaviour. The attribute that is affected by the pricing scheme is
the Start Time Distribution, so the panel presents a comparative chart of the start time
distribution with the basic and the new pricing schemes.
Pricing Scheme Preview Panel: This panel presents a comparative chart of the two
pricing schemes provided by the user, in order to make sure that the input is the
correct one.
Page 62 of 75
Grant Agreement No. 288429
D4.4.2 Cassandra Final Platform – Version 1.0
Figure 52 Create Response Models tab
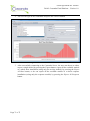
3.3.1 Usage workflow
The main usage workflow is as follows:
1. The user chooses an activity model from the list. Next, she types in the pricing
schemes (as shown in the Figure 53) as a triplet of starting time – ending time –
price (suitable only for TOU Pricing scheme). More details on the specifications of
the pricing scheme used in the Training Module can be found at the Specification
Deliverable [D3.6].
Page 63 of 75
Grant Agreement No. 288429
D4.4.2 Cassandra Final Platform – Version 1.0
Figure 53 Committing the pricing scheme
By pressing the Commit button the schemes are visualized in the Pricing Scheme panel
(Figure 54). Also, the Preview Response button is enabled.
Page 64 of 75
Grant Agreement No. 288429
D4.4.2 Cassandra Final Platform – Version 1.0
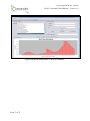
Figure 54 Visualizing pricing scheme and choosing response model
2. The user can now select the parameters for her response model from the Response
Parameters panel. Then, she can press the Preview Response button to see the
resulting model‟s Start Time distribution (Figure 55).
Page 65 of 75
Grant Agreement No. 288429
D4.4.2 Cassandra Final Platform – Version 1.0
Figure 55 Response Preview
3. After visualising the response model preview, the user can choose to create the
response models for the behaviour selected by pressing the Create Response Model
button, or she can use the same parameters to create new response models for all the
available behaviours on the list, by pressing the Create Response All button.
The newly created response models are passed to the Export Models tab. More details about
this tab can be found in the next section.
Page 66 of 75
Grant Agreement No. 288429
D4.4.2 Cassandra Final Platform – Version 1.0
3.4 Export Models Tab
Export Models tab is responsible for connecting Training Module to the main Cassandra
Platform and adding the created entities (installations, persons, appliances, behaviour
(activity) and response) models to the user's library.
It is comprised by 3 different panels, each used for choice selection or data visualization
(Figure 56).
Export Model Selection Panel: This panel presents the list of the entities available for
export. These can be any kind of entity (Installation, Person, Appliance, Behaviour
(Activity) and Response) models.
Export Model Preview Panel: This panel is responsible for visualizing the most
appropriate attributes of the selected entity from the list above. The visualization is
customized differently for each entity type selected.
Connection Properties Panel: In this panel, the user can input her authentication
credentials to the platform and then export the models she had created by selecting
them from the entity model list.
The authentication credentials are the same that are provided to the user for logging in
the main Cassandra Platform and they are provided by the administrator of the
Cassandra Server.
Page 67 of 75
Grant Agreement No. 288429
D4.4.2 Cassandra Final Platform – Version 1.0
Figure 56 Export Models tab
3.4.1 Usage workflow
The main usage workflow is as follows:
1. The user selects the entity that she wants to export to the main platform. The
visualization of the entity's properties is presented differently for each entity type.
Some examples can be found in the figures below.
Page 68 of 75
Grant Agreement No. 288429
D4.4.2 Cassandra Final Platform – Version 1.0
Figure 57 Export Installation models
Figure 58 Export Person models
Page 69 of 75
Grant Agreement No. 288429
D4.4.2 Cassandra Final Platform – Version 1.0
Figure 59 Export Appliance models
Figure 60 Export Activity/Response models
Page 70 of 75
Grant Agreement No. 288429
D4.4.2 Cassandra Final Platform – Version 1.0
2. The user can type in her credentials and press the Connect button.
Figure 61 Connect to the Cassandra Server
3. After successfully connecting to the Cassandra Server, the user can choose to either
export a single model by pressing the Export button, export all the available models
as a whole base installation (using only the activity models) by pressing the Export
All Base button, or he can export all the available models as a whole response
installation (using only the response models) by pressing the Export All Response
button.
Page 71 of 75
Grant Agreement No. 288429
D4.4.2 Cassandra Final Platform – Version 1.0
Figure 62 Exporting models as Base or Response installation
Page 72 of 75
Grant Agreement No. 288429
D4.4.2 Cassandra Final Platform – Version 1.0
4 Installation Manual
The following steps will help you installing the cassandra platform on your system:
1. Install MongoDB on your system.
2. Install Tomcat on your system (The platform was developed using Tomcat 7).
1. Make sure that you start Tomcat using Java 7. A solution to accomplish this create a
``setenv.sh`` file in ``CATALINA_HOME`` adding
``JRE_HOME=/path/to/your/java7/installation``. Then make it executable ``chmod
755 setenv.sh``. Check-out http://localhost:8080 to test if Tomcat is working.
3. Secure Tomcat (see next sub-section in the current section)
4. Download the Cassandra platform bundle
5. Configure the environment variables in the application's web.xml
``mongo.host.address`` and ``mongo.db`` and set them to the MongoDB **host
address** and the MongoDB **database name** to use.
6. Build the platform using ``ant``. The [[CASSANDRA Ant]] page describes the
specifics of the build process.
7. Start the Tomcat server. (``./startup.sh``)
8. Drop the ``cassandra.war`` file, found in the created ``dist`` directory of the built
Cassandra platfrom bundle after using ``ant``, in the webapps directory of the tomcat
installation. The war archive will self-extract and create the webapp directory.
9. Go to https://localhost:8443/cassandra and enjoy!
10. To shutdown Tomcat: ``./shutdown.sh``
4.1 Securing Tomcat
In this section we will secure Tomcat to listen only via https on port 8443:
1. Create a key:
``keytool -genkey -keyalg RSA -alias host -keystore keystore.jks -validity 999 -keysize
2048``
2. Add the following connector to Tomcat server.xml configuration file:
<Connector port="8443" protocol="HTTP/1.1" SSLEnabled="true"
maxThreads="150" scheme="https" secure="true"
clientAuth="false" sslProtocol="TLS"
keystoreFile="path/to/keystore.jks"
keystorePass="changeit"/>
Page 73 of 75
Grant Agreement No. 288429
D4.4.2 Cassandra Final Platform – Version 1.0
3. Make sure port 8080 redirect to 8443 (server.xml again):
<Connector connectionTimeout="20000" port="8080"
protocol="HTTP/1.1" redirectPort="8443"/>
4. Add the following xml snippet into **Tomcat's** web.xml configuration file:
<!-- SSL settings. only allow HTTPS access to tomcat -->
<security-constraint>
<web-resource-collection>
<web-resource-name>Entire Application</web-resource-name>
<url-pattern>/*</url-pattern>
</web-resource-collection>
<user-data-constraint>
<transport-guarantee>CONFIDENTIAL</transport-guarantee>
</user-data-constraint>
</security-constraint>
4.2 Adding users
The procedure for adding users is as follows:
Insert a user document in the database through the console interface of MongoDB or any
other UI MongoDB client (for example rockmongo):
1. { “username”: “demo”}
2. This document will have an ObjecID (for example “123”)
3. Run the tool md5hashgen.jar located under the folder tools
java –jar md5hashgen.jar secret 123
where secret is the chosen password and 123 the ObjectID
4. The tool will output a password in the console (for example “a1s2d3f4”)
5. Update the document in the MongoDB:
{
“username”: “demo”,
“password”: “a1s2d3f4”
}
Now the user can login with credentials demo and secret.
Page 74 of 75
Grant Agreement No. 288429
D4.4.2 Cassandra Final Platform – Version 1.0
5 Summary
The aim of the present deliverable is to offer a manual to accompany the early version of the
Cassandra platform. The up-to-date electronic version of this document can be found at:
https://github.com/cassandra-project/platform/wiki/User-Manual, while the early prototype of
the platform is located at: https://github.com/cassandra-project/platform.
Page 75 of 75