1
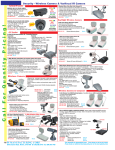
PPC-812T
( 8” Touch Panel PC )
User’s Manual
1
©
COPYRIGHT
All rights reserved. The information contained in this guide has been validated
and reviewed for accuracy. No patent liability is assumed with respect to the
use of the information contained herein. While every precaution has been
taken in the preparation of this guide, the Manufacturer assumes no
responsibility for errors or omissions.
No part of this publication may be reproduced, stored in a retrieval system, or
transmitted in any form or by any means, electronic, mechanical, photocopying,
recording, or otherwise, without the prior written permission of Manufacturer.
TRADEMARK™
®
®,
®
®
®
Intel , Celeron Pentium , MMX , Windows are registered trademarks of
®
Intel Corporation.
®
VIA is a registered trademark of VIA Corporation.
®
®
Microsoft and Windows are registered trademarks of Microsoft Corporation.
All products and company names are trademarks or registered trademarks of
their respective holders.
These specifications are subject to change without notice.
2
CONTENTS
SECTION 1 INTRODUCTION
1.1
1.2
1.3
1.4
1.5
INTRODUCTION
… … … … … … … … … … … … … … … … … …
Pictures of PPC-812T … … … … … … … … … … … … … … … … … …
Power Adapter … … … … … … … … … … … … … … … … … … … … …
Main board used in PPC-812T … … … … … … … … … … … … … … …
Specifications … … … … … … … … … … … … … … … … … … … ..… …
4
5
6
6
6
SECTION 2 INSTALLATIONS
2.1
How To Load Windows O.S. … … … … … … … … … … … … … … … .
8
SECTION 3 TOUCH DRIVER INSTALLATION
3.1
3.2
Touch Driver Installation … … … … … … … … … … … … … … … … … .. 8
25 Point Touch Driver Calibration … … … … … … … … … … … … … . 10
SECTION 4
4.1
BIOS SETUP
BIOS Setup … … … … … … … … … … … … … … … … … … … … … … .
11
SECTION 5 CPU CLOCK AND RATIO SETTING
5.1 CPU Clock and Ratio Setting … … … … … … … … … … … … … … … ... 11
3
1.1 Introduction
This Panel PC is designed to be used for all kinds of industrial, medical, commercial, moving
vehicles, train, bus, truck, home, as well as military applications. We have done our best to use
the industrial grade components to meet the harsh environments where ambient temperatures
can be higher or lower; air can be full of dust, chemical gas or liquid. Our products incorporate a
variety of advanced features and anti-shock, anti-vibration designs, yet we are able to offer very
cost-effective products and solutions. We believe that we can provide not only the best
technology and advanced products, but also the lowest cost products compared to other similar
products. For a complete view of our products and solutions, please discuss with our distributors
or check on our web site.
This product manual contains a variety of technical information to help you to use or install the
product. The manual contains the technical specification, port connectors, diagrams of the board
or unit and its various areas, jumper settings, and many other useful areas. Please refer to the
manual for details about each specific product. The manual also includes some general idea
about special features, software options, and some basic troubleshooting ideas to help you in
these areas.
The driver CD contains the various product manuals and many drivers, organized by the product,
then device such as LAN, and then by operating system such as Windows XP, 2000, NT, 98 or
Linux or other operating systems. Please select the product of interest first, and then select the
device area such as LAN or touch screen or other. Then select the operating system of
interest such as Linux, XP Embedded, Win CE, Win 98, etc. Now you will have a few choices
such as install a driver, look at the driver install guide, or browse the directory. You can easily
browse the directory to see related files and tips. The driver CD is designed to auto run under
windows, so for best use it is better to run it on windows. However if you are installing from a
Linux system for example, you can also browse the driver CD directly to go to the selected
product directory, organized by product name.
This Panel PC is widely used in all kinds of applications including Kiosk, factory automation, HMI
(Human-Machine-Interface), hotel, restaurant, home, banking (e.g. ATM), 7-11, POS, POI, super
markets, medical, military, food, mining, airport, school, building, vehicles,
telecommunications, … and so on. Whenever the customer has any special requirement, we
are very pleased to custom design for them at a much competitive pricing and within the average
4 weeks delivery time.
We are able to custom design the all-in-one or separate Panel PC from a very small 6.4”, 7”, 8.4”,
10.4”, 12.1”, 15”, 17”, 18”, 21”, 23”, 30”, all the way up to the largest 40” as per the customer’s
required specifications including in the very cold weather and a higher temperature or in a very
harsh environment with dirty, humid, full of particles in the air, etc. Please contact our
distributors for further details.
4
1.2
Pictures and dimensions of PPC-812T
- Pictures of PPC-812T
Front view
1.3
Dimensions
1.4
I/O Ports
VESA-75 compliant
Desktop stand is optional
5
4 x USB2.0, 4 x COM,
2 x LAN, MPEG-II, speakers
1.5
Power Adapter and Optional Accessories
Power supply
Wall mount Kit
GPS engine Board ( optional )
\
GPS Active Antenna
1.6 Mainboard used in PPC-812T : (NASA-6822VLLA)
6
1.7
Specifications
Model No.
PPC-872T & PPC-812T
Front bezel
812T has no aluminum front bezel.
872T has an 8mm thick solid aluminum front bezel
Housing
IP & NEMA
Made from 1.0mm rugged steel construction
872T meets 100% water-proof IP-65, 66, 67, 68, NEMA -4 on front
812T meets IP-56 and NEMA -12 on front
Color
Black color is standard. Silver color is optional at your request
Wall-mount
LCD specs.
Meet VESA-75 wall mount standard
8” TFT Japan SHARP LCD, 380-400 cd/m2 super high brightness, 640
x 480 resolutions
Touch screen
4-wire resistive touch screen, 2048 x 2048 resolution
Speaker
Processor
Built in 2 stereo speakers
VIA C3 Low power 1GHz CPU
System RAM
Support up to maximum 1GB DDR RAM. Standard is 256MB.
HDD
VGA
Standard is 20GB slim size anti-vibration HDD.
Support second monitor
AGP
Support 4X, 8X AGP speed
Video Memory
MPEG-II chip
Support 16M, 32M, and 64M share memory. Default is 32 or 64M.
Support hardware MPEG-I, MPEG-II video and movies
LAN
Dual fast 100/10 Mbps Ethernets support networking
USB 2.0
Serial port
4 x USB 2.0 at I/O port. (another 2 x USB pin headers on board)
Support 4 x COM ports (2 outside, 2 inside), 3 x RS232, 1 x RS232 /
422 / 485.
Keyboard
1 x PS2 type keyboard port
Mouse
Printer port
1 x PS2 type mouse port
1 x LPT port for printer interface
PCI ver. 2.2
Support PCI version 2.2
PCI IDE port
Audio jack
Support ATA -100 x 2 up to 4 devices
Support external speaker or microphone function
Vibration resistance
Passed strict IEC-60068 life random vibration test from 5 – 500 Hz at
2G RMS under Windows XP Pro.
Shock resistance
Passed strict IEC-60068 life shock test from 15G for 11ms duration at 3
axis 6 directions under Windows XP Pro.
Standard AC 100-240V power adapter. Output : 19VDC
DC 12, 24V power adapters are optional.
Power supply
Dimensions (WxHxD)
PPC-812T : 220 x 165 x 80mm
PPC-872T : 250 x 200 x 77mm
Operating temperature
From 0 to 50 degree C at an air ventilation area
7
Award BIOS Setup
SECTION 2 INSTALLATION
2.1
How to load Windows O.S.
There are two solutions for this :
a)
USB type external CD-ROM (see the above optional picture). Please use the legal copy of
Windows XP O.S. If you choose this way, you have to enter into the BIOS menu setup,
choose the USB CD-ROM as the primary boot up disk.
b)
Open up the rear cover from behind, find an IDE cable and a standard 4-pin power connector.
Connecting the IDE cable and 4-pin power connector to a standard 5.25” CD-ROM that you
prepare for the PPC. Enter into the BIOS menu, choose CD-ROM as the primary boot up
disk. Put the Windows O.S. into the CD-ROM, start loading the Windows O.S.
SECTION 3 TOUCH SCREEN DRIVER INSTALLATION
3.1
Touch screen driver
The touch driver was contained in the CD Disk came with the unit. There are two touch drivers.
One is E-T, one is S-M. Please choose E-T touch driver to load into the PPC. After loading the
E-T touch driver, you must perform a 25-point calibration on the touch. Please be sure that each
touch point must be calibrated one by one. After all of the 25 touch points were calibrated. The
touch driver is successfully loaded.
3.2
25-Point Calibration
Touch the center point of the blinking icon one by one until all 25 points were calibrated.
SECTION 4 BIOS SETUP
4.1
BIOS Setup
The 8” LCD built in is a Sharp TFT LCD with 640 x 480 resolution and a high brightness of 380 –
400 cd/m2. Please be sure to choose the correct Display Device and Panel Type at the Advanced
Chipset Features Setup in case you change the original BIOS setup by accident. Follow the
following procedures :
Step 1 : Enter into BIOS Setup Main menu
Step 2 : Choose Advanced Chipset Features Setup
Step 3 : Move to Display Device item, select [ CRT+LCD ]
Step 4 : Move to Panel Type item, select [ 00 ]
Step 5 : Save the setting and Exit the BIOS, restart the system
Finish.
BIOS Set-up :
Model No.
PPC-812T
PPC-872T
SECTION 5
Size
8”
8”
Mainboard
BIOS Main èAdvanced
Chipset Features setup
Panel Type
Display Device
NASA-6822VLLA
NASA-6822VLLA
00
00
CRT + LCD
CRT + LCD
LCD panel
Manufacture
Sharp, Japan
Sharp, Japan
CPU CLOCK AND RATIO SETTING
Only VIA C3 1.0GHz low power CPU can be used on this mainboard.
Note : BIOS setting must select 133MHz as CPU clock speed and 7.5 ratio. You can
also select a lower ratio than 7.5 in order to reduce the thermal heat of the system.
9