1
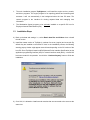
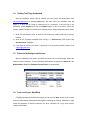
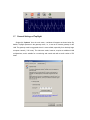
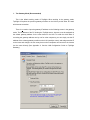
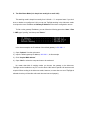
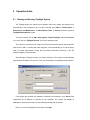
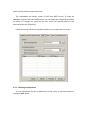
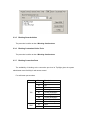
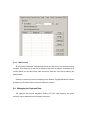
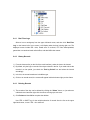
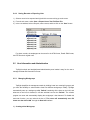
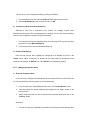
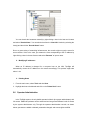
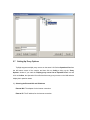
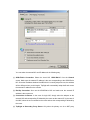
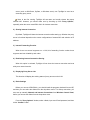
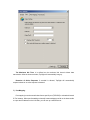
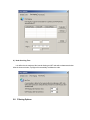
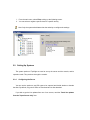
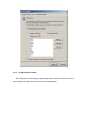
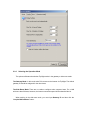
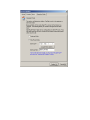
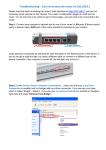
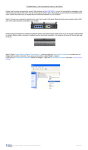
AnyRouter Tech, Tup Software Ltd.
___________________________________________________________________________________________________
User’s Manual
Last revised: September of 2006
WWW.TUPSOFT.COM
Contents
1
2
Installation Procedure ______________________________________________________ 3
1.1
Installation Preparation ________________________________________________ 3
1.2
Installation Package ___________________________________________________ 3
1.3
Installation Steps ______________________________________________________ 4
1.4
Getting Trail Copy Authorized __________________________________________ 5
1.5
Entrance to Background Services ________________________________________ 5
1.6
Low Level-Layer Start/Stop _____________________________________________ 5
1.7
General Settings of TupSight ____________________________________________ 6
Operation Guide ___________________________________________________________ 9
2.1
Starting and Running TupSight System ___________________________________ 9
2.2
The Main Interface ___________________________________________________ 10
2.3
Internet Access Control _______________________________________________ 10
2.3.1
General Settings __________________________________________________ 11
2.3.2
Blocking/Filtering URLs (Websites)___________________________________ 11
2.3.3
Blocking Emails __________________________________________________ 12
2.3.4
Blocking Chat Sessions_____________________________________________ 13
2.3.5
Blocking Game Activities ___________________________________________ 14
2.3.6
Blocking Customized Online Tools ___________________________________ 14
2.3.7
Blocking Connection Ports __________________________________________ 14
2.3.8
MAC Lockup ____________________________________________________ 15
2.4
Managing the Captured Data___________________________________________ 15
2.4.1
Real-Time Logs___________________________________________________ 16
2.4.2
History Records___________________________________________________ 16
2.4.3
Deleting Records__________________________________________________ 16
2.4.4
Saving Records or Exporting Lists ____________________________________ 17
2.5
Host Information and Administration____________________________________ 17
2.5.1
Managing Workgroups _____________________________________________ 17
2.5.2
Managing Computer Hosts __________________________________________ 18
2.6
Operator Administration ______________________________________________ 20
2.7
Setting Up Proxy Options______________________________________________ 21
2.8
Filtering Options _____________________________________________________ 25
2.9
Setting Up Systems ___________________________________________________ 26
2.9.1
Configuring the Server _____________________________________________ 26
2.9.2
Configuring the Console ____________________________________________ 27
2.9.3
Selecting the Operation Mode________________________________________ 28
3
Frequently Asked Questions ________________________________________________ 30
1 Installation Procedure
TupSight uses one computer on a local area network (LAN) not only to monitor and record
other hosts’ web behaviors, but also to restrict online activities according to customized
filtering Internet policies. Unlike other EIM (Employee Internet Management) products that are
based on WinPcap (The Windows Packet Capture Library) (http://www.winpcap.org/),
TupSight has no hardware requirements and can be used on any LAN infrastructures such as
a switched computer network.
To get the trial version of TupSight evaluated and registered later if you are satisfied with
the results, the engine must be installed on a PC host connected to the Internet and is able to
visit our website at http://www.tupsoft.com.
The following procedure will provide instructions for installing a TupSight system and
configuring in its first running.
1.1
Installation Preparation
1) Download the latest version of the TupSight programs from www.tupsoft.com.
2) Select a computer host with OS Windows 2000 Pro / 2000 Server / XP / 2003 to install the
TupSight programs.
3) The minimum hardware requirements are CPU Pentium 4 at 1 GHz/Memory 256 MB/Free
Hard Disk Space 1GB. We suggest the following configurations:
Server for 10 PC licenses: CPU 2.0 GHz/ Memory 512 MB/Storage 20 GB
Server for 100 PC licenses: CPU 2.8 GHz/Memory 512 MB/Storage 40 GB
Server for 200 PC licenses or more: CPU 2.8 GHz/Memory 1024 MB/Storage 80 GB
Workstation (Agent): CPU Pentium III > 800 MHz/Memory 256 MB/Storage 1 GB
Console: CPU Pentium III 800 MHz or higher/Memory 512 MB/Storage 30 MB
1.2
Installation Package
The installation package consists of four parts:
User’s Manual
Concise LAN Configuration Guide to TupSight Gateway (Appendix A)
The main installation program TupSight.exe. It will install the engine service, console,
and driver programs. The engine program is for capturing packets and controlling web
accesses. It will run automatically in the background when the host PC starts. The
console program is the interface for viewing captured data and managing host
information.
The Workstation (Agent) program to be optionally installed on a specific PC host for
Employee Intranet Administration (EIA).
1.3
Installation Steps
4) Back up the data and settings, i.e., select Retain data files and folders when uninstall
the old version.
5) Install the newest version of TupSight. It consists of a server (engine) and a console. By
default they are installed on the same PC host. In the installation process, the following
warning pop-up window might appear several times depending on the OS version of the
host PC. Since TupSight is based on NDIS (Network Driver Interface Specification) as the
application programming interface (API) for network interface cards (NICs), a virtual NIC
has been created for its operation. Just click the “Continue Anyway” button to finish the
installation.
6) On a LAN, it is allowed to install several consoles that are connected to the server at the
same time.
1.4
Getting Trail Copy Authorized
After the installation, please look up whether you have got the trail authorization from
http://www.tupsoft.com by selecting About from the main menu. The evaluation copy will
expire in 15 days and is limited to monitoring up to 5 computers. If the trail copy is not
authorized, select Register and click on Register again on the next screen. During the
process, please configure the firewall in the following way (or simply temporarily shut it down):
1) Allow TCP port 80 and 11901, or allow five TCP ports from 11900-11905 only for security
reasons.
2) Allow all the TupSight executable files running, i.e., ArServer.exe (TUP Engine) and
ArConsole.exe (TupSight).
3) If you want to monitor more than 5 computers in the trial period, please contact us at
[email protected].
1.5
Entrance to Background Services
After the installation and restart, by default the server will run automatically without the
need for a user to intervene. You can manually start/shutdown the engine from Services in the
Administrative Tools from Windows Control Panel, as shown below.
1.6
Low Level-Layer Start/Stop
If TupSight operates in the side-route mode, you can use the “Stop” button on the console,
as shown below, before shutting down the engine or restarting the PC host. Otherwise, it might
cause the disruption of Internet connection for other computers for a very short interval,
usually unnoticeable.
1.7
General Settings of TupSight
Single-click “Options” from the main menu, a window will appear as shown below. By
default, TupSight operates in the gateway mode, i.e., it acts as an Internet gateway for the
LAN. The gateway mode is suggested since it is more reliable, especially for a relatively large
computer network (≥50 hosts). The side-route mode, however, requires no additional LAN
configurations, and is suitable for a monitoring and control task with a small number of PC
hosts.
1. The Gateway Mode (Recommended)
This is the default working mode of TupSight. When working in the gateway mode,
TupSight will replace the previous gateway machine on the LAN to provide other PC hosts
with Internet connection.
There is no need to input the gateway IP address on the following screen in the gateway
mode. The IP address of the PC hosting the TupSight server, however, must be assigned as
the default gateway address for the other hosts on the LAN. To avoid the trivial tasks of
correcting the gateway address one by one for other computers, you can simply use the IP
address of the existent gateway machine on the LAN (usually a router), and assign another IP
to the router and configure in such a way that no other computers can connect to the Internet
via the router directly (See Appendix A: Concise LAN Configuration Guide to TupSight
Gateway).
2. The Side-Route Mode (It is simple but usually for a small LAN)
This working mode is simple but usually for a LAN with ≤50 computer hosts. If you don’t
know or bother to reconfigure a LAN, you can set TupSight working in the side-route mode.
Just input the router IP address to Gateway IP Address on the above configuration screen.
To find out the gateway IP address, you can follow the following procedure: Start
Run
CMD, type “ipconfig,” and then press ”Return.”
In the above example, the IP address of the default gateway is 192.168.1.1.
1) Open “Options” from the main menu.
2) Input the default gateway IP address, 192.168.1.1, in this example.
3) Click “Acquire MAC address.”
4) Open “Host” to select the computer hosts to be monitored.
No matter what kind of working modes you choose, the gateway or the side-route,
TupSight can be installed on any PC over the whole LAN and no special LAN structures are
required. When working in the side-route mode, however, no more than one set of TupSight is
allowed since they will interfere with each other and not work properly.
2 Operation Guide
2.1
Starting and Running TupSight System
The TupSight engine is a system service program. After every restart, the engine will run
automatically in the background. One can also manually select Start
Performance and Maintenance
Administrative Tools
Control Panel
Services and then right-click
TupSightCaptureService to start.
To run the console, click on Start, All programs, Tupsoft TupSight, and select Console,
or you can click the “TupSight Console” icon on the desktop to start.
The console is connected to the engine via TCP protocol with the default data connection
ports 80 and 11901. If conflicts with other programs, it will automatically try to use the larger
ports. For better performance, closing the IIS (Internet Information Services) on the PC
hosting TupSight is recommended.
After starting the TupSight console, you need to connect it to the engine from the following
logon window. Be default, the server is Local, user name Admin, and password blank (NULL).
If the engine and console are installed on different host machines, in the Server field
locate/enter the IP address or hostname for the computer. The console can display IP
addresses in the drop-down menu by automatically scanning the whole LAN.
Enter your user ID and password, and then click Logon.
After successfully logging on, the main interface will appear.
If the “Logoff” button is pressed, the system will exit.
2.2
The Main Interface
After logging on the console, the main interface will display as follows.
2.3
Internet Access Control
One important function of TupSight is its ability to restrict online activities according the
user’s customization and lock up MAC (Media Access Control) addresses.
Restriction of web access: You can use TupSight to set time schedules (Internet access
or specific online activities can be disabled at certain times of day for a host, group, or the
whole local network) and flow limits, block/filter URLs (web-sites) by user-defined keywords,
disallow Email servers, and regulate chat/game or customized tools.
Lockup of MAC addresses: You can use TupSight to disallow the change of MAC and IP
addresses on the LAN. (Note: Lockup of IP addresses in a DHCP system will lead to the
network failure.)
The restrictions are set only by the system administrator (Admin).
2.3.1
General Settings
General settings consist of the following tasks: 1) Blocking the online activities in a specific
time period; 2) Blocking unmonitored PCs from accessing the Internet (i.e., the new host rule);
3) Setting data flow limits; and 4) Limiting data links. (Usually there are several data links for
each webpage).
2.3.2
Blocking/Filtering URLs (Websites)
There are three modes to block/filter URLs: Disallow all the websites; allow part of
websites by user-defined keywords (blacklist); and allow part of websites (whitelist). For every
blocking/filtering mode you can set specific time schedules.
A URL black/white list can be complied by the Admin for a host, group, or the whole
network.
2.3.3
Blocking Emails
This blocking/filtering function can set rules such as what kind of Email tools, for instance,
FOXMAIL or OUTLOOK, are allowed and which mail server the host(s) can use for sending
and/or receiving mails at certain times of day.
The customizable mail servers consist of POP3 and SMTP servers. To locate the
addresses of specific POP3 and SMTP servers, you can lookup the corresponding websites
for details. For example, for yahoo.com the mail servers are pop.mail.yahoo.com and
smtp.mail.yahoo.com, respectively.
If there are several mail servers should be blocked, you must input them one by one.
2.3.4
Blocking Chat Sessions
You can define which chat tool is disallowed for a host, group, or the whole network by
clicking the “Edit” button.
2.3.5
Blocking Game Activities
The procedure is similar to that of Blocking Chat Sessions.
2.3.6
Blocking Customized Online Tools
The procedure is similar to that of Blocking Chat Sessions.
2.3.7
Blocking Connection Ports
The availability of blocking at the connection port level of TupSight gives the system
administrator more flexibility for web access control.
For well-known port numbers:
Protocol
TCP
UDP
Port
20
Description
Ftp
21
Ftp
23
Telnet
25
Sending Emails
80
Viewing Webpages
110
Receiving Emails
443
Viewing Webpages
1863
MSN
5050
Yahoo Messenger
53
DNS
8000
QQ
2.3.8
MAC Lockup
To lock up MAC addresses, TupSight views a host as invalid if it is not in the list previously
complied. Thus, whenever a new host is detected it will block the network connection by IP
conflict. Before you start the lockup, make sure all the hosts are in the list by scanning the
whole network.
Similarly, to prevent any host from modifying the IP address, TupSight will ban the network
connection by IP conflict until the correct IP address is returned.
2.4
Managing the Captured Data
The captured data include webpages, Emails, FTP files, chat sessions, and game
activities, and are classified into the following categories.
2.4.1
Real-Time Logs
Select a host or workgroup from the upper left-hand corner, and then click “Real-Time
Log” on the bottom left of your screen. It will display what the host is doing right now. The
displayed events include URL visits, Emails sent or received, FTP files down/uploaded,
game/chat or customized tools online/offline, and also MSN chat content.
2.4.2
History Records
1) From the host tree list (on the left of the main interface), select the host to be viewed.
2) By default, only the logs or records of the day are shown in the list. If you need to show the
records in a time period, just check the “Find by Period” box and select the interval
accordingly.
3) In the list, the unread records are in boldface type.
4) Click on an unread record, the content will appear inside the bottom right preview frame.
2.4.3
Deleting Records
1) The records of the day can be deleted by clicking the “Delete” button, or just select an
individual record and then right-click the mouse to bring up a sub-menu.
2) Click Delete and then OK to complete the deletion.
Use CTRL or SHIFT key for the multiple selection of records from the list on the upper
right-hand corner, or use CTRL + A to select all.
2.4.4
Saving Records or Exporting Lists
1) Select a record to be exported and right-click the mouse to bring up a sub-menu.
2) From the sub-menu, select Save or Export List as Text File/Excel File
3) In the new window, select a file path, enter a name, and then click on the “Save” button.
For those records, the webpages can be saved in the HTM format, Emails EML format,
and FTP files their original ones.
2.5
Host Information and Administration
TupSight’s simple and straightforward administration panel makes it easy for the user to
manage the data and information of hosts.
2.5.1
Managing Workgroups
TupSight simplifies the management tasks by dividing hosts into meaningful groups, and
you have the flexibility to select/combine hosts into different workgroups. Initially, TupSight
automatically sets up a workgroup called “Default” containing all the hosts on the LAN, and
whenever a new host is detected, it will also add that host into the “Default.” The console
program can scan and automatically display the workgroups it has detected. To disable this
auto-scan function, you can uncheck the box of “The server will automatically scan PC
hosts over the whole LAN” through the Host Info interface.
1) Creating a New Workgroup
You can set up a new workgroup manually by doing the following:
1. From the host tree list area, select Localnet and then right-click the mouse.
2. Select Add Workgroup, enter a name, and click on OK.
2) Transferring a Host to Another Workgroup
Whenever a new host is connected to the network, the TupSight console scans
automatically and moves it into a workgroup where it belongs. You can also move manually a
host from one workgroup to another by doing the following:
1. From the host tree list area, highlight a host (or hosts using CTRL key) and right-click
the mouse to select Move Workgroup.
2. From the sub-menu, select the destined workgroup.
3) Deleting a Workgroup
From the host tree list area, highlight the workgroup to be deleted and click on the
“Delete“ button. When a workgroup is deleted, all the hosts inside the workgroup will be
moved into the workgroup “Default” first. The “Default” is un-deletable by default.
2.5.2
Managing Computer Hosts
1) Scanning Computer Hosts
In its first running TupSight will automatically scan computer hosts over the whole LAN.
You can also manually scan the network by the following steps:
1. From the main menu, select Host and then click on the “Scan & Renew” button.
2. Input the starting and ending addresses and single-click the “Begin” button on the
pop-up screen.
3. Select those hosts that you want to add from the scanned results and click on the
“Confirm” button.
Alternately,
1. You can also input an IP address on the bottom of the pop-up window, and then click
on the “Acquire MAC Address” button.
2. Input a corresponding nickname, and then click on the “Add to List” button.
3. If the system is unable to get the MAC address for some reasons, you can also fill in
manually.
Note: In the following cases, the computer hosts are not detectable:
a) The machine has been turned off.
b) The computer is not connected to the network.
c) The computer and the server are not in the same network segment.
d) The firewall settings of the computer block the scanning of the server.
2) Modifying Host Information
1. Modifying hostnames
A hostname is the computer name corresponding to a specific IP address. By default, the
TupSight console will automatically fetch the computer name for a host.
You can decode the hostname manually by right-clicking a host in the host tree list area
and select “Decode Name.” You can also do that from the “Host Info” window by selecting the
host(s) and then hit the “Decode Name” button.
Due to a great variety of networking infrastructures, the console might not get the name for
some reasons. If this is the case, just rename the host corresponding to the IP address by
right-clicking a host in the tree list area and select “Rename” to input a name.
2. Modifying IP addresses
When an IP address is changed for a computer host on the LAN, TupSight will
automatically correct the IP address on the console accordingly. This process might take
about 1 min.
3. Deleting Hosts
1. From the main menu, select Tools and then Host.
2. Highlight the host to be deleted and click on the “Delete Host” button.
2.6
Operator Administration
In the TupSight system, the only default operator is Admin (the system administrator) with
full access. Additional operators can be authorized and are granted different levels of access
by the system administrator only. Through the operator administration console, as shown
below, operators are added or deleted, passwords changed, and access rights modified.
2.7
Setting Up Proxy Options
TupSight supports multiple proxy servers on the same LAN. Select Operation View from
the left bottom corner of the console, and then click on Config to bring up the “Proxy
Options“ window. If you mark the “Display proxy server list on Operation View” box and
click on Confirm, the Operation View will show how many proxy servers on the LAN and also
display their operation status.
1) Selecting the External NIC and IP Address
External NIC: The adapter for the Internet connection.
External IP: The IP address for the Internet connection.
You can select the external NIC and IP address in the following way:
(1) ADSL/Dial-In Connection: Select the virtual NIC “ADSL/Dial-In” from the General
screen. Make sure the external IP address is the one corresponding to the ADSL/Dial-In
NIC. Since the IP address obtained via ADSL dial-in is usually a dynamic one, the address
will be different when you dial again. TupSight will automatically adapt itself and correct
the external IP address on the console.
(2) Dial-Up Connection: Also use the ADSL/Dial-In NIC and make sure the external IP
address is the correct one.
(3) Connection via Router: In the case of single NIC, simply select the adapter as the
external NIC and corresponding IP allowed by the router as the external IP. In the case of
dual NIC, select the one connected to the router and use the corresponding IP allowed by
the router.
(4) TupSight as Secondary Proxy Server: Only when the primary one is an NAT proxy
server (such as WinRouter, SyGate, or Windows server) can TupSight be used as a
secondary proxy server.
Note: In the first running, TupSight will auto-scan and usually choose the proper
external NIC. However, you should make sure by checking up from "Proxy Options,"
especially when the server uses ADSL dial-in for Internet connection.
2) Sharing Internet Connection
By default, TupSight will share the Internet connection after starting up. Whether the proxy
server is functional depends on the correct configurations of external NIC and selection of IP
address.
3) Internal Forwarding Function
When there are several segments on a LAN, this forwarding function makes those
segments are inter-visitable by each other.
4) Disallowing Internet Connection Sharing
When this option is selected, TupSight will not share the Internet connection and acts
solely as a network monitor.
5) Displaying Proxy Server List
This function will display the working status of proxy servers on the LAN.
6) Dialer Settings
Before you can use ADSL/Dial-In, you should install the programs obtained from an ISP,
and then you can select the dialers from the drop-down menu. For dial-up connection, you
must set up manually Network and Internet Connections from Windows Control Panel,
before you can see the dialers from the drop-down menu.
From the “Proxy Options” window, select a dialer, input user ID and password, and then
hit the “Confirm” button.
The Maximum Idle Time: It is defined as the maximum idle interval without data
transmission. After the timeout window, TupSight will automatically hang up.
Detection of Online Requests: If auto-dial is allowed, TupSight will automatically
respond whenever an online request is detected.
7) Port Mapping
Port mapping is used to transfer data from a specific port (TCP/UDP) to a destined internal
IP. For instance, When port-forwarding universally known webpage port 80 on the Internet side
to a port and IP address on the LAN side, you can set up a website server.
8) Node Surviving Time
It is defined as the maximum idle interval allowing an NAT node without data transmission.
After the timeout window, TupSight will automatically invalidate the node.
2.8
Filtering Options
1. From the main menu, select Filter to bring up the following screen.
2. You can select to neglect a specific host for a specific activity.
Note: Only the system administrator has the authority to configure the settings.
2.9
Setting Up Systems
The system options of TupSight are used to set up the server and the console, and its
operation mode. They are done through the console.
2.9.1
Configuring the Server
You can use the options to set URL types to be captured and decide whether to decode
the titles. By default, only part of URLs are monitored and no tiles decoded.
If you wish to get the live updates from one of our servers, mark the “Fetch live updates
from the Tupsoft server daily” box.
2.9.2
Configuring the Console
The configuration includes setting up display parameters such as the maximum number of
logs or graphics to display. Each console can be set independently.
2.9.3
Selecting the Operation Mode
The options will determine whether TupSight works in the gateway or side-route mode.
The Gateway Mode: In this mode other PCs connect to the Internet via TupSight. The default
gateway IP should be assigned for the other hosts.
The Side-Route Mode: There are no needs to configure other computer hosts. For a LAN
with more than 50 hosts, however, the Internet connection speed will be slowed a little bit.
When working in the side-route mode, you must input Gateway IP and then click the
“Acquire MAC address” button.
3 Frequently Asked Questions
1. When I install TupSight, a warning window pops up stating that the software has not
passed Windows Logo testing to verify its compatibility.
TupSight is based on NDIS (Network Driver Interface Specification) as the application
programming interface (API) for network interface cards (NICs), and a virtual NIC has been
created for its operation. Just single-click the “Continue Anyway” button each time the
“Hardware Installation” warning appears until the end of installation.
2. Why the data captured by TupSight are from/for my local host but other computers?
TupSight has two operation modes, i.e., the gateway mode and the side-route mode. By
default, TupSight operates in the gateway mode, acting as an Internet gateway for the LAN.
When working in the gateway mode, you must configure the default gateway IP address for
other computer hosts so that TupSight can provide them with Internet connection.
When working in the side-route mode, just input the router IP address to Gateway IP on
the “Options” window, and click on Acquire MAC Address.
3.
After the computer hosts to be monitored are selected in the side-route mode, they
are not able to visit the Internet.
You should check whether the external NIC and IP address are correctly selected.
1) Logon the console as the system administrator.
2) Open Operation View from the left bottom corner on the console.
3) Single-click Config.
4) Check whether the external NIC and IP address are correctly selected.