1
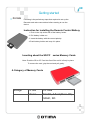
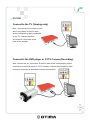
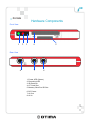
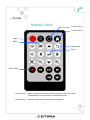
VR
PV-100S
VR
User Manual
1/12
VR
PV-100S
Overview
Congratulations on purchasing the MPEG-4 Portable Video Recorder
(for Security Surveillance Use).Now you can monitor and record
anywhere you want from CCTV Camera with our Motion Detection
Recording, Schedule Recording, Date & Time Stamped function.
You can also view videos on the Windows Pocket PC with its recording
format support.
For detailed description about the product and instructions, please
refer to this User Manual.
Main Features
The MPEG-4 Portable Video Recorder allows you to:
. Detect/Record Motion from CCTV Camera
. Record Videos with Timer Recorder/Schedule Recording function.
. Play/View Videos (ASF Format) on the Windows Pocket PC.
A Memory Stick Card need to be inserted in the Recorder for storage use.
2/12
VR
PV-100S
Package Contents
MPEG-4 Video Recorder
Power Adapter
Remote Control
User Manual
3-in-1 AV Cable (x2)
3/12
VR
Getting started
PV-100S
Following is the preliminary steps that required to set up the
Recorder and make connections before starting to use the
device.
Instruction for installing the Remote Control Battery.
1. Push in the clip at the side of the battery holder .
2. Pull battery holder out.
3. Insert the battery with the correct polarity.
4.Push battery holder and snap it in place.
Inserting about the SD/CF
series Memory Cards
Note: Push the SD or CF Card into Card Slot until it is firmly in place.
To remove the card, grip the card and pull gently.
A Category of Memory Cards
Storage
CF slot
CF card
SD slot
MiniSD, T-flash(Micro SD)
SDHC, SD
4/12
VR
PV-100S
Connect to the TV (Viewing only)
Note : Connect the A/V connectors (red,
white, and yellow) of the A/V cable,
to the corresponding input connectors
on the TV. Connect the other
end to the AV Out socket at the
back of the recorder.
Connect to the DVD player or CCTV Camera (Recording)
Note: Connect the A/V connectors of the A/V cable to the corresponding output
connectors on the DVD player or CCTV Camera. Connect the second A/V cable
to the A/V out socket as described in the previous section.
5/12
VR
PV-100S
Connecting power
Connect the power adaptor to the DC-in socket on the rear panel
of the recorder. Plug the other end of the adaptor into a power outlet.
Turning the MPEG-4 recorder on
Once the recorder is plugged in, the green power LED turns on.
Press the
button on the remote and the system turns on.
Press the
button again to turn off the recorder.
6/12
VR
PV-100S
Hardware Components
Front View
2
1
3
5
4
Rear View
6
7
8
1. Power LED (Green)
2. Recording LED
3. IR Receiver
4. CF Card Slot
5. Memory Stick Pro SD Slot
6. DC Power
7. AV Out
8. AV In
7/12
VR
PV-100S
Remote Control
Function Key 1
Function Key 2
Power
Menu
Return/Stop
Enter
Record/Stop
Function Key 1 : When you have two memory cards at the same time, you could
switch/display its contents from two differents cards.
Function Key 2 : Delete the files that is selected and highlighted.
8/12
VR
PV-100S
Software Function
V.Resolution : Set video format / modes while
recording.
V.Resolution options : 640x240 / 320x240
V.Quality : Set Video definition while recording.
V.Quality options : HIGH / MID / LOW
Manual Rec : Set video recording time.
Manual Rec options : Cont.(continuous) / 1HR
/ 2HR / 3HR / 4HR
TV Out : Set TV Out format.
TV Out options : NTSC / PAL
Time Setup : Set the Date / Time to
time zone.
your current
Format : Format memory cards and delete all data.
Format options : SD / CF
SD card maximum : 8GBytes
CF card maximum : 4GBytes
Reset to Default : Restore all settings to the
factory default.
Update Firmware : Update Firmware from storage
cards.
About : The current firmware version.
Timer Rec : Set recording time in advance.
Timer Rec options : Cancel / Once / Daily / Weekly
9/12
VR
PV-100S
Motion Rec : Motion detection recording.
Motion Rec options : OFF / ON
ļSelect “ON” before recording.
Motion Setup : Choose detect ranges.
ļUse the
button to choose detect ranges
( Red frame indicates the detect ranges that
be selected).
Motion Sense : Motion detection sensitivity.
Motion Sense options : HIGH / MID / LOW
Mot. Rec Time : Motion recording time
Mot. Rec Time options : 10S / 20S / 30S / 1M /
3M / 5M / 10M
10/12
VR
PV-100S
File Browsing
The file browser allows you to view the contents of both SD and CF Memory Cards
at the same time.
Play –
1. Press the
button on the Remote
Control and choose PVR file.
2. Select the file (xxxx.ASF) that you
want to view then press the
button to play .
Delete –
Delete Single File:
1. Press the
button on the Remote
Control and choose PVR file.
2. Select the file (xxxx.ASF) that you
want to delete then press the
3. Press the
button .
button to see “ Del Select”
option on TV then press the
button
to confirm it.
4. Press ”YES” when you are asked to
confirm deletion again.
Delete All Files:
1. Press the
button on the Remote
Control .
2. Press the
button to see “ Del All”
option on TV then press the
button
to confirm it.
3. Press ”YES” when you are asked to
confirm deletion again.
11/12
VR
PV-100S
Warning
Information in this document has been carefully checked for accuracy; however, no
guarantee is given as to the correctness of the contents. The information in this document
is subject to change without notice. This document contains proprietary information
protected by copyright. No part of this manual may be reproduced by any
mechanical, electronic or other means, in any form, without prior written permission
of the manufacturer.
All trademarks are the property of their respective owners.
Copyright© 2008. All Rights Reserved.
Safety Information
Please read the following safety instructions, and keep the user manual for later
reference.
• Use only the power adapter supplied with the product.
• Do not place the product near any source of heat or expose it to direct sunlight.
• Do not attempt to connect any computer accessory or electronic product without
instruction from qualified service personnel. It may result in risk of electric
shock.
• Do not expose the product to moisture. Never spill any liquids on the product.
• Do not place the product in regions with extreme temperatures.
Routine care
Wipe the product with a soft cloth. Do not use abrasive powders or solvents, such as
benzene or thinner. When you leave the product unused for a long time, unplug the
AC adapter from the outlet.
12/12