1
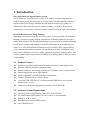
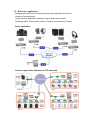
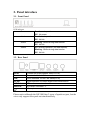
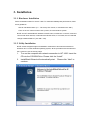
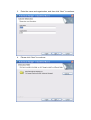
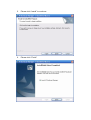
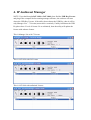
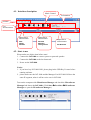
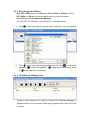
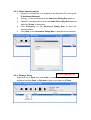
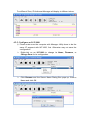
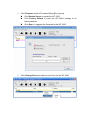
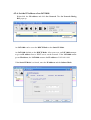
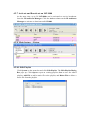
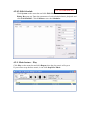
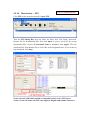
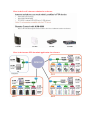
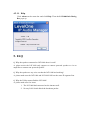
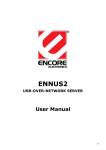
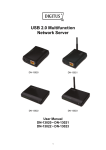
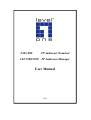
IAT-1000
IP Audiocast Terminal
IAT-1900/1920
IP Audiocast Manager
User Manual
V1.06
Contents
1.
Introduction..........................................................................................................3
1.1.
1.2.
1.3.
1.4.
2.
Product Feature........................................................................................3
Software System Requirement................................................................3
Reference Application..............................................................................4
Package List..............................................................................................5
3.
Panel introduce.....................................................................................................6
2.1.
Front Panel ...............................................................................................6
2.2.
Rear Panel.................................................................................................6
Installation ............................................................................................................7
4.
3.1.1.
Hardware Installation .........................................................................7
3.1.2.
Utility Installation ................................................................................7
IP Audiocast Manager .......................................................................................10
4.1.
Interface description.............................................................................. 11
4.2.
Start to use .............................................................................................. 11
4.2.1.
Play Background Music ....................................................................12
4.2.2.
IP Audiocast Manager Info ...............................................................12
5.
4.2.3.
4.2.4.
4.2.5.
4.2.6.
Make Announcements .......................................................................13
Manage Zones.....................................................................................13
Configure an IAT-1000 ......................................................................14
Set the IP Address of an IAT-1000 ....................................................16
4.2.7.
4.2.8.
4.2.8.1.
4.2.8.2.
4.2.9.
Activate and Deactivate an IAT-1000...............................................17
Main feature – System .......................................................................17
Edit Playlist.....................................................................................17
Edit Schedule..................................................................................18
Main feature – Play............................................................................18
4.2.10. Main feature – FTP............................................................................19
4.2.11. Help .....................................................................................................21
FAQ .....................................................................................................................21
1. Introduction
Easy deployment background music system
The IP Audiocast Terminal from LevelOne (IAT-1000) is an ideal component to a
flexible and powerful audio network covering a wide area. Old technology that uses
regular twisted pair wiring is cumbersome and difficult to deploy. By using Cat.5
infrastructure that is already in place in many building, LevelOne’s IP Audiocast
Terminals are cost-effective solutions to help you build your large scale audio network
Powerful Broadcast Streaming Manager
Managing your audio network has never been easier. Using LevelOne’s IP Audiocast
Manager (software) together with the IP Audiocast Terminals (hardware) provides a
robust audio solution. The IP Audiocast Manager uses broadcast streaming technology
to efficiently send the audio signals to each IAT-1000 terminal on the network. As a
result, every IAT-1000 terminal efficiently receives any MP3, WAV, playlist (M3U),
or live announcement that is streamed over the Ethernet network. In addition, each
zone can be scheduled to receive an audio signal that is different from the others. This
provides administrators with ultimate flexibility in streaming audio to different zones
of the building.
1.1. Product Feature
Simple to use audio terminal ideal for background music and paging system
Schedule different playlists in different zones
Search, configure, and manage all Audiocast Terminals from a central location
Stream high-quality stereo audio signals
100% Compatible with MP3 and WAV sound format
Lossless Transmission and 100% Fidelity.
Using NetUSB (USB Over IP), work around the DRM issues of streaming
Internet music sources
Control form both local and remote locations via TCP/IP(RJ-45)
1.2. Software System Requirement
Operation System with Windows 2000 ,XP , 2003 and Vista
PC with Pentium Intel Pentium IX 2.4G or above is recommended
Ram need 1GB or above
Hard Disk space need 30MB or above
One CD-ROM drive
1.3. Reference Application
Background music and live announcements are enquired functions in a
number of environments:
Large offices & business complexes, Airport and transit centers
Shopping malls, Theme parks, Hotels, Campus and dormitory, Theater
Basic application
Advance application with Internet FTP download
Advance application for shopping mall
1.4. Package List
IAT-1000
Power Adapter
CD/Manual
QIG
2. Panel introduce
2.1. Front Panel
LED indicator
Power
On - Normal operation.
Off - No power
Link
On - Normal operation.
Off - No link
Active
Blinking - Blinks during data transfer
Off - No link
Status
On - Normal operation (no data transfer).
Blinking - Blinks during data transfer
Off - No link
2.2. Rear Panel
DC-IN
Connect the power adapter here(12V/1A).
Reset
Reset to the default IP
LAN
Use a Standard 10/100 LAN cable(RJ-45)
S/P DIF
Digital Interface for Stereo digital audio transmission
AUDIO-L
RCA audio connector - L
AUDIO-R
RCA audio connector - L
3.5 earphone
Please notice although the IAT-1000 has 3 types of speak-out port, but the
voice only support one speak-out simultaneously.
3. Installation
3.1.1. Hardware Installation
Select a suitable location for the IAT-1000. To maximize reliability and performance, follow
these guidelines:
• Use an elevated location. (i.e. - On the top of a cubicle, or mounted on the wall.)
• Turn on the IAT-1000 in where have a power, RJ-45 and stereo system.
NOTE: the IAT-1000 default IP address is DHCP client, so after turn on the IAT-1000 and
connect with local network, it will search the DHCP server, if not found, the IAT-1000 will
change to default Static IP (192.168.1.100).
3.1.2. Utility Installation
NOTE: all the snapped images of installation mentioned in this manual are based on
Windows XP. For other windows operating system, all the procedures are the same but
the screens are not the exactly same.
1.
2.
Turn on the computer with network connection to IAT-1000. Insert the
CD into the CD-ROM Drive. Please click the “Install”.
InstallShield Wizard will automatically start. Please click “Next” to
continue.
3.
Enter the name and organization, and then click “Next” to continue.
4.
Please click “Next” to continue.
5.
Please click “Install” to continue.
6.
Please click “Finish”
4. IP Audiocast Manager
NOTE: If you had brought IAT-1920 or IAT-1900, pleas find the USB Key License
and plug in the computer before running manager software, the software will auto
detect the USB Key License, if the utility do not detect the USB Key, then it will be
only Manager Lite – 7 License(current active terminal), if utility had detect the USB
Key(there have 2 level of license: 20 or unlimited), then the utility will update the
license with advance feature.
This is Manager Lite with 7 License
This is IAT-1920 with 20 License
This is IAT-1900 with unlimited License
4.1. Interface description
Music Control
Information
Function
Live
Announcement
Right-click to
show function:
Right-click to
show function:
Add
Delete
Rename
Rename
Maintain
Change Zone
Right-click to
show function:
Set Network
4.2. Start to use
Please make sure below item before start!
1. Connect the IAT-1000 to a stereo system or powered speaker.
2. Connect the IAT-1000 to the local network.
3. Power on the IAT-1000.
Notice:
1. If you have buy IAT-1900/1920, please plug-in the USB Key License before
running software.
2. please make sure the IAT-1000 and the Manager Lite/IAT-1900/1920 are the
same IP segment, other it will no voice out via IAT-1000
Turn on the computer with IP Audiocast Manager and check the IP Audiocast
Manager had shows the IAT-1000. (Click Start LevelOne IP Audiocast
Manager to open the IP Audiocast Manager.)
4.2.1. Play Background Music
Each IAT-1000 belongs to a Zone (the default Zone is default.). All the
IAT-1000s in a Zone receives the same music or announcement
broadcast from the IP Audiocast Manager.
For IAT-1920, it’s 20 Zones, for IAT-1900, it’s unlimited zones.
1. Click
on the menu bar to open an mp3, a wav file, or an m3u playlist
2. Click
on the menu bar to play back the music. Click
playback,
to stop the playback,
or
to play back the next song.
to pause the
to play back the previous song,
4.2.2. IP Audiocast Manager Info
There is a info column in the right-up corner of IP Audiocast Manager, it
displays which Zone is choose, which song is played, how many IAT-1000
is active.
4.2.3. Make Announcements
1
Connect a microphone or a headset to the Windows PC running the
2
IP Audiocast Manager.
Click
on the menu bar and the Announce Dialog Box pops up.
3
Choose a recording device from the Audio Recording Devices and
select the Zones to announce.
4
Click Announce on the Announce Dialog Box to start the
announcement.
5
Click Stop on the Announce Dialog Box to stop the announcement.
4.2.4. Manage Zones
For IAT-1900/1920 only
Right-click on a Zone and click Add to create a new Zone, Delete to
delete an existing Zone, or Rename to give a new name to a Zone.
For different Zone, IP Audiocast Manager will display in different colors.
4.2.5. Configure an IAT-1000
※ Please make sure the computer with Manager Utility have to be the
same IP segment with IAT-1000, first. Otherwise may not save the
configuration.
Right-click on an IAT-1000 to change its Name, Firmware, or
Change Zone for its configuration.
Click Rename and the Server Name Dialog Box pops up. Enter a
Name and click OK.
Click Firmware and the Firmware Dialog Box pops up.
Click Restart Server to restart the IAT-1000,
Click Factory Default to reset the IAT-1000’s settings to its
factory defaults
Click Open to upgrade the firmware to the IAT-1000.
Click Change Zone and select a new Zone for the IAT-1000.
4.2.6. Set the IP Address of an IAT-1000
Right-click the IP Address and click Set Network. The Set Network Dialog
Box pops up.
An IAT-1000 can be set to the DHCP Mode or the Static IP Mode.
An IAT-1000 defaults to the DHCP Mode. After power on, an IAT-1000 attempts
to get an IP address from a DHCP server on the network. If the IAT-1000 cannot
get an IP address, the IAT-1000 assumes the IP address of 192.168.0.100.
If the Static IP Mode is selected, enter the IP Address and the Subnet Mask.
4.2.7. Activate and Deactivate an IAT-1000
At the same time, up to 20 IAT-1000s can be activated to receive broadcasts
from the IP Audiocast Manager. Click the Active column on the IP Audiocast
Manager to activate or deactivate an IAT-1000.
4.2.8. Main feature – System
4.2.8.1. Edit Playlist
Click System on the menu bar and click Edit Playlist. The Edit Playlist Dialog
Box pops up. Click Open to open an existing playlist, Save to save the edited
playlist, Add File to add a music file to the playlist, and Delete File to delete a
music file from the playlist.
4.2.8.2. Edit Schedule
For IAT-1900/1920 only
Click System on the menu bar and click Edit Schedule. Then the Edit Schedule
Dialog Box pops up. Enter the parameters of each scheduled music playback and
click Add Schedule. Click Confirm to save the Schedules.
4.2.9. Main feature – Play
Click Play on the menu bar and click Repeat, then the play music will repeat
If you want to stop the base music, it can click Stop Base Music.
4.2.10. Main feature – FTP
For IAT-1900/1920 only
Click FTP on the menu bar and click Open FTP.
Then the FTP Dialog Box pops up. Enter the Host, Port, User Name, Password,
Remote Dir for downloading files and click Open to open a Local Dir for saving
downloaded files. Choose the Download Time or At Once, click Apply, FTP will
download files from Remote Dir to Local Dir at the designated time. If user wants to
stop download, click Stop.
Notice: the IAT-1900/1920 can 100% compatible with Level1’s FTP device.
Notice: for the file name, the FTP only supports English and number character.
Here is the Level1’s internet solution for reference
Here is the internet FTP download application for reference
4.2.11. Help
Click About on the menu bar and click Help. Then the IAT-1000 Info Dialog
Box pops up.
5. FAQ
Q: Why the speaker connected to IAT-1000 doesn’t work?
A: please notice the IAT-1000 only support to connect powered speaker or via an
amplifier to connect non-powered speaker.
Q: Why the speaker no any voice out but the IAT-1000 had working?
A: please make sure the IAT-1000 and IAT-1900/1920 are the same IP segment first.
Q: Why the Utility cannot find the IAT-1000?
A: please make sure few items
1. The IAT-1000 had connected on the intranet well.
2. No any LAN Switch block the broadcast packet